В данной статье показаны действия, с помощью которых можно управлять различными режимами Защитника Windows в командной строке.
Защитник Windows (Windows Defender) в операционной системе Windows 10 — это встроенное антивирусное программное обеспечение для управления безопасностью и антивредоносными средствами для настольных компьютеров, мобильных устройств и серверов.
Приложение Защитник Windows представляет собой простой в использовании графический интерфейс и большую часть времени работает в фоновом режиме.
Вы также можете использовать Защитник Windows с помощью командной строки. Это может пригодиться при автоматизации определенных задач, а также в познавательных целях.
Есть два способа использовать Защитник Windows в командной строке.
С помощью исполняемого файла MSASCui.exe можно управлять графическим интерфейсом антивируса, который находится в папке:
%ProgramFiles%\\Windows Defender\\
И при помощи утилиты командной строки MpCmdRun.exe, которая предоставляет больше опций по использованию Защитника Windows и команды по умолчанию выполняются незаметно для пользователя в фоновом режиме. Утилита находится в папке:
%ProgramFiles%\\Windows Defender\\
Как использовать Защитник Windows (MSASCui.exe) в командной строке
Следующие команды используют MSASCui.exe и позволяют обновлять Защитник Windows и запускать разные режимы сканирования. Каждая из команд запускает приложение для выполнения какой-либо задачи, число команд ограничено по сравнению с возможностями утилиты MpCmdRun.exe.
Запустите командную строку от имени администратора, для этого нажмите сочетание клавиш ![]() + X или щелкните правой кнопкой мыши по кнопке Пуск в панели задач и в появившемся контекстном меню выберите пункт Командная строка (администратор).
+ X или щелкните правой кнопкой мыши по кнопке Пуск в панели задач и в появившемся контекстном меню выберите пункт Командная строка (администратор).

Для проверки наличия обновлений и быстрого сканирования выполните команду:
«%ProgramFiles%\\\\Windows Defender\\\\MSASCui.exe» -UpdateAndQuickScan

Для скачивания и установки обновлений выполните команду:
«%ProgramFiles%\\\\Windows Defender\\\\MSASCui.exe» -Update
Для быстрого сканирования выполните команду:
«%ProgramFiles%\\\\Windows Defender\\\\MSASCui.exe» -QuickScan
Для полного сканирования выполните команду:
«%ProgramFiles%\\\\Windows Defender\\\\MSASCui.exe» -FullScan
Также Вы можете выполнить вышеприведенные команды с параметром -hide в конце, при этом графический интерфейс приложения не будет запущен, например:
«%ProgramFiles%\\\\Windows Defender\\\\MSASCui.exe» -UpdateAndQuickScan -hide
Как использовать Защитник Windows с помощью утилиты командной строки MpCmdRun.exe
С помощью утилиты командной строки MpCmdRun.exe, Вы можете запускать задачи в фоновом режиме (без запуска графического интерфейса приложения).
Запустите командную строку от имени администратора, для этого нажмите сочетание клавиш ![]() + X или щелкните правой кнопкой мыши по кнопке Пуск в панели задач и в появившемся контекстном меню выберите пункт Командная строка (администратор).
+ X или щелкните правой кнопкой мыши по кнопке Пуск в панели задач и в появившемся контекстном меню выберите пункт Командная строка (администратор).
Для запуска обновления определений (сигнатур) выполните команду:
«%ProgramFiles%\\\\Windows Defender\\\\MpCmdRun.exe» -SignatureUpdate

Для выполнения быстрого сканирования выполните команду:
«%ProgramFiles%\\\\Windows Defender\\\\MpCmdRun.exe» -Scan -ScanType 1
Для полного сканирования выполните команду:
«%ProgramFiles%\\\\Windows Defender\\\\MpCmdRun.exe» -Scan -ScanType 2
Для выборочного сканирования файлов и папок выполните команду вида:
«%ProgramFiles%\\\\Windows Defender\\\\MpCmdRun.exe» -Scan -ScanType 3 -File PATH-TO-FILE-OR-FOLDER
Пример сканирования файлов и папок внутри папки Windows
«%ProgramFiles%\\\\Windows Defender\\\\MpCmdRun.exe» -Scan -ScanType 3 -File C:\\\\Windows
Также Вы можете сканировать и удалить вредоносный код загрузочного сектора, для этого выполните команду:
«%ProgramFiles%\\\\Windows Defender\\\\MpCmdRun.exe» -Scan -ScanType -BootSectorScan
Выше приведенные команды являются самыми распространенными, для просмотра других доступных опций, выполните команду:
«%ProgramFiles%\\\\Windows Defender\\\\MpCmdRun.exe»

Важно отметить, что эти инструкции также должны быть совместимы с предыдущими версиями операционной системы, включая Windows 7, Windows 8 и 8.1.
Защитник Windows 10 является встроенным антивирусным программным обеспечением, которое помогает защитить ваш компьютер от вредоносного программного обеспечения, вирусов и других угроз. Однако, иногда может возникнуть необходимость включить Защитник Windows через командную строку для выполнения определенных задач или настройки системы.
Включение Защитника Windows 10 через командную строку может показаться сложной задачей для некоторых пользователей, но на самом деле это довольно просто. Для этого вам понадобятся административные привилегии и знание нескольких команд.
Одной из основных команд для включения Защитника Windows 10 через командную строку является команда «sc config WinDefend start=auto». Эта команда позволяет изменить параметры запуска службы Защитника Windows на автоматический режим.
Также существуют и другие команды, которые могут быть полезны при настройке и управлении Защитником Windows через командную строку. Например, с помощью команды «sc start WinDefend» вы можете запустить службу Защитника Windows, а команда «sc stop WinDefend» позволит вам остановить его работу.
Включение Защитника Windows 10 через командную строку может быть полезным для опытных пользователей, которые предпочитают использовать командную строку для управления системой. Однако, перед использованием команд следует быть осторожными и внимательными, чтобы не повредить работу системы.
Как включить защитника Windows 10
Защитник Windows 10 — это встроенный антивирус и антишпионская программа, предназначенная для обеспечения безопасности операционной системы. Он может быть полезен в предотвращении вредоносных программ и защите ваших данных.
Для включения защитника Windows 10 через командную строку следуйте следующим шагам:
- Откройте командную строку, нажав на клавишу Win + X и выбрав «Командная строка (администратор)».
- Введите команду «sc start WinDefend» и нажмите клавишу Enter. Это запустит службу защитника Windows.
- Дождитесь завершения выполнения команды и закройте командную строку.
Теперь защитник Windows 10 должен быть включен на вашем компьютере. Если вы хотите убедиться, что он работает, выполните следующие действия:
- Откройте «Настройки» и выберите «Обновление и безопасность».
- В разделе «Windows Security» убедитесь, что статус защитника Windows отображается как «Включено».
- Проверьте наличие обновлений и выполните сканирование на наличие вредоносных программ.
Включение защитника Windows 10 через командную строку может быть полезным, если вы не можете включить его через стандартные методы или желаете автоматизировать этот процесс. Будьте внимательны при использовании командной строки и следуйте инструкциям, чтобы избежать ошибок.
Включение защитника Windows 10 через командную строку
Защитник Windows 10 является встроенным антивирусным программным обеспечением, которое предоставляет базовую защиту от вредоносных программ и других угроз.
Если вы предпочитаете использовать защитника Windows 10 вместо других антивирусных программ, вы можете его включить через командную строку.
Для включения защитника Windows 10 через командную строку выполните следующие действия:
- Откройте командную строку, нажав клавишу Win + R и введя команду cmd.
- Выполните команду sc start WinDefend, чтобы запустить защитника Windows 10.
- После выполнения команды защитник Windows 10 будет включен и начнет проверку вашей системы на наличие вредоносных программ.
Теперь ваша система будет защищена от вредоносных программ с помощью защитника Windows 10.
Если вы хотите отключить защитника Windows 10 через командную строку, выполните команду sc stop WinDefend.
Обратите внимание, что включение и отключение защитника Windows 10 через командную строку требует прав администратора.
Почему включение защитника Windows 10 через командную строку может быть полезным
Включение защитника Windows 10 через командную строку может быть полезным по нескольким причинам:
- Быстрота и удобство: Включение защитника Windows 10 через командную строку позволяет быстро и удобно активировать эту функцию без необходимости открывать меню настроек. Это особенно полезно, если вам нужно включить защитника на нескольких компьютерах или на удаленном компьютере.
- Улучшение безопасности: Защитник Windows 10 предоставляет базовую защиту компьютера от вредоносных программ и вирусов. Включение этой функции через командную строку позволяет обеспечить постоянное наличие защитника на вашем компьютере и повысить безопасность ваших данных.
- Автоматические обновления и сканирования: Защитник Windows 10 через командную строку автоматически обновляется и выполняет регулярные сканирования вашего компьютера на наличие вирусов и других угроз. Включение этой функции через командную строку гарантирует, что ваш компьютер будет всегда защищен и обновлен.
- Контроль над настройками: Включение защитника Windows 10 через командную строку дает вам больше контроля над настройками этой функции. Вы можете выбирать, какие типы угроз обнаруживать, какие файлы и папки сканировать и другие параметры, чтобы адаптировать защиту вашего компьютера под ваши потребности и предпочтения.
В целом, включение защитника Windows 10 через командную строку может быть полезным для обеспечения базовой защиты компьютера, повышения безопасности данных и удобства использования этой функции.
Шаги по включению защитника Windows 10 через командную строку
Шаг 1: Откройте командную строку от имени администратора. Для этого щелкните правой кнопкой мыши по значку «Пуск» и выберите «Командная строка (администратор)».
Шаг 2: В командной строке введите команду «sc start WinDefend» и нажмите клавишу «Enter». Эта команда запустит службу защитника Windows 10.
Шаг 3: После выполнения команды вы увидите сообщение о том, что служба успешно запущена. Теперь защитник Windows 10 будет активирован и работать на вашем компьютере.
Шаг 4: Проверьте, что защитник Windows 10 работает, открыв центр уведомлений. В правом нижнем углу экрана щелкните на значке «Центр уведомлений». В списке доступных опций должна быть видна иконка защитника Windows 10.
Шаг 5: Если вы хотите отключить защитник Windows 10, введите команду «sc stop WinDefend» в командной строке и нажмите клавишу «Enter». Служба защитника Windows 10 будет остановлена.
Итак, эти простые шаги помогут вам включить защитника Windows 10 через командную строку. Защитник Windows 10 обеспечит безопасность вашего компьютера и поможет защитить его от вредоносных программ и угроз из сети.
Дополнительные параметры командной строки для защитника Windows 10
Защитник Windows 10 — это встроенный антивирус, который обеспечивает базовую защиту от вредоносного программного обеспечения. Он автоматически включается в операционной системе Windows 10 и обновляется через службу Windows Update.
Однако, защитник Windows 10 также может быть настроен и управляем через командную строку. Это позволяет пользователю получить более гибкий контроль над антивирусными функциями и настройками.
Для доступа к дополнительным параметрам командной строки защитника Windows 10 можно воспользоваться командой «MpCmdRun.exe». С помощью этой команды можно выполнять различные действия, такие как сканирование файлов и папок, обновление базы данных вредоносного программного обеспечения, а также настройка различных параметров антивирусной защиты.
Например, с помощью команды «MpCmdRun.exe -Scan -ScanType 2 -File «C:путькфайлу»» можно выполнить сканирование конкретного файла на наличие вредоносного программного обеспечения. В этом случае параметр «ScanType 2» указывает на сканирование только файла, а не всего компьютера.
Кроме того, с помощью команды «MpCmdRun.exe -SignatureUpdate» можно вручную обновить базу данных вредоносного программного обеспечения защитника Windows 10. Это может быть полезно в случае, если автоматическое обновление базы данных не работает или требуется срочное обновление антивирусных определений.
Также с помощью команды «MpCmdRun.exe -SetScheduleJob» можно настроить расписание выполнения сканирования системы. Например, можно указать время и день недели, когда защитник Windows 10 будет автоматически сканировать компьютер на наличие вредоносного программного обеспечения.
В заключение, использование дополнительных параметров командной строки для защитника Windows 10 позволяет пользователю получить больше контроля над антивирусными функциями и настройками. Это может быть полезно для выполнения специфических задач, таких как сканирование конкретных файлов, ручное обновление базы данных или настройка расписания сканирования.
Проверка статуса защитника Windows 10 после включения через командную строку
После включения защитника Windows 10 через командную строку, важно проверить его статус, чтобы убедиться, что он функционирует правильно и включен.
Самым простым способом проверки статуса защитника Windows 10 является открытие Центра управления безопасностью Windows Defender. Для этого необходимо выполнить следующие шаги:
- Нажмите на кнопку «Пуск» в левом нижнем углу экрана.
- В поисковой строке введите «Центр управления безопасностью Windows Defender» и выберите соответствующий результат.
- После открытия Центра управления безопасностью Windows Defender, проверьте статус защитника в разделе «Защита от вредоносного ПО».
Если защитник Windows 10 включен и функционирует правильно, вы увидите сообщение «Все функции безопасности работают корректно» или что-то похожее. В этом случае можно быть уверенным, что ваш компьютер защищен от вредоносного ПО.
Однако, если вы видите сообщение о проблеме или о том, что защитник отключен, необходимо принять меры для восстановления его работы:
- Проверьте, что включены все необходимые службы защитника Windows 10.
- Обновите программное обеспечение защитника Windows 10 до последней версии.
- Проведите полное сканирование системы на наличие вредоносного ПО.
- При необходимости, перезагрузите компьютер и повторите проверку статуса защитника Windows 10.
Проверка статуса защитника Windows 10 после включения через командную строку является важным шагом для обеспечения безопасности вашего компьютера. Будьте внимательны и не забывайте проверять статус защитника регулярно, чтобы быть уверенными в его работе и надежной защите вашей системы.

Contents
- 1 How to Check for Updates for Windows Defender in the Command Line
- 2 How to Perform a Quick Virus Scan with he CMD Scan Command
- 3 How to Perform a Full Virus Scan via Microsoft Defender CMD Command
- 4 How to Perform a Custom Command line AntiVirus Scan
- 5 How to Perform a Boot Sector Malware Scan with the Windows Defender Command Line Tool
- 6 How to Restore Quarantined Items via a Windows Defender CMD Command
Knowing how to run Windows Defender from the command line can be very useful. Perhaps you’ve been locked out of its UI due to malware, are trying to run a scan from recovery media, or are using a GUI-less Windows Server install. In any of these situations, knowing a scan command or two can save you a lot of trouble.
Though Microsoft Defender is easier to control from the Windows Security app, command-line antivirus is also quite simple and presents many of the same options. Importantly, it also allows you to automate your anti-malware tasks if you wish. You could create a script to automatically perform a quick scan at a certain time, for example, or to perform the same scans across multiple PCs.
In this tutorial, we’ll be showing how to update Windows Defender with CMD, as well as how to perform a quick, full, or custom scan. By the end of it, you should have a good idea of how command-line antivirus works.
How to Check for Updates for Windows Defender in the Command Line
One task that admins are particularly eager to automate is updates. Knowing how to update Microsoft Defender from the command line will allow you to build it into an automatic update script so you never forget.
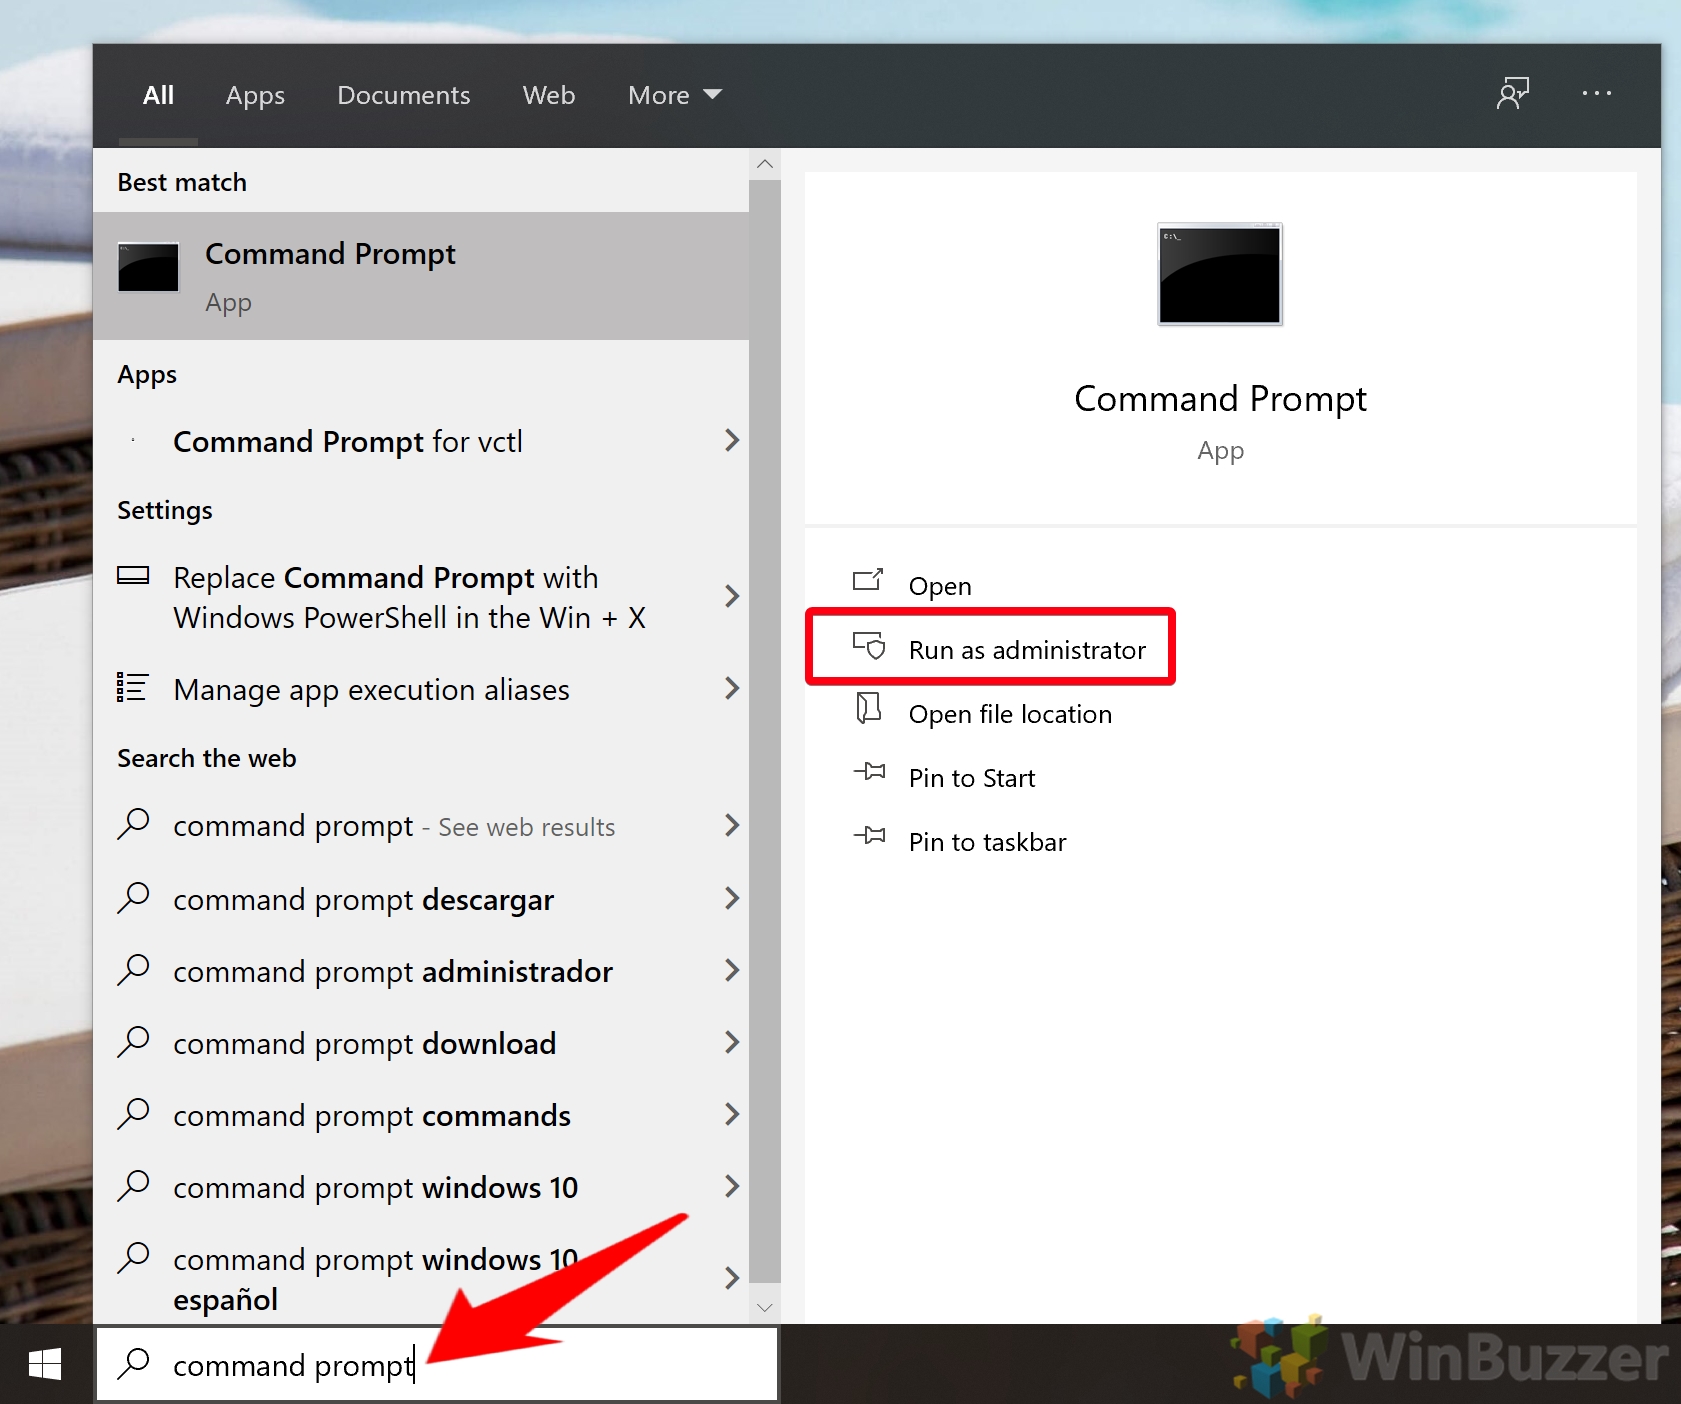
- Open Command Prompt
Press Start and then type “Command Prompt”. With the application selected, click “Run as administrator” in the sidebar.

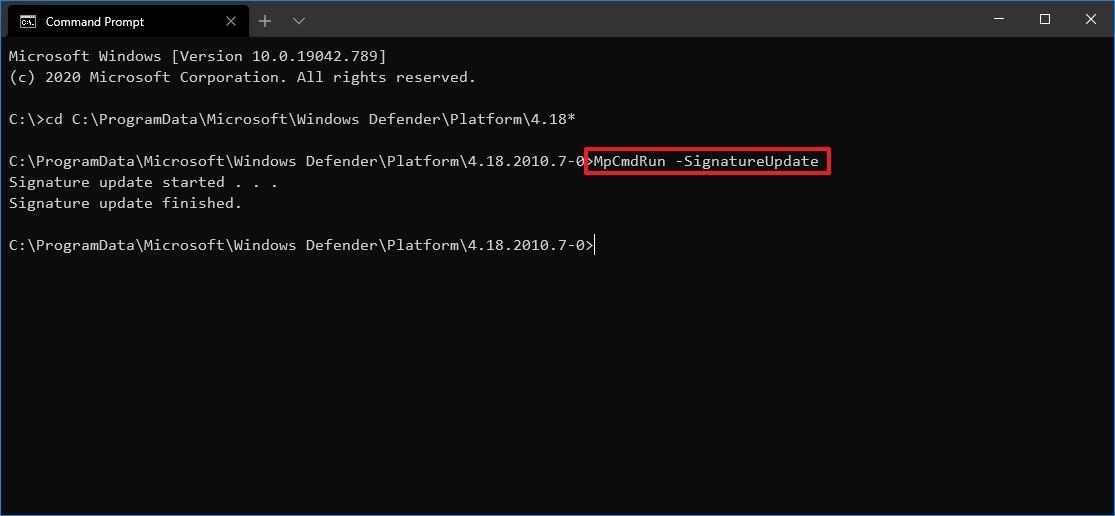
- Open and update the command line antivirus
To open the location of the command line anti-virus in CMD, paste the following:
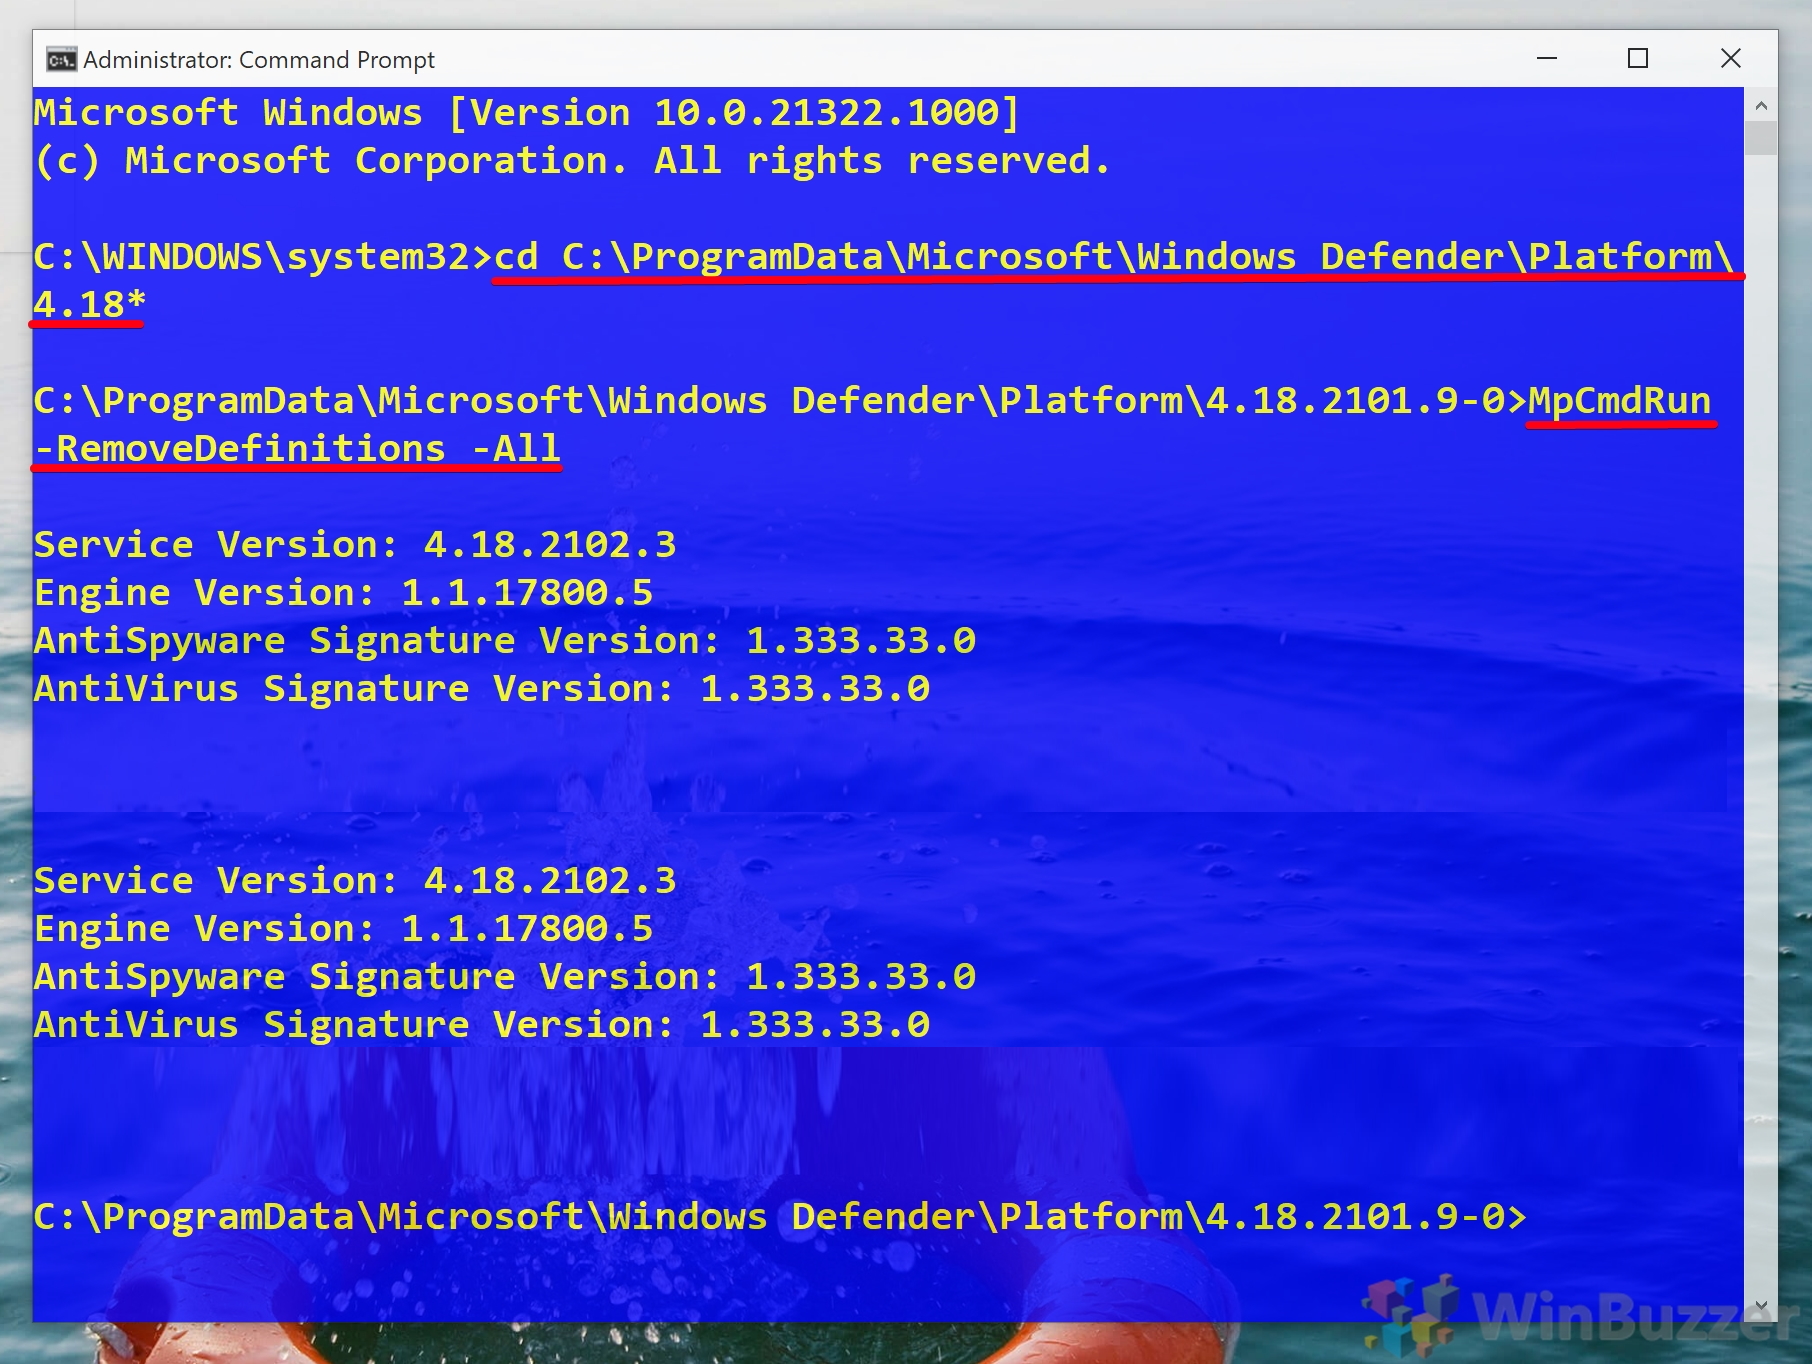
cd C:\ProgramData\Microsoft\Windows Defender\Platform\4.18*Now you can run a Windows Defender command-line update by typing:
MpCmdRun -SignatureUpdateThe tool will check for the most recent update and download and install it automatically if one is available.

- How to remove previously installed Microsoft Defender updates
So you know how to install updates, but what if you downloaded a faulty one? You can uninstall the most recent definitions with CMD.
First, open CMD by typing “Command Prompt” in your Start menu and then clicking “Run as administrator” on the right-hand side.
- Navigate to the Windows Defender folder and run the remove command
In your CMD window, type the following to navigate to your Windows Defender folder.
cd C:\ProgramData\Microsoft\Windows Defender\Platform\4.18*Then, run the following command to uninstall the most recent definitions:
MpCmdRun -RemoveDefinitions -AllThe
-Alloption restores previous definitions from the default set of signatures.
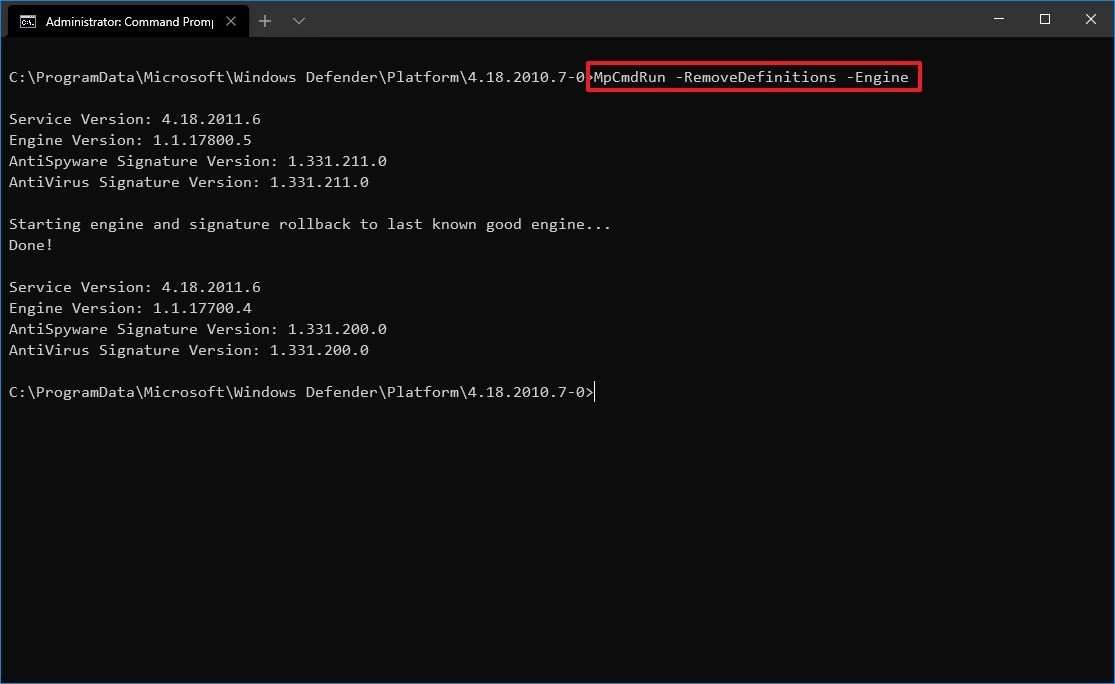
- Rollback the engine version
To roll back the engine version, type the following and press Enter:
MpCmdRun -RemoveDefinitions -Engine
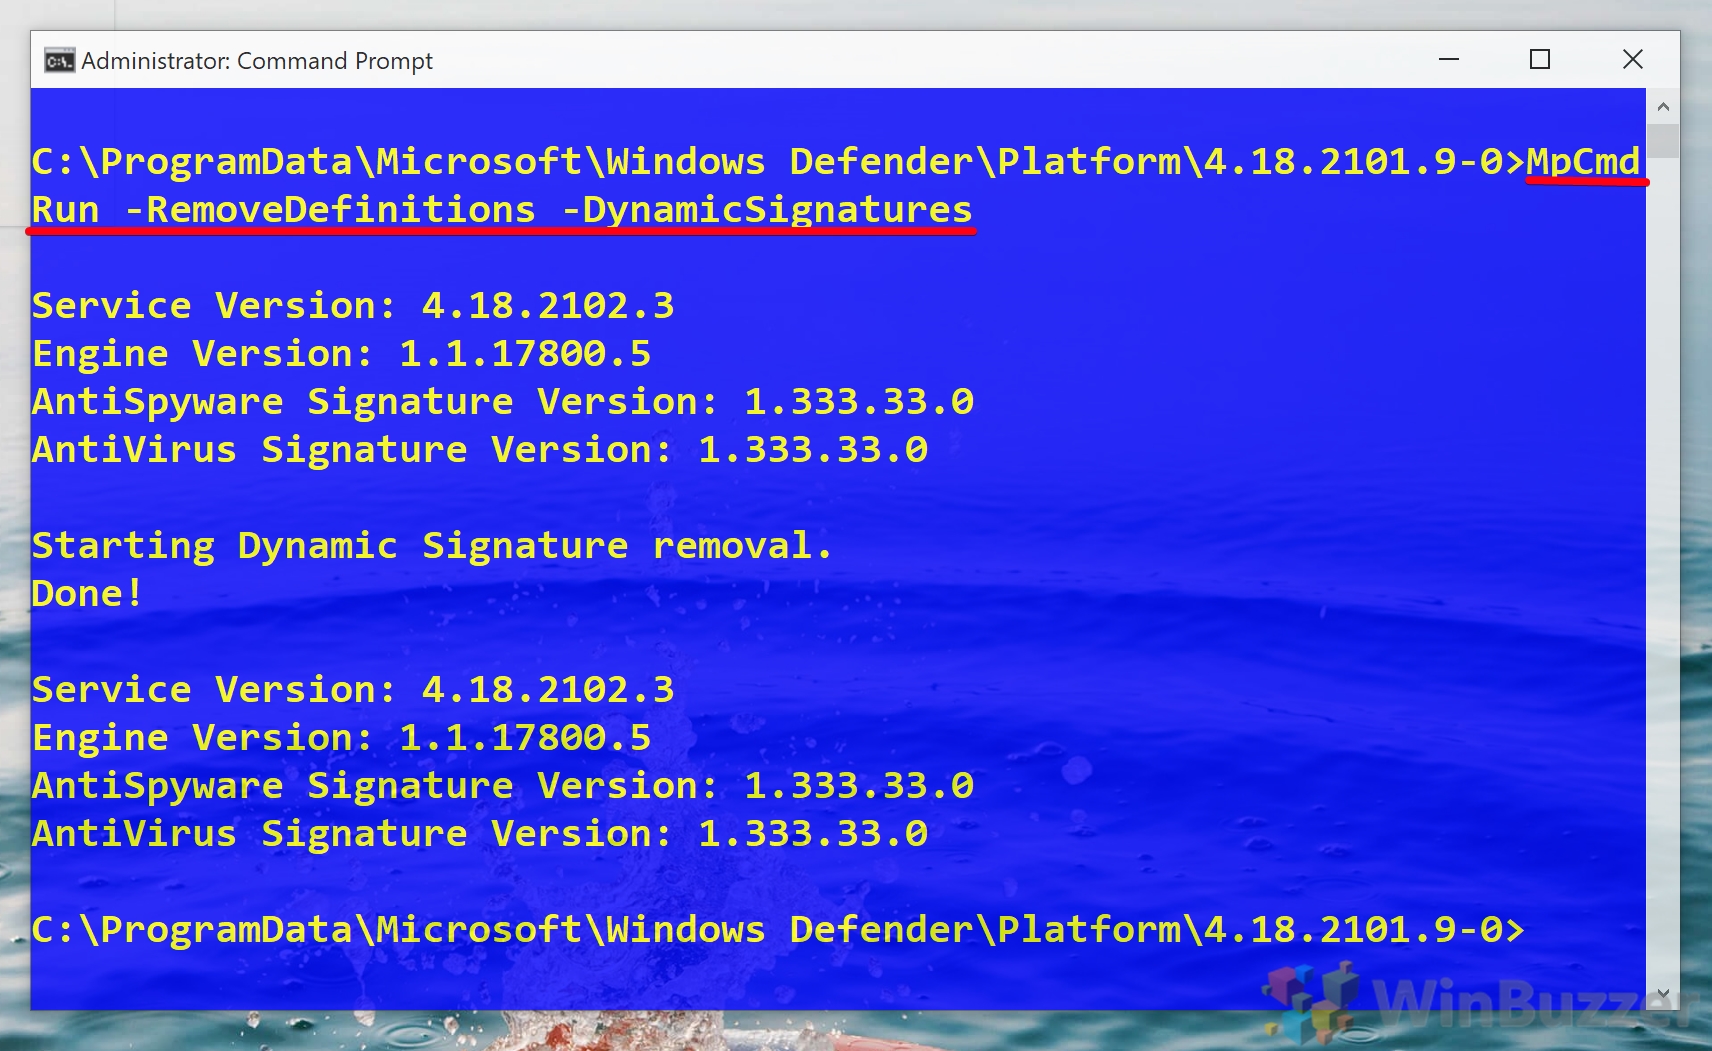
- Remove dynamic signature updates
You can uninstall only dynamic signatures by typing the following command and pressing Enter:
MpCmdRun -RemoveDefinitions -DynamicSignatures


How to Perform a Quick Virus Scan with he CMD Scan Command
In most cases, you should run a quick scan before any other type. This will cause Windows Defender to scan the most commonly infected files so you can quickly take action. You can use Windows Defender in the Command line to start one in less than a minute.
- Open Command Prompt
Press the Start button and type “Command Prompt”, then click “Run as administrator” on the right-hand side.
- Navigate to the Windows Defender folder and run the quick scan command
First, we need to navigate to the folder where Windows Defender is installed.
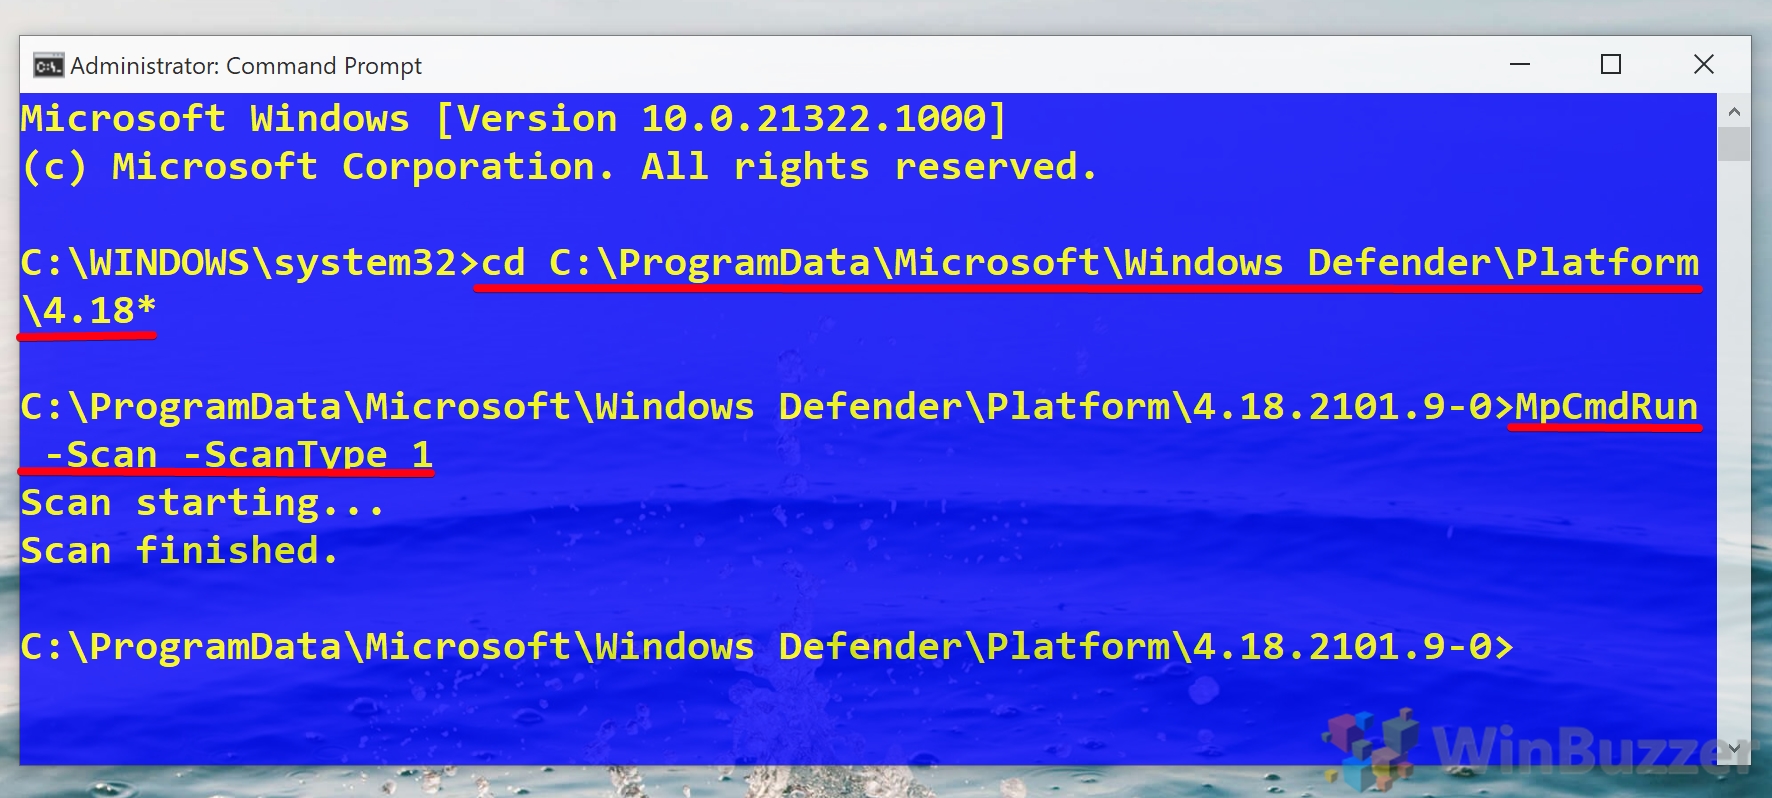
cd C:\ProgramData\Microsoft\Windows Defender\Platform\4.18*
Now we’re ready to run the CMD quick scan command:
MpCmdRun -Scan -ScanType 1The scan will begin, stopping itself automatically if it takes longer than a day.


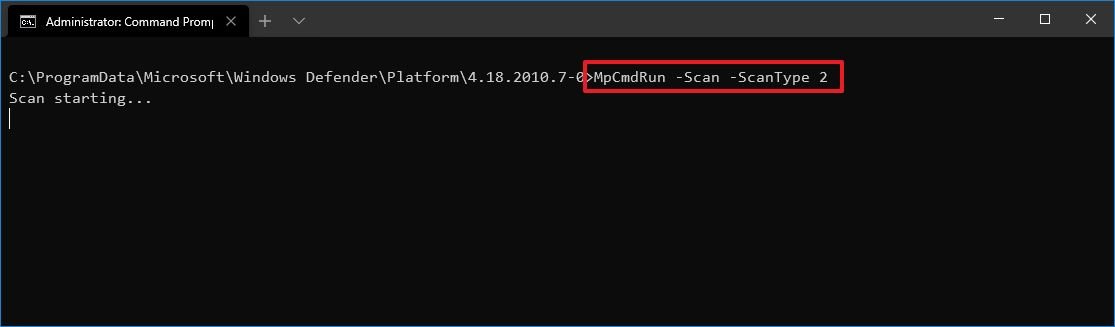
How to Perform a Full Virus Scan via Microsoft Defender CMD Command
So, your quick scan found some issues or found no issues, but you’re still seeing virus symptoms. The full scan will check every file on your PC for malware. Here’s how you can run it with a CMD scan command:
- Open Command Prompt
Press Start and then type “Command Prompt”. With the application selected, click “Run as administrator” in the sidebar.
- Open the Windows Defender folder and run the full CMD scan command
Before we can run our CMD scan, we need to navigate to the folder our anti-virus tool lives in:
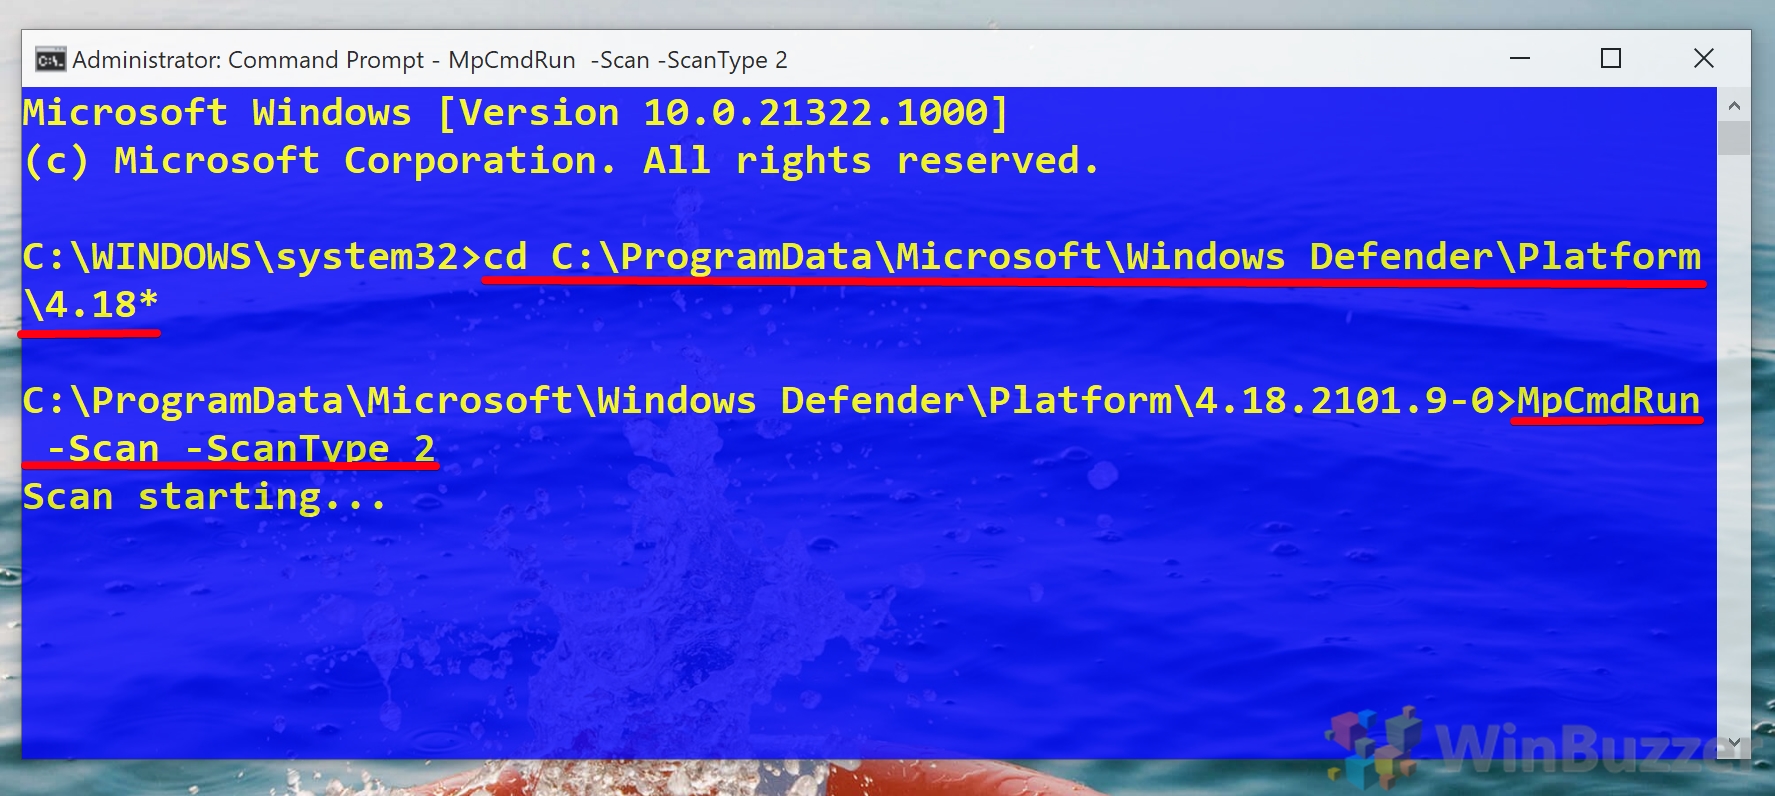
cd C:\ProgramData\Microsoft\Windows Defender\Platform\4.18*Now we can run our full command-line anti-virus scan:
MpCmdRun -Scan -ScanType 2If you followed the quick scan section, you’ll notice that this command is identical, except the scan type has been changed from
1to2.The scan will start and will take a very long time. The more files you have on your PC, the longer it will take.


How to Perform a Custom Command line AntiVirus Scan
If you just want to tell if a file you just downloaded is safe, you can perform a custom CMD scan by pointing it to a specific folder or file.
- Open Command Prompt
Press the Start button, type Command Prompt, then click “Run as administrator” on the right-hand side with it selected.
- Run the custom malware scan
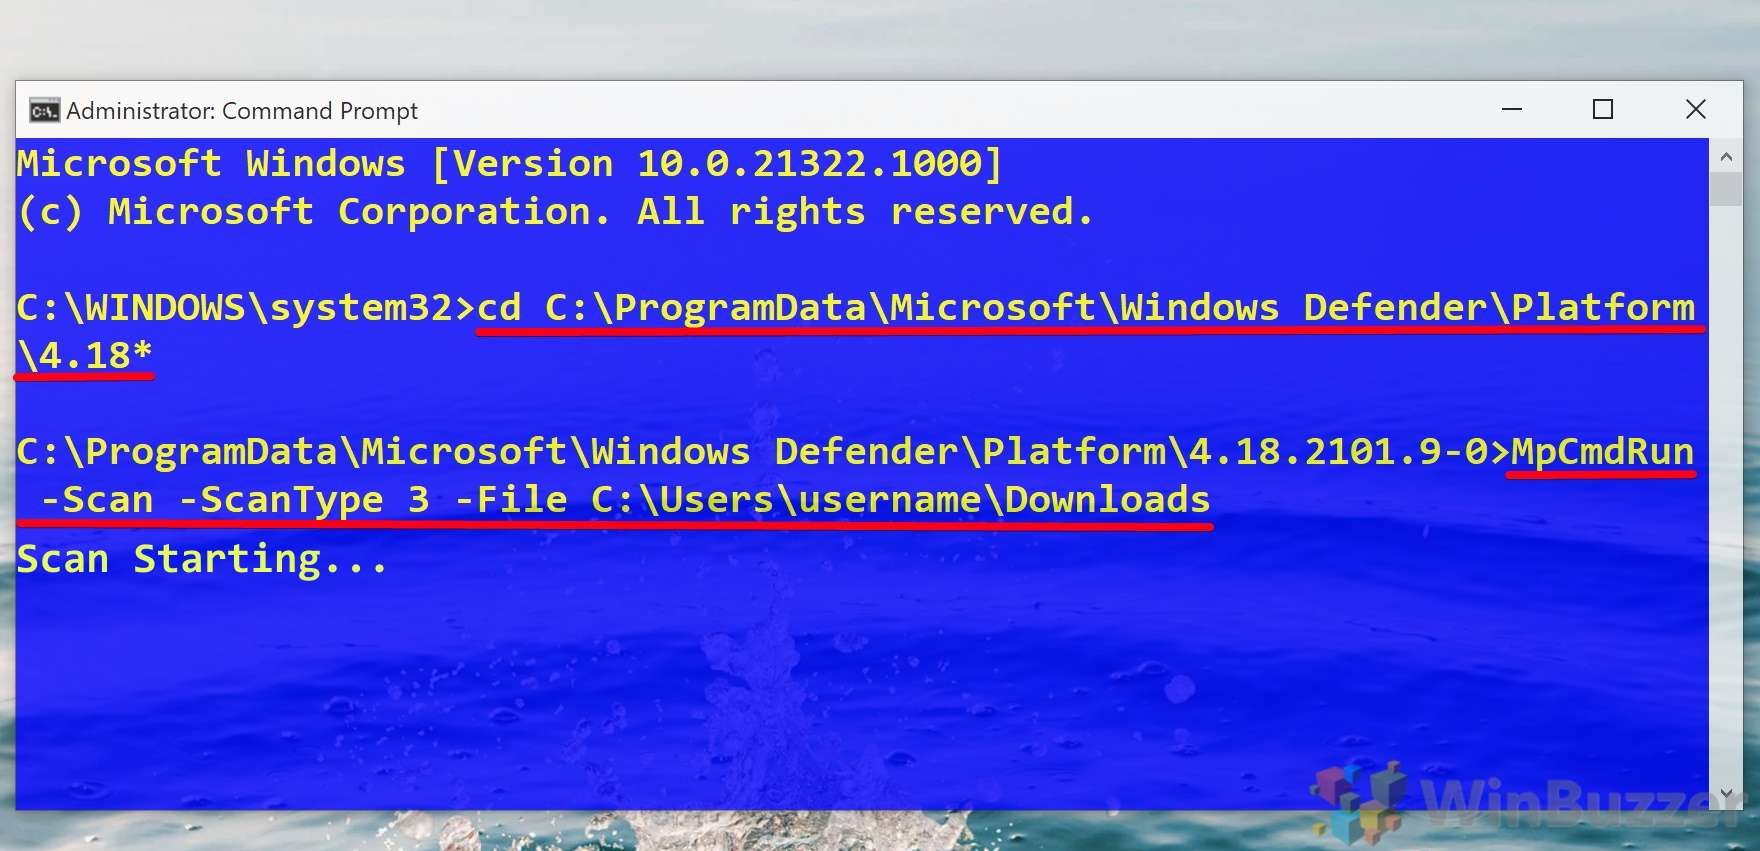
In your CMD window, type the following to navigate to your Windows Defender folder.
cd C:\ProgramData\Microsoft\Windows Defender\Platform\4.18*Now run the following command, switching C:/file/or/folder/path with the path to your file or folder.
MpCmdRun -Scan -ScanType 3 -File C:\file\or\folder\pathThe scan will start, and shouldn’t take too long if there are only a few files.

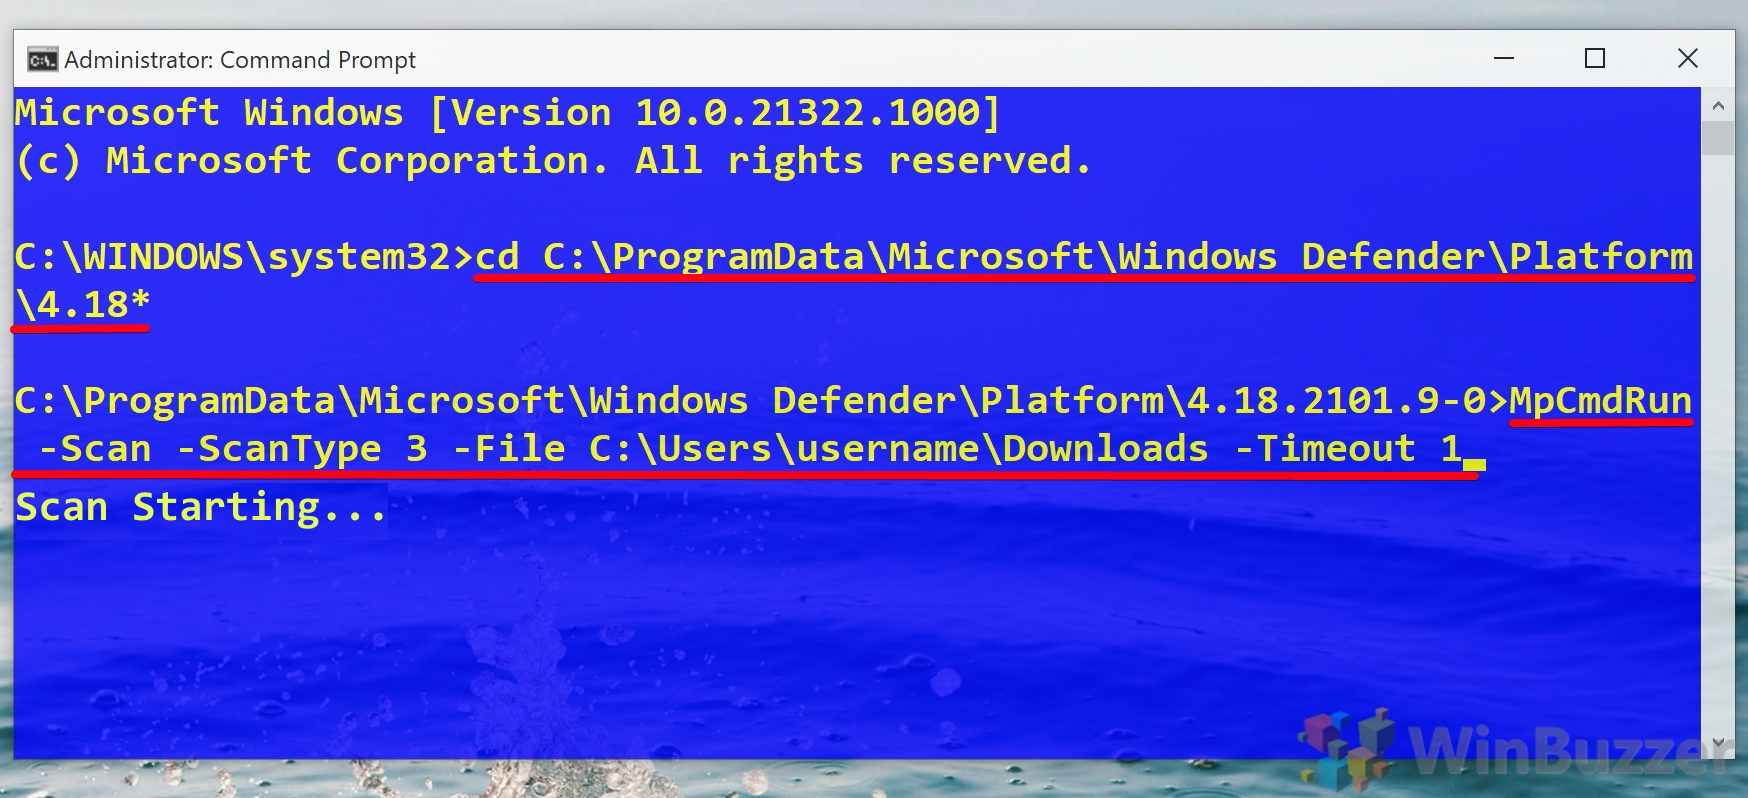
- Optional: Run the custom scan command with a timeout option
You can also define a timeout period for your scan in case it takes too long. Simply navigate to your Defender folder with
cd C:\ProgramData\Microsoft\Windows Defender\Platform\4.18*and run the following command:MpCmdRun -Scan -ScanType 3 -File C:\your\folder\or\file\path -Timeout 1Remember to switch the file path for the folder of your choice and that the timeout number represents days, not hours.


How to Perform a Boot Sector Malware Scan with the Windows Defender Command Line Tool
If you have a particularly nasty virus, it may have attacked your boot sector – the part of your PC that stores instructions that inform the startup process. Because such modifications can make it difficult to boot into your OS and cause other unwanted behavior, this can be hard to fix.
Thankfully, Windows Defender has a specific tool to find and resolve these issues – the boot sector scan. Even better, you can run it from the command line if you can’t access your normal OS. Here’s how:
- Open Command Prompt
Press Start and type “Command Prompt”, then click “Run as administrator” in the right-hand panel of the Start menu.
- Run a boot sector CMD scan
First, navigate to the Windows Defender folder with:
cd C:\ProgramData\Microsoft\Windows Defender\Platform\4.18*Then, run the following command:
MpCmdRun -Scan -ScanType -BootSectorScanThe command line anti-virus tool will then scan your boot sector for any malicious code and remove it if it can.


How to Restore Quarantined Items via a Windows Defender CMD Command
Last but not least, the Windows Defender Command-line tool lets you list and restore items that have been automatically quarantined. This can be useful if you’re sure a safe item has been removed.
- Open Command Prompt
Press Start, then type Command Prompt. With the tool selected, press “Run as administrator” on the right-hand side.
- Restore quarantined items
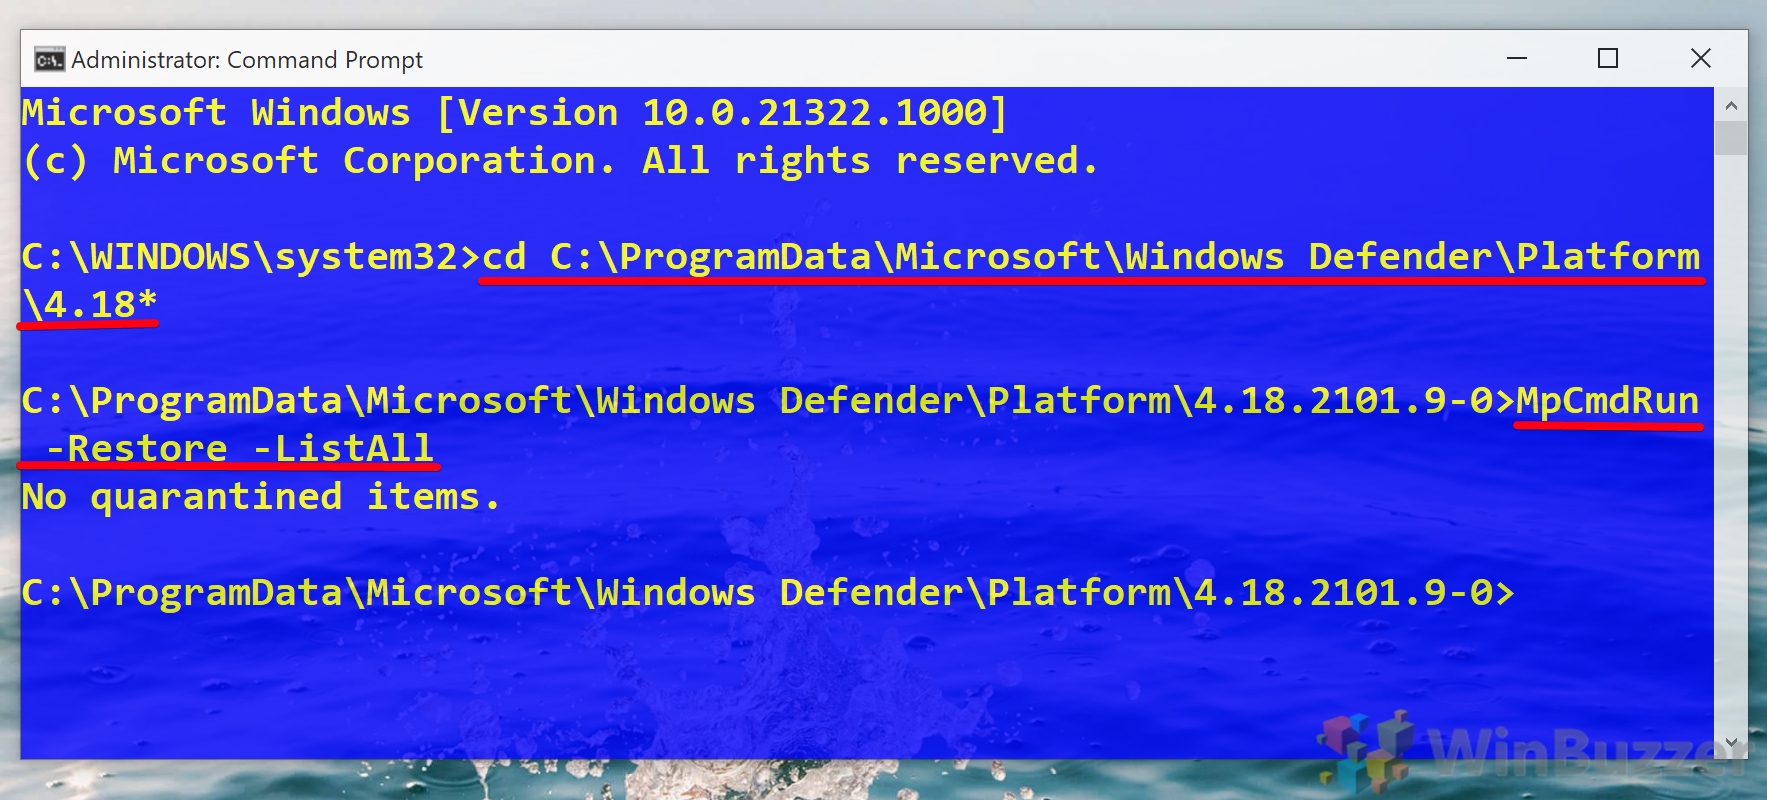
Navigate to the Microsoft Defender folder with the following command:
cd C:\ProgramData\Microsoft\Windows Defender\Platform\4.18*Now you can run the following command to view your quarantined items:
MpCmdRun -Restore -ListAllReference the list and type the following to restore a specific quarantined item:
MpCmdRun -Restore -Name ITEM-NAMEAlternatively, restore a file to a specific path with:
MpCmdRun -Restore -Name ITEM-NAME -FilePath PATH\TO\RESTOREYour items will be returned to their original or specified location.

With that, you should have all the tools you need to perform command line antivirus activities. However, to get the most out of Windows Defender, you may want to learn how to perform a scheduled scan or turn on the hidden adware scanner.

(Image credit: Windows Central )
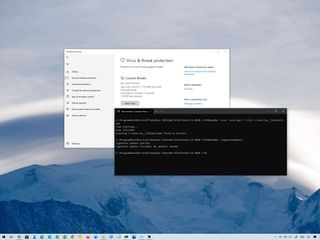
On Windows 10, Microsoft Defender Antivirus provides advanced real-time protection to protect your device and files against viruses, ransomware, spyware, rootkits, and other forms of malware, including hackers.
Although you can easily control the feature using the Windows Security app, you can also handle various aspects of the antivirus (updates, scans, and quarantined items) through Command Prompt. Usually, managing the experience with commands can be useful in many situations. For instance, when you need to use a script to automate some of the anti-malware tasks. You want to set a specific schedule to download updates or perform a quick, full, or custom scan. Or when you need to complete particular tasks on multiple computers.
In this Windows 10 guide, we will walk you through the steps to manage Microsoft Defender Antivirus with Command Prompt.
- How to check for updates on Microsoft Defender
- How to perform quick virus scan with Microsoft Defender
- How to perform full virus scan with Microsoft Defender
- How to perform custom virus scan with Microsoft Defender
- How to perform boot sector malware scan on Microsoft Defender
- How to restore quarantined items on Microsoft Defender
How to check for updates on Microsoft Defender
To check and download updates for Microsoft Defender, use these steps:
- Open Start.
- Search for Command Prompt, right-click the top result, and select the Run as administrator option.
- Type the following command to open the antivirus tool location and press Enter:
cd C:\ProgramData\Microsoft\Windows Defender\Platform\4.18* - Type the following command to check and update Microsoft Defender Antivirus and press Enter:
MpCmdRun -SignatureUpdate
Once you complete the steps, the tool will check and download any update available for the built-in antivirus.
Uninstall definitions updates
You can also remove previously installed updates with these steps:
- Open Start.
- Search for Command Prompt, right-click the top result, and select the Run as administrator option.
- Type the following command to open the antivirus tool location and press Enter:
cd C:\ProgramData\Microsoft\Windows Defender\Platform\4.18* - Type the following command to remove the most recent definitions and press Enter:
MpCmdRun -RemoveDefinitions -AllThe -All option restores the previous definitions from the backup or original default set of signatures. - Type the following command to rollback the engine version and press Enter:
MpCmdRun -RemoveDefinitions -EngineThe -Engine option rolls back to the previous version of the antivirus engine.
- Type the following command to remove dynamic signature updates and press Enter:
MpCmdRun -RemoveDefinitions -DynamicSignaturesThe -DynamicSignatures option uninstalls only the dynamic signatures.
After you complete the steps, the definitions will be removed from your computer according to your configuration.
How to perform quick virus scan with Microsoft Defender
To perform a quick Microsoft Defender scan, use these steps:
- Open Start.
- Search for Command Prompt, right-click the top result, and select the Run as administrator option.
- Type the following command to open the antivirus tool location and press Enter:
cd C:\ProgramData\Microsoft\Windows Defender\Platform\4.18* - Type the following command to perform a quick antivirus scan and press Enter:
MpCmdRun -Scan -ScanType 1Quick tip: You can also replace 1 with the 0 option in the command to start a default scan according to your configuration.

Once you complete the steps, the scan will begin, but it takes more than one day, the process will stop automatically.
How to perform full virus scan with Microsoft Defender
To perform a full Microsoft Defender scan with Command Prompt, use these steps:
- Open Start.
- Search for Command Prompt, right-click the top result, and select the Run as administrator option.
- Type the following command to open the antivirus tool location and press Enter:
cd C:\ProgramData\Microsoft\Windows Defender\Platform\4.18* - Type the following command to perform a full antivirus scan and press Enter:
MpCmdRun -Scan -ScanType 2
After you complete the steps, the antivirus will perform a full malware scan on your device. Depending on the amount of data, this process can take a very long time.
How to perform custom virus scan with Microsoft Defender
To customize a malware scan using Command Prompt, use these steps:
- Open Start.
- Search for Command Prompt, right-click the top result, and select the Run as administrator option.
- Type the following command to open the antivirus tool location and press Enter:
cd C:\ProgramData\Microsoft\Windows Defender\Platform\4.18* - Type the following command to perform a custom antivirus scan and press Enter:
MpCmdRun -Scan -ScanType 3 -File PATH\TO\FOLDER-FILESIn the command, make sure to specify the path to the folder you want to scan.For example, this command scans the «Downloads» folder:MpCmdRun -Scan -ScanType 3 -File C:\Users\username\Downloads
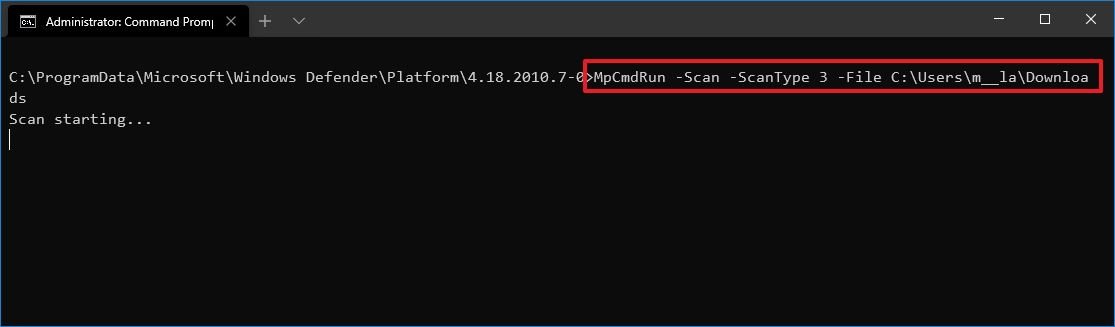
- (Optional) Type the following command to perform a custom scan with timeout time and press Enter:
MpCmdRun -Scan -ScanType 3 -File PATH\TO\FOLDER-FILES -Timeout 1In the command, make sure to specify the path to the folder you want to scan.For example, this command scans the «Downloads» folder and sets the timeout to one day:MpCmdRun -Scan -ScanType 3 -File C:\Users\username\Downloads -Timeout 1Quick note: You can always change the number for the timeout option to specify another number of days. The option is also available for quick and full scan commands.
Once you complete the steps, the anti-malware solution will only scan the location you specified. If you are using the «-Timeout» option, then if the scan is taking a long time, it will timeout once the time you specified has been reached.
How to perform boot sector malware scan on Microsoft Defender
On Windows 10, the boot sector is an essential section in the installation drive that stores the instructions on how to start the boot process. Sometimes, viruses can also attack the boot sector causing unwanted behaviors, which can be challenging to troubleshoot and fix. However, Microsoft Defender Antivirus includes an option to check and remove malicious code that may be residing in the boot sector.
To scan the boot sector for malware with Microsoft Defender, use these steps:
- Open Start.
- Search for Command Prompt, right-click the top result, and select the Run as administrator option.
- Type the following command to open the antivirus tool location and press Enter:
cd C:\ProgramData\Microsoft\Windows Defender\Platform\4.18* - Type the following command to perform a custom antivirus scan and press Enter:
MpCmdRun -Scan -ScanType -BootSectorScan

After you complete the steps, Microsoft Defender Antivirus will scan the boot sector for any malicious code that may be affecting the device.
How to restore quarantined items on Microsoft Defender
The Microsoft Defender Antivirus command-line tool also includes an option to view a list of quarantined items and another option to restore items that might have been detected as malicious when they are not harmful.
To view and restore quarantined items with Command Prompt, use these steps:
- Open Start.
- Search for Command Prompt, right-click the top result, and select the Run as administrator option.
- Type the following command to open the antivirus tool location and press Enter:
cd C:\ProgramData\Microsoft\Windows Defender\Platform\4.18* - Type the following command to view quarantined items and press Enter:
MpCmdRun -Restore -ListAll
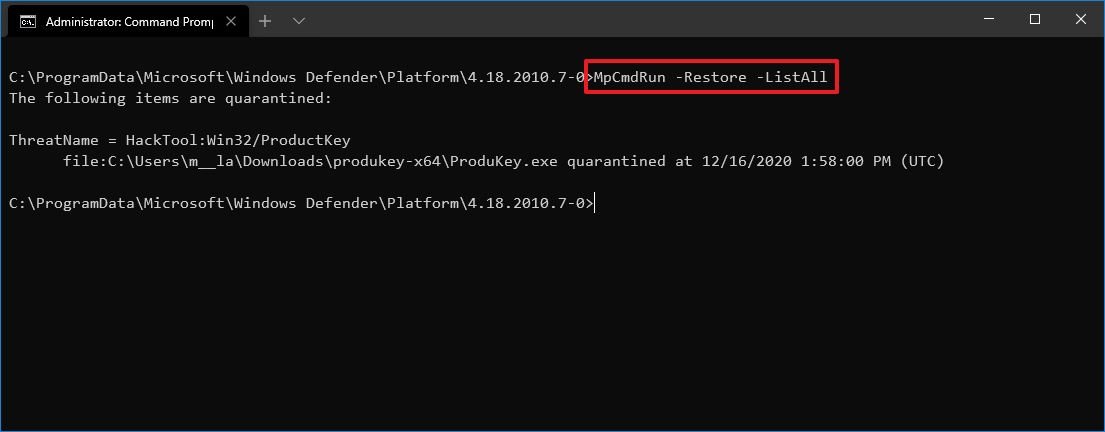
- Type the following command to restore all quarantined item and press Enter:
MpCmdRun -Restore -All - Type the following command to restore a specific quarantined item and press Enter:
MpCmdRun -Restore -Name ITEM-NAMEIn the command, replace the «ITEM-NAME» for the name of the quarantined item you want to restore. - Type the following command to restore a specific quarantined item to a specific path and press Enter:
MpCmdRun -Restore -Name ITEM-NAME -FilePath PATH\TO\RESTOREDIn the command, make sure to specify the path to restore the item.For example, this command restores a specific item to the Documents folder:MpCmdRun -Restore -Name app.exe -FilePath C:\Users\username\Downloads
Once you complete the steps, the items will be restored in the original or alternate location, depending on the command.
This guide focuses on the more important commands you can use with Command Prompt, but the tool includes additional options, which you can view running the
MpCmdRuncommand.
While you can manage a number of functions through Command Prompt, the tool is quite limited. For example, you cannot start an offline scan or change preferences. If you want to manage settings and control virtually every aspect of Microsoft Defender Antivirus with commands, you should be using the PowerShell modules instead.
All the latest news, reviews, and guides for Windows and Xbox diehards.
Mauro Huculak is technical writer for WindowsCentral.com. His primary focus is to write comprehensive how-tos to help users get the most out of Windows 10 and its many related technologies. He has an IT background with professional certifications from Microsoft, Cisco, and CompTIA, and he’s a recognized member of the Microsoft MVP community.
Защитник Windows, а также Microsoft Security Essentials могут сканировать, обновлять или запускать другие задачи из командной строки. Приложение MpCmdRun.exe находится в папке % ProgramFiles% \ Windows Defender или % ProgramFiles% \ Microsoft Security Essentials соответственно и называется как служебная программа командной строки Microsoft Antimalware .
Вы можете использовать этот инструмент для автоматизации и устранения неполадок службы Microsoft Antimalware. Здесь мы поговорим о Защитнике Windows на Windows 10.
Запустите Защитник Windows из командной строки
Для этого откройте командную строку от имени администратора. Введите следующее, чтобы получить полный список команд:
"% ProgramFiles% \ Защитник Windows \ MpCmdRun.exe"

Например, если вы хотите выполнить быстрое сканирование из командной строки, вы можете использовать параметр -Scan 1 :
"% ProgramFiles% \ Защитник Windows \ MpCmdRun.exe" -Scan -ScanType 1
Чтобы выполнить полное сканирование , используйте:
"% ProgramFiles% \ Защитник Windows \ MpCmdRun.exe" -Scan -ScanType 2
Чтобы обновить Защитника Windows или создать ярлык для обновления Защитника Windows, вы можете использовать следующую команду:
«% ProgramFiles% \ Защитник Windows \ MpCmdRun.exe» –signatureupdate

MpCmdRun.exe
Вот весь список, который я скопировал из результатов командной строки:
Использование: MpCmdRun.exe [команда] [-опции]
Описание команд:
- -?/-h : отображает все доступные опции для этого инструмента
- -Trace [-Grouping #] [-Level #] : запускает диагностическую трассировку
- -RemoveDefinitions [-All] : восстанавливает установленные определения сигнатур в предыдущую резервную копию или в исходный набор сигнатур по умолчанию
- -RestoreDefaults . Сбрасывает значения реестра для параметров службы Microsoft Antimalware на известные хорошие значения по умолчанию.
- -SignatureUpdate [-UNC] . Проверяет наличие новых обновлений определений.
- -Scan [-ScanType] . Сканирование на наличие вредоносного программного обеспечения.
- -Restore -Name [-All] . Восстановление самого последнего или всех помещенных в карантин элементов на основе имени
- -GetFiles : собирает информацию о поддержке
- -Восстановление . Восстановите или перечислите элементы на карантине
- -AddDynamicSignature : загружает динамическую подпись
- -ListAllDynamicSignatures : список загруженных динамических подписей.
- -RemoveDynamicSignature : удаляет динамическую подпись.
Надеюсь, это поможет вам начать.