Do you want to run VirtualBox on Windows 10 or 7 using the command line? But getting error – Vboxmanage command not found or vboxmanage.exe is not recognized as an internal or external command. Then here is the solution, which is, add the VirtualBox folder to your Windows user/system environment PATH.
We can use the VirtualBox command-line tool called vboxmanage on Windows 10 to create, start, stop, delete Virtual machines including other managing tasks. However, by default Vboxmanage.exe which is inside the Virtualbox folder will not be in our system path, thus as we run it in command prompt or PowerShell, we get command is not recognized error. Therefore, to run it we can either navigate directly to the Virtualbox folder and start CMD or Powershell there or declare it as a PATH environment variable.
The path variable omits the need of typing the whole path of some application in command to run it. You can say it is a kind of shortcut that we create globally for the whole system by defining the location. After setting the PATH of some folder, the system will automatically recognize all the files present inside that.
How to run vboxmanage.exe on Windows 10 or 7 using command
1. Open command prompt or PowerShell
First of all, either run command prompt or PowerShell on your Windows 10 or 7 operating system. For that, you can simply search for them in the search box. No need to run as an administrator, it can be opened under your standard system user.
2. Add Virtualbox folder to system PATH environment variable
As I mentioned at the beginning of this tutorial, if we don’t add the VirtualBox folder to the system PATH variable, the command tool Vboxmanage will through an error in CMD or Powershell, unless you are not inside the directory of Virtualbox where this tool resides. So, to remove the problem of switching to the Virtualbox directory, we add it directly to our system PATH variable. After that, we will be able to run vboxmanage from anywhere using the command line regardless of which directory we are in.
Those are using a Command prompt, use this command…
SET PATH=%PATH%;C:\Program Files\Oracle\VirtualBox
If you want to use PowerShell then run this one…
$env:PATH = $env:PATH + ";C:\Program Files\Oracle\VirtualBox"
3. Check VboxManage Command
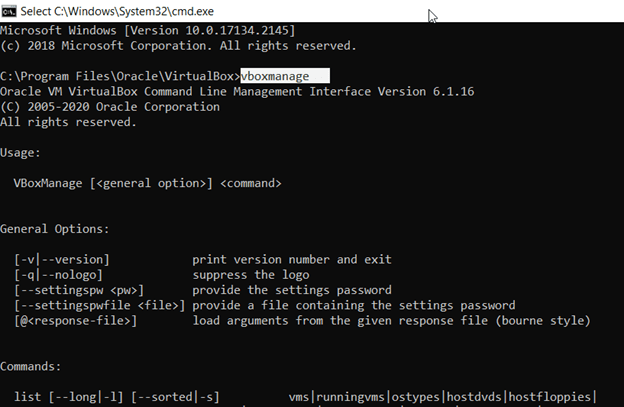
Now, let’s check whether the command vboxmanage will work on the command prompt and PowerShell without throwing any error or not. Run:
vboxmanage
Output:
Oracle VM VirtualBox Command Line Management Interface Version 6.1.18
(C) 2005-2021 Oracle Corporation
All rights reserved.

Usage:
VBoxManage [<general option>] <command>
General Options:
[-v|--version] print version number and exit
[-q|--nologo] suppress the logo
[--settingspw <pw>] provide the settings password
[--settingspwfile <file>] provide a file containing the settings password
[@<response-file>] load arguments from the given response file (bourne style)
----more----


4. Create a Virtual Machine using vboxmanage
This VirtualBox command tool is working perfectly and now we can use it to create virtual machines directly using the command line.
- Create new VM
Replace the demovm in each command with whatever name you want to give your Virtual machine.
VBoxManage createvm --name demovm --register
- To Set type Linux and version 64-bit
VBoxManage modifyvm demovm --ostype Linux_64
- Set RAM
VBoxManage modifyvm demovm --memory 1024 --vram 16
- Assign the Number of CPU cores
VBoxManage modifyvm demovm --cpus 2
- Create Virtual storage and set size for it
VBoxManage createhd --filename demovm.vdi --size 32768
- Add Storage controller and attach hard disk + ISO Image to boot.
VBoxManage storagectl demovm --name "SATA Controller" --add sata --controller IntelAHCI

VBoxManage storageattach demovm --storagectl "SATA Controller" --port 0 --device 0 --type hdd --medium H2SVM.vdi

VBoxManage storageattach demovm --storagectl "SATA Controller" --port 1 --device 0 --type dvddrive --medium "/home/how2shout/tails-amd64-4.16.iso"
Note: Change the ISO file path in the above command
- Set Boot order
VBoxManage modifyvm demovm --boot1 dvd --boot2 disk --boot3 none --boot4 none
- Set Network NAT
VBoxManage modifyvm demovm --nic1 nat --nictype1 82540EM
For Bridge Network, use-
VBoxManage modifyvm demovm --nic1 bridged --nictype1 82540EM --bridgeadapter1 wlx000b819609d3
- Turn on Physical Address Extension
VBoxManage modifyvm demovm --pae on
5. Start VM headless using vboxmanage
After creating a VM using the above commands, it’s time to start it. Here we have two options one is headless, which will start the VM in the background and the second one is the normal one which will open the VirtualBox graphical display window to let us know what is currently running.
vboxmanage startvm VM-name
Replace the VM-name with the one you have just created or any other existing one to start it.
In case you want to go headless, add that as a flag at the end of the above command:
VBoxManage startvm VM-name --type headless
6. List all VMs
Well, in case you want to know what are the virtual machines created so far using the command line, run the command
vboxmanage list vms
7. Display all running VMs list
Instead of showing all VMs, we can only get the ones that are currently running and active on VirtualBox,
vboxmanage list runningvms
8. vboxmanage command to Stop VM
After some time, when you don’t need any active VM, we can shut it down using a command, that is-
vboxmanage controlvm VM-name poweroff
Note– replace VM-name with your running Virtual machine that you want to stop.
9. Delete VM
Well, at some point in time we need to delete the created VMs to free up space or due to any other reason. Therefore, to do that we can also use the command-
VBoxManage unregistervm VM-name --delete
FAQ
[sc_fs_multi_faq headline-0=”h3″ question-0=”What is Vboxmanage?” answer-0=”VBoxManage is an Oracle VM VirtualBox command-line tool to manage and control virtual machines directly using the command terminal, prompt, or PowerShell in Windows, Linux, FreeBSD, and macOS host operating systems.” image-0=”” headline-1=”h3″ question-1=”How to open and run Vboxmanage?” answer-1=”Vboxmanage is available inside C:\Program Files>Oracle>VirtualBox on Windows 10/8/7, thus you can either navigate to the directory using command prompt or Powershell or add it as a system PATH variable. On Linux, simply type vboxmanage in the command terminal.” image-1=”” headline-2=”h3″ question-2=”How to find VirtualBox VMs UUID?” answer-2=”To find the UUID of virtual machines running on VirtualBox, we can use commands- one is vboxmanage list vms and the other is vboxmanage showhdinfo filename.vdi replace filename.vdi with the path of your virtual disk created for VM. ” image-2=”58226″ headline-3=”h3″ question-3=”How to change the UUID of a VDI file?” answer-3=”To change the UUID of VDI files, open the command terminal or prompt in Windows, macOS, or Linux. Then run VBoxManage internalcommands sethduuid ‘VDI file path’ Replace the VDI file path with the actual path of the Virtual Disk Image that UUID you want to change.” image-3=”” count=”4″ html=”true” css_class=”]
The file is located in Program Files/Oracle/VirtualBox/VBoxManage.exe and is used as a command-line interface with VirtualBox.
I’m using it to convert the .vdi image to a .vdmk (for VMware).
http://scottlinux.com/2011/06/24/convert-vdi-to-vmdk-virtualbox-to-vmware/
Here’s an example script:
$ VBoxManage list hdds
But where do I run this command? In Windows cmd? I tried both in cmd and in Linux but I can’t figure it out.
![]()
user9517
116k20 gold badges215 silver badges297 bronze badges
asked Mar 1, 2012 at 20:21
![]()
3
It’s a pretty sure bet that running an exe file in Linux won’t work. In Windows you do run it from the command prompt. If you get a message about the command not being found then either add the path to the command to your PATH environment variable or specify the full path to the command.
If the command runs but it’s not doing what you think it should be doing then read the documentation.
answered Mar 1, 2012 at 20:49
![]()
John GardeniersJohn Gardeniers
27.5k12 gold badges55 silver badges109 bronze badges
You need to either use the whole path for the command:
"C:\Program Files\Oracle\VirtualBox\VBoxManage.exe" list hdds
Or cd to the C:\Program Files\Oracle\VirtualBox directory, then:
VBoxManage.exe list hdds
Or you can add add the C:\Program Files\Oracle\VirtualBox directory to your PATH:
PATH=%PATH%;C:\Program Files\Oracle\VirtualBox
and then you can run VBoxManage from anywhere
2
- From the Windows7 start menu go to search programs and files folder.
- Type in CMD. Do not press enter.
- Right Click on the CMD icon and select copy.
- Navigate to c:\»Program Files\Oracle\VirtualBox\
- Right click in the window and select paste.
You should now be able to use VboxManage from the CMD window.
Try typing in VboxManage /?
If you see the help list then your on your way.
answered May 19, 2014 at 15:44
![]()
2
Not the answer you’re looking for? Browse other questions tagged
.
Not the answer you’re looking for? Browse other questions tagged
.
VBoxManage is the command-line interface (CLI) to VirtualBox. With it, we can completely control VirtualBox from the command line of our host operating system. VBoxManage supports all the features that the graphical user interface gives you access to, but it supports a lot more than that. It exposes really all the features of the virtualization engine, even those that cannot (yet) be accessed from the GUI.
It is extremely helpful when we are manage the VirtualBox VMs from remotely but only have access to a terminal on a remote host machine.
Other reasons that we may need VBoxManage is:
- Use a different user interface than the main GUI (for example,
VBoxSDLor the VBoxHeadless server); - Control some of the more advanced and experimental configuration settings for a VM.
VBoxManage is provided as an executable ("C:\Program Files\Oracle\VirtualBox\VBoxManage.exe") in Windows, we can execute this program like any other utility in Windows Command Line. By default, it is not in PATH environment variable, so we should add it to PATH so that we can execute it directly.
VBoxManage syntax
$ VBoxManage [-options] subcommand targetObserving Existing Virtual Machines
Assume we already have VMs registered in VirtualBox (say, with the help of the GUI), the first thing you we most likely want to do with VBoxManage is look through the list of those VMs:
$ VBoxManage list vms
"Ubuntu 12.04" {774c5e04-a35b-49c5-a406-305f1a887295}
"Ubuntu 17.10" {0d41ebff-4c96-48ec-a65a-233b4e21c10e}
"CentOS 7" {ad697671-713f-4704-9c46-882dd931c254}
If the command outputs nothing, you either currently have no VMs registered with Oracle VM VirtualBox or you’re running VBoxManage as a user different from the user who created those VMs.
To view the VMs that are running at the moment, you might use the runningvms subcommand of VBoxManage list:
$ VBoxManage list runningvms
"Oracle Developer Days" {c465cc52-dc11-4153-82d8-b5718182c117}
The VBoxManage list command can be used with option -l, which instructs the list command to output a detailed list (truncated below to save space):
$ VBoxManage list -l running vms
Name:            Ubuntu_16.10
Groups:          /
Guest OS:        Ubuntu (64-bit)
UUID:            ad697671-713f-4704-9c46-882dd931c254
Config file:     C:\Users\shichunhui\VirtualBox VMs\Ubuntu_16.10\Ubuntu_16.10.vbox
Snapshot folder: C:\Users\shichunhui\VirtualBox VMs\Ubuntu_16.10\Snapshots
Log folder:      C:\Users\shichunhui\VirtualBox VMs\Ubuntu_16.10\Logs
Hardware UUID:   ad697671-713f-4704-9c46-882dd931c254
Memory size:     4096MB
Page Fusion:     off
VRAM size:       16MB
CPU exec cap:    100%
HPET:            off
Chipset:         piix3
Firmware:        BIOS
Number of CPUs:  3
PAE:             off
...
Creating a VM
Use VBoxManage to create a VM in VirtualBox not only free us from manage the GUI interface, but also provides us an automated way to simplify the process.
$ VBoxManage createvm --name "Ubuntu17.10" --ostype Ubuntu --registerThe process of creating a VM is to build a VM definition in XML file. We can add the –register option to register the VM’s definition into the VirtualBox directly, or we can register it later with the help of the VBoxManage registervm command.
In fact, the name of the VM is the only mandatory parameter of the createvm command. The details can be specified later through the various parameters of the modifyvm command. Both modifyvm and createvm, however, support the ostype optional parameter that you can use to give VirtualBox an idea of what guest operating system will be installed into the VM.
To get a complete list of supported operating systems we can do:
$ VBoxManage list ostypesSetting Up a VM’s Properties
Once the VM is created, we may want to inspect its current properties:
$ VBoxManage showvminfo Ubuntu17.10
Name:            Ubuntu_16.10
Groups:          /
Guest OS:        Ubuntu (64-bit)
UUID:            ad697671-713f-4704-9c46-882dd931c254
Config file:     C:\Users\juniway\VirtualBox VMs\Ubuntu17.10\Ubuntu17.10.vbox
Snapshot folder: C:\Users\juniway\VirtualBox VMs\Ubuntu17.10\Snapshots
Log folder:      C:\Users\juniway\VirtualBox VMs\Ubuntu17.10\Logs
Hardware UUID:   ad697671-713f-4704-9c46-882dd931c254
Memory size:     4096MB
Page Fusion:     off
VRAM size:       16MB
CPU exec cap:    100%
HPET:            off
Chipset:         piix3
Firmware:        BIOS
Number of CPUs:  3
PAE:             off
Long Mode:       on
Triple Fault Reset: off
APIC:            on
X2APIC:          on
CPUID Portability Level: 0
CPUID overrides: None
Boot menu mode:  message and menu
Boot Device (1): Floppy
Boot Device (2): DVD
Boot Device (3): HardDisk
Boot Device (4): Not Assigned
ACPI:            on
IOAPIC:          on
BIOS APIC mode:  APIC
Beside, we might need to modify its properties to meet our personal needs and to comply with the requirements of the guest OS that we are going to install in the VM.
$ VBoxManage modifyvm Ubuntu17.10 --cpus 2 --memory 2048 --vram 12 --acpi on --boot1 dvd --nic1 natWhen setting the amount of RAM and CPUs for a VM, we should take into account the requirements of the guest OS, make sure that the host will have enough memory left to operate properly after we start all the VMs that are supposed to work simultaneously. Don’t assign more virtual CPUs than the number of physical cores on the host computer.
Since VBoxManage showvminfo displays VM’s complete infomation (too much), we can use grep to filter the output:
$ VBoxManage showvminfo Ubuntu17.10 | grep "Memory size"
Memory size:     2048MB
Configuring a Virtual Network Adapter
Network setting is very important when we set up a VM, we can configure a virtual network card over a physical network interface of the host system to provide your VM with the ability to interact with the outside world.
By default, VirtualBox configures one virtual adapter for a VM, setting it to operate in the NAT networking mode, in most case, this will satisfiy our need, the former command with option --nic1 nat explicitly specifies the networking mode to be NAT.
If we want to the mode of that adapter, nic1, to another mode (say bridged, for bridged networking), we can do this:
$ VBoxManage modifyvm Ubuntu17.10 --nic1 bridged --bridgeadapter1 eth0To list the available interfaces on the host system, we can use ipconfig in Windows.
Attaching Virtual Media to a VM
Like a real computer, VM needs a storage device, such as a hard disk, to boot from and for storing and retrieving system and user data. it’s time to create a virtual hard disk for the VM.
This is actually a three-step process.
As the first step, you create a new virtual hard disk image. With the following command, you create a disk image file in VirtualBox’s VDI format.
$ VBoxManage createhd --filename /path/to/hard_drive_image/Ubuntu17.10.vdi --size 100000 --variant Standard
0%...10%...20%...30%...40%...50%...60%...70%...80%...90%...100%
Disk image created.
UUID: c69e22d2-1560-44cc-85f6-d81979c81990
Here we create a virtual hard disk image with the size of 10 GB, the option –variant Standard means we create a dynamically allocated image file, if we want a fixed-size image, we could use –variant Fixed. In whichever case, we’ll be able to expand the image capacity anytime later with the VBoxManage modifyhd command.
The next step is to add a storage controller to be used with that hard disk:
$ VBoxManage storagectl Ubuntu17.10 --name "SATA Controller" --add sata --bootable onNote: When choosing Serial ATA (SATA) as the controller type, make sure the guest OS has device support for Advanced Host Controller Interface (AHCI), which is the standard interface for SATA controllers. Be warned that older operating systems, such as Windows XP, do not support AHCI. In that case, use an Integrated Drive Electronics (IDE) controller.
Finally, we need to attach the hard disk to the controller:
$ VBoxManage storageattach Ubuntu17.10 --storagectl "SATA Controller" --port 0 --device 0 --type hdd --medium /path/to/hard_drive_image/Ubuntu17.10.vdiWe can connect up to 30 virtual hard drives to a VM through a single SATA controller. In the case of an IDE controller, you’re limited to just 4 virtual storage devices, where one of them is normally the virtual CD/DVD drive.
Now a VM and the correspoding hardware device are set up completely, we are ready to install a Guest OS into the VM.
Install Guest OS in VM
Assume we have already have a ISO image file for the OS we want to install, we need to configure the VM to boot from the it, to do that we need to create a virtual CD/DVD drive and connect it to the installation media. Like virtual hard drives, virtual CD/DVD drives also require a storage controller. While this can be done using a SATA controller for many operating systems, the following example illustrates adding an IDE controller for the CD/DVD drive.
$ VBoxManage storagectl Ubuntu17.10 --name "IDE Controller" --add ide --controller PIIX4Suppose we have a installation DVD disk. Insert the installation disk into the host’s CD/DVD drive and then issue the following command, connecting the VM’s virtual CD/DVD drive to the physical CD/DVD drive on the host computer:
$ VBoxManage storageattach Ubuntu17.10 --storagectl "IDE Controller" --port 0 --device 0 --type dvddrive --medium /full/path/to/unbuntu17.10_server.iso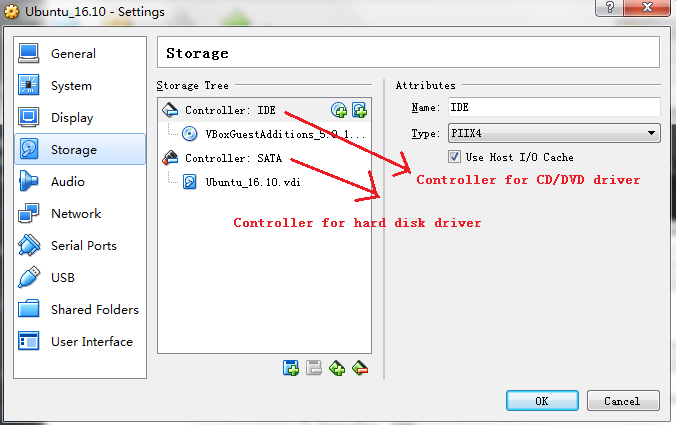
We can use vboxmanage showviminfo command to inspect whether we have IDE or SATA controller installed correctly:
$ VBoxManage showvminfo Ubuntu17.10 | grep "IDE"
Storage Controller Name (0):            IDE
IDE (0, 0): D:\Program Files\VBoxGuestAdditions_5.0.17.iso (UUID: 94ae2d78-c3b3-4d7f-86f7-389311e8d9fa)

$ VBoxManage showvminfo Ubuntu17.10 | grep "SATA"
Storage Controller Name (1):            SATA
SATA (0, 0): D:\Program Files\VDIs\ub1710.vdi (UUID: 31482d54-a73e-42ed-84be-ddde20546d9c)
Now you can boot the VM and start the guest installation using the following command, which starts in GUI mode by default, taking you through a standard guest OS installer:
$ VBoxManage startvm Ubuntu17.10 Things to do after we have successfully installed the Guest OS
Once we have completed the OS installation, we shut down the VM from within the guest, which causes VirtualBox to power off the VM was well.
The below command is equivalent to briefly pressing the power button on a physical computer.
$ VBoxManage controlvm Ubuntu17.10 acpipowerbuttonWe can forcibly shut down a VM using the following command, which is equivalent to pressing and holding a computer’s power button:
$ VBoxManage controlvm Ubuntu17.10 poweroffFinally, since the OS is already installed in the guest, we can remove the DVD from the VM configuration:
$ VBoxManage storageattach Ubuntu17.10 --storagectl "IDE Controller" --port 0 --device 0 --type dvddrive --medium none
$ VBoxManage modifyvm "Ubuntu17.10" --dvd none
Guest Additions and Shared Folders
(1) Mount Guest Addition
$ VBoxManage storageattach "Ubuntu17.10" --storagectl "IDE Controller" --port 1 --device 0 --type hdd --medium /path/to/VBoxGuestAdditions.iso(2) Adding/removing shared folders
$ vboxmanage sharedfolder add "Ubuntu17.10" --name shared_dir --hostpath /path/to/folder/ --automount
$ vboxmanage sharedfolder remove "io" --name share_dir
Export and Import VM
Oracle offers a number of prebuilt developer VMs for Oracle VM VirtualBox, providing a quick way to install and experience entire software stacks packaged into deployable appliances. The VBoxManage import command allows you to import such appliances packaged in OVA format into Oracle VM VirtualBox.
Also, if we want clone/package our local VM onto other Host Computer (System), we can export the VM out to a VirtualBox .ovf file and then import this file on other Host Computer.
Now, suppose we want to import Oracle Linux 7.2 into our VirtualBox from the OracleLinux72.ova package, which you have downloaded to your system from Oracle Linux Hands-on Labs. First, we might want to check the options available for the appliance to be imported. This can be done with the --dry-run option of the VBoxManage import command:
$ VBoxManage import /path/to/OracleLinux72.ova --dry-run Below command import an VM and pecify the amount of RAM and the number of CPUs to be allocated, also, use --eula accept option to accept the license agreement.
$ VBoxManage import /path/to/OracleLinux72.ova --vsys 0 --memory 1024 --cpus 2 --eula accept Once the import has successfully been completed, the Oracle Virtual Sysadmin Days VM icon should appear in the left pane of VirtualBox Manager. And, of course, you’ll be able to manipulate the VM from the command line using the VBoxManage commands.
Export has similar syntax, we can use --output to specify a file name
$ VBoxManage export "Ubuntu17.10" --output ub1710_clone.ovfReference
https://www.virtualbox.org/manual/ch08.html
https://community.oracle.com/docs/DOC-890092
http://nakkaya.com/2012/08/30/create-manage-virtualBox-vms-from-the-command-line/
Trying to VBoxManage in order to manage your virtual machines, but already stuck at the first step? Here’s how to fix it.
‘VBoxManage’ is not recognized as an internal or external command, operable program or batch file.
If you type VBoxManage in the command prompt, you expect a list of commands to pop up. However, when the command is not added to the PATH, it just won’t work. The PATH is the list of directories of which Windows can run executables from. VBoxManage.exe is the one you are trying to launch, but Windows has not identified the directory of this program.
The solutions is simple. Browse to the directory of your VirtualBox installation, and copy the pathname. For me this is ‘C:\Program Files\Oracle\VirtualBox’. Adding this directory to the PATH variable is the easiest by simply running the set command in your command prompt, as follows:
set PATH=%PATH%;"C:\Program Files\Oracle\VirtualBox"If you now type set again in the command prompt, it will print out all the directories to which the variable has access.
Take notice, if you want to add this command permanently, please take the following steps:
- Open Start
- Click (or type) Control Panel
- Click the System icon.
- Click Advanced system settings and then Environment Variables
- Search for the line under System variables that corresponds to the “Path” variable and select it
- Click Edit
- Go to the very end of the text listed in the Variable value text field
- Add the location of the bin folder of the installation to the end.
- Remember, the directories listed in the path variable should be separated by semicolons.
- Click OK when you are done (multiple times).
Congratulations, you can now use the VBoxManage command in your Windows command prompt.
Say thanks, ask questions or give feedback
Technologies get updated, syntax changes and honestly… I make mistakes too. If something is incorrect, incomplete or doesn’t work, let me know in the comments below and help thousands of visitors.
When you have a VirtualBox hypervisor installed, there is no doubt that the easiest way to navigate through the VirtualBox is via GUI. It is very user-friendly; even an average user can create and manage a virtual machine using VirtualBox GUI without having prior knowledge on how to manage VM’s.
But the fastest way to use the VirtualBox is via its command line. Many people think that working with the VirtualBox VM via the command line is a complex task, and only an advanced user should be performed. However, that’s not the case. Once you start using the VirtualBox CLI, you may not go back to the GUI again because it’s a faster way to get things done.
Instead of going through multiple steps, you can pretty much do everything with one single command, and you don’t have to move around the menus and sub-menus using the mouse pointer.
Moreover, the VirtualBox Command line supports more features than the GUI.
In this blog, we will look at how you can manage VirtualBox using the command line, we are not going through all the commands, but we will go through the essential ones.
After following this, you can manage the virtual machine in VirtualBox using the command line.
I am using VirtualBox on a Windows 10 machine, and the commands that I use here are pretty much the same for VirtualBox running on other operating systems.
Read also,
How to Manage Snapshot in VirtualBox? – Both GUI and CLI
Can I start VirtualBox GUI from command line?
You can start VirtualBox GUI from the command line. However, you have to be at the installation location and start the CMD from there, which we will discuss next.
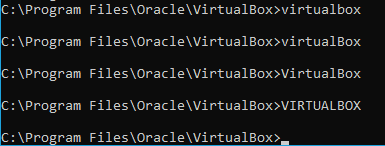
After you opened the cmd, all you have to do is type VirtualBox and hit enter. The GUI would open.
The character doesn’t have to be case-sensitive.
As you can see, I have typed the command with the mix of upper and lower cases, and all of them worked just fine. And that should open the Virtualbox GUI.
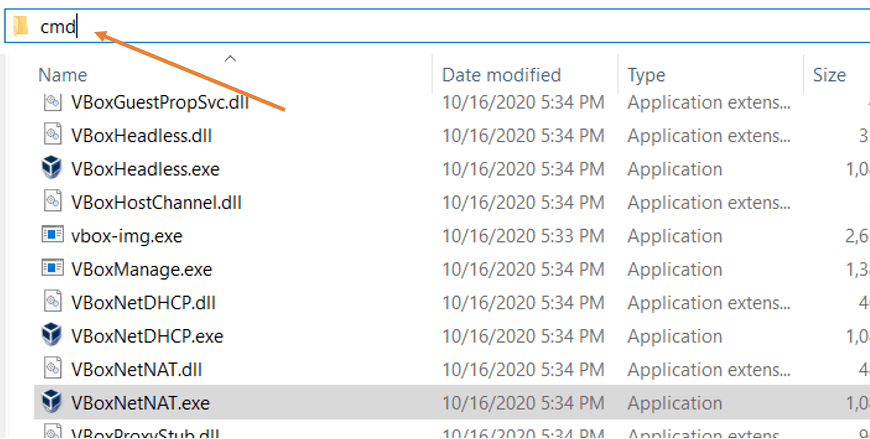
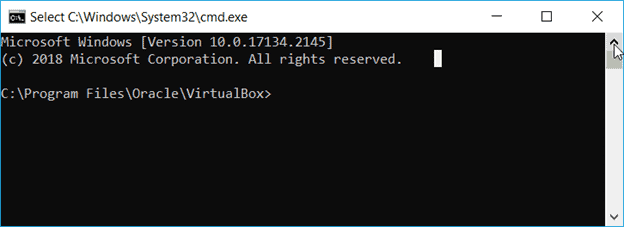
Vboxmanage is the command-line interface utility for the VirtualBox. To start the command line for VirtualBox, you will have to go to the installation location of the VirtualBox. By default, the installation location for the VirtualBox in windows is under C:\Program Files\Oracle\VirtualBox
While you are at the location, you can type cmd on the address bar. It should open up the command line on the exact location, and you can start to use vboxmanage and the rest of the VirtualBox commands from here now.
To get help or the command reference that you want to follow, you can enter the command vboxmanage and hit enter. It will show you a whole list of commands and the subcommands you could run with the vboxmanage.
List the VirtualBox VM’s.
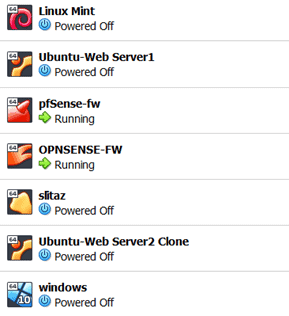
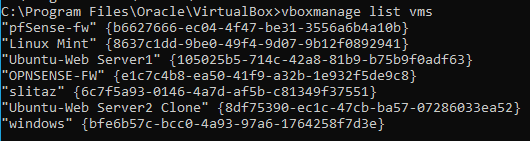
To see the VM’s list currently running on your VirtualBox machine, you can type the command vboxmanage list vms and hit enter.
It will show you all the VM’s that are currently installed in the VirtualBox environment with their name and UUID. We will see how we can use both the names and the UUIDs to manage the VM’s in VirtualBox CLI.
C:\Program Files\Oracle\VirtualBox>vboxmanage list vms
"pfSense-fw" {b6627666-ec04-4f47-be31-3556a6b4a10b}
"Linux Mint" {8637c1dd-9be0-49f4-9d07-9b12f0892941}
"Ubuntu-Web Server1" {105025b5-714c-42a8-81b9-b75b9f0adf63}
"OPNSENSE-FW" {e1c7c4b8-ea50-41f9-a32b-1e932f5de9c8}
"slitaz" {6c7f5a93-0146-4a7d-af5b-c81349f37551}
"Ubuntu-Web Server2 Clone" {8df75390-ec1c-47cb-ba57-07286033ea52}
"windows" {bfe6b57c-bcc0-4a93-97a6-1764258f7d3e}
C:\Program Files\Oracle\VirtualBox>
How do I see the running VM’s in vboxmanage?
While the list VM’s will show you the list of VM’s that you have in the VirtualBox, You can type the command vboxmanage list runningvms to see the list of VM’s that are currently running on the VirtualBox.
As you can see, I cannot see any VM’s that are currently running because I have not started any VM’s yet.
C:\Program Files\Oracle\VirtualBox>vboxmanage list runningvms
C:\Program Files\Oracle\VirtualBox>
Let’s take a look at how you can start a VM via CLI in VirtualBox.
How to start a VirtualBox VM from command line?
To start a VM, you can use the command startvm following vboxmanage and the VM name or UUID.
The command will be as follows.
Vboxmanage startvm <“vmname”>

You can also type the VMname without quotes. However, if the VM name has space, you cannot run the commands without the quotes.
As you can see, I tried to start a VM with a space in its name, but it didn’t start. Instead threw an error, and when I tried the same command with quotes, it started.

If your machine doesn’t have GUI access, you can also start the VM in a headless mode. This will not open the GUI, and from other devices or a local network, you can log in via ssh protocol and manage the VM, provided you should have the Virtualbox Networking properly set up.
To start the VM in a headless mode, right after the VM name add –type command and type as headless.
vboxmanage startvm <"vmname"> --type headless
When you enter the headless commands, you won’t see the VM opens up in a GUI. However, it will be running in the background. And you can use the runningvm command to see the running VM’s.
C:\Program Files\Oracle\VirtualBox>vboxmanage startvm "Ubuntu-Web Server1" --type headless
Waiting for VM "Ubuntu-Web Server1" to power on...
VM "Ubuntu-Web Server1" has been successfully started.
C:\Program Files\Oracle\VirtualBox>vboxmanage list runningvms
"pfSense-fw" {b6627666-ec04-4f47-be31-3556a6b4a10b}
"Ubuntu-Web Server1" {105025b5-714c-42a8-81b9-b75b9f0adf63}
Start the Virtualbox VM with UUID.
Remember, I mentioned managing the VM’s with name and UUID ?.
We have already taken a look at how you can manage the VM’s using the VM’s name. Let’s do the same thing with the UUID.
To get the UUID, you can type the list VM’s command again, and after the name, you should be able to see the UUID.
I have an Opnsense firewall VM with the UUID start with e1c and ends with 9c8.
"OPNSENSE-FW" {e1c7c4b8-ea50-41f9-a32b-1e932f5de9c8}
Let’s start the VM using the UUID, and you should see the VM has started. Since we have not used the headless mode, the VM should open up in a VirtualBox GUI if you have GUI access.
C:\Program Files\Oracle\VirtualBox>vboxmanage startvm "e1c7c4b8-ea50-41f9-a32b-1e932f5de9c8"
Waiting for VM "e1c7c4b8-ea50-41f9-a32b-1e932f5de9c8" to power on...
VM "e1c7c4b8-ea50-41f9-a32b-1e932f5de9c8" has been successfully started.
I entered the command list running VMS, and I can see the Opnsense firewall VM has been started and running now.
C:\Program Files\Oracle\VirtualBox>vboxmanage list runningvms
"pfSense-fw" {b6627666-ec04-4f47-be31-3556a6b4a10b}
"Ubuntu-Web Server1" {105025b5-714c-42a8-81b9-b75b9f0adf63}
"OPNSENSE-FW" {e1c7c4b8-ea50-41f9-a32b-1e932f5de9c8}
C:\Program Files\Oracle\VirtualBox>
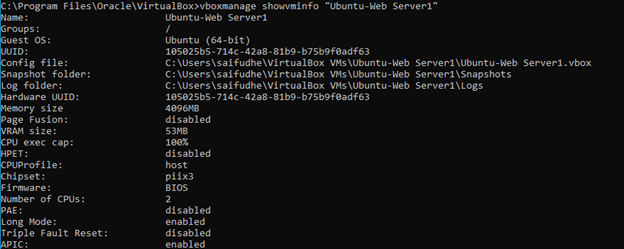
How do I see the properties of the Virtualbox VM?
When you wanted to see the properties or the information about a specific VM, you should use vboxmanage showvminfo <vmname> command.
It will help you alter the VM settings later on when you wanted to make some changes, which we will cover in the modifyvm settings.
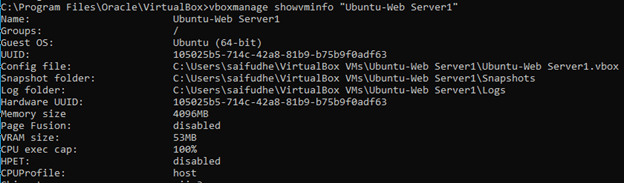
When you enter the showvminfo command, it will show you detailed information about VM resources, including OS type, CPU, Memory, Storage, and so on.
How to check host machine resources in vboxmanage CLI?
When you deploy a VM to VirtualBox, or any other hypervisor for that matter, the resources such as memory, CPU, and so on are allocated by the host machine. And you must know how much resources are left on your host machine before you spin up more VM’s.
We have checked the VM information by entering showvminfo right. Is it possible to check the host machine properties as well?
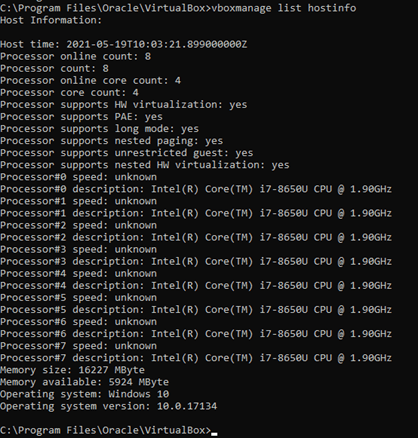
You can check the host machine information on the vboxmanage command line, by typing the command below.
vboxmanage list hostinfo.
As you can see, it will show you the number of processors your host machine has. The Memory size and available memory on the and operating system information as well.
Vboxmanage controlvm.
With vboxmanage controlvm you can change the state of the virtu albox virtual machine, you could pause, resume, power off, restart and everything can be done from here.
Let’s take a look at how it works in action.
The Virtualbox CLI is mainly used so everything can be done remotely over the ssh. To make things clear, I will also show you how each command works with the GUI as well.
How to stop VirtualBox VM from command line?
We have some VM’s that we have started to test the vboxmanage command line. How do we go about and shutdown those VM’s via CLI?
The shutdown option in VirtualBox is under the subcommand controlvm, similar to how you power down a physical machine by pressing the power button. You can do the same using acpipowerbutton option.
I will power down one of the Ubuntu web server that I am running in the VirtualBox.
First, let’s check the VM’s in CLI.
C:\Program Files\Oracle\VirtualBox>vboxmanage list runningvms
"pfSense-fw" {b6627666-ec04-4f47-be31-3556a6b4a10b}
"Ubuntu-Web Server1" {105025b5-714c-42a8-81b9-b75b9f0adf63}
"OPNSENSE-FW" {e1c7c4b8-ea50-41f9-a32b-1e932f5de9c8}
For your information, the GUI list also shown.
Shutdown the VM.
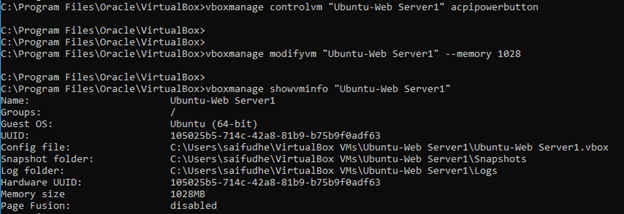
C:\Program Files\Oracle\VirtualBox>
C:\Program Files\Oracle\VirtualBox>vboxmanage controlvm "Ubuntu-Web Server1" acpipowerbutton
I used the command vboxmanage controlvm “Ubuntu-Web Server1” acpipowerbutton and as you can see the VM got shutdown and I no longer see the VM’s under the running state.
C:\Program Files\Oracle\VirtualBox>vboxmanage list runningvms
"pfSense-fw" {b6627666-ec04-4f47-be31-3556a6b4a10b}
"OPNSENSE-FW" {e1c7c4b8-ea50-41f9-a32b-1e932f5de9c8}
Virtualbox VM force shutdown.
When you try to shut down the VM’s using the acpipowerbutton command, it may not work for some of the VM’s because of no ACPI support on the operating system. You can use an alternate command which is poweroff, The poweroff option is like unplugging the cable from a physical machine, and you know that it is not a good practice.
And same applies to this poweroff command as well. You should be extra careful when you use this command as it can corrupt the virtual machine.
C:\Program Files\Oracle\VirtualBox>vboxmanage list runningvms
"pfSense-fw" {b6627666-ec04-4f47-be31-3556a6b4a10b}
"OPNSENSE-FW" {e1c7c4b8-ea50-41f9-a32b-1e932f5de9c8}
From the current running machines, I will shut down both remaining VM’s that I have.
C:\Program Files\Oracle\VirtualBox>vboxmanage controlvm "pfSense-fw" poweroff
0%...10%...20%...30%...40%...50%...60%...70%...80%...90%...100%
C:\Program Files\Oracle\VirtualBox>vboxmanage controlvm "OPNSENSE-FW" poweroff
0%...10%...20%...30%...40%...50%...60%...70%...80%...90%...100%
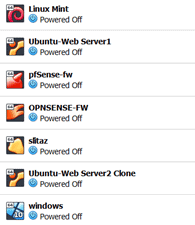
After few seconds, the VM’s will be powered down, and you should see there are no runningvms currently on the VirtualBox CLI as well in the GUI.
C:\Program Files\Oracle\VirtualBox>vboxmanage list runningvms
C:\Program Files\Oracle\VirtualBox>
Reboot a VM in VirtualBox using vboxmanage.
We have taken a look at how you can stop the VM’s using vboxmanage. You can also reboot the VM’s in VirtualBox using the vboxmanage command.
It is recommended to use the restart option within the VM’s, but you have this option available for you to use.
The command for restarting the VM is vboxmanage controlvm <vmname/uuid> reset.
It is similar to the reset button on the physical box.
I have just powered on one of the windows 10 machine that I have, and I will use the command against the same virtual machine.
As soon as I entered the command, the VM got rebooted.
Pause a VM using vboxmanage.
As the name suggests, the pause command will put the VM state into a pause state, and you won’t be able to make any changes on the VM. Neither can you log in. And the VM screen will look in grey.
To pause the VM, you can type the command vboxmanage controlvm “windows” pause.
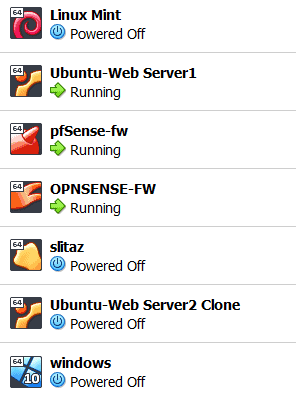
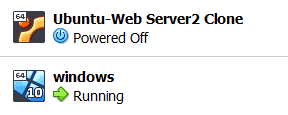
As you can see from the below screenshot, the one on the left running state and the right is when the VM is paused, and you cannot do anything in the VM until you resume the state of the VM.
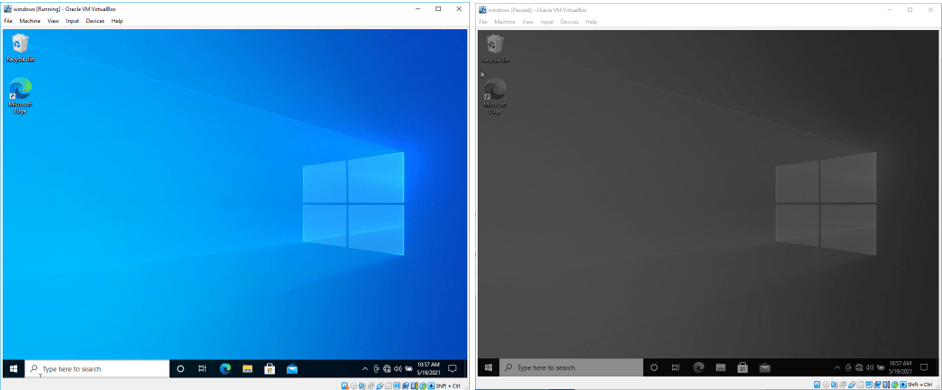
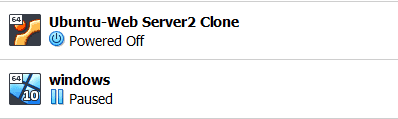
You can see the VM is paused in the list of VM’s in the GUI as well.
Resume the VM state from pause.
To come out of the pause state, you can replace pause with resume. It will bring up the VM to be running state again.
C:\Program Files\Oracle\VirtualBox>vboxmanage controlvm "windows" resume
You should see the state changed from the pause to resume in VirtualBox.
Save the virtual machine state.
When you try to close the VM’s in GUI, you must have seen an option that says Save the machine state. What it will do is, it will save the current machine state to the disk and close the VM.
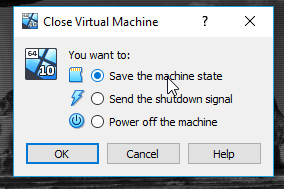
The same option is available under the controlvm command as savestate.
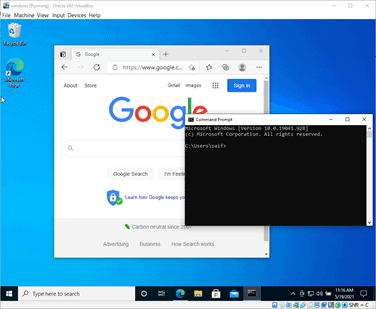
I have the same windows 10 VM running, and let’s run the command vboxmanage controlvm “windows” savestate.
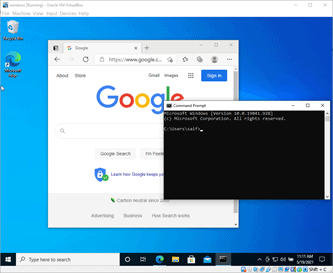
Before we run the command, let’s open some applications in the Windows VM and apply the command, and when we start the VM again, it should restore from where it was left off.
This option is handy when you are in the middle of something, and you want to take a long break and come back and resume from where you left off.
I have a web browser and a command prompt window which I have currently opened. And I am going to issue the command now.
I ran the command, and after few seconds, the VM has saved its state and shut down the VM.
C:\Program Files\Oracle\VirtualBox>vboxmanage controlvm "windows" savestate
0%...10%...20%...30%...40%...50%...60%...70%...80%...90%...100%
You wont be able to see the VM is running in the virtualbox.
C:\Program Files\Oracle\VirtualBox>vboxmanage list runningvms
C:\Program Files\Oracle\VirtualBox>
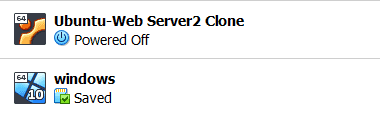
And in the GUI, you can see the VM status as Saved.
Let’s start the VM using the startvm command again, and it should start from where we left off.
C:\Program Files\Oracle\VirtualBox>vboxmanage startvm "windows"
Waiting for VM "windows" to power on...
VM "windows" has been successfully started.
C:\Program Files\Oracle\VirtualBox>
As soon as I powered on the VM, it started to restore the virtual machine. Though the remaining restoration time says 1minutes and 7 seconds, I could get in within few seconds.
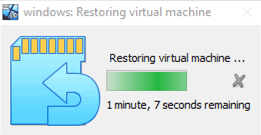
And you could see I could get back to the previous state I was in right before I shut down the machine.
Vboxmanage modifyvm
We have taken a look at how you can manage the VM using the vboxmanage controlvm. Let’s take a look at how you can modify the VM properties using the modifyvm subcommand in vboxmanage. When you run the command, make sure you shut down the Virtual machines first.
Change the VM name VirtualBox CLI.
If you want to change the name of the VM in virtualbox CLI, you can run the command vboxmanage modifyvm <" vmname"> --name <newname>
I will rename some of the VM’s names using the –name option in the CLI.
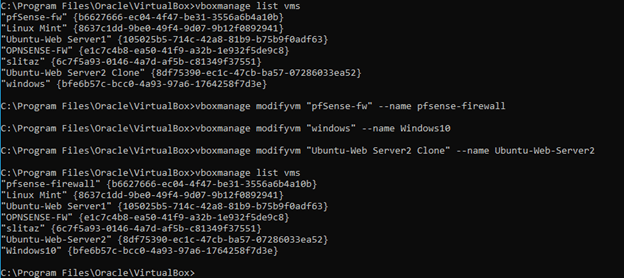
To rename the pfSense-fw we can type the command as follows.
vboxmanage modifyvm "pfSense-fw" --name pfsense-firewall
Similarly I have renamed the two other VM’s as well. Windows to Windows 10 and Ubuntu-web server2 clone to ubuntu_web_server2.
Modify the memory.
When I deployed the Ubuntu machine in VirtualBox, I have added 4Gigs of ram. Since my machine has enough RAM, it should be okay. However, when I want to run more VM’s at the same time, it will be a challenge.
So let’s see how can modify the memory in VirtualBox using CLI.
First, let’s check the current memory allocation.
I can check the memory allocation by typing the vboxmanage showvminfo “vmname” command.
I have provided 4096MB of RAM.
Let’s go ahead and reduce to 1028MB instead.
Before I make the changes, I need to see if I am running the VM or not.
C:\Program Files\Oracle\VirtualBox>vboxmanage list runningvms
"Ubuntu-Web Server1" {105025b5-714c-42a8-81b9-b75b9f0adf63}
As you can see, the Ubuntu VM is currently running, and I cannot modify the memory allocations to it.
Poweroff the machine. And modify the RAM size to 1028 with the below command.
vboxmanage modifyvm "Ubuntu-Web Server1" --memory 1028
After that, when I checked the vminfo, I could see the memory size reduced to 1gig.
Increasing the memory also the same way. Let’s say you want to increase the memory from 1028 to 2048 replace the 1028 in the previous command to 2048.
vboxmanage modifyvm "Ubuntu-Web Server1" --memory 1028
Modify the CPU.
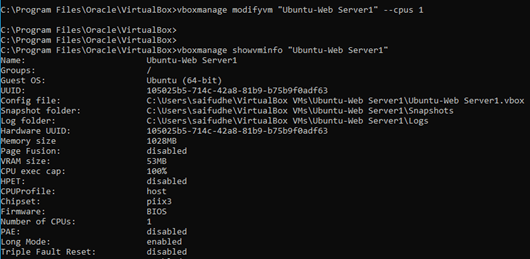
When we checked the Ubuntu VM CPU, we could see that we have assigned 2 CPUs to it.
What if you are machine is running slow, and you wanted to run the VM’s, but allocate only single-core? You can do that by using the modify CPU option.
So you can type the command vboxmanage modifyvm "Ubuntu-Web Server1" --cpus 1
After that, you can notice the in showvminfo, the CPU is changed to 1 core.
Change the OS Types.
After you deploy an operating system, and later you realize that you choose the different operating system type instead of a correct one, you can go back to the vboxmanage CLI and change the ostype and which is very easy.
You can get the list of supported ostypes in virtualbox by typing the following command.
Vboxmanage list ostypes
Let’s assume that I have installed, windows 10 on my VirtualBox, unfortunately, I have chosen windows 7 as the OS type during the installation.
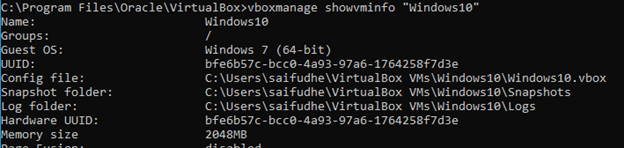
You can verify the same from the GUI as well.

To change the OS type, first, check the OStype from the list of supported ostypes mentioned above, my operating system type is listed below, which is windows 10 and I have two options to choose from one is 32 bit another is 64 bit.
ID:          Windows10
Description: Windows 10 (32-bit)
Family ID:   Windows
Family Desc: Microsoft Windows
64 bit:      false
ID:          Windows10_64
Description: Windows 10 (64-bit)
Family ID:   Windows
Family Desc: Microsoft Windows
64 bit:      true
To change from windows 7 to windows 10 enter the command as below.
vboxmanage modifyvm "Windows10" --ostype Windows10_64
After you made the changes, you should be able to see the vminformation changed on the virtualbox CLI and the GUI.


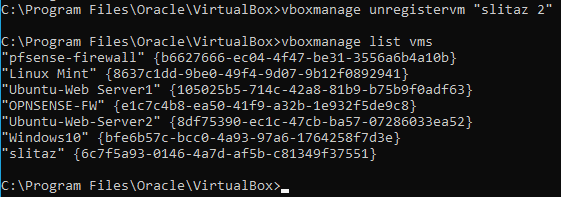
How to delete a VM from VirtualBox using CLI?
You can either remove the Virtual machine from the VirtualBox or delete it from the disk.
To remove the VM from the VirtualBox, you can use the command unregistervm, and it would remove the VM instance from the VirtualBox.
However, the VM files will still be there under the VirtualBox VM folder.
To altogether remove the VM, you can type the command –delete at the end. It should delete the VM.
I have below VM’s in the list, and I will remove slitaz 2 from the list.
C:\Program Files\Oracle\VirtualBox>vboxmanage list vms
"pfsense-firewall" {b6627666-ec04-4f47-be31-3556a6b4a10b}
"Linux Mint" {8637c1dd-9be0-49f4-9d07-9b12f0892941}
"Ubuntu-Web Server1" {105025b5-714c-42a8-81b9-b75b9f0adf63}
"OPNSENSE-FW" {e1c7c4b8-ea50-41f9-a32b-1e932f5de9c8}
"Ubuntu-Web-Server2" {8df75390-ec1c-47cb-ba57-07286033ea52}
"Windows10" {bfe6b57c-bcc0-4a93-97a6-1764258f7d3e}
"slitaz" {6c7f5a93-0146-4a7d-af5b-c81349f37551}
"slitaz 2" {d0001d66-dbb1-4c0f-beed-86b78cacb1ee}
C:\Program Files\Oracle\VirtualBox>
To do that enter the command as below.
vboxmanage unregistervm “slitaz 2” And you no longer see that VM in the list.
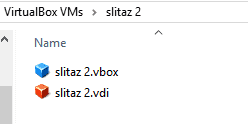
But you can see the VM files in the VirtualBox folder.

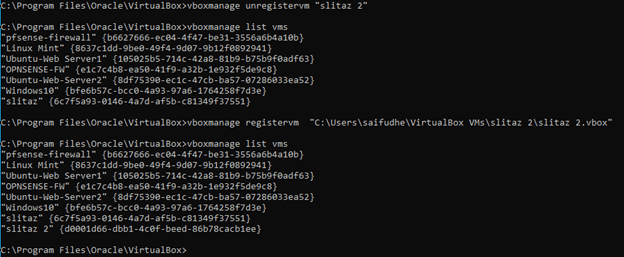
To register the VM which was removed, you can enter vboxmanage registervm
“C:\Users\saifudhe\VirtualBox VMs\slitaz 2\slitaz 2.vbox”
Note: You need to call the file from the Virtualbox VM locations.
Now the VM is registered back.
Delete the VM completely.
To delete the VM, you can use –delete at the end.

After the deletion, you will still see the folder, but the virtual machine files are deleted.
