PowerShell — это новая командная оболочка для Windows, которая по задумкам Microsoft должна вытеснить и заменить cmd. По-умолчанию, эта оболочка уже идет в составе Windows 7 и выше. Если у вас более старая операционная система или вы просто хотите скачать более свежую версию PowerShell, сделать это можно здесь: https://technet.microsoft.com/en-us/scriptcenter/dd742419.aspx
Как запустить скрипт PowerShell?
Есть несколько различных способов запуска скрипта, ниже приведены основные:
- Запустить оболочку PowerShell и в ней запустить скрипт (ввести путь до файла и имя файла, например, так: C:\Scripts\test.ps1, или перейти в папку скрипта командой cd C:\Scripts и запустить его командой .\test.ps1)Оболочку можно найти и запустить множеством способов. Один из способов — через меню «Пуск». Для Windows 7 — нужно зайти во «Все программы» — «Стандартные» — «Windows PowerShell» и запустить оболочку «Windows PowerShell». Для Windows 10 — нужно найти группу на букву «W» и в ней вы найдете «Windows PowerShell».
- Запустить «Интегрированную среду сценариев Windows PowerShell ISE» — это программа — среда разработки, позволяющая редактировать и отлаживать скрипты PowerShell, которая так же есть по-умолчанию вместе с самим PowerShell. Запустив ее, нужно просто нажать кнопку «Открыть» или зайти в меню Файл — Открыть и выбрать нужный скрипт, затем нажать F5 или кнопку «Выполнить скрипт».Найти Windows PowerShell ISE можно там же, где и оболочку PowerShell — в меню «Пуск».
- Запустить стандартную коммандную строку и в ней написать:
powershell -file <имя_скрипта> (пример: powershell -file myscript.ps1)
Если вы раньше не запускали скрипты PowerShell, то скорее всего, вы получите сообщение: Не удается загрузить файл <имя_скрипта>, так как выполнение скриптов запрещено для данной системы. Введите «get-help about_signing» для получения дополнительных сведений. Связано это с тем, что из соображений безопасности и недопущения случайного выполнения вредоносного кода, все скрипты должны быть подписаны цифровой подписью.
Как разрешить выполнение неподписанного скрипта PowerShell?
1. В оболочке PowerShell, перед тем как запускать скрипт, выполнить команду, разрешающую выполнение неподписанных скриптов для текущего сеанса оболочки:
Set-ExecutionPolicy RemoteSigned -Scope Process
2. При запуске из стандартной коммандной строки использовать параметр -executionpolicy, т.е. запускать скрипт так:
powershell -executionpolicy RemoteSigned -file <имя_скрипта>
Оба способа устанавливают политику только для текущего сеанса, при этом, политика безопасности выполнения скриптов PowerShell, прописанная в реестре, не будет изменена и останется прежней. Если вы хотите поменять политику безопасности выполнения скриптов «на постоянно», то используйте такой способ:
3. Разрешить запуск навсегда: запустить оболочку PowerShell от имени «Администратора», затем выполните команду:
Set-ExecutionPolicy RemoteSigned
Однако, я бы не рекомендовал такой способ, чтобы не подвергать ваш компьютер возможным угрозам, т.к. так вы разрешаете выполнение скриптов всем и всегда.
Примечание: Если скрипт был загружен из интернета, то чтобы избежать запроса на подтверждение запуска, нужно вместо RemoteSigned использовать Bypass — полное отключение любых запросов и предупреждений.
Как запустить скрипт PowerShell в фоновом режиме?
Для этого достаточно использовать параметр запуска -WindowStyle, который может принимать значения: Normal, Minimized, Maximized и Hidden. Таким образом, чтобы запустить неподписанный скрипт в фоновом режиме, нужно выполнить команду:
powershell -executionpolicy RemoteSigned -WindowStyle Hidden -file <имя_скрипта>
Так же можно еще при желании добавить -NonInteractive, чтобы скрипт не задавал никаких вопросов. Таким образом, скрипт выполнится незаметно для пользователя. Будmте внимательны, используя такой способ.
Запуск скрипта PowerShell c параметрами
Собственно запуск нужно делать как если бы вы запускали обычную программу или bat-файл с параметрами. Например, для запуска скрипта с параметрами из командной, можно написать такую команду:
powershell -executionpolicy RemoteSigned -file <имя_скрипта> param1 param2 «еще один текстовый параметр»
В самом скрипте вы можете получить эти параметры так:
param ($var1, $var2, $var3)
echo $var1, $var2, $var3
В интегрированной среде PowerShell ISE запустить скрипт с параметрами можно аналогично, используя область команд.
Как запустить скрипт PowerShell с помощью ярлыка?
Осуществить такую задачу можно двумя способами:
- Создать bat/cmd файл, в котором прописать команду для запуска скрипта (с параметрами вы ознакомились выше)
- Создать ярлык на PowerShell, который можно найти в папке c:\Windows\System32\WindowsPowerShell\v<версия>\ и в свойствах ярлыка в поле «Объект» дописать необходимые параметры.
Таким образом, например, чтобы запустить скрипт powershell при входе пользователя, можно просто создать ярлык, как описано во 2-м пункте и поместить его в автозагрузку. Так же, создание ярлыка одним из способов выше позволит легко запустить скрипт от имени администратора или от имени любого другого пользователя как обычную программу.
Скриптовый язык PowerShell — довольно мощный инструмент для решения различных задач, но его можно использовать не только для хороших вещей, но и во вред, поэтому, пользуйтесь им с умом 
(Image credit: Future)
On Windows 10 (or 11), PowerShell is a command-line interface (CLI) that allows you to run commands and scripts to automate tasks and change settings on your computer, similar to Command Prompt. However, PowerShell is a more powerful CLI that offers a more extensive set of tools and more flexibility. In addition, unlike Command Prompt, PowerShell is available across platforms, including Windows, macOS, and Linux.
Regardless of the platform, a script is a collection of instructions written to a text file (using the particular «.ps1» extension) that PowerShell understands and executes in sequence to run different actions.
The only problem is that the default security protocol prevents scripts from running on your device. This means that when double-clicking a «.ps1» file, Windows 10 won’t do anything, and if you try to run the script within PowerShell, you will see the «cannot be loaded because running scripts is disabled on this system» error message. However, running scripts on your computer is not impossible. You only need to enable the correct execution policy.
This how-to guide will walk you through the steps to write and run your first script file on PowerShell using Visual Studio Code, Notepad, and the PowerShell Integrated Scripting Environment (ISE) console, whether you use Windows 10 or the newer Windows 11.
How to create PowerShell script file on Windows 10
It’s possible to create PowerShell script files using any text editor or the legacy ISE application. However, the Visual Studio Code editor is the preferred option for writing scripts (whenever possible).
Create a script with VS Code
Visual Studio Code (VS Code) is a free and extensible cross-platform code editor to edit virtually any programming language. And when adding the PowerShell extension, you get an interactive scripting editing experience, which even comes with IntelliSense (code-completion) support.
You can still use PowerShell ISE, but Visual Studio Code with the PowerShell extension is meant to be the new default experience. Also, consider that the legacy experience won’t get any new features and doesn’t support PowerShell 7 or higher releases.
Install VS Code
To install Visual Basic Code on Windows 10 (or 11), use these steps:
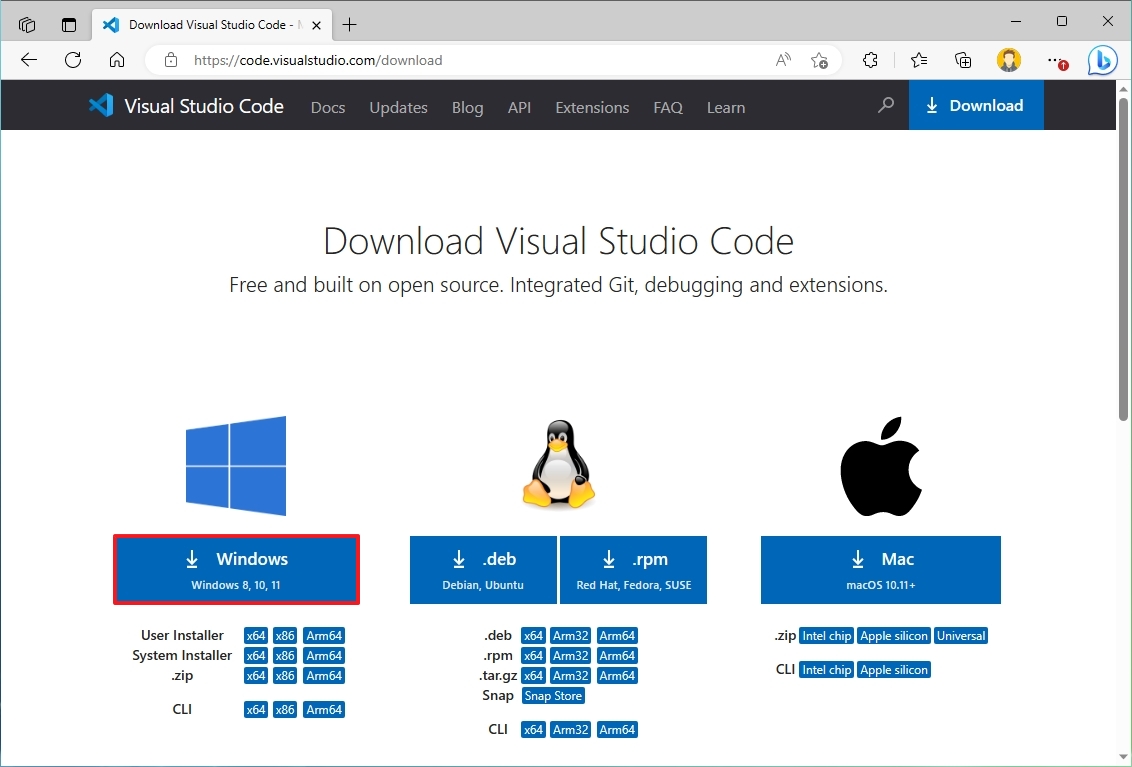
- Open the Visual Studio Download page.
- Click the Windows button to download the installation file.
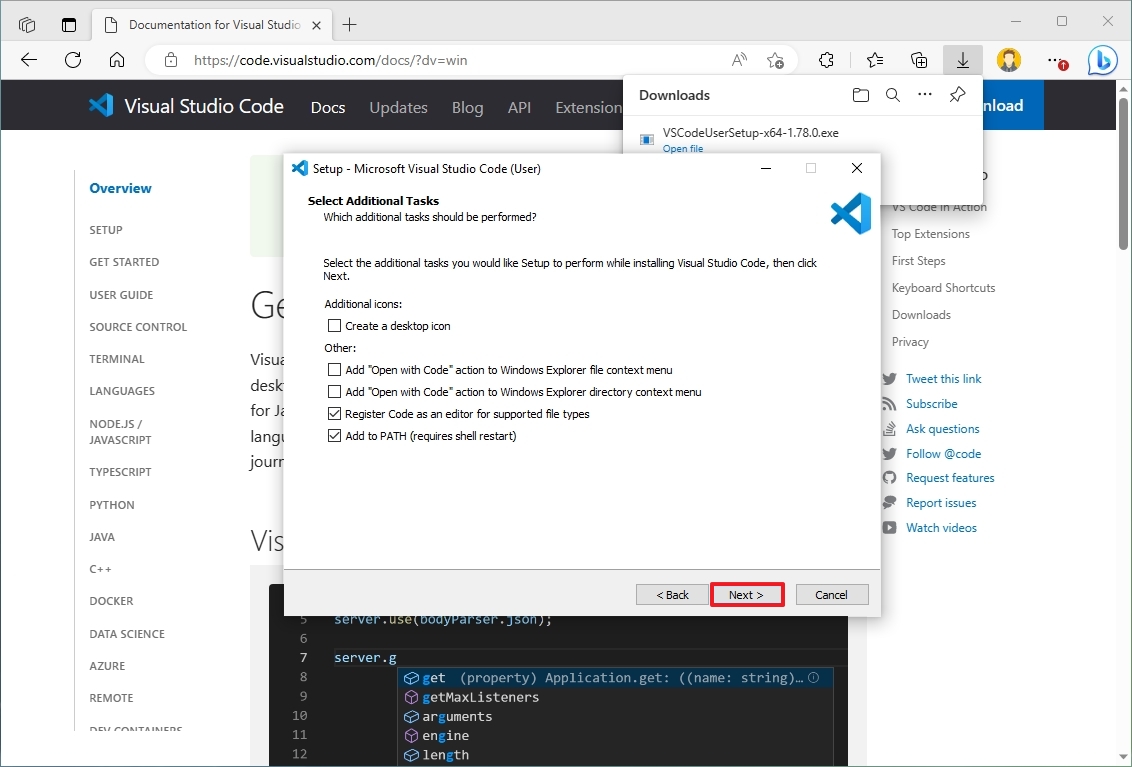
- Double-click the installer to begin the process.
- Select the «I accept the agreement» option.
- Click the Next button.
- Confirm additional tasks as necessary.
- Click the Next button again.
- Click the Install button.
- Click the Finish button.
Once you complete the steps, you can continue installing the PowerShell extension for VS Code.
Install PowerShell extension
To install the PowerShell extension on VS Code, use these steps:
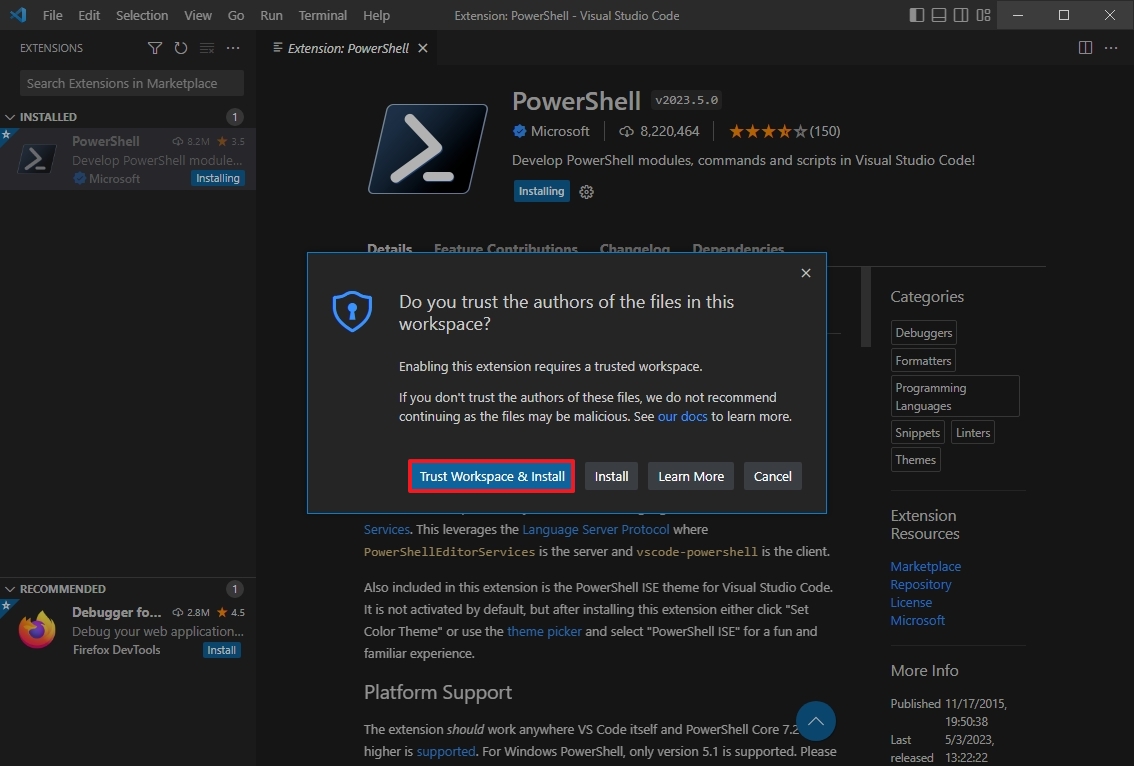
- Open VS Code.
- Click the Extensions tab («Ctrl + Shift + X» keyboard shortcut) from the left pane.
- Search for PowerShell and select the top result.
- Click the Install button.

- Click the «Trust Workspace & Install» button.
After you complete the steps, you can start writing PowerShell scripts from Visual Studio Code.
Create PowerShell script with Visual Studio Code
To create a script with Visual Basic Code on Windows 10 (or 11), use these steps:
- Open VS Code.
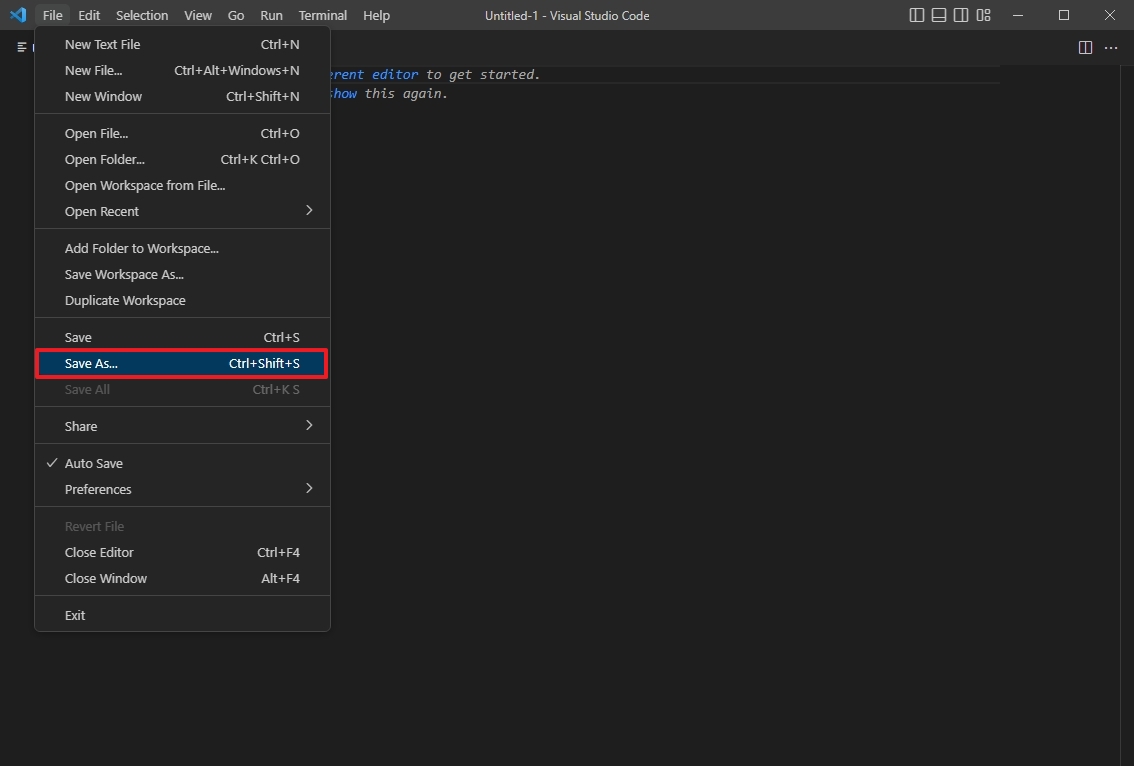
- Click the File menu and select the «New Text File» option.
- Click the File menu and select the Save As option.
- In the «File name» field, specify a name for the file with the «.ps1» extension — for example, first_script.ps1.
- Click the Save button.
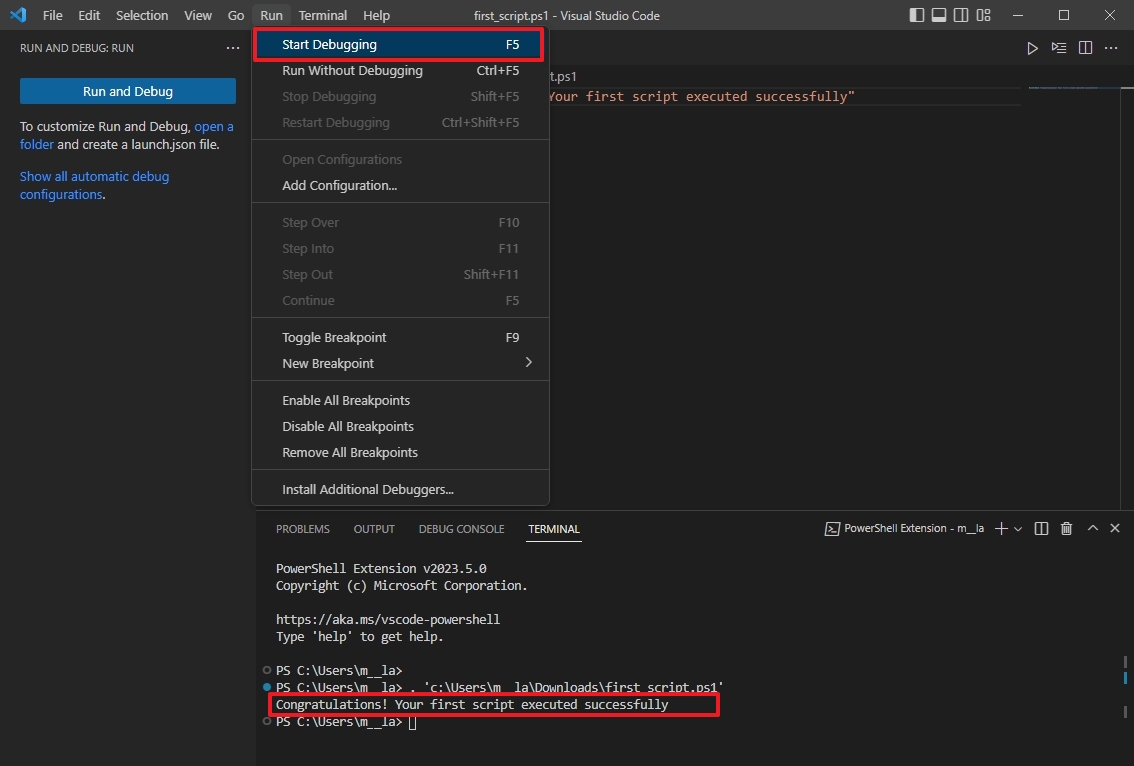
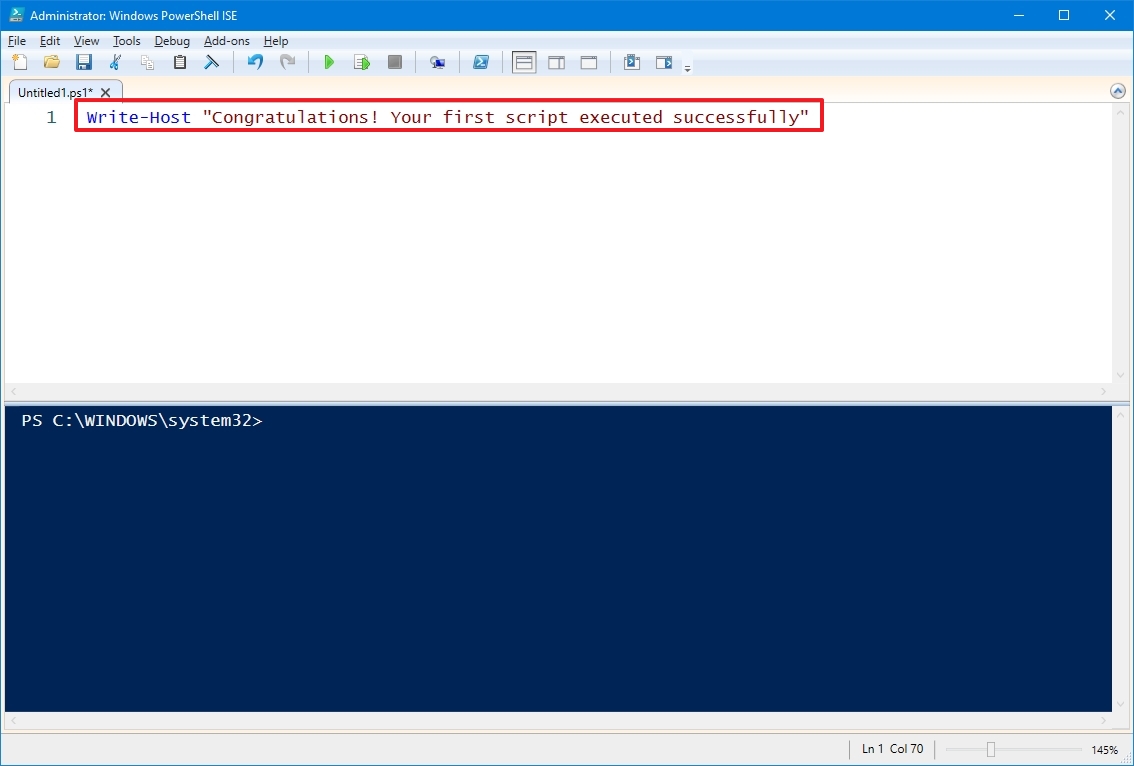
- Write a new or paste the script you want to run — for example, Write-Host «Congratulations! Your first script executed successfully»
- Quick note: The above script will output on the screen that says: «Congratulations! Your first script executed successfully.»
- (Optional) Open the Run menu, select the Start Debugging option from the command bar, or press the F5 key) to run the script.
- Click the File menu.
- Click the Save option.
Create PowerShell script with Notepad
To create a PowerShell script with Notepad, use these steps:
- Open Start.
- Search for Notepad, and click the top result to open the app.
- Write a new or paste your script in the text file — for example, Write-Host «Congratulations! Your first script executed successfully»
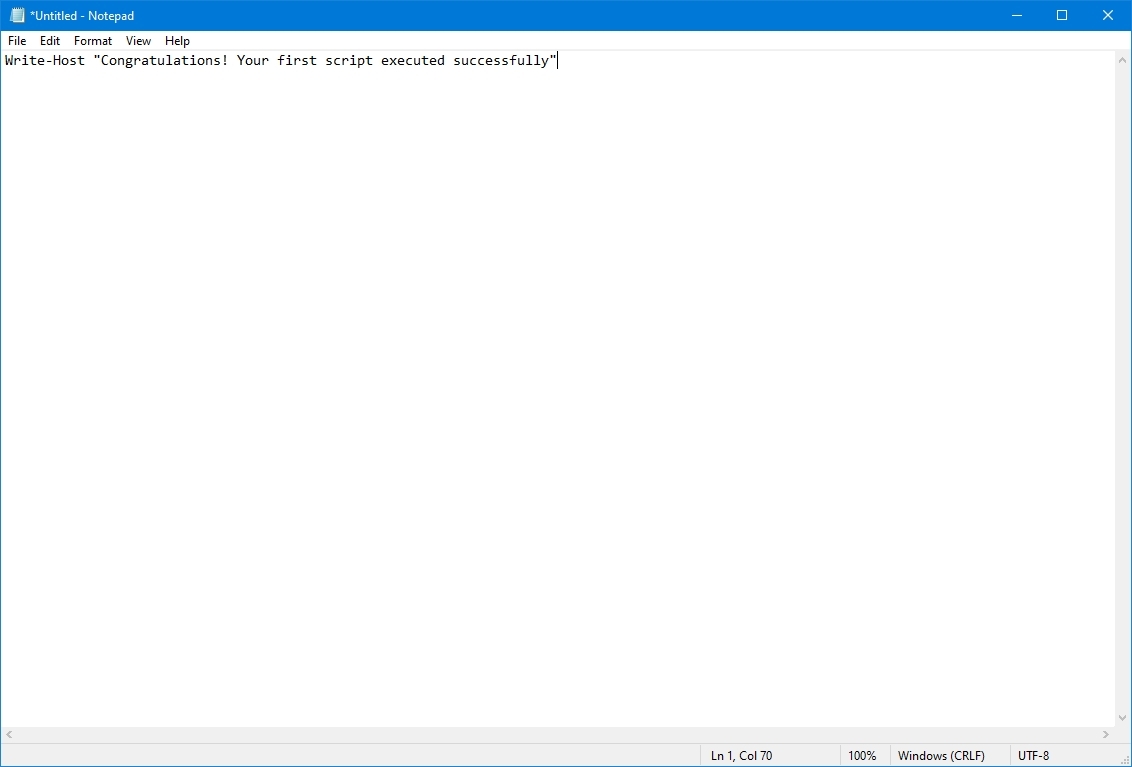
- Quick note: Although the Notepad app looks a little different on Windows 11, the instructions will also apply.
- Click the File menu.
- Select the Save As option.
- Confirm a descriptive name for the script — for example, first_script.ps1.
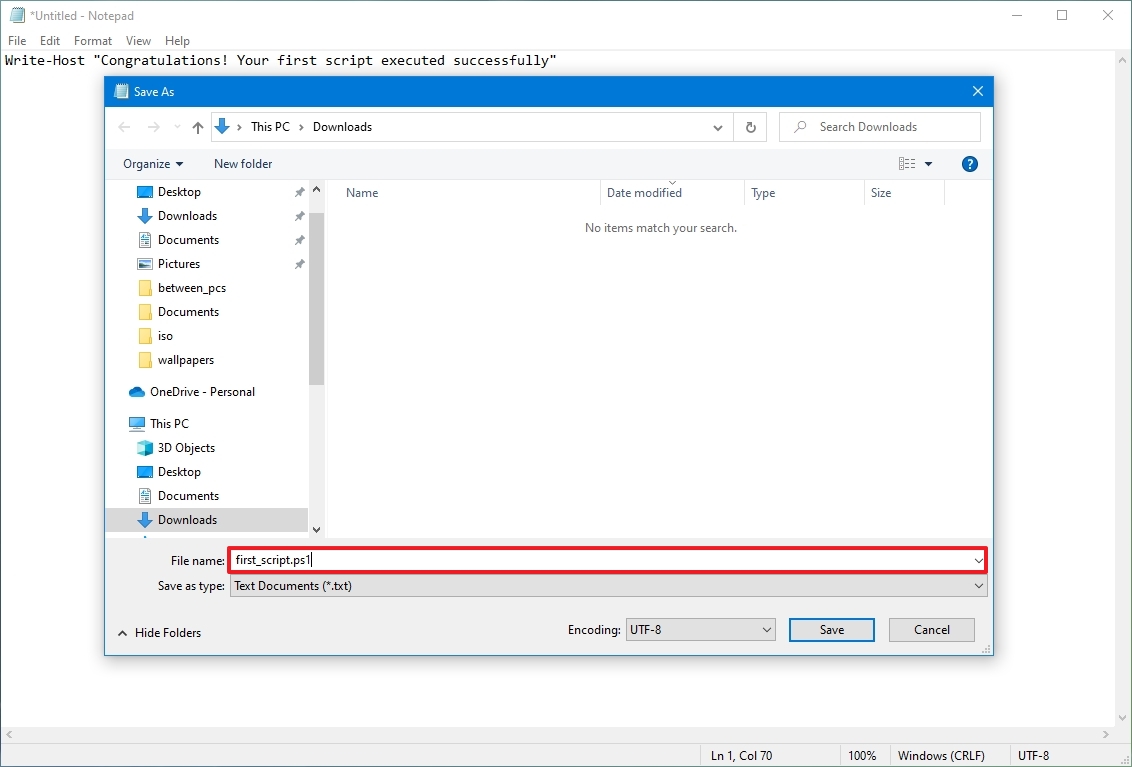
- Click the Save button.
Create PowerShell script with Integrated Scripting Environment
You can also use the built-in PowerShell ISE app to code your scripts on Windows 10 (or 11).
The Integrated Scripting Environment (ISE) is a complex tool, but you can get started using these easy steps:
- Open Start.
- Search for Windows PowerShell ISE, right-click the top result, and select the Run as administrator option.
- Click the File menu.
- Select the New option to create a new empty «.ps1» file.
- Write a new, or paste the script you want to run — for example, Write-Host «Congratulations! Your first script executed successfully»
- Click the File menu.
- Click the Save option.
- Type a name for the script — for example, first_script.ps1.
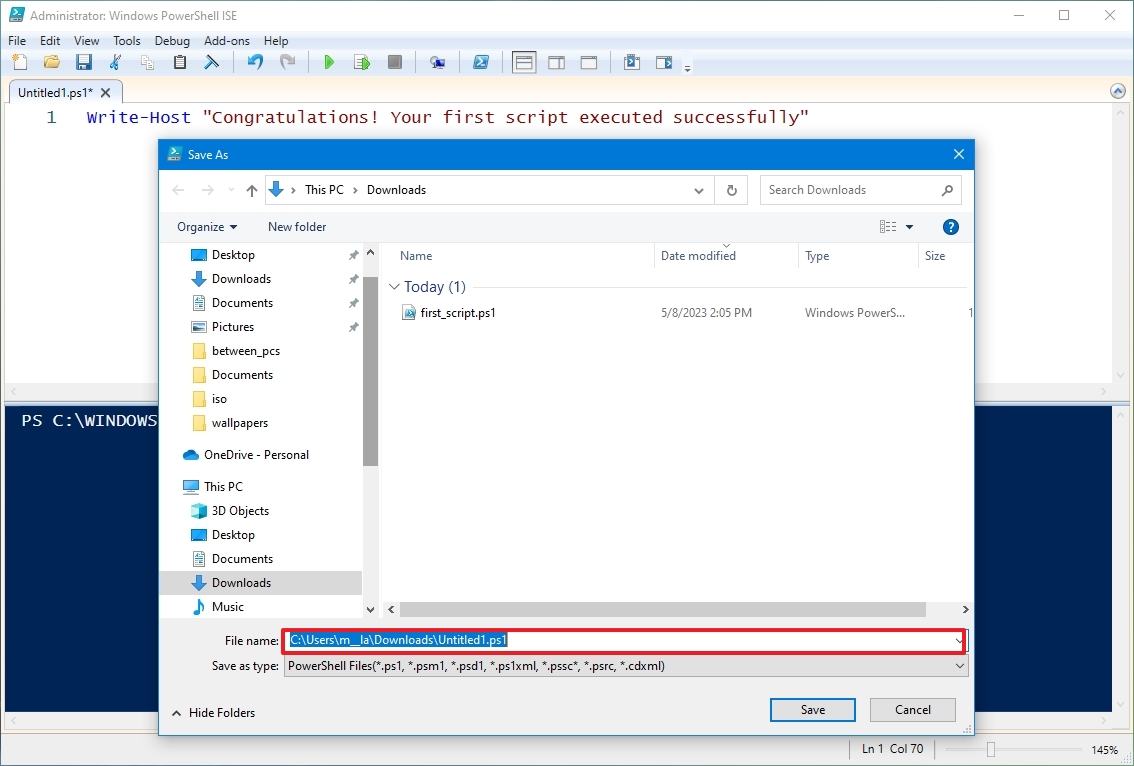
- Select the folder to save the script file.
- Click the Save button.
- (Optional) Click the Run button on the top-right side (or press the F5 key) to run the script.
Once you complete the steps using Notepad, Visual Studio Code, or PowerShell ISE, the script will be ready but fail using the default system settings. The reason is that the default PowerShell settings are configured to block the execution of any script. (The only exception is if you run the script’s contents within Visual Studio Code or PowerShell ISE.)
How to run PowerShell script file on Windows 10
Regardless of the version of Windows, you must change the execution policy to run a script with PowerShell.
To change the execution policy to run PowerShell scripts on Windows 10, use these steps:
- Open Start.
- Search for PowerShell, right-click the top result, and select the Run as administrator option.
- Type the following command to allow scripts to run and press Enter: Set-ExecutionPolicy RemoteSigned
- Type «A» and press Enter (if applicable).
- Type the following command to run the script and press Enter: & «C:\PATH\TO\SCRIPT\first_script.ps1»
In the above command, change «PATH\TO\SCRIPT» to the location of your script. For example, this command runs a script stored in the «Downloads» folder: & «C:\Users\username\Downloads\first_script.ps1»

After you complete the steps, the script will run, and if it was written correctly, you should see its output on the screen without issues.
PowerShell includes four execution policies that apply to Windows 10:
- Restricted — Prevents any script from running.
- RemoteSigned — Allows scripts created on the computer, but scripts created on another device won’t run unless they include a trusted publisher’s signature.
- AllSigned — All the scripts will run, but only if a trusted publisher has signed them.
- Unrestricted — Runs any script without any restrictions.
It’s recommended only to allow local scripts to run a script from a trusted source. If you don’t plan to run scripts regularly, it’s best to restore the default settings to block untrusted scripts using the same instructions outlined above, but in step 4, use the Set-ExecutionPolicy Restricted command.
More resources
For more helpful articles, coverage, and answers to common questions about Windows 10 and Windows 11, visit the following resources:
- Windows 11 on Windows Central — All you need to know
- Windows 10 on Windows Central — All you need to know
All the latest news, reviews, and guides for Windows and Xbox diehards.
Mauro Huculak is technical writer for WindowsCentral.com. His primary focus is to write comprehensive how-tos to help users get the most out of Windows 10 and its many related technologies. He has an IT background with professional certifications from Microsoft, Cisco, and CompTIA, and he’s a recognized member of the Microsoft MVP community.
How do I run a PowerShell script?
- I have a script named myscript.ps1
- I have all the necessary frameworks installed
- I set that execution policy thing
- I have followed the instructions on this MSDN help page
and am trying to run it like so:
powershell.exe 'C:\my_path\yada_yada\run_import_script.ps1'(with or without--noexit)
which returns exactly nothing, except that the file name is output.
No error, no message, nothing. Oh, when I add -noexit, the same thing happens, but I remain within PowerShell and have to exit manually.
The .ps1 file is supposed to run a program and return the error level dependent on that program’s output. But I’m quite sure I’m not even getting there yet.
What am I doing wrong?
![]()
asked Jan 9, 2010 at 22:19
![]()
1
Prerequisites:
- You need to be able to run PowerShell as an administrator
- You need to set your PowerShell execution policy to a permissive value or be able to bypass it
Steps:
-
Launch Windows PowerShell as an Administrator, and wait for the
PS>prompt to appear -
Navigate within PowerShell to the directory where the script lives:
PS> cd C:\my_path\yada_yada\ (enter) -
Execute the script:
PS> .\run_import_script.ps1 (enter)
Or: you can run the PowerShell script from the Command Prompt (cmd.exe) like this:
powershell -noexit "& ""C:\my_path\yada_yada\run_import_script.ps1""" (enter)
according to Invoking a PowerShell script from cmd.exe (or Start | Run) by Kirk Munro.
Or you could even run your PowerShell script asynchronously from your C# application.
![]()
TylerH
20.8k67 gold badges76 silver badges102 bronze badges
answered Jan 9, 2010 at 22:24
![]()
marc_smarc_s
734k176 gold badges1334 silver badges1460 bronze badges
6
If you are on PowerShell 2.0, use PowerShell.exe’s -File parameter to invoke a script from another environment, like cmd.exe. For example:
Powershell.exe -File C:\my_path\yada_yada\run_import_script.ps1
![]()
answered Jan 9, 2010 at 23:39
![]()
Keith HillKeith Hill
195k42 gold badges354 silver badges370 bronze badges
5
If you want to run a script without modifying the default script execution policy, you can use the bypass switch when launching Windows PowerShell.
powershell [-noexit] -executionpolicy bypass -File <Filename>
answered Jan 30, 2011 at 22:23
![]()
Chingiz MusayevChingiz Musayev
2,8321 gold badge14 silver badges6 bronze badges
1
Type:
powershell -executionpolicy bypass -File .\Test.ps1
NOTE: Here Test.ps1 is the PowerShell script.
![]()
igr
10.2k13 gold badges65 silver badges111 bronze badges
answered Feb 5, 2015 at 22:38
![]()
SudheeshSudheesh
1,1591 gold badge7 silver badges2 bronze badges
1
I’ve had the same problem, and I tried and tried… Finally I used:
powershell.exe -noexit "& 'c:\Data\ScheduledScripts\ShutdownVM.ps1'"
And put this line in a batch-file, and this works.
![]()
answered Mar 8, 2010 at 13:47
![]()
DennisDennis
1,8103 gold badges22 silver badges42 bronze badges
If you only have PowerShell 1.0, this seems to do the trick well enough:
powershell -command - < c:\mypath\myscript.ps1
It pipes the script file to the PowerShell command line.
![]()
answered Jul 1, 2010 at 9:32
![]()
AndyMAndyM
3,5946 gold badges40 silver badges45 bronze badges
1
Pretty easy. Right click the .ps1 file in Windows and in the shell menu click on Run with PowerShell.
![]()
answered Aug 23, 2016 at 14:51
![]()
1
- Open PowerShell in administrator mode
- Run:
set-executionpolicy unrestricted - Open a regular PowerShell window and run your script.
I found this solution following the link that was given as part of the error message: About Execution Policies
Make sure to run set-ExecutionPolicy default once you’re done, or you will be exposed to security risks.
![]()
TylerH
20.8k67 gold badges76 silver badges102 bronze badges
answered Sep 17, 2019 at 16:04
![]()
0
If your script is named with the .ps1 extension and you’re in a PowerShell window, you just run ./myscript.ps1 (assuming the file is in your working directory).
This is true for me anyway on Windows 10 with PowerShell version 5.1 anyway, and I don’t think I’ve done anything to make it possible.
![]()
answered Sep 6, 2016 at 19:58
![]()
rainabbarainabba
3,85435 silver badges36 bronze badges
3
Using cmd (BAT) file:
@echo off
color 1F
echo.

C:\Windows\system32\WindowsPowerShell\v1.0\powershell.exe -ExecutionPolicy Bypass -File "PrepareEnvironment.ps1"

:EOF
echo Waiting seconds
timeout /t 10 /nobreak > NUL
If you need run as administrator:
- Make a shortcut pointed to the command prompt (I named it
Administrative Command Prompt) - Open the shortcut’s properties and go to the Compatibility tab
- Under the Privilege Level section, make sure the checkbox next to «Run this program as an administrator» is checked
answered Nov 17, 2014 at 9:04
![]()
KiquenetKiquenet
14.6k35 gold badges148 silver badges243 bronze badges
An easy way is to use PowerShell ISE, open script, run and invoke your script, function…

![]()
answered Nov 1, 2016 at 16:39
![]()
0
-
Give the path of the script, that is, path setting by cmd:
$> . c:\program file\prog.ps1 -
Run the entry point function of PowerShell:
For example,
$> add or entry_func or main
![]()
answered Jun 16, 2013 at 9:28
![]()
pkmpkm
2,7032 gold badges30 silver badges44 bronze badges
1
You can run from cmd like this:
type "script_path" | powershell.exe -c -
answered Aug 23, 2020 at 7:30
![]()
WasifWasif
14.8k3 gold badges14 silver badges34 bronze badges
Use the -File parameter in front of the filename. The quotes make PowerShell think it is a string of commands.
![]()
answered Aug 1, 2018 at 11:17
![]()
EngineerEngineer
8341 gold badge13 silver badges27 bronze badges
0
I’ve just found the method what Microsoft do when we right click on a ps1 script and click on «Run with PowerShell» :
"C:\Windows\System32\WindowsPowerShell\v1.0\powershell.exe" "-Command" "if((Get-ExecutionPolicy ) -ne 'AllSigned') { Set-ExecutionPolicy -Scope Process Bypass }; & 'C:\Users\USERNAME\Desktop\MYSCRIPT.ps1'"
answered Mar 31, 2022 at 8:19
![]()
RoukmouteRoukmoute
6811 gold badge11 silver badges26 bronze badges
With the appropriate execution policy, you should just be able to call the file directly and Windows will associate it with PowerShell
C:\my_path\yada_yada\run_import_script.ps1
That does not do so well with arguments. The real answer to your question is that you are missing the & to say «execute this»
powershell.exe '& C:\my_path\yada_yada\run_import_script.ps1'
answered Jan 6, 2022 at 3:03
![]()
carrvocarrvo
5115 silver badges11 bronze badges
PowerShell scripts are a great way to automate tasks, gather information, or modify properties in bulk. Most PowerShell commands are only a single line that you can just copy and paste into PowerShell. But how do you run a complete PowerShell Script?
There are a couple of options when it comes to running PowerShell scripts, simply from the cmd, using the PowerShell ISE, or even a scheduled task.
In this article, I will explain the different options to run a PowerShell script. Also, I will help you with common errors, like “running scripts is disabled on this system”.
Fix Running Scripts is Disabled on this System
We are going to start with a common error that prevents most users from running a PowerShell script, the error “Running scripts is disabled on this system”. This error is caused by the PowerShell Execution Policy.
By default, the PowerShell Execution policy is set to Restricted. This means that PowerShell scripts won’t run at all.
So to run a PowerShell script, we first need to change the execution policy. For the policy we have a couple of options:
| Execution Policy | Description |
|---|---|
| Restricted | Default option – does not allow to run any PowerShell script |
| Unrestricted | Can run any script, shows warning for downloaded scripts |
| RemoteSigned | Requires a digital signature for downloaded scripts. You can run locally written scripts. You can unblock downloaded scripts to run them without signature |
| ByPass | You can run all scripts and no warnings are displayed |
| AllSigned | You can only run signed scripts from trusted publishers |
Execution Policies are not designed as a security model, but more to prevent the accidental execution of a PowerShell script. The best option is to use the RemoteSigned policy, this way you can’t run a downloaded script by accident (you will have to unblock it first). Read more about the execution policy in this article.
Tip
Learn more about writing your own PowerShell scripts in this complete guide
To change the execution policy in PowerShell (and fix “Running scripts is disabled on this system) we need to start PowerShell with administrator privilege:
- Press Windows key + X (or right click on the start menu)
- Choose Windows PowerShell (admin)
- Run the command below:
Set-ExecutionPolicy RemoteSigned
You should now be able to run PowerShell Scripts.
There are a couple of options to run a PowerShell script. The most convenient way is to simply right-click the file and choose Run with PowerShell.
But this method comes with a downside. By default, most PowerShell scripts will close the PowerShell window automatically when the script is done. So the script gets executed, but you won’t be able to read any errors or output.
You can solve this by adding the following line to the end of the PowerShell script, but that is not always a convenient option:
Read-Host -Prompt "Press Enter to exit"
Use Windows PowerShell
Personally, I prefer the start PowerShell scripts from the command line in Windows PowerShell itself. There are two ways to do this, you can first start PowerShell and navigate to the script or open PowerShell in the correct location from the explorer.
We start with the latter, opening the PowerShell in the correct location from the explorer. In the explorer, locate the script that you want to run, in this case, c:\temp\powershell.
- Right-click on the blank area in Explorer (not on the PowerShell file)
- Choose Open PowerShell window here
(In Windows 11 you will need to select Open in Windows Terminal)
As you can see, PowerShell is started in the folder c:\temp\PowerShell. We can now run the script by simply typing the filename (type the first few letters and press Tab to autocomplete it)
You can also first start Windows PowerShell:
- Right-click on the start menu (or press Windows key + X)
- Choose Windows PowerShell
- Navigate to the folder where the script is located
cd c:\path\to\script <enter> - Run the PowerShell script
.\PowerShellExampleScript.ps1 <enter>
Run PowerShell Script from CMD
If you have tried to run a PowerShell from cmd, then you might have noticed that it will just open the script in notepad. Not really the result we are looking for.
To run the PowerShell script, we need to tell the command prompt to open the script with PowerShell. We can use the following cmd for this:
PowerShell c:\path\to\script\PowerShellScript.ps1
Note that you will need to specify the full path to the PowerShell script. The result of the script is displayed in the command prompt.
If you want to keep the PowerShell session open, you can add the -noexit parameter to the command:
PowerShell -noexit c:\temp\PowerShell\PowerShellExampleScript.ps1
Using PowerShell ISE
When you download a script from the internet it’s always a good idea to review the script before you run it. An easy way to review and run a PowerShell script is to use the PowerShell ISE.
To open a PowerShell file in the editor, simply right-click it and choose Edit
When you use the editor for the first time you might need to expand the script pane first, to see the content of the PowerShell script:
To run a script in PowerShell ISE simply click on the green play button in the toolbar. The results of the scripts are displayed in the console:
Run PowerShell Script as Administrator
Some PowerShell scripts require administrator privilege to run correctly. They might need access to all folders on your system drive, or need to interact with other domain computers or servers.
The easiest way to run PowerShell scripts as an administrator is to start Windows PowerShell as administrator.
- Press Windows key + X (or right-click the start menu)
- Choose Windows PowerShell (admin)
- Click Yes on the User Account Security prompt
You can now run any PowerShell command or script with Administrator privilege. Simply navigate to the script (or even drag and drop the script) to run it.
You can also run a PowerShell script as administrator from the command line. When you have PowerShell open, we can start a new PowerShell process and run it as Administrator. Optionally we can even specify the file that we want to run:
# Open a new PowerShell windows with Administrator Privilege
Start-Process PowerShell -Verb runAs

# Run PowerShell script with Administrator Privilege
Start-Process PowerShell -Verb runAs -ArgumentList "-file c:\temp\powershell\powershellexamplescript.ps1"
Wrapping Up
I hope you were able to run your PowerShell script with the steps above. Make sure that you have set the Execution policy correctly before you run a PowerShell script.
If you have any questions, just drop a comment below. Make sure you also read more about setting up your PowerShell profile.
Editor’s note: Adam Bertram originally wrote this article, and Reda Chouffani has expanded it.
Even though administrators can accomplish many tasks with ad hoc PowerShell commands, learning how to script brings your productivity to the next level.
Most administrators get introduced to PowerShell by working with its cmdlets from the command line. Once you’re familiar with executing commands and learn how to work with objects and the PowerShell pipeline, then it’s time to stitch these commands together into a script.
Going from entering commands to scripting isn’t difficult if you think about a script as a long-form command. Scripts execute one or more PowerShell commands together to accomplish a single task.
What are the basics of PowerShell scripting?
The purpose of PowerShell is to provide a command-line shell and scripting capabilities to automate and configure Microsoft’s platforms. This helps IT professionals with many of their administrative tasks.
The platform provides several capabilities that some of the administrative portals don’t offer. Scripting is also available to administrators to automate some of their administrative activities.
PowerShell scripting starts with opening some of the PowerShell terminals on the administrator’s machine. This can be done from a Windows machine or a Linux machine as well. Once the administrator launches the PowerShell tool, they can enter any of the desired commands they need.
The syntax used is specific to PowerShell and provides a way for administrators to interact and confirm or extract information from different systems based on the modules used. PowerShell also offers admins the ability to script their tasks to automate any repeatable processes or tasks they perform on the different systems.
This PowerShell scripting tutorial for beginners helps you make the transition from basic use to advanced functions to help with tasks like server deployments or assigning licenses to users.
How to write and create a PowerShell script
Let’s start with an example of querying Windows services from Windows Server. The Get-Service cmdlet queries all the services running on a local Windows computer from the PowerShell console.
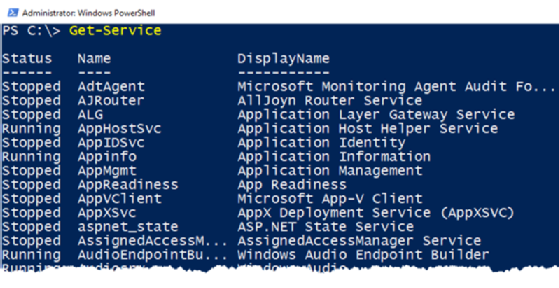
If you want to find all of the stopped services, try to start them and add some logging capabilities, you need to create a PowerShell script.
In the example below, the PowerShell script contains more than one line, a construct known as a loop, as well as containing references to multiple commands:
$services = Get-Service | Where-Object {$_.Status -eq 'Stopped'}
foreach ($service in $services) {
Add-Content -Path 'C:\ScriptLog.log' -value "Attempting to start
$($_.DisplayName)…"
$service | Start-Service
}
You can build the script in the PowerShell Integrated Scripting Environment (ISE) editor that comes with Windows. Open the PowerShell ISE editor, copy the code and save it as Start-StoppedServices.ps1. All PowerShell scripts have a PS1 extension for Windows that prompts the PowerShell engine to execute the script.
As another example, in Windows 10 and Windows 11 machines, you can use PowerShell to retrieve some of the Windows Update logs to determine if a recent workstation issue is the result of a recent Windows update. To perform this task, run the following command in PowerShell:
Get-WindowsUpdateLog

Once the command completes its execution, a file is generated to provide all the details of all updates performed on the specific machine.
How to save a PowerShell script
Microsoft provides several ways to create PowerShell scripts, including the following:
- PowerShell ISE.
- Notepad.
- Notepad++.
- Visual Studio (Standard, Pro, Enterprise, Code).
Once the script is created, you can save it locally or to server storage using the PS1 extension. You can also use code repository platforms to ensure the versioning of your scripts.
How to execute a PowerShell Script
With your script saved in a single file, instead of typing out all that code, you can execute it as a single command by passing the entire script to PowerShell.
If you go back to the PowerShell console, you can run C:-StoppedServices.ps1 to execute all the code in that script. Creating scripts is similar to creating commands; it lets you piece together code and run it as a single unit.
You can also run PowerShell scripts from the cmd.exe command interpreter or from a batch file. You can launch a script from anywhere by invoking the PowerShell engine and passing a script to it.
In the following example, you use the File parameter to pass the script to PowerShell without opening the PowerShell console.
powershell -File C:\Start-StoppedServices.ps1
Best practices when designing PowerShell scripts
Once you build up a proficiency with PowerShell cmdlets and its scripting language, there are endless ways to solve problems with code. This scripting tutorial wouldn’t be complete without a few best practices that can help you construct proper scripts.
Simplify things, and think of your script as something that performs a single task or that solves a single problem. In our example, the script starts all the services that have stopped. Administrators can benefit from writing basic scripts that complete repetitive tasks, providing them with more time to work on more demanding tasks.
In addition, design scripts that require little maintenance. If your script only performs one task, you can eventually combine it with other scripts to create building blocks. Make scripts modular so you don’t have to change the code constantly. Parameters can help you further customize your scripts by defining variables to pass different values during script execution.
This should start you on your way from clicking through multiple menu options to complete a task to producing code that handles complex jobs in a flash.