Connecting to a Database
psql is a regular PostgreSQL client application. In order to connect to a database you need to know the name of your target database, the host name and port number of the server, and what database user name you want to connect as. psql can be told about those parameters via command line options, namely -d, -h, -p, and -U respectively. If an argument is found that does not belong to any option it will be interpreted as the database name (or the database user name, if the database name is already given). Not all of these options are required; there are useful defaults. If you omit the host name, psql will connect via a Unix-domain socket to a server on the local host, or via TCP/IP to localhost on Windows. The default port number is determined at compile time. Since the database server uses the same default, you will not have to specify the port in most cases. The default database user name is your operating-system user name. Once the database user name is determined, it is used as the default database name. Note that you cannot just connect to any database under any database user name. Your database administrator should have informed you about your access rights.
When the defaults aren’t quite right, you can save yourself some typing by setting the environment variables PGDATABASE, PGHOST, PGPORT and/or PGUSER to appropriate values. (For additional environment variables, see Section 34.15.) It is also convenient to have a ~/.pgpass file to avoid regularly having to type in passwords. See Section 34.16 for more information.
An alternative way to specify connection parameters is in a conninfo string or a URI, which is used instead of a database name. This mechanism give you very wide control over the connection. For example:
$psql "service=myservice sslmode=require"$psql postgresql://dbmaster:5433/mydb?sslmode=require
This way you can also use LDAP for connection parameter lookup as described in Section 34.18. See Section 34.1.2 for more information on all the available connection options.
If the connection could not be made for any reason (e.g., insufficient privileges, server is not running on the targeted host, etc.), psql will return an error and terminate.
If both standard input and standard output are a terminal, then psql sets the client encoding to “auto”, which will detect the appropriate client encoding from the locale settings (LC_CTYPE environment variable on Unix systems). If this doesn’t work out as expected, the client encoding can be overridden using the environment variable PGCLIENTENCODING.
Entering SQL Commands
In normal operation, psql provides a prompt with the name of the database to which psql is currently connected, followed by the string =>. For example:
$ psql testdb
psql (16.0)
Type "help" for help.

testdb=>
At the prompt, the user can type in SQL commands. Ordinarily, input lines are sent to the server when a command-terminating semicolon is reached. An end of line does not terminate a command. Thus commands can be spread over several lines for clarity. If the command was sent and executed without error, the results of the command are displayed on the screen.
If untrusted users have access to a database that has not adopted a secure schema usage pattern, begin your session by removing publicly-writable schemas from search_path. One can add options=-csearch_path= to the connection string or issue SELECT pg_catalog.set_config('search_path', '', false) before other SQL commands. This consideration is not specific to psql; it applies to every interface for executing arbitrary SQL commands.
Whenever a command is executed, psql also polls for asynchronous notification events generated by LISTEN and NOTIFY.
While C-style block comments are passed to the server for processing and removal, SQL-standard comments are removed by psql.
Advanced Features
Variables
psql provides variable substitution features similar to common Unix command shells. Variables are simply name/value pairs, where the value can be any string of any length. The name must consist of letters (including non-Latin letters), digits, and underscores.
To set a variable, use the psql meta-command \set. For example,
testdb=> \set foo bar
sets the variable foo to the value bar. To retrieve the content of the variable, precede the name with a colon, for example:
testdb=> \echo :foo
bar
This works in both regular SQL commands and meta-commands; there is more detail in SQL Interpolation, below.
If you call \set without a second argument, the variable is set to an empty-string value. To unset (i.e., delete) a variable, use the command \unset. To show the values of all variables, call \set without any argument.
Note
The arguments of \set are subject to the same substitution rules as with other commands. Thus you can construct interesting references such as \set :foo 'something' and get “soft links” or “variable variables” of Perl or PHP fame, respectively. Unfortunately (or fortunately?), there is no way to do anything useful with these constructs. On the other hand, \set bar :foo is a perfectly valid way to copy a variable.
A number of these variables are treated specially by psql. They represent certain option settings that can be changed at run time by altering the value of the variable, or in some cases represent changeable state of psql. By convention, all specially treated variables’ names consist of all upper-case ASCII letters (and possibly digits and underscores). To ensure maximum compatibility in the future, avoid using such variable names for your own purposes.
Variables that control psql‘s behavior generally cannot be unset or set to invalid values. An \unset command is allowed but is interpreted as setting the variable to its default value. A \set command without a second argument is interpreted as setting the variable to on, for control variables that accept that value, and is rejected for others. Also, control variables that accept the values on and off will also accept other common spellings of Boolean values, such as true and false.
The specially treated variables are:
AUTOCOMMIT#-
When
on(the default), each SQL command is automatically committed upon successful completion. To postpone commit in this mode, you must enter aBEGINorSTART TRANSACTIONSQL command. Whenoffor unset, SQL commands are not committed until you explicitly issueCOMMITorEND. The autocommit-off mode works by issuing an implicitBEGINfor you, just before any command that is not already in a transaction block and is not itself aBEGINor other transaction-control command, nor a command that cannot be executed inside a transaction block (such asVACUUM).Note
In autocommit-off mode, you must explicitly abandon any failed transaction by entering
ABORTorROLLBACK. Also keep in mind that if you exit the session without committing, your work will be lost.Note
The autocommit-on mode is PostgreSQL‘s traditional behavior, but autocommit-off is closer to the SQL spec. If you prefer autocommit-off, you might wish to set it in the system-wide
psqlrcfile or your~/.psqlrcfile. COMP_KEYWORD_CASE#-
Determines which letter case to use when completing an SQL key word. If set to
lowerorupper, the completed word will be in lower or upper case, respectively. If set topreserve-lowerorpreserve-upper(the default), the completed word will be in the case of the word already entered, but words being completed without anything entered will be in lower or upper case, respectively. DBNAME#-
The name of the database you are currently connected to. This is set every time you connect to a database (including program start-up), but can be changed or unset.
ECHO#-
If set to
all, all nonempty input lines are printed to standard output as they are read. (This does not apply to lines read interactively.) To select this behavior on program start-up, use the switch-a. If set toqueries, psql prints each query to standard output as it is sent to the server. The switch to select this behavior is-e. If set toerrors, then only failed queries are displayed on standard error output. The switch for this behavior is-b. If set tonone(the default), then no queries are displayed. ECHO_HIDDEN#-
When this variable is set to
onand a backslash command queries the database, the query is first shown. This feature helps you to study PostgreSQL internals and provide similar functionality in your own programs. (To select this behavior on program start-up, use the switch-E.) If you set this variable to the valuenoexec, the queries are just shown but are not actually sent to the server and executed. The default value isoff. ENCODING#-
The current client character set encoding. This is set every time you connect to a database (including program start-up), and when you change the encoding with
\encoding, but it can be changed or unset. ERROR#-
trueif the last SQL query failed,falseif it succeeded. See alsoSQLSTATE. FETCH_COUNT#-
If this variable is set to an integer value greater than zero, the results of
SELECTqueries are fetched and displayed in groups of that many rows, rather than the default behavior of collecting the entire result set before display. Therefore only a limited amount of memory is used, regardless of the size of the result set. Settings of 100 to 1000 are commonly used when enabling this feature. Keep in mind that when using this feature, a query might fail after having already displayed some rows.Tip
Although you can use any output format with this feature, the default
alignedformat tends to look bad because each group ofFETCH_COUNTrows will be formatted separately, leading to varying column widths across the row groups. The other output formats work better. HIDE_TABLEAM#-
If this variable is set to
true, a table’s access method details are not displayed. This is mainly useful for regression tests. HIDE_TOAST_COMPRESSION#-
If this variable is set to
true, column compression method details are not displayed. This is mainly useful for regression tests. HISTCONTROL#-
If this variable is set to
ignorespace, lines which begin with a space are not entered into the history list. If set to a value ofignoredups, lines matching the previous history line are not entered. A value ofignorebothcombines the two options. If set tonone(the default), all lines read in interactive mode are saved on the history list.Note
This feature was shamelessly plagiarized from Bash.
HISTFILE#-
The file name that will be used to store the history list. If unset, the file name is taken from the
PSQL_HISTORYenvironment variable. If that is not set either, the default is~/.psql_history, or%APPDATA%\postgresql\psql_historyon Windows. For example, putting:\set HISTFILE ~/.psql_history-:DBNAME
in
~/.psqlrcwill cause psql to maintain a separate history for each database.Note
This feature was shamelessly plagiarized from Bash.
HISTSIZE#-
The maximum number of commands to store in the command history (default 500). If set to a negative value, no limit is applied.
Note
This feature was shamelessly plagiarized from Bash.
HOST#-
The database server host you are currently connected to. This is set every time you connect to a database (including program start-up), but can be changed or unset.
IGNOREEOF#-
If set to 1 or less, sending an EOF character (usually Control+D) to an interactive session of psql will terminate the application. If set to a larger numeric value, that many consecutive EOF characters must be typed to make an interactive session terminate. If the variable is set to a non-numeric value, it is interpreted as 10. The default is 0.
Note
This feature was shamelessly plagiarized from Bash.
LASTOID#-
The value of the last affected OID, as returned from an
INSERTor\lo_importcommand. This variable is only guaranteed to be valid until after the result of the next SQL command has been displayed. PostgreSQL servers since version 12 do not support OID system columns anymore, thus LASTOID will always be 0 followingINSERTwhen targeting such servers. LAST_ERROR_MESSAGELAST_ERROR_SQLSTATE#-
The primary error message and associated SQLSTATE code for the most recent failed query in the current psql session, or an empty string and
00000if no error has occurred in the current session. ON_ERROR_ROLLBACK#-
When set to
on, if a statement in a transaction block generates an error, the error is ignored and the transaction continues. When set tointeractive, such errors are only ignored in interactive sessions, and not when reading script files. When set tooff(the default), a statement in a transaction block that generates an error aborts the entire transaction. The error rollback mode works by issuing an implicitSAVEPOINTfor you, just before each command that is in a transaction block, and then rolling back to the savepoint if the command fails. ON_ERROR_STOP#-
By default, command processing continues after an error. When this variable is set to
on, processing will instead stop immediately. In interactive mode, psql will return to the command prompt; otherwise, psql will exit, returning error code 3 to distinguish this case from fatal error conditions, which are reported using error code 1. In either case, any currently running scripts (the top-level script, if any, and any other scripts which it may have in invoked) will be terminated immediately. If the top-level command string contained multiple SQL commands, processing will stop with the current command. PORT#-
The database server port to which you are currently connected. This is set every time you connect to a database (including program start-up), but can be changed or unset.
PROMPT1PROMPT2PROMPT3#-
These specify what the prompts psql issues should look like. See Prompting below.
QUIET#-
Setting this variable to
onis equivalent to the command line option-q. It is probably not too useful in interactive mode. ROW_COUNT#-
The number of rows returned or affected by the last SQL query, or 0 if the query failed or did not report a row count.
SERVER_VERSION_NAMESERVER_VERSION_NUM#-
The server’s version number as a string, for example
9.6.2,10.1or11beta1, and in numeric form, for example90602or100001. These are set every time you connect to a database (including program start-up), but can be changed or unset. SHELL_ERROR#-
trueif the last shell command failed,falseif it succeeded. This applies to shell commands invoked via the\!,\g,\o,\w, and\copymeta-commands, as well as backquote (`) expansion. Note that for\o, this variable is updated when the output pipe is closed by the next\ocommand. See alsoSHELL_EXIT_CODE. SHELL_EXIT_CODE#-
The exit status returned by the last shell command. 0–127 represent program exit codes, 128–255 indicate termination by a signal, and -1 indicates failure to launch a program or to collect its exit status. This applies to shell commands invoked via the
\!,\g,\o,\w, and\copymeta-commands, as well as backquote (`) expansion. Note that for\o, this variable is updated when the output pipe is closed by the next\ocommand. See alsoSHELL_ERROR. SHOW_ALL_RESULTS#-
When this variable is set to
off, only the last result of a combined query (\;) is shown instead of all of them. The default ison. The off behavior is for compatibility with older versions of psql. SHOW_CONTEXT#-
This variable can be set to the values
never,errors, oralwaysto control whetherCONTEXTfields are displayed in messages from the server. The default iserrors(meaning that context will be shown in error messages, but not in notice or warning messages). This setting has no effect whenVERBOSITYis set toterseorsqlstate. (See also\errverbose, for use when you want a verbose version of the error you just got.) SINGLELINE#-
Setting this variable to
onis equivalent to the command line option-S. SINGLESTEP#-
Setting this variable to
onis equivalent to the command line option-s. SQLSTATE#-
The error code (see Appendix A) associated with the last SQL query’s failure, or
00000if it succeeded. USER#-
The database user you are currently connected as. This is set every time you connect to a database (including program start-up), but can be changed or unset.
VERBOSITY#-
This variable can be set to the values
default,verbose,terse, orsqlstateto control the verbosity of error reports. (See also\errverbose, for use when you want a verbose version of the error you just got.) VERSIONVERSION_NAMEVERSION_NUM#-
These variables are set at program start-up to reflect psql‘s version, respectively as a verbose string, a short string (e.g.,
9.6.2,10.1, or11beta1), and a number (e.g.,90602or100001). They can be changed or unset.
SQL Interpolation
A key feature of psql variables is that you can substitute (“interpolate”) them into regular SQL statements, as well as the arguments of meta-commands. Furthermore, psql provides facilities for ensuring that variable values used as SQL literals and identifiers are properly quoted. The syntax for interpolating a value without any quoting is to prepend the variable name with a colon (:). For example,
testdb=>\set foo 'my_table'testdb=>SELECT * FROM :foo;
would query the table my_table. Note that this may be unsafe: the value of the variable is copied literally, so it can contain unbalanced quotes, or even backslash commands. You must make sure that it makes sense where you put it.
When a value is to be used as an SQL literal or identifier, it is safest to arrange for it to be quoted. To quote the value of a variable as an SQL literal, write a colon followed by the variable name in single quotes. To quote the value as an SQL identifier, write a colon followed by the variable name in double quotes. These constructs deal correctly with quotes and other special characters embedded within the variable value. The previous example would be more safely written this way:
testdb=>\set foo 'my_table'testdb=>SELECT * FROM :"foo";
Variable interpolation will not be performed within quoted SQL literals and identifiers. Therefore, a construction such as ':foo' doesn’t work to produce a quoted literal from a variable’s value (and it would be unsafe if it did work, since it wouldn’t correctly handle quotes embedded in the value).
One example use of this mechanism is to copy the contents of a file into a table column. First load the file into a variable and then interpolate the variable’s value as a quoted string:
testdb=>\set content `cat my_file.txt`testdb=>INSERT INTO my_table VALUES (:'content');
(Note that this still won’t work if my_file.txt contains NUL bytes. psql does not support embedded NUL bytes in variable values.)
Since colons can legally appear in SQL commands, an apparent attempt at interpolation (that is, :name, :'name', or :"name") is not replaced unless the named variable is currently set. In any case, you can escape a colon with a backslash to protect it from substitution.
The :{? special syntax returns TRUE or FALSE depending on whether the variable exists or not, and is thus always substituted, unless the colon is backslash-escaped.name}
The colon syntax for variables is standard SQL for embedded query languages, such as ECPG. The colon syntaxes for array slices and type casts are PostgreSQL extensions, which can sometimes conflict with the standard usage. The colon-quote syntax for escaping a variable’s value as an SQL literal or identifier is a psql extension.
Prompting
The prompts psql issues can be customized to your preference. The three variables PROMPT1, PROMPT2, and PROMPT3 contain strings and special escape sequences that describe the appearance of the prompt. Prompt 1 is the normal prompt that is issued when psql requests a new command. Prompt 2 is issued when more input is expected during command entry, for example because the command was not terminated with a semicolon or a quote was not closed. Prompt 3 is issued when you are running an SQL COPY FROM STDIN command and you need to type in a row value on the terminal.
The value of the selected prompt variable is printed literally, except where a percent sign (%) is encountered. Depending on the next character, certain other text is substituted instead. Defined substitutions are:
%M#-
The full host name (with domain name) of the database server, or
[local]if the connection is over a Unix domain socket, or[local:, if the Unix domain socket is not at the compiled in default location./dir/name] %m#-
The host name of the database server, truncated at the first dot, or
[local]if the connection is over a Unix domain socket. %>#-
The port number at which the database server is listening.
%n#-
The database session user name. (The expansion of this value might change during a database session as the result of the command
SET SESSION AUTHORIZATION.) %/#-
The name of the current database.
%~#-
Like
%/, but the output is~(tilde) if the database is your default database. %##-
If the session user is a database superuser, then a
#, otherwise a>. (The expansion of this value might change during a database session as the result of the commandSET SESSION AUTHORIZATION.) %p#-
The process ID of the backend currently connected to.
%R#-
In prompt 1 normally
=, but@if the session is in an inactive branch of a conditional block, or^if in single-line mode, or!if the session is disconnected from the database (which can happen if\connectfails). In prompt 2%Ris replaced by a character that depends on why psql expects more input:-if the command simply wasn’t terminated yet, but*if there is an unfinished/* ... */comment, a single quote if there is an unfinished quoted string, a double quote if there is an unfinished quoted identifier, a dollar sign if there is an unfinished dollar-quoted string, or(if there is an unmatched left parenthesis. In prompt 3%Rdoesn’t produce anything. %x#-
Transaction status: an empty string when not in a transaction block, or
*when in a transaction block, or!when in a failed transaction block, or?when the transaction state is indeterminate (for example, because there is no connection). %l#-
The line number inside the current statement, starting from
1. %digits#-
The character with the indicated octal code is substituted.
%:name:#-
The value of the psql variable
name. See Variables, above, for details. %`command`#-
The output of
command, similar to ordinary “back-tick” substitution. %[…%]#-
Prompts can contain terminal control characters which, for example, change the color, background, or style of the prompt text, or change the title of the terminal window. In order for the line editing features of Readline to work properly, these non-printing control characters must be designated as invisible by surrounding them with
%[and%]. Multiple pairs of these can occur within the prompt. For example:testdb=> \set PROMPT1 '%[%033[1;33;40m%]%n@%/%R%[%033[0m%]%# '
results in a boldfaced (
1;) yellow-on-black (33;40) prompt on VT100-compatible, color-capable terminals. %w#-
Whitespace of the same width as the most recent output of
PROMPT1. This can be used as aPROMPT2setting, so that multi-line statements are aligned with the first line, but there is no visible secondary prompt.
To insert a percent sign into your prompt, write %%. The default prompts are '%/%R%x%# ' for prompts 1 and 2, and '>> ' for prompt 3.
Note
This feature was shamelessly plagiarized from tcsh.
Command-Line Editing
psql uses the Readline or libedit library, if available, for convenient line editing and retrieval. The command history is automatically saved when psql exits and is reloaded when psql starts up. Type up-arrow or control-P to retrieve previous lines.
You can also use tab completion to fill in partially-typed keywords and SQL object names in many (by no means all) contexts. For example, at the start of a command, typing ins and pressing TAB will fill in insert into . Then, typing a few characters of a table or schema name and pressing TAB will fill in the unfinished name, or offer a menu of possible completions when there’s more than one. (Depending on the library in use, you may need to press TAB more than once to get a menu.)
Tab completion for SQL object names requires sending queries to the server to find possible matches. In some contexts this can interfere with other operations. For example, after BEGIN it will be too late to issue SET TRANSACTION ISOLATION LEVEL if a tab-completion query is issued in between. If you do not want tab completion at all, you can turn it off permanently by putting this in a file named .inputrc in your home directory:
$if psql
set disable-completion on
$endif
(This is not a psql but a Readline feature. Read its documentation for further details.)
The -n (--no-readline) command line option can also be useful to disable use of Readline for a single run of psql. This prevents tab completion, use or recording of command line history, and editing of multi-line commands. It is particularly useful when you need to copy-and-paste text that contains TAB characters.
Последнее обновление: 23.11.2022
Консольный клиент psql представляет еще один способ взаимодействия с сервером PostgreSQL. Данная программа также, как и pgAdmin, позволяет выполнять команды языка SQL.
Запустим psql. Программа предложит ввести название сервера, базы данных, порта и пользователя. Эти пункты можно прощелкать, так как для них будут использоваться
значения по умолчанию (для сервера — localhost, для базы данных — postgres, для порта — 5432, в качестве пользователя — суперпользователь postres).
Далее надо будет ввести пароль для пользователя (по умолчанию пользователя postgres):

И после удачного подключения можно будет отправлять серверу команды через psql.
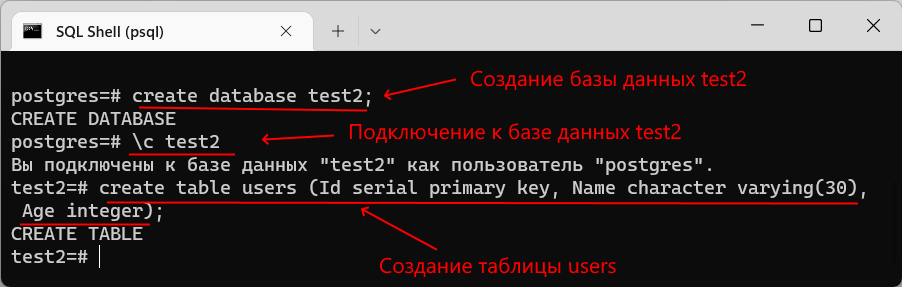
Теперь создадим базу данных с помощью следующей команды языка SQL:
Для создания базы данных применяется команда create database, после которой указывается название бд.
То есть в данном случае название бд — «test2». Причем команда завершается точкой с запятой.
Далее подключимся к этой базе данных для осуществления с ней взаимодействия. Для этого применяется команда \c (сокращение от connect),
после которой указывается имя базы данных:
Затем создадим в этой базе данных таблицу с помощью команды:
create table users (Id serial primary key, Name character varying(30), Age integer);
Данная команда создает таблицу users, в которой будет три столбца — Id, Name и Age.
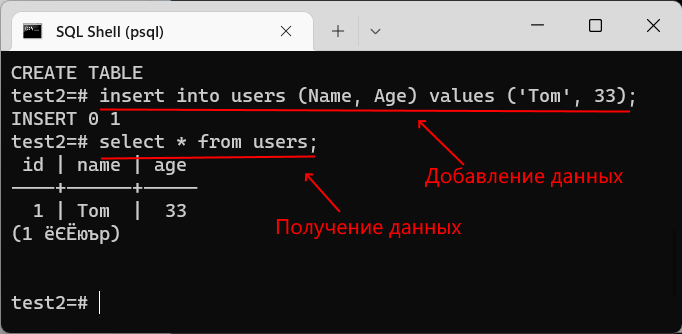
После этого мы можем добавлять и получать данные из выше созданной таблицы. Вначале добавим в таблицу одну строку с помощью следующей команды:
insert into users (Name, Age) values ('Tom', 33);
И в конце получим добавленные данные:
Стоит отметить, что по умолчанию консоль в Windows поддерживает кодировку CP866, тогда как базы данных могут работать совсем с другой кодировкой,
например, 1251. И даже сам клиент psql выводит нам соответствующие сообщения. Кроме того, при получении данных, при выводе информации о базах данных, таблицы и т.д.
некоторая информация может отображаться некорректно. В этом случае перед запуском psql надо установить нужную кодировку и затем из консоли запустить программу psql.
Now is a great time to learn relational databases and SQL. From web development to data science, they are used everywhere.
In the Stack Overflow 2021 Survey, 4 out of the top 5 database technologies used by professional developers were relational database management systems.
PostgreSQL is an excellent choice as a first relational database management system to learn.
- It’s widely used in industry, including at Uber, Netflix, Instagram, Spotify, and Twitch.
- It’s open source, so you won’t be locked into a particular vendor.
- It’s more than 25 years old, and in that time it has earned a reputation for stability and reliability.
Whether you’re learning from the freeCodeCamp Relational Database Certification or trying out PostgreSQL on your own computer, you need a way to create and manage databases, insert data into them, and query data from them.
While there are several graphical applications for interacting with PostgreSQL, using psql and the command line is probably the most direct way to communicate with your database.
What is psql?
psql is a tool that lets you interact with PostgreSQL databases through a terminal interface. When you install PostgreSQL on a machine, psql is automatically included.
psql lets you write SQL queries, send them to PostgreSQL, and view the results. It also lets you use meta-commands (which start with a backslash) for administering the databases. You can even write scripts and automate tasks relating to your databases.
Now, running a database on your local computer and using the command line can seem intimidating at first. I’m here to tell you it’s really not so bad. This guide will teach you the basics of managing PostgreSQL databases from the command line, including how to create, manage, back up, and restore databases.
Prerequisite – Install PostgreSQL
If you haven’t already installed PostgreSQL on your computer, follow the instructions for your operating system on the official PostgreSQL documentation.
When you install PostgreSQL, you will be asked for a password. Keep this in a safe place as you’ll need it to connect to any databases you create.
How to Connect to a Database
You have two options when using psql to connect to a database: you can connect via the command line or by using the psql application. Both provide pretty much the same experience.
Option 1 – Connect to a database with the command line
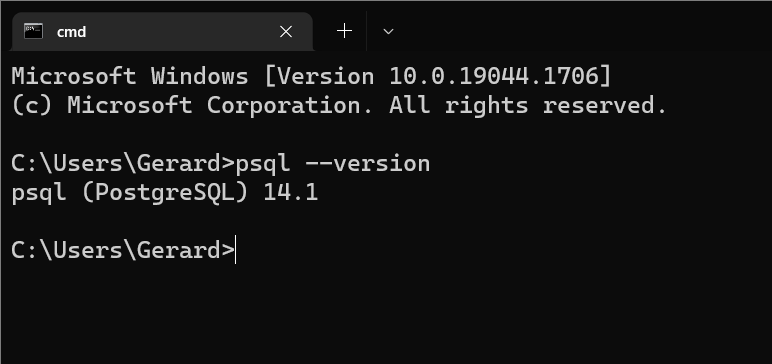
Open a terminal. You can make sure psql is installed by typing psql --version. You should see psql (PostgreSQL) version_number, where version_number is the version of PostgreSQL that’s installed on your machine. In my case, it’s 14.1.
The pattern for connecting to a database is:
psql -d database_name -U usernameThe -d flag is shorter alternative for --dbname while -U is an alternative for --username.
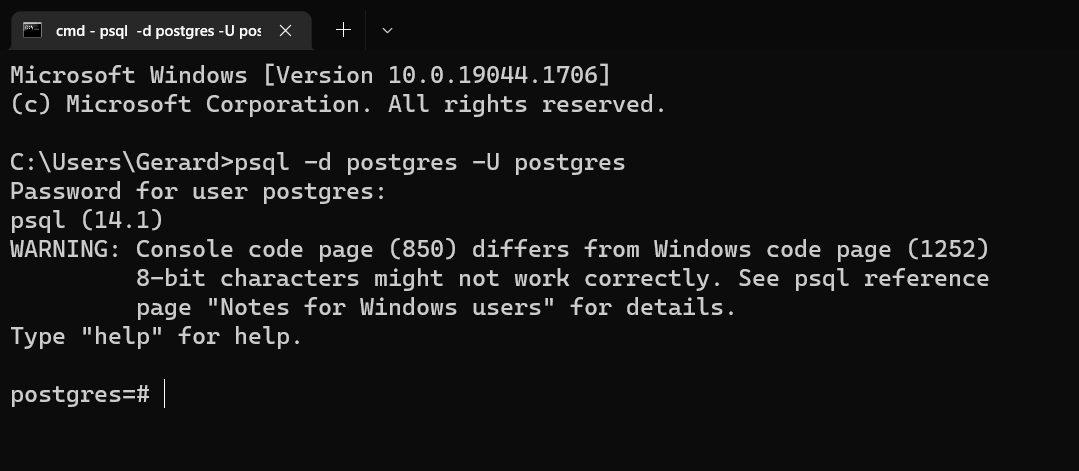
When you installed PostgreSQL, a default database and user were created, both called postgres. So enter psql -d postgres -U postgres to connect to the postgres database as the postgres superuser.
psql -d postgres -U postgresYou will be prompted for a password. Enter the password you chose when you installed PostgreSQL on your computer. Your terminal prompt will change to show that you’re now connected to the postgres database.
If you want to directly connect to a database as yourself (rather than as the postgres superuser), enter your system username as the username value.
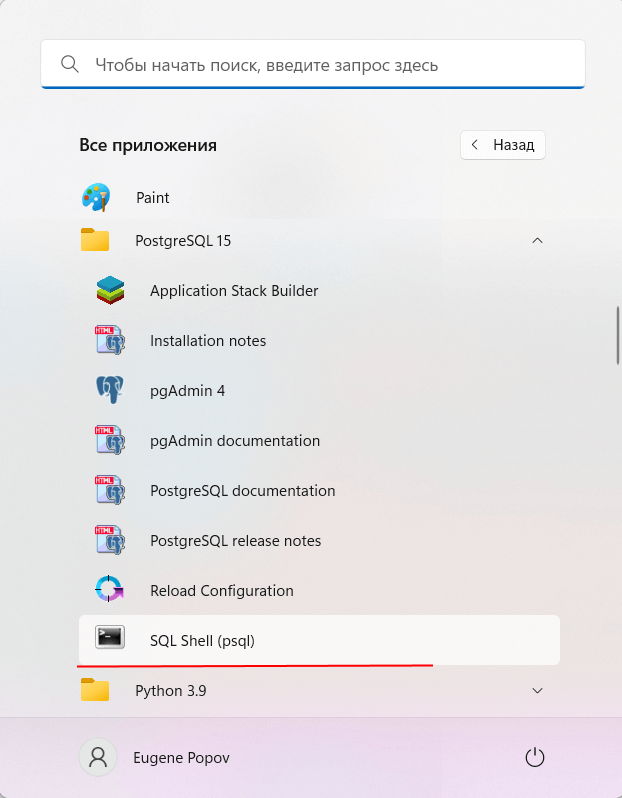
Option 2 – Connect to a database with the psql application
Launch the psql application – it’ll be called «SQL Shell (psql)». You will be prompted for a server, a database, a port and a username. You can just press enter to select the default values, which are localhost, postgres, 5432, and postgres.
Next, you’ll be prompted for the password you chose when you installed PostgreSQL. Once you enter this, your terminal prompt will change to show that you’re connected to the postgres database.

Note: If you’re on Windows you might see a warning like “Console code page (850) differs from Windows code page (1252) 8-bit characters might not work correctly. See psql reference page ‘Notes for Windows users’ for details.” You don’t need to worry about this at this stage. If you want to read more about it, see the psql documentation.
How to Get Help in psql
To see a list of all psql meta-commands, and a brief summary of what they do, use the \? command.
\?
If you want help with a PostgreSQL command, use \h or \help and the command.
\h COMMANDThis will give you a description of the command, its syntax (with optional parts in square brackets), and a URL for the relevant part of the PostgreSQL documentation.

How to Quit a Command in psql
If you’ve run a command that’s taking a long time or printing too much information to the console, you can quit it by typing q.
qHow to Create a Database
Before you can manage any databases, you’ll need to create one.
Note: SQL commands should end with a semicolon, while meta-commands (which start with a backslash) don’t need to.
The SQL command to create a database is:
CREATE DATABASE database_name;For this guide, we’re going to be working with book data, so let’s create a database called books_db.
CREATE DATABASE books_db;You can view a list of all available databases with the list command.
\l
You should see books_db, as well as postgres, template0, and template1. (The CREATE DATABASE command actually works by copying the standard database, called template1. You can read more about this in the PostgreSQL documentation.)
Using \l+ will display additional information, such as the size of the databases and their tablespaces (the location in the filesystem where the files representing the database will be stored).
\l+
How to Switch Databases
You’re currently still connected to the default postgres database. To connect to a database or to switch between databases, use the \c command.
\c database_nameSo \c books_db will connect you to the books_db database. Note that your terminal prompt changes to reflect the database you’re currently connected to.

How to Delete a Database
If you want to delete a database, use the DROP DATABASE command.
DROP DATABASE database_name;You will only be allowed to delete a database if you are a superuser, such as postgres, or if you are the database’s owner.
If you try to delete a database that doesn’t exist, you will get an error. Use IF EXISTS to get a notice instead.
DROP DATABASE IF EXISTS database_name;
You can’t delete a database that has active connections. So if you want to delete the database you are currently connected to, you’ll need to switch to another database.
How to Create Tables
Before we can manage tables, we need to create a few and populate them with some sample data.
The command to create a table is:
CREATE TABLE table_name();This will create an empty table. You can also pass column values into the parentheses to create a table with columns. At the very least, a basic table should have a Primary Key (a unique identifier to tell each row apart) and a column with some data in it.
For our books_db, we’ll create a table for authors and another for books. For authors, we’ll record their first name and last name. For books, we’ll record the title and the year they were published.
We’ll make sure that the authors’ first_name and last_name and the books’ title aren’t null, since this is pretty vital information to know about them. To do this we include the NOT NULL constraint.
CREATE TABLE authors(
	author_id SERIAL PRIMARY KEY,
	first_name VARCHAR(100) NOT NULL,
	last_name VARCHAR(100) NOT NULL
);

CREATE TABLE books(
	book_id SERIAL PRIMARY KEY,
	title VARCHAR(100) NOT NULL,
	published_year INT
);
You will see CREATE TABLE printed to the terminal if the table was created successfully.
Now let’s connect the two tables by adding a Foreign Key to books. Foreign Keys are unique identifiers that reference the Primary Key of another table. Books can, of course, have multiple authors but we’re not going to get into the complexities of many to many relationships right now.
Add a Foreign Key to books with the following command:
ALTER TABLE books ADD COLUMN author_id INT REFERENCES authors(author_id);Next, let’s insert some sample data into the tables. We’ll start with authors.
INSERT INTO authors (first_name, last_name)
VALUES (‘Tamsyn’, ‘Muir’), (‘Ann’, ‘Leckie’), (‘Zen’, ‘Cho’);
Select everything from authors to make sure the insert command worked.
SELECT * FROM authors;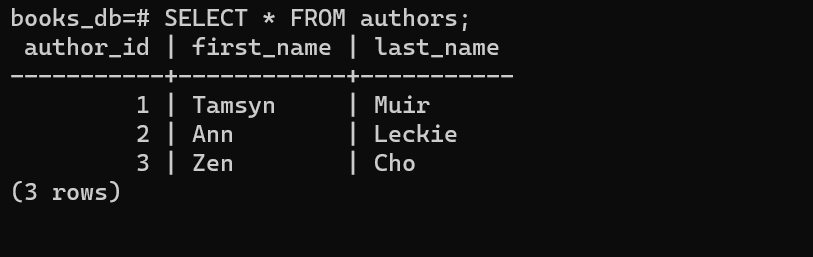
Next, we’ll insert some books data into books.
INSERT INTO books(title, published_year, author_id)
VALUES (‘Gideon the Ninth’, 2019, 1), (‘Ancillary Justice’, 2013, 2), (‘Black Water Sister’, 2021, 3);
If you run SELECT * FROM books; you’ll see the book data.

How to List All Tables
You can use the \dt command to list all the tables in a database.
\dtFor books_db you will see books and authors. You’ll also see books_book_id_seq and authors_author_id_seq. These keep track of the sequence of integers used as ids by the tables because we used SERIAL to generate their Primary Keys.

How to Describe a Table
To see more information about a particular table, you can use the describe table command: \d table_name. This will list the columns, indexes, and any references to other tables.
\d table_name
Using \dt+ table_name will provide more information, such as about storage and compression.
How to Rename a Table
If you ever need to change the name of a table, you can rename it with the ALTER TABLE command.
ALTER TABLE table_name RENAME TO new_table_name;How to Delete a Table
If you want to delete a table, you can use the DROP TABLE command.
DROP TABLE table_name;If you try to delete a table that doesn’t exist, you will get an error. You can avoid this by including the IF EXISTS option in the statement. This way you’ll get a notice instead.
DROP TABLE IF EXISTS table_name;How to Manage Longer Commands and Queries
If you’re writing longer SQL queries, the command line isn’t the most ergonomic way to do it. It’s probably better to write your SQL in a file and then have psql execute it.
If you are working with psql and think your next query will be long, you can open a text editor from psql and write it there. If you have an existing query, or maybe want to run several queries to load sample data, you can execute commands from a file that is already written.
Option 1 – Open a text editor from psql
If you enter the \e command, psql will open a text editor. When you save and close the editor, psql will run the command you just wrote.
\e
On Windows, the default text editor for psql is Notepad, while on MacOs and Linux it’s vi. You can change this to another editor by setting the EDITOR value in your computer’s environment variables.
Option 2 – Execute commands and queries from a file
If you have particularly long commands or multiple commands that you want to run, it would be better to write the SQL in a file ahead of time and have psql execute that file once you’re ready.
The \i command lets you read input from a file as if you had typed it into the terminal.
\i path_to_file/file_name.sqlNote: If you’re executing this command on Windows, you still need to use forward slashes in the file path.
If you don’t specify a path, psql will look for the file in the last directory that you were in before you connected to PostgreSQL.

How to Time Queries
If you want to see how long your queries are taking, you can turn on query execution timing.
\timingThis will display in milliseconds the time that the query took to complete.
If you run the \timing command again, it will turn off query execution timing.

How to Import Data from a CSV File
If you have a CSV file with data and you want to load this into a PostgreSQL database, you can do this from the command line with psql.
First, create a CSV file called films.csv with the following structure (It doesn’t matter if you use Excel, Google Sheets, Numbers, or any other program).

Open psql and create a films_db database, connect to it, and create a films table.
CREATE DATABASE films_db;

\c films_db

CREATE TABLE films(
	id SERIAL PRIMARY KEY,
	title VARCHAR(100),
	year INT,
	running_time INT
);
You can then use the \copy command to import the CSV file into films. You need to provide an absolute path to where the CSV file is on your computer.
\copy films(title, year, running_time) FROM 'path_to_file' DELIMITER ‘,’ CSV HEADER;The DELIMITER option specifies the character that separates the columns in each row of the file being imported, CSV specifies that it is a CSV file, and HEADER specifies that the file contains a header line with the names of the columns.
Note: The column names of the films table don’t need to match the column names of films.csv but they do need to be in the same order.
Use SELECT * FROM films; to see if the process was successful.

How to Back Up a Database with pg_dump
If you need to backup a database, pg_dump is a utility that lets you extract a database into a SQL script file or other type of archive file.
First, on the command line (not in psql), navigate to the PostgreSQL bin folder.
cd "C:\Program Files\PostgreSQL\14\bin"Then run the following command, using postgres as the username, and filling in the database and output file that you want to use.
pg_dump -U username database_name > path_to_file/filename.sqlUse postgres for the username and you will be prompted for the postgres superuser’s password. pg_dump will then create a .sql file containing the SQL commands needed to recreate the database.

If you don’t specify a path for the output file, pg_dump will save the file in the last directory that you were in before you connected to PostgreSQL.

You can pass the -v or --verbose flag to pg_dump to see what pg_dump is doing at each step.

You can also backup a database to other file formats, such as .tar (an archive format).
pg_dump -U username -F t database_name > path_to_file/filename.tarHere the -F flag tells pg_dump that you’re going to specify an output format, while t tells it it’s going to be in the .tar format.
How to Restore a Database
You can restore a database from a backup file using either psql or the pg_restore utility. Which one you choose depends on the type of file you are restoring the database from.
- If you backed up the database to a plaintext format, such as
.sql, use psql. - If you backed up the database to an archive format, such as
.tar, usepg_restore.
Option 1 – Restore a database using psql
To restore a database from a .sql file, on the command line (so not in psql), use psql -U username -d database_name -f filename.sql.
You can use the films_db database and films.sql file you used earlier, or create a new backup file.
Create an empty database for the file to restore the data into. If you’re using films.sql to restore films_db, the easiest thing might be to delete films_db and recreate it.
DROP DATABASE films_db;

CREATE DATABASE films_db;
In a separate terminal (not in psql), run the following command, passing in postgres as the username, and the names of the database and backup file you are using.
psql -U username -d database_name -f path_to_file/filename.sqlThe -d flag points psql to a specific database, while the -f flag tells psql to read from the specified file.
If you don’t specify a path for the backup file, psql will look for the file in the last directory that you were in before you connected to PostgreSQL.
You will be prompted for the postgres superuser’s password and then will see a series of commands get printed to the command line while psql recreates the database.
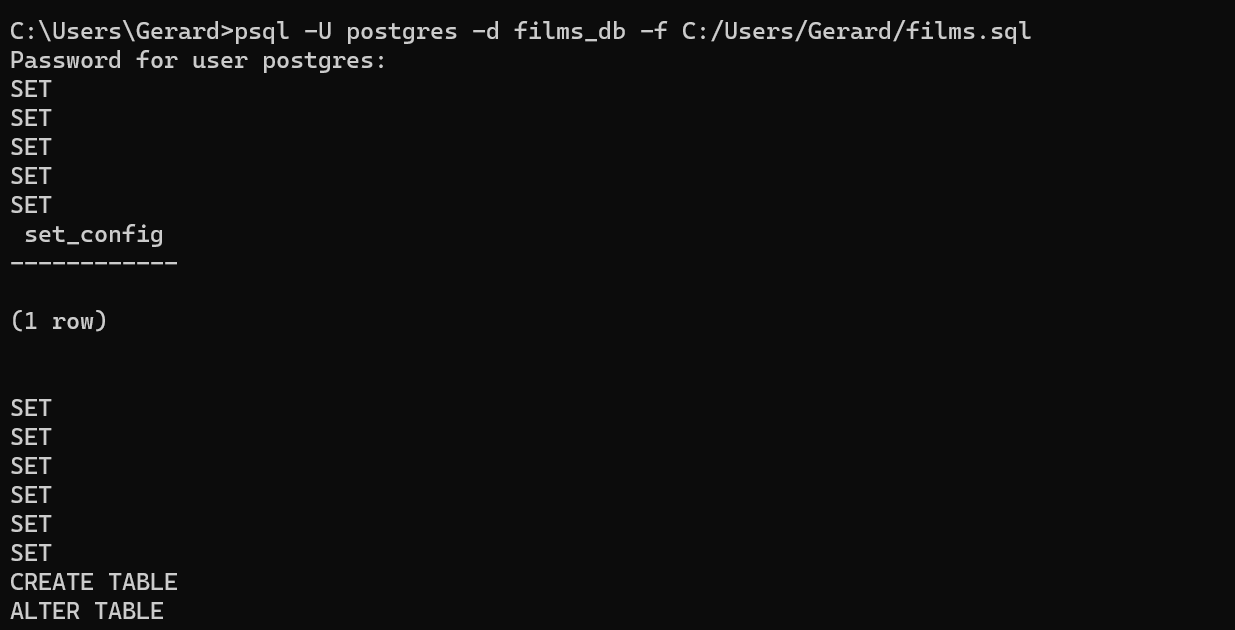
This command ignores any errors that occur during the restore. If you want to stop restoring the database if an error occurs, pass in --set ON_ERROR_STOP=on.
psql -U username -d database_name --set ON_ERROR_STOP=on -f filename.sqlOption 2 – Restore a database using pg_restore
To restore a database using pg_restore, use pg_restore -U username -d database_name path_to_file/filename.tar.
Create an empty database for the file to restore the data into. If you’re restoring films_db from a films.tar file, the easiest thing might be to delete films_db and recreate it.
DROP DATABASE films_db;

CREATE DATABASE films_db;
On the command line (not in psql), run the following command, passing in postgres as the username, and the names of the database and backup file you are using.
pg_restore -U username -d database_name path_to_file/filename.tar
You can also pass in the -v or --verbose flag to see what pg_restore is doing at each step.

How to Quit psql
If you’ve finished with psql and want to exit from it, enter quit or \q.
\qThis will close the psql application if you were using it, or return you to your regular command prompt if you were using psql from the command line.
Where to Take it from Here
There are lots more things you can do with psql, such as managing schemas, roles, and tablespaces. But this guide should be enough to get you started with managing PostgreSQL databases from the command line.
If you want to learn more about PostgreSQL and psql, you could try out freeCodeCamp’s Relational Database Certificate . The official PostgreSQL documentation is comprehensive, and PostgreSQL Tutorial offers several in-depth tutorials.
I hope you find this guide helpful as you continue to learn about PostgreSQL and relational databases.
Learn to code for free. freeCodeCamp’s open source curriculum has helped more than 40,000 people get jobs as developers. Get started
I have postgres installed.How to open postgres command Line?
When i open command prompt, i have
Microsoft Windows [Version 10.0.17134.590]
(c) 2018 Microsoft Corporation. All rights reserved.

C:\Users\dhanr>
How to navigate to postgres command Line, as my final goal is to run pg_dump dbname > outfile command.
- windows
- postgresql
- command-line
asked Feb 23, 2019 at 5:48
![]()
DhanrajDhanraj
1,1724 gold badges19 silver badges45 bronze badges
1
-
You need to have postgres executable on your Path.
Feb 23, 2019 at 5:56
2 Answers
You should use psql command-line tool.
You can find psql at your installation directory. Example;
C:\Program Files\PostgreSQL\10\bin\psql.exe
![]()
Wai Ha Lee
8,60885 gold badges57 silver badges92 bronze badges
answered Feb 23, 2019 at 6:00
![]()
grepgrep
5,50512 gold badges61 silver badges113 bronze badges
0
Go inside bin folder in C drive where Postgres is installed. run following command in git bash or Command prompt: pg_ctl.exe restart -D «» Ex: pg_ctl.exe restart -D «C:\Program Files\PostgreSQL\9.6\data»
Another way: type «services.msc» in run popup(windows + R). This will show all services running Select Postgres service from list and click on start/stop/restart.
answered Feb 23, 2019 at 5:56
![]()
1
-
Thanks for you answer.It will restart the service.. I was looking for command Line
Feb 23, 2019 at 6:42
postgres
You’ve installed PostgreSQL. Now what? I assume you’ve been given a task that
uses psql and you want to learn the absolute minimum to
get the job done.
This is both a brief tutorial and a
quick reference for the absolute least you need to know about psql.
I assume you’re familiar with the command line and have a rough idea about
what database administration tasks, but aren’t familiar with how to
use psql to do the basics.
View on GitHub Pages or directly on GitHub
The PostgreSQL documentation is incredibly
well written and thorough, but frankly, I didn’t know where to start reading. This
is my answer to that problem.
If you have any complaints or suggestions please let me know by
sending your feedback to tomcampbell@gmail.com.
It shows how to do the following at the psql prompt:
- Start and quit
psql - Get help
- Get information about databases
- Create databases
- CREATE TABLEs
- INSERT, or add records to a table
- SELECT, to do simple queries
- Reference pointing to the official PostgreSQL documentation
If you don’t have access to a live PostgreSQL installation at the moment we still have your back.
You can follow through the examples and the output is shown as if you
did type everything out.
The psql command line utility
Many administrative tasks can or should be done on your local machine,
even though if database lives on the cloud.
You can do some of them through a visual user interface, but that’s not covered here.
Knowing how to perform these operations on the command line means you can script them,
and scripting means you can automate tests, check errors, and do data entry on the command line.
This section isn’t a full cheat sheet for psql.
It covers the most common operations and shows them roughly in sequence,
as you’d use them in a typical work session.
| Starting and quitting the psql interactive terminal |
|---|
| Command-line prompts for psql |
| Quitting psql |
| Opening a connection locally |
| Opening a connection remotely |
| Using the psql prompt |
| Getting information about databases |
| \h Help |
| \l List databases |
| \c Connect to a database |
| \dt Display tables |
| \d and \d+ Display columns (field names) of a table |
| \du Display user roles |
| Creating and using tables and records |
| Creating a database |
| Creating a table (CREATE TABLE) |
| Adding a record (INSERT INTO) |
| Inserting several records at once (INSERT INTO) |
| Adding only specific fields from a record |
| Doing a simple query–get a list of records (SELECT) |
| Maintenance and operations |
| Timing |
| Watch |
| Maintenance |
What you need to know
Before using this section, you’ll need:
- The user name and password for your PostgreSQL database
- The IP address of your remote instance
Command-line prompts on the operating system
The $ starting a command line in the examples below represents your operating system prompt.
Prompts are configurable so it may well not look like this.
On Windows it might look like C:\Program Files\PostgreSQL> but Windows prompts are also configurable.
$ psql -U sampleuser -h localhost
A line starting with # represents a comment. Same for everything to the right of a #.
If you accidentally type it or copy and paste it in, don’t worry. Nothing will happen.
This worked to connect to Postgres on DigitalOcean
# -U is the username (it will appear in the \l command)
# -h is the name of the machine where the server is running.
# -p is the port where the database listens to connections. Default is 5432.
# -d is the name of the database to connect to. I think DO generated this for me, or maybe PostgreSQL.
# Password when asked is csizllepewdypieiib
$ psql -U doadmin -h production-sfo-test1-do-user-4866002-0.db.ondigitalocean.com -p 25060 -d mydb

# Open a database in a remote location.
$ psql -U sampleuser -h production-sfo-test1-do-user-4866002-0.db.ondigitalocean.com -p 21334
Using psql
You’ll use psql (aka the PostgreSQL interactive terminal) most of all because it’s used to create databases and tables, show information about tables, and even to enter information (records) into the database.
Quitting pqsql
Before we learn anything else, here’s how to quit psql and return to the operating system prompt.
You type backslash, the letter q, and then you press the Enter or return key.
# Press enter after typing \q
# Remember this is backslash, not forward slash
postgres=# \q
This takes you back out to the operating system prompt.
Opening a connection locally
A common case during development is opening a connection to a local database (one on your own machine).
Run psql with -U (for user name) followed by the name of the database, postgres in this example:
# Log into Postgres as the user named postgres
$ psql -U postgres
Opening a connection remotely
To connect your remote PostgreSQL instance from your local machine, use psql at your operating system command line.
Here’s a typical connection.
# -U is the username (it will appear in the \l command)
# -h is the name of the machine where the server is running.
# -p is the port where the database listens to connections. Default is 5432.
# -d is the name of the database to connect to. I think DO generated this for me, or maybe PostgreSQL.
$ psql -U doadmin -h production-sfo-test1-do-user-4866002-0.db.ondigitalocean.com -p 25060 -d defaultdb
Here you’d enter the password. In case someone is peering over your shoulder, the characters are hidden. After you’ve entered your information properly you’ll get this message (truncated for clarity):
Looking at the psql prompt
A few things appear, then the psql prompt is displayed.
The name of the current database appears before the prompt.
psql (11.1, server 11.0)
Type "help" for help.

postgres=#
At this point you’re expected to type commands and parameters into the command line.
psql vs SQL commands
psql has two different kinds of commands. Those starting with a backslash
are for psql itself, as illustrated by the use of \q to quit.
Those starting with valid SQL are of course interactive SQL used to
create and modify PostgreSQL databases.
Warning: SQL commands end with a semicolon!
One gotcha is that almost all SQL commands you enter into psql must end in a semicolon.
- For example,suppose you want to remove a table named
sample_property_5. You’d enter this command:
postgres=# DROP TABLE "sample_property_5";
It’s easy to forget. If you do forget the semicolon, you’ll see this perplexing prompt.
Note that a [ has been inserted before the username portion of the prompt, and another
prompt appears below it:
[postgres=# DROP TABLE "sample_property_5"
postgres=#
When you do, just remember to finish it off with that semicolon:
[postgres=# DROP TABLE "sample_property_5"
postgres=# ;
Scrolling through the command history
- Use the up and down arrow keys to move backwards and forwards through the command history.
Getting information about databases
These aren’t SQL commands so just press Enter after them. Remember that:
- When there’s more output than fits the screen, it pauses. Press space to continue
- If you want to halt the output, press
q.
\h Help
# Get help. Note it's a backslash, not a forward slash.
postgres=# \h
You’ll get a long list of commands, then output is paused:
Available help:
  ABORT                            CREATE USER
  ...
  ALTER AGGREGATE                  CREATE USER MAPPING
  ALTER PROCEDURE                  DROP INDEX
:
- Press space to continue, or
qto stop the output.
You can get help on a particular item by listing it after the \h command.
- For example, to get help on
DROP TABLE:
postgres=# \h drop table
You’ll get help on just that item:
Command:     DROP TABLE
Description: remove a table
Syntax:
DROP TABLE [ IF EXISTS ] name [, ...] [ CASCADE | RESTRICT ]
\l List databases
What most people think of as a database (say, a list of customers) is actually a table. A database is a set of tables, information about those tables, information about users and their permissions, and much more. Some of these databases (and the tables within) are updated automatically by PostgreSQL as you use them.
To get a list of all databases:
postgres=# \l
                                  List of databases
   Name    |  Owner   | Encoding |   Collate   |    Ctype    |   Access privileges
-----------+----------+----------+-------------+-------------+-----------------------
 visitor   | tom      | UTF8     | en_US.UTF-8 | en_US.UTF-8 |
 markets   | tom      | UTF8     | en_US.UTF-8 | en_US.UTF-8 |
 postgres  | postgres | UTF8     | en_US.UTF-8 | en_US.UTF-8 |
 template0 | postgres | UTF8     | en_US.UTF-8 | en_US.UTF-8 | =c/postgres          +
           |          |          |             |             | postgres=CTc/postgres
 template1 | postgres | UTF8     | en_US.UTF-8 | en_US.UTF-8 | =c/postgres          +
           |          |          |             |             | postgres=CTc/postgres
 tom       | tom      | UTF8     | en_US.UTF-8 | en_US.UTF-8 |
You can get info on a single database by following the \l prompt with its name.
- For example, to view information about the
template0database:
postgres=# \l template0
The output would be:
postgres=# \l
                                  List of databases
   Name    |  Owner   | Encoding |   Collate   |    Ctype    |   Access privileges
-----------+----------+----------+-------------+-------------+-----------------------
 template0 | postgres | UTF8     | en_US.UTF-8 | en_US.UTF-8 | =c/postgres          +
           |          |          |             |             | postgres=CTc/postgres
\l+ List databases with size, tablespace, and description
To get additional information on the space consumed by database tables
and comments describing those tables, use \l+:
postgres=# \l+
\x Expand/narrow table lists
Use \x (X for eXpanded listing) to control
whether table listings use a wide or narrow format.
| Command | Effect |
|---|---|
\x off |
Show table listings in wide format |
\x on |
Show table listings in narrow format |
\x |
Reverse the previous state |
\x auto |
Use terminal to determine format |
Example: Here’s an expanded listing:
/* List all databases. */
postgres=# \l

                                  List of databases
   Name    |  Owner   | Encoding |   Collate   |    Ctype    |   Access privileges
-----------+----------+----------+-------------+-------------+-----------------------
 foo       | tom      | UTF8     | en_US.UTF-8 | en_US.UTF-8 |
 foobarino | tom      | UTF8     | en_US.UTF-8 | en_US.UTF-8 |
 postgres  | postgres | UTF8     | en_US.UTF-8 | en_US.UTF-8 |
 template0 | postgres | UTF8     | en_US.UTF-8 | en_US.UTF-8 | =c/postgres          +
           |          |          |             |             | postgres=CTc/postgres
 template1 | postgres | UTF8     | en_US.UTF-8 | en_US.UTF-8 | =c/postgres          +
           |          |          |             |             | postgres=CTc/postgres
 tom       | tom      | UTF8     | en_US.UTF-8 | en_US.UTF-8 |
(6 rows)
Use \x on for narrower listings:
/* Turn on narrow listings. */
postgres=# \x on
postgres=# \l


-[ RECORD 1 ]-----+----------------------
Name              | foo
Owner             | tom
Encoding          | UTF8
Collate           | en_US.UTF-8
Ctype             | en_US.UTF-8
Access privileges |
-[ RECORD 2 ]-----+----------------------
Name              | foobarino
Owner             | tom
Encoding          | UTF8
Collate           | en_US.UTF-8
Ctype             | en_US.UTF-8
Access privileges |
-[ RECORD 3 ]-----+----------------------
Name              | postgres
Owner             | postgres
Encoding          | UTF8
Collate           | en_US.UTF-8
Ctype             | en_US.UTF-8
Access privileges |
\c Connect to a database
To see what’s inside a database, connect to it using \c followed by the database name.
The prompt changes to match the name of the database you’re connecting to.
(The one named postgres is always interesting.) Here we’re connecting to the one named
markets:
postgres=# \c markets
psql (11.1, server 11.0)
You are now connected to database "markets" as user "tom".
markets=#
\dt Display tables
- Use
\dtto list all the tables (technically, relations) in the database:
markets=# \dt

                    List of relations
 Schema |             Name             | Type  |  Owner
--------+------------------------------+-------+----------
 public | addresspool                  | table | tom
 public | adlookup                     | table | tom
 public | bidactivitysummary           | table | tom
 public | bidactivitydetail            | table | tom
 public | customerpaymentsummary       | table | tom
 ...
- If you choose a database such as
postgresthere could be many tables.
Remember you can pause output by pressing space or halt it by pressingq.
\d and \d+ Display columns (field names) of a table
To view the schema of a table, use \d followed by the name of the table.
- To view the schema of a table named
customerpaymentsummary, enter
markets=# \d customerpaymentsummary

                            Table "public.customerpaymentsummary"
            Column            |            Type             | Collation | Nullable | Default
------------------------------+-----------------------------+-----------+----------+--------
 usersysid                    | integer                     |           | not null |
 paymentattemptsall           | integer                     |           |          |
 paymentattemptsmailin        | integer                     |           |          |
 paymentattemptspaypal        | integer                     |           |          |
 paymentattemptscreditcard    | integer                     |           |          |
 paymentacceptedoutagecredit  | integer                     |           |          |
 totalmoneyin                 | numeric(12,2)               |           |          |
 updatewhen1                  | timestamp without time zone |           |          |
 updatewhen2                  | timestamp without time zone |           |          |
To view more detailed information on a table, use \d+:
markets=# \d customerpaymentsummary

                            Table "public.customerpaymentsummary"
            Column            |            Type             | Collation | Nullable | Default | Storage | Stats target |
------------------------------+-----------------------------+-----------+----------+---------+---------+---------------
 usersysid                    | integer                     |           | not null |         | plain   |              |
 paymentattemptsall           | integer                     |           |          |         | plain   |              |
 paymentattemptsmailin        | integer                     |           |          |         | plain   |              |
 paymentattemptspaypal        | integer                     |           |          |         | plain   |              |
 paymentattemptscreditcard    | integer                     |           |          |         | plain   |              |
 paymentacceptedoutagecredit  | integer                     |           |          |         | plain   |              |
 totalmoneyin                 | numeric(12,2)               |           |          |         | main    |              |
 updatewhen1                  | timestamp without time zone |           |          |         | plain   |              |
 updatewhen2                  | timestamp without time zone |           |          |         | plain   |              |

Indexes:
\du Display user roles
- To view all users and their roles, use
\du:
postgres=# \du
                                    List of roles
 Role name  |                         Attributes                         | Member of
------------+------------------------------------------------------------+-----------
 smanager   | Superuser                                                  | {}
 postgres   | Superuser, Create role, Create DB, Replication, Bypass RLS | {}
 tom        | Superuser, Create role, Create DB                          | {}
- To view the role of a specific user, pass it after the
\ducommand.
For example, to see the onlytomrole:
postgres=# \du tom
                                    List of roles
 Role name  |                         Attributes                         | Member of
------------+------------------------------------------------------------+-----------
 tom        | Superuser, Create role, Create DB                          | {}
Creating a database
Before you add tables, you need to create a database to contain those tables.
That’s not done with psql, but instead it’s done with createdb
(a separate external command; see the PostgreSQL createdb documentation) at the operating system command line:
# Replace markets with your database name
$ createdb markets
On success, there is no visual feedback. Thanks, PostgreSQL.
Adding tables and records
Creating a table (CREATE TABLE)
To add a table schema to the database:
postgres=# create table if not exists product (
  id              SERIAL,
  name            VARCHAR(100) NOT NULL,
  sku             CHAR(8)
);
And psql responds with:
For more see CREATE TABLE in the PostgreSQL official docs.
Adding a record (INSERT INTO)
- Here’s how to add a record, populating every field:
# The id field is an automatically assigned
# when you use DEFAULT. The serial primary key means
# that number will be increased by at least
# 1 and assigned to that same field when
# a new record is created.
# Using DEFAULT is a placeholder.
# In its place PostgreSQL automatically generates a unique integer for it.
postgres=# INSERT INTO product VALUES(DEFAULT, 'Apple, Fuji', '4131');
PostgreSQL responds with:
- Try it again and you get a simliar response.
postgres=# INSERT INTO product VALUES(DEFAULT, 'Banana', '4011');
INSERT 0 1
Adding (inserting) several records at once
- You can enter a list of records using this syntax:
postgres=# INSERT INTO product VALUES
(DEFAULT, 'Carrots', 4562),
(DEFAULT, 'Durian', 5228)
;
Adding only specific (columns) fields from a record
You can add records but specify only selected fields (also known as columns). MySQL will use common sense default values for the rest.
In this example, only the name field will be populated. The sku column is left blank, and the id column is incremented and inserted.
Two records are added:
postgres=# INSERT INTO product (name) VALUES
('Endive'),
('Figs')
;
PostgreSQL responds with the number of records inserted:
INSERT 0 2
For more on INSERT, see INSERT in the PostgreSQL official docs
Doing a simple query–get a list of records (SELECT)
Probably the most common thing you’ll do with a table is to obtain information about it
with the SELECT statement. It’s a huge topic
- Let’s list all the records in the
producttable:
postgres=# SELECT * FROM product;
The response:
postgres=# select * from product;
 id |    name     |   sku
----+-------------+----------
  1 | Apple, Fuji | 4131
  2 | Banana      | 4011
(2 rows)
Note
If your table has mixed case objects such as column names or indexes, you’ll need to enclose them in double quotes.
For example, If a column name were Product instead of product your query would need to look like this:
For more on SELECT, see the SELECT in the PostgreSQL official docs.
Maintenance and operations issues
Timing
\t Timing SQL operations
Use \t to show timing for all SQL operations performed.
| Command | Effect |
|---|---|
\timing off |
Disable timing of SQL operations |
\timing on |
Show timing after all SQL operations |
\timing |
Toggle (reverse) the setting |
Example of \t Timing command
tom=# insert into todo values ('Retry on Android before app submission,'8.x and earlier');
INSERT 0 1
tom=# \timing on
Timing is on.
tom=# insert into todo values ('Correct footer bug','Mobile version only');
INSERT 0 1
Time: 1.067 ms
tom=# insert into todo values ('Retry on Android before app submission', '8.x and earlier');
INSERT 0 1
Time: 23.312 ms
tom=# \timing
Timing is off.
Watch
The \watch command repeats the previous command at the specified interval.
To use it, enter the SQL command you want repeated, then
use \watch followed by the number of seconds you want for
the interval between repeats, for rexample, \watch 1
to repeat it every second.
Example of the \Watch command
Here’s an example of using \watch to see if any records have been
inserted within the last 5 seconds.
tom=# select count(*);
  count
--------
    726
(726 rows)

tom=# \watch 5
Mon Nov 16 13:50:36 2020 (every 2s)

  count
--------
    726
(726 rows)

Mon Nov 16 13:50:38 2020 (every 2s)

  count
--------
    726
(726 rows)

Mon Nov 16 13:50:40 2020 (every 2s)

  count
--------
    726
(726 rows)
Locate the pg_hba.conf file
Postgres configuration is stored in a file named pg_hba.conf somewhere in the file system, but
that location varies widely. The way to find it is to use show hba_file like this:
See below for hot reloading this file while Postgres is running.
Reload the configuration file while Postgres is running
If you make changes to the pg_hba.conf Postgres configuration sometimes you need to restart.
But you may just choose to reload the pg_hba.conf configuration file like this:
Reference
- PostgreSQL offical docs: Server Administration
psql, a.k.a the PostgreSQL interactive terminalcreatedbin the PostgreSQL offical docsCREATE TABLEin the PostgreSQL official docsINSERTin the PostgreSQL official docs