Windows Installation[edit]
Too long, won’t read: Use the RadioConda installer, as linked from our InstallingGR landing page.
Binary Installers[edit]
There are a few different unofficial GNU Radio binary installers that are maintained by the community:
1) Radioconda installer. This binary installer tends to be the most up-to-date, but you should check the list of packages to see if it includes what you need. It utilizes the conda package/environment manager and provides easy access to thousands of Python and other packages that are not strictly related to GNU Radio. This also lets you stay up-to-date without having to re-install. Since this provides the same conda-forge packages available without the installer, the conda install guide might be useful for additional instructions, including how to build additional OOT modules from source.
After installing Radioconda you will get a «GNU Radio Companion» added to your start menu. Run this to start GNU Radio Companion, the graphical GNU Radio design tool.
2) (only outdated versions as of 2023-09) Geof Nieboer’s installer hosted at gcndevelopment.com (recently unreachable in 2022-07, but reachable currently 2022-10-23). This is a binary installer for 64-bit Windows 7/8/10 that includes all dependencies for Windows, a custom python distro, commonly used SDR drivers, and several OOT blocks.
3) (only outdated versions as of 2023-09) Pothos SDR development environment installer. This binary installer includes GNU Radio, Pothos, CubicSDK, and other tools. It has historically been updated about once or twice per year.
Current Windows Status[edit]
Installing core GNU Radio and USRP on Windows is becoming more routine. Many OoT modules may still require compiling locally. Please report any success or failures. Patches and enhancements are especially welcome!
Windows Porting Issues[edit]
Considerable effort has been put into making the GNU Radio code portable among various operating systems, but there are several reasons why it cannot be «simply» compiled and run under Windows:
- The build and install procedures are based on Linux scripts and tools
- Several third-party libraries are used, each with its own, often system-dependent, installation procedure
- Most GNU Radio applications must interface to hardware (e.g., a sound card or USRP) which require system-dependent drivers and installation procedures
- Because GNU Radio is written as an extension to Python, there are potential problems on Windows if different runtime libraries are used for GNU Radio and Python
The following sections show how these issues can be addressed.
Installation Options[edit]
GNU Radio is designed to be flexible. It has a number of modules, capabilities, and options that can be enabled or disabled to suit the needs of the user, and the user can add custom blocks or modules to the system.
To support this flexibility, it comes with a set of files and scripts to be used with GNU software build tools (sh, make, autoconf, automake, etc.). These tools use Linux-like commands and filenames that are not normally available on Windows systems.
Fortunately, we are not the first to face this problem, and several solutions exist. These are presented in order of increasing difficulty:
Building on Windows with Native Tools[edit]
Ettus Application note [1] describes how to build from source. Similar is a post at [2] for OOT modules.
Powershell scripts are now available at https://www.github.com/gnieboer/gnuradio_windows_build_scripts that fully automate the build process for GNURadio 3.7.9.2+. A few build dependencies are required (MSVC 2015, Git, Doxygen, CMake, Perl, Wix) but all are free. The script has two options:
- Build all dependencies from source (including python itself)
- Download a prebuilt custom dependency package and then build only GNURadio and a few OOT modules on top.
The binary installers described above are built with these scripts. They ensure that all dependencies are built with the same toolchain against the same runtime libraries, and handle the patches and configuration «tweaks» needed to build them on Windows.
If option 1 is desired, note that to build scipy, the non-free Intel Fortran compiler is required, gfortran cannot build objects that can link with MSVC C objects. If you do not have said compiler, the scripts will download pre-compiled wheels instead.
More information on the build process is available on the GitHub repo readme, and also at http://www.gcndevelopment.com/gnuradio.
GNURadio 3.6 has also been compiled on Windows using native tools as well (see http://voltronics.blogspot.com/2013/01/gnu-radio-windows-build-guide.html and https://lists.gnu.org/archive/html/discuss-gnuradio/2013-08/msg00284.html)
More helpful tips on dependency version information have been reported:
https://lists.gnu.org/archive/html/discuss-gnuradio/2013-12/msg00497.html
MinGW/MSYS[edit]
MinGW (http://www.mingw.org/) provides GNU compilers and Window-specific header files for compiling native Windows applications.
MSYS (http://www.mingw.org/msys.shtml) is a companion set of Linux-like commands, shell, and build tools.
MinGW does not include a Linux programming interface; programs should be smaller and faster than with Cygwin (in theory), but will require more Windows-specific code.
MSYS is intended primarily as a build environment, making it more compact than Cygwin.
Because there is no Linux API emulation, GNU Radio built with MinGW should be used with standard Windows versions of Python and the third-party libraries.
MinGW does not provide as much support as Cygwin for installing third-party libraries, but in many cases precompiled binaries are available.
For detailed installation instructions using MinGW and MSYS see Installing GNU Radio with MinGW.
Cygwin[edit]
Cygwin (http://www.cygwin.com/) is a Linux-like environment for Windows.
It provides the Linux-like shell, file naming, and build tools we need and also makes it easy to install many of the third-party libraries required by GNU Radio. It also provides a Linux programming interface (API); this is not required by GNU Radio, but it lets us use the better-tested Linux versions of some functions.
Because the Linux API uses its own C runtime library, it is best to use Cygwin versions of Python and the third-party libraries when building GNU Radio with Cygwin.
For detailed installation instructions using Cygwin see Installing GNU Radio with Cygwin.
Chocolatey[edit]
To quote from the [|https://chocolatey.org/ Chocolatey homepage]: Chocolatey NuGet is a Machine Package Manager, somewhat like apt-get, but built with Windows in mind..
There are packages for gnuradio (and its dependencies) available in a separate repository (currently the best known source is: https://github.com/ariovistus/chocolatey-packages)
To install, open an Administrative command line session and run:
iex ((new-object net.webclient).DownloadString('https://chocolatey.org/install.ps1'))
Now you need to install a source which has the recipes for gnuradio and dependents. The easiest method is to clone the chocolatey-packages from the github repository listed above (https://github.com/ariovistus/chocolatey-packages), then add the local source from within an Administrative command line session:
choco source add -name gnuradio -source C:\<path-to>\chocolatey-packages
Create the numpy package:
cd <path-to>\chocolatey-package\numpy
cpack
Create the gnuradio package:
cd <path-to>\chocolatey-package\gnuradio
cpack
Now install the gnuradio package:
choco install gnuradio
Follow the command prompts.
WSL | Ubuntu[edit]
Enable WSL from windows features.
Install Ubuntu 20.04 (or newer) from Microsoft Store.
Using the Ubuntu terminal, install gnuradio as you would on linux [3]. If you want to develop GNU Radio’s core you will need to build GNU Radio from source.
WSL 1/2 (before WSLg)[edit]
Install additional package «libgtk-3-dev»
sudo apt install libgtk-3-dev
WSL 1 and 2 (before WSLg) do not have an X server for displaying graphical applications. Install an X server, either VcXsrv [4] or Xming [5] as WSL does not come with an X server. VcXsrv is recommended as it is open source and self-contained instead of being tied to Cygwin, whereas Xming «asks for donations» to the developer as a dubious «sale» for non-existent support.
Launch VcXsrv, making sure to select «Disable access control» option in the Extra settings so that any application can export to X11.
Edit bashrc to set up the display by adding the following lines at the bottom of the file.
WSL1:
 # X11 forwarding for Windows
 export DISPLAY=:0.0
 export LIBGL_ALWAYS_INDIRECT=1
WSL2:
 # X11 forwarding for Windows
 export DISPLAY=$(awk '/nameserver / {print $2; exit}' /etc/resolv.conf 2>/dev/null):0
 export LIBGL_ALWAYS_INDIRECT=1
Restart the Ubuntu terminal and run
gnuradio-companion
WSLg[edit]
Currently in early testing stages, the WSLg update contains a Wayland graphics server and X interface layer allowing graphical applications to run without extra setup.
From the Ubuntu terminal run
gnuradio-companion
Using an Azure VM[edit]
Another way to generate a GNU Radio environment if you’re using Windows, is to create an Azure Virtual Machine running Ubuntu Server 18.04 LTS.
If you already have an existing Azure account you can follow the instructions here[6] to create an Ubuntu VM using the Azure portal. Otherwise, you can sign up for an account here[7]. Azure provides free accounts for students[8] with a limited set of credits.
Once your VM is created you should be able to SSH into it, to install a desktop environment. Full instructions can be found here, but in summary:
Install xfce
 sudo apt-get update
 sudo apt-get -y install xfce4
Install xrdp as a remote desktop server
 sudo apt-get -y install xrdp
 sudo systemctl enable xrdp
Configure xrdp to use xfce
echo xfce4-session >~/.xsession
Restart the xrdp service
sudo service xrdp restart
You will need to create a local password for your Linux VM (on top of your existing SSH key), and open port 3389[9] on the VM.
Finally you can use a remote desktop client, such as Remote Desktop Connection to connect to your VM and follow the instructions for GNU Radio on Ubuntu found here[10].
GNURadio — это программное обеспечение с открытым исходным кодом, предназначенное для разработки радиосистем с помощью компьютера. Оно позволяет пользователям создавать и анализировать радиосигналы разного типа, а также выполнять цифровую обработку сигналов. Однако, установка GNURadio на Windows может вызывать сложности для некоторых пользователей. В этой статье мы предоставим пошаговую инструкцию по установке программы на операционную систему Windows, чтобы помочь вам начать работу с GNURadio.
Первым шагом является загрузка и установка зависимостей. GNURadio требует наличия некоторых компонентов и сторонних библиотек для корректной работы. На сайте GNURadio вы найдете список всех необходимых зависимостей и их ссылки для загрузки. Убедитесь, что вы загружаете версии, совместимые с вашей операционной системой.
После установки зависимостей вам потребуется загрузить и установить GNURadio самостоятельно. Посетите веб-сайт GNURadio и найдите раздел загрузок. Загрузите последнюю стабильную версию GNURadio для Windows. После завершения загрузки запустите установочный файл и следуйте инструкции по установке. По умолчанию GNURadio будет установлен в каталог «C:\Program Files\GNURadio».
После завершения установки вам потребуется настроить окружение GNURadio. Это может потребовать изменения системных переменных среды или создания новых. Проверьте документацию GNURadio для получения подробной информации о настройке окружения для вашей операционной системы. После настройки окружения, вы должны быть готовы начать использовать GNURadio на вашем компьютере с ОС Windows!
Содержание
- Как установить GNURadio на Windows: пошаговая инструкция
- Подготовка к установке GNURadio на Windows
- Загрузка и установка необходимых компонентов
- Настройка окружения и зависимостей
Как установить GNURadio на Windows: пошаговая инструкция
Шаг 1: Загрузка требуемых файлов
Перед началом установки GNURadio на Windows необходимо загрузить следующие файлы:
- Пакет установщика Python для Windows, доступный на официальном веб-сайте Python;
- Пакет установщика GNURadio для Windows, доступный на официальном сайте GNURadio.
Шаг 2: Установка Python
После загрузки пакета установщика Python для Windows, запустите его и следуйте инструкциям мастера установки:
- Выберите путь установки Python (обычно рекомендуется использовать предложенный путь по умолчанию);
- Убедитесь, что опция «Добавить Python в переменную среды PATH» выбрана;
- Нажмите кнопку «Установить» и дождитесь завершения установки.
Шаг 3: Установка GNURadio
После загрузки пакета установщика GNURadio для Windows, запустите его и следуйте инструкциям мастера установки:
- Выберите путь установки GNURadio (обычно рекомендуется использовать предложенный путь по умолчанию);
- Убедитесь, что все компоненты GNURadio, необходимые для вашего использования, выбраны;
- Нажмите кнопку «Установить» и дождитесь завершения установки.
Шаг 4: Проверка установки
После завершения установки GNURadio, проверьте его работу, выполнив следующие действия:
- Откройте командную строку;
- Введите команду «gnuradio-companion» и нажмите клавишу Enter;
- Если GNURadio Companion успешно запустился, значит установка прошла успешно.
Готово! Теперь вы можете начать использовать GNURadio на Windows и наслаждаться всеми его возможностями.
Подготовка к установке GNURadio на Windows
Прежде чем приступить к установке GNURadio на Windows, вам понадобится выполнить несколько предварительных действий. В этом разделе мы рассмотрим необходимые шаги.
1. Убедитесь, что ваш компьютер отвечает минимальным требованиям:
Для установки GNURadio на Windows вам понадобится компьютер с операционной системой Windows 7 или более поздней версии. Также убедитесь, что у вас установлены все последние обновления операционной системы.
2. Установите зависимости:
Перед установкой GNURadio вам потребуется установить несколько зависимостей. Обычно их можно установить с помощью менеджера пакетов Chocolatey. Если у вас уже установлен Chocolatey, вы можете пропустить этот шаг. В противном случае, вы можете установить его, следуя инструкциям на официальном сайте.
3. Загрузите и установите Python:
GNURadio требует установки языка программирования Python. Вы можете загрузить и установить Python с официального сайта Python. Рекомендуется установить последнюю стабильную версию Python.
4. Установите Visual Studio:
Для успешной установки GNURadio на Windows вам потребуется установить среду разработки Visual Studio. Гарантируется поддержка Visual Studio 2015 или новее. При установке Visual Studio убедитесь, что вы выбрали пакеты «Desktop development with C++» и «Python development».
5. Установите зависимости GNURadio:
Последним шагом подготовки к установке GNURadio на Windows является установка зависимостей GNURadio. Вам потребуется установить несколько пакетов, включая CMake, Git, Boost и прочие.
Готово!
Теперь вы готовы к установке GNURadio на Windows. В следующем разделе мы рассмотрим процесс установки шаг за шагом.
Загрузка и установка необходимых компонентов
Перед тем как установить GNURadio на Windows, необходимо загрузить и установить несколько дополнительных компонентов:
1. Python: GNURadio работает на языке Python, поэтому необходимо установить совместимую версию. Вы можете загрузить последнюю версию Python с официального веб-сайта python.org/downloads и запустить установщик.
2. MSYS2 и MinGW-w64: GNURadio требует использования MSYS2 и MinGW-w64 для компиляции библиотек и пакетов. Сначала загрузите и установите MSYS2 с официального веб-сайта msys2.org в соответствии с инструкциями для вашей системы. После установки MSYS2, запустите его и выполните обновление системы командой pacman -Syu. Затем установите MinGW-w64 командой pacman -S mingw-w64-x86_64-toolchain.
3. Git: GNURadio использует Git для установки и обновления. Вы можете загрузить Git по адресу git-scm.com и выполнить установку, следуя инструкциям.
4. CMake: CMake используется для компиляции исходного кода GNURadio. Загрузите CMake с официального веб-сайта cmake.org/download и запустите установку, выбрав соответствующую версию для вашей системы.
5. Qt: GNURadio использует библиотеки Qt для графического интерфейса пользователя. Загрузите Qt с официального веб-сайта qt.io/download и запустите установку, выбрав соответствующую версию для вашей системы.
6. GNURadio: Наконец, загрузите и установите GNURadio из официального репозитория GNURadio на GitHub. Вы можете склонировать репозиторий с помощью Git командой git clone https://github.com/gnuradio/gnuradio.git. После загрузки перейдите в каталог GNURadio и выполните следующие команды для компиляции и установки:
mkdir build
cd build
cmake ..
make
make install
После завершения установки вы можете запустить GNURadio, используя соответствующие команды или ярлык на рабочем столе (если они были созданы в процессе установки).
Теперь вы готовы к использованию GNURadio на Windows и начать разработку своих собственных программ для радиосвязи и обработки сигналов!
Настройка окружения и зависимостей
Перед установкой GNURadio на Windows необходимо настроить окружение и установить необходимые зависимости. В этом разделе мы рассмотрим основные шаги этого процесса.
1. Установите Python 3
GNURadio требует Python 3 для работы. Вы можете загрузить и установить последнюю версию Python 3 с официального сайта: www.python.org/downloads.
2. Установите Microsoft Visual C++
Одной из зависимостей GNURadio является Microsoft Visual C++. Вы можете скачать и установить его с официального сайта: visualstudio.microsoft.com/vs.
3. Установите зависимости через утилиту vcpkg
Утилита vcpkg позволяет установить необходимые зависимости для GNURadio. Вы можете скачать ее с GitHub: github.com/microsoft/vcpkg.
После установки vcpkg, выполните следующие команды в командной строке:
| Команда | Описание |
|---|---|
| cd path\to\vcpkg | Перейдите в папку, в которую была установлена утилита vcpkg. |
| .\bootstrap-vcpkg.bat | Запустите скрипт bootstrap-vcpkg.bat для настройки vcpkg. |
| .\vcpkg.exe install boost | Установите зависимость boost. |
| .\vcpkg.exe install fftw | Установите зависимость fftw. |
| .\vcpkg.exe install zeromq | Установите зависимость zeromq. |
4. Установите зависимость libusb
Libusb – еще одна зависимость GNURadio. Вы можете скачать и установить ее с официального сайта: libusb.info.
После выполнения всех этих шагов, вы будете готовы установить GNURadio на Windows и начать использовать его для разработки программного обеспечения SDR.
Время на прочтение
10 мин
Количество просмотров 39K
Привет, Хабр.
В третьей части было рассказано, как получить доступ к SDR-приемнику посредством языка Python. Сейчас мы познакомимся с программой GNU Radio — системой, позволяющей создать достаточно сложную конфигурацию радиоустройства, не написав ни единой строчки кода.

Для примера рассмотрим задачу параллельного приема нескольких FM-станций на один приемник. В качестве приемника будем использовать все тот же RTL SDR V3.
Продолжение под катом.
Установка
Для начала работы GNU Radio необходимо установить, дистрибутив для Windows можно скачать здесь. Система эта кроссплатформенная, версии есть также под Linux и под OSX (вроде бы GNU Radio успешно запускали и на Raspberry Pi, но 100% гарантии дать не могу).
По сути, GNU Radio это целый фреймворк для цифровой обработки сигналов, в котором программа «собирается» из отдельных модулей. Есть большое количество уже готовых блоков, при желании также можно создавать свои собственные. Сами модули написаны на С++, а для взаимодействия блоков друг с другом используется Python. Желающие могут посмотреть на API более подробно, но на практике это, скорее всего, не пригодится — все действия можно делать визуально в программе GNU Radio Companion.
Система ориентирована на обработку потоков данных, так что каждый блок обычно имеет вход и выход. Далее, соединяя блоки в редакторе, мы получаем готовую систему. Сам интерфейс GNU Radio довольно простой, сложность состоит в понимании того, что делает тот или иной блок. Как говорилось ранее, низкоуровневая работа с SDR имеет высокий порог входа и требует некоторого знания в DSP и математике. Но мы рассмотрим простую задачу, для которой никаких специальных знаний не потребуется. Итак, приступим.
Начало работы
Запускаем GNU Radio Companion, создаем новый проект, тип проекта выбираем WX GUI, добавляем на экран и соединяем два блока, как показано на скриншоте.
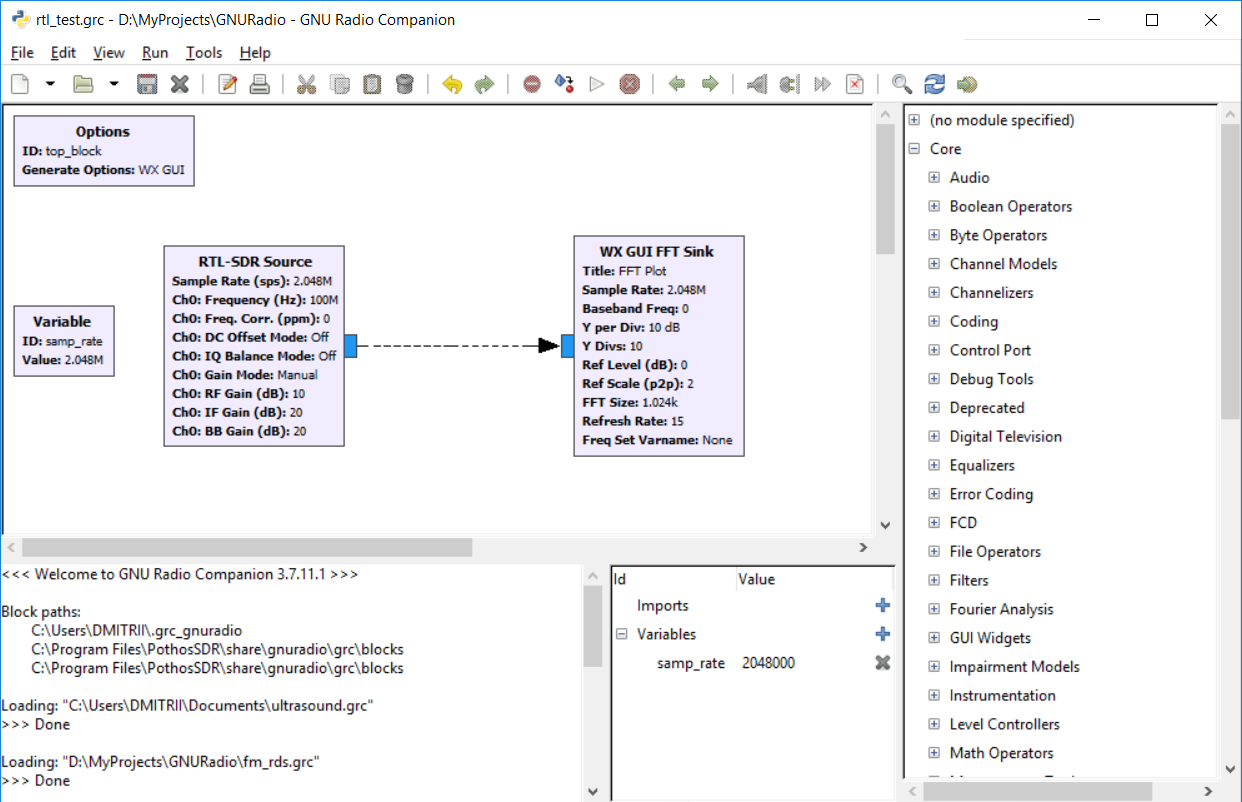
Мы видим два типа блоков — Source (источник) и Sink (выход, «слив»). RTL-SDR — это наш приемник, FFT GUI — это виртуальный спектроанализатор.
Переменную Sample Rate устанавливаем в 2048000, это частота дискретизации нашего приемника. Частоту RTL-SDR оставляем по умолчанию равной 100МГц.
Запускаем проект — все работает, мы видим спектр FM-станций. Первая программа для GNU Radio готова!

Если мы посмотрим лог, то увидим такие строки.
Generating: ‘D:\\MyProjects\\GNURadio\\top_block.py’
Executing: C:\Python27\python.exe -u D:\MyProjects\GNURadio\top_block.py
Да, мы можем посмотреть файл top_block.py, который сгенерил нам GNU Radio Companion. Истинные джедаи могут писать непосредственно в Python, но требуемый код, как мы видим, довольно большой. Мы же создали его за 1 минуту.
top_blocks.py
#!/usr/bin/env python2
# -*- coding: utf-8 -*-
##################################################
# GNU Radio Python Flow Graph
# Title: Top Block
# Generated: Wed May 22 22:05:14 2019
##################################################

if __name__ == '__main__':
    import ctypes
    import sys
    if sys.platform.startswith('linux'):
        try:
            x11 = ctypes.cdll.LoadLibrary('libX11.so')
            x11.XInitThreads()
        except:
            print "Warning: failed to XInitThreads()"

from gnuradio import eng_notation
from gnuradio import gr
from gnuradio import wxgui
from gnuradio.eng_option import eng_option
from gnuradio.fft import window
from gnuradio.filter import firdes
from gnuradio.wxgui import fftsink2
from grc_gnuradio import wxgui as grc_wxgui
from optparse import OptionParser
import osmosdr
import time
import wx


class top_block(grc_wxgui.top_block_gui):

    def __init__(self):
        grc_wxgui.top_block_gui.__init__(self, title="Top Block")

        ##################################################
        # Variables
        ##################################################
        self.samp_rate = samp_rate = 2048000

        ##################################################
        # Blocks
        ##################################################
        self.wxgui_fftsink2_0 = fftsink2.fft_sink_c(
        	self.GetWin(),
        	baseband_freq=0,
        	y_per_div=10,
        	y_divs=10,
        	ref_level=0,
        	ref_scale=2.0,
        	sample_rate=samp_rate,
        	fft_size=1024,
        	fft_rate=15,
        	average=False,
        	avg_alpha=None,
        	title='FFT Plot',
        	peak_hold=False,
        )
        self.Add(self.wxgui_fftsink2_0.win)
        self.rtlsdr_source_0 = osmosdr.source( args="numchan=" + str(1) + " " + '' )
        self.rtlsdr_source_0.set_sample_rate(samp_rate)
        self.rtlsdr_source_0.set_center_freq(100e6, 0)
        self.rtlsdr_source_0.set_freq_corr(0, 0)
        self.rtlsdr_source_0.set_dc_offset_mode(0, 0)
        self.rtlsdr_source_0.set_iq_balance_mode(0, 0)
        self.rtlsdr_source_0.set_gain_mode(False, 0)
        self.rtlsdr_source_0.set_gain(10, 0)
        self.rtlsdr_source_0.set_if_gain(20, 0)
        self.rtlsdr_source_0.set_bb_gain(20, 0)
        self.rtlsdr_source_0.set_antenna('', 0)
        self.rtlsdr_source_0.set_bandwidth(0, 0)


        ##################################################
        # Connections
        ##################################################
        self.connect((self.rtlsdr_source_0, 0), (self.wxgui_fftsink2_0, 0))

    def get_samp_rate(self):
        return self.samp_rate

    def set_samp_rate(self, samp_rate):
        self.samp_rate = samp_rate
        self.wxgui_fftsink2_0.set_sample_rate(self.samp_rate)
        self.rtlsdr_source_0.set_sample_rate(self.samp_rate)


def main(top_block_cls=top_block, options=None):

    tb = top_block_cls()
    tb.Start(True)
    tb.Wait()


if __name__ == '__main__':
    main()
Впрочем, если убрать громоздкую инициализацию, то мы увидим, что ключевых строк кода не так уж много.
from gnuradio import gr
from gnuradio.wxgui import fftsink2
import osmosdr

class top_block(grc_wxgui.top_block_gui):

    def __init__(self):
        grc_wxgui.top_block_gui.__init__(self, title="Top Block")
        self.samp_rate = samp_rate = 2048000
        self.wxgui_fftsink2_0 = fftsink2.fft_sink_c(...)
        self.Add(self.wxgui_fftsink2_0.win)
        self.rtlsdr_source_0 = osmosdr.source(args="numchan=" + str(1) + " " + '' )
        self.connect((self.rtlsdr_source_0, 0), (self.wxgui_fftsink2_0, 0))

def main(top_block_cls=top_block, options=None):
    tb = top_block_cls()
    tb.Start(True)
    tb.Wait()
Так что в принципе, это можно написать вручную. Но мышью оно все-таки быстрее. Хотя возможность поменять код иногда может пригодиться, если захочется добавить какую-то нестандартную логику.
Принимаем FM-радио
Теперь попробуем принять одну из станций. Как было видно из скриншотов, центральная частота приемника 100МГц и ширина полосы пропускания около 2МГц. На спектре мы видим две станции, на 100.1МГц и 100.7МГц соответственно.
Первым шагом необходимо перенести спектр станции в центр, сейчас он отстоит вправо на 100КГц. Для этого вспоминаем школьную формулу умножения косинусов — в результате будет две частоты, сумма и разность — нужная станция сдвинется в центр, что нам и нужно (а лишнее мы потом отфильтруем).
Создаем две переменные для хранения частоты freq_center=100000000 и freq_1=100100000, также добавляем генератор сигналов с частотой freq_center — freq_1.
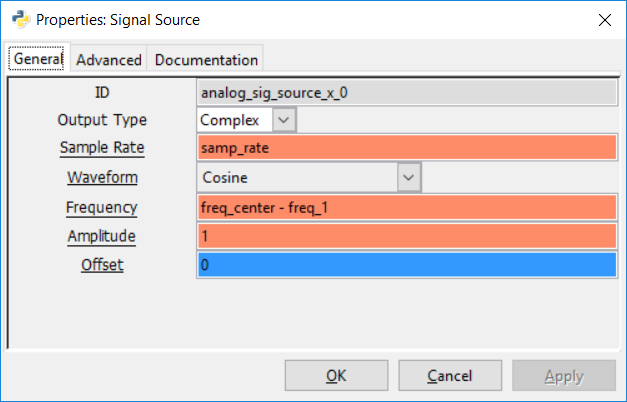
Т.к. система построена на базе Python, то в полях ввода параметров мы можем использовать выражения, что достаточно удобно.
Схема в итоге должна выглядеть так:
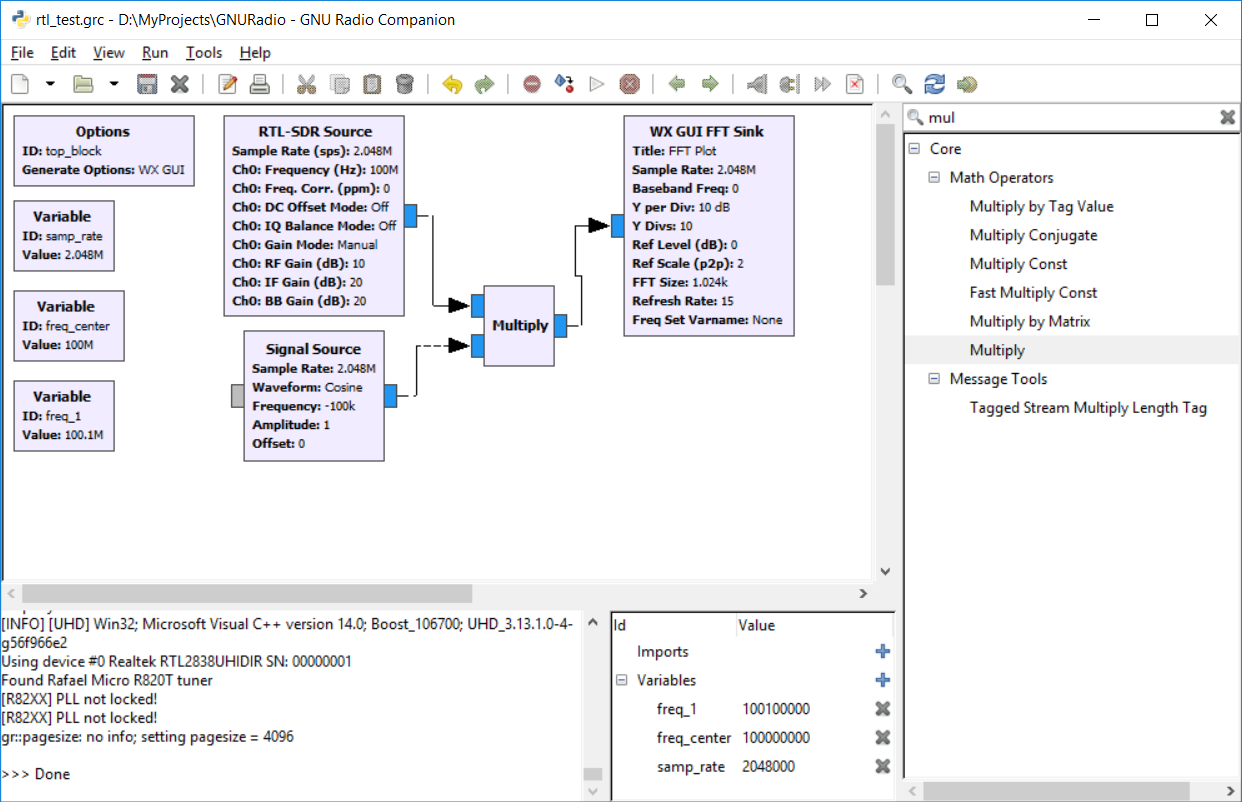
Теперь необходимо добавить сразу несколько блоков — уменьшить тактовую частоту входного сигнала (она равна 2048КГц), отфильтровать сигнал, подать его на FM-декодер, затем еще раз уменьшить тактовую частоту до 48КГц.
Результат показан на картинке:
Считаем внимательно. Мы делим тактовую частоту 2048КГц в 4 раза блоком Rational Resampler (получаем 512КГц), затем после Low Pass фильтра стоит WBFM-декодер с децимацией 10 (получаем 51.2КГц). В принципе, этот сигнал уже можно подать на звуковую карту, но высота тона будет чуть отличаться. Еще раз меняем тактовую частоту в 48/51, в результате будет тактовая частота 48.2КГц, разницей уже можно пренебречь.
Второй важный момент — тип входов. С приемника поступает комплексный IQ-сигнал (входы-выходы синего цвета), с FM-декодера выходит вещественный сигнал — входы и выходы желтого цвета. Если перепутать, ничего не заработает. Подробнее уже было на Хабре, нам достаточно понять общий принцип.
В общем, запускаем, убеждаемся что все работает. Можно запустить программу и слушать радио. Мы пойдем дальше — у нас же все-таки Software Defined радио — добавим одновременный прием второй станции.
Многоканальный прием
Второй приемник добавляется любимым программистским методом — Ctrl+C/Ctrl+V. Добавляем переменную freq_2, копируем блоки и соединяем их точно также.

Результат вполне сюрреалистичный — две FM-станции можно слушать одновременно. Тем же самым методом (Ctrl+V) можно добавить и третью станцию.
Запись
Слушать две станции оригинально, но на практике мало полезно. Сделаем что-то более нужное, например добавим запись звука в отдельные файлы. Это может быть достаточно удобно — с одного физического приемника можно параллельно записывать несколько каналов.
Добавим к каждому выходу компонент File Sink, как показано на скриншоте.
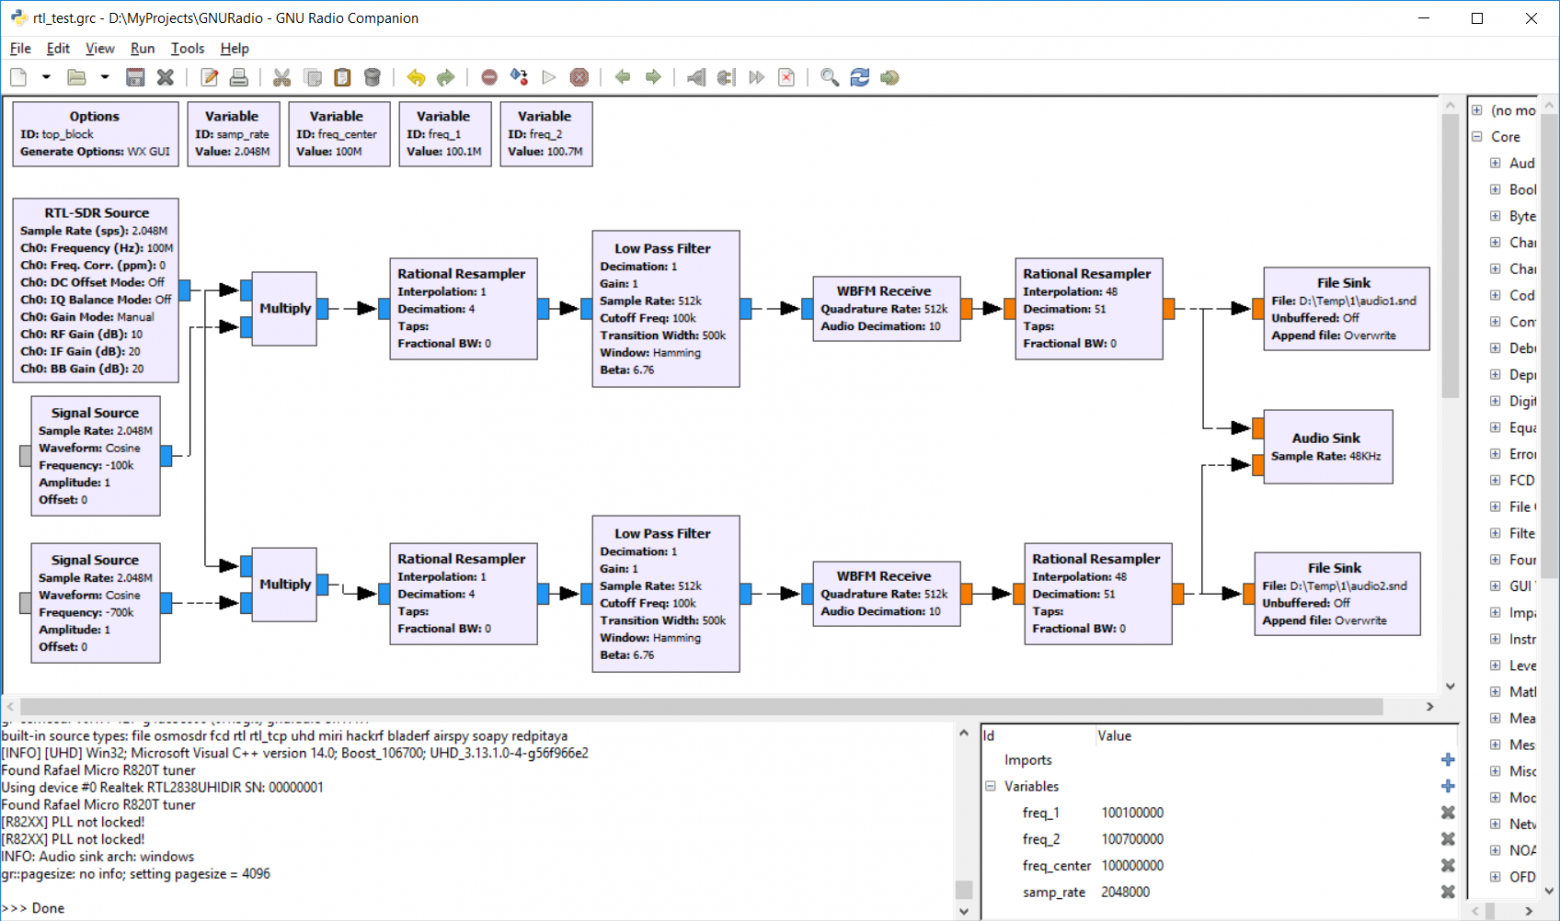
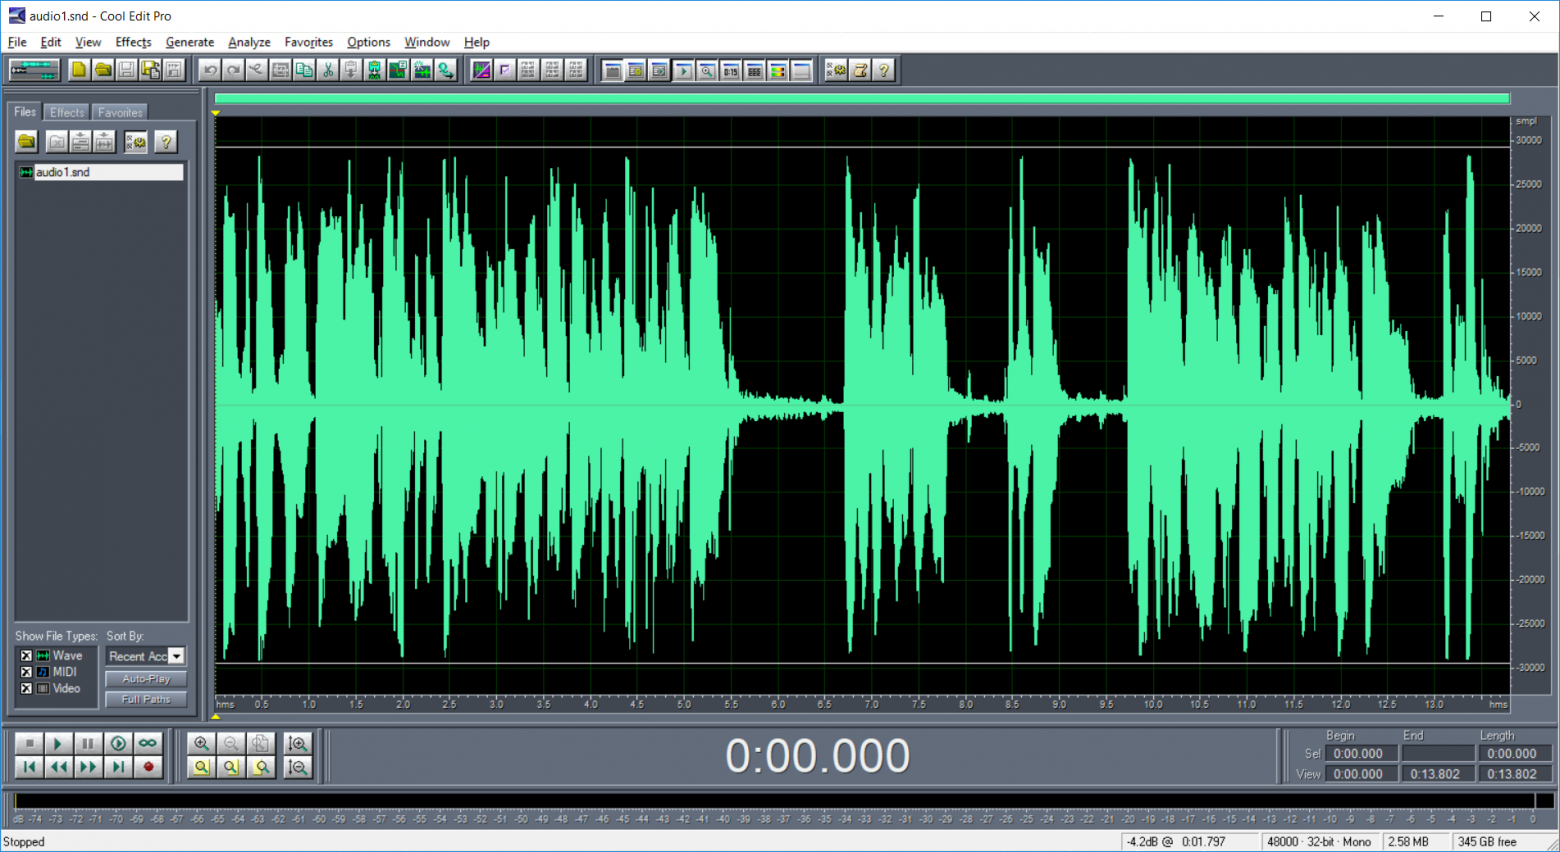
Windows-версия почему-то требует абсолютные пути файлов, иначе запись не работает. Запускаем, убеждаемся что все нормально. Размер сохраняемых файлов довольно большой, т.к. по умолчанию записывается формат float. Запись в формате int оставлю читателям в качестве домашнего задания.
Получившиеся файлы можно открыть в Cool Edit и убедиться, что звук записался нормально.

Разумеется, число записываемых каналов можно увеличить, оно ограничено только полосой пропускания приемника и мощностью компьютера. Кроме File Sink можно использовать и UDP Sink, так что программу можно использовать для трансляции по сети.
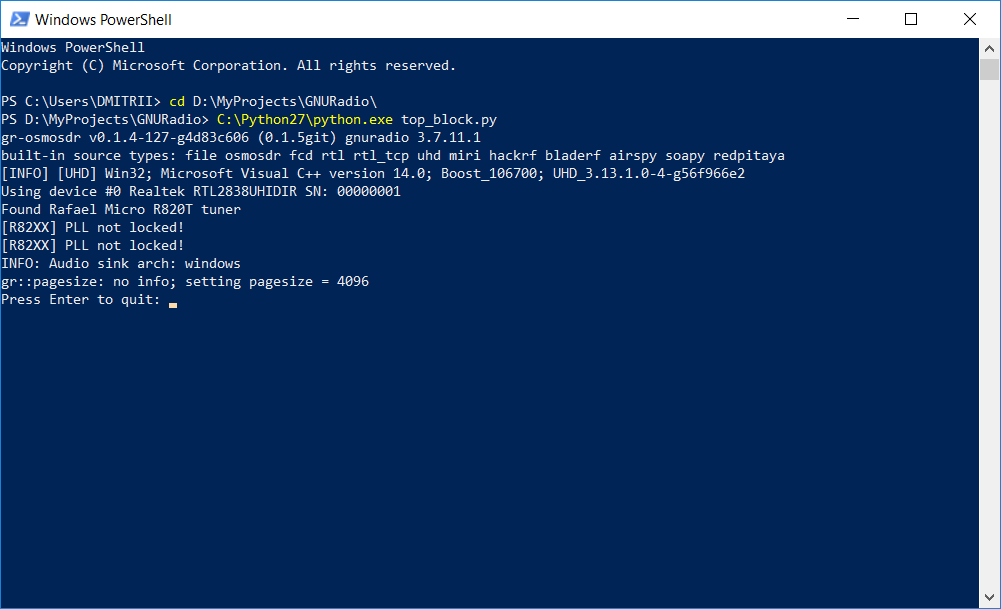
Запуск из командной строки
И последнее. Если использовать программу автономно, например для многоканальной записи, то UI в принципе и не нужен. В верхнем левом блоке Options меняем параметр Run Options на No UI. Запускаем программу еще раз, убеждаемся что все работает. Теперь сохраняем сгенерированный файл top_block.py — мы можем просто запускать его из командной строки, например из bat-файла или из консоли.
Если кому интересно, сгенерированный файл сохранен под спойлером.
recorder.py
#!/usr/bin/env python2
# -*- coding: utf-8 -*-
##################################################
# GNU Radio Python Flow Graph
# Title: Top Block
# Generated: Fri May 24 21:47:03 2019
##################################################

from gnuradio import analog
from gnuradio import audio
from gnuradio import blocks
from gnuradio import eng_notation
from gnuradio import filter
from gnuradio import gr
from gnuradio.eng_option import eng_option
from gnuradio.filter import firdes
from optparse import OptionParser
import osmosdr
import time


class top_block(gr.top_block):

    def __init__(self):
        gr.top_block.__init__(self, "Top Block")

        ##################################################
        # Variables
        ##################################################
        self.samp_rate = samp_rate = 2048000
        self.freq_center = freq_center = 100000000
        self.freq_2 = freq_2 = 100700000
        self.freq_1 = freq_1 = 100100000

        ##################################################
        # Blocks
        ##################################################
        self.rtlsdr_source_0 = osmosdr.source( args="numchan=" + str(1) + " " + '' )
        self.rtlsdr_source_0.set_sample_rate(samp_rate)
        self.rtlsdr_source_0.set_center_freq(freq_center, 0)
        self.rtlsdr_source_0.set_freq_corr(0, 0)
        self.rtlsdr_source_0.set_dc_offset_mode(0, 0)
        self.rtlsdr_source_0.set_iq_balance_mode(0, 0)
        self.rtlsdr_source_0.set_gain_mode(False, 0)
        self.rtlsdr_source_0.set_gain(10, 0)
        self.rtlsdr_source_0.set_if_gain(20, 0)
        self.rtlsdr_source_0.set_bb_gain(20, 0)
        self.rtlsdr_source_0.set_antenna('', 0)
        self.rtlsdr_source_0.set_bandwidth(0, 0)

        self.rational_resampler_xxx_1_0 = filter.rational_resampler_fff(
                interpolation=48,
                decimation=51,
                taps=None,
                fractional_bw=None,
        )
        self.rational_resampler_xxx_1 = filter.rational_resampler_fff(
                interpolation=48,
                decimation=51,
                taps=None,
                fractional_bw=None,
        )
        self.rational_resampler_xxx_0_0 = filter.rational_resampler_ccc(
                interpolation=1,
                decimation=4,
                taps=None,
                fractional_bw=None,
        )
        self.rational_resampler_xxx_0 = filter.rational_resampler_ccc(
                interpolation=1,
                decimation=4,
                taps=None,
                fractional_bw=None,
        )
        self.low_pass_filter_0_0 = filter.fir_filter_ccf(1, firdes.low_pass(
        	1, samp_rate/4, 100000, 500000, firdes.WIN_HAMMING, 6.76))
        self.low_pass_filter_0 = filter.fir_filter_ccf(1, firdes.low_pass(
        	1, samp_rate/4, 100000, 500000, firdes.WIN_HAMMING, 6.76))
        self.blocks_multiply_xx_0_0 = blocks.multiply_vcc(1)
        self.blocks_multiply_xx_0 = blocks.multiply_vcc(1)
        self.blocks_file_sink_0_0 = blocks.file_sink(gr.sizeof_float*1, 'D:\\Temp\\1\\audio2.snd', False)
        self.blocks_file_sink_0_0.set_unbuffered(False)
        self.blocks_file_sink_0 = blocks.file_sink(gr.sizeof_float*1, 'D:\\Temp\\1\\audio1.snd', False)
        self.blocks_file_sink_0.set_unbuffered(False)
        self.audio_sink_0 = audio.sink(48000, '', True)
        self.analog_wfm_rcv_0_0 = analog.wfm_rcv(
        	quad_rate=samp_rate/4,
        	audio_decimation=10,
        )
        self.analog_wfm_rcv_0 = analog.wfm_rcv(
        	quad_rate=samp_rate/4,
        	audio_decimation=10,
        )
        self.analog_sig_source_x_0_0 = analog.sig_source_c(samp_rate, analog.GR_COS_WAVE, freq_center - freq_2, 1, 0)
        self.analog_sig_source_x_0 = analog.sig_source_c(samp_rate, analog.GR_COS_WAVE, freq_center - freq_1, 1, 0)

        ##################################################
        # Connections
        ##################################################
        self.connect((self.analog_sig_source_x_0, 0), (self.blocks_multiply_xx_0, 1))
        self.connect((self.analog_sig_source_x_0_0, 0), (self.blocks_multiply_xx_0_0, 1))
        self.connect((self.analog_wfm_rcv_0, 0), (self.rational_resampler_xxx_1, 0))
        self.connect((self.analog_wfm_rcv_0_0, 0), (self.rational_resampler_xxx_1_0, 0))
        self.connect((self.blocks_multiply_xx_0, 0), (self.rational_resampler_xxx_0, 0))
        self.connect((self.blocks_multiply_xx_0_0, 0), (self.rational_resampler_xxx_0_0, 0))
        self.connect((self.low_pass_filter_0, 0), (self.analog_wfm_rcv_0, 0))
        self.connect((self.low_pass_filter_0_0, 0), (self.analog_wfm_rcv_0_0, 0))
        self.connect((self.rational_resampler_xxx_0, 0), (self.low_pass_filter_0, 0))
        self.connect((self.rational_resampler_xxx_0_0, 0), (self.low_pass_filter_0_0, 0))
        self.connect((self.rational_resampler_xxx_1, 0), (self.audio_sink_0, 0))
        self.connect((self.rational_resampler_xxx_1, 0), (self.blocks_file_sink_0, 0))
        self.connect((self.rational_resampler_xxx_1_0, 0), (self.audio_sink_0, 1))
        self.connect((self.rational_resampler_xxx_1_0, 0), (self.blocks_file_sink_0_0, 0))
        self.connect((self.rtlsdr_source_0, 0), (self.blocks_multiply_xx_0, 0))
        self.connect((self.rtlsdr_source_0, 0), (self.blocks_multiply_xx_0_0, 0))

    def get_samp_rate(self):
        return self.samp_rate

    def set_samp_rate(self, samp_rate):
        self.samp_rate = samp_rate
        self.rtlsdr_source_0.set_sample_rate(self.samp_rate)
        self.low_pass_filter_0_0.set_taps(firdes.low_pass(1, self.samp_rate/4, 100000, 500000, firdes.WIN_HAMMING, 6.76))
        self.low_pass_filter_0.set_taps(firdes.low_pass(1, self.samp_rate/4, 100000, 500000, firdes.WIN_HAMMING, 6.76))
        self.analog_sig_source_x_0_0.set_sampling_freq(self.samp_rate)
        self.analog_sig_source_x_0.set_sampling_freq(self.samp_rate)

    def get_freq_center(self):
        return self.freq_center

    def set_freq_center(self, freq_center):
        self.freq_center = freq_center
        self.rtlsdr_source_0.set_center_freq(self.freq_center, 0)
        self.analog_sig_source_x_0_0.set_frequency(self.freq_center - self.freq_2)
        self.analog_sig_source_x_0.set_frequency(self.freq_center - self.freq_1)

    def get_freq_2(self):
        return self.freq_2

    def set_freq_2(self, freq_2):
        self.freq_2 = freq_2
        self.analog_sig_source_x_0_0.set_frequency(self.freq_center - self.freq_2)

    def get_freq_1(self):
        return self.freq_1

    def set_freq_1(self, freq_1):
        self.freq_1 = freq_1
        self.analog_sig_source_x_0.set_frequency(self.freq_center - self.freq_1)


def main(top_block_cls=top_block, options=None):

    tb = top_block_cls()
    tb.start()
    try:
        raw_input('Press Enter to quit: ')
    except EOFError:
        pass
    tb.stop()
    tb.wait()


if __name__ == '__main__':
    main()
Удобно и то, что система является кросс-платформенной, и получившаяся программа может работать на Linux, Windows и OSX.
Заключение
Можно сказать, что GNU Radio достаточно сложная система, не в плане рисования блоков конечно, а в плане понимания того, как все это работает. Но какие-то несложные вещи сделать вполне посильно и интересно. GNU Radio также удобно использовать как «виртуальную лабораторию» для обучения — к любой части схемы можно подключить виртуальный осциллограф или спектроанализатор и посмотреть, как выглядит сигнал.
Если не будет каких-то отдельных пожеланий, тему SDR-приема наверно можно закрыть — все основные моменты уже рассмотрены, да и количество просмотров от первой к третьей части падает почти по экспоненте (хотя еще можно написать про передачу, но оно требует более дорогого «железа» для тестов чем RTL SDR). Надеюсь все же, что некоторое понимание того как это работает, у читателей осталось. Ну и всем удачных экспериментов.
Discussions
Log In/Sign up to comment
Become a Hackaday.io Member
Create an account to leave a comment.
Already have an account?
Log In.

MWK
wrote 07/04/2020 at 09:13
Step by Step How to install GNURadio , GQRX , and its components and adding system variables and paths in Win 10 64bit ! EASY to make GNU Radio , GQRX run ! ….
you need to do this step by step :
First Download GNURadio Components MWK from this link : https://drive.google.com/open?id=1L9v…
after that unzip it uxing .7z tool or any unzip tool , after that follow this :
1. install : vc_redist.x86.exe
2. install python : python-2.7.15.amd64.msi and make it install for all users
3. now you need to check your environment variables in your pc by right click in your pc icon then click in properties then click in advance system settings then click in Environment Variable
then down in system variable box lock at Path and double click on it then you need to check if paython
path added ,,,, if not you need to add these : click on new to add them like this :
look at your payhon in c directory and copy its location then add it like this : C:\Python27
and add another one :
C:\Python27\Scripts
then click ok and exit 4. now we need to install pip by going to google then right in search : get pip , then go to first link i install pip 20.0.2 , now download get-pip.py by right click on it and save link as then save it to desktop
now open command prompt in window by start then type cmd and open it then check first if the python works by typing in terminal : python now you should see python version and data about it .. so its works … now you need to type crtl+z to go back to command prompt now we need to install the file we download in desktop by typing this : first change directory to Desktop (were is my file download) by : cd Desktop now type this to install it :
python get-pip.py
now wait until install complete .
now exit and go back to main gnuraio components and now we need to install all other tools step by step like this :
we need to install now all (.whl) files :
5. install lxml-3.5.0-cp27-cp27m-win_amd64.Release.whl you need to install it by changing the directory in cmd to the gnuradio components folder . for me its located in Desktop
so in cmd terminal type :
cd C:\Users\MWK\Desktop\GNURadio Components MWK now after im in the folder directory and now i will install the component .whl file by this command :
pip install lxml-3.5.0-cp27-cp27m-win_amd64.Release.whl
after finish installing now continue with these files :
6.
pip install numpy-1.10.4-cp27-cp27m-win_amd64.ReleaseDLL.whl
7.
pip install PyQt4-4.11.4-cp27-cp27m-win_amd64.whl
8.
PyQwt-5.2.1.win-amd64.ReleaseDLL.exe (normal installation)
9.
pip install Cheetah-2.4.4-cp27-cp27m-win_amd64.ReleaseDLL.whl
10.
pip install PyOpenGL-3.1.0-py2-none-any.whl
11.
pip install pygtk-2.22.0-cp27-none-win_amd64.whl
12.
gtk2-runtime-2.24.10-2012-10-10-ash.exe (normal installation)
13.
pip install wx-3.0-cp27-none-win_amd64.ReleaseDLL.whl
14.
wxPython-common-3.0.2.0.win-amd64.ReleaseDLL.exe (normal installation)
15.
uhd_3.9.6-release_x64_VS2015.exe (normall installation) and install for all users 16.
now install GNURadio : this version works correctly with win10 64bit .. newest version i see there is bug to launch .grc files !! so im stay in this gnu version its works good ! install it :
gnuradio_3.7.11_win64.msi
and install it for all users now after finish installation … we need to change environment variables again …so right click on computer icon then
click in properties then advance system settings then environment variables then in system variables down box we need to add grc blocks path by click in new then type this :
in Variable name type :
GRC_BLOCKS_PATH
in Variable value type :
C:\Program Files\GNURadio-3.7\share\gnuradio\grc\blocks
then click ok now we need to check path by double clicking on Path in system variables down box theen check you should have these if not add it by clicking in new :
C:\Python27
C:\Python27\Scripts
C:\Program Files\UHD\bin
C:\Program Files\GNURadio-3.7\bin
C:\Program Files (x86)\GTK2-Runtime\bin
now we need to add python path in not exist down in system variables box by click in new then type :
Variable name :
PYTHONPATH
Variable value :
C:\Program Files\GNURadio-3.7\lib\site-packages
then click ok now after all this steps . just restart your Pc then run GNU Radio companion , by click on start then search by type gnu , its appair the icon of GNURadio Companion you can add it to desktop shortcut ..
and you can just right click on it in menu bar then click on open file location then you see icons you can launch like GQRX and Spectrum Scanner !! or you can go to this directory and send these icons to desktop . its located in :
C:\ProgramData\Microsoft\Windows\Start Menu\Programs\GNURadio 3.7
-GQRX
-GNURadio Companion
-GNURadio Command Prompt
on other Applications folder you can see : -Spectrum Scanner (FFT)
on USRP Applications folder you can see :
-USRP FM Receiver
-USRP Spectrum Scanner (FFT)
Now Enjoing GQRX , GNURadio companion in your Win10 64bit
Are you sure? yes | no
Update March 21:
At the moment on my Windows 10 PC there are GNU Radio 3.7.11 and 3.8.2 installed side by side without issues.
Both can be found following the link below:
http://www.gcndevelopment.com/gnuradio/downloads.htm
I tried some of the precompiled installers but not all worked. I got lucky with 3.7.11 and 3.8.2 :
Version 3.7.11 comes with osmosdr plugin preinstalled. Gr-osmosdr can be used to access AIRSPY and other SDR devices. In addition to that 3.7.11 is compatible with Myriad RF’s GR-limesdr plugin so you can control Lime SDR as well.
Version 3.8.2 comes with soapy and Osmosdr as well.
The direct link to GNU Radio 64 bit 3.7.11 is here :
http://www.gcndevelopment.com/gnuradio/downloads/installers/v1.2.0/gnuradio_3.7.11_win64.msi
The direct link to GNU Radio 64 but 3.8.2 is here:
http://www.gcndevelopment.com/gnuradio/downloads/installers/v3.8.2.1/gnuradio_3.8.2.0_win64.msi
###############################################
In the past I worked with 3.6.4.1 on WinXP, Win7 32 bits and had compiled the instructions below:
Older instruction how to install GNU RADIO 3.6.4.1 on Windows 7 (32 bit)
Most probably, these will work for Windows XP and 8 (32 bit) as well.
I wanted to install GNU Radio 3.6.4.1 on Windows 7 and found some excellent instructions here (click) . User Bhaskar11 uploaded them and below I have just recompiled the instructions based on my experience. Following these instructions GNU Radio worked on my Win7 machine.
Note: I could not get QT GUI blocks working , but this is not a problem for my needs, since WX GUI blocks work fine including FFT, Waterfall, Scope etc.
I have gathered all necessary packages required to install GNU Radio 3.6.4.1 in one place and created a zip folder “stuff_gnuradio” and uploaded it to Dropbox. You just need to download it from there , unzip it to C:\stuff_gnuradio and follow the instructions.
Download “stuff_gnuradio” folder (177MB)
INSTRUCTIONS how to install GNU-RADIO 3.6.4.1 on Windows 7 (32 bit).
Most probably, these will work for Windows XP and 8 (32 bit) as well.
GNU Radio will be installed to C:\gnuradio and the UHD USRP driver to C:\UHD.
Follow the …21 steps below 🙂
1.
Read carefully the provided html file:
“[Discuss-gnuradio] Successful installation of GNURadio 3.6.4.1 on Window”
All the instructions below come from this link
All credits go to user Bhaskar11 !
I have just recompiled his instructions based on my experience on Win7 and created a zip folder with all the necessary files in one place.
2.
Ensure your Internet connection is up and running
3.
If not already done, download all the necessary files (stuff_gnuradio.zip) from Dropbox and unzip this folder to C:\stuff_gnuradio
4.
Ensure that you have administrative privileges
5.
Go to the stuff_gnuradio folder, double click “vcredist_x86” and install C++ 2010 redistributable package, only if required.
If it says a copy is already installed and offers to repair it, accept to repair.
If it says a later version is already installed, then accept to close.
6.
Double click “python-2.7.3”, select install for all users and keep the default settings.
7.
Double click “lxml-3.0.2.win32-py2.7” and keep the default settings.
8.
Double click “numpy-1.7.1-win32-superpack-python2.7” and keep the default settings.
9.
Double click “PyQt-Py2.7-x86-gpl-4.9.6-1” and keep the default settings.
10.
Double click “PyQwt-5.2.1-py2.7-x32-pyqt4.9.6-numpy1.7.1” and keep the default settings
11.
At this point you need to install pip.
Open a command terminal (cmd) and change directory to the “stuff_gnuradio” folder:
cd C:\stuff_gnuradio
Then type:
python get-pip.py
If this does not work, you need to add python to your system path.
To do so, add the following paths to your “Path” in the “System variables” :
C:\Python27\;C:\Python27\Scripts;
Close the command terminal you opened before and open a new one.
Type again :
cd C:\stuff_gnuradio
Then type
python get-pip.py
Now the installation of pip should start.
12.
Install the Cheetah whl file by typing
pip install Cheetah-2.4.4-cp27-none-win32.whl
By the way , pip must be recognized as a command . If not,you need to add C:\Python27\Scripts to your “Path” in the “System variables” as mentioned above.
13.
Install the PyOpenGL whl file by typing:
pip install PyOpenGL-3.1.1b1-cp27-none-win32.whl
14.
Double click “pygtk-all-in-one-2.24.2.win32-py2.7” and keep the default settings.
15.
Double click “wxPython-2.8.12.1.win32-py2.7” and keep the default settings.
On Windows 7 and 8 you may get:
Runtime error R6034 “An application has made an attempt to load the C runtime library incorrectly.
Please contact the application’s support team for more information.”
Ignore the message and continue.
16.
Double click “wxPython-common-2.8.12.1.win32-py2.7”
On Windows 7 and 8 you may get:
Runtime error R6034 “An application has made an attempt to load the C runtime library incorrectly.
Please contact the application’s support team for more information.”
Ignore the message and continue.
17.
If you have a USRP install the drivers now by double-clicking
“uhd_003.005.004-release_Win32”
This is not the latest UHD driver.
I tried the latest but could not get connected to my USRP1.
Select the option to “Add gnuradio to the system path for all users”.
Change installation directory to C:\UHD.
All other settings default.
Double check that your system path includes C:\UHD\bin; If not,add it.
When you plug in the USRP1 for the first time, point it to this directory:
erllc_uhd_winusb_driver found in the stuff_gnuradio folder.
18.
Double click “gnuradio_3.6.4.1_Win32”
Select the option to “Add gnuradio to the system path for all users”.
Change installation directory to C:\gnuradio.
On Windows 8 you may receive “Warning! PATH too long installer unable to modify PATH!” which seems to be a NSIS
installer problem when it finds the total path to be longer than 1024.
If you receive this message then you must manually add the installation bin directory to the system path.
Double check that your system path includes C:\gnuradio\bin; If not,add it.
19.
Manually add the PYTHONPATH environment variable.
Create a new environmental variable “PYTHONPATH”
Since we have installed gnuradio to C:\gnuradio , its value should be:
C:\gnuradio\lib\site-packages;
20.
Check that the GRC_BLOCKS_PATH environment variable has been set to by GNURadio installer.
Normally this should happen automatically.
If it has not been set, then first create a system variable GRC_BLOCKS_PATH and then set its value manually:
C:\gnuradio\share\gnuradio\grc\blocks;
21.
You are done! Close all open command windows, open a new one and type
gnuradio-companion.py
This will open GNU Radio!
Open TEST_GRC.grc file , hit F5( Generate) ,then hit F6(Execute) .
You can also use the provided “gnuradio.bat” file and create a shortcut to easily launch GNU Radio.
Enjoy !
Michael Margaras – SV1CAL