Время на прочтение
6 мин
Количество просмотров 551K
Это первая статья в серии, где я буду документировать мой опыт написания веб-приложения на Python, используя микрофреймворк Flask.
Здесь список всех статей в серии:
Часть 1: Привет, Мир!
Часть 2: Шаблоны
Часть 3: Формы
Часть 4: База данных
Часть 5: Вход пользователей
Часть 6: Страница профиля и аватары
Часть 7: Unit-тестирование
Часть 8: Подписчики, контакты и друзья
Часть 9: Пагинация
Часть 10: Полнотекстовый поиск
Часть 11: Поддержка e-mail
Часть 12: Реконструкция
Часть 13: Дата и время
Часть 14: I18n and L10n
Часть 15: Ajax
Часть 16: Отладка, тестирование и профилирование
Часть 17: Развертывание на Linux (даже на Raspberry Pi!)
Часть 18: Развертывание на Heroku Cloud
Моя предыстория
Я разработчик ПО с двузначным числом лет опыта разработки комплексных приложений на нескольких языках. Впервые я познакомился с Python для создания привязок к C++ библиотеке на работе. Вдобавок к Python, я писал веб-приложения на PHP, Ruby, Smalltalk и, верите вы или нет, еще на С++. Из всего этого, я нахожу комбинацию Python/Flask самой гибкой.
Приложение
Приложение, которое я собираюсь разрабатывать как часть этого руководства, является сервером микроблогов, и я решил назвать его microblog. Довольно креативно, я знаю.
Во время нашего прогресса я затрону следующие темы:
- Управление пользователями, включая управление входами, сессиями, ролями пользователя, профилями и пользовательскими аватарами
- Управление базой данных, включая миграцию
- Поддержка форм, включая валидацию полей
- Пагинация длинных списков элементов
- Полнотекстовый поиск
- E-mail уведомления пользователей
- HTML шаблоны
- Поддержка нескольких языков
- Кеширование и другая оптимизация производительности
- Методы отладки для серверов разработки и продакшна
- Установка на продакшн сервер
Как видите, я весьма значительно берусь за все это. Надеюсь, что это приложение, когда я его закончу, станет чем-то вроде шаблона для написания других веб-приложений.
Требования
Если ваш компьютер поддерживает Python 2.6/2.7, то все, вероятно, пойдет хорошо. Приложение из руководства должно нормально работать на Windows, OS X и Linux.
Это руководство подразумевает, что вы знакомы с окном терминала (командной консолью в случае Windows), и вы знаете основные команды для работы с файлами вашей ОС. Если это не так, то перед тем как продолжить, я рекомендую вам ознакомиться с тем, как создавать директории, копировать файлы и т.д., используя консоль.
Наконец, вы должны чувствовать себя свободно в написании кода на Python. Знакомство с модулями и пакетами этого языка также не помешает.
Установка Flask
Ну что ж, приступим!
Если у вас еще не установлен Python 2.7, то берем его отсюда.
Теперь нам нужно установить Flask и несколько расширений, которые мы будем использовать. Я предпочитаю создание виртуального окружения, где все это будет установлено таким образом, что ваша основная установка Python затронута не будет. В качестве бонуса, вам не нужен будет root доступ для установки таким способом.
Итак, открываем терминал, выбираем место, где будет ваше приложение, и создаем новую папку, в которой оно будет содержаться. Назовем эту папку microblog.
Далее скачиваем virtualenv.py и кладем его внутрь новой папки.
Чтобы создать новое окружение введите следующую команду:
python virtualenv.py flask
Эта команда создаст полноценное окружение Python внутри папки flask
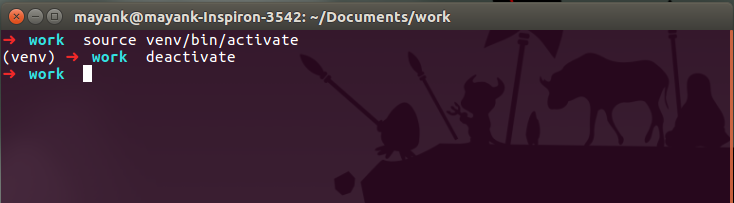
Виртуальные окружения могут быть активированы и деактивированы по желанию. Активированное окружение добавляет путь своей папки bin в path системы, например, когда вы вызываете интерпретатор python, то получаете версию текущего окружения, а не системную. Лично я никогда не любил это свойство, поэтому ни разу не активировал ни одно из моих окружений, вместо этого я просто вызывал тот интерпретатор, который хотел, печатая его путь.
Прим. пер.: Перед тем как вы начнете вводить команды, хочу отметить, что в комментариях к девятой части отметится баг в flask-whooshalchemy, исправленную версию можнонужно скачать отсюда (репозиторий автора)
Если вы пользователь Linux, OS x или Cygwin, установите flask и расширения, вводя следующие команды одну за одной:
Список команд
flask/bin/pip install flask==0.9
flask/bin/pip install flask-login
flask/bin/pip install flask-openid
flask/bin/pip install flask-mail
flask/bin/pip install sqlalchemy==0.7.9
flask/bin/pip install flask-sqlalchemy==0.16
flask/bin/pip install sqlalchemy-migrate
flask/bin/pip install flask-whooshalchemy==0.54a
flask/bin/pip install flask-wtf==0.8.4
flask/bin/pip install pytz==2013b
flask/bin/pip install flask-babel==0.8
flask/bin/pip install flup
Если же вы пользователь Windows, то команды слегка отличаются:
Список команд
flask\Scripts\pip install flask==0.9
flask\Scripts\pip install flask-login
flask\Scripts\pip install flask-openid
flask\Scripts\pip install sqlalchemy==0.7.9
flask\Scripts\pip install flask-sqlalchemy==0.16
flask\Scripts\pip install sqlalchemy-migrate
flask\Scripts\pip install flask-whooshalchemy==0.54a
flask\Scripts\pip install flask-wtf==0.8.4
flask\Scripts\pip install pytz==2013b
flask\Scripts\pip install flask-babel==0.8
flask\Scripts\pip install flup
Эти команды скачают и установят все пакеты, которые мы будем использовать в нашем приложении.
Учтите, что мы собираемся использовать Flask 0.9, а не последнюю версию. Flask 0.10 не было довольно долго и некоторые расширения не готовы для работы с данной версией. Также есть несколько несовместимостей между пакетами и последней версией pip, которые решены использованием конкретных версий для установки.
Windows пользователей ждет еще один шаг. Наблюдательный читаель заметит, что в списке команд для Windows отсутствует flask-mail. Это расширение не устанавливается чисто на Windows, поэтому мы пойдем обходным путем:
flask\Scripts\pip install --no-deps lamson chardet flask-mail
Я не буду вдаваться в подробности, поэтому если вы хотите узнать больше, прочтите документацию к flask-mail.
Если установка всех пакетов прошла успешно, вы можете удалить virtualenv.py, поскольку файл нам больше не понадобится.
«Hello, World!» в Flask
Теперь у вас есть подпапка flask, в вашей папке microblog, содержащая интерпретатор Python и фреймворк Flask с расширениями, которые мы будем использовать в этом приложении. Настало время написать наше первое веб-приложение!
После того как вы переместились папку microblog, давайте создадим основную структуру папок для нашего приложения:
mkdir app
mkdir app/static
mkdir app/templates
mkdir tmp
В папку app мы поместим само наше приложение. Подпапка static нужна для хранения статики, такой как картинки, javascript файлы и таблицы стилей. Подпапка templates, очевидно, предназначена для хранения наших шаблонов.
Давайте начнем с создания простого скрипта инициализации нашего пакета app (файл app/__init__.py)
from flask import Flask

app = Flask(__name__)
from app import views
Скрипт выше просто создает объект приложения (наследуя Flask), затем импортирует модуль представлений, который мы еще не написали.
Представления — это обработчики, которые отвечают на запросы веб-браузера. Представления в Flask пишутся как Python функции. Каждая функция представления сопоставляется с одним или несколькими запросами URL.
Напишем нашу первую функцию представления (файл app/views.py)
from app import app

@app.route('/')
@app.route('/index')
def index():
    return "Hello, World!"
Это весьма простое представление, которое просто возвращает строку для отображения в пользовательском браузере. Два декоратора route создают привязку адресов / и /index к этой функции.
Последним шагом для получения полностью работающего веб-приложения будет создание скрипта, который стартует веб-сервер нашего приложения. Давайте назовем скрипт run.py и положим его в корневой каталог (microblog/):
#!flask/bin/python
from app import app
app.run(debug = True)
Скрипт просто импортирует переменную app из нашего пакета app и вызывает метод run для того, чтобы запустить сервер. Помните, что переменная app — экземпляр класса Flask, мы создали его выше.
Для запуска вашего приложения просто запустите скрипт. На OS X, Linux и Cygwin вам следует пометить файл исполняемым перед тем как вы сможете его запустить.
chmod a+x run.py
Тогда скрипт может быть вызван просто:
./run.py
В Windows процесс немного отличается. Нет необходимости помечать файл исполняемым. Вместо этого вам нужно запустить скрипт как аргумент интерпретатора Python:
flask/Scripts/python run.py
После старта сервер будет прослушивать порт 5000, ожидая соединений. Теперь откроем браузер и введем следующий URL в адресную строку:
Или же вы можете использовать эту ссылку:
http://localhost:5000/index
Теперь вы увидели маршрутизацию в действии? Первый URL привязан к /, в то время как второй к /index. Оба маршрута ассоциированы с нашей функцией представления, поэтому они дают одинаковый результат. Если вы введете любой другой маршрут, то получите ошибку, так как только эти два были привязаны к функции представления.
Когда вы закончите играть с сервером вы можете просто нажать Ctrl-C, чтобы остановить его.
И этим я хочу закончить первую часть этого руководства.
Те из вас, кто поленился печатать, могут скачать код из этого руководства ниже:
Скачать microblog-0.1.zip.
Обратите внимание, что вам нужно установить Flask, чтобы запустить приложение из архива выше.
Что дальше
В следующей части серии мы изменим наше маленькое приложение для использования HTML шаблонов.
Надеюсь увидимся в следующей части.
Мигель
Flask is a powerful web framework for Python that allows developers to build scalable and flexible web applications. While setting up Flask on Linux or macOS can be relatively straightforward, the process can be a bit more complex on Windows. In this guide, we’ll walk you through the steps to set up Flask on Windows 10 using VS Code.
Step 1: Install Python
Before installing Flask, we need to install Python on our Windows machine. Go to the official Python website and download the latest version of Python for Windows.
Once the download is complete, run the installer and follow the instructions to install Python on your system. During the installation process, make sure to select the option to add Python to your system path.
Step 2: Install VS Code
Next, we’ll need to install Visual Studio Code (VS Code) on our system. Go to the official VS Code website and download the latest version of VS Code for Windows.
Once the download is complete, run the installer and follow the instructions to install VS Code on your system.
Step 3: Create a Virtual Environment
After installing Python and VS Code, we’ll need to create a virtual environment for our Flask project. A virtual environment is a self-contained environment that allows us to install Python packages without affecting the global Python installation on our system.
To create a virtual environment, open a new terminal window in VS Code and navigate to the root directory of your project. Then, run the following command to create a new virtual environment:
python -m venv venv
Enter fullscreen mode
Exit fullscreen mode
This command will create a new virtual environment named ‘venv’ in the root directory of your project.
Step 4: Activate the Virtual Environment
After creating the virtual environment, we need to activate it. To activate the virtual environment, run the following command in the terminal:
venv\Scripts\activate
Enter fullscreen mode
Exit fullscreen mode
This command will activate the virtual environment, and you’ll see the name of your virtual environment in the terminal prompt.
Step 5: Install Flask
With the virtual environment activated, we can now install Flask using pip, the package manager for Python. To install Flask, run the following command in the terminal:
pip install flask
Enter fullscreen mode
Exit fullscreen mode
This command will download and install Flask and all its dependencies in your virtual environment.

Come on peepal… don’t sleep 😉😉😉
There’s more…!
Step 6: Create a Flask Application
Now that we have Flask installed, we can create a new Flask application. Create a new Python file named app.py in the root directory of your project and add the following code:
from flask import Flask

app = Flask(__name__)

@app.route('/')
def index():
    return 'Hello, World!'
Enter fullscreen mode
Exit fullscreen mode
This code will create a new Flask application with a single route that returns the string ‘Hello, World!’ when the root URL is accessed.
Step 7: Run the Flask Application
With the Flask application created, we can now run it using the following command:
flask run
Enter fullscreen mode
Exit fullscreen mode
This command will start the Flask development server, and you’ll be able to access your application by navigating to http://localhost:5000/ in your web browser.
Step 8: Debugging with VS Code

Debugging is an essential part of any software development process, and VS Code makes it easy to debug Flask applications.
-
Open your Flask project in VS Code.
-
Make sure you have the Python extension installed in VS Code. If not, you can install it from the VS Code Marketplace.
-
In the VS Code editor, click on the «Run and Debug» icon on the left-hand side panel, or press Ctrl + Shift + D on your keyboard.
-
This will open the «Run and Debug» panel in VS Code. Click on the «create a launch.json file» link to create a new launch configuration for your Flask application.
-
In the «Select Environment» dropdown, select «Python». This will create a new launch.json file in the .vscode folder of your project.
-
Modify the configuration settings in the launch.json file as follows:
{
    "version": "0.2.0",
    "configurations": [
        {
            "name": "Python: Flask",
            "type": "python",
            "request": "launch",
            "module": "flask",
            "env": {
                "FLASK_APP": "app.py",
                "FLASK_ENV": "development",
                "FLASK_DEBUG": "1"
            },
            "args": [
                "run",
                "--no-debugger",
                "--no-reload"
            ],
            "jinja": true
        }
    ]
}
Enter fullscreen mode
Exit fullscreen mode
Here, the «FLASK_APP»: «app.py» setting should match the name of the main Flask application file in your project. The «FLASK_ENV»: «development» and «FLASK_DEBUG»: «1» settings enable Flask’s development mode and debugger, respectively.
-
Place a breakpoint in your Flask application code where you want to start debugging.
-
Click on the «Start Debugging» button in the «Run and Debug» panel, or press F5 on your keyboard.
-
This will start the Flask server with the debugger attached. When the breakpoint is hit, the execution will pause, and you can inspect variables and step through the code using the debugging controls in the VS Code editor.
-
You can also use the «Debug Console» panel in VS Code to interactively run Python commands and inspect variables during debugging.
Debugging your Flask application with VS Code can save you a lot of time and effort in finding and fixing issues in your code. I hope this guide helps you set up and use VS Code’s debugging capabilities with Flask.

Until next time 😜
Flask is basically a Python module. It can work with Python only and it is a web-developing framework. It is a collection of libraries and modules. Frameworks are used for developing web platforms. Flask is such a type of web application framework. It is completely written in Python language. Unlike Django, it is only written in Python. As a new user, Flask is to be used. As it is easier to handle. As it is only written in Python, before installing Flask on the machine, Python should be installed previously.
Features of Python Flask:
- Flask is easy to use and easily understandable for new users in Web Framework.
- It can also be used as any third-party plugin extension.
- It is also used for prototyping purposes.
Install Virtual Environment
We use a module named virtualenv which is a tool to create isolated Python environments. virtualenv creates a folder that contains all the necessary executables to use the packages that a Python project would need.
pip install virtualenv
Create Python virtual environment
Go to the local directory where you want to create your Flask app.
virtualenv venv
Activate a virtual environment based on your OS
For windows > venv\Scripts\activate
For linux > source ./venv/bin/activate
Install Flask on Windows or Linux
Step 1: Make sure that Python PIP should be installed on your OS. You can check using the below command.
pip -V
or
pip --version
Step 2: At first, open the command prompt in administrator mode. Then the following command should be run. This command will help to install Flask using Pip in Python and will take very less time to install. According to the machine configuration, a proper Flask version should be installed. Wait for some time till the process is completed. After completion of the process, Flask is completed successfully, the message will be displayed. Hence Installation is successful.
pip install flask

Step 3: After that, also the following two commands should be run. These commands will start Flask in the command prompt. Hence, the process is completed successfully.
python
import flask

Last Updated :
21 Jun, 2023
Like Article
Save Article
Introduction
Flask is a micro web framework purely written in Python that allows us to build web applications. Flask is a lightweight framework that helps in web development using Python.
Some of you who have already worked with Flask know there are two ways to run the Flask application.
app.run()- not the only option
After writing minimal code for our application, we use app.run() in our IDE or Code editor to run the Flask app.
It is an excellent and easy way to get started and see our app on the web, but as developers, we must learn new things for no one but ourselves to keep enhancing our experience.
Flask provides the flask run CLI command for running our applications from our terminals on Windows, macOS, and Linux.
We’ll talk about how to run our Flask application from the command line.
I’m assuming you’re familiar with Flask, but if you aren’t, don’t worry. In this tutorial, we’ll start from scratch.
Creating virtual environments
We’ll create two Python virtual environments for two versions of Flask. One is for Flask v2.2.x, and another is for Flask less than v2.2.x.
If you’re wondering why we’ll be working on two Flask versions. Then I must inform you that after Flask v2.2, new CLI commands were added to run the flask app from the terminal, and prior to Flask v2.2, we used different CLI commands. As a result, we’ll see both scenarios.
Please create a new directory or make it using the mkdir command in your terminal and set up the virtual environments.
I am using the virtualenv package for better performance and features.
|
cd cli_flask virtualenv Flask_X virtualenv Flask_Y |
Installing Flask
Activate your Flask_X application and install Flask v2.2.1.
|
# Activating Flask_X .\Flask_X\Scripts\activate # Installing Flask v2.2.1 (Flask_X)> pip install Flask==2.2.1 |
Similarly, with the application Flask_Y, we’ll activate and install Flask v1.1.4.
|
# Activating Flask_Y .\Flask_Y\Scripts\activate # Installing Flask v1.1.4 (Flask_Y)> pip install Flask==1.1.4 |
For detailed knowledge of Python virtual environments. Click here
Creating Flask App
We need to write some code to make our minimal Flask app. Refer to the official site for a quick start guide to creating a minimal flask app in just a few lines of code.
|
from flask import Flask app = Flask(__name__) @app.route(«/») def hello_world(): return «<p>Hello, World!</p>» |
We’ll add the same code inside the app.py file for both applications. Open your IDE or Code editor and make an app.py file inside the directory Flask_X. The same goes for Flask_Y.
Flask_X > app.py
|
from flask import Flask app = Flask(__name__) @app.route(«/») def hello_world(): return «<h1>Flask_X Application</h1> <h2>Hey, there Developers!</h2>» |
Flask_Y > app.py
|
from flask import Flask app = Flask(__name__) @app.route(«/») def hello_world(): return «<h1>Flask_Y Application</h1> <h2>Hey, there Geeks!</h2>» |
CLI commands
Primarily, we use the app.run() because it seems to be a more convenient way to start our Flask application, but it got some disadvantages too.
We will run our Flask application from our terminal, which is the recommended way by the Flask project.
Note: The CLI commands used in this tutorial are for Command Prompt(CMD) on Windows Operating System.
For the latest version
With the release of the latest versions of Flask, --app flag was added, which is used to specify how to load the application.
Running the development server
|
(Flask_X)> flask —app app run |
We used the --app and then specified our Flask application name to tell Flask that you have to run that specific application.
However, we can directly run the command flask run, and it will run successfully because it will try to import and detect the application instance as a .py file or package.
If no instance is found, the command will look for a factory function named create_app or make_app that returns an instance.
WARNING: Do not use this command to run your application on the production server. Use the development server for development.
Debug mode
Do you realize how useful enabling debug mode when running the Flask app can be?
If we enable debug mode, we won’t have to restart our server every time we make changes to the code because it will enable the reloader and interactive debugger by default, allowing us to easily read and see the errors.
--debug option is used to enable debug mode.
|
(Flask_X)> flask —app app —debug run ......... * Serving Flask app ‘app’ * Debug mode: on * Running on http://127.0.0.1:5000 Press CTRL+C to quit * Restarting with stat * Debugger is active! * Debugger PIN: 584-527-312 |
Handling environment variables
.env files are used to store highly confidential information which is not supposed to be shown publicly.
Flask does not load or read .env file when running the app by default. Hence Flask shows a warning.
Flask_X > app.py
|
from flask import Flask import os app = Flask(__name__) env_file = os.environ.get(«TEXT») @app.route(«/») def hello_world(): return f«<h1>{env_file}</h1>» |
When we try to run the Flask app from the cmd
|
(Flask_X)> flask —app app —debug run ......... * Tip: There are .env or .flaskenv files present. Do «pip install python-dotenv» to use them. |
To avoid the warning, install the python-dotenv package. After that, try to rerun the Flask app, and this time the Flask app will read the .env file.

Running on a different port
Use --port flag to run the Flask app on a different port other than port=5000.
|
(Flask_X)> flask run —port 4000 ......... Running on http://127.0.0.1:4000 Press CTRL+C to quit |
For the older version
--app flag is unavailable for Flask less than v2.2.x. Instead, we need to use FLASK_APP command.
Setting up
We need to set up our Flask app first to run it.
|
(Flask_Y)> set FLASK_APP=app (Flask_Y)> flask run |
WARNING: Do not use this command to run your application on the production server. Use the development server for development.
Debug mode
To enable debug mode, we need to set the FLASK_DEBUG value to 1.
|
(Flask_Y)> set FLASK_DEBUG=1 (Flask_Y)> flask run ......... * Serving Flask app «app» (lazy loading) * Environment: production WARNING: This is a development server. Do not use it in a production deployment. Use a production WSGI server instead. * Debug mode: on * Restarting with stat * Debugger is active! * Debugger PIN: 151-573-460 * Running on http://127.0.0.1:5000/ (Press CTRL+C to quit) |
Another way to enable debug mode by default is to set the FLASK_ENV value to development.
|
(Flask_Y)> set FLASK_ENV=development (Flask_Y)> flask run ......... * Serving Flask app «app» (lazy loading) * Environment: development * Debug mode: on * Restarting with stat * Debugger is active! * Debugger PIN: 151-573-460 * Running on http://127.0.0.1:5000/ (Press CTRL+C to quit) |
Running on a different port
By default, the Flask app runs on the port=5000. To run our Flask app on ports other than 5000 we have to set FLASK_RUN_PORT value to any port number.
|
(Flask_Y)> set FLASK_RUN_PORT=3001 (Flask_Y)> flask run ......... Running on http://127.0.0.1:3001/ (Press CTRL+C to quit) |
Conclusion
It’s always been a difficult decision to run the Flask app through the app.run() or the flask run command. You can use either command, depending on your comfort or preference.
Both commands have nearly identical features, but there is one minor distinction. There is no command-line interface for app.run(). It does, however, directly invoke the run() method on the object, whereas the flask run command needs to learn where our Flask app instance is located, which it does by setting the FLASK_APP environment variable to point to it.
After all, in this tutorial, we’ve learned.
- how to run the Flask app using the command-line interface.
- how to run the Flask app on different ports.
- how to handle
.envfiles. - how to enable a debugger for easier viewing of errors.
Furthermore, we have a thorough understanding of how to create and activate Python virtual environments in Windows using a command prompt.
That’s all for now
Keep Coding✌✌
Flask is a lightweight Python framework for web applications that provides the basics for URL routing and page rendering.
Flask is called a «micro» framework because it doesn’t directly provide features like form validation, database abstraction, authentication, and so on. Such features are instead provided by special Python packages called Flask extensions. The extensions integrate seamlessly with Flask so that they appear as if they were part of Flask itself. For example, Flask doesn’t provide a page template engine, but installing Flask includes the Jinja templating engine by default. For convenience, we typically speak of these defaults as part of Flask.
In this Flask tutorial, you create a simple Flask app with three pages that use a common base template. Along the way, you experience a number of features of Visual Studio Code including using the terminal, the editor, the debugger, code snippets, and more.
The completed code project for this Flask tutorial can be found on GitHub: python-sample-vscode-flask-tutorial.
If you have any problems, you can search for answers or ask a question on the Python extension Discussions Q&A.
Prerequisites
To successfully complete this Flask tutorial, you must do the following (which are the same steps as in the general Python tutorial):
-
Install the Python extension.
-
Install a version of Python 3 (for which this tutorial is written). Options include:
- (All operating systems) A download from python.org; typically use the Download button that appears first on the page.
- (Linux) The built-in Python 3 installation works well, but to install other Python packages you must run
sudo apt install python3-pipin the terminal. - (macOS) An installation through Homebrew on macOS using
brew install python3. - (All operating systems) A download from Anaconda (for data science purposes).
-
On Windows, make sure the location of your Python interpreter is included in your PATH environment variable. You can check the location by running
pathat the command prompt. If the Python interpreter’s folder isn’t included, open Windows Settings, search for «environment», select Edit environment variables for your account, then edit the Path variable to include that folder.
Create a project environment for the Flask tutorial
In this section, you will create a virtual environment in which Flask is installed. Using a virtual environment avoids installing Flask into a global Python environment and gives you exact control over the libraries used in an application.
-
On your file system, create a folder for this tutorial, such as
hello_flask. -
Open this folder in VS Code by navigating to the folder in a terminal and running
code ., or by running VS Code and using the File > Open Folder command. -
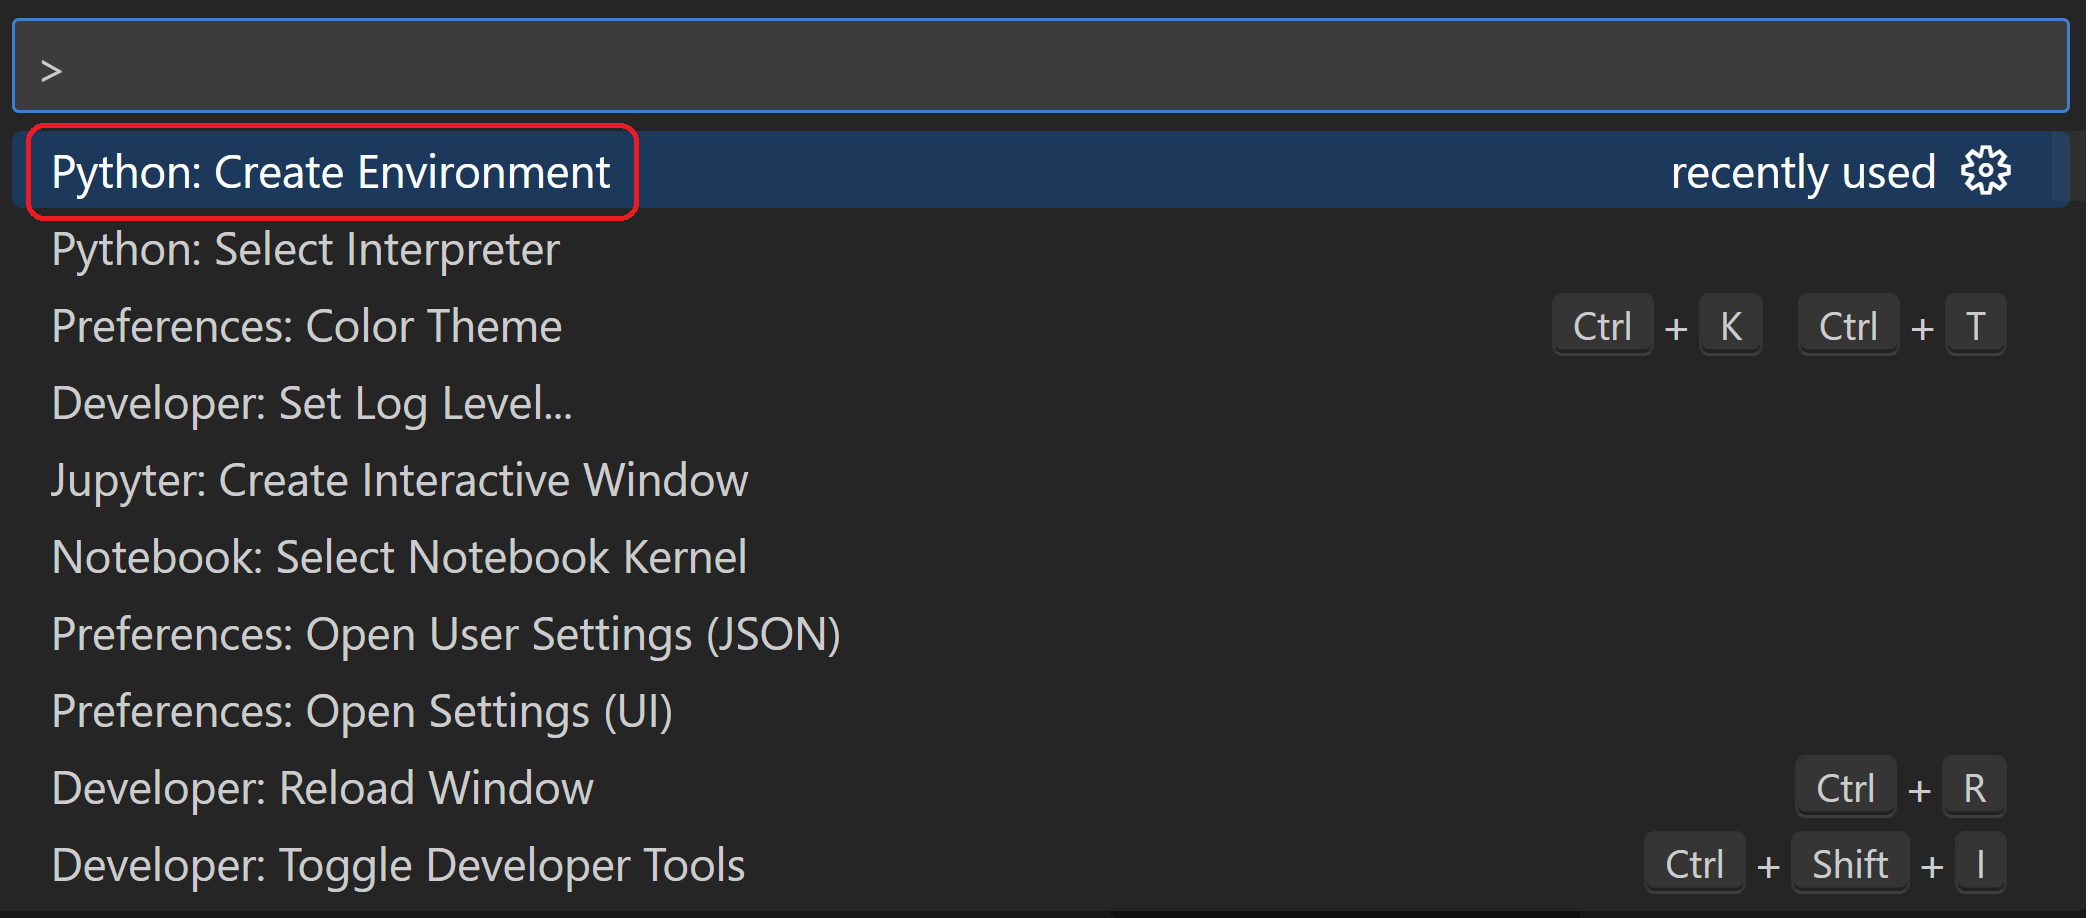
In VS Code, open the Command Palette (View > Command Palette or (⇧⌘P (Windows, Linux Ctrl+Shift+P))). Then select the Python: Create Environment command to create a virtual environment in your workspace. Select
venvand then the Python environment you want to use to create it.Note: If you want to create an environment manually, or run into error in the environment creation process, visit the Environments page.

-
After your virtual environment creation has been completed, run Terminal: Create New Terminal (⌃⇧` (Windows, Linux Ctrl+Shift+`))) from the Command Palette, which creates a terminal and automatically activates the virtual environment by running its activation script.
Note: On Windows, if your default terminal type is PowerShell, you may see an error that it cannot run activate.ps1 because running scripts is disabled on the system. The error provides a link for information on how to allow scripts. Otherwise, use Terminal: Select Default Profile to set «Command Prompt» or «Git Bash» as your default instead.
-
Install Flask in the virtual environment by running the following command in the VS Code Terminal:
python -m pip install flask
You now have a self-contained environment ready for writing Flask code. VS Code activates the environment automatically when you use Terminal: Create New Terminal. If you open a separate command prompt or terminal, activate the environment by running source .venv/bin/activate (Linux/macOS) or .venv\Scripts\Activate.ps1 (Windows). You know the environment is activated when the command prompt shows (.venv) at the beginning.
Create and run a minimal Flask app
-
In VS Code, create a new file in your project folder named
app.pyusing either File > New from the menu, pressing Ctrl+N, or using the new file icon in the Explorer View (shown below). -
In
app.py, add code to import Flask and create an instance of the Flask object. If you type the code below (instead of using copy-paste), you can observe VS Code’s IntelliSense and auto-completions:from flask import Flask app = Flask(__name__) -
Also in
app.py, add a function that returns content, in this case a simple string, and use Flask’sapp.routedecorator to map the URL route/to that function:@app.route("/") def home(): return "Hello, Flask!"Tip: You can use multiple decorators on the same function, one per line, depending on how many different routes you want to map to the same function.
-
Save the
app.pyfile (⌘S (Windows, Linux Ctrl+S)). -
In the Integrated Terminal, run the app by entering
python -m flask run, which runs the Flask development server. The development server looks forapp.pyby default. When you run Flask, you should see output similar to the following:(.venv) D:\py\\hello_flask>python -m flask run * Environment: production WARNING: Do not use the development server in a production environment. Use a production WSGI server instead. * Debug mode: off * Running on http://127.0.0.1:5000/ (Press CTRL+C to quit)If you see an error that the Flask module cannot be found, make sure you’ve run
python -m pip install flaskin your virtual environment as described at the end of the previous section.Also, if you want to run the development server on a different IP address or port, use the host and port command-line arguments, as with
--host=0.0.0.0 --port=80. -
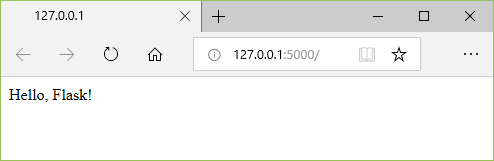
To open your default browser to the rendered page, Ctrl+click the
http://127.0.0.1:5000/URL in the terminal. -
Observe that when you visit a URL like /, a message appears in the debug terminal showing the HTTP request:
127.0.0.1 - - [11/Jul/2018 08:40:15] "GET / HTTP/1.1" 200 - -
Stop the app by using Ctrl+C in the terminal.
Tip: When using a different filename than
app.py, such aswebapp.py, you will need to define an environment variable named FLASK_APP and set its value to your chosen file. Flask’s development server then uses the value of FLASK_APP instead of the default fileapp.py. For more information, see Flask command line interface.
Run the app in the debugger
Debugging gives you the opportunity to pause a running program on a particular line of code. When a program is paused, you can examine variables, run code in the Debug Console panel, and otherwise take advantage of the features described on Debugging. Running the debugger also automatically saves any modified files before the debugging session begins.
Before you begin: Make sure you’ve stopped the running app at the end of the last section by using Ctrl+C in the terminal. If you leave the app running in one terminal, it continues to own the port. As a result, when you run the app in the debugger using the same port, the original running app handles all the requests and you won’t see any activity in the app being debugged and the program won’t stop at breakpoints. In other words, if the debugger doesn’t seem to be working, make sure that no other instance of the app is still running.
-
Replace the contents of
app.pywith the following code, which adds a second route and function that you can step through in the debugger:import re from datetime import datetime from flask import Flask app = Flask(__name__) @app.route("/") def home(): return "Hello, Flask!" @app.route("/hello/<name>") def hello_there(name): now = datetime.now() formatted_now = now.strftime("%A, %d %B, %Y at %X") # Filter the name argument to letters only using regular expressions. URL arguments # can contain arbitrary text, so we restrict to safe characters only. match_object = re.match("[a-zA-Z]+", name) if match_object: clean_name = match_object.group(0) else: clean_name = "Friend" content = "Hello there, " + clean_name + "! It's " + formatted_now return contentThe decorator used for the new URL route,
/hello/<name>, defines an endpoint /hello/ that can accept any additional value. The identifier inside<and>in the route defines a variable that is passed to the function and can be used in your code.URL routes are case-sensitive. For example, the route
/hello/<name>is distinct from/Hello/<name>. If you want the same function to handle both, use decorators for each variant.As described in the code comments, always filter arbitrary user-provided information to avoid various attacks on your app. In this case, the code filters the name argument to contain only letters, which avoids injection of control characters, HTML, and so forth. (When you use templates in the next section, Flask does automatic filtering and you won’t need this code.)
-
Set a breakpoint at the first line of code in the
hello_therefunction (now = datetime.now()) by doing any one of the following:- With the cursor on that line, press F9, or,
- With the cursor on that line, select the Run > Toggle Breakpoint menu command, or,
- Click directly in the margin to the left of the line number (a faded red dot appears when hovering there).
The breakpoint appears as a red dot in the left margin:
-
Switch to the Run and Debug view in VS Code (using the left-side activity bar or ⇧⌘D (Windows, Linux Ctrl+Shift+D)). You may see the message «To customize Run and Debug create a launch.json file». This means that you don’t yet have a
launch.jsonfile containing debug configurations. VS Code can create that for you if you click on the create a launch.json file link: -
Select the link and VS Code will prompt for a debug configuration. Select Flask from the dropdown and VS Code will populate a new
launch.jsonfile with a Flask run configuration. Thelaunch.jsonfile contains a number of debugging configurations, each of which is a separate JSON object within theconfigurationarray. -
Scroll down to and examine the configuration, which is named «Python: Flask». This configuration contains
"module": "flask",, which tells VS Code to run Python with-m flaskwhen it starts the debugger. It also defines the FLASK_APP environment variable in theenvproperty to identify the startup file, which isapp.pyby default, but allows you to easily specify a different file. If you want to change the host and/or port, you can use theargsarray.{ "name": "Python: Flask", "type": "python", "request": "launch", "module": "flask", "env": { "FLASK_APP": "app.py", "FLASK_DEBUG": "1" }, "args": [ "run", "--no-debugger", "--no-reload" ], "jinja": true, "justMyCode": true },Note: If the
enventry in your configuration contains"FLASK_APP": "${workspaceFolder}/app.py", change it to"FLASK_APP": "app.py"as shown above. Otherwise you may encounter error messages like «Cannot import module C» where C is the drive letter where your project folder resides.Note: Once
launch.jsonis created, an Add Configuration button appears in the editor. That button displays a list of additional configurations to add to the beginning of the configuration list. (The Run > Add Configuration menu command does the same action.). -
Save
launch.json(⌘S (Windows, Linux Ctrl+S)). In the debug configuration dropdown list select the Python: Flask configuration. -
Start the debugger by selecting the Run > Start Debugging menu command, or selecting the green Start Debugging arrow next to the list (F5):
Observe that the status bar changes color to indicate debugging:
A debugging toolbar (shown below) also appears in VS Code containing commands in the following order: Pause (or Continue, F5), Step Over (F10), Step Into (F11), Step Out (⇧F11 (Windows, Linux Shift+F11)), Restart (⇧⌘F5 (Windows, Linux Ctrl+Shift+F5)), and Stop (⇧F5 (Windows, Linux Shift+F5)). See VS Code debugging for a description of each command.
-
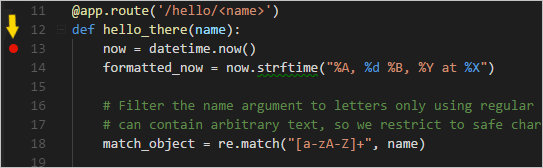
Output appears in a «Python Debug Console» terminal. Ctrl+click the
http://127.0.0.1:5000/link in that terminal to open a browser to that URL. In the browser’s address bar, navigate tohttp://127.0.0.1:5000/hello/VSCode. Before the page renders, VS Code pauses the program at the breakpoint you set. The small yellow arrow on the breakpoint indicates that it’s the next line of code to run. -
Use Step Over to run the
now = datetime.now()statement. -
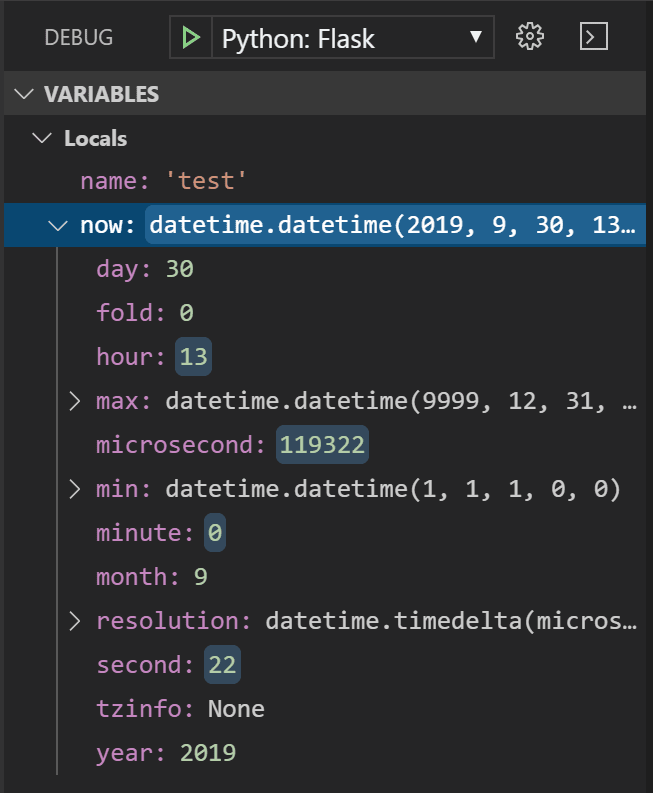
On the left side of the VS Code window, you see a Variables pane that shows local variables, such as
now, as well as arguments, such asname. Below that are panes for Watch, Call Stack, and Breakpoints (see VS Code debugging for details). In the Locals section, try expanding different values. You can also double-click values (or use Enter (Windows, Linux F2)) to modify them. Changing variables such asnow, however, can break the program. Developers typically make changes only to correct values when the code didn’t produce the right value to begin with. -
When a program is paused, the Debug Console panel (which is different from the «Python Debug Console» in the Terminal panel) lets you experiment with expressions and try out bits of code using the current state of the program. For example, once you’ve stepped over the line
now = datetime.now(), you might experiment with different date/time formats. In the editor, select the code that readsnow.strftime("%A, %d %B, %Y at %X"), then right-click and select Evaluate in Debug Console to send that code to the debug console, where it runs:now.strftime("%A, %d %B, %Y at %X") 'Wednesday, 31 October, 2018 at 18:13:39'Tip: The Debug Console also shows exceptions from within the app that may not appear in the terminal. For example, if you see a «Paused on exception» message in the Call Stack area of Run and Debug view, switch to the Debug Console to see the exception message.
-
Copy that line into the > prompt at the bottom of the debug console, and try changing the formatting:
now.strftime("%a, %d %B, %Y at %X") 'Wed, 31 October, 2018 at 18:13:39' now.strftime("%a, %d %b, %Y at %X") 'Wed, 31 Oct, 2018 at 18:13:39' now.strftime("%a, %d %b, %y at %X") 'Wed, 31 Oct, 18 at 18:13:39' -
Step through a few more lines of code, if you’d like, then select Continue (F5) to let the program run. The browser window shows the result:
-
Change the line in the code to use different datetime format, for example
now.strftime("%a, %d %b, %y at %X"), and then save the file. The Flask server will automatically reload, which means the changes will be applied without the need to restart the debugger. Refresh the page on the browser to see the update. -
Close the browser and stop the debugger when you’re finished. To stop the debugger, use the Stop toolbar button (the red square) or the Run > Stop Debugging command (⇧F5 (Windows, Linux Shift+F5)).


Tip: To make it easier to repeatedly navigate to a specific URL like
http://127.0.0.1:5000/hello/VSCode, output that URL using a
Go to Definition and Peek Definition commands
During your work with Flask or any other library, you may want to examine the code in those libraries themselves. VS Code provides two convenient commands that navigate directly to the definitions of classes and other objects in any code:
-
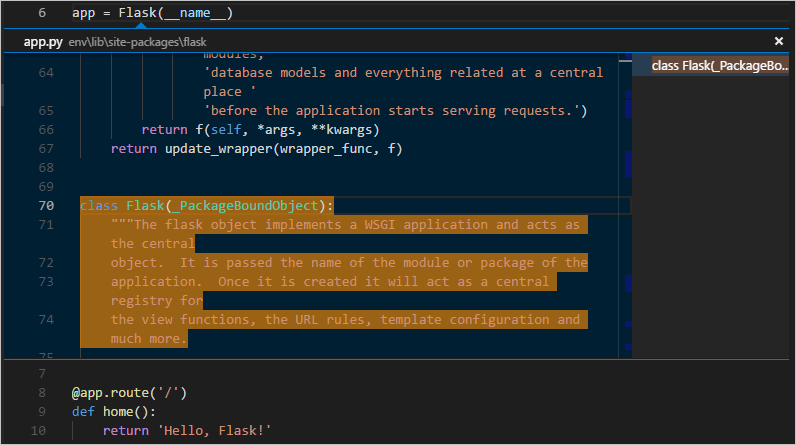
Go to Definition jumps from your code into the code that defines an object. For example, in
app.py, right-click on theFlaskclass (in the lineapp = Flask(__name__)) and select Go to Definition (or use F12), which navigates to the class definition in the Flask library. -
Peek Definition (⌥F12 (Windows Alt+F12, Linux Ctrl+Shift+F10), also on the right-click context menu), is similar, but displays the class definition directly in the editor (making space in the editor window to avoid obscuring any code). Press Escape to close the Peek window or use the x in the upper right corner.
Use a template to render a page
The app you’ve created so far in this tutorial generates only plain text web pages from Python code. Although it’s possible to generate HTML directly in code, developers avoid such a practice because it opens the app to cross-site scripting (XSS) attacks. In the hello_there function of this tutorial, for example, one might think to format the output in code with something like content = "<h1>Hello there, " + clean_name + "!</h1>", where the result in content is given directly to a browser. This opening allows an attacker to place malicious HTML, including JavaScript code, in the URL that ends up in clean_name and thus ends up being run in the browser.
A much better practice is to keep HTML out of your code entirely by using templates, so that your code is concerned only with data values and not with rendering.
- A template is an HTML file that contains placeholders for values that the code provides at run time. The templating engine takes care of making the substitutions when rendering the page. The code, therefore, concerns itself only with data values and the template concerns itself only with markup.
- The default templating engine for Flask is Jinja, which is installed automatically when you install Flask. This engine provides flexible options including automatic escaping (to prevent XSS attacks) and template inheritance. With inheritance, you can define a base page with common markup and then build upon that base with page-specific additions.
In this section, you create a single page using a template. In the sections that follow, you configure the app to serve static files, and then create multiple pages to the app that each contains a nav bar from a base template.
-
Inside the
hello_flaskfolder, create a folder namedtemplates, which is where Flask looks for templates by default. -
In the
templatesfolder, create a file namedhello_there.htmlwith the contents below. This template contains two placeholders named «name» and «date», which are delineated by pairs of curly braces,{{and}}. As you can see, you can also include formatting code in the template directly:<!DOCTYPE html> <html> <head> <meta charset="utf-8" /> <title>Hello, Flask</title> </head> <body> {%if name %} <strong>Hello there, {{ name }}!</strong> It's {{ date.strftime("%A, %d %B, %Y at %X") }}. {% else %} What's your name? Provide it after /hello/ in the URL. {% endif %} </body> </html>Tip: Flask developers often use the flask-babel extension for date formatting, rather than
strftime, as flask-babel takes locales and timezones into consideration. -
In
app.py, import Flask’srender_templatefunction near the top of the file:from flask import render_template -
Also in
app.py, modify thehello_therefunction to userender_templateto load a template and apply the named values (and add a route to recognize the case without a name).render_templateassumes that the first argument is relative to thetemplatesfolder. Typically, developers name the templates the same as the functions that use them, but matching names are not required because you always refer to the exact filename in your code.@app.route("/hello/") @app.route("/hello/<name>") def hello_there(name = None): return render_template( "hello_there.html", name=name, date=datetime.now() )You can see that the code is now much simpler, and concerned only with data values, because the markup and formatting is all contained in the template.
-
Start the program (inside or outside of the debugger, using ⌃F5 (Windows, Linux Ctrl+F5)), navigate to a /hello/name URL, and observe the results.
-
Also try navigating to a /hello/name URL using a name like
<a%20value%20that%20could%20be%20HTML>to see Flask’s automatic escaping at work. The «name» value shows up as plain text in the browser rather than as rendering an actual element.
Serve static files
Static files are of two types. First are those files like stylesheets to which a page template can just refer directly. Such files can live in any folder in the app, but are commonly placed within a static folder.
The second type are those that you want to address in code, such as when you want to implement an API endpoint that returns a static file. For this purpose, the Flask object contains a built-in method, send_static_file, which generates a response with a static file contained within the app’s static folder.
The following sections demonstrate both types of static files.
Refer to static files in a template
-
In the
hello_flaskfolder, create a folder namedstatic. -
Within the
staticfolder, create a file namedsite.csswith the following contents. After entering this code, also observe the syntax highlighting that VS Code provides for CSS files, including a color preview:.message { font-weight: 600; color: blue; } -
In
templates/hello_there.html, add the following line before the</head>tag, which creates a reference to the stylesheet.<link rel="stylesheet" type="text/css" href="{{ url_for('static', filename='site.css')}}" />Flask’s url_for tag that is used here, creates the appropriate path to the file. Because it can accept variables as arguments,
url_forallows you to programmatically control the generated path, if desired. -
Also in
templates/hello_there.html, replace the contents<body>element with the following markup that uses themessagestyle instead of a<strong>tag (and also displays a message if you just use a hello/ URL without a name):{%if name %} <span class="message">Hello there, {{ name }}!</span> It's {{ date.strftime("%A, %d %B, %Y at %X") }}. {% else %} <span class="message">What's your name? Provide it after /hello/ in the URL.</span> {% endif %} -
Run the app, navigate to a /hello/name URL, and observe that the message renders in blue. Stop the app when you’re done.
Serve a static file from code
-
In the
staticfolder, create a JSON data file nameddata.jsonwith the following contents (which are meaningless sample data):{ "01": { "note": "This data is very simple because we're demonstrating only the mechanism." } } -
In
app.py, add a function with the route /api/data that returns the static data file using thesend_static_filemethod:@app.route("/api/data") def get_data(): return app.send_static_file("data.json") -
Run the app and navigate to the /api/data endpoint to see that the static file is returned. Stop the app when you’re done.
Create multiple templates that extend a base template
Because most web apps have more than one page, and because those pages typically share many common elements, developers separate those common elements into a base page template that other page templates can then extend (this is also called template inheritance.)
Also, because you’ll likely create many pages that extend the same template, it’s helpful to create a code snippet in VS Code with which you can quickly initialize new page templates. A snippet helps you avoid tedious and error-prone copy-paste operations.
The following sections walk through different parts of this process.
Create a base page template and styles
A base page template in Flask contains all the shared parts of a set of pages, including references to CSS files, script files, and so forth. Base templates also define one or more block tags that other templates that extend the base are expected to override. A block tag is delineated by {% block <name> %} and {% endblock %} in both the base template and extended templates.
The following steps demonstrate creating a base template.
-
In the
templatesfolder, create a file namedlayout.htmlwith the contents below, which contains blocks named «title» and «content». As you can see, the markup defines a simple nav bar structure with links to Home, About, and Contact pages, which you will create in a later section. Each link again uses Flask’surl_fortag to generate a link at runtime for the matching route.<!DOCTYPE html> <html> <head> <meta charset="utf-8" /> <title>{% block title %}{% endblock %}</title> <link rel="stylesheet" type="text/css" href="{{ url_for('static', filename='site.css')}}" /> </head> <body> <div class="navbar"> <a href="{{ url_for('home') }}" class="navbar-brand">Home</a> <a href="{{ url_for('about') }}" class="navbar-item">About</a> <a href="{{ url_for('contact') }}" class="navbar-item">Contact</a> </div> <div class="body-content"> {% block content %} {% endblock %} <hr/> <footer> <p>© 2018</p> </footer> </div> </body> </html> -
Add the following styles to
static/site.css, below the existing «message» style, and save the file. Note that this walkthrough doesn’t attempt to demonstrate responsive design; these styles simply generate a reasonably interesting result..navbar { background-color: lightslategray; font-size: 1em; font-family: 'Trebuchet MS', 'Lucida Sans Unicode', 'Lucida Grande', 'Lucida Sans', Arial, sans-serif; color: white; padding: 8px 5px 8px 5px; } .navbar a { text-decoration: none; color: inherit; } .navbar-brand { font-size: 1.2em; font-weight: 600; } .navbar-item { font-variant: small-caps; margin-left: 30px; } .body-content { padding: 5px; font-family:'Segoe UI', Tahoma, Geneva, Verdana, sans-serif; }
You can run the app at this point, but because you haven’t made use of the base template anywhere and haven’t changed any code files, the result is the same as the previous step. Complete the remaining sections to see the final effect.
Create a code snippet
Because the three pages you create in the next section extend layout.html, it saves time to create a code snippet to initialize a new template file with the appropriate reference to the base template. A code snippet provides a consistent piece of code from a single source, which avoids errors that can creep in when using copy-paste from existing code.
-
In VS Code, select File > Preferences > Configure User Snippets.
-
In the list that appears, select html. The option may appear as «html.json» in the Existing Snippets section of the list if you’ve created snippets previously.
-
After VS Code opens
html.json, add the following entry within the existing curly braces (the explanatory comments, not shown here, describe details such as how the$0line indicates where VS Code places the cursor after inserting a snippet):"Flask Tutorial: template extending layout.html": { "prefix": "flextlayout", "body": [ "{% extends \"layout.html\" %}", "{% block title %}", "$0", "{% endblock %}", "{% block content %}", "{% endblock %}" ], "description": "Boilerplate template that extends layout.html" }, -
Save the
html.jsonfile (⌘S (Windows, Linux Ctrl+S)). -
Now, whenever you start typing the snippet’s prefix, such as
flext, VS Code provides the snippet as an autocomplete option, as shown in the next section. You can also use the Insert Snippet command to choose a snippet from a menu.
For more information on code snippets in general, refer to Creating snippets.
Use the code snippet to add pages
With the code snippet in place, you can quickly create templates for the Home, About, and Contact pages.
-
In the
templatesfolder, create a new file namedhome.html, Then start typingflextto see the snippet appear as a completion:When you select the completion, the snippet’s code appears with the cursor on the snippet’s insertion point:
-
At the insertion point in the «title» block, write
Home, and in the «content» block, write<p>Home page for the Visual Studio Code Flask tutorial.</p>, then save the file. These lines are the only unique parts of the extended page template: -
In the
templatesfolder, createabout.html, use the snippet to insert the boilerplate markup, insertAbout usand<p>About page for the Visual Studio Code Flask tutorial.</p>in the «title» and «content» blocks, respectively, then save the file. -
Repeat the previous step to create
templates/contact.htmlusingContact usand<p>Contact page for the Visual Studio Code Flask tutorial.</p>in the two content blocks. -
In
app.py, add functions for the /about/ and /contact/ routes that refer to their respective page templates. Also modify thehomefunction to use thehome.htmltemplate.# Replace the existing home function with the one below @app.route("/") def home(): return render_template("home.html") # New functions @app.route("/about/") def about(): return render_template("about.html") @app.route("/contact/") def contact(): return render_template("contact.html")


Run the app
With all the page templates in place, save app.py, run the app, and open a browser to see the results. Navigate between the pages to verify that the page templates are properly extending the base template.

Note: If you’re not seeing the latest changes, you might need to do a hard refresh on the page to avoid seeing a cached file.
Optional activities
The following sections describe additional steps that you might find helpful in your work with Python and Visual Studio Code.
Create a requirements.txt file for the environment
When you share your app code through source control or some other means, it doesn’t make sense to copy all the files in a virtual environment because recipients can always recreate the environment themselves.
Accordingly, developers typically omit the virtual environment folder from source control and instead describe the app’s dependencies using a requirements.txt file.
Although you can create the file by hand, you can also use the pip freeze command to generate the file based on the exact libraries installed in the activated environment:
-
With your chosen environment selected using the Python: Select Interpreter command, run the Terminal: Create New Terminal command (⌃⇧` (Windows, Linux Ctrl+Shift+`))) to open a terminal with that environment activated.
-
In the terminal, run
pip freeze > requirements.txtto create therequirements.txtfile in your project folder.
Anyone (or any build server) that receives a copy of the project needs only to run the pip install -r requirements.txt command to reinstall the packages in the original environment. (The recipient still needs to create their own virtual environment, however.)
Note:
pip freezelists all the Python packages you have installed in the current environment, including packages you aren’t currently using. The command also lists packages with exact version numbers, which you might want to convert to ranges for more flexibility in the future. For more information, see Requirements Files in the pip command documentation.
Refactor the project to support further development
Throughout this Flask tutorial, all the app code is contained in a single app.py file. To allow for further development and to separate concerns, it’s helpful to refactor the pieces of app.py into separate files.
-
In your project folder, create a folder for the app, such as
hello_app, to separate its files from other project-level files likerequirements.txtand the.vscodefolder where VS Code stores settings and debug configuration files. -
Move the
staticandtemplatesfolders intohello_app, because these folders certainly contain app code. -
In the
hello_appfolder, create a file namedviews.pythat contains the routings and the view functions:from flask import Flask from flask import render_template from datetime import datetime from . import app @app.route("/") def home(): return render_template("home.html") @app.route("/about/") def about(): return render_template("about.html") @app.route("/contact/") def contact(): return render_template("contact.html") @app.route("/hello/") @app.route("/hello/<name>") def hello_there(name = None): return render_template( "hello_there.html", name=name, date=datetime.now() ) @app.route("/api/data") def get_data(): return app.send_static_file("data.json") -
In the
hello_appfolder, create a file__init__.pywith the following contents:import flask app = flask.Flask(__name__) -
In the
hello_appfolder, create a filewebapp.pywith the following contents:# Entry point for the application. from . import app # For application discovery by the 'flask' command. from . import views # For import side-effects of setting up routes. -
Open the debug configuration file
launch.jsonand update theenvproperty as follows to point to the startup object:"env": { "FLASK_APP": "hello_app.webapp" }, -
Delete the original
app.pyfile in the project root, as its contents have been moved into other app files. -
Your project’s structure should now be similar to the following:
-
Run the app in the debugger again to make sure everything works. To run the app outside of the VS Code debugger, use the following steps from a terminal:
- Set an environment variable for
FLASK_APP. On Linux and macOS, useexport set FLASK_APP=webapp; on Windows use$env:FLASK_APP=webappif you’re using PowerShell, orset FLASK_APP=webappif you’re using Command Prompt. - Navigate into the
hello_appfolder, then launch the program usingpython -m flask run.
- Set an environment variable for

Create a container for a Flask app using the Docker extension
The Docker extension makes it easy to build, manage, and deploy containerized applications from Visual Studio Code. If you’re interested in learning how to create a Python container for the Flask app developed in this tutorial, check out the Python in a container tutorial, which will walk you through how to:
- Create a
Dockerfilefile describing a simple Python container. - Build, run, and verify the functionality of a Flask app.
- Debug the app running in a container.
If you have any problems, you can search for answers or ask a question on the Python extension Discussions Q&A.
Next steps
Congratulations on completing this walkthrough of working with Flask in Visual Studio Code!
The completed code project from this tutorial can be found on GitHub: python-sample-vscode-flask-tutorial.
Because this tutorial has only scratched the surface of page templates, refer to the Jinja2 documentation for more information about templates. The Template Designer Documentation contains all the details on the template language. You might also want to review the official Flask tutorial as well as the documentation for Flask extensions.
To try your app on a production website, check out the tutorial Deploy Python apps to Azure App Service using Docker Containers. Azure also offers a standard container, App Service on Linux, to which you deploy web apps from within VS Code.
You may also want to review the following articles in the VS Code docs that are relevant to Python:
- Editing Python code
- Linting
- Managing Python environments
- Debugging Python
- Testing
01/20/2023