In this guide, we will show you various methods to fix the “BlueStacks can’t start when Hyper-V is enabled” error on your Windows 11 PC. When it comes to Android emulators, then hardly an iota of a doubt that Bluestack is one o the best in this domain. Both its app and cloud-based cross-platform products behold a plethora of nifty features in its arsenal. However, in spite of all the goodies attached, it isn’t free from its fair share of issues either.
Numerous users have voiced their concern that they are getting the “BlueStacks can’t start when Hyper-V is enabled” error on their Windows 11 PC. As a result of which, they are unable to launch Bluestack and try out their preferred Android apps or games. As far as the reason for this is concerned, it could be attributed to Microsoft’s hardware virtualization product. So in this guide, we will show you how to address this virtualization which in turn should fix the Bluestack issue. Follow along.
It is recommended that you try out each of the below-mentioned workarounds and then see which one spells out success for you. So with that in mind, let’s get started.
FIX 1: Update Blustacks
Previous versions of Bluestacks aren’t compatible with Hyper-V. So if you try and run them, they would straightaway give you this error message. Therefore, you should consider updating Bluestacks to one of those versions that come with in-built support for Hyper-V. Here’s how it could be done:
- To begin with, bring up Run via Windows+R and type in the below command:
appwiz.cpl
- Now select Bluestacks from the list and hit Uninstall.
- Then proceed with the on-screen instructions to complete the uninstallation.
- Once done, head over to the Bluestacks website and download the “Nougat 64-bit” version.

- Then launch the setup and proceed with the on-screen instructions to complete the installation.
- Once done, it should fix the “BlueStacks can’t start when Hyper-V is enabled” error in Windows.

FIX 2: Disable Hyper-V
As already mentioned before, the culprit is Microsoft’s hardware virtualization product Hyper-V. To rectify this issue, you will have to turn it off. So if you are not ready yet to upgrade Blustack, then disabling Hyper-V is your only way out. Here’s how it could be done:
- Bring up the Run dialog box via Windows+R shortcut keys.
- Then type in the below command and hit Enter to open Windows Features:
optionalfeatures.exe
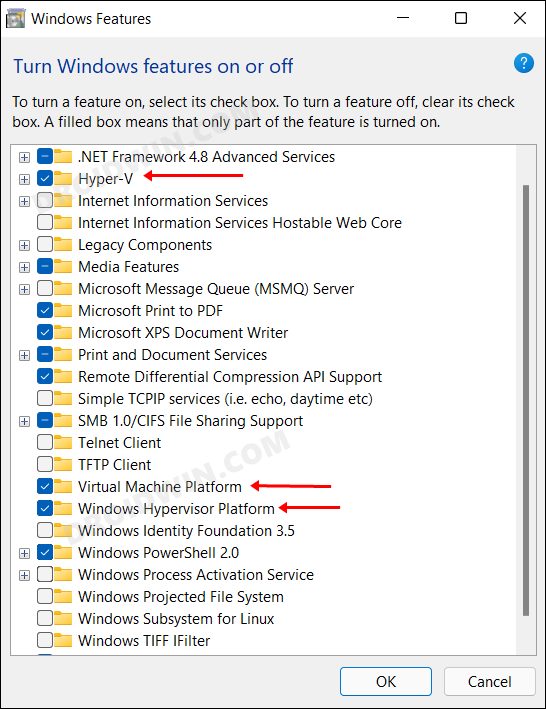
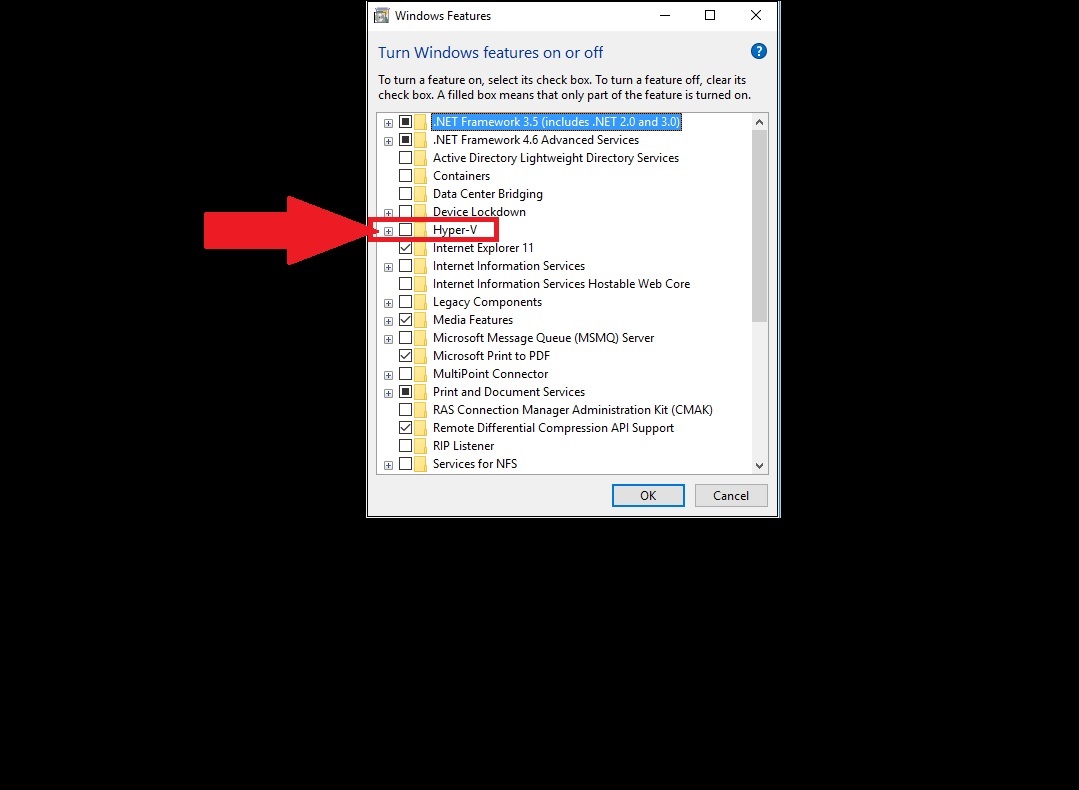
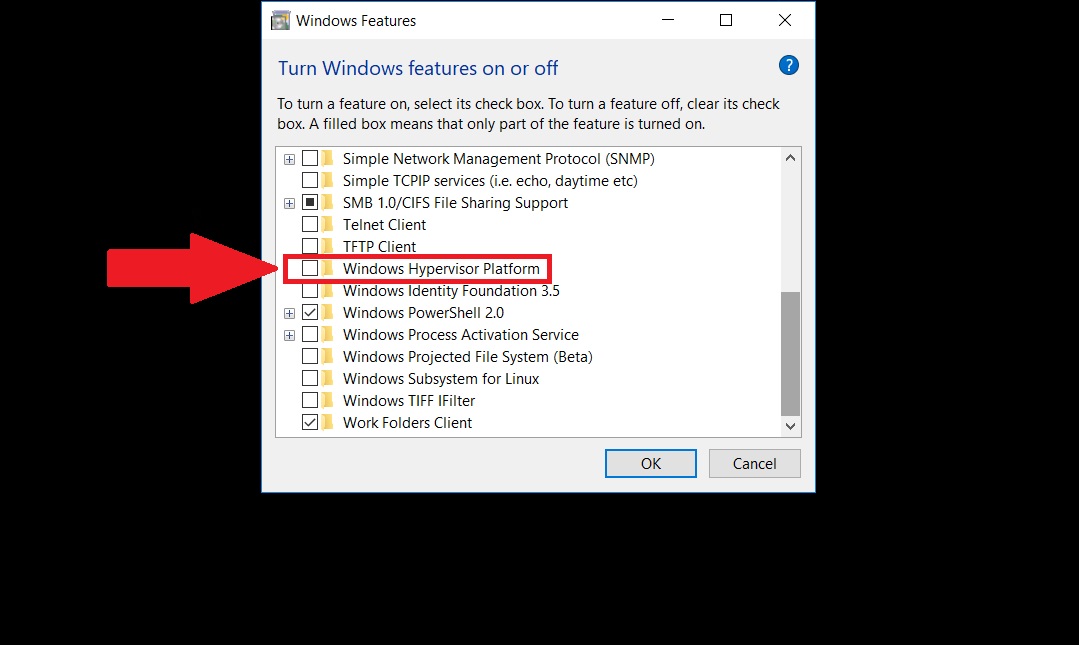
- Now, uncheck Hyper-V, Virtual Machine Platform, and Windows Hypervisor Platform and click OK.

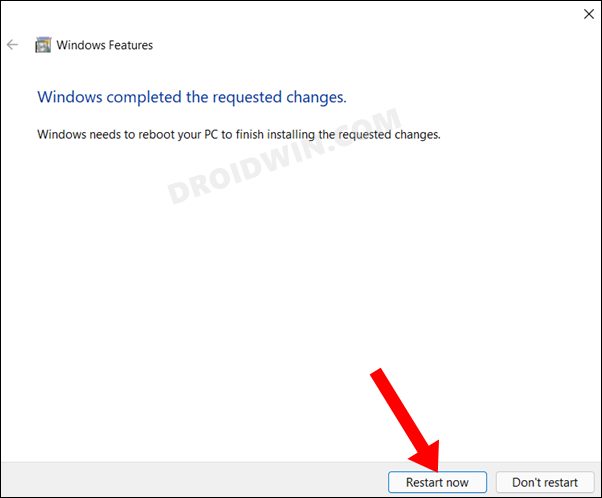
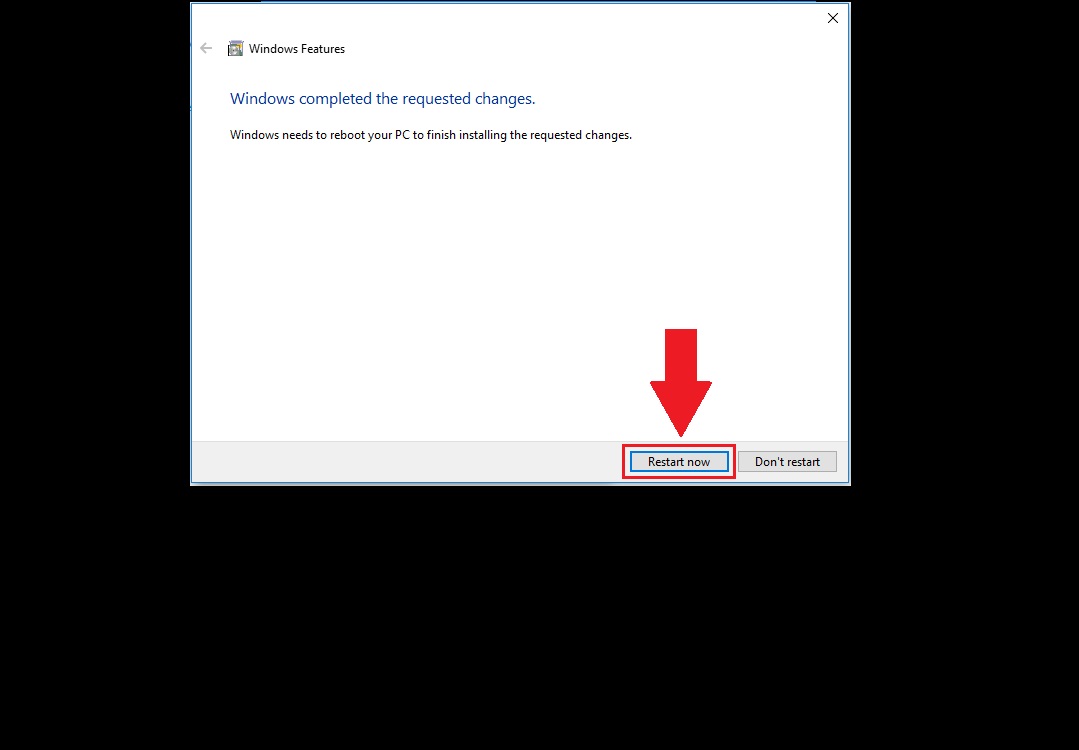
- It will install the necessary dependencies. Once done, restart your PC for the changes to take place.

That’s it. These were the two different methods that shall help you fix the “BlueStacks can’t start when Hyper-V is enabled” error on your Windows 11 PC. If you have any queries concerning the aforementioned steps, do let us know in the comments. We will get back to you with a solution at the earliest.
- How to Install and Enable Hyper-V in Windows 11(Opens in a new browser tab)
- VT-X/AMD-V Hardware Acceleration is Not Available on Your System [Fix]
- Windows Error 2 Occurred While Loading The Java VM [Fixed]
- Convert Legacy BIOS to UEFI and MBR to GPT in Windows 11
About Chief Editor

Sadique Hassan
administrator
A technical geek by birth, he always has a keen interest in the Android platform right since the birth of the HTC Dream. The open-source environment always seems to intrigue him with the plethora of options available at his fingertips. “MBA by profession, blogger by choice!”
Содержание
- Невозможно запустить движок виртуализации BlueStacks в Windows 10
- Как исправить ошибку при запуске эмулятора BlueStacks
- BlueStacks cannot start when Hyper-V is enabled
- BlueStacks cannot start when Hyper-V is enabled
- 1] Make sure Hyper-V and the related feature is disabled
- 2] Disable Hyper-V using an exe file
- 3] Disable Hyper-V using the registry file
- Related Posts
- The system file is not suitable for running MS-DOS and Microsoft Windows applications
- How to fix Runtime Error 217 on Windows 10
- Fix SystemSettings.ViewModel.SettingEntry or NetworkUX.ViewModel.SettingEntry error
- [email protected]
- How to disable Hyper-V on Windows for BlueStacks 5 Beta
- How will this help?
- How to disable Hyper-V on Windows?
- BlueStacks Hyper-V (BETA)
- Ключевые моменты
- Исправленные ошибки:
- Нововведения:
- Улучшения:
- Исправленные ошибки:
- Нововведения:
- Улучшения:
Многие пользователи сталкиваются с ошибкой при запуске BlueStacks — эмулятора Android для ПК. Ошибка звучит следующим образом «Невозможно запустить движок виртуализации«, также может быть похожая «Не удается запустить BlueStacks, блюстакс не может использовать аппаратную виртуализацию во время работы Hyper-V«. Мне один пользователь задал вопрос, -я отключил Hyper-V, а ошибка все ровно появляется. Эта ошибка может появляться даже тогда, когда вы отключили Hyper-V, потому-что это связано с защитником Windows, а быть точнее с функцией aplication Guard. Давайте разберем, что делать и как исправить данную проблему.

Как исправить ошибку при запуске эмулятора BlueStacks
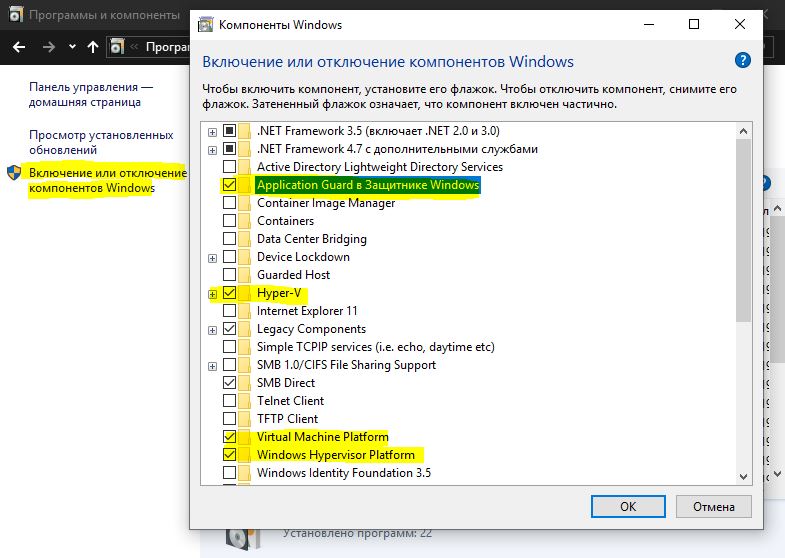
Откройте «Панель управление», нажмите «Удаление программ». Далее слева выберите «Включение или отключение компонентов». Найдите следующие пункты и отключите их, уберите галочки:
- Aplication Guard в Защитнике Windows.
- Hyper-V.
- Virtual Machine Platform.
- Windows Hypervisor Platform.
Перезагрузите ПК и ошибки «Невозможно запустить движок виртуализации», «Не удается запустить BlueStacks», пропадут.
BlueStacks cannot start when Hyper-V is enabled
Trying to run BlueStacks which is an android app emulator on a Windows 10 PC, a prerequisite, is that it is necessary that Hyper-V and any other virtual feature should be disabled. If you have disabled Hyper-V but still encounter the error message BlueStacks cannot start when Hyper-V is enabled when trying to run BlueStacks, then this post is intended to help you with the solutions you can try to successfully resolve the issue.
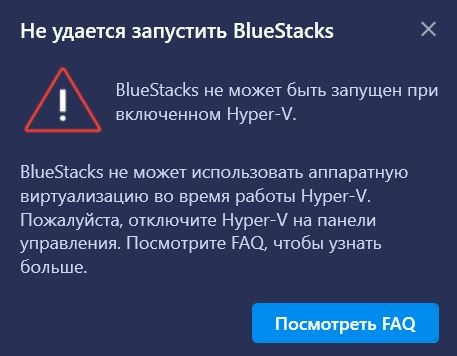
When you encounter this issue. you’ll receive the following full error message;
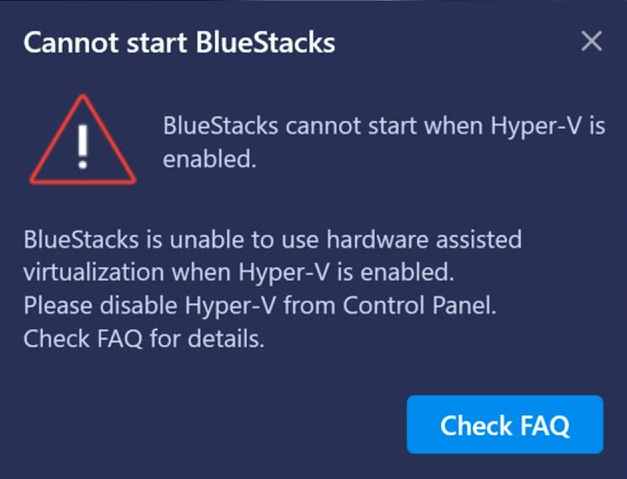
Cannot start BlueStacks
BlueStacks cannot start when Hyper-V is enabled.
BlueStacks is unable to use hardware assisted virtualization when Hyper-V is enabled.
Please disable Hyper-V from Control Panel.
Check FAQ for details.
BlueStacks cannot start when Hyper-V is enabled
If you’re faced with this issue, you can try the following to resolve the issue.
- Make sure Hyper-V and the related feature is disabled
- Disable Hyper-V using an exe file
- Disable Hyper-V using the registry file
Let’s take a look at the description of the process involved concerning each of the listed solutions.
Before you go ahead with these suggestions, you may want to run BlueStacks without disabling Hyper-V. If so, you can download this version of BlueStacks.
Note: This version of BlueStacks is based on Android 64-bit. If you face any issue while running Android 32-bit apps, or you do not want to enable Hyper-V on your system, you can download BlueStacks 32-bit from the official website.
1] Make sure Hyper-V and the related feature is disabled
Make sure the options Hyper-V, and other related features (if applicable) like Virtual Machine Platform and Windows Hypervisor Platform are unchecked. Click OK to save the changes.
Windows Feature will apply the changes and prompt you to restart. Restart your system/PC to apply the requested changes by clicking on Restart now button.
For some specific versions of Windows 10, the Virtual machine platform and Windows hypervisor platform check-boxes are not available. In which case, you can turn off the Memory integrity.
2] Disable Hyper-V using an exe file
Download and double-click the exe file. After running this file, restart your device. If you still get this error after restarting once, restart your device a few times, after which Hyper-V will be disabled.
3] Disable Hyper-V using the registry file
If none of the above alternatives worked, you can download this registry file and double-click to run it. After running the registry, restart your computer and then try to run BlueStacks. It should work normally.
Note: This registry will work on Windows 10 (64 Bit) only.
Hope this helps!
Date: October 8, 2020 Tags: Errors
The system file is not suitable for running MS-DOS and Microsoft Windows applications
How to fix Runtime Error 217 on Windows 10
Fix SystemSettings.ViewModel.SettingEntry or NetworkUX.ViewModel.SettingEntry error
[email protected]
Obinna Onwusobalu, has studied Information & Communication Technology and is a keen follower of the Windows ecosystem. He runs a computer software clinic. He says it’s best practice to create a System Restore Point before making any changes to your PC. You can contact him on Twitter @ChidumOsobalu.
How to disable Hyper-V on Windows for BlueStacks 5 Beta

How will this help?
The steps in this article will guide you on how to disable Hyper-V on Windows, so that you begin using BlueStacks 5 Beta.
How to disable Hyper-V on Windows?
The video below shows how to disable Hyper-V on Windows.
You can disable Hyper-V on your PC by either:
1. Disabling Hyper-V using an .exe file
We have created an .exe file that will disable Hyper-V on your PC. Please download and double-click the .exe file from this link. After running this file, please restart your PC/Laptop. If you still get this error after restarting once, please restart your PC/Laptop a few times, after which Hyper-V will be disabled.
2. Disabling Hyper-V using the «Windows features» option
Hyper-V can be disabled from the control panel using the Windows features option. Follow the steps mentioned below to disable Hyper-V:
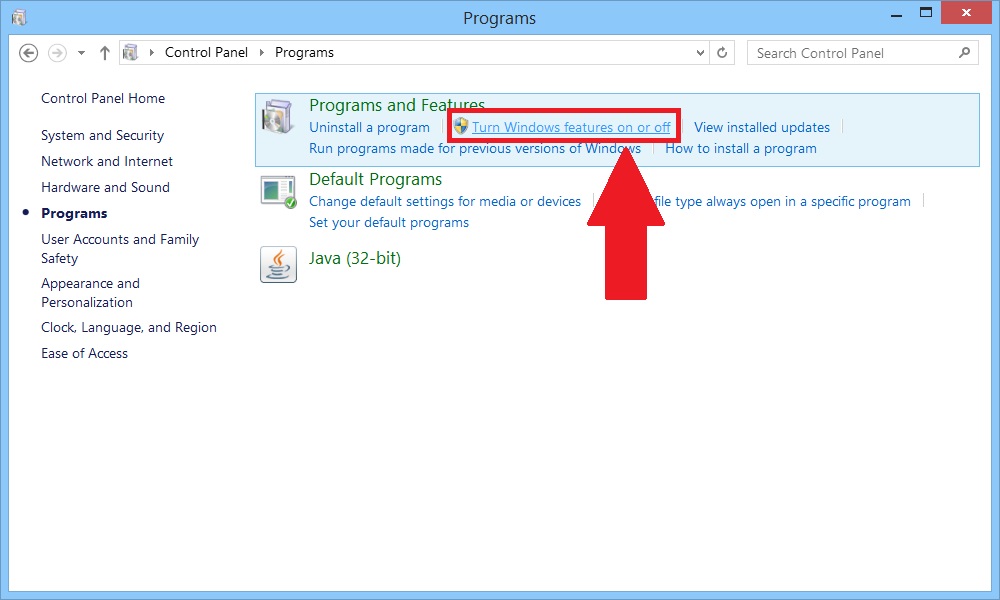
1. Go to Control Panel → Programs → Turn Windows features on or off
2. You will now have to uncheck different Windows features for different editions of Windows and installed updates.
- For Windows 8 Pro 64-bit edition, Windows 8 Enterprise 64-bit edition, Windows 8.1 Pro 64-bit edition and Windows 8.1 Enterprise 64-bit edition, uncheck the Hyper-V option, as shown below. Then click on OK.
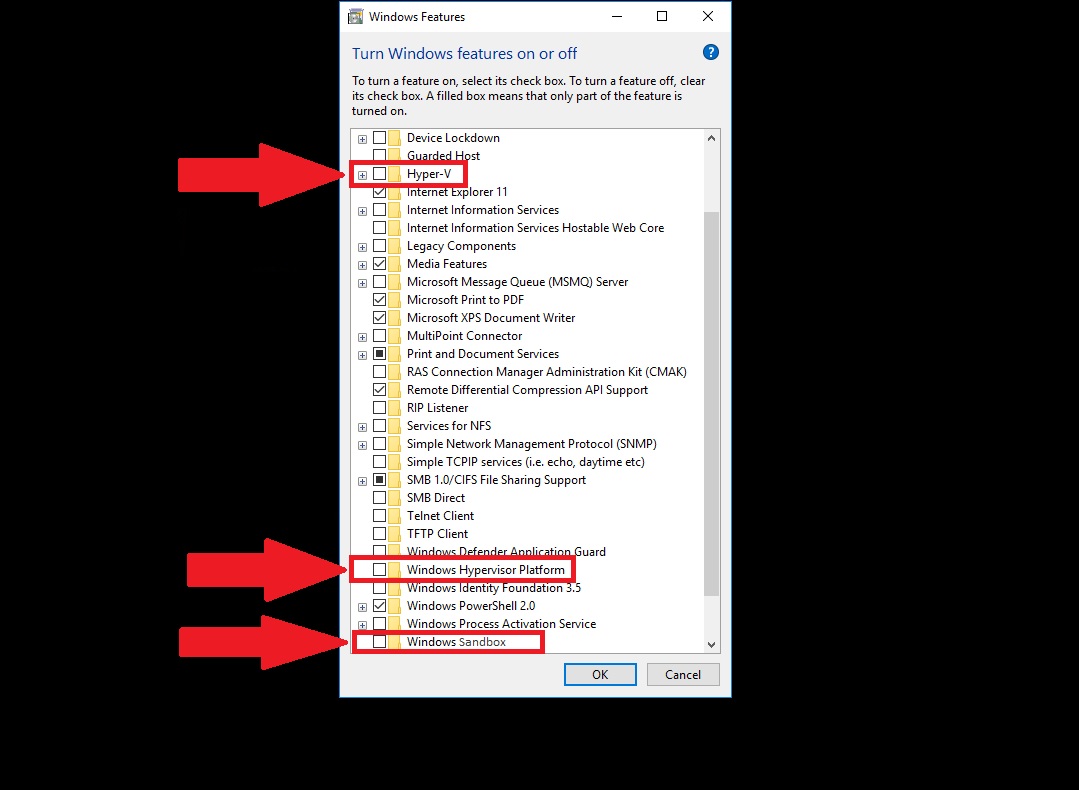
- If you are using Professional, Enterprise or Education editions of Windows 10, please uncheck Hyper V, Windows Hypervisor Platform and Windows Sandbox. Then, click on OK.
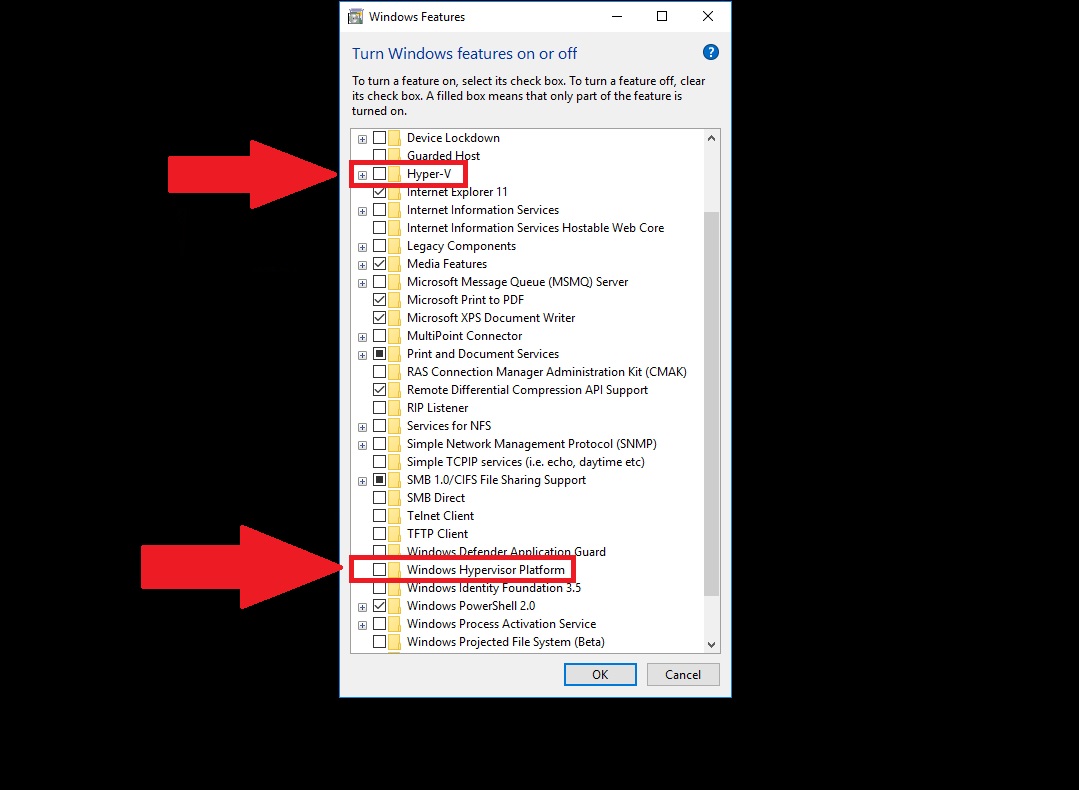
- For Windows 10 Pro 64-bit edition, make sure the options Hyper-V and Windows Hypervisor Platform are unchecked, as shown in the image. Click OK to save the changes.
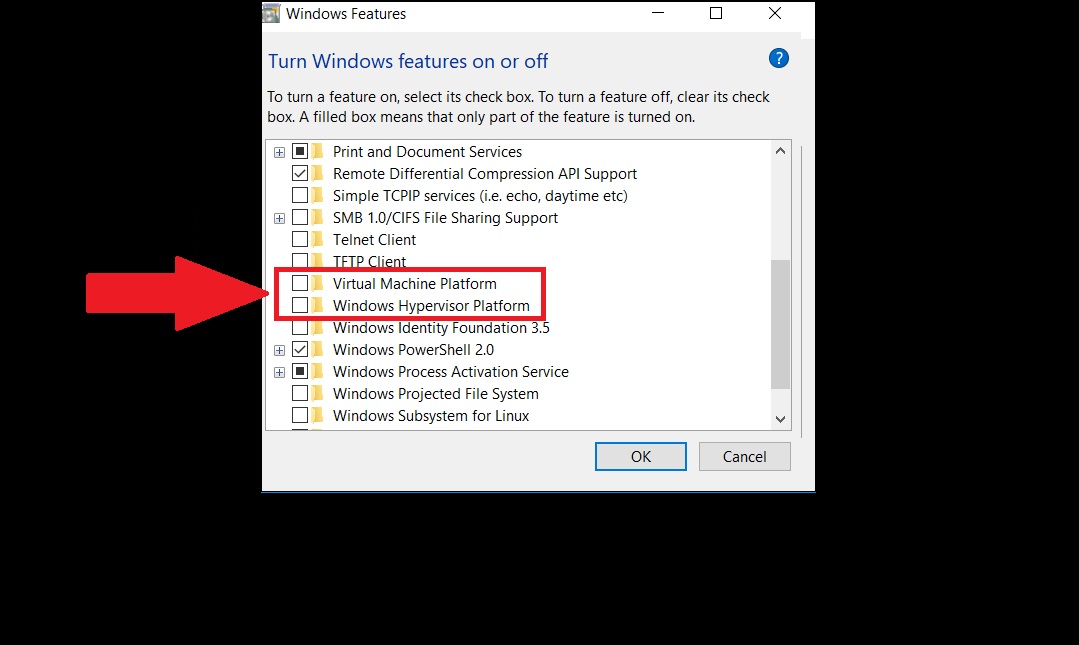
- For Windows 10 Home (Version 1809 ) and almost all the recent editions of Windows 10, make the two options shown in the image are unchecked. Then, select OK.
- For Windows 10 Home (version 1803 ), uncheck the Windows Hypervisor Platform option and click on OK.
3. Click on OK. Windows Feature will apply the changes and ask you to restart. Please restart your system/PC to apply the requested changes by clicking on Restart now.
NOTE: For some specific versions of Windows 10, the «Virtual machine platform» and «Windows hypervisor platform» check-boxes are not available. Users should follow the steps illustrated below if they do not see these options in the Windows features:
1. In the windows search bar, search for «core isolation«.
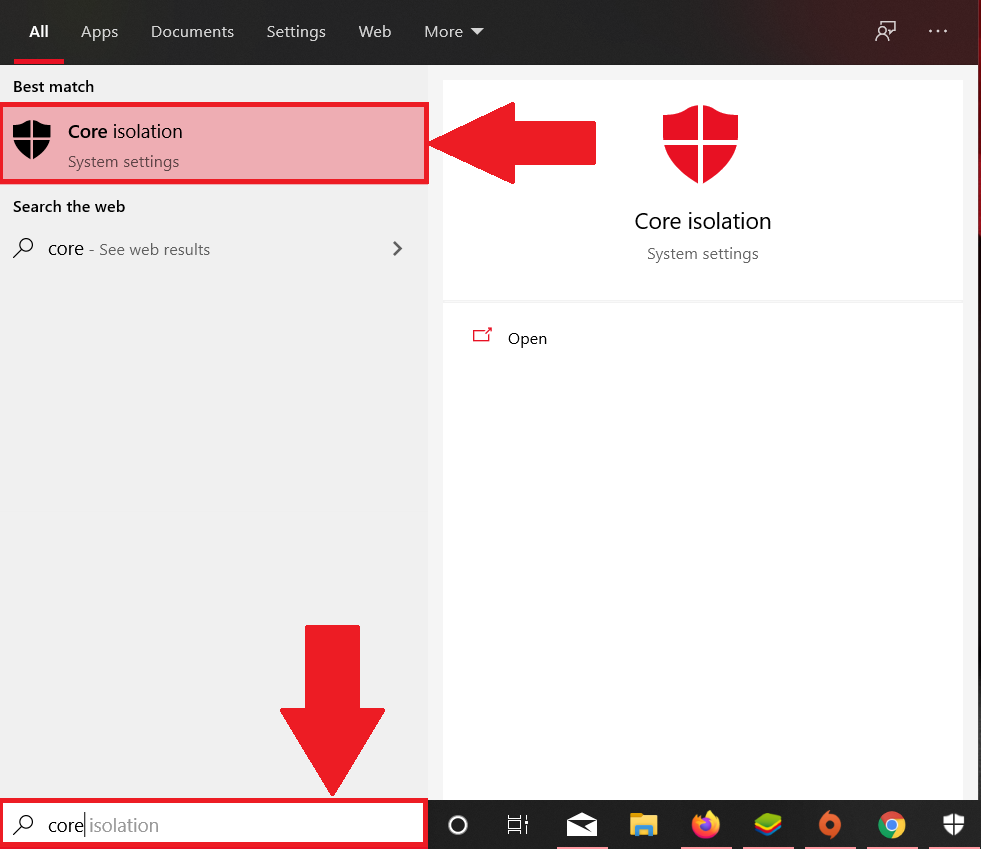
2. In the core isolation settings, turn off the Memory integrity.
BlueStacks Hyper-V (BETA)
Ключевые моменты
1. В этом апдейте разработчики уделили особое внимание League of Legends: Wild Rift:
- Теперь вы можете нахначить схему управления MOBA или WASD для каждого героя по отдельности в специальном окне, редакторе или окне игрового управления.
- Кроме того, в BlueStacks 4 появилось ультравысокое разрешение для мониторов 21:9. Вы получите более широкий обзор игровой арены.
- Также останавливайте перемещение персонажа простым нажатием клавиши S. При этом вы можете изменить клавишу на другую в окне игрового управления.
- Отметим, что вы можете играть в League of Legends со схемой управления, которая аналогична управлению в ПК-версии игры.
2. Ультравысокое разрешение доступно не только в LoL, но и в целом для широкоформатных мониторов 21:9.
3. Вы можете зеркально отразить изображение перед их захватом, что особенно полезно в таких приложениях, как Instagram.
Исправленные ошибки:
- Устранены различные проблемы с запуском BlueStacks.
Нововведения:
1. Стало доступно автоматическое скрытие уведомлений, которые отображаются в правом нижнем углу рабочего стола. После включения этой опции они будут исчезать через несколько секунд.
2. Добавлено несколько новых профилей устройств для улучшения вашего игрового опыта.
3. Кроме того, вы можете скрыть ярлыки игр, запускаемых в дополнительных окнах, чтобы они не отображались в разделе «Мои игры».
4. Улучшено масштабирование в Rise of Kingdoms. Это будет полезно и для других стратегических игр.
5. В Marvel Strike Force появился вертикальный режим для удобного просмотра списка супергероев.
6. В редактор управления добавлен новый контроллер MOBA D-pad. Используйте его для лучшего контроля навыков в играх жанра MOBA, таких как League of Legends: Wild Rift .
7. Также в редакторе игрового управления легко регулируйте чувствительность мыши.
8. Отныне на каждом экранном контроллере есть значок шестеренки , клик по которому открывает дополнительные настройки контроллера.
Улучшения:
1. Теперь все скриншоты, сделанные вами в BlueStacks, будут сохраняться в высочайшем качестве в формате PNG.
2. Меню настроек теперь стало более интуитивным. Назначение ядер процессора (CPU) и оперативной памяти (ОЗУ) вынесено в верхнюю часть экрана вкладки «Движок», а все настройки профиля устройства перенесены в отдельную вкладку «Устройство».
3. Улучшен дизайн главного экрана BlueStacks.
4. Повышена точность использования навыков героев в League of Legends: Wild Rift (com.riotgames.league.wildrift).
5. Проведена общая оптимизация платформы. Теперь вы можете проводить долгие игровые сессии и не наблюдать лаги, вылеты и другие признаки низкой производительности.
6. Последние улучшения также не обошли стороной визуальную составляющую и частоту кадров . Вы отметите значительное улучшение графики и более стабильный FPS в Seven Nights II, Huang Yi Qun Xia Biography M and 美好 的 世界 獻上 祝福 Days Fantastic Days. Эти игры используют адаптивное масштабируемое сжатие текстур (ASTC) .
7. Использование фарм-аккаунта в Rise of Kingdoms стало проще, чем когда-либо. Прочтите наш гайд с советами и хитростями по сбору ресурсов в RoK.
8. Теперь, при совершении группового звонка в BlueStacks, вы будете получать специальное уведомление, если у вас отключен звук. Также вы можете отключить звук своего микрофона сочетанием клавиш Ctrl+Shift+Z.
Исправленные ошибки:
- プロ野球スピリッツA (jp.konami.prospia). Решена проблема появления уведомления об обнаружении эмулятора.
- 한게임포커 클래식 (com.nhnent.pokerclassic). Исправлена проблема появления сообщения о безопасности.
- Critical Ops: Reloaded (com.nhnent.cops). Решена проблема вылетов игры после предоставления всех необходимых разрешений.
- Fate Grand Order (com.xiaomeng.fategrandorder). Устранена проблема вылетов игры.
- 全民打棒球 Pro (hk.com.joybomb.bbm3). Устранены фризы в игре.
- Видео вInstagram (com.instagram.android) больше не воспроизводятся в зеркальном или перевернутом виде.
- MLB 9 Innings 20 (com.com2us.ninepb3d.normal.freefull.google.global.android.common). Решена проблема появления уведомления об обнаружении эмулятора.
- 뮤 아크엔젤 (com.webzen.mua.google). Исправлена проблема появления черного экрана в игре.
- 東方LostWord (jp.goodsmile.touhoulostword_android). Устранены вылеты в игре.
- Dragon Quest Walk (com.square_enix.android_googleplay.dqwalkj) и Naruto X boruto Ninja Voltage (com.bandainamcoent.ninjavoltage_app). Решена проблема появления ошибок о безопасности.
- グリムエコーズ(com.square_enix.android_googleplay.grimmsechoes). Исправлены вылеты игры и появление черного экрана.
- Просмотр чемпионов в MARVEL Strike Force (com.foxnextgames.m3) теперь доступно в вертикальном и горизонтальном положениях.
- Решены различные проблемы с запуском BlueStacks.
- Игры Call of Duty: Mobile (com.activision.callofduty.shooter), Call of Duty: Mobile — Garena (com.garena.game.codm), Call of Duty: Mobile (KR) (com.tencent.tmgp.kr.codm) и Call of Duty: Mobile VN (com.vng.codmvn) больше не вылетают при запуске.
- PUBG: Mobile Lite (com.tencent.iglite). Решена проблема появления уведомления о занятых серверах и просьбой попробовать войти в игру позже.
- 為美好的世界獻上祝福!Fantastic Days ( tw.wonderplanet.fantasticdays ) больше не вылетает при запуске и не лагает в процессе игры.
- Prince Connect (tw.sonet.princessconnect). Вам больше не надо указывать свое местоположение на картах Google.
- Destiny Child: Defense War (com.ta.dcdw.gl) теперь можно найти и скачать в Google Play Store.
- ‘黃易群俠傳M‘ (com.chinesegamer.hemtw). Исправлены лаги в игре.
- Tsubasa (jp.miraire.tsubasaplus). Решена проблема появления черного экрана при запуске.
- ‘바람의나라: 연‘ (com.nexon.baram) и ‘A3: 스틸얼라이브’ (com.netmarble.survival). Решены проблемы совместимости.
- BlueStacks больше не зависает при использовании менеджера окон.
- Исправлены различные ошибки и задержки при создании скриншотов.
Версия выпущена 14 января 2021 года
Если на вашем ПК включена технология Hyper-V, то у вас будет автоматически установлена версия BlueStacks с ее поддержкой.
Исправлены следующие ошибки:
- Некоторые пользователи после установки BlueStacks с поддержкой Hyper-V получали уведомление, что Hyper-V недоступен. Теперь эта ситуация устранена.
- Отныне BlueStacks с поддержкой Hyper-V загружается без каких-либо проблем.
Версия выпущена 13 октября 2020 года
Если на вашем ПК включена технология Hyper-V, то у вас будет автоматически установлена версия BlueStacks с ее поддержкой.
Нововведения:
1. Добавлен голосовой чат для игры в Among Us на BlueStacks. Общайтесь с друзьями в специальной созданной комнате или присоединяйтесь к уже существующей.
2. Появилась возможность делиться изображениями в Rise of Kingdoms, просто перенося их в чат с помощью курсора мыши или используя медиа-менеджер.
3. Изменяйте расположение иконок инструментов на боковой панели на свое усмотрение.
4. Теперь вы можете точно задавать координаты щелчков мыши на игровом поле во время записи макросов.
5. Включайте и выключайте звук щелчков мыши в Android на BlueStacks.
6. Также включайте/выключайте уведомления из приложений для рабочего стола вашего ПК.
7. Стало доступно скрытие синих маркеров по краям игрового поля в полноэкранном режиме.
8. В Редактор игрового управления добавлен новый контроллер «Прокрутка». С его помощью вы можете отрегулировать скорость прокрутки колеса мыши.
9. В BlueStacks появилась опция включения/выключения VSync, которая позволяет синхронизировать FPS в игре с частотой обновления монитора, чтобы избежать разрывов экрана, которые способны негативно повлиять на игровой процесс.
10. В Редактор игрового управления д обавлен контроллер «Прокрутка от края экрана». Теперь вы сможете перемещаться по карте, направляя курсор к краю игрового поля.
11. Изменяйте размер иконок приложений и сортируйте их по названию или по дате установки.
12. Обновляйте схемы управления для любимых игр в редакторе игрового управления. Также добавлен еще один контроллер «Наклон».
13. Введено компактное меню для быстрого доступа к настройкам управления.
14. Создавайте напоминания для внутриигровых событий для Rise of Kingdoms и State of Survival. Отслеживайте важные ивенты и получайте уведомления на электронную почту, как на мобильных устройствах, так и на компьютере.
15. Узнавайте, что нового появилось в BlueStacks перед установкой обновления.
16. Также на панель инструментов BlueStacks добавлена опция установки приложения с помощью файла APK. Кроме того, этот способ установки ускорен на 30%
17. Улучшен функционал создания скриншотов. Теперь вы можете делать красивые скриншоты игры и главного экрана BlueStacks.
18. На главном экране BlueStacks появились разделы «Мои игры» и «Игровой центр».
19. Изменена горячая клавиша для блокировки/разблокировки курсора мыши. Теперь это клавиша Esc.
Улучшения:
1. Улучшен функционал общения во внутриигровых чатах. При открытом чате на время отключается игровое управление и скрываются подсказки с кнопками, а ч тобы отправить сообщение в чат, достаточно нажать на Enter.
2. Изменяйте чувствительность мыши как по вертикали, так и горизонтали.
3. В боковою панель инструментов BlueStacks добавлены всплывающие подсказки для каждого инструмента.
4. Улучшен режим уведомлений, который включает в себя еще больше опций персонализации.
5. В обновленном меню настроек, во вкладке «Движок», добавлена возможность отдельно назначать количество ядер процессора (CPU) и оперативной памяти (ОЗУ) для нужд BlueStacks.
6. Улучшена поддержка встроенных контроллеров геймпада.
7. Сохраняйте ресурсы системы и оставайтесь мультизадачны благодаря режиму эко, который теперь доступен на боковой панели инструментов BlueStacks.
8. Улучшена чувствительность мыши и точность прицеливания в Free Fire.
9. Добавлена сортировка дополнительных окон в менеджере окон BlueStacks. Вы можете сортировать их по имени или по типу движка.
10. Выполнена общая оптимизация программы, благодаря которой BlueStacks закрывается значительно быстрее, чем раньше.
11. Также мы сократили скорость загрузки BlueStacks.
12. Отныне смарт-управление работает и в DirectX.
13. Оптимизирован процесс установки приложений с помощью опции «Установить APK».
14. Теперь вы будете видеть все последние обновления при запуске BlueStacks.
15. Дополнительно вы получите уведомления об обновлениях BlueStacks и новых статьях по вашим любимым играм в блоге.
16. На экран загрузки BlueStacks вынесены советы и рекомендации , которые помогут максимально эффективно настроить ваш игровой процесс.
17. Добавлено предупреждение о проблемах производительности , если вы попытаетесь назначить все ядра процессора (CPU) для нужд BlueStacks.
![]() BlueStacks позволяет запускать приложения и играть в игры для Android на компьютере под управлением Windows посредством технологии аппаратной виртуализации.
BlueStacks позволяет запускать приложения и играть в игры для Android на компьютере под управлением Windows посредством технологии аппаратной виртуализации.

Поэтому, если на вашем компьютере или ноутбуке установлены другие виртуальные машины, использующие аппаратную виртуализацию, например, VirtualBox или VMware Workstation Player, то это может привести к снижению производительности БлюСтакс.
Одновременно только один компонент программного обеспечения может использовать оборудование для виртуализации, доступное на большинстве современных процессоров (Intel VT-x и AMD-V).
Кроме того, на производительность BlueStacks оказывает влияние и встроенная система аппаратной виртуализации Windows – Microsoft Hyper-V. Так, при включенной Hyper-V, многие пользователи сталкиваются со сбоями в работе, или вовсе ошибкой установки БлюСтакс на компьютер.
В этом случае мастер установки предлагает отключить Hyper-V для завершения установки BlueStacks 5. Как это сделать, рассмотрим далее.
Как отключить Hyper-V в Windows 10 для установки BlueStacks 5
Обратите внимание, что иногда причина ошибки установки BlueStacks может быть вызвана не Hyper-V (хотя мастер установки блюстакс указывает именно на это), а другим компонентом операционной системы – «Песочница Windows». Поэтому, если вы получаете сообщение об ошибке установки BlueStacks 5 из-за включенного Hyper-V, но в настройках компонентов он отключен, то первым делом проверьте активна ли песочница.
На этом всё. Отключение Hyper-V поможет ускорить работу BlueStacks и исключить появление ошибки в процессе установки программы.
А вдруг и это будет интересно:
- Режим Бога или GodMode для Windows 8
- Создаём дополнительные пункты в контекстном меню проводника Windows 11
- Бесплатное обновление до Windows 10 с помощью Media Creation Tool
- Ventoy: запись загрузочной флешки для установки Windows 11 на несовместимых устройствах
- Microsoft Edge: проблемы с Adobe Flash Player в Windows 10
- Отключаем предложение обновления до windows 10
Дата: 2021-05-25 | Размещено в Статьи
В BlueStacks не запускается движок виртуализации. Что делать? Проблема действительно серьезная, так как без этого движка эмулятор работать не будет. Поэтому ее нужно решать. И в данном материале мы расскажем о том, как это сделать.
Содержание
- Коротко о движке виртуализации
- Отключение виртуализации Hyper-V
- Отключаем защиту системы
- Очистка оперативной памяти
- Удаление вирусов и другого вредоносного ПО
- Переустановка эмулятора
Коротко о движке виртуализации
Движок виртуализации – это основной компонент эмулятора. Благодаря ему программа способна создать виртуальную среду Android на ПК и запустить в ней какие-либо игры. Если эта штука не работает, то Блюстакс даже не запустится.
Проблема в том, что для такого поведения эмулятора есть множество причин. И определить, почему именно произошла такая ошибка часто просто невозможно. Поэтому и приходится перебирать все возможные варианты для исправления ситуации.

Отключение виртуализации Hyper-V
Чаще всего такая проблема связана с тем, что в операционной системе включена опция под названием «Виртуализация Hyper-V». Именно эта настройка мешает работе виртуальных машин (к коим, по сути, относится и BlueStacks).
Такое может наблюдаться как в официальных сборках Windows, так и в сборках, загруженных с торрент-трекеров. Исправить ситуацию можно следующим образом:
- Открываем меню «Пуск», переходим в каталог «Служебные – Windows», ищем пункт «Панель управления» и кликаем по нему.

- Далее переходим в раздел «Программы»/«Удаление программы».

- Здесь в левом столбце щелкаем по пункту «Включение и отключение компонентов Windows».

- Ищем в списке каталог Hyper-V и просто снимаем с него галочку.

- Закрываем все окна и перезагружаем машину.


После рестарта можно пробовать заново запускать Блюстакс. Если проблема была действительно в этом, то движок виртуализации должен заработать.
«Панель управления» можно вызвать и другим способом. Для этого требуется нажать на клавиатуре Win + R и запустить инструмент «Выполнить». После этого требуется ввести в строку control и нажать на «ОК» или Enter. После этого запустится нужный нам компонент.
Отключаем защиту системы
Если появляется такая проблема, то весьма вероятно, что защитные механизмы Windows по какой-то причине блокируют запуск Блюстакс и его движка виртуализации.
Для того, чтобы движок запустился придется отключить встроенный брандмауэр и сторонний антивирус на некоторое время:
- Открываем меню «Пуск» и переходим в каталог «Служебные – Windows» / «Панель управления».
- В режиме просмотра «Крупные значки» щелкаем по пункту «Администрирование».

- Далее переходим в «Службы».

- Дальше переходим в «Брандмауэр Windows».
- Откроется окно с настройками службы. Здесь нажимаем на кнопку «Остановить».
- В графе «Тип запуска» выставляем «Отключена».
- Последовательно жмем кнопки «Применить» и «ОК».


Только что мы отключили «Брандмауэр Windows». Это куда быстрее и надежнее, чем возиться с его настройками. Теперь будем разбираться с антивирусом. В качестве примера возьмем ESET Smart Security.
- В системном трее необходимо найти иконку антивируса. Она имеет форму буквы «е». Кликаем по ней правой кнопкой мыши.
- Появится меню, в котором нужно выбрать «Приостановить защиту».

- В следующем окне программа попросит выбрать временной интервал для отключения защиты. Достаточно 10 минут.

- Выставляем это значение в соответствующей графе и жмем «ОК».
- Снова кликаем по значку «е» и выбираем в меню «Отключить файервол».

- В соответствующем окне выставляем десятиминутный временной промежуток и снова жмем на кнопку «ОК».


Вот теперь можно опять запускать BlueStacks. Если дело было именно в блокировке антивирусом, то придется внести эмулятор в список исключений брандмауэра и антивирусного продукта, а затем снова включить защиту.
Очистка оперативной памяти
Есть еще один вариант такого поведения эмулятора: недостаточное количество свободной оперативной памяти. Особенно это актуально для владельцев относительно слабых машин. Но есть способ решить проблему.
Для этого нам понадобится остановить все процессы, не связанные с системными службами и программами. Для этого придется воспользоваться «Диспетчером задач».
- Зажимаем на клавиатуре сочетание Win + R и вызываем инструмент «Выполнить».
- В соответствующей строке вписываем
taskmgrи жмем «ОК» или Enter.
- В списке процессов выбираем тот, который не относится к системным (например, firefox.exe) и кликаем по нему правой кнопкой мыши.
- В появившемся контекстном меню щелкаем по пункту «Снять задачу».

- Повторяем эти действия для других процессов.


После такой процедуры освободится некоторое количество оперативной памяти. Возможно, этого хватит для запуска BlueStacks. Во всяком случае, попробовать стоит.
Вызвать «Диспетчер задач» можно с помощью комбинации клавиш Ctrl + Shift + Esc. Или через контекстное меню Панели задач.
Удаление вирусов и другого вредоносного ПО
Возможен и такой вариант, что работа эмулятора блокируется вирусами, находящимися на компьютере пользователя. На примере встроенного антивируса Windows 10 покажем, как очистить систему от вирусов.
- Выполняем правый клик мыши по иконке щита в системном трее.
- В открывшемся меню выбираем пункт «Открыть».
- В главном окне защитника выбираем тип проверки. Отмечаем галочкой пункт «Полная».
- Нажимаем на кнопку «Проверить сейчас».
Обычно такой проверки недостаточно. Рекомендуется дополнительно воспользоваться сторонним антивирусным продуктом, например, при помощи ESET Smart Security. Сканирование как правило происходит в автоматическом режиме. После завершения рекомендуется перезагрузить компьютер.
Переустановка эмулятора
Если ничего из вышеописанного не помогает, то вполне вероятно, что вирусы или какой-то системный сбой повредили файлы BlueStacks. И поэтому он не может запустить движок виртуализации.
В этом случае поможет только деинсталляция продукта и последующая его установка на компьютер пользователя. Процесс не особо сложный, но требует много времени.
- Открываем «Панель управления» в режиме просмотра «Категория». Далее переходим в раздел «Удаление программы».
- Выделяем кликом мыши строчку с программой BlueStacks App Player и в панели инструментов жмем кнопку «Удалить».

- Во время деинсталляции мастер спросит о том, желаете ли вы сохранить установленные приложения. Выбираем «Нет».
- Теперь возвращаемся к списку установленных программ и повторяем процедуру удаления для компонента BlueStacks Notification Center.
- После деинсталляции всех компонентов перезагружаем компьютер.
- После рестарта запускаем веб-обозреватель, вводим в адресную строку
https://www.bluestacks.com/bluestacks-4.htmlи жмем на кнопку Enter. - Жмем по кнопке Download BlueStacks.
- На следующей странице снова нажимаем на кнопку Download.
- Дожидаемся завершения загрузки, закрываем браузер и открываем «Проводник Windows».
- Переходим в каталог загрузок, ищем файл с именем
BlueStacksInstaller_4.120.0.4004_nativeи кликаем по нему правой кнопкой мыши. - В появившемся контекстном меню выбираем пункт «Запуск от имени администратора».
- Запустится мастер установки. В главном окне отмечаем галочкой пункт «Принять лицензию ПО» и нажимаем на кнопку «Установить сейчас».

Вот так происходит переустановка эмулятора Блюстакс. На выходе пользователь получит свежий продукт, который по определению должен работать хорошо.
Bluestacks is an Android emulator that enables users to run Android applications on Windows and Mac computers. Due to the vast selection of apps and games available for the platform, it has become increasingly popular. However, some may prefer using Bluestacks inside a virtual machine to keep their host machine free from any potential issues caused by running Android applications.
Hyper-V is a virtualization technology created by Microsoft that enables you to create and run virtual machines on either Windows 10 or Windows Server. Installing Bluestacks on Hyper-V can be challenging, but this article will guide you through the process step-by-step.
Prerequisites
Before we can begin the installation process, a few prerequisites must be fulfilled.
Check that your computer supports Hyper-V. To do this, ensure your Windows version is 64-bit; an example would be Windows 10 Pro, Enterprise, or Education. You can check if your machine supports it by typing “Hyper-V Manager” into the search bar.
Ensure you have enough RAM and CPU resources to allocate to the virtual machine. Bluestacks require at least 2 GB of RAM for optimal performance, so allocate additional resources accordingly.
Download the Bluestacks installer from their official website.
Installation
Once all prerequisites have been fulfilled, let’s move forward with the installation process.
Step 1: Enable Hyper-V
The initial step in setting up Hyper-V on your computer is to enable it. Here are the instructions:
- To open Control Panel, click on Programs.
- Click “Turn Windows features on or off.”
- Scroll down until you come upon Hyper-V, and make sure the box next to it is checked off.
- Click OK and wait for the installation to finish.
Step 2: Construct a Virtual Machine
The next step is to create a new virtual machine to run Bluestacks. Here are the necessary steps:
- To create a virtual machine in Hyper-V Manager, click “New > Virtual Machine.”
- Follow the wizard to create a virtual machine. First, specify how much RAM and CPU resources should be allocated for this virtual machine.
- When asked to select an installation media, select the option to install the operating system later.
- Once your virtual machine has been created, right-click it and select Settings.
- Under the Processor tab, increase the number of virtual processors to at least 2.
- Under the Memory tab, increase the available memory to at least 4 GB.
- Under the Network Adapter tab, select the option to connect to an external network.
Step 3: Install the Operating System
The next step is to install an operating system on the virtual machine. Here are the steps to take:
- To begin the virtual machine, insert your operating system installation media.
- Follow the instructions in the wizard to install your operating system, making sure to install all necessary updates and drivers.
- Once the operating system has been installed, install Hyper-V Integration Services for enhanced performance and functionality.
Step 4: Install Bluestacks
To complete this process, we must install Bluestacks on the virtual machine. Here are the steps to take:
- First, download the Bluestacks installer from its official website.
- Transfer the installer to your virtual machine using a USB drive or network share.
- Install Bluestacks on a virtual machine by following the instructions in the wizard.
- Once Bluestacks is installed, you can run Android applications within the virtual machine.
How to uninstall Bluestack from a Hyper-V virtual machine?
Suppose you have decided that Bluestacks is no longer necessary on your Hyper-V virtual machine. In that case, it is essential to uninstall it properly to avoid any potential issues with performance and stability. Uninstalling Bluestacks from a Hyper-V virtual machine is an easy process that can be completed by following the steps outlined in this article. Properly uninstalling Bluestacks and deleting any leftover files or folders will ensure your virtual machine remains stable and performs optimally.
Here are the steps to uninstall Bluestacks from a Hyper-V virtual machine:
Step 1: Close Bluestacks
Before uninstalling Bluestacks, ensure it’s closed without running any processes in the background. You can check this by opening Task Manager on your virtual machine and ensuring no Bluestacks processes are present.
Step 2: Uninstall Bluestacks
To completely uninstall Bluestacks from your virtual machine, follow these steps:
- To open the Control Panel on your virtual machine, navigate to:
- Then, click on Programs and Features.
- Look for Bluestacks in the list of installed programs and click it to open.
- Click Uninstall and follow the on-screen instructions to complete the uninstallation process.
Step 3: Dispose of Bluestacks Files
After uninstalling Bluestacks, it is wise to delete any leftover files and folders associated with the application to guarantee that your virtual machine is free from all Bluestacks-related data.
Here are the steps to take:
- To open the Run dialog box on your virtual machine, press Windows key + R.
- Type in %ProgramData% and press Enter.
- Locate the Bluestacks folder and delete it.
- Press the Windows key + R again to launch the Run dialog box.
- Enter %AppData% and press Enter.
- Locate the Bluestacks folder and delete it.
- Empty your virtual machine’s recycle bin to delete files permanently.
Step 4: Reboot Your Virtual Machine
Once you’ve deleted the Bluestacks files, restart your virtual machine to ensure all changes take effect.
What is Hyper-V BlueStacks?
Hyper-V Bluestacks is a virtual machine environment that enables users to run Bluestacks on Windows operating systems. Hyper-V is an embedded virtualization technology built into Windows systems, allowing users to create and run virtual machines on their computers.
Bluestacks is an Android emulator that enables users to run Android applications on their Windows computers. By combining these two technologies, users can create a virtual machine using Hyper-V and install Bluestacks for running Android applications within that virtual machine.
Hyper-V Bluestacks provides a secure and isolated environment for running Android applications on a Windows computer. Since the virtual machine is isolated from its host operating system, any potential security threats or issues with Android applications running inside it remain within that virtual machine, safeguarding both the host operating system and other applications running therein.
Hyper-V Bluestacks also offers the unique capability of running Android apps on a virtual machine without an actual Android device, making it especially helpful for developers who need to test their programs across various devices and configurations.
Overall, Hyper-V Bluestacks is an impressive tool that allows users to run Android applications on Windows in a secure and isolated environment. By combining the virtualization capabilities of Hyper-V with Android emulation capabilities in Bluestacks, users can take advantage of both worlds and run their favorite Android applications directly on Windows computers.
Is Enabling Virtualization for BlueStacks Safe?
Enabling virtualization for BlueStacks is perfectly safe and necessary to run it optimally on your computer. Many experts suggest it for optimal performance.
Virtualization is a technology that allows multiple operating systems to run on the same physical hardware, improving resource utilization and security. For example, enabling virtualization on your computer’s CPU creates multiple virtual CPUs allocated to different virtual machines. That gives Bluestacks’ virtual machine more access to CPU resources so it can operate more efficiently.
Enabling virtualization for Bluestacks is a straightforward process that requires access to your computer’s BIOS settings. Of course, the exact steps may differ depending on the manufacturer and model of your machine. Still, typically you’ll need to restart and press a key during startup to gain access.
Once in the BIOS settings, search for an option related to virtualization technology. For example, it may be called Intel Virtualization Technology, AMD-V, or something similar. Enable this setting and save your changes before exiting out of BIOS settings.
After enabling virtualization on your computer, you should experience improved performance when running Bluestacks. However, any issues or errors arise after enabling virtualization. In that case, you may need to update your BIOS or confirm that your hardware supports virtualization.
Does BlueStacks Damage My PC?
No, Bluestacks does not damage a computer in any way. But Bluestacks could cause issues if installed or used correctly like any other software.
Bluestacks is an Android emulator that enables users to run Android applications on their Windows computers. It has been downloaded by millions of users worldwide, and its regular updates ensure its safety and performance remain top-notch. As such, bluestacks has earned its users’ trust as a dependable and trustworthy program.
However, there may be some potential issues when using Bluestacks. These include:
Compatibility Issues: Bluestacks may not function correctly on all computers, especially if your machine doesn’t meet the minimum system requirements. If this is the case for yours, performance issues or crashes may occur when running Bluestacks.
Security Concerns: Like any emulator, Bluestacks can potentially be used to run malicious software or apps that could harm your computer. It is, therefore, essential to only download apps from trusted sources and use a reliable antivirus program to protect your device.
Performance Issues: Running Bluestacks on a computer that lacks enough resources (RAM or CPU power) can cause performance issues, including slow or unresponsive performance.
Overall, Bluestacks is a safe and reliable application that should not cause any harm to your PC when used correctly. However, to guarantee an optimal experience with Bluestacks, your computer must meet the minimum system requirements, only download apps from trusted sources, and utilize an effective antivirus program for protection.
Conclusion
Installing Bluestacks on a Hyper-V virtual machine may seem complex. Still, it’s an adequate safeguard for your host machine against potential issues when running Android apps. Following the steps outlined in this article, you should be able to successfully install Bluestacks in a Hyper-V virtual machine and enjoy Android apps on either Windows 10 or Windows Server operating system.
It is essential to be aware that running Bluestacks on a virtual machine may result in reduced performance compared to running it on a physical one since the virtual machine must share resources with both the host machine and other virtual machines running on the same system.
You can allocate more resources to the virtual machine to boost performance, such as increasing RAM and CPU cores and ensuring it has access to high-speed storage.
Furthermore, keeping the operating system and virtual machine up-to-date with all updates and security patches is essential. Doing so will protect the virtual machine from potential security flaws.
Overall, installing Bluestacks on a Hyper-V virtual machine is an ideal way to enjoy Android apps on your Windows operating system without compromising the performance or security of your host machine. Following the steps outlined in this article, you should be able to quickly set up and run Bluestacks within a virtual machine and begin exploring all that Android has to offer!
Download Windows Speedup Tool to fix errors and make PC run faster
Trying to run BlueStacks which is an android app emulator on a Windows 11/10 PC, a prerequisite, is that it is necessary that Hyper-V and any other virtual feature should be disabled. If you have disabled Hyper-V but still encounter the error message BlueStacks cannot start when Hyper-V is enabled when trying to run BlueStacks, then this post is intended to help you with the solutions you can try to successfully resolve the issue.
When you encounter this issue. you’ll receive the following full error message;
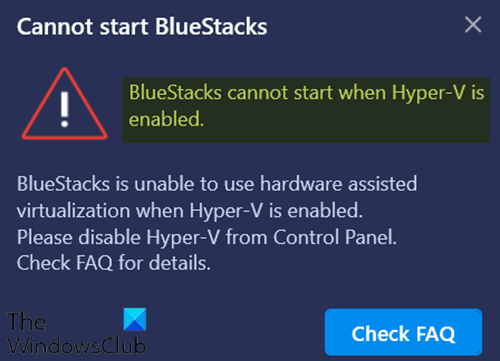
Cannot start BlueStacks
BlueStacks cannot start when Hyper-V is enabled.BlueStacks is unable to use hardware assisted virtualization when Hyper-V is enabled.
Please disable Hyper-V from Control Panel.
Check FAQ for details.
If you’re faced with this issue, you can try the following to resolve the issue.
- Make sure Hyper-V and the related feature is disabled
- Disable Hyper-V using an exe file
- Disable Hyper-V using the registry file
Let’s take a look at the description of the process involved concerning each of the listed solutions.
Before you go ahead with these suggestions, you may want to run BlueStacks without disabling Hyper-V. If so, you can download this version of BlueStacks.
Note: This version of BlueStacks is based on Android 64-bit. If you face any issue while running Android 32-bit apps, or you do not want to enable Hyper-V on your system, you can download BlueStacks 32-bit from the official website.
1] Make sure Hyper-V and the related feature is disabled
You can disable Hyper-V via Control Panel or PowerShell.
Make sure the options Hyper-V, and other related features (if applicable) like Virtual Machine Platform and Windows Hypervisor Platform are unchecked. Click OK to save the changes.
Windows Feature will apply the changes and prompt you to restart. Restart your system/PC to apply the requested changes by clicking on Restart now button.
For some specific versions of Windows 10, the Virtual machine platform and Windows hypervisor platform check-boxes are not available. In which case, you can turn off the Memory integrity.
Read: Bluestacks stuck on Initializing screen
2] Disable Hyper-V using an exe file
Download and double-click the exe file. After running this file, restart your device. If you still get this error after restarting once, restart your device a few times, after which Hyper-V will be disabled.
Related: VirtualBox Interface has active connections error message when shutting down.
3] Disable Hyper-V using the registry file
If none of the above alternatives worked, you can download this registry file and double-click to run it. After running the registry, restart your computer and then try to run BlueStacks. It should work normally.
Note: This registry will work on Windows 11/10 (64 Bit) only.
Hope this helps!
Obinna has completed B.Tech in Information & Communication Technology. He has worked as a System Support Engineer, primarily on User Endpoint Administration, as well as a Technical Analyst, primarily on Server/System Administration. He also has experience as a Network and Communications Officer. He has been a Windows Insider MVP (2020) and currently owns and runs a Computer Clinic.
После обновления до Windows 11 версии 22H2 кроссплатформенный эмулятор BlueStacks Nougat-64 не открывается у большого количества людей. При попытке запустить приложение появляется сообщение об ошибке «Несовместимые настройки Windows».
Windows 10 22H2 удалила Hyper-V, и это является причиной этой проблемы с эмулятором Android. Вместо этого эта функция удалена, но все еще существуют следы и остатки, которые мешают работе BlueStacks при запуске приложения. См. Как исправить BlueStacks, не работающий в Windows 10.
Вот как исправить проблемы или ошибки BlueStacks в Windows 11 22H2 —
Способ 1: удалить остатки Hyper-V
BlueStacks уже страдает от Hyper-V, целостности памяти, песочницы Windows, платформы виртуальных машин и WSL. Эти функции Windows препятствуют правильной работе эмулятора, поэтому вам придется последовательно отключать их.
Теперь, когда Windows 11 22H2 прекратила работу Hyper-V, но остатки являются препятствием для приложения, поэтому их необходимо очистить. Официальный веб-сайт BlueStacks предоставляет пользовательский .exe-файл для того же самого, поэтому не о чем беспокоиться, когда вы сталкиваетесь с проблемами BlueScreen в Windows 11 22H2. Все, что вам нужно сделать, это следовать инструкциям –
- Нажмите на пользовательский файл .exe.
- Перейдите в папку загрузки на рабочем столе и дважды щелкните HD-DisableHyperV_native_v2.exe.
- Выбирать Да в приглашении учетной записи пользователя.
- Разрешить программе установки завершить свою задачу на 100 %.
- Нажмите Да когда появляется всплывающее окно с сообщением: «Процесс успешно завершен. Вы хотите перезагрузить компьютер, чтобы изменения вступили в силу?».
Способ 2: отключить Hyper-V
В версии 22H2 Hyper-V удален, но в версии 21H2 эта функция все еще существует. Поэтому, если в Windows 11 21H1 возникает ошибка Bluestack «Несовместимые настройки Windows», вы можете загрузить собственный файл .exe и запустить его, чтобы исправить ошибку Bluestack 21H2 «Несовместимые настройки Windows». Этот файл также может удалить приложение Bluestack из Windows. Кроме того, с помощью настроек и командной строки то же самое можно сделать следующим образом:
А) Использование панели управления
Чтобы решить проблему с BlueStacks, вы должны вручную отключить Hyper-V с помощью функций Windows —
- Нажмите Начинать.
- Тип контроль.
- Нажимать Входить.
- Выбирать – Программы и особенности.
- Нажмите на Включение или отключение функций Windows с левой панели.
- Теперь вам нужно снять отметку с разных Возможности системы Windows для вашей версии Windows.
- Снимите флажок Гипер-V и нажмите на ХОРОШО.
- После завершения перезагрузите систему, чтобы изменения вступили в силу.
- Проверьте, исправлена ли ошибка.
- Если это не решено, выполните эти шаги еще раз и отключите песочницу Windows, платформу виртуальных машин и подсистему Windows для Linux.
Прочтите 5 способов открыть диспетчер Hyper V в Windows 11 или 10
Б) через командную строку
Опытные пользователи могут отключить Hyper-V на ПК через командную строку, чтобы исправить проблемы Windows 11 22H2 BlueStacks. Следующие шаги покажут вам, как это сделать:
- Нажимать Винки+Р.
- Тип – команда.
- Далее нажмите Ctrl + Shift + Enter.
- После того, как откроется командная строка, введите следующую команду и нажмите клавишу Enter.
bcdedit/установить тип запуска гипервизора выключенным
После выполнения этой команды Hyper-V будет отключен на вашем ПК.
Способ 3: отключить целостность памяти
Много раз, Гипервизор Windows и Виртуальная машина параметры не существуют в Windows 11. В этом случае вы должны выполнить следующие действия:
- Нажмите на Поиск.
- Тип изоляция ядра.
- Нажимать Входить.
- Как только появятся настройки изоляции ядра, отключите Целостность памяти.
Способ 4: удалить обновление Windows
Проблемы или ошибки BlueStacks могут возникнуть после установки обновления Windows, в котором есть ошибки. Многие люди сталкиваются с этой проблемой в Windows 11, особенно в 22H2. Если вы попали в такое же состояние, без колебаний удалите обновление Windows, используя приведенное ниже руководство.
- Нажмите на – Начинать.
- Тип – обновления.
- Ударил Входить чтобы развернуть страницу настроек обновления Windows.
- Выбирать – История обновлений с правой панели.
- Нажмите на – Удалить обновления.
- На следующей странице нажмите на Удалить для обновления и подтвердите всплывающее окно.
Методы:
Способ 1: удалить остатки Hyper-V
Способ 2: отключить Hyper-V
Способ 3: отключить целостность памяти
Способ 4: удалить обновление Windows
Вот и все!!