by Claire Moraa
Claire likes to think she’s got a knack for solving problems and improving the quality of life for those around her. Driven by the forces of rationality, curiosity,… read more
Updated on
- ADB stands for Android Debug Bridge used by developers to connect their development computer with an Android device via a USB cable.
- If you don’t have Android SDK installed on your PC, ADB may not be recognized. It’s recommended you download the latest version.
- You also need to enable Developer mode and USB debugging on your phone for ADB to be recognized.
- If you already have Android SDK installed and the problem persists, we have some troubleshoot options you can try to resolve the issue.
XINSTALL BY CLICKING THE DOWNLOAD
FILE
If you are trying to flash a custom ROM, recover your phone from boot loop, or unlock the bootloader, ADB and Fastboot will be your best friends.
ADB helps you to install apps on your phone, uninstall system apps without rooting your device, get app logs, issue commands to apps, and general communication with your Android device.
Fastboot and ADB are two of the most important tools used when working with Android devices. However, many people often run into problems when trying to use ADB and Fastboot for the first time.
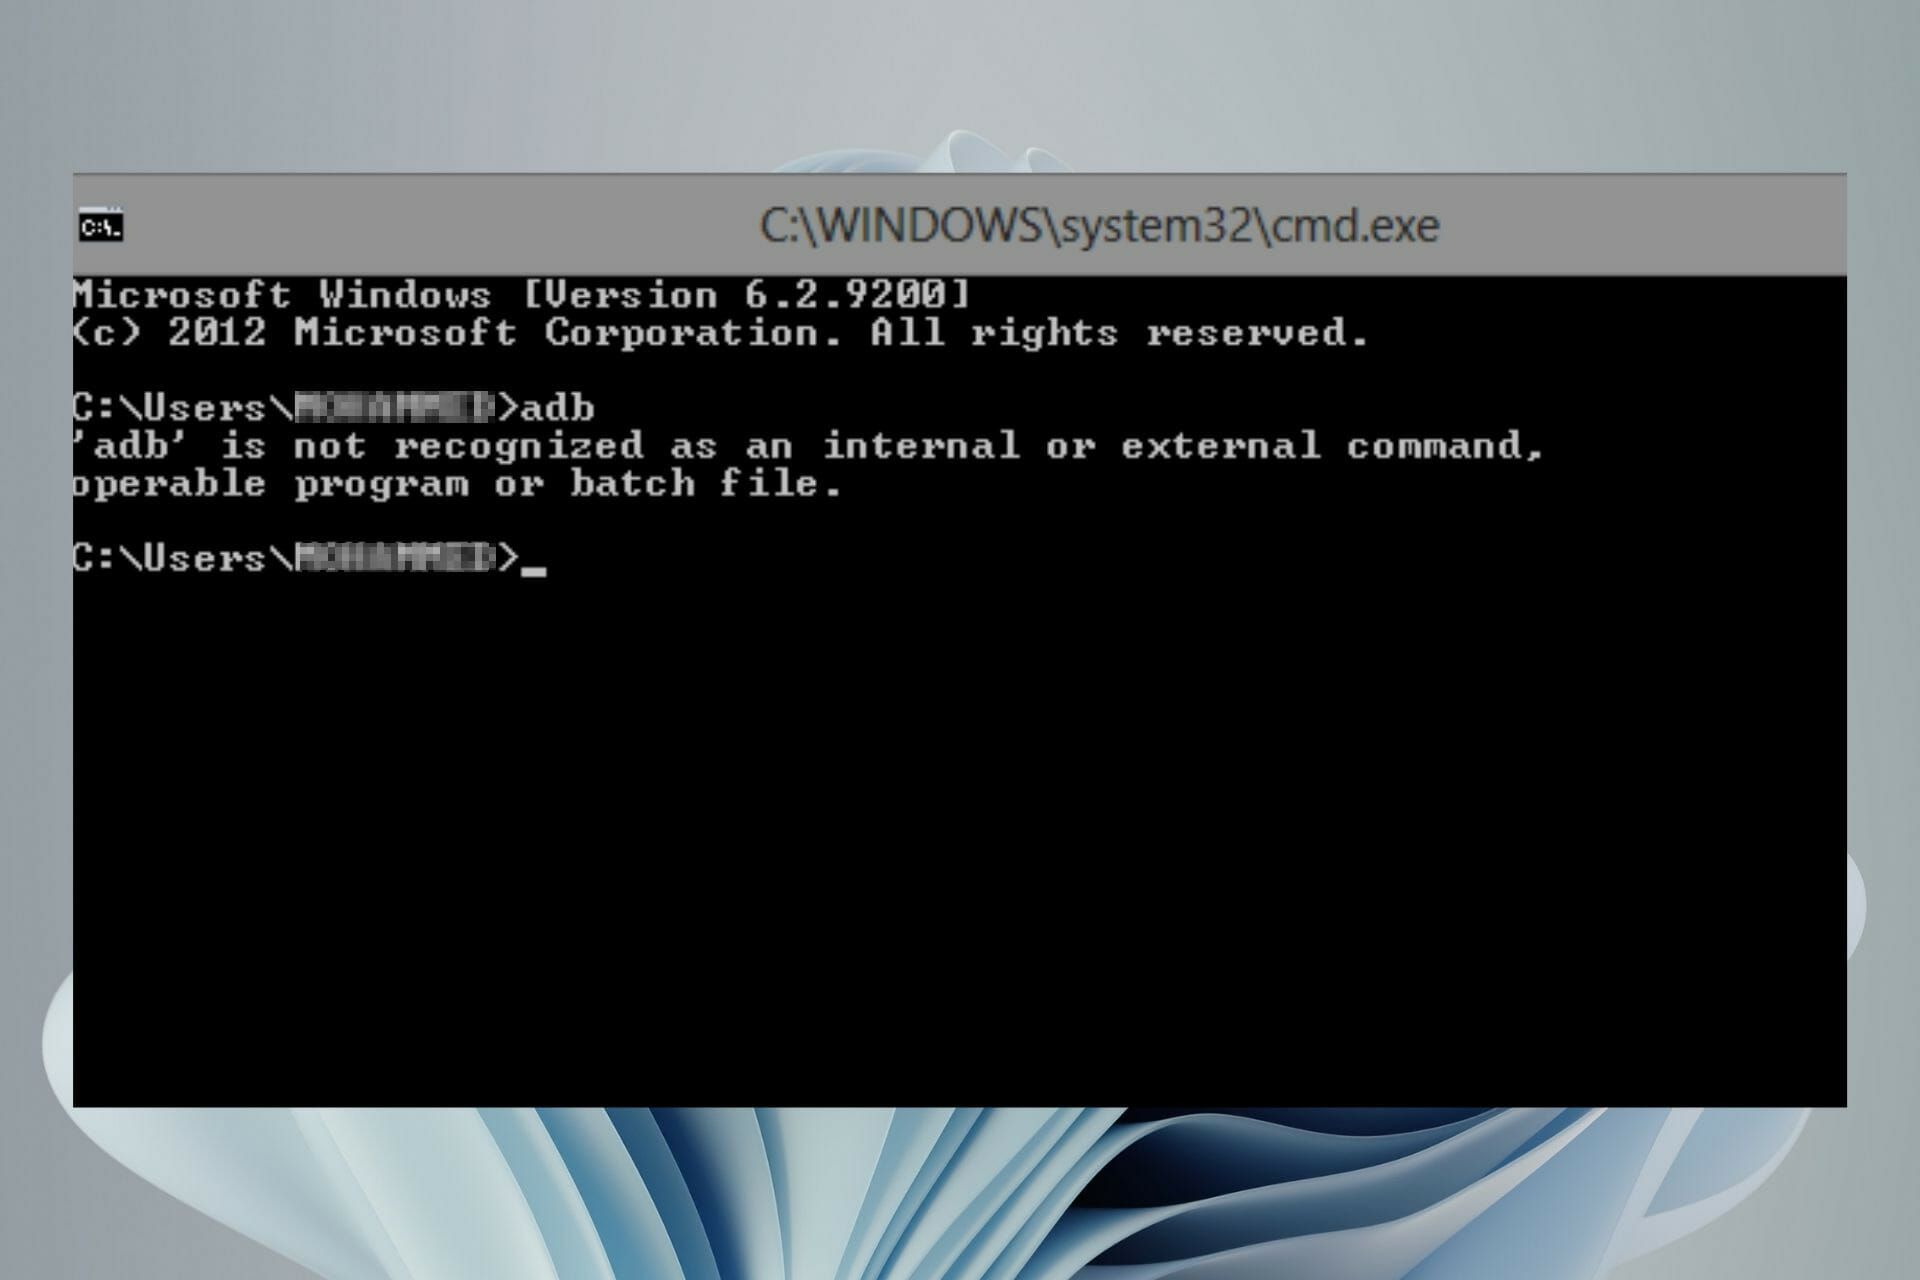
The ADB is not recognized error is common for those who are trying to set up ADB for the first time, but it can also pop up for more experienced users that have been using it for a while.
This is the most common problem faced by all users of Android Debug Bridge (ADB) and Fastboot commands.
Why is ADB not recognized on my Windows 11?
There are several reasons why this problem might occur. It can be a bad driver installation or a corrupt/missing file in your ADB installation folder or the ADB command cannot be found.
You can also get this error if you are using old or incompatible ADB commands on Windows 11. There are lots of possibilities that can cause this error. Some of the common reasons include:
How we test, review and rate?
We have worked for the past 6 months on building a new review system on how we produce content. Using it, we have subsequently redone most of our articles to provide actual hands-on expertise on the guides we made.
For more details you can read how we test, review, and rate at WindowsReport.
- No ADB drivers are installed – ADB drivers do not come pre-installed in your PC. You need to download the package and setup the drivers to be able to issue commands and any other activities.
- Wrong configuration of ADB drivers – This is a very common mistake among Android users that don’t know how to setup or use ADB and Fastboot tools properly. Fortunately, this is a very easy fix. You just need to download and install ADB & Fastboot Drivers for Windows on your PC and then add the path of these drivers.
- Outdated ADB drivers – If you have an outdated version of ADB and Fastboot drivers, uninstall them before proceeding. Also, remove any ADB drivers installed by any other app or service.
- Faulty USB cables – At times, your cable may be the problem so try switching with a different one and see if the problem persists.
If you encounter any of the problems above, there are some workarounds you can try right away.
What can I do if my ADB is not recognized in Windows 11?
1. Add a System Path for ADB
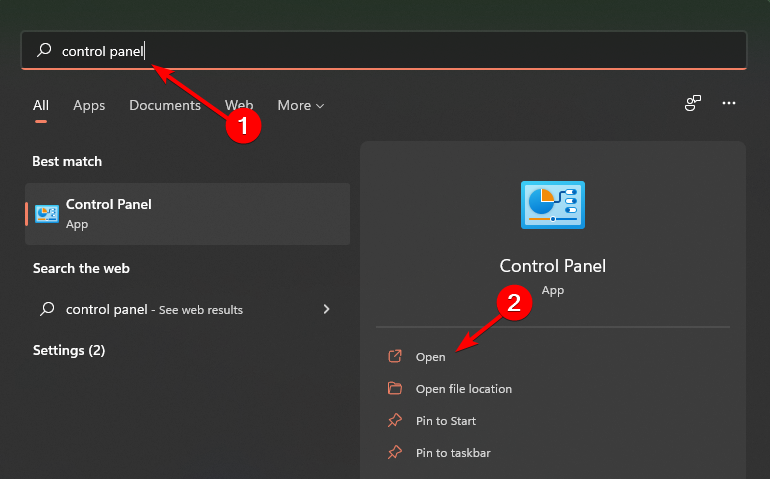
- Hit the Windows key, type Control Panel in the search bar, and click Open.

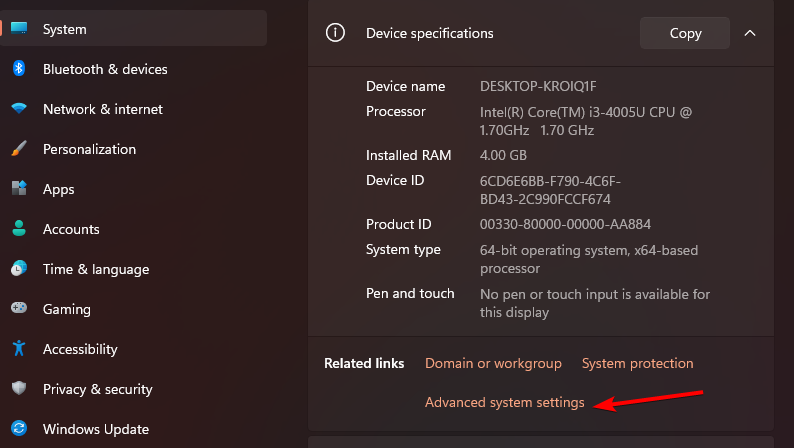
- Navigate to System.

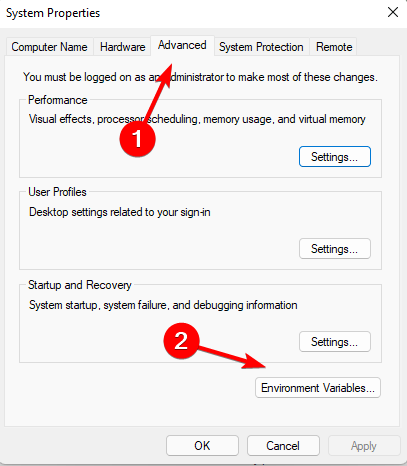
- Click on Advanced system settings.

- Select the Advanced tab in the dialog box that pops up and click on Environment Variables.

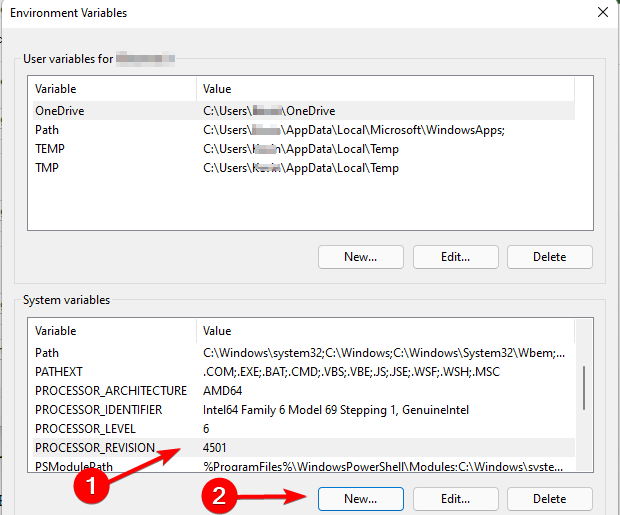
- Under System variables, click on any item and select New.

- Under Variable name, type Path, click on Browse Directory to select the folder, and then click the OK button.


2. Execute the ADB command from the installation folder
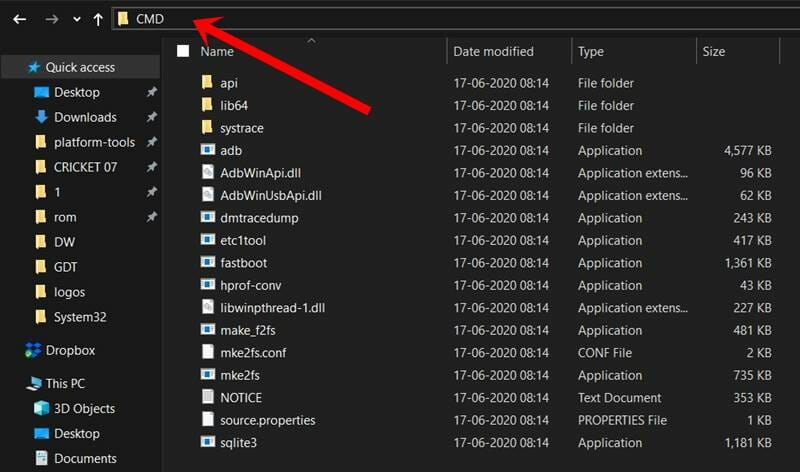
- Open the folder containing the ADB files, type CMD in the address bar, then press Enter.

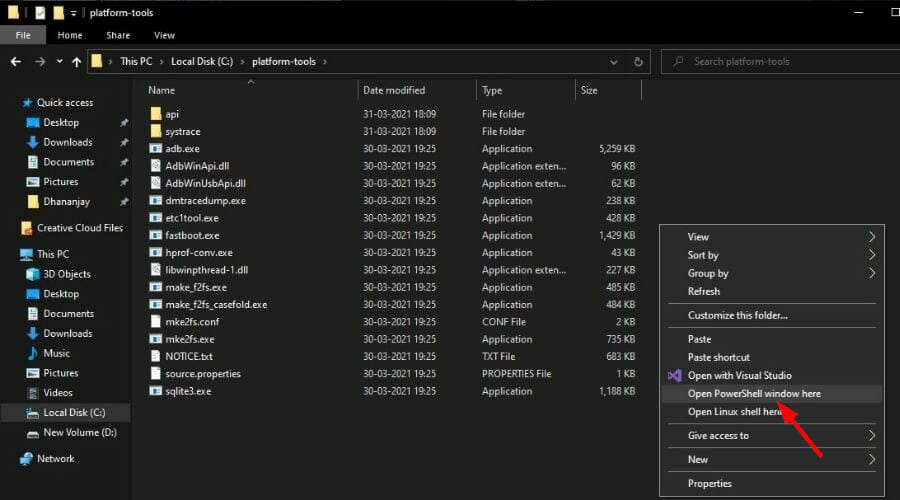
- Right click on an empty space and select Open Powershell window here.

- Now try running ADB commands.
3. Enable USB debugging
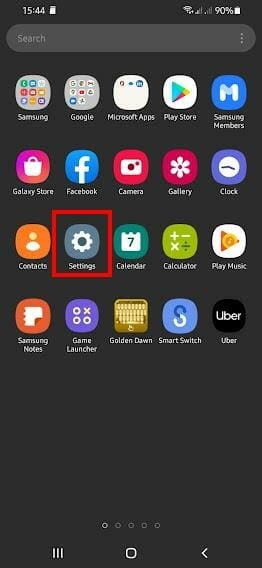
- On your phone, navigate to Settings.

- Scroll down and select About phone.
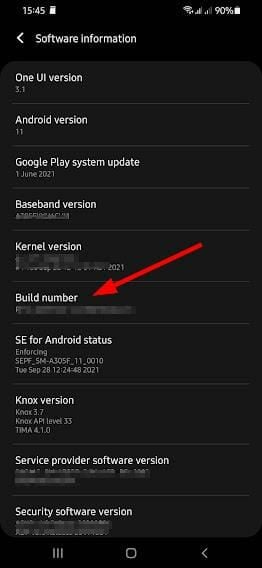
- Select Software information.
- Tap on Build number 7 times to enable Developer mode.
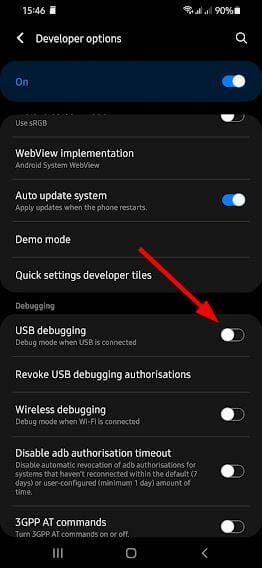
- Go back to Developer options and enable USB debugging.


How are ADB and Fastboot tools related?
ADB and Fastboot are arguably two of the most indispensable tools used when working with Android devices. Both ADB and Fastboot come as part of the Android SDK package.
- Fix Android issues and learn to easily master it
- How to sideload Android APKs on Windows 11
- FIX: Android Emulator error installing APK on Windows
If you really want to modify, debug, and tweak along with their countless uses in rooting, and other procedures ADB and Fastboot are a must for any Android device owner.
The two can however be confusing if you are a beginner but worry not, once you understand the function of each tool, it will be a smooth ride.
ADB allows you to send commands to your Android device via USB from a PC command line.
This is the most powerful part of ADB, it lets you completely back up and restore your device, install custom ROMs, and do other advanced operations.
Fastboot is a separate diagnostic protocol that you can boot your Android device into. It will let you modify the system partition in various ways; for example, pushing and pulling files, installing apps, flashing different boot images, recovering your device when it gets stuck, and so on.
If you are interested in modifying your Android, you can proceed to install Fastboot drivers and explore your phone further.
You can also refer to our guide on Fastboot not working in case you encounter any problems while trying to enter boot mode.
Are ADB drivers safe for installation on my PC?
You might be wondering if ADB drivers are safe to install on your computer. You’re not alone. This is an important tool for development, as it allows you to easily test your applications and make sure they work as expected on a variety of different devices.
In the unlikely event that something goes wrong, you can always uninstall them. ADB drivers only become unsafe if you are not sure of what you are doing, or if you’ve never had any experience with the Android platform.
If you choose to use some unknown third-party application to manage your device, then it may install its own app to help with the management of your device and that app could be dangerous.
However, to ensure you stay safe, it is recommended that you have a backup of all your data before doing anything with ADB. You can use AOMEI Backupper for a smooth migration given its perfect cloning features for a successful boot
Should you face any other related issues such as ADB interface being unable to install, visit our helpful guide to quickly resolve the problem.
We hope our solutions were able to come through for you in your time of need and you successfully resolved your issue.
Let us know which solution worked out for you in the comments section below.
![]()
Using the ADB driver, you can establish a connection between your Windows PC and Android devices.
The process of installing ADB drivers can be daunting, especially if it’s your first time.
Don’t worry. In this guide, I will walk you through the steps to download and install ADB drivers on Windows 11.
Let’s get started without further ado.
Check out the easiest way to Fix cFosSpeed Driver Preventing Windows 11 Installation
What is ADB and How Does it Work?
Android Debug Bridge (ADB) is a command-line tool from Google to help developers debug their applications or the Android system. It works as a bridge between a computer and an Android device. If Android devices need modification at system levels, install ADB drivers on your computer.
Android Debug Bridge (ADB) is a fundamental tool for Android Development. It allows users to perform high-level tweaking on Android devices at both app and system levels.
In order to access several features of the Android platform, users must utilize Android’s hidden paths and methods. And here comes ADB that enables you to access all available Android features for more extensive off-limits changes on Android devices.
ADB helps you flash and recover custom ROMs, sideload applications, firmware upgrades, system updates, and modify hidden settings, among other high-level adjustments.
The Android Debug Bridge (ADB) is based on the classic client-server architecture. There are three major components of ADB, these are:
- The client: The client indicates your computer, which you connect to your Android device.
- The daemon: Android uses daemons, which run commands on a device. They run in the background on each device and handle communication between the system and apps.
- The server: A server is a background process that manages communication between the client and daemon.
Now that you have a basic understanding of what ADB is and how it functions, let’s dive straight into the usage guide.
To download ADB drivers on Windows 11, go to the Android SDK Platform Tools website and download the ADB drivers for Windows. Then extract and place the ADB driver files in a suitable folder. Connect the Android device via USB and use the command prompt to run ADB commands.
First and foremost, you need to install the ADB drivers on your computer to perform any customization on your Android devices. Without installing the ADB drivers, you can’t control your Android devices.
In this section, I will show you a step-by-step guide to downloading and installing the ADB drivers on your Windows 11 computer.
You can also follow these steps to install the ADB drivers on your Windows 10 or Mac computer. Sounds great, right? Okay, let’s see how to do this.
Here are the steps to download and install the ADB drivers on Windows 11:
1. Download ADB Drivers
First, you need to download Windows 11 ADB drivers, and the best source to download them is from the Android Developers website. You can get the ADB drivers for both the 64-bit and 32-bit operating systems there.
Here are the steps to download the ADB drivers on Windows 11:
Once the file is downloaded, you need to configure the Android to use ADB drivers on it. Let’s do that in the next step.
2. Set Up the Android Device
In order to run ADB commands, you must set up your Android devices, such as smartphones or tablets. You need to enable USB debugging on your device.
Without setting up your Android phone, you can’t establish the ADB bridge connection because your Android won’t be able to execute the ADB command. So, follow the steps below to set up your Android.
Here are the steps to set up your Android device:
- Open the Settings app on your phone.
- Go to the About Phone option on your Settings window.
- Find the Build Number section and tap on it several times to enable the Android Developer Mode. Notification will show on the display when the Developer Mode is enabled.
- Get back to the primary Settings window and open the Developer Options.
- Enable the USB Debugging option under the Debugging section.
- Connect your device to your PC using a USB cable. Change the USB mode to file transfer (MTP)
Now we are ready to use ADB for Windows 11. Let’s proceed.
3. Install ADB Drivers
Installing and setting up ADB drivers isn’t a typical job, but it is pretty straightforward. Let’s show you how to install it.
Here are the steps to install ADB on Windows 11:
a. cmd
b. adb devices
- Allow the debugging access while the USB debugging prompt window appears on your Android device.
- Re-enter the command: adb devices.
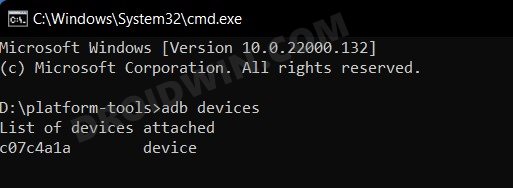
After executing the above steps, you can see the list of all devices connected to your computer. It confirms that ADB is installed on your computer and that the ADB connection is complete.
Once the drivers are installed, you can run any ADB command or do ADB debugging on your connected device using the ADB shell.
How to Use ADB using WiFi
Using ADB via the USB cable may not be convenient always. There are many common USB connection issues and also you might need to install OEM drivers specific to the Android phone.
Using ADB over Wifi eliminates these issues and provides a streamlined way to run ADB commands. ADB over Wifi is natively supported starting with Android 11.
Follow the steps below to use ADB via Wifi:
- Ensure the Android and the computer are connected to the same WiFi
- On your phone, go to Settings > Developer options and enable Wireless debugging.
- Note the Wifi pairing code, IP address, and port displayed on the pop-up.
- Open Command Prompt
- Type the following command: “adb pair IP_Address:Port”, and press Enter, where you have to put the IP address and port number from the previous step.
- After running the command, you’ll be prompted for the pairing code that you noted earlier. Enter the pairing code and press Enter. You should see a message indicating pairing is successful.
- Execute the following command on your computer Command window: “adb connect IP_Address:Port”, where you have to put the IP address and port number you’ve noted above.
If you see a message saying “connected to IP_Address:Port”, you have successfully connected the ADB using Wifi.
Frequently Asked Questions (FAQs)
Does ADB work on Windows 11?
Yes, it works on Windows 11. Android Debug Bridge (ADB) also works on other versions of Windows like Windows 10. It also works on Mac and Linux OS.
Are ADB drivers safe for installation and use?
Yes, ADB drivers are safe for installation and use on your Windows or Mac computer. It only works as a bridge between your Windows PC/Mac computer and Android devices.
How do I download ADB drivers?
Go to the Android SDK Platform Tools website to download the ADB drivers. Then scroll down and find the Download section. After that, download the ADB drivers for your Windows, Mac, and Linux on the list.
Final Thoughts
The ADB has three major components: the client, the server, and the daemon. These three components are the ADB architecture.
The ADB is an excellent Android development tool of Google that allows users to perform different tasks by creating a bridge connection between their PC and Android phones.
Following this guide, you can easily and effectively establish the bridge connection between your Windows 11 PC and Android phones without facing any problems that help you flash and recover custom ROMs, sideload applications, firmware upgrades, customize OEM features or user interfaces, etc.
That’s it. Pretty simple, isn’t it? As usual, check out the other articles for more information and details. Thanks for staying with me. Have a good day.
Android Debug Bridge (ADB) — это полезный инструмент командной строки, созданный Google для разработчиков, которые хотят получить доступ к скрытым настройкам различных Android устройств.
Он состоит из трех компонентов, которые работают вместе для установления связи между вашим компьютером и устройством: клиент, демон (adbd) и сервер. Клиент представляет собой ваш компьютер, который вы будете подключать к своему портативному устройству, и это компонент, который отправляет команды с помощью USB-кабеля. Тем временем демон выполняет команды на устройстве, а сервер управляет связью между клиентом и демоном. В отличие от демона, который работает как фоновый процесс на устройстве, сервер работает как фоновый процесс на компьютере.
ADB можно использовать в разных компьютерных системах, таких как Windows, macOS и даже Linux. Но в этом случае мы выделим его использование на Windows 11. Однако важно отметить, что ADB не является инструментом, который легко устанавливается на ваш компьютер. Вам нужно инициировать его загрузку, но хорошая новость заключается в том, что Google предоставляет прямые ссылки на то, где вы можете скачать ADB для Windows 11.
Тем не менее, понимание использования инструмента имеет решающее значение перед его загрузкой. Google создал ADB для разработчиков, что означает, что он предоставит вам высокоуровневые настройки для вашего телефона или других устройств Android. В частности, он устанавливает связь между устройством и компьютером, позволяя вам отлаживать первую систему и ее приложения, получать доступ к оболочке Unix и выполнять другие команды.
Установка драйверов ADB на ПК с Windows 11
Вот пошаговый процесс установки драйверов ADB на ПК с Windows 11.
- На Страница руководства пользователя ADB предоставляется Google, вы можете получить доступ к ссылка на страницу загрузки инструмента ADB. Он предлагает драйверы ADB в трех вариантах, в зависимости от операционной системы вашего компьютера. Выберите первый, чтобы получить последнюю версию, которую вы можете использовать для своей Windows 11.
- Нажав на опцию «Загрузить SDK Platform-Tools для Windows», вы попадете на страницу подсказки. Просто установите флажок и нажмите кнопку Загрузить Android SDK Platform-Tools для Windows, чтобы начать загрузку.
- После загрузки ZIP-файла вам нужно переместить, а затем извлечь папку в папку, к которой вы можете легко получить доступ. Мы рекомендуем иметь его на корневом диске ПК с Windows 11 (C:\).
- Чтобы выполнить процесс извлечения, просто щелкните правой кнопкой мыши ZIP-файл и выберите параметр «Извлечь все…». После этого появится подсказка. Просто нажмите кнопку «Извлечь», чтобы продолжить.
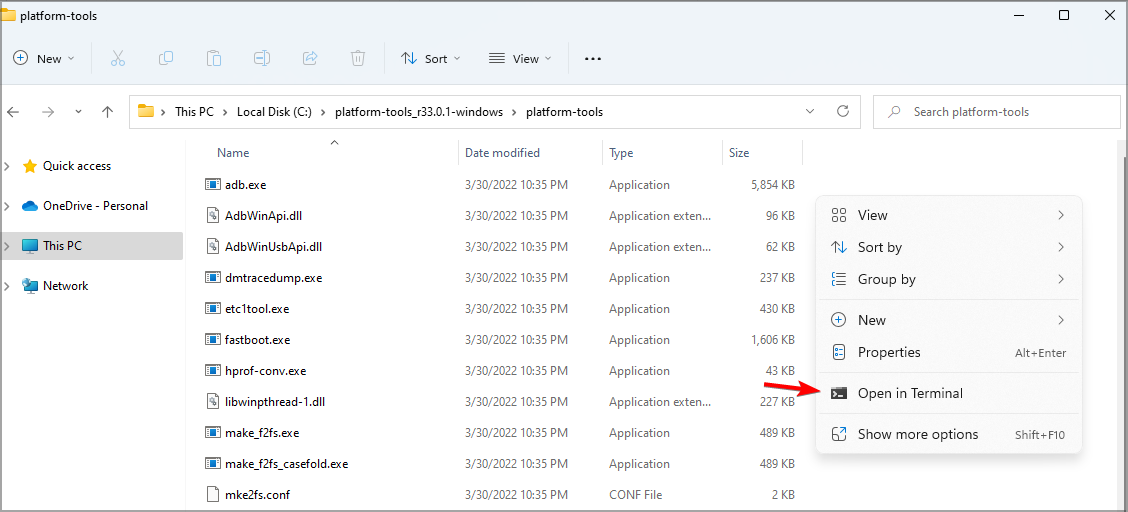
- Откройте извлеченную папку и щелкните ее правой кнопкой мыши. Выберите параметр «Открыть в терминале», чтобы запустить командную строку Windows PowerShell.
Активация отладки ADB на Android-устройстве
Загрузка драйверов ADB — это не единственное, что вам нужно сделать для запуска команд ADB на устройствах Android. Вы также должны подготовить свой телефон или планшет для работы связи между компонентами ADB. Вот как вы можете включить отладку ADB на своем устройстве.
- Вам нужно включить режим разработчика, который по умолчанию скрыт. Для этого перейдите в «Настройки» > «О телефоне» > «Номер сборки». Быстро коснитесь номера сборки семь раз, чтобы активировать режим.
- После активации появятся параметры разработчика системы устройства. Расположение раздела зависит от режима или марки вашего телефона. Вы можете найти его, открыв «Настройки»; иногда он находится в области «Системы и обновления» и в других местах. Он также может называться по-другому на других устройствах.
- Перейдите в «Параметры разработчика» и активируйте параметр «Отладка по USB» в разделе «Отладка».
- Подключите ваше устройство к ПК с Windows 11 с помощью USB-кабеля и измените режим USB на режим «передача файлов (MTP)».
- На вашем устройстве появится диалоговое окно с запросом разрешения на отладку по USB, которое позволяет выполнять отладку через этот компьютер. Нажмите «ОК», чтобы продолжить. Вы также можете установить флажок в диалоговом окне, чтобы вам не приходилось делать это каждый раз при подключении устройства к ПК.
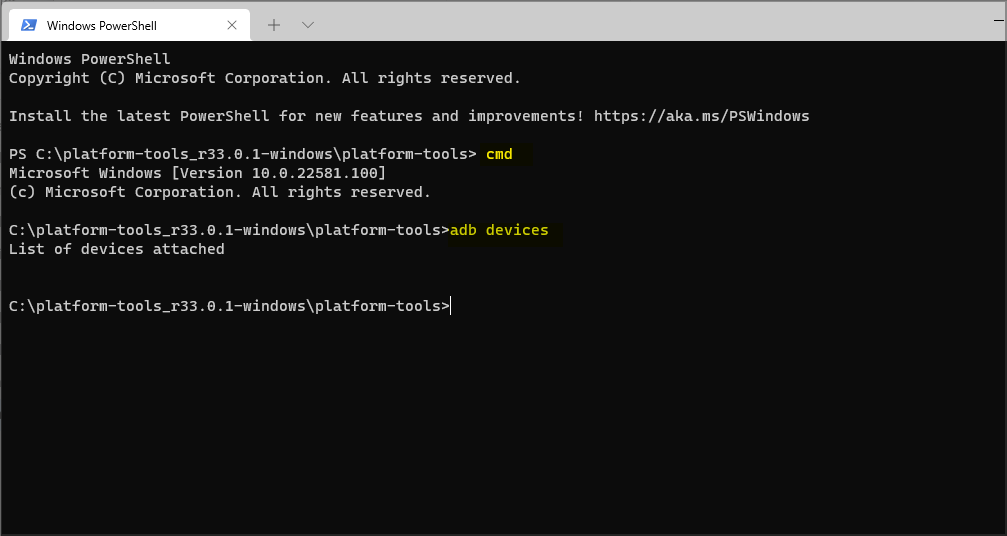
После того, как все настроено (драйвер ADB установлен, параметры разработчика портативного устройства Android активированы, а само устройство подключено к ПК через USB-кабель), вы можете проверить, успешно ли ваше устройство подключено к ПК. Просто выполните в окне командной строки вашего ПК команды «cmd» и «adb devices». При этом вы увидите «Список подключенных устройств».
Использование USB-кабеля при выполнении отладки ADB обычно используется разработчиками, но это также можно сделать по беспроводной сети на определенных устройствах, подключенных через Wi-Fi. Настройка устройств требует больше работы, но устраняет распространенные проблемы с USB-подключением, такие как установка драйвера.
ADB можно использовать на устройствах с разными версиями операционной системы Android. Однако обратите внимание, что инструкции по отладке беспроводной сети различаются для устройств под управлением Android 11 или более поздней версии и Android 10 и более ранней версии. Вот как вы можете это сделать.
Беспроводная отладка для устройств под управлением Android 11 и выше
- Перед запуском необходимо, чтобы ПК с Windows 11 и устройство были подключены к одной и той же беспроводной сети.
- Включите параметры разработчика вашего устройства, выполнив те же действия, что и выше.
- В параметрах разработчика перейдите в раздел «Отладка» и активируйте «Беспроводная отладка». Выберите «Разрешить», когда получите приглашение.
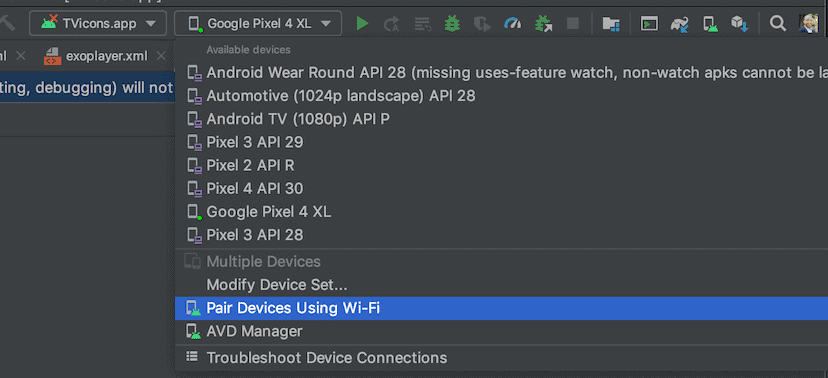
- Запустить Android Studio Бамблби на вашем ПК и выберите «Сопряжение устройств с помощью Wi-Fi», к которому вы можете получить доступ через раскрывающееся меню конфигураций запуска. Вы увидите всплывающее окно для сопряжения устройств с помощью QR-кода или кода сопряжения.
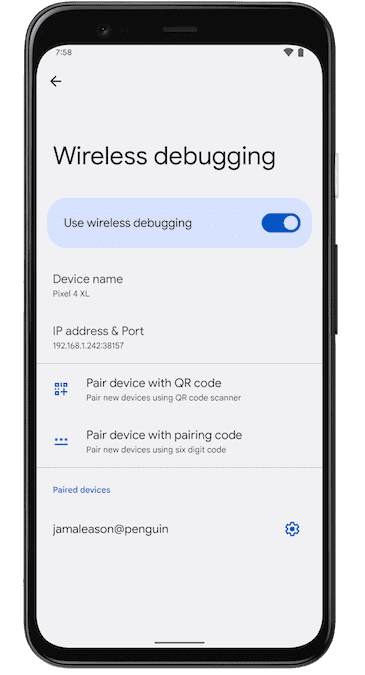
- Проверьте свое устройство и нажмите «Беспроводная отладка», чтобы начать сопряжение. Как уже говорилось, есть два способа сделать это: с помощью QR-кода или кода сопряжения. Выбирайте, какой из них вам больше подходит.
Беспроводная отладка для устройств под управлением Android 10 и ниже
- Подключите ваше устройство и компьютер к одной и той же сети Wi-Fi.
- Подключите устройство к ПК с помощью USB-кабеля и настройте устройство на ожидание соединения TCP/IP через порт 5555.

- Отключите устройство от ПК с Windows 11, отсоединив USB-кабель.
- Теперь вы можете подключиться к ПК, используя IP-адрес вашего Android-устройства.

- В случае, если соединение потеряно, просто выполните команды «adb connect» или «adb kill-server», причем последнее потребует от вас повторения процесса снова и снова.
В некоторых случаях вы можете столкнуться с проблемами при установлении соединения между ПК с Windows 11 и вашим устройством Android, и причины могут различаться в зависимости от типа используемой вами отладки. Например, беспроводная отладка может быть проблематичной, если ПК и устройство по отдельности подключены к двум разным сетям. Это также может произойти, если на ПК не установлены драйверы ADB или они устарели. При проводной отладке неисправный USB также может привести к проблемам.
После того, как все будет исправлено, использование ADB может дать вам много возможностей для изучения на ваших устройствах Android. Он может предоставлять широкий спектр команд, от копирования файлов до настройки OEM-функций или пользовательских интерфейсов и многих других. в Руководство пользователя Android Studio, Google предоставляет список, который вы можете попробовать запустить, чтобы настроить переадресацию портов, остановить сервер ADB, выполнить команды оболочки и многое другое.
Используя их, вы можете получить больше контроля над устройством Android и внести соответствующие изменения. Тем не менее, хотя ADB обычно не вреден (он не вносит изменений в ПК), его ненадлежащее использование может привести к некоторым проблемам. При этом вы можете оценить свои причины для его использования, а также свои навыки и знания, прежде чем устанавливать драйверы ADB и выполнять команды ADB.
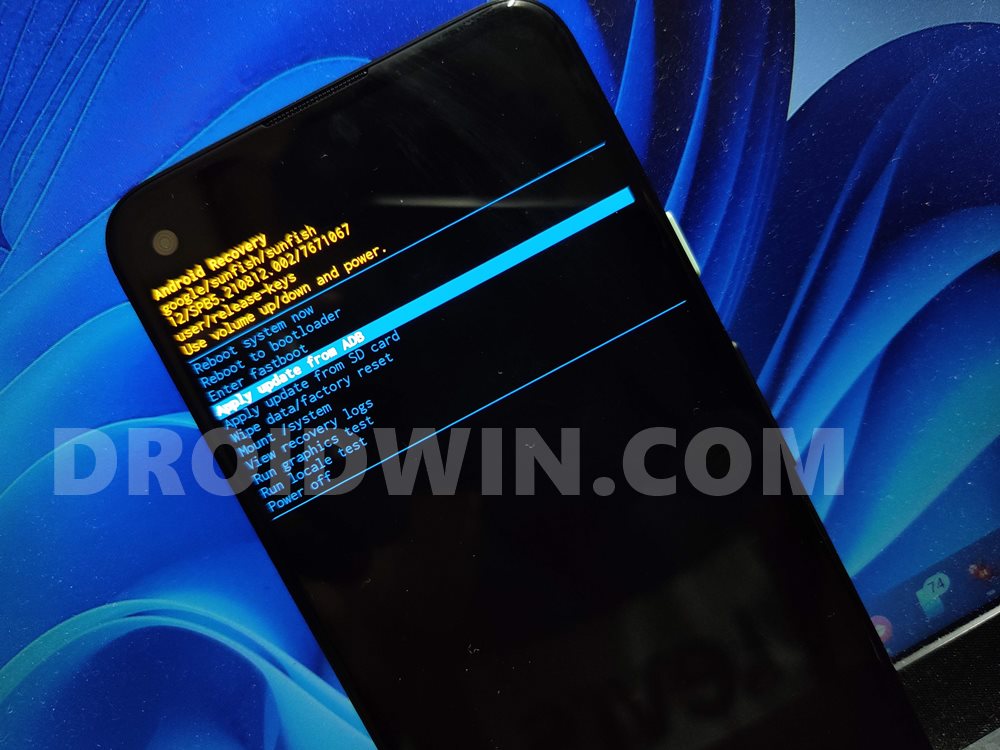
In this guide, we will show you the steps to install the Android ADB Drivers on your Windows 11 PC. ADB Commands are among the most important tool that a tech enthusiast could have in their arsenal. It beholds a slew of important functionalities, such as booting the device to stock recovery, flashing the stock firmware via ADB Sideload, and carrying out administrative level tasks via adb shell.
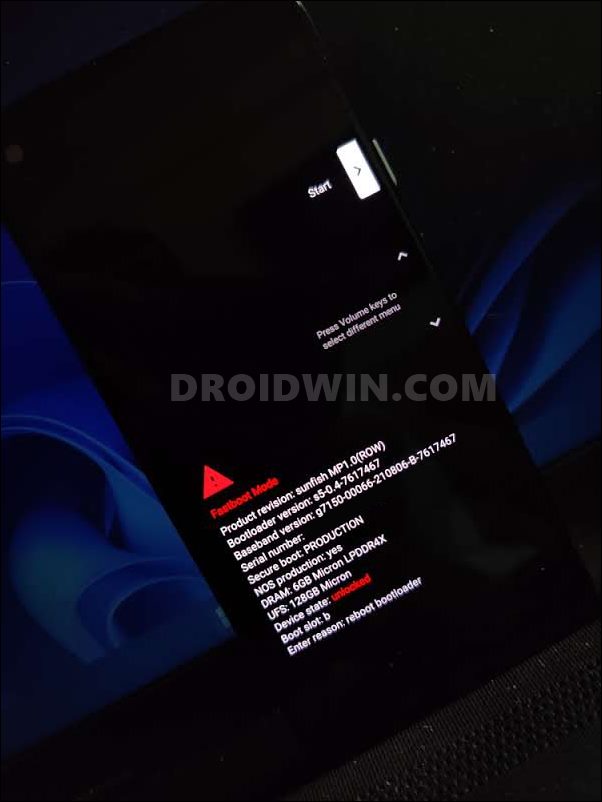
Apart from that, you could also use the ADB command to boot your device to Fastboot- which would then open the floodgates to plethora of customizations. In this regard, to establish a successful ADB connection between your device and PC, enabling USB Debugging and using the Android SDK Platform Tools are the two of the most important prerequisites.
And in most cases, they are sufficient for executing the ADB commands. However, in some instances, your PC would still be unable to recognize your device. This is where the need to install the Android ADB Drivers on your Windows 11 PC would arise. So without further ado, let’s get started with the installation steps.

- First off, download and extract Android SDK Platform Tools on your PC.

- Enable USB Debugging on your device and connect it to PC via USB cable.

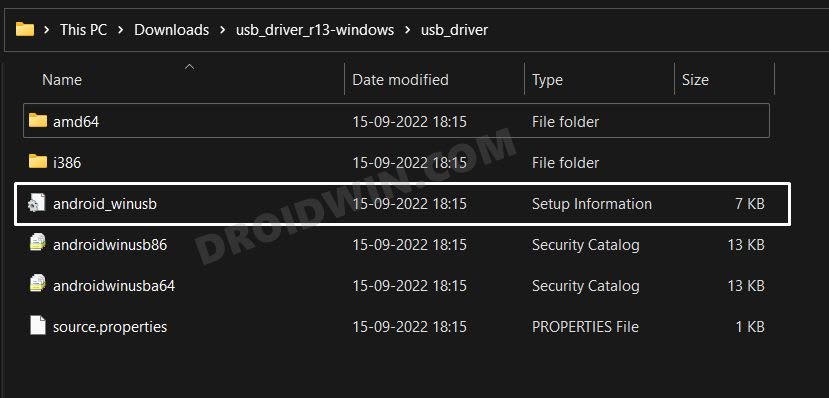
- Then download and extract Google USB Drivers to any location on your PC.

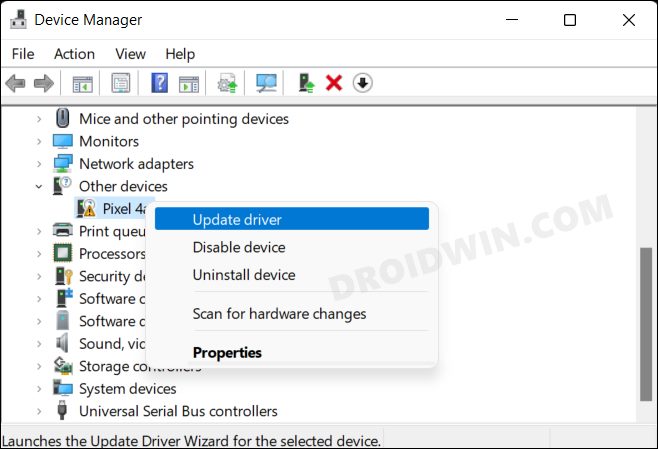
- After that, press Windows+X and select Device Manager. Then expand the Other Devices section.
- Your device will be listed with an exclamation mark. Right-click on it and select Update Drivers.

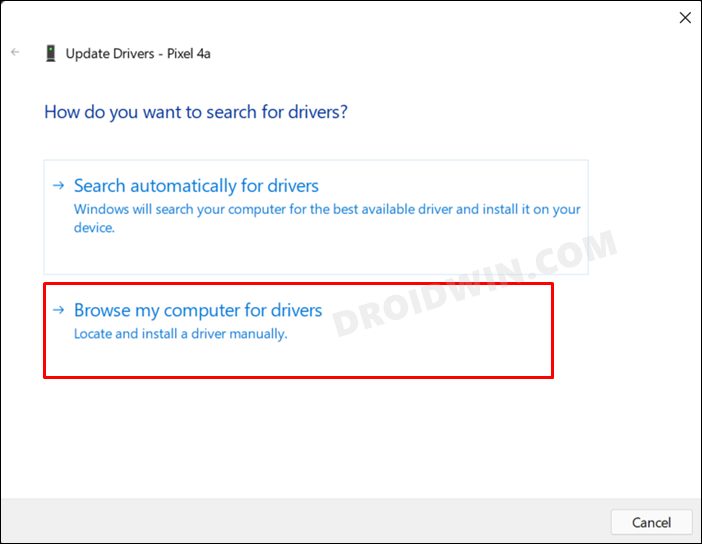
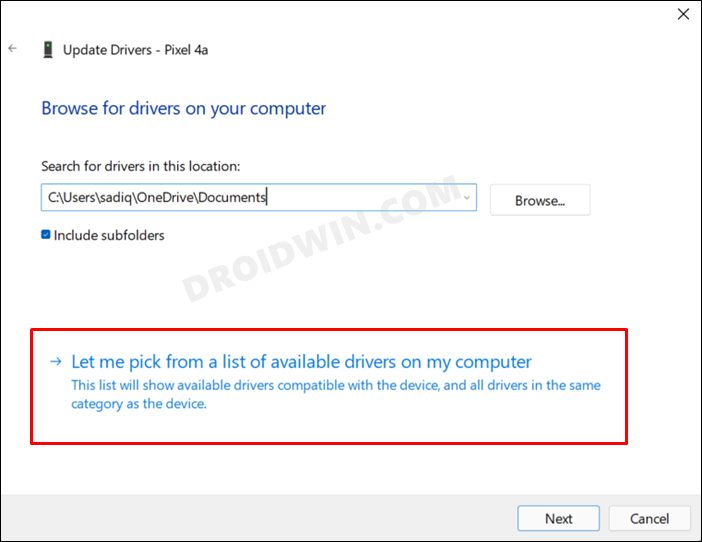
- After that, select Browse my computer for drivers.

- Then select Let me pick from a list of available drivers.

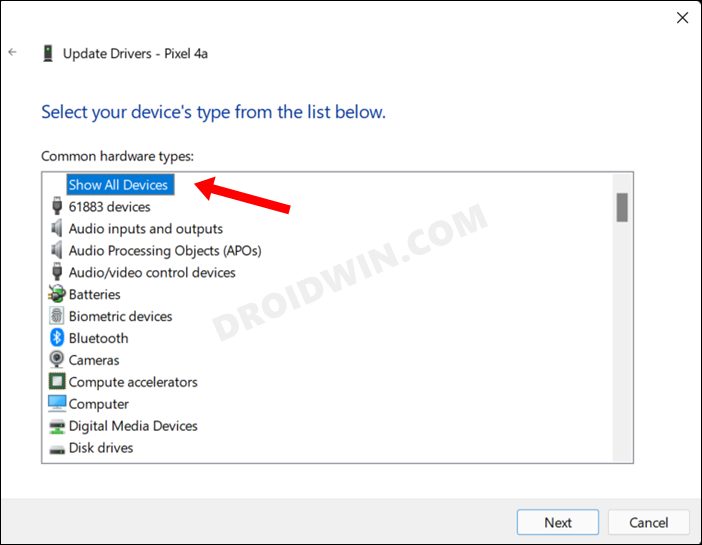
- Then select Show All Devices and click Next.

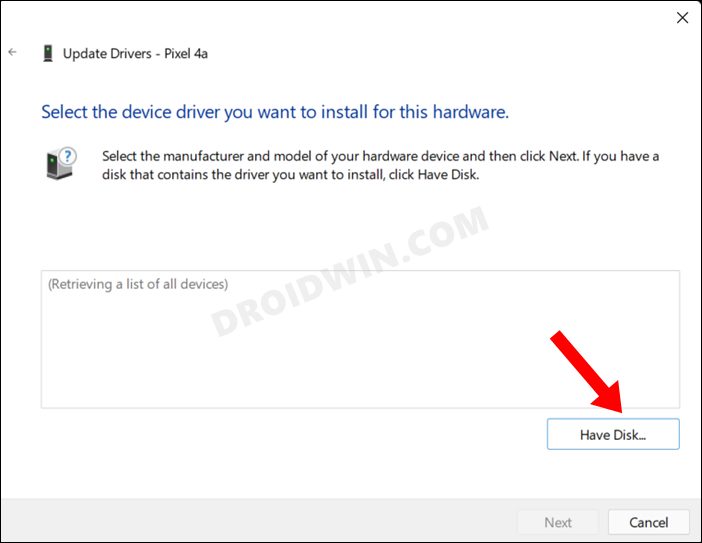
- Now click on the Have Disk button.

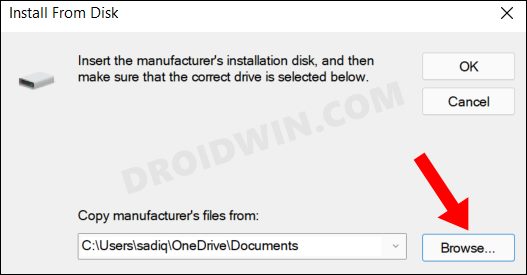
- After that, click on the Browse button.

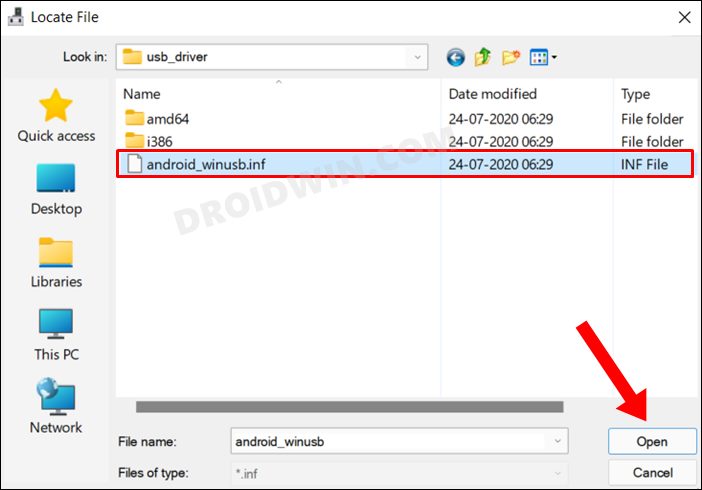
- Then navigate to the folder where you have extracted the Google USB Drivers, select the android_winusb.inf file, and click Open.

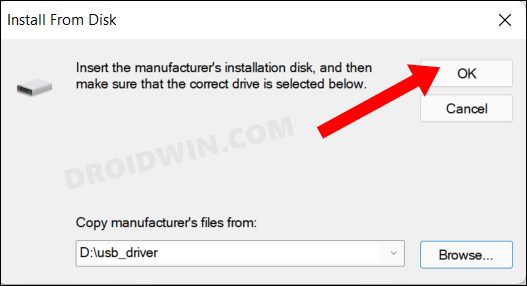
- After that, click OK to load these drivers.

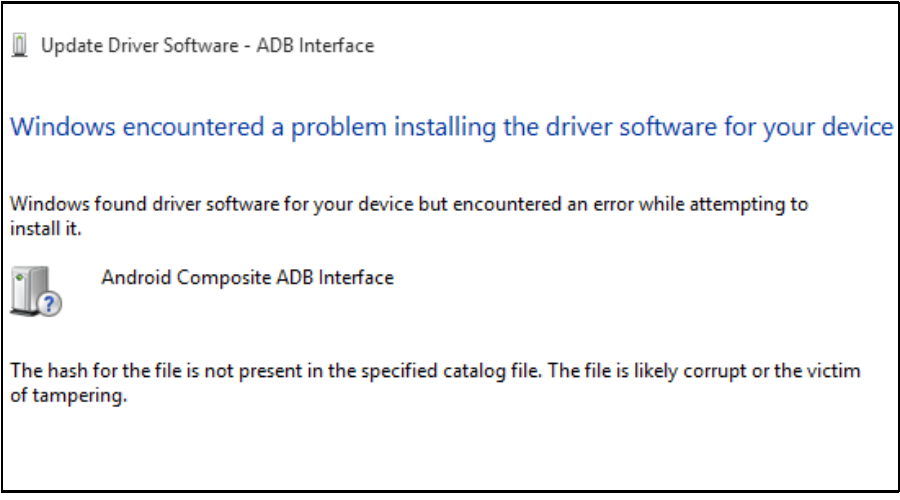
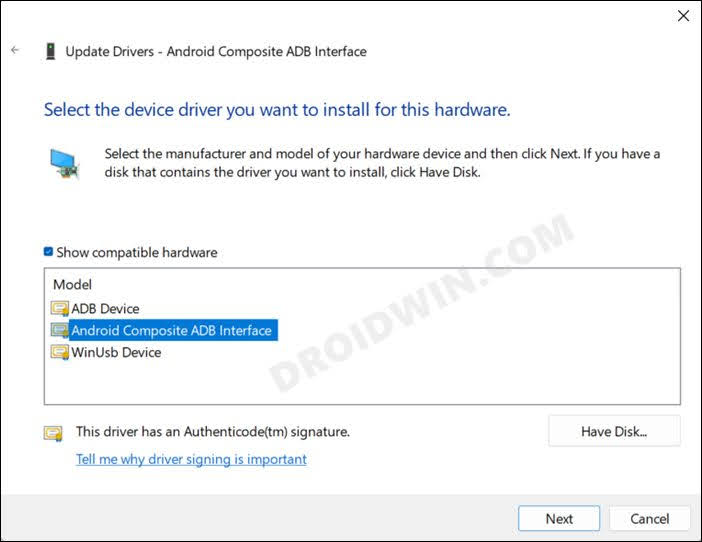
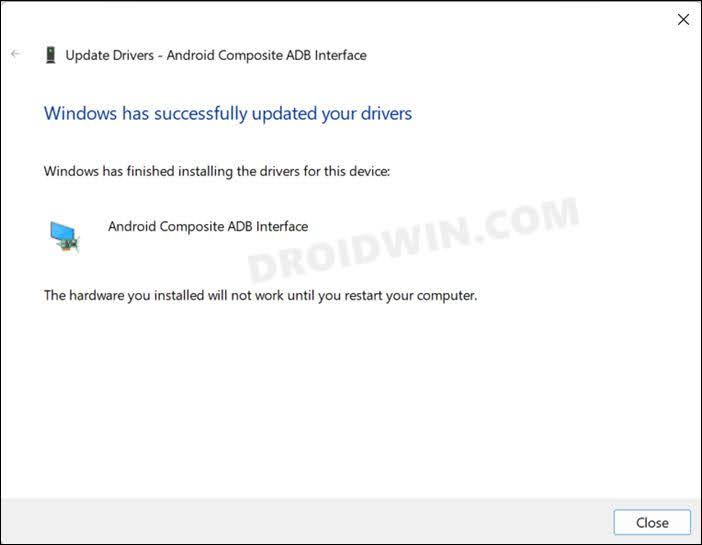
- Windows will now bring up a list of drivers. Select Android Composite ADB Interface and click Next.
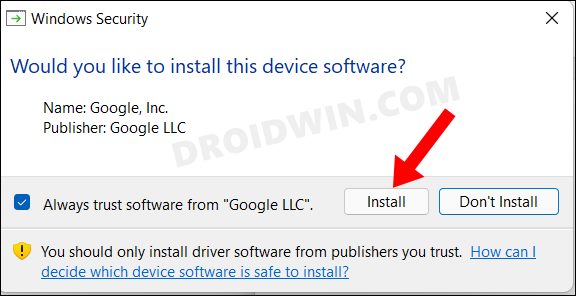
- If you get a prompt, then click Install.

- The Android Composite ADB Interface drivers will now be installed and you shall be notified of the same.
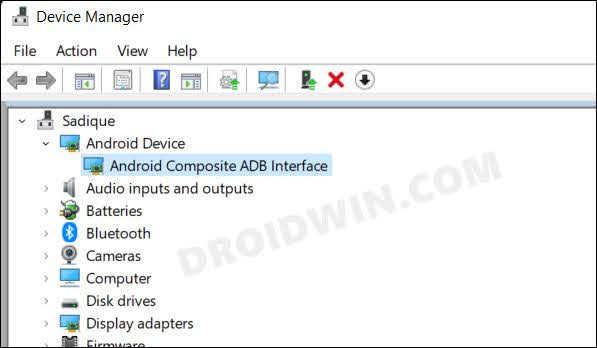
- Once the installation is complete, your device will automatically from the Other Device section over to Android Device.

- Moreover, your device will be named Android Composite ADB Interface. [Read Next: How to Install Fastboot Drivers in Windows 11].
- Finally, it is compulsory that you add the ADB to your System Environmental Variables Path as well.

Video Guide to Install ADB Drivers in Windows 11
How to Verify ADB Connection
Now that we are done installing the Android ADB Drivers on your Windows 11 PC, let’s verify if the ADB connection has been successfully established or not. Follow along.
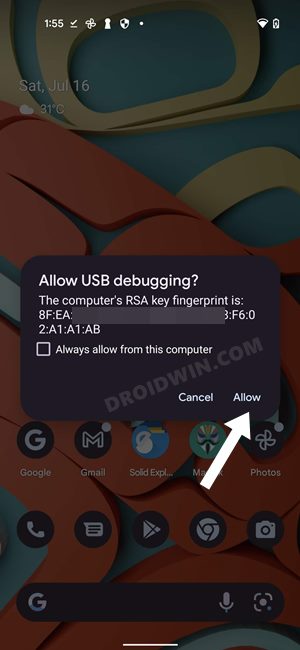
- Enable USB Debugging on your device and connect it to the PC via a USB cable.
- You would also get a prompt on your device, tap Allow. This will authorize USB Debugging.

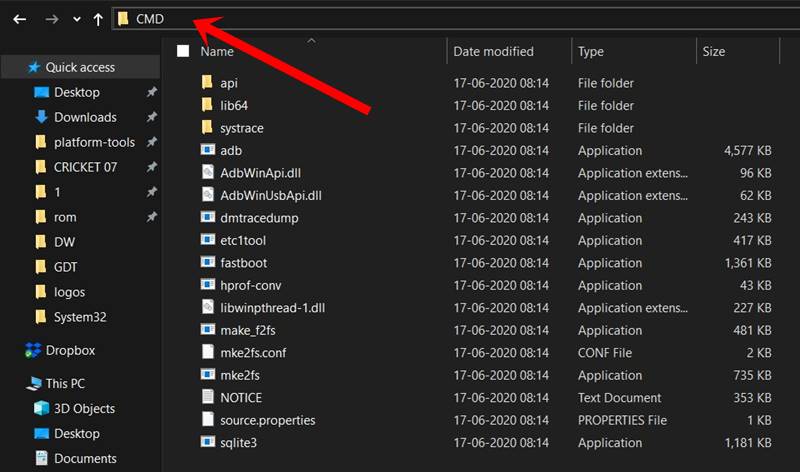
- Then go to the platform-tools folder, type in CMD in its address bar, and hit Enter.
- This will launch Command Prompt. So execute the below command in this CMD window:
adb devices

- If it lists out your device serial number, then the ADB Connection has been successfully established.
That’s it. These were the steps to install the Android ADB Drivers on your Windows 11 PC. If you have any queries concerning the aforementioned steps, do let us know in the comments. We will get back to you with a solution at the earliest.
- How to Install Fastboot Drivers in Windows 11
- How to Install Google’s Android Bootloader Interface Drivers
- Fix Waiting for Device Error in ADB or Fastboot Commands
- How to Check and Install Missing Drivers in Windows 11
Fix: Cannot Install ADB Drivers on Windows 11
If you are still unable to install the ADB Drivers on your Windows 11 PC<. then try out the below-listed workarounds and one of them would definitely rectify this issue.
FIX 1: Use USB 2.0 Port
First off, it is recommended that you use the official USB cable that came with your device. Moreover, you should use the USB 2.0 port on your PC and not the USB 3.0 Port.
FIX 2: Use USB Type C to Type A
Next up, consider using a USB Type C to Type A cable instead of a Type C to Type C cable.
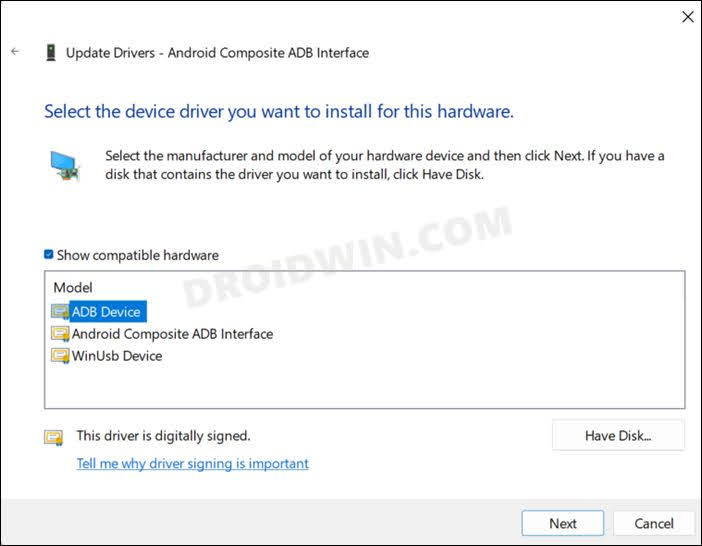
FIX 3: install ADB “Device” Drivers
Previously, we had installed the Android Composite ADB Interface drivers. If that’s not working in your case, then you could try installing the ADB Drivers instead. To do so, carry out STEPS 1 to 13 as listed above, then select ADB Device [instead of Android Composite ADB Interface] and click Next > Install. Once done, re-verify the ADB connection as explained above.
About Chief Editor

Sadique Hassan
administrator
A technical geek by birth, he always has a keen interest in the Android platform right since the birth of the HTC Dream. The open-source environment always seems to intrigue him with the plethora of options available at his fingertips. “MBA by profession, blogger by choice!”
Android Debug Bridge, abbreviated as ADB, is a command-line tool that enables users to perform a plethora of app-level and system-level tweaks on Android devices using a Windows PC. As the very name implies, the ADB driver acts as a bridge to establish a connection between a computer and an Android smartphone/tablet over a USB cable. It allows you to sideload apps, system updates, flash custom ROMs and recoveries, upgrade firmware, modify hidden settings, and more. These are the sophisticated changes we are talking about that are off-limits to users and cannot take place without the ADB driver.
How to Install the ADB driver on Windows 11?
We have broken down the whole process into 4 steps to make it easy for you to get the job done.
Step 1: Download ADB Driver

To get started, first of all, head over to the Android SDK Platform Tools official website. Click on “Download SDK Platform-tools for Windows,” and you will be presented with the terms & conditions page. Simply scroll down to the bottom, check the box, and hit the download button.

Once the file is downloaded, navigate to the download location. Right-click on the file and select “Extract here.” This will require extracting software, so make sure you have one installed on your PC.
Now, open the extracted folder, press CTRL+A to select all, and “Cut” it. Next, go to your C: drive, create a new folder named “ADB,” and paste all the contents there.

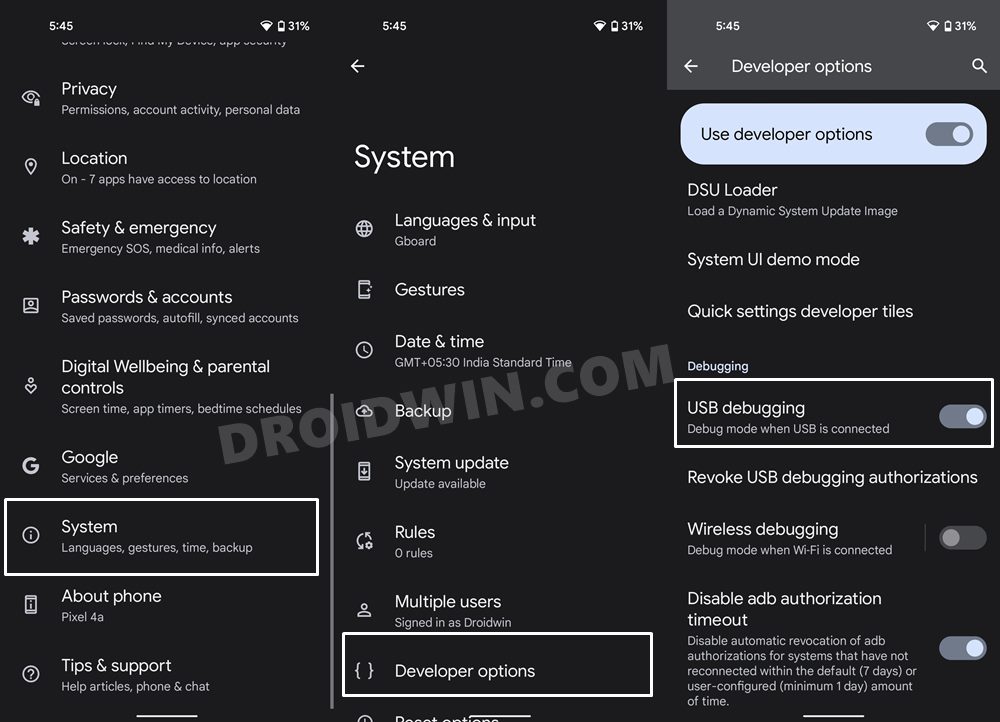
Step 2: Enable USB Debugging on Your Phone
To use ADB with your Android device, there is a feature called USB debugging that you must enable first. So grab your smartphone quickly, and open the “Settings.” Scroll down to the “About phone” option and select “Software information.”
Now, tap the “Build number” 7 times to enable the developer’s option for your device. You will be asked to enter your PIN or draw the pattern, so do the needful.
Now go back to the “Settings,” scroll to the bottom, and click on “Developer options.” Look for the “USB debugging option” and toggle it on.
Step 3: Run a Test
Once you have successfully downloaded the SDK Platform tools and enabled USB debugging on your device, it’s time to conduct a test to ensure that everything is working fine.
Connect your Android device with your PC using a USB cable. In the beginning, you may get asked to authorize USB debugging, click on the “Allow” button.
Now, with the help of the Command prompt, you can ensure the Android device is getting recognized by the ADB driver and working properly. To do that, click on the Start button and search for “cmd.” Tap on “Run as administrator” and allow the authorization when asked. Type the following command and hit Enter. It will take you to the ADB folder you have created in the C drive.

cd c:\adb
Next, execute the following command, and as an output, you should see your Android device listed there.
adb devices

That’s all. Now you are all set to play with various ADB commands and make significant changes on your Android phone.
NOTE: In some cases, you may get the “unauthorized” label next to the device name. It means that you haven’t authorized the USB connection between your PC and smartphone. But as soon as you hit the above command, you should get a notification on your mobile device to grant the necessary permission. So do what’s required, and you’ll be good to go.
Step 4: Setup Windows PATH Environment Variables for ADB Driver
In order to run ADB commands, you will be required to access the ADB folder located on your PC. But if you want to skip this step, you can utilize the Windows feature called PATH Environment Variables. It allows you to set up a default path for the ADB driver, so you don’t have to access the folder, particularly every time you want to run ADB commands. Although this is an optional method, if you are a regular user, you might want to use it.
- First of all, head over to the “platform-tools” folder you have pasted on C drive and copy its path.

- Search for “This PC” and select “Properties.

- Now, scroll down to the bottom and click on “Advanced system settings.”
- Tap on “Environment Variables” and double-click on “Path.”

- Click on New and paste the directory path you’ve copied.

- Lastly, hit the OK button to save the changes.
To check, open Command Prompt and type “adb devices” (excluding quotations), and hit Enter. If the output reverts your device name, that means the feature is working fine, and you have successfully installed and configured the ADB driver on your Windows 11.
Even if you use different Windows versions, you can implement the same method we mentioned in this article. So that is it for this brief guide on how to install the ADB driver on Windows. If you face any issues with the steps involved in the process, feel free to shoot up your question by writing them down in the comment box.