 При запуске некоторых старых программ и инструментов командной строке в современных версиях Windows, например, в Windows 11 и Windows 10, вы можете получить сообщение «Неподдерживаемое 16-разрядное приложение. Не удалось запустить программу или компонент из-за несовместимости с 64-разрядной версией Windows. Обратитесь к разработчику программного обеспечения за версией программы, совместимой с 64-разрядной версией Windows».
В этой инструкции подробно о том, как запустить 16-разрядное приложение в Windows 11, Windows 10 или другой современной версии системы.
Запуск 16-разрядных приложений в Windows 11 и Windows 10 64-бит

При запуске 16-разрядного приложения в графическом интерфейсе вы получите сообщение: «Невозможно запустить это приложение на вашем ПК. Чтобы найти версию для вашего компьютера, обратитесь к издателю приложения».

Если запускать это же приложение в командной строке, появится окно «Неподдерживаемое 16-разрядное приложение. Не удалось запустить программу или компонент из-за несовместимости с 64-разрядной версией Windows», а после его закрытия в консоли вы увидите текст «Эта версия не совместима с версией Windows, работающей на этом компьютере».
Причина заключается в том, что 64-разрядные системы не поддерживают компонент NTVM (NTVDM, Windows NT DOS Virtual Machine), необходимый для запуска 16-разрядных приложений, в них возможен запуск только x64 и x86 (32-бит приложений). Режим совместимости с предыдущими версиями Windows здесь так же не поможет.
Однако, решение есть. Чтобы запускать 16-разрядные приложения в x64 Windows 11/10, выполните следующие шаги:
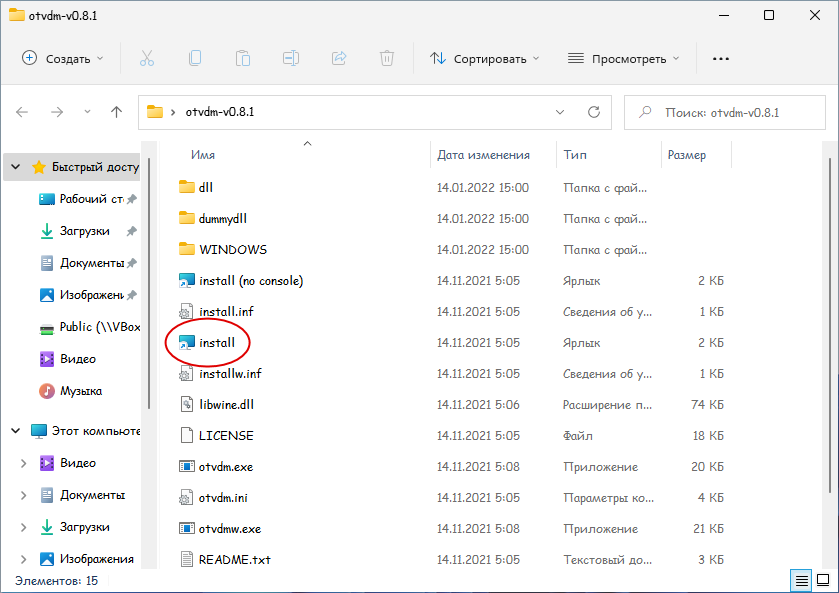
- Со страницы GitHub загрузите последнюю версию Winevdm (otvdm) и распакуйте архив в удобное расположение на компьютере. На странице в разделе Assets представлены два архива: otvdm и otvdm-for-old-windows, второй предназначен для версий Windows до Vista и Server 2008
- Распаковав архив, вы можете сразу использовать находящийся в нём файл otvdm.exe для запуска нужной вам программы в командной строке: достаточно ввести команду
путь_к\otvdm.exe путь_к\программа.exe
Тем же образом можно создать ярлыки для запуска 16-разрядных программ.

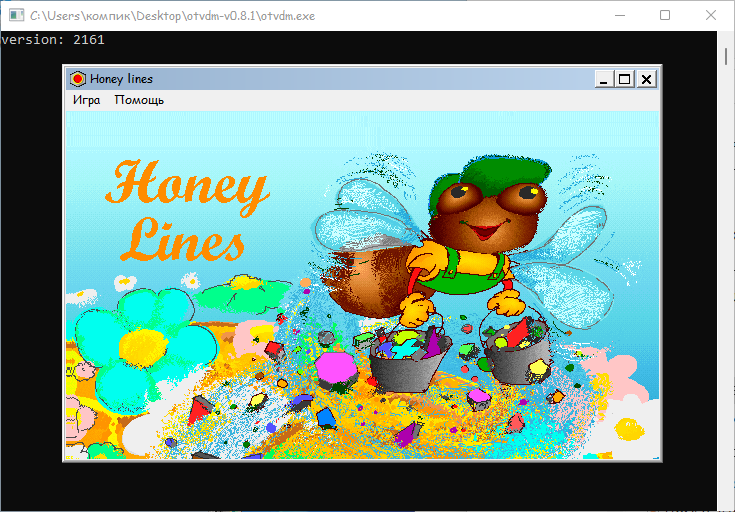
- Если вы не хотите каждый раз использовать командную строку для запуска или создавать ярлыки, установите winevdm/otvdm на компьютере, используя файл install или install (no console) в папке. После установки 16-разрядные программы будут запускаться так же, как и любые другие программы Windows, например, двойным кликом по значку. Ниже на скриншоте — 16-бит приложение запущенное в Windows 11 x64:


На близкую тему может быть полезным: Как запускать старые DOS-игры и программы в современных версиях Windows.
Также на сайте Майкрософт присутствует инструкция, описывающая способ упаковать 16-разрядное приложение таким образом, чтобы его установка стала возможной в современных версиях Windows.

I wrote this post as a proof of concept and as a best effort to make a 16-bit application run on Windows 10 64-bit.
It will be demonstrated how to use a third-part open source framework called otya128 – winevdm, how to use MSIX, UWP Execution Alias and Packaging Support Framework.

Please notice that Microsoft recommends using virtualization or 32-bit machines to run 16-bit applications.
This post is only a proof of concept and for informational and training purposes only and are provided «as is» without warranty of any kind, whether express or implied.
Download the 16-bit emulator
As 64-bit operating system does not have support for the Windows NT DOS Virtual Machine (NTVM) system component, the first step is to download the 16-bit emulator called otya128 – winevdm that is open source and available on GitHub:

https://github.com/otya128/winevdm
You can clone the repository and build yourself or download the build artifact from the AppVeyor repository https://ci.appveyor.com/project/otya128/winevdm/history
If you opt to download the app from the AppVeyor repository, you need to choose what build you want:

Select the job:

And finally click on artifacts to download the artifact file:

Now, all you must do is to extract the files to a folder of your preference. I will extract the files in the following folder of the root of my C drive:
C:\otvdm-master-1846Installing Microsoft Visual Basic 3.0 IDE on Windows 10 64-bit
If you try to run the Visual Basic 3 installer (setup.exe), you will receive the following message telling that the application cannot run, since it is a 16-bit application and that the NTVDM is not available.

We need to run the otvdm.exe passing as argument the application that we want to launch, in our case, the setup.exe of Visual Basic 3.0:
C:\otvdm-master-1846\otvdm.exe "C:\VB\VB.EXE"Notice that now the Visual Basic 3.0 16-bit installer has been successfully launched:

We can proceed with the installation:

The default destination folder is C:\VB:

There are no registry keys, and all the files will be copied to the C:\VB directory:

Done!!!! Visual Basic is successfully installed:

Click on Run Visual Basic 3.0 to launch VB3 on Windows 10 64-bit:

Notice that despite of Visual Basic 3 is available on Start menu, you can’t directly launch the app from there, as the app is 16-bit:

In that case you need to run the following command:
C:\otvdm-master-1846\otvdm.exe "C:\VB\VB.EXE"Improving the app distribution and providing a better user experience through MSIX
Let’s see how MSIX can simplify the application deployment by keeping together the 16-bit emulator and VB3 application in a single MSIX installation file. The installation will be reduced to a single click action that will install the App in less than 10 seconds.
At the same time MSIX will provide a better user experience, allowing users or other apps to call the application executable, in this case, VB.EXE without having to specify the otvdm emulator. This is possible, because once packaged, the App will be access to the UWP manifest that allows us to create an execution alias.
MSIX Packaging Tool
The first step is to download and install the MSIX Packaging Tool, that is free and available on Microsoft Store, to allow us to package our App:
https://www.microsoft.com/store/productId/9N5LW3JBCXKF

Before launching the MSIX Packaging Tool, move the emulator and VB folders to another folder, like C:\setup\:

This step is need, as MSIX Packaging Tool (MPT) will monitor the changes made on the computer environment. So, as we already have VB3 installed and we don’t want to install it again, I will just copy these two folders to their final destinations at the moment that the MPT will be monitoring the modifications.
Once installed, open the MSIX Packaging Tool and click on Application package to create a new package for the application:

The MSIX Packaging Tool will monitor the changes made on the environment. To perform the packaging, it is possible to use a virtual machine or the physical machine itself to install the application.
The best scenario is to use a virtual machine allowing you to reproduce the same process if necessary. It is important that the machine used to install the application does not contain the applications and their previously installed components.
Choose the desired scenario and click the Next button:

In this step, the tool will verify that the MSIX Packaging Tool Driver is installed and will disable Windows Update to decrease the number of changes to the operating system:

Click on the Next button.
Only MSIX packages signed with a valid certificate can be installed on Windows 10 machines.
You can create a self-signed certificate for testing purposes, using the following PowerShell command:
function CreateCertificate($name, $path)
{

    Set-Location Cert:\LocalMachine\My

    New-SelfSignedCertificate -Type Custom -Subject "CN=$name" -KeyUsage DigitalSignature -FriendlyName $name -CertStoreLocation "Cert:\LocalMachine\My"

    $cert = Get-ChildItem "Cert:\LocalMachine\My" | Where Subject -eq "CN=$name"

    $pwd = ConvertTo-SecureString -String DefineTheCertificatePasswordHere@2020 -Force -AsPlainText

    Export-PfxCertificate -cert $cert.Thumbprint -FilePath "$path.pfx" -Password $pwd

    Export-Certificate -Cert $cert -FilePath "$path.cer"

    Move-Item -Path $cert.PSPath -Destination "Cert:\LocalMachine\TrustedPeople"

}

CreateCertificate "luisdem" "cert"
To execute the command, open PowerShell_ISE.exe and press F5. The command creates the test certificate and copies it to the Trusted People folder.
It is important to notice that this test certificate should only be used to approve the application in a test environment. To distribute the application.
Now, that we have a certificate, we can inform the certificate to have the final MSIX package file automatically signed. It is not necessary to provide the installer file, as the tool monitors all changes made to the operating system.

Click on the Next button.
In this step, it is necessary to provide information such as the name of the package, the description that will be displayed to the user during installation, the name of the supplier (must be the same as the certificate) and the version number. Fill in the requested information:

Click on the Next button.
Is in this step that we need to install the application.

As we already have the VB3 installed, this is the moment to moving back the emulator and VB3 folders to the drive C root:

Click on the Next button only after completing the application installation and all settings.
On the next screen it is necessary to define which applications will be visible in the start menu.
As VB3 is a 16-bit application that depends on the 16-bit emulator, select only the otvdm.exe, as follows:

Notice that is not possible to provide the arguments for the otvdm.exe, i.e., C:\VB\VB.EXE. For now, we can ignore the arguments as we are fix that later.
Follows the expected result so far:

Click on the Next button.
The following screen is displayed at the end of the installation and asks for confirmation if the monitoring can be ended:

Click the Next button, as the application does not install any services:

At this point, it is necessary to inform where the package will be generated, as well as it is possible to edit the package before saving it.
Click on the Package editor button to check the package structure, as follows:

Click on Open file to check how the manifest was generated:

It is possible to edit the manifest information, such as processor architecture, application description, minimum supported version of Windows 10 and others.
Change the ProcessorArchitecture to “x86”, the DisplayName and Description attributes to “Microsoft Visual Basic 3.0”:

Notice that the Executable attribute doesn’t have the C:\otvdm-master-1846 path, but instead it has the value VFS\AppVPackageDrive\otvdm-master-1846. The AppVPackageDrive is the folder inside the package that corresponds to the drive C root. The application will look for the file on C:\otvdm-master-1846 but it will be redirected to the folder inside the package (VFS\AppVPackageDrive\otvdm-master-1846).
The only problem here, is that is no possible to pass arguments in this manifest file. So, we will need to use Package Support Framework (PSF) to fix that.
For now, just change the Executable value path to “PsfLauncher32.exe” that is part of the PSF.

We will now create an execution alias to allow launching the application by typing or calling the VB.EXE command from anywhere. To do this, add the following lines just below the line </uap:VisualElements>:
<Extensions>
        <uap3:Extension Category="windows.appExecutionAlias"
                        Executable="PsfLauncher32.exe"
                        EntryPoint="Windows.FullTrustApplication">
          <uap3:AppExecutionAlias>
            <desktop:ExecutionAlias Alias="VB.EXE" />
          </uap3:AppExecutionAlias>
        </uap3:Extension>
 </Extensions>
Follows how the manifest file must be defined:

Save and close the manifest (Notepad file) to unblock the MSIX Packaging Tool editor screen.
Click on Package files and check if all the files and directories listed are used by the application.
Remove unnecessary files or directories to reduce the package size:

It is at this step that we need to add the Package Support Framework files, to allow the PsfLauncher32.exe calling the emulator passing the arguments.
To proceed, download the PSF files (PSFBinaries.zip) available on GitHub:
Releases · microsoft/MSIX-PackageSupportFramework (github.com)

And extract the contents to a folder of your preference. I will extract to C:\PSF:

In the same folder, create a config.json file with the following content:
{
   "applications": [
    {
      "id": "OTVDM",
      "executable": "VFS/AppVPackageDrive/otvdm-master-1846/otvdmw.exe",
      "arguments": "AppVPackageDrive/VB/VB.EXE",
      "workingDirectory": "VFS"
    }
  ]
}
The id corresponds to the Application Id defined in the application manifest, the executable contains the emulator path inside the package and the arguments the VB3 path inside the package.
Switch back to MSIX Packaging Tool. In the Package file tab, right click on Package folder and click on
Add file from the context menu:

Add all the files that finish with 32 and the config.json files to the project:

Click on the Create button to generate the package and inform where the file should be generated.
The following screen will display where the MSIX file was generated as well as the log file:

Install the Visual Basic 3 packaged with MSIX
Double-click the package to install the application:

You can now launch the application directly from Start menu or typing vb.exe in a prompt command:

This solution is compatible with MSIX App Attach for Windows Virtual Desktop on-premises or on Microsoft Azure.

I hope you like it!!!
Если вы попробуете запустить в Windows 10 или 11 старое 16-битное приложение, то наверняка получите ошибку «Невозможно запустить это приложение на вашем ПК» или «Не удалось запустить программу или компонент из-за несовместимости с 64-разрядной версией». В этом нет ничего удивительного, ведь новые версии Windows, тем более 64-разрядные, не работают более со старыми, вытащенными из нафталина программами и играми.

Даже в режиме совместимости.
Стало быть без эмулятора не обойтись?
Необязательно.
Решить проблему вы можете с помощью мини-компонента otvdm, скачав оный со страницы разработчика
github.com/otya128/winevdm/releases
Распакуйте архив с компонентом и установите его кликом по ярлыку «install».
Процедура установки проходит в тихом режиме, разве что с открытой командной строкой.
После того как консоль закроется, можете запускать ваше 16-битное приложение.
Правда, на этом этапе может возникнуть еще одна ошибка «Не удается продолжить выполнение кода, поскольку система не обнаружила VCRUNTTME140.dll».
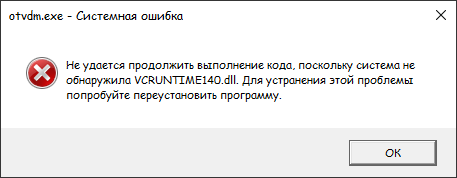
В этом случае вам нужно будет установить компонент Microsoft Visual C++ Redistributable for Visual Studio 2017.
Устанавливайте обе редакции компонента, и 64-битный, и 86-битный. Если всё сделано правильно, при запуске старой программы или игры сначала стартует окно классической командной строки, а за ним запустится и старое 16-битное приложение.
Поскольку otvdm является по сути портативным, вы не должны удалять его папку или перемещать ее в другое расположение, иначе при запуске старых приложений вы получите ошибку «Не удается найти путь», так как запускаются приложения через посредством otvdm.
Если вы захотите удалить компонент, запустите файл uninstall.reg в его папке, а затем удалите и саму папку с исполняемыми и конфигурационными файлами.
![]() Загрузка…
Загрузка…
by Tashreef Shareef
Tashreef Shareef is a software developer turned tech writer. He discovered his interest in technology after reading a tech magazine accidentally. Now he writes about everything tech from… read more
Updated on

Like the previous version of Windows OS, the Windows 10 also comes with support for running the older programs not compatible with the Windows 10 64bit edition. Since the Windows 64-bit system lacks the 16-bit subsystem to run 16-bit apps, we need to try a workaround.
To install 16-bit apps in Windows 10 64-bit we need to install a Virtual Machine first and then install an older version of Windows OS like XP onto it. After that, you can install most of the 16-bit apps in Windows 10 via Virtual Machine.
How we test, review and rate?
We have worked for the past 6 months on building a new review system on how we produce content. Using it, we have subsequently redone most of our articles to provide actual hands-on expertise on the guides we made.
For more details you can read how we test, review, and rate at WindowsReport.
Can I run 16 bit programs on a 64 bit computer?
Install and configure VirtualBox
- Start with downloading Oracle VirtualBox that you can download for free from the official page. Make sure you download the right version for your Windows (Virtualbox 5.1.4 for Windows hosts).
- Run the installer after the download is complete.
- Once you have installed the Oracle Virtual Box successfully, you need to create a new virtual machine for your legacy application.
- Since you want to run a 16-bit app in Windows 10 64-bit system, it is recommended that you use Windows XP to create a new virtual machine.
- Make sure you have downloaded the Windows XP ISO onto your computer. You can find the Windows XP ISO with a simple Google search. Proceed with creating new Virtual Machine, after you have the Windows XP ISO ready.
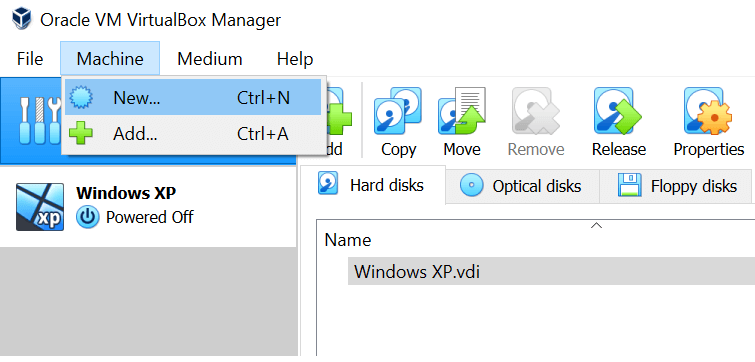
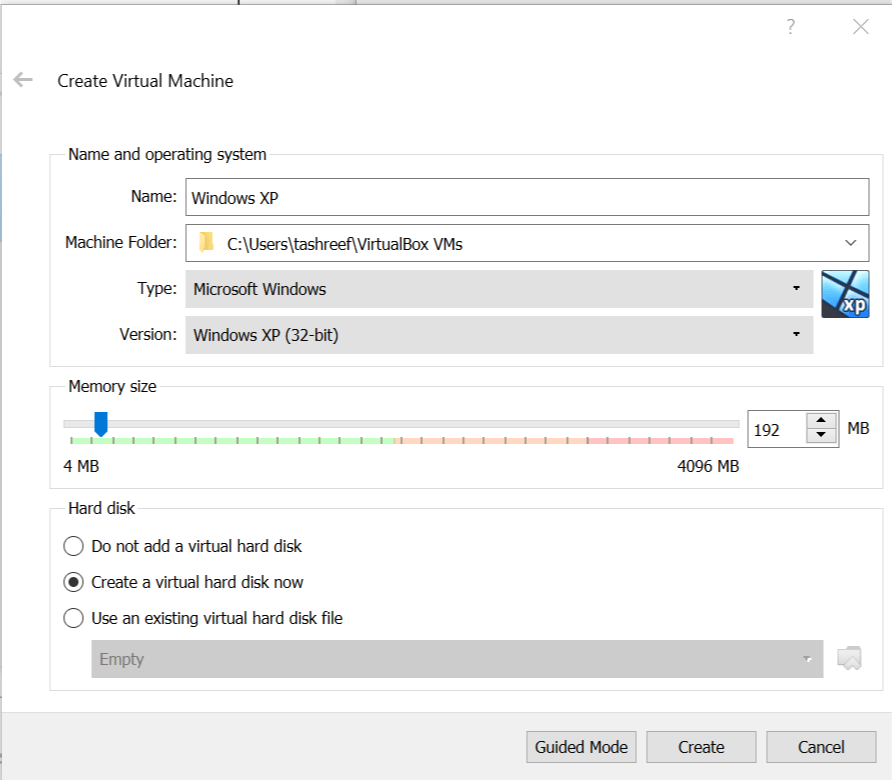
- Launch Virtual Box, click on Machine and select New.

- Here you need to enter a name for the VM. Enter Windows XP. Most likely Oracle Box will automatically fill the OS version to Windows XP 32-bit.

- If not click on the drop-down menu for version and select “Windows XP (32-bit).
- Next, you need to set the memory size. If you have 8 GB of RAM then I would recommend setting the size to 1GB and for 4GB set it to 512 MB.
- Under “Hard Disk” section, select “Create a virtual hard disk now” option. This partition will store the operating system.
- Click the Create button.
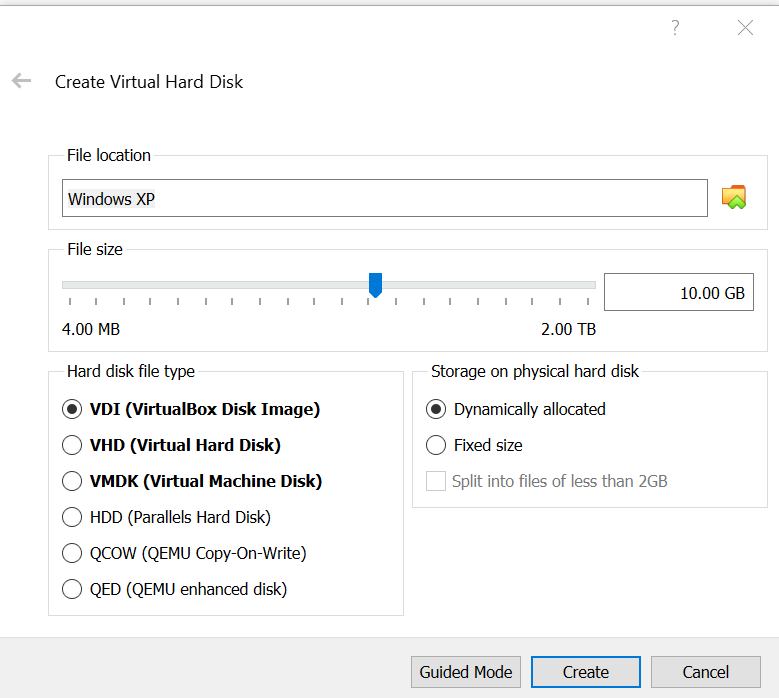
- In the “Create a Virtual Hard Disk” window, leave the File Location as it is.

- Go to Hard Disk file type and select VDI (VirtualBox Disk Image).
- For “Storage on Physical hard disk” select “Dynamically allocated” option.
- Click on the Create button again.
- OracleBox will now start creating your Hard Disk. It may take a while so, wait for till it completes.
Do you want to use Windows XP forever? We’ve got your back.
Install the Windows XP OS
- To install the OS you need the Windows XP ISO Image. If you have it downloaded, proceed with the next steps.
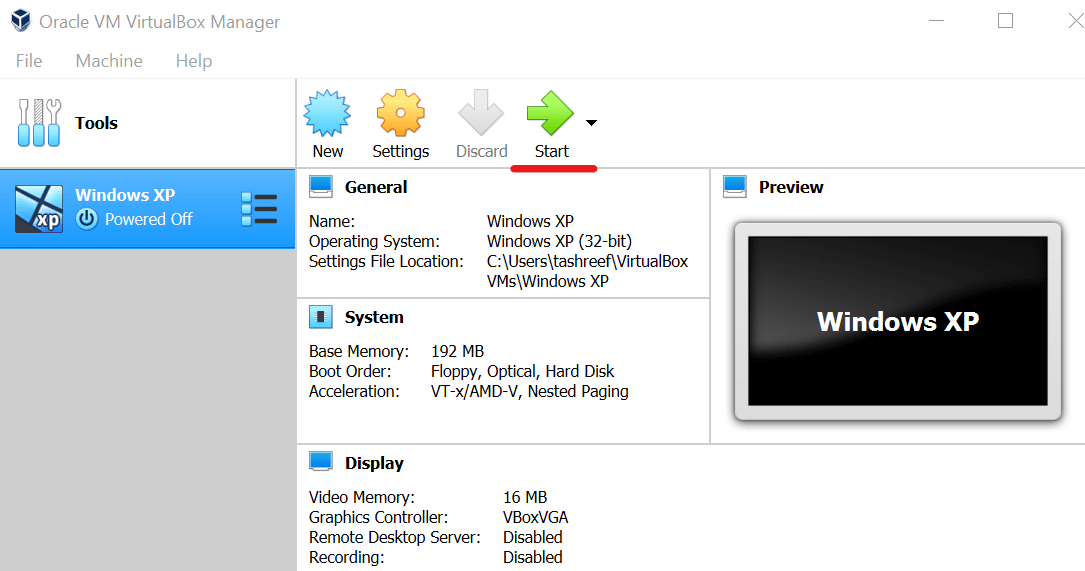
- In the Virtual Box, select Windows XP and click on the Start button.

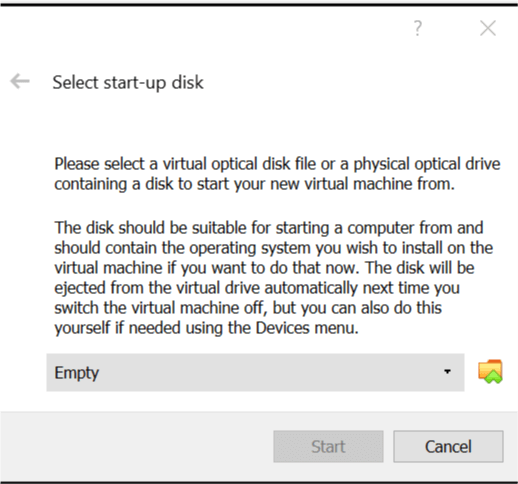
- Since this is the first time you are installing Windows OS, it will ask you to select a Startup Disk.

- Click on the Browse icon and navigate to where your Windows ISO Image is located. Select the ISO Image and click on Start.
- Now follow the on-screen instructions to install the OS.
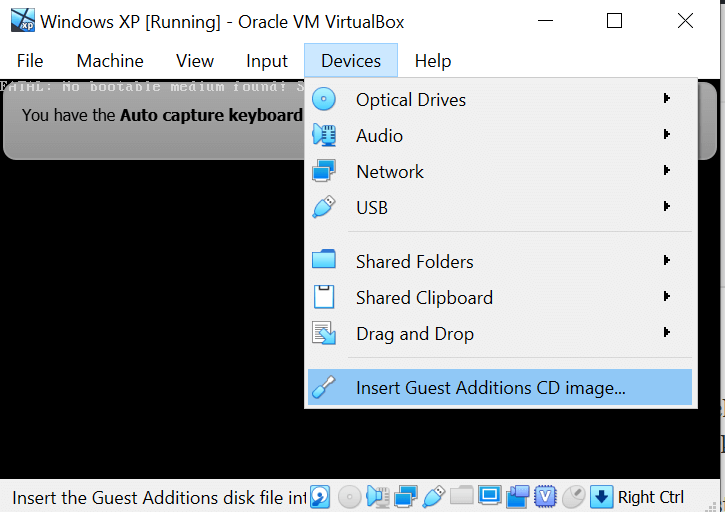
Install Guest Additions
- To move between the virtual machine and the host easily, you need to install Guest Additions.

- In your Virtual Machine, click on Devices and click on Insert Guest Additions CD Image. Click Next.
RELATED STORIES YOU MAY LIKE:
- Run Windows XP in Windows 10 With VirtualXP
- How to Fix VirtualBox Video Driver Problems in Windows 10
- Fix: VirtualBox not opening in Windows 10 problem
![]()
Приведенные ниже советы применимы к самым разным приложениям – от программ для Windows XP и старых компьютерных игр с DRM защитой до приложений под DOS и Windows 3.1.

Запуск от имени администратора
Многие приложения, написанные для Windows XP, без проблем работают и в современных версиях Windows, однако есть один нюанс. Во времена Windows XP среднестатистический пользователь обычно имел права администратора, и приложения создавались с расчетом на это. При отсутствии прав администратора они могут не запускаться. Конец постоянному использованию программ с правами администратора положило появление контроля учетных записей пользователя, и поначалу это приводило к возникновению определенных проблем.
Если устаревшее приложение работает некорректно, попробуйте нажать правой кнопкой мыши на его ярлыке или .exe-файле и выбрать опцию «Запуск от имени администратора» (Run as Administrator). Если программа действительно нуждается в правах администратора, можно настроить ее так, чтобы она всегда запускалась от имени администратора, о чем ниже.

Настройки совместимости
В Windows есть настройки совместимости, позволяющие наладить нормальную работу устаревших приложений. Чтобы получить к ним доступ, нажмите правой кнопкой мыши на ярлыке или .exe-файле приложения и выберите пункт «Свойства» (Properties). Чтобы добраться до ярлыка в Windows 10, нажмите правой кнопкой мыши на значке приложения в меню «Пуск» (Start) и выберите опцию «Открыть расположение файла» (Open file location), а уже затем в открывшейся папке нажмите правой кнопкой мыши на ярлыке приложения и выберите пункт «Свойства». Откройте вкладку «Совместимость» (Compatibility). Здесь можно воспользоваться кнопкой «Запустить средство устранения проблем с совместимостью» (Use the compatibility troubleshooter) или сделать все самостоятельно.
Например, если приложение не работает в Windows 10, но прекрасно работало в Windows XP, поставьте флажок «Запустить программу в режиме совместимости с» (Run this program in compatibility mode) и выберите вариант «Windows XP (пакет обновления 3)» (Windows XP (Service Pack 3)).
Можно попробовать и другие настройки. Например, очень старые игры могут заработать, если включить «Режим пониженной цветности» (Reduced color mode). А на мониторах высокого разрешения можно выбрать опцию «Отключить масштабирование изображения при высоком разрешении экрана» (Disable display scaling on high DPI settings), чтобы программа выглядела нормально.

32-битные драйверы и драйверы без подписи
В 64-битной версии Windows 10 используется принудительная проверка подписей драйверов, так что установить неподписанный драйвер просто нельзя. В 32-битной версии Windows 10 с этим проще, но на новых компьютерах с UEFI тоже требуются драйверы с подписями. Это повышает безопасность и стабильность системы, защищая ее от ненадежных и вредоносных драйверов. Неподписанные драйверы можно устанавливать только в том случае, если это действительно необходимо, а их безопасность гарантирована.
Если старое программное обеспечение нуждается в неподписанных драйверах, придется воспользоваться специальной опцией загрузки системы, чтобы их установить. Если нужные драйверы 32-битные, придется поставить 32-битную версию Windows 10, поскольку в 64-битной будут работать только 64-битные же драйверы.

Игры с DRM-защитой SafeDisc и SecuROM
В Windows 10 не работают игры с DRM-защитой SafeDisc и SecuROM. От этих технологий управления цифровыми правами больше проблем, чем пользы, поэтому даже хорошо, что Windows 10 больше не позволяет замусоривать ими систему. Однако по этой причине некоторые старые игры на CD и DVD-дисках с такой защитой запускаться и работать нормально, увы, не будут.
Выходов может быть несколько: найти патч «no CD» для конкретной игры (что, впрочем, потенциально очень небезопасно, поскольку такие патчи обретаются на сомнительных пиратских сайтах); купить игру в цифровом магазине GOG или Steam; либо поискать официальный патч, снимающий DRM-защиту, на сайте издателя или разработчика.
Более продвинутый вариант – установить на компьютер вторую, более старую версию Windows параллельно с Windows 10 или попробовать запустить игру в виртуальной машине под управлением более старой версии Windows. Вполне возможно, что мощности виртуальной машины будет достаточно – игры с такой DRM-защитой, как правило, очень старые и нетребовательные к современным ресурсам.
Виртуальные машины для старого ПО
В Windows 7 был специальный «режим Windows XP» – по сути, встроенная виртуальная машина с бесплатной лицензией Windows XP. Из Windows 10 этот режим убрали, но его можно реализовать самостоятельно.
Все, что для этого потребуется – программа для создания виртуальных машин, например
VirtualBox, и действующая лицензия на Windows XP. Можно установить Windows XP в виртуальную машину и пользоваться ею в отдельном окне внутри Windows 10.
Решение довольно ресурсоемкое и сложное, но в большинстве случаев действенное – если только программное обеспечение, которое предполагается таким способом использовать, не нуждается в доступе непосредственно к оборудованию и устройствам. Виртуальные машины поддерживают лишь ограниченный круг периферийных устройств.

Приложения для DOS и Windows 3.1DOSBox позволяет запускать старые DOS-приложения (в основном игры) в окнах на рабочем столе. Это гораздо удобнее, чем командная строка. DOSBox справляется с DOS-программами намного лучше.
Windows 3.1 – по сути, тоже DOS-приложение, а значит, можно установить ее в DOSBox и запускать написанные под нее 16-битные приложения через DOSBox.

16-битные приложения
16-битные программы не поддерживаются в 64-битных версиях Windows, поскольку там отсутствует уровень совместимости WOW16, позволяющий запускать такие приложения. При попытке запустить 16-битную программу в 64-битной версии Windows появляется сообщение о том, что это приложение нельзя запустить на данном компьютере.
Если без 16-битных приложений никак не обойтись, придется установить 32-битную версию Windows 10 вместо 64-битной. Впрочем, вовсе не обязательно переустанавливать систему – можно поставить в виртуальную машину 32-битную версию Windows и использовать ее для запуска 16-битных приложений. Или установить Windows 3.1 в DOSBox.

Сайты, требующие Java, Silverlight, ActiveX или Internet Explorer
В Windows 10 по умолчанию используется новый браузер Microsoft Edge, который не поддерживает Java, ActiveX, Silverlight и другие подобные технологии. В браузере Google Chrome тоже больше нет поддержки NPAPI-плагинов типа Java и Silverlight.
Для запуска старых веб-приложений, нуждающихся в этих технологиях, используйте браузер Internet Explorer. Он включен в состав Windows 10 как раз из соображений обратной совместимости и по-прежнему поддерживает ActiveX. Кроме того, Java и Silverlight поддерживаются в Mozilla Firefox.
Запустить Internet Explorer можно через меню «Пуск» либо через меню Microsoft Edge – там есть опция «Открыть в Internet Explorer» (Open with Internet Explorer), позволяющая открыть текущую страницу в IE.

Но в большинстве случаев, если старое приложение не работает в Windows 10, лучше поискать нормальный современный аналог. Однако старые игры и бизнес-приложения порой незаменимы, и тогда на помощь придут описанные выше решения.
Автор: Chris Hoffman
Перевод
SVET
Оцените статью: Голосов