Роутер tp link tl wr340g является бюджетным беспроводным роутером со скоростью до 54Мбит/с. Это модель разрабатывалась в первую очередь для использования дома и в малых офисах.
Он может работать в режиме беспроводной точки доступа, сетевого экрана, 4-х портового коммутатора или в режиме NAT-маршрутизатора. Также существует модель с буквой d на конце – tp link tl wr340gd. Это две идентичных модели с тем отличием, что последний имеет съемную антенну. В данной статье они будут рассматриваться как один и тот же маршрутизатор.
Внешний вид роутера TP-LINK TL-WR340G

Лицевая сторона роутера
Внешне дизайн устройства очень неплох, на верхней части находится оригинальная круглая вентиляционная решётка, делающая tp link tl wr340gd роутер немного похожим на космический корабль. Но стоит отметить, что греется корпус незначительно – заметный на ощупь нагрев можно почувствовать только в районе этого самого круга. На передней панели расположены светодиодные индикаторы, информирующие нас об включении устройства в розетку, включении модуля Wi-Fi, и работе портов lan.
В задней чести роутера расположены все порты и разъемы.

Задняя сторона роутера
Перечислим по порядку слева на право:
- Разъем для подключения блока питания «POWER»;
- 4 lan порта для подключения устройств локальной сети;
- 1 wan порт для подключения к линии провайдера;
- Утопленная в корпус кнопка «RESET» для сброса всех настроек на заводские;
- Коннектор для подключения съемной антенны (для модели с буквенным обозначением «d» на конце).
Перевернув роутер tp link wr340gd, можно на этикетке прочитать mac-адрес устройства, сетевой адрес и логин и пароль для входа в меню настроек роутера.

Этикетка с информацией на нижней стороне роутера
Аппаратная версия роутера TP-LINK TL-WR340G
Стоит отметить, что данная модель маршрутизатора имеет 5 разных аппаратных версий. Какая именно версия на вашем устройстве, указано в конце строки идентификационного номера устройства:

Строка с ID роутера
В нашем случае это версия 3. Номер версии необходимо знать при поиске обновленной прошивки на сайте производителя.
Комплектация роутера TP-LINK TL-WR340G
В комплекте с роутером также идут довольно хорошая 5 дБи антенна, блок питания, метровый сетевой провод RJ45 и инструкция.

Комплектация упаковки роутера
Настройка роутера TP-LINK TL-WR340G
Вход в меню настройки роутера
Важно! Первая настройка роутера tp link wr340gd производится исключительно через проводное соединение! Для этого убедитесь, что роутер включен, соединен с компьютером сетевым проводом к любому из lan портов и сетевая карта в компьютере настроена на автоматическое получение сетевого адреса (в режиме DHCP).
Для входа в меню настроек запускаем любой веб браузер, и в адресной строке вводим 192.168.1.1. Это стандартный адрес роутера. В поле «Имя пользователя» вводим admin, в поле «Пароль» тоже слово admin. Напомню, что эта информация указана на этикетке снизу роутера. Жмем «OK».

Окно для ввода имени и пароля для входа в меню настроек роутера
Главное меню настроек роутера TP-LINK TL-WR340G
Перед вами откроется главное меню настроек роутера. Если этого не произошло, значит, роутер уже подвергался настройкам и, скорее всего, был изменен IP адрес устройства или имя/пароль. В таком случае острым предметом нажмите кнопку «RESET» на задней части роутера и удерживайте 10 секунд. Настройки сбросятся на заводские.
После ввода пароля появится главное окно меню настроек роутера. Сразу обнаруживается существенный минус – отсутствие русского языка.

Главное меню роутера
В верхней части окна можно узнать версию прошивки «Firmware Version» и аппаратную версию «Hardware Version».
Обновление прошивки роутера TP-LINK TL-WR340G
Первым делом необходимо зайти на сайт производеля и посмотреть, нет ли новой версии прошивки. Для этого переходим на сайт
http://www.tp-linkru.com/products/details/?categoryid=&model=TL-WR340G
выбираем аппаратную версию и смотрим буквенно-численный код прошивки. Если имеется более всежая версия, то скачиваем на жесткий диск. Далее в меню переходим во вкладку «System Tools», далее подменю «Firmware Upgrade». В появившимся окне нажимаем кнопку «Обзор…», выбираем путь к скаченой прошивке и жмем кнопку «Upgrade». Все, ждем окончания процесса, в результате которого wifi роутер tp link wr340gd автоматически перезагрузиться.

Обновление прошивки на роутере
Обновление имени и пароля для входа с меню настроек роутера TP-LINK TL-WR340G
После обновления прошивки вторым делом рекомендуется сменить имя пользователя и пароль для входа в меню настроек. Для этого переходим в меню «System Tools», далее в подменю «Password». В верхней части вводим старые имя/пароль (admin/admin), в нижней части новое имя, пароль, и еще раз пароль для подтверждения. Жмем «Save», после чего снова появится начальное окно входа в меню настроек. Вводим новое имя и пароль.

Смена имени пользователя и пароля для входа в меню настроек роутера
Настройка Wi-Fi роутера TP-LINK TL-WR340G
Далее произведем настройку Wi-Fi. Переходим в меню «Wireless», далее в подменю « Wireless Settings». В строке «SSID» вводим название нашей беспроводной сети. Остальное в верхней части окна оставляем по умолчанию. В нижней части окна в строке «Security Type» выбираем «WPA-PSK/ WPA2-PSK», так как такой тип шифрования ключа наиболее безопасный. В строку «PSK Passphrase» придумываем и вводим пароль для подключения к беспроводной сети. Пароль должен состоять из букв и цифр и его длина не должна быть меньше 8 символов. Остальные опции оставляем по умолчанию. Жмем «Save».
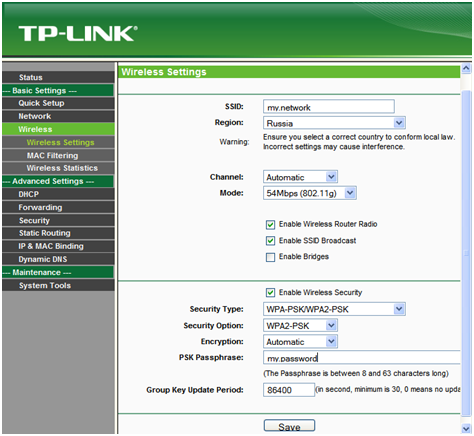
Настройка Wi-Fi роутера
Все, основные настройки для работоспособности роутера закончены. Для изучения остальных пунктов настройки роутера смотрите видео:
Предыдущая
D-LinkДомашний интернет для двух компьютеров
Следующая
D-LinkНастраиваем беспроводной роутера D-Link DiR-655 самостоятельно
Помогла статья? Оцените её
![]() Загрузка…
Загрузка…
Роутер tp link wr340g является доступным и популярным устройством для организации домашней Wi-Fi сети. Если вы только начинаете знакомиться с миром сетевых настроек, то данная инструкция станет незаменимым помощником для настройки вашего роутера.
Первым шагом необходимо подключить роутер к вашему компьютеру. Вставьте сетевой кабель в разъем WAN на задней панели роутера и подключите другой конец к порту Ethernet на компьютере. Включите роутер и компьютер.
Войдите в веб-интерфейс роутера, открыв интернет-браузер и введя в адресной строке IP-адрес роутера. Для tp link wr340g IP-адрес по умолчанию составляет 192.168.1.1. После ввода адреса, нажмите Enter.
После того как вы вошли в веб-интерфейс роутера, вам потребуется ввести логин и пароль. Обычно эти данные по умолчанию указаны на наклейке на задней панели роутера. Введите логин и пароль, и нажмите на кнопку Войти.
Если вы захотите изменить пароль для входа в роутер, проследуйте к разделу «Настройки безопасности». Здесь вы сможете изменить пароль на более надежный. Не забудьте сохранить настройки, чтобы применить изменения.
Правильная настройка роутера tp link wr340g позволит вам насладиться высокоскоростным и безопасным интернет-подключением. Следуйте данной инструкции шаг за шагом, и ваши сетевые проблемы будут решены.
Содержание
- Настройка роутера tp link wr340g
- Подготовка к настройке роутера
- Подключение роутера к компьютеру
- Вход в настройки роутера
Настройка роутера tp link wr340g
В этой статье мы расскажем вам, как настроить роутер tp link wr340g. Настройка роутера может показаться сложной задачей для новичков, но с нашей пошаговой инструкцией вы сможете справиться без проблем.
Шаг 1: Подключение роутера
Сначала убедитесь, что ваш роутер подключен к вашему компьютеру с помощью Ethernet-кабеля. Убедитесь, что все провода надежно подключены.
Шаг 2: Вход в панель управления
Откройте любой веб-браузер на вашем компьютере и введите IP-адрес роутера в адресной строке. Обычно IP-адрес tp link wr340g по умолчанию — 192.168.1.1. Нажмите Enter.
Шаг 3: Вход в систему
Введите имя пользователя и пароль. По умолчанию имя пользователя admin, а пароль также admin. Если вы поменяли пароль, введите свои учетные данные.
Шаг 4: Настройка соединения
В панели управления роутера найдите раздел «Quick Setup» или «Быстрая настройка». Следуйте инструкции на экране, чтобы настроить соединение с вашим поставщиком интернет-услуг. Вам может потребоваться знать некоторые данные от вашего поставщика интернет-услуг.
Шаг 5: Беспроводное соединение
В разделе «Wireless Settings» или «Настройки беспроводной сети» вы можете настроить имя сети (SSID) и пароль для беспроводного соединения. Рекомендуется использовать сложный пароль для обеспечения безопасности вашей сети.
Шаг 6: Сохранение настроек
После завершения всех настроек не забудьте сохранить их, нажав на кнопку «Save» или «Сохранить» в панели управления роутера.
Теперь ваш роутер tp link wr340g должен быть настроен и готов к использованию. Вы можете подключить к нему различные устройства и наслаждаться быстрым и надежным интернет-соединением.
Подготовка к настройке роутера
Прежде чем приступить к настройке роутера TP-Link WR340G, необходимо выполнить несколько предварительных шагов для обеспечения успешного процесса настройки:
1. Подключение роутера к питанию
Убедитесь, что роутер подключен к электрической сети и включен в розетку. Убедитесь, что индикатор питания на роутере горит. Это позволит убедиться в том, что роутер работает и готов к настройке.
2. Подключение кабеля Ethernet
Соедините один конец кабеля Ethernet с портом WAN на задней панели роутера, а другой конец подключите к модему сети интернет. Убедитесь, что кабель надежно закреплен в обоих разъемах.
3. Подключение компьютера к роутеру
Для выполнения настройки роутера, подключите компьютер к одному из портов LAN на задней панели роутера с использованием второго Ethernet-кабеля. Убедитесь, что кабель надежно закреплен в обоих разъемах.
После выполнения этих предварительных шагов можно приступить к настройке роутера TP-Link WR340G.
Подключение роутера к компьютеру
Для начала настройки роутера TP-Link WR340G необходимо подключить его к компьютеру. Следуйте инструкциям ниже:
- Убедитесь, что роутер находится в выключенном состоянии.
- Возьмите сетевой кабель, поставляемый вместе с роутером, и подключите его один конец в разъем LAN вашего компьютера.
- Подключите другой конец сетевого кабеля в порт сети (обычно помечен как «LAN» или «Ethernet») на задней панели роутера.
- Включите роутер в розетку и дождитесь, пока индикаторы начнут мигать. Это может занять несколько секунд.
Теперь ваш роутер TP-Link WR340G успешно подключен к компьютеру. Вы готовы перейти к следующему этапу — настройке роутера.
Вход в настройки роутера
Для настройки роутера TP-Link WR340G, необходимо войти в его настройки. Для этого выполните следующие шаги:
- Подключите роутер к компьютеру при помощи сетевого кабеля.
- Откройте любой веб-браузер (например, Google Chrome, Mozilla Firefox и т. д.).
- В адресной строке браузера введите IP-адрес роутера, который по умолчанию: 192.168.1.1.
- Нажмите клавишу Enter или нажмите на кнопку перехода по ссылке.
- Откроется страница входа в настройки роутера TP-Link WR340G.
- Введите имя пользователя и пароль для доступа к настройкам (по умолчанию admin/admin).
- Нажмите на кнопку «Войти» или «ОК».
После выполнения этих шагов вы будете находиться в настройках роутера TP-Link WR340G и сможете приступить к его настройке согласно вашим потребностям.
Компьютерные подсказки
- WoT: вылетает игра – проблемы и решения
- Обзор бесплатной версии Windows Store
- Почему не заходит в игру World Of Tanks?
- FAQ по маркировке и технологиям HDD Western Digital
- Что такое HDD, жёсткий диск и винчестер Все о жестком диске ноутбука и маркировке
- Защита флешки от вирусов
- LDF расширение Установлена неправильная версия Microsoft SQL Server
- VLC Media Player скачать бесплатно для windows русская версия Скачать проигрыватель для всех форматов vlc
- Download Master Portable скачать бесплатно русская версия Даунлоад файл
- Программы для Windows Скачать 7 zip последняя версия
- Почему не создается учетная запись Apple ID?
- Не печатает номера страниц word
- Настройка веб-серверов для работы с «1С:Предприятием
- Начальная страница в 1с 8
- Настройка начальной страницы приложения
- Отключить начальную страницу в 1с 8
- Сопоставление номенклатуры
- Программно установить отбор в 1с 8
- Самодельный инвентор 12 220 из блока питания
- Блок питания Простой блок питания на 20 30 вольт
- Импульсный металлодетектор clone pi w
- Назначение и состав днс, упсв, упн
- Заполнение массива с клавиатуры паскаль
- Программные средства защиты информации
- Делаем робота из компьютерной мыши Что можно сделать с мышкой от компьютера
- Что такое SQL. Назначение и основа. Основные команды SQL, которые должен знать каждый программист Использование sqlcode для управления циклами
- Как сделать из компьютерной мышки ручку для рисования?
- Мастер-класс для педагогов
- Программы восстановления данных с жесткого диска и флешки
- Как подготовить школьные публикации: бюллетени, газеты, заметки и т
- Как обновить программное обеспечение на Samsung Galaxy Обновление по samsung galaxy
- Обновление android 7.1 1. Обзор Android Nougat — все секреты, фишки и новые функции. Как работает разделение экрана в Android N
- Самсунг галакси s7 сравнение
- Хороший, качественный и точный переводчик
- Во что поиграть на компьютере, когда скучно?
- По морям, по океанам — обзор настольной игры «Колонизаторы
- Как обнулить принтер: быстрый сброс количества напечатанных страниц на чипе картриджа Особенности обнуления принтера Canon
- Как сохранить закладки: пошаговая инструкция
- Как сохранить все открытые вкладки в Opera
- Как заблокировать страницу в «ВК»: советы и рекомендации
Have you recently bought a TL-WR340G router model from the popular router brand TP-LINK? You must be facing issues such as how to login to the admin console of your router, how you can configure the network, etc, But don’t worry, now you found the perfect place!
Here in this comprehensive guide, we will cover everything you need to know about the TL-WR340G router model, from default username and password to IP address and network configuration. Below you will also get a piece of information about sharing the default IP address of the router.
If we talk about the most popular and best router, then most people will say the TP-LINK router without even a blink of an eye. Their routers are very easy to use and offer you lots of facilities.
If we talk about particular model TL-WR340G, TP-LINK TL-WR340G router, It allows you to change the default settings like username, password, and network setting in one click, you don’t need to contact your ISP. Additionally, you can reboot your device remotely.
How to Login to TL-WR340G
Usually, TP-LINK’s TL-WR340G router uses 192.168.1.1 as its default IP address, You can easily login with it, But sometimes if you got your router from internet service providers then it is quite possible that your default IP address can differ.
First of all, You should just check that if your default IP address is 192.168.1.1 or not, For that you have to follow the below instruction.

So, now you have to log in to the admin console using your default IP address if you are unable to login with that IP address then we would go forward with other options.
To login, All you need to do is just go to the web browser enter your default IP address (which is most probably 192.168.1.1 in this router case), and just hit enter, Just make sure that your device is connected with that same wifi network while doing this process.
You can also just click here, It will directly take you to your router’s admin console.
Rather than the login page, if something else comes, it clarifies that your ISP has changed to host IP for a router. You need to contact them for the login IP. (As of now, we are assuming that your IP is correct)
Once you visit the login page, You will be asked to enter your username and password to login into the admin console. If this whole process you are performing for the very first time then you have to enter the default username and password of your router, Which if you don’t have then don’t worry, All you need to do is just click here and it will directly take you to our giant database, Where you can easily get your router’s default username and password.
Once you enter all login credentials correctly, you will be directly on the admin console of your router where you can easily manage your router’s setting, Such as changing your username and password and many more.
How To Find The IP Address Of TL-WR340G Router?
What if the default router host IP 192.168.1.1 is not working for you, You can easily contact your internet service provider they will surely fill your all gaps but fr some reason if you are unable to contact them then don’t worry! We have a solution through that you can easily get your default IP address.
Basically, It is not rocket science to find your router’s default IP address all you have to do just run a command. Now, what exactly is that command, Let’s figure it out.
For macOS users it is just a few seconds process, Just open the terminal and enter the mentioned command and this will detect your “inet” IP address of your device.
ifconfig | grep "inet" | grep -Fv 127.0.0.1 | awk '{print $2}'
Now, Let’s talk about window users, It is quite different than macOS users,
If you are a windows user, you need to open a command prompt. Go to Start Menu >> Search for CMD, and double click on it to open. You can also open CMD using the Run option of windows. For that, press «windows key +R» and enter «cmd.» Enter the below command and hit enter,
ipconfig/all
This way you’ll find the default “Gateway IP Address” of your device.
Default Username & Password of TL-WR340G
There are very high chances that the default username and password are mostly written in the router user manual of the router, It contains the default credentials along with the IP address of your router.
You can check our database of router’s username and password where you have shared the credentials of almost all the routes available across the globe, contain details of 520+ routers brand and 5500+ models. All our data is in a well-arranged manner so that you can find the credentials for your TL-WR340G router model. To visit our database just click here.
How to boost TP-LINK TL-WR340G WiFi and overcome connectivity issues:
Place the router in a perfect place:
It is really important for better connectivity to place your TP-LINK router at the perfect pace, Perfect place refers here to make sure that your TP-LINK router is not facing any wall or curtains.
Find a Good Wireless Channel Instead of Auto on your TP-LINK TL-WR340G router
It is way too obvious that you are way too smarter than your TP-LINK router so considering that fact I would advise you not to go for auto channels but go for a seamless wireless channel. This would make sure that your signal would not interfere with that of your neighbors.
If you’re running a Windows-based PC, you can see what channels neighboring Wi-Fi networks are using
Press Start > type “cmd”. Open Command prompt
In command prompt type netsh wlan show all
Check the frequency of TP-LINK W3000
It is your responsibility if your TP-LINK router has dual bands, There is commonly used band is 2.4GHz Well, No doubt switching to 5G would give you a better result, And It totally depends on your device and if you are counting on an old device you should stick back to the conventional.
Reboot TP-LINK TL-WR340G on a schedule
Well, Whenever your TP-LINK router gives you quite a problem at the end you just stay with nothing but to reboot your router so, Yeah, Rebooting your TP-LINK router will surely fix internet connection issues, Try unplugging your TP-LINK modem on a quarterly basis to stay proactive.
How to Reset My TL-WR340G?
Resetting the router is a really easy and important process to make. First of all, just take a look at your router and turn it back, You will notice a hole in your router and a button along with that hole. You need to have a sim ejector pin to press this button. It is not accessible with a normal finger.
All you have to is just press that button for a while means 2 or 3 seconds and your router is all set with resetting to its initial settings and passwords.
Once this resetting process is all done, You can use the default username and password to get access to the admin console of your router, where you can make your own username and password as well and can manage other router’s settings too very easily.
Wrapping Up!
We hope that you liked our article and this helped you to find your default IP address or your default username and password. We have shared that how can you reset your router as well.
If you have any queries and suggestions regarding this post feel free to comment that down. Do share this article with your friends and family if it is helpful for you in any manner.
Stay connected.
- Home
- TP-Link
- TL-WR340G
TP-Link TL-WR340G router setup & security
- To login to TP-Link TL-WR340G Router, Open your web browser and type the default IP Address 192.168.1.1 in the address bar
- You should now see the router login page with 2 text fields where you can type a username and a password
- The default username for your TP-Link TL-WR340G router is admin and the default password is admin
- In the login page of the router’s web user interface, type-in the username & password, hit «Login» and now you should see the TP-Link TL-WR340G router control panel

(Remember, you must be at home and connected to home WiFi to do this)
And no need to get your breathing rates high in case you have changed the username / password of TP-Link TL-WR340G and forgot them, as you can just reset the TP-Link TL-WR340G router by press-and-hold the reset button with a clip for about 15 seconds.
TP-Link TL-WR340G Quick links:
| Default username for TP-Link TL-WR340G: | admin | COPY |
| Default password for TP-Link TL-WR340G: | admin | COPY |
2.Change TP-Link TL-WR340G Default Login and Password
Since, security of a network is vital, the first and foremost task is to change the TP-Link TL-WR340G router Default Login and Password to something more personal and secure.
TP-Link TL-WR340G Router Password Tips:
Choose a complex and hard-to-guess password for your TP-Link which only you can remember
It should be something personal, like &ilostmyvirginity@30, so that you’ll never forget it. Ever
Protect it
The amount of protection directly depends on the password complexity, and the effort taken to protect that password on your TP-Link TL-WR340G router.
Usability first
Give Password for your TP-Link TL-WR340G router that you can remember (usability first). Of course, you can build a strong hash password with special characters, numbers, Greek, and Latin. But ultimately you’ll end up writing it on a sticky and putting it on the router, which defeats the purpose. Here is an example $lasttriptovegas0916
You did good so far. Now consider ⭐ Bookmarking this page. It always helps.
3.Change TP-Link TL-WR340G Default WiFi name (SSID) and WiFi Password and enable Network Encryption
Another small suggestion (as it has no impact on security), is to change the TP-Link TL-WR340G Default WiFi name (SSID) as it will make it more obvious for others to know which network they are connecting to.
Look for Network Name (SSID), this is the WiFi name of your TP-Link TL-WR340G Router. Do not use your name, home address, or other personal information (since this isn’t a Facebook status!) in the SSID name. (No Mr.Paul&Princy) A few funny WiFi name suggestions: I’m cheating on my WiFi!, FBI Surveillance Van #594 (scares away stupid criminals), Lord of the Pings …
Once you enter the name for your network, you have to enable WPA2-PSK encryption on your TP-Link TL-WR340G router. That’s the strongest encryption standard available for home networks.
Enter a new WPA Pre-Shared Key / WiFi Password – this is the password that you will use to connect to your home WiFi. Keep it to 16-20 characters (please!) don’t use the same password that you used for TP-Link TL-WR340G router login!
🤓 Geek out your guests. Print a Free WiFi QR Code Sticker for your fridge now
4.Update router firmware in TP-Link TL-WR340G and turn on Automatic Updates
Router software often contains critical bugs and security vulnerabilities; Check if your router has known vulnerabilities
Check — TP-Link TL-WR340G
Its important that you turn on Automatic Firmware updates and always keep your TP-Link TL-WR340G router up-to-date. To turn on Automatic updates, Login to your TP-Link TL-WR340G router and look for the section which contains Automatic updates and turn it «ON»
And even if the router has auto-update, check every now and then to make sure it is actually working, and the router firmware is up-to-date. If your router manufacturer hasn’t released any updates to the firmware in the past 3-5 years, consider upgrading to a «newer» router
5.Security is a continuous process
Just keep in mind to change the passwords often or at least once in every 6 months! on your TP-Link TL-WR340G You don’t want the safety you have worked so hard for to fail just because of ignorance, negligence, or casual laziness! Time for a bulletin on the fridge, folks! We can remind you though? Enter your email below! Nope, we are not spammers!
TP-Link TL-WR340G Router Reset instructions
How to Reset the TP-Link TL-WR340G Router To Factory Default
To reset TP-Link TL-WR340G router,
- Turn on the TP-Link TL-WR340G router
- Look for the reset button. Few routers have a tiny hole and few others have a reset button.
- Press the Factory reset button with a straightened paperclip pin or something that gets through the tiny hole, and hold it for about 15 seconds! (till you see all the lights flashing)
- The TP-Link TL-WR340G router will reboot automatically. the unit has been reset and is ready to use. You can start from Step 1 in this guide to set it up.
TP-Link TL-WR340G Password Does not Work
Passwords find a way to not work! Or, in most cases, users find a way to forget them! In either case, look up the How to Reset the TP-Link TL-WR340G Router To Default Settings section
Forgot Password for TP-Link TL-WR340G Router
Incase if you have changed the default username and password of TP-Link TL-WR340G and forgot it, please see How to Reset the TP-Link TL-WR340G Router To Default Settings section
How to boost TP-Link TL-WR340G WiFi and overcome connectivity issues
1.Place the TP-Link TL-WR340G in a perfect spot
The perfect spot does it all; be it romance or your router! To avail the best signal and network connectivity, make sure you keep your TP-Link TL-WR340G router visible and not facing the wall or behind the curtains
2.Find a Good Wireless Channel Instead of Auto on your TP-Link TL-WR340G router
Auto-channels might fail you once in a while; believe that you’re smarter than the TP-Link router! Find a seamless wireless channel instead of what the router finds automatically. This would ensure that your signal doesn’t interfere with that of your neighbors.
If you’re running a Windows-based PC, you can see what channels neighboring Wi-Fi networks are using.
- Press Start > type “cmd”. Open Command prompt
- In command prompt type netsh wlan show all
You will see a list of all wireless networks and the channels being used in your vicinity. instead of using “Auto” for the control channel, Pick the channel that has the lowest interference
3.Check the frequency of TP-Link TL-WR340G
Check if TP-Link TL-WR340G has dual-band, the most commonly used band would be 2.4GHz; however, switching to 5GHz would bring out better results! It depends on your device though; if you’re running an old lad, you might have to switch back to the conventional
4.Hardwire gaming consoles / media streamers into your TP-Link TL-WR340G instead of WiFi
Gaming consoles/media streamers work better when connected through Ethernet cable of TP-Link TL-WR340G; in fact, as you might not be moving your TV all over the house, why connect it to the Wi-Fi at all? The Gaming consoles / video streaming devices flood the network with data. This means that if possible, you should consider hardwire (using Ethernet cable) the devices that tend to consume a lot of bandwidth. Although this can sort of defeat the purpose of having wireless networks, it can actually help your overall network speed of TP-Link TL-WR340G if you can hardwire the bandwidth hogs.
5. Reboot TP-Link TL-WR340G on schedule
Here’s something important to note! On schedule, folks, reboot your TP-Link TL-WR340G router! Though routers are built to constantly be running at all times, simple tweaks like regular power cycling (a fancy way of saying, unplugging the power cord and shoving it back up) helps with most issues. Rebooting your TP-Link TL-WR340G can fix Internet connection problems, improve slow moving connections, and resolve wireless issues altogether. Try unplugging your TP-Link modem on a quarterly basis to stay proactive (Never reset; always reboot router)