Connecting to the Router
There are two types of routers:
- With default configuration
- Without default configuration. When no specific configuration is found, IP address 192.168.88.1/24 is set on ether1 or combo1, or sfp1.
More information about the current default configuration can be found in the Quick Guide document that came with your device. The quick guide document will include information about which ports should be used to connect for the first time and how to plug in your devices.
This document describes how to set up the device from the ground up, so we will ask you to clear away all defaults.
When connecting the first time to the router with the default username admin and no password (for some models, check user password on the sticker), you will be asked to reset or keep the default configuration (even if the default config has only an IP address). Since this article assumes that there is no configuration on the router you should remove it by pressing «r» on the keyboard when prompted or click on the «Remove configuration» button in WinBox.
Router without Default Configuration
If there is no default configuration on the router you have several options, but here we will use one method that suits our needs.
Connect Routers ether1 port to the WAN cable and connect your PC to ether2. Now open WinBox and look for your router in neighbor discovery. See detailed example in Winbox article.
If you see the router in the list, click on MAC address and click Connect.
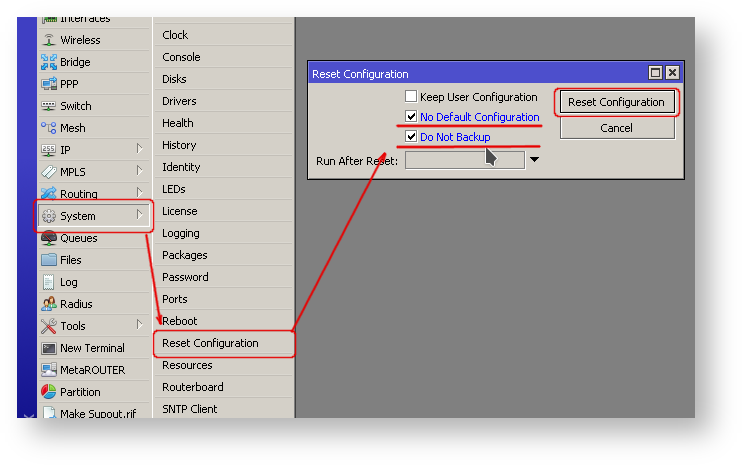
The simplest way to make sure you have absolutely clean router is to run
/system reset-configuration no-defaults=yes skip-backup=yes
Or from WinBox (Fig. 1-1):
Configuring IP Access
Since MAC connection is not very stable, the first thing we need to do is to set up a router so that IP connectivity is available:
- add bridge interface and bridge ports;
- add an IP address to LAN interface;
- set up a DHCP server.
Set bridge and IP address are quite easy:
/interface bridge add name=local
/interface bridge port add interface=ether2 bridge=local
/ip address add address=192.168.88.1/24 interface=local
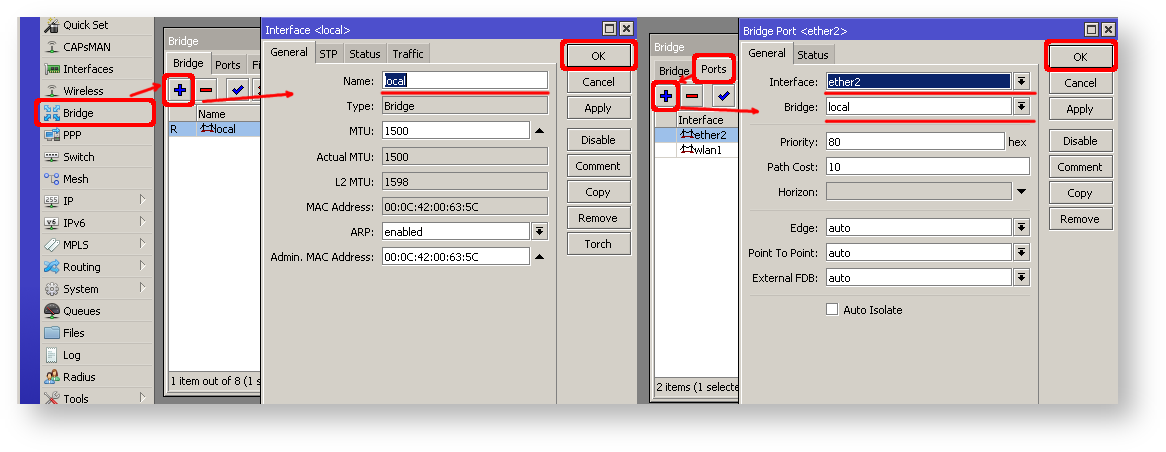
If you prefer WinBox/WeBfig as configuration tools:
- Open Bridge window, Bridge tab should be selected;
- Click on the + button, a new dialog will open, enter bridge name local and click on OK;
- Select the Ports tab and click on the + button, a new dialog will open;
- select interface ether2 and bridge local form drop-down lists and click on the OK button to apply settings;
- You may close the bridge dialog.
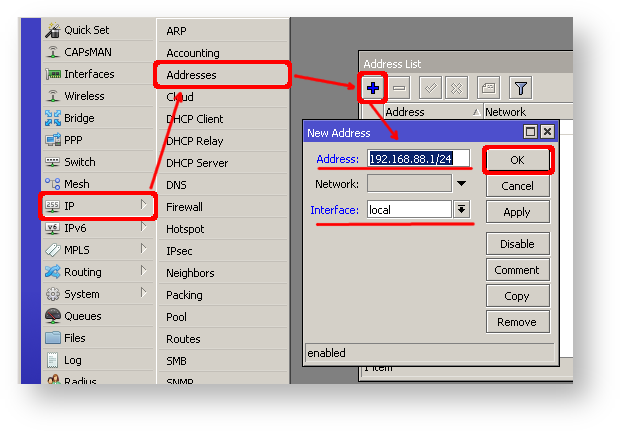
- Open Ip -> Addresses dialog;
- Click on the + button, a new dialog will open;
- Enter IP address 192.168.88.1/24 select interface local from the drop-down list and click on OK button;
The next step is to set up a DHCP server. We will run the setup command for easy and fast configuration:
      [admin@MikroTik] /ip dhcp-server setup [enter]
      Select interface to run DHCP server on

      dhcp server interface: local [enter]
      Select network for DHCP addresses

      dhcp address space: 192.168.88.0/24 [enter]
      Select gateway for given network

      gateway for dhcp network: 192.168.88.1 [enter]
      Select pool of ip addresses given out by DHCP server

      addresses to give out: 192.168.88.2-192.168.88.254 [enter]
      Select DNS servers

      dns servers: 192.168.88.1 [enter]
      Select lease time

      lease time: 10m [enter]
Notice that most of the configuration options are automatically determined and you just simply need to hit the enter key.
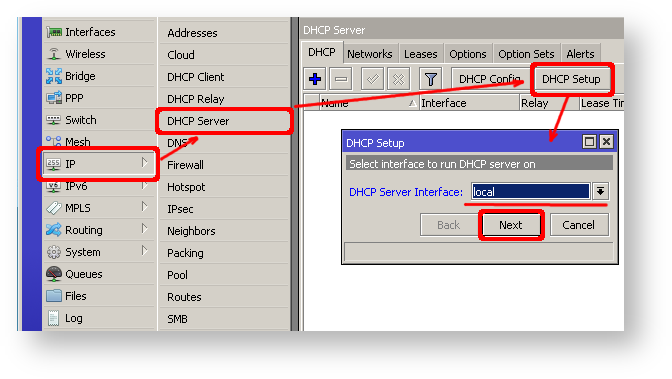
The same setup tool is also available in WinBox/WeBfig:
- Open Ip -> DHCP Server window, DHCP tab should be selected;
- Click on the DHCP Setup button, a new dialog will open, enter DHCP Server Interface local and click on Next button;
- Follow the wizard to complete the setup.
Now connected PC should be able to get a dynamic IP address. Close the Winbox and reconnect to the router using IP address (192.168.88.1)
Configuring Internet Connection
The next step is to get internet access to the router. There can be several types of internet connections, but the most common ones are:
- dynamic public IP address;
- static public IP address;
- PPPoE connection.
Dynamic Public IP
Dynamic address configuration is the simplest one. You just need to set up a DHCP client on the public interface. DHCP client will receive information from an internet service provider (ISP) and set up an IP address, DNS, NTP servers, and default route for you.
/ip dhcp-client add disabled=no interface=ether1
After adding the client you should see the assigned address and status should be bound
[admin@MikroTik] /ip dhcp-client> print
Flags: X - disabled, I - invalid
 #   INTERFACE           USE ADD-DEFAULT-ROUTE STATUS        ADDRESS
 0   ether1               yes yes               bound         1.2.3.100/24
Static Public IP
In the case of static address configuration, your ISP gives you parameters, for example:
- IP: 1.2.3.100/24
- Gateway: 1.2.3.1
- DNS: 8.8.8.8
These are three basic parameters that you need to get the internet connection working
To set this in RouterOS we will manually add an IP address, add a default route with a provided gateway, and set up a DNS server
/ip address add address=1.2.3.100/24 interface=ether1
/ip route add gateway=1.2.3.1
/ip dns set servers=8.8.8.8
PPPoE Connection
PPPoE connection also gives you a dynamic IP address and can configure dynamically DNS and default gateway. Typically service provider (ISP) gives you a username and password for the connection
/interface pppoe-client
  add disabled=no interface=ether1 user=me password=123 \
    add-default-route=yes use-peer-dns=yes
Winbox/Webfig actions:
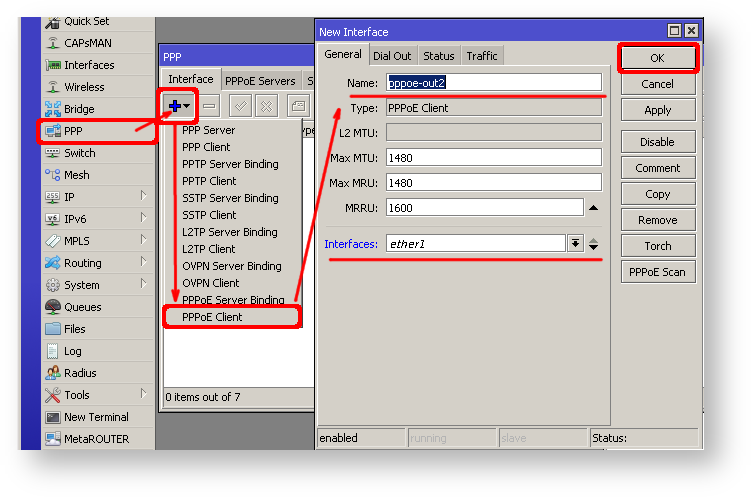
- Open PPP window, Interfaces tab should be selected;
- Click on the + button, and choose PPPoE Client from the dropdown list, new dialog will open;
- Select interface ether1 from the dropdown list and click on the OK button to apply settings.
Further in configuration WAN interface is now pppoe-out interface, not ether1.
Verify Connectivity
After successful configuration, you should be able to access the internet from the router.
Verify IP connectivity by pinging known IP address (google DNS server for example)
[admin@MikroTik] > /ping 8.8.8.8
HOST                                     SIZE TTL TIME  STATUS
8.8.8.8                                    56  47 21ms
8.8.8.8                                    56  47 21ms
Verify DNS request
[admin@MikroTik] > /ping www.google.com
HOST                                     SIZE TTL TIME  STATUS
173.194.32.49                              56  55 13ms
173.194.32.49                              56  55 12ms
If everything is set up correctly, ping in both cases should not fail.
In case of failure refer to the Troubleshooting section
Protecting the Router
Now anyone over the world can access our router so it is the best time to protect it from intruders and basic attacks
User Password Access
MikroTik routers require password configuration, we suggest using a password generator tool to create secure and non-repeating passwords. With secure password we mean:
- Minimum 12 characters;
- Include numbers, Symbols, Capital and lower case letters;
- Is not a Dictionary Word or Combination of Dictionary Words;
/user set 0 password="!={Ba3N!40TуX+GvKBzjTLIUcx/,"
Another option to set a password,
We strongly suggest using a second method or Winbox interface to apply a new password for your router, just to keep it safe from other unauthorized access.
[admin@MikroTik] > / password
old password:
new password: ******
retype new password: ******
Make sure you remember the password! If you forget it, there is no recovery. You will need to reinstall the router!
You can also add more users with full or limited router access in /user menu
The best practice is to add a new user with a strong password and disable or remove the default admin user.
/user add name=myname password=mypassword group=full
/user remove admin
Note: login to the router with new credentials to check that the username/password is working.
MAC Connectivity Access
By default mac server runs on all interfaces, so we will disable default all entry and add a local interface to disallow MAC connectivity from the WAN port. MAC Telnet Server feature allows you to apply restrictions to the interface «list».
First, create an interface list:
[admin@MikroTik] > /interface list add name=listBridge
Then, add your previously created bridge named «local» to the interface list:
[admin@MikroTik] > /interface list member add list=listBridge interface=local
Apply newly created «list» (of interfaces) to the MAC server:
[admin@MikroTik] > tool mac-server set allowed-interface-list=listBridge
Do the same for Winbox MAC access
[admin@MikroTik] > tool mac-server mac-winbox set allowed-interface-list=listBridge
Winbox/Webfig actions:
- Open Interfaces → Interface List → Lists window and add a new list by clicking «+»;
- Input the interface list name «listBridge» into the Name field and click OK;
- Go back to the Interfaces → Interface List section and click «+»;
- Select «listBridge» from the dropdown List options and select «local» from the dropdown Interface options and click OK;
- Open Tools -> Mac Server window;
- Click on the «MAC Telnet Server» button, a new dialog will open;
- Select the newly created list «listBridge» from the dropdown list and click on OK button to apply settings.
Do the same in the MAC Winbox Server tab to block Mac Winbox connections from the internet.
Neighbor Discovery
MikroTik Neighbor discovery protocol is used to show and recognize other MikroTik routers in the network. Disable neighbor discovery on public interfaces:
/ip neighbor discovery-settings set discover-interface-list=listBridge
IP Connectivity Access
Besides the fact that the firewall protects your router from unauthorized access from outer networks, it is possible to restrict username access for the specific IP address
/user set 0 allowed-address=x.x.x.x/yy
x.x.x.x/yy — your IP or network subnet that is allowed to access your router.
IP connectivity on the public interface must be limited in the firewall. We will accept only ICMP(ping/traceroute), IP Winbox, and ssh access.
/ip firewall filter
  add chain=input connection-state=established,related action=accept comment="accept established,related";
  add chain=input connection-state=invalid action=drop;
  add chain=input in-interface=ether1 protocol=icmp action=accept comment="allow ICMP";
  add chain=input in-interface=ether1 protocol=tcp port=8291 action=accept comment="allow Winbox";
  add chain=input in-interface=ether1 protocol=tcp port=22 action=accept comment="allow SSH";
  add chain=input in-interface=ether1 action=drop comment="block everything else";
In case if a public interface is a pppoe, then the in-interface should be set to «pppoe-out».
The first two rules accept packets from already established connections, so we assume those are OK to not overload the CPU. The third rule drops any packet which connection tracking thinks is invalid. After that, we set up typical accept rules for specific protocols.
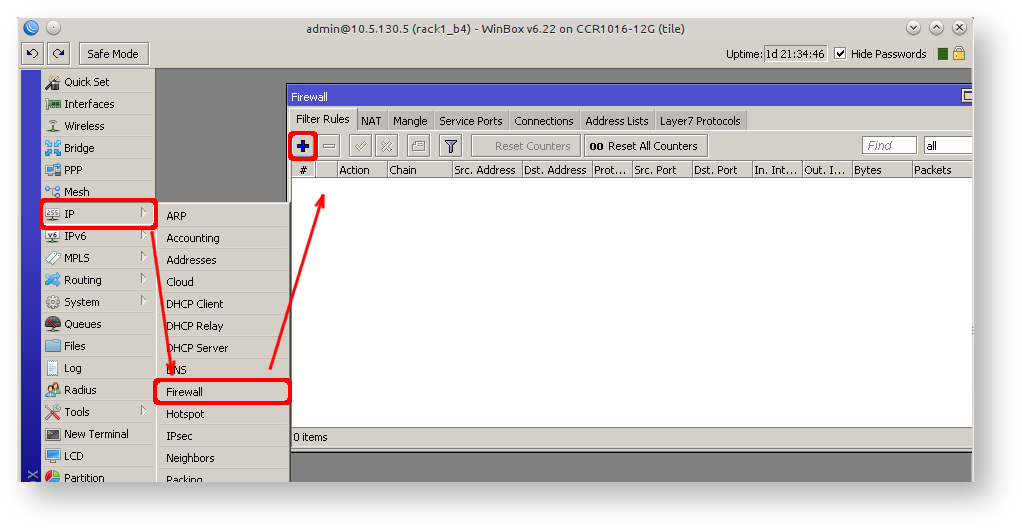
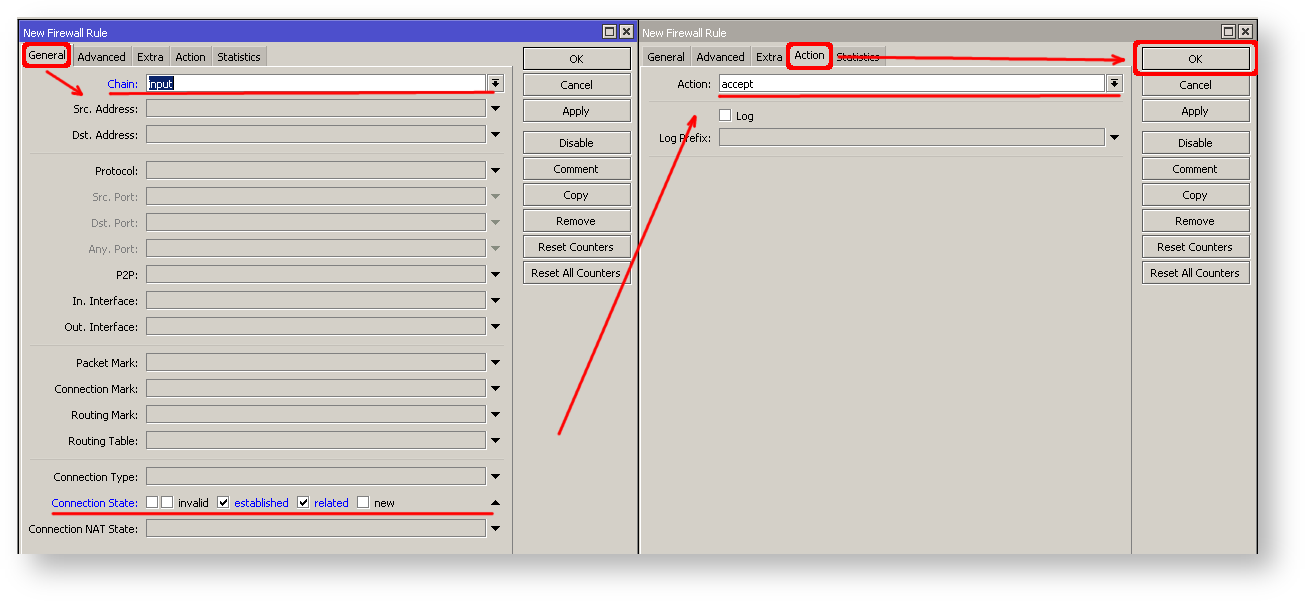
If you are using Winbox/Webfig for configuration, here is an example of how to add an established/related rule:
- Open Ip -> Firewall window, click on Filter rules tab;
- Click on the + button, a new dialog will open;
- Select chain input, click on Connection state, and select checkboxes for established and related;
- Click on the Action tab and make sure action accept is selected;
- Click on the Ok button to apply settings.
To add other rules click on + for each new rule and fill the same parameters as provided in the console example.
Administrative Services
Although the firewall protects the router from the public interface, you may still want to disable RouterOS services.
Most of RouterOS administrative tools are configured at the /ip service menu
Keep only secure ones,
/ip service disable telnet,ftp,www,api
Change default service ports, this will immediately stop most of the random SSH brute force login attempts:
/ip service set ssh port=2200
Additionally, each service can be secured by allowed IP address or address range(the address service will reply to), although more preferred method is to block unwanted access in firewall because the firewall will not even allow to open socket
/ip service set winbox address=192.168.88.0/24
Other Services
A bandwidth server is used to test throughput between two MikroTik routers. Disable it in the production environment.
/tool bandwidth-server set enabled=no
A router might have DNS cache enabled, which decreases resolving time for DNS requests from clients to remote servers. In case DNS cache is not required on your router or another router is used for such purposes, disable it.
/ip dns set allow-remote-requests=no
Some RouterBOARDs have an LCD module for informational purposes, set pin or disable it.
It is good practice to disable all unused interfaces on your router, in order to decrease unauthorized access to your router.
/interface print
/interface set x disabled=yes
Where «X» is a number of the unused interfaces.
RouterOS utilizes stronger crypto for SSH, most newer programs use it, to turn on SSH strong crypto:
/ip ssh set strong-crypto=yes
Following services are disabled by default, nevertheless, it is better to make sure that none of then were enabled accidentally:
- MikroTik caching proxy,
- MikroTik socks proxy,
- MikroTik UPNP service,
- MikroTik dynamic name service or IP cloud,
/ip cloud set ddns-enabled=no update-time=no
At this point, PC is not yet able to access the Internet, because locally used addresses are not routable over the Internet. Remote hosts simply do not know how to correctly reply to your local address.
The solution for this problem is to change the source address for outgoing packets to routers public IP. This can be done with the NAT rule:
/ip firewall nat
  add chain=srcnat out-interface=ether1 action=masquerade
In case if a public interface is a pppoe, then the out-interface should be set to «pppoe-out».
Another benefit of such a setup is that NATed clients behind the router are not directly connected to the Internet, that way additional protection against attacks from outside mostly is not required.
Port Forwarding
Some client devices may need direct access to the internet over specific ports. For example, a client with an IP address 192.168.88.254 must be accessible by Remote desktop protocol (RDP).
After a quick search on Google, we find out that RDP runs on TCP port 3389. Now we can add a destination NAT rule to redirect RDP to the client’s PC.
/ip firewall nat
  add chain=dstnat protocol=tcp port=3389 in-interface=ether1 \
    action=dst-nat to-address=192.168.88.254
If you have set up strict firewall rules then RDP protocol must be allowed in the firewall filter forward chain.
Setting up Wireless
For ease of use bridged wireless setup will be made so that your wired hosts are in the same Ethernet broadcast domain as wireless clients.
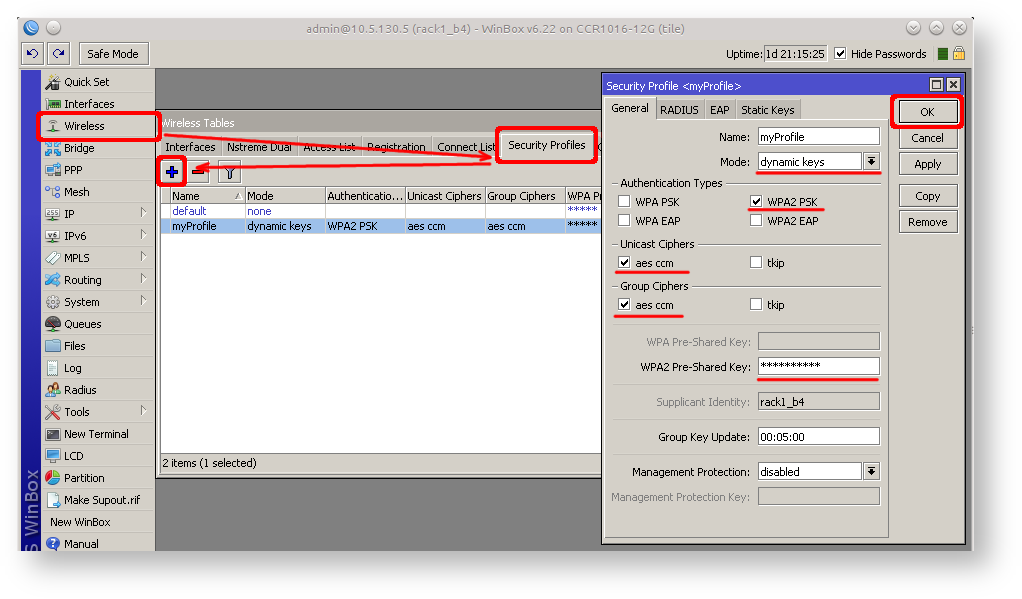
The important part is to make sure that our wireless is protected, so the first step is the security profile.
Security profiles are configured from /interface wireless security-profiles menu in a terminal.
/interface wireless security-profiles
  add name=myProfile authentication-types=wpa2-psk mode=dynamic-keys \
    wpa2-pre-shared-key=1234567890
in Winbox/Webfig click on Wireless to open wireless windows and choose the Security Profile tab.
If there are legacy devices that do not support WPA2 (like Windows XP), you may also want to allow WPA protocol.
WPA and WPA2 pre-shared keys should not be the same.
Now when the security profile is ready we can enable the wireless interface and set the desired parameters
/interface wireless
  enable wlan1;
  set wlan1 band=2ghz-b/g/n channel-width=20/40mhz-Ce distance=indoors \
    mode=ap-bridge ssid=MikroTik-006360 wireless-protocol=802.11 \
    security-profile=myProfile frequency-mode=regulatory-domain \
    set country=latvia antenna-gain=3
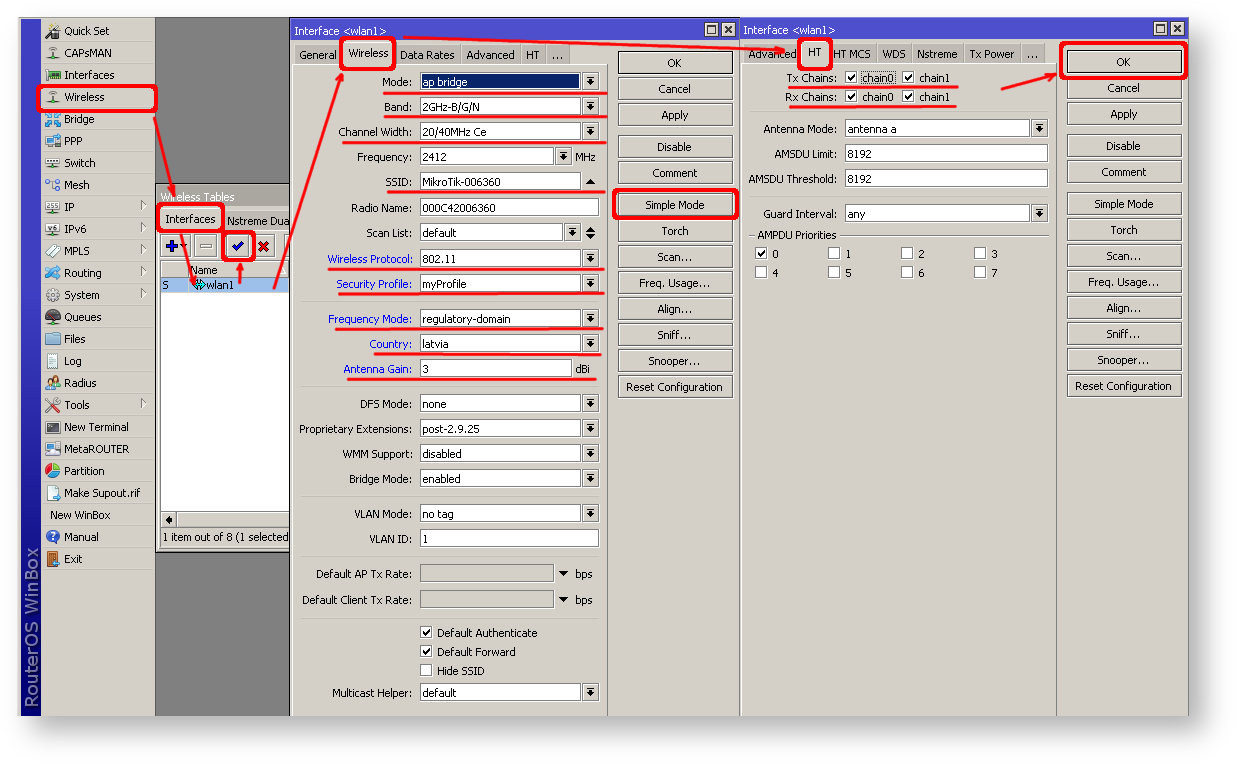
To do the same from Winbox/Webfig:
- Open Wireless window, select wlan1 interface, and click on the enable button;
- Double click on the wireless interface to open the configuration dialog;
- In the configuration dialog click on the Wireless tab and click the Advanced mode button on the right side. When you click on the button additional configuration parameters will appear and the description of the button will change to Simple mode;
- Choose parameters as shown in the screenshot, except for the country settings and SSID. You may want to also choose a different frequency and antenna gain;
- Next, click on the HT tab and make sure both chains are selected;
- Click on the OK button to apply settings.
The last step is to add a wireless interface to a local bridge, otherwise connected clients will not get an IP address:
/interface bridge port
  add interface=wlan1 bridge=local
Now wireless should be able to connect to your access point, get an IP address, and access the internet.
Protecting the Clients
Now it is time to add some protection for clients on our LAN. We will start with a basic set of rules.
/ip firewall filter
  add chain=forward action=fasttrack-connection connection-state=established,related \
    comment="fast-track for established,related";
  add chain=forward action=accept connection-state=established,related \
    comment="accept established,related";
  add chain=forward action=drop connection-state=invalid
  add chain=forward action=drop connection-state=new connection-nat-state=!dstnat \
    in-interface=ether1 comment="drop access to clients behind NAT from WAN"
A ruleset is similar to input chain rules (accept established/related and drop invalid), except the first rule with action=fasttrack-connection. This rule allows established and related connections to bypass the firewall and significantly reduce CPU usage.
Another difference is the last rule which drops all new connection attempts from the WAN port to our LAN network (unless DstNat is used). Without this rule, if an attacker knows or guesses your local subnet, he/she can establish connections directly to local hosts and cause a security threat.
For more detailed examples on how to build firewalls will be discussed in the firewall section, or check directly Building Your First Firewall article.
Blocking Unwanted Websites
Sometimes you may want to block certain websites, for example, deny access to entertainment sites for employees, deny access to porn, and so on. This can be achieved by redirecting HTTP traffic to a proxy server and use an access-list to allow or deny certain websites.
First, we need to add a NAT rule to redirect HTTP to our proxy. We will use RouterOS built-in proxy server running on port 8080.
/ip firewall nat
  add chain=dst-nat protocol=tcp dst-port=80 src-address=192.168.88.0/24 \
    action=redirect to-ports=8080
Enable web proxy and drop some websites:
/ip proxy set enabled=yes
/ip proxy access add dst-host=www.facebook.com action=deny
/ip proxy access add dst-host=*.youtube.* action=deny
/ip proxy access add dst-host=:vimeo action=deny
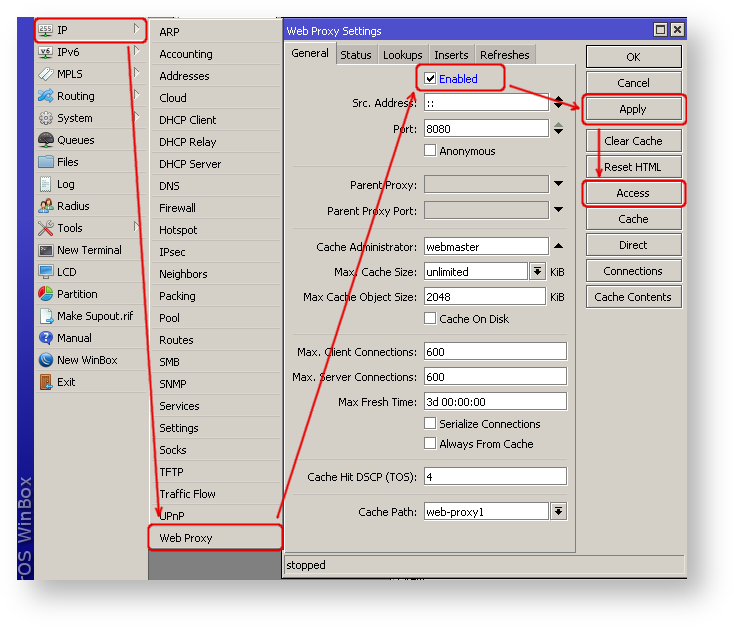
Using Winbox:
- On the left menu navigate to IP -> Web Proxy
- Web proxy settings dialog will appear.
- Check the «Enable» checkbox and click on the «Apply» button
- Then click on the «Access» button to open the «Web Proxy Access» dialog
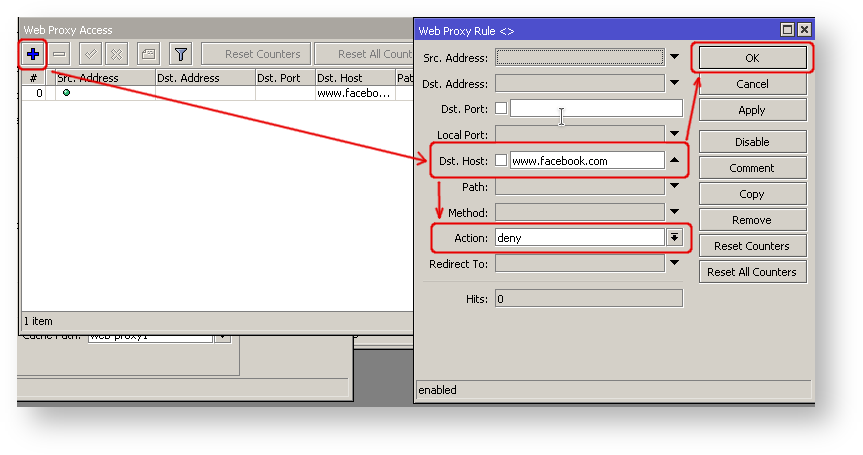
- In the «Web Proxy Access» dialog click on «+» to add a new Web-proxy rule
- Enter Dst hostname that you want to block, in this case, «www.facebook.com», choose the action «deny»
- Then click on the «Ok» button to apply changes.
- Repeat the same to add other rules.
Troubleshooting
RouterOS has built-in various troubleshooting tools, like ping, traceroute, torch, packet sniffer, bandwidth test, etc.
We already used the ping tool in this article to verify internet connectivity.
Troubleshoot if ping fails
The problem with the ping tool is that it says only that destination is unreachable, but no more detailed information is available. Let’s overview the basic mistakes.
You cannot reach www.google.com from your computer which is connected to a MikroTik device:
If you are not sure how exactly configure your gateway device, please reach MikroTik’s official consultants for configuration support.
Решил открыть раздел на этом сайте со статьями по роутерам MikroTik. И начать я решил с инструкции по входу в настройки роутера MikroTik. Рассмотрим подробно, как войти в RouterOS (на которой работают эти сетевые устройства) по адресу 192.168.88.1, и разберемся с возможными проблемами. Когда не открывается страница по адресу 192.168.88.1 и не заходит в настройки маршрутизатора.
Многие обходят роутеры MikroTik стороной. По той причине, что у них очень сложный web-интерфейс, и их очень сложно настроить. Операционная система RouterOS, на которой работают эти роутеры, немного сложная и сильно загружена разными настройками. С одной стороны это плохо, так как простому пользователю, который не сильно разбирается в этих фишках, будет сложно найти и настроить какую-то функцию. Но с другой стороны, есть возможность очень тонко настроить свой MikroTik. К тому же, эти роутеры очень надежные и производительные. И цена на них хорошая.
Это первая моя инструкция по MikroTik, и первое мое знакомство с самим брендом и системой RouterOS в том числе. И я хочу сказать, что там нет ничего сложно. Все основные настройки можно задать на главной странице (настройка Wi-Fi, подключение к интернету, смена пароля web-интерфейса). Все что нужно, это подключиться к роутеру MikroTik по Wi-Fi сети, или по сетевому кабелю, зайти на IP-адрес 192.168.88.1 через браузер, задать необходимые параметры и сохранить.
Как зайти на 192.168.88.1 в настройки роутера MikroTik?
Устройство, с которого мы будем открывать настройки, должно быть подключено к маршрутизатору. Можно подключится по Wi-Fi сети. По умолчанию сеть открыта, без пароля. Или с помощью сетевого кабеля. В комплекте с моим MikroTik hAP Lite TC сетевого кабеля в комплекте не было, и это очень плохо.
На компьютере, в свойствах подключения (через которое вы подключены к роутеру) нужно поставить автоматическое получение IP-адреса. По умолчанию, как правило, там стоит именно автоматическое получение всех адресов. Если web-интерфейс роутера не откроется, то нужно в первую очередь проверить именно эти параметры.
Чтобы открыть панель уравнения маршрутизатором MikroTik, нужно в браузере перейти по адресу http://192.168.88.1. Подойдет любой браузер: Опера, Хром, Internet Explorer и т. д.
Вот так выглядит сам web-интерфейс RouterOS:
Как можно увидеть выше на скриншоте, на главной странице можно задать практически все необходимые параметры. Да, соглашусь, что если необходимо например сделать проброс портов, или еще что-то, то придется покопаться в настройках. Их там очень много 🙂
Почему не заходит на 192.168.88.1?
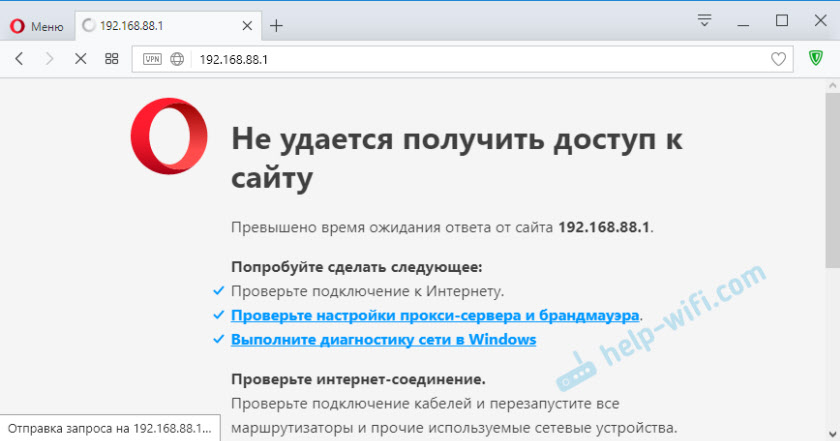
Самая популярная проблема – когда не удается открыть настройки по IP-адресу 192.168.88.1. Страница не открывается, или появляется ошибка, что «Не удается получить доступ к сайту», «Отобразить страницу» и т. д.
В таком случае, попробуйте следующие решения:
- Убедитесь, что в свойствах протокола IPv4 вашего подключения установлено автоматическое получение всех адресов.
Подробнее об этом читайте здесь.
- Проверьте, подключены ли вы к роутеру MikroTik. Доступа к интернету может не быть. Для входа на адрес 192.168.88.1 интернет не нужен.
- Сделайте сброс настроек роутера.
- По умолчанию, при входе в настройки RouterOS не нужно вводить пароль. Но его можно установить. И если появляется запрос пароля, который вы не знаете, или появляется ошибка «Неверный пароль», то так же нужно делать сброс настроек роутера.
- Больше информации по этой проблеме можно найти в статье: не заходит в настройки роутера. Не обращайте внимание, что статья написана на примере других IP адресов, а не 192.168.88.1.
- Попробуйте открыть панель управления с другого браузера, или устройства.
Надеюсь, вы смогли зайти в настройки своего маршрутизатора MikroTik. У меня не возникло вообще никаких проблема. Все даже проще, чем с другими маршрутизаторами более популярных компаний. Почему проще? Нет пароля по умолчанию на Wi-Fi сеть и на доступ к веб-интерфейсу. Зайти на RouterOS не сложно, а вот разобраться в ней… 🙂
Веб-интерфейс роутера MikroTik — это панель управления вашим роутером, в которой осуществляется сохранение и изменение всех настроек. Чтобы внести изменения в свою сеть, вам необходимо выполнить вход в свой роутер MikroTik.
Необходимые условия для доступа к веб-интерфейсу MikroTik
Доступ к веб-интерфейсу MikroTik довольно прост, и все, что вам понадобится, это:
- Роутер MikroTik
- Доступ к сети, либо по LAN-кабелю, либо по Wi-Fi
- Веб-браузер, который у вас наверняка есть.
Ниже приведены инструкции по подключению к интерфейсу роутера MikroTik с целью его конфигурирования и диагностики.
1. Убедитесь, что вы подключены к роутеру MikroTik
Чтобы получить доступ к страницам настройки вашего роутера MikroTik, вам необходимо подключиться к его сети.
Поэтому, начните с подключения к сети либо по WiFi, либо по Ethernet-кабелю.
Совет: Если вы не знаете пароль к WiFi своего роутера MikroTik, вы всегда можете подключиться к нему с помощью Ethernet-кабеля, для которого пароль не требуется.
2. Откройте веб-браузер и перейдите по адресу 192.168.88.1
Откройте браузер и в поле адреса введите IP-адрес роутера. Наиболее частым IP-адресом для роутеров MikroTik является: 192.168.88.1 Если этот IP-адрес не работает, используйте список IP-адресов по умолчанию для MikroTik, чтобы отыскать его для вашей конкретной модели.
Совет:
Поскольку вы уже подключены к роутеру MikroTik, вы также можете использовать whatsmyrouterip.com , чтобы быстро узнать IP-адрес. Он будет указан после «Router Private IP».
192.168.88.1
3. Введите имя пользователя и пароль для вашего роутера MikroTik
В поле имя пользователя и пароль введите текущее имя пользователя и пароль, а затем нажмите клавишу ввода / вход.
Стандартные учетные данные для входа в MikroTik
Если вы не уверены в имени пользователя/пароле, вы можете посмотреть стандартные учетные данные для MikroTik, чтобы узнать об используемых значениях по умолчанию и способах их восстановления.
— Учетные данные также могут быть указаны на наклейке на задней панели роутера.
Готово! Теперь вы сможете выполнить все требуемые настройки устройства.
Как настроить роутер MikroTik
После входа в интерфейс администратора MikroTik вы сможете изменить все имеющиеся настройки.
Чтобы не нарушить работу сети, при настройке роутера следует действовать осторожно.
Совет: прежде чем что-либо менять, запишите свои текущие настройки, чтобы их можно было вернуть в случае возникновения проблем.
Что делать, если после изменения конфигурации мой роутер MikroTik или сеть перестает работать
Если вы по ошибке внесете какие-либо изменения, которые повредят вашей домашней сети MikroTik, вы всегда можете откатиться назад, воспользовавшись универсальным способом аппаратного сброса 30 30 30.
Как правило, это крайняя мера, и если у вас все еще есть доступ к интерфейсу MikroTik, вы всегда можете выполнить вход и сначала попытаться восстановить настройки (конечно же, это предполагает, что вы записали исходные значения перед их изменением).
Вы держите первый раз в руках роутер микротик, на который как-то надо попасть и настроить для дома через Quick Setup.
Зайти на MikroTik можно через WEB, WinBox, SSH, Telnet, а так же консольный порт.
Вход через WEB
Если устройство из коробки, то оно имеет дефолтный адрес http://192.168.88.1, перейдя на который, можно попасть в WebFig. Если адрес недоступен, проверьте какой компьютер получил адрес и шлюз. Адрес шлюза и будет точкой входа в настройки. Если адрес не получает, но сеть работает, нужен сброс настроек:
Вход через WinBox
Если у вас есть Интернет, или уже скаченный WinBox, можно использовать его, даже если устройство не имеет IP адреса, подключиться можно по MAC адресу по L2.
Вход через SSH/Telnet
Когда ваш MikroTik уже настроен, можно подключиться через Putty

Вход через консольный порт
Если ваш MikroTik имеет консольный порт

То при наличии USB-COM кабеля как на cisco, можно подключиться через тот же Putty
Вход в маршрутизатор MikroTik с RouterOS — 192.168.88.1
Предлагаем ознакомиться с инструкцией по входу в настройки маршрутизаторов MikroTik. Давайте узнаем, как войти в RouterOS по адресу 192.168.88.1, а также посмотрим на проблемы, которые могут при этом возникнуть. А особенно, когда по указанному адресу 192.168.88.1 не получается зайти в настройки роутера.
Многие наши клиенты стараются обходить маршрутизаторы MikroTik стороной. Причиной называют их сложность настройки. С их слов следует, что операционная система RouterOS через чур сложная и весьма загружена различными настройками. Простому пользователю это усложняет работу с маршрутизатором, так как ему сложно найти и настроить на свой лад нужную функцию. Но, если посмотреть с другой стороны, то это позволяет весьма точно или, как говорят многие тонко настроить роутер MikroTik. Ведь маршрутизаторы этого производителя недорогие, надежные и обладают отличной производительностью.
Да и если посмотреть чуть внимательнее, то нет в настройке Микротик ничего сложного. Основные настройки сразу предоставляются на главной странице. Среди них настройка беспроводного wi-fi, подключение к Internet, редактирование пароля для доступа к web-интерфейсу. От пользователя требуется только подсоединиться к маршрутизатору MikroTik по сетевому кабелю или при помощи wi-fi, а после зайти на IP-адрес со значением 192.168.88.1 через любой из используемых браузеров. После задаете параметры и просто сохраняете.
Как зайти в настройки MikroTik
Сам роутер, которому нужно внести или изменить настройки должен быть подключен к устройству, с которого мы будем вносить эти настройки. Можно использовать Wi-Fi (+р). При первом заходе сеть будет открыта, то есть без необходимости вводить пароль. А можно использовать обычный сетевой кабель. Не все модели при покупке комплектуются сетевым кабелем, так что тут с этим бывает и плохо.
Устройство, с которого мы подключаемся к роутеру, должно быть активировано автоматическое получение IP-адреса. Как правило, в современных ПК везде по умолчанию так и стоит. Если веб-интерфейс маршрутизатора не открывается, то сразу проверьте именно этот параметр.
Чтобы получить доступ к панели управления роутера MikroTik, необходимо в браузере вбить адрес https://192.168.88.1. Использовать можно любой привычный Вам браузер.
А вот так будет выглядеть веб-интерфейс RouterOS:
Из скриншота, что выше, можно увидеть, что главная страница позволяет внести почти все нужные нам параметры. Конечно, если станет необходимость в пробросе портов или сделать что-то другое, то придется немного поглубже разобраться в настройках. Но сейчас нам это не нужно.
Теперь давайте разбираться, почему не получается зайти на 192.168.88.1
Наиболее популярной проблемой является то, что пользователь при заходе на IP-адрес 192.168.88.1 не может открыть настройки. То есть, страница не открывается. При этом может появляться ошибка, где будет что то по типу:
В таких случаях нужно воспользоваться следующими решениями:
1. Убеждаемся в том, что установлено ранее нами сказанное «Автоматическое получение всех адресов» в свойствах протокола IPv4.
2. Нужно проверить, а подключено ли Ваше устройство непосредственно к маршрутизатору MikroTik. Чтобы зайти на адрес 192.168.88.1 доступ к сети Internet не нужен.
3. Сбросьте настройки маршрутизатора.
4. По умолчанию, когда входите в настройки ОС RouterOS, нет необходимости вводить пароль. Его можно задать. А вот если появляется запрос на введение пароля, которого у Вас нет и Вы его не знаете или же демонстрируется ошибка «Неверный пароль», то просто произведите сброс настроек маршрутизатора Микротик.
5. Можно еще попытаться открыть панель управления с прочего браузера. А можно и вообще попробовать использовать другое устройство.
Надеемся, что Вы смогли без проблем зайти в настройки своего роутера производства MikroTik или же Вам помогли это сделать наши рекомендации (+р). В абсолютном большинстве у пользователей не возникает никаких проблем. Как видите, всё куда проще, даже чем с прочими роутерами более популярных производителей. Легче потому что по умолчанию нет пароля на сеть wi-fi и на сам доступ к web-интерфейсу.


 Подробнее об этом читайте здесь.


