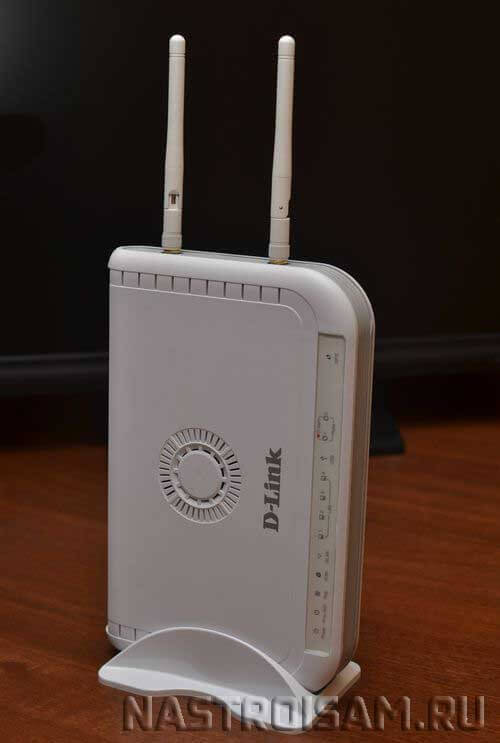
Tripple-Play маршрутизатор D-Link DVG-N5402GF я получил для тестирования гигабитного доступа в сеть Интернет по технологии «Оптика в дом» (FTTB). Его предшественники — G5402SP и N5402SP у нас используются уже несколько лет. Ничем хорошим, кроме как наличием VoIP-модуля с возможностью настройки двух номеров SIP эти аппараты не выделяются. Более того, откровенно слабое железо и кривоватая прошивка оставили весьма негативное впечатление. Чего только стоил непонятный мак-флуд с устройства, который просто ложил целый кольцо домовых коммутаторов FTTB. Решалось просто обновлением микропрограммы. А уж про нестабильную работу WiFi и говорить не приходится.
Новый роутер тоже не оправдал ожиданий, показав на тесте более низкую скорость по протоколу PPPoE — 170 Мегабит в секунду, нежели значительно более дешёвый ASUS RT-N56 — 500 Мегабит в сек. Обновление прошивки на ту, что имелась на официальном сайте на момент тестирования, результатов не дало. Учитывая цену в 9000 — 10000 рублей, выгоднее купить нормальный маршрутизатор и к нему отдельно SIP-телефон. Выгода будет и в цене, и в качестве работы устройств.
Теперь давайте посмотрим непосредственно на сам DVG-N5402GF. Выполнен от точно в таком же корпусе, что и DVG-N5402SP — это довольно-таки крупный маршрутизатор в вертикальном форм-факторе с двумя слабенькими 2dBi-антеннами в торце.
Хорошо хоть подставка съёмная и, при желании, его можно положить горизонтально.
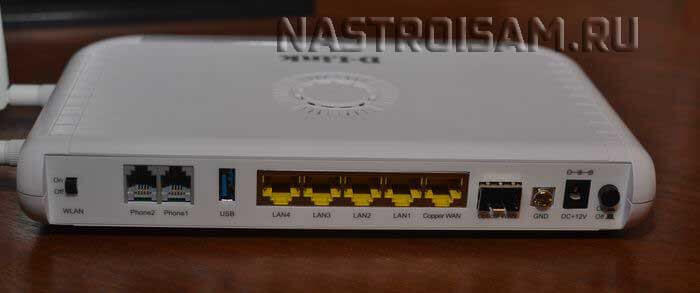
На задней стороне корпуса 5 гигабитных портов — 4 LAN и 1 WAN. Слева два разъёма RJ11 для подключения телефонов и один USB-порт. Так же есть отдельная кнопка питания и ползунок включения/выключения беспроводной сети WiFi.
Главная и единственная, на мой взгляд, изюминка модели — комбинированный WAN-порт: медный RJ45 или SFP-разъём для оптики. То есть D-Link DVG-N5402GF можно ставить абонентам вместо медиаконвертора при FTTC-подключении ( само-собой, при наличии совместимых SFP-модулей).
Как настроить роутер:
Сразу хочу сказать, что ко мне попала модель с обычной, то есть с заводской прошивкой. Насколько мне известно, в некоторые филиалы Ростелеком поставлялись залоченные по Домолинк или Онлайм модели с урезанным функционалом. Для разлочки устройства Вам придётся обращаться в сервисный центр.
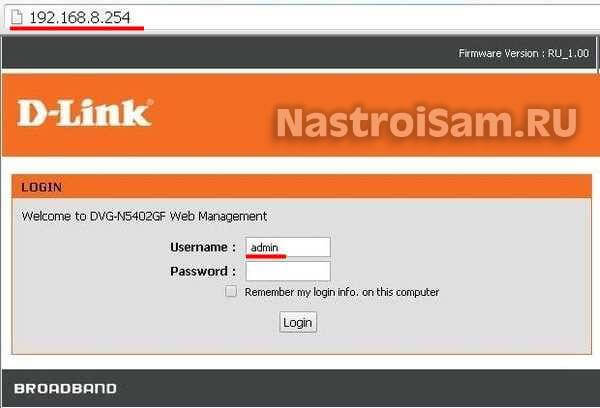
IP-адрес роутера Д-Линк DVG-N5402GF в локальной сети не обычный 192.168.1.1 или 192.168.0.1, а совершенно иной — 192.168.8.254.
Логин для входа — admin, а вместо пароля изначально идёт просто пустая строка.
Подключение к Интернет:
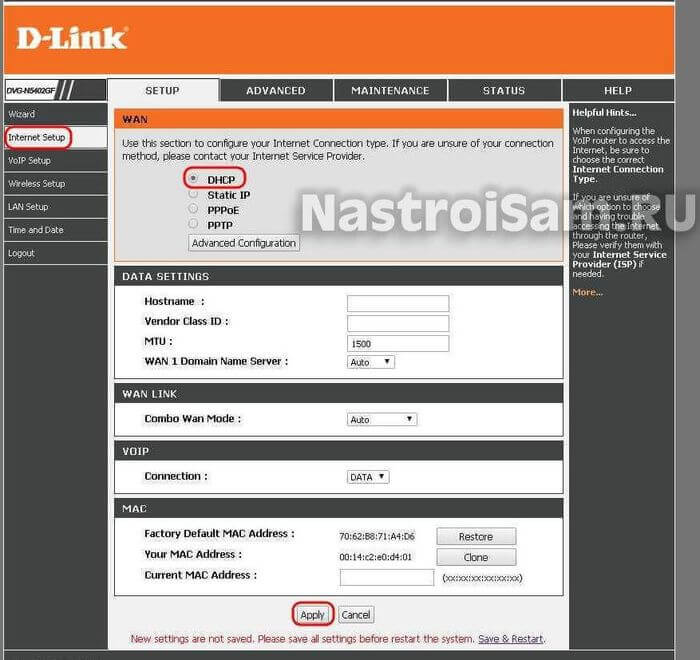
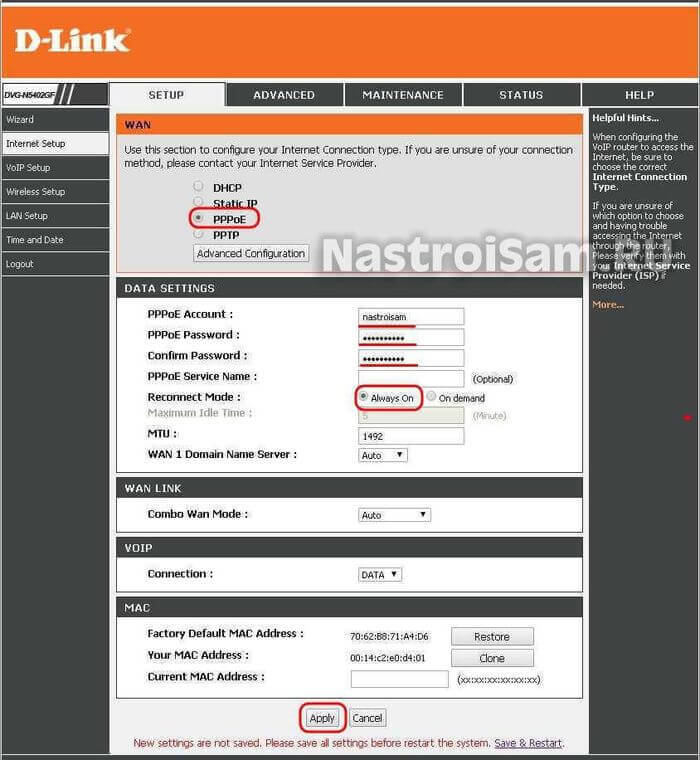
Для настройки подключения к провайдеру нужно зайти в раздел «Setup»->»Internet Setup» и нажать кнопку «Manual»:
Первое, что необходимо сделать — это выбрать используемый тип подключения. Если в Вашем филиале Ростелеком используется Динамический IP-адрес, то достаточно всего лишь поставить галочку на DHCP, как на скриншоте, и нажать кнопку «Apply».
Если же, как в нашем филиале, используется протокол PPPoE, то ставим галочку на этот тип:
Ниже, в поле «Account» прописываем пароль на подключение к Интернет, который Вам выдали при заключении договора.
В полях «Password и «Confirm Password» надо указать пароль на подключение.
В поле «Reconnect Mode» должен стоять флажок «Always On».
Остальное ничего не трогаем и клакаем на «Apply».
Цифровое телевидение IPTV:
В случае, когда подключена ещё и услуга ТВ от Ростелеком, то под ТВ приставку в большинстве МРФ необходимо отдельно настроить порт. Но перед этим необходимо выяснить — нужно ли Вам дополнительно указывать идентификатор VLAN ID. Если нет, то сразу идите в раздел LAN. Если да, как в нашем филиале, то в параметрах WAN-соединения надо зайти в дополнительные параметры «Advanced Configuration» и поставить галку «Enable VLAN Tagging»:
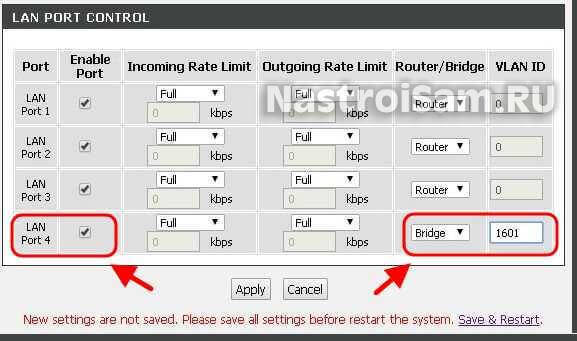
Интернет-трафик при этом обычно идёт нетегированным и поэтому у него VLAN ID равен 0. Сохраняем и переходим в раздел «LAN Setup». В самом низу страницы есть раздел «LAN Port Control»:
Выбираем разъём для приставки — как правило используется 4й порт LAN. Ставим ему тип «Bridge» (Мост). Если ранее включили тегирование, то в поле VLAN ID надо прописать идентификатор. Узнать его можно в технической поддержке. После этого кликаем на «Apply».
Беспроводная сеть WiFi:
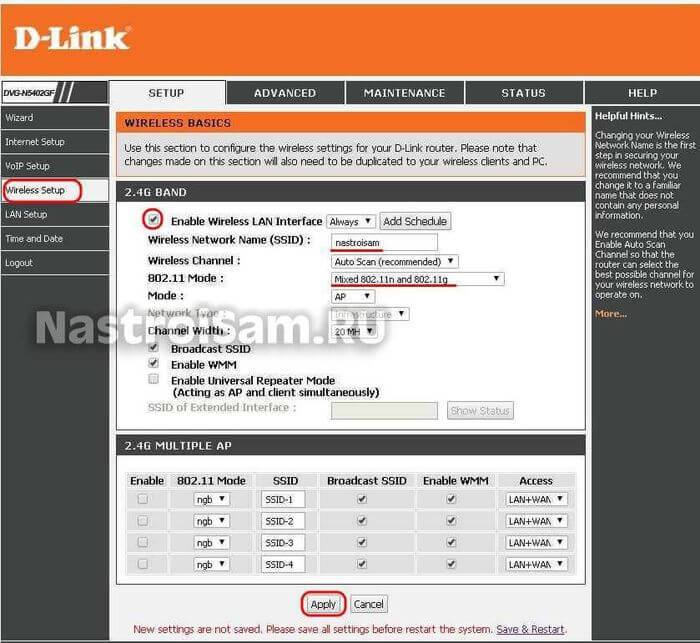
Чтобы настроить Вай-Фай на D-Link DVG-N5402GF, Вам нужно перейти в раздел «Wireless Setup» ->»Basic Setup»:
Проверяем чтобы стояла галочка «Enable Wireless LAN Interface», иначе модуль будет неактивен.
В поле «Wireless Network Name (SSID)» прописываем имя создаваемой сети. В поле «Mode»(Режим) выбираем вариант «Mixed 802.11g and 802.11n».
Более ничего не меняем и кликаем на «Apply».
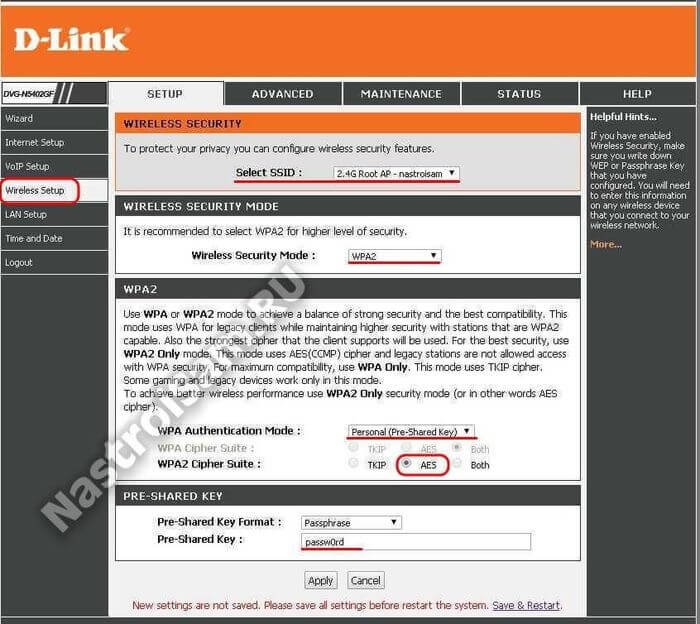
Следующим шагом надо зайти в подраздел «Wireless Security»:
В списке «Select SSID» выбираем созданную ранее сеть.
Ниже нужно выставить используемый стандарт безопасности «Security Mode» — «WPA2» c режимом «Personal (Pre-Shared Key)» и типом шифрования «AES». Остаётся только прописать пароль на WiFi в поле «Pre-Shared Key». В качестве ключа сети можно использовать буквенную, цифирную или смешанную последовательность символов не короче 8 знаков.
Сохраняем изменения.
Пароль на доступ к устройству:
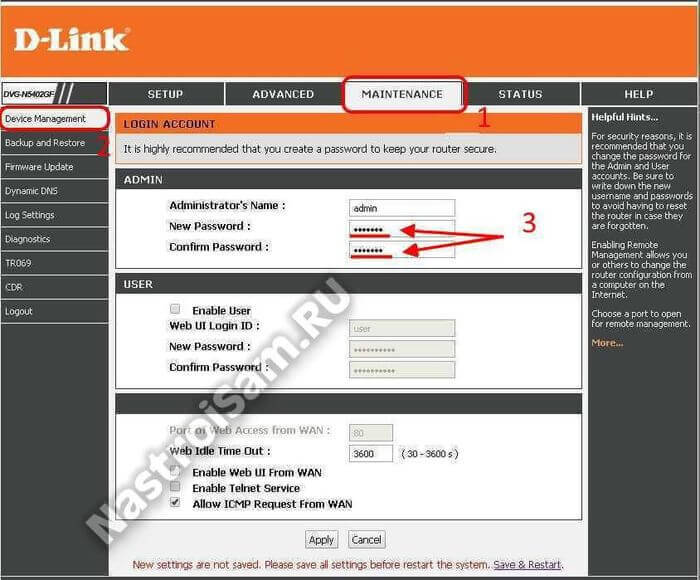
По-умолчанию, на роутере D-Link DVG-N5402GF пароль на вход под логином admin не установлен. Так быть не должно и мы сейчас эту ситуацию исправим. Для этого надо зайти в раздел «Maintenance»->»Device Management»:
В поле New Password прописываем новый пароль и повторяем его в «Confirm Password».
Применяем изменения.
Сохранение настроек маршрутизатора:
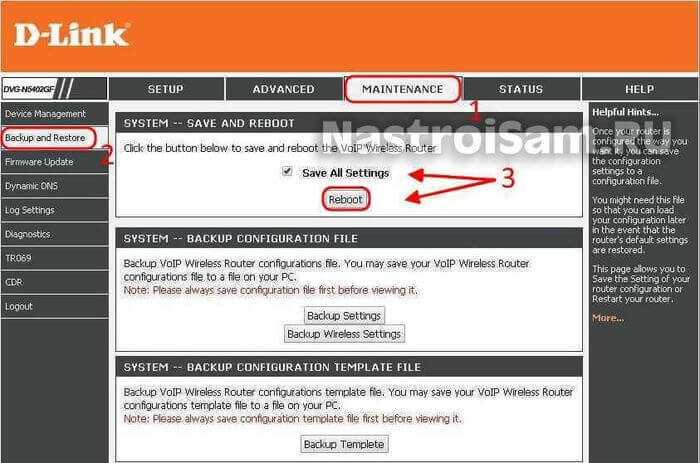
К сожалению, роутер после каждого серьёзного изменения параметров требует сохраниться и перезагрузиться. Делается это в разделе «Maintenance»->»Backup and Restore»:
Следим чтобы была установлена галочка «Save All Settings» и нажимаем кнопку «Reboot».
Готово, роутер настроен и готов к работе.
Если Вам нужно настроить на нём ещё и SIP-телефонию Ростелеком, то действуйте по этой инструкции.
Среди всего многообразия сетевого оборудования IP-адрес 192.168.8.254 используется редко и, как правило, на VoIP-шлюзах типа D-Link DVG-5004S,DVG-6004S. Если рассматривать беспроводные маршрутизаторы и модемы, то ярким примером будет WiFi роутер D-Link DVG-N5402SP и его гигабитный «брат» — DVG-N5402GF. У этих устройств для локальной сети используется подсеть 192.168.8.0/24, с шлюзом в виде самого маршрутизатора с адресом 192.168.8.254. Настройка роутера и установка пароля осуществляется через веб-интерфейс девайса, доступный как раз через этот АйПи.
Для этого надо запустить любой веб-браузер — Chrome, Opera, Firefox, Edge или Internet Explorer. Затем, в адресной строке вводим следующий адрес: 182.168.8.254.
При этом ненужно добавлять «http://» или «www.» перед адресом. Просто вводим АйПи и нажимаем клавишу «Enter».
Далее, если всё настроено верно, должно появится окно авторизации, в котором надо ввести логин и пароль роутера.
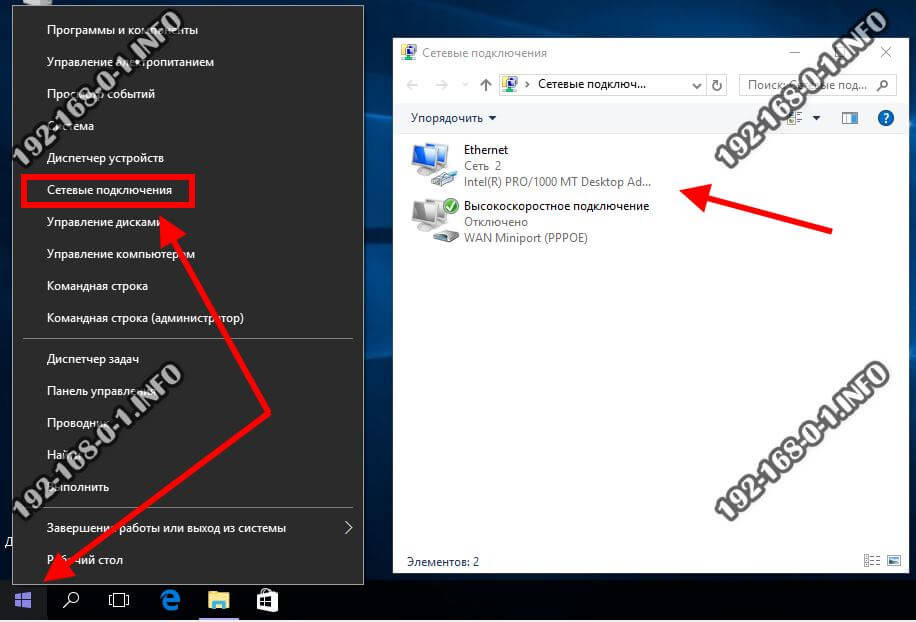
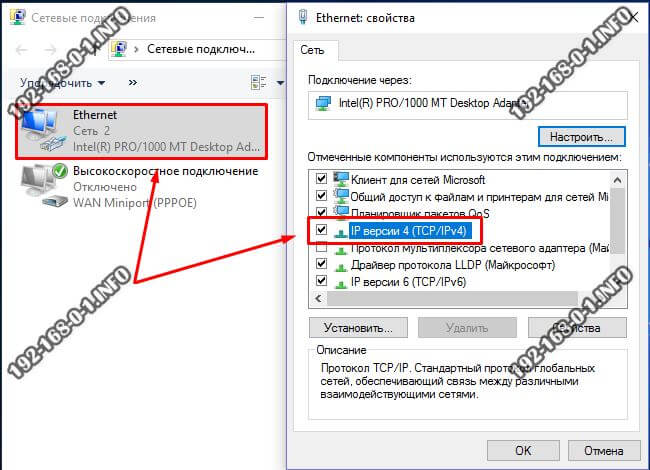
Если при попытке входа в настройки Вай-Фай маршрутизатора или VoIP-шлюза Вы столкнулись с тем, что сайт роутера по 192.168.8.254 недоступен и не открывается — то чаще всего причиной этого является неверная настройка параметров сетевой карты компьютера. Чтобы это проверить, надо открыть список сетевых подключений. В Windows 10 для этого надо кликнуть правой кнопкой мыши по кнопке «Пуск». В появившемся меню надо кликнуть по пункту «Сетевые подключения»:
В Windows 7, 8 или 8.1 для этого необходимо на клавиатуре нажать на комбинацию клавиш Win+R, ввести команду ncpa.cpl в строке «Выполнить» и нажимаем кнопку «ОК».
В списке подключений необходимо найти то из них, через которое к ПК подключен роутер. Кликаем по нему правой кнопкой мыши и выбираем пункт меню «Свойства».
Теперь дважды кликаем левой кнопкой мыши по строчке IP версии 4 (TCP/IPv4) чтобы появилось вот такое окно:
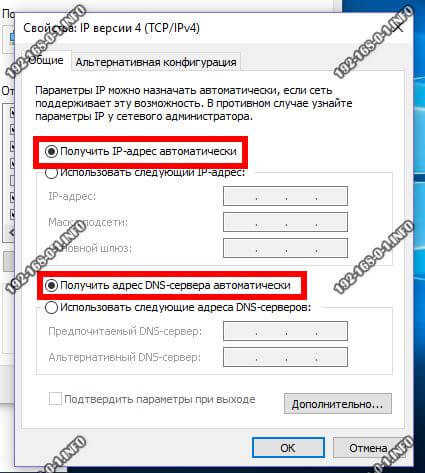
Обычно, для того чтобы вход на 192.168.8.254 прошел без проблем, достаточно поставить галочки на автоматическое получение IP адресов и DNS серверов.
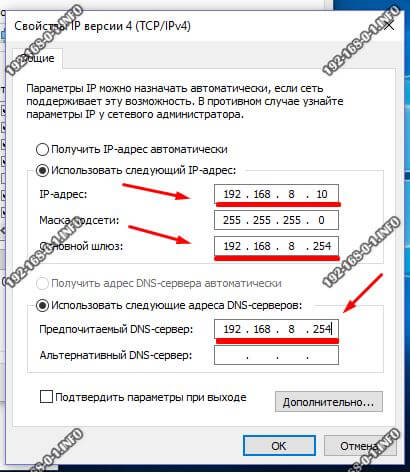
Если при этом зайти в настройки роутера по-прежнему не получается, то скорее всего есть какая-то проблема с DHCP и можно попробовать прописать адреса вручную. Для этого ставим галочку «Использовать следующие адреса».
Затем вводим вот такие значения:
IP-адрес: 192.168.8.10
Маска: 255.255.255.0
Шлюз по умолчанию: 192.168.8.254
Предпочитаемый DNS: 192.168.8.254
Нажимаем кнопку ОК для применения настроек и снова пробуем зайти в настройки Вай-Фай маршрутизатора. Если и после этого ничего не получается, то в этом случае настоятельно рекомендуется попробовать подключиться к роутеру с другого компьютера или ноутбука. Этим Вы исключите возможные проблемы с Вашим ПК.
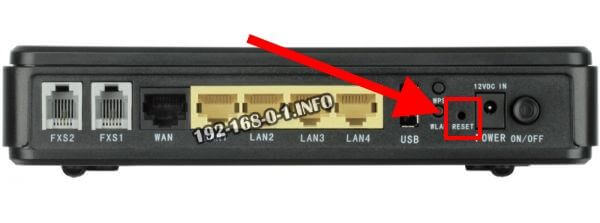
Если же и с другого устройства вход на 192.168.8.254 будет недоступен, то имеет смысл попробовать сбросить его настройки с помощью кнопки «Reset», расположенной на задней части корпуса VoIP-шлюза.
Кнопку надо нажать скрепкой или зубочисткой на включенном устройстве и подержать в нажатом состоянии 5-10 секунд, после чего отпустить.
Этим нехитрым действием вы полностью обнулите текущие настройки своего сетевого устройства до того состояния, в котором оно шло с завода.
Благодаря сбросу настроек очень часто удаётся устранить сбои в работе роутера или модема, возникшие в процессе его эксплуатации.
To get access to your D-Link DVG-5402SP, you need the IP of your device, the username and password. You’ll find such information in the Manual of your D-Link DVG-5402SP router. But if you do not have the manual for your router or you do not want to read the whole manual to find the default login information then you can use the quick guide below. To get to the router login page it’s necessary that you are connected to the router.
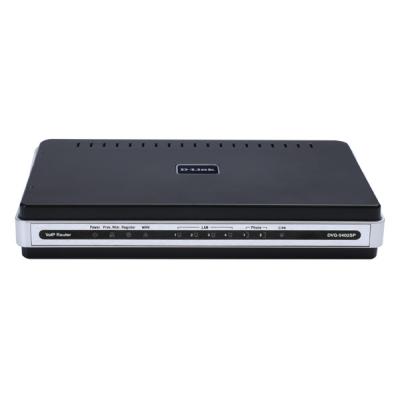
D-Link DVG-5402SP Login Guide
- Open your web browser (e.g. Chrome, Firefox, Opera or any other browser)
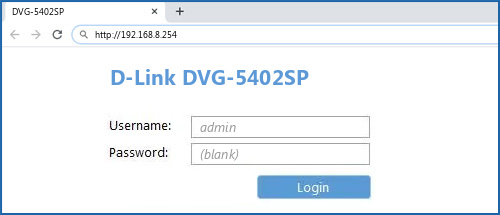
- Type 192.168.8.254 (the default IP to access the admin interface) in the address bar of your internet browser to access the router’s web-based user interface.
- You should see 2 text fields where you can enter a username and a password.
- The default username for your D-Link DVG-5402SP is admin.
The default password is (blank). - Enter the username & password, hit «Enter» and now you should see the control panel of your router.
If above login credentials doesn’t work with your D-Link DVG-5402SP router then try this method
Try different ID/password combinations that are widely used by D-Link that you’ll find below. In this list are the most popular default username and password combinations used by D-Link. Sometimes the username and password doesn’t work that we mentioned in the top of this guide. Then you can try these username/password combinations below to get access to your D-Link DVG-5402SP wireless router.
| # | Username | Password |
| 1 | admin | (blank) |
| 2 | admin | |
| 3 | admin | admin |
| 4 | (blank) | (blank) |
| 5 | admin | password |
| 6 | (blank) | |
| 7 | n/a | n/a |
| 8 | (blank) | admin |
| 9 | admin | |
| 10 | n/a | (blank) |
| 11 | user | user |
| 12 | admin | telus |
| 13 | (blank) | private |
| 14 | admin | <blank> |
| 15 | root | admin |
| 16 | (blank) | public |
| 17 | admin | ‘randomly generated’ |
| 18 | C | 192.168.0.1 |
| 19 | admin | root |
| 20 | admin | randomly generated |
| 21 | Admin | ‘blank’ |
| 22 | (blank) | (sticker on the bottom of the device) |
| 23 | volcom75 | 1987197500 |
| 24 | n/a | admin |
| 25 | admin | public |
| 26 | 88612421 | 2421D |
| 27 | (blank) | 0 |
| 28 | admin | n/a |
| 29 | administrator | @*nigU^D.ha |
| 30 | (blank) | 211cmw91765 |
| 31 | admin | none |
| 32 | D Link 25 | (blank) |
| 33 | admin | user |
| 34 | D-Link | D-Link |
| 35 | admin | (configured in setup) |
| 36 | admin | year2000 |
| 37 | (blank) | (see notes) |
| 38 | public | |
| 39 | (label on the bottom of the router) |
Default login IPs for my D-Link router
You tried different router IPs but nothing worked? Did you try the following IPs? In the list below we listed all known router IPs for the manufacturer D-Link. Maybe this will work for you.
| # | Default Router IP |
| 1 | 192.168.0.1 |
| 2 | 192.168.0.50 |
| 3 | 192.168.1.1 |
| 4 | 192.168.8.254 |
| 5 | 192.168.10.1 |
| 6 | 192.168.0.30 |
| 7 | 10.90.90.91 |
| 8 | 10.1.1.1 |
| 9 | 192.168.0.20 |
| 10 | 10.90.90.90 |
| 11 | 192.168.15.1 |
| 12 | 192.168.0.35 |
| 13 | 192.168.0.40 |
| 14 | acquired via DHCP |
| 15 | 192.168.1.254 |
| 16 | 192.168.0.101 |
| 17 | 192.168.0.50:2000 |
| 18 | 192.168.0.32 |
| 19 | 192.168.0.10 |
| 20 | 192.168.0.60 |
| 21 | 192.168.1. |
| 22 | 10.255.255.1 |
| 23 | 192.168.229.61 |
| 24 | 192.168.0.100 |
| 25 | 193.168.1.150 |
| 26 | 192.160.0.50 |
| 27 | 192.168.2.1 |
Manuals for D-Link DVG-5402SP
Manual
Datasheet
Nothing of the methods worked for me and I still not get access to my D-Link !
All you need to do is to reset your modem. This can be done easily by clicking on the reset button at the back or at the bottom of your router. If you hold down this small button for approximately 20 seconds, (you may have to use a toothpick), then your modem will get restored to the factory settings. What you need to keep in mind is that when you reset your modem, you will lose your connection online. It is therefore better to take an expert’s assistance in this regard. Note: If you have not enough information, it is obviously recommended that you should get help from a person who has all the knowledge about this topic.
- Home
- D-Link
- DVG-N5402SP
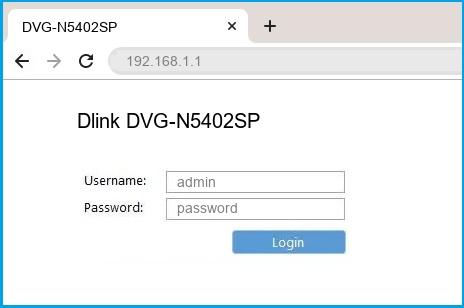
Dlink DVG-N5402SP router setup & security
- To login to Dlink DVG-N5402SP Router, Open your web browser and type the default IP Address 192.168.1.1 in the address bar
- You should now see the router login page with 2 text fields where you can type a username and a password
- The default username for your Dlink DVG-N5402SP router is admin and the default password is password
- In the login page of the router’s web user interface, type-in the username & password, hit «Login» and now you should see the Dlink DVG-N5402SP router control panel
(Remember, you must be at home and connected to home WiFi to do this)
And no need to get your breathing rates high in case you have changed the username / password of Dlink DVG-N5402SP and forgot them, as you can just reset the Dlink DVG-N5402SP router by press-and-hold the reset button with a clip for about 15 seconds.
Dlink DVG-N5402SP Quick links:
| Default username for Dlink DVG-N5402SP: | admin | COPY |
| Default password for Dlink DVG-N5402SP: | password | COPY |
2.Change Dlink DVG-N5402SP Default Login and Password
Since, security of a network is vital, the first and foremost task is to change the Dlink DVG-N5402SP router Default Login and Password to something more personal and secure.
Dlink DVG-N5402SP Router Password Tips:
Choose a complex and hard-to-guess password for your D-Link which only you can remember
It should be something personal, like &ilostmyvirginity@30, so that you’ll never forget it. Ever
Protect it
The amount of protection directly depends on the password complexity, and the effort taken to protect that password on your Dlink DVG-N5402SP router.
Usability first
Give Password for your Dlink DVG-N5402SP router that you can remember (usability first). Of course, you can build a strong hash password with special characters, numbers, Greek, and Latin. But ultimately you’ll end up writing it on a sticky and putting it on the router, which defeats the purpose. Here is an example $lasttriptovegas0916
You did good so far. Now consider ⭐ Bookmarking this page. It always helps.
3.Change Dlink DVG-N5402SP Default WiFi name (SSID) and WiFi Password and enable Network Encryption
Another small suggestion (as it has no impact on security), is to change the Dlink DVG-N5402SP Default WiFi name (SSID) as it will make it more obvious for others to know which network they are connecting to.
Steps:
- Look for — SETUP (found in the menu bar at the top of the page) , and click on it
- Look for — Wireless Setup (found in the left hand side menu bar) , and click on it
- Look for — Wireless Basics, and click on it
Look for Network Name (SSID), this is the WiFi name of your Dlink DVG-N5402SP Router. Do not use your name, home address, or other personal information (since this isn’t a Facebook status!) in the SSID name. (No Mr.Paul&Princy) A few funny WiFi name suggestions: I’m cheating on my WiFi!, FBI Surveillance Van #594 (scares away stupid criminals), Lord of the Pings …
Once you enter the name for your network, you have to enable WPA2-PSK encryption on your Dlink DVG-N5402SP router. That’s the strongest encryption standard available for home networks.
Enter a new WPA Pre-Shared Key / WiFi Password – this is the password that you will use to connect to your home WiFi. Keep it to 16-20 characters (please!) don’t use the same password that you used for Dlink DVG-N5402SP router login!
🤓 Geek out your guests. Print a Free WiFi QR Code Sticker for your fridge now
4.Update router firmware in Dlink DVG-N5402SP and turn on Automatic Updates
Router software often contains critical bugs and security vulnerabilities; Check if your router has known vulnerabilities
Check — Dlink DVG-N5402SP
Its important that you turn on Automatic Firmware updates and always keep your Dlink DVG-N5402SP router up-to-date. To turn on Automatic updates, Login to your Dlink DVG-N5402SP router and look for the section which contains Automatic updates and turn it «ON»
And even if the router has auto-update, check every now and then to make sure it is actually working, and the router firmware is up-to-date. If your router manufacturer hasn’t released any updates to the firmware in the past 3-5 years, consider upgrading to a «newer» router
5.Security is a continuous process
Just keep in mind to change the passwords often or at least once in every 6 months! on your Dlink DVG-N5402SP You don’t want the safety you have worked so hard for to fail just because of ignorance, negligence, or casual laziness! Time for a bulletin on the fridge, folks! We can remind you though? Enter your email below! Nope, we are not spammers!
Dlink DVG-N5402SP Router Reset instructions
How to Reset the Dlink DVG-N5402SP Router To Factory Default
To reset Dlink DVG-N5402SP router,
- Turn on the Dlink DVG-N5402SP router
- Look for the reset button. Few routers have a tiny hole and few others have a reset button.
- Press the Factory reset button with a straightened paperclip pin or something that gets through the tiny hole, and hold it for about 15 seconds! (till you see all the lights flashing)
- The Dlink DVG-N5402SP router will reboot automatically. the unit has been reset and is ready to use. You can start from Step 1 in this guide to set it up.
Dlink DVG-N5402SP Password Does not Work
Passwords find a way to not work! Or, in most cases, users find a way to forget them! In either case, look up the How to Reset the Dlink DVG-N5402SP Router To Default Settings section
Forgot Password for Dlink DVG-N5402SP Router
Incase if you have changed the default username and password of Dlink DVG-N5402SP and forgot it, please see How to Reset the Dlink DVG-N5402SP Router To Default Settings section
How to boost Dlink DVG-N5402SP WiFi and overcome connectivity issues
1.Place the Dlink DVG-N5402SP in a perfect spot
The perfect spot does it all; be it romance or your router! To avail the best signal and network connectivity, make sure you keep your Dlink DVG-N5402SP router visible and not facing the wall or behind the curtains
2.Find a Good Wireless Channel Instead of Auto on your Dlink DVG-N5402SP router
Auto-channels might fail you once in a while; believe that you’re smarter than the D-Link router! Find a seamless wireless channel instead of what the router finds automatically. This would ensure that your signal doesn’t interfere with that of your neighbors.
If you’re running a Windows-based PC, you can see what channels neighboring Wi-Fi networks are using.
- Press Start > type “cmd”. Open Command prompt
- In command prompt type netsh wlan show all
You will see a list of all wireless networks and the channels being used in your vicinity. instead of using “Auto” for the control channel, Pick the channel that has the lowest interference
3.Check the frequency of Dlink DVG-N5402SP
Check if Dlink DVG-N5402SP has dual-band, the most commonly used band would be 2.4GHz; however, switching to 5GHz would bring out better results! It depends on your device though; if you’re running an old lad, you might have to switch back to the conventional
4.Hardwire gaming consoles / media streamers into your Dlink DVG-N5402SP instead of WiFi
Gaming consoles/media streamers work better when connected through Ethernet cable of Dlink DVG-N5402SP; in fact, as you might not be moving your TV all over the house, why connect it to the Wi-Fi at all? The Gaming consoles / video streaming devices flood the network with data. This means that if possible, you should consider hardwire (using Ethernet cable) the devices that tend to consume a lot of bandwidth. Although this can sort of defeat the purpose of having wireless networks, it can actually help your overall network speed of Dlink DVG-N5402SP if you can hardwire the bandwidth hogs.
5. Reboot Dlink DVG-N5402SP on schedule
Here’s something important to note! On schedule, folks, reboot your Dlink DVG-N5402SP router! Though routers are built to constantly be running at all times, simple tweaks like regular power cycling (a fancy way of saying, unplugging the power cord and shoving it back up) helps with most issues. Rebooting your Dlink DVG-N5402SP can fix Internet connection problems, improve slow moving connections, and resolve wireless issues altogether. Try unplugging your D-Link modem on a quarterly basis to stay proactive (Never reset; always reboot router)

