— Advertisement —
Hello! Windows Server is a system focused on the business sector. In addition, Microsoft developed it as a safe, functional, and practical system. However, it is also susceptible to failure. Such as errors in drivers, services, or parameters of both the system itself and other components. To solve this type of failure, the Redmond company has incorporated the Safe Mode. With this mode, the system will start in a basic state. In other words, it will only make use of a limited set of files and drivers. Consequently, it will be much easier to rule out bugs and problems. So by being able to enter the system using this mode, we can then reverse any changes responsible for the malfunction. For that reason, it is important to know how to use this function. So let’s see, how to start in safe mode in Windows Server 2019/2016.
How to start in safe mode from the system.
Before we go any further, it is important to clarify that the safe mode has two options:
- Safe mode: load basic controllers.
- Safe mode with network functions. Includes network drivers and services needed to access the Internet and other computers on the local network.
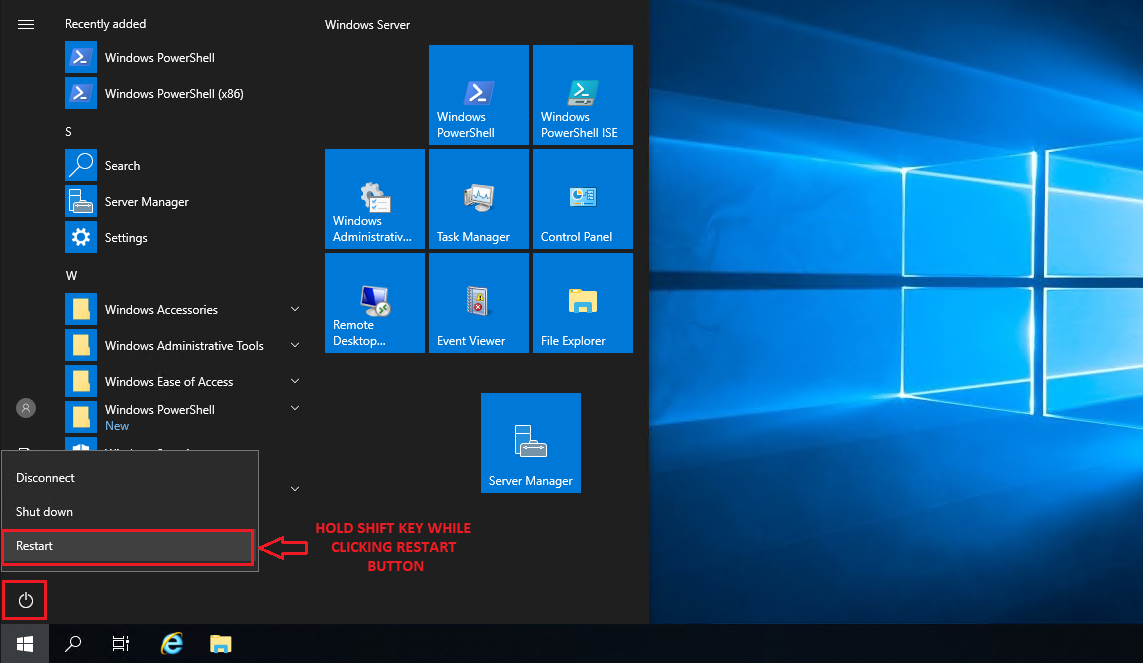
In order to set up the safe mode, it is necessary to start the system in the advanced mode. If you are running the system, then you have a couple of options to start in advanced mode:
- Press the Shift key and the off button at the same time. Once there, click on restart.
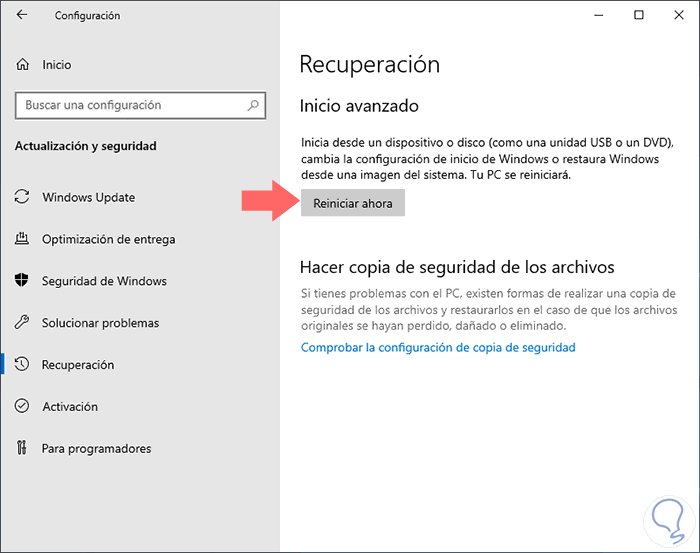
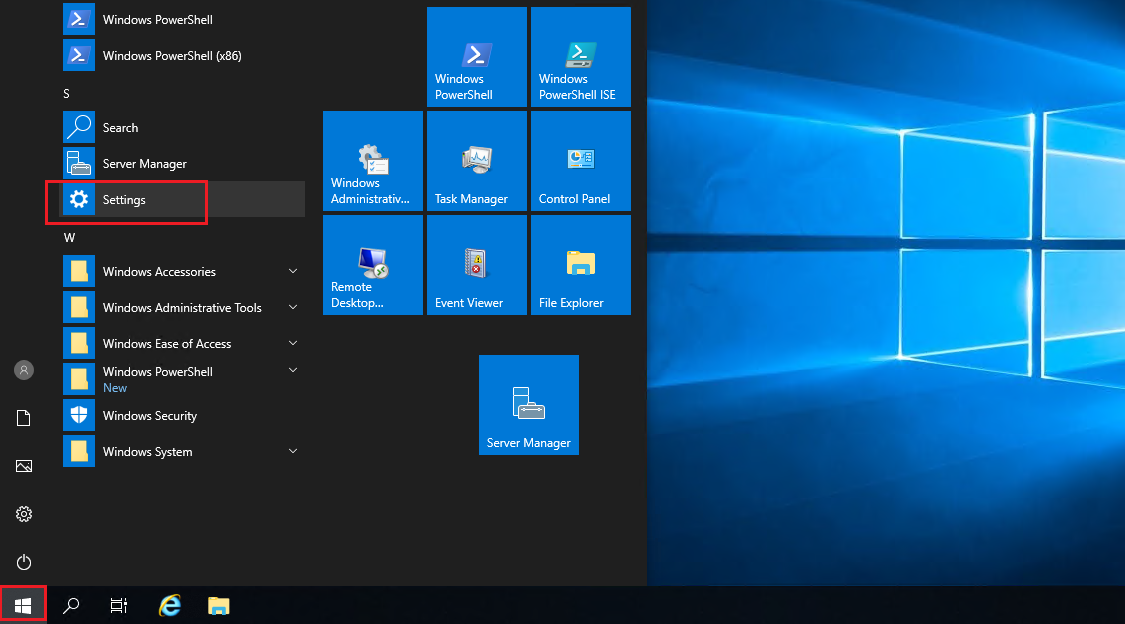
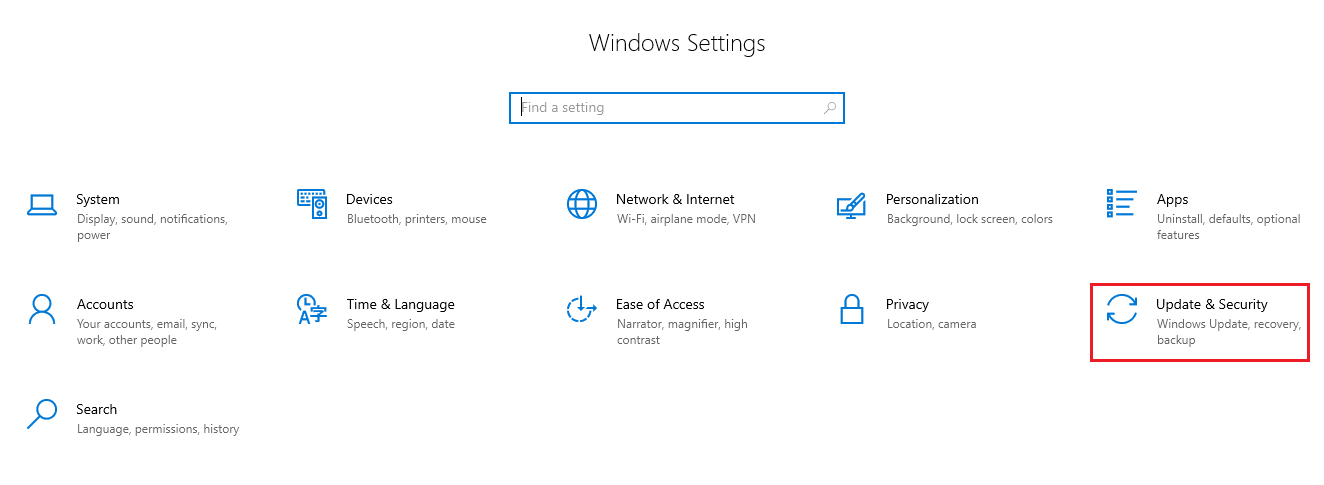
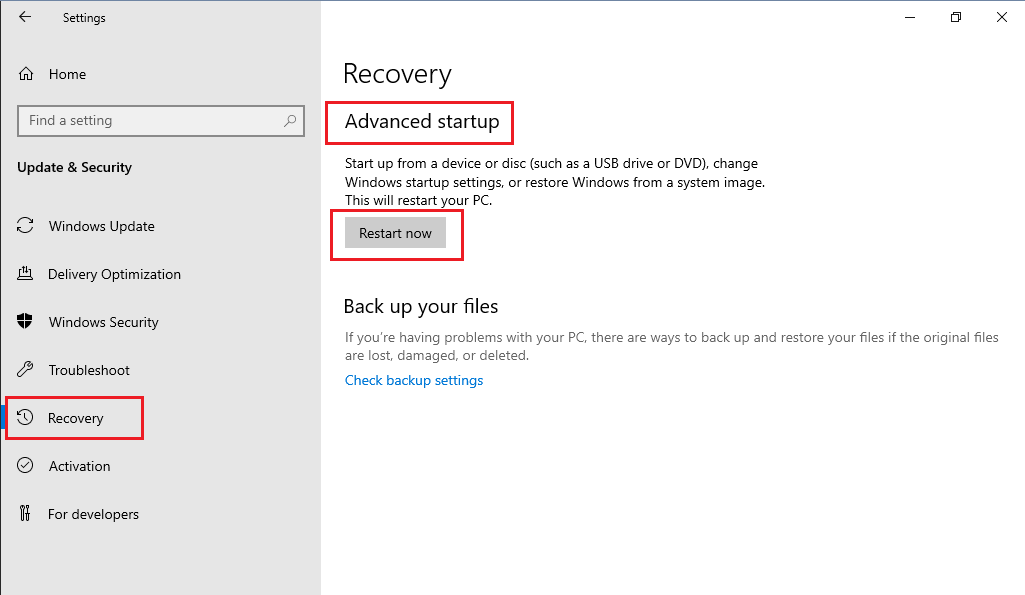
- Press the Win+I combination to enter the Windows Settings. Then follow the path: Update & Security> Recovery. Once there, click on Restart Now.

How to start in safe mode, using a Windows Server 2019/2016 installation media.
For this method, it is necessary to have some means of installing Windows Server. Either a DVD or a USB boot. Then, you have to start the process as if you were going to install the system. On the welcome screen, click on Next.

Please click on Repair computer.

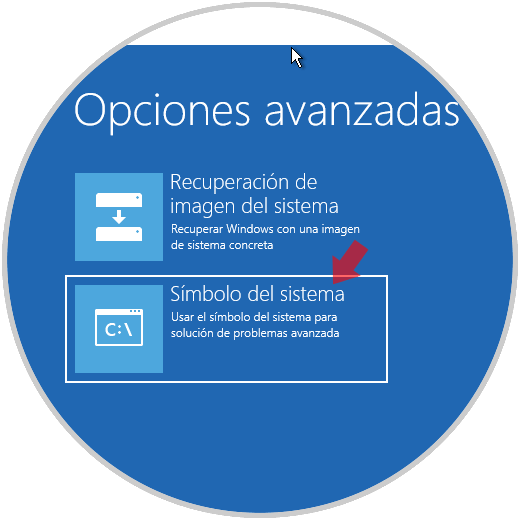
A window with several options will be displayed immediately. Please click on Troubleshoot.

Then select Command Prompt:

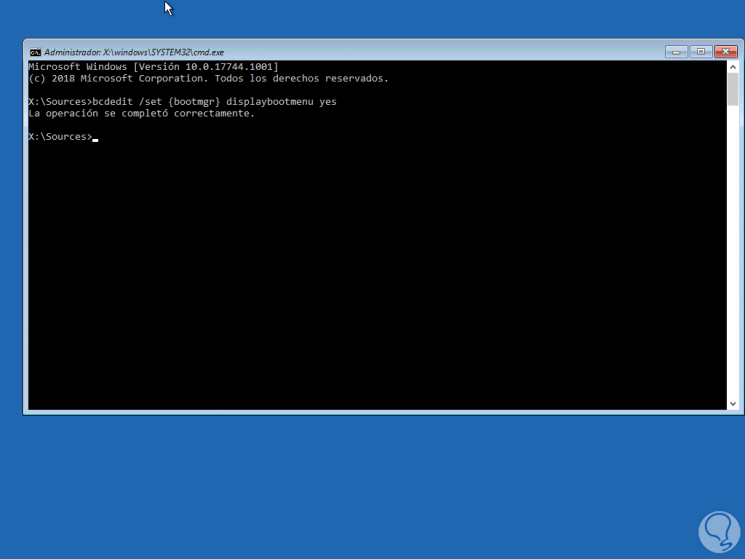
This will cause the CMD to be deployed. Please run this command:
bcdedit /set {bootmgr} displaybootmenu yes

This is a command line tool to manage the data associated with the boot configuration of the system.
Once this line is executed, we will execute the following:
bcdedit /set {bootmgr} timeout 15

After executing this command, execute the Exit command to exit the console. And back to the previous menu, turn off the system.

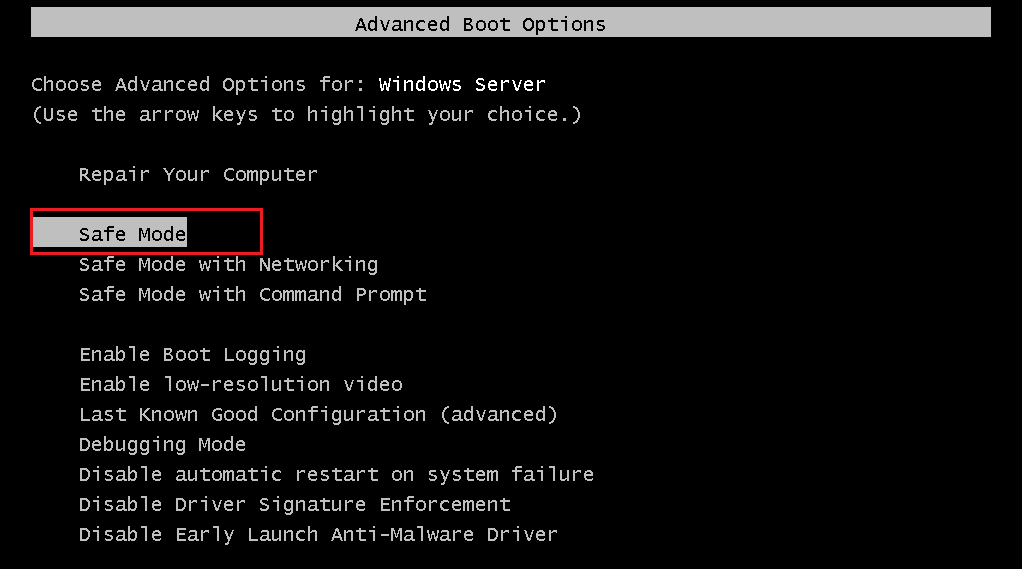
When you reboot the system, you will see the boot manager. Please select Windows Server. Then, press F8 to enter advanced start options.

Then, just click on Safe Mode to start the system.

Eventually, the system will boot into Safe Mode.

Conclusion
Ultimately we have seen how to start in Safe Mode in Windows Server 2019/2016. This mode allows you to start the system with a minimum of drivers and files. This allows for troubleshooting. In addition, these instructions are common to both versions. I hope you find them useful in managing your servers. Before saying goodbye, I invite you to see our post about VMware on Windows 10. See you!
Windows Server 2016 – самая популярная операционная система для серверов, которая предлагает широкий спектр функций для управления IT-инфраструктурой. Однако, несмотря на свою популярность и надежность, безопасность серверов на базе Windows Server 2016 требует особого внимания.
В этой статье мы расскажем вам о безопасном режиме работы Windows Server 2016. Безопасный режим – это специальный режим, при котором операционная система работает с минимальными привилегиями и ограниченным функционалом, что позволяет уменьшить риски возникновения уязвимостей и атак со стороны злоумышленников.
Мы рассмотрим подробную инструкцию по включению и настройке безопасного режима работы Windows Server 2016. Вы узнаете как отключить ненужные службы, настроить права доступа, установить дополнительные программы для обнаружения и предотвращения атак. При этом, мы дадим рекомендации по улучшению безопасности шифрования данных и настройке брандмауэра.
Содержание
- Включение безопасного режима в Windows Server 2016
- Шаг 1: Открытие «Параметров запуска»
- Шаг 2: Выбор «Безопасного режима» из списка параметров
- Шаг 3: Перезагрузка системы и вход в безопасный режим
Включение безопасного режима в Windows Server 2016
Безопасный режим в Windows Server 2016 позволяет работать в системе, минимизируя риски нарушений безопасности. Для включения безопасного режима в Windows Server 2016 следуйте инструкциям ниже:
- Запустите систему в безопасном режиме:
- Ограничьте доступ к критическим данным:
- Обновите систему и программное обеспечение:
- Настройте брандмауэр:
- Используйте антивирусное программное обеспечение:
- Защитите административный доступ:
- Мониторьте и анализируйте журналы событий:
- Обучайте пользователей:
Перезагрузите сервер и нажмите клавишу F8 несколько раз перед появлением логотипа Windows. В меню выберите «Безопасный режим» и нажмите клавишу Enter.
Отключите все ненужные службы и фоновые процессы, чтобы минимизировать риски эксплуатации уязвимостей. Установите ограничения на доступ пользователей к критическим данным и ресурсам.
Регулярно устанавливайте обновления для операционной системы и установленных программ. Используйте автоматическое обновление для обеспечения максимальной безопасности.
Настройте брандмауэр для блокировки нежелательного сетевого трафика и контроля доступа к серверу. Открывайте только необходимые порты для обеспечения работы требуемых служб.
Установите и настройте антивирусное программное обеспечение для постоянного мониторинга и обнаружения вредоносных программ. Обновляйте базы данных вирусов регулярно.
Используйте сложные пароли для учетных записей администратора и отключите гостевую учетную запись. Ограничьте доступ к административным инструментам только необходимым пользователям.
Регулярно проверяйте и анализируйте журналы событий на предмет подозрительной активности. Используйте специализированные средства для выявления нарушений безопасности.
Обучайте пользователей правилам безопасной работы с системой и предупреждайте их о последствиях небрежности. Установите политику использования сложных паролей.
Шаг 1: Открытие «Параметров запуска»
Следуйте этим инструкциям, чтобы открыть «Параметры запуска» в Windows Server 2016:
- Перезагрузите ваш сервер, если он уже работает. Вы можете сделать это, нажав кнопку «Пуск» в левом нижнем углу экрана, затем выбрав «Перезагрузить».
- При перезагрузке нажмите и удерживайте клавишу F8 на вашей клавиатуре до появления экрана с параметрами запуска.
- На экране «Параметры запуска» выберите опцию «Безопасный режим». Для навигации используйте клавиши со стрелками на клавиатуре.
- Нажмите клавишу Enter, чтобы выбрать «Безопасный режим» и продолжить загрузку Windows Server 2016 в безопасном режиме.
- Подождите, пока сервер загрузится в безопасном режиме. Это может потребовать некоторого времени, пожалуйста, будьте терпеливы.
Теперь вы успешно открыли «Параметры запуска» и готовы продолжить с выполнением других шагов для обеспечения безопасной работы Windows Server 2016.
Шаг 2: Выбор «Безопасного режима» из списка параметров
После того, как вы загрузили операционную систему Windows Server 2016 и увидели начальный экран с параметрами загрузки, вам необходимо выбрать «Безопасный режим».
Для этого используйте стрелки на клавиатуре, чтобы перемещаться по меню и выделите опцию «Безопасный режим». Затем нажмите клавишу Enter, чтобы выбрать этот режим загрузки.
Выбор «Безопасного режима» позволит вам загрузить сервер в режиме, который обеспечивает минимальное количество драйверов и сервисов, что поможет вам устранить возможные проблемы и восстановить работоспособность сервера.
Пожалуйста, учтите, что в «Безопасном режиме» некоторые функции и возможности сервера могут быть ограничены или отключены, но это необходимо для обеспечения безопасности и стабильности работы в случае проблем.
Шаг 3: Перезагрузка системы и вход в безопасный режим
После того, как вы активировали безопасный режим в Windows Server 2016, вам необходимо перезагрузить систему и войти в безопасном режиме. Это позволит вам использовать систему, минимизируя загрузку дополнительных фоновых процессов и программ, что обеспечит более безопасное и стабильное функционирование сервера.
Для перезагрузки системы выполните следующие действия:
| 1. | Проверьте, что все открытые программы и файлы сохранены, так как перезагрузка системы приведет к их закрытию. |
| 2. | Кликните на кнопку «Пуск» в левом нижнем углу экрана. |
| 3. | Выберите пункт «Выключить» и нажмите на стрелку возле него. |
| 4. | В контекстном меню выберите пункт «Перезагрузить». |
| 5. | Дождитесь, пока система завершит процесс перезагрузки. |
| 6. | После перезагрузки системы вы увидите экран выбора параметров загрузки операционной системы. |
| 7. | Нажмите на клавишу F8 для вызова меню параметров загрузки. |
| 8. | В меню параметров загрузки выберите пункт «Безопасный режим» и нажмите на клавишу Enter. |
| 9. | Дождитесь, пока система запустится в безопасном режиме. |
Теперь вы успешно перезагрузили систему и вошли в безопасный режим. Вы можете продолжить работу с сервером, обеспечивая его безопасность и стабильность.
July 24, 2016 updated by
Leave a reply »
How can I get into Safe Mode on the new Windows operating systems such as Windows 8, Windows 10 and Server 2012? Starting from Windows 8, the system boots very quickly and the time to press F8 key to access Safe Mode is smaller than 200 milliseconds, so it’s almost impossible to enter into the Safe Mode by pressing F8 during boot time.
In this tutorial we’ll show you 3 workable ways to boot Windows Server 2012 into Safe Mode. The methods should also work with Windows 10 and Windows 8/8.1.
Method 1: Boot Windows Server 2012 into Safe Mode Using Command Prompt
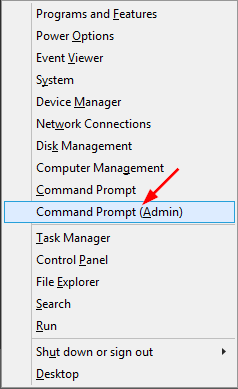
- Press the Windows key + X to open the WinX menu, select “Command Prompt (Admin)” from the list.

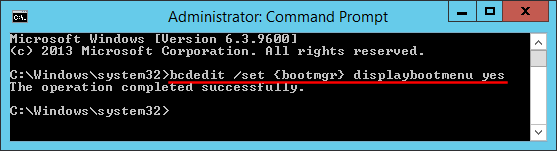
- In order to make Windows display the Windows Boot Manager, type the following command at the Command Prompt and press Enter. You will get a confirmation stating that The operation completed successfully.
bcdedit /set {bootmgr} displaybootmenu yes
If you want to stop displaying the Windows Boot Manager later, run this command instead:
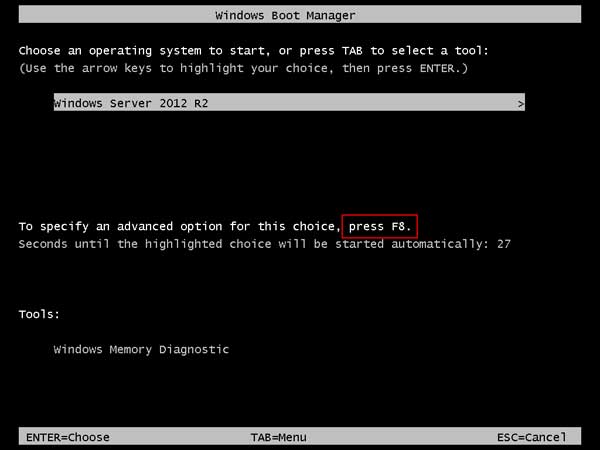
bcdedit /set {bootmgr} displaybootmenu no - Now restart your computer and you’ll see the Windows Boot Manager screen. Just press F8 to bring up the Advanced Boot Options.

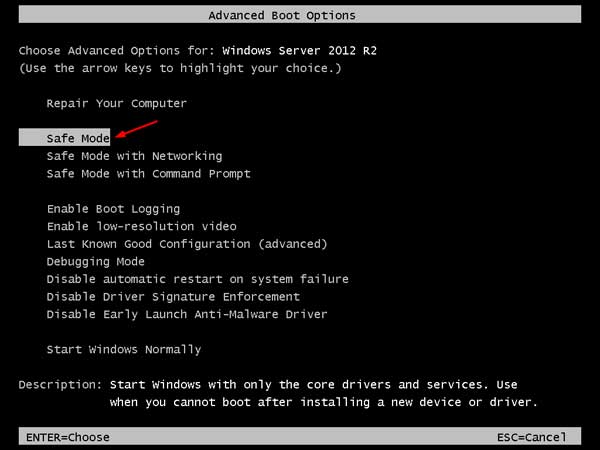
- Select Safe Mode and press Enter. This will open Windows Server 2012 in Safe Mode.
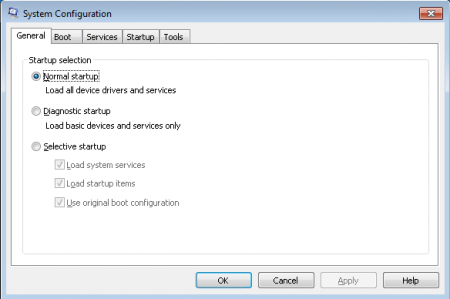
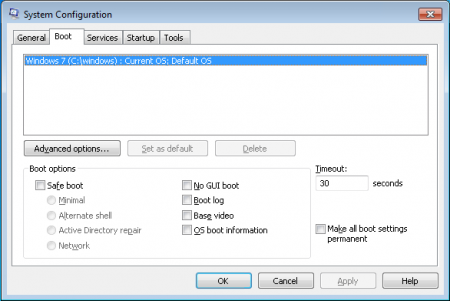
Method 2: Boot Windows Server 2012 into Safe Mode Using System Configuration
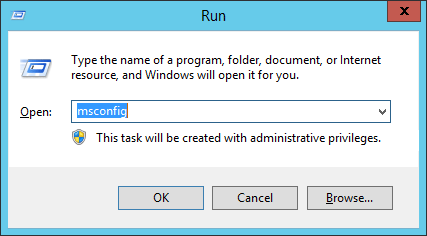
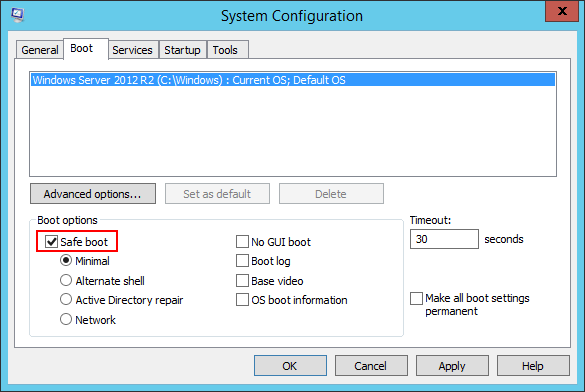
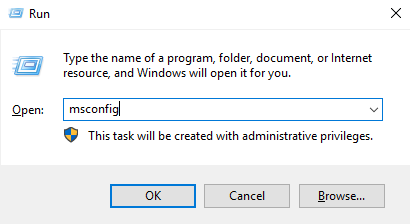
- Press the Windows key + R to open the Run box. Type msconfig and press Enter.

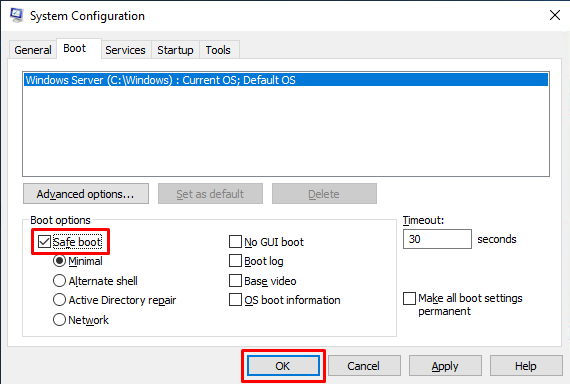
- Now the System Configuration dialog box will be opened. Under the Boot tab, check the Safe boot option and click OK.

- Reboot your computer and it will boot directly into Safe Mode automatically. If you wan to stop Windows from booting into Safe Mode next time, you need to open the System Configuration utility (msconfig) again and uncheck the Safe boot option.
Method 3: Boot Windows Server 2012 into Safe Mode Using Settings App
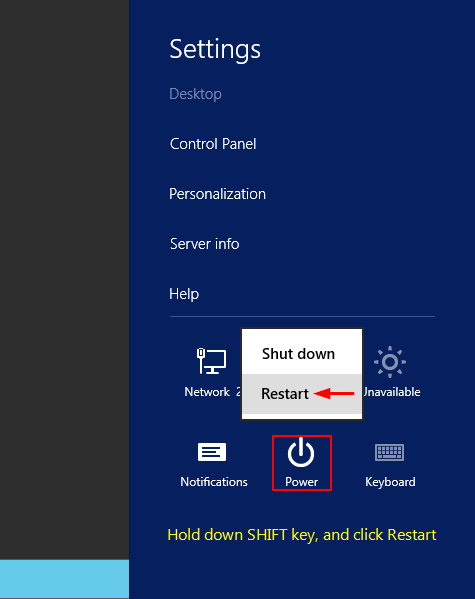
- To get started, you need to open the Settings panel. This can be done by hovering your mouse to the top right-hand corner of the screen, or press the Windows key + I on your keyboard.
- Hold down the SHIFT key on your keyboard, and then click on Power icon and select Restart.

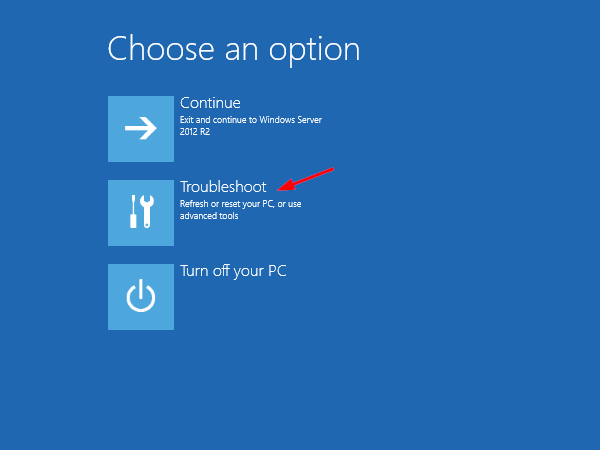
- You will need to click on the Troubleshoot option.
- Click Startup Settings.
- Click Restart.
- The computer will boot automatically to the Advanced Boot Options screen. From there you can select Safe Mode to start Windows Server 2012 in Safe Mode.

- Previous Post: How to Change Windows 10 Login Background to Solid Color
- Next Post: How to Fix “Task Manager is Disabled or Greyed out” in Windows 10
- Способ 1. Использование параметров запуска
- Способ 2: использование msconfig
Безопасный режим — это режим в Windows, который позволяет получить доступ к специальным функциям. Эти функции часто используются для устранения неполадок.
Для того, чтобы загрузиться в безопасном режиме, вам нужно будет иметь нормальный доступ к вашему Windows Server. Это означает, что вы можете получить доступ к вашему Windows Server с помощью пользователя и иметь права администратора.
Используйте любой из способов ниже, чтобы загрузить сервер в безопасном режиме.
Способ 1. Использование параметров запуска
Чтобы включить безопасный режим с помощью графического интерфейса, нажмите Windows + C , откройте «Настройки», затем нажмите «Питание». Затем зажмите Shift и нажмите «Перезагрузить».
Нажмите «Устранение неполадок», затем «Параметры запуска». Нажмите «Перезагрузить» после подтверждения того, что в отображаемом списке написано «Включить безопасный режим».
Используйте клавиши со стрелками для перехода в безопасный режим. При нажатии Enter после перехода в безопасный режим ваш Windows Server будет загружен в безопасный режим.
Ваш фон должен быть черным, а в верхнем правом углу графического интерфейса должно быть написано «Безопасный режим».
Способ 2: использование msconfig
Вы также можете загрузиться в безопасном режиме с помощью настройки системы ( msconfig). Для этого перейдите в Run и запустите msconfig.
На вкладке «Загрузка» в разделе «Параметры загрузки» выберите «Безопасная загрузка». Затем нажмите «ОК», и сервер перезагрузится в безопасном режиме. Нажмите «Перезагрузить», если вам будет предложено.
При загрузке в безопасном режиме фон рабочего стола будет черным, а в правом верхнем углу рабочего стола появится надпись «Безопасный режим».
— Advertisement —
Hello! Windows Server is a system focused on the business sector. In addition, Microsoft developed it as a safe, functional, and practical system. However, it is also susceptible to failure. Such as errors in drivers, services, or parameters of both the system itself and other components. To solve this type of failure, the Redmond company has incorporated the Safe Mode. With this mode, the system will start in a basic state. In other words, it will only make use of a limited set of files and drivers. Consequently, it will be much easier to rule out bugs and problems. So by being able to enter the system using this mode, we can then reverse any changes responsible for the malfunction. For that reason, it is important to know how to use this function. So let’s see, how to start in safe mode in Windows Server 2019/2016.
How to start in safe mode from the system.
Before we go any further, it is important to clarify that the safe mode has two options:
- Safe mode: load basic controllers.
- Safe mode with network functions. Includes network drivers and services needed to access the Internet and other computers on the local network.
In order to set up the safe mode, it is necessary to start the system in the advanced mode. If you are running the system, then you have a couple of options to start in advanced mode:
- Press the Shift key and the off button at the same time. Once there, click on restart.
- Press the Win+I combination to enter the Windows Settings. Then follow the path: Update & Security> Recovery. Once there, click on Restart Now.
How to start in safe mode, using a Windows Server 2019/2016 installation media.
For this method, it is necessary to have some means of installing Windows Server. Either a DVD or a USB boot. Then, you have to start the process as if you were going to install the system. On the welcome screen, click on Next.
Please click on Repair computer.
A window with several options will be displayed immediately. Please click on Troubleshoot.
Then select Command Prompt:
This will cause the CMD to be deployed. Please run this command:
bcdedit /set {bootmgr} displaybootmenu yes
This is a command line tool to manage the data associated with the boot configuration of the system.
Once this line is executed, we will execute the following:
bcdedit /set {bootmgr} timeout 15
After executing this command, execute the Exit command to exit the console. And back to the previous menu, turn off the system.
When you reboot the system, you will see the boot manager. Please select Windows Server. Then, press F8 to enter advanced start options.
Then, just click on Safe Mode to start the system.
Eventually, the system will boot into Safe Mode.
Conclusion
Ultimately we have seen how to start in Safe Mode in Windows Server 2019/2016. This mode allows you to start the system with a minimum of drivers and files. This allows for troubleshooting. In addition, these instructions are common to both versions. I hope you find them useful in managing your servers. Before saying goodbye, I invite you to see our post about VMware on Windows 10. See you!
Windows Server – это операционная система бизнес-типа, разработанная Microsoft для того, чтобы мы, как администраторы, имели под рукой возможность централизованного управления различными ролями и службами, ориентированными на каждого клиента, имеющего лучшие службы.
Windows Server был разработан как безопасная, функциональная и практичная система, но, как и любая другая система, разработанная человеком, он не свободен от сбоев, и по этой причине мы можем найти ошибки в драйверах, службах или параметрах как самой системы, так и других компонентов, и, следовательно, важно знать, как полностью управлять системой.
Для этого типа администрирования и поддержки Microsoft интегрировала функцию безопасного режима в Windows Server 2016 или 2019. В безопасном режиме операционная система Windows загружается в базовое состояние, то есть будет использовать только ограниченный набор файлов и драйверов для выполнения задач администрирования в гораздо более полный способ ..
Это даст нам лучшие перспективы относительно решения проблем, которые может иметь оборудование, в этом режиме будет намного проще исключить сбои, например , если система работает нормально в этом безопасном режиме, мы можем исключить, что как конфигурация по умолчанию, так и базовые драйверы устройства не являются основной причиной проблемы, и, таким образом, можно будет сосредоточиться на других аспектах системы.
Безопасный режим
В безопасном режиме есть два варианта:
- Безопасный режим: загрузка базовых драйверов.
- Безопасный режим с сетевыми функциями, он отличается тем, что включает сетевые драйверы и службы, необходимые для доступа к Интернету и другим компьютерам в локальной сети.
TechnoWikis объяснит, как мы можем запустить Windows Server, в данном случае 2019, в безопасном режиме, но в идеале следует помнить, что этот процесс в равной степени относится и к Windows. Сервер 2016 ..
T o не отставайте, не забудьте подписаться на наш канал на YouTube! ПОДПИСАТЬСЯ
Чтобы настроить безопасный режим в Windows Server 2019, мы должны запустить систему в расширенном режиме, и для этого у нас есть несколько вариантов:
- Используйте клавишу Shift, нажмите кнопку выключения Windows Server и выберите «Перезагрузить там».
- Перейдите в меню «Пуск/Конфигурация». /Обновление и безопасность/Путь восстановления и нажмите кнопку «Перезагрузить сейчас» в разделе «Расширенный запуск»

Шаг 1
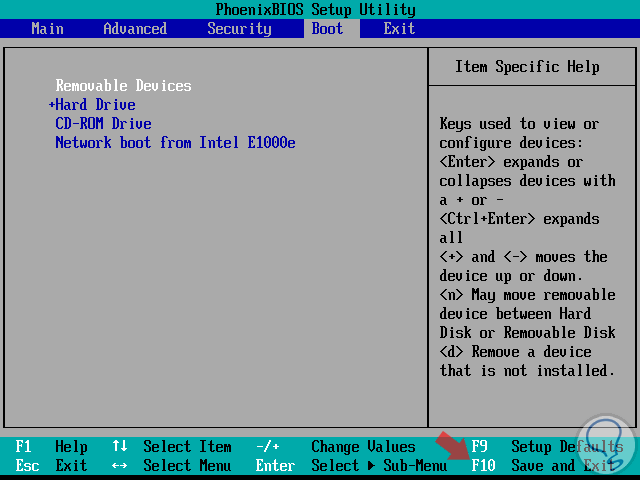
Третий метод, который мы будем использовать в этом руководстве, – использовать ISO-образ Windows Server 2019 или 2016 либо через DVD или загрузочный USB. Когда это доступно, мы должны получить доступ к BIOS или UEFI компьютера и настроить метод загрузки на вкладке Boot. Нажмите клавишу F10, чтобы сохранить изменения..
- Съемные устройства: USB-устройства
- Привод CD-ROM: DVD-привод

Шаг 2
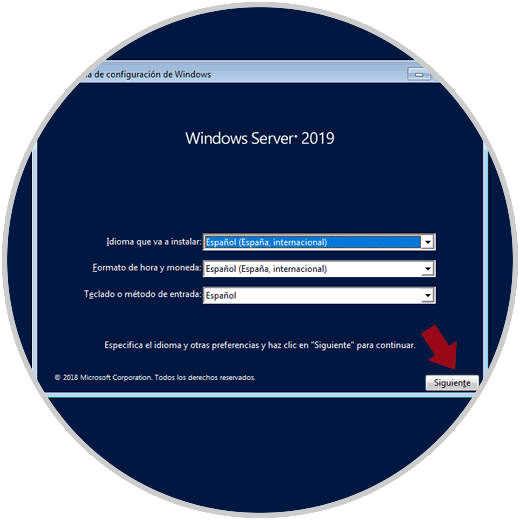
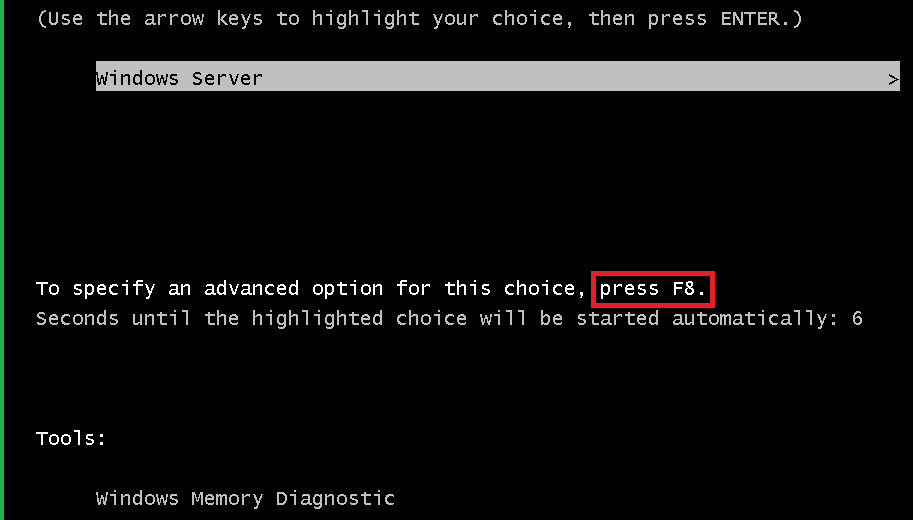
После запуска процесса загрузки нажмите любую клавишу, чтобы настроить запуск Windows Server 2019:

Шаг 3
Там мы нажимаем «Далее» и видим следующее:

Шаг 4
Здесь мы нажимаем на строку «Ремонт оборудования», и мы будем перенаправлены в следующее окно (то же самое, используя один из предыдущих методов):

Шаг 5
Там выбираем «Устранение неполадок» вариант, и в следующем окне мы выбираем параметр командной строки:

Шаг 6
Выбрав этот параметр, мы получим доступ к командной строке Windows Server, где мы введем следующую строку:
bcedit/set {bootmgr} displaybootmenu yes

Шаг 7
Примечание
BCDEdit – это инструмент командной строки, разработанный Microsoft, благодаря которому можно будет управлять данными, связанными с конфигурацией загрузки системы (BCD).
После выполнения этой строки мы выполним следующее.
bcedit/set {bootmgr} timeout 15

Примечание
После завершения этого процесса мы выполняем команду exit для выхода из командной строки и перейти к выключению компьютера, чтобы устранить это и снова настроить загрузку с жесткого диска.
Шаг 8
При запуске системе мы увидим следующее: 
Шаг 9
Там выбираем нашу рабочую system, а позже, возможно, мы выберем тип загрузки в безопасном режиме, который нам нужен для Windows Server 2019: 
Шаг 10
Нажмите Enter, и как только мы войдем в систему, можно будет выполнить необходимые административные задачи: 
Таким образом, мы научились получать доступ этим практичным и полезным способом в Windows Server 2016 или 2019 для выполнения необходимых административных задач.
Можно ли загрузить Windows Server 2016 в командной строке таким образом, чтобы диски и файловые системы оставались там, где они находятся? Я не ищу безопасный режим. Когда я нажимаю F8 при загрузке, я могу попасть в меню «безопасный режим» (там, конечно, есть и другие варианты). Однако мой C: не имеет такой же структуры папок, и у меня есть новый диск «X: ». Я хотел бы попасть в командную строку, в которой диски оставлены в покое, а у меня нет этого нового диска X: с «некоторым» из того, что было на C :. В моем C: есть только две папки с файлами Program, и все. Это возможно?
Windows Server is an operating system of the business type which has been developed by Microsoft in order that as administrators we have at hand the possibility of managing in a centralized way various roles and services focused on each client having the best services ..
Windows Server has been developed as a safe, functional and practical system, but like every system developed by man, it is not free from failures and for this reason we can find errors in the drivers, services or parameters of both the system itself and others components and hence the importance of knowing how to fully manage the system.
For this type of administration and support, Microsoft has integrated the Safe Mode function into Windows Server 2016 or 2019. With the safe mode, the Windows operating system will boot into a basic state , that is, it will only use a limited set of files and drivers to perform administration tasks in a much more complete way..
This will give us better perspectives regarding the solution of the problems that the equipment may have, seen from this mode, it will be much simpler to rule out failures, for example, if the system works normally in this safe mode, we can rule out that both the default configuration As the basic device drivers are not the root cause of the problem and thus it will be possible to concentrate on other aspects of the system.
Safe Mode
Safe mode has two options that are:
- Safe mode: load basic drivers.
- Safe mode with network functions, this differs in that it includes the network drivers and the services necessary to access the Internet and other computers on the local network.
TechnoWikis will explain how we can start Windows Server, in this case 2019, in safe mode, but it is ideal to remember that this process applies equally to Windows Server 2016..
To keep up, remember to subscribe to our YouTube channel! SUBSCRIBE
To configure the safe mode in Windows Server 2019, we must start the system in advanced mode and for this we have several options that are:
- Use the Shift key and press the Windows Server shutdown button and select Restart there
- Go to the Start / Configuration / Update and security / Recovery path and click on the Restart now button in the Advanced Start section
Step 1
The third method, which we will use in this tutorial, is to use the ISO image of Windows Server 2019 or 2016 either through the DVD or a bootable USB. With this available, we must access the BIOS or UEFI of the computer and there configure the boot method in the Boot tab as well. Press the F10 key to save the changes.
- Removable Devices: USB Devices
- CD-ROM Drive: DVD Drive
Step 2
Once the boot process starts, press any key to configure Windows Server 2019 startup:
Step 3
There we click on «Next» and we will see this:

Step 4
There we click on the «Repair the equipment» line and we will be redirected to the following window (the same one using one of the previous methods):

Step 5
There we select the «Troubleshoot» option and in the next window we select the Command Prompt option:
Step 6
By selecting this option, we will access the command prompt of the Windows Server where we will enter the following line:
bcedit / set {bootmgr} displaybootmenu yes
Step 7
Note
BCDEdit is a command line tool developed by Microsoft thanks to which it will be possible to manage the data associated with the system’s boot configuration (BCD).
Once this line is executed, we will execute the following.
bcedit / set {bootmgr} timeout 15

Note
Once this process is done, we execute the exit command to exit the command line and proceed to turn off the computer to eliminate it and to be able to configure the boot again from the hard disk.
Step 8
When starting the system, we will see the following: 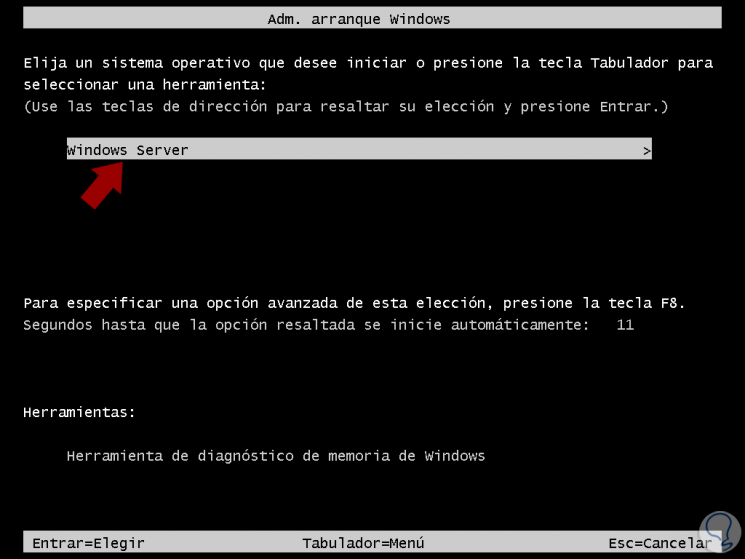
Step 9
There we select our operating system and later it will be possible we will select the type of boot in safe mode that we want for Windows Server 2019: 
Step 10
Press Enter and once we access the system it will be possible to perform the required administrative tasks: 
Thus, we have learned to access in this practical and useful way in Windows Server 2016 or 2019 to perform the necessary administration tasks.
Safe Mode is a special mode on Windows systems that is mainly used for troubleshooting purposes. If there is any issue to boot Windows successfully due to virus, malicious software, or driver installation, you can boot the system into Windows safe mode and fix the issues.
See the instructions for booting into Safe Mode by using Windows Recovery Tools, Command Prompt(cmd), or System Configuration on the Windows server below.
Using Windows Recovery Tools
One of the common ways to access Safe Mode for Windows servers is to get into the Windows Recovery options. The below steps outline the methods for this when the server is online as well as when it is having issues starting up normally.
When the server does not start up Windows normally
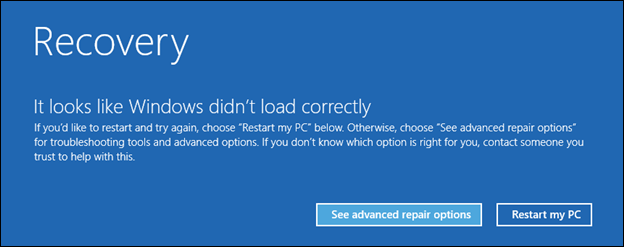
When the server fails to start up Windows normally more than once, it will automatically present the Windows Recovery option to access advanced repair options.
When the server is accessible with Windows able to start up normally
When the server is online, the Windows Recovery Environment can be accessed from inside the server once it is logged in using two methods.
NOTE: It is advised that the below steps be performed while accessing the server through
Consoleoption under LayerPanel 2.
-
Using the
Restartbutton in the server.This is done by holding down the
Shiftkey while clicking theRestartbutton.
OR
-
Using the
Update & Securityoption.a) Click on Windows
Startmenu and then click onSettings.b) Click on
Update & Security.c) Click on
Recoveryin the left panel and then onRestart NowunderAdvanced startupsection.
Using Troubleshooting option to start Safe Mode
-
Once the server is restarted by following either of the above-specified methods, the server will be rebooted into the
Troubleshooting screenas below. Click onTroubleshootto continue to steps. -
In the
Advanced optionsscreen, click onStartup Settings. -
In the
Startup Settingsscreen, click on theRestartbutton. -
Once the server is restarted, the Advanced Boot Options screen will show up, from where the
Safe Modeoption can be selected for booting up the server further.


Using Command Prompt (cmd)
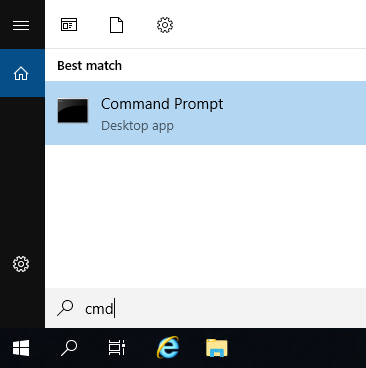
-
To open the
Command prompt, just click on theWindows keyto openstartand searchcmd, and then click on theCommand Promptwhich is shown in the below image. -
Now get the command prompt interface and run the below command to display the Boot manager.
> bcdedit /set {bootmgr} displaybootmenu yesNOTE: Run the below command to stop showing the Boot manager
> bcdedit /set {bootmgr} displaybootmenu no -
Now restart the server to see the
Windows Boot Managerscreen. Once it has been done, pressF8to go to theAdvanced Boot Options. -
From the
Advanced Boot Options, select theSafe Modethat is shown in the below image and pressEnter. It will open Windows Server 2019 in Safe Mode.


Using System Configuration
-
Open the run box by pressing the
Windowskey and searchRun, and then typemsconfigin the run box and pressEnter. -
Once it has been done, will get the System Configuration dialog box. Check the
Safe bootoption and clickOKUnder theBoottab as shown in the below image. -
Now reboot the server and then it will boot directly into
Safe Modeautomatically.NOTE: To stop boot into safe mode, un-tick the
Safe bootoption and clickOKUnder the Boot tab.
Have you ever tried to boot Windows VM into safe mode easily ?. Let me show you how you can start your computer into safe mode.
Recently I installed the latest version of VMware workstation on my PC and set up ConfigMgr lab. I installed the latest Windows Server OS and Windows 10.
My lab setup was ready and since everything was setup correctly, I thought i won’t have any issues. But then one of my server showed up the BSOD.

I guess this could be probably due to a faulty update that got installed.
However when I attempted to boot my virtual machine into safe mode, it didn’t work. Maybe I was not quick in pressing F8 button, so I attempted again and still no luck.
I know booting a Windows guest operating system into Safe Mode is very easy. You restart the virtual machine and when the computer starts, you press and hold F8.
In my case when I pressed F8 it took me to the BIOS options and I tried multiple times but it didn’t help. So let me show you how to boot or start your PC in safe mode.
To know more about the safe mode, read the following article.
In this example, I will be booting Windows Server 2019 into safe mode. First login to Windows Server. Click Start > then click Settings icon.

You will now see Windows Settings page, click Update & Security.

On the Windows Update page, in the left pane, click Recovery.

Click Restart now on the Recovery window.

You may specify a reason to restart the computer. Click Continue. The VM now restarts.

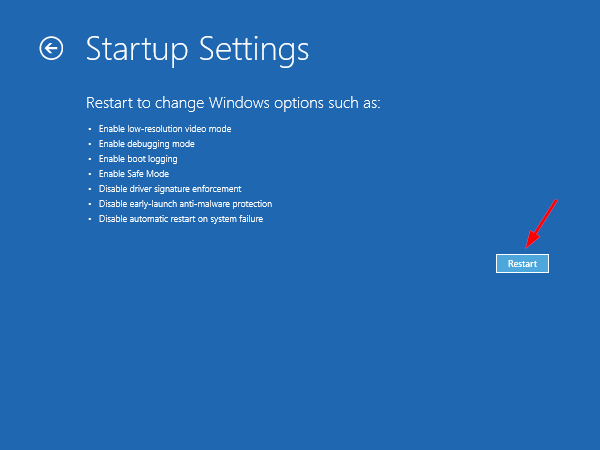
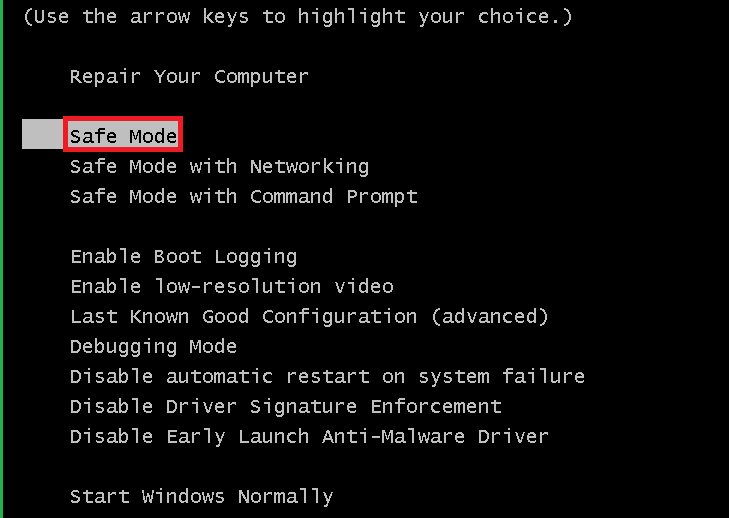
The screen that you see now has got 4 options.
- Continue
- Use a device
- Troubleshoot
- Turn off your PC
Click Troubleshoot option.

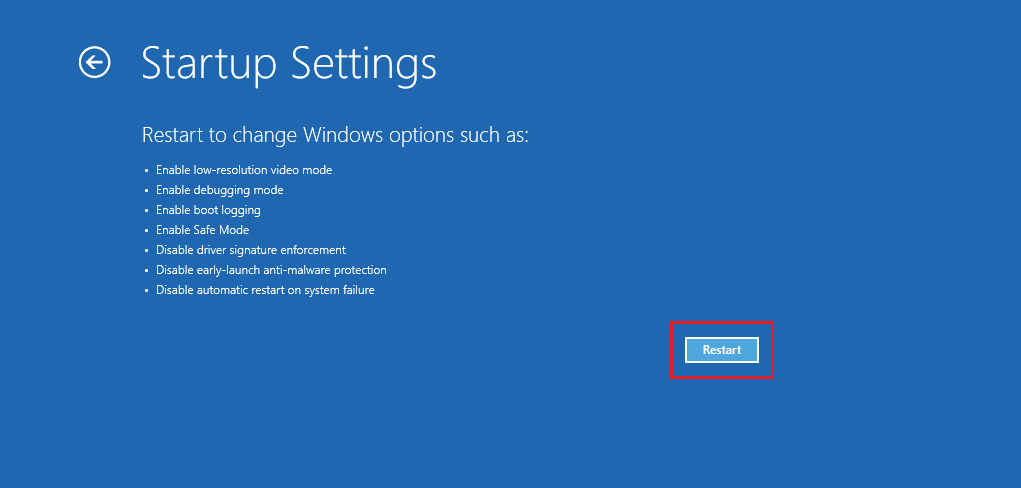
On the Advanced options screen, click Start Settings.

On the Startup settings screen, you can click Restart to change several windows options.
- Enable low-resolution video mode
- Enable debugging mode
- Boot logging
- Disable automatic restart on system failure
- Enable safe mode
- Disable driver signature enforcement
- Disable early-launch anti-malware protection

You will see Advance Boot options screen. Select Safe Mode and hit enter key to boot virtual machine into Safe Mode.

I hope this post helps.

Prajwal Desai is a Microsoft MVP in Enterprise Mobility. He writes articles on SCCM, Intune, Configuration Manager, Microsoft Intune, Azure, Windows Server, Windows 11, WordPress and other topics, with the goal of providing people with useful information.
Skip to the content

10 May 2021
To enable F8 boot in Windows Server 2012 / Windows Server 2016, / Windows Server 2019 you need to go to an elevated CMD prompt.
If your server does not start (hence the need for F8), you can boot from a Windows Server installation DVD and select the option REPAIR YOUR COMPUTER, Troubleshoot, then Command Prompt.
Once you have opened a command prompt (as an administrator), enter the following commands:
|
bcdedit /set {bootmgr} displaybootmenu yes bcdedit /set {bootmgr} timeout 10 |
Restart your server and press F8
Hits: 2740


Always eager to communicate with other system engineers and administrators. I enjoy all aspects of my job, designing, deploying and updating server, desktop, network and storage systems. I blog regularly and contribute wherever possible to the Microsoft community.
Number of visits :
Total : 1006582 Visits
Yesterday : 320 Visits
![]()
Ads Blocker Detected!!!
We have detected that you are using extensions to block ads. Please support us by disabling these ads blocker.
Как мне загрузить сервер?
Загрузка с USB: Windows
- Нажмите кнопку питания на вашем компьютере.
- Во время начального экрана запуска нажмите ESC, F1, F2, F8 или F10. …
- Когда вы решите войти в программу настройки BIOS, появится страница служебной программы настройки.
- Используя клавиши со стрелками на клавиатуре, выберите вкладку ЗАГРУЗКА. …
- Переместите USB на первое место в последовательности загрузки.
Как мне загрузить сервер в обычном режиме?
Как запустить Windows в нормальном режиме из безопасного режима
- Получите доступ к начальному экрану и откройте панель чудо-кнопок.
- Щелкните значок «Настройки» на панели чудо-кнопок. Этот значок имеет форму шестеренки.
- Щелкните значок «Питание» и выберите «Перезагрузить» в появившемся меню. Ваш компьютер перезагрузится в нормальный рабочий режим.
Экран «Дополнительные параметры загрузки» позволяет запускать Windows в расширенных режимах устранения неполадок. Вы можете получить доступ к меню, включив компьютер и нажав клавишу F8 перед запуском Windows. Некоторые параметры, такие как безопасный режим, позволяют запускать Windows в ограниченном состоянии, когда запускаются только самые необходимые компоненты.
Windows: доступ к BIOS
Перед тем как нажать кнопку перезапуска, удерживайте клавишу [Shift]. Во время перезагрузки системы обычный стартовый экран Windows не появляется, а меню параметров загрузки, обеспечивающее доступ в BIOS откроется.
Что делать, если сервер не загружается?
Проверка операционной системы — попробуйте загрузиться в Безопасный режим с помощью клавиши F8 на клавиатуре, чтобы Windows могла загрузиться. Как только он сможет загрузиться, перезагрузите сервер, чтобы сервер мог загрузиться в нормальном состоянии. Проверка системных дисков — Зайдите в экран BIOS. Если вам нужны инструкции о том, как попасть в BIOS, нажмите здесь.
Как мне загрузиться без BIOS?
Загрузка с USB на старый компьютер без модификации BIOS
- Шаг 1. Вещи, которые вам понадобятся. …
- Шаг 2. Сначала запишите образ диспетчера загрузки на чистый компакт-диск. …
- Шаг 3. Затем создайте загрузочный USB-накопитель. …
- Шаг 4: Как использовать PLOP Bootmanager. …
- Шаг 5: Выберите опцию USB в меню. …
- 2 человек сделали этот проект! …
- Комментарии 38.
Что такое команда BCDEdit?
BCDEdit — это инструмент командной строки для управления данными конфигурации загрузки (BCD). … BCDEdit можно использовать для различных целей, включая создание новых хранилищ, изменение существующих хранилищ, добавление параметров меню загрузки и так далее.
Пожалуйста, выберите Windows Server. Затем нажмите F8, чтобы войти в расширенные параметры запуска. Потом, просто нажмите «Безопасный режим», чтобы запустить система. В конце концов, система загрузится в безопасном режиме.
Как перейти в безопасный режим?
Самый простой способ исправить ошибки — перевести телефон в безопасный режим, который блокирует работу всех сторонних приложений. Вы можете перевести устройство Android в безопасный режим нажав и удерживая кнопку питания, затем нажав и удерживая слова «Выключение», а затем выбрав «ОК» при появлении «Перезагрузить в безопасный режим» опция появляется.
Меню загрузки F12 позволяет вам чтобы выбрать устройство, с которого вы хотите загрузить операционную систему компьютера, нажав клавишу F12 во время самотестирования компьютера при включении., или процесс POST. В некоторых моделях ноутбуков и нетбуков меню загрузки F12 по умолчанию отключено.
I — Удерживайте клавишу Shift и перезапустите
Это самый простой способ получить доступ к параметрам загрузки Windows 10. Все, что вам нужно сделать, это зажать клавишу Shift на клавиатуре и перезагрузить компьютер. Откройте меню «Пуск» и нажмите кнопку «Питание», чтобы открыть параметры питания.
Как мне загрузиться в безопасном режиме из BIOS?
Пока он загружается, удерживайте клавишу F8 перед появится логотип Windows. Появится меню. Затем вы можете отпустить клавишу F8. С помощью клавиш со стрелками выделите Safe Mode (или Safe Mode with Networking, если вам нужно использовать Интернет для решения вашей проблемы), затем нажмите Enter.
Иногда необходимо выполнить загрузку компьютера с минимальным набором драйверов, системных программ и ПО, которое запускается автоматически, например, при необходимости выполнить низкоуровневые операции с операционной системой, при удалении вирусов, программном сбое или удалении специального ПО.
Итак, чтобы перейти в безопасный режим, необходимо при старте операционной системы зажать кнопку F8. Должен появиться черный экран с выбором вариантов загрузки.
В безопасном режиме можно загрузиться без поддержки сети, в этом случае компьютер не будет загружать драйверы сетевых устройств, и компьютер будет вне сети, а можно с поддержкой сетевых устройств, в этом случае сеть будет работать в штатном режиме.
В настоящее время, многие современные компьютеры загружаются достаточно быстро и можно не успеть нажать F8 в нужным момент. В этом случае, если компьютер успешно загружается в штатном режиме, можно использовать штатную утилиту Microsoft управления параметрами загрузки: MSConfig.
Как выполнить загрузку Windows в безопасном режиме
Если необходимо выполнить запуск компьютера в безопасном режиме, то необходимо выполнить следующие действия:
- Нажмите сочетание клавиш Win + R.
- В открывшемся окне ввести команду msconfig, а затем нажать кнопку OK.
- Перейти на вкладку Boot.
- В разделе Boot Options Установить флажок Safe boot (и указать необходимые пункты) и нажать OK
- Перезагрузить компьютер

После перезапуска, компьютер будет запущен в безопасном режиме
Как отменить загрузку Windows в безопасном режиме
Если необходимо выйти из безопасного режима, то выполните следующие действия:
- Нажмите сочетание клавиш Win + R.
- В открывшемся окне ввести команду msconfig, а затем нажать кнопку Ок.
- Перейти на вкладку Boot.
- В разделе Boot Options снимите флажок Safe boot.
- Перезапустить компьютер
После перезапуска, компьютер будет запущен в обычном режиме