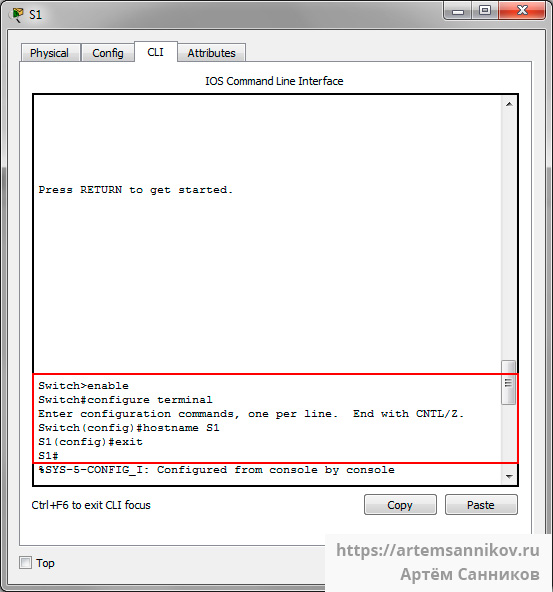
Чтобы присвоить имя коммутатору, необходимо выполнить команду hostname в CLI.
Switch> enable //переходим в привилегированный режим EXEC
Switch# configure terminal // переходим в режим глобальной конфигурации
Switch(config)# hostname S1 //присваиваем имя S1 текущему коммутатору
S1(config)# exit //выходим из режима настроек
S1#
Результат выполнения команды hostname.
Метки: Cisco, CLI, hostname, Packet tracer.
Common Cisco Router Configuration on Packet Tracer
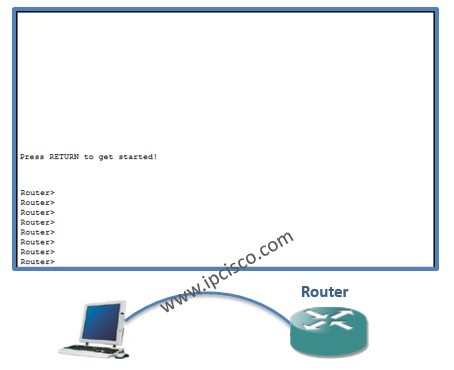
Table of Contents
In this Basic Cisco Router Configuration lesson, we will see how to configure a Cisco router basically with the help of Packet Tracer. This CCNA lesson will be an entrance to routers for a Cisco router newbie. Here, we will see Basic Cisco Router Configuration.

You can DOWNLOAD the Packet Tracer example with .pkt format here.
Basic Cisco Router Configuration: How to Start to Configure a Router?
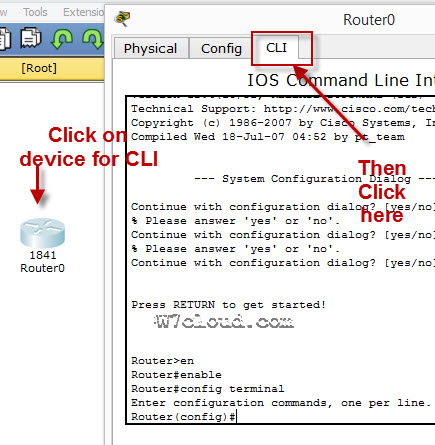
This is the fisrt question of a Cisco router newbie, a new network engineer  Do not worry it is vey basic. To configure a Cisco router, first of all youneed to enter the “enable mode”. Normall you are under user mode, you can run only show commands. To enter enable mode use the below command:
Router>enable
After this command you are in enable mode. But to make configuration, you need to enter also teh below command under enable mode:
Router#configure terminal
Enter configuration commands, one per line. End with CNTL/Z.
Router(config)#
Now you can do any configuration on the Cisco router. After a while, you will gain Cisco hands on experience and speed. At this time you will write “en”, instead of enable, “conf ter” instead of configure terminal etc…
How to Configure a Router’s Hostname
To configure the hostname of the router, use the below command. Here, hostname is the name of your router.
Router(config)#hostname MyRouter
MyRouter(config)#
As you can see, the name of the router has changed as MyRouter.
How to Give a Password to a Router?
To give a password to your router, you can use the “Enable Password” and “Enable Secret Password”. Enable Password stores your password as a clear text. If you want to encryp it you need to use service password-encryption command. Enable Secret Password stores your password in MD5 encryption. And “Enable Secret Password” is more secure. You can check the seem of enable secret in configuration file below.
MyRouter(config)#enable secret 1234567
MyRouter(config)#service password-encryption
You can view the encrypted password with “show running-config” command.
MyRouter#show running config
…
enable secret 5 $1$mERr$iHGIpzTedTCk9bQ93Wry30…
How to Configure Console Connection Options?
You can configure your console connection. The console password, the history size can be configured. To do this we will use the below commands in thiz Basic Cisco Router Configuration lesson.
MyRouter(config)#line console 0
MyRouter(config-line)#password cisco123
MyRouter(config-line)#login
MyRouter(config-line)#history size ?
<0-256> Size of history buffer
MyRouter(config-line)#history size 10
Beside these the logging syncronization of console can be configured here. Many new engineers complaintive about the logging synronization of the console. While they are writing someting on the router, it sometimes print something on the secreen and divides your writings. I do not affect the command but it affect your seem. To avoid this, use “logging synchronous” command.
MyRouter(config-line)#logging synchronous
You can also DOWNLOAD all the Packet Tracer examples with .pkt format in Packet Tracer Labs section.
A second more complaint comes about the time out of the session. After a certain of time without a user input, your router time-out. To avoid this use “exec-timeout” command.
MyRouter(config-line)#exec-timeout ?
<0-35791> Timeout in minutes
MyRouter(config-line)#exec-timeout 0 ?
<0-2147483> Timeout in secondsMyRouter(config-line)#exec-timeout 0 0
How to Configure Your Telnet Connection Options?
You can use the same commands used in console connection options under also telnet connection. There are 0 to 15 telnet connections.
MyRouter(config)#line vty 0 15
MyRouter(config-line)#password cisco123
MyRouter(config-line)#login
How to Configure an Interface of Router?
To configure an interface, firsty you need to go to that interface configuration mode. And then, under this interface, add the ip address with its mask. Do not forget to write “no shutdown”. This opens the interface.
MyRouter(config)#interface GigabitEthernet 0/0
MyRouter(config-if)#ip address 10.0.0.1 255.255.255.0
MyRouter(config-if)#no shutdownMyRouter(config-if)#
%LINK-5-CHANGED: Interface GigabitEthernet0/0, changed state to up
Let’s Write a Console Message Like the Software Developers “Hello World” 
“Banner Moth” is another one of basic router commands on Cisco. To use it , in the configuration mode, use “banner motd“command. After this write “d” and enter. Then write your message, and finish it with “d” again.
MyRouter(config)#banner motd d
Enter TEXT message. End with the character ‘d’.
Merhaba! Hello! Bonjour! Hola! Namaste! dAfter you exit from the console, with multiple exit, you will see the below.
(Do not wait for time-out, we closed it)Press RETURN to get started!
Merhaba! Hello! Bonjour! Hola! Namaste!
User Access Verification
Password:
What About Saving The Configuration?
To save the configuration, we will use “copy running-config startup-config”. The exact (startup-config) configuration is stored at NVRAM, and the running config is stored at RAM. As you know RAM is temporary storage. To save this confiugration to a permanent one, use “copy running-config startup-config” command.
MyRouter#copy running-config startup-config
Verification of Basic Cisco Router Configuration
To see the full configuration, use “show running-config” command. This is the last configuration you did. If you wonder the startup configuration stored in NVRAM, use “show startup-config” command.
MyRouter#show running-config
In this Basic Cisco Router Configuration lesson, I tried to explain, how to configure Cisco routers basically to a Cisco Router Newbie. We have seen basic Router commands on Cisco. This is only the beginning. Welcome 
You can DOWNLOAD the Packet Tracer example with .pkt format here.
You can download “Packet Tracer” in Tools section.

Packet Tracer Cisco CLI Commands list
Here is the detailed Cisco router configuration commands list, which can be implemented with packet tracer. Packet tracer is a network simulator used for configuring and creating the virtual cisco devices and network. There are also some other similar software but Cisco IOS output will be same on all simulators.
Related Article: PowerShell vs Command prompt
Cisco Router Configuration Step By Step
To configure any device in packet tracer you are required to open or access its CLI. You can do it by clicking any device and then navigating to CLI tab. Once you are at CLI you can perform all Cisco Commands here.

Cisco IOS supports numerous command modes which can be practice with packet tracer, followings are the main command modes of cisco CLI with specific commands to navigate from one mode to another. Also Check out some best cheap routers for real practice.
| Mode | Symbol | How to access this mode | Command for leaving this mode |
| User EXEC Mode | Router > | Default mode after booting. Press enter for accessing this. | Use exit command |
| Privileged EXEC mode | Router # | Use enable command from user exec mode for entering into this mode | exit |
| Global Configuration mode | Router(config)# | Use configure terminal command from privileged exec mode | Exit or Ctrl+Z for user EXEC mode |
| Interface Configuration | Router(config-if)# | Use interface <interface name+number> command from global configuration mode | Use exit command to return in global mode |
| ROMMON | ROMMON > | Enter reload command from privileged exec mode. Press CTRL + C key combination during the first 60 seconds of booting process. | Use exit command.
Watch a video of rommon mode |
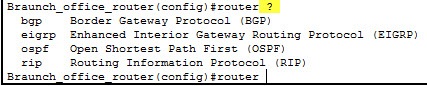
IOS commands are not case sensitive it means that you can use them in uppercase, lowercase, or mixed case, but passwords are case sensitive. Therefore make sure you type it in correctly. In any mode, you can obtain a list of commands available on that mode by entering a question mark (?).
How to Change the Cisco Router name
You can change the cisco router name by using command hostname in global configuration mode.
![]()
How to set the Enable password:
You can set the password for protecting enable mode by following command: (Following command will set the password to cisco)

How to set the telnet password on Cisco:
You can access the cisco router remotely by VTY lines, these are the Virtual Terminal lines for access router, you can set password on these line by using the following commands:
Router(config)#line vty 0 4
Router(config-line)#password Cisco
Router(config-line)#no login
The above command will set the telnet password to “Cisco”.
How to set the IP address to Cisco interface:
You can set the IP address to any Cisco device interface by using the following commands:
Router(config)#interface <interface name&number>
Router(config-if)#ip address <IP address> <subnet mask>
How to enable a port or interface
Router(config-if)#no shut
Example:
![]()
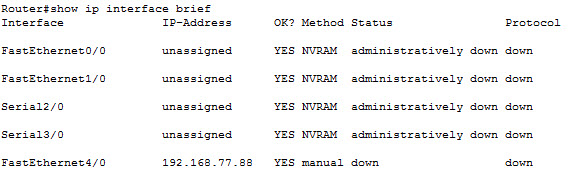
How to check the IP address of all interfaces:
You can use the “show ip interface brief” command in Privileged EXEC mode for checking the IP address of all interface of Cisco device.
How to save the configurations:
You can use the following command for router configuration to Nvram for use at next boot up
Router#copy running-config startup-config
How to configure the access-list on Cisco:
You can configure the access-list on cisco by using following commands:
Router(config)#Access-list <number> <permit|deny> <ip> <mask>
Router(config-if)#ip access-group <number> <in|out>
OR
Router(config)#Access-list <number> <permit|deny> <protocol> <from ip and mask> <to ip and mask> <port number>
Router(config-if)#
Command Example:
Router(config)#access-list 2 deny 192.168.0.33 0.0.0.255
Router(config)#interface fastEthernet 4/0
Router(config-if)#ip access-group 2 in
How to configure the default route on Cisco:
Following command will set the default route to 10.10.10.101.
Router(config)# ip route 0.0.0.0 0.0.0.0 10.10.10.101
How to create a static route on Cisco router
Router(config-router)#ip route [destination_network] [mask] [next-hop_address
you can set a static route by using above command example is also given below:
Router(config-router)#ip route 192.132.23.1 255.255.255.0 10.10.10.1
—————————
——————-
| RIP Configuration Commands | |
| Commands | Details |
| Router(config)#Router rip | Enable RIP routing on router. |
| Router(config-router)#Network <network ip address>
Why we use RIP? |
Define the network which you want to advertise in RIP. E.g. Network 192.168.88.0 |
|
OSPF Configuration Commands |
|
| Router(config)#Router ospf <process-id> | Enable OSPF routing on router. Process-id is any number & must be same for all networks in AS. |
| Router(config-router)#Network < ip address> <wild cardmask>
Why we use OSPF? |
IP address is the IP of network which will be advertise in OSPF and wild card mask will represent the network bits. E.g. network 192.168.1.0 0.0.255.255 is equilent to 192.168.0.0/16 |
| EIGRP configuration Commands | |
| Router(config)#Router eigrp <AS number> | AS number is a number must be same for networks which are desired to connect with each other. E.g. Router eigrp 1 |
| Router(config-router)#Network < ip address> | Advertise network in EIGRP |
| Router(config-router)#no auto-summary
Why we use EIGRP? |
Disable auto summay |
banner motd <banner start identification> banner message <banner end identification>
Command Example:
banner motd #Unauthorized access to this device is prohibited!#
Above command with set the banner to “Unauthorized access to this device is prohibited”
Famous Show Commands in Privileged EXEC Mode
You can run all these command for checking different setting of Cisco device in privileged EXEC mode:
Show Version
Show running-config
Show Vlan
Show mac-address-table
Show clock
Show privilege
Show interface <interface name>
show ip route
Show controllers
show cdp neighbors
Show memory
Show protocols
Show startup-config
Show Flash
Show spanning-tree
Verifying Commands for Network Connectivity
You can use these commands to verify network connectivity for your router
router# enable
router# ping [ip-address | hostname]
Command Example:
router# ping 192.168.3.1
(A reply response from host 192.168.3.1 will verify the connectivity)
How to telnet any host:
telnet {ip-address | hostname}
e.g. router# telnet 192.168.3.1
Related Article: NMAP Commands Linux

Me Waqas Azam and I am a professional blogger & freelance writer. I also working in the IT industry for over 7 years. I am graduated in Computer Science and information technology.
В командной строке Cisco Packet Tracer можно назначить компьютеру имя, чтобы его было легче идентифицировать. Это может быть особенно полезно при работе с большим количеством устройств.
Ниже приведены шаги, которые необходимо выполнить, чтобы назначить имя компьютеру в Cisco Packet Tracer.
Шаг 1: Откройте командную строку устройства
В Cisco Packet Tracer выберите устройство, которому вы хотели бы назначить имя, и щелкните по нему правой кнопкой мыши.
В контекстном меню выберите «Command Prompt» (командная строка).
Шаг 2: Введите команду «hostname NAME»
В командной строке введите команду «hostname NAME», где NAME — это имя, которое вы хотите назначить компьютеру.
Например, если вы хотите назначить компьютеру имя «PC1», введите следующую команду: hostname PC1
Шаг 3: Проверьте, что имя компьютера назначено
Чтобы проверить, что имя компьютера было назначено, введите команду «show running-config» в командной строке.
В выводе вы должны увидеть строку «hostname NAME», где NAME — это имя, которое вы назначили компьютеру.
Шаг 4: Сохраните конфигурацию
Важно сохранить конфигурацию устройства, чтобы не потерять изменения при перезагрузке.
Введите команду «copy running-config startup-config» в командной строке, чтобы сохранить конфигурацию.
Теперь вашему компьютеру в Cisco Packet Tracer было назначено имя. Вы можете повторить эти шаги для других устройств, чтобы назначить им соответствующие имена.
Стоит также отметить, что вместо командной строки вы можете назначить имя компьютера через графический интерфейс Cisco Packet Tracer. Щелкните по устройству правой кнопкой мыши, выберите «Config» и затем «Hostname». Введите необходимое имя и нажмите «Ok», чтобы сохранить изменения.
В заключение, назначение имени компьютера в командной строке Cisco Packet Tracer может значительно упростить работу с большим количеством устройств. Этот процесс не займет у вас много времени, но позволит более удобно использовать программу.
Cisco Packet Tracer — это мощный инструмент для моделирования и создания сетевых конфигураций. С его помощью вы можете создавать виртуальные сети, подключать устройства, настраивать сетевые протоколы и тестировать свою сеть перед его реализацией в реальном мире. В этой статье мы рассмотрим процесс подключения роутера и настройки сети с помощью Cisco Packet Tracer.
Для начала, откройте Cisco Packet Tracer и создайте новый проект. После этого выберите устройства из библиотеки и перетащите их на рабочую область. Наиболее важным устройством в сети является роутер, так как он выполняет функцию маршрутизации и позволяет устройствам обмениваться данными.
Чтобы подключить роутер к устройствам, выберите кабель Ethernet из библиотеки и перетащите его на интерфейс устройства и роутера. Затем повторите этот процесс для каждого устройства, которое вы хотите подключить к сети. После того, как вы подключили все устройства, вы можете приступить к настройке сети.
Вы можете настроить сетевые протоколы, IP-адреса, маршруты и другие настройки с помощью командного интерфейса роутера. Чтобы открыть командный интерфейс, щелкните правой кнопкой мыши по роутеру и выберите «Консоль». Здесь вы можете вводить команды для настройки сети. Если вы новичок в Cisco Packet Tracer, рекомендуется ознакомиться с документацией Cisco и изучить основные команды для настройки сетевых устройств.
Примечание: При настройке сети в Cisco Packet Tracer рекомендуется сохранять проект и регулярно делать резервные копии. Также стоит помнить, что этот инструмент предназначен для моделирования и обучения, и может отличаться от реальной сетевой среды.
В заключение, Cisco Packet Tracer — это отличный инструмент для моделирования и создания сетевых конфигураций. Если вы хотите научиться подключать роутер и настраивать сеть, Cisco Packet Tracer — это лучший выбор для вас. Благодаря его простому интерфейсу и возможностям моделирования, вы сможете быстро и эффективно настроить сеть и проверить ее до ее реализации в реальном мире.
Содержание
- Использование Cisco Packet Tracer для подключения роутера и настройки сети
- Ознакомление с Cisco Packet Tracer
- Выбор и подключение роутера
Использование Cisco Packet Tracer для подключения роутера и настройки сети
Для начала, откройте программу Cisco Packet Tracer и перейдите во вкладку «Devices» (Устройства) в боковом меню. В списке доступных устройств найдите роутер и перетащите его на рабочую область.
Подключение роутера происходит с помощью соединительных кабелей. Нажмите на устройство «Router» и выберите опцию «Connections» (Подключения) во всплывающем меню. Затем, выберите подходящий тип соединения и подключите кабель к другому устройству в сети.
Настройка сети может включать в себя задание IP-адресов, создание подсетей и настройку маршрутизации. Для настройки роутера, нажмите на него и выберите опцию «CLI» (Командная строка) во всплывающем меню.
В командной строке роутера вы можете вводить команды для настройки его интерфейсов, установки IP-адресов и добавления маршрутов. Например, используйте команду «interface» для выбора интерфейса, а затем «ip address» для задания IP-адреса.
Кроме того, Packet Tracer предлагает возможность настройки и других параметров, таких как безопасность, виртуальные локальные сети (VLAN) и многое другое.
После завершения настройки роутера и сети, вы можете проверить их работоспособность, запустив симуляцию сети в Packet Tracer. Нажмите на кнопку «Simulation» (Симуляция) в верхнем меню и выберите «Start» (Запуск).
Загрузка и настройка роутера может быть сложной задачей для начинающих, поэтому рекомендуется ознакомиться с подробными учебными материалами, доступными на официальном сайте Cisco.
Вывод: Cisco Packet Tracer — мощный инструмент для создания и настройки сетей, включая подключение роутера. Путем использования командной строки и разнообразных опций, вы можете настроить сетевую инфраструктуру и убедиться в ее работоспособности, сэкономив время и ресурсы.
Ознакомление с Cisco Packet Tracer
С помощью Cisco Packet Tracer пользователь может создавать и настраивать сетевые топологии, добавлять и настраивать устройства, устанавливать виртуальные соединения между устройствами, настраивать параметры сетевых протоколов и маршрутизации, а также наблюдать за передачей данных в сети.
Программа имеет интуитивный интерфейс, что делает ее доступной даже для новичков. В Cisco Packet Tracer представлены различные инструменты и элементы управления для создания и настройки сетей, что позволяет пользователям легко и быстро смоделировать и проверить различные сетевые сценарии.
Cisco Packet Tracer также используется как учебная платформа для студентов и преподавателей, чтобы изучать и преподавать сетевые технологии. В программе доступны различные задания и сценарии, которые помогают практиковать и углубить понимание основных концепций и принципов работы сетей.
Выбор и подключение роутера
Перед тем как начать настраивать сеть с использованием Cisco Packet Tracer, важно выбрать и подключить подходящий роутер.
При выборе роутера необходимо учитывать требования и потребности вашей сети. Важные факторы при выборе роутера включают:
- Скорость передачи данных;
- Поддержка беспроводной связи;
- Количество портов Ethernet;
- Поддержка протоколов маршрутизации;
- Бюджет.
После выбора роутера, необходимо правильно подключить его к сети. Для этого следуйте инструкциям, предоставленным производителем вашего роутера. Обычно, подключение роутера включает в себя следующие шаги:
- Подключите кабель Ethernet от модема Интернет-провайдера к порту WAN (Internet) на задней панели роутера.
- Подключите компьютеры или другие устройства к портам Ethernet на задней панели роутера.
- Проверьте, что все подключения надежно закреплены и устройства включены в сеть.
- Для доступа к настройкам роутера, установите программное обеспечение, предоставленное производителем, если требуется.
- Следуйте инструкциям производителя для настройки параметров сети, таких как SSID и пароль Wi-Fi, IP-адрес и др.
- После настройки роутера, проверьте подключение к Интернету с помощью одного из подключенных устройств.
После успешного подключения роутера к сети, вы можете приступить к настройке сетевых устройств в Cisco Packet Tracer и созданию необходимых конфигураций.