Based on your needs, you can set your router’s Wi-Fi to either blocklist or trustlist mode by enabling Wi-Fi Access Control. In blocklist mode, devices in the list will not be able to access your wireless network. In trustlist mode, only listed devices will be able to access your wireless network. Setting up a blocklist or trustlist will not only further enhance the security of your wireless network, but also limit the access of unwanted users, even if they know your Wi-Fi name and password.
Method 1: Using HUAWEI AI Life App
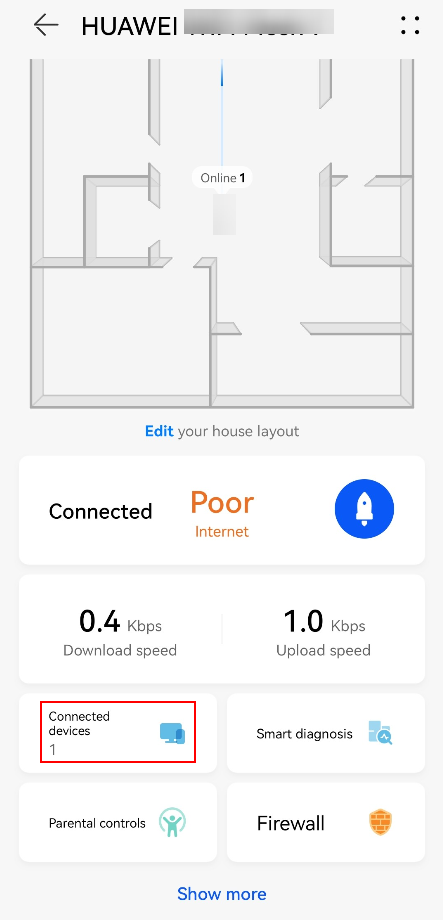
- Connect your phone to the router’s Wi-Fi network.
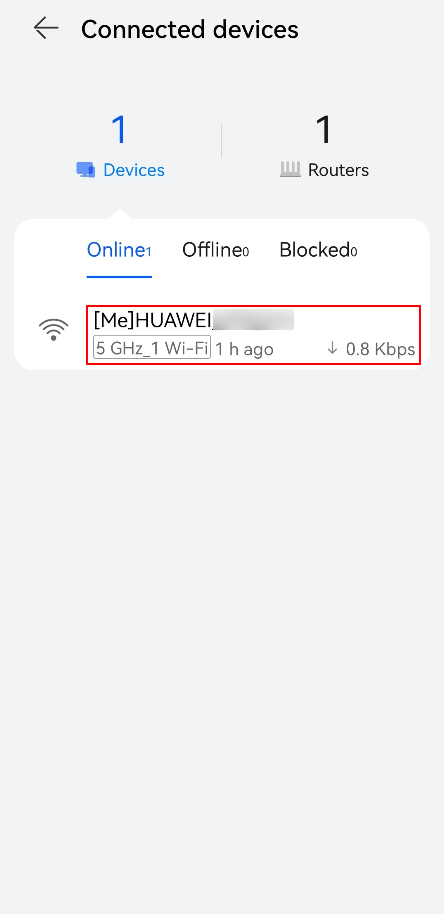
- Open the HUAWEI AI Life App on your phone and go to the Router screen, Touch Connected devices to view device connection details.
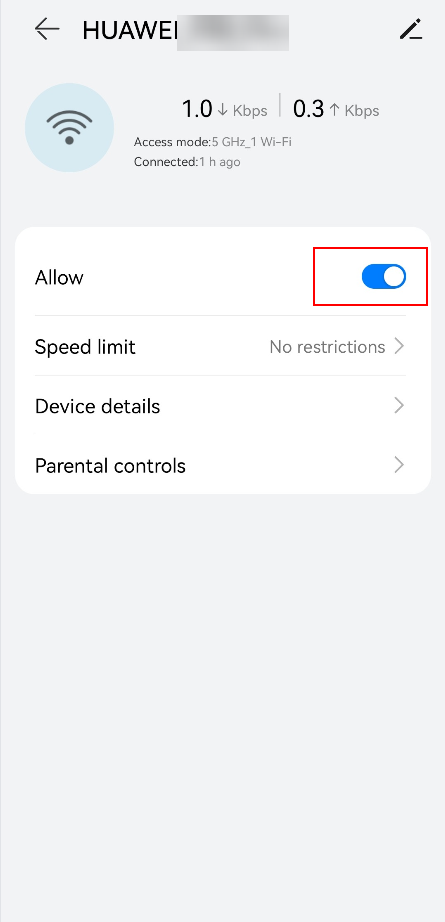
- Click the name of a device, close the Allow button, then this device is blocklisted.


Method 2: Using the web-based management page
- Connect your computer/phone to the router’s Wi-Fi , or connect the computer to the router’s LAN port using an Ethernet cable. Enter the default IP address in your browser address bar and log in to the web-based management page(check the nameplate at the bottom of the router for the default IP address).

- For routers that feature self-adaptive ports, you do not need to distinguish between WAN and LAN ports.
- If you are connecting your phone to the router’s Wi-Fi network, switch your phone’s webpage to the PC-based UI before performing the following operations.
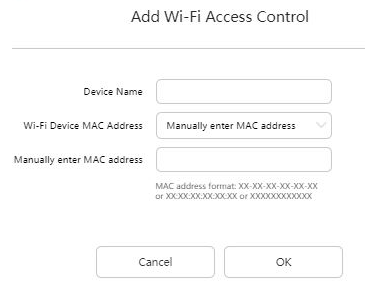
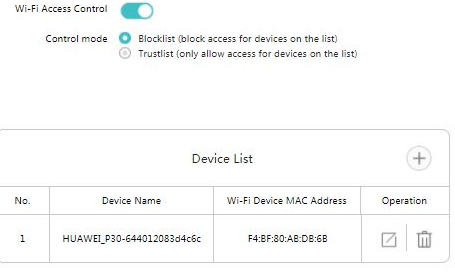
- Go to , and toggle on Wi-Fi Access Control. Set the router to Blocklist(block access from devices in the list) or Trustlist(allow access from only devices in the list) according to your needs.

- Click the
 icon in the upper right corner of the Device List, and add the devices that you want to blocklist or trustlist. Click OK.
Once the devices are added, they will appear in the Device List of the Wi-Fi Access Control.
You can also click the
 icon next to the corresponding device to remove it from the blocklist or trustlist.
 - To disable the blocklists or trustlist, toggle off Wi-Fi Access Control.


There are many tutorials out there on how to block websites on Huawei router HG8245H.
Unfortunately, the available guides out there do not offer the exact steps for blocking a website on a Huawei HG8245H router.
Many people who have tried blocking websites have been largely unsuccessful. However, we have the perfect solution.
To block a website on a Huawei HG8245H router, you must log in to your user interface with the default username and password.
Under security, you will have to edit parental control. This section allows you to specifically block a website you do not want.
With this method, you can choose to block a website for specific devices. You may also choose to whitelist a website that is deemed as a bad website yet you wish to access it.
Read further for the steps.

The obvious reason for blocking a specific website is parental control. However, this is not the only reason you may want to consider blocking a website.
In some situations, you can block a website that consumes too much data.
If there is a website that is affecting bandwidth for the whole house simply block it.
How to Block Websites on Huawei Router HG8245H Step by Step
The steps for blocking websites on Huawei HG8245H router are quite detailed. To be successful, you must follow all the steps without missing them.
If you miss a step you will have to get back and start fresh. Here are the steps to follow.
Step #1 Access Your Router User Interfacer

This is the simplest step. Simply log in to your Huawei router using your router credentials.
If you have not changed the router username or password, use the one on the back of your router.
Steps to access router UI
- Open your browser and go to 192.168.3.1
- Enter your Username and Password
- Click on Login
Note: If you have never changed your login password and username, use the default found on your router or the router manual.
Step #2 Open Parental Controls Settings

Once you have logged into your router, you have to navigate to the parental controls section.
It is under this section that you have the ability to block and unblock websites.
To access parental control settings
- Tap on Advanced on your login page
- Select Security
- Tap on Parental Control
This will lead you to a page with a wide range of details. Do not be intimidated by the many details on the page.
Just follow the steps below to set up your website filter.
Step #3 Allocate a Name to the URL you Want to Block

Allocating a name to the URL you want to block is very important. Most people just rush to block a URL without naming it.
This can be a problem since the changes will not apply.
To allocate a name to the URL you wish to block, you have to create a new template for it. It is this template you will use to determine how the blocked websites function.
How to assign a template name for the URL you wish to block
- Under Parental Control select Template right next to Overview
- Tap on Enter New
- Under Template Name assign a name to the URL you wish to block
- Click on Next
Note: You can assign any name you want for the template name section.
However, it is recommended to use the website name. For instance, if you want to block the URL to Facebook, you could just name the template “Block Facebook“.
Step #4 Specify the Blocking Period

The next step is to specify how long within a day the URL is blocked.
If you are only blocking to avoid bandwidth congestion, the website can be blocked for a few hours.
For instance, if your son loves playing a certain video game, you could allow access at specific hours of the day.
To set hours for blocking the website
- Select New after taping on Next in the above step
- Click on Whole Day to block a website the whole day
- To block for specific hours select Start Time and End Time
- Under Repeat select Every day to block the website every day
- If you wish to give access on some days select Blocking Days between Sunday and Monday
- Tap on Next to go to the next step
Tip: If you want to select specific days, simply tap on every day then uncheck the boxes for days to which you wish to give access.
Step #5 Enable URL Filter

Once you have selected the day, simply tap next to access the next settings page.
On this page, you will have to specify the type of filtering you want. You can either blacklist or whitelist a URL.
Steps to blacklist a URL
- Under URL Filter Type tap to show a drop-down menu and select Blacklist
- Click on New just below the Filter Type
- In the URL box enter the exact URL you wish to block starting with www.
- Click on Apply
- Tap on Finish to complete setting up
Note: When you enter the URL you want to block, remove HTTP or HTTPS and replace it with www.
This is because, in some instances, some HTTPS sites may bypass the blocklist measure. To avoid this situation, only use www which does not specify the site security.
Step #6 Specify the Devices to Block the Websites

When blocking a website on a router, you can either limit just one device or all devices. It is upon you to choose which devices not to access such sites.
For instance, if you want the router to prevent access to Facebook for your child, you can limit their device alone.
How to choose a device to block the websites
- From the router Homepage select Advanced
- Tap on Security
- Select Parental Control
- Tap on Overview under Parental Control
- To apply on all devices tap on Apply on all Devices
- To apply on specific devices tap on Choose Devices and select a device
- Scroll down to the bottom of the page and select the template name assigned to the URL in step #3 above
- Click on Apply to confirm changes
Note: If you did not choose a template name for your URL, all the settings you have made will not be applied.
Make sure you follow all the steps in step #3 above for this purpose.
Step #7 Delete Browsing History and Clear Cookies

Once you have made all the necessary changes and saved them, you must go back to your browser and delete the cookies.
If there are cookies and browsing history on your computer, the sites could still be accessed.
Alternatively, you may also power cycle the router so that all memory of sites already accessed is lost.
Steps to clear cookies on chrome browser
- Open Your Browser
- Click on More at the top right corner
- Click on More tools
- Click on Clear Browsing Data
- Under time range select All to delete all history
- Check all the boxes next to Cookies and Cache to remove all data
- Click on Clear Data
With that, you should be set to prevent access to any unwanted sites.
If the person using the blocked site still has access after all the above steps, power cycle your router to initiate the changes.
Step #8 Powercycle Your Router

This final step is not mandatory for all routers. In some cases, the changes may apply immediately after setting them. However, some devices may still have access to blocked websites.
In this case, you have to power off your router and power it back on. The best approach here is to power cycle it.
How to power cycle your router
- Turn off wifi access for all connected devices
- Locate the power cord at the rear end of your router
- Unplug the power cable
- Let your router rest for about 1 minute
- Plug it back on and give it about 2 minutes to power on
After this, the websites you have blocked will not be accessible now.
Summary
In solving how to block websites on Huawei router HG8245H, it is important to follow all the steps.
Many people complain of failure to institute these changes because they do not apply all the steps.
Fill in all the details appropriately and ensure you assign your URL template a name.
Read Next: Netgear Router Setup Without Modem – Complete Setup Guide

Kevin has over five years of experience working in various Tech startups and providing Technical solutions. He has contributed to many Tech publications and websites.
![]()
Download Article
A simple guide to blocking websites and keywords on your home network
![]()
Download Article
- Using Your Router’s Block Function
- Using Linksys Parental Controls
- Expert Q&A
- Tips
|
|
|
Do you want to prevent people on your home or office network from opening certain websites? If you want to keep prying eyes away from certain sites, you don’t have to fork out cash for a net monitoring program. Nearly all home routers, including Netgear, TP-Link, and Xfinity, have built-in firewalls and/or parental control options that make it easy to block sites like YouTube, Facebook, and just about anything else. You’ll just need to log in to your router’s admin website through your web browser, which is easy to do. This wikiHow article will walk you through blocking unwanted websites on any router.
Things You Should Know
- If you purchased your own router, chances are that you can access its settings to filter sites that you don’t want to allow.
- In case you rent your router and don’t have the option to access its settings, you can instead edit the «Host» file on your Windows computer.
- For Macs, use Screen Time to prevent specific pages, like YouTube, from opening.
-
1
Open your router’s configuration page. The steps to block a website on your router are going to be very different depending on your router model. In most cases, you’ll need to access your router’s admin page, which you can get to by visiting its IP address in your web browser.
- Check out our guide to find your router’s IP address, or try these common options for the most popular routers:
- Linksys – https://myrouter.local
- D-Link — http://192.168.0.1
-
Netgear – http://www.routerlogin.net[1]
- Belkin — http://192.168.2.1
- ASUS — http://192.168.50.1/
- AT&T U-verse — http://192.168.1.254
- Xfinity — http://10.0.0.1
-
2
Log in to your router. Your router has a default username and password (or sometimes just a password, depending on the router). If you haven’t changed the login information, you can visit https://www.routerpasswords.com and search for your model to find the default login information.
Advertisement
-
3
Find the URL Filtering or Blocking section. The location of this will vary depending on your router. You may find this in the «Firewall» menu, or in the «Security» section.
- On a Netgear router, go to Advanced > Security > Block Sites.[2]
- If you have a TP-Link router, look for Access Control and select Host to block websites.[3]
- On most Arris routers, you’ll need to go to Firewall > Access Control.[4]
- Some routers have built-in parental controls that make it easy to block websites. For example, on a Huawei router, you can go to More Functions > Security Settings > Parental Controls to block any site or service.[5]
- On an Xfinity router (non-xFi), go to Parental Controls > Managed Services, choose Enable, and you’ll see the option for Blocked Sites.[6]
- On a Netgear router, go to Advanced > Security > Block Sites.[2]
-
4
Add the URLs or keywords that you want to block. Enter each URL that you want to block on your connected devices.[7]
- For example, if you have a Netgear router, you can enter «www.youtube.com» to block the YouTube website, but you can also enter «Roblox» if you want to block everything that mentions «Roblox.»
-
5
Save your settings. Click the «Save» or «Apply» button to save your settings. Your router will apply the settings and reboot, which may take about a minute.
- After saving your settings, try visiting the sites you added to your blocked list. If you can still access the sites, try using this guide to block websites from all browsers on your computer instead.


Advertisement
-
1
-
2
Click Parental Controls. It’s in the menu on the left side of the page, the third icon from the top that looks like a triangle.
-
3
Click the switch to turn it on
. You’ll see this switch under the «Enable parental controls» header.
-
4
Click the device that you want to manage. In the box under the header «Restrict Internet access on», you’ll see a list of all the devices on your network. Click one to be able to manage its access to the internet.
-
5
Configure that device’s settings. You can restrict that device «Never», «Always», or «Specific Times.» Once you select either «Always» or «Specific Times,» you’ll be able to add URLs and keywords you want to block.
-
6
Click OK. This saves your changes.[8]
- Your child can still access those restricted sites if they use a different network other than your own, like a cell phone using mobile data instead of Wi-Fi.


Advertisement
Add New Question
-
Question
How do I block unwanted sites on Google Chrome?

Stan Kats is a Professional Technologist and the COO and Chief Technologist for The STG IT Consulting Group in West Hollywood, California. Stan provides comprehensive technology solutions to businesses through managed IT services, and for individuals through his consumer service business, Stan’s Tech Garage. Stan holds a BA in International Relations from The University of Southern California. He began his career working in the Fortune 500 IT world. Stan founded his companies to offer an enterprise-level of expertise for small businesses and individuals.
Professional Technologist
Expert Answer
Use the built-in software that your router already has. Most routers have spots where you can enter specific sites that you don’t want people to visit.
-
Question
How can I see the WiFi password in LAN connected computer?
Look for the default Gateway, it’s generally the IP address of the Router. Open that address in a web browser. Then login to the login page of router (the general id is «admin» and password is «password» or «admin» or look on the net for default router passwords). Look for wireless settings, there you can get the password. Note: this won’t work if the default credentials are changed for the router login page or if they are using a firewall.
-
Question
Can I block Google Hangouts?
Yes, you do it the same way as any other site, the method is explained well in the article above.

See more answers
Ask a Question
200 characters left
Include your email address to get a message when this question is answered.
Submit
Advertisement
-
Many modern routers have simple mobile apps that make it easy to configure your router from your phone or tablet. For example, you can install the Linksys or Xfinity mobile app to manage your parental controls on the go.
Advertisement
About This Article
Thanks to all authors for creating a page that has been read 857,767 times.
Is this article up to date?
Потребность блокировки доступа к определённым сайтам может возникнуть по разным причинам. Например, когда родители не хотят, чтобы дети зависали в соцсетях или заходили на интернет-ресурсы для взрослых. Или в офисе, чтобы сотрудники работали, не отвлекаясь на веб-сёрфинг. Способов для этого существует немало. Но в этой статье мы рассмотрим самый эффективный – блокировку сайта на роутере.
Ограничение доступа в интернет
Заблокировать доступ к сайту или нескольким сайтам на компьютере можно разными способами:
- Отредактировать файл hosts, который находится в папке C:\Windows\System32\drivers\etc. Открыть его можно с помощью стандартной программы «Блокнот». В этот файл дописываются адреса сайтов, которые нужно заблокировать. После сохранения изменений и перезагрузки компьютера эти сайты загружаться не будут.
- Запретить доступ к сайтам в брандмауэре Wndows. Сайты блокируются по IP-адресу. Также брандмауэр позволяет заблокировать доступ в интернет программам, например, мессенджерам.
- В популярном браузере Google Chrome есть специальное расширение Block Site, которое нужно установить из магазина Chrome. С помощью этого расширения можно запретить доступ к сайтам в этом браузере. В других браузерах при этом сайты работать будут.
- Кроме того, доступ к сайтам можно ограничить с помощью различных сервисов. Например, OpenDNS, Skydns.ru, Яндекс.DNS. Или же посредством специального программного обеспечения.
Недостаток этих способов в том, что настраивать блокировку нужно вручную на каждом компьютере. Кроме того, если пользователь ПК в курсе того, как это работает, он сможет изменить настройки и открыть доступ к заблокированным ресурсам.
Поэтому более надёжным способом блокировки является ограничение доступа в интернет через роутер. Преимущества этого способа очевидны:
- Можно настроить блокировку как для конкретного компьютера по МАС-адресу или IP, так и для нескольких компьютеров или для всех компьютеров в сети.
- Пользователи клиентских устройств, не имея доступа к роутеру, не смогут изменить настройки.
Настройка блокировки на роутере
Принципы настройки блокировки сайтов аналогичны для большинства роутеров, однако в веб-интерфейсе устройств разных производителей имеются некоторые различия. Мы рассмотрим как заблокировать доступ к сайтам на примере роутеров трёх производителей – TP-Link, Asus и ZyXEL.
TP-Link
В роутерах TP-Link имеется встроенная функция «Контроль доступа», которая позволяет либо запретить доступ к определённым сайтам либо наоборот разрешить доступ только к определённым сайтам.
Настройка целей
Для настройки блокировки войдите в веб-интерфейс вашего роутера. Найдите в меню пункт «Контроль доступа» или Access Control, если у вас англоязычная версия прошивки. Откройте подпункт «Цель» (Target). Здесь нужно добавить правило блокировки. Для этого нажмите кнопку «Создать» (Add New).

В открывшемся окне в пункте «Режим» выберите из выпадающего списка «Доменное имя», а в следующем окошке введите описание правила. В описании можете написать что угодно. Далее в полях «Доменное имя» введите адрес или часть адреса сайта, который вы хотите заблокировать. В данном примере показана блокировка социальных сетей на роутере: ВКонтакте, Facebook, Одноклассники и Мой Мир.

Не обязательно писать полный адрес. Например, для того чтобы заблокировать доступ к сайту YouTube на роутере, достаточно ввести «youtube». Тогда будет блокирован доступ ко всем сайтам, в адресе которых присутствует это слово.
Таких правил вы можете создать сколько угодно. В нашем примере мы создали 2 цели: для блокировки основных соцсетей и для YouTube. На всякий случай для YouTube было прописано «youtube.com».

Теперь вам нужно указать доступ с каких устройств или компьютеров вашей сети будет блокироваться.
Настройка узлов
Для этого переходим в разделе «Контроль доступа» в другой подпункт – «Узел» (Host). Здесь жмём кнопку «Добавить».

Можно указать IP-адреса устройств, если они в вашей сети статические. Но, как правило, они динамические. Поэтому блокировать лучше по МАС-адресу. Для этого в поле «Режим» выбираем «МАС-адрес», в поле «Имя узла» вводим любое описание, а в поле «МАС-адрес» вписываем адрес устройства, на котором нужно заблокировать доступ.

Включение
Параметры блокировки настроены. Теперь её нужно включить.
Для этого в пункте «Контроль доступа» выбираем подпункт «Правило». Здесь первым делом ставим галочку «Включить управление контролем доступа к Интернет» и жмём кнопку «Сохранить». Прокручиваем страницу вниз и жмём кнопку «Создать».

Придумываем название для правила блокировки, в поле «Узел» выбираем из списка нужный компьютер, в поле «Цель» — список блокируемых сайтов. Сохраняем настройки и перезагружаем роутер.

В данном случае была выбрана любая цель. Хотя в выпадающем меню можно было бы выбрать одну из ранее созданных целей: для блокировки YouTube или соцсетей.
ZyXEL
На роутерах фирмы ZyXEL в прошивке установлены два сервиса, с помощью которых можно ограничить доступ к сайтам. Это SkyDNS и Яндекс.DNS. В старых версиях прошивки этих сервисов нет. В этом случае нужно обновить ПО устройства.
Яндекс.DNS предназначен для блокировки вредоносных сайтов и сайтов для взрослых, но в нём нет возможности вручную указать адреса сайтов, к которым нужно закрыть доступ. Эта возможность присутствует в SkyDNS.
Регистрация в SkyDNS
Войдите в веб-интерфейс роутера и перейдите на вкладку «Безопасность». Вверху страницы выберите вкладку SkyDNS. Если вы не пользовались этим сервисом ранее, появится окно с предложением зарегистрироваться. Перейдите по ссылке на сайт и пройдите процедуру регистрации. Потребуется указать адрес электронной почты и придумать пароль. А потом выбрать тарифный план.
Сервис SkyDNS не совсем бесплатный, однако платить нужно только за расширенные возможности. Базовым функционалом можно пользоваться бесплатно.
Настройка роутера
После регистрации вы можете войти в личный кабинет и настроить блокировку сайтов. Есть возможность заблокировать доступ сразу к целым категориям сайтов. Например, к соцсетям. Для этого перейдите во вкладку «Фильтр» и поставьте галочки напротив нужных категорий. Если же вам нужно заблокировать конкретные сайты, нажмите кнопку «Разрешить всё», сохраните настройки и перейдите во вкладку «Домены». Здесь есть раздел «Чёрный список», в который вы можете добавить адреса сайтов, которые нужно заблокировать. Этот список можно редактировать, добавлять и удалять сайты в любое время, зайдя в личный кабинет SkyDNS.
Собственно, это всё, что нужно сделать. Теперь необходимо выполнить дополнительные настройки на роутере, чтобы сервис заработал на вашем устройстве.
Снова идём на вкладку SkyDNS и в открывшемся окне укажите адрес электронной почты и пароль, которые вы ввели при регистрации. Поставьте галочку в пункте «Включить» и сохраните настройки.
Бесплатный функционал SkyDNS не позволяет создавать правила блокировки для разных клиентских устройств вашей сети. То есть доступ к чёрному списку сайтов будет заблокирован на всех устройствах. Для создания отдельных профилей для каждого устройства или ПК вам придётся перейти на платный тариф.
Профили для устройств создаются там же, в личном кабинете на сайте SkyDNS. Перейдите в пункт «Настройки» — «Профили». И добавьте нужные вам профили, дав им названия. Например, «Для планшета», «Для ПК №2» и так далее. Потом во вкладке «Фильтры» задайте фильтры для каждого профиля. После этого войдите в веб-интерфейс роутера, откройте вкладку «Домашняя сеть» и кликните на устройство, которому вы хотите задать профиль. Откроется окно, в котром нужно поставить галочку напротив пункта «Постоянный IP-адрес» и нажать кнопку «Зарегистрировать». Все зарегистрированные устройства появятся на вкладке SkyDNS. Напротив каждого устройства можно выбрать нужный профиль.
Asus
Производитель роутеров Asus почему-то не удосужился сделать полноценную возможность блокировки для сайтов. В веб-интерфейсе устройства есть функция «Родительский контроль», однако она не решает данную задачу. С её помощью можно настроить ограничение доступа в интернет по времени для определённых устройств. На сайте есть отдельная статья про родительский контроль. Блокировать сайты посредством этой функции нельзя.
Есть возможность настроить фильтрацию адресов с помощью встроенного брандмауэра. Однако здесь нет возможности задать параметры блокировки для конкретного устройства. А также брандмауэр не позволяет заблокировать доступ к сайтам с адресом https.
Для того, чтобы воспользоваться этой функцией, перейдите на вкладку «Брандмауэр». Здесь минимум настроек. Блокировать сайты можно по адресам и ключевым словам.
Заключение
Таким образом, наиболее полноценно функция блокировки сайтов реализована на роутерах TP-Link. Разработчики ZyXEL поленились создать собственный функционал и обладателям этих роутеров приходится использовать сторонний сервис, который к тому же не бесплатный. А в роутерах Asus функция блокировки доступа к сайтам представлена в сильно урезанном виде.
![]()
Загрузить PDF
![]()
Загрузить PDF
Чтобы заблокировать определенные сайты, не нужно тратиться на специальные программы, нужно просто изменить настройки своего маршрутизатора. Если веб-сайты, которые вы хотите заблокировать, зашифрованы, используйте бесплатный сервис, такой как OpenDNS, чтобы отфильтровать сайты.
-
1
Проверьте, зашифрован ли сайт, который вы хотите заблокировать. Большинство домашних маршрутизаторов не могут блокировать доступ к зашифрованным (с префиксом https://) веб-сайтам. Чтобы определить, зашифрован ли сайт, поищите значок в виде замка слева от адреса сайта. Если сайты, которые вы пытаетесь заблокировать, зашифрованы, перейдите к следующему разделу.
-
2
-
3
Введите свои учетные данные. Если вы не меняли их, введите учетные данные, установленные производителем маршрутизатора. В большинстве случаев и в качестве имени пользователя, и в качестве пароля нужно ввести «admin» (или ничего не вводить). Если вы не знаете, какие учетные данные вводить, обратитесь к инструкции к маршрутизатору.
-
4
Найдите раздел «URL Filtering» (Фильтрация) или «Blocking» (Блокировка). Расположение этой опции зависит от модели маршрутизатора; скорее всего, вы найдете ее в меню «Firewall» (Брандмауэр) или в разделе «Security» (Безопасность).[1]
-
5
Введите URL-адреса сайтов, которые нужно заблокировать на подключенных устройствах. Помните, что заблокировать адреса с префиксом https:// не получится, поэтому этот метод не такой эффективный. О том, как заблокировать зашифрованный сайт, читайте в следующем разделе.
-
6
Сохраните настройки. Нажмите «Save» (Сохранить) или «Apply» (Применить). Маршрутизатор перезагрузится; на это уйдет около минуты.
-
7
Попробуйте открыть сайты, адреса которых вы добавили в настройки маршрутизатора. Если сайты открываются, они, скорее всего, зашифрованы; в этом случае воспользуйтесь сервисом OpenDNS (перейдите в следующий раздел).
Реклама


-
1
Подпишитесь на бесплатный план OpenDNS Home. Чтобы заблокировать определенные сайты, лучше воспользоваться сервисом OpenDNS, чем менять настройки маршрутизатора. Это связано с тем, что большинство домашних маршрутизаторов не блокируют сайты с префиксом https:// (зашифрованные сайты), причем зашифрованных сайтов становится все больше. OpenDNS может фильтровать зашифрованные сайты для всех пользователей в вашей сети.[2]
- Бесплатно зарегистрироваться можно на странице opendns.com/home-internet-security/.
-
2
-
3
Введите свои учетные данные. Сделайте это, чтобы попасть на страницу конфигурации. Если вы не меняли учетные данные, и в качестве имени пользователя, и в качестве пароля нужно ввести «admin» (или ничего не вводить).
-
4
Найдите раздел «WAN» или «Internet» (Интернет). Он, скорее всего, находится в разделе «Basic Setup» (Основные настройки).
-
5
Отключите автоматическое назначение DNS-серверов. Сделайте это, чтобы вручную ввести нужные адреса DNS-серверов.
-
6
Введите адреса серверов OpenDNS. В двух строках введите следующие адреса серверов OpenDNS:
- 208.67.222.222
- 208.67.220.220
-
7
Сохраните настройки. Нажмите «Save» (Сохранить) или «Apply» (Применить). Маршрутизатор перезагрузится; на это уйдет 1–2 минуты.
-
8
Откройте панель управления OpenDNS. Перейдите на страницу opendns.com и войдите в свою учетную запись. Откроется панель управления OpenDNS.
-
9
Щелкните по вкладке «Settings» (Настройки) и введите IP-адрес домашней сети. IP-адрес отобразится в верхней части панели управления. Введите этот адрес в поле «Add a network» (Добавить сеть). В этом случае OpenDNS будет регистрировать трафик из вашей сети и блокировать сайты.
- Вам придется подтвердить свою сеть с помощью электронного письма, которое будет отправлено на электронный адрес, введенный вами при регистрации на OpenDNS.
-
10
Откройте раздел «Web Content Filtering» (Фильтрация контента) на вкладке «Settings» (Настройки). Теперь укажите, какой контент нужно заблокировать.
-
11
Выберите один из предустановленных уровней фильтрации (если хотите). Выберите «Low» (Низкий), «Medium» (Средний) или «High» (Высокий) уровень. Имейте в виду, что OpenDNS регулярно обновляет списки блокируемого контента.
-
12
Добавьте сайты, которые вы хотите заблокировать, в список «Manage individual domains» (Управление доменами). В этот список можно добавить до 25 веб-сайтов. Убедитесь, что у каждого сайта выбрана опция «Always block» (Всегда блокировать).
-
13
Очистите DNS-кеш. Сделайте это, чтобы новые настройки вступили в силу. DNS-кеш каждого устройства в вашей сети будет очищен автоматически в течение некоторого времени, но, чтобы настройки вступили в силу немедленно, очистите кеш вручную:
- Windows — нажмите ⊞ Win+R и введите ipconfig/flushdns, чтобы очистить кеш. Теперь проверьте параметры фильтрации.
- Mac OS X — откройте окно терминала (он находится в папке «Утилиты»), введите dscacheutil -flushcache, чтобы очистить кеш, а затем введите sudo killall -HUP mDNSResponder, чтобы перезапустить службу DNS. Вероятно, вам придется ввести пароль администратора.
-
14
Попробуйте открыть сайты, адреса которых вы добавили в настройки OpenDNS. Если сайты блокируются, вы перейдете на страницу OpenDNS «Blocked Site» (Заблокированный сайт).
Реклама


Об этой статье
Эту страницу просматривали 20 100 раз.