В этой инструкции подробно о способах удалить Xbox Game Bar как встроенными средствами системы — с помощью PowerShell, так и с помощью сторонних программ-деинсталляторов.
Удаление Xbox Game Bar в PowerShell
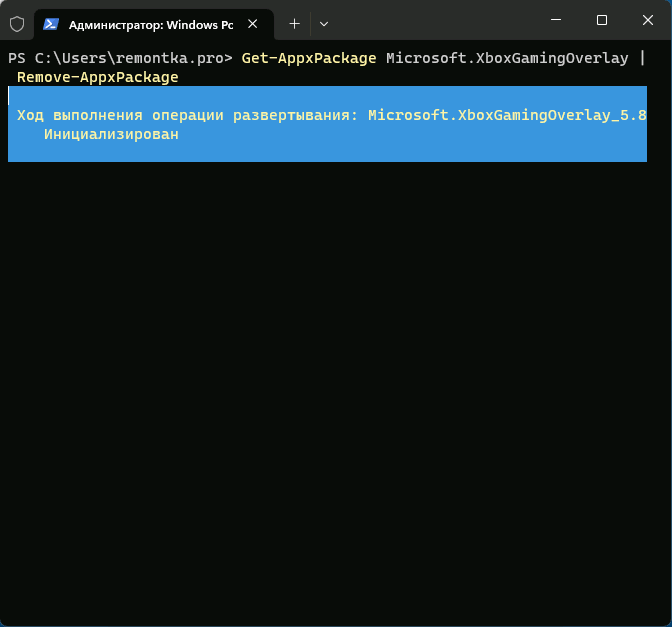
Стандартный способ удаления приложения Xbox Game Bar — использование команды Windows PowerShell. Шаги для этого будут следующими:
- Запустите Терминал Windows или Windows PowerShell от имени Администратора. В Windows 11 и 10 сделать это можно в контекстном меню кнопки «Пуск».
- Введите команду
Get-AppxPackage Microsoft.XboxGamingOverlay | Remove-AppxPackage
и нажмите Enter.
- В результате приложение Xbox Game Bar будет удалено для текущего пользователя, но сам пакет приложения останется на компьютере.
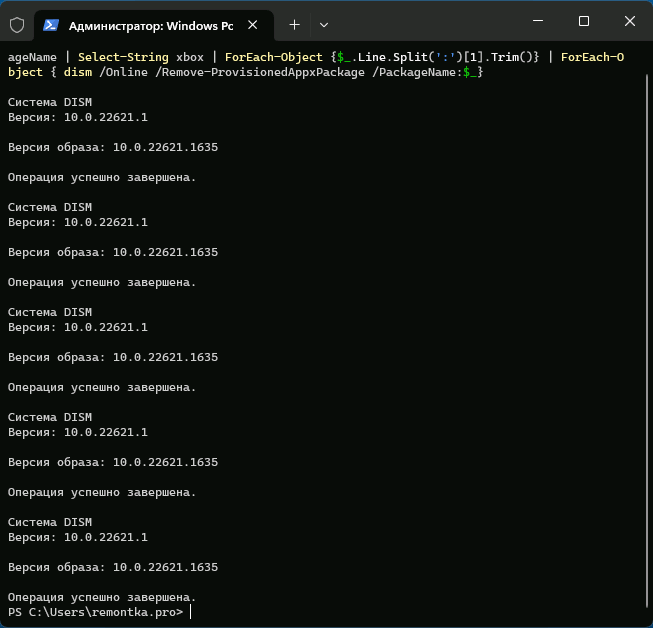
- Ещё три варианта команд, которые удаляет все приложения Xbox (не только Game Bar), также запускаем в PowerShell (первая команда оставляет хранящиеся на компьютере пакеты приложений, вторая и третья — удаляет их):
Get-AppxPackage | select-string xbox | Remove-AppxPackage
dism /Online /Get-ProvisionedAppxPackages | Select-String PackageName | Select-String xbox | ForEach-Object {$_.Line.Split(':')[1].Trim()} | ForEach-Object { dism /Online /Remove-ProvisionedAppxPackage /PackageName:$_}
Get-ProvisionedAppxPackage -Online | Where-Object { $_.PackageName -match "xbox" } | ForEach-Object { Remove-ProvisionedAppxPackage -Online -allusers -PackageName $_.PackageName }
Ещё один способ удалить Xbox Game Bar и другие, имеющие отношение к Xbox в PowerShell, указав конкретные пакеты приложений вручную (ключевое в контексте рассматриваемой темы — XboxGamingOverlay):
- Используем команду
Get-AppxPackage | Select-String xbox
чтобы получить имена пакетов.
- Используем по порядку команды
Remove-AppxPackage имя_пакета
для удаления каждого из них, имя пакета можно скопировать в буфер обмена прямо в PowerShell.
- Чтобы удалить их для всех пользователей, используем параметр -allusers
Remove-AppxPackage -allusers имя_пакета
- Для удаления не только установленного приложения, но и соответствующего пакета для всех пользователей:
Remove-ProvisionedAppxPackage -Online -allusers -PackageName имя_пакета
Обратите внимание, что после удаления Xbox Game Bar, вы можете начать получать сообщения об ошибках вида «Вам понадобится новое приложение, чтобы открыть эту ссылку ms-gamingoverlay» или «Получите приложение, чтобы открыть эту ссылку ms-gamingoverlay». Подробно про ошибки ms-gamingoverlay.
Сторонние деинсталляторы
Многие сторонние программы для удаления программ и встроенных приложений Windows позволяют, в том числе, легко удалить Xbox Game Bar. Среди рекомендуемых решений для этих целей:
- BC Uninstaller
- HiBit Uninstaller
Обе программы отлично справятся с задачей удаления Xbox Game Bar с компьютера, а делается это в простом графическом интерфейсе. Но при необходимости вы можете использовать и другие функциональные бесплатные деинсталляторы с функцией удаления встроенных приложений Windows 11 и других версий.
Game Bar в Windows 11 и Windows 10 – это всплывающий полноэкранный оверлей с множеством функций, которые могут понадобится в компьютерных играх. Game Bar позволяет делать скриншоты, записывать видео, управлять воспроизведением звука и записью голоса, отслеживать производительность компьютера, прослушивать музыку с помощью Spotify и общаться с друзьями в сети Xbox. Game Bar открывается при нажатии кнопки на геймпаде от Xbox или комбинацией клавиш Win-G.
Но, далеко не всем пользователям нравится Game Bar. Некоторых он только отвлекает от игры своими внезапными появлениями на весь экран. В данном материале мы расскажем, как отключить или полностью удалить Game Bar в Windows 11 и Windows 10.
Как отключить Game Bar в Windows 11
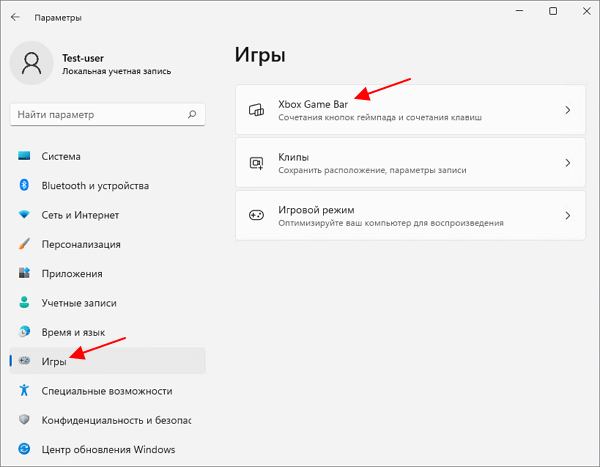
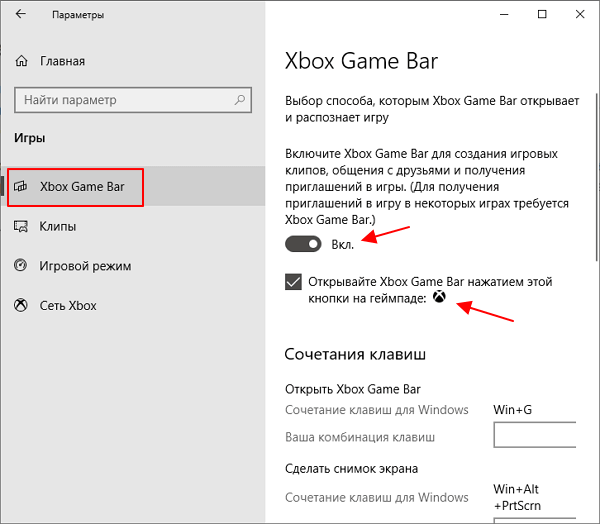
Если вы используете Windows 11, то для отключения Xbox Game Bar нужно открыть меню «Параметры» (комбинация клавиш Win-i) и перейти в раздел «Игры — Xbox Game Bar».
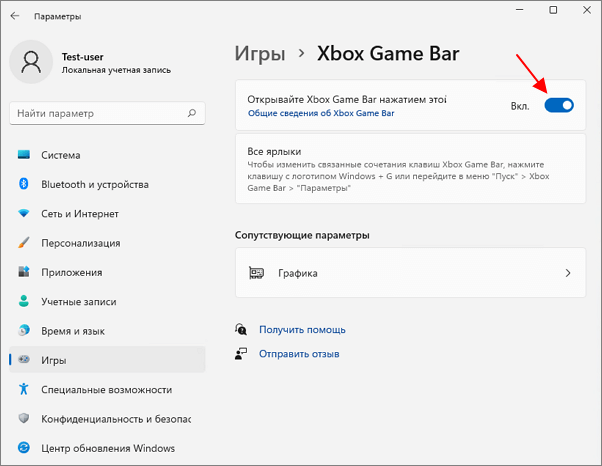
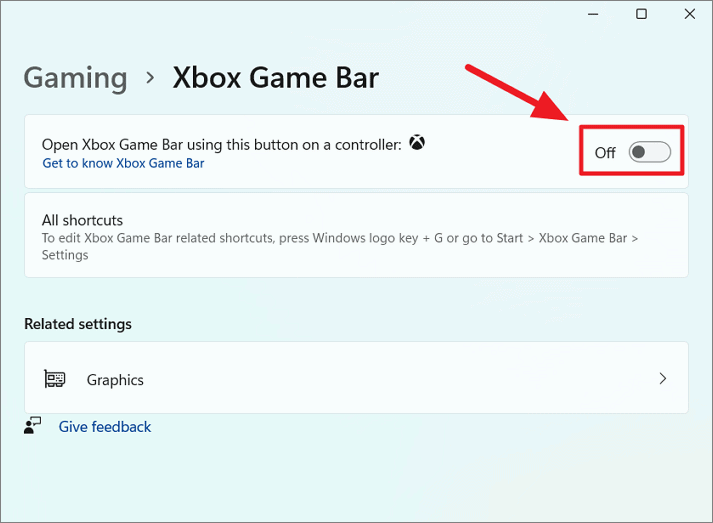
Здесь нужно отключить функцию «Открывайте Xbox Game Bar нажатием кнопки на геймпаде». Это отключит появление оверлея при нажатии на кнопку на геймпаде.
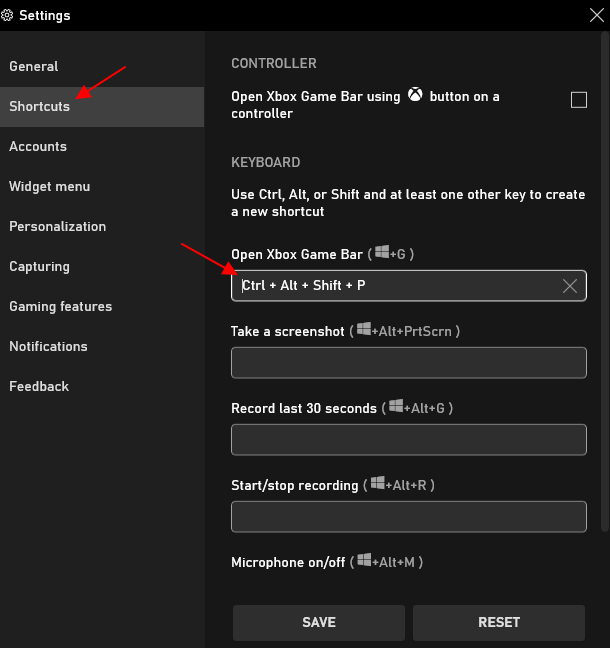
Но, оверлей все еще будет появляться при нажатии комбинации клавиш Win-G. Отключить эту функцию в Windows 11 нельзя (на данный момент), но вы можете изменить комбинацию клавиш, чтобы исключить случайные нажатия.
Для этого откройте оверлей (Win-G), перейдите в настройки (кнопка с шестеренкой), откройте раздел «Shortcuts» и поменяйте комбинацию клавиш.
Например, для открытия оверлея можно настроить что-то вроде Ctrl-Alt-Shift-P.
Как отключить Game Bar в Windows 10
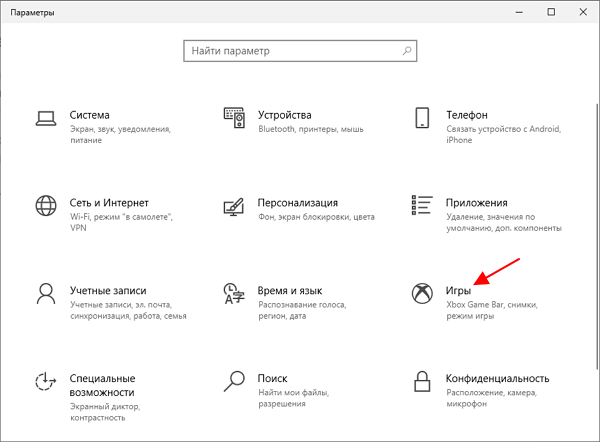
В Windows 10 можно полностью отключить Game Bar. Для этого откройте меню «Параметры» (комбинация клавиш Win-i) и перейдите в «Игры».
Здесь в разделе «Xbox Game Bar» нужно перевести переключатель в положение «Выкл» и снять отметку напротив функции «Открывайте Xbox Game Bar нажатием кнопки на геймпаде».
После этого Game Bar больше не должен появляться во время игры при нажатии комбинации Win-G или при нажатии кнопки на геймпаде.
Как полностью удалить Game Bar в Windows 10
Также есть возможность полностью удалить Game Bar из вашей Windows 11 или Windows 10 при помощи PowerShell. Данный способ не рекомендуется использовать, так как он потенциально может привести к появлению новых ошибок или нестабильной работе других компонентов Windows. Например, возможны проблемы при подключении контроллера от Xbox.
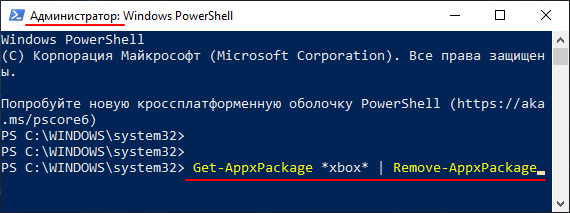
Для того чтобы удалить Game Bar из Windows 11 или Windows 10 нужно запустить PowerShell с правами администратора и выполнить следующую команду:
Get-AppxPackage *xbox* | Remove-AppxPackage
Данная команда удалит из операционной системы все компоненты Xbox. Вместе с ними будет удален и Game Bar.
Посмотрите также:
- Как отключить Xbox DVR в Windows 10
- Как отключить оверлей GeForce Experience в игре
- Как полностью удалить NVIDIA GeForce Experience на Windows 10 или Windows 7
- Как подключить геймпад Xbox One по Bluetooth к ПК с Windows 10
- Как включить счетчик FPS в NVIDIA GeForce Experience
Автор
Александр Степушин
Создатель сайта comp-security.net, автор более 2000 статей о ремонте компьютеров, работе с программами, настройке операционных систем.
Остались вопросы?
Задайте вопрос в комментариях под статьей или на странице
«Задать вопрос»
и вы обязательно получите ответ.
The easiest way is to use the Settings app
by Srishti Sisodia
Srishti Sisodia is an electronics engineer and writer with a passion for technology. She has extensive experience exploring the latest technological advancements and sharing her insights through informative… read more
Updated on
- You can disable the Xbox Game Bar by making changes in the Registry Editor or running a command in PowerShell.
- This guide will cover all the available methods to get this done.
XINSTALL BY CLICKING THE DOWNLOAD
FILE
The Xbox Game Bar is a helpful app for gamers as it contains a set of widgets that allow users to record videos and capture gameplay screenshots. However, if you have no use for the application, you can disable it to free system resources.
This guide will cover all the methods that enable you to disable the Xbox Game bar on Windows 11.
How can I disable the Xbox Game Bar on Windows 11?
1. Use the Settings
- Press Windows + I to open Settings.
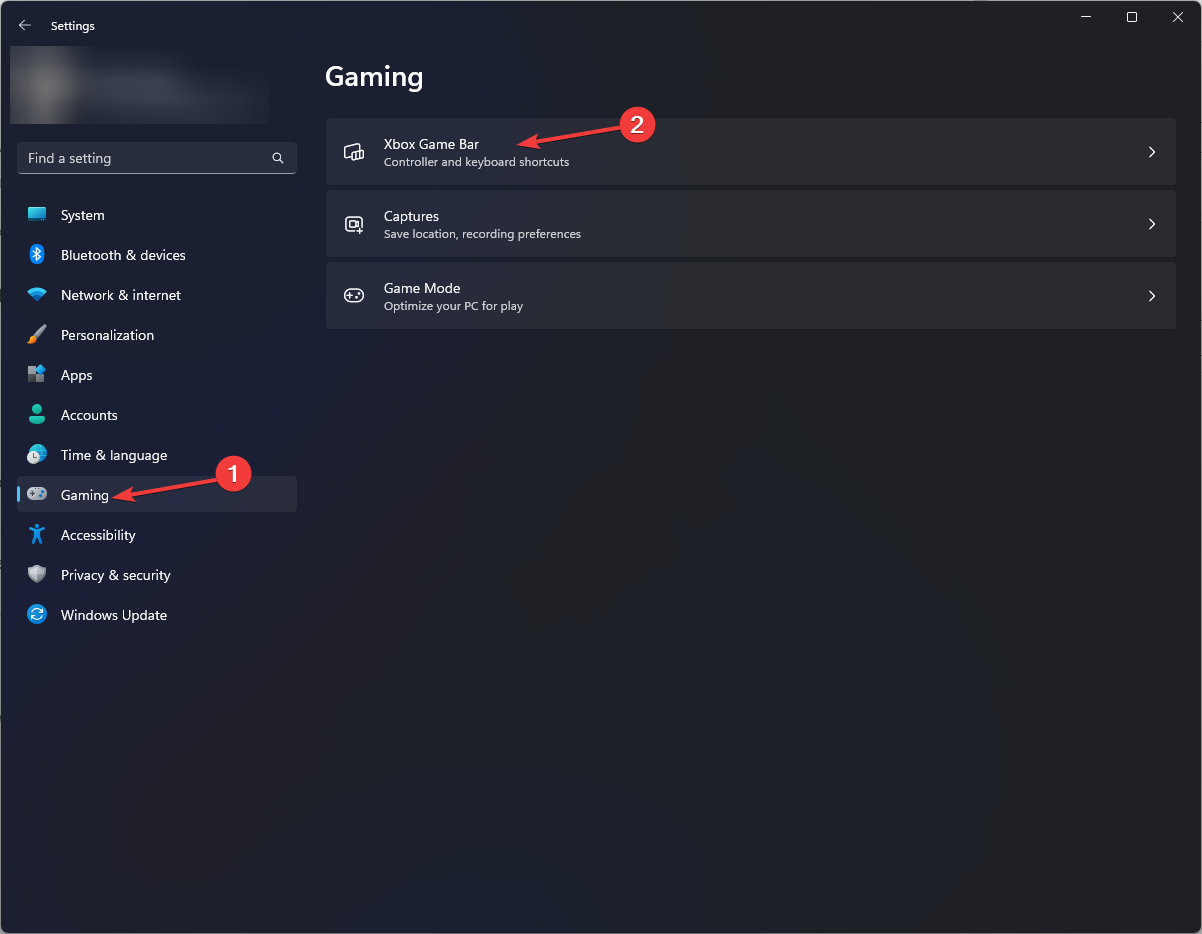
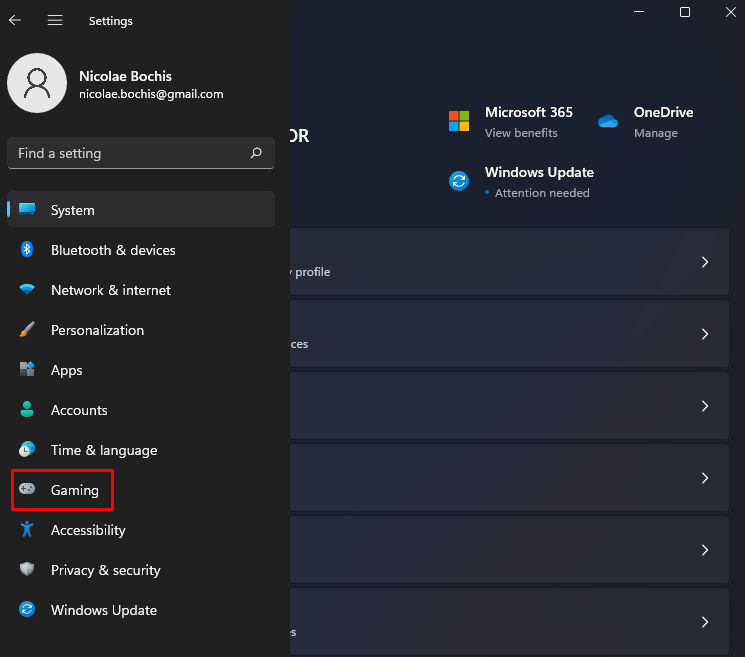
- From the left pane, click Gaming.
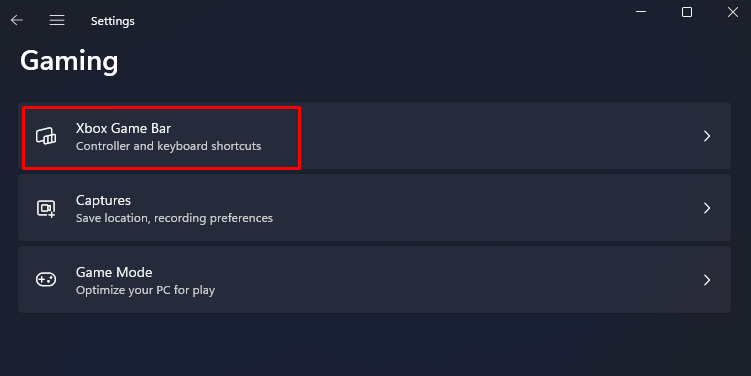
- Next, click the Xbox Game Bar option.
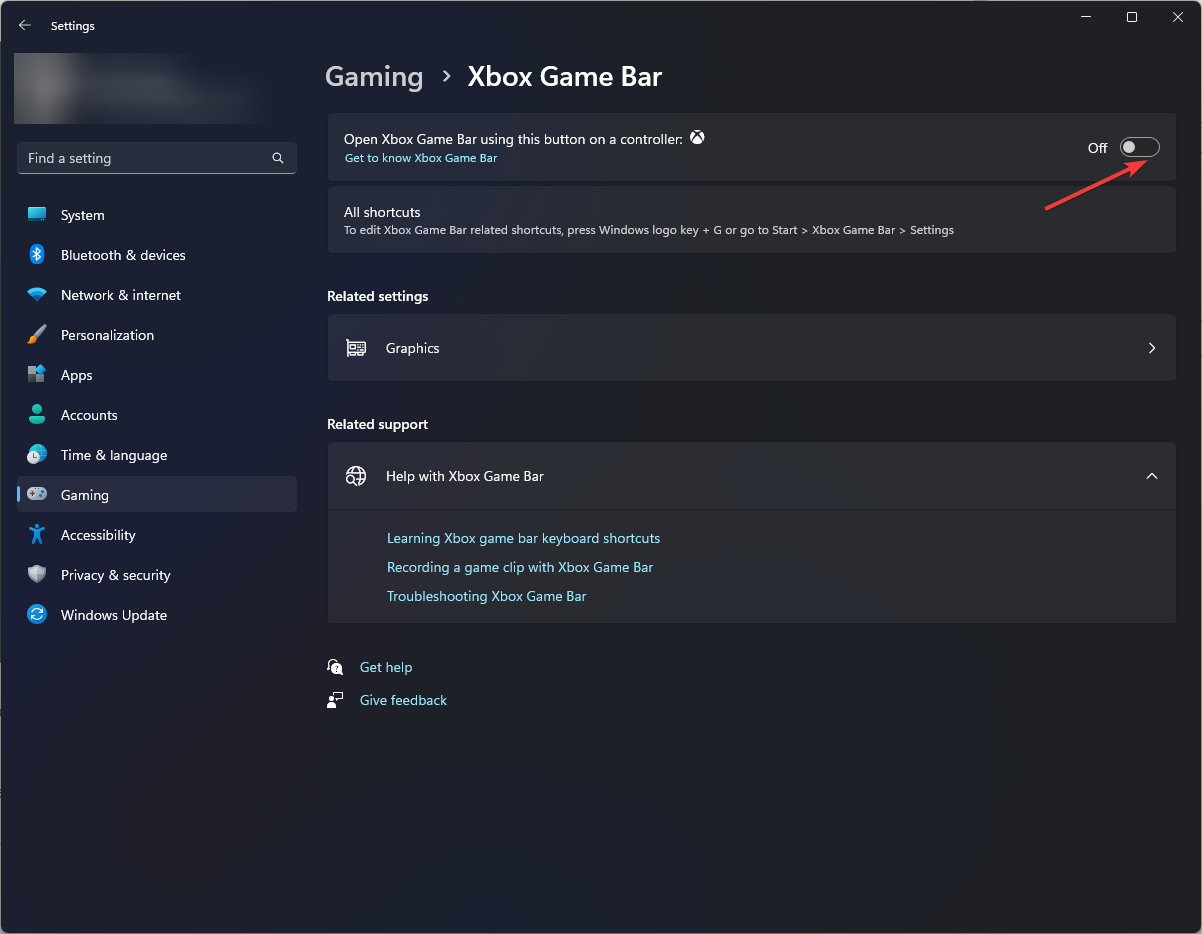
- Toggle off the switch next to Open Xbox Game Bar using this button on a controller.
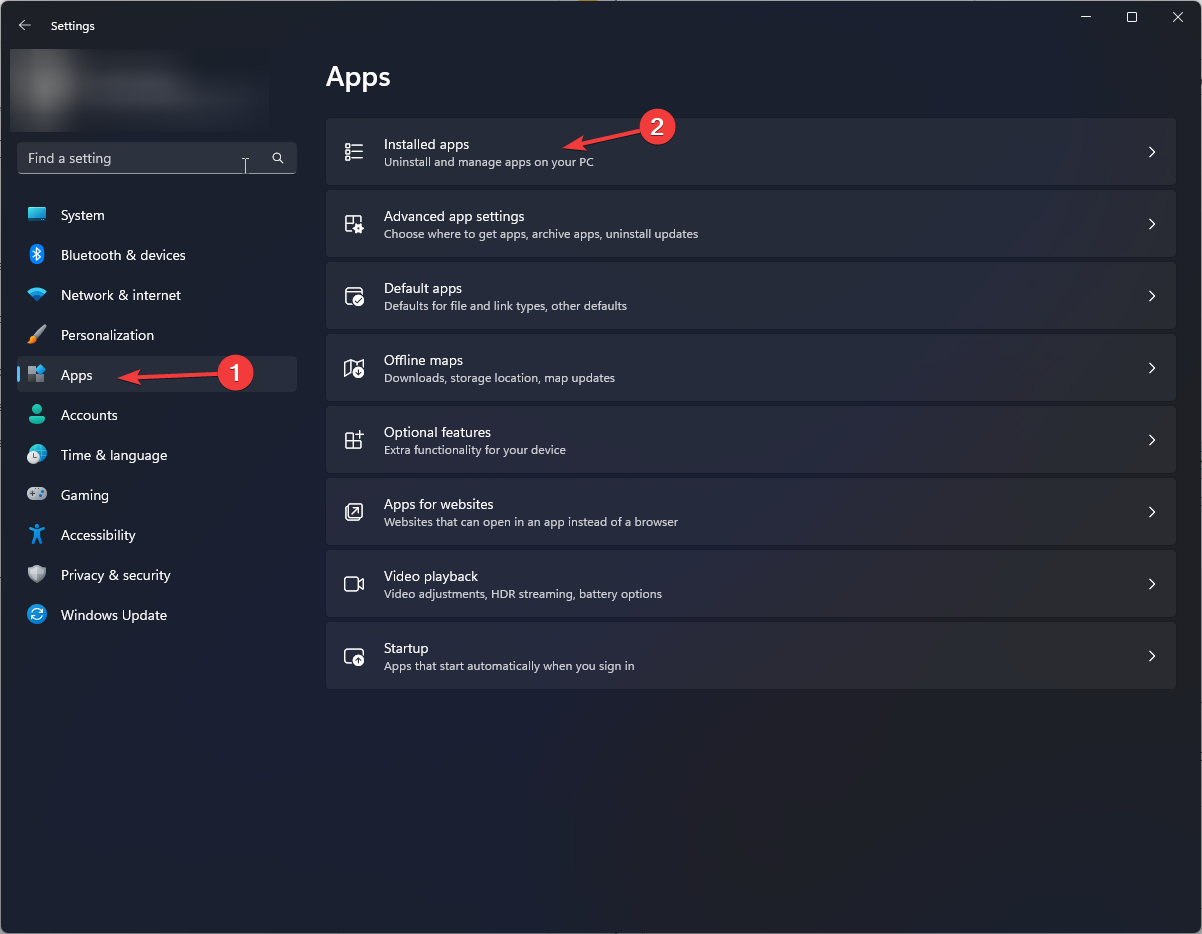
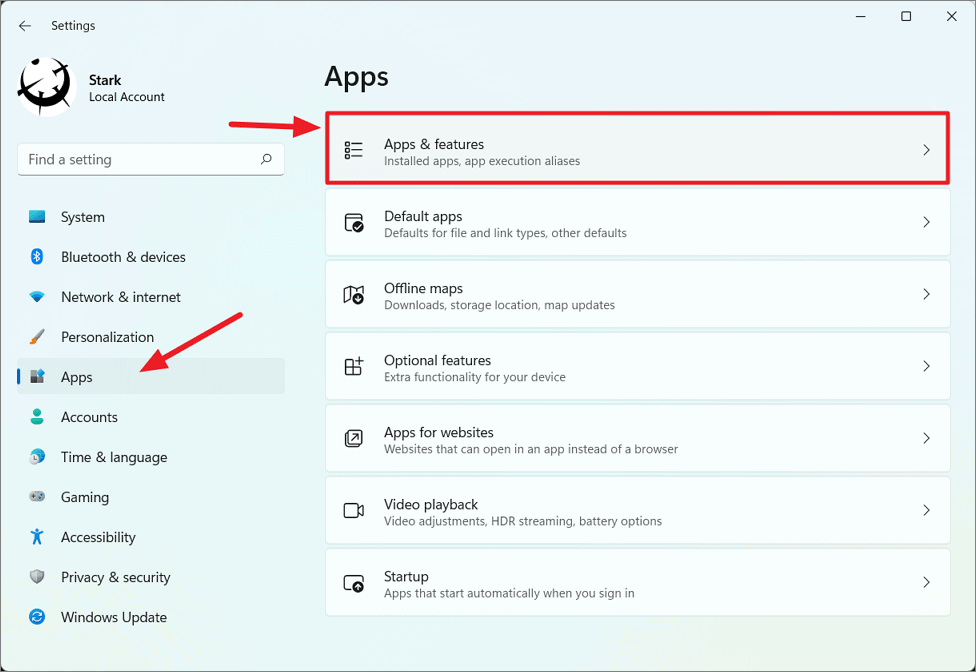
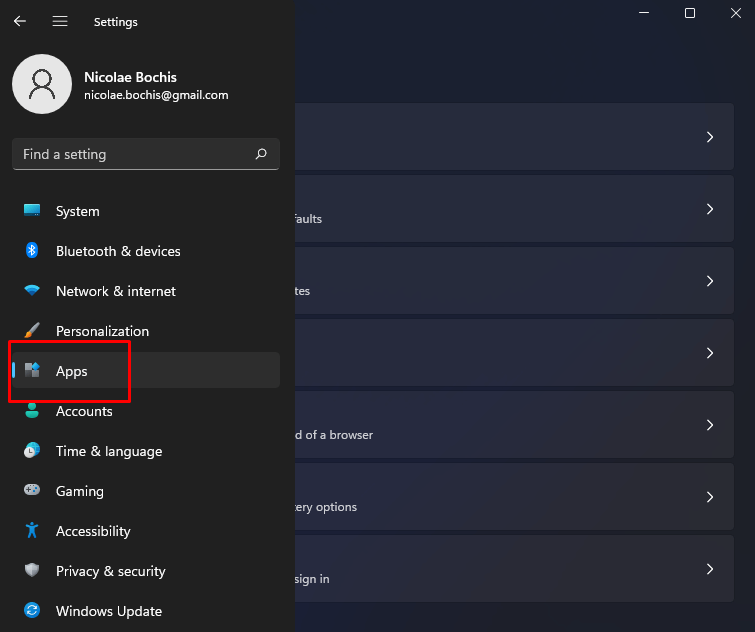
- Go back to the main page of Settings. Click Apps, then select Installed apps.
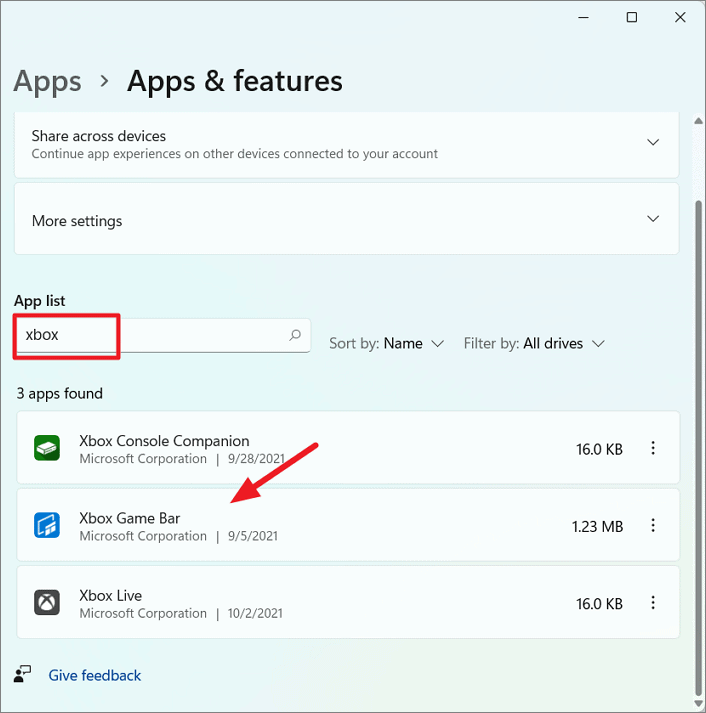
- Now under Installed apps, in the search bar, type Xbox.
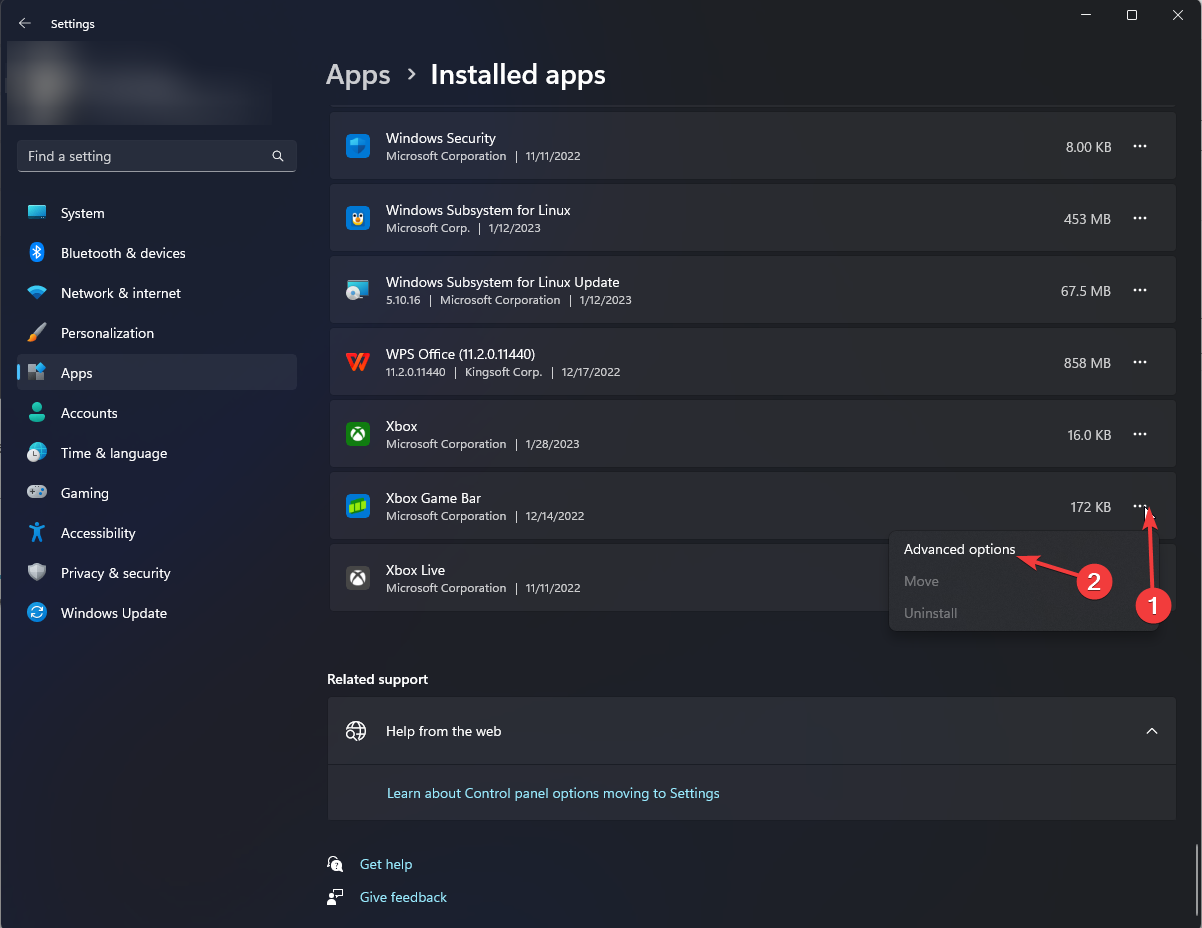
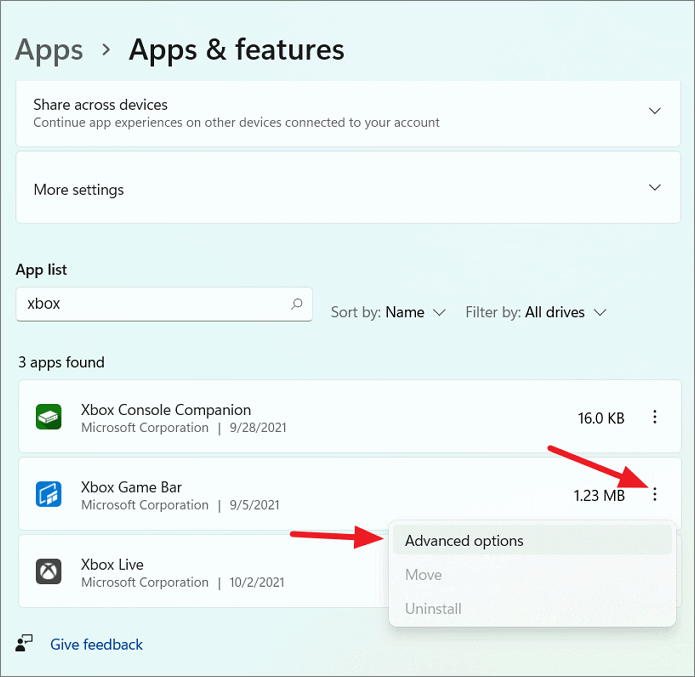
- Click the three dots next to the Xbox Game Bar, and select Advanced options.
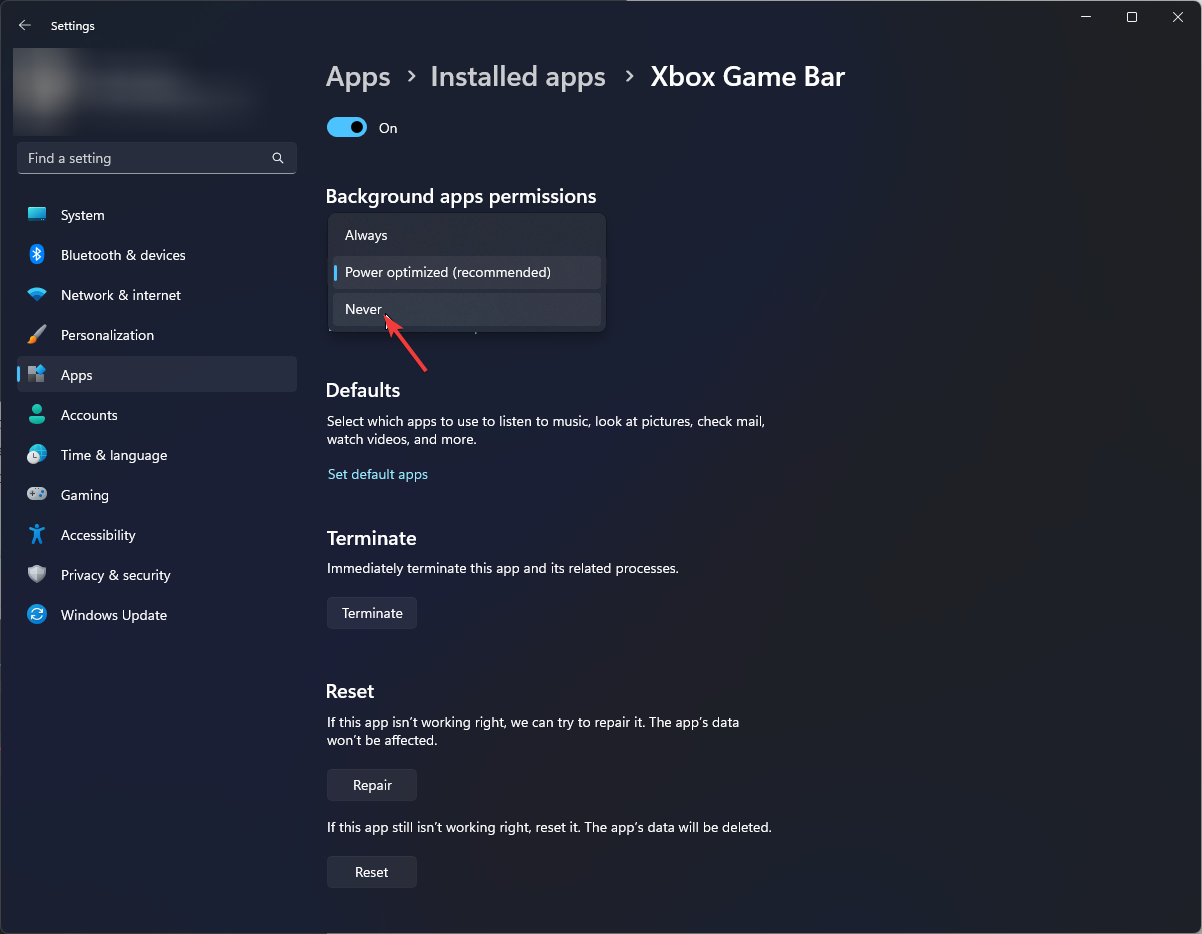
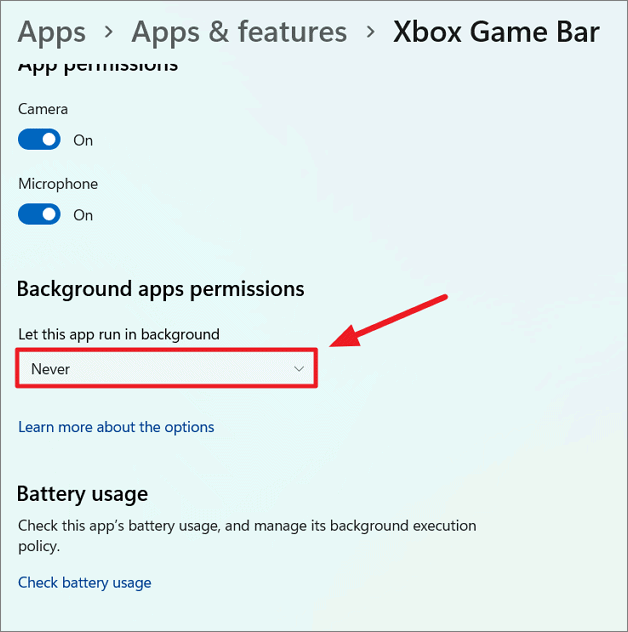
- Scroll down to the Background apps permissions section and select Never from the drop-down.
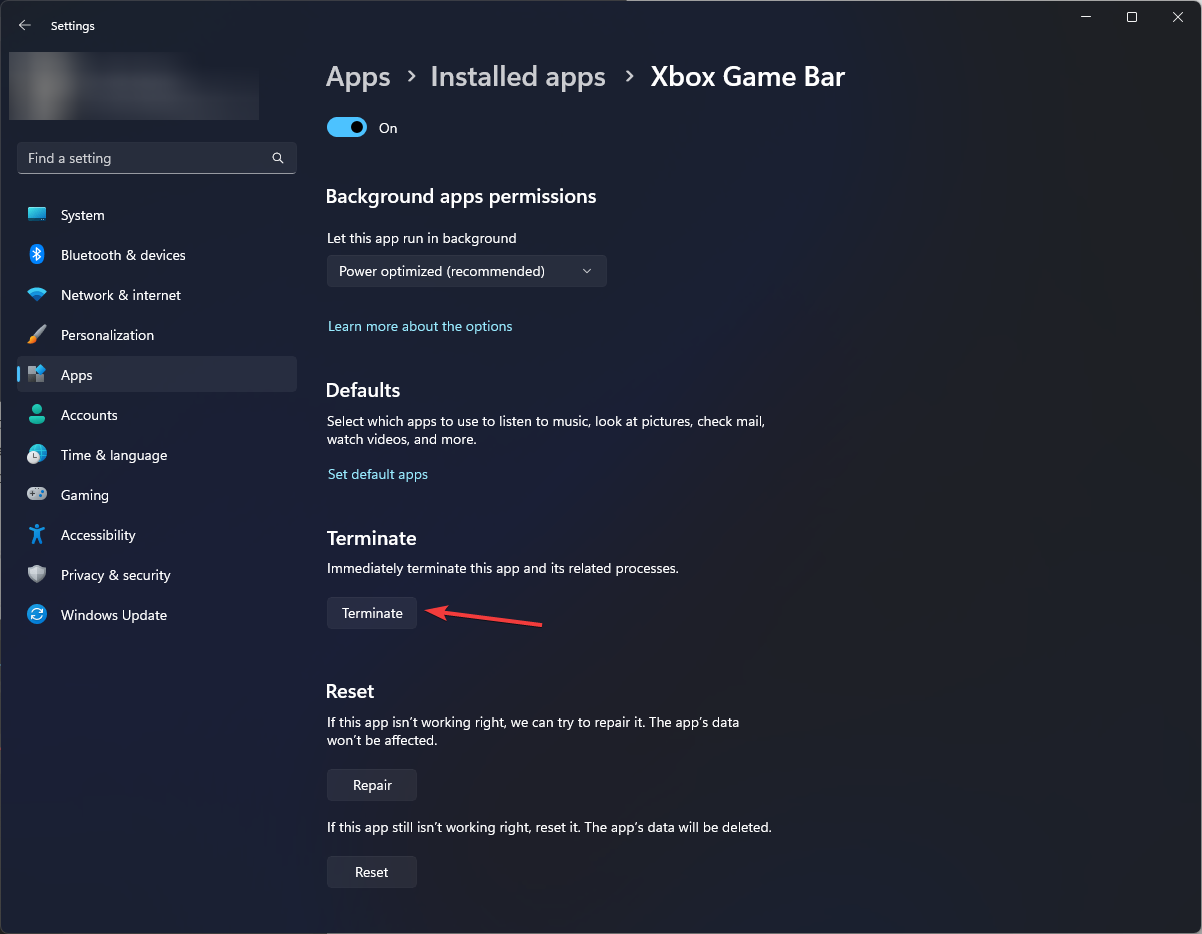
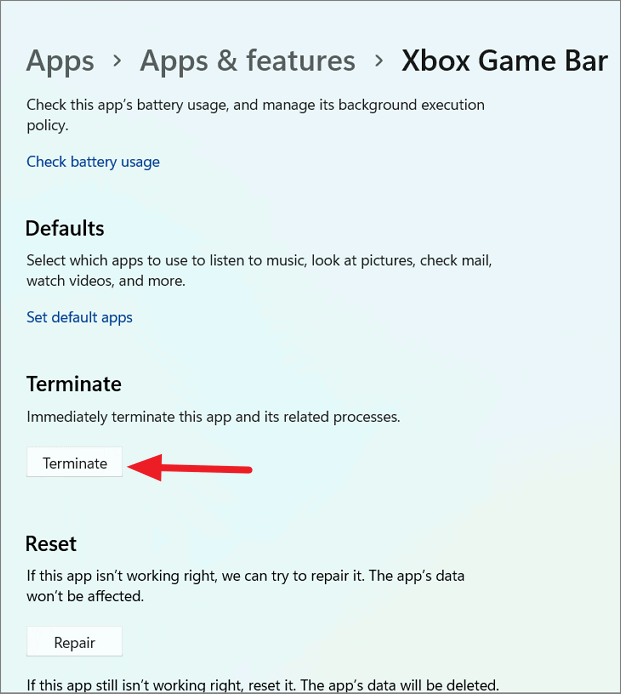
- Now scroll a bit more, and click the Terminate button.
2. Use the Windows PowerShell
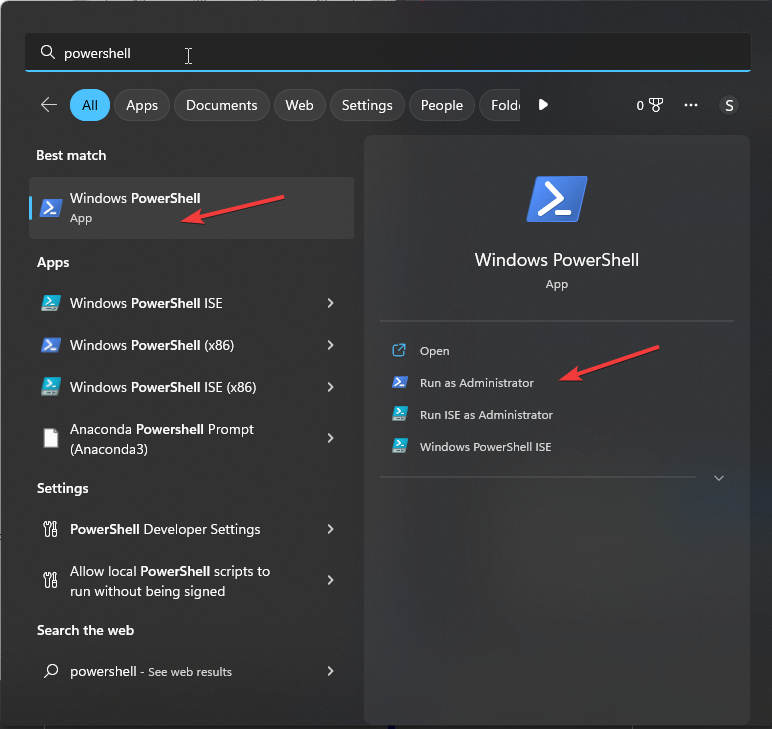
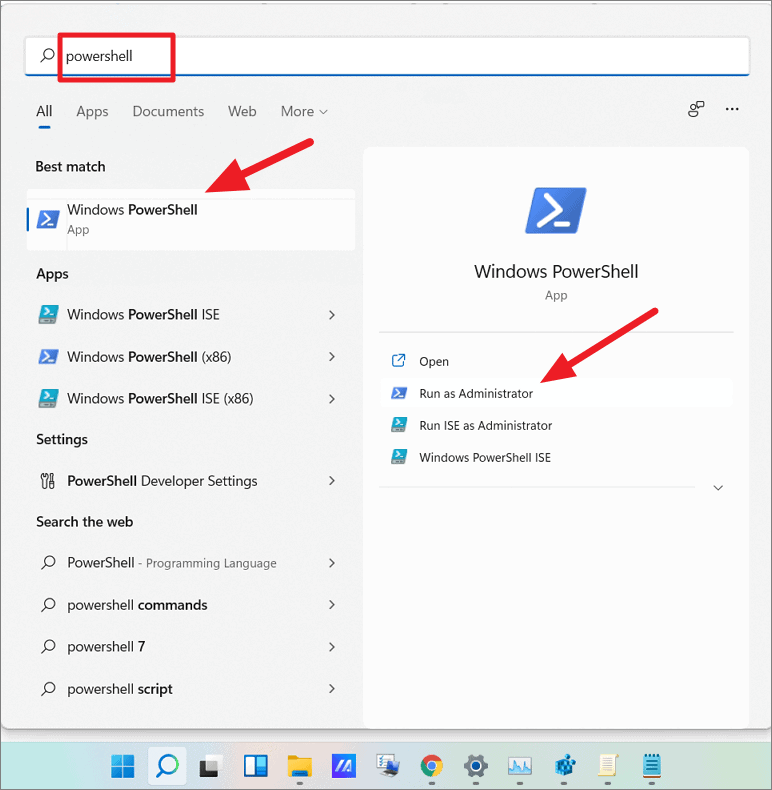
- Press the Windows key, type PowerShell, and click Run as administrator.
- Type the following command to check the packages on your computer and press Enter:
dism /Online /Get-ProvisionedAppxPackages | Select-String PackageName | Select-String xbox - Copy and paste the following command to uninstall and press Enter:
Get-ProvisionedAppxPackage -Online | `
Where-Object { $_.PackageName -match "xbox" } | `
ForEach-Object { Remove-ProvisionedAppxPackage -Online -PackageName $_.PackageName } - Type the following command to check if the Xbox packages are deleted and hit Enter:
dism /Online /Get-ProvisionedAppxPackages | Select-String PackageName | Select-String xbox
- Fix: XP-Pen is Detected as a Keyboard on Windows 11
- How to Find Restored Files From Recycle Bin on Windows 11
- Fix: Can’t Turn Off Real-Time Protection on Windows 11
3. Use the Registry Editor
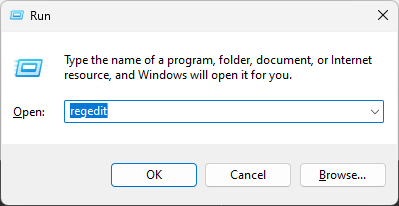
- Press Windows + R to open the Run window.
- Type Regedit and hit Enter to open Registry Editor.
- Click Yes on the UAC prompt.
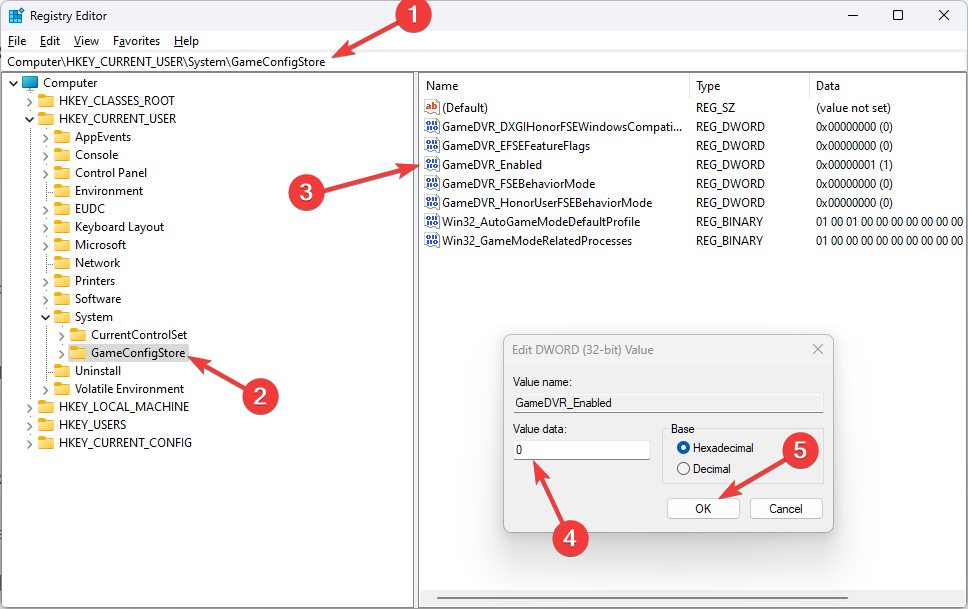
- Follow this path:
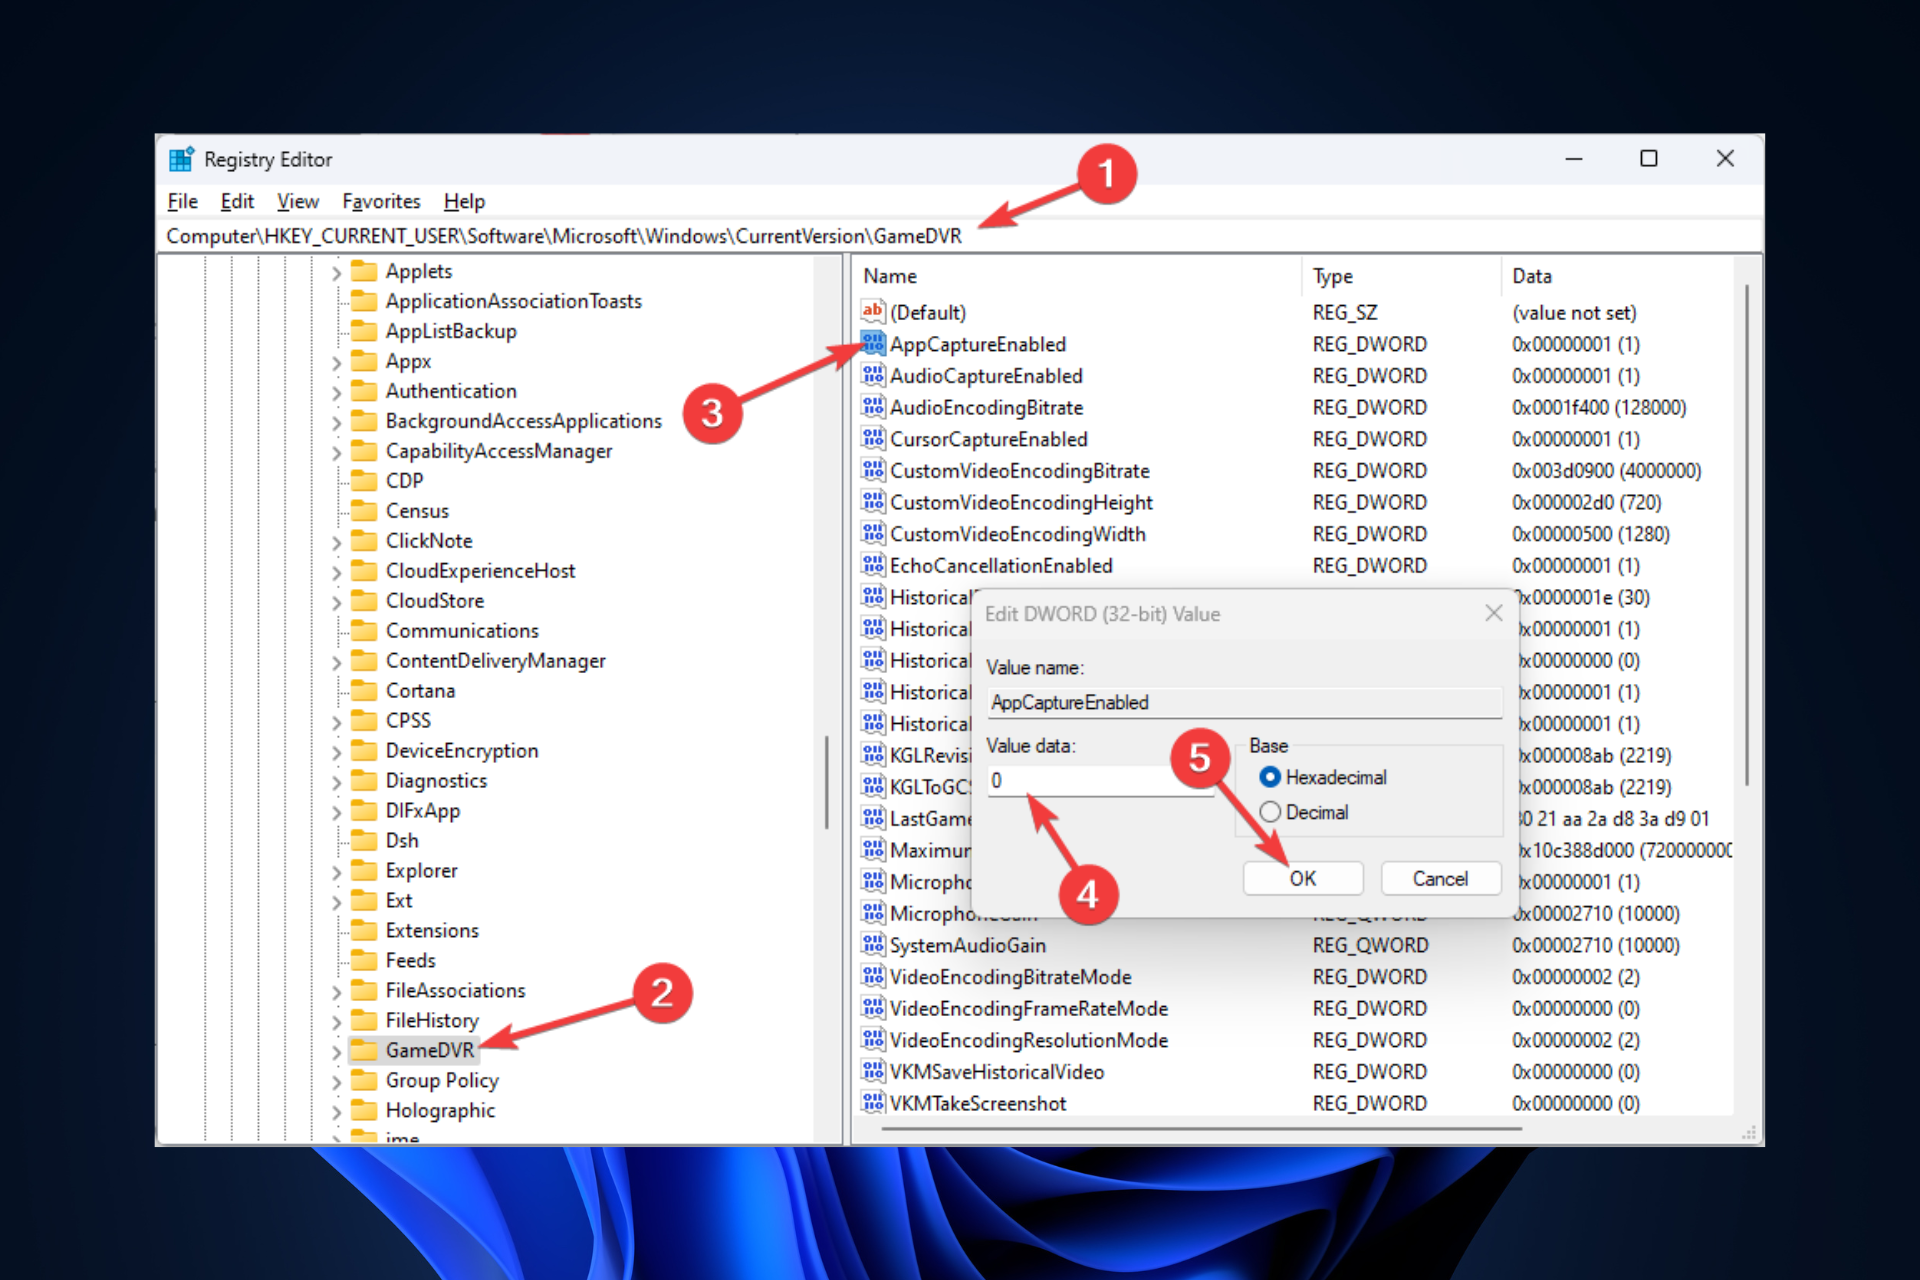
Computer\HKEY_CURRENT_USER\System\GameConfigStore - Locate and double-click GameDVR_Enabled. Change the Value data from 1 to 0.
- Click OK.
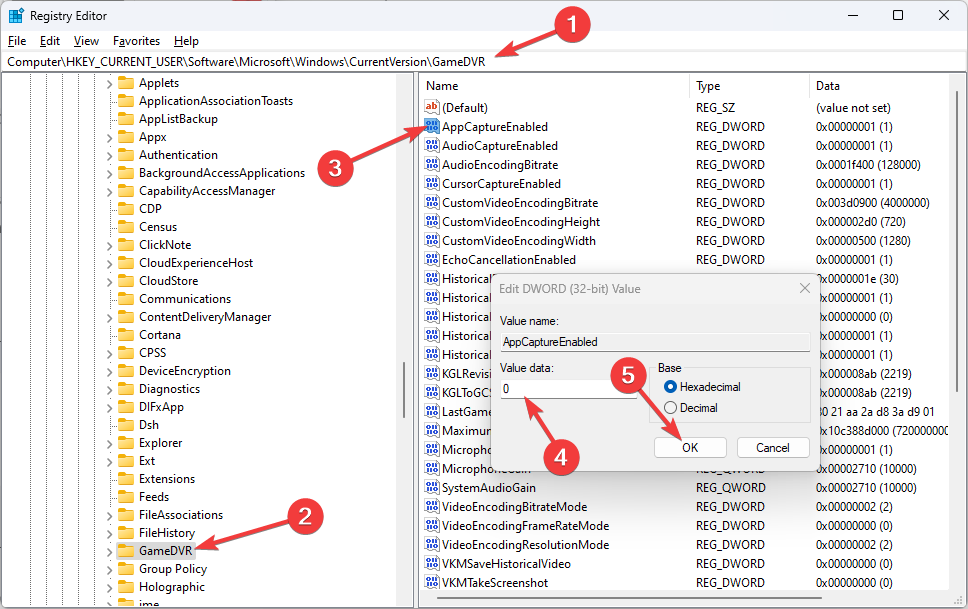
- Now navigate to this path:
Computer\HKEY_CURRENT_USER\SOFTWARE\Microsoft\Windows\CurrentVersion\GameDVR - Locate and double-click AppCaptureEnabled and change the Value data to 0. Click OK.
- Restart your computer.
4. Use the Group Policy Editor
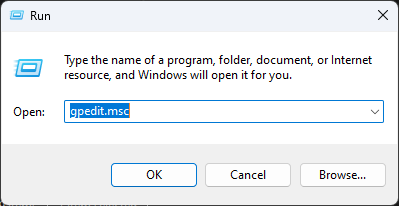
- Press Windows + R to open the Run window.
- Type gpedit.msc and hit Enter to open Group Policy Editor.
- Navigate to this path:
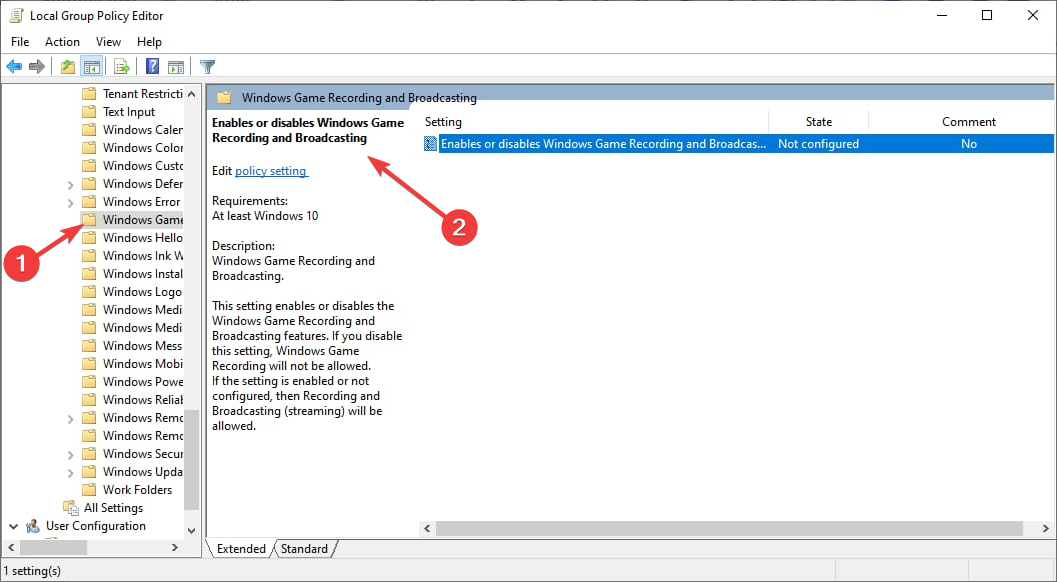
Computer Configuration\Administrative Templates\Windows Components\ Windows Game Recording and Broadcasting - Double-click on Enables or disables Windows Game Recording and Broadcasting.
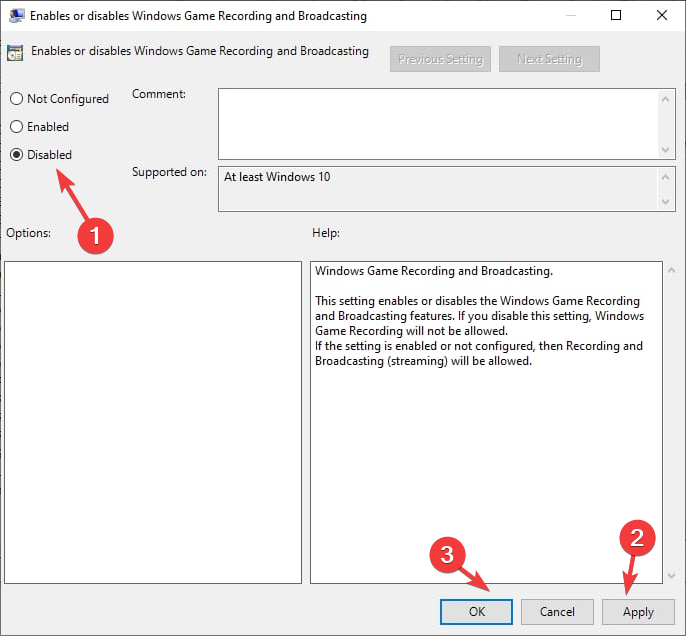
- Select Disabled, then click Apply, and then OK.
- Restart your computer to confirm the changes.
So, these are methods you can follow to disable the Xbox Game Bar on Windows 11. Try them and let us know what worked for you in the comments below.
If the Xbox Game Bar is not opening or working for you, you can follow these steps to fix it and record your gameplay and capture screens.
🔊
In Short.
To disable Xbox Game Bar on Windows 11, go to Settings > Gaming > Xbox Game Bar and turn off the toggle. To stop any related background processes, go to Apps & features > Xbox Game Bar > Advanced options > Background app permissions > Never. Alternatively, use PowerShell to remove the feature for all users.
The Xbox Game Bar is a gaming overlay that comes pre-installed with Windows 11. It offers a range of features that allow gamers to capture videos, record gameplay, take screenshots, share content, and chat with friends without leaving their game. The overlay is accessible by pressing the Windows + G shortcut on your keyboard, and it includes various widgets designed to make gaming more immersive.
However, not all users find the Xbox Game Bar useful. Some gamers have reported experiencing glitches, unresponsiveness, game crashes, and slowdowns, which can be frustrating. If you are not a gamer or have better alternatives to this tool, you may want to disable or remove the Xbox Game Bar to prevent it from consuming system resources in the background.
Fortunately, disabling or removing the Xbox Game Bar is a straightforward process. In this guide, we will walk you through the necessary steps to disable or remove the Xbox Game Bar in Windows 11.
Disable the Xbox Game Bar on Windows 11 using Settings App
If you’re don’t want to use the Xbox Game bar anymore, the easiest way to disable it is through the Windows 11 settings app. Here’s how you do this:
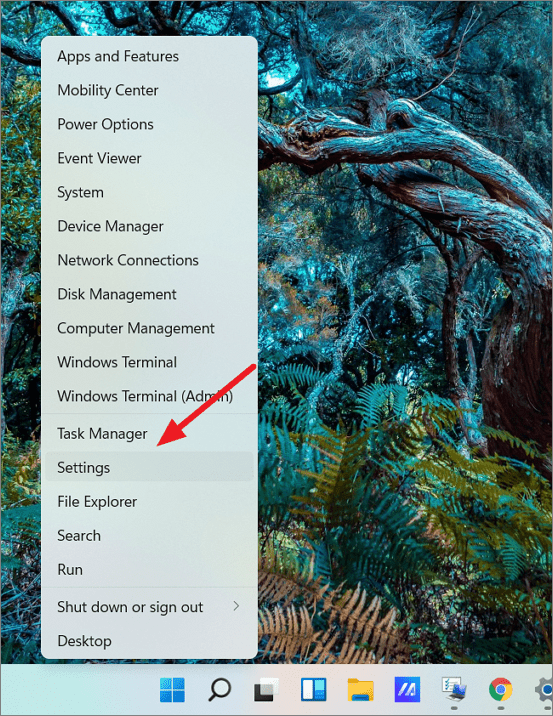
First, right-click the Start menu (Windows logo) and select ‘Settings’ or press Windows + I to launch the Settings app.
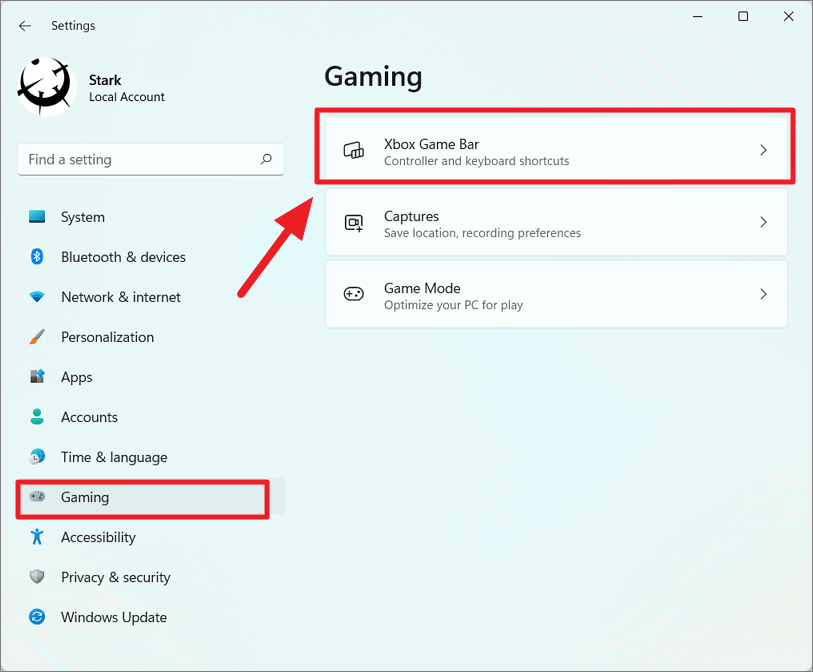
In the Settings app, go to the ‘Gaming’ tab on the left pane and click on the ‘Xbox Game Bar’ setting on the right.
On the Xbox Game Bar page, turn Off the toggle next to the ‘Open Xbox Game Bar using this button on a controller’ option. This will only disable the launch shortcut for the Game Bar from your Xbox controller if you use one.
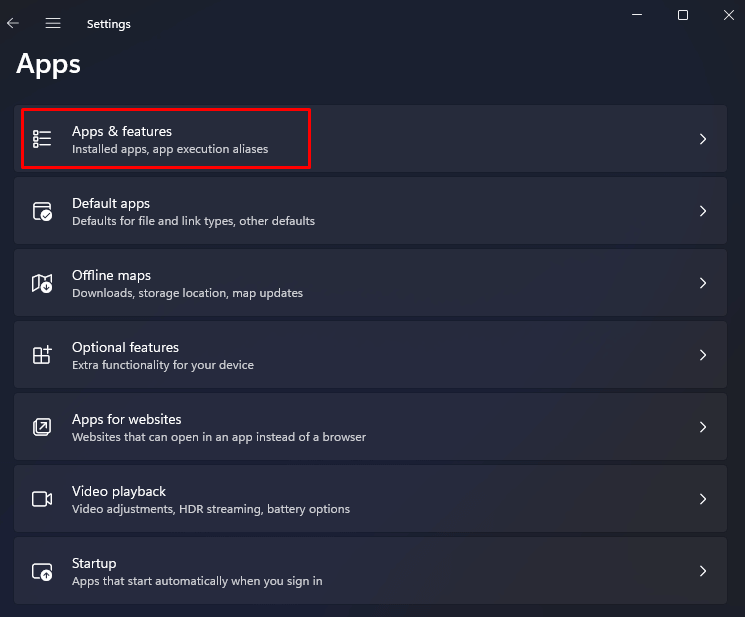
To make sure Game Bar doesn’t run any background processes, go to the ‘Apps’ tab on the Settings and click ‘Apps & features’.
On the ‘Apps & features’ page, scroll down the App list and find ‘Xbox Game Bar’ or you can type ‘Xbox’ in the search bar to bring up the app in the search result.
Then, click the three vertical dots (vertical ellipsis) next to ‘Xbox Game Bar’ and select ‘Advanced options’.
On the next page, scroll down to the ‘Background app permissions’ section and choose ‘Never’ from the drop-down below it.
Then, scroll further down the page, and click the ‘Terminate’ button to immediately stop the app and its related processes.
Remove Xbox Game Bar in Windows 11 via Windows PowerShell
If you are not a gamer or don’t see yourself using Xbox Game Bar ever, then you can completely remove the Xbox Game Bar feature from your system to preserve system resources. Windows Settings doesn’t give options to uninstall the Xbox Game Bar app, so you have to use this indirect method to remove Xbox Game Bar. Here’s how you do this:
First, look for ‘PowerShell’ in Windows Search and click ‘Run as administrator’ on the right side for the top result.
For the current user:
In the PowerShell window, enter the following two commands one after the other:
Get-AppxPackage *Microsoft.XboxGameOverlay* | Remove-AppxPackageGet-AppxPackage *Microsoft.XboxGamingOverlay* | Remove-AppxPackageThe above commands will completely remove Xbox Game Bar for the current user only.
For all users:
If you want to remove the Game bar from all users accounts, then use these commands instead:
Get-AppxPackage -AllUsers *Microsoft.XboxGameOverlay* | Remove-AppxPackageGet-AppxPackage -AllUsers *Microsoft.XboxGamingOverlay* | Remove-AppxPackageBesides, Xbox Game bar, there are a few other Xbox apps that come pre-installed with Windows 11 such as:
- Xbox App
- Xbox Gaming Services
- Xbox Identify Provider
- Xbox Speech To Text Overlay
To uninstall these apps use the below codes:
Get-AppxPackage *Microsoft.Xbox.TCUI* | Remove-AppxPackageGet-AppxPackage *Microsoft.XboxApp* | Remove-AppxPackageGet-AppxPackage *Microsoft.GamingServices* | Remove-AppxPackageGet-AppxPackage *Microsoft.XboxIdentityProvider* | Remove-AppxPackageGet-AppxPackage *Microsoft.XboxSpeechToTextOverlay* | Remove-AppxPackageRe-installing Xbox Game Bar in Windows 11
If removed or uninstalled the Xbox game bar or any other app using the above method or the settings app, you can re-install it at any time.
To re-install the Xbox Game bar app only, enter the following command in the PowerShell and press Enter:
Get-AppxPackage -allusers *Microsoft.XboxGamingOverlay* | Foreach {Add-AppxPackage -DisableDevelopmentMode -Register “$($_.InstallLocation)\AppXManifest.xml”}To re-install all other Xbox related apps and services, type the below command:
Get-AppxPackage -allusers *Xbox* | Foreach {Add-AppxPackage -DisableDevelopmentMode -Register “$($_.InstallLocation)\AppXManifest.xml”}You can also re-install the Xbox Game bar from the Microsoft Store app.
Conclusion
The Xbox Game Bar is a useful tool for gamers on Windows 11, but it may not be for everyone. If you find it unresponsive or causing issues with your games, disabling or removing it is an option. Using the Windows 11 settings app or PowerShell, you can easily turn off the Game Bar or completely remove it from your system. And if you change your mind later, you can also re-install it just as easily. With these steps, you can customize your Windows 11 experience to suit your needs and preferences.
The Xbox Game Bar is a great feature in Windows 11 that lets gamers quickly access game-related features from the desktop. You can use its widgets to record game clips, take screenshots, chat with your gamer friends, and monitor performance.
Although useful, Xbox Game Bar can slow down your PC. If you notice that the performance of your computer is affected or you’re not using the feature at all, you should consider disabling or uninstalling it. In this blog post, we’ll discuss how you can disable or uninstall Xbox Game Bar without affecting other programs on your computer and gain more control over your PC.
What Is the Xbox Game Bar?
The Xbox Game Bar is a customizable gaming overlay with several features. You won’t need to leave the game to start recording gameplay or to start a live stream. It will even allow you to play Spotify in-game and enjoy good music during those long gaming sessions.
However, many users prefer to use alternatives or separate tools for streaming, recording, or chatting. That said, the Xbox Game Bar is not easy to uninstall, and even if you disable it, it’ll continue running in the background. This can cause PC issues and crashes.
Why Are You Not Allowed to Uninstall Xbox Game Bar?
The Xbox Game Bar is an app built into the Windows system. That’s why if you try to uninstall it through Add or Remove Programs, you’ll notice its uninstall button is grayed out. As a system application, it cannot be quickly deleted.
Luckily you can disable the Xbox Game Bar and even stop it from working in the background. You can also uninstall it, but it will take more time and effort than a simple click.
Uninstall Xbox Game Bar With PowerShell
PowerShell is your best option for completely removing the Xbox Game Bar app from your Windows PC. But before you start uninstalling the Game Bar with it, create a system restore point in case something goes wrong.
Then follow these steps to uninstall the Xbox Game Bar with PowerShell:
- Go to the Windows search bar and type “PowerShell” to find it.
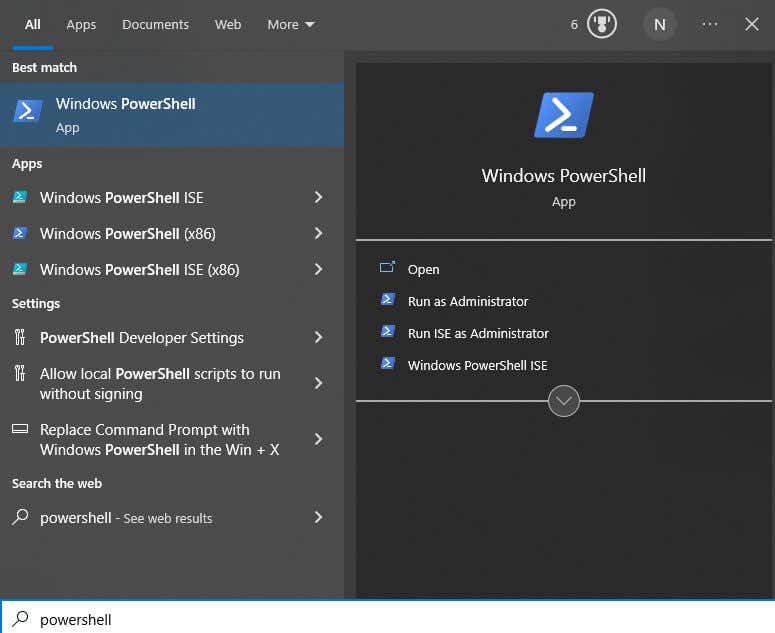
- Right-click on the app and select Run as administrator to open PowerShell.
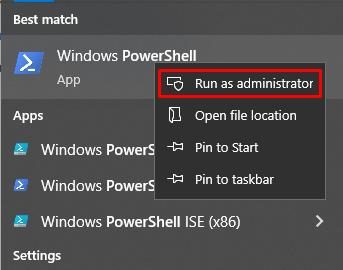
- Windows PowerShell command bar will open, type the following command:
dism /Online /Get-ProvisionedAppxPackages | Select-String PackageName | Select-String xbox and hit enter.

- This command will show your system’s packages. To delete the Xbox game bar you can do it by DISM (Deployment Image Service and Management) or cmdlet commands.
Using the DISM Command
Here’s how to use the DISM method. Just type the following commands, pressing Enter after each one:
Dism /Online /Get-ProvisionedAppxPackages | ‘
Select-String PackageName | ‘
Select-String xbox | ‘
ForEach-Object {$_.Line.Split(‘:’)[1].Trim()} | ‘
ForEach-Object { dism /Online /Remove-ProvisionedApxPackage /PackageName:$_}

Using the Cmdlet Command
Here’s how to use the cmdlet option:
Get-ProvisionedAppxPackage -Online | ‘
Where-Object { $_.PackageName -match “xbox”} | ‘
ForEach-Object { Remove-ProvisionedAppexPackage -Online -PackageName$_.PackageName}

If you want to remove the Xbox Game Bar for all users, use these commands instead:
Get-ProvisionedAppxPackage -Online | ‘
Where-Object { $_.PackageName -match “xbox”} | ‘
ForEach-Object { Remove-ProvisionedAppexPackage -Online -AllUsers -PackageName$_.PackageName }

To check if the Xbox packages were successfully removed, type this in the command prompt: dism /Online /Get-ProvisionedAppxPackages | Select-String PackageName | Select-String xbox
If PowerShell doesn’t display any results, you have successfully removed the Xbox Game Bar from your Windows 11 or 10 device.
Uninstall the Xbox Game Bar with Third Party Programs
If PowerShell is too complicated and you don’t want to mess with it, you can use uninstaller apps to remove Xbox Game Bar from your PC. These apps are designed to remove system-bound apps that your Windows system won’t allow you to uninstall. There are plenty of such apps on the market, and they all work similarly.
You’ll have to:
- Find an uninstaller app in the Microsoft Store to download and install on your PC.
- Launch it and find the Xbox Game Bar.
- Click Remove or Uninstall, depending on the app you choose.
- Restart your computer to implement the change.
If you don’t want to permanently remove the Xbox Game Bar from your device, you don’t have to. In that case, continue reading to learn how to correctly disable it.
Disable Xbox Game Bar with Registry Editor
If PowerShell is too complicated and you don’t want to mess with it, you can disable it instead.
You can use the Registry Editor to remove the Xbox Game Bar. Remember that you won’t uninstall the Xbox Game Bar with this method; you will only disable it. Here’s what you need to do:
- Press the Windows key + R keyboard shortcut to open the Run dialog. Next, type regedit.exe to open the Registry Editor. You can also use the search function and type Registry Editor to find it and run it as administrator.
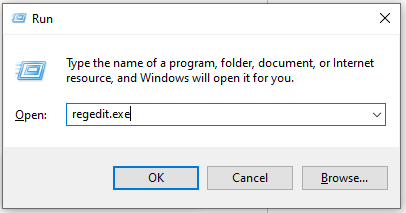
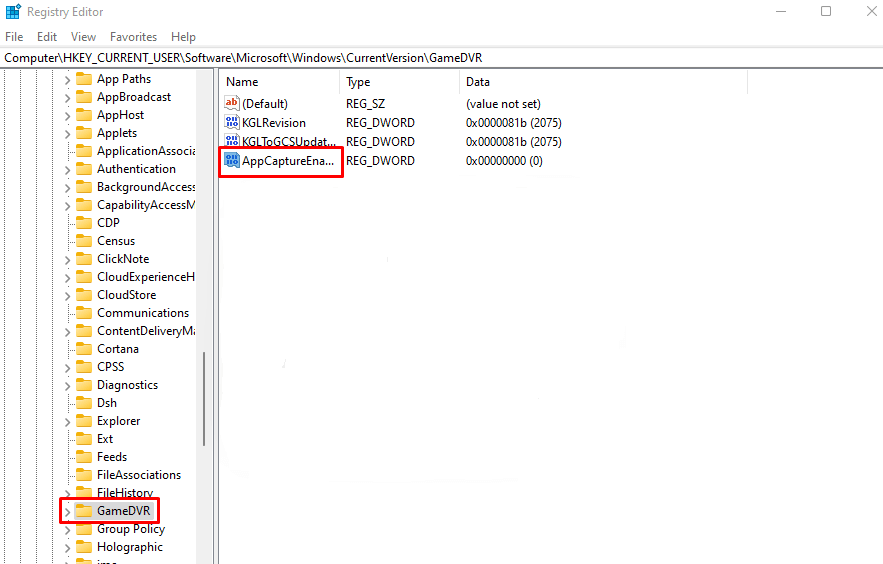
- Type the following line in the top address bar: computer\HKEY_Current_User\SOFTWARE\Microsoft\Windows\CurrentVersion\GameDVR. Hit enter to go to the address. You can also manually navigate to this section.
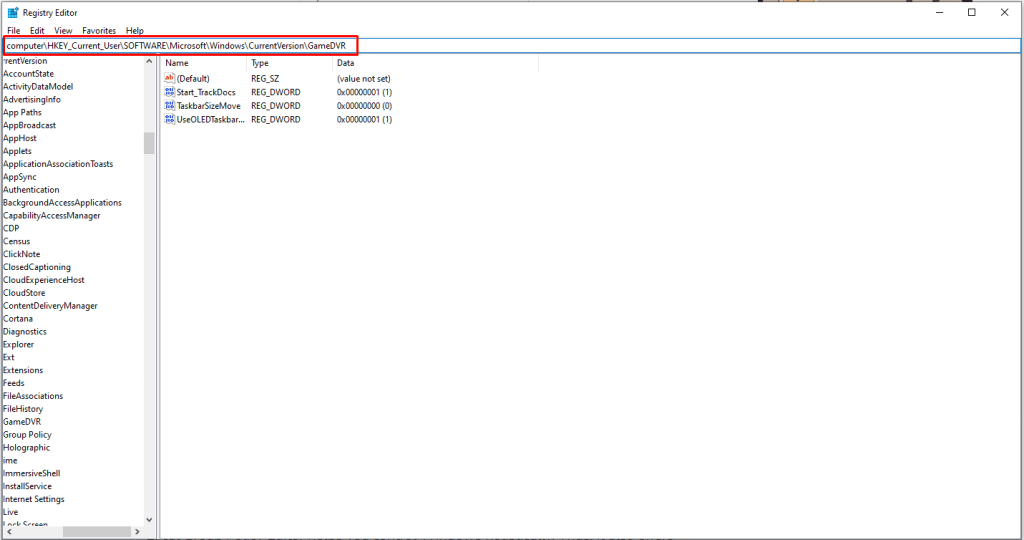
- Find the GameDVR folder on the left side menu and select it. Then double-click the AppCaptureEnabled option on the right panel.
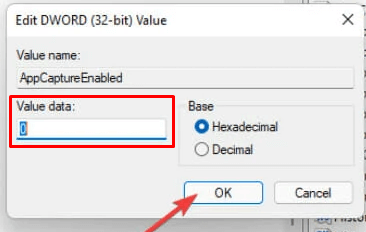
- When the prompt opens, type 0 under Value data and press OK.
You’ll have to reboot your PC to implement these changes. And that’s all there is to it. You successfully disabled Xbox Game Bar from your PC. This method works on both Windows 11 and Windows 10.
Disabling the Xbox Game Bar on Windows 10 is not enough. It’ll keep running in the background and affect your computer’s performance. You’ll have to disable both the Xbox Bar and its background access. Here’s how:
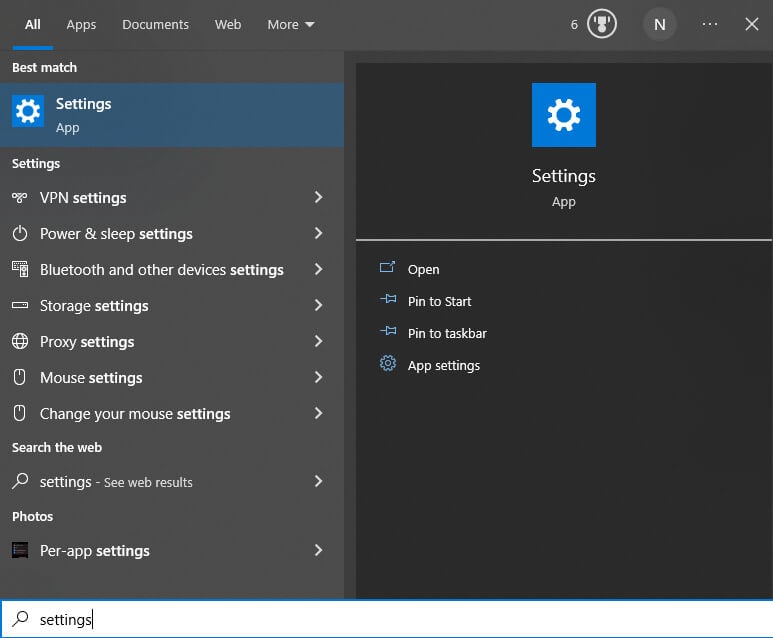
- Go to Windows Settings by pressing the Windows key + i on your keyboard. Alternatively, type Settings in the search bar in the Start menu.
- Type Xbox Game Bar in the search box at the top of the window and hit enter.

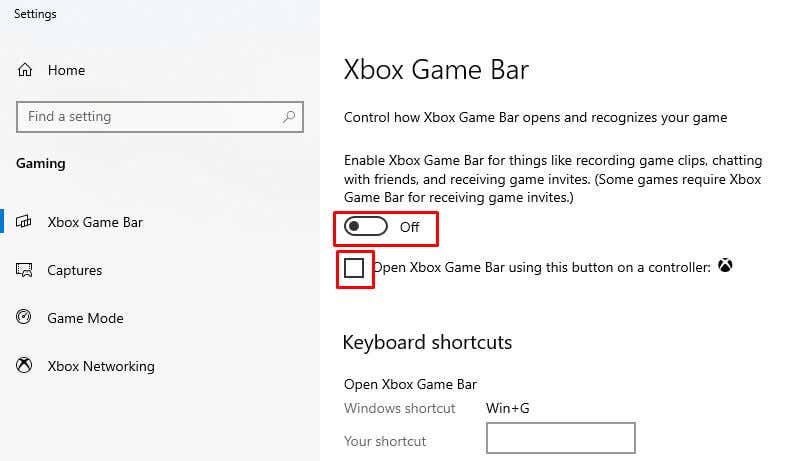
- This will open the Xbox Game Bar settings, where you can toggle it off.
- Find Open Xbox Game Bar using this button on a controller option and uncheck the box next to it.
Now, you can rest assured that the Game Bar won’t hamper your work.
How to Disable Xbox Game Bar on Windows 11
Disabling Xbox Game Bar is pretty straightforward on Windows 11 devices, but there are some differences from Windows 10. So if you’re a Windows 11 user, follow these steps:
- Open the Settings menu.
- Go to Gaming located in the left column.
- Select Xbox Game Bar.
- Toggle the switch to turn it off.

- On the left panel, find Apps.
- Select the Apps & Features option.
- In the apps list field, type Xbox to find the Game Bar.
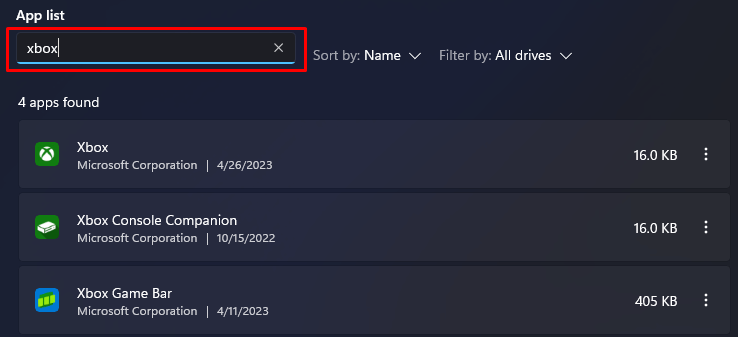
- Click the three dots menu next to it, and select the Advanced option.

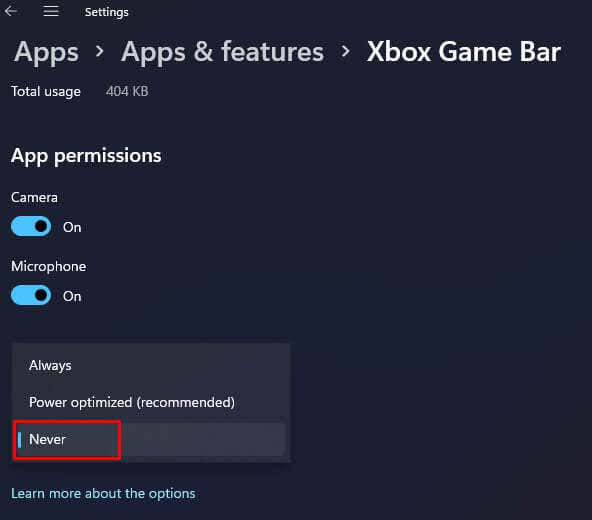
- Scroll down until you find Background apps permissions, and select Never from the drop-down menu.
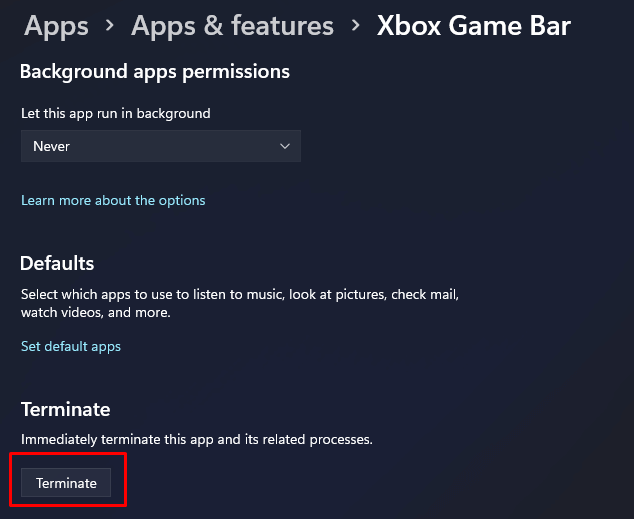
- Scroll down to find Terminate. This will stop the app from running in the background.
Congrats! You successfully disabled Xbox Game Bar on your Windows 11 PC.
All in all, disabling or uninstalling the Xbox app on Windows 11 is easy. Remember to create a restore point before uninstalling the game bar. Other than this, you don’t have to worry about anything.
