(Image credit: Windows Central)
On Windows 10, PowerShell is a powerful cross-platform tool that allows you to run scripts and commands to change system settings, manage features, troubleshoot problems, and automate tasks.
Although it is a useful command-line shell, in some situations, you may need to disable it to make sure that users do not make unwanted changes or execute scripts with malicious commands. And other times, you may need to restrict access to PowerShell to comply with the company’s policies.
Whatever the reason it might be, Windows 10 offers multiple ways to disable access to the built-in version of PowerShell or the standalone version of the tool, PowerShell 7.
In this Windows 10 guide, we will walk you through three different ways to disable access to PowerShell, including PowerShell 7.
- How to block PowerShell access using Group Policy
- How to block PowerShell access using Security Policy
- How to block PowerShell 7 access uninstalling app
How to block PowerShell access using Group Policy
If you use Windows 10 Pro (or Enterprise), the easiest way to disable access to PowerShell is using the Local Group Policy Editor.
To disable PowerShell on Windows 10, use these steps:
- Open Start.
- Search for gpedit.msc and select the top result to open the Local Group Policy Editor.
- Browse the following path:
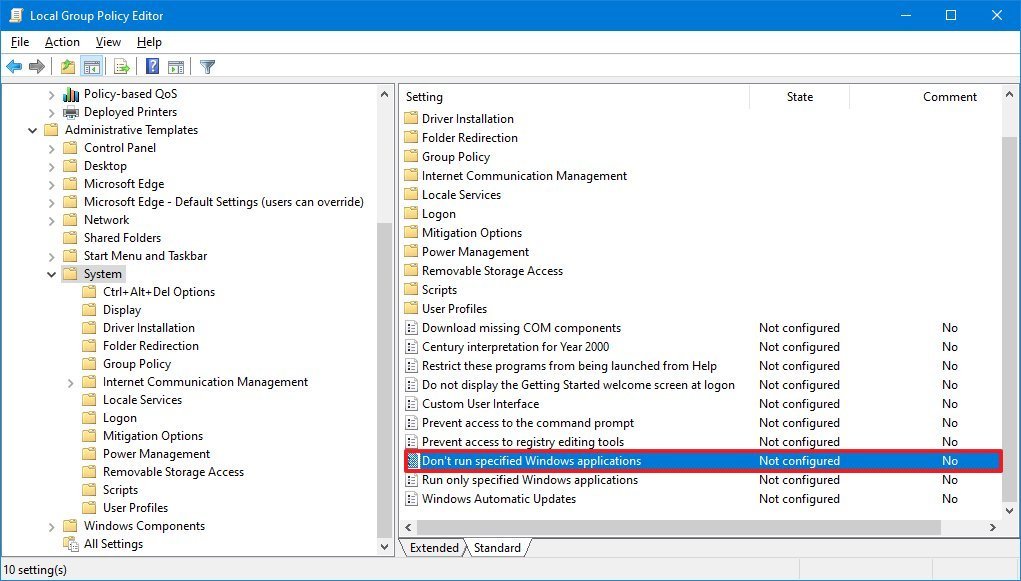
User Configuration > Administrative Templates > System - On the right side, double-click the Don’t run specified Windows applications policy.
- Select the Enabled option.
- Under the «Option»s section, click the Show button.
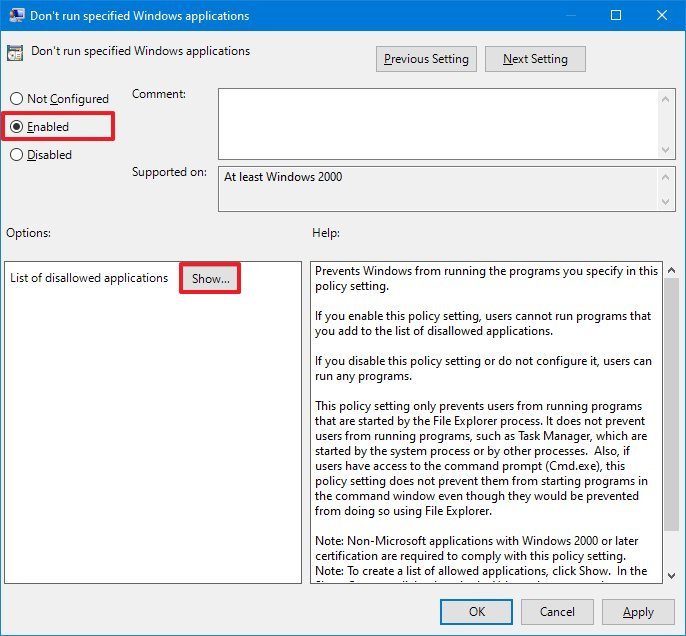
- In the «Value» column, type powershell.exe to disable the PowerShell experience.
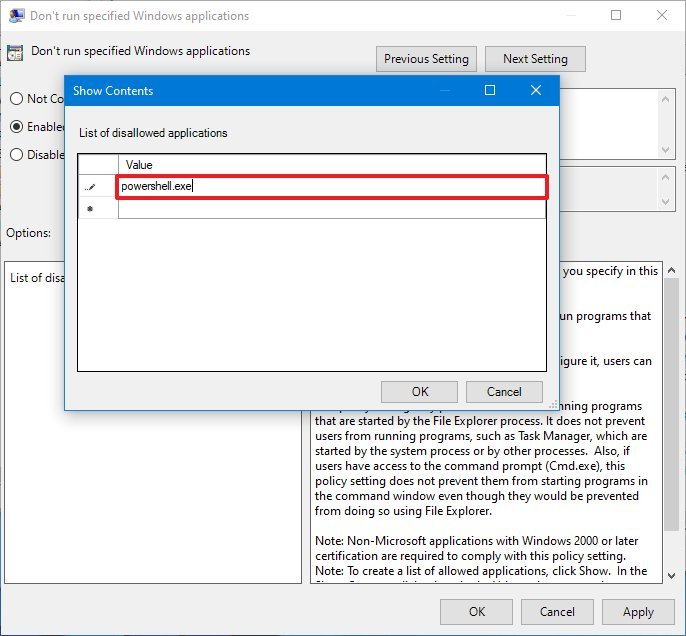
- (Optional) In the «Value» column, type powershell_ise.exe in a new cell to disable the PowerShell ISE interface.
- (Optional) In the «Value» column, type pwsh.exe in a new cell to disable PowerShell 7.
- Click the Apply. button
- Click the OK button.
Once you complete the steps, users will no longer be able to launch and use PowerShell.
In the case you change your mind, you can roll back the previous settings using the same instructions, but on step No. 5, select the Not Configured option.
We are focusing this guide on disabling PowerShell for all users, but you can also restrict access to the shell for specific users with these instructions.
How to block PowerShell access using Security Policy
Alternatively, you can achieve the same effect using the Local Security Policy console.
To prevent users from launching PowerShell settings up a Local Security Policy, use these steps:
- Open Start.
- Search for Local Group Policy and click the top result to open the app.
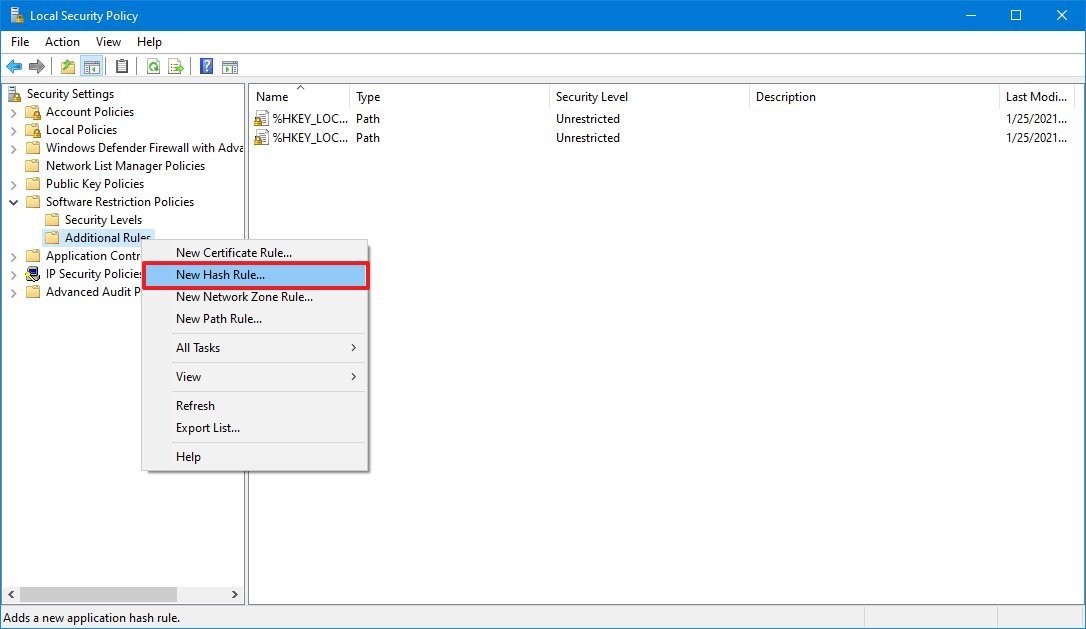
- Double-click to expand the Software Restriction Policies branch.
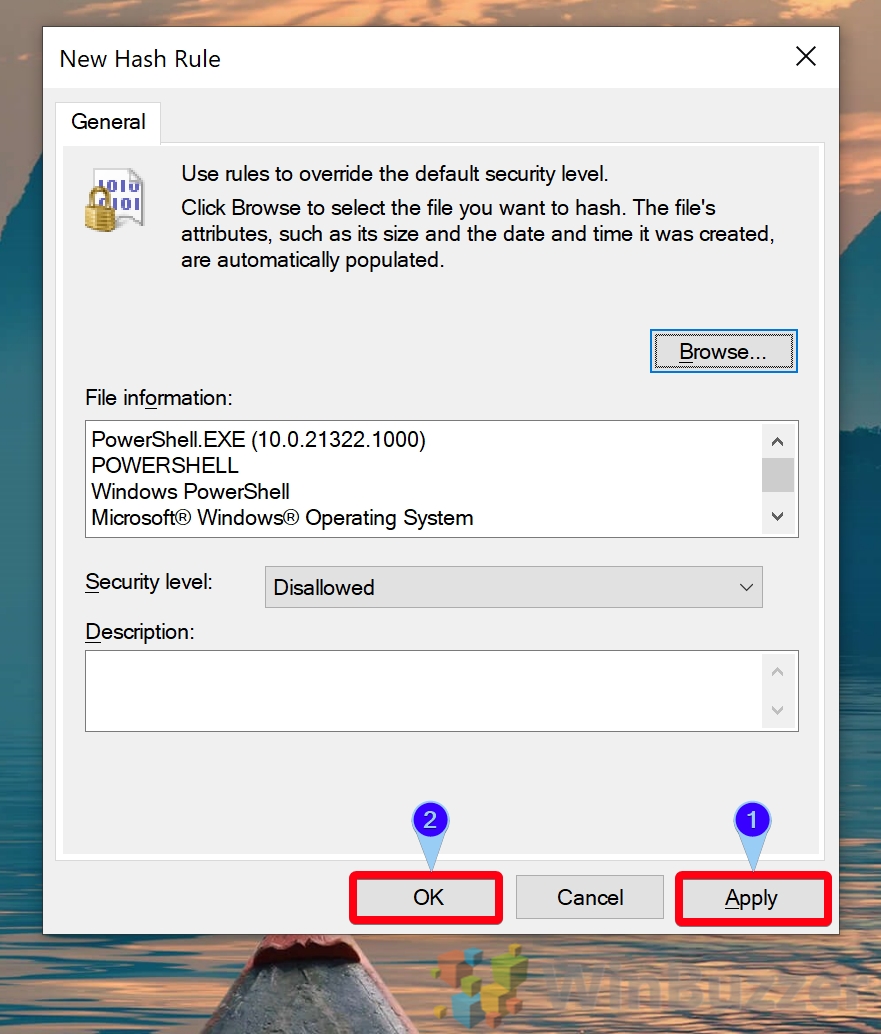
- Right-click the «Additional Rules» category, and select the New Hash Rule option.Quick tip: If the category is not available, right-click the Software Restriction Policies branch and select the New Software Restriction Policies option.
- Click the Browse button.
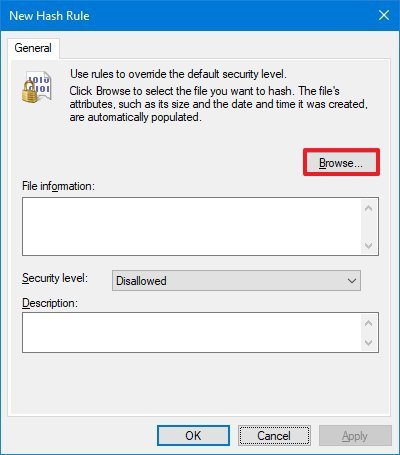
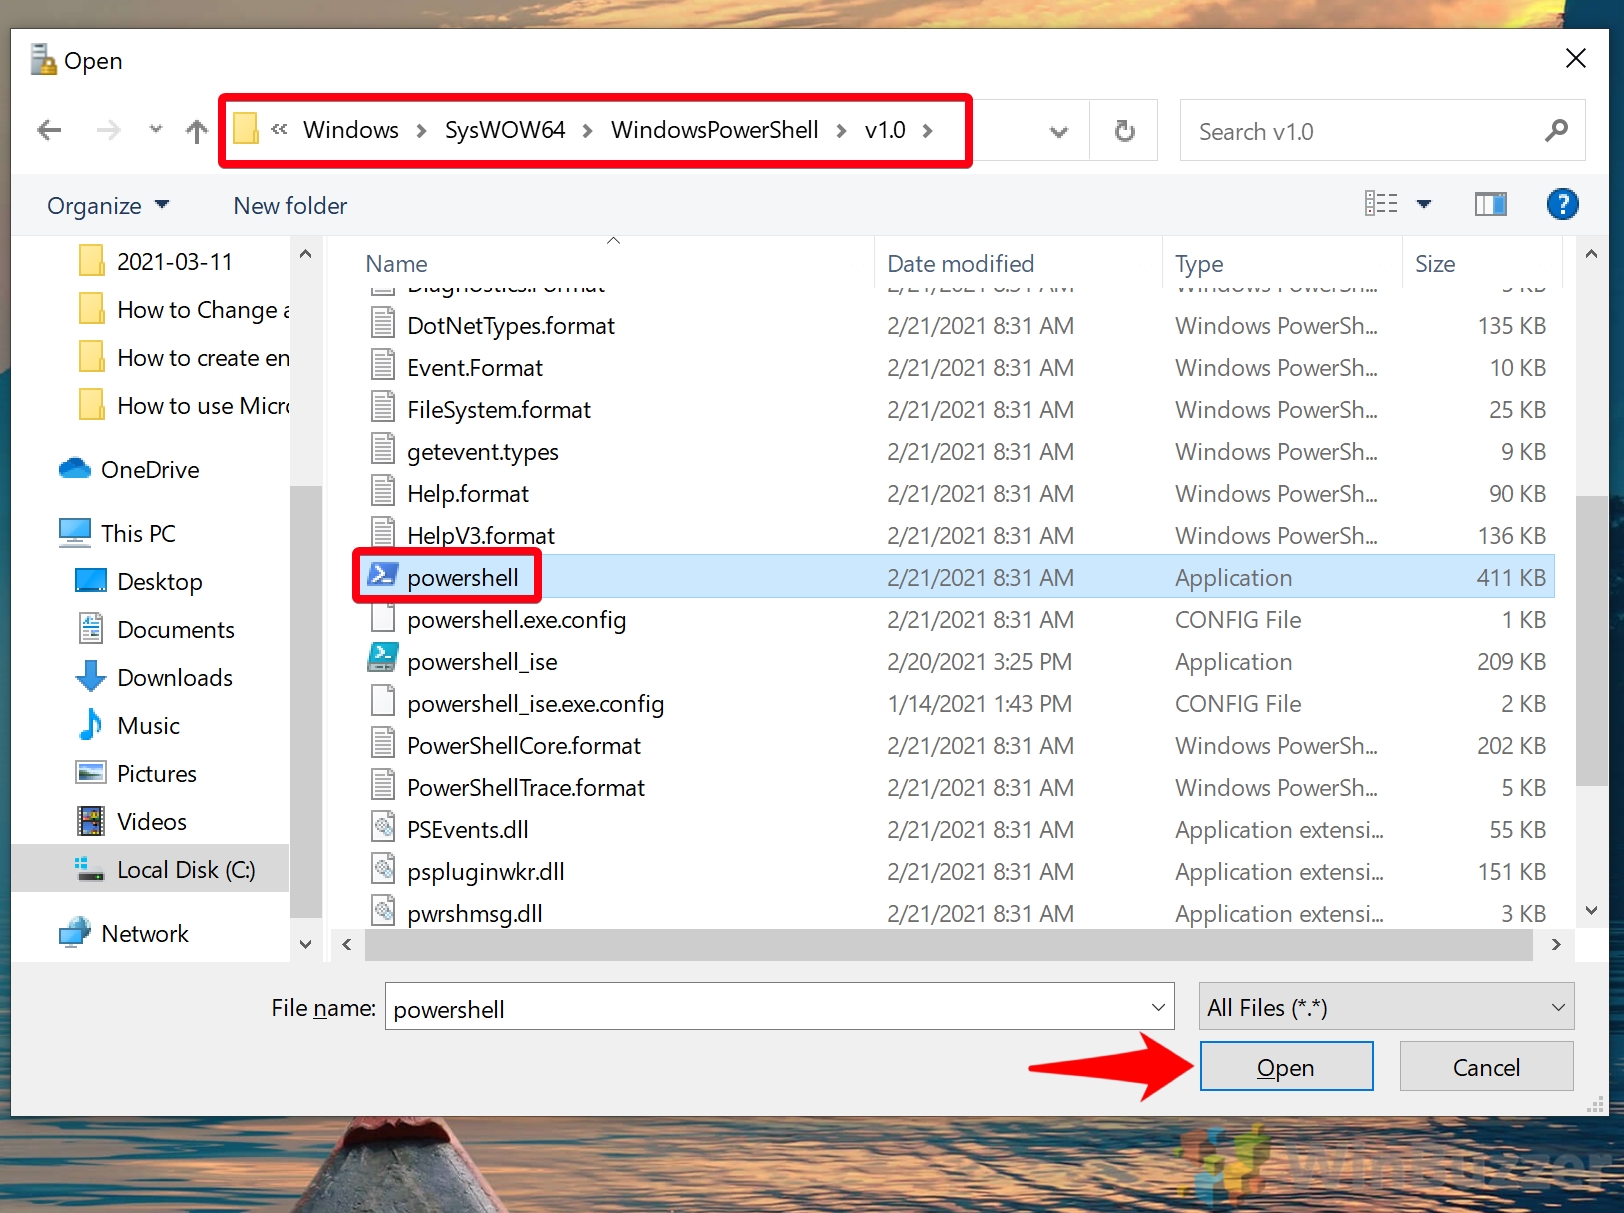
- Copy and paste the following path in the address bar to locate the 32-bit version of PowerShell and press Enter:
%SystemRoot%\system32\WindowsPowerShell\v1.0 - Select the powershell.exe executable.
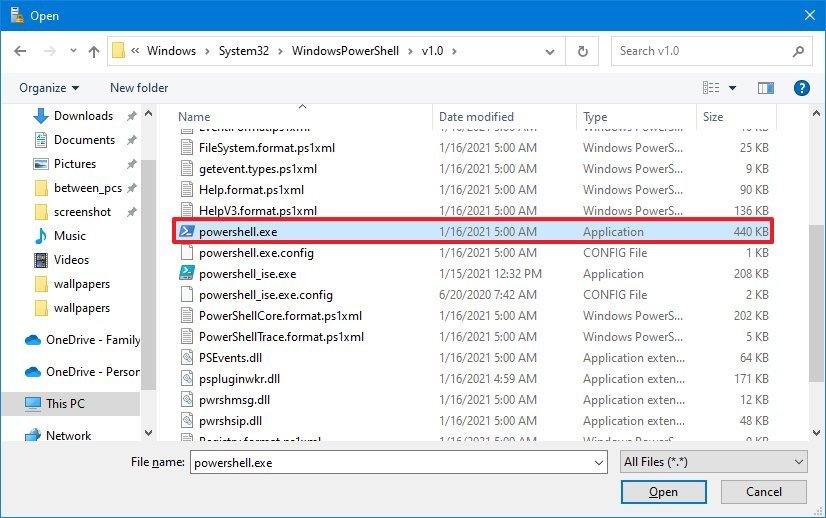
- Click the Open button.
- Click the Apply button.
- Click the OK button.
- Right-click the «Additional Rules» category and select the New Hash Rule option.
- Click the Browse button.
- Copy and paste the following path in the address bar to locate the 64-bit version of PowerShell and press Enter:
%SystemRoot%\SysWOW64\WindowsPowerShell\v1.0Quick tip: If you want to disable access to PowerShell version 7, then you can create another hash rule with this path:"%SystemRoot%\Program Files\PowerShell\7\pwsh.exe. Or uninstall the app with the steps below. - Select the powershell.exe executable.

- Click the Open button.
- Click the Apply button.
- Click the OK button.
- Restart the computer.
After you complete the steps, users will no longer be able to launch the 32-bit or 64-bit version of PowerShell.
Disable access PowerShell ISE
Although the above steps can restrict access to the command-line tool, users can still get around this limitation using the PowerShell ISE interface. However, you can also disable access to this tool with the Local Security Policy app.
To disable access to PowerShell ISE, use these steps:
- Open Start.
- Search for Local Group Policy and click the top result to open the app.
- Double-click to expand the Software Restriction Policies branch.
- Right-click the «Additional Rules» category, and select the New Hash Rule option.
- Click the Browse button.
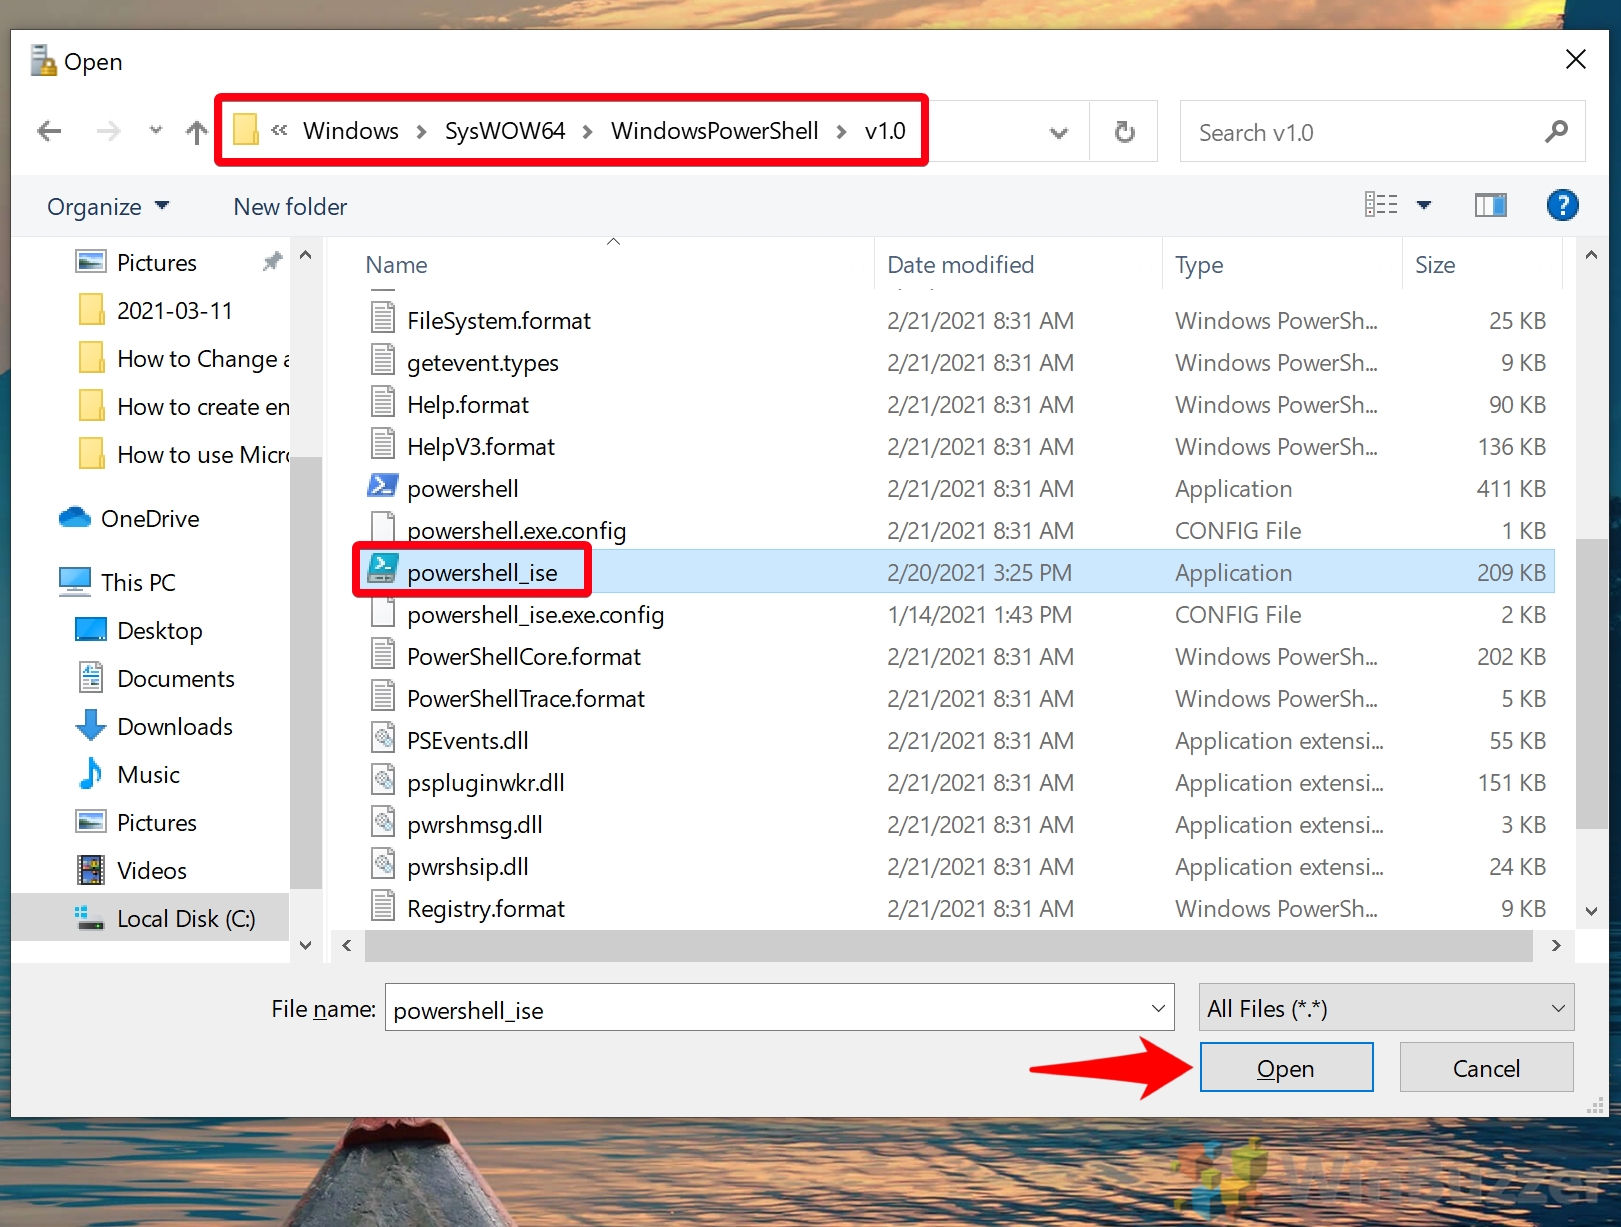
- Copy and paste the following path in the address bar to locate the 32-bit version of PowerShell ISE and press Enter:
%SystemRoot%\system32\WindowsPowerShell\v1.0 - Select the powershell_ise.exe executable.
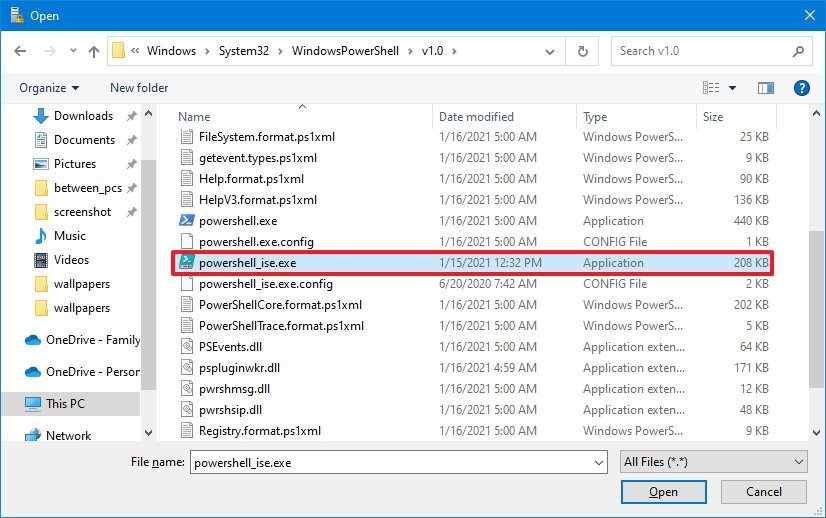
- Click the Open button.
- Click the Apply button.
- Click the OK button.
- Right-click the «Additional Rules» category and select the New Hash Rule option.
- Click the Browse button.
- Copy and paste the following path in the address bar to locate the 64-bit version of PowerShell and press Enter:
%SystemRoot%\SysWOW64\WindowsPowerShell\v1.0 - Select the powershell_ise.exe executable.

- Click the Open button.
- Click the Apply button.
- Click the OK button.
- Restart the computer.
Once you complete the steps, the built-in version of PowerShell ISE will no longer be accessible.
If you want to revert the changes, you can use the same instructions outlined above, but on step No. 4, right-click each hash rule you created, select the Delete option, and restart the computer.
How to block PowerShell 7 access uninstalling app
If the device also has PowerShell 7, you can restrict access by removing the app from Windows 10.
To uninstall PowerShell 7, use these steps:
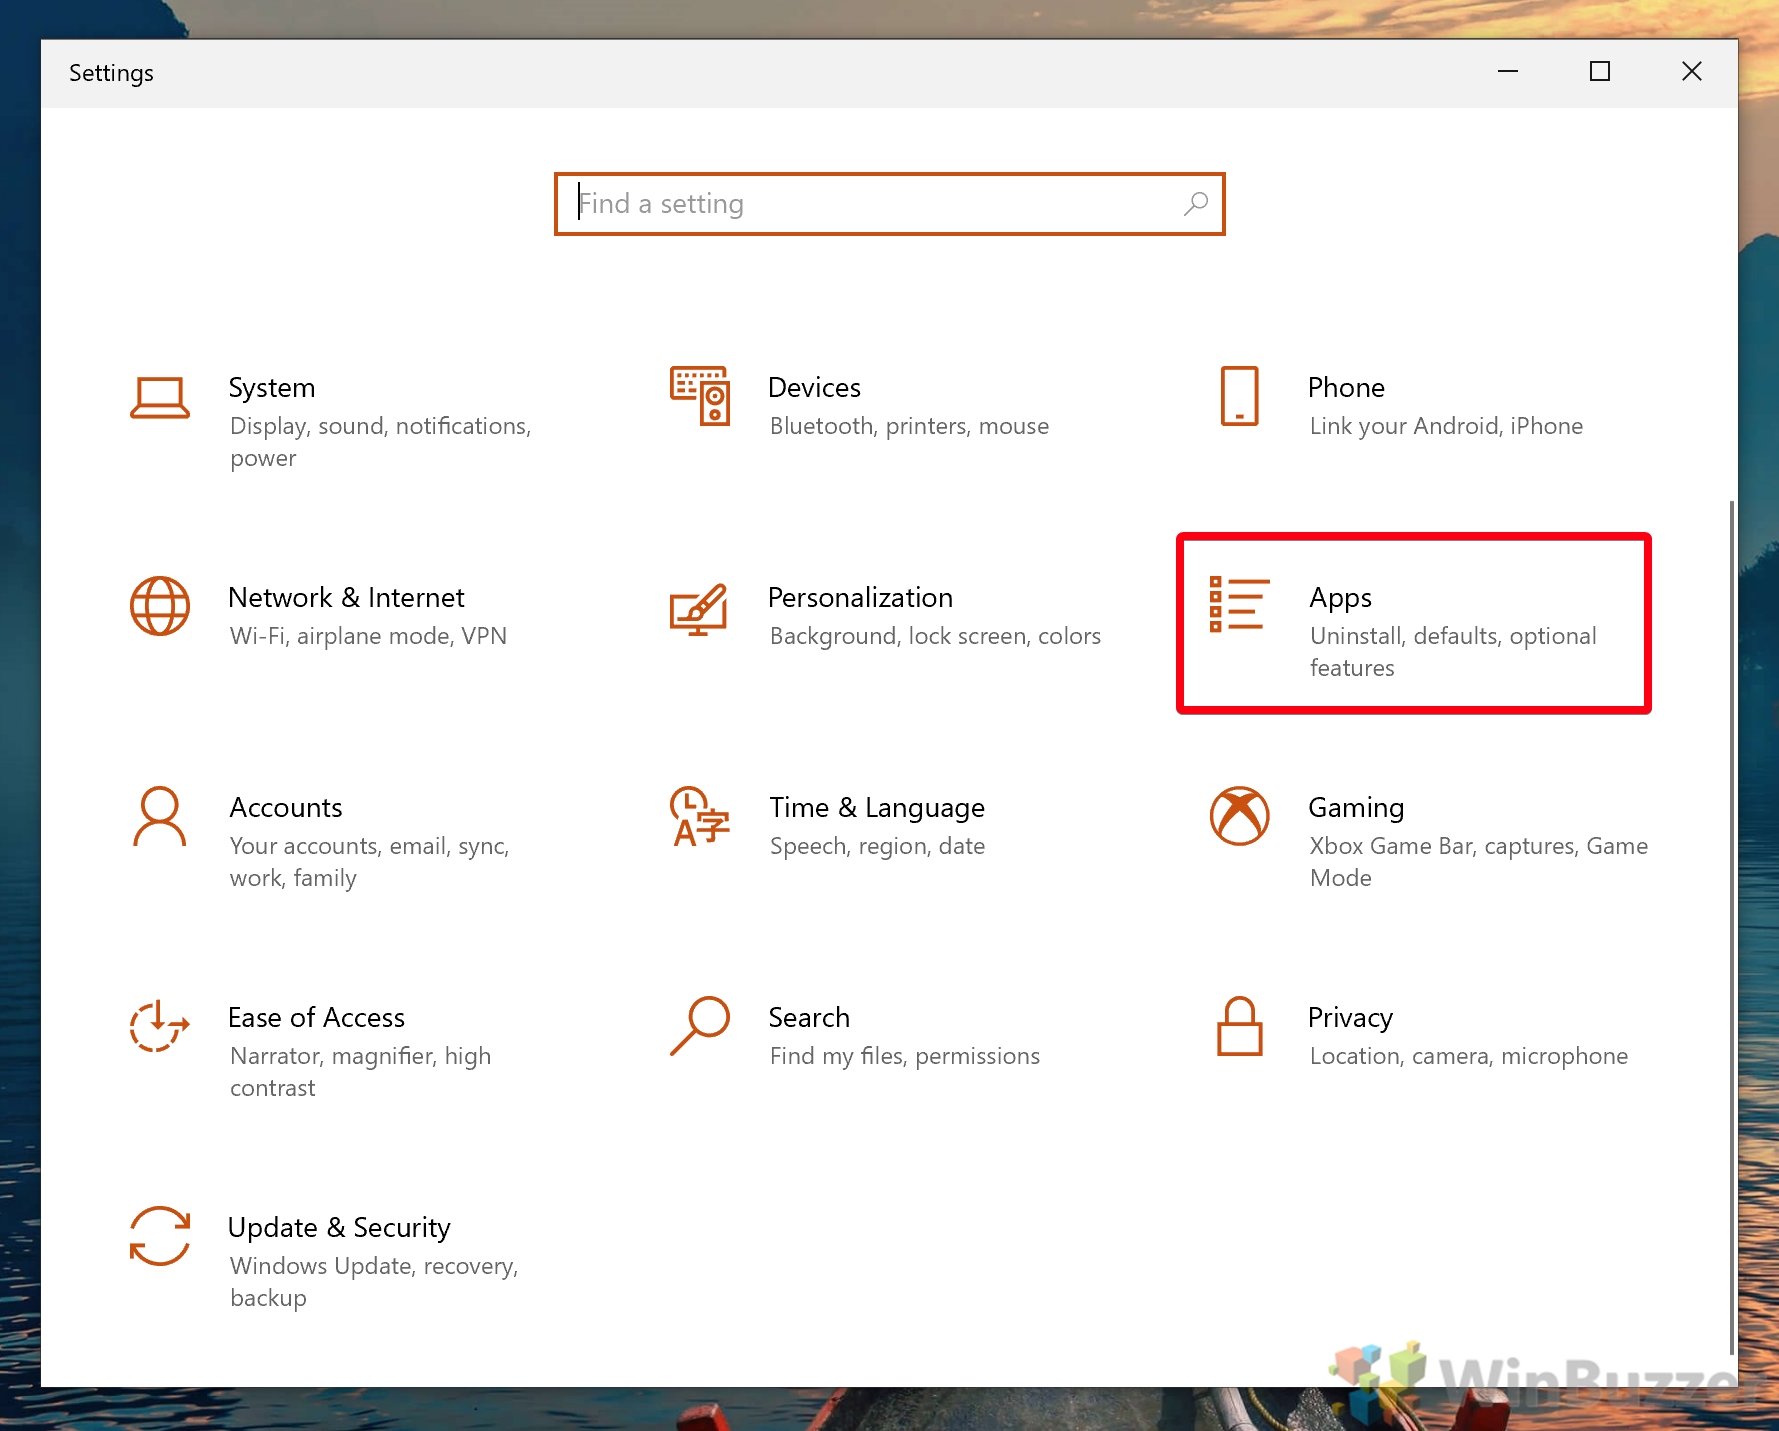
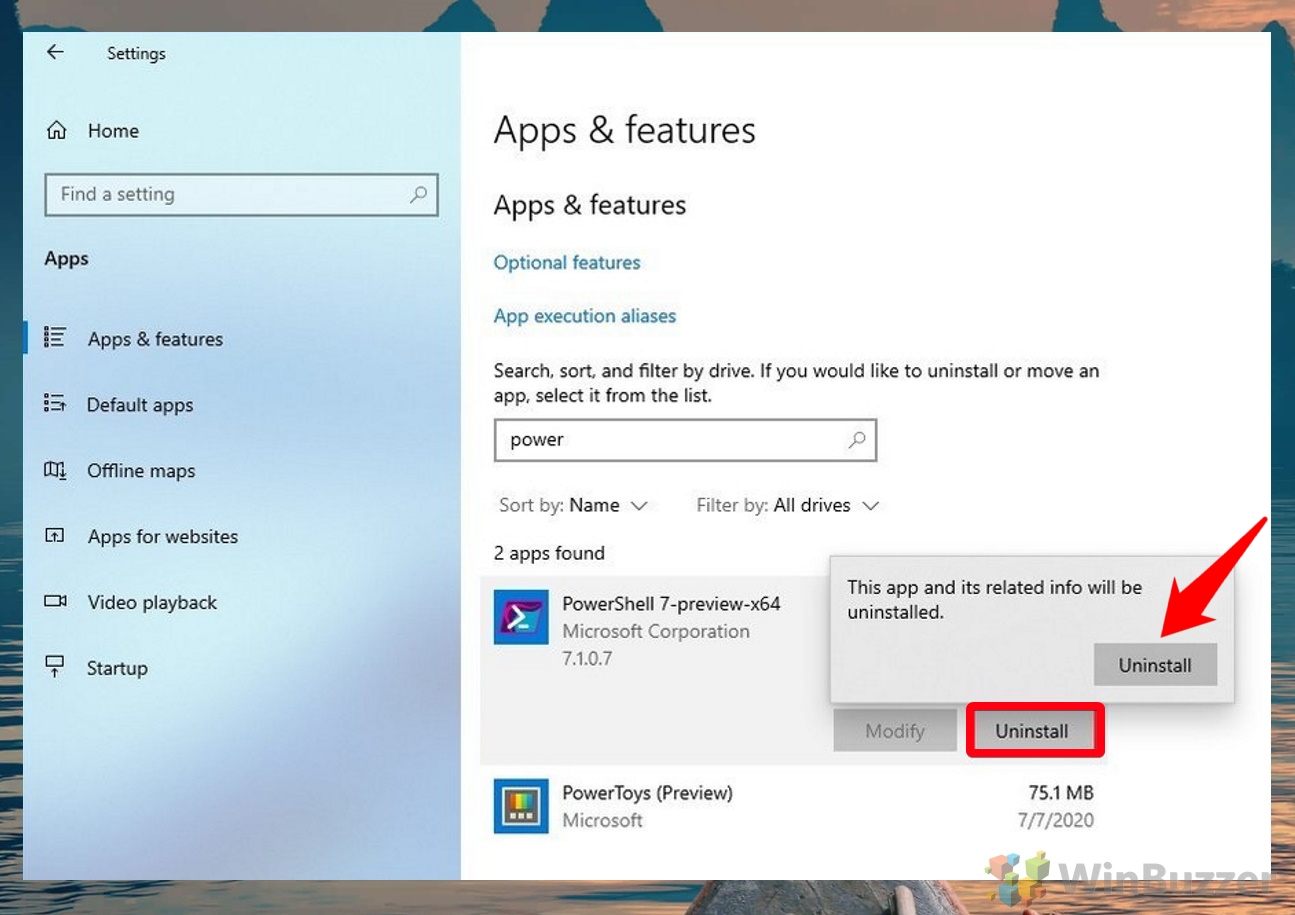
- Open Settings.
- Click on Apps.
- Click on Apps & features.
- Under the «Apps & features» section, select the PowerShell app.
- Click the Uninstall button.

- Click the Uninstall button again.
- Continue with the on-screen directions (if applicable).
After you complete the steps, no one will have access to PowerShell version 7 since it’s no longer installed on the device. Of course, you can always download and install the app again.
If you are trying to prevent users from making unwanted system changes, in addition to restricting access to PowerShell, you can also disable Command Prompt, Task Manager, and Registry. Furthermore, you can even try switching the account type to «Standard User» to prevent users from making system changes and make the account more secure. However, users will still have access to PowerShell, Command Prompt, and Task Manager to perform some common tasks.
All the latest news, reviews, and guides for Windows and Xbox diehards.
Mauro Huculak is technical writer for WindowsCentral.com. His primary focus is to write comprehensive how-tos to help users get the most out of Windows 10 and its many related technologies. He has an IT background with professional certifications from Microsoft, Cisco, and CompTIA, and he’s a recognized member of the Microsoft MVP community.
Оболочка Windows PowerShell пришла в операционную систему Windows 10 на замену командной строки, хотя командная строка также получила обновление и возможность вставки команд с буфера обмена. Поскольку большинство пользователей привыкли к обычной командной строке, то даже замена пункта командной строки на оболочку PowerShell может показаться навязчивой.
Данная статья расскажет как удалить Windows PowerShell и вернуть командную строку вместо PowerShell в Windows 10. Процесс удаления оболочки заключается в отключении компонента Windows PowerShell 2.0 или же только в замене пункта в контекстном меню. Обратите внимание, что полностью убрать оболочку Windows PowerShell не удастся, даже после полного отключения компонента.
С выходом нового обновления операционной системы в контекстном меню пуска была сделана замена возможности выбора командной строки на Windows PowerShell. Корпорация Майкрософт оставила за пользователями возможность возврата командной строки вместо PowerShell.
- Открываем Пуск > Параметры > Персонализация > Панель задач.
- Дальше изменяем значение пункта Заменить командную строку оболочкой Windows PowerShell в меню, которое появляется при щелчке правой кнопкой мыши по кнопке Пуск или при нажатии клавиш Windows+X на Отключено.

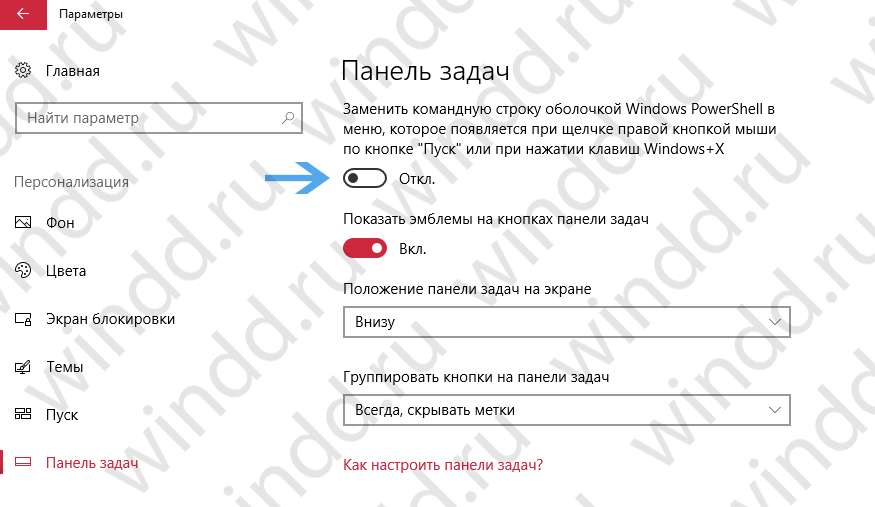
После чего в контекстном меню пуск появится доступная ранее командная строка. Смотрите также другие способы запуска командной строки в Windows 10. А также заменить PowerShell на командную строку можно использую редактор реестра. Обратите внимание что перед внесением изменений в реестр рекомендуется создать резервную копию реестра, а после внесения изменений необходимо выполнить перезагрузку компьютера или перезапуск проводника.
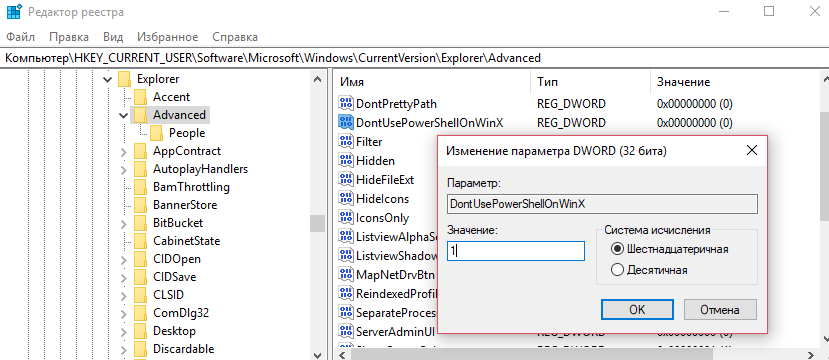
- Откройте редактор реестра выполнив команду regedit в окне Win+R.
- Дальше перейдите в расположение: HKEY_CURRENT_USER\Software\Microsoft\Windows\CurrentVersion\Explorer\Advanced.
- Измените значение параметра DontUsePowerShellOnWinX на 1.

Как отключить PowerShell в Windows 10
Программы и компоненты
Ранее мы уже рассматривали где находятся программы и компоненты в Windows 10, среди которых и присутствует оболочка Windows PowerShell 2.0. Включение и отключение компонента позволяет добавить или удалить оболочку Windows PowerShell в Windows 10. Полностью удалить компонент из системы последней версии не получится, и собственно в этом нет необходимости.
- Откройте компоненты Windows выполнив команду optionalfeatures в окне Win+R.
- Дальше найдите в открывшемся списке компонент Windows PowerShell 2.0 и отключите его.

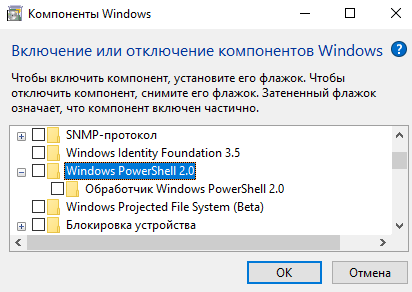
Чтобы отключить компонент, достаточно снять его флажок и применить изменения. Затемненный флажок означает, что компонент включен частично.
Windows PowerShell
Для отключения компонента можно использовать сам компонент Windows PowerShell. Пользователю достаточно запустить оболочку PowerShell и выполнить одну команду для отключения любого с компонентов.
- Запускаем оболочку выбрав в результатах поиска классическое приложение Windows PowerShell от имени администратора.
- В открывшемся окне выполняем следующую команду: [stextbox id=’download’]Disable-WindowsOptionalFeature -Online -FeatureName MicrosoftWindowsPowerShellV2Root[/stextbox]
С помощью одной команды можно отключить ненужный компонент Windows PowerShell устаревшей версии. После отключения обновленный PowerShell пятой версии останется доступным.
Заключение
Вместе с обновлениями Windows 10 обновляются и компоненты операционной системы. Изменения потерпели множество компонентов, начиная от оболочки Windows PowerShelll, и включительно до компонента виртуализации Hyper-V Windows 10.
После отключения компонента Windows PowerShell второй версии обновленный PowerShell останется. Но пользователи предпочитающие видеть командную строку в контекстном меню пуск могут нажатием одной кнопки её вернуть.
(6 оценок, среднее: 2,00 из 5)
Администратор и основатель проекта Windd.pro. Интересуюсь всеми новыми технологиями. Знаю толк в правильной сборке ПК. Участник программы предварительной оценки Windows Insider Preview. Могу с лёгкостью подобрать комплектующие с учётом соотношения цены — качества. Мой Компьютер: AMD Ryzen 5 3600 | MSI B450 Gaming Plus MAX | ASUS STRIX RX580 8GB GAMING | V-COLOR 16GB Skywalker PRISM RGB (2х8GB).
Windows 11/10 comes with a pre-installed PowerShell cross-platform tool. This is a very important tool that makes it easy to perform several tasks just by typing some simple commands. It lets you run commands to make various changes in the Settings, troubleshoot several issues, manage features, and automate your work, etc.
Windows PowerShell is an essential and convenient application included in the Windows operating system. But sometimes, you may need to disable it to avoid making unwanted changes by running malicious commands. This tool is used by a threat actor to create malicious software that runs malicious scripts and accesses the file system and registry. In other words, you can say that this tool is also used by some hackers to run malicious commands.
In such a case, if you need to disable the PowerShell application then this article will help you to do so. This article explains how to disable the PowerShell application using Security policy and Local Group Policy Editor. Let us see them in detail.
Before you proceed, it is recommended to create a System Restore point. Now follow the below suggestions to disable Windows PowerShell on Windows 10:
1] Disable PowerShell on Windows using Security Policy
Local Security Policy offers users a way to block PowerShell access on Windows 10. Follow the instructions given below to do so:

- Click Start, type Local Security Policy, and select the result from the menu list.
- Go to the left pane and expand Software Restriction Policies.
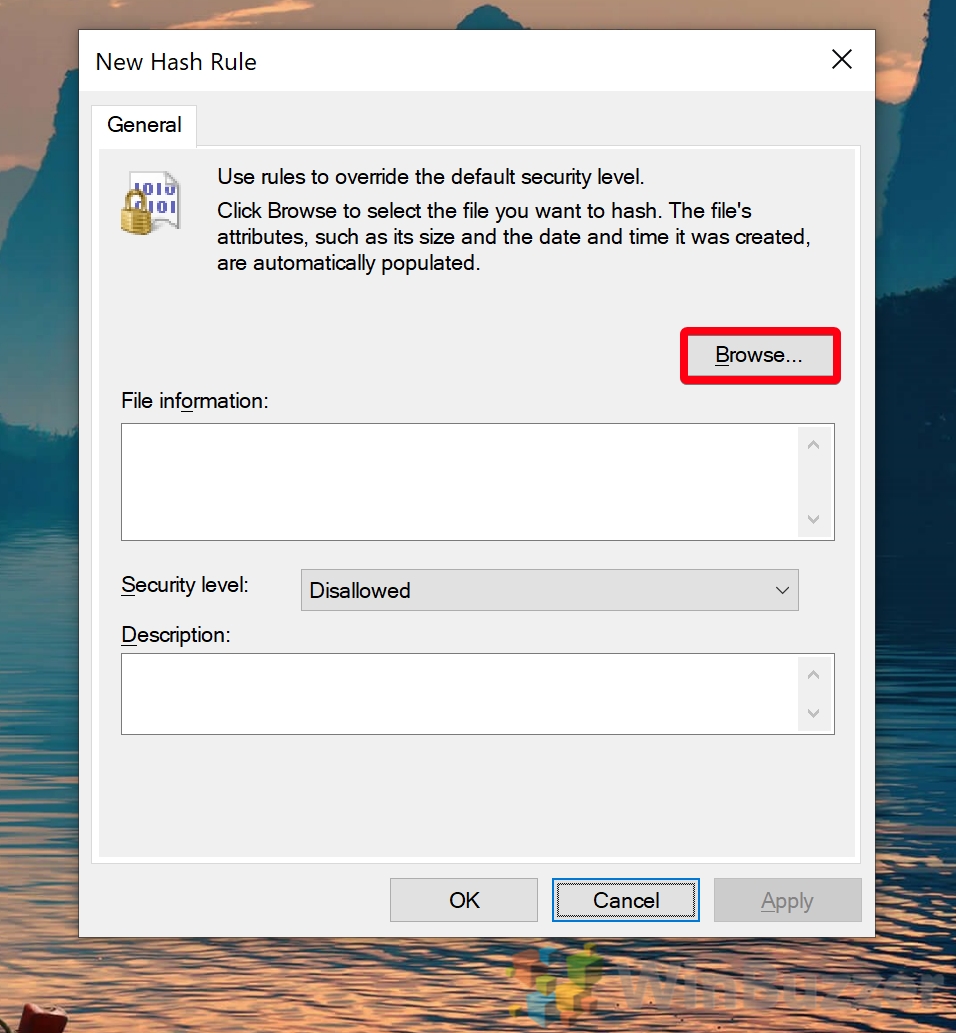
- Right-click on the Additional Rules and select the New Hash Rule option.
- If you don’t find the way to expand the Software Restriction Policies then right-click on the Software Restriction Policies and select the New Software Restriction Policies option.

In the New Has Rule window, tap on the Browse option. Now open the file explorer using Windows+E keys and type the following path location in the address bar and press Enter:
%SystemRoot%\system32\WindowsPowerShell\v1.0
This will locate the 32-bit version of PowerShell. Select the powershell.exe from the list and then click Open > Apply > OK.
Disable PowerShellISE
If you want to disable PowerShellISE on your Windows 10 computer, then select powershell_ise.exe (instead of powershell.exe) from the list.
In the Local Security Policy window, right-click on the Additional Rules under the Software Restriction Policies section and click on the New Hash Rule button and then select the Browse button.
Again open the File Explorer and copy-paste the path given below in the address bar. Then press the Enter key to select the 64-bit version of PowerShell.
%SystemRoot%\SysWOW64\WindowsPowerShell\v1.0
On the following page, scroll down and select the powershell.exe option and then click on the Open button.
Note: You need to select the powershell_ise.exe option if you want to disable PowerShellISE.
Then click Apply and then select the OK button.
After completing the above steps, restart your computer to save the changes. This will disable Powershell access on your PC.
2] Disable PowerShell on Windows using Group Policy
Local Group Policy Editor is a powerful tool available in Windows 10 Pro or Enterprise that eases several tasks on PC. Those users with the Pro or Enterprise version of Windows 11/10 can use the Group policy tool to block PowerShell. Follow the below steps to disable PowerShell using Group Policy:
First of all, press the Windows+R keyboard shortcut to open the Run dialog box.
Type gpedit.msc and hit Enter. In the Local Group Policy Editor window, navigate to the path below:
User Configuration > Administrative Templates > System

Go to the right pane and double click on the Don’t run specified Windows applications policy.

On the next page, click on the Enabled button as shown in the above image. Then go to the Options sections and click on the Show button.
Now you need to open a new cell in the Value column, type powershell.exe, and click the OK button. This will disable the PowerShell access.
You can also disable the PowerShell ISE interface. To do so, open a new cell, type powershell_ise.exe, and click the OK button.
However, if you need to disable the PowerShell 7, type pwsh.exe in the new cell and then click the OK button.
In last, click Apply > OK to save the changes.
Once you complete the above process, you will not be able to access Powershell anymore.
TIP: This post shows how to uninstall PowerShell.
Disable PowerShell 7 on Windows
If you have PowerShell 7 on your device, you can disable it by uninstalling it from your Windows PC. Here are the steps you need to follow:
- Right-click on the Start button
- Select Setting from the power user menu.
- In the Settings app, click on the Apps category
- Then select the Apps & features option from the left pane.
- Now go to the right-pane, scroll down and select the PowerShell app.
- Click on the Uninstall button.
- If Windows asks you to confirm, click the Uninstall button again.
Follow the on-screen instructions to uninstall this app. It will remove the app and its related data. This way you can disable the user’s access to PowerShell version 7.
Read next: How to turn on or off Windows PowerShell script execution.
Windows 10 provides the following CLIs: Command Prompt and PowerShell. Windows PowerShell is a powerful tool for users to install and manage Windows, troubleshoot problems, and do advanced configuration. PowerShell can also be used to automate tasks and perform tasks that would normally take a long time to complete in a graphic user interface.
Sometimes, PowerShell can be used for bad purposes as well. It can be utilized to perform automated malicious tasks and effectively infect devices across an entire network.
In some environments, it may be advisable to disable PowerShell, particularly if you believe an individual is not using PowerShell for everyday tasks.
This article explores two ways through which you can disable Windows PowerShell on your computer so that it does not become abused.
Table of contents
- Disable PowerShell in Windows 10 using Group Policy
- Disable PowerShell in Windows 10 using Local Security Policy
- Disable PowerShell 7 in Windows 10
- Closing words
Disable PowerShell in Windows 10 using Group Policy
On Windows 10, you can also manage your PC with tools like Group Policy Editor.
Tip: If you are a Windows 10 Home Edition user, follow this guide to install the Group Policy Editor.
You can use the Group Policy Editor to disable Windows PowerShell on your PC, here is how:
- Launch the Group Policy Editor by typing in gpedit.msc in Run.

- Now navigate to the following from the left pane:
User Configuration -> Administrative Templates -> System - Now look in the right pane for Don’t run specified Windows applications. Double-click it.

- In the pop-up window, select the Enabled radio button. Then, click on Show under Options.

- In the new Show Contents popup window, type in powershell.exe under the Value column. You can also type in powershell_ise.exe and pwsh.exe to disable the Integrated Scripting Environment (ISE) which is the host application for PowerShell.

Click OK when done. - Close the Don’t run specified Windows application window by clicking Apply and OK.
- Now type in gpupdate /force in Command Prompt to enforce the changes made to the Group Policy.


Now try launching PowerShell from the Start Menu but it won’t work, because the PowerShell Core (pwsh.exe) has also been disabled and launching it via the Run menu will prompt you with the following:

If at any point you wish to re-enable PowerShell, simply return to the same location within the Group Policy Editor, double-click Don’t run specified Windows application, and select the Disabled or Not Configured radio button.
Disable PowerShell in Windows 10 using Local Security Policy
The Local Security Policy Editor in Windows 10 allows users to manage their security protocols across users as well as the entire computer.
Tip: If you are a Windows 10 Home Edition user, follow this guide to install the Security Policy Editor.
Here is how you can disable Windows PowerShell using the Security Policy Editor:
- Launch the Local Security Policy Editor by typing in secpol.msc in Run.

- Right-click Software Restriction Policies in the left pane and click New Software Restriction Policies from the context menu.

- Now right-click Additional rules and then click New Hash Rule from the context menu.

- In the New Hash Rule window, click Browse.

- In the browsing window, enter the path given below in the address bar:
%SystemRoot%\system32\WindowsPowerShell\v1.0
- Now select powershell.exe from your current working directory.

At this point, you can also select powershell_ise.exe to disable ISE. In order to disable both, repeat steps ____ and select the other one. - Now back on the New Hash Rule window, click Apply and OK.

- Now restart your computer for the changes to take effect.


Trying to run disabled content (PowerShell or PowerShellISE) will result in the following prompt:

If you want to re-enable Windows PowerShell or ISE, simply re-open the Local Security Policy Editor and click Additional Rules on the left pane. Now, right-click the Hash Rules you have created in the right pane and click Delete from the context menu.

If a confirmation dialog box appears, click Yes. Now all you need to do is reboot your computer to re-enable Windows PowerShell when required.
Disable PowerShell 7 in Windows 10
If you have PowerShell 7 on your Windows 10 device, then the method to remove it from your PC would be a bit different than the ones above. PowerShell 7 can be considered an application. Hence, you can remove it using the Settings app. Here is how to do so:
- Navigate to the following location:
Start Menu -> Settings -> Apps -> Apps and features - Now scroll down and click on PowerShell 7.

- Now click Uninstall.


Now, trying to launch PowerShell 7 will result in a prompt stating that it could not find it. However, if you ever need it in the future, click this link to download the latest standalone version of PowerShell.
Closing words
Windows PowerShell is a powerful tool that not everybody should use. It may appear complicated for some, but it is also an avenue for malicious activity for others.
It may be good practice for the IT administrators to only enable PowerShell when they are using a device while disabling it for the other standard users.

Contents
- 1 How to Block PowerShell via Group Policy Editor (gpedit)
- 2 How to Disable PowerShell in Windows 10 via Security Policy
- 3 How to Remove PowerShell 7 from Windows 10 by Uninstalling the App
Windows 10’s PowerShell is a very useful and powerful multi-purpose tool that works across various OSes. With it, a user can perform almost any task on their system – but this represents a security challenge for parents and IT admins. As a result, you may want to disable PowerShell in Windows 10.
What is Windows PowerShell?
Windows PowerShell is a command-line tool that lets users run scripts, modify system settings and even perform basic operating system tasks such as creating folders and text files.
Unfortunately, this means an uneducated user could also do a lot of damage with PowerShell. They could inadvertently run a malicious script, purposefully delete system files, or bypass other restrictions.
For these reasons, many will be wondering how to remove PowerShell from Windows 10. Thankfully, Microsoft has created at least three ways to deactivate it. We’ll be covering each of them in detail below. If you also want to disable the Command Line (CMD) check our other tutorial.
How to Block PowerShell via Group Policy Editor (gpedit)
The easiest and recommended way to disable PowerShell is GPO, or Group Policy. Many admins will already be familiar with this tool. It’s worth noting, though, that it’s only available in Windows 10 Pro and higher.
Don’t know your Windows version? Here’s how to check.
- Open the Group Policy Editor
Press “Start” and then type “gpedit.msc”. Click the top result.

- Open the “System” folder and double-click “Don’t run specified Windows applications”
The System folder can be found underUser Configuration > Administrative Templates.
- Create your PowerShell GPO
The process to turn off PowerShell is slightly different to Command Prompt as it doesn’t have a dedicated group policy. Instead, switch the policy to “Enabled” and then Click “Show…” next to “List of disallowed applications”.In the “Value” column of the “Show Contents” field, add three rows with each version of PowerShell.
These are:powershell.exe
powershell_ise.exe
pwsh.exeOnce you’re done, press “OK”.

- Press ‘OK' and ‘Apply' in the main policy window
You should then test whether Windows PowerShell is disabled. If PowerShell is blocked successfully, you'll get an error message such as “This app has been blocked by your system administrator”.
If you're wondering how to enable PowerShell again, just change the policy from “Enabled” to “Disabled”.


How to Disable PowerShell in Windows 10 via Security Policy
Alternatively, you can stop PowerShell from working by setting up a Local Security Policy. This takes a little longer but is still quite simple.
First, press Start, search for “Local Group Policy”, and click the top result to open it. Then you can follow the steps below:
- Create a new hash rule in the Additional Rules folder
In the sidebar, navigate to “Software Restriction Policies > Additional Rules”. Right-click the folder and select “New Hash Rule…”.

- Press “Browse” in the New Hash Rule window

- Open powershell.exe
A File Explorer window will open. In the top bar, paste%SystemRoot%\system32\WindowsPowerShell\v1.0. This will take you to the PowerShell folder, where you can click on “powershell” and press “Open”.
- Press “Apply” and “OK”

- Add the 32-bit version of PowerShell as a hash rule
Repeat steps 1 – 2 above, but this time paste the following into your File Explorer window:
%SystemRoot%\SysWOW64\WindowsPowerShell\v1.0. Press “Open” to add it to your hash rule.
- Press “Apply” and “OK”
If you'd like, you can add PowerShell 7 here by visiting
%SystemRoot%\Program Files\PowerShell\7\pwsh.exeor follow the steps later on to uninstall it.
- Block PowerShell_ISE
Now we need to block the 32-bit and 64-bit versions of PowerShell_ISE. To do so, repeat steps 1 – 2, then paste the following in your File Explorer directory bar:
%SystemRoot%\system32\WindowsPowerShell\v1.0Click “powershell_ise” in the folder and press “Open”.

- Press “Apply” and “OK”

- Add 64-bit PowerShell ISE as a hash rule
Follow steps 1 – 2 once more and paste%SystemRoot%\SysWOW64\WindowsPowerShell\v1.0in your Explorer bar. Click on “powershell_ise” and then press “Open”.
- Press “OK” and “Apply”


How to Remove PowerShell 7 from Windows 10 by Uninstalling the App
If the device you're working on also have PowerShell 7, you can just uninstall it. Here's how:
- Open Settings
Press the Start button, then click the settings cog, above the power button. Alternatively, press Windows + I.

- Click ‘Apps'

- Search for PowerShell 8 and uninstall it Step title
In the “Apps & features” section, type “Power” into the search bar. Once you see PowerShell 7, click it, press “Uninstall”, and then click “Uninstall” again.

With that, you should know how to disable all instances of PowerShell on your system. Though you'll see that using a GPO PowerShell toggle is the easiest, it's always good to have alternatives.
Though PowerShell is now disabled, you shouldn't forget about Command Prompt, as it has similar functionality. If you need to lock down your system further, you can also consider enabling kiosk mode, which limits users to certain apps.