Если вы используете на своем компьютере две операционные системы, Windows и Linux, и обновили свою Windows из 7, 8 или 8.1 до самой новой Windows 10, могут возникнуть проблемы с загрузчиком Grub при использовании защищенной загрузки UEFI. Во время обновления Windows 10 просто затрет загрузчик Grub и запишет туда свой.
Вы, как обычно, перезагружаете систему и ожидаете увидеть меню выбора операционной системы Grub, но вместо этого загружается новая Windows 10. Вам может показаться, что нет никакого способа получить доступ к Ubuntu или что не может работать Ubuntu рядом с Windows 10. Но это не так.
Многие советуют установить Ubuntu на другой диск, но есть более простое и прекрасно работающие решение, чтобы восстановить grub после установки windows 10. Кончено, всегда можно восстановить grub2 стандартным способом, с помощью LiveCD диска, но если вы используете UEFI, есть более легкое решение, мы сделаем все с помощью Windows 10.
Хотя за основу в этой статье берется Ubuntu, но это также будет работать и для других дистрибутивов. Просто папка, в которой находятся файлы загрузчика будет немного отличатся.
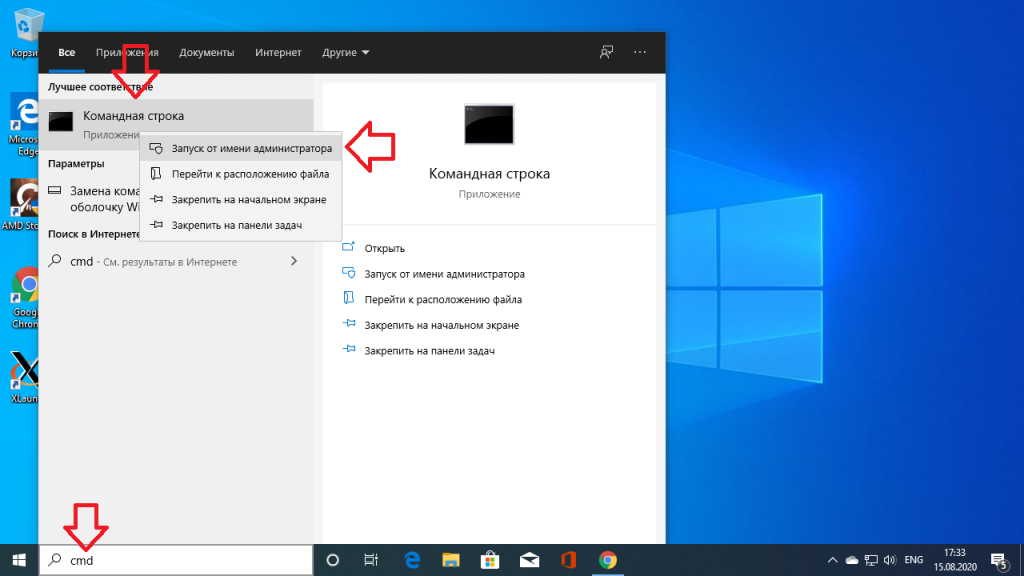
Шаг 1. Запуск cmd
Кликните по иконке поиск в Windows, наберите там cmd и найдите Командную строку Windows. Кликните по ней правой кнопкой и выберите Запустить от имени администратора:
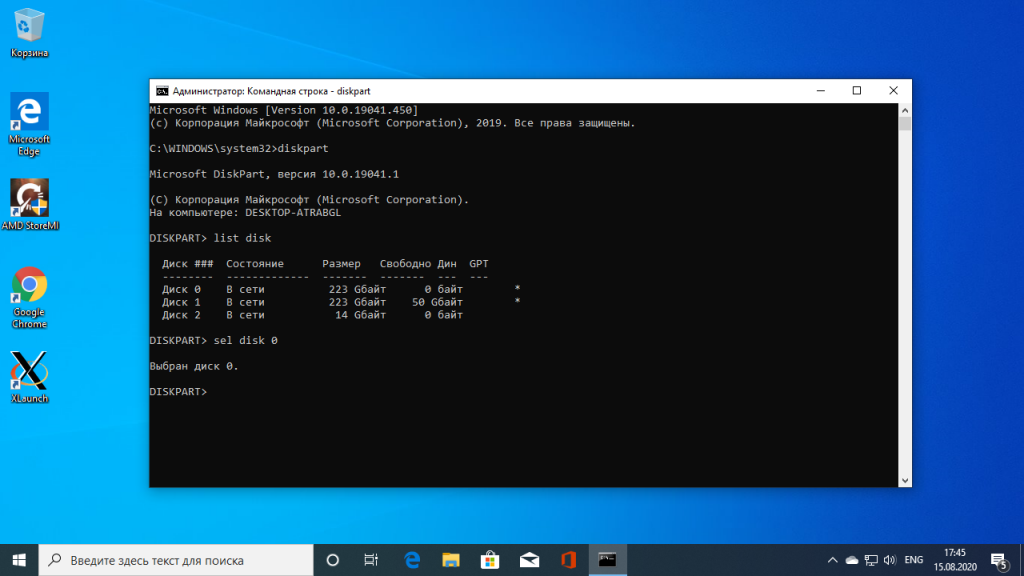
Шаг 2. Подключение раздела EFI
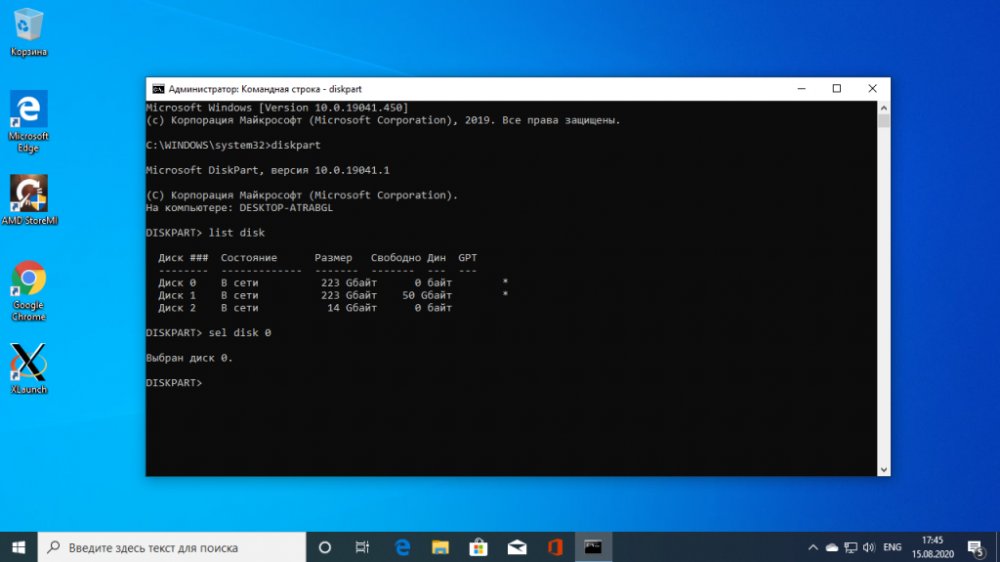
Далее вы можете попытаться угадать как называется файл загрузчика Grub на разделе EFI, но можно поступить по другому и просто посмотреть. Чтобы подключить раздел EFI запустите diskpart. Для этого выполните:
diskpart
Затем выведите список доступных дисков:
list disk
Выберите в качестве активного диск, на который установлена Windows 10 и на котором сейчас находится раздел EFI:
sel disk 0
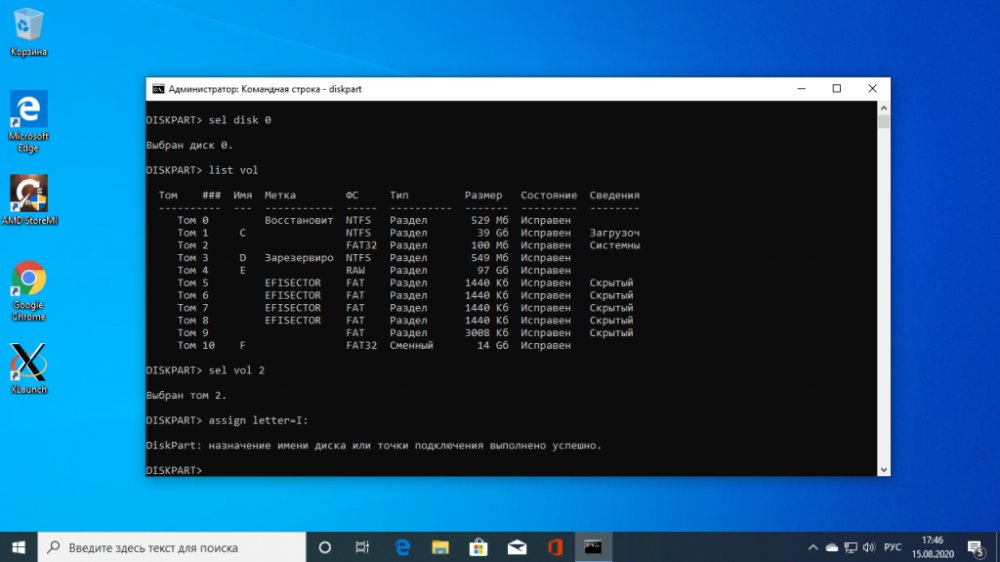
Далее выведите список разделов на диске:
list vol
Найдите раздел EFI, он обычно отформатирован в файловую систему FAT и занимает около 100 мегабайт места. В данном случае это том 2:
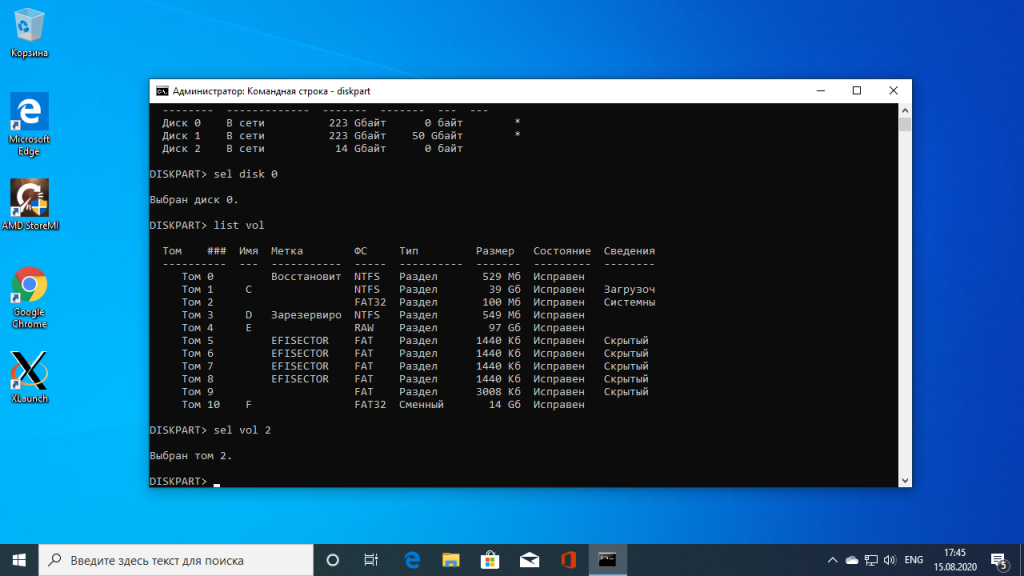
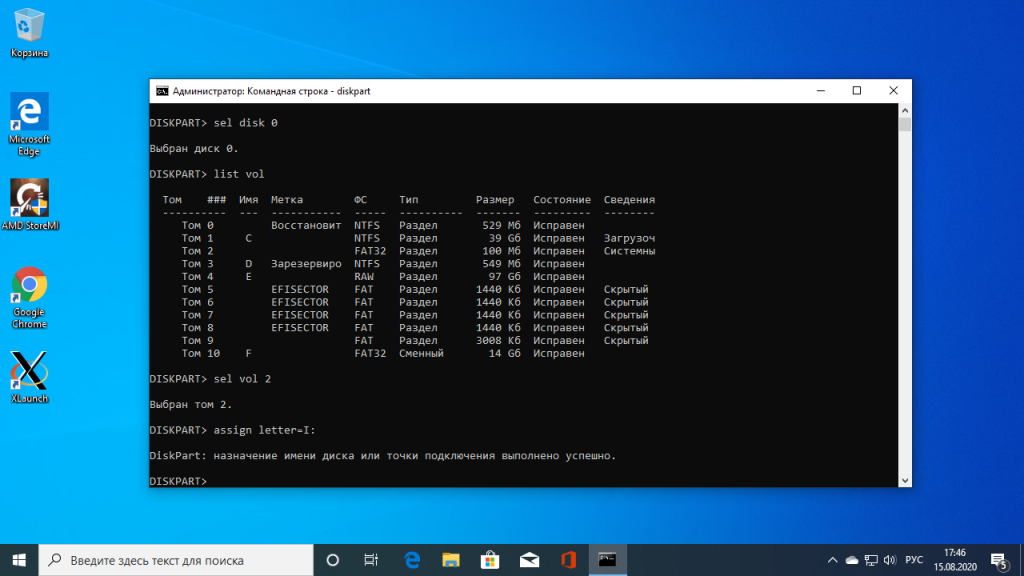
Этому разделу надо присвоить букву. Для этого выполните:
sel vol 2
assign letter=I:
Шаг 3. Поиск загрузчика
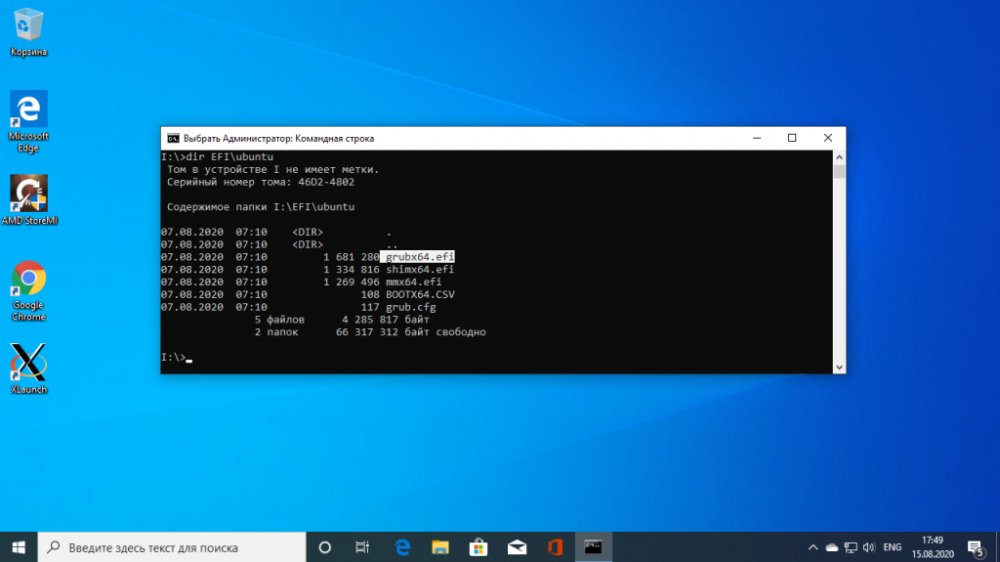
Далее надо найти файл загрузчика на разделе EFI. Но открыть этот раздел в проводнике вы не сможете, надо использовать только командную строку. Закройте DiskPart и выполните:
cd /d I:
Затем с помощью команды dir найдите загрузчик Grub. Например:
dir EFI\Ubuntu

Здесь есть файл grubx64.efi. Это он. Загрузчик может называться по другому в других дистрибутивах, именно поэтому я рассказал как всё посмотреть.
Шаг 4. Восстановление Grub
Скопируйте и выполните эту команду:
bcdedit /set {bootmgr} path \EFI\ubuntu\grubx64.efi
Вам не нужно будет вводить пароль, у вас уже есть права администратора и программа должна отработать нормально. Эта команда обратно запишет вместо загрузчика Windows 10 загрузчик Grub.
Если команда вернула ошибку, вы можете откатить изменения с помощью следующих команд:
bcdedit /deletevalue {bootmgr} path \EFI\ubuntu\grubx64.efi
bcdedit /set {bootmgr} path \EFI\Microsoft\Boot\bootmgfw.efi
Выводы
Восстановление Grub после Windows 10 завершено. Перезапустите компьютер и вы увидите на экране знакомый Grub. Надеюсь, эта краткая инструкция помогла вам выполнить восстановление Grub после установки Windows 10.
Обнаружили ошибку в тексте? Сообщите мне об этом. Выделите текст с ошибкой и нажмите Ctrl+Enter.
Об авторе
![]()
Основатель и администратор сайта losst.ru, увлекаюсь открытым программным обеспечением и операционной системой Linux. В качестве основной ОС сейчас использую Ubuntu. Кроме Linux, интересуюсь всем, что связано с информационными технологиями и современной наукой.
Relax, it might not be deleted just overwritten
by Tashreef Shareef
Tashreef Shareef is a software developer turned tech writer. He discovered his interest in technology after reading a tech magazine accidentally. Now he writes about everything tech from… read more
Updated on
- GRUB (GRrand Unified Bootloader) is a bootloader software that is crucial in the boot process of many computer OS, especially Linux.
- If you can’t get the GRUB screen to load, keep reading to find the solutions.
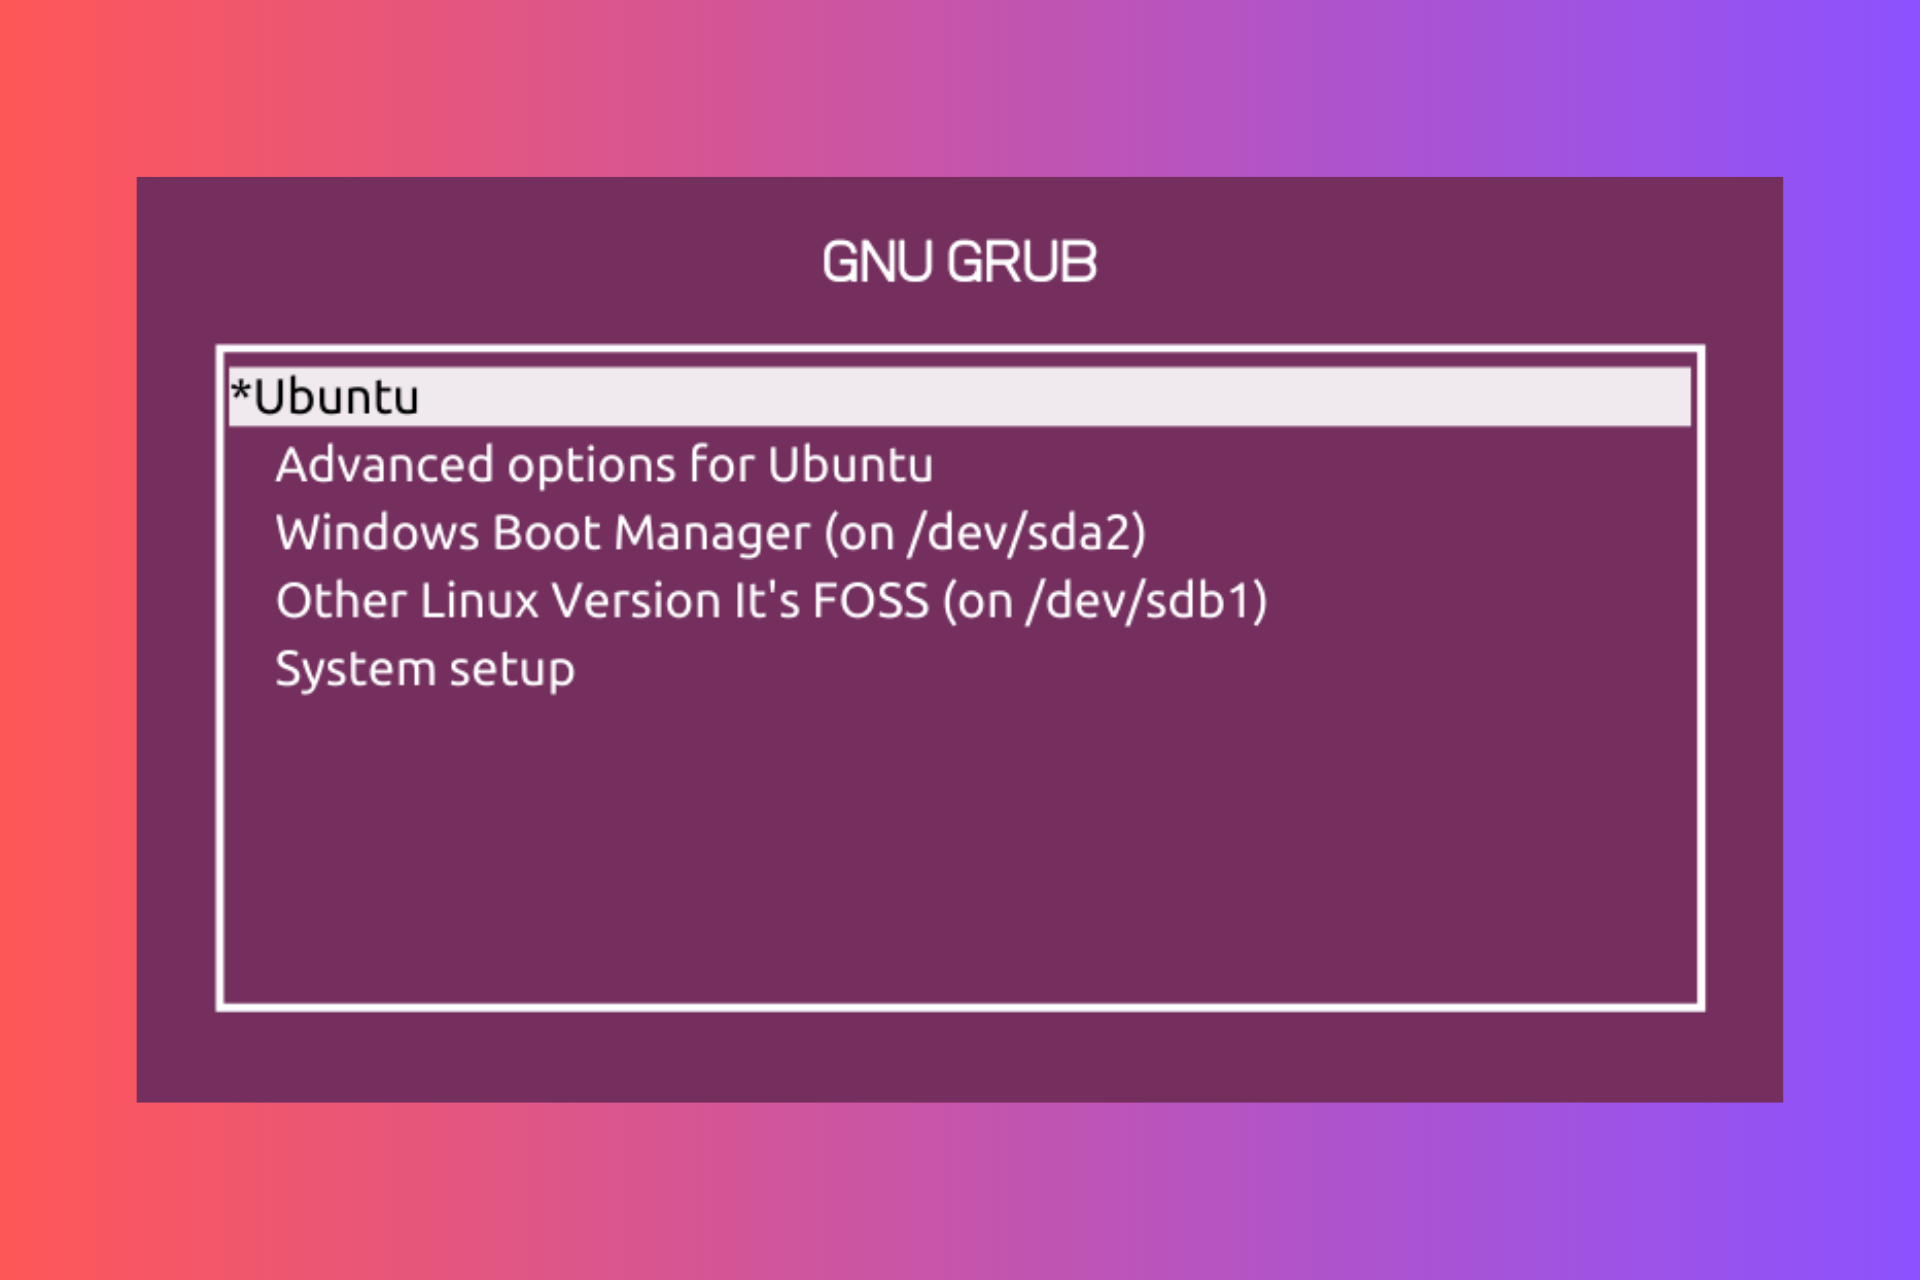
If you have a multi-boot setup like Windows 10 and Linux, and you aren’t getting the Grub Bootloader screen to choose which operating system to load, and every time you restart, the Windows OS loads, this guide can help!
This is a common problem users report after they update Windows or install Windows 10. When you update or install Windows, the Windows bootloader overwrites the Grub bootloader.
Some other causes of the GRUB Deleted and Windows 10 loading up are Linux reinstallation, fast startup feature, malware activity, changes to BIOS settings, and third-party boot manager conflicts.
How do I recover GRUB after installing Windows?
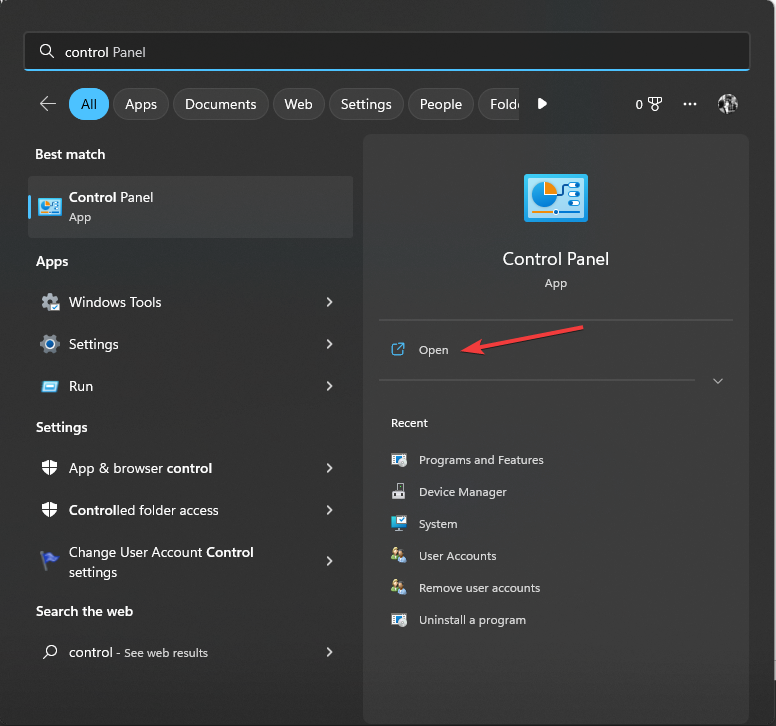
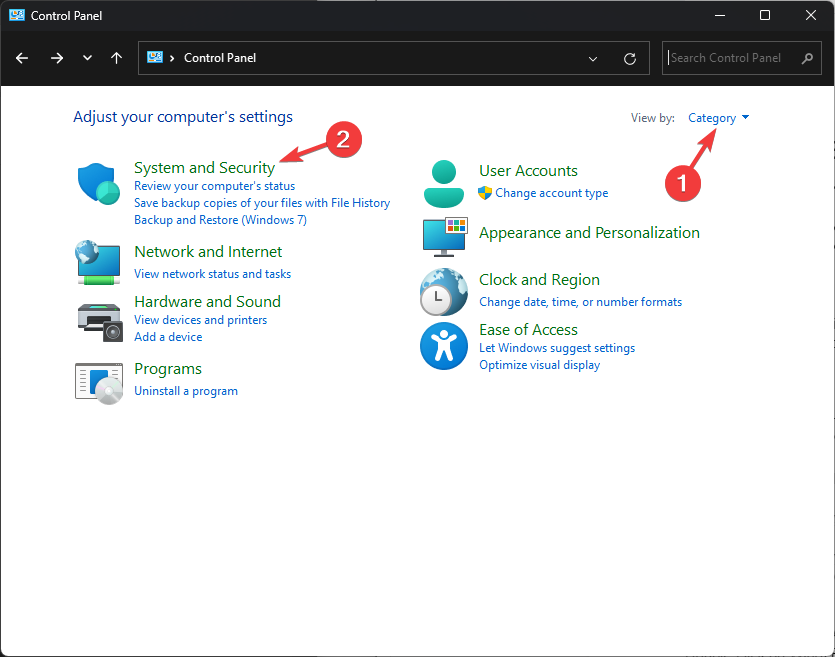
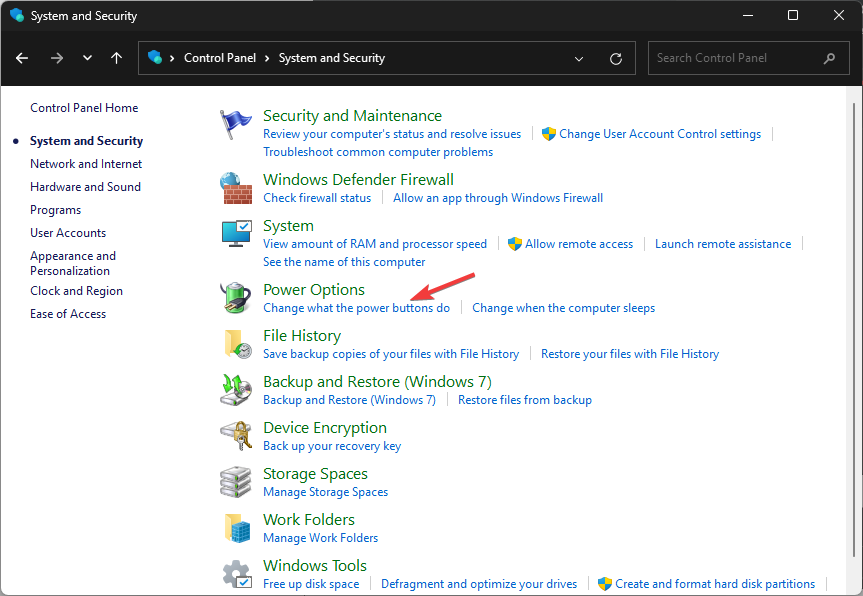
1. Disable Fast Startup
- Press the Windows key, type control panel, and click Open.

- Select Category for the View by option, and click System and Security.

- Next, locate Power Options and click Change what the power buttons do.

- Click the Change settings that are currently unavailable link.
- Remove the checkmark next to Turn on Fast Startup and click Save changes.
- Restart your PC, and you will see the GRUB screen.
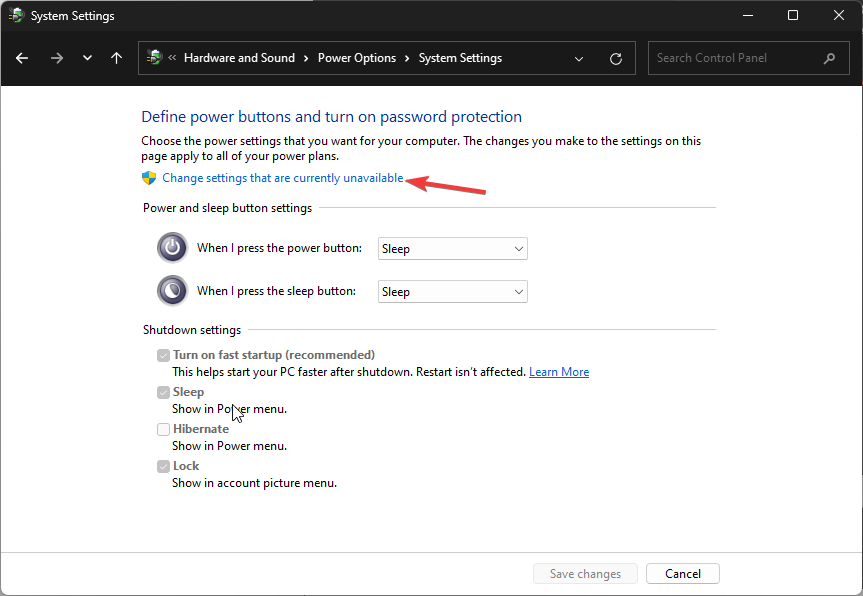
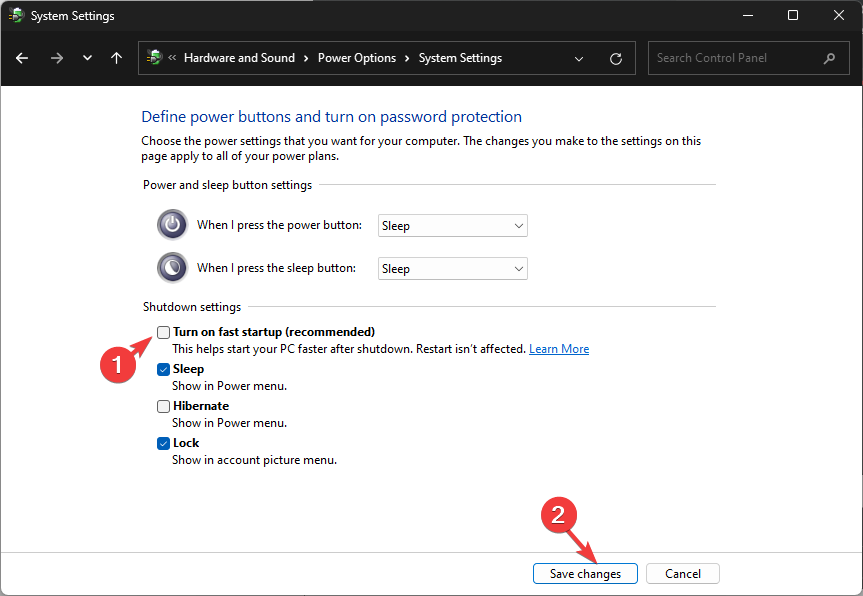
Windows Fast Startup is a feature that can interfere with the boot process of other operating systems; that’s why it is advised to disable it to avoid issues. It is not a direct solution but is a preventive measure
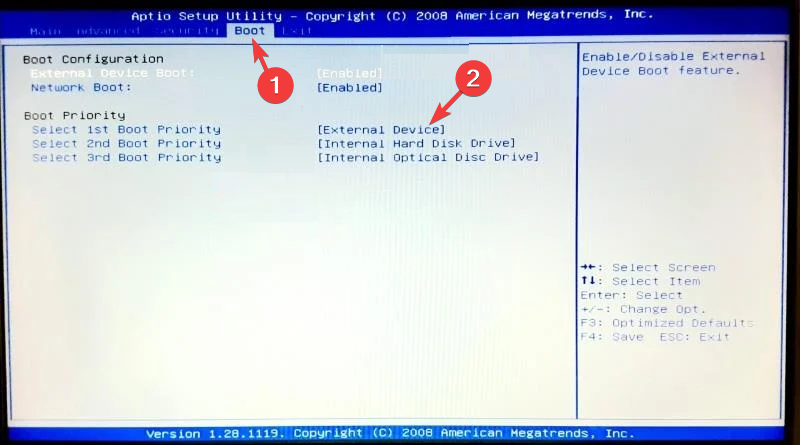
2. Change the boot order
- Restart your computer. When you see the manufacturer’s logo, press the function key designated by the manufacturer to access the boot menu. For example, for HP, it is F9; for Dell, it is F2.
- Go to the Boot menu, locate the Boot priority order, look for Linux, and press F5 to move it up the order.
- Next, locate Secure Boot, and select Disabled.

- Press F10 to save & exit the boot menu.
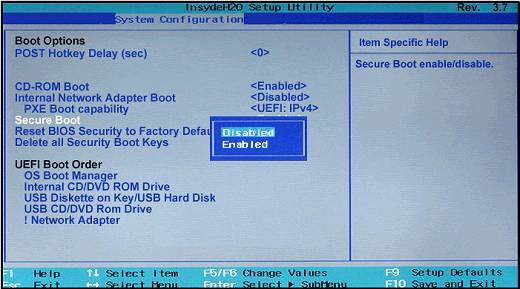
This method will work if you have the Ubuntu or Linux entry in the boot menu; if you can’t find it, move to the next one.
How we test, review and rate?
We have worked for the past 6 months on building a new review system on how we produce content. Using it, we have subsequently redone most of our articles to provide actual hands-on expertise on the guides we made.
For more details you can read how we test, review, and rate at WindowsReport.
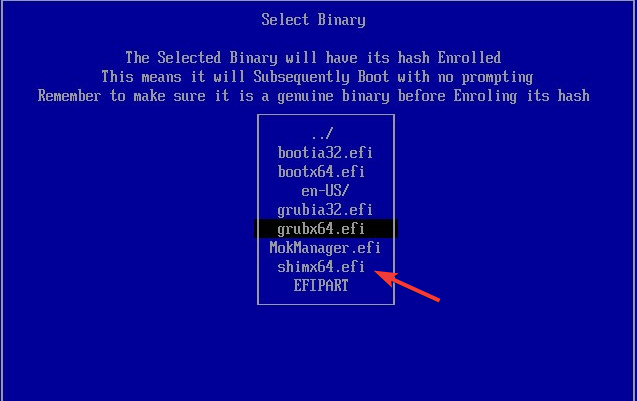
3. Add Linux boot entry
- Use the steps mentioned in Step 2 and enter the BIOS menu.
- Locate Boot or Security and look for the Add Boot Option.
- You will either get an option to add an EFI file or will be taken to the hard drive Linux distribution installed.
- Select EFI. Locate and choose the folder with your name.
- From the folder, choose shimx64.efi file and press Enter.

- Click Yes or OK to confirm the changes.
- The boot option will now appear; press F10 to save the changes.
- Fix: MSI Afterburner Failed to Start Scanning
- How to Fix Microsoft Common Language Runtime Native Compiler High CPU Usage?
4. Modify the registry settings
- Press the Windows key, type cmd, and click Run as administrator.

- Type the following command to change the bootloader back to GRUB after replacing Ubuntu with your distribution and press Enter:
bcdedit /set {bootmgr} path \EFI\ubuntu\grubx64.efi
- Reboot your PC; you will get the GRUB menu back.


If you have similar issues but can’t load the Windows bootloader instead, we recommend you check out this guide
5. Reinstall GRUB

NOTE
You will need a USB flash drive with 16 GB of free space on it. Delete or transfer all the data from your pen drive, as the data might be deleted during the process.
First, you need to create a bootable USB drive with Linux Live in it.
- Go to Linux’s official website and download the Linux distribution you want.

- The ISO file will be downloaded on your computer; plug in the USB drive that you want to use.
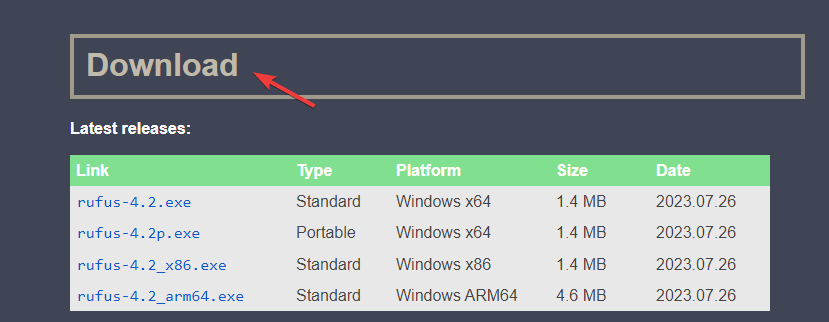
- Download and install Rufus from the official site.

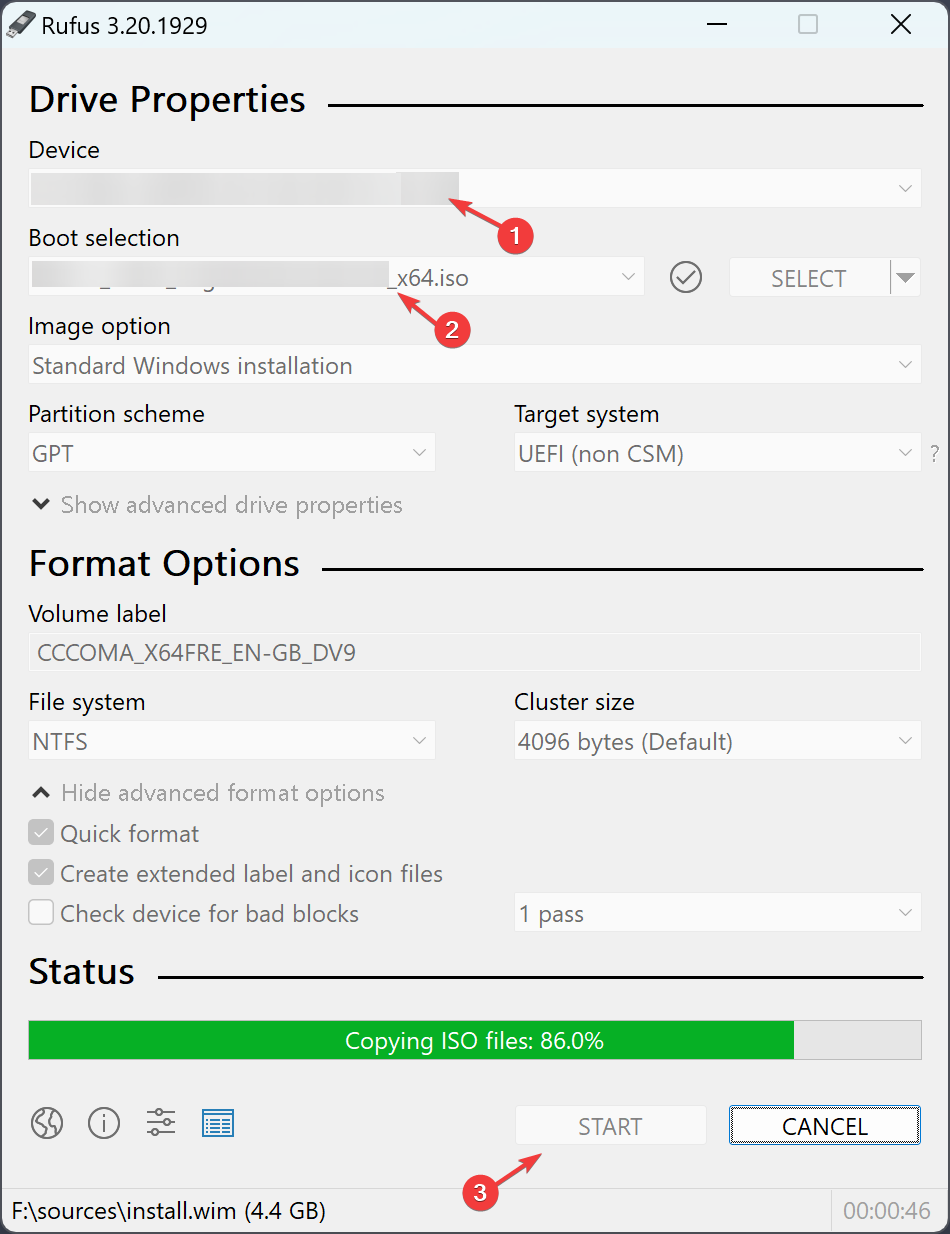
- Launch Rufus, and choose your USB driver under the Device section.

- Locate Boot selection, select the downloaded Linux ISO file, and click Start.

Once completed, you will have a bootable Linux USB flash drive. Now follow these steps to make the USB priority to boot
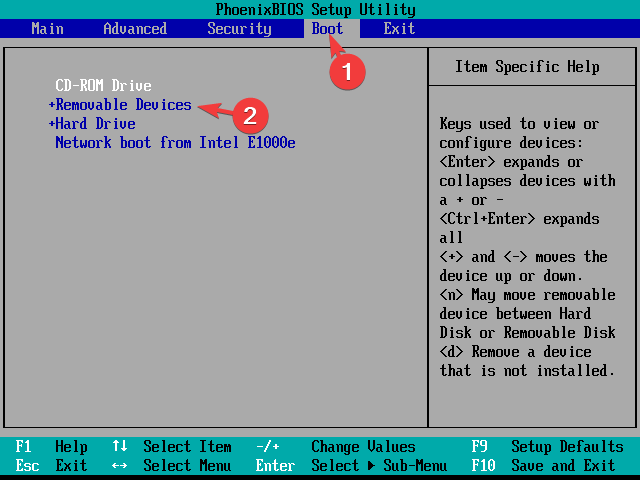
- Restart your computer and press the function key designated by the manufacturer to access the boot menu when you see the manufacturer’s logo.
- Go to the Boot menu, locate the Boot order, look for a USB drive, and press F5 to move it up the order.

- Press F10 to save & exit the boot menu.
Now when your computer boots up, you will get a functional Linux environment to reinstall GRUB.
- Open Terminal and copy & paste the following command to get the list of available disks and hit Enter:
sudo fdisk -l - Carefully look through the output to recognize the partition that is related to Linux installation, then type the following command after replacing /dev/sdXY with the actual partition designation and press Enter:
sudo mount /dev/sdXY /mnt - Next, to mount virtual file systems, copy & paste the following commands one by one and press Enter after each command:
sudo mount --bind /dev /mnt/dev
sudo mount --bind /sys /mnt/sys
sudo mount --bind /proc /mnt/proc
sudo mount --bind /run /mnt/run
- To change the root to your Linux installation, type the following command and hit Enter:
sudo chroot /mnt - Copy & paste the following command to reinstall GRUB as per your Linux distribution and press Enter:
- On Debian/Ubuntu-
sudo grub-install /dev/sdX - On Red Hat/Fedora –
sudo grub2-install /dev/sdX
- On Debian/Ubuntu-
- Once it is installed, type the following command to update its configuration to detect the installed OS and hit Enter:
sudo update-grub - Next, to exit the Chroot environment, type exit and press Enter.
- To unmount the mounted partitions in the reverse order, copy & paste the following commands one by one and press Enter after each command:
sudo umount /mnt/dev
sudo umount /mnt/sys
sudo umount /mnt/proc
sudo umount /mnt/run
sudo umount /mnt/boot
sudo umount /mnt
- Reboot your system, and you will get the GRUB menu with both operating systems listed.
6. Use the Boot-Repair tool
Create the bootable USB drive with Linux Live distribution and change the boot order using the steps mentioned in Step 3, then plug the flash drive into your computer, and follow these steps:
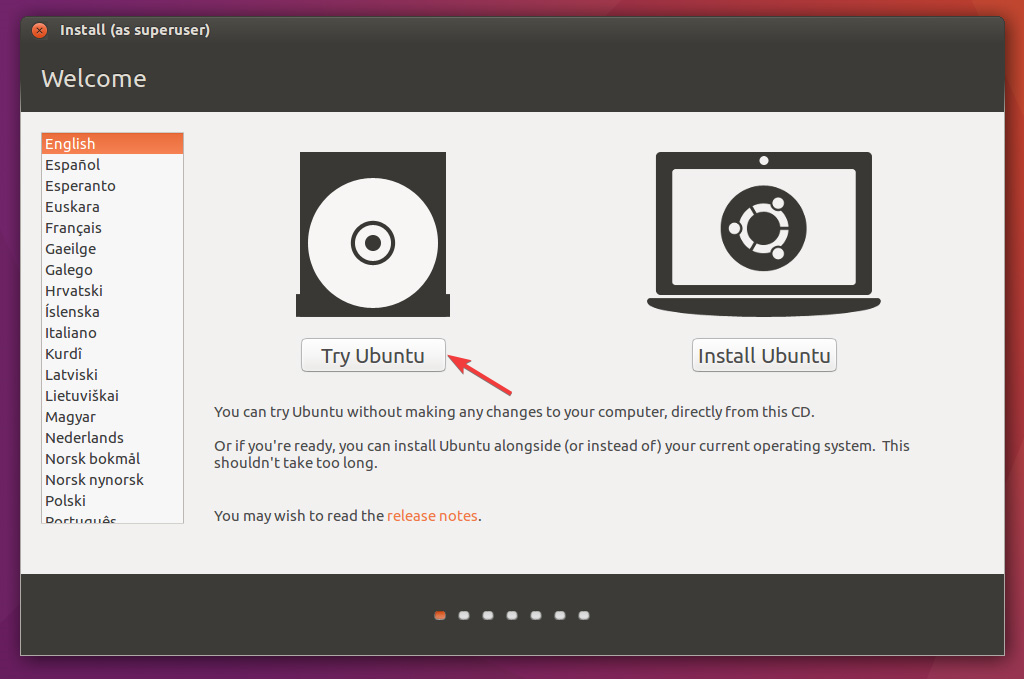
- Restart your computer, and the Ubuntu Live environment will load; choose the Try Ubuntu option to get a functional Ubuntu session.

- To install Boot-Repair, launch the Terminal, and copy & paste the following commands one by one and press Enter after every command:
sudo add-apt-repository ppa:yannubuntu/boot-repair
sudo apt-get update
sudo apt-get install -y boot-repair
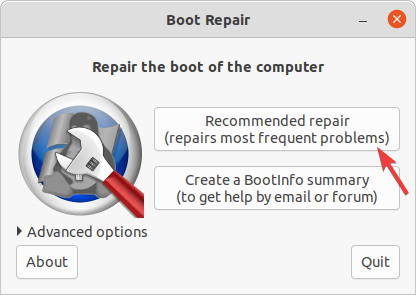
- Now type the following command to launch Boot-Repair and press Enter:
boot-repair - The Boot-Repair tool window will come up, and select the Recommended repair option.

- Follow the on-screen instructions to complete the process.
- Restart your computer using the Power Off or Shut Down option. Remove the pen drive, and the GRUB menu will appear upon restart.
If you can’t see Windows in the GRUB menu, then read this guide to understand the reasons and solutions to fix it.
How can I fix can’t boot up Windows 10 after removing Ubuntu?
Before proceeding with any steps, go through the following preliminary checks:
- Ensure you have a USB drive with a minimum of 8 GB of storage
- Stable internet connection
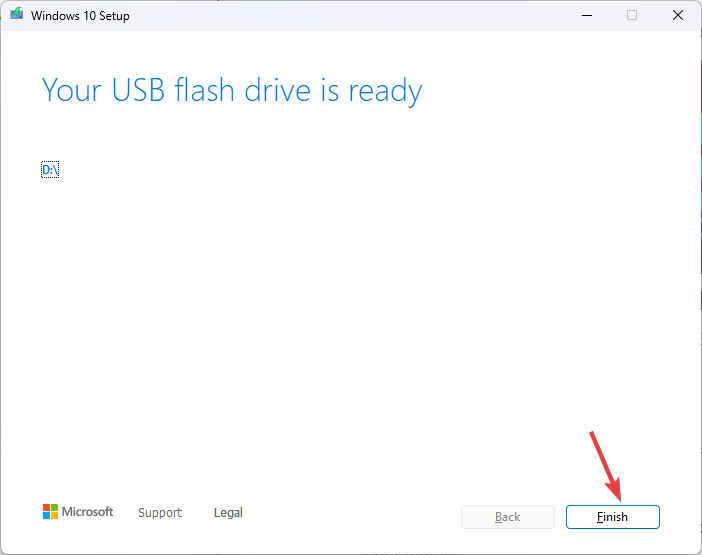
1. Create installation media and change the boot order
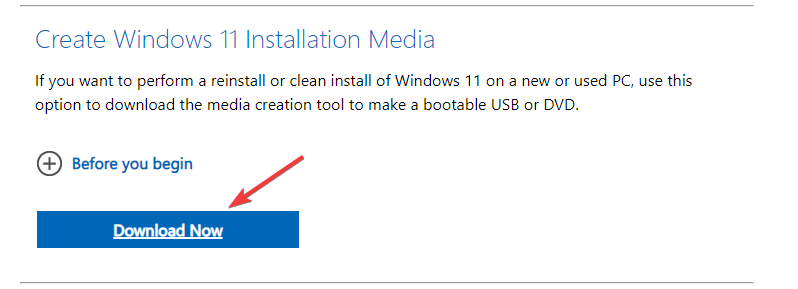
- On another PC, go to the Windows 11 website, locate Windows 11 Installation Media, and click Download Now.

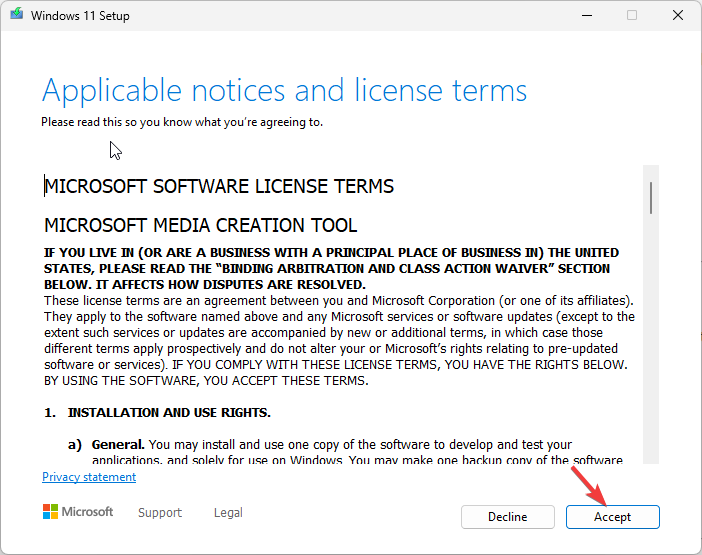
- The mediacreation.exe file will be downloaded; double-click to open it.
- Select Accept.

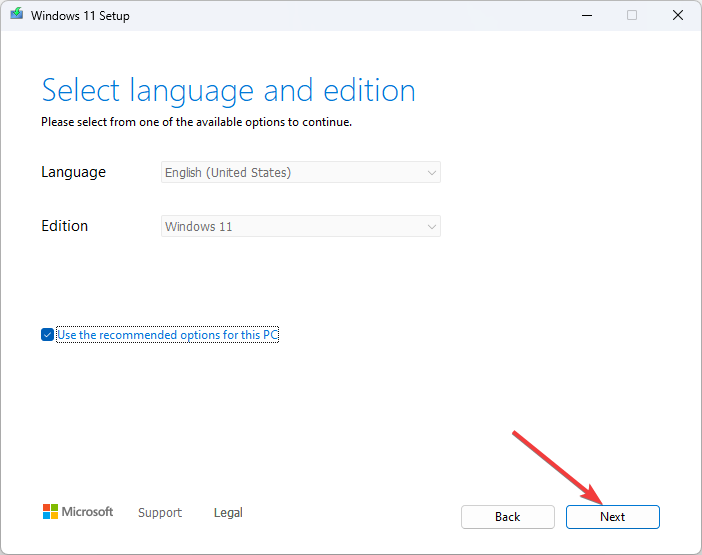
- For Select language and edition, choose Language and Edition and click Next.
- Select the USB flash drive option and plug in the flash drive.
- The Windows 11 Setup will detect it and show the drive; click Next.
- The files will be mounted to the drive; once ready, click Finish.
- Plug in the flash drive to the affected computer and turn it on. Press the key designated by the manufacturer to enter Boot options. Go to Boot and locate the USB flash drive, use the arrow keys to move it up in the list, and save the changes & restart.


2. Repair your PC
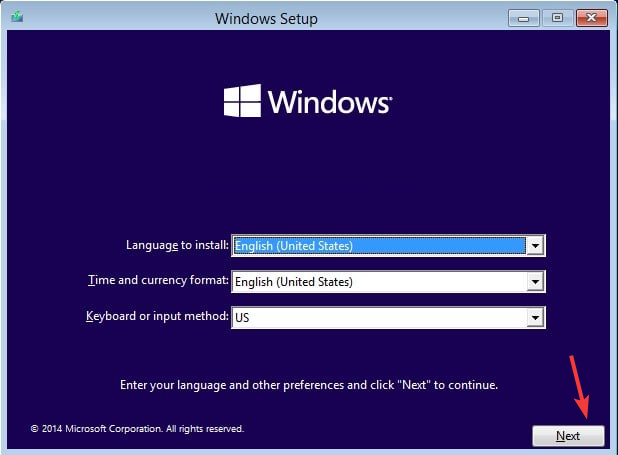
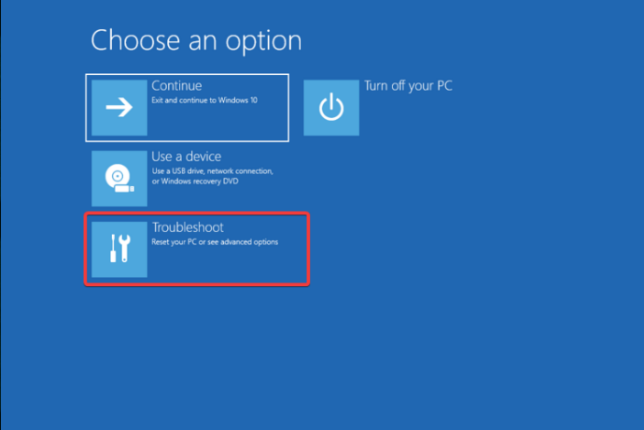
- Upon restart, on the Windows Setup screen, select Language to install, Time and currency format, and Keyboard or input method.

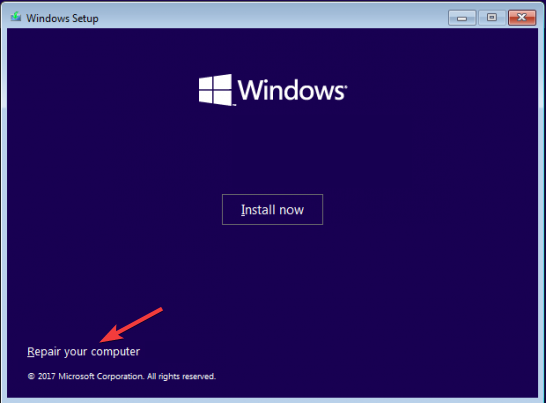
- Click the Repair your computer option from the next page.

- From the Choose an option page, select Troubleshoot.

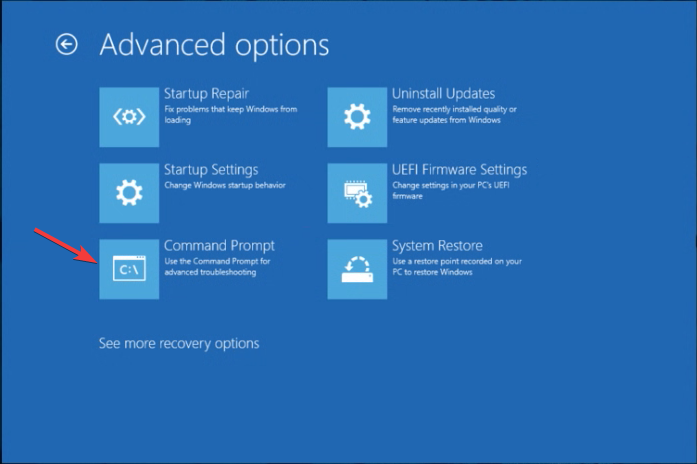
- Choose Advanced options.

- Select Command Prompt from the advanced options.

- The computer will restart, and you might be prompted to enter user credentials.
- On the Command Prompt window, type this command after replacing D with your Windows system drive and hit Enter:
D: - Type the following command to scan your drive with Windows installed after replacing the system driver letter and hit Enter:
chkdsk D: /f /r - Copy & paste the following commands one by one and hit Enter after every command:
bootrec /fixmbr
bootrec /fixboot
bootrec /scanos
bootrec /rebuildbcd
sfc /scannow
- Once the commands are successfully executed, reboot your PC to save the changes.

Windows bootloader often overwrites the GRUB bootloader after an update or upgrade, resulting in the missing GRUB menu.
To avoid GRUB being deleted on Windows 10, you can keep the Fast startup feature on Windows disabled, install Windows & Linux on separate hard drives or partitions, and keep GRUB updated.
Stuck somewhere? Feel free to mention your queries in the comments section below. We will be happy to help!
![]()
Если вы пользуетесь на компьютере двумя операционными системами, Windows и Linux, и обновили свою Windows из 7, 8 или 8.1 до самой новой Windows 10, могут возникнуть проблемы с загрузчиком Grub при использовании защищенной загрузки UEFI. В ходе обновления системы Windows 10 просто затрет загрузчик Grub и запишет туда свой.
Дальше после перезагрузки системы пользователь ожидает увидеть меню выбора операционной системы Grub, но вместо этого загружается новая Windows 10. Может показаться, что нет никакого способа получить доступ к Ubuntu или что не может работать Ubuntu рядом с Windows 10. Но это не так.
Восстанавливаем Grub
Часто специалисты советуют установить Ubuntu на другой диск, но есть простое решение. Всегда можно воспользоваться стандартным способом, например, с помощью LiveCD диска. Но если вы используете UEFI, есть решение с помощью Windows 10.
ЗАПУСК CMD
Для начала кликните по иконке поиск в Windows, наберите там cmd и найдите Командную строку Windows. Кликните по ней правой кнопкой и выберите Запустить от имени администратора:

ПОДКЛЮЧЕНИЕ РАЗДЕЛА EFI
Далее вы можете попытаться угадать как называется файл загрузчика Grub на разделе EFI, но можно поступить по другому и просто посмотреть. Чтобы подключить раздел EFI запустите diskpart. Для этого выполните:
$ diskpart
Затем выведите список доступных дисков:
$ list disk
Выберите в качестве активного диск, на который установлена Windows 10 и на котором сейчас находится раздел EFI:
$ sel disk 0
Выведите список разделов на диске:
$ list vol
Найдите раздел EFI, он обычно отформатирован в файловую систему FAT и занимает около 100 мегабайт места. В данном случае это том 2:
Этому разделу надо присвоить букву. Для этого выполните:
$ sel vol 2$ assign letter=I:
ПОИСК ЗАГРУЗЧИКА
Теперь необходимо найти файл загрузчика на разделе EFI. Но открыть этот раздел в проводникель нельзя, надо использовать только командную строку. Закройте DiskPart и выполните:
$ cd /d I:
Затем с помощью команды dir найдите загрузчик Grub. Например:
$ dir EFIUbuntu
Здесь есть файл grubx64.efi. Это он. Загрузчик может называться по другому в других дистрибутивах, именно поэтому я рассказал как всё посмотреть.
ВОССТАНОВЛЕНИЕ GRUB
Теперь скопируйте и выполните эту команду:
bcdedit /set {bootmgr} path EFIubuntugrubx64.efi
Не придется вводить пароль, если есть права администратора и программа должна отработать нормально. Эта команда обратно запишет вместо загрузчика Windows 10 загрузчик Grub.
Если команда вернула ошибку, вы можете откатить изменения такой командой:
$ bcdedit /deletevalue {bootmgr} path EFIubuntugrubx64.efi
Затем можно включить загрузчку загузчика Windows 10:
$ bcdedit /set {bootmgr} path EFIMicrosoftBootootmgfw.efi
Перезапустите компьютер и вы увидите на экране знакомый Grub. На этом процесс восстановиления Grub завершен.
 Всем доброго времени!
Эта заметка будет довольно специфична и пригодится только тем, у кого на компьютере установлено несколько версий ОС: Windows, Linux…
Так вот, при переустановке (обновлении) одной из ОС (обычно, так делает Windows) — может затереться загрузчик Grub, и при включении ПК более не будет появляться «черного» меню с предложением выбрать какую систему загружать… 👀
Разумеется, чтобы не переустанавливать ОС (и не настраивать всё заново) — лучше просто восстановить сам этот загрузчик. Как правило, для этого достаточно загрузиться с LiveCD (👉 Linux Mint, Elementary OS, Ubuntu и пр.), смонтировать корневой раздел Linux и ввести спец. команды для восстановления…
Однако, «ручная» работа через терминал имеет «тонкости» (и не всегда выполняется просто). Поэтому здесь хочу предложить гораздо более легкий вариант! 👌
*
Содержание статьи📎
- 1 Восстановление Grub
- 1.1 ШАГ 1
- 1.2 ШАГ 2
- 1.3 ШАГ 3
→ Задать вопрос | дополнить
Восстановление Grub
ШАГ 1
Для начала нам нужно подготовить загрузочную флешку (LiveCD) c одним из дистрибутивов Linux. Скорее всего она у вас должна быть!
(Если у вас одна из «разновидностей» Ubuntu — я бы порекомендовал использовать образ 👉 с Linux Mint — т.к. в нем уже предустановлена нужная утилита // Boot Repair).
На всякий случай здесь приведу несколько ссылок в помощь:
1) Как создать загрузочную флешку с Linux;
2) Как загрузиться с USB-флешки или внешнего HDD.
Будем считать, что загрузиться с подготовленной флешки у вас получилось… 👌
*
ШАГ 2
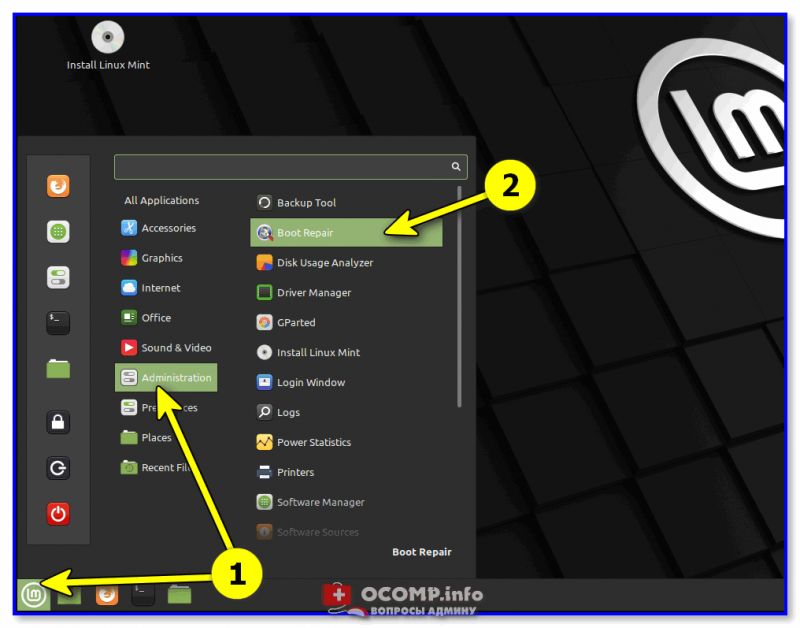
Далее (после загрузки с LiveCD с Linux) нам понадобиться установить утилиту Boot Repair (если у вас последняя версия Linux Mint — то она встроена, и чтобы ее запустить — откройте меню «Пуск / Administration / Boot Repair»).
После можно переходить к ШАГУ 3 (для тех, у кого нет встроенной Boot Repair — чуть ниже я покажу как ее установить).
Linux Mint — Boot Repair
Для инсталляции Boot Repair сначала проверьте, что у вас есть подключение к Интернет.
Далее необходимо открыть терминал (обычно, для этого используют сочетания Ctrl+Alt+T или Win+T) и ввести поочередно следующие три команды (после каждой нажимать Enter!).
sudo add-apt-repository ppa:yannubuntu/boot-repair
sudo apt-get update
sudo apt-get install -y boot-repair
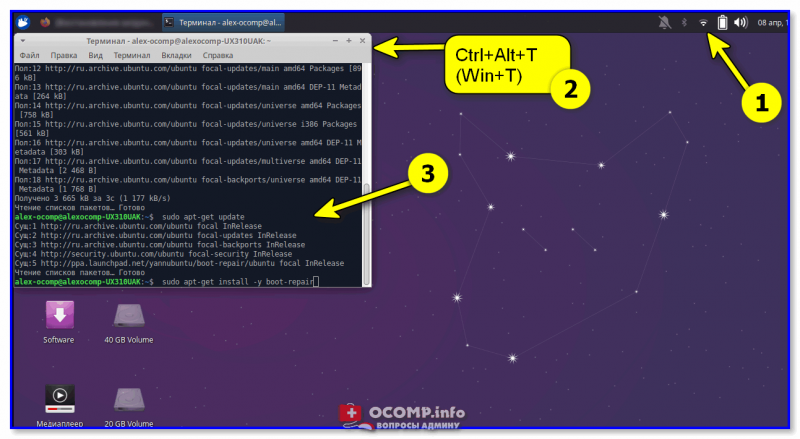
Xubuntu (для примера) — устанавливаем Boot Repair
После в меню «Пуск» должна появиться ссылка на нашу утилиту (обратите внимание, что на русском она называется как «Восстановление загрузки»… 👇). Кстати, запустить Boot Repair можно и из консоли. Команда:
boot-repair
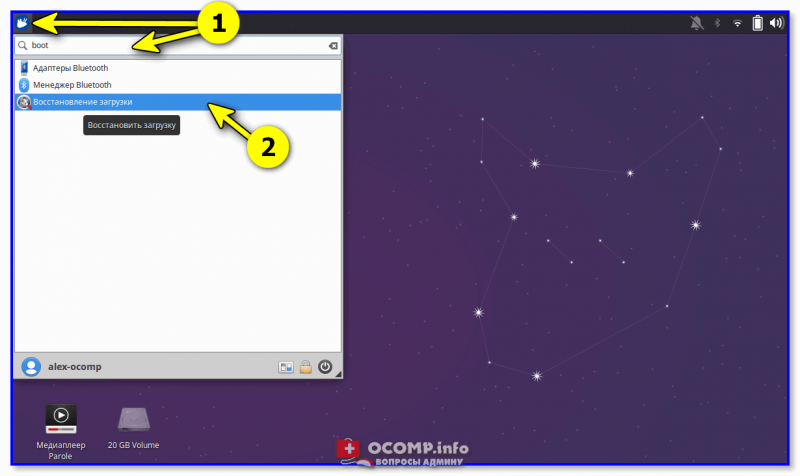
ПУСК — восстановление загрузки (Boot Repair)
*
ШАГ 3
1) В большинстве случаев утилита Boot Repair справляется с восстановлением Grub в автоматическом режиме. Поэтому порекомендую вам сразу же нажать на первый пункт «Recommended Repair». Пару скринов ниже. 👇
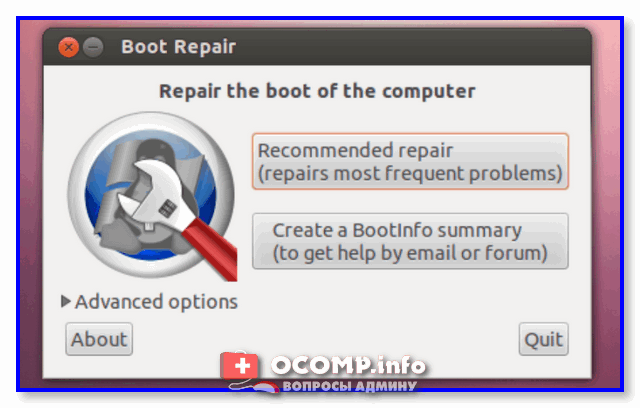
Boot Repair (на английском)
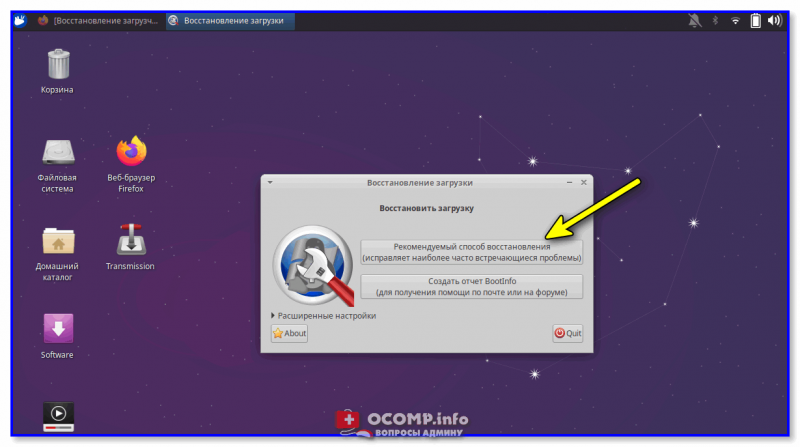
Рекомендуемый способ восстановления (русская версия)
2) Как правило, на весь процесс требуется 1-2 мин. 👇
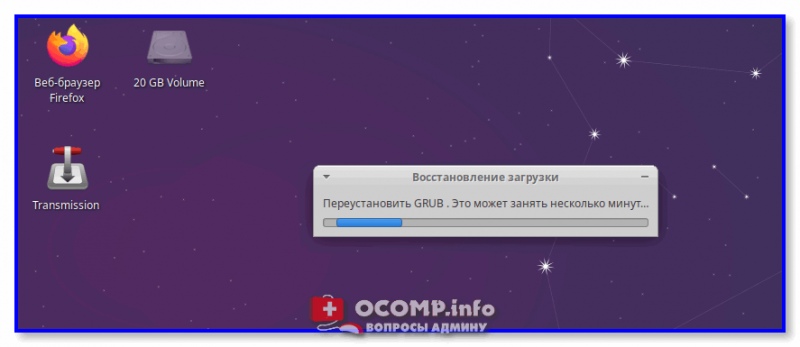
Процесс пошел!
3) Если всё прошло успешно — увидите окно об успешном восстановлении Grub. Теперь можно выключить ПК (ноутбук), вынуть из USB-порта флешку с LiveCD и проверить как загружается устройство: появляется ли меню Grub?.. 👌

Загрузка успешно восстановлена
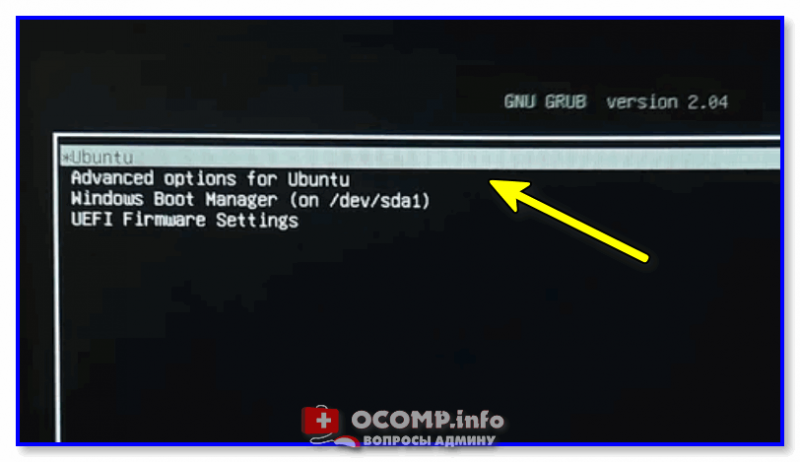
GNU Grub version 2.04 — все заработало!
4) Кстати, иногда утилита Boot Repair может попросить вас выполнить ряд команд в терминале (сочетание клавиш для его запуска: Ctrl+Alt+T или Win+T).
Сами команды, разумеется, утилита приводит в своем окне. После их выполнения — нажмите на кнопку «Forward» (если вы не выполнили команды — утилита снова покажет текущее окно). Ничего «опасного» и удаляющего данные с домашних разделов диска —в них быть не должно!

Эти команды нужно будет ввести вручную в терминал (и нажать Enter)
PS
Кстати, у Boot Repair есть расширенные настройки, в которых можно вручную задать ряд параметров. Если вы слабо представляете «что, где и как…» — то лучше это меню не трогать (во избежание лишних проблем…).
*
Другие простые решения, — само собой, приветствуются!
На сим пока всё, удачи!
👋


The three interfaces of Grub functions at various levels. The menu interface consists of the list of kernels or the operating systems.
You have the option to select a particular operating system with the help of the arrow keys and you can boot it with the Enter key.
All the Commands in Grub are displayed in the menu entry editor interface. You can change the commands before you load the Operating System.
The Command-Line interface is the basic interface that provides the user with the utmost control. You can execute any command with the help of it.
You may sometimes encounter how to install a grub bootloader in windows 10 issues raised by the corrupted boot directory or the partition.
Restore Grub After Windows Install
The Grub Bootloader is particularly important as you cannot start the Operating System without it.
While you switch on the program, this is the first program that gets started. Then the Bootloader transfers the control it has to the Operating System Kernel.
When you are stuck with how to install a grub bootloader in Windows 10, you can go for a clean installation of Windows 10 or reset your BIOS settings. These may help you to resolve the problem.
You also have other options to fix it like rebuilding the BCD or simply replacing your damaged hard drive.
Through this article let us address the possibilities to fix the Grub related problem effectively.
Solution 1: Setting The Correct Partition
If the correct partition gets deactivated somehow, you face this grub related problem and need to go for restoring grub after windows install.
This happens as the boot loader gets initiated by the BIOS from the active partition.
We suggest you verify whether the active partition is incorrect. Then you will have to get the proper partition activated.
This process works wonder to fix the grub related issues swiftly. Follow the steps mentioned below to execute the process:
Step 1: First of all you need to connect a DVD or USB Flash Player bootable media to your PC.
Step 2: Then give your system a fresh restart to execute the Automatic Repairing Process.
Step 3: Select to Troubleshoot and go to the Advanced options. Now, launch Command Prompt and enter diskpart and hit the Enter button.
Step 4: Input the commands mentioned below one after another:
- list disk: This will give you the list of all your hard drives
- select disk n: n denotes the disk where you have installed the operating system.
- list volume: All the Volumes on Disk 0 will be enlisted here.
- select volume n: he will give you the number of system partitions
- active: this will show you the active system partition. Identify the specific partition from the displayed list that ought to be active.
Step 5: Now, enter the commands given below and after inputting each one, press the Enter Key.
- select partition d
- active
- quit
Step 6: After you have finished the above step give your Computer a fresh restart.
Check whether your Grub related problem is solved this way.
Solution 2: Resetting the BIOS Settings
Resetting BIOS is another effective way to fix grub after windows 10 upgrade.
Here I am providing you a complete guideline to execute the task. Follow the steps:
Step 1: Turn off your computer and wait for a couple of minutes, then give it a fresh restart.
Step 2: Now, press F2 and repeat the process till you see the System Screen Window.
The function key may vary from system to system. Give it a check while you start your system.
Step 3: Now with the help of the Right Arrow Key go to the Exit menu bar. Then move on to the Load Optimized Defaults.
Step 4: After you pressed the Load Optimized Device option, hit the Enter button.
After you accomplished the entire procedure check whether this has helped. You also have the option to flash the BIOS of your computer to fix the issue.
Solution 3: Using the Automatic Repair and restoring the Boot Sector Code
You may use your automatics repair system provided by Windows 10 and run are repairing process for restoring grub after windows install.
The boot sector code may be damaged and this may create the problem. So, you need to restore the boot sector code so that the grub rescue error is not prompted.
For this, I am describing the process that you are required to follow meticulously.
Step 1: Give your PC a fresh restart for repeated times and then select to Troubleshoot. From the displayed panel, choose Advanced and from there move on to Start-up Repair.
Step 2: Now, the repairing process will commence. Wait till the procedure gets completed.
We recommend you not to proceed for any operation in between. After that check, if that was good enough to address your problem.
Step 3: You have another option to use DVD or USB Flash Drive for resting the boot Sector Code.
For this, connect the bootable USB or DVD to your PC give your computer a fresh restart to go to the Automatic Repair Mode.
Step 4: Now proceed to Troubleshoot and then go to the Advanced Tab.
Step 5: Now Enter cmd to launch Command Prompt. Input the given commands in the Command Prompt. Do not forget to hit the Enter button after you type them.
diskpart
select disk 0
list volume
This way you will get all the volumes displayed. In the Type section, you will get to see DVD-ROM.
Make sure to remember the letter for the drive of the DVD or USB Flash Drive that you have connected to your Device. Like D or E.
Step 6: Now, enter the commands that I am providing below and click Enter.
Exit
D: or E:
CD Boot
Dir
Step 7: Scrutinize whether there is bootsect.exe file in the provided list. On finding it input the given command and then hit the enter button.
bootsect /nt60 SYS /mbr
Exit
Step 8: Now reboot your Computer and hope this will solve the problem you are muddling with.
Solution 4: Clean Installation Of Windows 10
To repair grub from windows, install Windows 10 afresh so that the installations done previously completely get removed.
For this, you will have to download the ISO file of Windows 10 on another device and get it burned on a DVD. You may also proceed with creating a USB drive that you can boot.
You may take the help of a third-party utility or you may also fix the boot related error if you create a bootable media.
That will automatically help you launching the program, selecting the proper partition, etc.
Solution 5: Rebuilding BCD With The Help Of Windows 10 Automatic Repair
If you cannot find bootsect.exe file, then you may need to rebuild BCD to combat your Grub issue.
Many users have reported that by using this rebuilding BCD technique they could easily fix the Grub related issue.
Follow the given process described below to rebuild the BCD:
Step 1: First of all you will have to connect bootable USB Flash Drive DVD to your system.
Step 2: Then reboot your PC and go to the Automatic Repair Mode.
Then from the advanced window choose Command Prompt for initiating BCD Files.
Step 3: Enter the below-given commands in the Command Prompt and when you have finished press Enter:
- Bootrec /Fixmbr
- Bootrec /Fixboot
- Bootrec /Rebuildbcd
Step 4: When you complete the process, exit from Command Prompt and then give your device a fresh restart.
Solution 6: Replace The Hard Drive
Sometimes you may face several issues with your hard drive. Your hard drive may get damaged somehow and this may lead to the Grub rescue issue along with other burning issues for your system.
In case you discover that your hard drive is damaged, we suggest you replace it immediately.
Hard Drives are available on your manufacturer’s website or from the retail sites then replace your drive and clean install Windows 10 to get rid of the Grub related problem.
Winding Up
Hope the resolutions provided could give you the answer to how to install grub bootloader in Windows 10.
If you still have queries or issues with the related files, feel free to intimate us in the comments section or may shoot us a mail.
We always look forward to hearing back from you.