Главная
> Как это сделать > Как восстановить OneDrivе в Windows 11 и Windows 10 после удаления
![]() Если вы удалили OneDrivе идущий из коробки с операционной системы Windows 10 / 11, следуя инструкциям статьи «Как отключить или удалить OneDrive в Windows 10 и 11» то при необходтмости восстановить Microsof обратно, скорей всего столкнетесь с тем, что не совсем понятно как правильно и быстро это сделать.
Если вы удалили OneDrivе идущий из коробки с операционной системы Windows 10 / 11, следуя инструкциям статьи «Как отключить или удалить OneDrive в Windows 10 и 11» то при необходтмости восстановить Microsof обратно, скорей всего столкнетесь с тем, что не совсем понятно как правильно и быстро это сделать.
Весь секрет в том, что на самом деле даже после удаления приложения в недрах операционной системы остается установочный файл OneDriveSetup, который позволяет в один клик мыши восстановить OneDrivе обратно. Это можно сделать следуя следующей инструкции:
1. Запускаем Проводник, открываем системный диск и переходим в папку «Windows -> WinSxS».
2. В строке поиска Проводника набираем «OneDriveSetup» и нажима стрелочку, появившуюся с правой стороны.

3. Ждем несколько десятков секунд, потому что в выбраненной папке находиться несколько тысяч папок с вложенными файлами, пока в основном окне проводника не появиться установочный файл OneDrivе, который называется «OneDriveSetup». Запускам его двойным кликом, разрешая вносить изменения на компьютер.

Как вариант установочный файл OneDrivе можно скачать отсюда или установить в виде приложения из Microsoft Store, перейдя на эту страницу.
Для информации, OneDrivе это облачное хранилище данных от Microsof, к файлам в котором можно получить с любого устройства имеющего доступ в интернет. Все зарегистрировавшиеся в OneDrivе получают бесплатно 5 гигабайт свободного места.

Проверьте, как это работает!
Возможно, вам не потребуется восстанавливать OneDrive, но если многие из ваших файлов удаляются, перезаписываются или заражены вредоносными программами, вы можете восстановить все OneDrive в прошлый раз.
-
Перейдите на веб-сайт OneDrive.
-
В верхней части страницы выберите Настройки > Параметры, а затем нажмите пункт Восстановление OneDrive в области навигации слева.
-
На странице «Восстановление» выберите дату из раскрывающегося списка или щелкните пункт Настраиваемые дата и время.
-
Используйте диаграмму активности и веб-канал активности для просмотра последних действий, которые нужно отменить.
Хотите узнать больше?
Статья Восстановление OneDrive
Видео: удаление и восстановление файлов
Справка OneDrive
Нужна дополнительная помощь?
Нужны дополнительные параметры?
Изучите преимущества подписки, просмотрите учебные курсы, узнайте, как защитить свое устройство и т. д.
В сообществах можно задавать вопросы и отвечать на них, отправлять отзывы и консультироваться с экспертами разных профилей.
OneDrive, Microsoft’s cloud storage solution, has become an essential tool for many users who need to store, access, and share files across devices. With the release of Windows 11, OneDrive has only become more tightly integrated into the operating system. However, like any software, OneDrive can sometimes run into issues, requiring users to reset or reinstall the app to fix problems or improve performance.
In this guide, we will provide you with detailed, step-by-step instructions on how to reset or reinstall OneDrive in Windows 11.
Also see: How to Disable or Remove OneDrive From Windows 11
Why reset or reinstall OneDrive?
There are several reasons why you might need to reset or reinstall OneDrive on your Windows 11 device:
- Syncing issues: If your files aren’t syncing correctly, resetting or reinstalling OneDrive can often resolve the problem.
- Performance problems: If OneDrive is running slowly or consuming excessive system resources, resetting or reinstalling the app might help.
- Corrupted files or settings: If OneDrive’s files or settings have become corrupted, resetting or reinstalling can restore the app to its default state.
- Software conflicts: If you suspect that another program or process is causing issues with OneDrive, resetting or reinstalling might alleviate the conflict.
Resetting OneDrive in Windows 11
Resetting OneDrive will return the app to its default state, which can often resolve various issues you may be experiencing. There are two methods for resetting OneDrive: Run the reset OneDrive command in the Run dialog box or the Command Prompt.
Using the reset OneDrive command
Resetting OneDrive using the reset command is a simple and efficient way to return the app to its default state. Here’s how to execute the reset command using the Run dialog box:
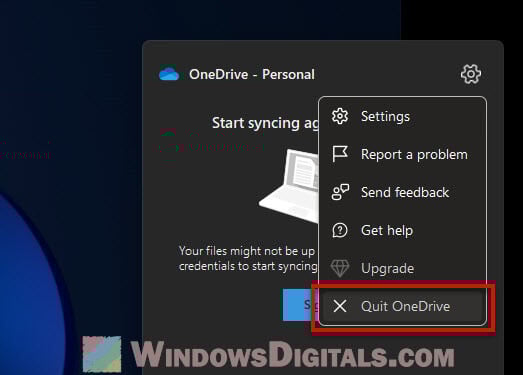
- Close OneDrive by right-clicking on the OneDrive icon in the system tray, clicking the Settings icon and selecting “Quit OneDrive.”

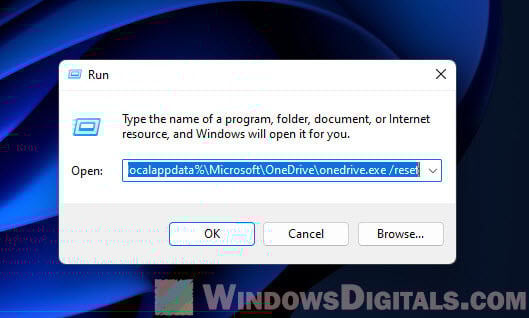
- Press Win + R to open the Run dialog box. Type or copy and paste the following command:
%localappdata%\Microsoft\OneDrive\onedrive.exe /reset

- Press Enter to execute the command. OneDrive will close and reset itself. This process may take a few minutes.
- After OneDrive has reset, restart your computer to ensure that the changes take effect.
Reset OneDrive using Command Prompt
If you prefer using the Command Prompt to reset OneDrive, follow the steps below:
- Go to Start menu and search for “Command Prompt”.
- Right-click Command Prompt from the search result and select “Run as administrator”.

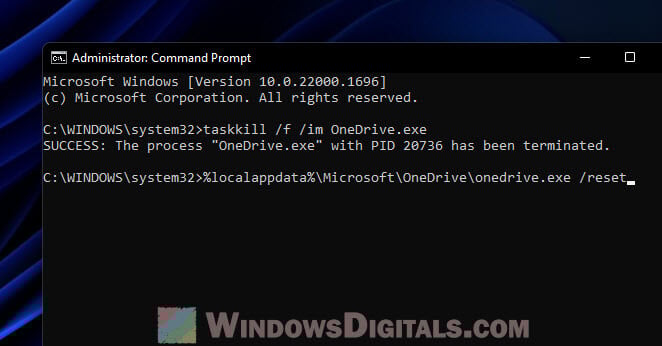
- In the Command Prompt, type or copy and paste the following command to forcefully close OneDrive:
taskkill /f /im OneDrive.exe
- Press Enter to execute the command. OneDrive will be closed if it was running.
- Next, type or copy and paste the following command to reset OneDrive:
%localappdata%\Microsoft\OneDrive\onedrive.exe /reset

- Press Enter to execute the command. OneDrive will reset itself. This process may take a few minutes.
- After OneDrive has reset, restart your computer to ensure that the changes take effect.

Reinstalling OneDrive in Windows 11
If resetting OneDrive does not solve the issue, you may need to completely uninstall and then reinstall the app. Below, you will find the detailed steps on how to completely remove OneDrive from your computer and reinstall it in Windows 11.
Step 1: Completely uninstall OneDrive
There are several methods to uninstall OneDrive in Windows 11. If one doesn’t work, you can try another method to ensure successful removal.
Using the Settings app
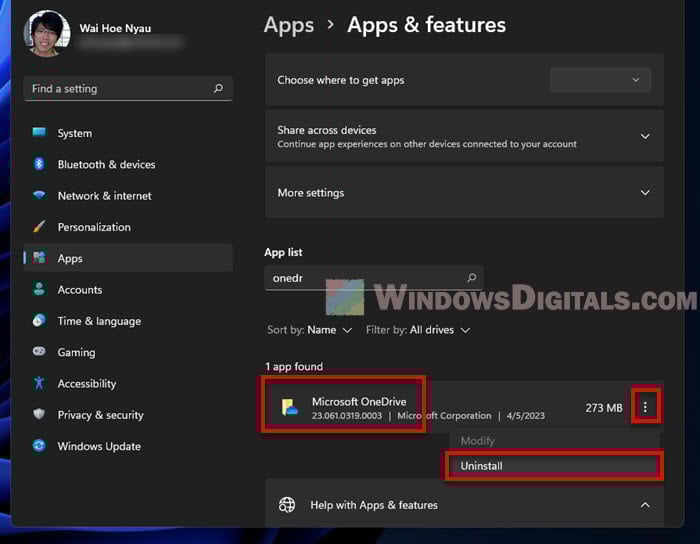
The most common method to uninstall the OneDrive app is to uninstall it via the Apps & features settings in the Settings app.
- Press Win + i to open the Settings app.
- Click on “Apps” and then “Apps & features.”
- In the “Apps & features” list, find Microsoft OneDrive, click on the three-dot menu next to it, and select “Uninstall.”

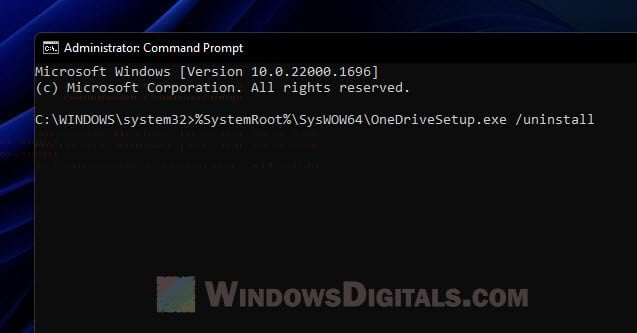
Using Command Prompt
Alternatively, you can also manually run a command to uninstall OneDrive in Windows 11. Here’s how to do it:
- Press Win + X on your keyboard and click on “Command Prompt (Admin)” to open an elevated Command Prompt window.
- In the Command Prompt, type or copy and paste the following command to uninstall OneDrive:
%SystemRoot%\SysWOW64\OneDriveSetup.exe /uninstall

- Press Enter to execute the command. OneDrive will be uninstalled from your system. This process may take a few minutes.
- Restart your computer to ensure that the changes take effect.
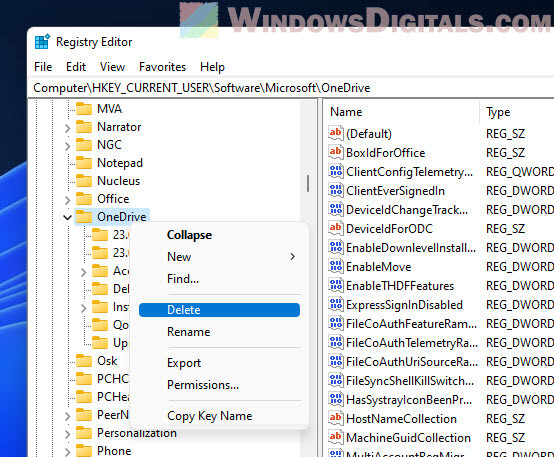
Delete the OneDrive Registry
If you encounter errors such as “A newer version of OneDrive is installed – You need to uninstall it first before installing this version” or other issues that indicate you may not have uninstalled OneDrive properly, try the following method to delete the OneDrive registry.
Warning: Editing the Windows registry can be risky. Making incorrect changes to the registry may cause your system to become unstable or unbootable. Before proceeding with the steps below, it is highly recommended to create a system restore point. This will allow you to revert your system back to a previous state if something goes wrong.
- Open Registry Editor by typing “regedit” into the Start menu.
- Navigate to
HKEY_CURRENT_USER\Software\Microsoft\OneDrive. - Right-click on “OneDrive” and select “Delete.”

- Restart your computer.
- After your computer restarts, follow the section below to reinstall OneDrive.
Step 2: Download and install OneDrive
Once you have completely uninstalled OneDrive, you can reinstall it using one of the methods below.
Download OneDrive from Microsoft
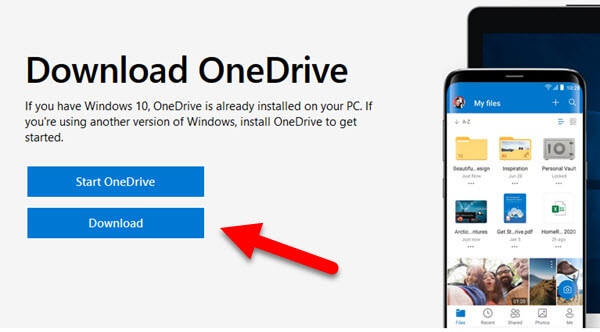
If you prefer to download the latest version of OneDrive directly from Microsoft’s website, you can do so by following the steps below. This method ensures that you’re installing the most recent version of the app and can be useful if you’ve encountered issues with the locally stored installer on your system.
- Go to the OneDrive download page.
- Click on the “Download” button to download the OneDrive installation file.
- Once the file has been downloaded, double-click on it to start the installation process.
- Follow the on-screen prompts to complete the installation.
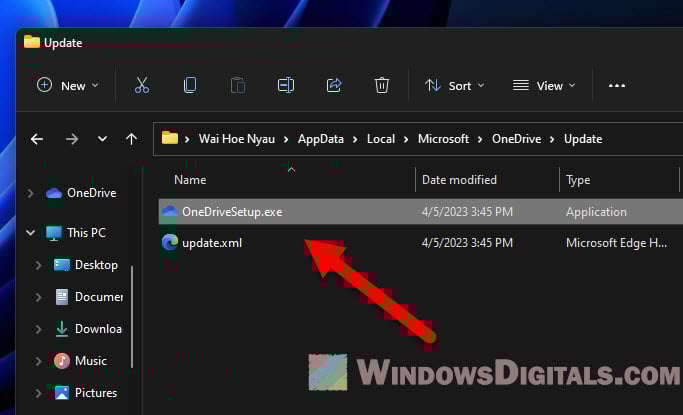
Use the local OneDriveSetup.exe
Alternatively, you can run the local OneDriveSetup.exe that may still be on your computer to install OneDrive. Installing OneDrive this way does not ensure that you have the latest version of OneDrive installed, but you can update the app afterward.
- Press Win + R to open the Run dialog box. Type or copy and paste the following command:
%SystemRoot%\SysWOW64\OneDriveSetup.exe
It can also be located in:
%localappdata%\Microsoft\OneDrive\Update\OneDriveSetup.exe

- Press Enter to execute the command. OneDrive will be reinstalled on your system. This process may take a few minutes.
- Restart your computer to ensure that the changes take effect.
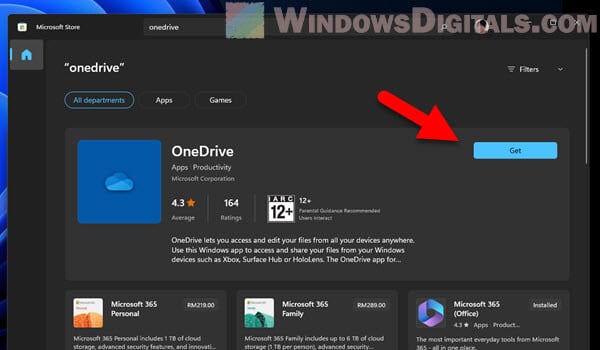
Install the app from Microsoft Store
Reinstalling OneDrive from the Microsoft Store is another viable option, especially if you prefer to keep your apps up-to-date through the store’s automatic update feature. This method ensures that you’re installing the most recent version of the app and makes it easy to manage OneDrive alongside your other Microsoft Store apps.
- Open the Microsoft Store by clicking on the Store icon in the taskbar or by searching for “Microsoft Store” in the Start menu.
- In the Microsoft Store, search for “OneDrive” and click on the “Microsoft OneDrive” app from the search results.
- Click on the “Get” button to reinstall OneDrive on your system.
- Once the reinstall process is complete, restart your computer to ensure that the changes take effect.
Other troubleshooting tips for OneDrive issues
In some cases, the standard reset methods may not resolve your OneDrive issues. If you continue to experience problems after resetting OneDrive, consider trying these advanced troubleshooting steps:
Verify file and folder names
OneDrive has certain restrictions on file and folder names, which can cause sync issues if not adhered to. Ensure that your file and folder names:
-
- Do not contain any of the following characters:
~ " # % & * : < > ? / \ { | } - Are not longer than 400 characters
- Do not begin or end with a space
- Do not contain any of the following characters:
Check the DisableFileSync registry value
Sometimes, the Windows registry might contain values such as DisableFileSyncNGSC and DisableFileSync that disable OneDrive’s file synchronization feature, causing issues with syncing. To check and correct the registry values, follow these steps:
- Press Win + R to open the Run dialog box. Type
regeditand press Enter to open the Registry Editor. - Navigate to the following registry keys:
HKEY_LOCAL_MACHINE\SOFTWARE\Policies\Microsoft\Windows\OneDrive

HKEY_LOCAL_MACHINE\SOFTWARE\Policies\Microsoft\Windows\Skydrive
- Check to see if there is a registry value called DisableFileSyncNGSC or DisableFileSync in either of these folders.
- If any of these registry values exist, ensure that their value is set as 0. If they don’t exist, you do not need to make any changes as OneDrive’s file synchronization feature will be enabled.
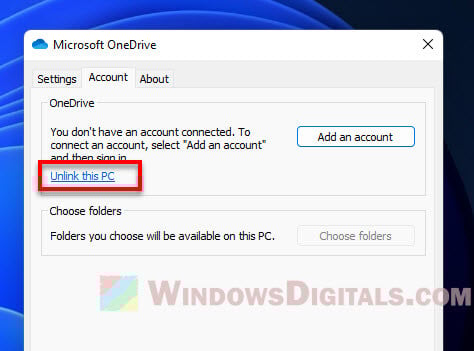
Re-link Your OneDrive Account
If you’re experiencing issues related to account syncing, try re-linking your OneDrive account:
- Right-click on the OneDrive icon in the system tray and select “Settings.”
- In the OneDrive settings window, click on the “Account” tab.
- Click on the “Unlink this PC” button.

- Follow the on-screen prompts to unlink your account and then sign back in with your Microsoft account credentials.
Check for conflicting applications
Some third-party applications, particularly antivirus and firewall software, can interfere with OneDrive’s functionality. To determine if a conflicting application is causing your issue, try temporarily disabling your antivirus or firewall and then checking to see if OneDrive works correctly. If disabling the software resolves the issue, consider adding an exception for OneDrive in your antivirus or firewall settings.
Update Windows and OneDrive
Ensure that your Windows 11 operating system and OneDrive app are up-to-date, as updates often include bug fixes and performance improvements.
- Press Win + I to open the Settings app.
- Click on “Windows Update” and then “Check for updates.” Install any available updates.
- Open the Microsoft Store, click on the three-dot menu in the upper-right corner, and select “Downloads and updates.” Check for any available OneDrive updates and install them.
OneDrive in Windows 11 Is Missing!
“My Windows 11 OneDrive disappeared! This morning, when I wanted to upload my documents to my OneDrive, I find them not showing up on my PC at all! I have searched for it for half an hour but there was no result. I really need to use it as soon as possible. Thank you for your help in advance!”
OneDrive, providing a file hosting service, is considered one of the best cloud services on the Internet. OneDrive supplies users to store their files and data in the cloud, share and sync files among Android, iOS mobile devices, Windows, and macOS PCs.
System updates are always accompanied by a series of possible problems. Windows 11 was released recently, which has resulted in some OneDrive problems in the using process. One of the most common problems is “Windows 11 OneDrive missing”. The same problem has also occurred in the past just like “Windows 10 OneDrive missing” or “OneDrive missing from File Explorer in Windows 10”.
If the OneDrive icon doesn’t appear in the notification area, OneDrive might not be running or your OneDrive icon has been hidden.
6 Solutions to OneDrive Missing in Windows 11
If your OneDrive is missing from file Explorer in Windows 11, it is quite a tiresome issue. We listed 6 solutions maybe work on this problem. Continue to read and hope you find it helpful to you.
-
Solution 1. Search for OneDrive Directly
-
Solution 2. Look for OneDrive Icon in Hidden Area
-
Solution 3. Enable OneDrive Icon in Settings
-
Solution 4. Uninstall and Reinstall Your OneDrive Client
-
Solution 5. Reset Your OneDrive
-
Solution 6. Check Policy Settings
-
Tip 1: Upload Files to OneDrive via OneDrive Web App
-
Tip 2: Back Up to OneDrive via CBackup
Solution 1. Search for OneDrive Directly
If fortunately, the simplest way is to search OneDrive in Windows 11 taskbar, and then you will see the OneDrive icon in the search result list. Then you can know the location of the OneDrive application.

Solution 2. Look for OneDrive Icon in Hidden Area
If your OneDrive icon is missing from taskbar, maybe it is hidden. Follow the steps and you can find it again:
1. Click on the upward arrow icon on the right side of the taskbar.
2. Check if your OneDrive icon is hidden in it.
![]()
3. If it is hidden there, just drop it to the taskbar.
Solution 3. Enable OneDrive Icon in Settings
If you cannot find the OneDrive icon in the hidden area, maybe you need to check your settings about it:
1. Right-click on the empty area of the taskbar.
2. Select Taskbar settings in the menu.

3. In the Settings > Personalization > Taskbar window, find the Notification area.
4. Click on Select which icons appear on the taskbar.

5. Locate OneDrive and select the button which next to OneDrive to make sure it is on.

Solution 4. Uninstall and Reinstall Your OneDrive Client
Usually uninstalling and reinstalling the OneDrive client completely can solve most of the OneDrive problems, so you can have a try:
1. Press Windows+R at the same time, and type “regedit” into the box.
2. Go to the following registry directory:

3. Right-click the registry entry named “DisableFileSyncNGSC”, select Modify, and enter 0 into the Value data box, then click OK.

4. Open Command Prompt as an administrator, type the following commands:
%SystemRoot%SysWOW64OneDriveSetup.exe /uninstall
%SystemRoot%SysWOW64OneDriveSetup.exe /install

Now your OneDrive could be reinstalled completely, the icon missing issue should be solved.
Solution 5. Reset Your OneDrive
Maybe the icon missing issue is caused by a broken OneDrve cache. Reset OneDrive may be a solution:
1. Press Windows+R at the same time, copy the following text, and click OK:
%localappdata%\Microsoft\OneDrive\onedrive.exe /reset and %localappdata%\Microsoft\OneDrive\onedrive.exe

2. Check if your OneDrive icon appears after around 2 minutes. If it does not appear, repeat Step 1 with the following text:
%localappdata%MicrosoftOneDriveonedrive.exe
Solution 6. Check Policy Settings
If the solutions above cannot make your OneDrive icon reappear, the last solution is to check the policy settings. It may be caused by third-party applications or anti-tracking programs, which affected modifications to the OS and may make the OneDrive icon disappear. Follow these steps to check policy settings:
1. Press Windows+R into the Run window, and type gpedit.msc in the box.

2. Go to Computer Configuration > Administrative Templates > Windows Components. Double-click on the OneDrive option in the right window.

3. Right-click Prevent the Usage of OneDrive for File Storage and click Edit.
4. Make sure Not Configured is chosen, click Apply and OK.

Tip 1: Upload Files to OneDrive via OneDrive Web App
If all the solutions above cannot solve your problem but you need to use OneDrve immediately, you can have a try on uploading files to OneDrive via the OneDrive web app:
1. Go to the OneDrive web app and log in.
2. Click the Upload button at the top of the page. Then you can upload your local files or folders that need to be backed up.

Tip 2: Back up to OneDrive via CBackup
If you can’t find your OneDrive in Windows 11 and don’t want to upload files to OneDrive manually via web app, we recommend a free cloud sync tool called CBackup to you, which supports syncing files to OneDrive automatically.
CBackup is a professional cloud service. It allows you to add different cloud drives such as OneDrive, Dropbox, and Google Drive to it. It also supports to backup Hyper-V machines provided by Microsoft and many other types of data. Thus, you can sync files to OneDrive via CBackup directly for free.
What’s more, you can also use many effective functions for free in CBackup. For example. The Scheduler function can help you to automatically sync your files on a daily, weekly, or monthly basis. And other useful settings like File Filter, Email Notification are also been provided to improve your working efficiency.
If you want to try CBackup, follow these steps to sync your data to OneDrive via CBackup easily:
1. Download and install the CBackup, then run it.
2. Sign up for a CBackup account for free and log in.
3. Click Storage to choose OneDrive to and choose Authorize Now.

4. Click on Sync, and click the Sync PC to Public Cloud.

5. You can change the Task Name if you need. After choosing files under Source and folder in OneDrive under Destination, click Start Sync to sync files to OneDrive easily in Windows 11.

More About CBackup
In addition, you can use these free features on the CBackup desktop client:
Combined Cloud: When your OneDrive storage space is not enough to use, you can use the Combined Cloud feature. With it, several OneDrive accounts can be merged together so that you can get a larger storage space for free.

Cloud to Cloud Backup: CBackup provides a safe and professional backup service between clouds. Many cloud drives are supported such as Google Drive, OneDrive, Dropbox, and so on. If you need to change a cloud drive, you can transfer your data from one drive to another via CBackup easily.

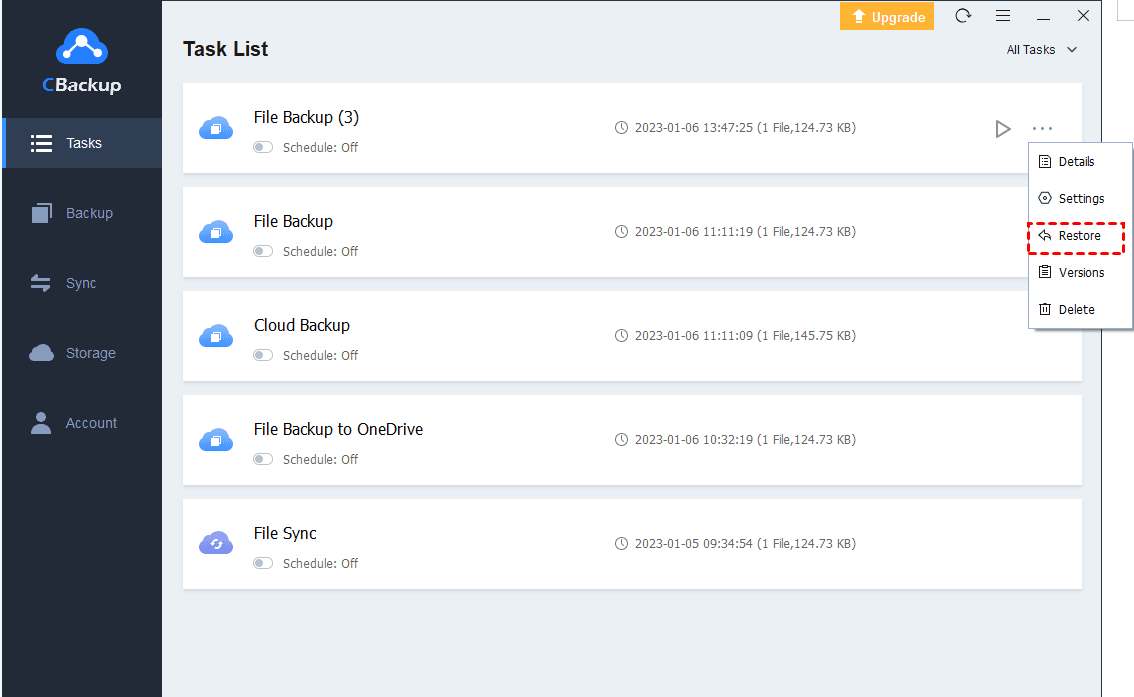
Restore: You can use this feature to restore data when the hardware or server crashes. When you need to back up all your data to a new computer, you can also use this function to make it.
Summary
If you read this article to solve “Windows 11 OneDrive missing” issue, I hope that you have found the cause of the problem and solution. If you are tired of handling these problems, you can switch to a more professional cloud service – CBackup.
This tutorial shows you how to reinstall OneDrive on Windows 10 or 11 in case you uninstall it or facing sync problems.
OneDrive is one of the most popular cloud storage services deeply integrated with Microsoft Office and the Windows operating system. In fact, in Windows 10 and Windows 11, OneDrive comes pre-installed. The good thing is, when compared to other cloud storage services like Google Drive, what makes OneDrive unique is its files on-demand feature. With this feature, you can see all the files and folders in OneDrive without downloading them. When needed, the files or folders will be automatically downloaded for you.
Generally, OneDrive works perfectly fine for a vast majority of users. However, that is not the case for everyone. If you are facing any problems with OneDrive, one of the easiest ways to solve the issue is to uninstall OneDrive and then reinstall it. If you’ve uninstalled OneDrive for whatever reason, here is how to reinstall OneDrive on Windows 10 and Windows 11 in simple steps.
There are multiple ways to reinstall OneDrive. The good thing is, you don’t have to download anything from the Internet. All the files required to reinstall OneDrive are already on your computer. You have to know where to find the installation file and how to use it to reinstall OneDrive. I will show you all the ways you can install OneDrive. Follow the one you like.
Table of contents:
- From File Explorer
- Using the command prompt
- Using PowerShell
1. Reinstall OneDrive from File Explorer
Windows keeps the installation file within the system’s root directory even after uninstalling OneDrive. We can use this installation file to reinstall OneDrive as and when needed. However, this file is buried deep within the system files. All you have to do is find the installation file and execute it.
1. First, open File Explorer by clicking on the taskbar icon or by pressing the keyboard shortcut Win + E.
2. In the file explorer, copy and paste the below location in the address bar and press Enter.
%systemroot%\System32\
- Alternate location for the OneDrive setup file
%systemroot%\SysWOW64\
Quick trivia: %systemroot% is the short form for C:\Windows
3. Once you are here, find and double-click on the “OneDriveSetup.exe” file. To make things easier, use the search bar appearing in the top-right corner of file explorer.

4. As soon as you open the file, Windows starts to reinstall OneDrive. Just follow the installation wizard to complete installing OneDrive.

2. Reinstall OneDrive using Command Prompt
The alternate way you can install OneDrive is from the command prompt. To reinstall OneDrive using the command prompt, all you have to do is execute a single line of command.
1. First, search for “cmd” in the start menu, right-click on “Command Prompt” and select “Run as administrator.”
2. In the command prompt window, execute the below command based on your system architecture.
%systemroot%\System32\OneDriveSetup.exe
- Alternate command
%systemroot%\SysWOW64\OneDriveSetup.exe

3. As soon as you execute the command, Windows starts installing OneDrive on your system. Follow the installation wizard to complete installing OneDrive.
3. Reinstall OneDrive using PowerShell
Just as you can install OneDrive from the command prompt, you can also install OneDrive via PowerShell. Since we are only executing an executable, the commands are identical too. Just follow the steps below, and you should be good.
1. Open the Start menu, search for “Windows PowerShell,” right-click on the result and select the “Run as administrator” option. This will open Windows PowerShell with admin rights.
2. In the PowerShell window, execute the below command based on your system architecture.
%systemroot%\System32\OneDriveSetup.exe
- Alternate command
%systemroot%\SysWOW64\OneDriveSetup.exe

3. That is it. Now, follow the installation wizard to complete installing OneDrive on Windows 10 or Windows 11.
Hope that helps. Here are some other tips that might help you.
If you cannot find the OneDrive installation file in the appropriate location, you can download one from here: https://www.microsoft.com/en-in/microsoft-365/onedrive/download
- How to reinstall the Microsoft store
- How to delete clipboard history on Windows
- How to increase system-wide font size on Windows (better for your eyes)
- How to uninstall any antivirus software on Windows
- How to make the taskbar fully transparent on Windows 10 (awesome taskbar customization)
- How to remove OneDrive from File Explorer sidebar
- Stop OneDrive from syncing desktop, documents, and pictures folders
- More OneDrive tutorials.
Update: Updated the tutorial to make sure it works on Windows 10 and Windows 11.