Для настройки роутера необходимо подключить Ваш роутер к компьютеру. Это можно сделать через Wi-Fi либо кабелем. После того, как подключение выполнено необходимо открыть браузер и в адресной строке 192.168.0.1 (на новых версиях прошивки адрес 192.168.1.1). В случае если интерфейс роутера не открывается в адресной строке введите tplinkwifi.net
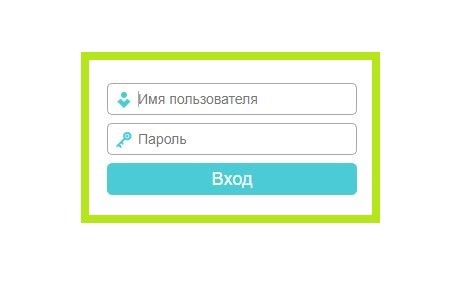
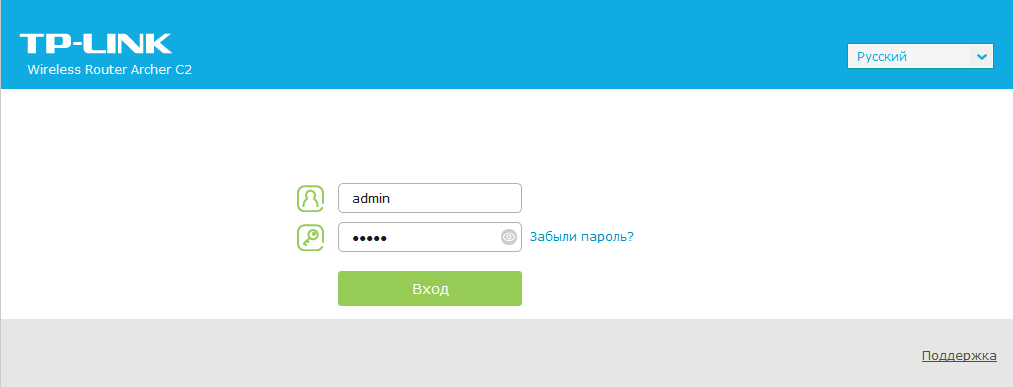
При входе по IP адресу роутера потребуется авторизация. В окне Логин (User) вводим admin, в окне Пароль (Password) – admin
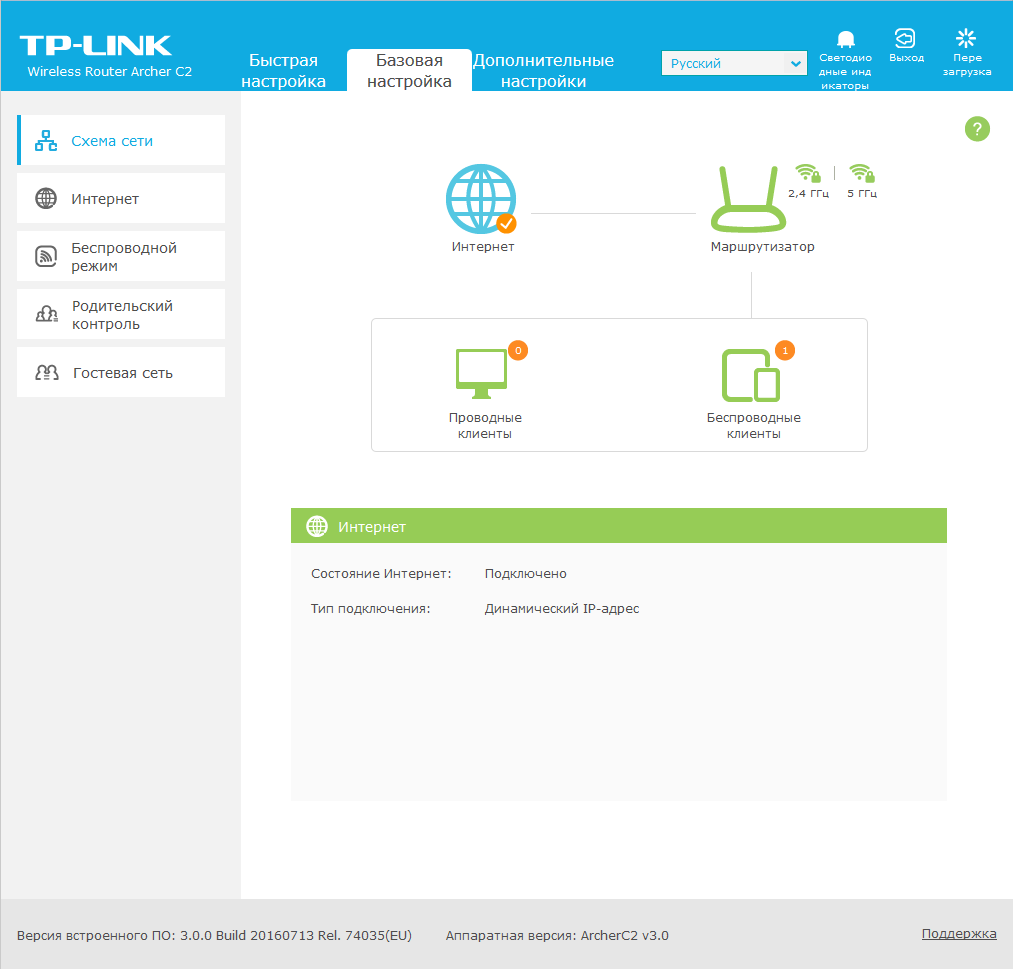
В случае, если заходим по ссылке авторизация не потребуется.
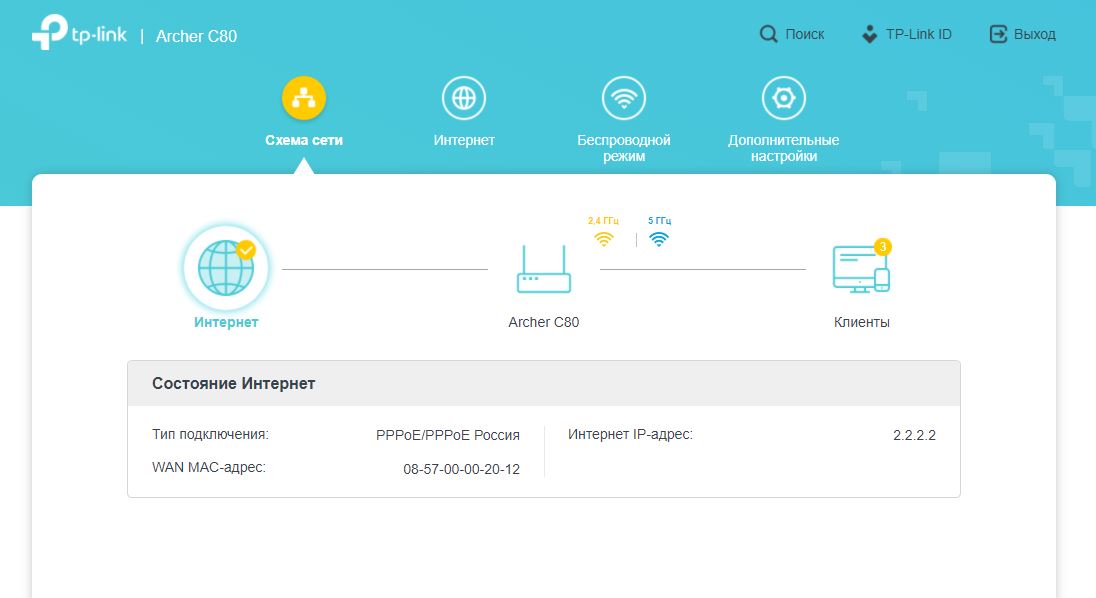
После авторизации откроется интерфейс роутера. Для начала настройки Вам необходимо выбрать режим работы вашего устройства
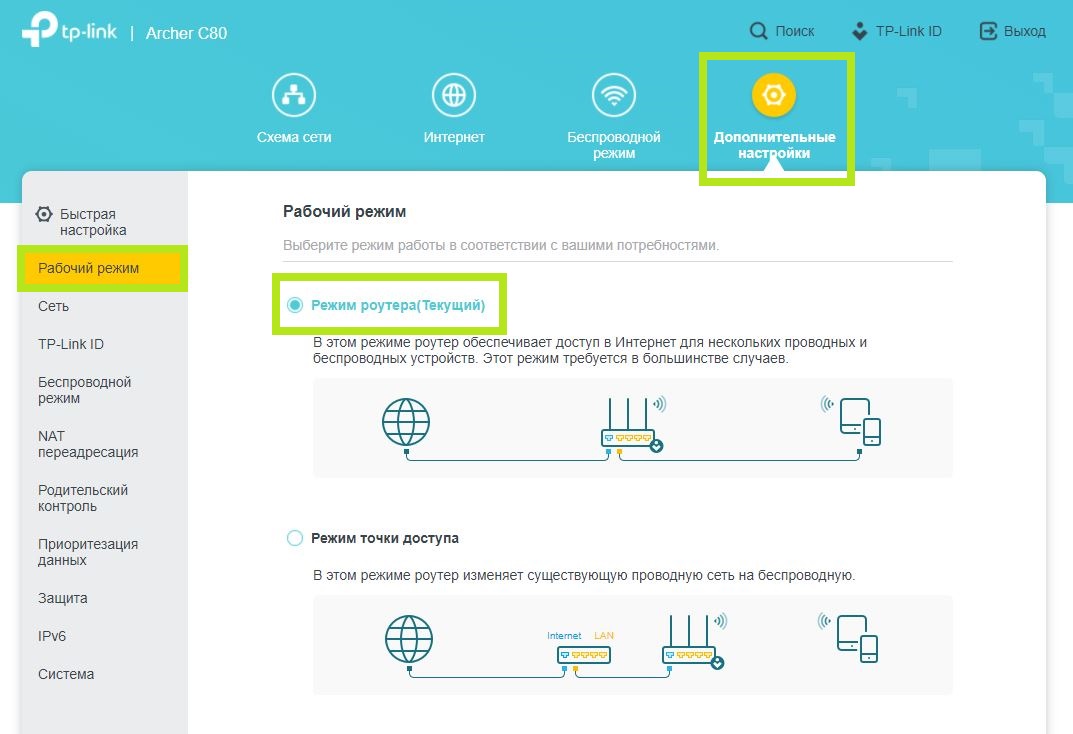
Для этого переходим в категорию “Дополнительные настройки”. В пункте “Рабочий режим” нужно выбрать режим “Режим роутера (CТекущий). Этот режим означает, что ваше устройство будет работать в режиме роутера.
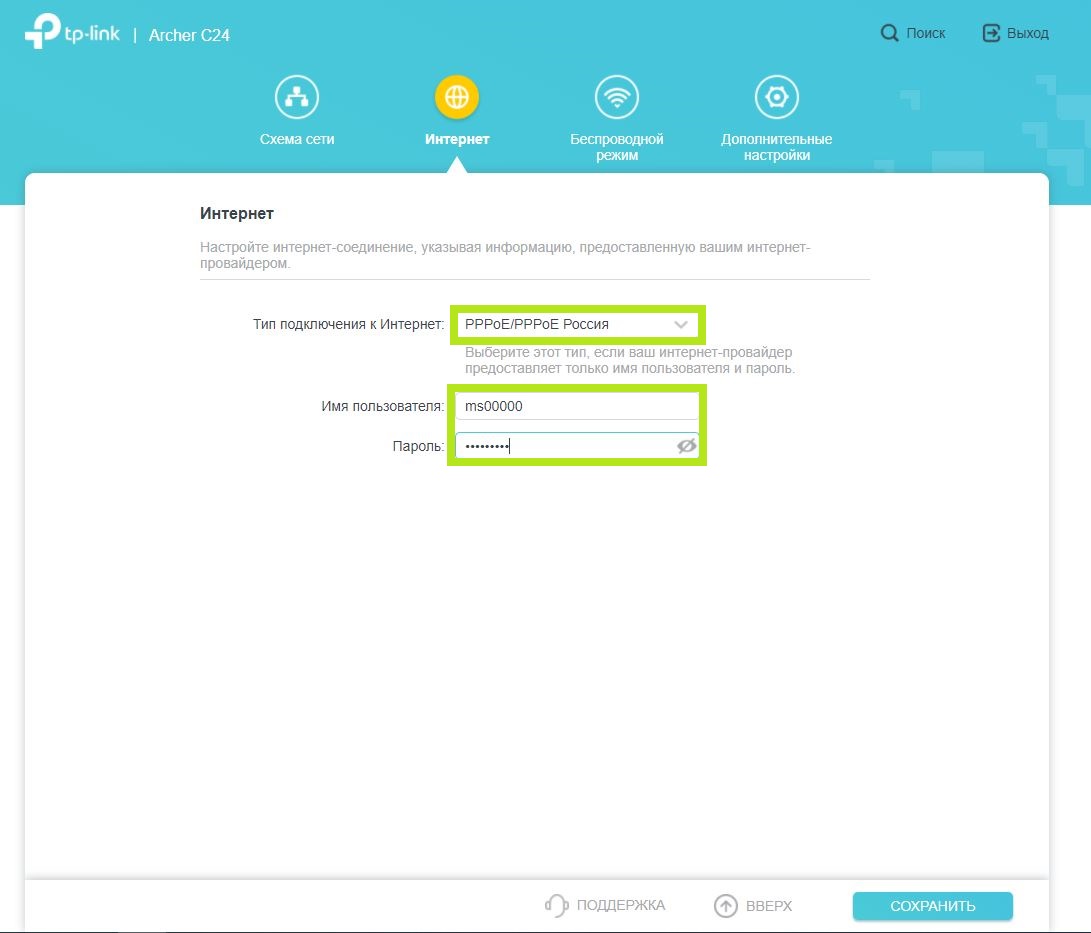
В категории “Интернет” в графе “Тип подключения к Интернет” выбираем “РРРоЕ/РРРоЕ Россия”. “Имя пользователя” и “Пароль” указаны в Вашем договоре в графе “Аутентификационные данные”. Обязательно подтвердите пароль и нажмите на кнопку “Сохранить”. Если все ввели правильно – подключение будет выполнено.
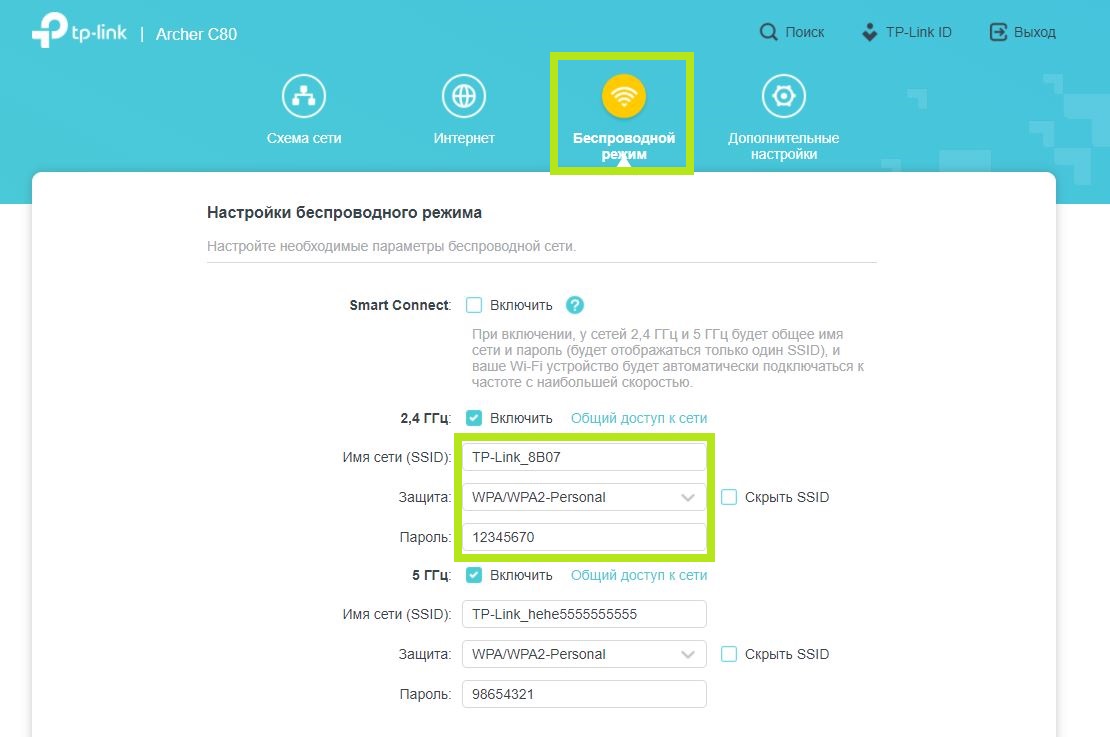
Для дальнейшей настройки Wi-Fi Вам необходимо перейти в категорию “Беспроводной режим”. В настройках сетевого режима вы можете изменить название вашей Wi-Fi сети в строке “Имя сети (SSID)”.
Защитить ваше Wi-Fi соединение можно задав пароль для подключения. Для этого перейдите в строке “Пароль”, укажите подходящий Вам пароль.
1. Upgrade the Firmware
TP-Link aims at providing better network experience for users.
We will inform you through the web management page if there’s any update firmware available for your router. Also, the latest firmware will be released at the TP-Link official website www.tp-link.com, and you can download it from the Support page for free.
Notes:
•Backup your router configuration before firmware upgrade.
•Do NOT turn off the router during the firmware upgrade.
1.1. Online Upgrade
1.Visit http://tplinkwifi.net, and log in with your TP-Link ID or the password you set for the router.
2.When the latest firmware is available for your router, the upgrade icon will display in the top-right corner of the page. Click the icon to go to the Firmware Upgrade page.
Alternatively, you can go to Advanced > System > Firmware Upgrade, and click CHECK FOR UPGRADES to see whether the latest firmware is released. If there is new firmware click UPGRADE.
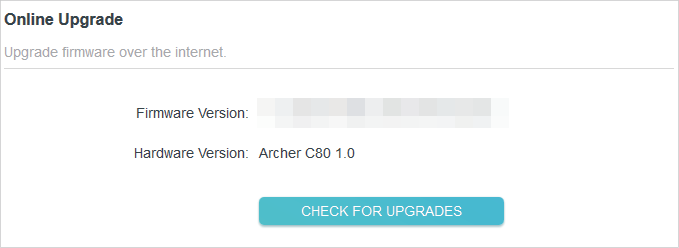
3.Wait a few minutes for the upgrade and reboot to complete.
Tips: If there’s a new and important firmware update for your router, you will see the prompt notification on your computer as long as a web browser is opened. Click UPGRADE, and log in to the web management page with the username and password you set for the router. You will see the Firmware Upgrade page.
1.2. Local Upgrade
1.Download the latest firmware file for the router from www.tp-link.com.
2.Visit http://tplinkwifi.net, and log in with your TP-Link ID or the password you set for the router.
3.Go to Advanced > System > Firmware Upgrade.
4.Focus on the Local Upgrade section. Click BROWSE to locate the downloaded new firmware file, and click UPGRADE.
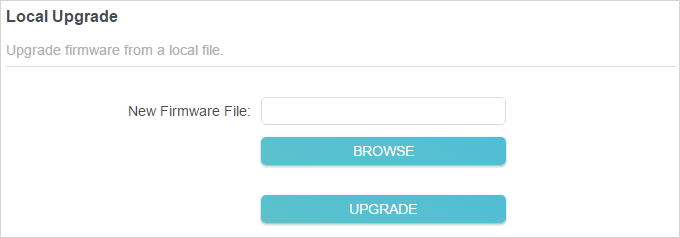
5.Wait a few minutes for the upgrade and reboot to complete.
Note: If you fail to upgrade the firmware for the router, please contact our Technical Support.
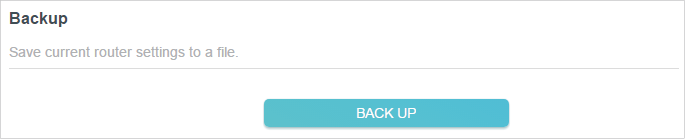
2. Backup and Restore Configuration Settings
The configuration settings are stored as a configuration file in the router. You can backup the configuration file to your computer for future use and restore the router to a previous settings from the backup file when needed. Moreover, if necessary you can erase the current settings and reset the router to the default factory settings.
1.Visit http://tplinkwifi.net, and log in with your TP-Link ID or the password you set for the router.
2.Go to Advanced > System Tools > Backup & Restore.
•To backup configuration settings:
Click BACK UP to save a copy of the current settings to your local computer. A ‘.bin’ file of the current settings will be stored to your computer.
•To restore configuration settings:
1.Click BROWSE to locate the backup configuration file stored on your computer, and click RESTORE.
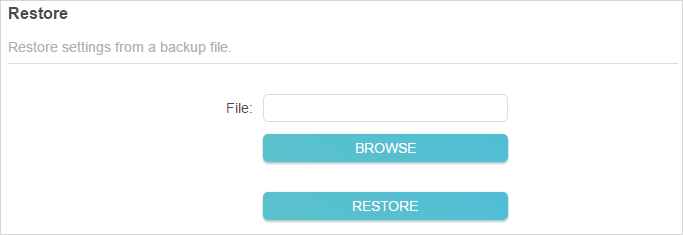
2.Wait a few minutes for the restoring and rebooting.
Note: During the restoring process, do not turn off or reset the router.
•To reset the router except your login password and TP-Link ID:
1.In the Factory Default Restore section, click RESTORE.
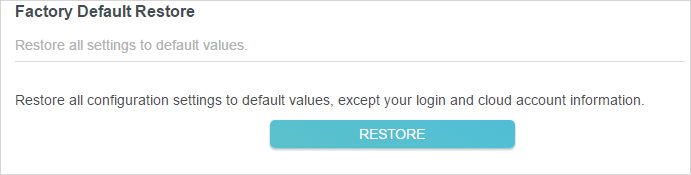
2.Wait a few minutes for the resetting and rebooting.
Note:
•During the resetting process, do not turn off the router.
•After reset, you can still use the current login password or the TP-Link ID to log in to the web management page.
•To reset the router to factory default settings:
1.Click FACTORY RESTORE to reset the router.

2.Wait a few minutes for the resetting and rebooting.
Note:
•During the resetting process, do not turn off or reset the router.
•We strongly recommend you backup the current configuration settings before resetting the router.
3. Change the Login Password
The account management feature allows you to change your login password of the web management page.
Note: If you are using a TP-Link ID to log in to the web management page, the account management feature will be disabled. To manage the TP-Link ID, go to Advanced > TP-Link ID.
1.Visit http://tplinkwifi.net, and log in with the password you set for the router.
2.Go to Advanced > System > Administration and focus on the Change Password section.
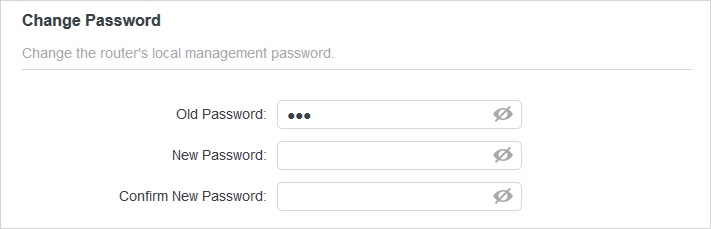
3.Enter the old password, then a new password twice (both case-sensitive). Click SAVE.
4.Use the new password for future logins.
4. Local Management
This feature allows you to limit the number of client devices on your LAN from accessing the router by using the MAC address-based authentication.
1.Visit http://tplinkwifi.net, and log in with your TP-Link ID or the password you set for the router.
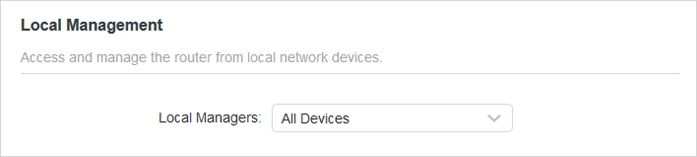
2.Go to Advanced > System > Administration and complete the settings In Local Management section as needed.
•Allow all LAN connected devices to manage the router:
Select All Devices for Local Managers.
•Allow specific devices to manage the router:
1.Select All Devices for Local Managers and click SAVE.
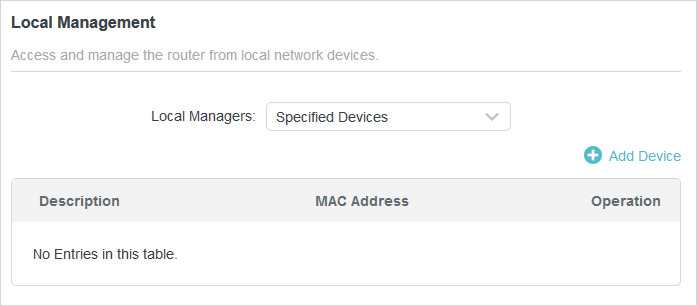
2.Click Add Device.
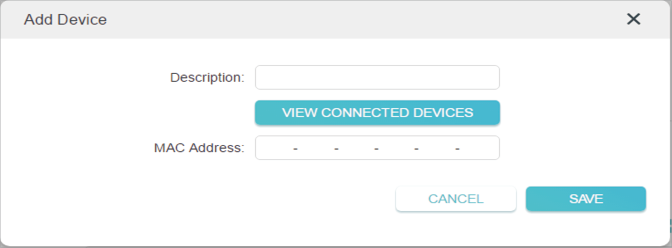
3.Click VIEW CONNECTED DEVICES and select the device to manage the router from the Connected Devices list, or enter the MAC address of the device manually.
4.Specify a Description for this entry.
5.Click SAVE.
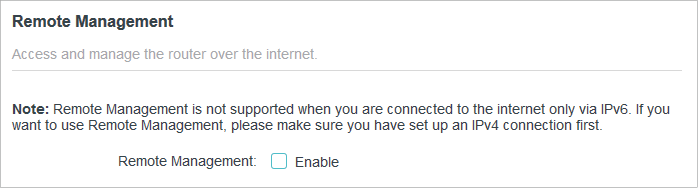
5. Remote Management
This feature allows you to control remote devices’ authority to manage the router.
1.Visit http://tplinkwifi.net, and log in with your TP-Link ID or the password you set for the router.
2.Go to Advanced > System > Administration and complete the settings in Remote Management section as needed.
•Forbid all devices to manage the router remotely:
Do not tick the Enable checkbox of Remote Management.
•Allow all devices to manage the router remotely:
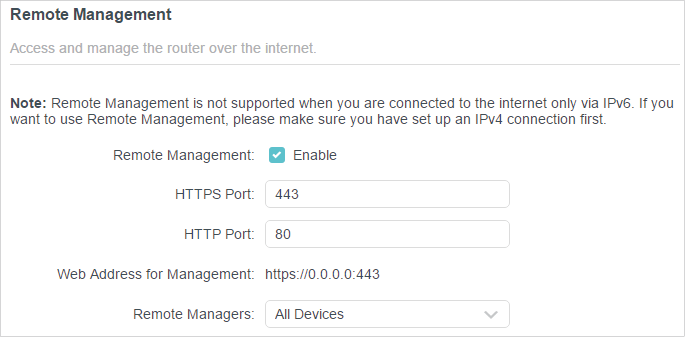
1.Tick the Enable checkbox of Remote Management.
2.Keep the HTTPS and HTTP port as default settings (recommended) or enter a value between 1024 and 65535.
3.Select All Devices for Remote Managers.
4.Click SAVE.
Devices on the internet can log in to http://Router’s WAN IP address:port number (such as http://113.116.60.229:1024) to manage the router.
Tips:
•You can find the WAN IP address of the router on Network Map > Internet.
•The router’s WAN IP is usually a dynamic IP. Please refer to Set Up a Dynamic DNS Service Account if you want to log in to the router through a domain name.
•Allow a specific device to manage the router remotely:
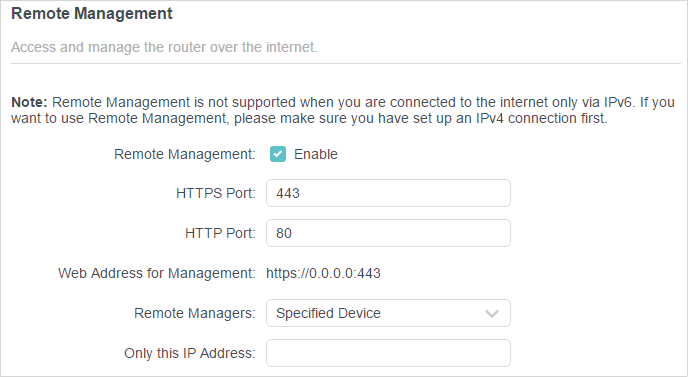
1.Tick the Enable checkbox of Remote Management.
2.Keep the HTTPS and HTTP port as default settings (recommended) or enter a value between 1024 and 65535.
3.Select Specified Device for Remote Managers.
4.In the Only this IP Address field, enter the IP address of the remote device to manage the router.
5.Click SAVE.
Devices using this WAN IP can manage the router by logging in to http://Router’s WAN IP:port number (such as http://113.116.60.229:1024).
Tips: The router’s WAN IP is usually a dynamic IP. Please refer to Set Up a Dynamic DNS Service Account if you want to log in to the router through a domain name.
6. View System Log
When the router does not work normally, you can save the system log and send it to the technical support for troubleshooting.
1.Visit http://tplinkwifi.net, and log in your TP-Link ID or the password you set for the router.
2.Go to Advanced > System > System Log.
3.In the Save Log section, click SAVE TO LOCAL to save the system logs to a local disk.
7. Test the Network Connectivity
Diagnostics is used to test the connectivity between the router and the host or other network devices.
1.Visit http://tplinkwifi.net, and log in with your TP-Link ID or the password you set for the router.
2.Go to Advanced > System > Diagnostics.
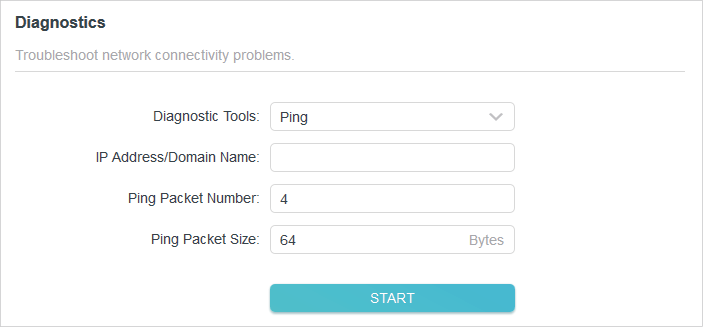
3.Enter the information:
1 )Choose Ping or Tracert as the diagnostic tool to test the connectivity;
•Ping is used to test the connectivity between the router and the tested host, and measure the round-trip time.
•Tracert is used to display the route (path) your router has passed to reach the tested host, and measure transit delays of packets across an Internet Protocol network.
2 )Enter the IP Address or Domain Name of the tested host.
3 )Modify the Ping Packet Number and the Ping Packet Size. It’s recommended to keep the default value.
4 )If you have chosen Tracert, you can modify the Traceroute Max TTL. It’s recommended to keep the default value.
4.Click START to begin the diagnostics.
The figure below indicates the proper connection between the router and the Yahoo server (www.Yahoo.com) tested through Ping.

The figure below indicates the proper connection between the router and the Yahoo server (www.Yahoo.com) tested through Tracert.

8. Set Up System Time & Language
The the router’s default system language is English. When changed, the router’s settings on web management will appear in another language.
System time is the time displayed while the router is running. The system time you configure here will be used for other time-based functions like Parental Controls. You can choose the way to obtain the system time as needed.
1.Visit http://tplinkwifi.net, and log in with your TP-Link ID or the password you set for the router.
2.Go to Advanced > System > Time & Language.
•To change system language:
1.Select the language from the drop-down list.
2.Click SAVE.
•To get time from the internet:
1.Enable 24-Hour Time if you want the time to display in a 24-hour way.
2.In the Set Time field, select Get from Internet.
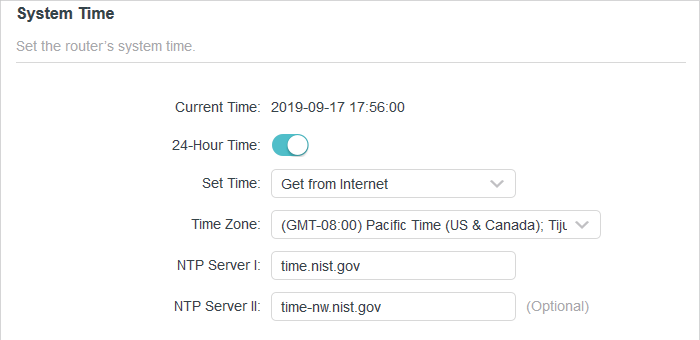
3.Select your local Time Zone from the drop-down list.
4.In the NTP Server I field, enter the IP address or domain name of your desired NTP Server.
5.(Optional) In the NTP Server II field, enter the IP address or domain name of the second NTP Server.
6.Click SAVE.
•To get time from your computer:
1.In the Set Time field, select Get from Managing Device.
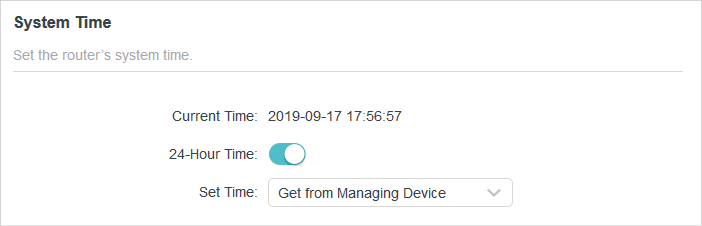
2.The time of your computer will then be displayed and click SAVE.
•To manually set the date and time:
1.In the Set Time field, select Manually.
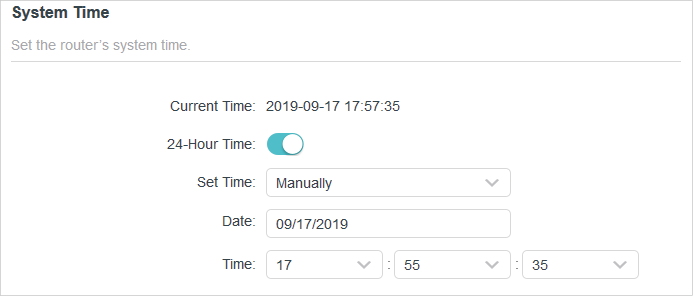
2.Set the current Date (In MM/DD/YYYY format).
3.Set the current Time (In HH/MM/SS format).
4.Click SAVE.
•To set up Daylight Saving Time:
1.Tick the Enable box of Daylight Saving Time.

2.Select the correct Start date and time when daylight saving time starts at your local time zone.
3.Select the correct End date and time when daylight saving time ends at your local time zone.
4.Click SAVE.
9. Set the Router to Reboot Regularly
The Scheduled Reboot feature cleans the cache to enhance the running performance of the router.
1.Visit http://tplinkwifi.net, and log in with your TP-Link ID or the password you set for the router.
2.Go to Advanced > System > Reboot.
3.Tick the Enable box of Reboot Schedule.

4.Specify the Reboot Time when the router reboots and Repeat to decide how often it reboots.
5.Click SAVE.
10. Control the LED
The LED of the router indicates its activities and status. You can enable the Night Mode feature to specify a time period during which the LED is off.
1.Visit http://tplinkwifi.net, and log in with your TP-Link ID or the password you set for the router.
2.Go to Advanced > System > LED Control.
3.Enable Night Mode.
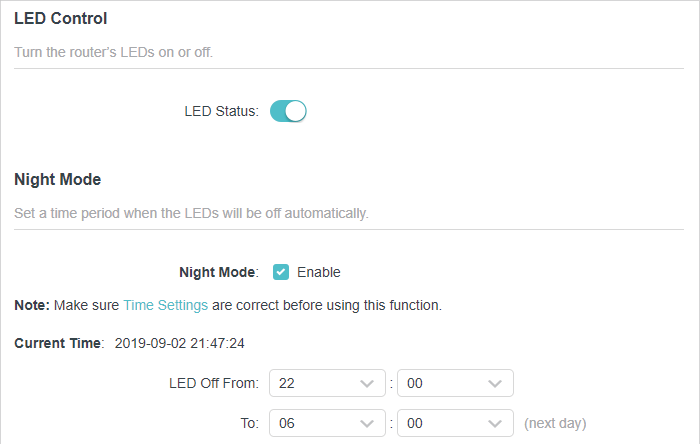
4.Specify the LED off time, and the LED will be off during this period every day.
5.Click SAVE.
Шаг 1 из 3
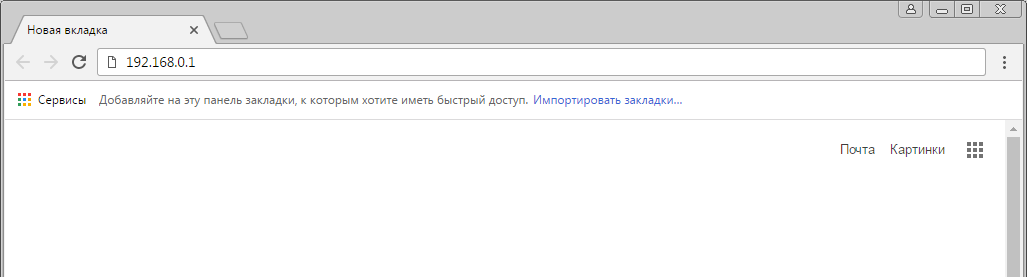
Открываем браузер, в адресной строке набираем адрес роутера 192.168.0.1, нажимаем Enter.
Шаг 2 из 3
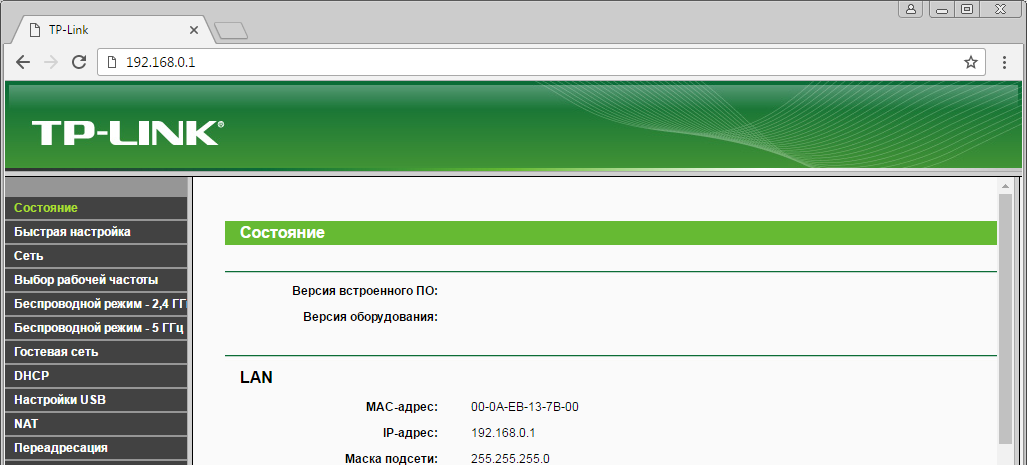
Если открывается страница авторизации роутера, вводим логин и пароль для доступа к роутеру, нажимаем Enter.

Шаг 3 из 3
Откроются настройки роутера.
Шаг 1 из 2
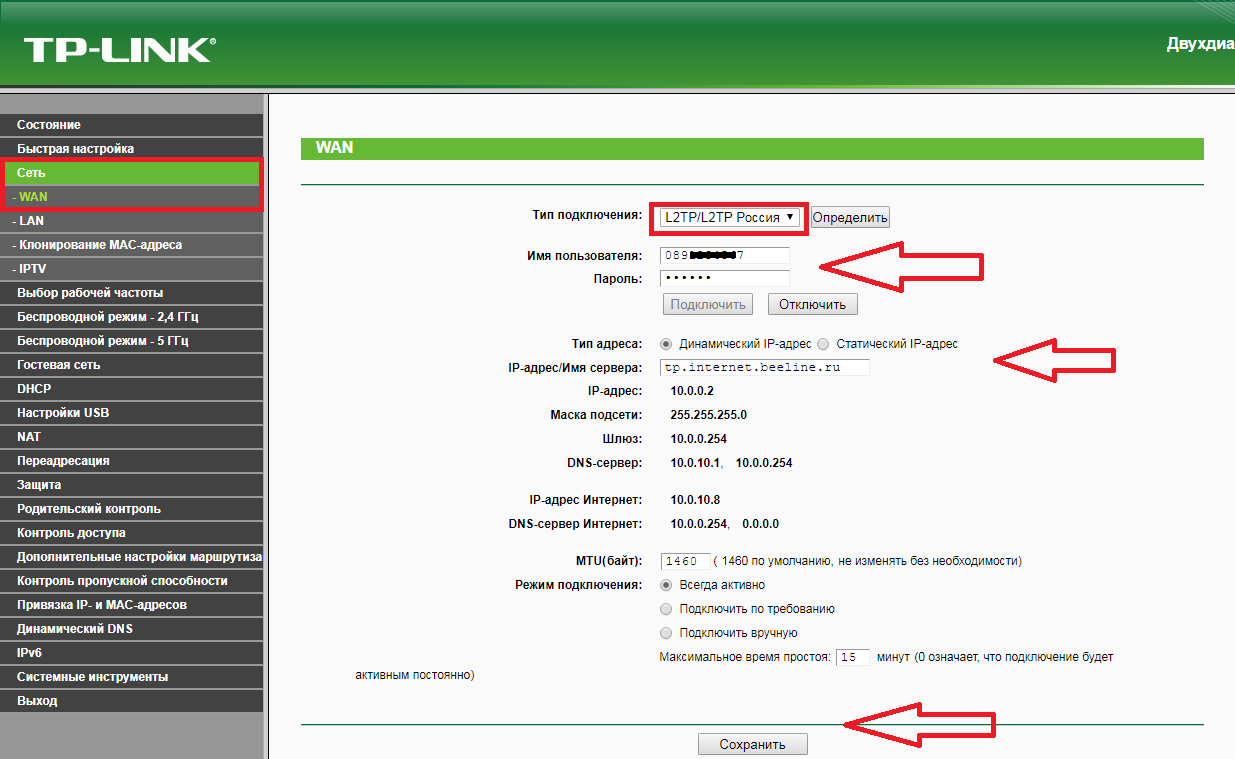
В левом меню нажимаем на пункт «Сеть» (Network). Выбираем подпункт WAN. Откроется соответствующее окно. В пункте «Тип подключения WAN» (WAN Connection Type) из выпадающего списка выбираем L2TP / Russia L2TP.

Шаг 2 из 2
Появятся остальные поля для настройки L2TP:
— В поле «Имя пользователя» (Username) вводим лицевой счёт.
— В поле «Пароль» (Password) вводим пароль от домашнего интернета.
— Убеждаемся, что отмечен пункт «Динамический IP» (Dynamic IP).
— В поле «IP-адрес / Имя сервера» (Server IP Address / Name) вводим tp.internet.beeline.ru.
— В режиме подключения — «Всегда активно».
После чего внизу нажимаем «Сохранить».
Шаг 1 из 4
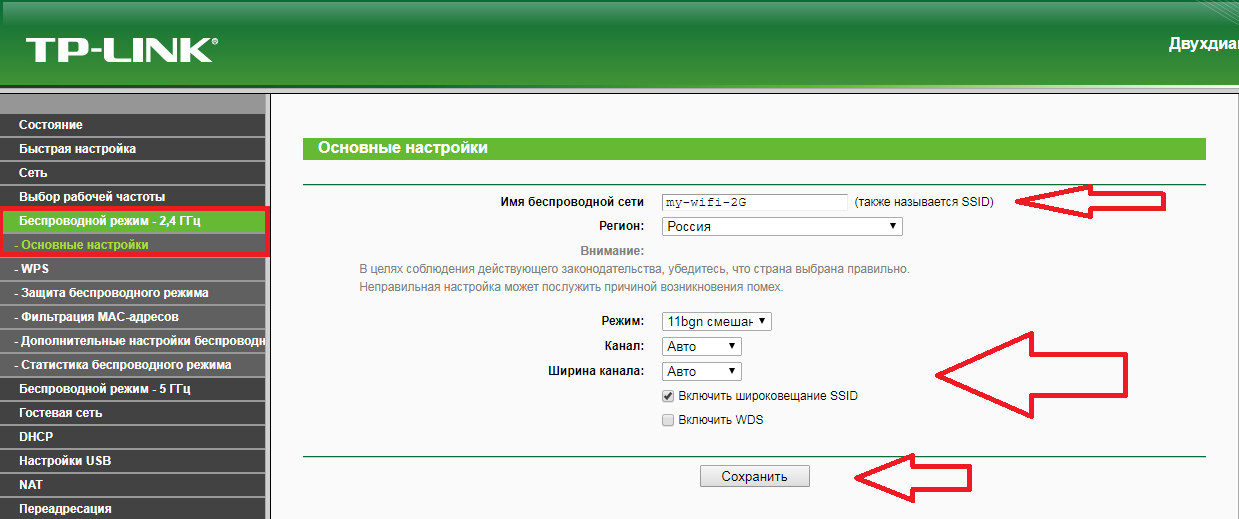
В левом меню выбираем пункт «Беспроводной режим» (Wireless) или «Беспроводной режим — 2,4 ГГц» (Wireless — 2,4GHz). Откроется окно «Настройки беспроводного режима» (Wireless settings). В поле «Имя беспроводной сети» (Wireless Network Name) придумываем и пишем новое имя сети. В поле «Регион» (Region) выбираем «Россия» (Russia). Убеждаемся, что пункт «Включить широковещание SSID» (Enable SSID Broadcast) отмечен. Нажимаем кнопку «Сохранить» (Save), ждём применения настроек.
Шаг 2 из 4
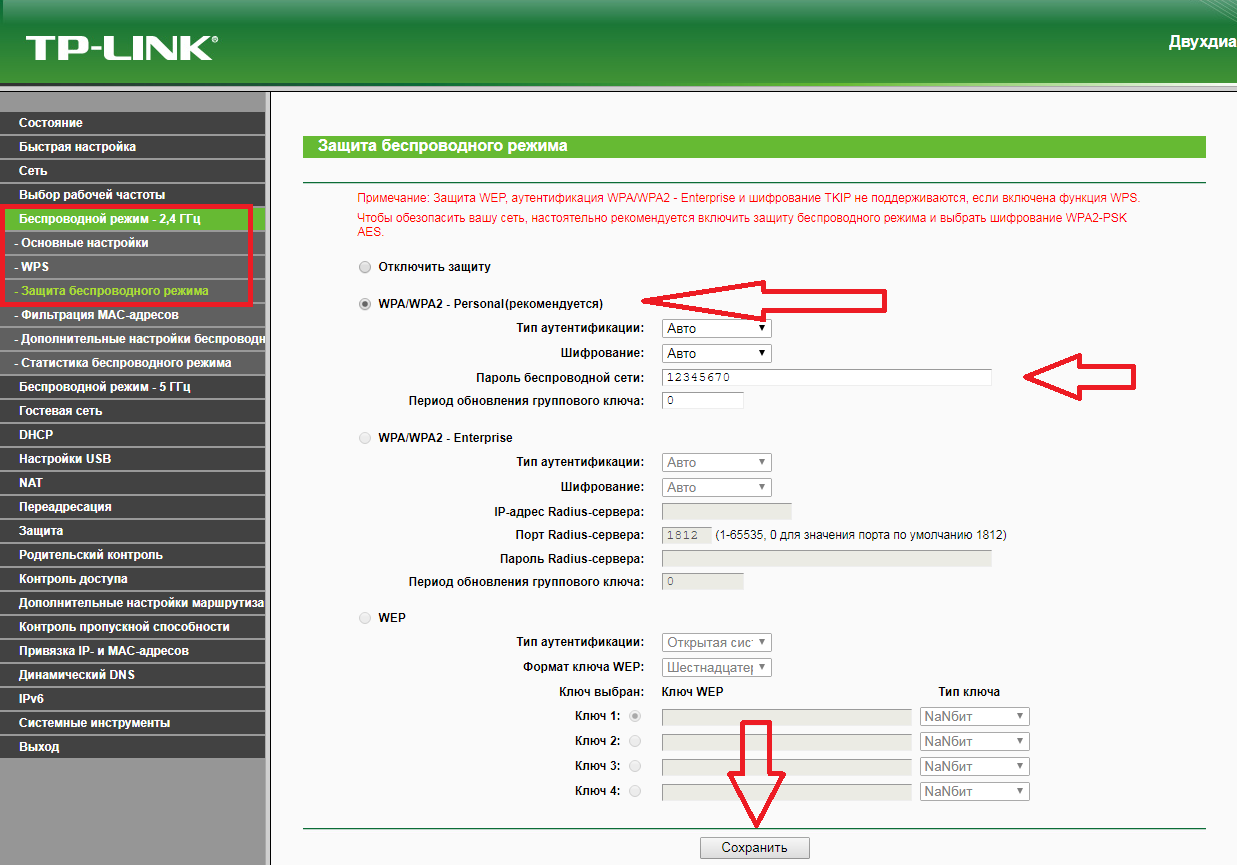
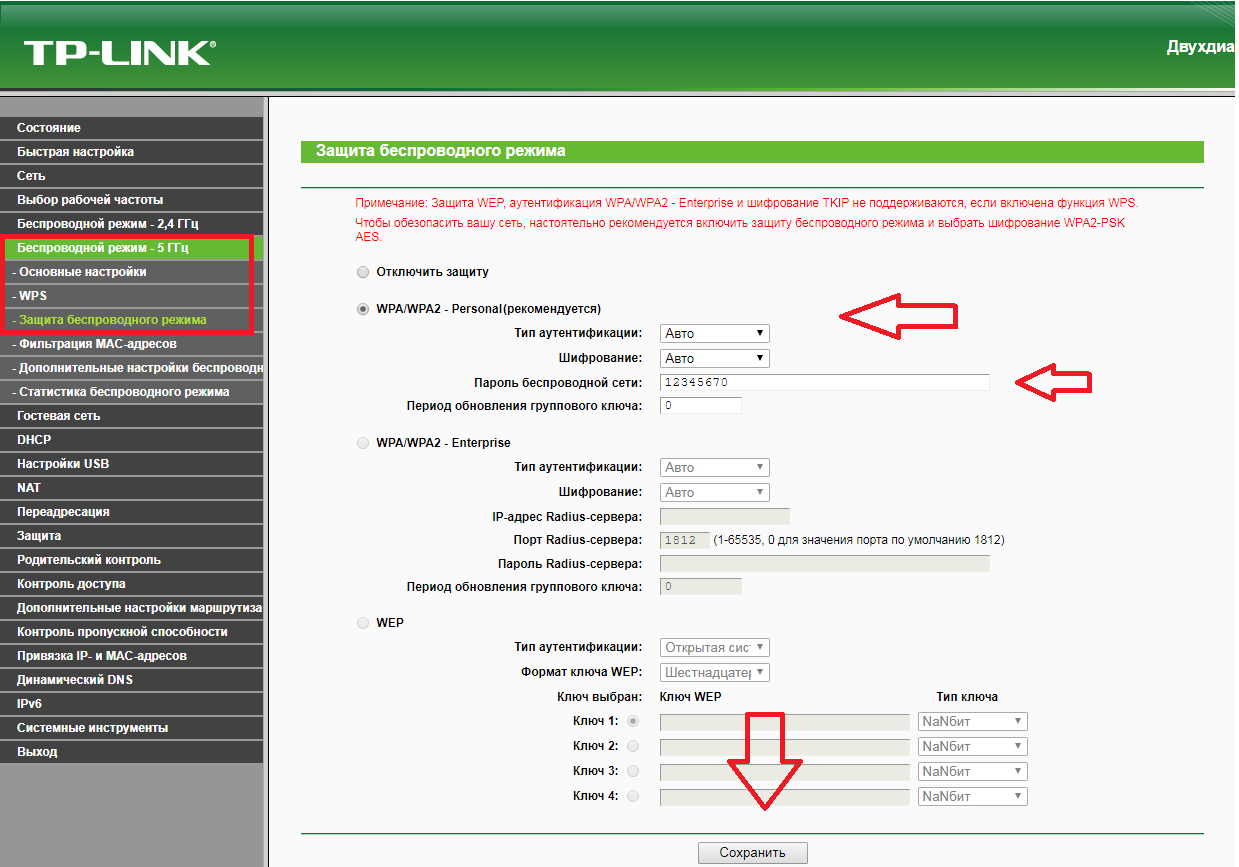
В левом меню выбираем пункт «Защита беспроводного режима» (Wireless Security). Откроется соответствующее окно, отмечаем пункт WPA/WPA2 — Personal. В поле «Тип аутентификации» (Authentication Type) выбираем «Авто» (Auto). В поле «Шифрование» (Encryption) выбираем «Авто» (Auto). В поле «Пароль PSK» (Wireless Password) придумываем и пишем новый пароль для Wi-Fi-сети (не менее 8 символов, используя только английские буквы или цифры) и нажимаем «Сохранить».
Шаг 3 из 4
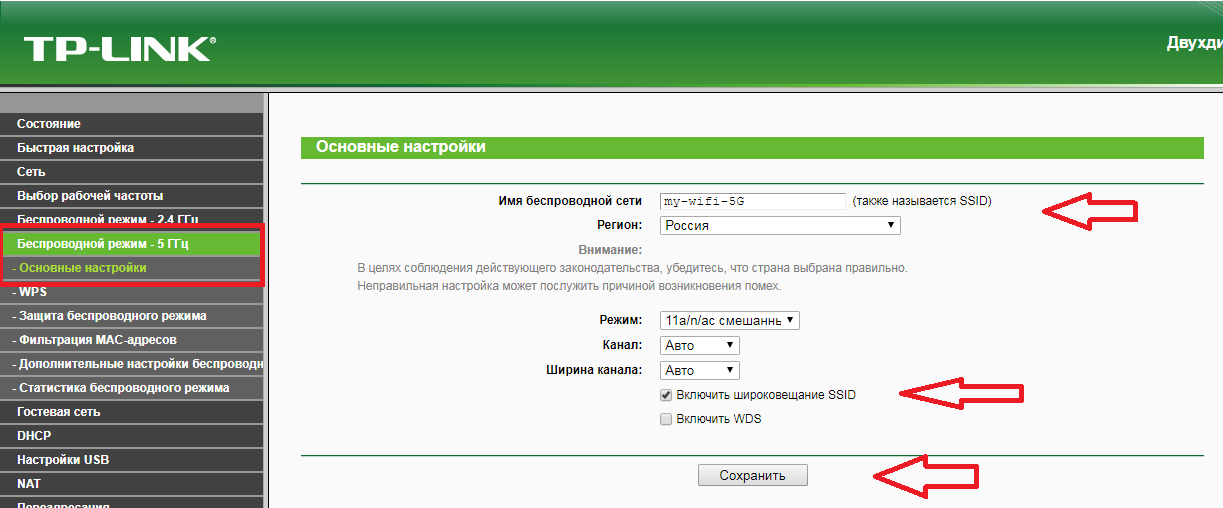
Если в слева есть пункт «Беспроводной режим – 5 ГГц», то переходим в него, после чего откроется окно «Настройки беспроводного режима» (Wireless settings). В поле «Имя беспроводной сети» (Wireless Network Name) придумываем и пишем новое имя сети. В поле «Регион» (Region) выбираем «Россия» (Russia). Убеждаемся, что пункт «Включить широковещание SSID» (Enable SSID Broadcast) отмечен. Нажимаем «Сохранить» (Save), ждём применения настроек.
Шаг 4 из 4
В левом меню выберите пункт «Защита беспроводного режима» (Wireless Security). Откроется соответствующее окно, отмечаем пункт WPA/WPA2 — Personal. В поле «Тип аутентификации» (Authentication Type) выбираем «Авто» (Auto). В поле «Шифрование» (Encryption) выбираем «Авто» (Auto). В поле «Пароль PSK» (Wireless Password) придумываем и пишем новый пароль для Wi-Fi-сети (не менее 8 символов, используя только английские буквы или цифры). Листаем страницу вниз. Нажимаем «Сохранить» (Save), ждём применения настроек.
Шаг 1 из 1
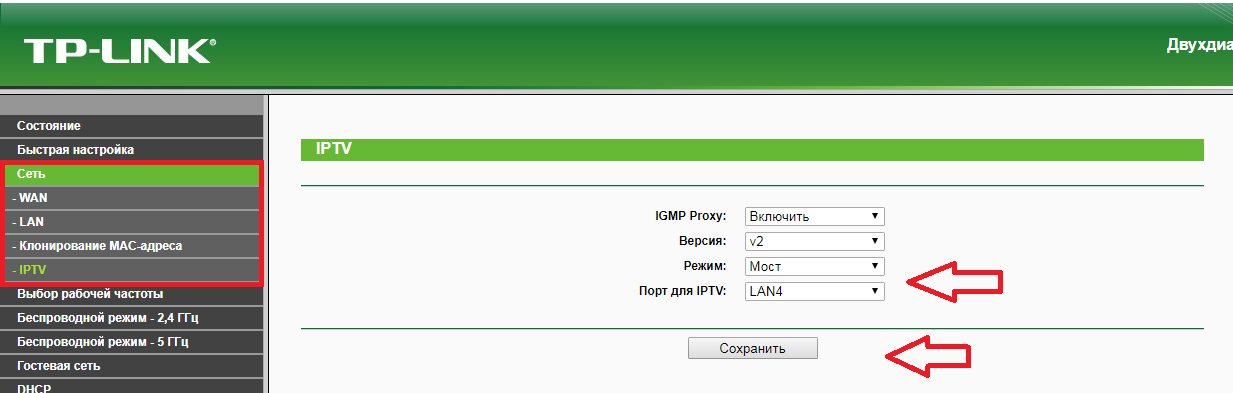
В левом меню выбираем пункт «Сеть» (Network), далее IPTV (если пункта IPTV нет, дополнительных настроек для телевидения не требуется). В поле «Режим» (Mode) выбираем «Мост» (Bridge). В поле «Порт для IPTV» (Port for IPTV) — порт для подключения ТВ-приставки. Нажимаем «Сохранить» (Save), ждём применения настроек.
Подключите роутер Archer C80 к электросети. Кабель Севcтар, приходящий в квартиру, подключите в порт синего цвета (WAN), а кабель от ПК подключите в любой желтый порт (LAN(1-4)). Если роутер новый, то позвоните в колл-центр +7 978 899 00 00 и сообщите о новом оборудовании. Оператор привяжет роутер к Вашей учётной записи.
Если Ваш номер телефона привязан к Вашей учетной записи, то при звонке система автоматически определит, что Вы подключили новое оборудование и предложит нажать цифру 2 для регистрации Вашего роутера. Нажмите цифру 2 и начните настройку.
Стандартный логин и пароль от беспроводной сети находится на оборотной стороне роутера.
Настройка:
- Введите в браузере 192.168.0.1
- В выпадающем списке выберите русский язык.

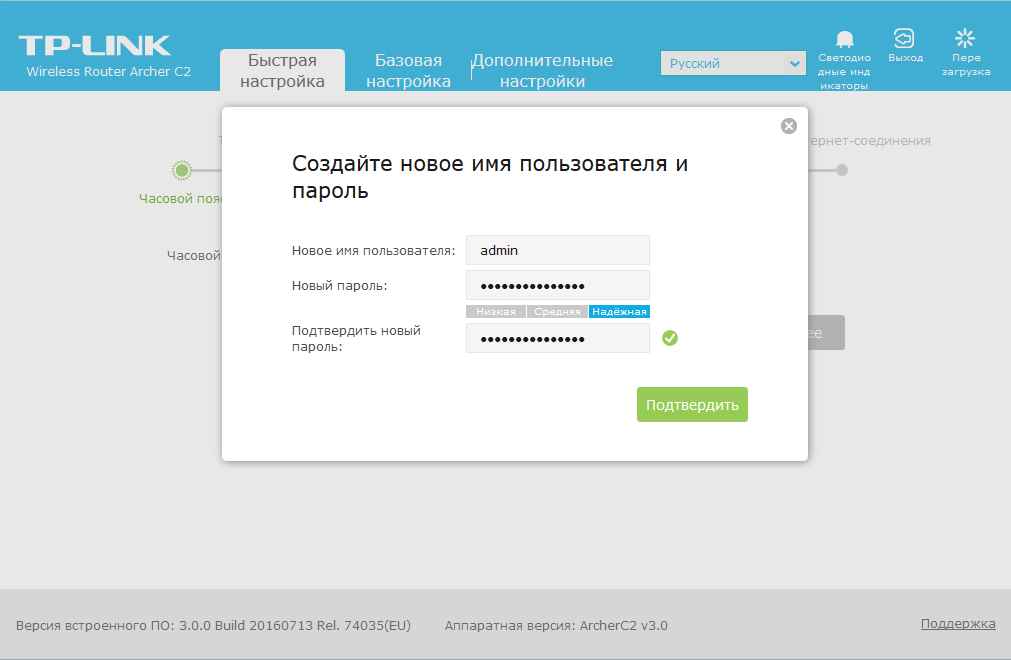
- В поле «логин» введите admin. В поле «пароль» введите admin.

- Во вкладке «Быстрая настройка» во всплывающем окне измените имя пользователя и пароль при необходимости. Нажмите [Подтвердить].

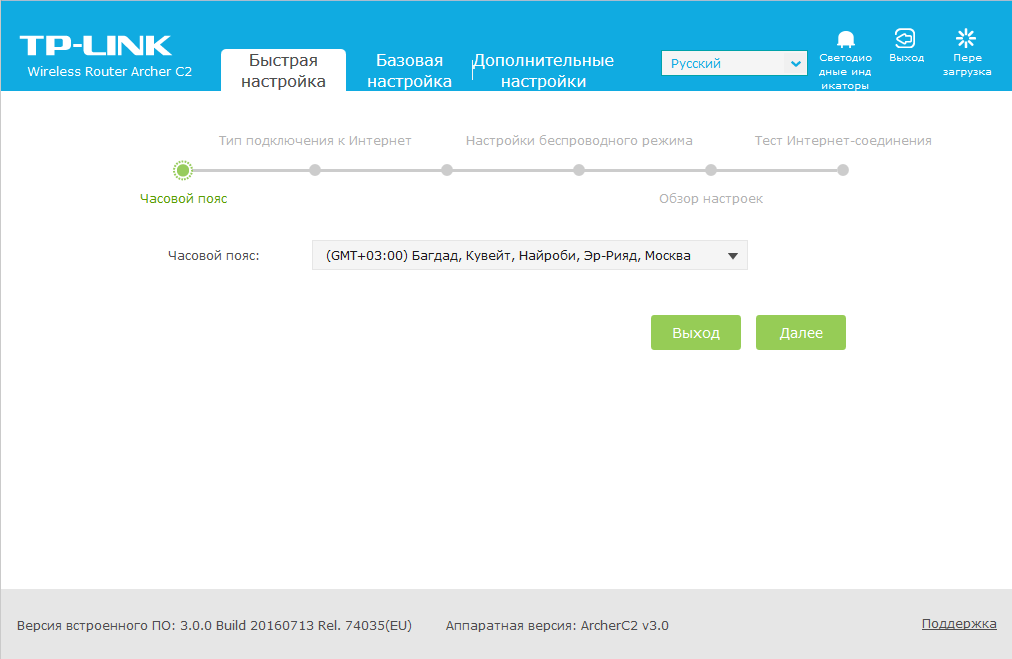
- Быстрая настройка. Шаг 1: «Часовой пояс».
В выпадающем списке выберите свой часовой пояс и нажмите [Далее].
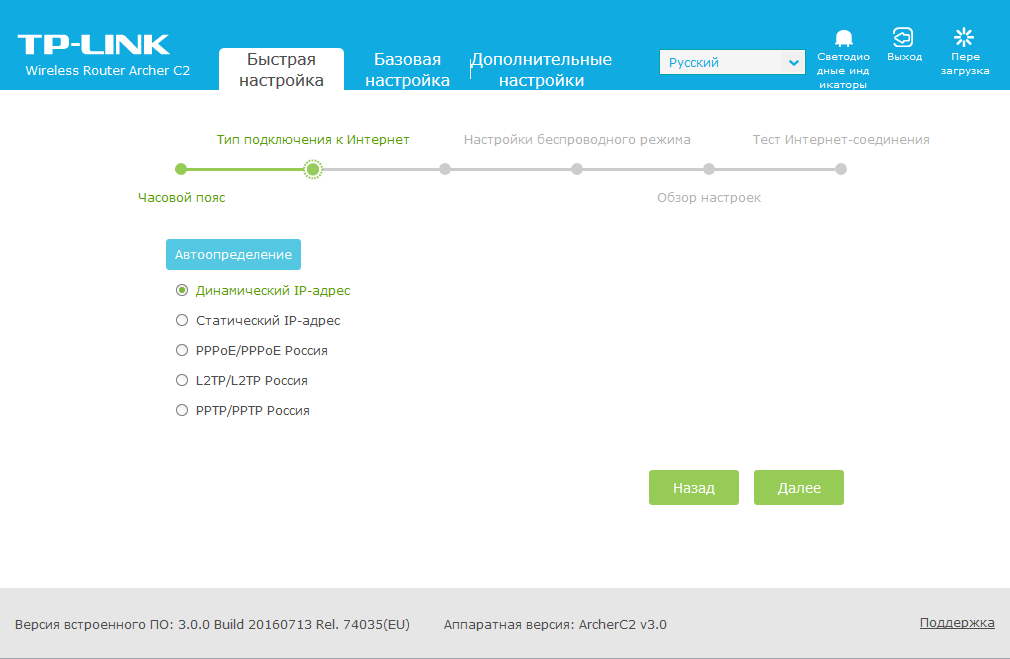
- Быстрая настройка. Шаг 2: «Тип подключения к Интернет».
Из приведенного списка выберите «Динамический IP-адрес» и нажмите [Далее].
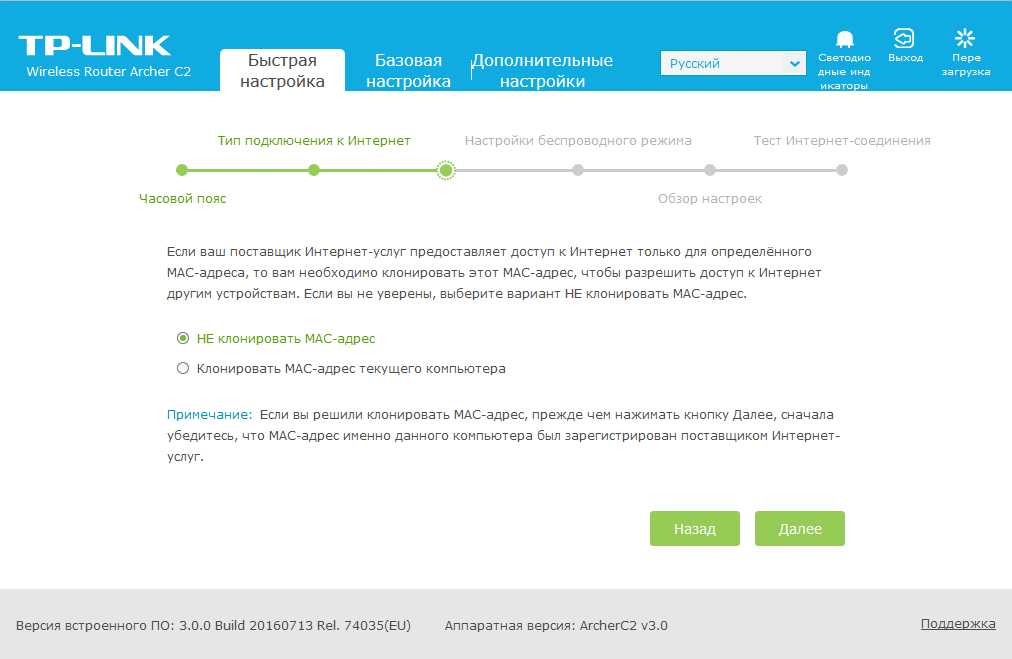
- Быстрая настройка. Шаг 3: «MAC-адрес».
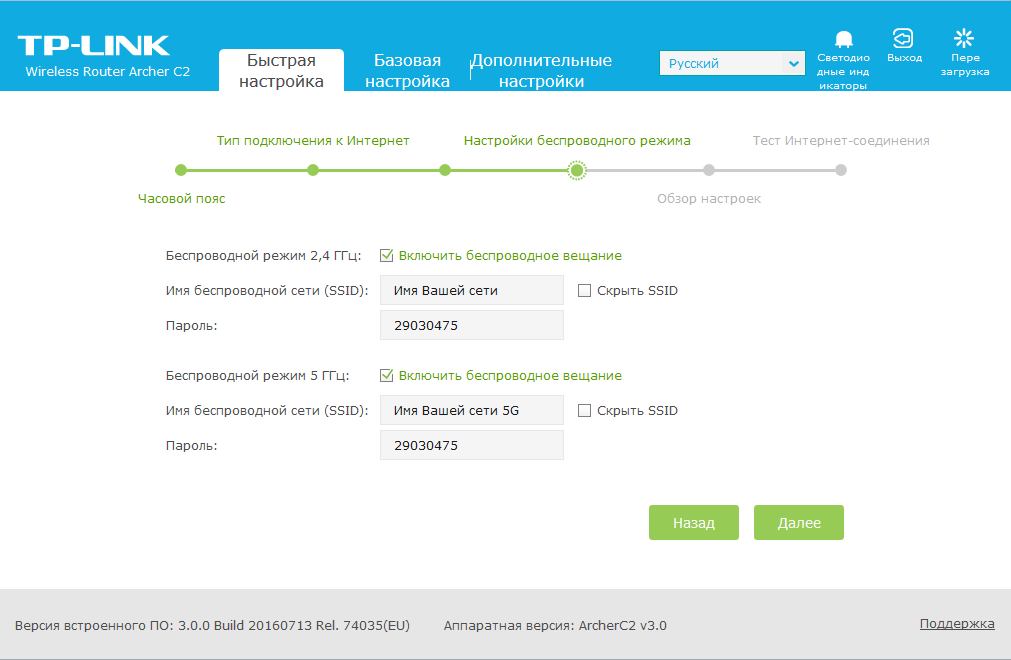
Из приведённого cписка выберите «НЕ клонировать MAC-адрес» и нажмите [Далее]. - Быстрая настройка. Шаг 4: «Настройка беспроводного режима».
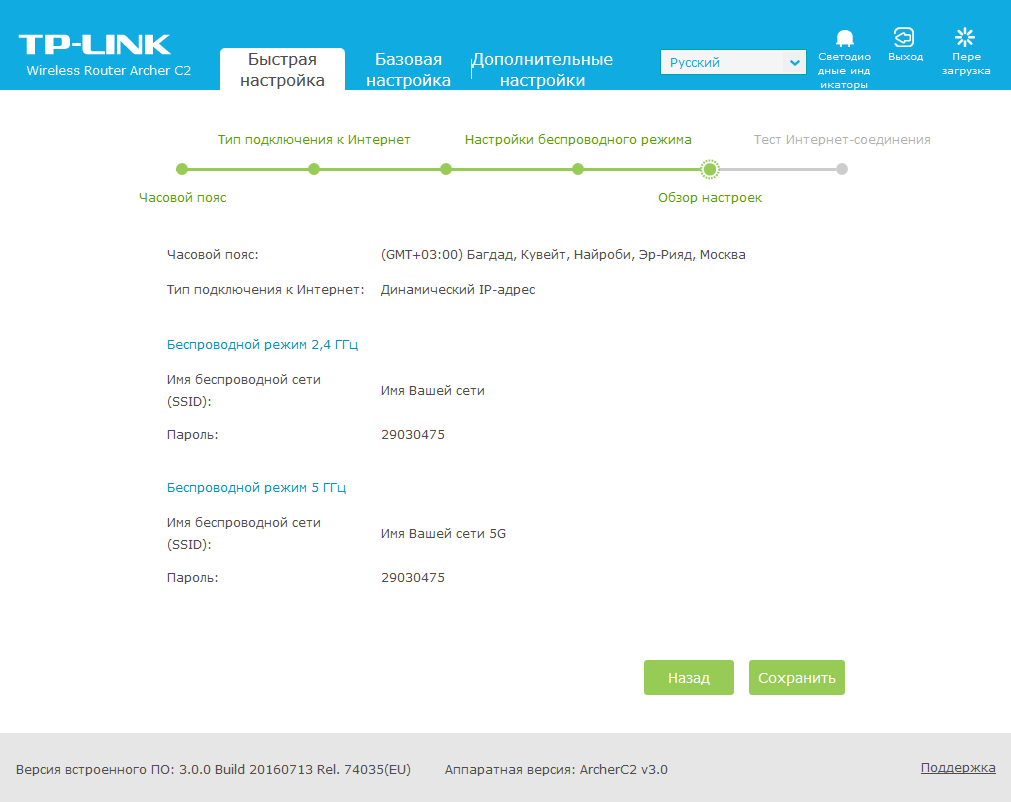
Выберите имя и пароль для беспроводных сетей и нажмите [Далее]. - Быстрая настройка. Шаг 5: «Обзор Настроек».
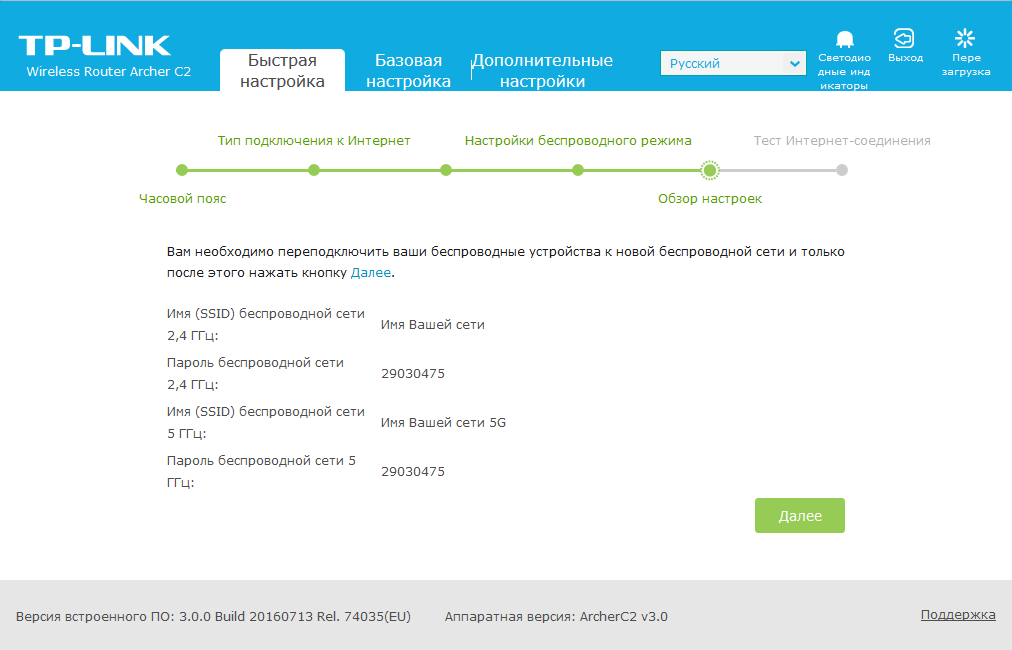
Проверьте Ваши настройки и нажмите [Cохранить].
- Переподключите Ваши беспроводные устройства и нажмите [Далее].

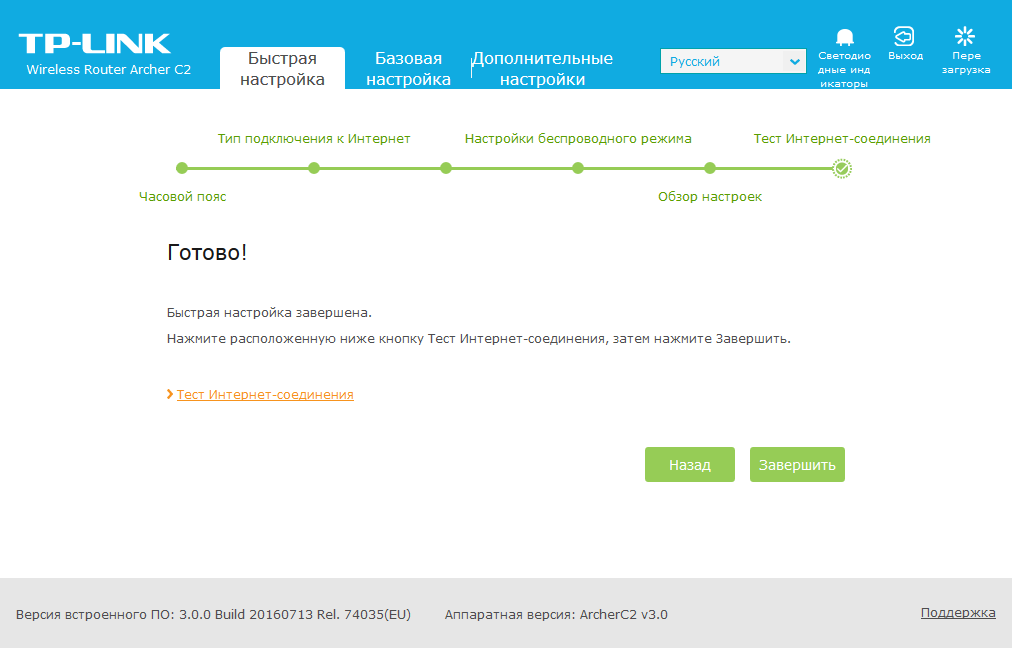
- Быстрая настройка. Шаг 6: «Тест Интернет-соединения».
Нажмите кнопку [Завершить]. И в появившемся окне нажмите [ОК].
- По окончании настройки Вы увидите экран «Базовой настройки». На иконке глобуса отобразится галочка. Подключение к интернету активно.

Настройка роутера
1. Подключите интернет-кабель в WAN(Ethernet) порт Вашего роутера.
2. Подключите дополнительным кабелем компьютер к LAN порту роутера (обычно они пронумерованы).
3. Наберите в адресной строке Вашего браузера адрес роутера. Он указан в инструкции к роутеру или на корпусе (Примеры: 192.168.1.1 или 192.168.0.1).
4. появившемся окне необходимо ввести Имя пользователя и Пароль, которые также указаны на самом роутере или в инструкции по эксплуатации. По умолчанию возможны следующие варианты: Имя пользователя-> admin Пароль-> admin (возможные варианты: 1234, password, или оставить поле пустым).
Настройка параметров сети на примере маршрутизатора TP-Link
Необходимо настроить параметры подключения к сети Интернет, выбрав в меню: Сеть > WAN (возможные варианты: Основные настройки, Internet, WAN setup, Setup wizard, Connection setup, IP config).
Настройка параметров IP (возможные варианты: Тип подключения, Connection Type): Динамический IP (возможные варианты: Automatic IP, Dynamic IP, DHCP).
После завершения настройки необходимо нажать Применить (возможные варианты: Сохранить, Завершить, Apply, Save, Finish)
После сохранения настроек требуется перезагрузить роутер, отключив, а затем подключив его питание

Настройка беcпроводного соединения.
Чтобы установить имя и пароль Вашей сети следует сделать следующее:
Выберите в меню роутера беспроводной режим(возможные варианты: Wireless Settings, Настройка беспроводной сети, сеть Wi-Fi)
Установите Имя беспроводной сети (возможные варианты: Network name, SSID)
Нажмите на «Сохранить».

Защита беспроводной сети.
4) Для защиты Вашей беспроводной сети от несанкционированного доступа рекомендуется включить защиту сети.
Для этого в подменю Безопасность (возможные варианты: Шифрование, Security Mode, Encryption) необходимо выбрать тип WPA2-PSK.
5) Далее необходимо указать кодовое слово, с помощью которого и будет шифроваться сигнал Вашей Wi-Fi сети. Кодовое слово должно быть от 8 до 63 символов, может содержать латинские буквы и цифры. Введите кодовое слово в поле Сетевой ключ или Пароль PSK
6) Нажмите Применить (возможные варианты: Сохранить, Завершить, Apply, Save, Finish)

Регистрация в сети RAMNET.
После завершения настройки Вам необходимо авторизовать устройство в нашей сети. Для этого необходимо перейти на любой сайт (на страницу аутентификации Вас перенаправит автоматически). В случае, если страница не появляется, следует ввести прямой адрес в адресной строке браузера: 178.22.48.243:8005/login
Система потребует ввести Ваш логин и пароль от личного кабинета, указанные в договоре. Перед номером договора указана латинская заглавная буква I или слово user. Пароль следует вводить, соблюдая регистр.

Настройка завершена, поздравляем!