Objective
The objective of this document is to explain options to find the IP address and access the Graphical User Interface (GUI) on a Cisco Business router. If the router is on a network, and you know the IP of the router, you can skip to the Accessing the GUI section of this article.
If you must find the IP address of the router on an existing network you can use Command Prompt, FindIT Discovery Tool (a simple application), or Cisco FindIT. Details will be highlighted in a separate (future) article and linked when available.
When setting up a new router, Cisco Business recommends you do the configurations before connecting it to your network. This can help avoid potential issues and conflicts.
Introduction
One of the easiest ways to configure settings and make changes on a router is by accessing its GUI. The GUI is also referred to as the web-based interface, web-based guidance, web-based utility, web configuration page, or web configuration utility.
Every Cisco RV Series router comes with a GUI. This type of interface, what you see on your screen, shows options for selection. You do not need to know any commands to navigate through these screens. The GUI gives the administrator a tool that contains all of the possible features that can be changed to modify the performance of a router.
Applicable Devices | Software Version
All Cisco Business RV Series routers | all versions (download latest)
Connect to the Router
Connect one end of an Ethernet cable to a numbered port on the router and the other end to your computer. Make sure the router has power. An adapter might be needed for the computer, depending on the model.
Figure Out the IP Address
To access the GUI, you need to know the IP address of the router. To keep it simple, proceed with one of the following options:
- If your Cisco Business router is new, the default IP address is 192.168.1.1.
- If you can’t remember the IP address or you don’t have a special configuration, use an open paperclip to press the reset button on your router for at least 10 seconds while it is powered on. This will reset the router to default settings and the default IP address of 192.168.1.1.
- If you set a static IP address for the router, you could enter that IP address instead of the default. This is not recommended as there may be conflicting configurations which may create issues in your existing network.
Accessing the GUI
Now that you know the IP address of the router, you can access the GUI.
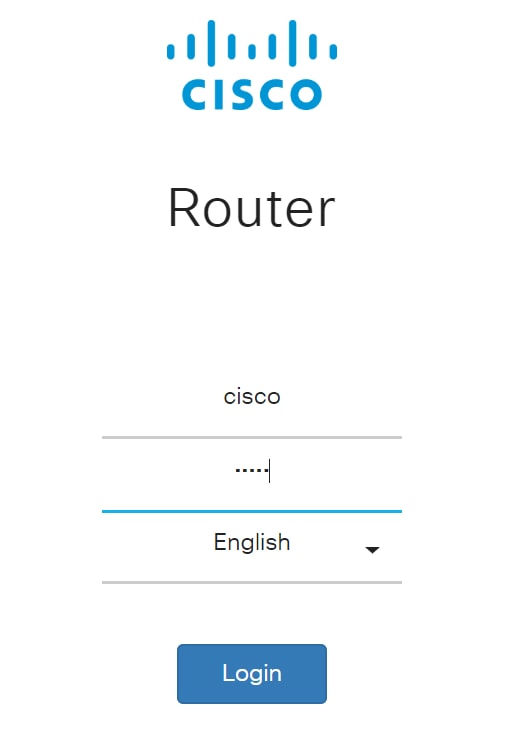
Step 1. Double-click on a web browser to open the address (search) bar.

Step 2. Enter 192.168.1.1, or the other assigned IP address, and click Enter on your keyboard. This should open the GUI screen of the router. From here you have access to all configuration options.
When accessing a router, this default IP address only applies in situations when the router is not connected to an existing network and your computer is connected directly to the router. If the is connected to a network, Dynamic Host Configuration Protocol (DHCP) will, by default, assign an IP address and it may be different.
Step 3. You will see the log in screen. Enter a username and password. The default credentials are cisco for both the username and password the first time. It is highly recommended that you change the password to be more complex for security purposes. Click Login.
Conclusion
After you log into your router, you will see the GUI screen that includes a navigation pane down the left side. It contains a list of the top-level features. The navigation pane is also sometimes referred to as a navigation tree, navigation bar, or a navigation map.
The colors of this page may vary, as well as the top-level features, depending on the equipment and firmware version. The categories and options vary between routers.
Here is an example:
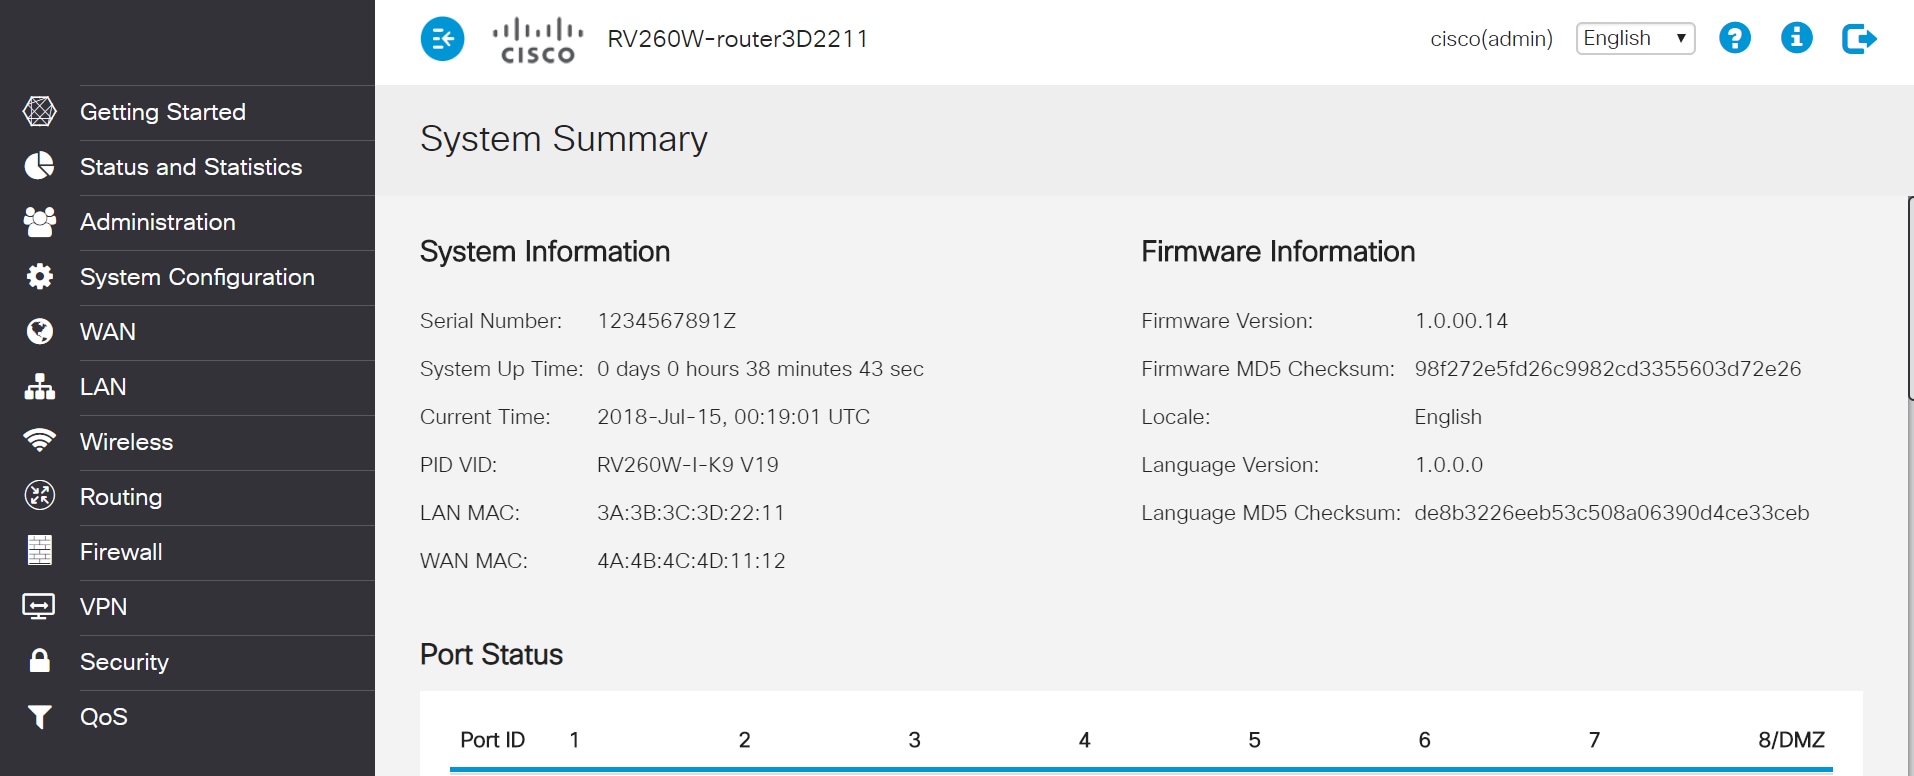
You now have access to the GUI of your router and should be able to configure settings or make changes that are just right for your business.
Revision History
| Revision | Publish Date | Comments |
|---|---|---|
|
1.0 |
11-Dec-2018 |
Initial Release |
Веб-интерфейс роутера Cisco — это панель управления вашим роутером, в которой осуществляется сохранение и изменение всех настроек. Чтобы внести изменения в свою сеть, вам необходимо выполнить вход в свой роутер Cisco.
Необходимые условия для доступа к веб-интерфейсу Cisco
Доступ к веб-интерфейсу Cisco довольно прост, и все, что вам понадобится, это:
- Роутер Cisco
- Доступ к сети, либо по LAN-кабелю, либо по Wi-Fi
- Веб-браузер, который у вас наверняка есть.
Ниже приведены инструкции по подключению к интерфейсу роутера Cisco с целью его конфигурирования и диагностики.
1. Убедитесь, что вы подключены к роутеру Cisco
Чтобы получить доступ к страницам настройки вашего роутера Cisco, вам необходимо подключиться к его сети.
Поэтому, начните с подключения к сети либо по WiFi, либо по Ethernet-кабелю.
Совет: Если вы не знаете пароль к WiFi своего роутера Cisco, вы всегда можете подключиться к нему с помощью Ethernet-кабеля, для которого пароль не требуется.
2. Откройте веб-браузер и перейдите по адресу 192.168.1.1
Откройте браузер и в поле адреса введите IP-адрес роутера. Наиболее частым IP-адресом для роутеров Cisco является: 192.168.1.1 Если этот IP-адрес не работает, используйте список IP-адресов по умолчанию для Cisco, чтобы отыскать его для вашей конкретной модели.
Совет:
Поскольку вы уже подключены к роутеру Cisco, вы также можете использовать whatsmyrouterip.com , чтобы быстро узнать IP-адрес. Он будет указан после «Router Private IP».
192.168.1.1
3. Введите имя пользователя и пароль для вашего роутера Cisco
В поле имя пользователя и пароль введите текущее имя пользователя и пароль, а затем нажмите клавишу ввода / вход.
Стандартные учетные данные для входа в Cisco
Если вы не уверены в имени пользователя/пароле, вы можете посмотреть стандартные учетные данные для Cisco, чтобы узнать об используемых значениях по умолчанию и способах их восстановления.
— Учетные данные также могут быть указаны на наклейке на задней панели роутера.
Готово! Теперь вы сможете выполнить все требуемые настройки устройства.
Как настроить роутер Cisco
После входа в интерфейс администратора Cisco вы сможете изменить все имеющиеся настройки.
Чтобы не нарушить работу сети, при настройке роутера следует действовать осторожно.
Совет: прежде чем что-либо менять, запишите свои текущие настройки, чтобы их можно было вернуть в случае возникновения проблем.
Что делать, если после изменения конфигурации мой роутер Cisco или сеть перестает работать
Если вы по ошибке внесете какие-либо изменения, которые повредят вашей домашней сети Cisco, вы всегда можете откатиться назад, воспользовавшись универсальным способом аппаратного сброса 30 30 30.
Как правило, это крайняя мера, и если у вас все еще есть доступ к интерфейсу Cisco, вы всегда можете выполнить вход и сначала попытаться восстановить настройки (конечно же, это предполагает, что вы записали исходные значения перед их изменением).
Роутер является незаменимым устройством в современных домашних и офисных сетях. Он позволяет управлять подключением к Интернету, настройками безопасности и другими параметрами, обеспечивая стабильную и безопасную работу сети. Один из крупнейших производителей роутеров — компания Cisco, предлагает широкий ассортимент моделей с различными функциями и возможностями. Чтобы осуществить необходимые настройки, вам понадобится вход в административную панель роутера.
Зайти в настройки роутера Cisco — процесс довольно прост, но требует некоторой подготовки. Следуя пошаговой инструкции, вы сможете получить доступ к административной панели и настроить роутер по своему усмотрению. Важно отметить, что некорректные или неправильные настройки могут привести к неправильной работе сети, поэтому будьте внимательны и осторожны при внесении изменений.
Перед началом настройки роутера Cisco рекомендуется подключиться к роутеру с использованием сетевого кабеля. Это обеспечит более стабильное подключение и избавит от возможных проблем с Wi-Fi сетью.
Шаг 1: Запустите веб-браузер и введите IP-адрес вашего роутера в адресную строку. Обычно IP-адрес роутера Cisco равен 192.168.1.1 или 192.168.0.1. Нажмите Enter, чтобы перейти на страницу авторизации.
Шаг 2: Введите логин и пароль для доступа к административной панели роутера Cisco. Если вы не знаете логин и пароль, попробуйте стандартные комбинации: для логина — admin, для пароля — admin или password. Если эти комбинации не сработали, обратитесь к документации роутера или к поставщику услуг Интернета для получения правильных логина и пароля.
Шаг 3: После успешной авторизации вы попадете в административную панель роутера Cisco. Здесь вы найдете различные разделы и настройки, которые позволят вам изменить параметры сети по вашему желанию.
Следуя этой пошаговой инструкции, вы сможете легко и безопасно зайти в настройки роутера Cisco. Не забывайте сохранять важные настройки перед внесением изменений и будьте внимательны при внесении изменений в параметры сети.
Содержание
- Как найти IP-адрес роутера Cisco?
- Установка подключения к роутеру Cisco
- Шаги для входа в настройки роутера Cisco
- Изменение параметров в настройках роутера Cisco
- Как сохранить изменения в настройках роутера Cisco?
Как найти IP-адрес роутера Cisco?
Чтобы зайти в настройки роутера Cisco, необходимо знать его IP-адрес. Вот несколько способов найти IP-адрес роутера Cisco:
| Способ | Подробное описание |
|---|---|
| 1 | Использование командной строки |
| 2 | Просмотр настройек сетевого подключения |
| 3 | Использование утилиты поиска устройств в сети |
Первый способ предполагает использование командной строки на компьютере, подключенном к роутеру. Выполнив несколько команд, вы сможете узнать IP-адрес роутера Cisco.
Второй способ связан с просмотром настроек сетевого подключения на вашем компьютере. Вам потребуется открыть «Сетевые подключения» и найти информацию о подключении к роутеру Cisco.
Третий способ предполагает использование специальных утилит для поиска устройств в сети. Вы сможете найти IP-адрес роутера Cisco, сканируя вашу локальную сеть.
Выберите способ, который вам наиболее удобен, и найдите IP-адрес роутера Cisco. После этого вы сможете без проблем зайти в его настройки и настроить его по вашим потребностям.
Установка подключения к роутеру Cisco
Чтобы установить подключение к роутеру Cisco, выполните следующие шаги:
- Подключите компьютер к роутеру с помощью Ethernet-кабеля.
- Откройте веб-браузер и в адресной строке введите IP-адрес роутера Cisco (обычно это 192.168.1.1 или 192.168.0.1).
- Нажмите клавишу Enter для открытия страницы входа в настройки роутера.
- Введите имя пользователя и пароль для входа в систему роутера. Если вы не установили свои учетные данные, используйте значения по умолчанию (обычно это «admin» и «password»).
- Нажмите кнопку «Войти» или «OK», чтобы авторизоваться в системе роутера.
- После успешной авторизации вы будете перенаправлены на страницу настроек роутера Cisco.
Теперь вы можете настроить различные параметры роутера, такие как Wi-Fi, безопасность, настройки подключения к интернету и т.д.
Обратите внимание, что процедура входа в настройки роутера Cisco может незначительно отличаться в зависимости от модели и версии программного обеспечения роутера, поэтому рекомендуется обратиться к документации или поддержке производителя для получения точной информации.
Шаги для входа в настройки роутера Cisco
Если вы хотите войти в настройки роутера Cisco, следуйте этим простым шагам:
Шаг 1: Подключите свой компьютер к роутеру Cisco с помощью Ethernet-кабеля.
Шаг 2: Откройте любой веб-браузер на своем компьютере и введите IP-адрес роутера Cisco в адресной строке. Обычно IP-адрес роутера Cisco равен 192.168.1.1 или 192.168.0.1.
Шаг 3: Нажмите клавишу Enter, чтобы перейти на страницу входа в настройки роутера.
Шаг 4: Введите имя пользователя и пароль для входа в настройки роутера. Если вы не знаете учетные данные, обратитесь к документации роутера или свяжитесь с администратором сети.
Шаг 5: После успешного входа вы будете перенаправлены на страницу настроек роутера Cisco, где сможете изменять и настраивать параметры сети по своему усмотрению.
Теперь у вас есть доступ к настройкам роутера Cisco и вы можете вносить изменения, необходимые для оптимизации работы вашей сети.
Изменение параметров в настройках роутера Cisco
Для изменения параметров в настройках роутера Cisco, следуйте этим пошаговым инструкциям:
Шаг 1: Запустите веб-браузер на компьютере, подключенном к роутеру Cisco.
Шаг 2: В адресной строке браузера введите IP-адрес роутера Cisco и нажмите клавишу Enter.
Шаг 3: Введите имя пользователя и пароль для доступа к настройкам роутера Cisco. Если вы не изменили эти данные, по умолчанию имя пользователя admin, а пароль admin или password.
Шаг 4: В меню настроек выберите соответствующий пункт для изменения конкретного параметра. Например, вы можете изменить пароль для Wi-Fi сети или настроить порты LAN.
Шаг 5: Внесите нужные изменения в выбранный параметр. Обратите внимание на инструкции, предоставляемые интерфейсом настроек роутера.
Шаг 6: После внесения изменений сохраните настройки роутера. Обычно это делается путем нажатия кнопки «Применить» или подобного пункта меню.
Шаг 7: Перезагрузите роутер Cisco, чтобы изменения вступили в силу.
Таким образом, вы можете легко изменить различные параметры в настройках роутера Cisco, чтобы адаптировать его под ваши нужды и предпочтения.
Как сохранить изменения в настройках роутера Cisco?
После внесения изменений в настройки роутера Cisco очень важно сохранить их, чтобы они вступили в силу. Для этого можно воспользоваться командой write memory или copy running-config startup-config.
Процесс сохранения изменений включает в себя следующие шаги:
| Шаг | Описание |
|---|---|
| 1 | Убедитесь, что вы вошли в командный режим роутера. Произведите вход в командный режим, введя соответствующий логин и пароль. |
| 2 | Введите команду write memory или copy running-config startup-config. |
| 3 | Дождитесь завершения операции сохранения. При использовании команды write memory вам будет выведено сообщение о сохранении изменений. При использовании команды copy running-config startup-config вы увидите сообщение о копировании текущей конфигурации в постоянную память. |
| 4 | Убедитесь, что изменения успешно сохранены, выполнив команду show running-config. В выводе должны быть отображены все внесенные вами изменения. |
После выполнения этих шагов ваши изменения успешно сохранятся и будут применяться каждый раз при загрузке роутера Cisco.
If you haven’t heard about Cisco, here is an article about it. From 1984 till date, Cisco has been around in the industry and their quality services and products are still being delivered. Based on Amazon Best Sellers, Cisco routers are of preference for most buyers. So, if you’re one of those who use this modem, you might want to know how to access Cisco router login. In the event you’re using a different model, don’t worry! Check out the Router Login List for more details.
This article will explain in detail how you can log in to your Cisco router. It will also show you the steps to change the default log-in credentials. Furthermore, it will help you in finding your IP address. Scroll down to know more.
Contents
- 1 Your Default Cisco Router Login
- 2 Router Log-in Details
- 3 Change Log-in Username and Password
- 3.1 Why Is Cisco Router Login Login Not Working
- 4 Reset Router
- 4.1 Find Router Login IP
- 4.1.1 For Windows users
- 4.1.2 For Apple users
- 4.1.3 For Linux users
- 4.2 FAQ
- 4.2.1 Conclusion
- 4.1 Find Router Login IP
Logging in to the Cisco router would allow you to configure settings and change the default password or username. You can also check some other basic information about your modem. Take a look at how.
- Connect your device, either computer or mobile, to your internet.
- Open a web browser and enter the IP address of your router. The IP address used for most Cisco routers is 192.168.15.1.
- From the log-in page, enter your username and password. If you haven’t changed your default settings, type admin for username and Password for the code. (Note: Not all Cisco routers used this combination.)
- Hit the Ok button to access your web interface.
Router Log-in Details
Your router comes with a default username and password. You’ll need this if you’re going to access your modem’s settings for the first time. This is really important because you’ll need this in order to change your router’s settings.
The default username used commonly by Cisco routers is either admin or cisco. It varies depending on the model and unit of your modem. For password, they used the username or leave it blank. If you’re having a hard time figuring out your default username and password, you can check out the rest of this guide.
Find out the default login details for other routers. Check our guides on Xfinity, Comcast Business, Linksys, and NetGear.
Change Log-in Username and Password
For security reasons, it is advisable to change
your default username and password. Not changing it would make you more
susceptible to hacking and would jeopardize your security. So, take the
necessary precaution by following the instruction below.
- Connect your computer to your modem using LAN or wirelessly.
- Launch your web browser and enter the IP address of your router. After that, a log-in page will appear.
- Enter your log-in details and click Log-in.
- Now, choose Setup from the Menu tab and go to Quick Setup.
- Input your new password on the box beside the Pre-Shared Key. To apply the changes you’ve made, click Save Settings.
Why Is Cisco Router Login Login Not Working
Cisco routers are essential pieces of hardware when it comes to connecting networks and devices. They are used to access the internet, send and receive data, and enable communication between computers and other devices. But if you’re having trouble logging into your router, you’re not alone. Many people have encountered login issues with their Cisco routers, and it’s important to understand why.
One of the most common reasons for Cisco router login not working is due to incorrect login credentials. This could be because the username and/or password you’re using is incorrect or because you’ve forgotten your login information. It’s also possible that you’ve set up a dual-layer security system on your router, and you’re not entering the correct credentials for the second layer.
Another possible cause of login problems is incorrect configuration. Your router may be configured incorrectly, which can prevent successful login attempts. It’s important to make sure your router is configured correctly and that you’re following the manufacturer’s instructions for setting up the router. Incorrect DNS settings or IP address settings can also cause login issues.
If you’ve recently changed your router’s firmware or settings, it’s possible that the changes are preventing you from logging in. It’s also possible that the router is malfunctioning due to a hardware issue. In this case, you may need to contact the manufacturer to have them diagnose and repair the issue.
In some cases, a firewall can be preventing you from logging in. Firewalls are designed to protect networks from malicious traffic, and they can sometimes block legitimate login attempts. It’s important to make sure that your firewall is configured correctly and that it’s allowing access to the router’s admin page.
Finally, it’s possible that the router itself is malfunctioning. This could be due to physical damage, such as a power surge, or due to a software issue. If this is the case, you’ll need to contact the manufacturer to have the router repaired or replaced.
Troubleshooting login issues with your Cisco router can be frustrating, but it’s important to understand the possible causes before attempting to fix the problem. Incorrect credentials, incorrect configuration, recent changes to the router, firewalls, and hardware/software issues can all prevent you from logging into your router. If you’re having trouble logging in, it’s important to take the time to diagnose the issue before trying to fix it.
Reset Router
Resetting your modem can help you resolve problems that you encountered while connecting to your network. Actually, there are two types of reset that you can perform. One is a soft reset and the other is a hard reset.

The former is done when you unplug your device and after some time, plug it again. This is advisable for it is fast and does not tweak your settings. In the event that it did not solve your problem, try the other setup—which is a hard reset. This is suitable if you forgot your assigned password and username. By doing this, you’ll be able to restore your settings to default. Here’s how:
- Find
the Reset button on the rear part of your router. - Press
the button and hold it for 30 seconds. You may use the pointy end of your pen
or clip. - The
modem will then reset automatically.
After resetting your router, your settings will be restored in its default mode. Thus, it’s recommended that you change your username and password right away.
Learn how to reset the password for other routers. Read our guides on Ubee, Orbi, Windstream, and Cox.
Find Router Login IP
Most CISCO routers used one unique IP address,
however, not all devices are similar. As
such, you need to get your right IP address to access your router’s web
interface. It’s really simple to know your IP. Take a look at the guide below.
For Windows users
- Open
Command Prompt on your computer. You can do this by going to your search bar
and typing cmd. Press the Enter button to open the app. - Once
done, input ipconfig then click Enter. - From
the list that will appear, find Default Gateway. The address shown is
your IP.
If you’re a Windows 10 user, you can also follow
these steps.
- Press
the window icon on your computer screen and click Settings or the toggle
icon. - Upon clicking,
a new window will appear. Choose Network and Internet > Status > View
your network properties. - Now,
scroll down until you see Default Gateway.
For Apple users
If you own a Mac computer, then follow this
instead:
- Launch
a Terminal Window on your computer. Go to Finder > Applications >
Utilities. - From
here, choose Terminal. - Type netstat
-nr | grep default and wait for it to process your command. - Your
screen will then display your IP.
For Linux users
- Press Ctrl + Alt + T to open the Terminal Window.
- After that, enter IP route | grep default and click Enter.
- Your IP address will then be shown on your screen.
FAQ
How to log-in to Cisco router?
1. Connect your device, either computer or mobile, to your internet.
2. Open a web browser and enter the IP address of your router. The IP address used for most CISCO routers is 192.168.15.1.
3. From the log-in page, enter your username and password. If you haven’t changed your default settings, type admin for username and Password for the code. (Note: Not all CISCO routers used this combination.)
4. Hit the Ok button to access your web interface!
What is the default log-in for Cisco router?
The default username used commonly by CISCO routers is either admin or cisco. It varies depending on the model and unit of your modem. For passwords, they used the username or leave it blank.
How to reset Cisco router log-in?
1. Find the Reset button on the rear part of your router.
2. Press the button and hold it for 30 seconds. You may use the pointy end of your pen or clip.
3. The modem will then reset automatically.
Conclusion
In Conclusion, Cisco routers typically use the username admin or cisco as the default username. It changes based on the modem’s model and unit. Resetting your modem can assist you in resolving issues you may have had connecting to your network.
Is this article to your liking? To summarise this article, understanding how to get into a Cisco router is not a tough process. It does not necessitate any technological experience or knowledge. Even a tech novice can do the task if they follow the instructions above. You don’t need any additional tools to reset your router to factory defaults. Default IPs include cisco cisco 192.168.10.2, cisco cisco 192.168.1.254, and so on.
Although most Cisco routers have a single IP address, not all devices are alike. As a result, in order to access your router’s web interface, you must obtain the correct IP address.
You may leave a comment if you have any questions about Cisco Support, wifi connection, Cisco FTD, Cisco ESA Email, Cisco ESA Bounce Verification, altering address username, or any other topics not addressed in this post.
This article is a complete Guide on Cisco Router Configuration with Details. I have divided this article into three parts i.e.
- Basic cisco router configuration step by step
- Advanced cisco router configuration
- Cisco GUI Configurations
Cisco Router Configuration For Beginners
I want to make it clear that this cisco configuration tutorial is for cisco learners. Although I have tried to cover the most topics, but visit Cisco’s website for more details and advanced configuration.
In basic Cisco router configurations, we will review all basic steps for configuration of a router and then see all basic Cisco CLI commands.
Basic Cisco router Configuration step by step
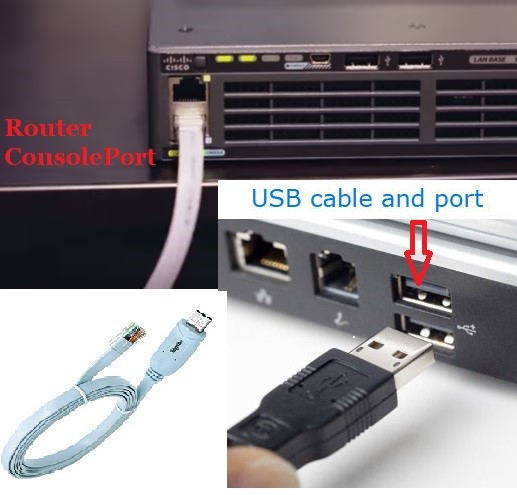
In Order to configure a cisco router you need to access the router CLI interface. You can do this in numerous ways. Here I am show you the most basic way to access a cisco router that is access Cisco router through console cable. Most for configuring a brand new router you need to adopt this method.
Access Cisco router with USB Console cable
Old console connection came with the DB-9 to console connection. But now a USB console connections are being used in market. You see this connection in following figure and you can connect it according to this.
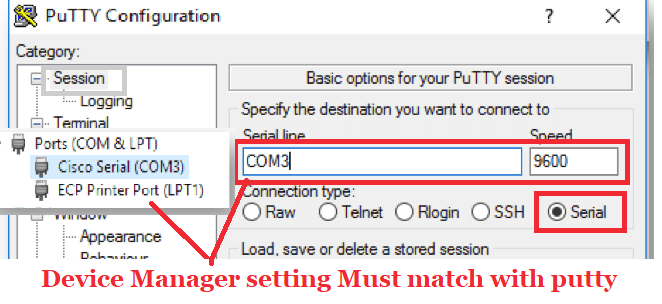
Once your connection setting is complete, you are required a software for access the router CLI. Putty is the most famous and easy to use software. You can download it free from internet. For making the connection to your router you need to confirm the com-port number, open device manage and find the com port number under the “Ports (COM & LPT)”. Open the putty and give the same serial line as you find in device manage and click connect.
You can use any other software for creating a connection to router.
What are Three Modes in Cisco Router configuration?
Once you have a physical connection with your Cisco Router, you can configure it. Before Going into configurations of Cisco Router, let introduce you the basic configuration modes of Cisco. There are 3 modes or command-levels in Cisco router. In each command mode you have specific privileges and control.
- User Mode
- Privileged EXEC Mode
- Global_Configuration Mode
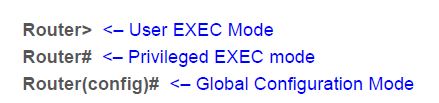
Cisco User Mode Cisco:
In first command mode of cisco you can run limited type of show commands, basic reachability tests. This command mode is represented by symbol “>”.
Cisco Privileged Mode
Privileged EXEC is second command level mode with the symbol “#”. Use “enable” command in user mode for accessing the privileged mode. In this mode you can have access to all monitoring commands of router.
What is global configuration mode of cisco router?
The Global configuration mode is for administrator where you can configure your Cisco router and the running configuration. You can access global configuration mode from Privileged EXEC mode using a command “configure terminal”. For more Cisco Global configuration mode Commands you can visit here.
How to Check Current Configurations on Cisco Router?
Once your cisco router is boot up you can check already performed configuration or default configuration Using command show running-config. If you are new to cisco just run this command in privileged mode this will give you a brief of all physical interfaces of cisco routers as well as all the protocols configuration.
What are Different types of passwords you can set on CISCO Router?
You can set different types of password on each command level mode, which will make your router secure.
How to configure console Password on Cisco Router?
The most basic password that you can configure on cisco router is to set the console password. This password blocks the unauthorized access through console cable on Cisco router. You can set the console password by using the following commands.
Router2>enable
Router2# configure terminal
Router2(config)#line console 0
Router2(config-line)#password cisco
Router2(config-line)#login
Above command will set the console password of router to “cisco”.
How to set enable password?
With the enable password you can secure privilege exec mode. You can set enable password in two ways. Both commands will set the enable password but the difference is first command will save the password in clear text which will be visible in show running-config, whereas the enable secret will save the password in encrypted form.
router(config)# enable password cisco
or
router(config)# enable secret cisco
How to set the Telnet password on Cisco Router?
Telnet password is used to secure your remote access to cisco router. By default there are five VTY line ot connections available but it may vary depending upon the version of Cisco router. You can set the telnet password by using these commands:
Router(config)#line vty 0 (This command will Set password to cisco on five vty lines)
Router(config-line)#password cisco
Router(config-line)#login
How to configure Cisco Router Host name?
After securing your router with different password, the most basic setting is to change the router name or host name of your cisco router. You can accomplish this by executing a cisco command “Hostname <router_new_name>” in global configuration mode.
Router(config)# hostname home_router

home_router(config)#
Above command will set the hostname to “home_router”
Disable automatic domain lookup
If you are beginner then it is better to turn off automatic domain lookup. It will save your time because if domain lookup is not disabled then router tries to resolve every word that is not a command. And every incorrectly typed command will result a wait of one or two minute. To understand the concept of automatic domain lookup any random word on cisco router and press enter and see the results. You can disable it with the help of command:
Router(config)# no ip domain-lookup
Configure IP address of Cisco Router
Configuring an IP address of a Cisco router is a most common and easy task. You can setting the IP address to any router interface with the following details
- Choose the interface by number.
- Specify the interface number.
- Specify the IP address and Subnet mask
You can check all the interfaces of a router by using the command “show ip interface brief” this will display all the interfaces of your Cisco router. Now select interface you want to configure. There are different type of interfaces available in Cisco router e.g. Ethernet, fastethernet, serial interfaces etc
You can configure all type of interface in a same way. Following commands can be used for configuring the Cisco router interfaces
Router(config)# Interface <interface_type & number>

Router(config-if)#ip address <IP_Address of interface> <Subnet Mask>

Router(config-if)#no shutdown
Following are the examples of different interfaces configurations on Cisco router:
| Sr | FastEthernet Interface | Serial Interface |
Router(config)#interface fastethernet 0/0 |
Router(config)#interface serial 0/0/0DCE side only command. Assigns a clock rate for the interfaceRouter(config-if)#bandwidth 64n |
What is a loopback interface used for & how to Configure it?
The Loopback interfaces are not physical interface but these are the logical interfaces used for different purpose. Loopback interface remain always up and most network professional use these interfaces for testing to test IP software without worrying about broken or corrupted drivers or hardware. A different IP scheme is designated for loopback IP address with start number 127.0.0.1. You can configure the loopback interface on Cisco Router with commands as under:
Router1(config)#interface loopback 1

Router1(config-if)#ip address 127.2.0.1 255.0.0.0

Router1(config-if)#no shutdown
Router1(config)#interface loopback 2

Router1(config-if)#ip address 127.3.0.2 255.0.0.0

Router1(config-if)#no shutdown
How to disable or stop a Router Interface?
You can start or stop any Cisco router interface by using the commands “shutdown” to disable the interface and “no shutdown” to enable any interface.
How to Configure IPV6 interface on Cisco Router?
For configuring an IPv6 address on Cisco router, you need to enable it as it is not enable on Cisco Router by-default. You can enable IPV6 using command “ipv6 unicast-routing“. An IPV6 interface on Cisco Router can be configured with following commands:
Router1(config)#ipv6 unicast-routing

Router1(config)#int fa0/0

Router1(config-if)#ipv6 address 2001:0BB9:AABB:1234::/64 eui-64
How to save Cisco Router Configurations?
You can save the configuration on Cisco router by using the following command in privilege mode:
Router#copy run start
or Simply use Router#write
Backup Cisco Router Configuration:
You can save the configuration of cisco router to local device using the TFTP server. Following cisco commands will do the task for you.
Router2#copy running-config tftp

Address or name of remote host []? 192.168.2.11

Destination filename [Router2-confg]? backup_of-my_router

!!

1030 bytes copied in 3.58 secs (415 bytes/sec)

Router2#
For more detail on Taking backup and restore with TFTP server you can visit here.
What is default Gateway and how to configure it on Cisco?
The purpose of default gateway is to direct packets addressed to networks not found in the routing-table. In presence of default routes all packets with the unknown destinations are forwarded to default gateway. Default gateways help in limiting system resources like memory, broadcast & processing power.
You can use these cisco commands for configuring default Gateway:
Router2(config)#ip default-gateway 172.16.1.13
Router2(config)#ip default-gateway 172.16.1.13
or
Router2(config)# ip route 0.0.0.0 0.0.0. 172.16.1.13
All above commands will set the cisco router default gateway to 172.16.1.13, you can use any one of these commands.
Cisco Router Configuration DHCP Server
The DHCP server is used for automatic assignments of IP address to hosts. A DHCP server have a pool of IPs and assigns one of them to the every DHCP client. You can configure a Cisco router as a DHCP server by using these commands:
R1(config)#ip dhcp excluded-address 192.168.10.1 192.168.10.10

R1(config)#ip dhcp pool W7_DHCP_Pool

R1(dhcp-config)#network 192.168.10.0 255.255.255.0

R1(dhcp-config)#default-router 192.168.10.1

R1(dhcp-config)#dns-server 192.168.10.1
Exclude-address command will define the range of IP address which will not be assigned to hosts. W7_DHCP_Pool is name of DHCP pool, you can use any other. Ans network command will define the IP address which are assigned by DHCP server to DHCP clients.
How to configure DNS Server on Cisco router:
They main purpose of DNS to resolve IP address into domain name and voice versa. DNS maintain a directory of Fully Qualified Domain Names and translate them to IPs. DNS makes Domain names easy for people to remember. You can configure DNS on Cisco by help of following commads:
R1# configure terminal

R1(config)# ip dns server

R1(config)# ip domain-lookup

R1(config)# ip name-server 4.2.2.2

R1(config)# ip host fileserver 192.168.0.5
Advanced Cisco Router Configuration
Now we will see some advance Cisco router configuration examples:
Access list Cisco Router configuration
With ACL you can apply different restrictions and can assign different permission for data packet. For example you can deny or permit a network to enter or out from an interface. There are two main types of ACL
- Standard ACL range is from 1-99
- Extened ACL range 100–199 and 2000–2699
For configuration example of Cisco ACL, you can visit here.
What is NAT and how to config it on Cisco?
NAT (Network Address Translation) is used to provide Internet_access to the local LAN‘s hosts. NAT uses one or more local IP-address and translated this into Global IP address and vice versa. In Cisco we configured NAT (Network Address Translation) on Border or edge router, on one side of router we have internal LAN network and on other side we have ISP network. There are three types of Network Address Translation:
- Static NAT
- Dynamic NAT
- PAT
You can configure NAT on Cisco router by following steps:
- Configure a ACL to Allow the IP addresses for internet access
- Define a NAT pool
- Apply the ACL on Interface
R1(config)#access-list 1 permit 192.168.22.0 0.0.0.255

R1(config)#ip nat pool NAT-POOL 155.55.55.1 155.55.55.7 netmask 255.255.255.240

R1(config)#ip nat inside source list 1 pool NAT_POOL_IPs

R1(config)#int fa0/0

R1(config-if)#ip nat inside
You can configure Network Address Translation on Cisco Router by using this Tutorial.
Configuration of inter-vlan routing on Cisco
Vlan are used to create different virtual LAN under the same switch, which creates different broadcast domains. Host under the one VLAN cant communicate with other VLANs. You require a router if you want to interconnect VLANs with each other. This concept is known as “inter-vlan routing” or“router on a stick”. If you want to learn about the configurations of “inter-vlan routing” on cisco Router, click here.
RIP Cisco router Configuration:
The RIP (Routing Information Protocol) is one of easiest protocol to configure on Cisco Router. RIP is distance vector routing protocol and support maximum 15 hub counts. RIP is used for small scale networks. RIP also supports equal cast load balancing for dividing the load across the different interfaces. On Cisco Router you can enable the Routing Information Protocol by following commands:
R1(config)#router rip

R1(config-router)#network 10.1.1.0

R1(config-router)#network 11.1.1.0
With the network command you can define which connected network you want to advertise in RIP. For example if we have two network on R1 10.1.1.0 & 11.1.1.0, and want to advertise into RIP. In this case you can do so by using the above commands.
EIGRP configuration on Cisco Router:
Enhanced Interior Gateway Routing Protocol is designed by Cisco and it is a routing protocol which you can use only on Cisco Router. Configuration of EIGRP on Cisco Router is resembles With RIP. Commands are almost similar to RIP. Following few commands are required for basic configuration of Enhanced Interior Gateway Routing Protocol.
Router(config)# router eigrp <Number>

Router(config-router)# network <Subnet or Network-ID>
You can use EIGRP with other routing protocols in same network. This concept is know as redistribution of routing protocols into EIGRP.
OSPF configuration on Cisco Router:
OSPF (Open Shortest Path First ) is the one of the famous and most used routing protocol. It is open standard protocol and you can used it on very vendor’s router. OSPF is link state routing protocol, by using its algorithm Open Shortest Path First can find it best path more accurately. An example of OSPF configuration on Cisco is as under:
R2#conf t

R3(config)#router ospf 1

R3(config-router)#network 1 7 2.16.10.0 0.0.0.255 area 0

R3(config-router)#network 10 .10.22.0 0 .0.0.255 area 0
Cisco port forwarding
IS IS Configuration on Cisco Router
IS-IS is stands for Intermediate System To Intermediate System. IS IS is a link-state routing protocol and more efficient in case of handling router memory. Configuration of IS-IS is a little tricky as compare to configuration of other routing protocol. Here are example command example:
R1(config-if)# router isis

R1(config-router)# net 49. 0020. 3333.3333.3333.00

R1(config-router)# is-type level-2-only

R1(config-router)# summary-address 11.0.0.0 255.255.0.0 level-1-2
For Complete configuration of IS-IS on Cisco, you can visit here.
Cisco PPPOE Configuration On Router
The Point-to-Point Protocol over Ethernet PPPoe is Protocol used for configuring a path between the LAN users to ISP network. PPPoe is used to provide the DSL internet access to LAN users.
Client side PPPoe configuration is quite simple.
- Create a dialer_interface for PPPoE connection
- Tie it to a physical interface
dialer interface use these configuration commands on Cisco:
R1(config)# interface dialer_new

R1(config-if)# dialer pool 1

R1(config-if)# encapsulation ppp

R1(config-if)# ip address negotiated

The line ip address negotiated instructs the client to use an IP address provided by the PPPoE server.
R1(config-if)# mtu 1492
Tie it to a physical interface: In 2nd step we assign our ISP facing physical interface to our newly created PPPoE dialer group:
R1(config)# interface f0/0

R1(config-if)# no ip address

R1(config-if)# pppoe-client dial-pool-number 1

R1(config-if)# no shutdown
Configure Cisco Router as NTP Server
With an NTP server you can synchronize time setting on every Cisco device in the network. The NTP server is important, because different protocol configurations required the same time on all the network devices. After that you have set the NTP server, all the client devices can get the updated time setting from FTP server. Few commands are required for basic configurations of NTP server on Cisco:
NTP_client(config)#ntp server 172.16.1.11

NTP_Server(config)#ntp master
MPLS Configuration On Cisco router
The M PLS stands for Multiprotocol Label Switching and it is a routing technique for fast forwarding of data packets. MPLS is a very detail and large topic and i am sharing here a an example of MPLS VPNs on Cisco Routers. For more detail you can explore more on search engine.
HTTP Configuration on Cisco Router
You can enable the HTTP on Cisco router with following ip commands.
R1(config)#aaa new-model

R1(config)#aaa authentication login default local

R1(config)#username test secret testpass

R1(config)#ip http authentication local

R1(config)#ip http secure-server
Cisco router configure HSRP:
The HSRP Hot Standby Router Protocol is designed by Cisco and it redundancy protocol used for handling different Gateways. The main purpose of HSRP is to keep a link up with ISP., In case of failure of one link.
SSH Configuration on Cisco
The SSH is used for creating a secure connection from remote host.
- Set console and enable password on Cisco Router
- Generate the RSA Keys and Line VTY configurations
- Username & password for SSH
Here is an example of SSH configuration on Cisco, you can read it here.
Cisco GUI Configurations
If you think that CLI commands are difficult to remember for configuration of Cisco router. There are tools like Cisco SDM and “Cisco Network Assistant” is available, using these tools you can configure Cisco router with using any command. For example you can visit how to configure Cisco Router with SDM GUI tool.
In conclusion, I have tried to cover some important topics related to Cisco configurations,if you want to learn more about the CISCO configuration CLI Commands, you can visit here. For Basic Switch Configuration on Cisco Visit here.
Using this configuration guide you can configue any Ciso IOS router like Cisco 1800 series,1841, cisco 1905 k9, 1941 k9, cisco 2900 series, cisco 800 series, cisco 800 series, cisco 881-k9, cisco asr 1001-x router, cisco ios xrv 9000 etc
Please share this if you like it. Thank you..!
Advanced BGP Interview Questions

Me Waqas Azam and I am a professional blogger & freelance writer. I also working in the IT industry for over 7 years. I am graduated in Computer Science and information technology.