На чтение 6 мин Просмотров 2.8к. Опубликовано
Обновлено
С каждым годом растет потребление видео и аудио контента в интернете. А значит и на роутер ложится все большая нагрузка. Для ее оптимизации разработчики придумывают новые технологии, позволяющие равномерно распределить нагрузку в сети и обеспечить непрерывную и беспроблемную работу WiFi сети по стандарту QoS (Quality of Service). Одной из них явлется WMM (WiFi Multimedia), которая также может обозначаться как WME (Wireless Multimedia Extensions). Что это за настройка на роутере, как ее включить и использовать?
Что такое WMM (WME)?
WMM, или Wi-Fi Multimedia – это настройка роутера, которая позволяет выдавать приоритет для того типа трафика, которому требуется максимальная пропускная способность канала WiFi в текущий момент. Подробные технические характеристики — в ВикиПедии
На практике это означает то, что при включенной функции «Wireless Multimedia» роутер в первую очередь освобождает сеть с одним или несколькими SSID под трансляцию «тяжелого» контента. Чтобы он воспроизводился на компьютере, телевизоре или ТВ приставке без задержек. И только потом для передачи текстовых документов.
Это и есть так называемая среда QoS (Quality of Service), или «качество сервиса» по-русски. Когда к WiFi подключаются сразу несколько пользователей и потребляют разный контент, то для каждого из них в зависимости от типа подгружаемых данных устанавливается свой «коридор» пропускной способности. Чтобы ни один из них не испытывал дискомфорта во время работы внутри сети. При одноврмененном подключении к роутеру тот человек, который соверщает онлайн звонок через WhatsApp или смотрит видео в высоком разрешении в онлайн кинотеатре получит большую скорость, чем другой клиент, который сидит в социальной сети или скачивает файлы через протокол FTP или Torrent.
Типы WMM (WME) трафика
Технология WMM на маршрутизаторе работает с четыремя типами передаваемого по сети контента:
- Голосовой трафик (AC_VO или Voice) — по умолчанию имеет наивысший приоритет и позволяет производить множественные одновременные голосовые звонки через VoIP
- Видео (AC_Vi или Video) — приоритет просмотра онлайн видео из кинотеатров (Кинопоиск, IVI, Megago, KEON, OKKO и т.д.) или таких сервисов, как YouTube или Vimeo
- Обычный трафик, или так называемый «WMM приоритет негарантированной доставки (AC_BE или Best Effort) — это работа с устройствами, которые не поддерживают механизмов QoS. Используется при обычном интернет-серфинге — печещении сайтов и сервисов через приложения или браузер
- Фоновый трафик (AC_BK или Background) — вспомогательный, имеет самый низкий приоритет WMM, поскольку не слишком требователен к задержкам
Когда нужно активировать WMM в маршрутизаторе на практике?
В реальной жизни целесообразно использовать WMM в следующих случаях:
- Видеозвонки по web-камере с высоким разрешением картинки (HD, от 1080p)
- Просмотр Youtube или других онлайн видеосервисов в высоком разрешении (1080, 4K)
- Просмотр Кинопоиска, OKKO или других мультимедийных онлайн кинотеатров
- Звонок через интернет по VoIP из приложений Telegram, WhatsApp, Viber, Skype
- Онлайн игры в многопользовательской среде, например WoT, WoW, Archage, Perfect World
При активированном WMM на роутере именно такому типу контента будет выдаваться приоритет перед остальными типами трафика.
WMM APSD
APSD — это дополнительная надстройка над функцией WMM, которая контролирует обмен информацией между модулями WiFi смартфона и роутера для экономии энергии батареи. При переходе телефона в режим ожидания для него на роутере создается некий буфер обмена, в которые подгружаются данные из интернета. И при активации смартфона он берет их именно оттуда, что требует меньшего расхода энергии.
Не все роутеры поддерживают данную опцию. Но если она есть, то как правило можно активировать WMM APSD автоматически или задать расписание для его работы.
Плюсы и минусы использования WMM
Увеличивается скорость передачи больших файлов, которые нужно одновременно с загрузкой воспроизводить на экране
Повышается эффективность использованиия беспроводного или кабельного канала связи
Удлиняется продолжительность работы смартфонов и других девайсов, которые работают от аккумулятора
Стандарт WMM поддерживается большинством брендов, выпускающих сетевую или компьютерную технику
Нет возможности установить полный приоритет для видео и голоса перед тругим трафиком
Устаревшие гаджеты не поддерживают WMM
Названия WMM на разных устройствах
Если вы захотите активировать функцию WMM на WiFi роутере или другом устройстве или узнать, поддерживается ли этот стандарт, то можете столкнуться с тем или иным его наименованием:
- WMM Capable (Совместимый с WMM
- WMM gaming environment (Игровая среда)
- Multimedia Extensions (Мультимедиа расширения)
- WME или Wireless Multimedia Extensions (Беспроводные мультимедиа расширения)
Как включить WMM на роутере?
Для работы WMM внутри локальной сети необходимо активировать данную функцию на роутере. Она работает для всех стандартов WiFi, начиная с 802.11n — 802.11ac (Wi-Fi 5), 802.11ax (Wi-Fi 6). Но может не поддерживаться некоторыми моделями — со спецификациями устройства нужно ознакомиться заранее еще до покупки
WMM на роутере TP-Link
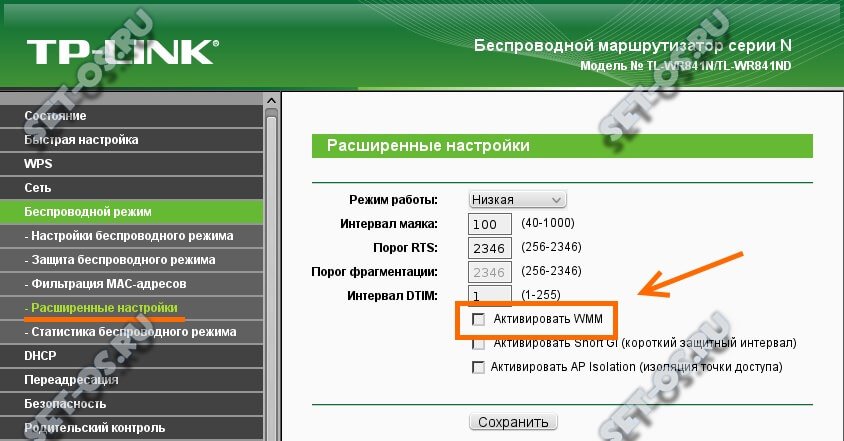
В более старых модификацях TP-Link с серо-зеленой администраторской панелью настройка WMM расположена непосредственно в меню управления каждого из диапазонов сетей WiFi (2.4 5 ГГц). Нужно зайти в раздел «Беспроводной режим 2.4 GHz» (или 5 GHz) и открыть подрубрику «Дополнительные настройки». И поставить галочку на «Включить WMM»
В более новых роутерах ТП-Линк с админкой в бело-голубых оттенках надо зайти во вкладку «Дополнительные настройки». Здесь открываем меню «Системные инструменты — Параметры системы». И устанавливаем «Включить WMM»
WMM в маршрутизаторе Asus
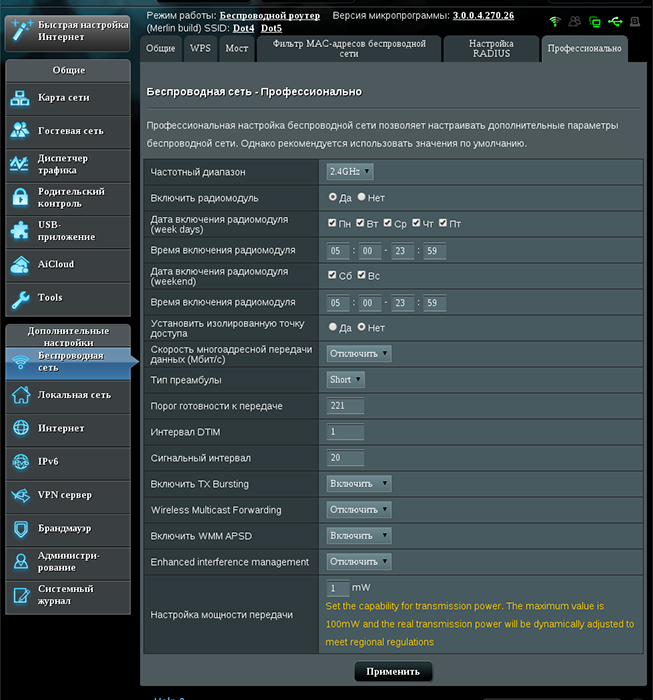
На роутерах Asus, имеющих поддержку WMM, ее настройка скрывается в разделе «Беспроводная сеть». Здесь надо переключиться на вкладку «Профессионально» и напротив пункта «WMM» в выпадающем списке выбрать «Включить»
WMM на Zyxel Keenetic
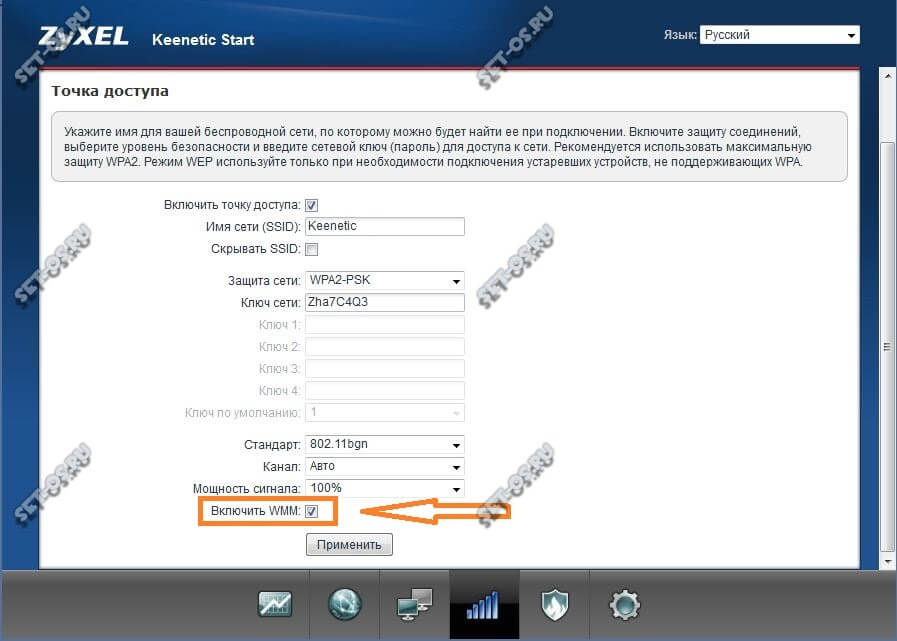
На роутерах Zyxel Keenetic все совсем просто. В нижней панели навигации выбираем «Wi-Fi» и на главной странице этой категории ставим флажок на «Включить WMM»
D-Link
В панели маршрутизаторов D-Link «WMM» вынесен в отдельный пункт меню в рубрике «Wi-Fi». Ставим здесь галочку напротив названия функции. Удобно то, что на этой странице также отображается статистика использования беспроводного канала теми или иными приложениями
Актуальные предложения:

Задать вопрос
- 10 лет занимается подключением и настройкой беспроводных систем
- Выпускник образовательного центра при МГТУ им. Баумана по специальностям «Сетевые операционные системы Wi-Fi», «Техническое обслуживание компьютеров», «IP-видеонаблюдение»
- Автор видеокурса «Все секреты Wi-Fi»
Современные WI-Fi роутеры представляют собой многофункциональные устройства, которые кроме базового функционала, отвечающего за выполнение основных задач, оснащены к тому же различными опциями, повышающими эффективность работы в сети и адаптированными под требования пользователя. Шагая в ногу со временем, производители беспроводного сетевого оборудования стараются соответствовать актуальным стандартам, применяя, в том числе новейшие технологии для увеличения скоростных характеристик работы программ мультимедиа. С этой целью в функционале многих маршрутизаторов используется режим WMM («WI-Fi Multimedia»). Для чего предусмотрена эта опция, как её включить и какие возможности она предлагает, мы и рассмотрим.
Использование режима WMM.
Для чего нужна эта функция
Наличием параметра WMM на роутере уже никого не удивишь. При этом не все пользователи знают, что это такое, когда обнаруживают опцию в настройках сетевого устройства. Стандарт «Wi-Fi Multimedia» предназначен для обеспечения достойного уровня качества обслуживания в беспроводной сети (GoS) и может применяться с целью указания приоритета для трафика VoIP или видео над прочими данными. Задать приоритет можно и для трафика негарантированной доставки от девайсов, не поддерживающих GoS. Так, задача функции заключается в повышении эффективности подключения за счёт предоставления преимуществ для мультимедийных файлов, игрового контента. Возможность настройки доступна только на маршрутизаторах с поддержкой WMM, в старом оборудовании оснащением не предполагалось наличие подобного функционала. Протокол WI-fi Multimedia, базирующийся на стандарте IEEE 802.11e, обеспечивает более высокую пропускную способность (скорость выше 54 Мбит/с), стабильность работы мультимедиа и снижает количество проявляющихся в приложениях ошибок.
Как включить и настроить беспроводную связь
Для наиболее эффективного использования, а именно повышения скорости трафика режим WMM необходимо активировать. Функция требуется для всех Wi-fi-устройств, сертифицированных для применения стандарта 802.11n (адаптеры, беспроводные маршрутизаторы или точки доступа). Так, включить режим WI-fi Multimedia нужно, как на роутере, так и точке доступа. В параметрах разных устройств названия опции могут отличаться (WMM, WMM Capable, Мультимедийная среда), при этом имеется в виду та же возможность. Поскольку по умолчанию режим WMM отключён, понадобится ручная настройка, в свойствах устройства для функции должно быть выставлено значение «Включено». С русским интерфейсом настройки беспроводной сети всё просто, необходимо отметить пункт «Включить WMM» (актуально для роутеров ZyXEL, Asus) или «Активировать WMM» (для TP-Link), а в том случае, если веб-интерфейс маршрутизатора на английском – «Enable WMM».
Ввиду отличий меню параметров для разных моделей устройств, дать универсальную инструкцию невозможно. Опция обычно находится в общих настройках беспроводной сети или расширенных, но иногда её можно найти в отдельно вынесенном разделе меню, например, как с роутерами D-Link. В английском варианте софта WMM может находиться в разделе Wireless, параметр может быть представлен и как Quality of Service (GoS). В программном обеспечении для маршрутизаторов функция нередко также обозначена как «WME» («WI-Fi Multimedia Extensions»), что не меняет сути. Посредством включения опции (с применением изменений после выбора соответствующего пункта) вы оптимизируете обслуживание программ мультимедиа, и разница будет заметна.
Главные достоинства и недостатки использования функции
Маршрутизаторы, включающие опцию WI-Fi Multimedia, имеют как плюсы, так и минусы использования. Поддержка технологии WMM обеспечивает роутерам целый ряд преимуществ:
- Повышение эффективности беспроводной сети.
- Поддержка стандарта осуществляется большинством производителей современного сетевого оборудования.
- Оптимизация передачи пакетов данных для увеличения скорости трафика для файлов мультимедиа, в частности видео и голосовых сигналов.
- Увеличение времени автономной работы устройств, подключаемых к сети WI-Fi и использующих в качестве источника питания аккумуляторы.
- Снижение числа ошибок.
К недостаткам можно отнести следующие факторы:
- Стандарт не поддерживается устаревшими моделями сетевого оборудования.
- Отсутствует возможность полноценной настройки абсолютных приоритетов для трафика видео и звуковых сигналов.
Дополнительные возможности
В стремлении покрыть потребности современного пользователя, активно работающего с файлами мультимедиа, производители расширяют функционал оборудования, внедряя новые возможности. Сегодня многие продвинутые маршрутизаторы помимо основного функционала оснащены некоторыми дополнительными опциями:
- WMM DLS. Режим инфраструктура обеспечивает управление качеством сигнала между оборудованием.
- WMM APSD. Переход в режим энергосбережения выполняется для управления и контроля питания подключаемых к сети беспроводных устройств. Увеличить длительность автономной работы девайсов можно при наличии поддержки APSD в смартфоне, планшете, ноутбуке и пр.
Современные технологии, внедряемые в аппаратное обеспечение, и методы реализации поддержки стандартов в сетевом оборудовании значительно улучшают взаимодействие устройств, сообщающихся посредством сети Wi-Fi, повышают скорость и эффективность передачи данных. Если функционал вашего маршрутизатора позволяет настроить лучшее качество, то рекомендуется использовать потенциал аппаратного обеспечения, применив в настройках функцию.
На чтение 9 мин Просмотров 21к.
Сергей Ломакин
.
Задать вопрос
WMM расшифровывается как Wi-Fi Multimedia. Этот протокол разработан для беспроводных сетей. Поддерживает главные функции стандарта QoS (Quality of Service — качество обслуживания), устанавливая повышенный приоритет для мультимедиа трафика над остальным. Например, это может быть голосовой трафик или видеопоток. Режим WMM способствует стабильной работе IP-телефонии, позволяет проводить качественные видеотрансляции, без задержек воспроизводить видео на web-страницах. Включить WMM можно в настройках роутера, в разделе Wlan.
Содержание
- Что такое WMM, как работает режим
- Плюсы и минусы технологии
- В каких случаях стоит активировать WMM
- Как включить и настроить эту функцию в роутере
- FAQ
- Что такое wmm apsd?
- Почему включение это функции не гарантирует быстрый и стабильный сигнал?
Что такое WMM, как работает режим
Wi-Fi multimedia основан на стандарте IEEE 802.11e, что позволяет задействовать главные функции технологии QoS, которая и задает разным видам трафика свои приоритеты.
Протокол WMM имеет четыре категории доступа для каждого типа трафика, соответственно их потребностям:
- Голосовой – имеет самый высокий приоритет, отчего множество каналов VoIP работают через интернет с минимальной задержкой.
- Видеотрафик. Имеет приоритет над обычным.
- Обычный трафик или трафик от устройств, работающих без технологии QoS. Этот вид трафика передается, если есть ресурсы для него.
- Фоновый. Имеет самый низкий приоритет. Как правило, у него нет требований ко времени задержки и производительности при отправке пакетов.
В некоторых сетевых устройствах есть дополнительные возможности WMM – например, DLS и APSD. Первая функция регулирует качество сигнала, вторая отвечает за режим энергосбережения, если мобильное устройство ее поддерживает.
Режим WMM присутствует во всех новых роутерах. Протокол не поддерживается в старых моделях роутеров с устаревшим программным обеспечением.
Плюсы и минусы технологии
Как и любая технология, WMM имеет свои преимущества и недостатки.
Улучшает качество голосового трафика, видеоконтента и онлайн-игр.
Работа функции заметна сразу после включения.
Увеличивает продолжительность автономной работы мобильных устройств.
Стопроцентной гарантии приоритета мультимедиа трафика нет.
Приоритет выставляется автоматически, самостоятельно задать его нельзя.
В каких случаях стоит активировать WMM
Об этой функции и о ее способности увеличивать качество картинки знают многие геймеры и пользователи, просматривающие видеотрансляции. С выключенной опцией мультимедийной игровой среды Wi-Fi скорость соединения с маршрутизатором и, соответственно, интернета будет не более 54 Мбит в секунду, что мало, чтобы комфортно работать с голосом и видео, особенно для просмотра видео онлайн качества 1080р и выше.
Включение режима multimedia gaming environment устанавливает приоритет самому «тяжелому» трафику и это правильно с точки зрения целесообразности использования канала: этот трафик нуждается в большей пропускной способности, чем загрузка веб-страниц, так как современные сайты оптимизированные и быстрые.
С этой технологией улучшается пинг до сервера, обмен данными быстрее, потоковое видео воспроизводится стабильно и качественно. Также устанавливается хорошее качество звука при звонках через мессенджеры. Все это необходимо тем, кто работает удаленно через интернет.
Как включить и настроить эту функцию в роутере
Чтобы настроить режим WMM в роутере, необходимо иметь доступ к панели администратора устройства.
- С помощью адресной строки браузера войдите в личный кабинет роутера (адрес входа в настройки зависит от модели роутера, например, это может быть 192.168.0.1, 192.168.1.1).
- Перейдите в раздел Wi-Fi или Беспроводные сети. Переместитесь в расширенные или дополнительные настройки.
- WMM в настройках роутера находится в разделе настроек Wlan. Проверьте, включен ли там режим WMM.
Во всех современных роутерах присутствует поддержка Wi-Fi WMM, которая обычно включена по умолчанию.
Если интерфейс панели администратора англоязычный, следует искать словосочетание «wmm support».
Маршрутизаторы Zyxel Keenetic и D-Link обычно имеют расширенные настройки этого режима, среди которых есть ширина канала и мощность сигнала. Чтобы включить режим, необходимо установить напротив его названия галочку, выбрать соответствующий пункт из выпадающего меню, нажать «enable wmm» — зависит от модели оборудования. Желательно выставить остальные значения ширины канала мощности сигнала максимально, чтобы приоритеты и передача данных работали стабильно.
Чтобы включить мультимедийный режим на ноутбуке или компьютере с Windows, подключенном к Wi-Fi, необходимо зайти в диспетчер устройств, в разделе «Сетевые адаптеры» найти беспроводную сетевую карту, нажать на нее правой кнопкой мыши, выбрать свойства и в них вкладку «Дополнительно». Откроется раздел со списком, в нем надо найти строку «WMM» и установить значение «включено».
FAQ
Включение функции WMM – дело простое, но насчет этой технологии у пользователей есть немало вопросов.
Что такое wmm apsd?
Эта функция позволяет увеличить время работы мобильного устройства. Современные мультимедийные сервисы становятся более ресурсоемкими, нагружая устройства и ускоряя расход энергии аккумулятора. Технология WMM APSD разработана для беспроводных сетей Wi-Fi для контроля радиомодуля роутера и модуля принимающего устройства, экономя электроэнергию мобильного устройства. Чтобы эта функция работала, необходимо, чтобы источник и приемник поддерживали ее. Наличие функции можно посмотреть в технической документации устройства.
Функция включает более долгий интервал маяка и другой временной период DTIM. Все это помогает роутеру создавать буфер данных для устройства при его переходе в режим сна. Есть два вида этой функции: принудительной экономии энергии и энергосбережения по расписанию.
Включить WMM APSD можно в настройках точки доступа, если она им поддерживается. Включается она в разделе настройки беспроводной сети. Вот, например, как она включается на роутере Asus DSL-N66U:
Почему включение это функции не гарантирует быстрый и стабильный сигнал?
Это может произойти по нескольким причинам:
- Беспроводные точки доступа соседей, которые могут перебивать сигнал и создавать помехи.
- Толстые стены и другие преграды, ослабляющие сигнал.
- Большое расстояние до роутера.
- Наличие рядом других беспроводных устройств, которые могут вносить помехи в сигнал.
- Устройства с USB 3.0 могут мешать устройствам, действующим в диапазоне 2,4 ГГц.
Чтобы точка доступа не конфликтовала с соседскими, можно установить на ней другой стандарт передачи данных, но это сработает, если на соседских точках доступа стоит одинаковый стандарт.
Что такое WMM gaming environment?
Не будет ли включенная функция WMM мешать загрузке немультимедийного трафика?
Как проверить работу WMM на практике?
В моем роутере нет функции WMM, как решить эту проблему?
Как работает сертификат Power Save?
Технология WMM решает многие проблемы с загрузкой мультимедийного трафика. Кроме своей основной функции, имеет возможность управлять энергосбережением, качеством передачи информации и другими процессами беспроводной сети. Технология продолжает развиваться и обновляется вместе с оборудованием и беспроводными устройствами, что приводит к лучшему качеству работы сети.
Chapter 6 Configure the Router in Access Point Mode
This chapter presents how to configure the various features of the router working as an access point.
It contains the following sections:
•Status
•Operation Mode
•Network
•Wireless
•DHCP
•System Tools
•Logout
1. Status
1.Visit http://tplinkwifi.net, and log in with the username and password you set for the router.
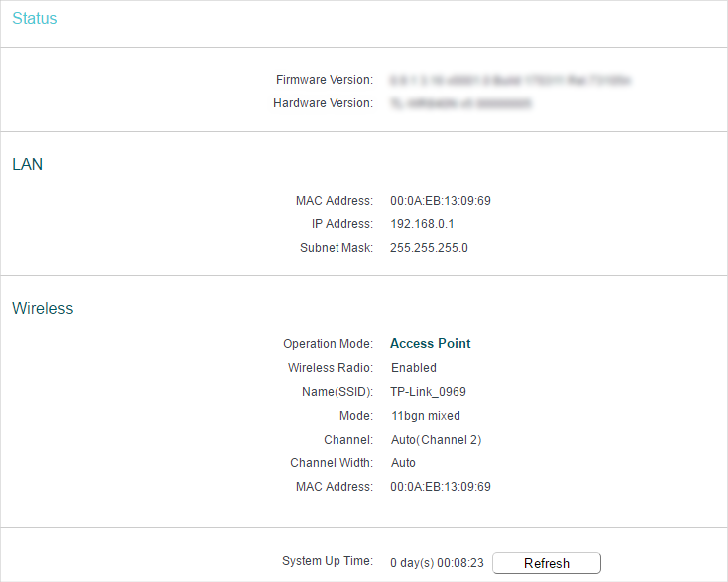
2.Go to Status. You can view the current status information of the router.
•Firmware Version — The version information of the router’s firmware.
•Hardware Version — The version information of the router’s hardware.
•LAN — This field displays the current settings of the LAN, and you can configure them on the Network > LAN page.
•MAC address — The physical address of the router.
•IP address — The LAN IP address of the router.
•Subnet Mask — The subnet mask associated with the LAN IP address.
•Wireless — This field displays the basic information or status of the wireless function, and you can configure them on the Wireless > Basic Settings page.
•Operation Mode — The current wireless working mode in use.
•Wireless Radio — Indicates whether the wireless radio feature of the router is enabled or disabled.
•Name(SSID) — The SSID of the router.
•Mode — The current wireless mode which the router works on.
•Channel — The current wireless channel in use.
•Channel Width — The current wireless channel width in use.
•MAC Address — The physical address of the router.
•System Up Time — The length of the time since the router was last powered on or reset.
Click Refresh to get the latest status and settings of the router.
2. Operation Mode
1.Visit http://tplinkwifi.net, and log in with the username and password you set for the router.
2.Go to Operation Mode.
3.Select the working mode as Access Point and click Save.
3. Network
3.1. LAN
1.Visit http://tplinkwifi.net, and log in with the username and password you set for the router.
2.Go to Network > LAN.
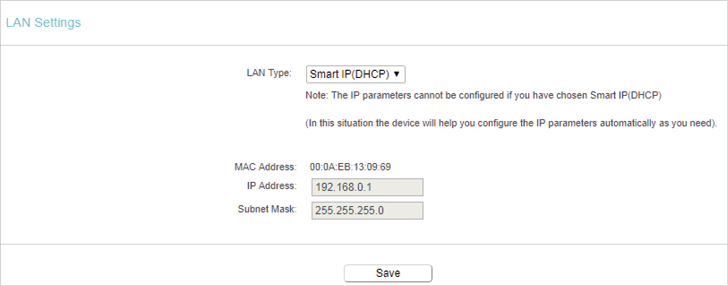
3.Configure the IP parameters of the LAN and click Save.
•LAN Type — Either select Smart IP(DHCP) to get IP address from DHCP server, or Static IP to configure IP address manually.
•MAC Address — The physical address of the LAN ports. The value can not be changed.
•IP Address — Enter the IP address in dotted-decimal notation if your select Static IP (factory default — 192.168.0.1).
•Subnet Mask — An address code that determines the size of the network. Normally 255.255.255.0 is used as the subnet mask.
Note:
•If you have changed the IP address, you must use the new IP address to login.
•If you select Smart IP(DHCP), the DHCP server of the router will not start up.
•If the new IP address you set is not in the same subnet as the old one, the IP Address pool in the DHCP Server will be configured.
4. Wireless
4.1. Basic Settings
1.Visit http://tplinkwifi.net, and log in with the username and password you set for the router.
2.Go to Wireless > Basic Settings.
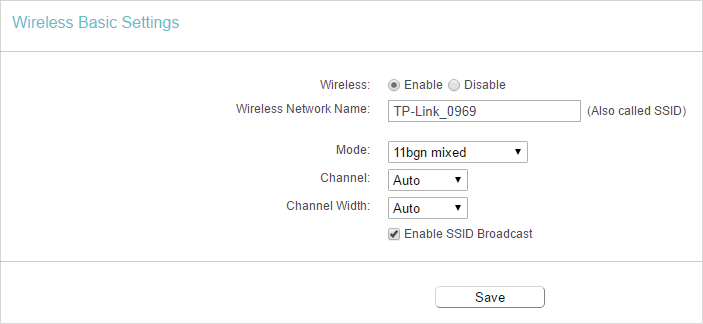
3.Configure the basic settings for the wireless network and click Save.
•Wireless — Enable or disable wireless network.
•Wireless Network Name — Enter a value of up to 32 characters. The same Name (SSID) must be assigned to all wireless devices in your network.
•Mode — You can choose the appropriate “Mixed” mode.
•Channel — This field determines which operating frequency will be used. The default channel is set to Auto. It is not necessary to change the wireless channel unless you notice interference problems with another nearby access point.
•Channel Width — This field determines which operating frequency will be used. It is not necessary to change the wireless channel unless you notice interference problems with another nearby access point. If you select Auto, then AP will choose the best channel automatically.
•Enable SSID Broadcast — If enabled, the router will broadcast the wireless network name (SSID).
4.2. WPS
WPS (Wi-Fi Protected Setup) can help you to quickly and securely connect to a network. This section will guide you to add a new wireless device to your router’s network quickly via WPS.
Note:
The WPS function cannot be configured if the wireless function of the router is disabled. Please make sure the wireless function is enabled before configuration.
1.Visit http://tplinkwifi.net, and log in with the username and password you set for the router.
2.Go to Wireless > WPS.
3.Follow one of the following three methods to connect your client device to the router’s Wi-Fi network.
Method ONE: Press the WPS Button on Your Client Device
1.Keep the WPS Status as Enabled and click Add Device.
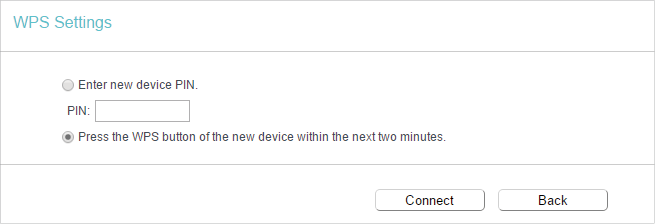
2.Select Press the WPS button of the new device within the next two minutes and click Connect.
3.Within two minutes, press the WPS button on your client device.
4.A success message will appear on the WPS page if the client device has been successfully added to the router’s network.
Method TWO: Enter the Client’s PIN
1.Keep the WPS Status as Enabled and click Add Device.
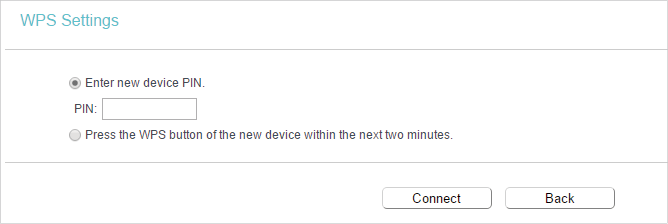
2.Select Enter new device PIN, enter your client device’s current PIN in the PIN filed and click Connect.
3.A success message will appear on the WPS page if the client device has been successfully added to the router’s network.
Method Three: Enter the Router’s PIN
1.Keep the WPS Status as Enabled and get the Current PIN of the router.
2.Enter the router’s current PIN on your client device to join the router’s Wi-Fi network.
4.3. Wireless Security
1.Visit http://tplinkwifi.net, and log in with the username and password you set for the router.
2.Go to Wireless > Wireless Security.
3.Configure the security settings of your wireless network and click Save.
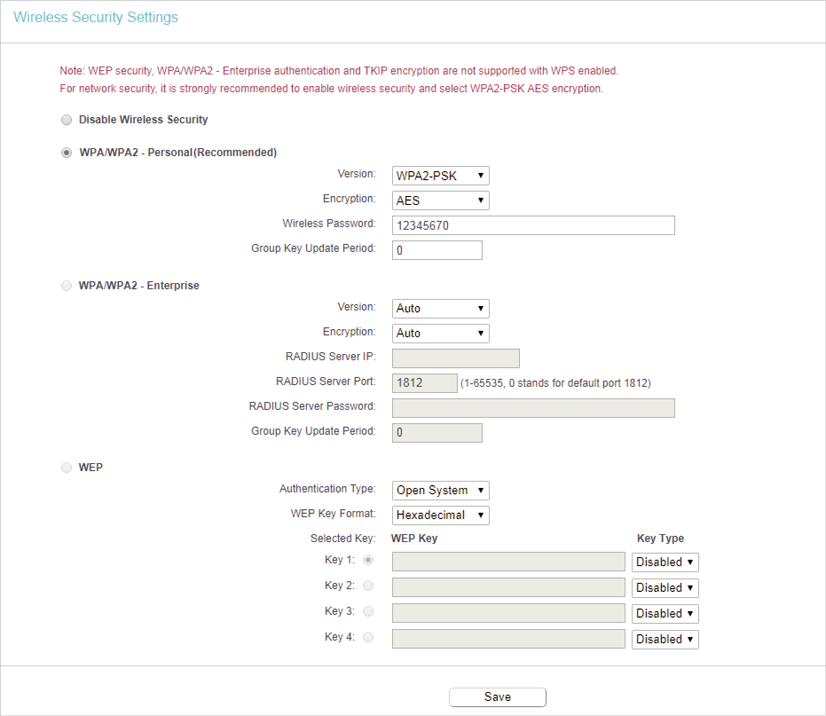
•Disable Wireless Security — The wireless security function can be enabled or disabled. If disabled, wireless clients can connect to the router without a password. It’s strongly recommended to choose one of the following modes to enable security.
•WPA-PSK/WPA2-Personal — It’s the WPA/WPA2 authentication type based on pre-shared passphrase.
•Version — Select Auto, WPA-PSK or WPA2-PSK.
•Encryption — Select Auto, TKIP or AES.
•Wireless Password — Enter ASCII or Hexadecimal characters. For Hexadecimal, the length should be between 8 and 64 characters; for ASCII, the length should be between 8 and 63 characters.
•Group Key Update Period — Specify the group key update interval in seconds. The value can be 0 or at least 30. Enter 0 to disable the update.
•WPA /WPA2-Enterprise — It’s based on Radius Server.
•Version — Select Auto, WPA or WPA2.
•Encryption — Select Auto, TKIP or AES.
•Radius Server IP — Enter the IP address of the Radius server.
•Radius Server Port — Enter the port that Radius server used.
•Radius Server Password — Enter the password for the Radius server.
•Group Key Update Period — Specify the group key update interval in seconds. The value should be 30 or above. Enter 0 to disable the update.
•WEP — It is based on the IEEE 802.11 standard.
•Authentication Type — The default setting is Auto, which can select Shared Key or Open System authentication type automatically based on the wireless client’s capability and request.
•WEP Key Format — Hexadecimal and ASCII formats are provided here. Hexadecimal format stands for any combination of hexadecimal digits (0-9, a-f, A-F) in the specified length. ASCII format stands for any combination of keyboard characters in the specified length.
•WEP Key (Password) — Select which of the four keys will be used and enter the matching WEP key. Make sure these values are identical on all wireless clients in your network.
•Key Type — Select the WEP key length (64-bit or 128-bit) for encryption. Disabled means this WEP key entry is invalid.
•64-bit — Enter 10 hexadecimal digits (any combination of 0-9, a-f and A-F. Null key is not permitted) or 5 ASCII characters.
•128-bit — Enter 26 hexadecimal digits (any combination of 0-9, a-f and A-F. Null key is not permitted) or 13 ASCII characters.
4.4. Wireless MAC Filtering
Wireless MAC Filtering is used to deny or allow specific wireless client devices to access your network by their MAC addresses.
I want to:
Deny or allow specific wireless client devices to access my network by their MAC addresses.
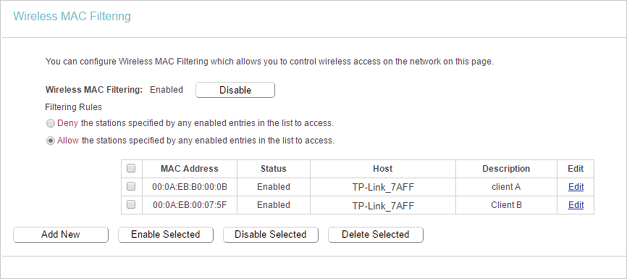
For example, you want the wireless client A with the MAC address 00:0A:EB:B0:00:0B and the wireless client B with the MAC address 00:0A:EB:00:07:5F to access the router, but other wireless clients cannot access the router
How can I do that?
1.Visit http://tplinkwifi.net, and log in with the username and password you set for the router.
2.Go to Wireless > Wireless MAC Filtering.
3.Click Enable to enable the Wireless MAC Filtering function.
4.Select Allow the stations specified by any enabled entries in the list to access as the filtering rule.
5.Delete all or disable all entries if there are any entries already.
6.Click Add New and fill in the blank.
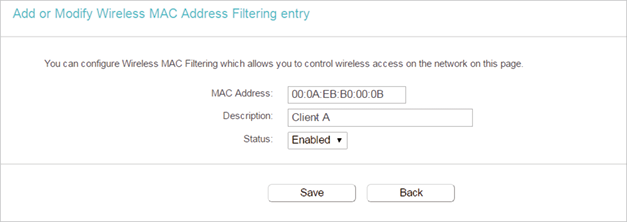
1 )Enter the MAC address 00:0A:EB:B0:00:0B / 00:0A:EB:00:07:5F in the MAC Address field.
2 )Enter wireless client A/B in the Description field.
3 )Select Enabled in the Status drop-down list.
4 )Click Save and click Back.
7.The configured filtering rules should be listed as the picture shows below.
Done!
Now only client A and client B can access your network.
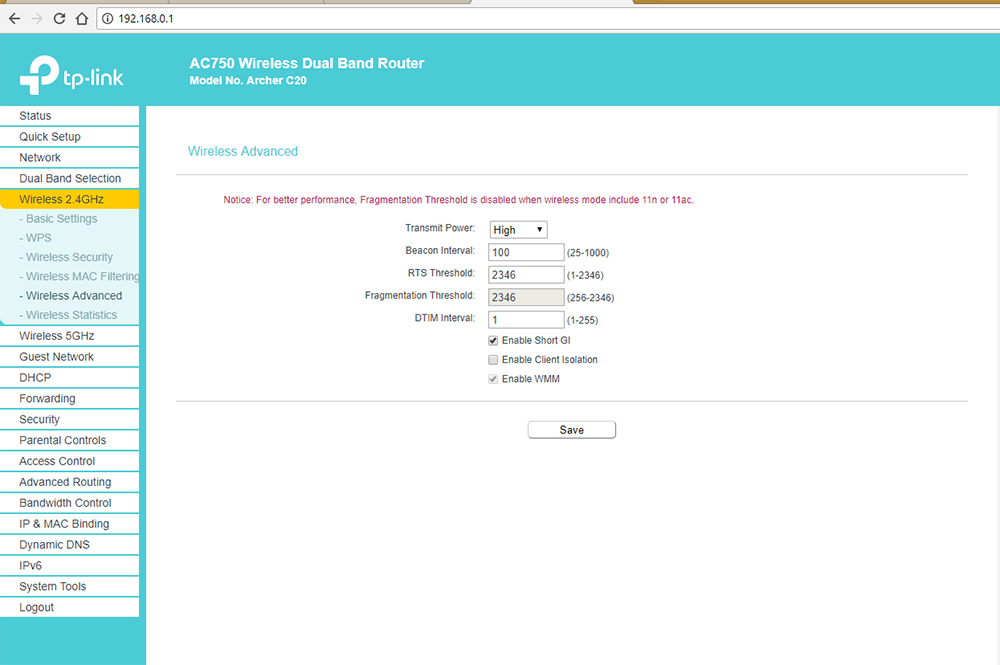
4.5. Wireless Advanced
1.Visit http://tplinkwifi.net, and log in with the username and password you set for the router.
2.Go to Wireless > Wireless Advanced.
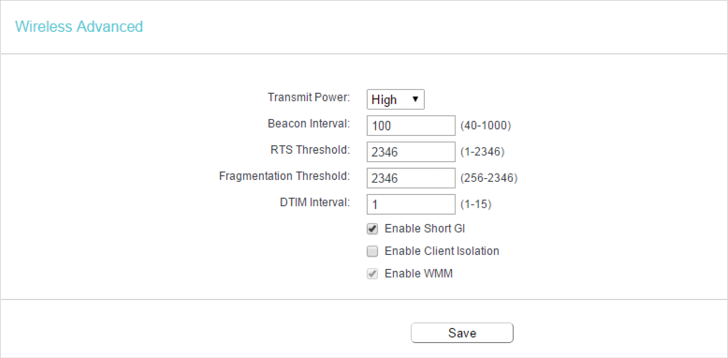
3.Configure the advanced settings of your wireless network and click Save.
Note:
If you are not familiar with the setting items on this page, it’s strongly recommended to keep the provided default values; otherwise it may result in lower wireless network performance.
•Transmit Power — Select High, Middle or Low which you would like to specify for the router. High is the default setting and recommended.
•Beacon Interval — Enter a value between 40-1000 milliseconds for Beacon Interval here. Beacon Interval value determines the time interval of the beacons. The beacons are the packets sent by the router to synchronize a wireless network. The default value is 100.
•RTS Threshold — Here you can specify the RTS (Request to Send) Threshold. If the packet is larger than the specified RTS Threshold size, the router will send RTS frames to a particular receiving station and negotiate the sending of a data frame. The default value is 2346.
•Fragmentation Threshold — This value is the maximum size determining whether packets will be fragmented. Setting a low value for the Fragmentation Threshold may result in poor network performance because of excessive packets. 2346 is the default setting and is recommended.
•DTIM Interval — This value determines the interval of the Delivery Traffic Indication Message (DTIM). A DTIM field is a countdown field informing clients of the next window for listening to broadcast and multicast messages. When the router has buffered broadcast or multicast messages for associated clients, it sends the next DTIM with a DTIM Interval value. You can specify the value between 1-255 Beacon Intervals. The default value is 1, which indicates the DTIM Interval is the same as Beacon Interval.
•Enable Short GI — It is recommended to enable this function, for it will increase the data capacity by reducing the guard interval time.
•Enable Client Isolation — This function isolates all connected wireless stations so that wireless stations cannot access each other through WLAN.
•Enable WMM — WMM function can guarantee the packets with high-priority messages being transmitted preferentially. It is strongly recommended to enable this function.
4.6. Wireless Statistics
1.Visit http://tplinkwifi.net, and log in with the username and password you set for the router.
2.Go to Wireless > Wireless Statistics to check the data packets sent and received by each client device connected to the router.
•MAC Address — The MAC address of the connected wireless client.
•Current Status — The running status of the connected wireless client.
•Received Packets — Packets received by the wireless client.
•Sent Packets — Packets sent by the wireless client.
•SSID — SSID that the station associates with.
4.7. Throughput Monitor
1.Visit http://tplinkwifi.net, and log in with the username and password you set for the router.
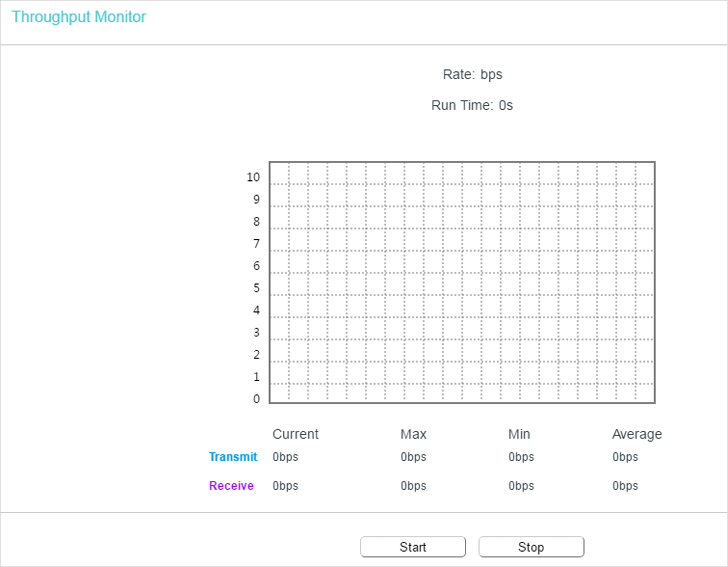
2.Go to Wireless > Throughput Monitor to view the wireless throughput information.
•Rate — The Throughput unit.
•Run Time — How long this function is running.
•Transmit — Wireless transmit rate information.
•Receive — Wireless receive rate information.
Click Start/Stop to start or stop wireless throughput monitor.
5. DHCP
By default, the DHCP (Dynamic Host Configuration Protocol) Server is enabled and the router acts as a DHCP server; it dynamically assigns TCP/IP parameters to client devices from the IP Address Pool. You can change the settings of DHCP Server if necessary, and you can reserve LAN IP addresses for specified client devices.
5.1. DHCP Settings
1.Visit http://tplinkwifi.net, and log in with the username and password you set for the router.
2.Go to DHCP > DHCP Settings.
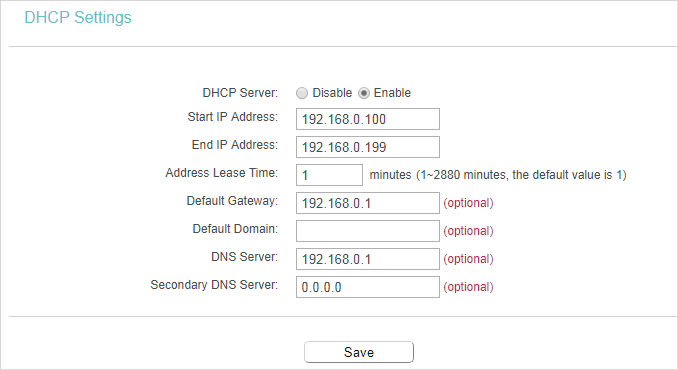
3.Specify DHCP server settings and click Save.
•DHCP Server — Enable or disable the DHCP server. If disabled, you must have another DHCP server within your network or else you must configure the computer manually.
•Start IP Address — Specify an IP address for the DHCP Server to start with when assigning IP addresses. 192.168.0.100 is the default start address.
•End IP Address — Specify an IP address for the DHCP Server to end with when assigning IP addresses. 192.168.0.199 is the default end address.
•Address Lease Time — The Address Lease Time is the amount of time a network user will be allowed to connect to the router with the current dynamic IP Address. When time is up, the user will be automatically assigned a new dynamic IP address. The range of the time is 1 ~ 2880 minutes. The default value is 1.
•Default Gateway (Optional) — It is suggested to input the IP address of the LAN port of the router. The default value is 192.168.0.1.
•Default Domain (Optional) — Input the domain name of your network.
•DNS Server (Optional) — Input the DNS IP address provided by your ISP.
•Secondary DNS Server (Optional) — Input the IP address of another DNS server if your ISP provides two DNS servers.
Note:
•To use the DHCP server function of the router, you must configure all computers on the LAN as Obtain an IP Address automatically.
•When you choose Smart IP(DHCP) in Network > LAN, the DHCP Server function will be disabled. You will see the page as below.
5.2. DHCP Clients List
1.Visit http://tplinkwifi.net, and log in with the username and password you set for the router.
2.Go to DHCP > DHCP Clients List to view the information of the clients connected to the router.
•Client Name — The name of the DHCP client.
•MAC Address — The MAC address of the DHCP client.
•Assigned IP — The IP address that the outer has allocated to the DHCP client.
•Lease Time — The time of the DHCP client leased. After the dynamic IP address has expired, a new dynamic IP address will be automatically assigned to the user.
You cannot change any of the values on this page. To update this page and show the current attached devices, click Refresh.
5.3. Address Reservation
You can reserve an IP address for a specific client. When you specify a reserved IP address for a PC on the LAN, this PC will always receive the same IP address each time when it accesses the DHCP server.
1.Visit http://tplinkwifi.net, and log in with the username and password you set for the router.
2.Go to DHCP > Address Reservation.
3.Click Add New and fill in the blanks.
1 )Enter the MAC address (in XX:XX:XX:XX:XX:XX format.) of the client for which you want to reserve an IP address.
2 )Enter the IP address (in dotted-decimal notation) which you want to reserve for the client.
3 )Leave the Status as Enabled.
4 )Click Save.
6. System Tools
6.1. Time Settings
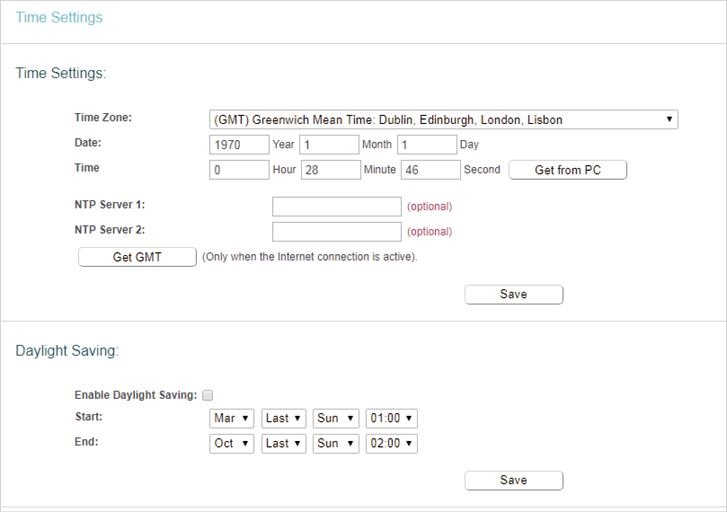
This page allows you to set the time manually or to configure automatic time synchronization. The router can automatically update the time from an NTP server via the internet.
1.Visit http://tplinkwifi.net, and log in with the username and password you set for the router.
2.Go to System Tools > Time Settings.
•To set time manually:
1.Select your local Time Zone.
2.Enter the Date in Month/Day/Year format.
3.Enter the Time in Hour/Minute/Second format.
4.Click Save.
•To set time automatically:
5.Select your local Time Zone.
6.Enter the address or domain of the NTP Server 1 or NTP Server 2.
7.Click Get GMT to get time from the internet if you have connected to the internet.
•To set Daylight Saving Time:
1.Select Enable Daylight Saving.
2.Select the start time from the drop-down list in the Start fields.
3.Select the end time from the drop-down list in the End fields.
4.Click Save.
Note:
This setting will be used for some time-based functions such as firewall. You must specify your time zone once you log in to the router successfully; otherwise, time-based functions will not take effect.
6.2. Diagnostic
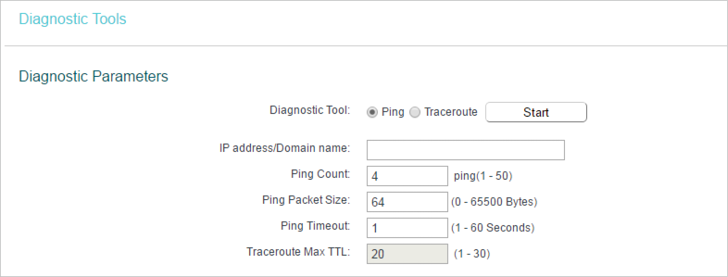
Diagnostic is used to test the connectivity between the router and the host or other network devices.
1.Visit http://tplinkwifi.net, and log in with the username and password you set for the router.
2.Go to System Tools > Diagnostic.
•Diagnostic Tool — Select one diagnostic tool.
•Ping — This diagnostic tool troubleshoots connectivity, reachability, and name resolution to a given host or gateway.
•Tracerouter — This diagnostic tool tests the performance of a connection.
Note:
You can use ping/traceroute to test both numeric IP address or domain name. If pinging/tracerouting the IP address is successful, but pinging/tracerouting the domain name is not, you might have a name resolution problem. In this case, ensure that the domain name you are specifying can be resolved by using Domain Name System (DNS) queries.
•IP Address/Domain Name — Enter the destination IP address (such as 192.168.0.1) or Domain name (such as www.tp-link.com).
•Ping Count — The number of Ping packets for a Ping connection.
•Ping Packet Size — The size of Ping packet.
•Ping Timeout — Set the waiting time for the reply of each Ping packet. If there is no reply in the specified time, the connection is overtime.
•Traceroute Max TTL — The max number of hops for a Traceroute connection.
3.Click Start to check the connectivity of the internet.
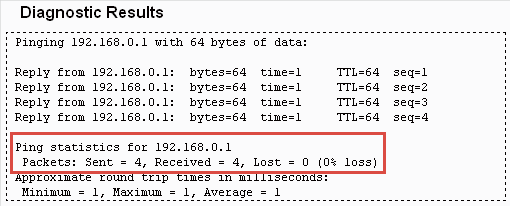
4.The Diagnostic Results page displays the diagnosis result. If the result is similar to the following figure, the connectivity of the internet is fine.
6.3. SNMP Settings
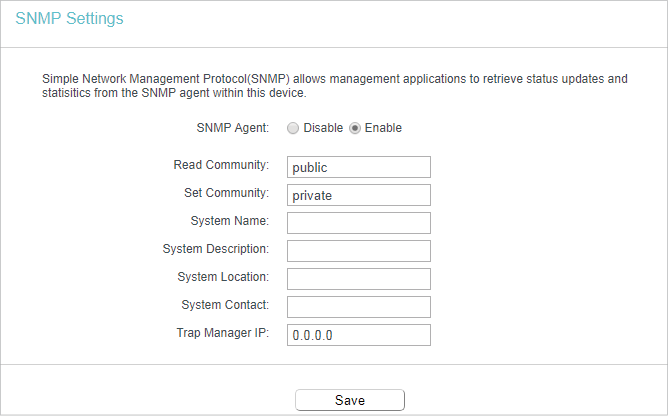
Simple Network Management Protocol (SNMP) is a popular network monitoring and management protocol, which allows management applications to retrieve status updates and statisitics from the SNMP agent within this device.
1.Visit http://tplinkwifi.net, and log in with the username and password you set for the router.
2.Go to System Tools > SNMP Settings.
3.Specify SNMP settings and click Save.
•SNMP Agent — Enable or disable the SNMP agent. Choose Enable to open this function if you want to have remote control through SNMPv1/v2 agent with MIB-II. Choose Disable to close this function.
•Read Community — Enter the community name that allows Read-Only access to this device’s SNMP information. The community name can be considered a group password. The default setting is public.
•Set Community — Enter the community name that allows Read/Write access to this device’s SNMP information. The community name can be considered a group password. The default setting is private.
•System Name — An administratively-assigned name for this managed node.
•System Description — The software version information for this managed node.
•System Location — The physical location of this node.
•System Contact — The textual identification of the contact person for this managed node.
•Trap Manager IP — A restricted source can be a specific IP address (e.g. 10.10.10.1), or a subnet — represented as IP/BITS (e.g. 10.10.10.0/24). If an IP Address of 0.0.0.0 is specified, the agent will accept all requests under the corresponding community name.
Note:
Specifying one of these values via the Device’s Web-based Utility makes the corresponding object read-only. If there isn’t such a config setting, then the write request will succeed (assuming suitable access control settings), but the new value would be forgotten the next time the agent was restarted.
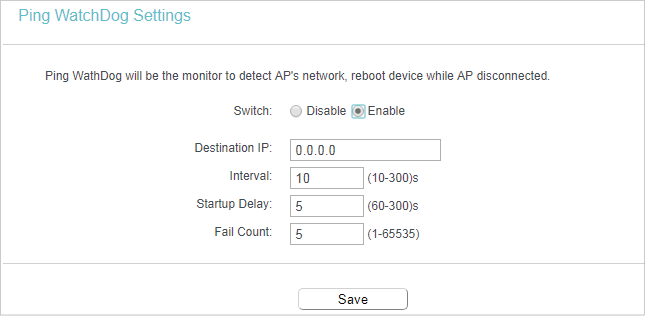
6.4. Ping WatchDog
The Ping Watch Dog is dedicated for continuous monitoring of the particular connection to remote host using the Ping tool. It makes this device continuously ping a user defined IP address (it can be the internet gateway for example). If it is unable to ping under the user defined constraints, this device will automatically reboot.
1.Visit http://tplinkwifi.net, and log in with the username and password you set for the router.
2.Go to System Tools > Ping WatchDog.
3.Specify the settings and click Save.
•Switch — Enable/Disable Ping Watch Dog.
•IP Address — The IP address of the target host where the Ping Watch Dog Utility is sending ping packets.
•Interval — Time interval between two ping packets which are sent out continuously.
•StartupDelay — Time delay before first ping packet is sent out when this device is restarted.
•Fail Count — Upper limit of the ping packet this device can drop continuously.If this value is overrun, this device will restart automatically.
6.5. Firmware Upgrade
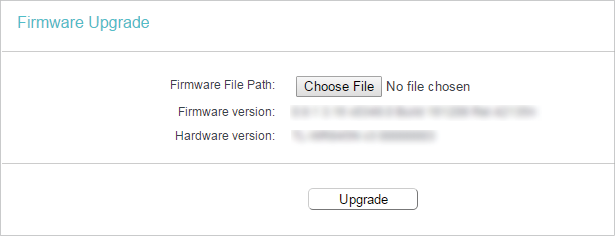
TP-Link is dedicated to improving and richening the product features, giving users a better network experience. We will release the latest firmware at TP-Link official website
www.tp-link.com. You can download the lastest firmware file from the Support page of our website and upgrade the firmware to the latest version.
1.Download the latest firmware file for the router from our website www.tp-link.com.
2.Visit http://tplinkwifi.net, and log in with the username and password you set for the router.
3.Go to System Tools > Firmware Upgrade.
4.Click Choose File to locate the downloaded firmware file, and click Upgrade.
6.6. Factory Defaults
1.Visit http://tplinkwifi.net, and log in with the username and password you set for the router.
2.Go to System Tools > Factory Defaults. Click Restore to reset all settings to the default values.
•Default Username: admin
•Default Password: admin
•Default IP Address: 192.168.0.1
•Default Subnet Mask: 255.255.255.0
6.7. Backup & Restore
The configuration settings are stored as a configuration file in the router. You can backup the configuration file in your computer for future use and restore the router to the previous settings from the backup file when needed.
1.Visit http://tplinkwifi.net, and log in with the username and password you set for the router.
2.Go to System Tools > Backup & Restore.
•To backup configuration settings:
Click Backup to save a copy of the current settings in your local computer. A “.bin“ file of the current settings will be stored in your computer.
•To restore configuration settings:
1.Click Choose File to locate the backup configuration file stored in your computer, and click Restore.
2.Wait a few minutes for the restoring and rebooting.
Note:
During the restoring process, do not power off or reset the router.
6.8. Reboot
Some settings of the router will take effect only after rebooting, including:
•Change the LAN IP Address (system will reboot automatically).
•Change the DHCP Settings.
•Change the Working Modes.
•Change the Web Management Port.
•Upgrade the firmware of the router (system will reboot automatically).
•Restore the router to its factory defaults (system will reboot automatically).
•Update the configuration with the file (system will reboot automatically).
1.Visit http://tplinkwifi.net, and log in with the username and password you set for the router.
2.Go to System Tools > Reboot, and you can restart your router.
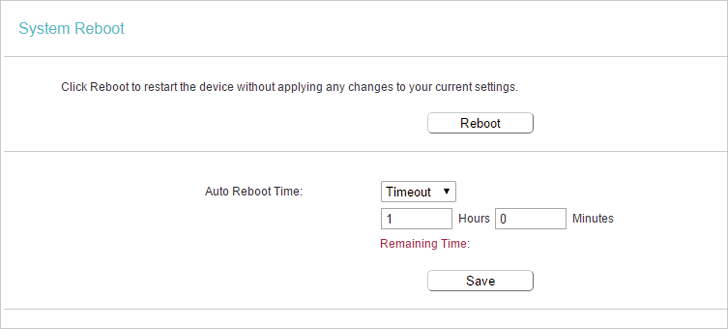
•To reboot the router manually:
Click Reboot, and wait a few minutes for the router to rebooting.
•To set the router reboot every a couple of hours:
1.Select Timeout from the Auto Reboot Time drop-down list.
2.Specify a time interval. The router will reboot automatically after every this interval.
3.Click Save.
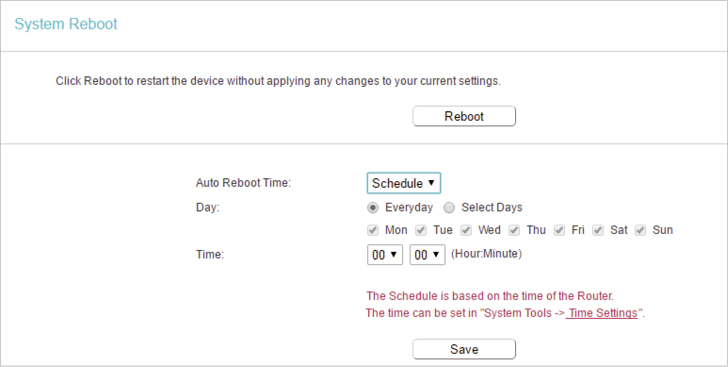
•To schedule the router to reboot at a specific time:
1.Select Schedule from the Auto Reboot Time drop-down list.
2.Specify the Day(s) and Time for the router to reboot.
3.Click Save.
6.9. Password
1.Visit http://tplinkwifi.net, and log in with the username and password you set for the router.
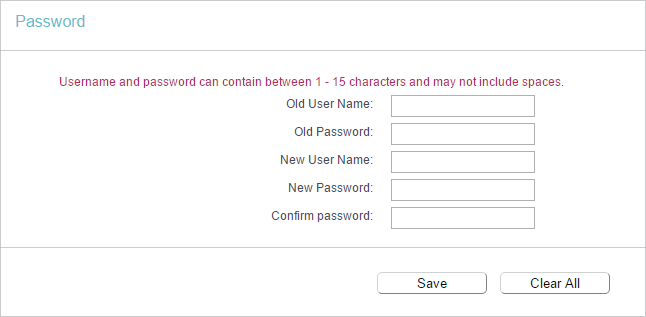
2.Go to System Tools > Password, and you can change the factory default username and password of the router.
It is strongly recommended that you change the default username and password of the router, for all users that try to access the router’s web-based utility or Quick Setup will be prompted for the router’s username and password.
Note:
The new username and password must not exceed 15 characters and not include any spacing.
3.Click Save.
6.10. System Log
1.Visit http://tplinkwifi.net, and log in with the username and password you set for the router.
2.Go to System Tools > System Log, and you can view the logs of the router.
•Loge Type -By selecting the log type, only logs of this type will be shown.
•Log Level — By selecting the log level, only logs of this level will be shown.
•Refresh — Refresh the page to show the latest log list.
•Clear Log — All the logs will be deleted from the router permanently, not just from the page.
7. Logout
Click Logout at the bottom of the main menu, and you will log out of the Web-based Utility and return to the login window.
Для того, чтобы обеспечить клиентам беспроводных сетей определённый уровень Качества обслуживания QOS был создан специальный стандарт Wi-Fi Multimedia — WMM.
У некоторых производителей сетевого оборудования он называется несколько иначе — Wi-Fi Multimedia Extensions, WME. За основу взят стандарт IEEE 802.11e, благодаря чему обеспечены основные возможности QOS для WiFi.
На текущий момент WMM определяет четыре класса обслуживания трафика беспроводной сети:
- голос, высокий приоритет
- видео (уникаст и мультикаст)
- обычный, best-effort
- фоновый, самый низкий приоритет
Эта технология не предоставляет средств абсолютной и безоговорочной приоритизации. Но тем не менее даёт возможность пакетам с приоритетом передаваться быстрее, чем другие за счёт меньших задержек, по сравнению с менее приоритетными.
По совместимости устройств с поддержкой функции WMM и без таковой — проблем не возникает. Если трафик приходит от устройства, не поддерживающего эту технологию, то он воспринимается как best-effort, т.е. с негарантированной доставкой.
Хотя сейчас встретить современный роутер или точку доступа без поддержки WMM QOS достаточно сложно, так как она поддерживается большинством производителей сетевого оборудования и прочей электроники. На старых устройствах поддержка функционала Wi-Fi Multimedia очень часто можно активировать через установку новой прошивки (firmware).
Плюсы и минусы технологии WMM
Плюсы:
+ широко поддерживается многими производителями оборудования;
+ повышает эффективность беспроводной сети;
+ позволяет увеличить время автономной работы телефонов и планшетов за счёт управления электропитанием U-APSD;
+ работает для голосового трафика и видео;
+ позволяет достичь максимальной скорости передачи по воздуху;
Минусы:
— не поддерживается в более старых устройствах;
— не обеспечивает стопроцентного приоритета голосового трафика;
По умолчанию, функция приоритизации беспроводного трафика на многих модемах и маршрутизаторах выключена. Для того, чтобы включить WMM QOS на роутере, необходимо зайти в его веб-интерфейс (обычно по IP-адресу 192.168.0.1 или 192.168.1.1), открыть настройки беспроводной сети и поставить соответствующую галочку. Вот так это делается на роутерах TP-Link:
А вот так это делается на роутера Zyxel Keenetic:
Грубо говоря, ищите опцию в общих параметрах сети. Если там её нет — смотрите в расширенных настройках. В некоторых случаях (как на маршрутизаторах D-Link) настройки WMM QOS находятся в отдельном пункте меню.







.png)


