In this post, we will show you how to disable or enable Virtualization-based Security (VBS) in Windows 11/10. You can follow these steps to turn on VBS if you find that Virtualization-based Security is not enabled on your computer.
Virtualization-based Security creates a secure and isolated region of memory from the regular operating system, allowing users to host various security solutions. While checking the status of Virtualization-based security in the System Information wizard, you might find it Not enabled in Windows 11/10. If so, here is everything you need to know about this security functionality, whether you should disable or enable it, its requirements, etc.

What is Virtualization-based Security (VBS) in Windows 11
Virtualization-based Security of VBS is a security functionality included in Windows 11, allowing users to prevent unsigned drivers, codes, software, etc., from residing in the memory of your system. That being said, it creates an isolated regime, which works as an additional security layer to protect your system. For your information, it works alongside Core isolation and Memory integrity.
The problem begins when it starts consuming more than usual resources. As it requires running in the background continuously, you must provide a lump sum of CPU resources for a smoother experience. It works fine when you do not game or run multiple high-performance apps simultaneously on mid-range hardware.
Should I disable Virtualization-based Security (VBS) in Windows 11?
Disabling Virtualization-based Security in Windows 11 frees up some resources, making your PC a lot smoother for gaming, but the security takes a beating for sure. If you think you do not need such a feature or want to compromise it with your gaming performance, you can undoubtedly disable Virtualization-based Security or VBS.
However, if you want to make your PC more secure in exchange for some resources, you can keep it running. Nonetheless, if the status is Not enabled, this article will let you turn it on.
If Virtualization-based Security is not enabled in Windows 11/10, then use one of these methods:
- Using Windows Security
- Using Registry Editor
To learn more about these steps, continue reading.
How to enable Virtualization-based Security (VBS) in Windows 11/10
1] Using Windows Security
It is probably the easiest way to enable or disable Virtualization-based Security in Windows 11. In other words, you need to enable Core isolation to get it done. For that, do the following:
- Search for windows security in the Taskbar search box.
- Click on the individual search result.
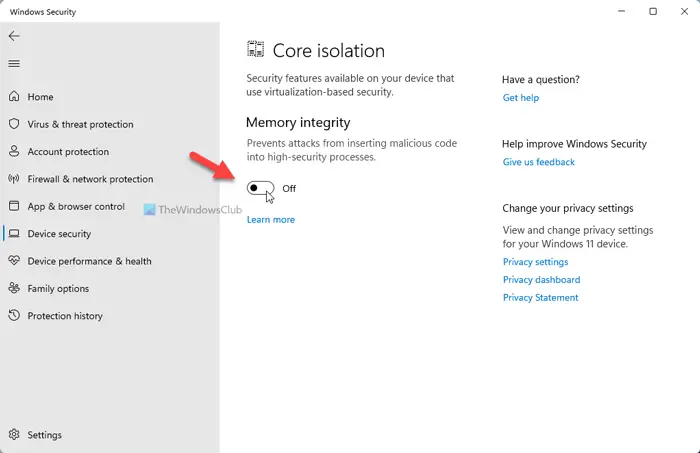
- Switch to the Device security tab.
- Click on the Core isolation details option.
- Toggle the Memory integrity button to turn it on.
- Restart your computer.
After restarting, you can open the System Information window to find the status. However, if you want to disable Virtualization-based Security in Windows 11, you need to check if it is turned on. If so, toggle the same button to disable the feature.
2] Using Registry Editor
To turn on Virtualization-based Security in Windows 11 using Registry Editor, do the following:
Press Win+R to open the Run prompt.
Type regedit > press the Enter button > click the Yes option.
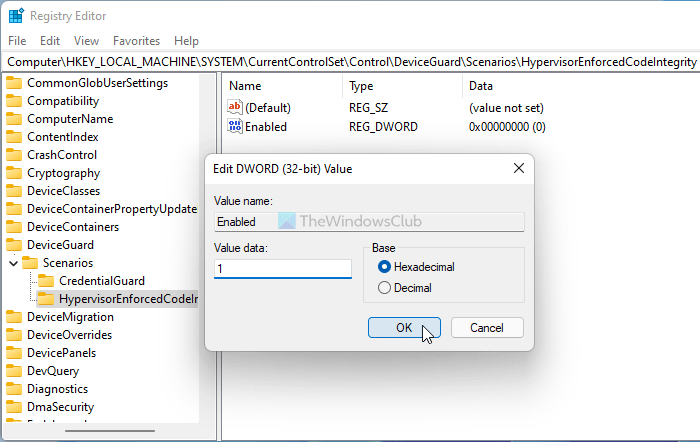
Go to-
HKEY_LOCAL_MACHINE\SYSTEM\CurrentControlSet\Control\DeviceGuard\Scenarios\HypervisorEnforcedCodeIntegrity
Right-click on HypervisorEnforcedCodeIntegrity > New > DWORD (32-bit) Value.
Name it as Enabled.
Double-click on it to set the Value data as 1.
Click the OK button.
Close all windows and restart your computer.
After that, you can find it enabled. However, if you want to disable Virtualization-based Security in Windows 11, you need to set the Value data as 0.
What are the requirements for VBS in Windows 11?
If the Virtualization-based Security is not enabled even after following the aforementioned guides, you need to check if your computer complies with the system requirements:
- x64 CPU
- SLAT or Second Level Address Translation
- Intel VT-D or AMD-Vi
- Trusted Platform Module 2.0
- SMM protection supported firmware
- UEFI memory reporting
- Security MOR 2
- HVCI or Hypervisor Code Integrity
How to check if VBS is enabled?
To check if VBS is enabled, you need to search for System Information in the Taskbar search box and click on the individual search result. Then, find out the Virtualization-based security section and check the status on the right side. You can find either Enabled or Not enabled.
Read: How to disable VBS?
How to disable VBS in Windows 11?
As mentioned in the post, to disable VBS in Windows 11, you need to open Windows Security. Then, switch to the Device security tab, and click on the Core isolation details. Following that, toggle the Memory integrity button to turn it off.
Hope this guide helped.

Безопасность на основе виртуализации, также известная как VBS, позволяет Windows 11 создавать защищенный анклав памяти, изолированный от небезопасного кода. Другая встроенная функция, называемая целостностью кода с применением гипервизора (HVCI), использует возможности VBS для предотвращения попадания неподписанных или сомнительных драйверов и программного обеспечения в память. Вместе VBS и HVCI добавляют уровень защиты, который ограничивает ущерб, который вредоносное ПО может нанести, даже если оно пройдет мимо вашего антивирусного ПО.
К сожалению, VBS и HVCI требуют значительных затрат на производительность, особенно когда дело касается игр. В тестах обнаружили, что игры работали на 5 процентов медленнее с этими настройками, чем с выключенными. Другие тестировщики увидели еще большое снижение производительности; на сайте PC Gamer отметили падение производительности на 25 процентов, хотя они тестировали процессоры Intel 10-го поколения, когда Microsoft рекомендует не менее 11-го поколения.
Простое обновление до Windows 11 не включит VBS, если вы не включили его в Windows 10, где он не использовался по умолчанию в течение нескольких лет. Так что на данный момент это проблема, с которой сталкиваются немногие.
Однако, если вы выполняете чистую установку Windows 11 или покупаете новый ноутбук или настольный компьютер с Windows 11, по умолчанию у вас может быть включен VBS / HVCI. Microsoft рекомендует включить его в OEMS по умолчанию, но отмечает, что «некоторые устройства, которые особенно чувствительны к производительности (например, игровые ПК), могут поставляться с отключенным HVCI». И уже известно, по крайней мере, об одном OEM, который утверждает, что они будут поставлять свои системы с отключенным VBS.
Если вы используете Windows 11, и производительность, особенно в играх, имеет для вас наибольшее значение, ниже будет показано, как проверить, включен ли VBS / HVCI и как его отключить. Однако, если вы не играете, вы можете оставить защиту на месте.
Как проверить, включен ли VBS в Windows 11
Прежде чем вы начнете думать об отключении VBS, вам нужно выяснить, включен ли он вообще.
1. Откройте системную информацию. Самый простой способ сделать это — выполнить поиск «системной информации» в поиске Windows и щелкнуть верхний результат.

2. Прокрутите вниз и найдите строку «Безопасность на основе виртуализации». Если написано «работает», значит VBS включен. Но если написано «не включено», значит ничего больше делать не надо.

Как отключить VBS / HVCI в Windows 11
1. Найдите Core Isolation в поиске Windows и щелкните верхний результат .

2. Нажмите «Безопасность Windows» и «ОК», если вас спросят, какое приложение использовать. Откроется подменю.

3. Выключите целостность памяти, если она была включена. Если уже выключена, переходите к шагу 6.

4. Перезагрузите компьютер, как будет предложено.

5. Еще раз проверьте информацию о системе, чтобы убедиться, что безопасность на основе виртуализации выключена. Если да, то все готово. Если нет, перейдите к шагу 6, где вы отключите VBS в реестре.

6. Откройте regedit. Самый простой способ — нажать Windows + R, ввести regedit в текстовое поле и нажать ОК.

7. Перейдите к HKEY_LOCAL_MACHINE\System\CurrentControlSet\Control\DeviceGuard.

8. Откройте EnableVirtualizationBasedSecurity и установите для него значение 0.

9. Закройте regedit и перезагрузите компьютер .
На этом этапе вы должны увидеть, что VBS отключен в приложении с системной информацией.
рекомендации
4070 MSI по старой цене дешевле Palit
13900K в Регарде дешевле чем при курсе 60
Ищем PHP-программиста для апгрейда конфы

Функция Безопасность на основе виртуализации (Virtualization Based Security или VBS) появилась ещё в Windows 10 и позже перекочевала в Windows 11. Смысл её работы в том, что VBS изолирует потенциально опасный код в памяти компьютера, предотвращая его выполнение напрямую в операционной системе. С точки зрения безопасности — Функция полезная. Но вот если у Вас слабый или игровой компьютер, то рекомендуется отключить безопасность на основе виртуализации в Windows для повышения производительности. Так же есть ряд приложений, которые вообще отказываются запускаться, если VBS включена.
В этой инструкции я покажу как выключить функцию Virtualization Based Security, используя редактор локальной и групповой политики Windows 11, а так же включить его обратно, при необходимости. А ещё расскажу про альтернативные способы, если вдруг через политики это сделать не получится.
Содержание
Проверка состояния функции «Безопасность на основе виртуализации»
Прежде чем думать как отключить функцию — сначала проверьте работает ли она вообще. Как это сделать? Нам поможет инфопанель msinfo32.
Нажмите клавиши Win+R, введите команду «msinfo32» и нажмите на «Enter».
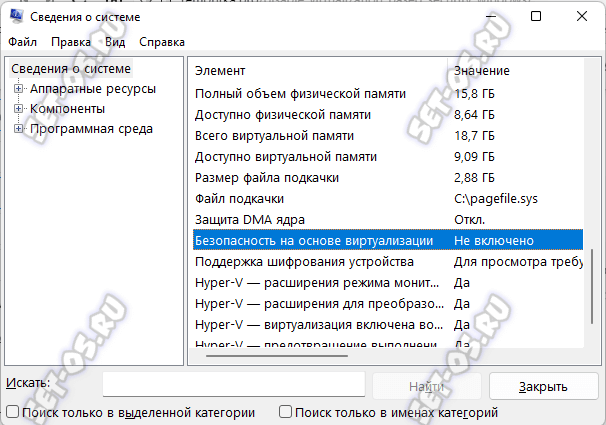
В разделе «Сведения о системе» прокрутите страничку вниз, где найдете пункт «Безопасность на основе виртуализации» — там будет указан текущий статус работы функции. Если стоит «Не включено», то и выключать не придётся!
Управляем Virtualization Based Security через групповые политики
Самый главный способ отключить Безопасность на основе виртуализации (Virtualization Based Security) — это настройка соответствующей групповой политики в Windows. Для этого надо открыть редактор групповых политик. Нажимаем правой кнопкой мыши по кнопке «Пуск» и выбираем пункт «Выполнить», вводим команду gpedit.msc и нажимаем клавишу «Enter».
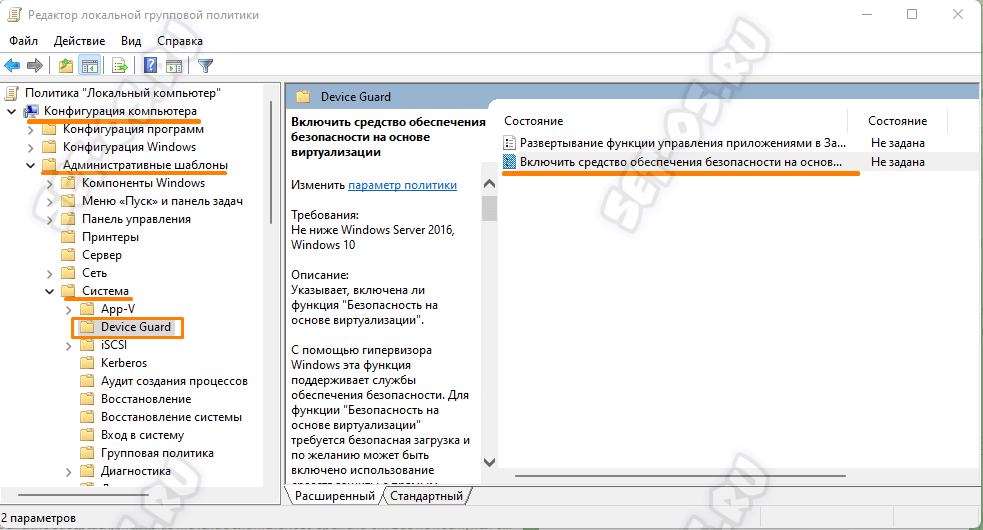
Дальше, в редакторе локальной групповой политики надо открыть раздел «Конфигурация компьютера» ⇒ «Административные шаблоны» ⇒ «Система» ⇒ «Device Guard». В правой части окна кликните дважды по пункту «Включить средство обеспечение безопасности на основе виртуализации».
Чтобы отключить VBS Windows 11 — поставьте флажок на значение «Отключено» и нажмите кнопку «ОК».
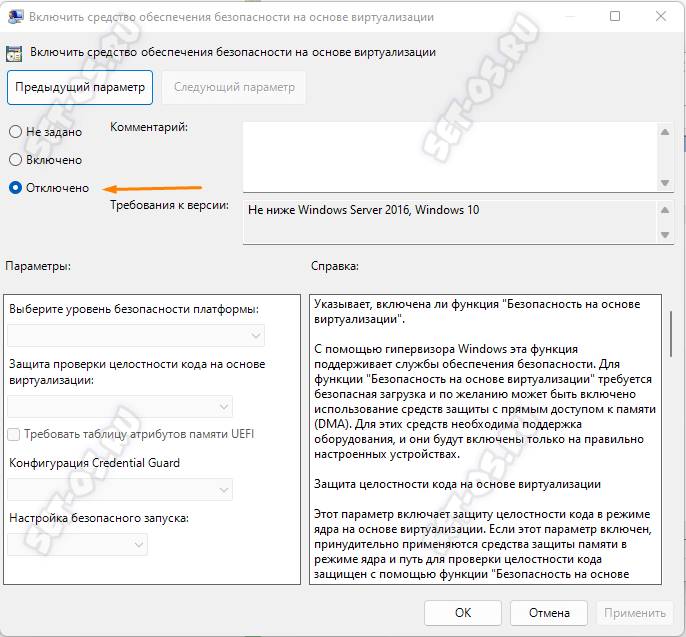
После этого нужно будет перезагрузить компьютер.
Если вдруг потребуется снова Virtualization Based Security включить, то опять открываем эту политику и ставим значение «Включено»:
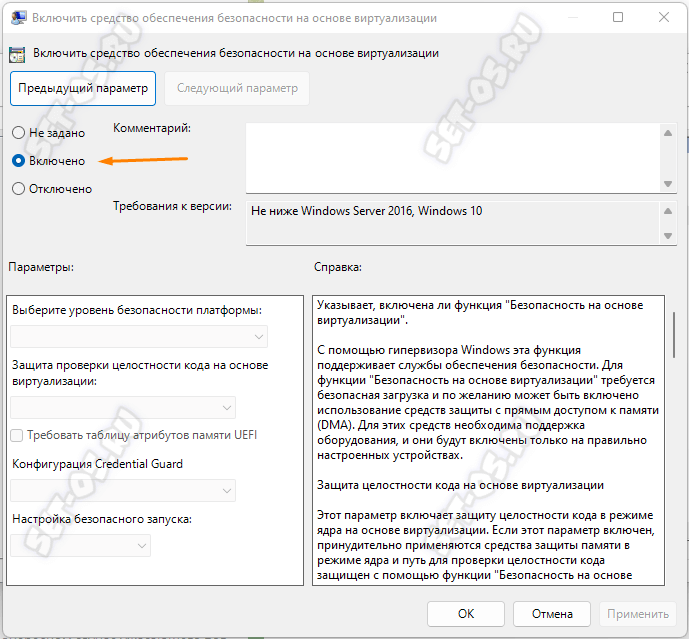
После этого нужно будет опять перезагрузить компьютер.
Windows 11 Home Edition
Для тех, у кого на ПК установлена домашняя версия Windows — Home Edition — в которой нет доступа к редактору групповых политик, тоже есть выход! Можно использовать редактор реестра! Чтобы его открыть — нажмите клавиши Win+R на клавиатуре, в появившемся окне «Выполнить» введите команду «regedit» и нажмите клавишу Enter.
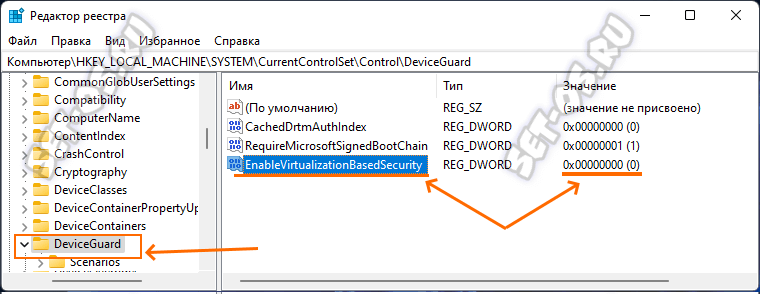
Перейдите вот в этот раздел реестра:
HKEY_LOCAL_MACHINE\ System\ CurrentControlSet\ Control\ DeviceGuard
После этого в правой части окна редактора надо нажать правой кнопкой мыши в пустом месте и через открывшееся меню создайте новый параметр DWORD с именем EnableVirtualizationBasedSecurity. Установите значение параметра равным «0». Если там уже есть такой параметр, то дважды кликните по нему и измените значение на «0».
Перезагрузите свой компьютер и проверьте работу функции через msinfo32.
Прочие способы отключить Virtualization Based Security
Если с редактором групповых политик у Вас есть какие-то сложности, то можно воспользоваться альтернативными способами.
Внимание! Использование альтернативных способов приведёт не только отключит Безопасность на основе виртуализации, но и саму виртуализацию на базе Hyper-V в Windows 11 и Windows 10. Обязательно учтите это!
Командная строка
Запустите командную строку от имени Администратора и введите команду:
bcdedit /set hypervisorlaunchtype off
Нажмите клавишу «Enter», чтобы выполнить её. Вот так:

После этого перезагрузите компьютер.
Отключение компонентов Windows 11
Отключить виртуализацию в Windows можно через раздел «Программы и компоненты». Для этого с помощью комбинации клавиш Win+R открываем окно «Выполнить», вводим команду: appwiz.cpl и нажимаем на кнопку «ОК». В открывшемся окне кликаем на ссылку «Включение или отключение компонентов Windows»:
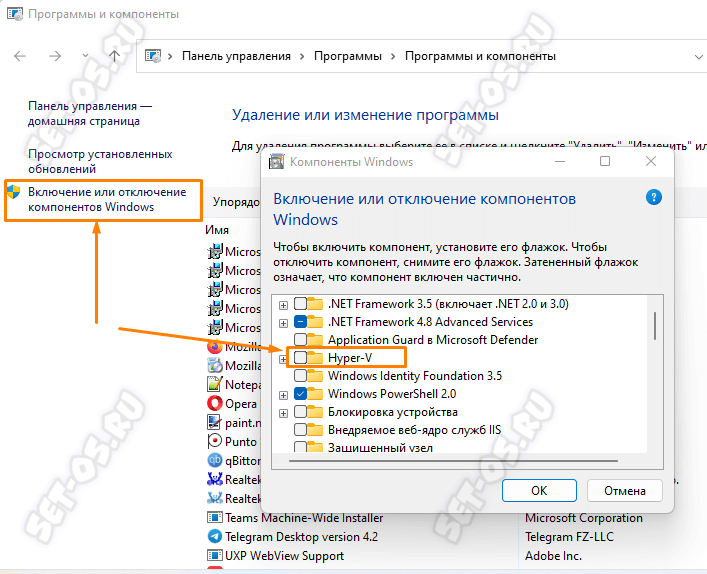
В появившемся окне «Компоненты Windows» найдите и отключите компоненты «Application Guard в Microsoft Defender», «Hyper-V», «Платформа виртуальной машины». Нажмите на кнопку «Ок». Перезагрузите компьютер.
Безопасность на основе виртуализации, также известная как VBS, позволяет операционной системе Windows 11 создавать защищенный канал памяти полностью изолированный от небезопасного кода и влияет на игровую производительность компьютера.

Другая встроенная функция, называемая целостностью памяти с применением гипервизора (HVCI), использует возможности VBS для предотвращения попадания неподписанных или сомнительных драйверов и программного обеспечения в оперативную память.
Вместе VBS и HVCI создают дополнительный уровень защиты, который ограничивает ущерб, от вредоносного программного обеспечения. К сожалению, данный функционал требуют значительных затрат системных ресурсов и влияет на производительность, особенно когда дело касается компьютерных игр.
В тестах с процессором Intel 11-го поколения обнаружилось, что игры работали на 5 процентов медленнее с включенным параметром, чем с неактивным. Так же отмечено падение производительности на 25 процентов, при тестировании c процессорами Intel 10-го поколения.
Простое обновление до Windows 11 не включит безопасность на основе виртуализации, если вы не включили её в Windows 10, где она использовалась по умолчанию в течение нескольких лет. Так что на данный момент это проблема, с которой сталкиваются немногие.
Однако, если вы выполняете чистую установку операционной системы Windows 11, покупаете новый ноутбук или настольный компьютер с Windows 11, по умолчанию у вас может быть включен VBS / HVCI.
Если вы используете Windows 11, и производительность, особенно в играх, имеет для вас наибольшее значение, мы покажем вам, как проверить, включен ли VBS / HVCI и как его отключить.
Как проверить, включен ли VBS в Windows 11
1. Самый простой способ сделать это — открыть меню Пуск, ввести в поиске «Сведения о системе» и открыть результат.

2. Прокрутите вниз страницу и найдите строку «Безопасность на основе виртуализации». Если написано «работает», значит VBS включен. Но если написано «не включено», значит, все в порядке.

Как отключить VBS и улучшить игровую производительность Windows 11
1. Найдите через поиск «Изоляция ядра» и откройте параметры безопасности.

2. Выключите целостность памяти.

3. После чего, перезагрузите компьютер.
4. Еще раз проверьте сведения о системе, чтобы убедиться, что безопасность на основе виртуализации отключена. Если да, то все готово. Если нет, перейдите к шагу 5, где вы отключите VBS в реестре.
5. Откройте реестр и перейдите к ветке «HKEY_LOCAL_MACHINE\System\CurrentControlSet\Control\DeviceGuard«. Дважды кликните параметр «EnableVirtualizationBasedSecurity» и установите для него значение «0«.

7. Закройте реестр и выполните перезагрузку компьютера.
Источник: Tom’s Hardware
Learn how to Enable or Disable Virtualization Based Security (VBS) on Windows 11. The implementation of VBS uses hardware virtualization features to create and isolate a certain memory region from the normal Operating System window. It uses the secure virtual mode to host several security solutions.
Hypervisor Enforced Code Integrity (HVCI), called Memory Integrity, uses Virtualization-Based Security (VBS) to enforce code integrity policy. VBS protects system memory from loading unsigned drivers and system files. VBS protects the vital system and operating system resources by enforcing restrictions.
VBS protects security assets such as authenticated user credentials. VBS creates a secure environment that can host several security features. VBS greatly improves platform security. VBS also changes the trust boundaries in a window device. As per Microsoft, VBS reduces the impact of Kernel viruses and Malware attacks.
To improve the performance of windows 11 and a smooth gaming experience need to disable Virtualization-Based Security (VBS). If you are using a low-end gaming device or an old device upgraded from Windows 10 to Windows 11.

- Intune Microsoft Store Repository First Look of Windows Package Manager Integration
- Improve Windows 11 Performance using Debloat Tool
- Issue: Unable to enroll devices in Microsoft Intune | iOS devices accessing protected Apps
After all the above discussion, the question will arise “What is the need to disable VBS (such powerful security enabled by default in Windows 11) from Windows 11?”. The answer: According to many tests, it’s clear that the VBS will lower your device performance, especially while playing games.
The Advantages and Disadvantages of Disabling VBS on Windows 11
Let’s quickly look at the Advantages Vs. Disadvantages of disabling VBS. We don’t recommend disabling the VBS at all. But if you have a specific scenario where disabling VBS is mandatory, you can use any of the following methods.
| Advantages of Disabling VBS | Disadvantages of Disabling VBS |
|---|---|
| Improvement in PC as well as the gaming performance | Weaken the securities features of Windows |
| Recommended for low-end gaming PC, and old upgraded PC | Disabling VBS, the over PC security may get compromised, and this could break Hyper-V related features |
Checking Status of VBS in Windows 11
There is a simple process to check the status of VBS on Windows 11 if it is enabled (activate) or disabled (deactivate). Let’s follow the steps below to check the status of Virtualization Based Security.
- Click the Search icon on the taskbar
- Type System Information or msinfo32
- Click Open of System Information

The System Information window opens, and the System Summary section is under it. In the System Summary section, some items with their value appear; scroll down a little to find the object named Virtualization-based security and its value. If the value shows Running, it means the VBS is enabled. If the value indicates Not enabled, VBS is disabled on your device.


Core Isolation Method to Disable Virtualization Based Security (VBS)
There is a process to disable VBS simply under the system settings named Core Isolation. This is how we must change VBS setting using GUI. Let’s follow the steps below:
- Click the Search icon on the taskbar
- Type Core Isolation
- Click Open of Core Isolation System Settings

Now you are in the Windows Security section, Core Isolation. Just check for Memory Integrity, whether it is on or off. Toggle to turn off the button of Memory Integrity to disable the VBS features.
- Memory Integrity (toggle to Off)

After disabling VBS, a security window pop-up and says, “Restart to apply protection changes.” The recent change to your protection settings required a restart of your device. Restart the device for the applicability of the changes made therein.
Windows Features Method to Disable Virtualization-Based Security (VBS)
Another process to disable VBS using Windows Features. This is a more advanced option to disable the Virtualization Based Security settings using GUI.
- Click on the Search icon on the taskbar.
- Type “Windows Features” in the search box.
- Click on Open under the Turn Windows Features on or off to explore windows features.

The turn windows feature on or off opens now, find and uncheck the adjacent boxes of the options are Windows Hypervisor Platform, Virtual Machine Platform, and Microsoft Defender Application Guard. Once unchecked all the above categories, press OK to complete the process of disabling VBS.

Registry Method to Disable Virtualization-Based Security (VBS)
There is another way to enable or disable VBS completely. This procedure is done using the Registry Editor. Let’s discuss the step-by-step guidelines for it.
| Setting Type | Hive | Key | Value | Value Name | Value Data |
|---|---|---|---|---|---|
| Registry | HKEY_LOCAL_MACHINE | System\CurrentControlSet\Control\DeviceGuard | DWORD (32-bit) | EnableVirtualizationBasedSecurity | 0 to Disable 1 to Enable |
Open run Window, press Windows Key + R from the keyboard simultaneously. This is the keyboard shortcut to open the run window. Now, type regedit and click on OK to continue. Then it asks the Admin’s permission to make changes to the device click Yes.
- Window Key + R (To open run command)
- Type ‘regedit‘ and press OK
- Administrator Permission press Yes.

Now, the Registry Editor opens. HKEY_LOCAL_MACHINE\System\CurrentControlSet\Control\DeviceGuard is the path. Following the trail, I reached the Device Guard sub-folder for a further course of action.
HKEY_LOCAL_MACHINE\System\CurrentControlSet\Control\DeviceGuard

Clicking on Device Guard shows several options in the right panel. From the several options, double-click on EnableVirtualizationBasedSecurity and set the value data 0, press OK and restart the device. Now you successfully disabled VBS from your device.
| Value of EnableVirtualizationBasedSecurity | Description |
|---|---|
| 0 | Disables virtualization-based security. This is the default OS value. |
| 1 | Enables virtualization-based security. |
Restart the Windows 11 device after changing the registry values to take effect.

Intune Policy to Disable Virtualization-Based Security VBS on Windows 11
Let’s check the Intune Setting catalog policy options to Enable or Disable Virtualization-Based Security (VBS) on Windows 11 devices. You can go through Intune Settings Catalog Guide to create the policy in detail. However, for this context, search with the following keyboard – EnableVirtualizationBasedSecurity.
NOTE! – More details on Intune settings catalog guide – Create Intune Settings Catalog Policy.
- Search with “EnableVirtualizationBasedSecurity” in the Settings picker search box.
- Select the Device Guard Category.
- Enable Virtualization Based Security options from the Settings name section.
- Keep the policy’s settings to DISABLED or ENABLE if you want to keep it enabled.
NOTE! Restart the Windows 11 device after changing the registry values to take effect.

Group Policy Settings – Disable Virtualization-Based Security (VBS) on Windows 11
You can use Group Policy Settings to Disable Virtualization-Based Security (VBS). You can use this method for Domain Joined devices to automate the entire process. Let’s see how to open it in Group Policy Settings.
- Window Key + R (To open run command)
- Type ‘gpedit.msc‘ and press OK

- GP unique name: EnableVirtualizationBasedSecurity
- GP name: Turn On Virtualization Based Security
- GP path (Mandatory): Administrative Templates/System/Device Guard/
- GP path (Recommended): Administrative Templates/System/Device Guard- Default Settings (users can override)/
- GP ADMX file name:
When the group policy editor opens, follow the path “Local Computer Policy/Computer Configuration/Administrative Templates/System/Device Guard” to reach the proper location to perform the desired task.
Computer Configuration/Administrative Templates/System/Device Guard

After reaching Device Guard click on it to explore. Select and double-click on the option Turn On Virtualization Based Security. In the next pop-up window, check the box adjacent to Disable, click on Apply, and press Ok to continue.
I have also added how to enable Virtualization Based Security (VBS) using group policy settings on Windows 11 devices.
Note! Don’t forget to restart your device after performing the above methods.

Author
Alok is a Master of Computer Applications (MCA) graduate. He loves writing on Windows 11 and related technologies. He likes to share his knowledge, quick tips, and tricks with Windows 11 or Windows 10 with the community.