How to Enable SSL in Windows 10
SSL is a security feature that enables websites to send and receive secure data. Windows 10 comes with a built-in feature that helps you enable SSL. When you browse the web, you can see a padlock icon in the address bar. When you click on the icon, a pop-up window will display the current certificate validity.
To disable SSL v3 in Windows 10, you can open the Windows Registry. This is found in the Control Panel, and it can be accessed via the Start menu. Press the Windows key (or Start if you are using a tablet or mobile device), and then select Run. In the Run dialog box, type regedit and press OK. The Registry Editor window should look like the following Google:
Click the Advanced option. Select the Disable SSL v3 option. If it is enabled, the command should show a warning. Otherwise, run the command again. This should reset the encryption settings. After the change, reboot your computer. After changing the settings, you’ll need to re-enable SSLv3 before your changes take effect.
How To Disabling SSL V3:
Disabling SSL v3 in Windows will also remove any existing certificates from your PC. You can disable the SSL protocol in older versions of Internet Explorer as these don’t support the TLS 1.1.2 protocols. To disable SSL v3, go to the Internet Options window and click the Advanced tab. Go to the Security section. Double-click the value in the right pane and click OK.
Once the certificate has been installed, you can enforce SSL by using the Computer Management console. To do this, you need to click the Advanced icon in the options window and choose the SSL tab. Select the “Encryption” section. On the Encryption tab, click the “View Certificates” and “Import” options. Once you have selected the correct certificate, you will need to enter your master password and then enter the certificate password.
How To Installing A Certificate:
You can check the validity of the SSL certificate by using the Certificate Manager. Alternatively, you can use the aircheck Windows Sysinternals utility to view the trusted Microsoft root certificate list. The certificate you install must be issued by a Certificate Authority (CA). To apply an SSL certificate, you will need to generate a CSR, which is a document that is submitted to the CA.
Once you have the certificate, you can install it on the site. The process to install an SSL certificate is easy. First, go to the Server Certificates page. Go to the Actions panel and click the “Complete Certificate Request” button. In the next window, you will see the Certificate Manager, which will allow you to browse and choose the certificate you want to install. You should now be able to visit the website.
How To Configuring A Web Server:
In Windows 10, you can configure a web server to enable SSL. To do this, you need to use the Server Configuration dialog box. In the Server Configuration dialog box, select the SSL tab. Choose the appropriate SSL certificate. There are several different types of certificates, including internal and wildcard certificates.
Generally, SSL is used by many websites to secure the connection between the website and the browser. This protects the privacy of users, and encrypts data. To use SSL, you need to use a certified certificate and bind the website to the https protocol.
How To Changing The Registry Key:
Choosing a certificate for your website is a critical step for protecting data. An SSL certificate is a sign of authenticity. When choosing an SSL certificate, you need to work with your IT department and web host to select the appropriate certificate. Next, you need to configure your Windows server to use the new certificate.
The easiest way to enable SSL in Windows 10 is to change a single key in the Windows registry. It is recommended to consult your System Administrator first before making any changes to the registry. Open the Registry Editor by pressing the Windows key + R. In the registry editor window, right-click the Protocols folder and select New. Next, create a new folder called “TLS 1.2.” Inside the folder, add a new key called “Client.” After adding the key, select it and then click Modify. Then, set the Base to Hexadecimal.
SSL Port On Windows Firewall:
- Start > Settings > Control Panel.
- Click the Windows Firewall icon. A window will appear.
- Click the Exceptions tab.
- Add Port button. A window will appear.
- Enter a name in the Name field.
- In the Port field, enter the port number of the Administration Server.
- Select the TCP option.
- Click the OK button.
The registry contains two basic elements: keys and values. Each key has a corresponding subkey. The key names are case-insensitive and must be at least two characters long. For example, if you want to enable HTTPS in Windows 10, the registry key name must begin with ‘https://’.
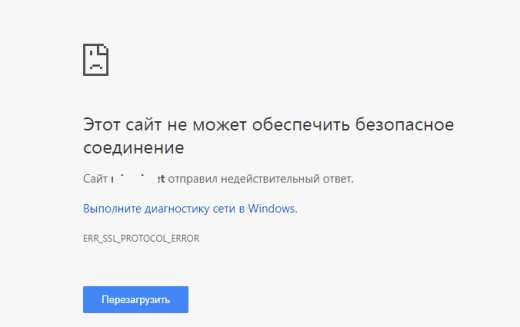
У меня почему-то перестали открываться некоторые HTTPS сайты (не все!). При попытке открыть такой сайт в браузере появляется окно с ошибкой «Этот сайт не может обеспечить безопасное соединение». Сайты не отображаются как в Google Chrome, так и в Opera, Яндекс Браузере и Microsoft Edge. Без HTTPS некоторые сайты открываются, но не все, только те, у которых страницы доступны и по протоколу HTTPS и по протоколу HTTP. В Google Chrome ошибка при открытии HTTPS сайт выглядит так:
Этот сайт не может обеспечить безопасное соединение.
Сайт sitename.ru отправил недействительный ответ.
ERR_SSL_PROTOCOL_ERROR.
И так:
 Этот сайт не может обеспечить безопасное соединение.
На сайте sitename.ru используется неподдерживаемый протокол.
ERR_SSL_VERSION_OR_CIPHER_MISMATCH.
Клиент и сервер поддерживают разные версии протокола SSL и набора шифров. Скорее всего, сервер использует шифр RC4, который считается небезопасный.» [/alert]

Или в Mozilla Firefox :
Secure Connection Failed
В Opera и Яндекс Браузере ошибки выглядит примерно также.
Как мне открыть такие сайты?
Ответ
Как вы уже вероятно поняли, проблема связана с проблемами при SSL взаимодействии между вашим компьютеров и HTTPS сайтом. Причины такой ошибки могут быть довольно разные. В этой статье я попробовал собрать все методы исправления ошибки «Этот сайт не может обеспечить безопасное соединение» (This site can’t provide a secure connection, ERR_SSL_PROTOCOL_ERROR) в различных браузерах.
Содержание:
- Очистите в брайзере кэш и куки, сбросьте SSL кэш
- Отключите сторонние расширения в браузере
- Проверьте настройки антивируса и файрвола
- Проверьте настройки даты и времени
- Обновите корневые сертификаты Windows
- Отключите поддержку протокола QUIC
- Проверьте версии протоколов TLS, поддерживаемых вашим браузером и сайтом
- Включите поддержку старых версий протоколов TLS и SSL
Сразу хочется отметить, что несмотря на то, что браузеры Google Chrome, Opera, Яндекс Браузер и Edge выпускаются разными компаниями, на самом деле все эти браузеры основаны на одном и том же движке — WebKit (Chromium) и проблема с ошибками при открытии HTTPS сайтов в них решается одинаково.
В первую очередь нужно убедиться, что проблема не на стороне самого HTTPS сайта. Попробуйте открыть его с других устройств (телефон, планшет, домашний/рабочий компьютер и т.д.). Также проверьте, открывается ли в других браузерах, например, IE/Edge или Mozilla Firefox. В Firefox похожая ошибка обсуждалась в статье Ошибка при установлении защищённого соединения в Mozilla Firefox.
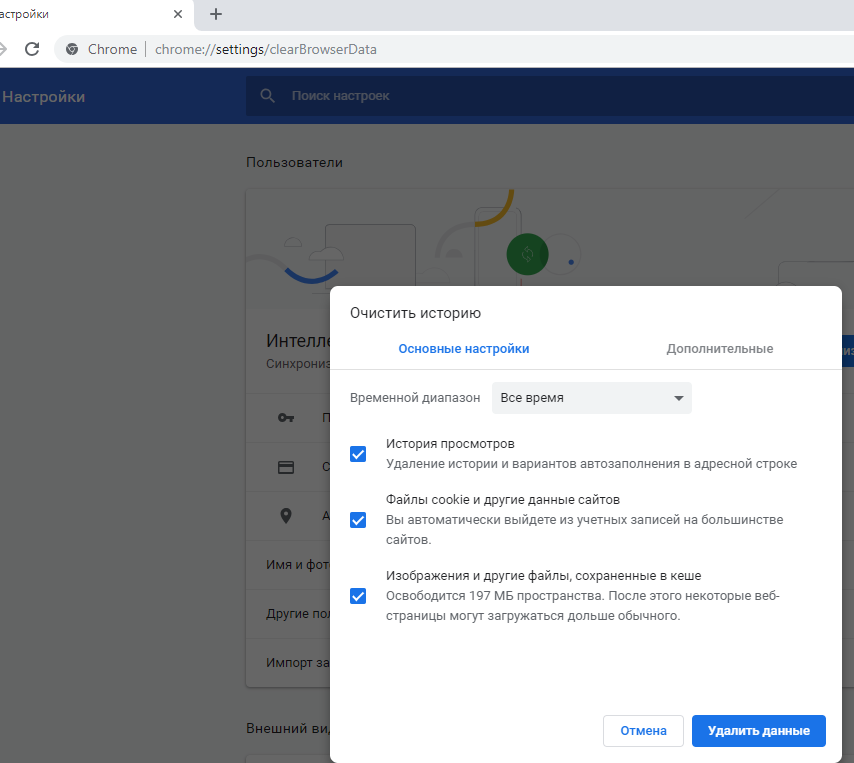
Очистите в брайзере кэш и куки, сбросьте SSL кэш
Кэш и куки браузера могут быть частой причиной возникновения ошибок с SSL сертификатами. Рекомендуем сначала очистить в браузере кэш и куки. В Chrome нужно нажать сочетание клавиш Ctrl + Shift + Delete, выберите промежуток времени (Все время) и нажмите кнопку очистки данных (Удалить данные / Clear Data).
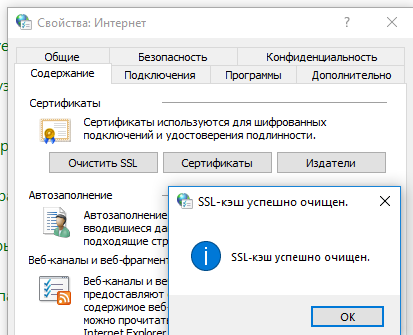
Чтобы очистить SSL кэш в Windows:
- Перейдите в раздел Панель управления -> Свойства браузера;
- Щелкните по вкладке Содержание;
- Нажмите на кнопку Очистить SSL (Clear SSL State);
- Должно появится сообщение “SSL-кэш успешно очищен”;
- Осталось перезапустить браузер и проверить, осталась ли ошибка ERR_SSL_PROTOCOL_ERROR.
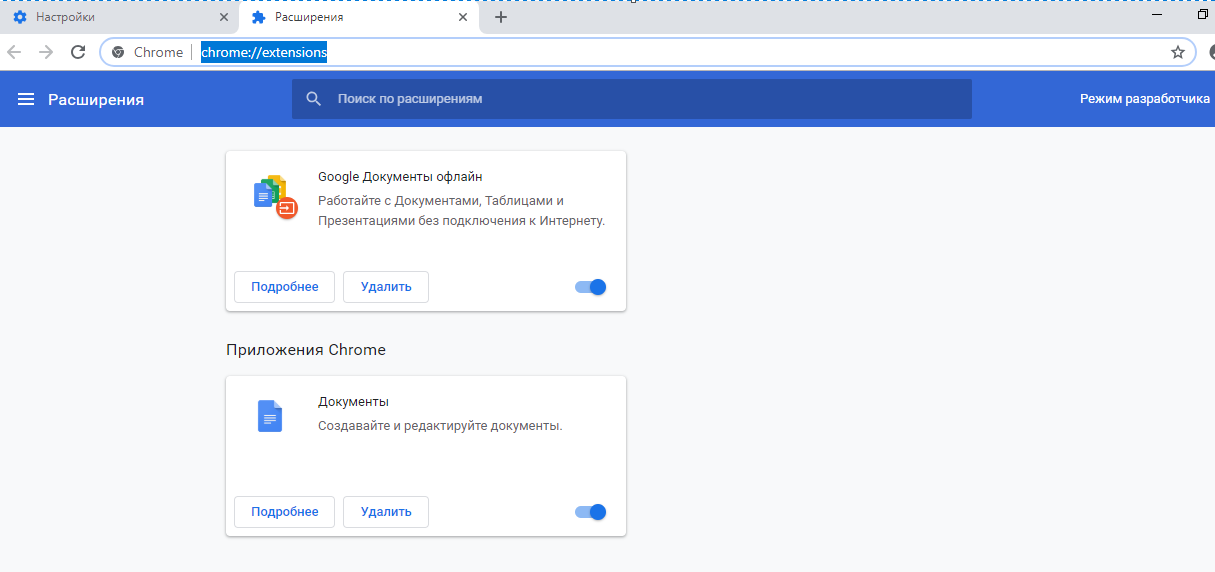
Отключите сторонние расширения в браузере
Рекомендуем отключить (удалить) сторонние расширения браузера, особенно всякие анонимайзеры, прокси, VPN, расширения антивируса и другие подобные Addon-ы, которые могут вмешиваться в прохождение трафика до целевого сайта. Посмотреть список включенных расширения в Chrome можно, перейдя в Настройки -> Дополнительные инструменты -> Расширения, или перейдя на страницу
chrome://extensions/
. Отключите все подозрительные расширения.
Проверьте настройки антивируса и файрвола
Если на вашем компьютере установлены антивирусная программа или межсетевой экран (часто он встроен в антивирус), возможно доступ к сайту блокируется именно ими. Чтобы понять, ограничивают ли доступ к сайту антивирусы или файрволы, попробуйте на время приостановить их работу.
Во многих современных антивирусах по-умолчанию присутствует модуль проверки SST/TLS сертификатов сайтов. Если антивирус обнаружит, что сайт использует недостаточно защищенный (или самоподписанный) сертификат или устаревшую версию протокола SSL (тот же SSL 3.0 или TLS 1.0), доступ к пользователя к такому сайту может быть ограничен. Попробуйте отключить сканирование HTTP/HTTPS трафика и SSL сертификатов. В различных антивирусах эта опция может называть по-разному. Например:
Проверьте настройки даты и времени
Неправильная дата и время (и часового пояса) на компьютере также может быть причиной ошибки при установке защищенного соединения с HTTPS сайтами. Ведь при выполнении аутентификации система проверяет срок создания и дату истечения сертификата сайта и вышестоящего центра сертификации.
Проверьте что у вас установлено правильно время и часовой пояс. Если время постоянно сбивается – смотри статью “Сбивается время на компьютере при выключении: что делать?”.
Обновите корневые сертификаты Windows
Если ваш компьютер находится в изолированном сегменте, давно не обновлялся или на нем совсем отключена служба автоматического обновления, на вашем компьютере могут отсутствовать новые корневые доверенные сертификаты (TrustedRootCA). Рекомендуем выполнить обновление системы: установить последние обновления безопасности и обновления часовых поясов.
Вы можете вручную обновить корневые сертификаты по статье: Как вручную обновить корневые сертификаты в Windows (так же рекомендуем проверить хранилище сертификатов на предмет недоверенных сертификатов, это позволит предотвратить перехват вашего HTTPs трафика и ряд других проблем).
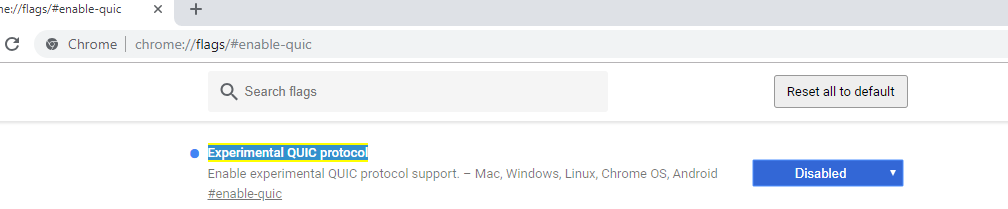
Отключите поддержку протокола QUIC
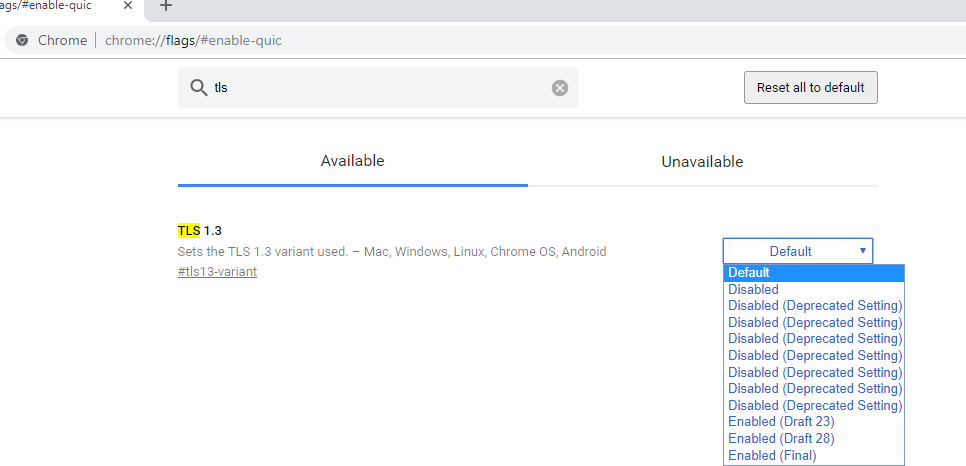
Проверьте, не включена ли в Chrome поддержка протокола QUIC (Quick UDP Internet Connections). Протокол QUIC позволяет гораздо быстрее открыть соединение и согласовать все параметры TLS (HTTPs) при подключении к сайту. Однако в некоторых случая он может вызывать проблемы с SSL подключениями. Попробуйте отключить QUIC:
- Перейдите на страницу: chrome://flags/#enable-quic;
- Найдите опцию Experimental QUIC protocol;
- Измените значение опции Default на Disabled;
- Перезапустите Chrome.
Проверьте версии протоколов TLS, поддерживаемых вашим браузером и сайтом
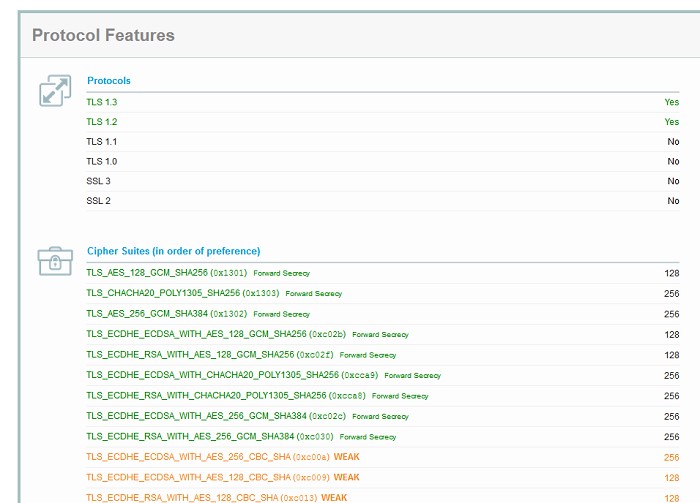
Проверьте, какие версии протоколов TLS/SSL и методы шифрования (Cipher Suite ) поддерживаются вашим браузером. Для этого просто откройте веб страницу https://clienttest.ssllabs.com:8443/ssltest/viewMyClient.html
Онлайн сервис SSL Labs вернет список протоколов и методов шифрования, которые поддерживает ваш блаузер. Например, в моем примере Chrome поддерживает TLS 1.3 и TLS 1.2. Все остальные протоколы (TLS 1.1, TLS 1.0, SSL3 и SSL 2) отключены.
Чуть ниже указан список поддерживаемых методов шифрования.
Cipher Suites (in order of preference)
- TLS_AES_128_GCM_SHA256
- TLS_CHACHA20_POLY1305_SHA256
- TLS_AES_256_GCM_SHA384
- TLS_ECDHE_ECDSA_WITH_AES_128_GCM_SHA256
- TLS_ECDHE_RSA_WITH_AES_128_GCM_SHA256
- TLS_ECDHE_ECDSA_WITH_CHACHA20_POLY1305_SHA256
- TLS_ECDHE_RSA_WITH_CHACHA20_POLY1305_SHA256
- TLS_ECDHE_ECDSA_WITH_AES_256_GCM_SHA384
- TLS_ECDHE_RSA_WITH_AES_256_GCM_SHA384
- TLS_ECDHE_ECDSA_WITH_AES_256_CBC_SHA
- TLS_ECDHE_ECDSA_WITH_AES_128_CBC_SHA
- TLS_ECDHE_RSA_WITH_AES_128_CBC_SHA
- TLS_ECDHE_RSA_WITH_AES_256_CBC_SHA
- TLS_RSA_WITH_AES_128_GCM_SHA256
- TLS_RSA_WITH_AES_256_GCM_SHA384
- TLS_RSA_WITH_AES_128_CBC_SHA
- TLS_RSA_WITH_AES_256_CBC_SHA
Полный список методов шифрования, включенных в Windows можно вывести с помощью PowerShell:
Get-TlsCipherSuite | Format-Table -Property CipherSuite, Name
Затем проверьте список протоколов TLS/SSL, которые поддерживает ваш сайт. Для этого воспользуйтесь онлайн сервисом проверки SSL
https://www.ssllabs.com/ssltest/analyze.html?d=domain.ru
(замените
domain.ru
на адрес сайта, который вы хотите проверить).
Проверьте, все ли версии TLS/SSL поддерживаемые сайтом доступны в вашем браузере.
В этом примере видно, что сайт не поддерживает TLS 3.1 и SSL3/2. Аналогично сравните список Cipher Suite.
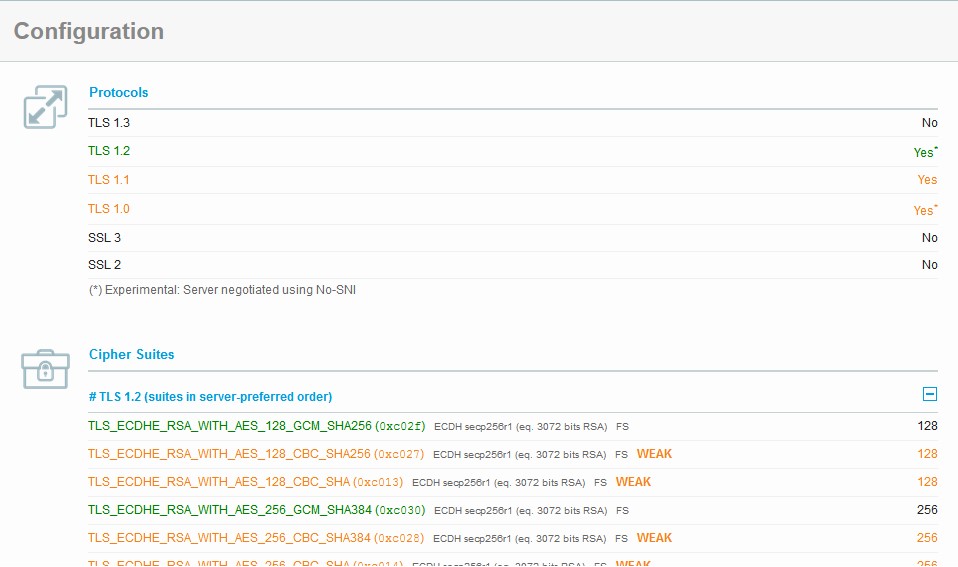
Если метод шифрования не поддерживается вашим браузером, возможно нужно включить его в Windows.
Если сайт не поддерживает SSL протоколы, которые требует использовать клиент, то при подключении вы увидите ошибку “ Этот сайт не может обеспечить безопасное соединение”.
Включите поддержку старых версий протоколов TLS и SSL
И самый последний пункт. Cкорее всего для решения проблемы вам достаточно будет включить поддержку старых версий протоколов TLS и SSL. В большинстве случае он окажется самым эффективным, но я намеренно перенес его в конец статьи. Объясню почему.
Старые версии протоколов TLS и SSL отключены не по простой прихоти разработчиков, а в связи с наличием большого количества уязвимостей, которые позволяют злоумышленникам перехватить ваши данные в HTTPS трафике и даже видоизменить их. Бездумное включение старых протоколов существенно снижает вашу безопасность в Интернете, поэтому к этому способу нужно прибегать в последнюю очередь, если все другое точно не помогло.
Современные браузеры и ОС уже давно отказались от поддержки устаревших и уязвимых протоколов SSL/TLS (SSL 2.0, SSL 3.0 и TLS 1.1). Стандартном сейчас считаются TLS 1.2 и TLS 1.3
Если на стороне сайта используется более старая версия протокола SSL/TLS, чем поддерживается клиентом/браузером, пользователь видит ошибку установки безопасного подключения ERR_SSL_VERSION_OR_CIPHER_MISMATCH. Такая ошибка появляется, если клиент на этапе TLS Handshake обнаружил, что на сайте используется протокол шифрования или длина ключа, которая не поддерживается вашим браузером. Выше мы показали, как определить набор протоколов и шифров, поддерживаемых сервером.
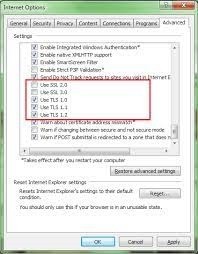
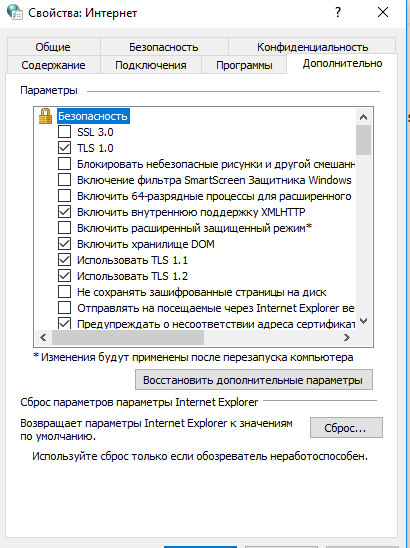
Чтобы разрешить использовать старые версии протоколов SSL/TLS в Windows (еще раз отмечаю – это небезопасно!):
- Откройте Панель Управления -> Свойства браузера;
- Перейдите на вкладку Дополнительно;
- Включите опции TLS 1.0, TLS 1.1 и TLS 1.2 (если не помогло, включите также SSL 3.0,2.0).

- Перезапустите браузер.
Если все рассмотренные способы не помогли избавиться от ошибки «Этот сайт не может обеспечить безопасное соединение» также попробуйте:
-
- Проверить, что в файле C:\Windows\System32\drivers\etc\hosts отсутствуют статические записи. Файл hosts может использоваться в Windows в том числе для блокировки доступа к сайтам. Выведите содержимое файла hosts с помощью PowerShell:
Get-Content $env:SystemRoot\System32\Drivers\etc\hosts - Попробуйте использовать публичные DNS сервера, например – DNS сервер Google. В настройках сетевого подключения в качестве предпочитаемого DNS сервера укажите IP адрес 8.8.8.8;
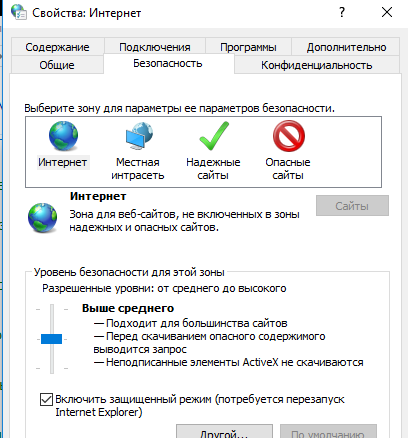
- В Панели управления -> свойства браузера, убедитесь, что для зоны Интернет выбрана уровень безопасности Выше среднего или Средний. Если выбрана зона Высокий, некоторые SSL подключения могут блокироваться браузером.
- Возможно проблема связана с сертификатом сайта. Проверьте его с помощью онлайн утилит SSL Checker;
- Если на компьютере используется VPN или задан прокси сервер в Windows, попробуйте отключите их;
- В тестовых целях, если вам нужно быстро просмотреть содержимое сайта, можно отключить ошибки проверки SSL сертификатов в Chrome. Для этого нужно запустить его с параметром —ignore-certificate-errors:
"C:\Program Files (x86)\Google\Chrome\Application\chrome.exe" --ignore-certificate-errors
(не работайте в таком режиме постоянно и не отправляйте конфиденциальные данные пароли/кредитки в такой сессии); - В Chrome проверьте, включен ли протокол TLS 1.3. В адресной строке перейдите в раздел настроек chrome://flags, С помощью поиска найдите параметр TLS 1.3. Убедитесь, что он включен (Enabled) или находится в состоянии Default. Если отключен – его нужно включить;

- Если у вас используется одна из старых версий ОС (Windows XP или Windows 7), установите вместо Chrome браузер Mozilla Firefox. В отличии от движков на базе Chromium, Mozilla не использует собственные модули реализации протоколов шифрования SSL/TLS, а не встроенные в Windows.
- Проверить, что в файле C:\Windows\System32\drivers\etc\hosts отсутствуют статические записи. Файл hosts может использоваться в Windows в том числе для блокировки доступа к сайтам. Выведите содержимое файла hosts с помощью PowerShell:
For communication securities, Windows uses Transport Layer Security (TLS) protocols. With the help of TLS standard level authentication protocols, your Windows system can securely communicate to Internet websites. You can learn more and in detail about TLS on Wikipedia. Mainly there are 3 TLS protocol versions Windows have at the moment. These are TLS 1.0, TLS 1.1 and TLS 1.2 versions.
You can enable or disable either of these TLS protocol versions as per your requirement. There are two ways, in which you can configure TLS protocol settings on your Windows 10. Both ways are mentioned below, try them as per your convenience,
Page Contents
How To Configure TLS Settings In Windows 10
WAY 1 – Via Internet Properties
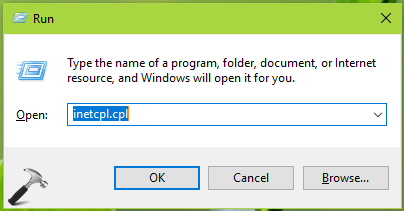
1. Press  + R and type inetcpl.cpl in the Run dialog box, to open Internet Properties.
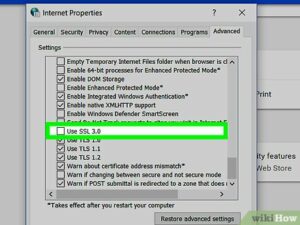
2. In Internet Properties window, switch to Advanced tab. Under Settings, scroll to Security heading. Beneath it, you’ll find Use TLS 1.0, Use TLS 1.1, Use TLS 1.2 options. You can enable/disable these options to allow/prevent corresponding TLS protocol.
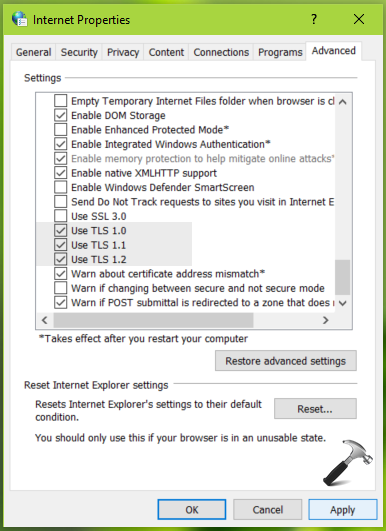
3. Once you’re done with your selection, click Apply followed by OK to save your settings.
Now let us see, how to use registry to configure TLS settings on your Windows 10.
WAY 2 – Via Registry
Registry Disclaimer: The further steps will involve registry manipulation. Making mistakes while manipulating registry could affect your system adversely. So be careful while editing registry entries and create a System Restore point first.
1. Press + R and put regedit in Run dialog box to open Registry Editor (if you’re not familiar with Registry Editor, then click here). Click OK.

2. In left pane of Registry Editor window, navigate to following registry key:
HKEY_LOCAL_MACHINE\SYSTEM\CurrentControlSet\Control\SecurityProviders\SCHANNEL\Protocols
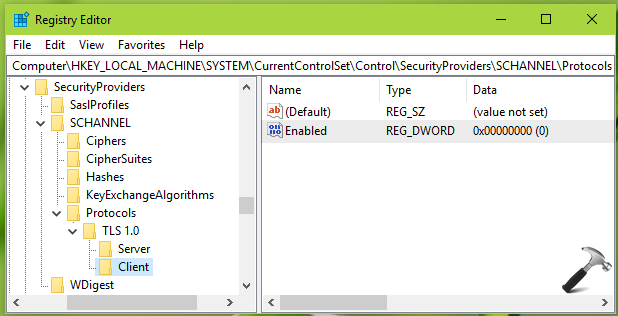
3. Right click Protocols registry key, select New > Key. Name the newly created sub-key as TLS 1.0. Similarly create two sub-keys to TLS 1.0 registry key and name them as Server and Client. Now in the right pane of Client registry key (HKEY_LOCAL_MACHINE\SYSTEM\CurrentControlSet\Control\SecurityProviders\SCHANNEL\Protocols\TLS 1.0\Client), right click and select New > DWORD Value. Name the newly created registry DWORD (REG_DWORD) as Enabled. Double click on this DWORD to modify its Value data:
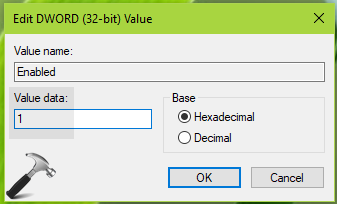
4. Finally, set the Value data to 1 to enable TLS 1.0 protocol. Click OK. If you want to allow TLS 1.0 to server side as well, create Enabled registry DWORD and set it to 1, for Server registry key (HKEY_LOCAL_MACHINE\SYSTEM\CurrentControlSet\Control\SecurityProviders\SCHANNEL\Protocols\TLS 1.0\Client) as well.
5. You can follow similar way for other TLS protocols such as TLS 1.1 and TLS 1.2 versions. Create TLS 1.1, TLS 1.2 registry sub-keys to Protocols registry key, and then create Client, Server specific registry sub-keys and then add Enabled DWORD to control the corresponding TLS version. Once you’re done, close Registry Editor and make sure to reboot the machine to make changes effective.
TIP: You can configure SSL protocol versions (SSL 2.0, SSL 3.0) in the same way. However, SSL is now deprecated and it is predecessor of TLS. You can create SSL 2.0 and SSL 3.0 registry sub-keys to Protocols (HKEY_LOCAL_MACHINE\SYSTEM\CurrentControlSet\Control\SecurityProviders\SCHANNEL\Protocols) registry key. The proceed similarly for client and server specific registry sub-keys.
In this way, you can configure to TLS settings in Windows 10.
That’s it!
READ THESE ARTICLES NEXT
- Microsoft released Windows 10 Version 22H2
- Differences between Windows 10 and Windows 11
- Run programs in Compatibility Mode in Windows 11/10
- How to Manage & Free Up Storage on Windows
- Fix: Recycle Bin Not Refreshing in Windows 11/10
- Fix: Location Settings Greyed Out in Windows 11/10
- Fix: Location Tab Missing in Properties on Windows 11/10
- Enable or Disable Memory Compression in Windows 11/10
- How to Schedule Automatic Shutdown in Windows 11/10
- How To Enable Hyper-V In Windows 11/10
If you’re looking to increase the security of your Windows 10 device, then installing an SSL certificate is a great place to start. In this article, we’ll walk you through exactly how to install an SSL certificate on a Windows 10 device, so you can ensure your data is kept safe and secure. So let’s get started!
Installing an SSL Certificate on Windows 10 is easy. Here are the steps to follow:
- Download the SSL Certificate and its associated private key
- Install the Private Key into the Windows Certificate Store
- Configure the server to use the Certificate

Steps to Install SSL Certificate in Windows 10
The SSL Certificate is an essential security component that provides encryption and authentication for websites. It is important to ensure that your site is properly secured by using an SSL Certificate. This article will provide instructions on how to install an SSL Certificate in Windows 10.
The first step in installing an SSL Certificate is to obtain the certificate from a Certificate Authority (CA). The CA will provide the necessary files and instructions for the installation. Once the files have been received, they can be installed using the Windows Certificate Manager. To access the Certificate Manager, open the Start Menu and type “certmgr.msc” in the search bar. This will open the Certificate Manager, where the SSL Certificate can be installed.
Importing the Certificate
The first step in installing the SSL Certificate is to import it into the Certificate Manager. To do this, click on the “Trusted Root Certification Authorities” tab and then click the “Import” button. This will open a window where the SSL Certificate can be selected. After selecting the certificate, click the “Open” button to begin the installation process.
The next step is to select the “Place all certificates in the following store” option and then click the “Browse” button. This will open a window where the “Trusted Root Certification Authorities” store can be selected. Once the store is selected, click the “OK” button to continue the installation process.
Verifying the Certificate
Once the SSL Certificate has been imported, it is important to verify that it is properly installed. To do this, click on the “Trusted Root Certification Authorities” tab and then double-click on the certificate. This will open a window where the details of the certificate can be viewed. If the certificate is properly installed, all of the fields should be filled out correctly.
Binding the Certificate to a Domain
The next step is to bind the certificate to a domain. To do this, click on the “Bindings” tab and then click the “Add” button. This will open a window where the domain name can be entered. After entering the domain name, click the “OK” button to continue the installation process.
Testing the SSL Certificate
Once the SSL Certificate has been installed, it is important to test it to ensure that it is working properly. To do this, open a web browser and navigate to the domain name that the certificate is bound to. If the certificate is properly installed, the web browser should display a secure connection.
Updating the Certificate
In order to keep the SSL Certificate up-to-date, it is important to update it regularly. To do this, open the Certificate Manager and double-click on the certificate to open it. This will open a window where the “Renewal” tab can be accessed. From here, the certificate can be renewed with a new expiration date.
Finalizing the Installation
Once the SSL Certificate has been installed and tested, it is important to finalize the installation. To do this, open the Certificate Manager and double-click on the certificate to open it. This will open a window where the “Certificate Path” tab can be accessed. Click the “Finish” button to complete the installation process.
Frequently Asked Questions
1. What is an SSL Certificate?
An SSL Certificate is a digital certificate used to establish a secure connection between a website and a user’s web browser. It is used to encrypt data and ensure that any information exchanged between the two parties cannot be intercepted or modified by a third party. The SSL Certificate also provides authentication of the website, allowing visitors to be sure they are connected to the correct website and not a malicious attempt to steal their data.
2. Why do I need an SSL Certificate?
An SSL Certificate is necessary to secure sensitive information exchanged between the user and your website. This includes personal information such as credit card numbers, passwords, and other confidential data. Without an SSL Certificate, this information can be intercepted by malicious third parties and used for fraudulent purposes. Additionally, having an SSL Certificate allows you to build trust with your customers, as it provides assurance that the website is legitimate and secure.
3. How do I install an SSL Certificate in Windows 10?
The installation of an SSL Certificate in Windows 10 is a relatively straightforward process. First, you will need to purchase an SSL Certificate from a trusted Certificate Authority (CA). Once you have purchased the SSL Certificate, you will need to download and install it on your Windows 10 system. This is done by using the Microsoft Management Console (MMC) to import the SSL Certificate. Once the certificate is imported, you will need to bind it to the desired web server or service.
4. What is the Microsoft Management Console (MMC)?
The Microsoft Management Console (MMC) is a Windows 10 application used to manage and configure Windows-based services. It is used to manage local and remote computers, as well as manage the security, configuration, and other settings of the system. The MMC can be used to install and configure SSL Certificates on Windows 10 systems.
5. What is binding an SSL Certificate?
Binding an SSL Certificate is the process of connecting an SSL Certificate to a specific web server or service. This is done by using the Microsoft Management Console (MMC) to map the SSL Certificate to the desired IP address and port. Once the SSL Certificate is bound, it will be used to encrypt any information exchanged between the user and the website.
6. Are there any other steps I need to take after installing an SSL Certificate?
Yes, after the SSL Certificate has been installed and bound to the web server or service, you will need to configure your website to use HTTPS. This is done by editing the website’s configuration files, such as the Apache httpd.conf file. Additionally, you may also want to consider setting up an HTTP Strict Transport Security (HSTS) policy to ensure that all future connections to your website are secure.
How to install the Securly SSL certificate for Windows 10 (manually)
Installing an SSL certificate in Windows 10 is an important step in ensuring that your data is secured and your website is trustworthy. By following the steps outlined in this article, you can successfully install an SSL certificate on your Windows 10 machine. With SSL installed, you can rest assured that your data is safe and your website visitors will be able to trust your site.
Hello Spice works.
Recently i have upgraded the widows 10 version to 1709 to all systems.
After upgrade all works good but have some issues while browsing the some of the HTTPS website.
i have found that ssl 2.0 not supported on windows 10 version 1709.
Few network users have reported the issue that they are not able to connect some of the network equipment website like ( firewall / WiFi default home page ).
previous version of windows all working fine.
I have tried to enable ssl 2.0 with registry settings, enablesslflowback to version 3.0 & done with some of the group policy settings on local systems. turn off encryption support enable to ssl 2.0,30 & tls ver 1.0,1.1 & 1.2.
Still we are not able to access websites to ie.
Every time its getting error redirected page failed on ie.
Older version of Firefox like 40.0 its working fine.
On latest version windows internet explorer option settings ssl 2.0 option not shown same as older version.
Is this possible to enable ssl 2.0 windows 10 version 1709 ?