Содержание
- Способ 1: Проверка назначения клавиш
- Способ 2: Отключение блокировки Win
- Проверка блокировки Win в GPO
- Способ 3: Использование Print Screen
- Способ 4: Сброс приложения
- Вопросы и ответы
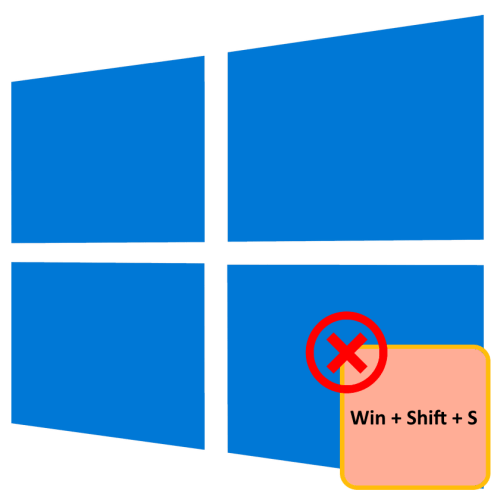
Проблемы с запуском нового встроенного инструмента создания скриншотов экрана нажатием Win + Shift + S в Windows 10 чаще всего возникает из-за некорректного переназначения клавиш, но неполадка может быть вызвана и другими причинами.
Способ 1: Проверка назначения клавиш
Если вы используете стороннее приложение для переназначения быстрых клавиш, зайдите в его настройки и убедитесь, что назначенная по умолчанию комбинация запуска приложения «Набросок на фрагменте экрана» не передана другой программе или ярлыку. В противном случае освободите это сочетание клавиш, чтобы Windows 10 могла его использовать по назначению.
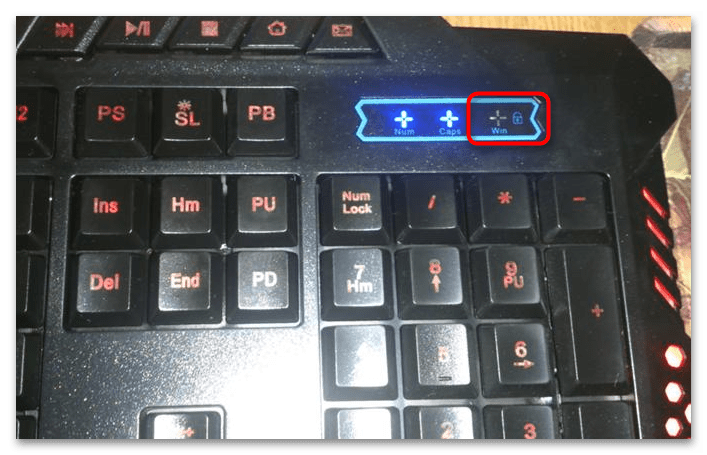
Некоторыми клавиатурами поддерживается сочетание клавиш, позволяющее блокировать клавишу Win. Если последняя будет заблокирована, за исключением Fn + Win все клавиатурные комбинации с Win работать не будут. При наличии на вашей клавиатуре блокиратора или индикатора Win Lock отключение Win поддерживается. Если индикатор горит, нажмите клавишу Win Lock, если таковая имеется, а если она отсутствует, попробуйте комбинации Fn + F6 и Fn + Win.
Проверка блокировки Win в GPO
Проверьте на всякий случай, не заблокирована ли клавиша Win политикой администратора. Для этого выполните следующие действия.
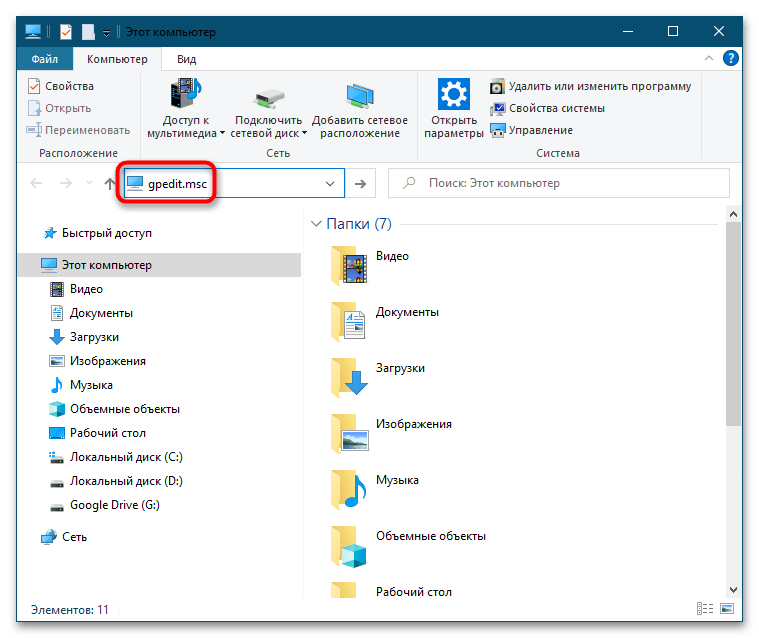
- Откройте «Редактор локальных групповых политик», для чего выполните команду
gpedit.mscв адресной строке «Проводника», если не работает комбинация вызова окошка быстрого выполнения команд Win + R. - Перейдите в раздел «Конфигурация пользователя» → «Административные шаблоны» → «Компоненты Windows» → «Проводник» и найдите справа политику «Отключить сочетания клавиш, в которых используется клавиша Windows».
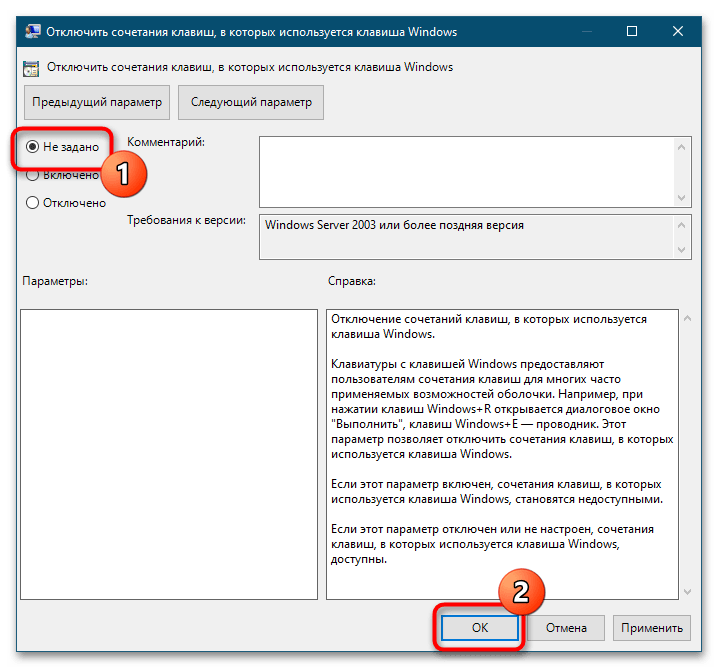
- Если она активна, отключите ее. Откройте свойства политики двойным кликом и включите радиокнопку «Не задано» или «Отключено».
- Перезагрузите компьютер или перезайдите в учетную запись Windows.

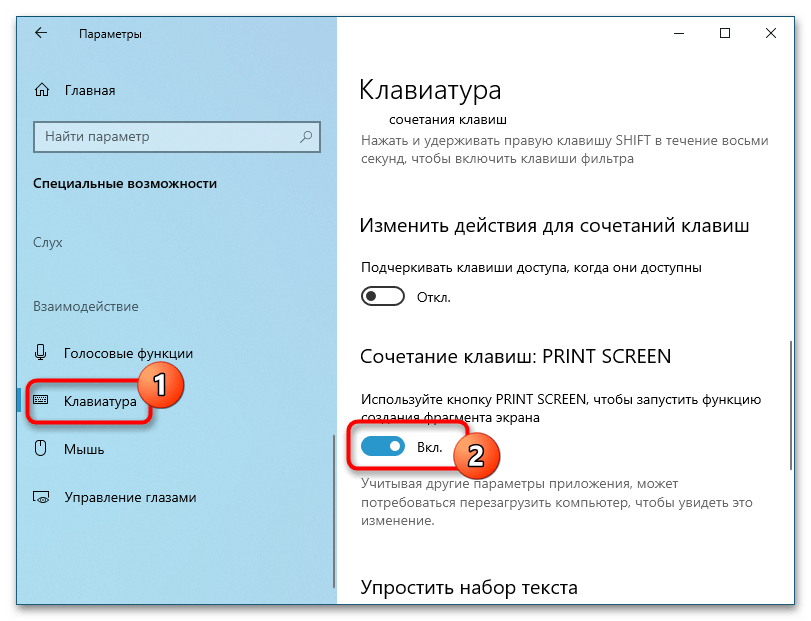
Способ 3: Использование Print Screen
Если у вас не работает комбинация Win + Shift + S, замените ее на Print Screen. К сожалению, этот способ работает не во всех сборках Windows 10, тем не менее попробовать решение все же стоит.
- Откройте приложение «Параметры» и перейдите в раздел «Специальные возможности» → «Клавиатура».
- Справа найдите опцию «Сочетание клавиш: PRINT SCREEN» и активируйте ее, переключив рычажок в положение «Вкл».
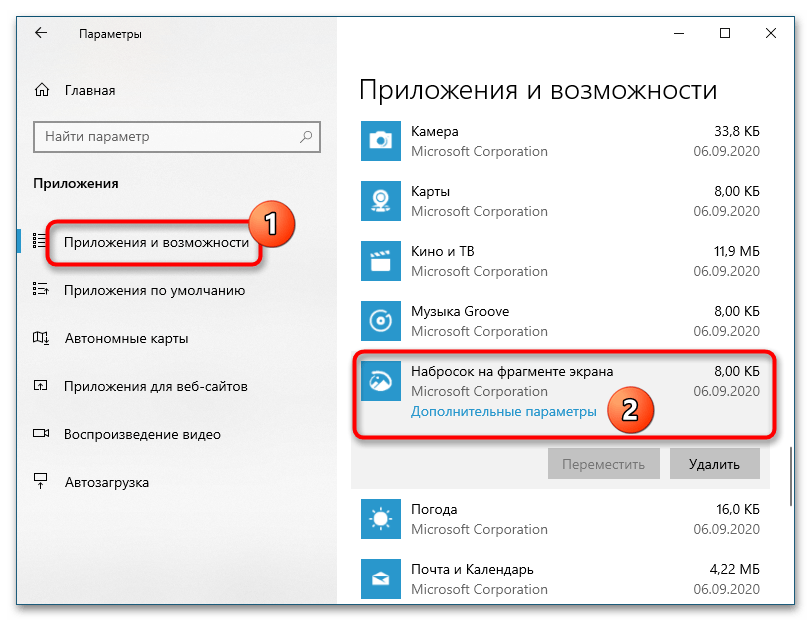
Способ 4: Сброс приложения
Не исключено, что проблема была вызвана повреждением самого приложения «Набросок на фрагменте экрана». Устранить ее можно путем сброса этой штатной программы.
- Откройте приложение «Параметры», перейдите в раздел «Приложения» → «Приложения и возможности» и найдите справа программу «Набросок на фрагменте экрана».
- Нажмите по нему мышкой, а затем кликните ссылку «Дополнительные параметры».
- Нажмите кнопку «Сбросить», чтобы восстановить исходные настройки приложения.
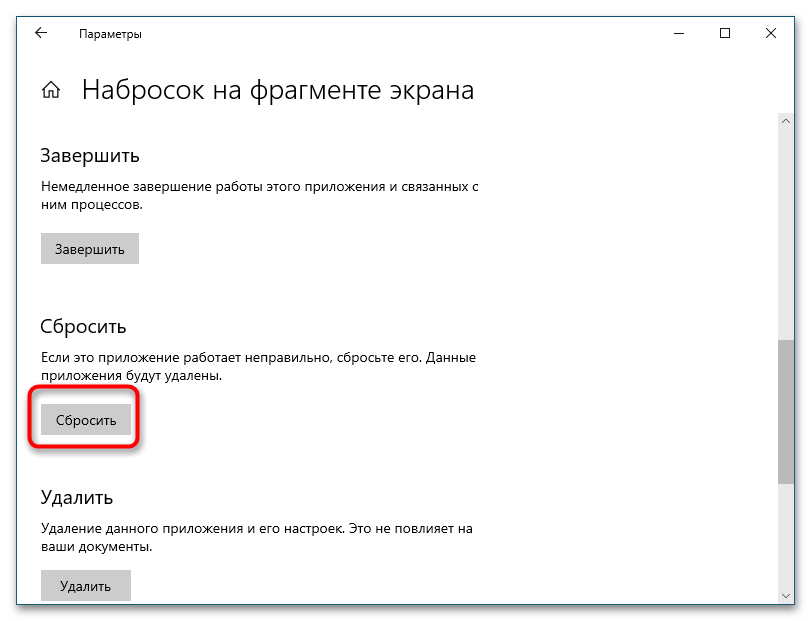
Если проблема сохранится и после сброса, удалите приложение и установите его повторно из Microsoft Store. Удалить программу можно из того же раздела, из которого выполнялся ее сброс.
Еще статьи по данной теме:
Помогла ли Вам статья?
Want to take a screenshot but nothing happens after pressing the Windows logo key + Shift + S shortcut? This can be very annoying. But don’t worry. In this post, we’ll show you how to fix the Windows + Shift + S not working issue easily and quickly.
Quick fixes to Windows + Shift + S not working
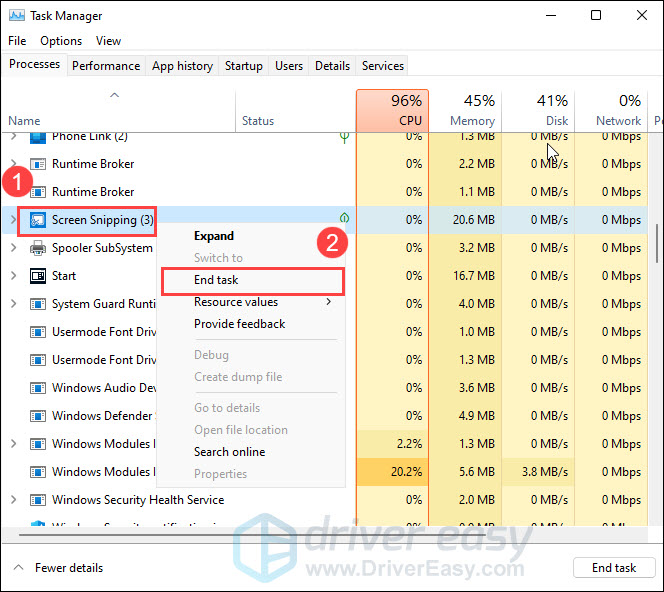
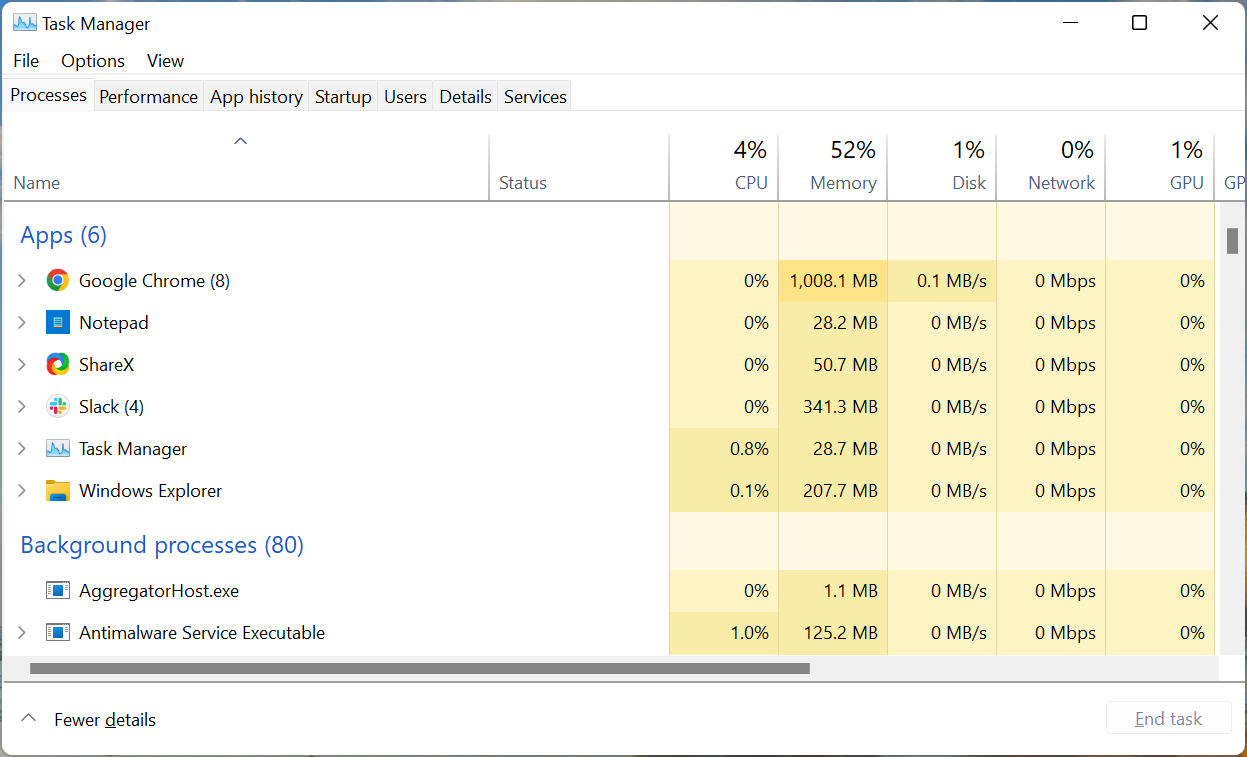
Before you begin, try to kill the Screen Snipping process in Task Manager. Here’s how:
- On your keyboard, press Ctrl + Shift + Esc at the same time to open Task Manager.
- Under Background processes, right-click Screen Snipping and select End task.

Check to see if your problem is resolved. If not, don’t worry, there are a few fixes you can try.
Try these fixes
You don’t have to try all of them, just work your way down the list until you find the one that works for you.
- Enable notifications for Snip & Sketch
- Turn on clipboard history
- Reset Snip & Sketch
- Reinstall Snip & Sketch
- Check for Windows updates
- Use an alternative to take screenshots
Fix 1: Enable notifications for Snip & Sketch
Normally, when you take a screenshot by hitting the Windows logo key + Shift + S, a notification that says Snip saved to clipboard appears in the lower right corner of your screen. However, if you’ve turned off notifications for Snip & Sketch, you’ll have to turn them on again. Here’s how to do it:
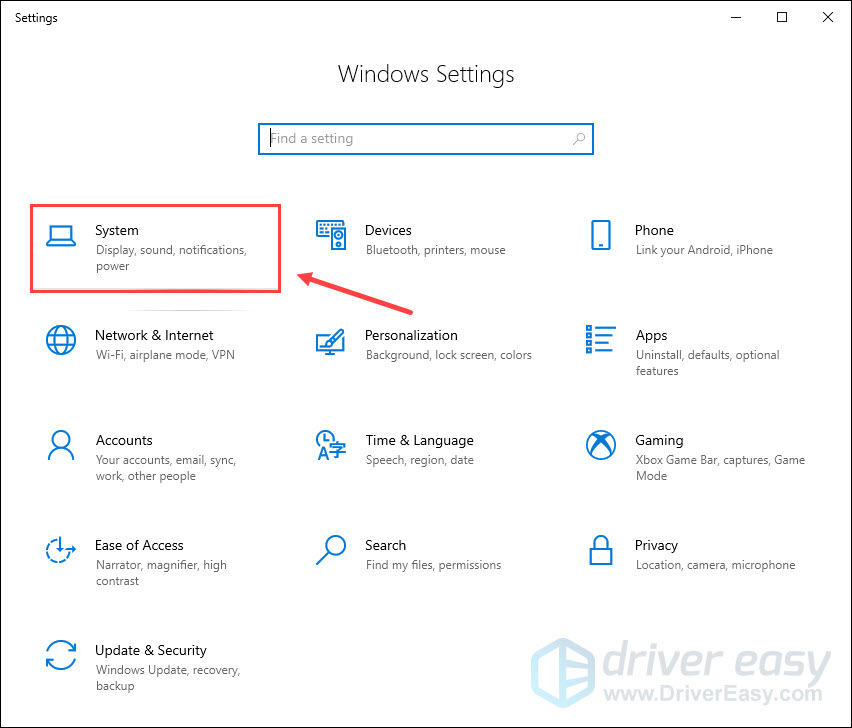
- On your keyboard, press the Windows logo key + I simultaneously to open Windows Settings, then select System.

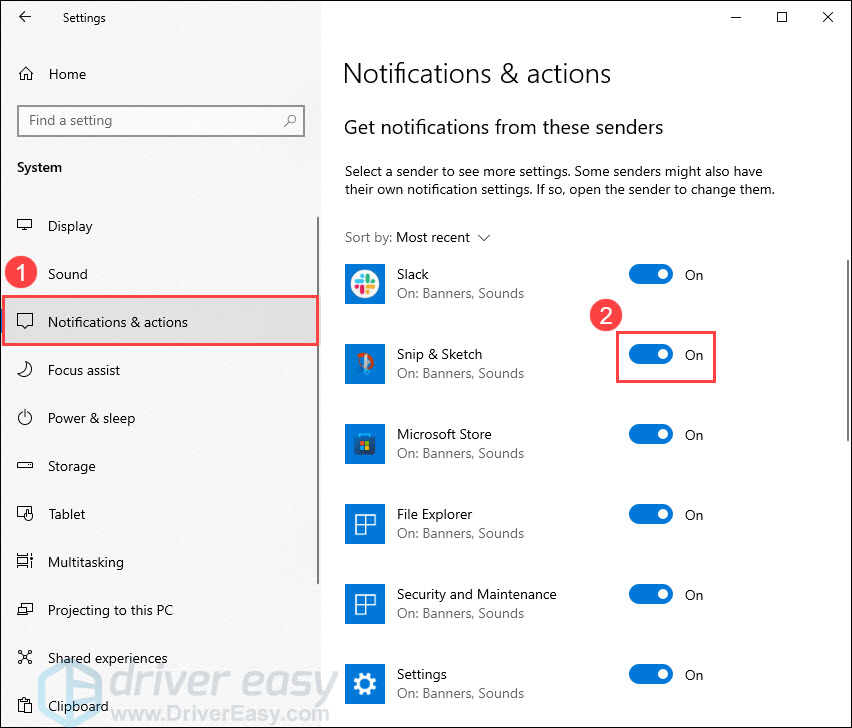
- In the left panel, select Notifications & actions. Under Get notifications from these senders, locate Snip & Sketch and make sure it is set to On.
If you’ve enabled notifications for Snip & Sketch but the keyboard shortcut still doesn’t work properly, check out the next fix.
Fix 2: Turn on clipboard history
The screenshot you captured will be automatically copied to your clipboard. To view the screenshot, you can turn on clipboard history. Here’s how:
- On your keyboard, press the Windows logo key + I simultaneously to open Windows Settings, then select System.
- In the left panel, select Clipboard, then turn on Clipboard history.
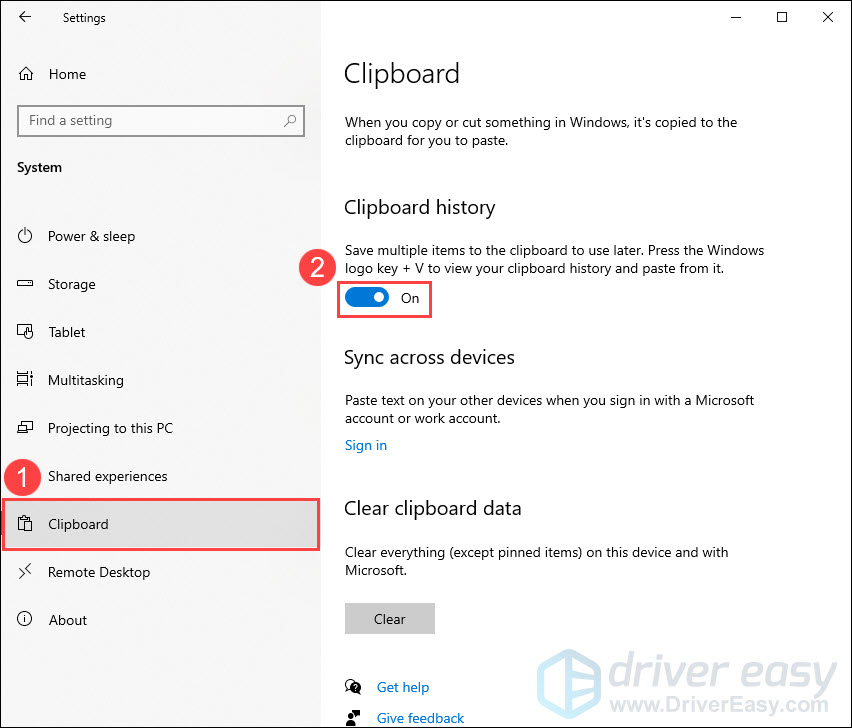
Now press the Windows logo key + Shift + S to take a screenshot and check if the screenshot appears on the clipboard by hitting the Windows logo key + V.
Fix 3: Reset Snip & Sketch
The Windows logo key + Shift + S allows you to take a screenshot without starting Snip & Sketch. But if this keyboard shortcut isn’t working right, you can try resetting Snip & Sketch. Here’s how:
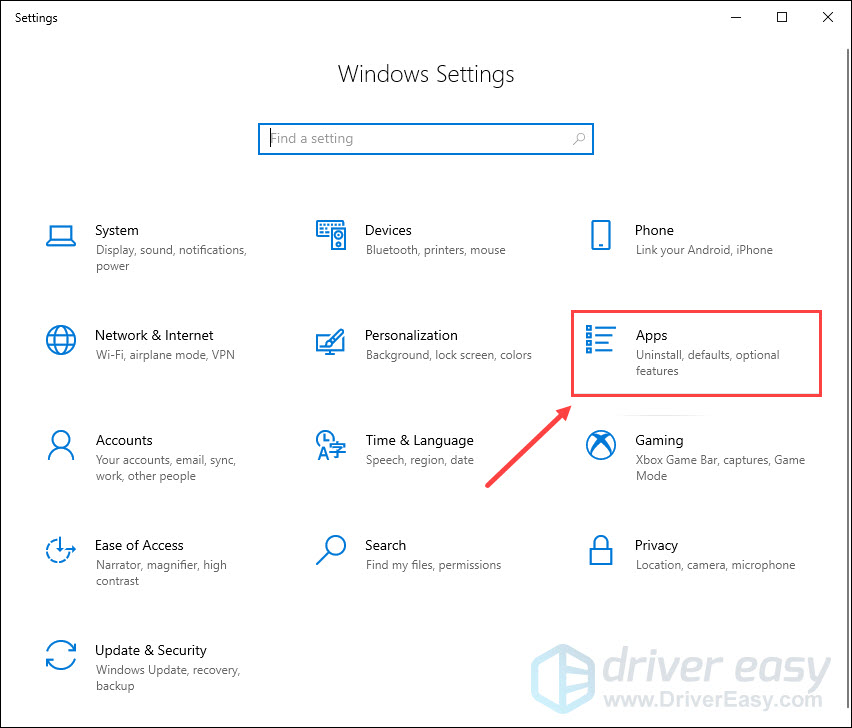
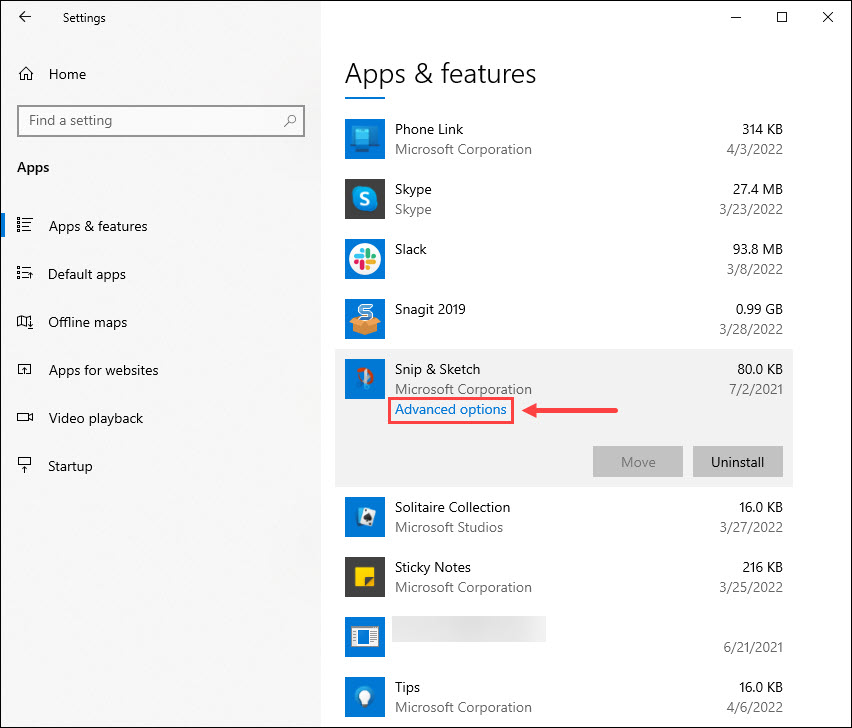
- On your keyboard, press the Windows logo key + I simultaneously to open Windows Settings, then select Apps.
- Under Apps & features, scroll down the page and click Snip & Sketch. Then select Advanced options.
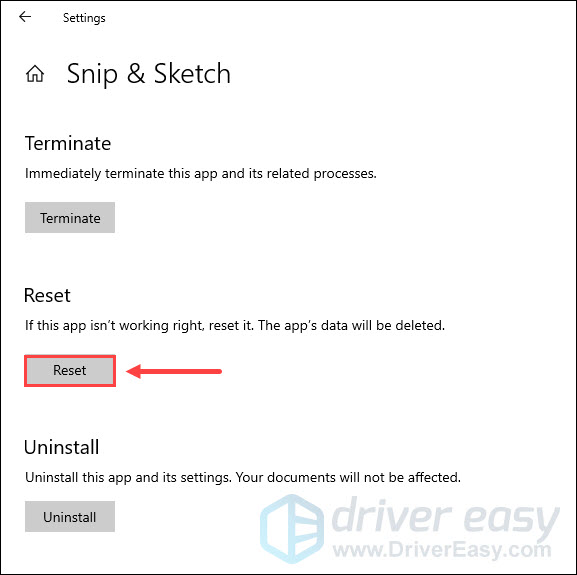
- Click Reset.

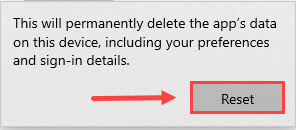
- When prompted to confirm your action, click Reset again.

Once the process is finished, restart your computer and check if the Windows logo key + Shift + S hotkey works properly. If not, take a look at the next fix.
Fix 4: Reinstall Snip & Sketch
If resetting Snip & Sketch doesn’t help, try reinstalling this app. To do so:
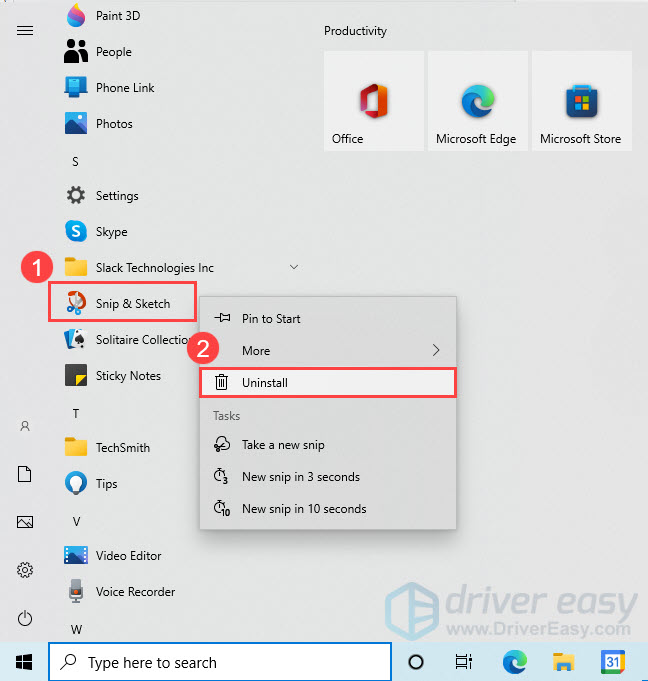
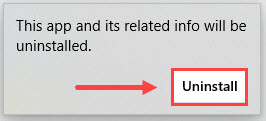
- On your keyboard, press the Windows logo key to open the Start menu. Then right-click Snip & Sketch and select Uninstall.

- In the pop-up window, click Uninstall again.

- After uninstalling Snip & Sketch, go to Microsoft Store to download and reinstall the app again on your system.
Once you’ve reinstalled Snip & Sketch, press the Window logo key + Shift + S to see if it works properly. If not, check out the next fix.
Fix 5: Check for Windows updates
Windows updates often contain bug fixes and security improvements. To ensure the snipping tool works properly, you should install the latest updates on your system. Here’s how to do it:
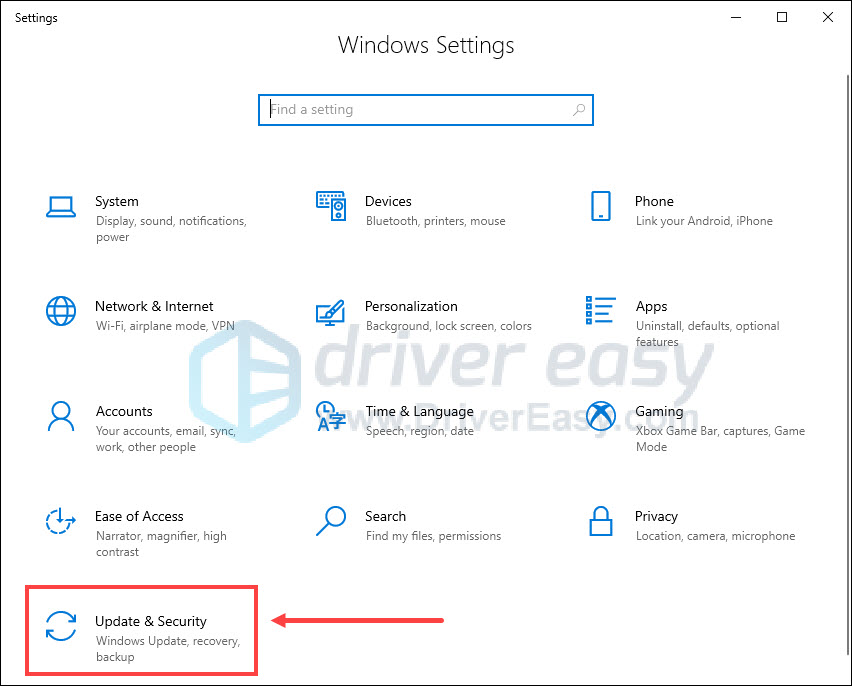
- On your keyboard, press the Windows logo key + I at the same time to open Windows Settings. Then select Update & Security.

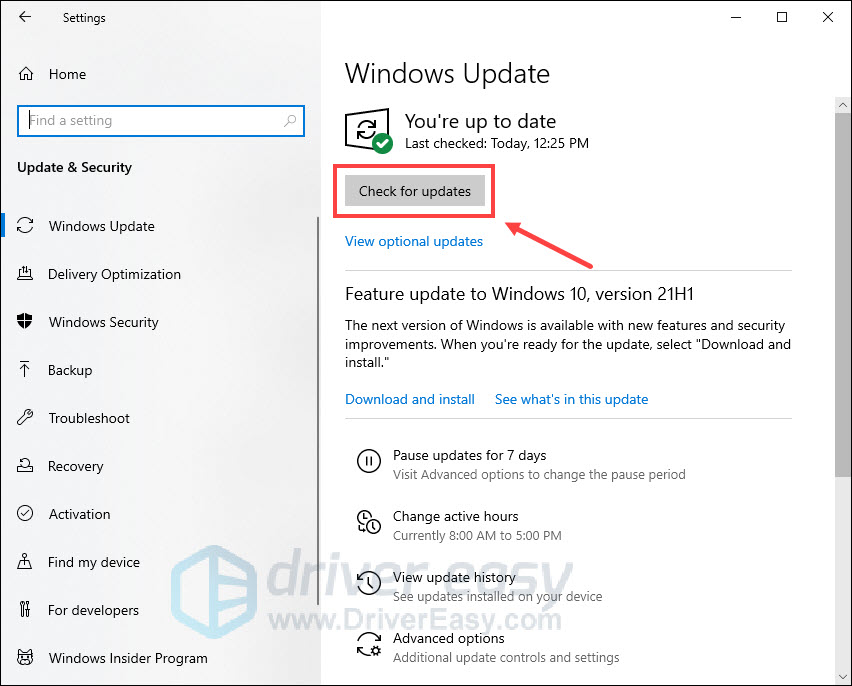
- Under Windows Update, click Check for updates. Windows will automatically scan for, download and install the available updates.
After installing all available updates, restart your computer and check if the Windows logo key + Shift + S shortcut works fine.
If this keyboard shortcut is still not working, consider using an alternative to take screenshots.
Fix 6: Use an alternative to take screenshots
If all the above methods fail to solve your problem, you can try either of the following ways to take screenshots.
Option 1 – Print Screen shortcut
The Print Screen or PrtScn key on your keyboard allows you to capture an image of your entire screen. To use this button, you need to enable it in settings. Here’s how:
- On your keyboard, press the Windows logo key + I at the same time to open Windows Settings. Then select Ease of Access.
- In the left panel, select Keyboard. Under Print Screen shortcut, toggle the switch to On.

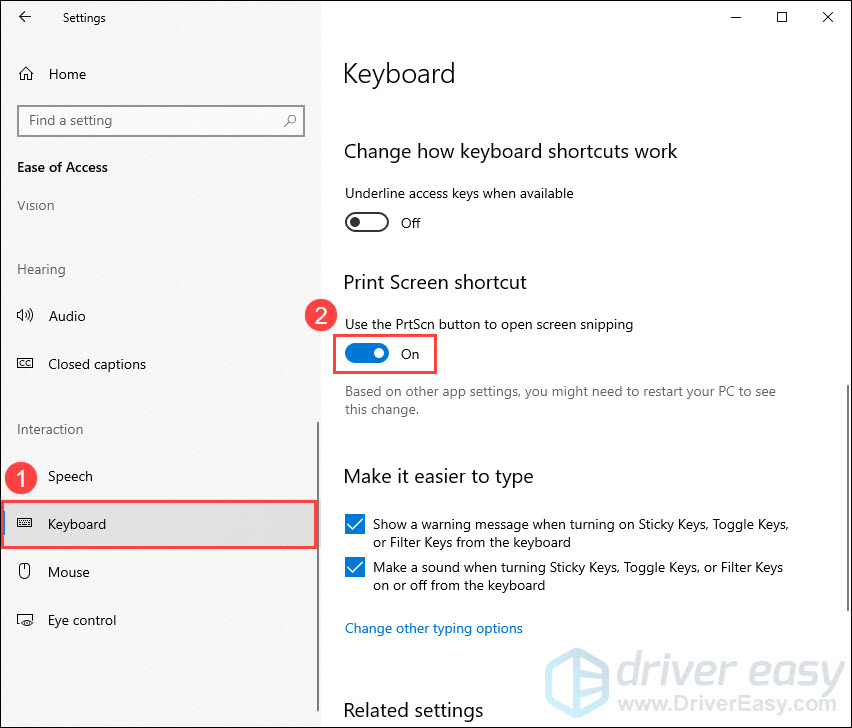
Now you can use the PrtScn key to open screen snipping.
If your keyboard’s PrntScrn key has two jobs then you may need to press the Fn key + PrtScn at the same time to capture an image.
Option 2 – Snagit
Snagit is a simple and powerful screen capture and recording software. With Snagit, you can quickly take screenshots, add additional context, and share images, GIFs, or videos across your preferred platforms.
To take a screenshot with Snagit:
- Download and install Snagit.
- Open Snagit. Then select Image, click the Shortcut field and press the desired key combination on your keyboard. The new keyboard shortcut will appear in the field.

- Press the new shortcut you set in Step 2. The screen will be grayed out allowing you to select the screen area for capture by dragging the orange crosshairs.

- Once taken, the screenshot will open up in the Snagit Editor. From there, you can edit the image, such as cropping the image, blurring particular areas, and adding arrows, shapes, icons or text. Once done, you can choose to save it on your desktop, copy it to your clipboard, email it to someone or share it online.

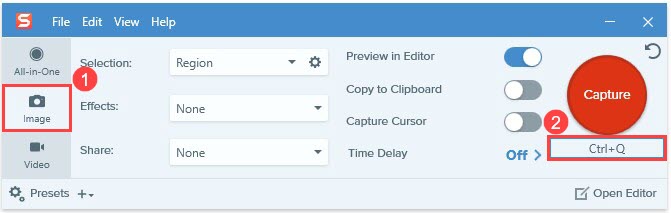

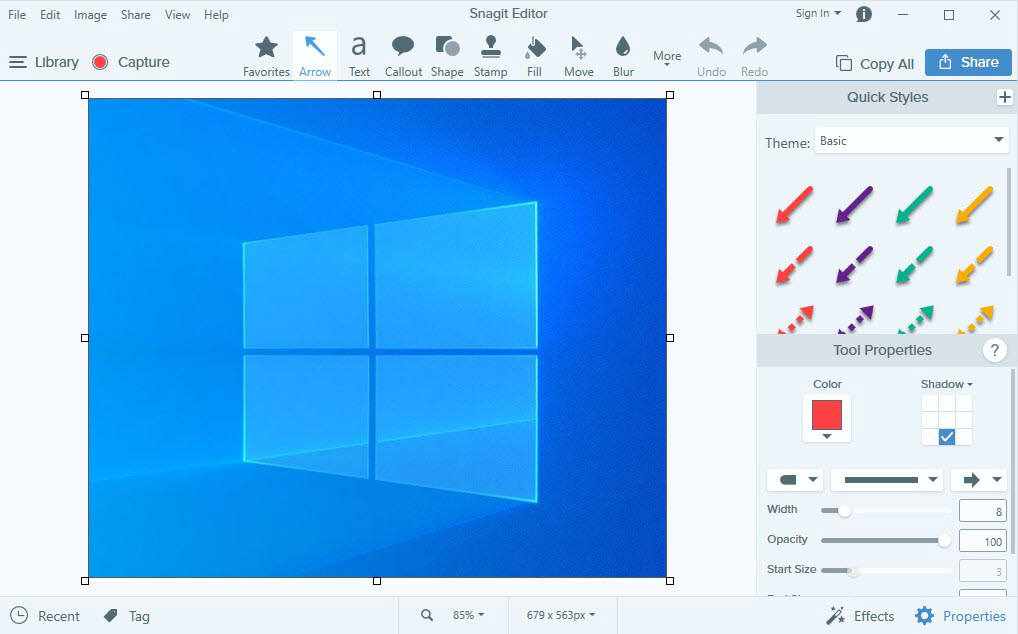
You can get a free trial for 15 days and click here for the detailed tutorial.
That’s all for now. Hopefully, this post helped you solve the snipping tool shortcut (Windows + Shift + S) not working issue. If you have further questions or suggestions, feel free to drop us a line.
49
49 people found this helpful
Ссылки на устройства
- Windows 10
- Windows 11
- Отсутствует устройство?
Сочетание клавиши Windows с другими клавишами на клавиатуре позволяет быстро выполнять различные задачи Windows. Ярлык Windows + Shift + S — это удобный способ сделать снимок экрана вашего компьютера, поэтому может быть неприятно, если он внезапно перестанет работать. К счастью, есть несколько способов восстановить его полную функциональность. Продолжайте читать, чтобы узнать больше.
Если сочетание клавиш Windows + Shift + S не работает, проблема может заключаться в приложении, управляющем инструментом Snip & Эскиз. Кроме того, проблема может быть вызвана вашей системой. Какова бы ни была основная причина, есть простое решение.
Включите Snip & Уведомления Sketch
Если вы отключили уведомления для Snip & Инструмент Sketch, ярлык может работать, но вы просто не видите результата. Вы можете быстро решить эту проблему, снова включив уведомления. Таким образом, после нажатия сочетания клавиш Windows + Shift + S в правом нижнем углу появится сообщение.
- Нажмите “Windows + I” чтобы запустить “Параметры Windows”

- Нажмите значок “ Система” icon.
- Перейдите в раздел “Уведомления и amp; действия” на левой панели.
- Прокрутите вниз до пункта “Получать уведомления от этих отправителей” section.
- Найдите “Snip & Эскиз” в списке.
- Переключите ползунок рядом с его названием.


Сбросить фрагмент & Эскиз
Если ваши уведомления включены, но функция Snip & Инструмент Sketch все еще играет скромно, возможно, лучше сбросить его. Это должно позволить вам возобновить создание скриншотов с помощью сочетания клавиш Windows + Shift + S.
- Посетите “Настройки Windows” нажав “Windows + I” ярлык.
- Нажмите на “Приложения” icon.
- Выберите “Приложения и приложения; функции” на левой панели.
- Пролистайте вниз, пока не найдете “ Отрезать & Эскиз” в списке приложений и нажмите на него.
- Нажмите кнопку “Дополнительно параметры” кнопку.
- Коснитесь кнопки “Сброс”
- Подтвердите действие, нажав “Сброс” еще раз во всплывающем окне и перезагрузите компьютер, чтобы завершить процесс.


< h3> Переустановите Snip & Эскиз
Предположим, проблема с ярлыком сохраняется даже после сброса Snip & Инструмент эскиз. В этом случае пришло время сделать более решительный шаг и полностью удалить его. Но не волнуйтесь, мы вернем его сразу после этого.
Чтобы удалить приложение с компьютера, выполните следующие действия:
- Нажмите “Windows” для запуска меню «Пуск».
- Найдите “Snip & Эскиз.”
- Щелкните правой кнопкой мыши и выберите “Удалить” в раскрывающемся меню.
- Подтвердите действие, нажав &ldquo ;Удалить” снова.


После удаления приложения посетите Microsoft Store и следуйте инструкциям на экране, чтобы переустановить Snip & Скетч на вашем ПК. Наконец, попробуйте сделать снимок экрана с помощью сочетания клавиш Windows + Shift + S, чтобы проверить, сработал ли этот метод.
Включить историю буфера обмена
Когда вы делаете снимок экрана, он автоматически копируется. в буфер обмена. Вы можете включить историю буфера обмена и просмотреть свой скриншот там.
- Нажмите “Windows + I” чтобы открыть “Настройки Windows”
- Щелкните значок “Система” icon.
- Перейдите в “Буфер обмена” на левой панели.
- Включите ползунок для “ История буфера обмена” раздел.


После включения этой функции нажмите сочетание клавиш Windows + Shift + S. Затем нажмите Windows + V, и снимок экрана должен появиться в буфере обмена.
Проверьте наличие обновлений Windows
Обновление Windows — один из самых популярных способов решения любых проблем, которые могут возникнуть. опыт. Если вы не можете найти никаких проблем с инструментом «Ножницы», попробуйте проверить наличие обновлений системы. Часто они могут исправлять ошибки и повышать производительность системы.
- Запустите “Настройки Windows” нажав “Windows + I” ключи одновременно.
- Нажмите кнопку “Обновить & Безопасность” icon.
- Выберите “Центр обновления Windows” на левой панели.
- Нажмите “Проверить наличие обновлений&rdquo ; кнопку в верхней части окна.


После установки доступных обновлений перезагрузите компьютер. Когда он снова загрузится, проверьте, работает ли ярлык.
Выполните восстановление системы
Если ничего не помогает, вы всегда можете восстановить свою систему и вернуться к последнему состоянию, в котором инструмент работал правильно. Выполните следующие действия, чтобы выполнить восстановление системы:
- Нажмите “Windows + R” одновременно, чтобы открыть окно команды «Выполнить».
- Введите “rstrui” в поле поиска команд.
- Нажмите “ОК”
- Нажмите “Далее” в “Восстановление системы” окно и следуйте инструкциям на экране, чтобы завершить процесс.


Один раз процесс завершен, перезагрузите компьютер. Перезапуск может занять некоторое время, так что наберитесь терпения. Как только компьютер снова включится, вы снова сможете использовать инструмент для обрезки.
Windows 11
Если сочетание клавиш Windows + Shift + S не работает в Windows 11, вероятно, это связано с проблемами с клавиатурой или неправильно настроенными настройками. Поэтому, прежде чем изменять настройки, мы рекомендуем выполнить некоторые базовые проверки.
Во-первых, убедитесь, что клавиатура подключена правильно. Затем проверьте, не застряло ли что-то под рассматриваемыми клавишами. Если все в порядке, причина не в вашей клавиатуре.
Перезапустите процесс проводника Windows
Snip & Инструмент «Эскиз» является подмножеством службы «Проводник». Если эта программа не работает, сочетание клавиш Windows + Shift + S тоже сработает. Если это так, вам нужно только перезапустить процесс Windows Explorer. Вот как это сделать:
- Нажмите клавиши “Ctrl + Shift + Esc” ключи для запуска диспетчера задач.
- Прокрутите вниз, пока не найдете “Проводник Windows” под “Имя” вкладка
- Нажмите правой кнопкой мыши на его имени, чтобы открыть всплывающее окно.
- Выберите “Перезапустить” в раскрывающемся меню.


Обновите драйвер клавиатуры
Хотя физическая клавиатура может и не создавать проблемы, ее драйверы вполне могут создавать проблемы. Чтобы обновить драйвер клавиатуры, выполните следующие действия:
- Нажмите клавишу “Windows + S” ярлык, чтобы открыть панель поиска.
- Введите “Диспетчер устройств” вверху страницы.
- Нажмите на приложение «Диспетчер устройств». в результатах поиска.
- Дважды щелкните значок “Клавиатура” tab.
- Нажмите правой кнопкой мыши на клавиатуре и выберите “Обновить водитель” в раскрывающемся меню.
- Нажмите “Поиск автоматически для водителей” и следуйте инструкциям на экране, чтобы завершить процесс.


Удалите последнее обновление окна
Если Windows + Shift + Перестал работать ярлык S после недавнего обновления Windows, следует вернуться к предыдущей стабильной сборке. Выполните следующие действия, чтобы удалить проблемное обновление:
- Нажмите “Windows + I” для запуска “Настройки” приложение.
- Перейдите в “Центр обновления Windows” на левой панели.
- Нажмите “История обновлений”
- Перейдите к “Удалить обновления” tab.
- Нажмите на последнее обновление.
- Нажмите кнопку “Удалить” над списком.
- Нажмите “Да” во всплывающем окне.


Snap Away
< p>Хотя потеря возможности сделать снимок экрана нажатием трех клавиш может раздражать, эту проблему можно легко решить. Неважно, в чем проблема: в инструменте для обрезки или в вашей системе. В любом случае, наше руководство вернет вас к тому, чтобы делать столько снимков экрана, сколько вам нужно, в кратчайшие сроки.
Были ли у вас проблемы с неработающим сочетанием клавиш Windows + Shift + S? Как вы решили проблему? Дайте нам знать в разделе комментариев ниже.

by Kazim Ali Alvi
Kazim has always been fond of technology, be it scrolling through the settings on his iPhone, Android device, or Windows. And at times, unscrewing the device to take… read more
Updated on
- If Windows + Shift + S is not working in Windows 11, it’s likely due to misconfigured settings or issues with the keyboard.
- First, check if the keyboard works fine and there’s nothing stuck under the keys.
- Next, you can restart the Windows Explorer process, or update the drivers, amongst other methods here.
The Snip & Sketch or Snipping Tools allows users to quickly and easily capture screenshots in Windows with a dedicated keyboard shortcut. But, several users reported that the Windows + Shift +S is not working in Windows 11.
While there are a bunch of third-party snipping tools available, many still rely on Snip & Sketch due to the very fact that it’s easily accessible, offers a bunch of ways to capture screenshots, and provides the option to annotate and edit the screenshot.
However, when hitting the keyboard shortcut does not launch the tool, users are left perplexed due to the lack of available information on the subject. So, read the following sections and find out what to do when Windows + Shift + S is not working in Windows 11.
Why is Windows + Shift + S not working in Windows 11?
There could be a few reasons behind the problem, but the most common still are minor issues with the keyboard. It doesn’t require the whole keyboard to malfunction, but if any of the three keys in the shortcut stopped working, you wouldn’t be able to use it.
Other than that, misconfigured settings, issues with the Registry, conflicting external devices, and internal applications too could lead to the issue.
Many users also reported that Windows + Shift + S is not working after update, which is likely due to a bug in the latest version.
No matter what the underlying cause is, just follow the methods listed in the next section to get Snip & Sketch/Snipping Tools up and running in no time.
How we test, review and rate?
We have worked for the past 6 months on building a new review system on how we produce content. Using it, we have subsequently redone most of our articles to provide actual hands-on expertise on the guides we made.
For more details you can read how we test, review, and rate at WindowsReport.
What do I do if Windows + Shift + S is not working in Windows 11?
1. Some basic checks
The very first thing you must check is that the keyboard is properly connected and that there’s nothing stuck under the keys. Press the keys and identify if it feels different than the others. Because, if that’s the case, there’s something stuck under them.
You can blow light air to dislodge the stuck particles or use a can of compressed air for the purpose. Also, verify that the Windows key has not been disabled unintentionally, since certain manufacturers provide a shortcut for that.
In case these tricks don’t work, connect a different keyboard to the computer and check if the Windows + Shift + S is now working in Windows 11. If it does, the problem was with the previously connected keyboard and you should get it repaired or replaced.
But, if the issue persists, it’s the system settings to be blamed, and you should try the methods listed next.
2. Restart the Windows Explorer process
- Press Ctrl + Shift + Esc to launch the Task Manager.

- Now, locate the Windows Explorer process, right-click on it and select End task from the context menu.
- Next, click on the File menu near the top-left, and select Run new task.
- Enter explorer.exe in the text field, and click on OK at the bottom.

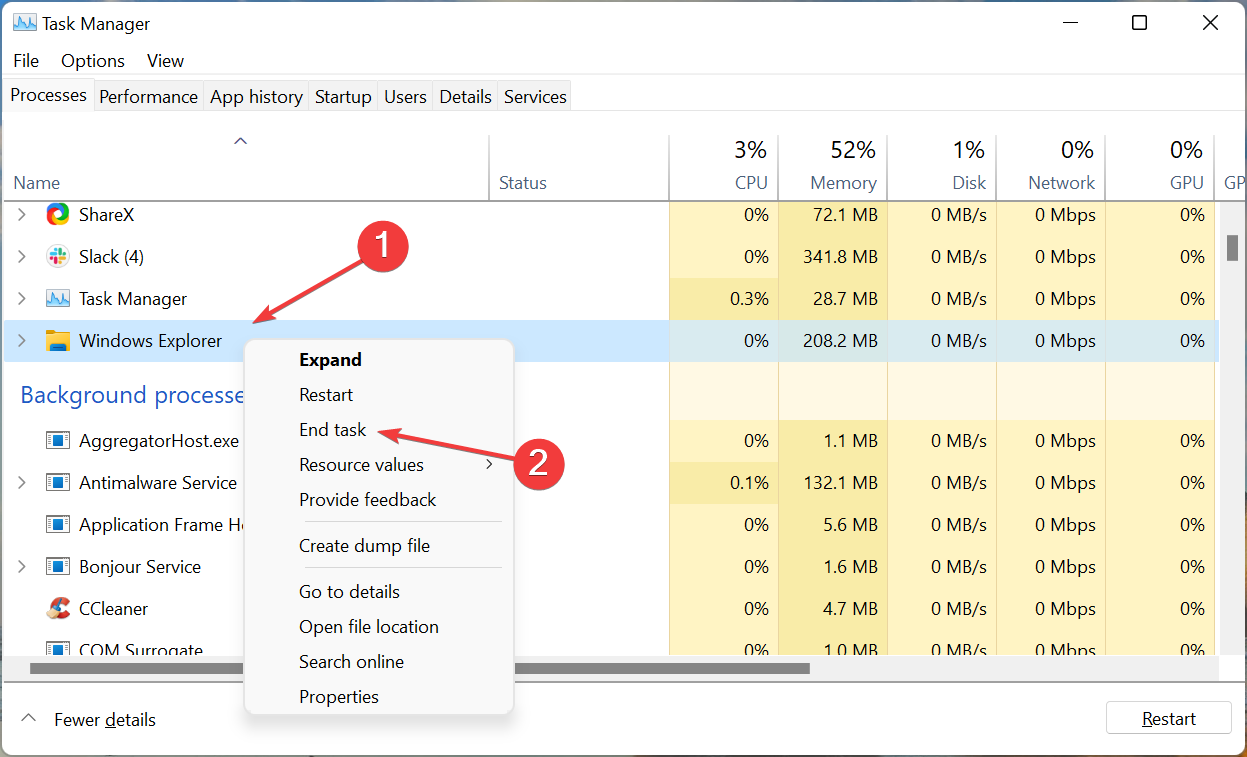

While executing these steps, the background and the Taskbar may go black momentarily when the Windows Explorer task is terminated. But don’t worry, that’s a part of the process. Once done, check if the Windows + Shift + S not opening Snip and Sketch problem is resolved.
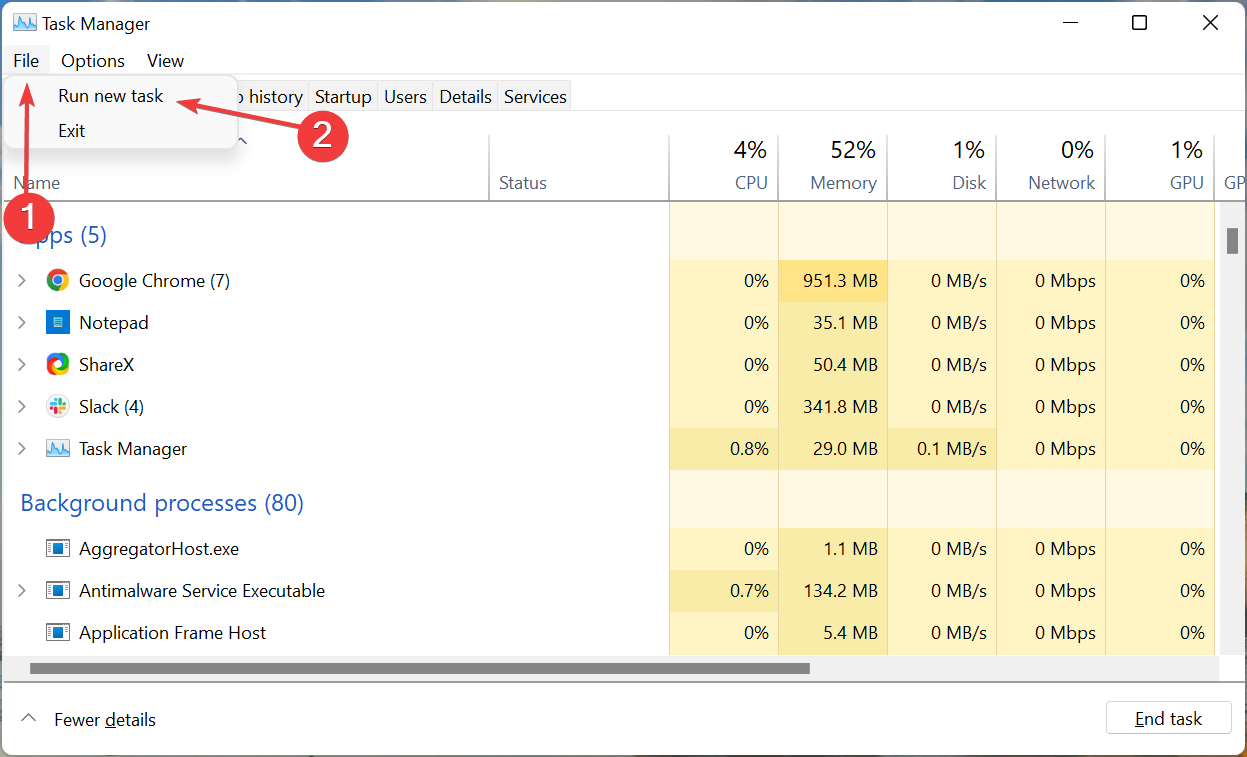
3. Turn on notifications for Snip & Sketch
- Press Windows + I to launch the Settings app, and click on Notifications on the right in the System tab.

- Now, locate the Snipping tools entry, and make sure that the toggle for it is enabled.
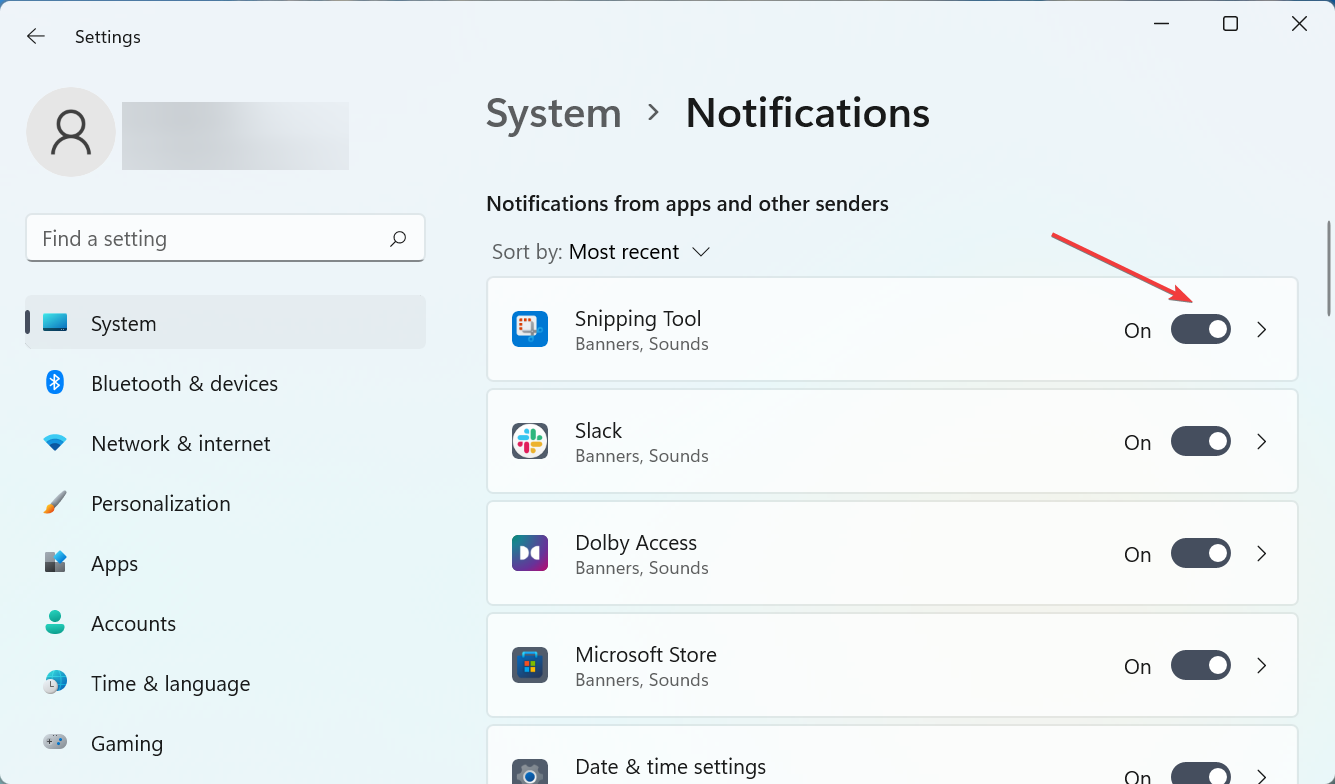
If the notifications for Snipping Tool are disabled, it may appear as if Windows + Shift + S is not working in Windows 11, but that’s not the case. The screenshot will still be copied to the clipboard. To avoid any confusion, turn on the notifications for the tool.
- The latest Windows 11 Dev build made Microsoft Store faster
- Windows 11 adds new icons for low-battery Bluetooth devices
- Windows 11 will now notify users when apps request location
- Microsoft added a scrollable view option to Quick Settings
- CredentialUIBroker.exe Error: How to Fix it on Windows 11
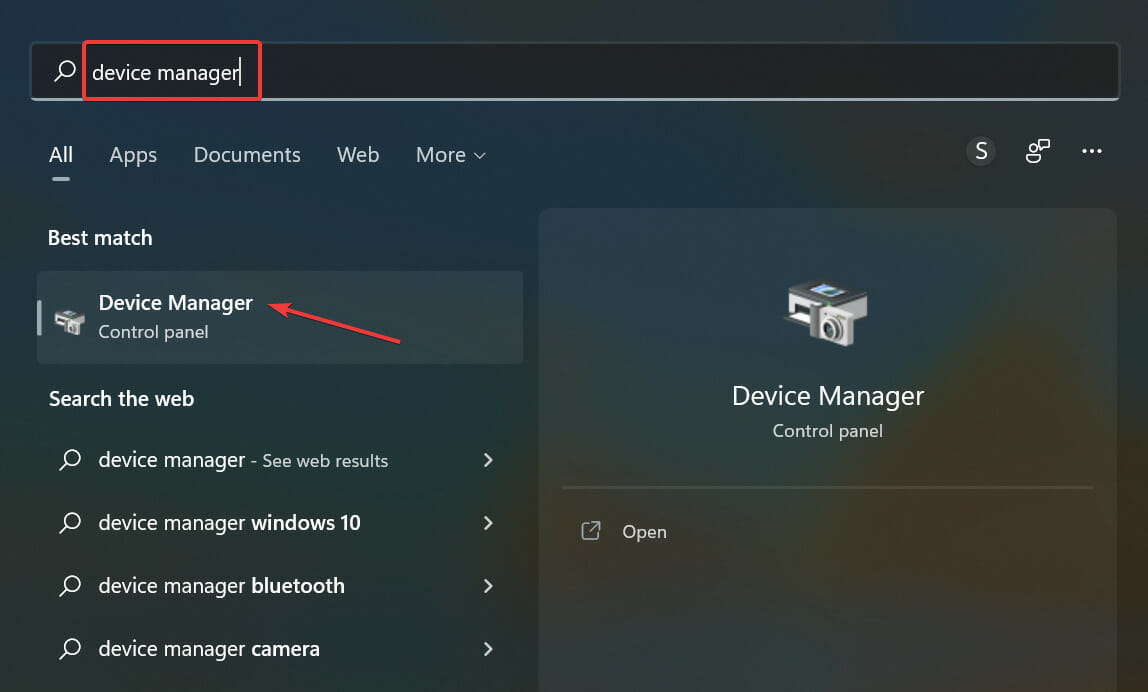
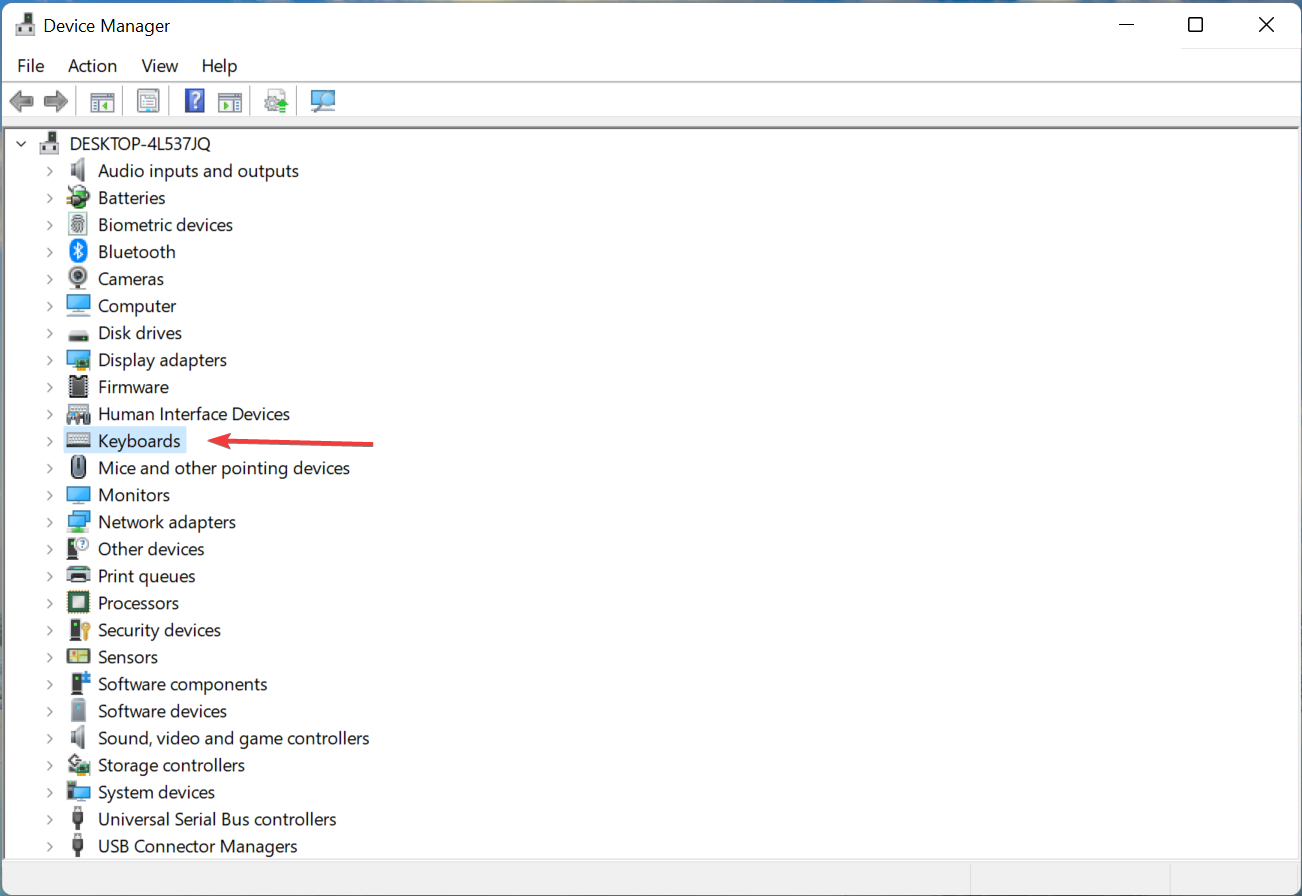
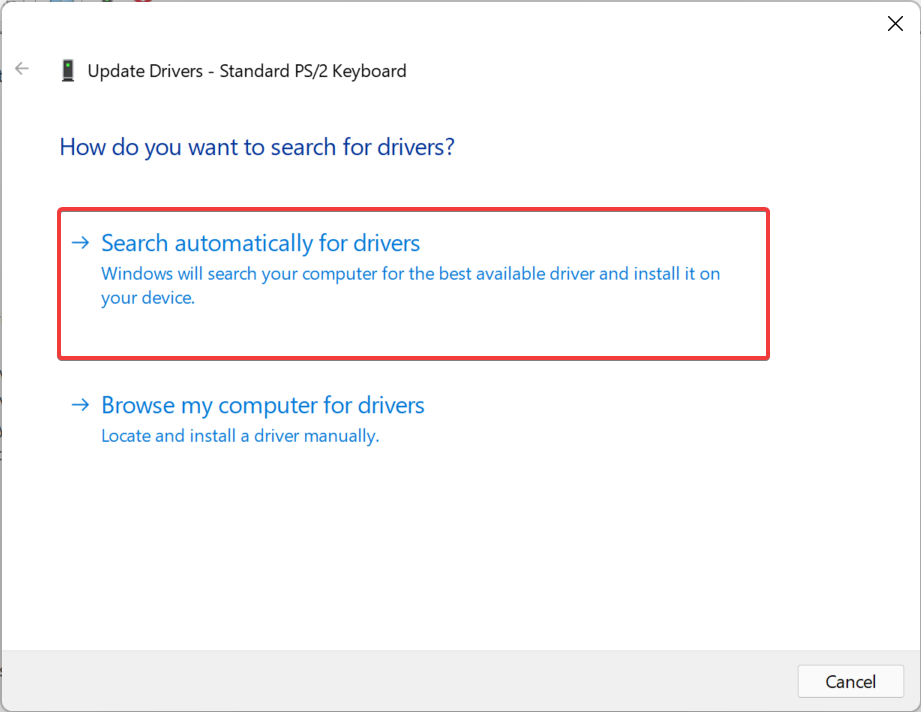
4. Update the keyboard driver
- Press Windows + S to launch the Search menu, enter Device Manager in the text field at the top, and click on the relevant search result.

- Double-click on the Keyboards entry.

- Right-click on the problematic keyboard and select Update driver from the context menu.
- Select Search automatically for drivers from the two options.

- Now, wait for Windows to locate the best available driver on the system and install it.
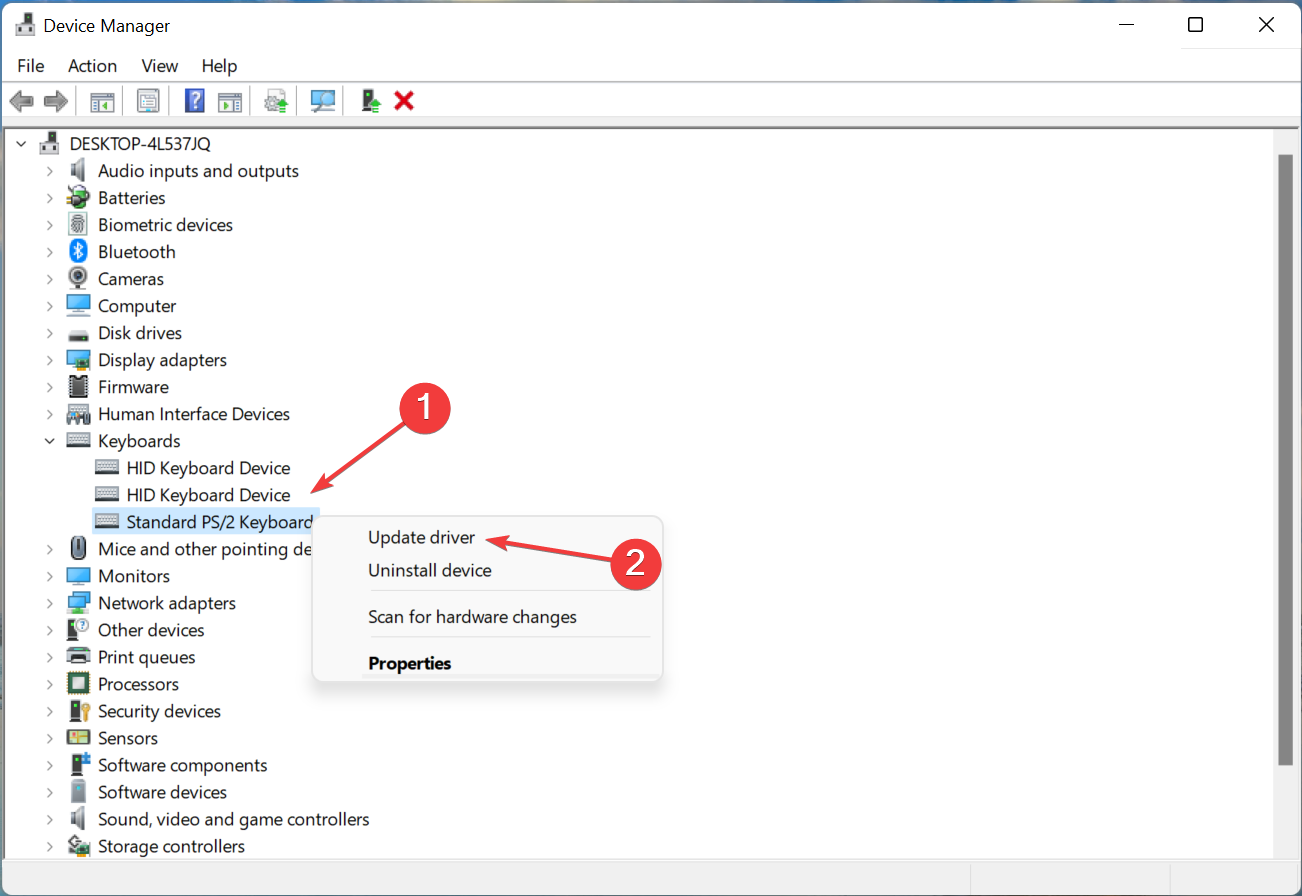
Outdated drivers are one of the primary reasons behind issues with devices. Whether it’s a trivial issue or one that prevents the device from working altogether, updating the driver should do the trick.
If you are unable to find an update using the Device Manager, try the other methods to manually install the latest driver version in Windows 11. Some manufacturers directly release the driver updates on their official website and you have to manually get them.
If you think that is too much work, you can also use a dedicated driver updater like Outbyte Driver Updater. The tool keeps track of all new driver updates and automatically installs them to your PC as soon as they become available.
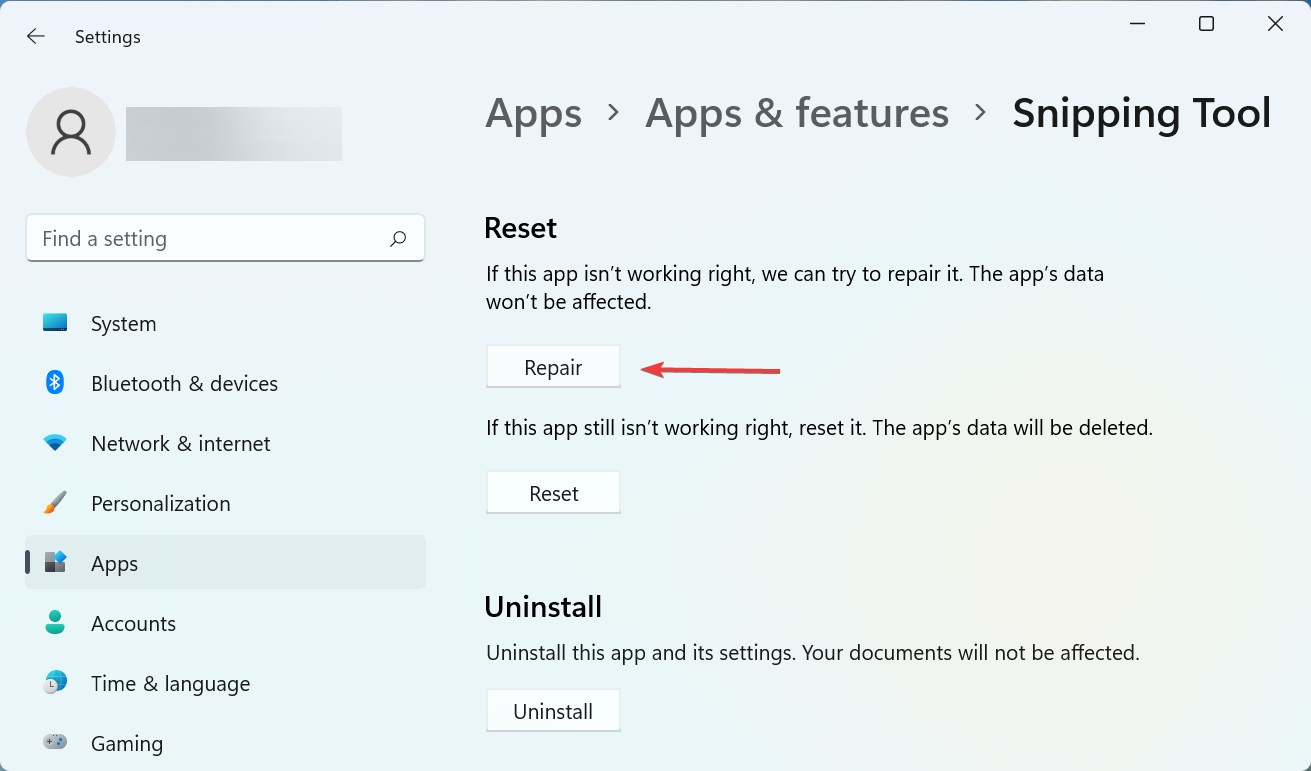
5. Repair and Reset the tool
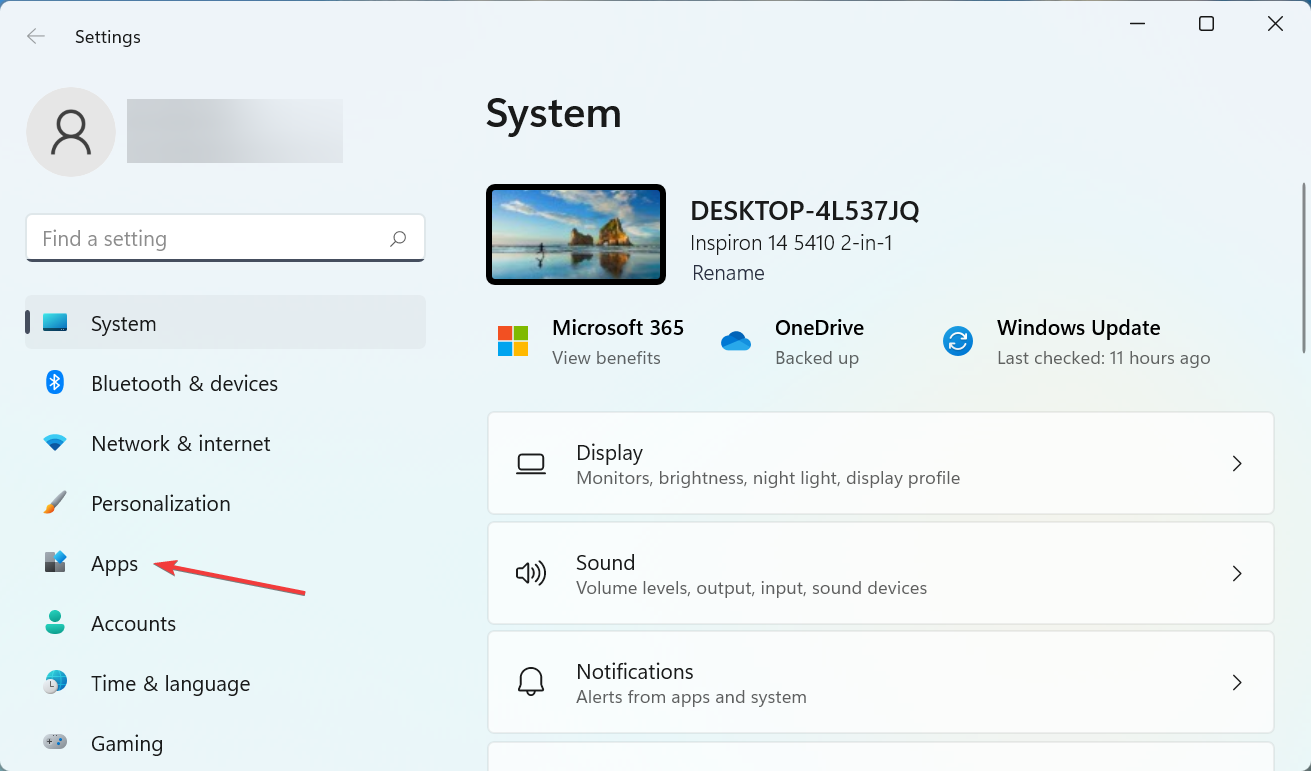
- Press Windows + I to launch Settings, and select Apps from the tabs listed in the navigation pane on the left.

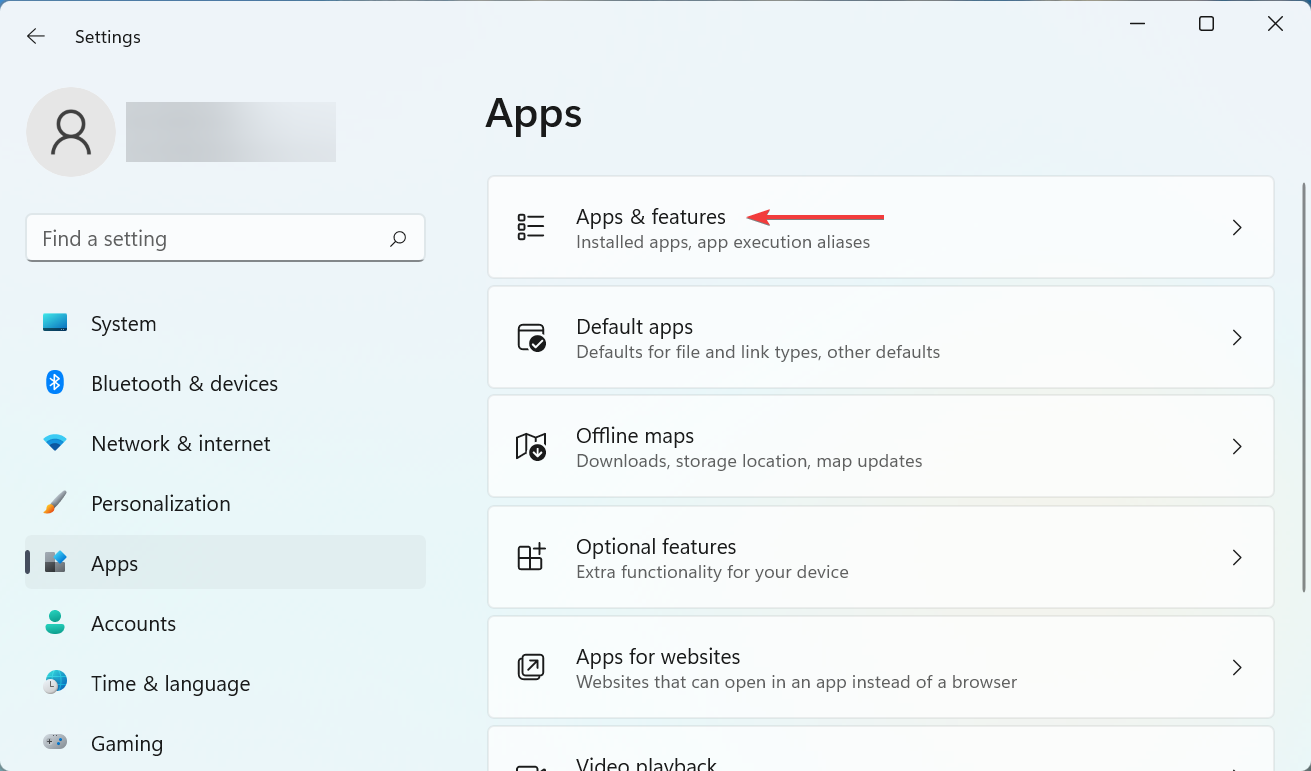
- Next, click on Apps & features on the right.
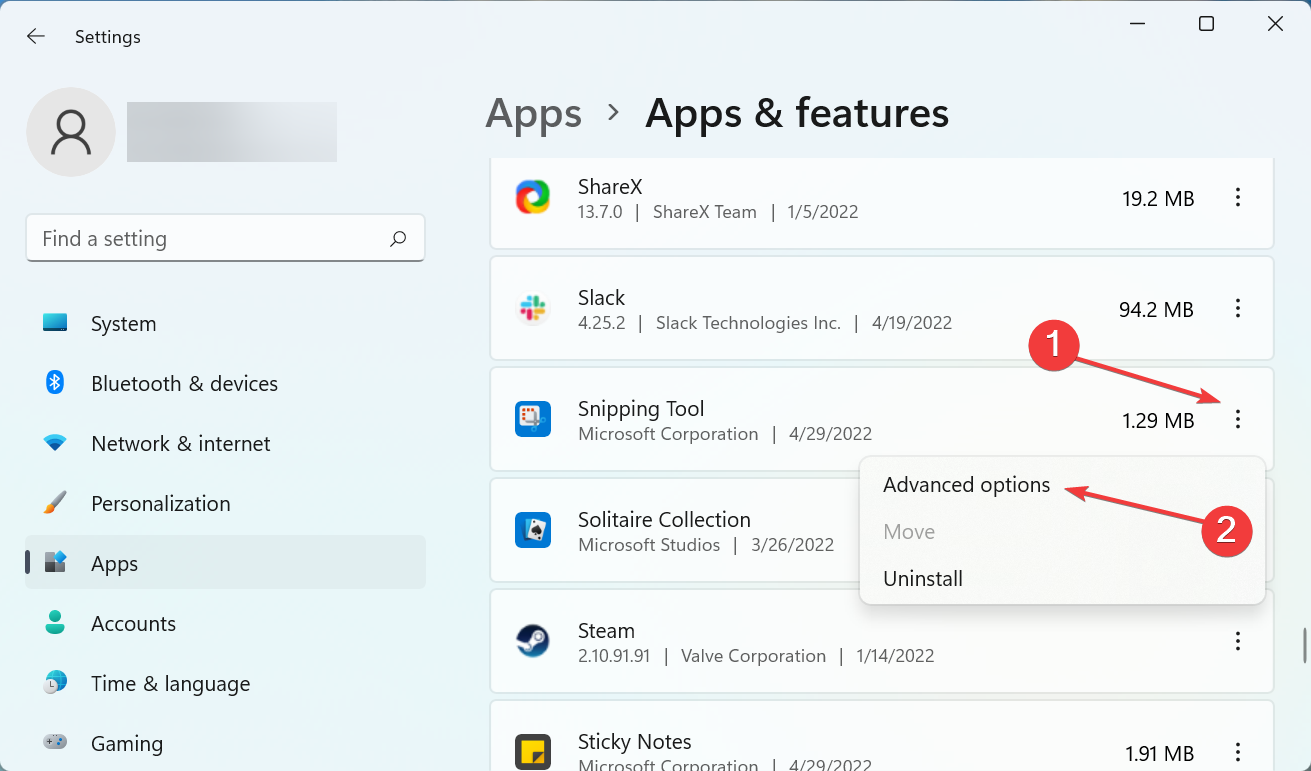
- Locate the Snipping Tool program, click on the ellipsis next to it, and select Advanced options from the menu.
- Now, click on the Repair button and wait for the process to complete.
- Once done, restart the computer and check if the problem is fixed.
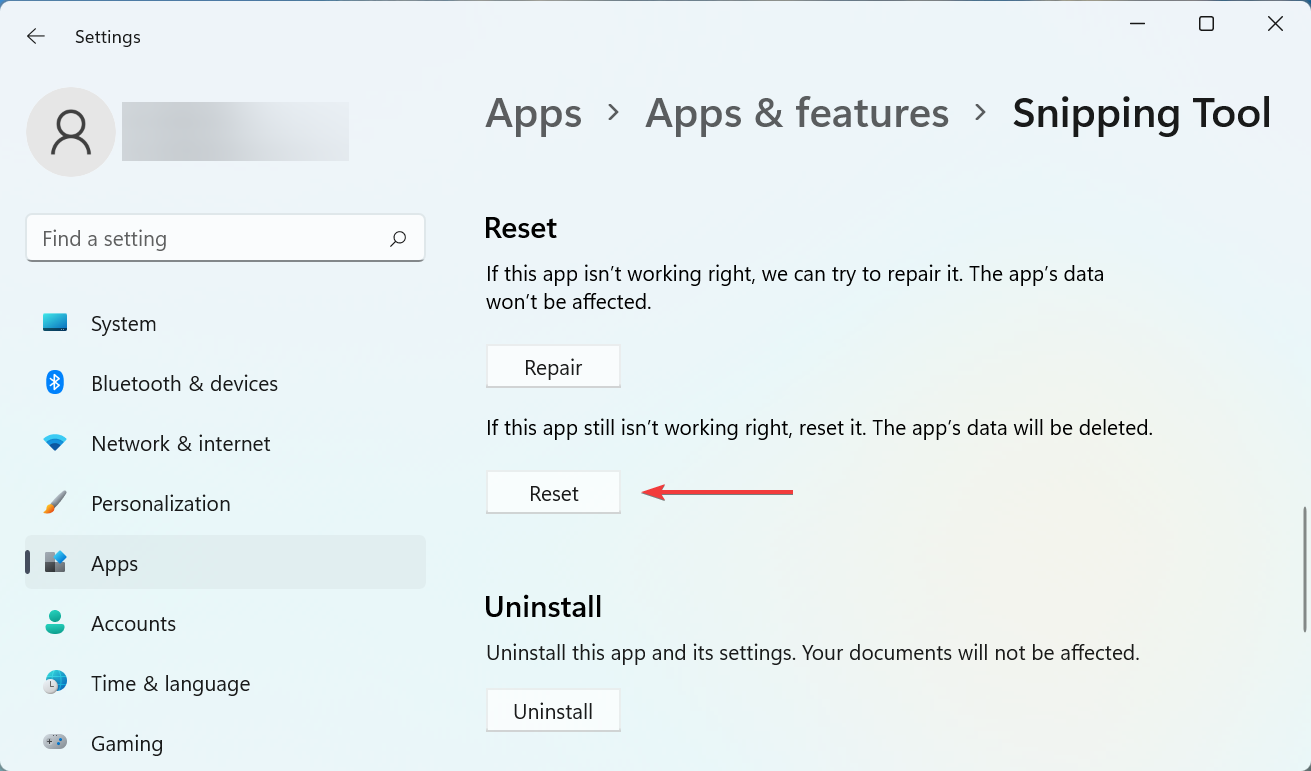
- In case it persists, again head to Advanced options for Snipping Tool and click on Reset this time.
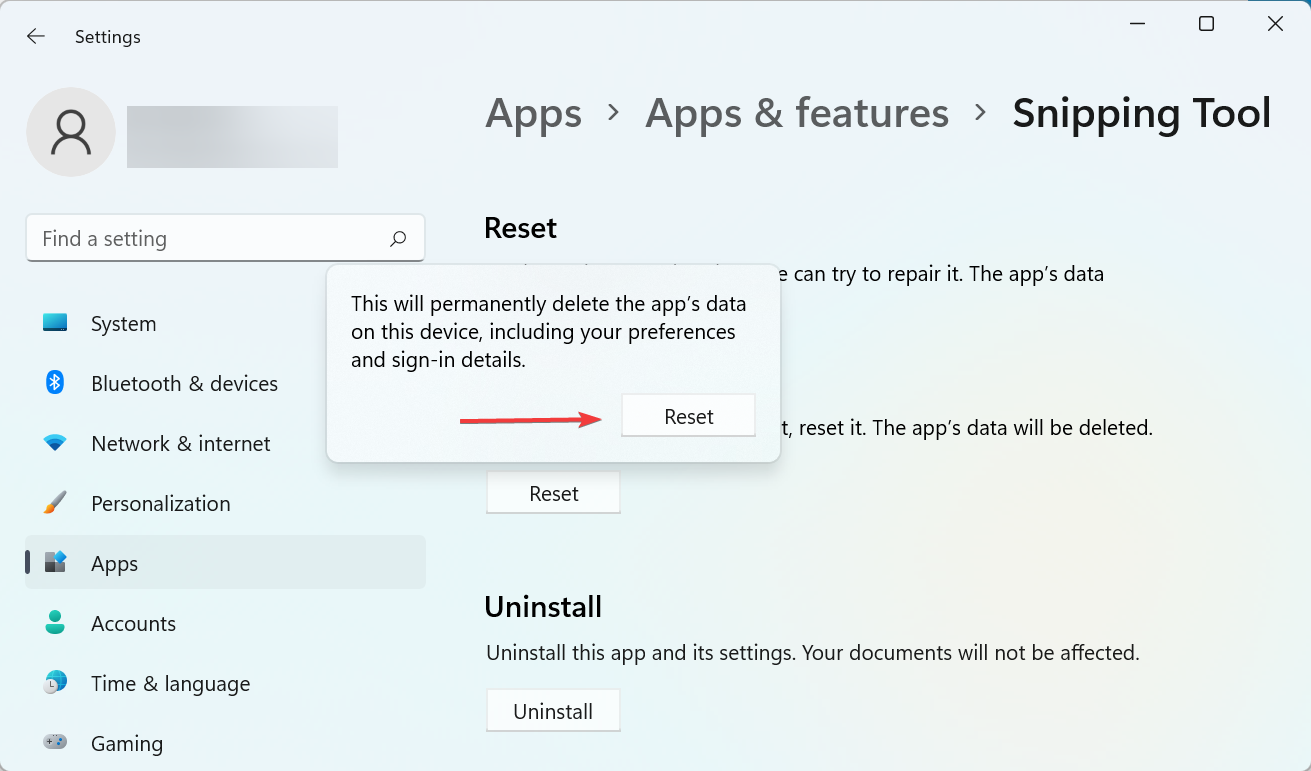
- Click Reset in the confirmation prompt that pops up.
The reset and repair process can quickly help eliminate issues with any app on the computer. So make sure to run two, and check if Windows + Shift + S not working sometimes in Windows 11 error is fixed.
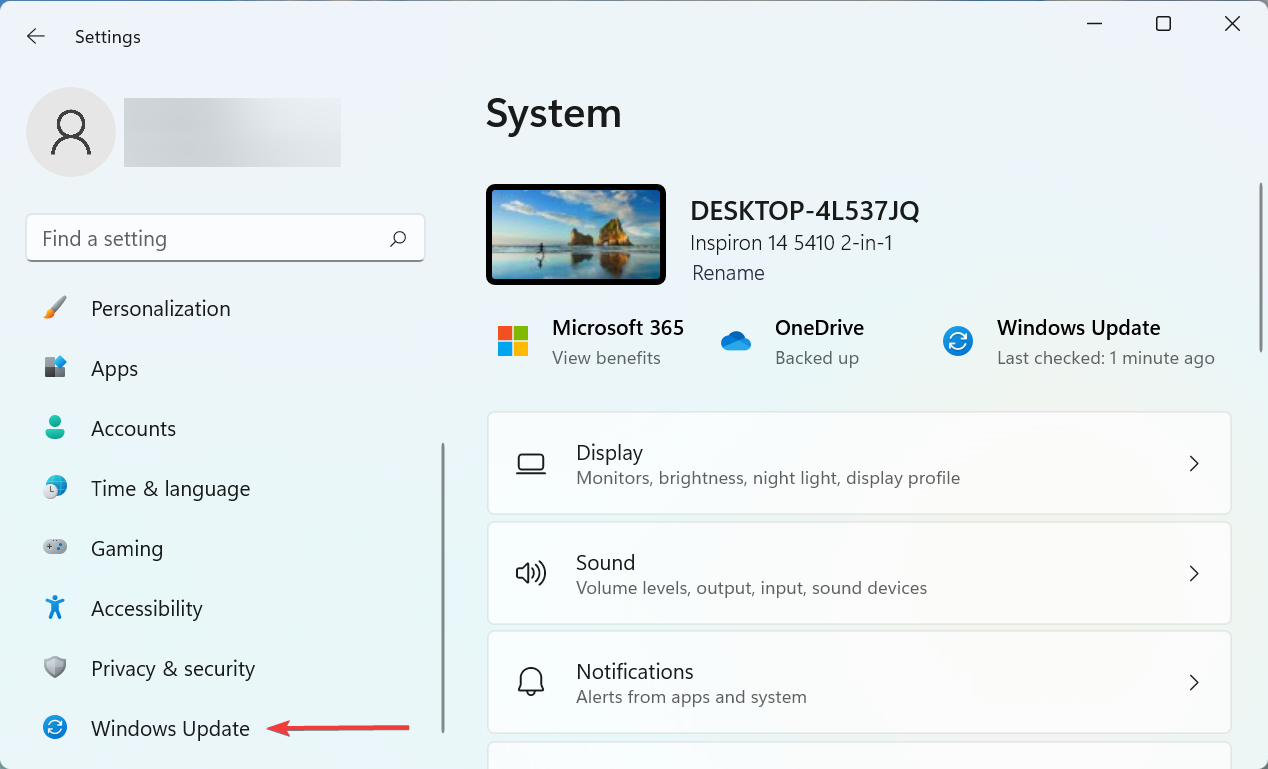
6. Uninstall the recent Windows update
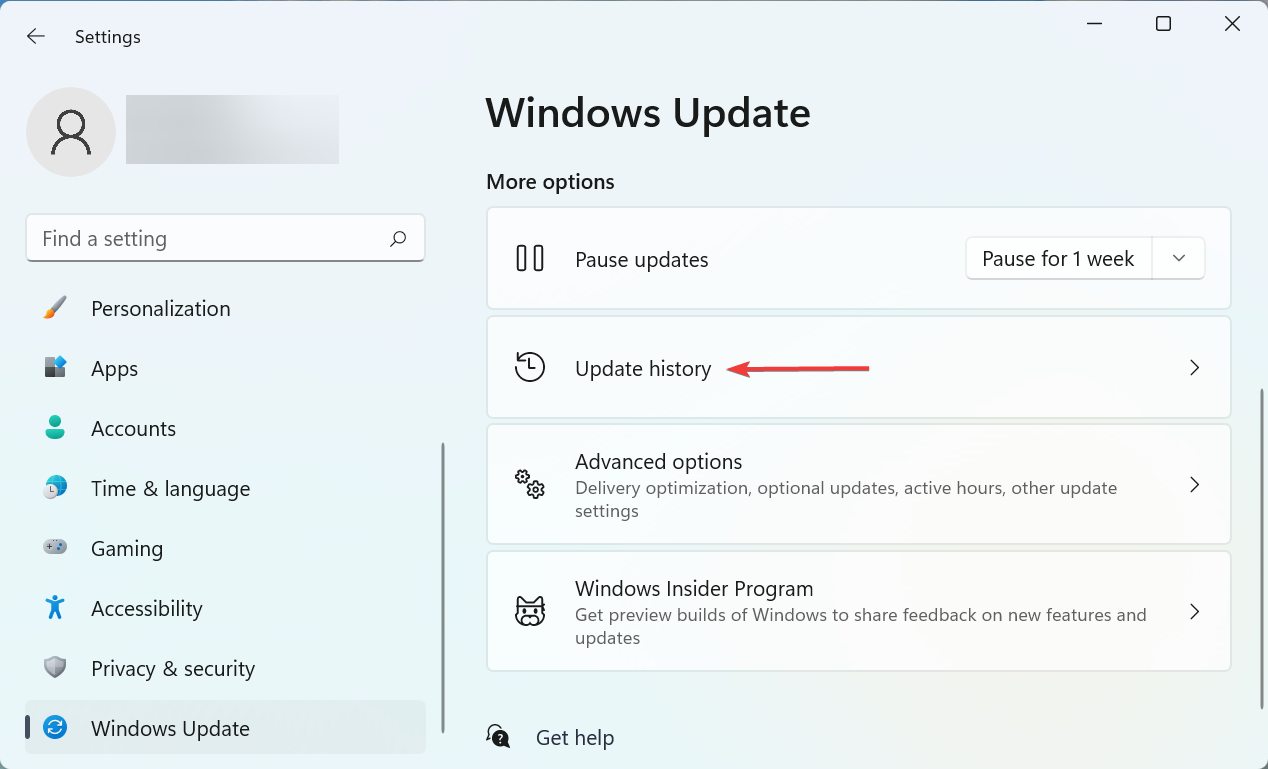
- Press Windows + I to launch the Settings app, and then select the Windows Update tab from the left.

- Next, click on Update history on the right.
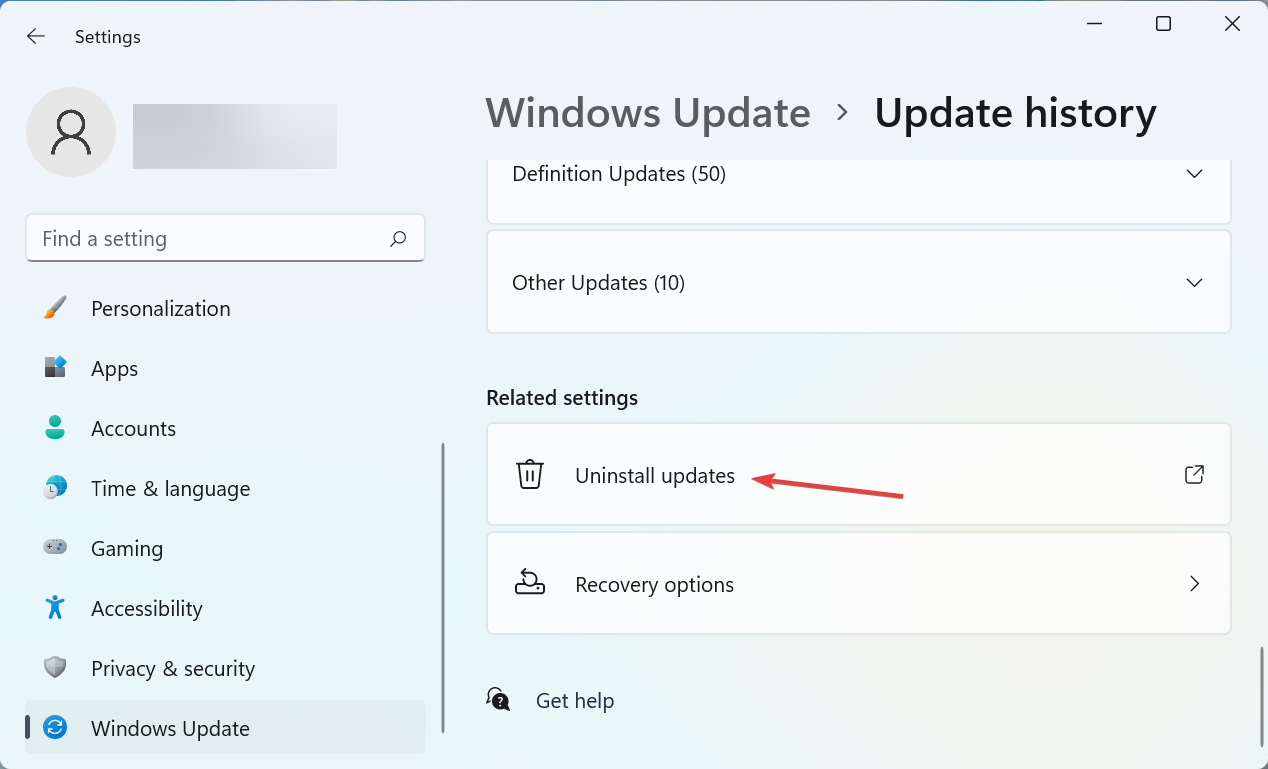
- Scroll down to the bottom and click on Uninstall updates.
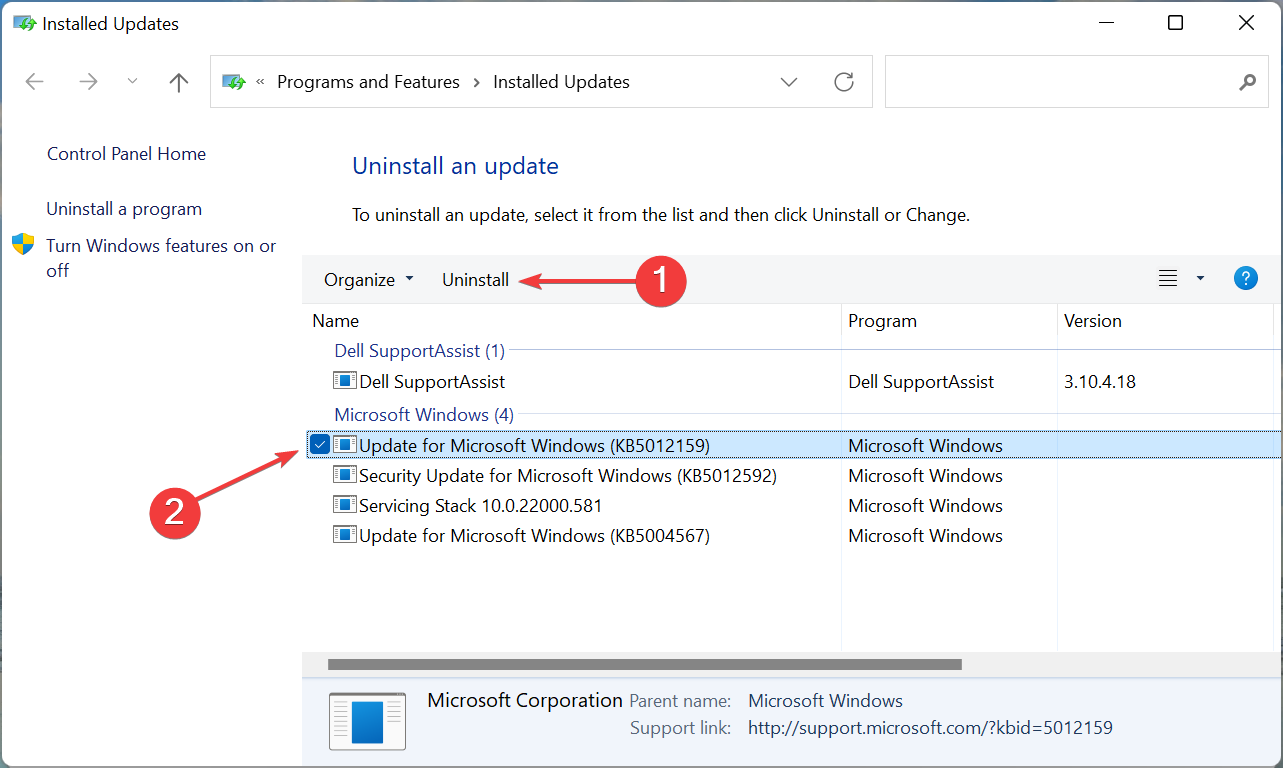
- Now, locate the last installed update, and click on Uninstall at the top.

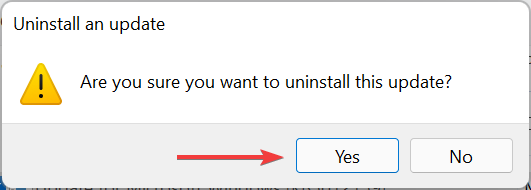
- Click Yes in the confirmation prompt that pops up.

If the Windows + Shift + S started not working after an update, it’s time you uninstall the current version and revert to the previous stable build. Oftentimes, bugs in the latest releases can introduce instability and cause conflict with the apps and programs.
7. Perform a system restore
If none of the methods listed here have worked, you are left with no option but to perform a system restore. It’s an effective way to revert all recent changes on the PC, including app installations and changes in settings, though the stored file won’t be affected.
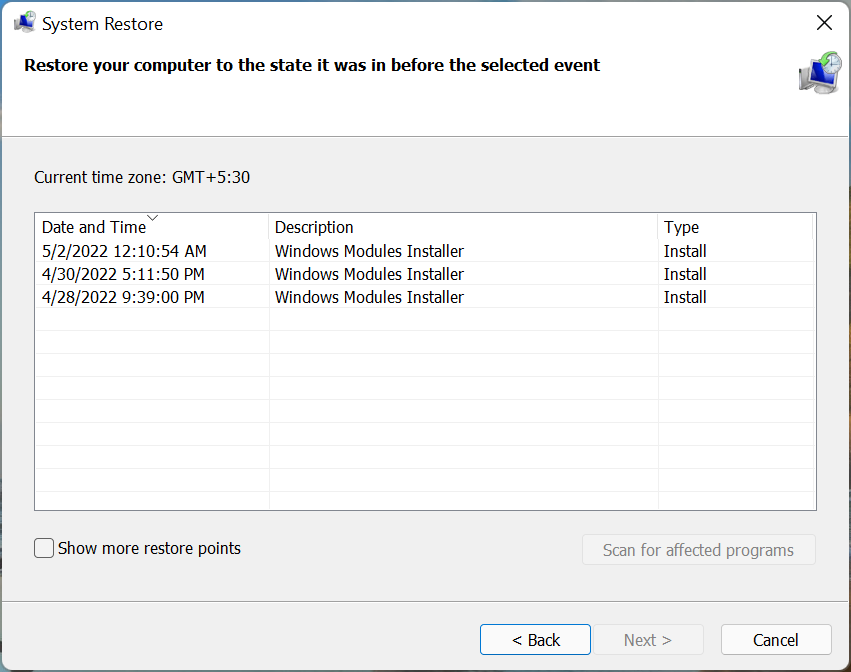
The process would take 15-60 minutes depending on the files stored, changes to be made, and the system configuration. But, if System Restore is taking a long time, try running an SFC scan or using a different restore point.
These are the seven most effective ways you can fix the problem. Also, remember that these methods would help resolve Windows + Shift + S not working on Windows 7, as well as on the other later iterations of the OS.
Several users complaining that Windows + Shift + S is not working in Windows 10 found our detailed guide helpful in that regard.
Also, check our article on how to capture a screenshot in Windows 11, and learn the various ways you can do it.
Tell us which fix worked for you in the comments section below.
![]()

The Snipping Tool is useful for taking screenshots, but only if the keyboard shortcut for it (Windows + Shift + S) is working properly. This guide explains how to fix it.
One of the easiest ways to take a screenshot on a Windows 10 and 11 PC is to use a keyboard shortcut using the Windows key + Shift + S keys. Using this shortcut allows you to take a screenshot using the Snipping Tool.
When this keyboard shortcut stops working, you’ll need to troubleshoot the issue or use a workaround. There are other keys and key combinations you can use. You can also try to fix the Snipping Tool itself.
Luckily, there are some things you can do to fix Windows + Shift + S not working on your Windows PC using the following steps.
Check Your Keyboard
If the keyboard shortcut isn’t working, there could be a problem with the keyboard itself. Ensure it’s plugged in correctly and is recognized by your PC.
Got a laptop keyboard causing you trouble? If you have an extra keyboard lying around, plug it in and see if it works. If it does, it’s probably an issue with the keyboard itself.

Using a wireless keyboard? Re-pair it by following the manufacturer’s instructions.
You should also check any cables for damage, make sure that the keys are debris-free, and press down appropriately. For more, check out these fixes for a broken keyboard on Windows 11.
Use the Print Screen Key
If you’re in dire need of a screenshot and don’t have time to troubleshoot, you can use a workaround first. To get a full shot of your desktop, hit the Print Screen key.
It’s on the top-right of your keyboard and typically labeled as PrtSc, PrntScrn, or similar on other keyboards.
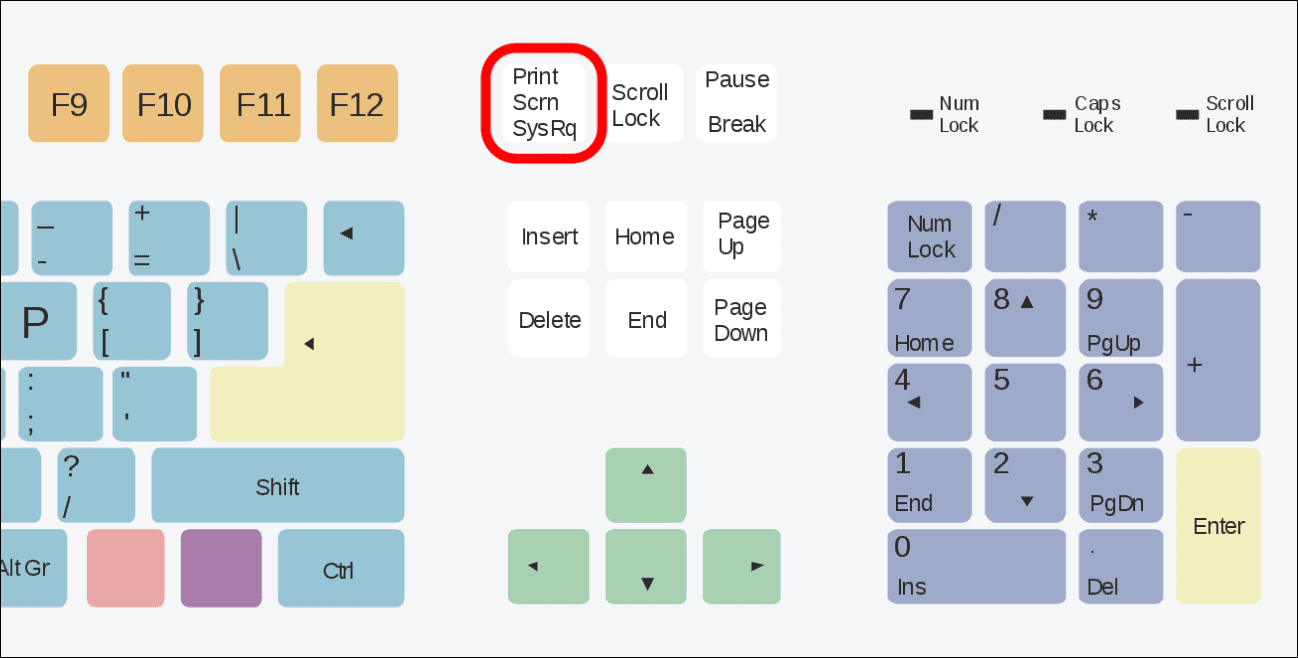
The shot of your full desktop is copied to your clipboard, and you can paste it into an image editor like Paint or a word processor like Word. After that, edit it however you want to, or send it off or save it for use later.
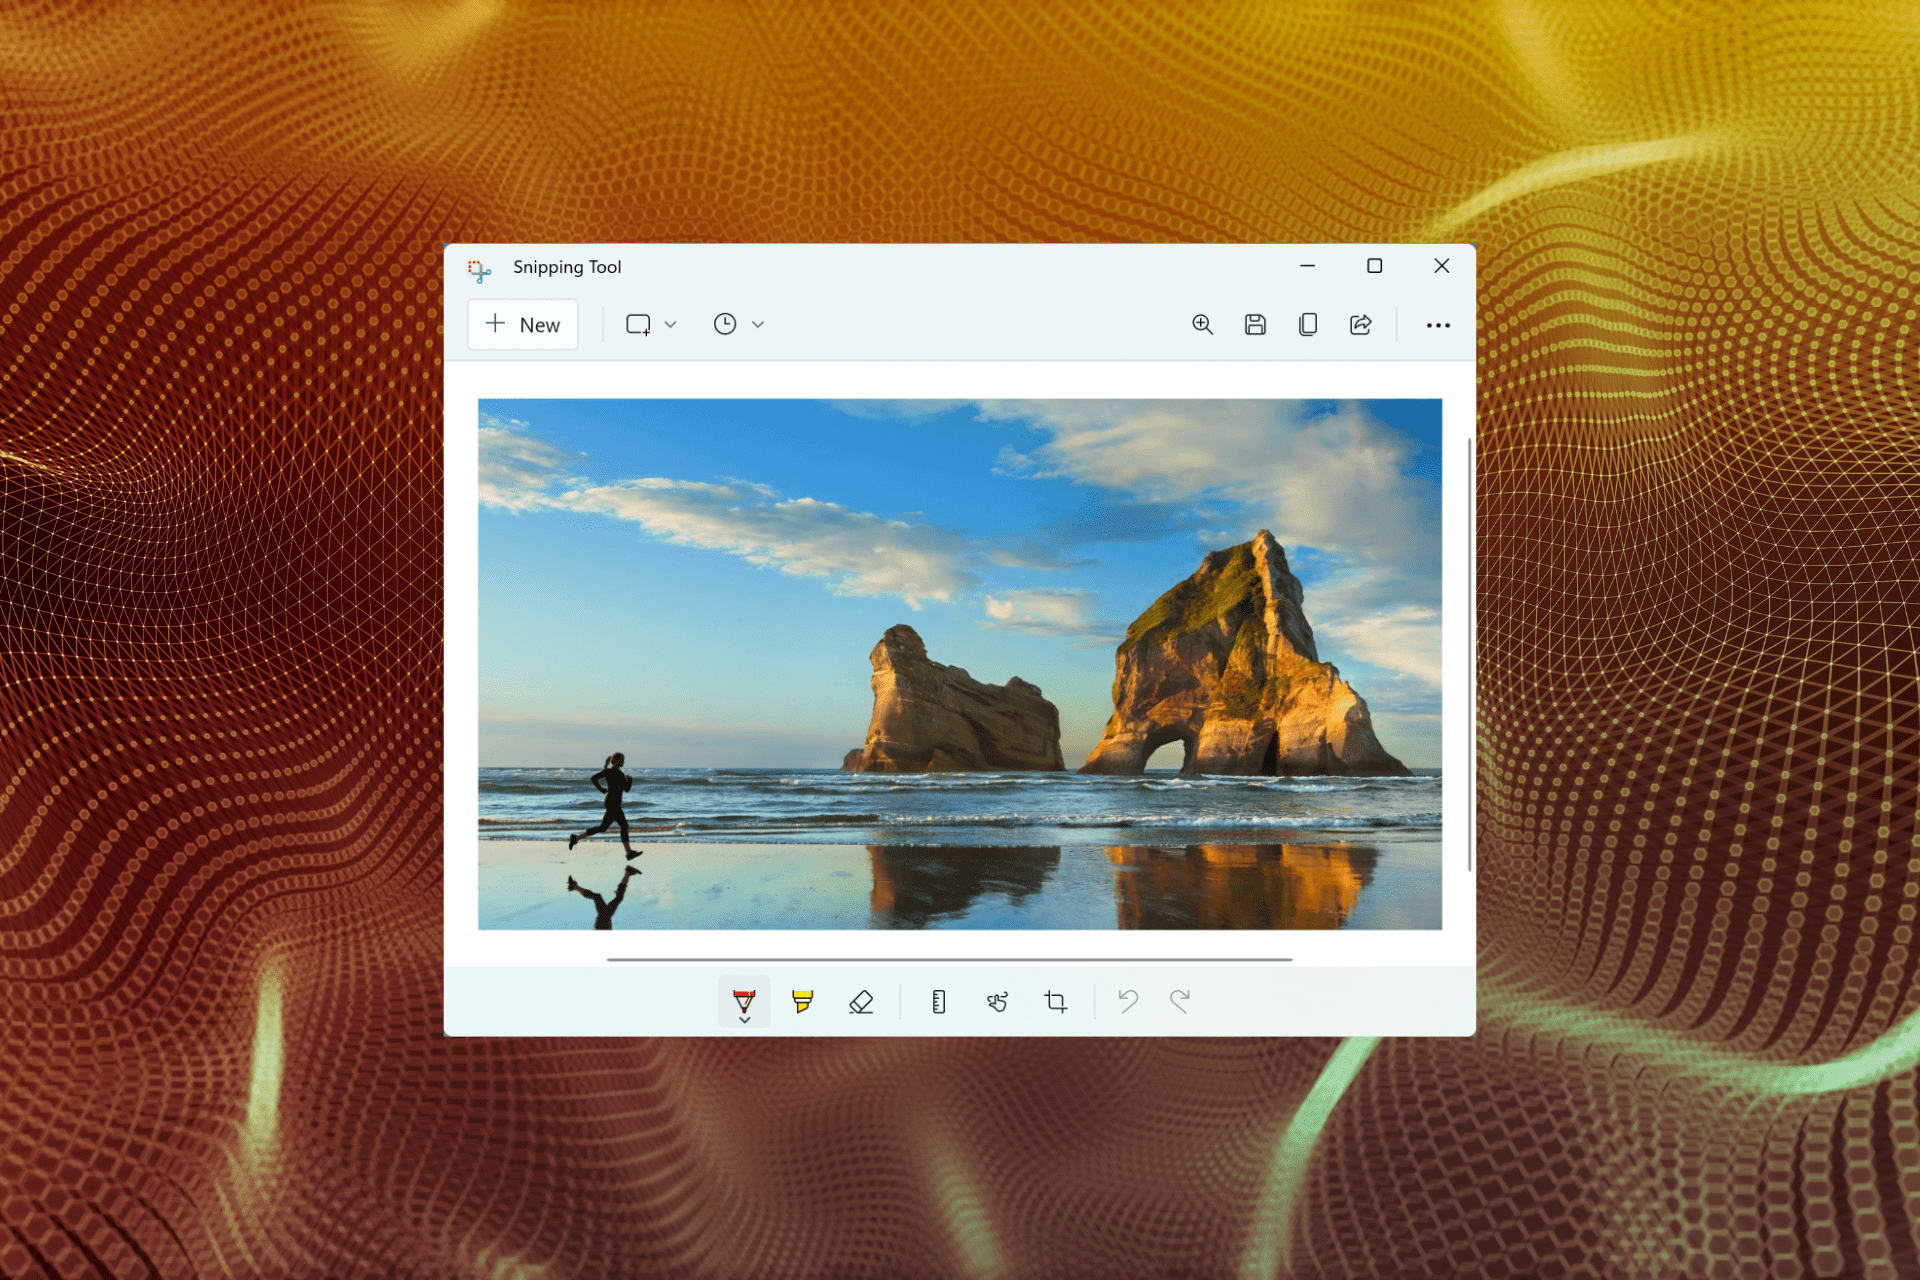
How to Reset or Repair the Snipping Tool
If the Snipping Tool isn’t working, you can reset or repair the app to get it working again. This will help to resolve keyboard shortcut issues like the one we’ve described above.
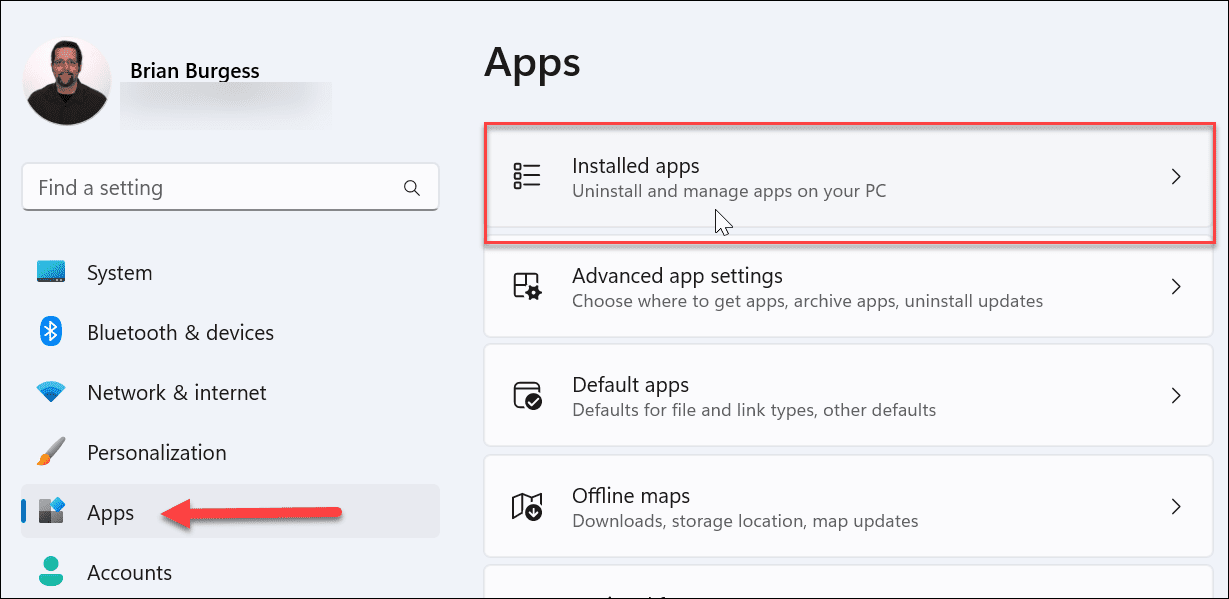
To reset or repair the Snipping Tool on Windows 11:
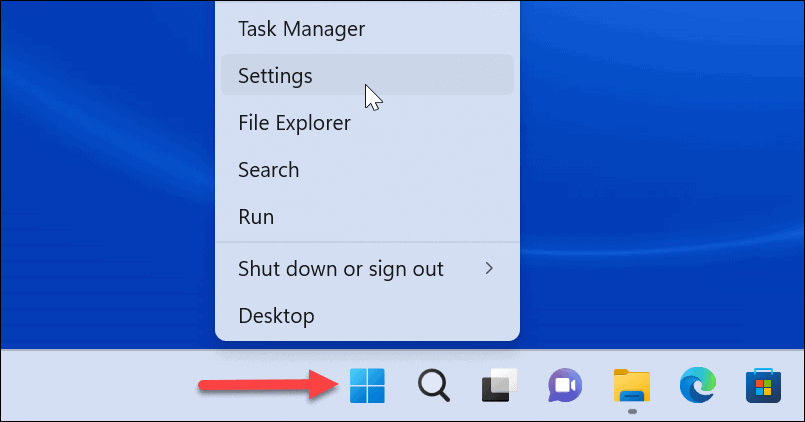
- Right-click the Start button and select Settings.

- When Settings opens, press Apps on the left.
- On the right, select Installed apps.

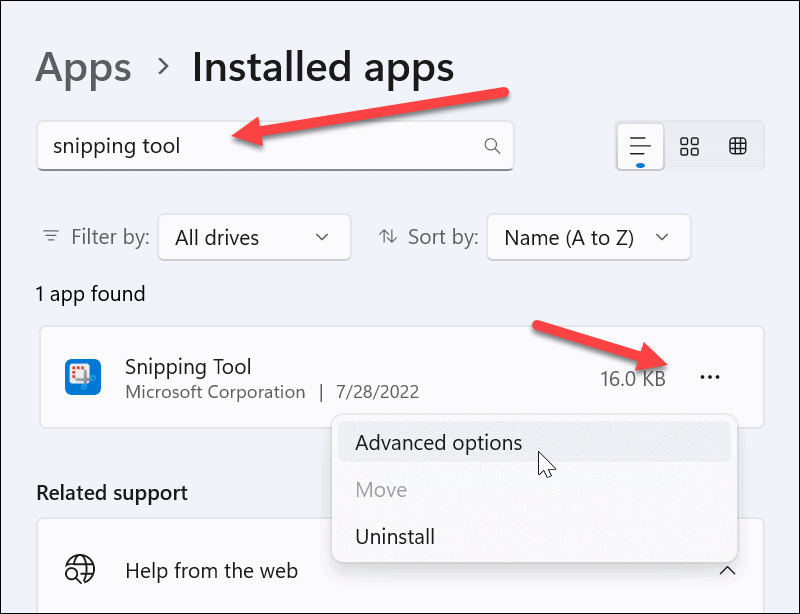
- Type snipping tool in the app search field at the top.
- Click the three-dot button next to Snipping Tool and select Advanced options.

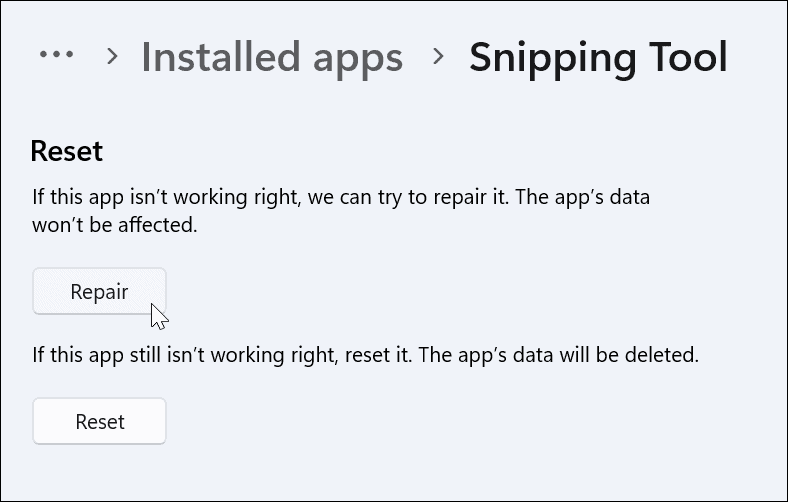
- Scroll down to the Reset section and click the Repair button—wait a moment for the repair to complete.
- Check if Windows key + Shift + S works after the repair.
- If that doesn’t work, click the Reset button, and see if it works.

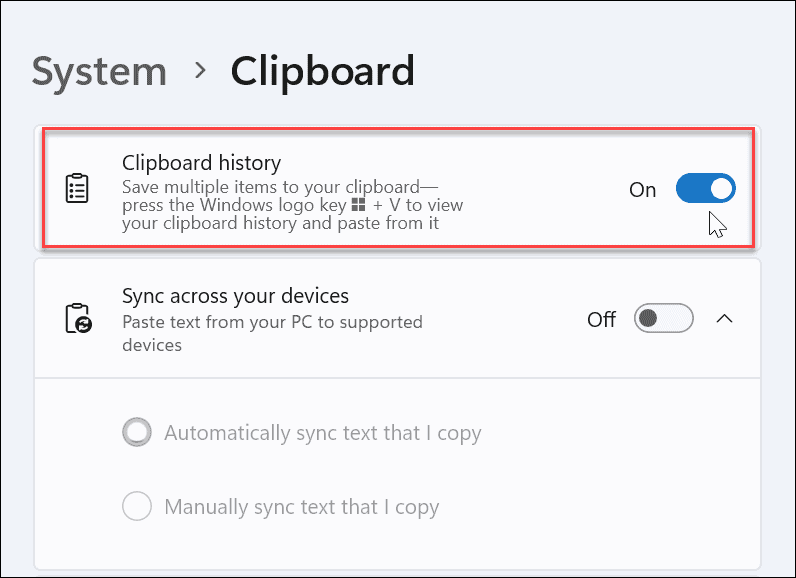
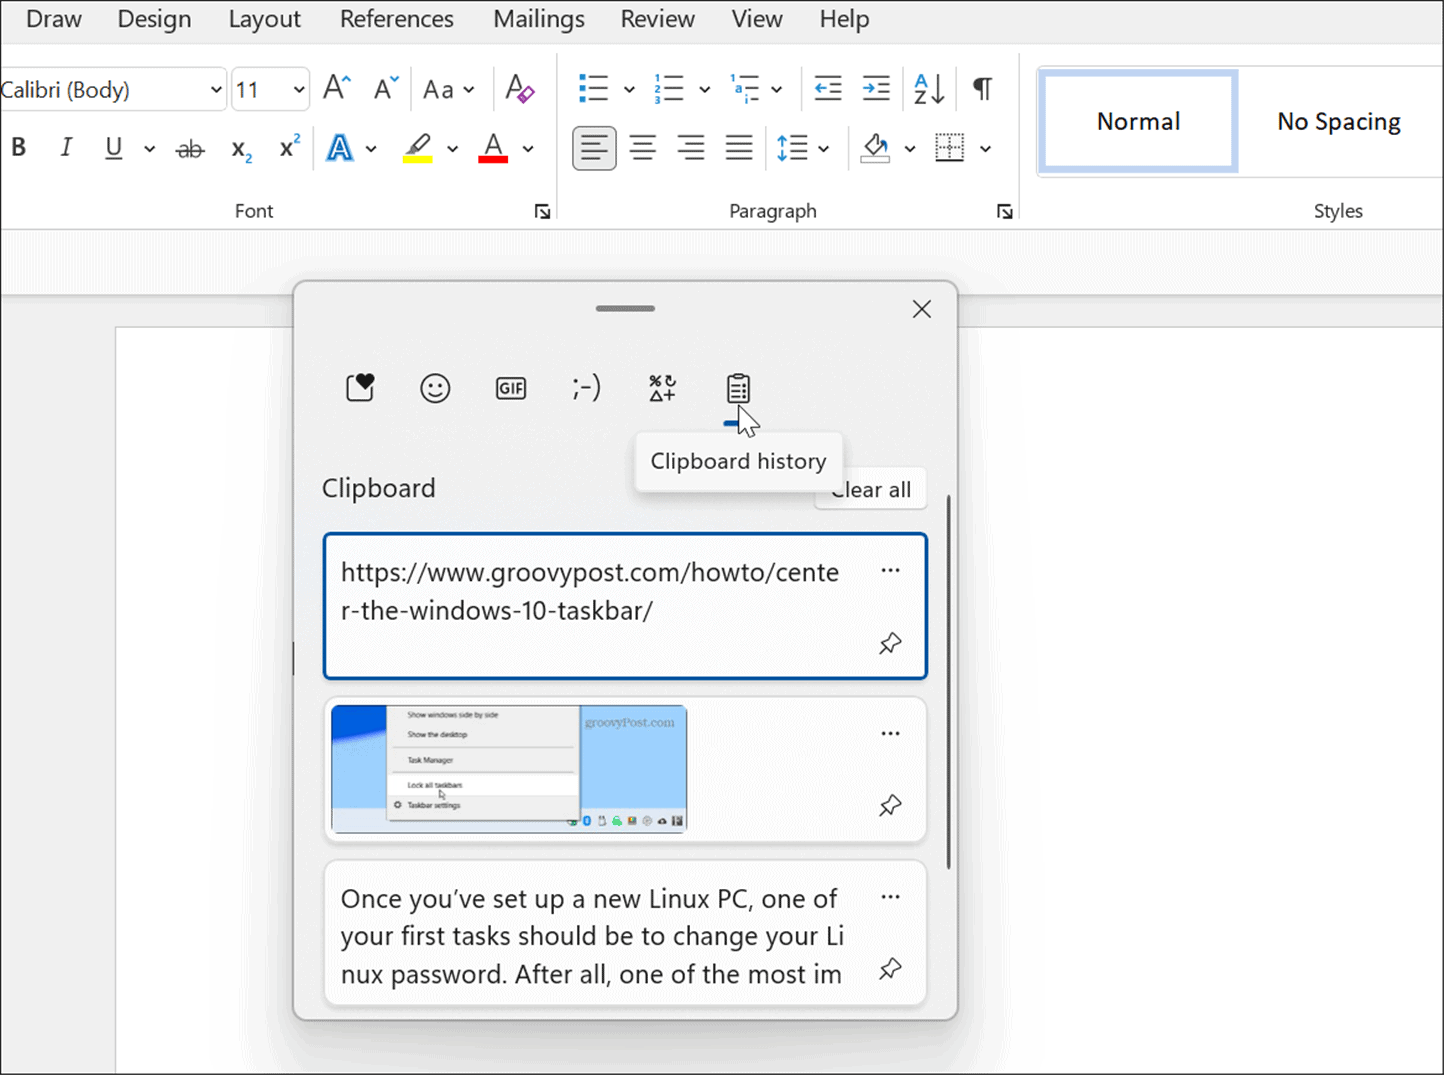
How to Enable Clipboard History to Fix Windows + Shift + S Not Working
Another thing you can do is ensure that the clipboard history feature is enabled. This feature allows you to save multiple snippets of text to your clipboard. It can also help fix keyboard shortcut problems.
To enable clipboard history on Windows:ing:
- Open Settings and select System from the menu.
- After that, scroll down and select the Clipboard option.

- Under the System > Clipboard section, toggle the switch next to the Clipboard history option to the On position.

- Close the Settings menu.
- Take a couple of screenshots to see if the clipboard history feature is working. It should provide a history of the shots you took to paste into a document or app like Paint.


Clean Boot Your PC
If the above steps don’t work, doing a clean boot of your PC is another thing to try. Other apps on your PC could be interfering with the Snipping tool. For example, a clean boot will use the minimal startup apps and drivers required to load Windows. It allows more control over the services and apps than Windows in safe mode.
Performing a clean boot of Windows is straightforward, following our instructions to clean boot Windows 11. If you’re running Windows 10, the clean boot process takes virtually the same steps.
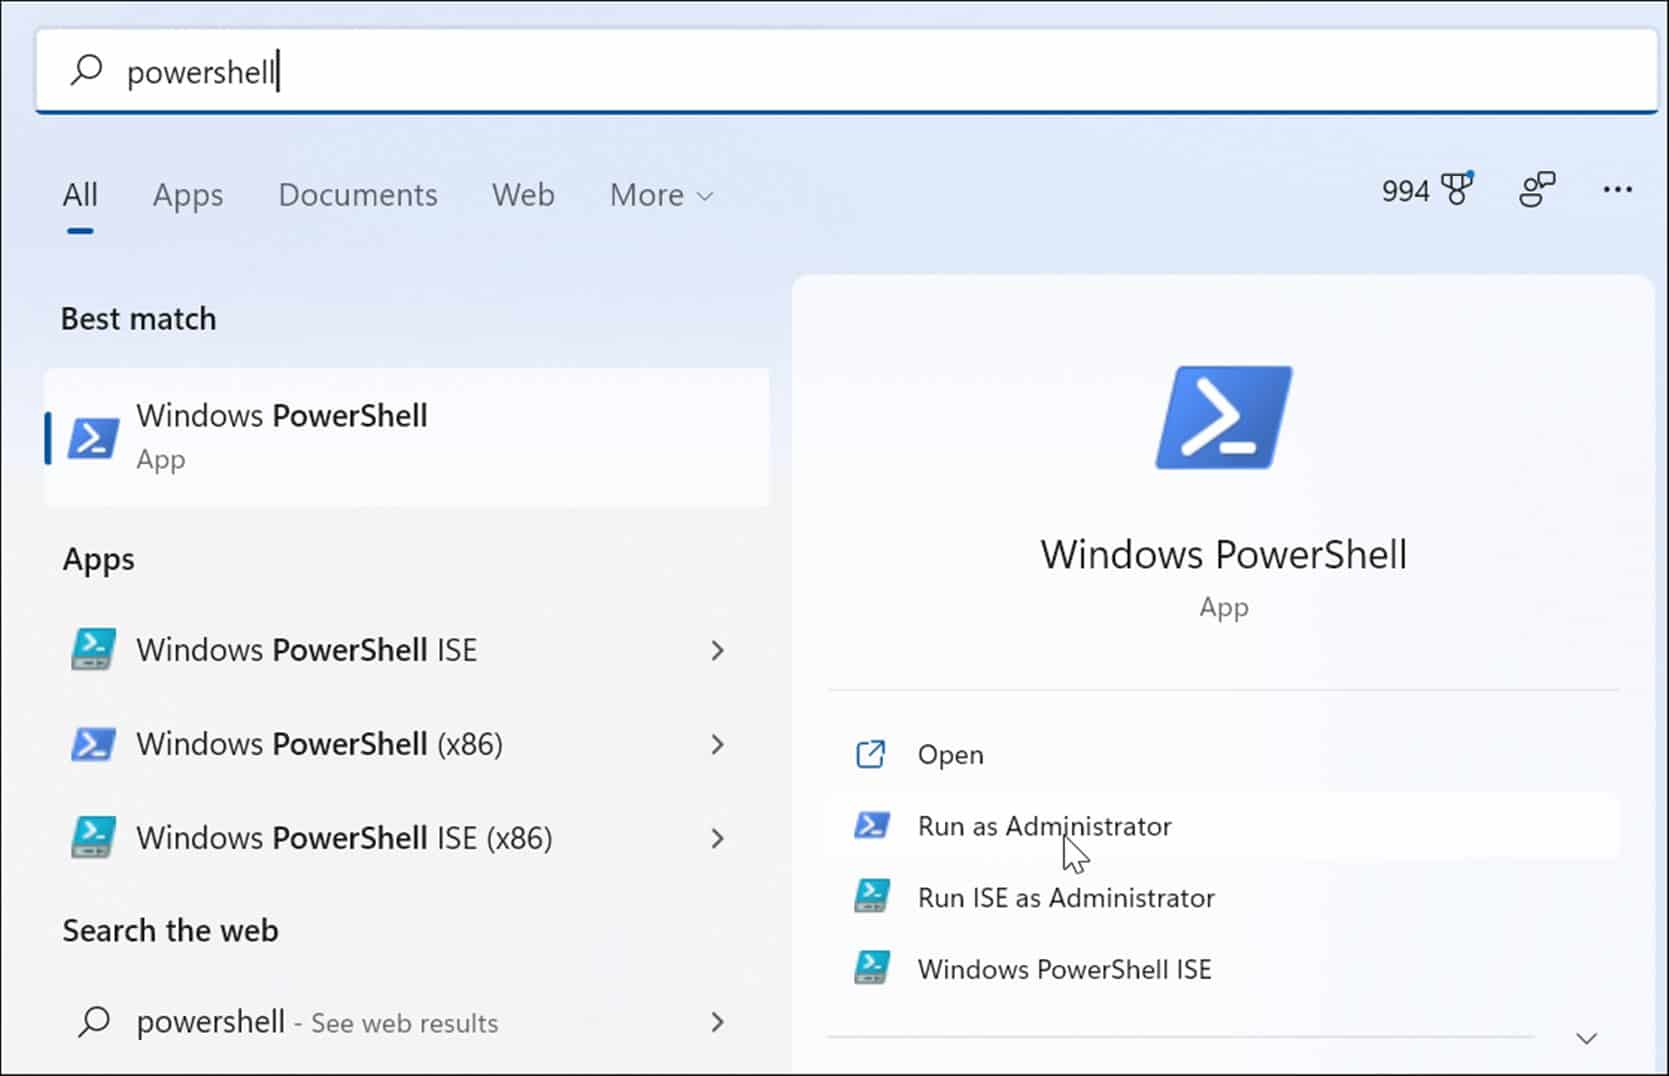
Run a DISM and SFC Scan
Your keyboard shortcut may not be working due to a corrupt system file. However, running an SFC and DISM scan can fix the issue and get your keyboard working again. These scans help to ensure that your Windows system files haven’t been corrupted.
To run an SFC and DISM scan on Windows:
- Press the Windows key and search for PowerShell.
- Click the Run as Administrator option from the results on the right.

- Run the following command in the terminal:
sfc /scannow

- After the SFC scan completes, you’ll want to run a DISM scan if SFC can’t replace specific system files.
- With PowerShell still open as an administrator, run the following command:
DISM /Online /Cleanup-Image /RestoreHealth

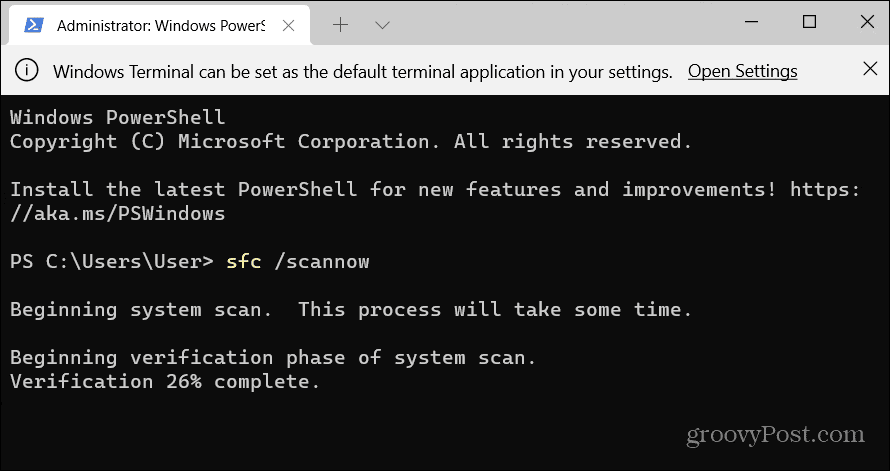
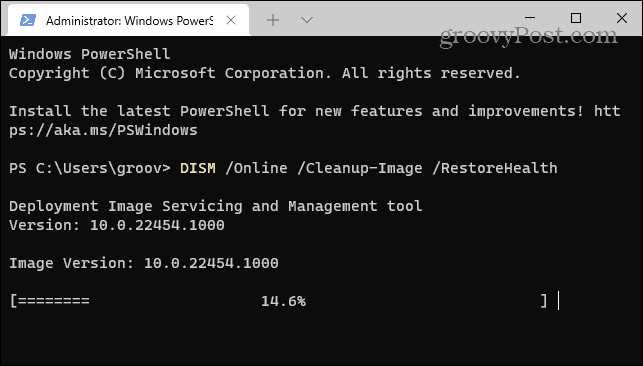
Remember that these scans can take a while to complete, and the amount of time will vary. Once the scans, restart your PC and see if the Windows key + Shift + S keyboard shortcut works.
Get Screenshots and Fix Windows + Shift + S Not Working
If your Windows + Shift + S keyboard shortcut stops working, using one of the solutions above should help to get things working again to get the screenshots you need.
If the keyboard shortcut ends up working, but you’re having other issues with the Snipping Tool, check out these fixes if the Snipping Tool stops working. Also, for more about screenshots, read our guide on how to take a screenshot on Windows 11. It includes other workarounds you can use, which include using the Xbox Game Bar and third-party utilities.
![]()