Сетевой протокол SMB (Server Message Block) используется для предоставления совместного удаленного доступа к файлам, принтерам и другим устройствам через порт TCP 445. В этой статье мы рассмотрим: какие версии (диалекты) протокола SMB доступны в различных версиях Windows (и как они соотносятся с версиями samba в Linux); как определить версию SMB на вашем компьютере; и как включить/отключить клиент и сервер SMBv1, SMBv2 и SMBv3.
Содержание:
- Версии протокола SMB в Windows
- Как проверить поддерживаемые версии SMB в Windows?
- Вывести используемые версии SMB с помощью Get-SMBConnection
- Об опасности использования SMBv1
- Включение и отключение SMBv1, SMBv2 и SMBv3 в Windows
Версии протокола SMB в Windows
Есть несколько версии протокола SMB (диалектов), которые последовательно появлялись в новых версиях Windows:
Для реализации протокола SMB в Linux/Unix системах используется samba. В скобках мы указали в каких версиях samba поддерживается каждый диалект SMB.
- CIFS — Windows NT 4.0;
- SMB 1.0 — Windows 2000;
- SMB 2.0 — Windows Server 2008 и Windows Vista SP1 (поддерживается в Samba 3.6);
- SMB 2.1 — Windows Server 2008 R2 и Windows 7 (поддерживается в Samba 4.0);
- SMB 3.0 — Windows Server 2012 и Windows 8 (поддерживается в Samba 4.2);
- SMB 3.02 — Windows Server 2012 R2 и Windows 8. 1 (не поддерживается в Samba);
- SMB 3.1.1 – Windows Server 2016 и Windows 10 (не поддерживается в Samba).
Начиная с версии Samba 4.14, по умолчанию используется SMB2.1.
При сетевом взаимодействии по протоколу SMB между клиентом и сервером используется максимальная версия протокола, поддерживаемая одновременно и клиентом, и сервером.
Ниже представлена сводная таблица, по которой можно определить версию протокола SMB, которая выбирается при взаимодействии разных версий Windows:
| Операционная система | Win 10, Server 2016 | Windows 8.1, Server 2012 R2 |
Windows 8, Server 2012 |
Windows 7, Server 2008 R2 |
Windows Vista, Server 2008 |
Windows XP, Server 2003 и ниже |
| Windows 10 ,
Windows Server 2016 |
SMB 3.1.1 | SMB 3.02 | SMB 3.0 | SMB 2.1 | SMB 2.0 | SMB 1.0 |
| Windows 8.1 , Server 2012 R2 |
SMB 3.02 | SMB 3.02 | SMB 3.0 | SMB 2.1 | SMB 2.0 | SMB 1.0 |
| Windows 8 , Server 2012 |
SMB 3.0 | SMB 3.0 | SMB 3.0 | SMB 2.1 | SMB 2.0 | SMB 1.0 |
| Windows 7, Server 2008 R2 |
SMB 2.1 | SMB 2.1 | SMB 2.1 | SMB 2.1 | SMB 2.0 | SMB 1.0 |
| Windows Vista, Server 2008 |
SMB 2.0 | SMB 2.0 | SMB 2.0 | SMB 2.0 | SMB 2.0 | SMB 1.0 |
| Windows XP, 2003 и ниже | SMB 1.0 | SMB 1.0 | SMB 1.0 | SMB 1.0 | SMB 1.0 | SMB 1.0 |
К примеру, при подключении клиентского компьютера с Windows 8.1 к файловому серверу с Windows Server 2016 будет использоваться протокол SMB 3.0.2.
Согласно таблице Windows XP, Windows Server 2003 для доступа к общим файлам и папкам на сервере могут использовать только SMB 1.0, который в новых версиях Windows Server (2012 R2 / 2016) может быть отключен. Таким образом, если в вашей инфраструктуре одновременно используются компьютеры с Windows XP (снятой с поддержки), Windows Server 2003/R2 и сервера с Windows Server 2012 R2/2016/2019, устаревшие клиенты не смогут получить доступ к файлам и папкам на файловом сервере с новой ОС.
Если Windows Server 2016/2012 R2 с отключенным SMB v1.0 используется в качестве контроллера домена, значить клиенты на Windows XP/Server 2003 не смогут получить доступ к каталогам SYSVOL и NETLOGON на контроллерах домена и авторизоваться в AD.
На старых клиентах при попытке подключиться к ресурсу на файловом сервере с отключенным SMB v1 появляется ошибка:
The specified network name is no longer available
Как проверить поддерживаемые версии SMB в Windows?
Рассмотрим, как определить, какие версии протокола SMB поддерживаются на вашем компьютере Windows.
В Windows 10, 8.1 и Windows Server 2019/2016/2012R2 вы можете проверить состояние различных диалектов SMB протокола с помощью PowerShell:
Get-SmbServerConfiguration | select EnableSMB1Protocol,EnableSMB2Protocol

Данная команда вернула, что протокол SMB1 отключен (
EnableSMB1Protocol=False
), а протоколы SMB2 и SMB3 включены (
EnableSMB1Protocol=True
).
Обратите внимание, что протоколы SMBv3 и SMBv2 тесно связаны между собой. Нельзя отключить или включить отдельно SMBv3 или SMBv2. Они всегда включаются/отключаются только совместно, т.к. используют один стек.
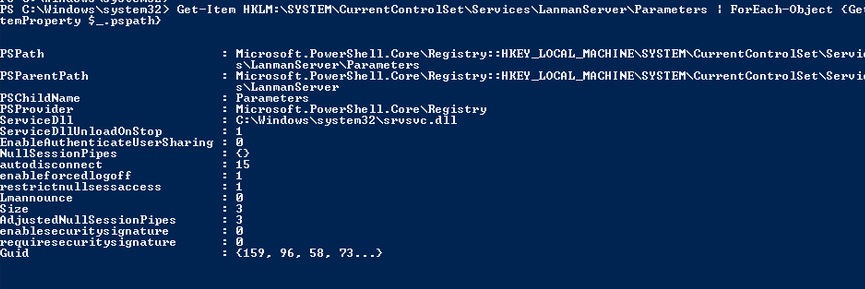
В Windows 7, Vista, Windows Server 2008 R2/2008:
Get-Item HKLM:\SYSTEM\CurrentControlSet\Services\LanmanServer\Parameters | ForEach-Object {Get-ItemProperty $_.pspath}
Если в данной ветке реестра нет параметров с именами SMB1 или SMB2, значить протоколы SMB1 и SMB2 по умолчанию включены.
Также в этих версиях Windows вы можете проверить, какие диалекты SMB разрешено использовать в качестве клиентов с помощью команд:
sc.exe query mrxsmb10
SERVICE_NAME: mrxsmb10
TYPE : 2 FILE_SYSTEM_DRIVER
STATE : 4 RUNNING
(STOPPABLE, NOT_PAUSABLE, IGNORES_SHUTDOWN)
WIN32_EXIT_CODE : 0 (0x0)
SERVICE_EXIT_CODE : 0 (0x0)
CHECKPOINT : 0x0
WAIT_HINT : 0x0
sc.exe query mrxsmb20
SERVICE_NAME: mrxsmb20
TYPE : 2 FILE_SYSTEM_DRIVER
STATE : 4 RUNNING
(STOPPABLE, NOT_PAUSABLE, IGNORES_SHUTDOWN)
WIN32_EXIT_CODE : 0 (0x0)
SERVICE_EXIT_CODE : 0 (0x0)
CHECKPOINT : 0x0
WAIT_HINT : 0x0
В обоих случаях службы запущены (
STATE=4 Running
). Значит Windows может подключаться как к SMBv1, так и к SMBv2 серверам.
Вывести используемые версии SMB с помощью Get-SMBConnection
Как мы говорили раньше, компьютеры при взаимодействии по протоколу SMB используют максимальную версию, поддерживаемую как клиентом, так и сервером. Для определения версии SMB, используемой для доступа к удаленному компьютеру можно использовать командлет PowerShell
Get-SMBConnection
:
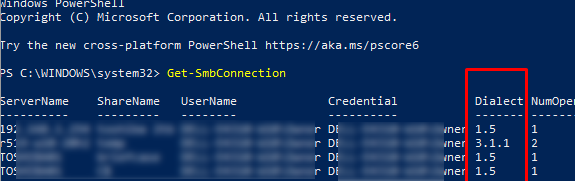
Версия SMB, используемая для подключения к удаленному серверу (ServerName) указана в столбце Dialect.
Можно вывести информацию о версиях SMB, используемых для доступа к конкретному серверу:
Get-SmbConnection -ServerName servername
Если нужно отобразить, используется ли SMB шифрование (появилось в SMB 3.0), выполните:
Get-SmbConnection | ft ServerName,ShareName,Dialect,Encrypted,UserName
В Linux вывести список SMB подключения и используемые диалекты в samba можно командой:
$ sudo smbstatus
Чтобы на стороне сервера вывести список используемых клиентами версий протокола SMB и количество клиентов, используемых ту или иную версию протокола SMB, выполните команду:
Get-SmbSession | Select-Object -ExpandProperty Dialect | Sort-Object -Unique

В нашем примере имеется 825 клиентов, подключенных к серверу с помощью SMB 2.1 (Windows 7/Windows Server 2008 R2) и 12 клиентов SMB 3.02.
С помощью PowerShell можно включить аудит версий SMB, используемых для подключения:
Set-SmbServerConfiguration –AuditSmb1Access $true
События подключения затем можно извлечь из журналов Event Viewer с помощью PowerShell:
Get-WinEvent -LogName Microsoft-Windows-SMBServer/Audit
Об опасности использования SMBv1
Последние несколько лет Microsoft из соображений безопасности планомерно отключает устаревший протокол SMB 1.0. Связано это с большим количеством критических уязвимостей в этом протоколе (вспомните историю с эпидемиями вирусов-шифровальщиков wannacrypt и petya, которые использовали уязвимость именно в протоколе SMBv1). Microsoft и другие IT компании настоятельно рекомендуют отказаться от его использования.
Однако отключение SMBv1 может вызвать проблемы с доступом к общий файлам и папкам на новых версиях Windows 10 (Windows Server 2016/2019) с устаревших версий клиентов (Windows XP, Server 2003), сторонних ОС (Mac OSX 10.8 Mountain Lion, Snow Leopard, Mavericks, старые версии Linux), различных старых NAS устройствах.
Если в вашей сети не осталось legacy устройств с поддержкой только SMBv1, обязательно отключайте эту версию диалекта в Windows.
В том случае, если в вашей сети остались клиенты с Windows XP, Windows Server 2003 или другие устройства, которые поддерживают только SMBv1, их нужно как можно скорее обновить или тщательно изолировать.
Включение и отключение SMBv1, SMBv2 и SMBv3 в Windows
Рассмотрим способы включения, отключения различных версий SMB в Windows. Мы рассматриваем отдельно включение клиента и сервера SMB (это разные компоненты).
Windows 10, 8.1, Windows Server 2019/2016/2012R2:
Отключить клиент и сервер SMBv1:
Disable-WindowsOptionalFeature -Online -FeatureName smb1protocol
Отключить только SMBv1 сервер:
Set-SmbServerConfiguration -EnableSMB1Protocol $false
Включить клиент и сервер SMBv1:
Enable-WindowsOptionalFeature -Online -FeatureName smb1protocol
Включить только SMBv1 сервер:
Set-SmbServerConfiguration -EnableSMB1Protocol $true
Отключить сервер SMBv2 и SMBv3:
Set-SmbServerConfiguration -EnableSMB2Protocol $false
Включить сервер SMBv2 и SMBv3:
Set-SmbServerConfiguration -EnableSMB2Protocol $true

Windows 7, Vista, Windows Server 2008 R2/2008:
Отключить SMBv1 сервер:
Set-ItemProperty -Path "HKLM:\SYSTEM\CurrentControlSet\Services\LanmanServer\Parameters" SMB1 -Type DWORD -Value 0 –Force

Включить SMBv1 сервер:
Set-ItemProperty -Path "HKLM:\SYSTEM\CurrentControlSet\Services\LanmanServer\Parameters" SMB1 -Type DWORD -Value 1 –Force
Отключить SMBv1 клиент:
sc.exe config lanmanworkstation depend= bowser/mrxsmb20/nsi
sc.exe config mrxsmb10 start= disabled
Включить SMBv1 клиент:
sc.exe config lanmanworkstation depend= bowser/mrxsmb10/mrxsmb20/nsi
sc.exe config mrxsmb10 start= auto
Отключить SMBv2 сервер:
Set-ItemProperty -Path "HKLM:\SYSTEM\CurrentControlSet\Services\LanmanServer\Parameters" SMB2 -Type DWORD -Value 0 -Force
Включить SMBv2 сервер
Set-ItemProperty -Path "HKLM:\SYSTEM\CurrentControlSet\Services\LanmanServer\Parameters" SMB2 -Type DWORD -Value 1 –Force
Отключить SMBv2 клиент:
sc.exe config lanmanworkstation depend= bowser/mrxsmb10/nsi
sc.exe config mrxsmb20 start= disabled
Включить SMBv2 клиент:
sc.exe config lanmanworkstation depend= bowser/mrxsmb10/mrxsmb20/nsi
sc.exe config mrxsmb20 start= auto
Для отключения сервера SMBv1 на всех компьютерах независимо от версии Windows можно распространить параметр реестра типа REG_DWORD с именем SMB1 и значением 0 (HKEY_LOCAL_MACHINE\SYSTEM\CurrentControlSet\Services\LanmanServer\Parameters)на через GPO.
Для отключения SMBv2 нужно в этой же ветке установить параметр SMB2=0.
Для отключения SMBv1 клиента нужно распространить такой параметр реестра:
- Key: HKEY_LOCAL_MACHINE\SYSTEM\CurrentControlSet\services\mrxsmb10
- Name: Start
- Type: REG_DWORD
- Value: 4
При отключении SMB 1.0/CIFS File Sharing Support в Windows вы можете столкнуться с ошибкой “0x80070035, не найден сетевой путь”, ошибкой при доступе к общим папкам, и проблемами обнаружения компьютеров в сетевом окружении. В этом случае вместо служба обозревателя компьютеров (Computer Browser) нужно использовать службы обнаружения (линк).
In Windows 10, enabling SMB3 is the default setting, but if you’d like to turn it off, you can follow these instructions. Note that the SMB3 protocol is a part of Windows networking, and disabling it may cause problems with the operating system. To enable or disable SMB3 on Windows 10, you should open the command prompt as an administrator. Type the command “Get-SmbServerConfiguration” and you’ll receive a response of true.
Open the Control Panel and click the Add/Remove Programs and Features option. You can also turn Windows features on and off by typing a command in the search box. Select SMB 1.0/CIFS file sharing support. Next, click Network and Sharing Center. If you’re prompted, select Yes. You should now be able to connect to a Windows server via SMB. If you’ve been disconnected from the server for too long, you should try rebooting your computer.
SMB signing is another security feature of SMB. It prevents attackers from changing packets or replaying them in a man-in-the-middle attack. Both Windows versions support SMB signing. To enable SMB signing, make sure you enable it on both computers in an SMB connection. If you’re not sure, try WireShark to decode the packets. You can also find out what protocol version your computer is using by searching for a connection with that IP address in a web browser.
Does Windows 10 Have SMB3?
Yes, Windows 10 has SMB3 support. All versions of the operating system support SMB3. This version includes security enhancements such as enforcing secure connections between newer clients and using stronger encryption protocols. Windows 10 also supports the Get-SMBConnection command. To check if Windows 10 supports SMB3, use a network diagnostic tool such as WireShark. Ensure that you have admin rights to run the command.
SMB is a client-server communication protocol developed by Microsoft. It provides access to files and printers on other computers in a network with authenticated inter-process communication. SMB was first implemented in the LAN Manager operating system and used the NetBIOS protocol as the underlying transport. The latest version of SMB is Windows NT 3.1. SMB is comprised of two vaguely named Windows services (LanmanWorkstation and SMB). The latter uses NTLM or Kerberos authentication.
For SMBv3, you can enable write-through mode. This option ensures that writes reach the disk. You can enable write-through by running the NET USE /WRITETHRU command or run the PowerShell cmdlet New-SMBMapping-UseWriteThrough. However, write-through can cause performance degradation. In addition, SMB clients cannot access the remote server with a Guest account. Likewise, SMB2 does not allow Fallback to Guest account when a user provides an invalid password.
How Do I Enable SMB3 Encryption?
Enabling SMB3 encryption is not an intuitive process. In order to make a shared folder or network drive encrypted, the client must enable the encryption on its settings. If you enable it but it is disabled, you will be disconnected. To enable it, navigate to the “Network” pane on your computer. Then, click on the “SMB3 encryption” tab. Select ‘Enable SMB3 encryption’.
Changing this setting will make your file sharing even safer. Windows also has an option for signing CIFS messages, which can prevent man-in-the-middle attacks. You can enable this feature by changing the SMB security settings on your server. Windows Server vNext Insider Preview build 25075 supports this security feature. By enabling SMB3 encryption, you’ll be able to share files across multiple PCs more quickly.
If you don’t see SMB3 enabled by default, you need to disable it manually. You can do this with the powershell command. Afterwards, use the Command Prompt to check if the settings are still correct. If you’re unable to enable SMB3, you can also try the Enable-WindowsOptionalFeature command. You can also use PowerShell tool to troubleshoot connectivity problems.
What Version of SMB Does Windows 10 Use?
To check if your PC is running SMB2, open the Control Panel and select Network and Sharing. You can use the Get-SmbServerConfiguration command to check if SMB2 is enabled. If it is, you will see a True value in the Dialect column. You can also enable SMB2 by turning it on in Turn Windows features. To enable SMB2, you must be running the latest version of Windows.
In Windows 10, you can find out what version of SMB your computer uses by running Get-SMBConnection. It displays the SMB version used by each connection. To turn on SMB encryption, run Set-SmbServerConfiguration. You can also turn off SMB2 before installing Windows 10.
If you are using SMB v2.0 and want to test if it is supported on Windows 10, you can open Wireshark and see if it shows the current SMB protocol version. Windows 10 is using SMB 2.0 by default, but you can use SMB v3 if you want. If you need to use SMB 2.0 for Windows 10, you can also use Wireshark to check the signature.
Does SMB Work on Windows 10?
Does SMB Work on Windows 10? It is a common question and there are two main ways to enable it. One method is by using the command line. Open the Command Prompt and type “smb” in the command window. Windows 10 will automatically detect SMBv2 and show it as a shared folder. If it does not, then you may need to enable it manually. If you have administrative rights, use the PowerShell command.
Windows 10 supports SMB 3.1.1 and SMB 2.1. The new version has a mechanism to negotiate crypto algorithms per connection. It uses AES-128-GCM by default but allows you to change it if needed. It also supports rolling cluster upgrades and communication using different dialects of the protocol. SMB Direct client support is included with Windows 10 Enterprise, Education, and Pro editions. The new version also adds support for querying normalized names.
If you’re wondering how SMB works on Windows 10, you need to install it. SMB is a network protocol that connects to devices via a network. The protocol allows computers to read and write files, and perform service requests on other network devices. SMB is used to connect to devices that aren’t Windows, such as routers with file sharing capabilities, and other Linux-based systems. The protocol also works with macOS and Linux through the SAMBA feature.
How Do I Change My SMB on Windows 10?
SMB is a network protocol that is used on nearly every desktop operating system. However, Windows 10 does not come with SMB enabled by default, and you must enable it manually. To change your SMB settings, open the Control Panel and search for the option “Turn Windows features on and off”.
On the left side of the window, click “Programs and Features” to open the control panel. You will need administrative access to access the control panel. Open the Control Panel and find the SMB Windows 10 support section. On the next page, select the SMB server and client options. In the left sidebar, select “Remove SMBv1 support.”
After making the changes, restart your computer. If you’re unable to connect to a network drive, your computer is not compatible with the sharing protocol. To change this, open the Control Panel and search for “SMB 1.0/CIFS File Sharing Support.”
What is SMB3?
What is SMB3? SMB3 is an acronym for “Suwer Mario Bros. 3”. It is an acronym for gaming and technology. It also stands for Windows and Microsoft. In addition to gaming, SMB3 has several other uses, including Windows, technology, and computing. Let’s learn what SMB3 is and why you might hear it. Here are some uses of SMB3:
Server Message Block 3.0 is a protocol that enables client applications to read, write, and request services from servers. This protocol was originally created by IBM to create a networked file system for DOS. After Microsoft bought IBM’s technology, they improved SMB. SMB 3.0 was introduced in Windows Vista. This new protocol adds compatibility and reliability. SMB 3.0 was originally introduced as SMB 2.2, but the name has been changed to reflect the addition of new features.
In SMB3, a new feature called “Write-through” is introduced. This feature gives users the assurance that writes actually make it to the physical disk. It can be enabled using the NET USE /WRITETHRU command or the New-SMBMapping -UseWriteThrough PowerShell cmdlet. However, it can negatively affect performance. In addition, the SMB client no longer allows guest access to a remote server. In addition, it no longer provides Fallback functionality when user credentials are invalid. This feature is disabled in Windows by default.
Is SMB 3 Encrypted by Default?
If you’re looking for answers about security and encryption, you’ve come to the right place. The latest version of Windows enables SMB 3 encryption by default. If you’re on a Windows 8 or Windows Server 2008 R2 machine, you can see SMB connections in Windows Explorer. You’ll also see that the new version of Windows includes encryption in the SMB protocol (AES 128 GCM).
SMB 3.1.1 adds encryption to your network connections. In the previous version of SMB, only trusted systems could access the data they shared. In version 3.1.1, Microsoft added a new feature called pre-authentication integrity that prevents attackers from gaining access to data in transit. The encryption protocol SHA-512 is used to decrypt authentication data, so it cannot be intercepted by outside parties.
SMB uses the TCP and IP protocols to transfer data. While SMB isn’t secure in general, it does provide several benefits. By default, it encrypts files sent between computers and is designed to cope with complex, interconnected networks. It also has encryption and message signing, which improves security. SMB3 also has more advantages in this regard than SMB 2.0. SMB3 also uses modern encryption algorithms.
Learn More Here:
1.) Windows Help Center
2.) Windows – Wikipedia
3.) Windows Blog
4.) Windows Central

- Remove From My Forums
-
Question
-
Hello, I am testing a T-Kernel based CIFS / SMB Server application with my Windows 10 Pro PC. That is, I am using my Windows 10 Pro PC as SMB Client. I could successfully communicate with SMB1 / SMB2. However, I don’t know how to test with SMB3. Please suggest
if I need to do some specific configuration in my Windows 10 Pro PC or if I need to check something etc.Thanks in advance.
Dibyajyoti
All replies
-
-
Edited by
Wednesday, July 15, 2020 2:28 AM
-
Edited by
-
This «Windows 10 Application Compatibility» Forum will be migrating to a new home on Microsoft Q&A, please refer to this
sticky
post for more details.
«Windows 10 Application Compatibility» forum will be migrating to a new home on
Microsoft Q&A!
We invite you to post new questions in the «Windows 10 Application Compatibility» forum’s new home on
Microsoft Q&A!
For more information, please refer to the
sticky post.
-
Edited by
Teemo TangMicrosoft contingent staff
Wednesday, July 15, 2020 2:29 AM
-
Edited by
-
Thanks a lot for your quick response. I have done all the necessary steps, as mentioned in the referred URL.
I have checked from the PowerShell that SMB2/3 is enabled [with the following command]
Get-SmbServerConfiguration | Select EnableSMB2Protocol
However, I observed that SMB3 dialect is not being advertised in the SMB header of the SMB Negotiate Request Packet, sent by my Windows 10 Pro PC [SMB Client]. It advertises only upto SMB2 dialects.
However, I expect the following dialects to be listed in the dialect field also, that indicates support of SMB3 family:
Dialect: 0x0300; 0x0302; 0x0311
Please advise, if I am missing anything?
Best Regards,
Dibyajyoti
-
Edited by
DGhosh
Wednesday, July 15, 2020 7:58 AM
-
Edited by
-
Would you mind letting me know the update of the problem? If you need further assistance, feel free to let me know.
Please
mark the reply as an answer if you find it is helpful.
Вариант 1: Способы включения SMBv1
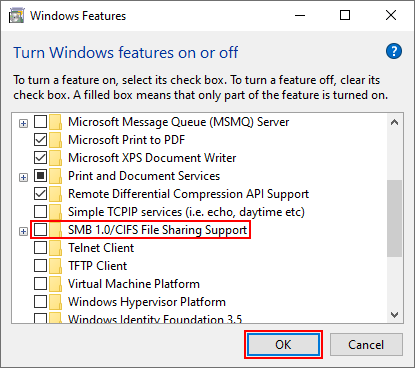
Задействовать сетевой прокол SMB первой версии на компьютере с Windows 10 на сегодняшний день можно сразу тремя способами, актуальными в разных ситуациях. Наиболее простой метод сводится к переходу в раздел «Программы и компоненты» через «Параметры» или классическую «Панель управления», открытию раздела «Включение или отключение компонентов Windows», поиску пункта «Поддержка общего доступа к файлам SMB 1.0/CIFS» в представленном списке и включению с помощью установки нескольких галочек.
Подробнее: Как включить SMBv1 на компьютере с Windows 10

Альтернативным решением может стать использование специальной команды для Windows PowerShell или добавление компонента для управления сетевыми политиками с последующим обновлением реестра. Какой бы из вариантов вы не выбрали, ознакомиться с полным порядком действий и командами можете в представленной по ссылке выше инструкции на нашем сайте, не забывая, что лучше всего ограничиться настройками компонентов Windows.
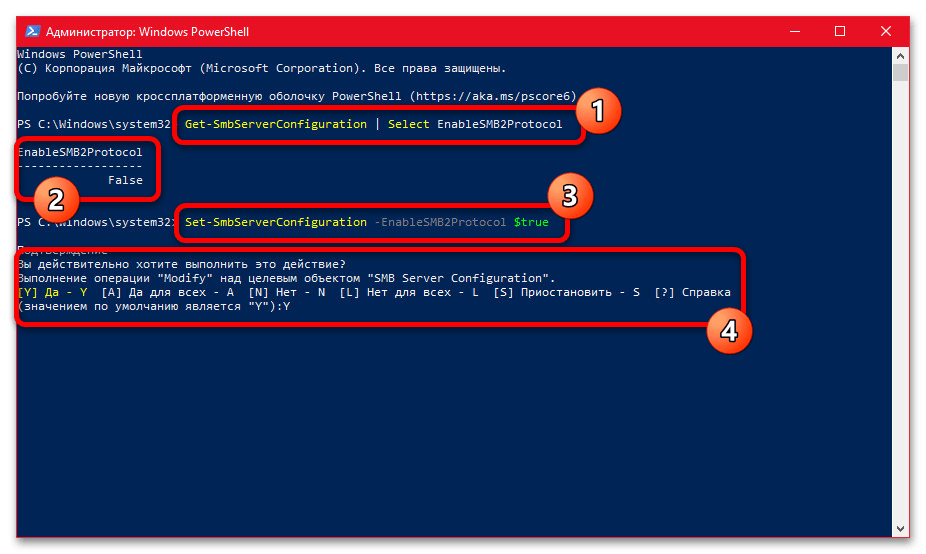
Вариант 2: Способы включения SMBv2
Более современная вторая версия SMB в Windows 10 может быть задействована исключительно средствами оболочки Windows PowerShell с помощью специальной команды, представленной в рамках другой подробной инструкции. Сами по себе действия практически не отличаются от включения SMBv1 – необходимо открыть указанное приложение от имени администратора, вставить скопированную заранее команду, нажать «Enter» для выполнения и подтвердить включение с помощью клавиши «Y» на клавиатуре.
Подробнее: Как включить SMBv2 на компьютере с Windows 10
В некоторых случаях, если по каким-то причинам не получается выполнить указанную команду, можно воспользоваться редактором реестра для самостоятельного включения протокола через изменение существующего или создание нового правила. При том важно учитывать, что последняя версия SMB, а именно SMBv3, так или иначе автоматически задействуется вместе со второй, и потому какие-либо дополнительные действия в этом случае не требуются – достаточно будет повторить описанное в соответствующей инструкции.
Еще статьи по данной теме:
Помогла ли Вам статья?
Server Message Block (SMB) is a file sharing protocol that allows computer applications to read and write files and access other system resources of networked devices. Windows uses the SMB protocol for sharing files with other devices on your network, specifically with non-Windows systems.
SMB was originally known as CIFS (Common Internet File System), which we now refer to as SMBv1. SMBv1/CIFS was decommissioned due to being inefficient and containing severe security vulnerabilities.
Windows used the SMBv1 protocol up until Windows Vista, where it began utilizing SMBv2. Modern versions of Windows, like Windows 10, use SMBv2 or SMBv3. In a security update to Windows 10, Microsoft disabled SMBv1 by default.
Generally SMB (v2/v3) is already enabled in Windows 10, so you don’t need to manually enable it. If you want to double check, or need to enable SMBv1 for legacy application support, then continue reading to find out how.
How to Enable, Disable, and Check for SMB in Windows 10
Microsoft introduced a handy Windows PowerShell cmdlet in Windows 8 and Windows Server 2012 that allows you to enable, disable, or check for SMB. Note that Windows 10 uses SMBv3, but uses the same EnableSMB2Protocol cmdlet to enable/disable it.
To check which version of SMB is currently running in Windows 10, open Windows PowerShell and run the following commands:
Get-SmbServerConfiguration | Select EnableSMB1Protocol
Get-SmbServerConfiguration | Select EnableSMB2Protocol
These commands will return true or false indicating whether SMBv1 or SMBv2/3 is currently running on the system, respectively:
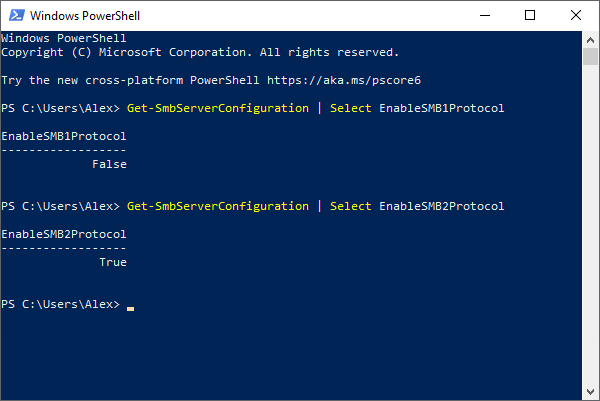
The photo above shows a system where SMBv2/3 is running and SMBv1 is not.
To enable or disable SMBv2/3 in Windows 10, run the following commands in Windows PowerShell:
Enable
Set-SmbServerConfiguration -EnableSMB2Protocol $true
Disable
Set-SmbServerConfiguration -EnableSMB2Protocol $false
Disabling SMBv2/3 in Windows 10 disables a lot of other Windows functionality and Microsoft recommends you only do so for troubleshooting purposes.
SMBv1 is disabled in Windows 10 by default, but you can (dangerously) enable it through Windows Features.
Microsoft strongly recommends you don’t enable SMBv1 in Windows 10. If you’re not convinced yet, then consider this quote from Microsoft’s Stop using SMB1 support article:
The original SMB1 protocol is nearly 30 years old , and like much of the software made in the 80’s, it was designed for a world that no longer exists. A world without malicious actors, without vast sets of important data, without near-universal computer usage. Frankly, its naivete is staggering when viewed though modern eyes.
Ned Pyle
If you must enable SMBv1 in Windows 10, for legacy application support, you can do so using the following method:
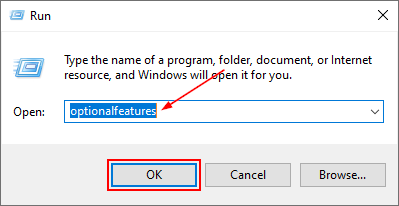
- Hit
Windows key + Ron your keyboard to open the Windows Run dialog box. - Type in
optionalfeaturesand clickOK, or hitEnteron your keyboard. Alternatively, you can go to Windows Settings > Apps > Optional features > More Windows features (at the bottom).
- in the
Windows Featureswindow that appears, Check the box to the left ofSMB 1.0/CIFS File Sharing Supportand then clickOK.
- Restart the computer and SMBv1 will now be running.
Alternatively, you can open Windows PowerShell and run the following command:
Set-SmbServerConfiguration -EnableSMB1Protocol $true
Final Thoughts
Microsoft is making great strides when it comes to securing Windows systems through updates like disabling SMBv1 and Reputation Based Protection. If you must enable SMBv1 in your Windows environment, it’s important to plan upgrades that ensure it’s only temporary.