По-умолчанию в Windows Server 2016/2019 и Windows 10 (начиная с билда 1709) отключена поддержка сетевого протокола для общего доступа к файлам в сетевых папках Server Message Block 1.0 (SMBv1). Этот протокол в большинстве случаев нужно только для обеспечения работы устаревших систем, например снятых с поддержки Windows XP, Windows Server 2003 и т.д. В этой статье мы рассмотрим, как включить или корректно отключить поддержку клиента и сервера SMBv1 в Windows 10 и Windows Server 2016/2019.
Если вашей сети не осталось устройств, которые поддерживают только протокол SMB 1.1, нужно полностью отключить протокол SMBv1 на всех Windows компьютерах в целях безопасности. Отключив SMB 1, вы защитите компьютеры Windows от большого количества уязвимостей, которые есть в этом устаревшем протоколе (самый известный публичный эксплоит для SMBv1 — EternalBlue). В результате клиенты при доступе к общим сетевым SMB шарам будут использовать новые более производительные, безопасные и
функциональные
версии протокола SMB.
В одной из предыдущих статей мы приводили таблицу совместимости версий протокола SMB на стороне клиента и сервера. Согласно этой таблице, старые версии клиентов (XP, Server 2003 и некоторые устаревшие *nix клиенты) могут использовать для доступа к файловым ресурсам только протокол SMB 1.0. Если таких клиентов в сети не осталось, можно полностью отключить SMB 1.0 на стороне файловых серверов (в том числе контролерах домена AD) и клиентских станциях.
В Windows 10 и Windows Server 2016 протокол SMBv1 разделен на два отдельных компонента – SMB клиент и SMB сервер, которые можно включать/отключать отдельно.
Содержание:
- Аудит доступа к файловому серверу по SMB v1.0
- Включение/отключение SMB 1.0 в Windows Server 2016/2019
- Включить/отключить SMB 1.0 в Windows 10
- Отключение SMBv1 с помощью групповых политик
Аудит доступа к файловому серверу по SMB v1.0
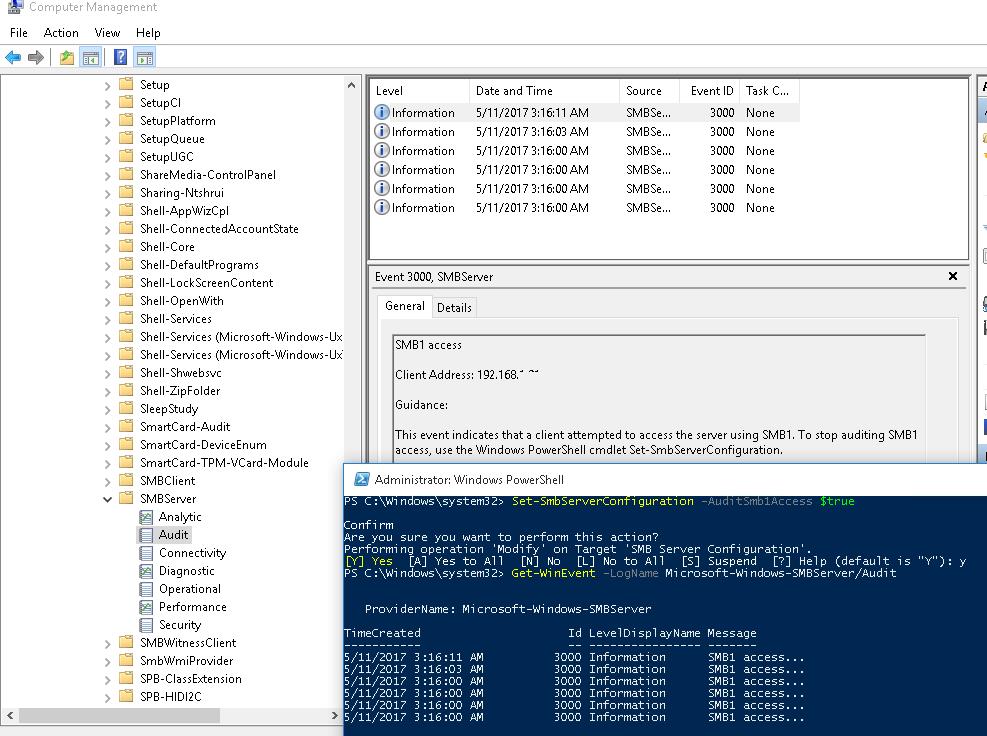
Перед отключением и полным удалением драйвера SMB 1.0 на стороне файлового SMB сервера желательно убедится, что в сети не осталось устаревших клиентов, которые используют для подключения протокол SMB v1.0. Для этого, нужно включить аудит доступа к файловому серверу по SMB1 протоколу с помощью команды PowerShell:
Set-SmbServerConfiguration –AuditSmb1Access $true
Через пару дней откройте на сервере журнал событий Applications and Services -> Microsoft -> Windows -> SMBServer -> Audit и проверьте, были ли зафиксированы попытки доступа к ресурсам сервера по протоколу SMB1.
В нашем примере в журнале обнаружено событие с EventID 3000 от источника SMBServer, в котором указано что клиент 192.168.1.10 пытается обратиться к сервереу по протоколу SMB1.
SMB1 access Client Address: 192.168.1.10

Guidance: This event indicates that a client attempted to access the server using SMB1. To stop auditing SMB1 access, use the Windows PowerShell cmdlet Set-SmbServerConfiguration.
Вам нужно найти в сети этот компьютер или устройство, при необходимости обновить ОС или прошивку, до версии поддерживающий, более новые протоколы SMB: SMBv2 или SMBv3.
В данном случае, мы проигнорируем эту информацию, но нужно учитывать тот факт, что в дальнейшем данный клиент не сможет получить SMB доступ к общим папкам на этом сервере.
Включение/отключение SMB 1.0 в Windows Server 2016/2019
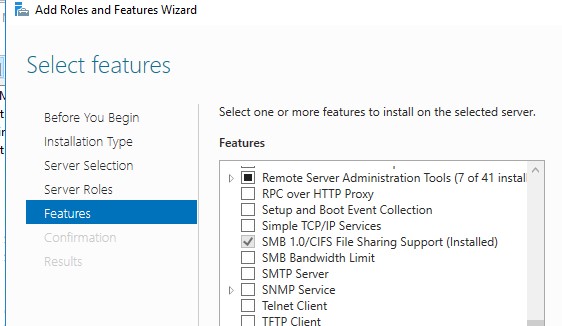
В Windows Server 2016, начиная с билда 1709, и Windows Server 2019 по умолчанию отключен протокол SMBv1. Чтобы включить поддержку клиентского протокола SMBv1в новых версиях Windows Server, нужно установить отдельный компонент SMB 1.0/CIFS File Sharing Support.
Вы можете установить компонент поддержки клиента SMBv1 с помощью Server Manager, или через PowerShell.
Проверить, что SMBv1 включен можно командой PowerShell:
Get-WindowsFeature | Where-Object {$_.name -eq "FS-SMB1"} | ft Name,Installstate

Чтобы установить компонент FS-SMB1, выполните:
Install-WindowsFeature FS-SMB1
Для удаления SMBv1 клиента (понадобится перезагрузка), выполните:
Uninstall-WindowsFeature –Name FS-SMB1 –Remove
Еще одна PowerShell команда, которая также позволяет удалить протокол SMB1Protocol:
Disable-WindowsOptionalFeature -Online -FeatureName SMB1Protocol -Remove
Чтобы ваш сервер мог обрабатывать доступ клиентов по протоколу SMBv1, кроме компонента FS-SMB1 нужно, чтобы поддержка протокола SMBv1 была включена на уровне файлового сервера SMB. Чтобы проверить, что на вашем сервере включен доступ по SMBv1 к сетевым папкам, выполните:
Get-SmbServerConfiguration
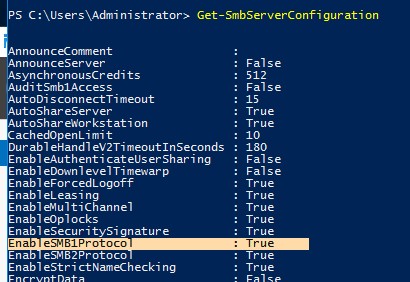
Строка “
EnableSMB1Protocol: True
” говорит о том, что у вас разрешен доступ по протоколу SMBv1 к сетевым папкам на сервере. Чтобы отключить поддержку сервера SMBv1 в Windows Server, выполните команду:
Set-SmbServerConfiguration -EnableSMB1Protocol $false -Force
Теперь с помощью командлета
Get-SmbServerConfiguration
убедитесь, что протокол SMB1 отключен.

Чтобы включить поддержку протокола SMBv1 на сервере, выполните команду:
Set-SmbServerConfiguration -EnableSMB1Protocol $True -Force
В Windows 7/8 и Windows Server 2008 R2/ 2012 для отключения клиента SMB нужно отключать службу и драйвер доступа по SMBv1 командами:
sc.exe config lanmanworkstation depend= bowser/mrxsmb20/nsi
sc.exe config mrxsmb10 start= disabled

Включить/отключить SMB 1.0 в Windows 10
Как мы уже говорили, начиная с Windows 10 1709, во всех новых билдах поддержка протокола SMB1 отключена (также отключен гостевой доступ по протоколу SMBv2).
В Windows 10 вы можете проверить статус компонентов SMBv1 протокола командой DISM:
Dism /online /Get-Features /format:table | find "SMB1Protocol"
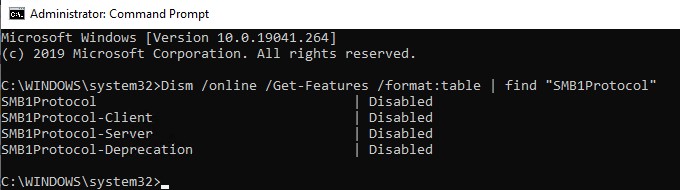
В нашем примере видно, что все компоненты SMBv1 отключены:
SMB1Protocol                                | Disabled
SMB1Protocol-Client                         | Disabled
 SMB1Protocol-Server                         | Disabled
SMB1Protocol-Deprecation                    | Disabled
В Windows 10 также можно управлять компонентами SMB 1 из панели управления компонентами (
optionalfeatures.exe
). Разверните ветку Поддержка общего доступа к файлам SMB 1.0 /CIFS. Как вы видите здесь также доступны 3 компонента:
- Клиент SMB0/CIFS
- Сервер SMB0/CIFS
- Автоматическое удаление протокола SMB0/CIFS
Вы можете включить клиент и сервер SMBv1 в Windows 10 из окна управления компонентами или командой:
Dism /online /Enable-Feature /FeatureName:"SMB1Protocol"
Dism /online /Enable-Feature /FeatureName:"SMB1Protocol-Client"
Dism /online /Enable-Feature /FeatureName:"SMB1Protocol-Server"
Также можно включить сервер и клиент SMBv1 с помощью PowerShell:
Enable-WindowsOptionalFeature -Online -FeatureName SMB1Protocol-Server
Enable-WindowsOptionalFeature -Online -FeatureName SMB1Protocol-Client
Если после включения SMBv1 клиента, он не используется более 15 дней, он автоматически отключается.
Автоматическое отключение клиента SMBv1 это разовая операция. Если администратор включит SMBv1 вручную еще раз, он не будет отключаться автоматически.
Чтобы отключить поддержку клиента и сервера SMB1 в Windows 10, выполните следующие команды DISM:
Dism /online /Disable-Feature /FeatureName:"SMB1Protocol"
Dism /online /Disable-Feature /FeatureName:"SMB1Protocol-Client"
Dism /online /Disable-Feature /FeatureName:"SMB1Protocol-Server"
Если вы отключили поддержку SMBv1 клиента в Windows 10, то при доступе к сетевой папке на файловом сервере, который поддерживает только SMBv1 (протоколы SMBv2 и v3 отключены или не поддерживаются), появятся ошибки вида:
- 0x80070035 — не найден сетевой путь;
-
Вы не можете подключиться к общей папке, так как она небезопасна. Эта общая папка работает по устаревшему протоколу SMB1, который небезопасен и может подвергнуть вашу систему риску атаки. Вашей системе необходимо использовать SMB2 или более позднюю версию.
Unable to connect to file shares because it is not secure. This share requires the obsolete SMB1 protocol, which is not secure and could expose your system to attacks
;

-
Вы не можете подключиться к общей папке, так как она небезопасна. Эта общая папка работает по устаревшему протоколуSMB1, который небезопасен и может подвергнуть вашу систему риску атаки. Вашей системе необходимо использовать SMB2 или более позднюю версию.
You can’t connect to the file share because it’s not secure. This share requires the obsolete SMB1 protocol, which is unsafe and could expose your system to attack. Your system requires SMB2 or higher).
Также при отключении клиента SMBv1 на компьютере перестает работать служба Computer Browser (Обозреватель компьютеров), которая используется устаревшим протоколом NetBIOS для обнаружения устройств в сети. Для корректгого отобрражения соседних компьютеров в сети Windows 10 нужно настроить службу Function Discovery Provider Host (см. статью).
Отключение SMBv1 с помощью групповых политик
В доменной среде Active Directory вы можете отключить протокол SMBv1 на всех серверах и компьютеров с помощью групповой политики. Т.к. в стандартных политиках Windows нет политики настройки компонентов SMB, придется отключать его через политику реестра.
- Откройте консоль управления Group Policy Management (gpmc.msc), создайте новый объект GPO (disableSMBv1) и назначьте его на OU с компьютерами, на которых нужно отключить SMB1;
- Перейдите в режим редактирования политики. Выберите Computer Configuration -> Preferences -> Windows Settings -> Registry;
- Создайте новый параметр реестра (Registry Item) со следующими настройками:
Action:
Update
Hive:
HKEY_LOCAL_MACHINE
Key Path:
SYSTEM\CurrentControlSet\Services\LanmanServer\Parameters
Value name:
SMB1
Value type:
REG_DWORD
Value data:
0

Данная политика отключит через реестр поддержку компонента сервер SMBv1 на всех компьютерах.Если в вашем домене остались компьютеры с Windows XP/Server 2003, можно использовать отдельный WMI фильтр политики, чтобы исключить эти версии Windows из-под действия политики.
Если вы хотите через GPO отключить на компьютерах SMB клиент, создайте дополнительно два параметра реестра:
- Параметр Start (типа REG_DWORD) со значением 4 в ветке реестра HKLM\SYSTEM\CurrentControlSet\services\mrxsmb10;
- Параметр DependOnService (типа REG_MULTI_SZ) со значением Bowser, MRxSmb20, NSI (каждое значение с новой строки) в ветке реестра HKLM\SYSTEM\CurrentControlSet\Services\LanmanWorkstation.
Осталось обновить настройки групповых политик на клиентах и после перезагрузки проверить, что компоненты SMBv1 полностью отключены.
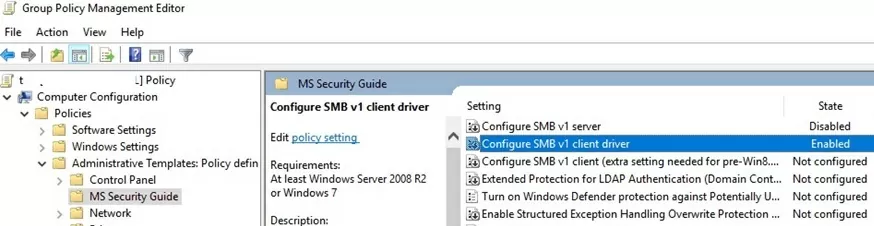
В групповых политиках Security Baseline из Microsoft Security Compliance Toolkit есть отдельный административный шаблон (файлы SecGuide.adml и SecGuide.ADMX), в которых есть отдельные параметры для отключения сервера и клиента SMB:
- Configure SMB v1 server;
- Configure SMB v1 client driver.

I realize this is not a very exciting post, especially compared to my other wonderful musing on this site, but I felt I really had to write it to share the pain!
A colleague I work with needed to enable this feature on an Azure Windows Server 2019 machine to communicate with some old system that only supports Server Message Block version 1 (SMB1). Easy enough to add that right?
Trying the installation
Let’s first get some information about the feature:
Get-WindowsOptionalFeature -Online -FeatureName SMB1Protocol
The output:

Notice the State property? The feature is disabled and the payload (installation files) are not on the Azure virtual machine.
When you try to install the feature, you get:
I guess I need the Windows Server 2019 sources!
Downloading Windows Server 2019
I downloaded Windows Server 2019 (November 2019 version) from https://my.visualstudio.com/Downloads?q=SQL%20Server%202019. I am not sure if you can use the evaluation version of Windows Server 2019 because I did not try that. I downloaded the ISO to the Azure virtual machine.
Mount ISO and copy install.wim
On recent versions of Windows, you can right click an ISO and mount it. In the mounted ISO, search for install.wim and copy that file to a folder on your C: disk like c:\wim. Under c:\wim, create a folder called mount and run the following command:
dism /mount-wim /wimfile:c:\wim\install.wim /index:4 /mountdir:c:\wim\mount /readonly
The contents of install.wim is now available in c:\wim\mount. Now don’t try to enable the feature by pointing to the sources with the -source parameter of Enable-WindowsOptionalFeature. It will not work yet!
Patch the mounted files
The Azure Windows Server 2019 image (at time of writing, June 2020) has a cumulative update installed: https://support.microsoft.com/en-us/help/4551853/windows-10-update-kb4551853. For this installatin to work, I needed to download the update from https://www.catalog.update.microsoft.com/home.aspx and put it somewhere like c:\patches.
Now we can update the mounted files offline with the following command:
Dism /Add-Package /Image:"C:\wim\mount" /PackagePath="c:\patches\windows10.0-kb4551853-x64_ce1ea7def481ee2eb8bba6db49ddb42e45cba54f.msu"
It will take a while to update! You need to do this because the files mounted from the downloaded ISO do not match the version of the Windows Server 2019 image. Without this update, the installation of the SMB1 feature will not succeed.
Enable the SMB1 feature
Now we can enable the feature with the following command:
dism /online /Enable-Feature /FeatureName:SMB1Protocol /All /source:c:\wim\mount\windows\winsxs /limitaccess
You will need to reboot. After rebooting, from a PowerShell prompt run the command below to check the installation:
Get-WindowsOptionalFeature -Online -FeatureName SMB1Protocol
The State property should say: Enabled
Conclusion
Something this trivial took me way too long. Is there a simpler way? Let me know! 👍
And by the way, don’t enable SMB1. It’s not secure at all. But in some cases, there’s just no way around it.
Протокол SMB (Server Message Block) является одним из самых популярных протоколов для обмена файлами и печати в Windows-среде. Он позволяет пользователям подключаться к удаленным ресурсам и обмениваться данными с другими компьютерами. Если вы управляете сервером на базе Windows Server 2019 и хотите включить SMB для обеспечения более удобного обмена файлами, в этой статье представлена подробная пошаговая инструкция.
Перед началом настройки SMB на Windows Server 2019, убедитесь, что у вас есть административные права на сервере. Также убедитесь, что у вас установлена самая последняя версия операционной системы и все обновления безопасности.
По умолчанию, SMB включен в Windows Server 2019, но возможно, что он был отключен или настроен неправильно. Чтобы включить SMB, следуйте этим простым шагам:
- Откройте «Панель управления» и выберите «Программы».
- Нажмите на «Включение или отключение компонентов Windows».
- В появившемся окне найдите «Протокол файловых служб Windows» и отметьте его флажком.
- Нажмите «ОК» и подождите, пока компоненты будут установлены.
- После завершения установки перезагрузите сервер.
После перезагрузки сервера SMB будет включен и готов к использованию. Вы можете настройть дополнительные параметры SMB в «Параметрах SMB» в «Панели управления».
Обратите внимание, что активация SMB может привести к неправильной работе сетевой безопасности, если не будут приняты соответствующие меры предосторожности. Рекомендуется обязательно установить пароль на учетную запись администратора и настроить фаервол, чтобы предотвратить несанкционированный доступ к серверу.
Теперь вы знаете, как включить SMB на Windows Server 2019. Этот протокол обеспечивает простой и удобный способ обмена файлами с другими компьютерами в вашей сети.
Содержание
- Как включить SMB на Windows Server 2019:
- Подготовка к включению SMB:
- Шаг 1: Открытие «Серверного менеджера» в Windows Server 2019:
- Шаг 2: Установка SMB-компонента:
- Шаг 3: Настройка SMB после установки:
Как включить SMB на Windows Server 2019:
Вот пошаговая инструкция по включению SMB на Windows Server 2019:
- Откройте «Панель управления» и выберите «Программы».
- Нажмите на «Включение или отключение компонентов Windows».
- В открывшемся окне найдите «Службы файлов на клиентской части SMB» и поставьте галочку рядом с ним.
- Нажмите «ОК» и дождитесь завершения установки.
- После установки включите SMB, перезагрузив сервер.
Теперь SMB будет включен на Windows Server 2019 и вы сможете использовать этот протокол для обмена файлами в вашей сети. Убедитесь, что настройки безопасности SMB соответствуют вашим требованиям, чтобы обезопасить свою сеть.
Подготовка к включению SMB:
Прежде чем включить протокол SMB на Windows Server 2019, необходимо выполнить некоторые предварительные шаги:
- Перед включением SMB убедитесь, что сервер работает под управлением Windows Server 2019 и у вас есть необходимые административные права.
- Проверьте, установлен ли протокол SMB на сервере. Если протокол SMB не установлен, вам нужно будет добавить его. Для этого нажмите правой кнопкой мыши на кнопку «Пуск», выберите «Панель управления» и затем «Программы и компоненты». Нажмите на «Включение или отключение компонентов Windows» в левой панели. Откройте ветку «Службы файлов и системы хранения» и убедитесь, что установлены компоненты «Сервер SMB 1.0/CIFS» и «Станция клиента SMB 1.0/CIFS». Если какой-то компонент не установлен, отметьте его флажок и нажмите «ОК».
- Убедитесь, что на сервере не установлена антивирусная программа или брандмауэр, которые могут блокировать SMB. Если такая программа установлена, убедитесь, что для SMB протокола открыты соответствующие порты или временно отключите антивирусную программу/брандмауэр.
После выполнения этих предварительных шагов вы будете готовы включить и настроить SMB протокол на Windows Server 2019.
Шаг 1: Открытие «Серверного менеджера» в Windows Server 2019:
Для начала процесса включения SMB на Windows Server 2019 необходимо открыть «Серверный менеджер». Для этого следуйте инструкциям ниже:
- Нажмите на кнопку «Пуск» в левом нижнем углу экрана.
- Откройте «Серверный менеджер» из меню «Пуск».
- В «Серверном менеджере» выберите «Управление» в левой панели.
- Далее выберите «Роли и компоненты».
После выполнения этих шагов вы будете перенаправлены в раздел «Роли и компоненты», где сможете продолжить настройку SMB на Windows Server 2019.
Шаг 2: Установка SMB-компонента:
1. Откройте «Панель управления» на сервере Windows Server 2019.
2. В разделе «Программы» выберите «Возможности Windows».
3. В новом окне разверните раздел «Файловый сервер» и отметьте флажок «SMB 1.0/CIFS клиент».
4. Нажмите «OK», чтобы начать установку компонента.
5. Дождитесь окончания процесса установки.
6. После завершения установки SMB-компонента нажмите «Закрыть».
Шаг 3: Настройка SMB после установки:
После установки и настройки Windows Server 2019 необходимо выполнить несколько дополнительных действий для правильной настройки SMB.
- Откройте «Панель управления» и выберите «Система и безопасность».
- Выберите «Администрирование» и перейдите к «Службам компонентов».
- Откройте «Службы файловых ресурсов» и выберите «Службы SMB 1.0/CIFS».
- Найдите «Сервер SMB 1.0/CIFS», щелкните правой кнопкой мыши и выберите «Свойства».
- Во вкладке «Общие» установите флажок напротив «Включить службу SMB 1.0/CIFS».
- Щелкните «Применить» и «ОК», чтобы сохранить настройки.
После завершения этих шагов SMB будет включен и готов к использованию на вашем Windows Server 2019. Убедитесь, что ваши настройки безопасности и прав доступа к папкам SMB настроены соответствующим образом, чтобы обеспечить безопасность вашей сети.
In Windows Server 2016/2019 and Windows 10 (starting with build 1709), the Server Message Block 1.0 (SMBv1) network protocol used to access shared folders is disabled by default. In most cases, this protocol is required to access shared folders hosted on legacy systems, such as no longer supported Windows XP, Windows Server 2003 and older OSs. In this article, we’ll look on how to enable or disable SMBv1 client and server support on Windows 10 and Windows Server 2016/2019.
If there are no SMB 1.x clients left on your network, you must completely disable SMBv1 on all Windows devices. By disabling SMB 1.0, you can protect Windows computers from a wide range of vulnerabilities in this legacy protocol (the most famous public exploit for SMBv1 is EternalBlue). As a result, your devices will use new, more efficient, secure and functional versions of the SMB protocol when accessing network shares.
In one of the previous articles, we showed the table of client- and server-side SMB version compatibility. According to the table, old client versions (XP, Server 2003 and some *nix clients) can access network shared folders only using SMB v1.0 protocol. If there are no such clients in the network, you can completely disable SMB 1.0 on the side of file servers (including AD domain controllers) and client desktops.
In Windows 10 and Windows Server 2016, the SMBv1 protocol is split into two separate components – SMB client and SMB server, which can be enabled/disabled independently.
Contents:
- Auditing Shared Folder Access via SMB v1.0
- Enable/Disable SMB 1.0 on Windows Server 2016/2019
- How to Enable/Disable SMBv1 on Windows 10?
- Disabling SMBv1 Client and Server via Group Policy
Auditing Shared Folder Access via SMB v1.0
Before disabling or completely removing SMB 1.0 driver on the side of the SMB file server, it’s worth making sure that there are no legacy clients that use it in your network. To do this, enable the audit of file server access over SMB v1.0 using the following PowerShell command:
Set-SmbServerConfiguration –AuditSmb1Access $true
After a couple of days, open the Event Viewer on the server, check the log Applications and Services -> Microsoft -> Windows -> SMBServer -> Audit and see if any clients accessed the file server over SMB1.
In our example, an event with EventID 3000 from the SMBServer source was found in the log. The event indicates that the client 192.168.1.10 is trying to access the server using the SMB1 protocol.
SMB1 access
Client Address: 192.168.1.10
Guidance:
This event indicates that a client attempted to access the server using SMB1. To stop auditing SMB1 access, use the Windows PowerShell cmdlet Set-SmbServerConfiguration.

You need to find this computer or device on the network and update the OS or firmware to a version that supports newer SMB protocol versions: SMBv2 or SMBv3.
In our case we’ll ignore this information, but you should bear in mind that later this client won’t be able to access shared folders on this SMB server.
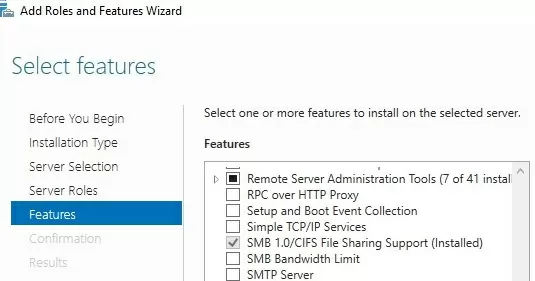
Enable/Disable SMB 1.0 on Windows Server 2016/2019
In Windows Server 2016 starting with build 1709 and Windows Server 2019, SMBv1 is disabled by default. To enable support for the SMBv1 client protocol in newer versions of Windows Server, you need to install the separate SMB 1.0/CIFS File Sharing Support feature.
You can install the SMBv1 feature using Server Manager, or through PowerShell.
You can check that SMBv1 is enabled with the PowerShell command:
Get-WindowsFeature | Where-Object {$_.name -eq "FS-SMB1"} | ft Name,Installstate
To install the FS-SMB1 feature, run:
Install-WindowsFeature FS-SMB1
To uninstall the SMBv1 client feature (requires a reboot), run the command:
Uninstall-WindowsFeature –Name FS-SMB1 –Remove
Another PowerShell command that also removes the SMB1Protocol feature:
Disable-WindowsOptionalFeature -Online -FeatureName SMB1Protocol -Remove
In order for your server to handle SMBv1.0 client access, you need to enable SMBv1 support at the SMB file server level in addition to the FS-SMB1 component. To check if SMBv1 access is enabled for network shares on your server, run:
Get-SmbServerConfiguration
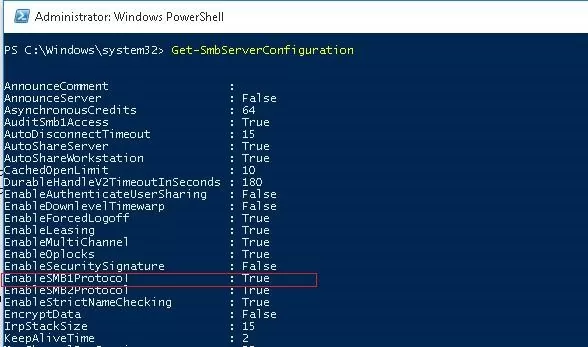
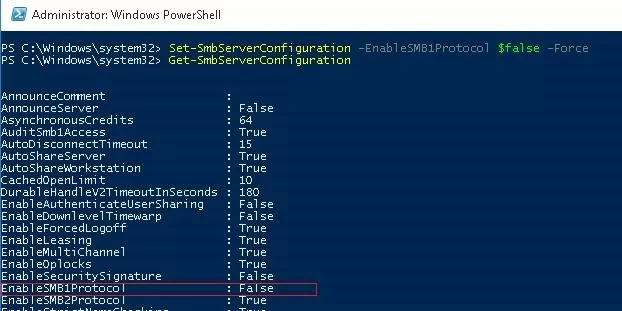
The line “EnableSMB1Protocol: True” means that you are allowed to access shared folders on this server using the SMBv1 protocol. To disable SMBv1 server support in Windows Server, run the PowerShell command:
Set-SmbServerConfiguration -EnableSMB1Protocol $false -Force
Now use the Get-SmbServerConfiguration cmdlet to make sure SMB1 server is disabled.
To enable SMBv1 support on the server, run the command:
Set-SmbServerConfiguration -EnableSMB1Protocol $True -Force
On Windows 7/8 and Windows Server 2008 R2/2012, in order to disable the SMB 1.0 client, you need to disable the service and the SMBv1 access driver with the commands:
sc.exe config lanmanworkstation depend= bowser/mrxsmb20/nsi
 sc.exe config mrxsmb10 start= disabled
![]()
How to Enable/Disable SMBv1 on Windows 10?
As we already said, in all new builds of Windows10 (starting from 1709) support for the SMB1 protocol is disabled (guest access via the SMBv2 protocol is also disabled).
In Windows 10, you can check the status of the SMBv1 protocol components with the DISM command:
Dism /online /Get-Features /format:table | find "SMB1Protocol"

In our example, you can see that all SMBv1 features are disabled:
SMB1Protocol                                | Disabled
SMB1Protocol-Client                         | Disabled
SMB1Protocol-Server                         | Disabled
SMB1Protocol-Deprecation                    | Disabled
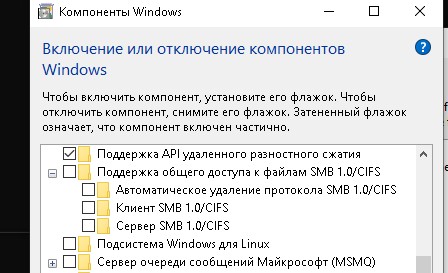
In Windows 10, you can also manage SMB 1 features from the Control Panel (optionalfeatures.exe). Expand the SMB 1.0 /CIFS File Sharing Support option. As you can see, 3 SMBv1 components are also available here:
- SMB 1.0/CIFS Automatic Removal
- SMB 1.0/CIFS Client
- SMB 1.0/CIFS Server
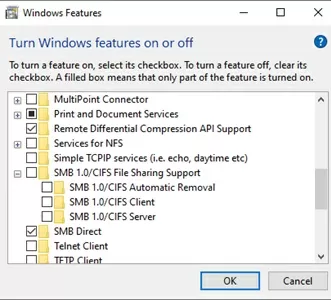
You can enable SMBv1 client and server on Windows 10 from the feature management window or using the commands:
Dism /online /Enable-Feature /FeatureName:"SMB1Protocol"
 Dism /online /Enable-Feature /FeatureName:"SMB1Protocol-Client"
 Dism /online /Enable-Feature /FeatureName:"SMB1Protocol-Server"
You can also enable SMBv1 server and client in Windows 10 using PowerShell:
Enable-WindowsOptionalFeature -Online -FeatureName SMB1Protocol-Server
 Enable-WindowsOptionalFeature -Online -FeatureName SMB1Protocol-Client
If after enabling SMBv1 client, it is not used for more than 15 days, it is automatically disabled.
Automatic removal of SMBv1 client is a one-time operation. If the administrator manually enables SMBv1 again, it won’t be disabled automatically.
To disable SMB1 client and server support in Windows 10, run the following DISM commands:
Dism /online /Disable-Feature /FeatureName:"SMB1Protocol"
 Dism /online /Disable-Feature /FeatureName:"SMB1Protocol-Client"
 Dism /online /Disable-Feature /FeatureName:"SMB1Protocol-Server"
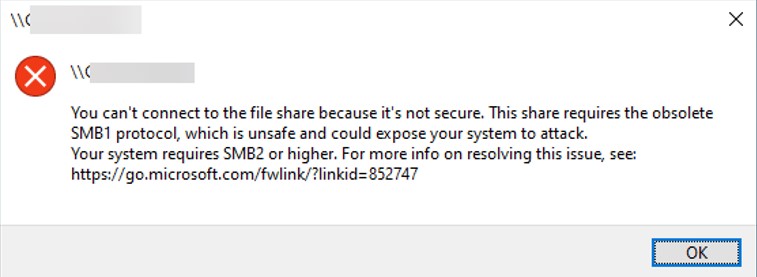
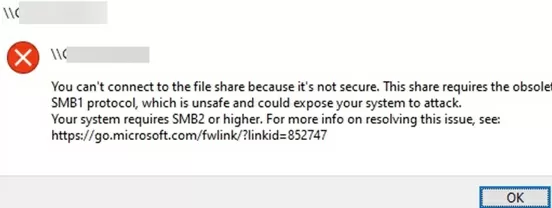
If you disabled the SMBv1 client in Windows 10, then when you access a snared folder on a file server that only supports SMBv1 (the SMBv2 and v3 protocols are disabled or not supported), you may receive the following errors:
-
0x80070035 The network path was not found;
-
Unable to connect to file shares because it is not secure. This share requires the obsolete SMB1 protocol, which is not secure and could expose your system to attacks;
-
You can’t connect to the file share because it’s not secure. This share requires the obsolete SMB1 protocol, which is unsafe and could expose your system to attack. Your system requires SMB2 or higher.

Additionally, if you disable the SMBv1 client, the Computer Browser service, which is used by the legacy NetBIOS protocol to discover devices on the network, stops working on the computer. To correctly display neighboring computers on the Windows 10 network, you must configure the Feature Discovery Provider Host service (check this article).
Disabling SMBv1 Client and Server via Group Policy
In an Active Directory domain environment, you can disable SMBv1 on all servers and computers using Group Policies (GPOs). Since there is no separate SMB configuration policy in the standard Windows Group Policies, you will have to disable it through the registry policy.
- Open the Group Policy Management console (
gpmc.msc), create a new GPO (disableSMBv1) and link it to the OU containing the computers on which you want to disable SMB1; - Switch to the policy editing mode. Expand the GPO section Computer Configuration -> Preferences -> Windows Settings -> Registry;
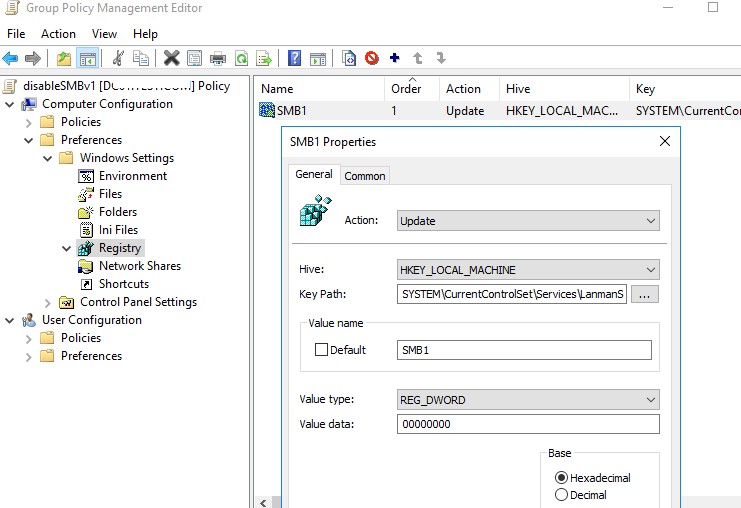
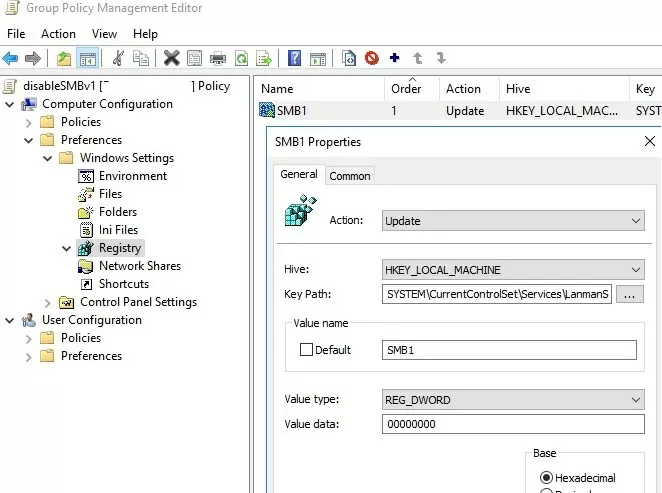
- Create a new Registry Item with the following setting:
Action:Update
Hive:HKEY_LOCAL_MACHINE
Key Path:SYSTEM\CurrentControlSet\Services\LanmanServer\Parameters
Value name:SMB1
Value type:REG_DWORD
Value data:0

This policy will disable support for the SMBv1 server component through the registry on all computers.You can exclude some version of Windows from this policy using the WMI filter.
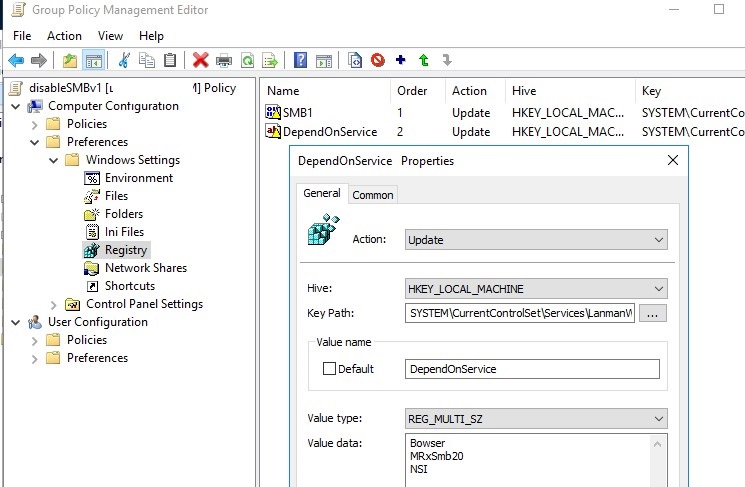
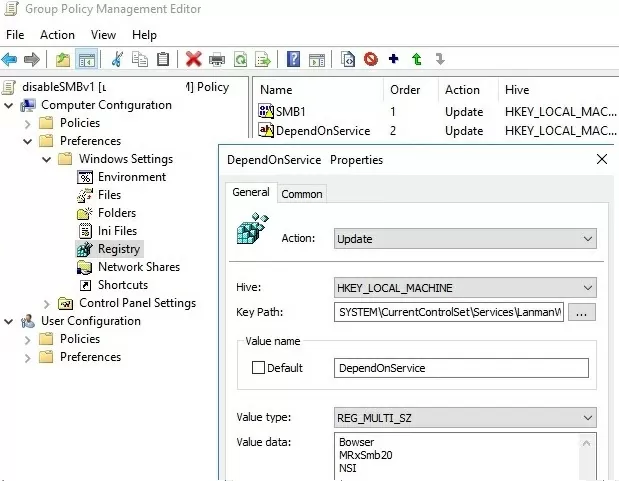
If you want to disable the SMB client on domain computers via GPO, create two additional registry parameters:
- The Start parameter (REG_DWORD type) with value 4 in the registry key HKLM\SYSTEM\CurrentControlSet\services\mrxsmb10;
- The DependOnService parameter (REG_MULTI_SZ type) with the value Bowser, MRxSmb20, NSI (each value on a new line) in the reg key HKLM\SYSTEM\CurrentControlSet\Services\LanmanWorkstation.
It remains to update the Group Policy settings on the clients (gpupdate /force) after the reboot make sure that the SMBv1 components are completely disabled.
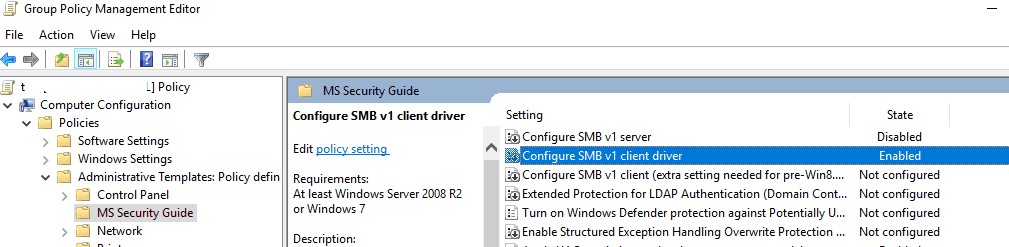
The Security Baseline GPOs from the Microsoft Security Compliance Toolkit have a separate administrative template MS Security Guide (SecGuide.adml and SecGuide.admx files) that have separate options for disabling the SMB server and client:
- Configure SMB v1 server;
- Configure SMB v1 client driver.
We recently had a client that needed to wipe out their Nutanix storage and virtual machine cluster and to do that we needed to load a Nutanix ISO from a Windows server. No matter what source we selected we received this error message:
The source files could not be found.
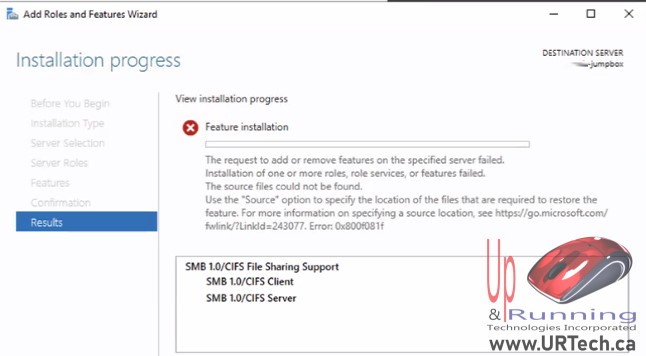
So what we Did is install a brand new Windows Server 2022 Azure Edition in Microsoft Azure period now we know that SMB 1.0 has been correctly vilified by Microsoft because of its lack of security. It’s a dangerous protocol to use in today’s world.
However SMB 1.0 / CIFS still shows as an option even in Windows Server 2022 Azure Edition so we didn’t think we should have any problems. Well it turns out we were wrong; you cannot install SMB1.0 onto Windows Server 2022 Azure Edition but you can install SMB 1.0 / CIFS onto a:
- Windows Server 2019 machine in Azure
- Windows Server 2022 box in an on-prem Hyper-V
- Windows 10 LTSB 2016
If you want to install SMB1.0/CIFS onto your Windows Server 2019 in azure what you have to do is install an old version of Windows Server windows Server 2019, add SMB 1.0 / CIFS:
1. Install a fresh copy of Windows Server 2019 to a temporary server and join it to my domain. Make sure the build number is 17763.737 or lower.
2. Attach the Windows Server 2019 evaluation ISO to the server. Install the SMB1 feature and enter WIM:E:\sources\install.wim:4 as the source.
3. Reboot the server once the feature is installed
4. Install all the latest updates to the server and reboot
5. Share the C:\windows\winsxs folder on the server. Give “everyone” read permission.
6. Go to the server where you are unable to install SMB1. Do the installation but put the source as \\servername\winsxs that you shared in step 5. The installation will complete
https://techcommunity.microsoft.com/t5/windows-server-insiders/windows-server-2019-build-17623-smb1-does-no-more-exists/m-p/176832
The other thing you can do is simply install Windows Server 2022 on your on premise Hyper V and it just works.
In our case we couldn’t get an old copy of Windows Server 2019 and we had to do the install in Azure so we ended up installing Windows 10 LTSB 2016 in azure And that comes with S MB 1.0 enabled by default. at that point our Nutanix machine with was able to copy files from our Windows 10 Long Term Servicing Branch (LTSB).