Use Device Manager to enable the HID-compliant touch screen
Updated on October 3, 2023
What to Know
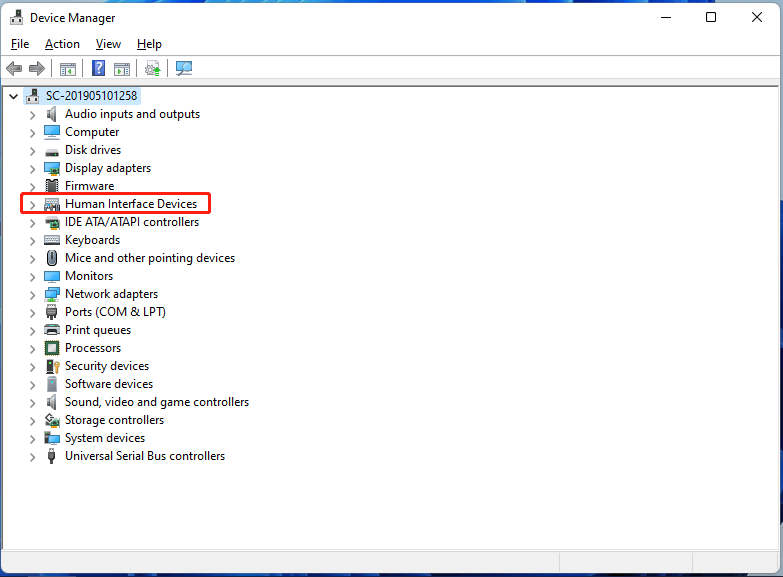
- Open Device Manager and select Human Interface Devices > HID-compliant touch screen > Action > Enable device.
- Repeat for any additional HID-compliant touch screen listings within the Human Interface Devices list.
- If you can’t find HID-compliant touch screen, your Windows 11 device may not have a touch screen.
Are you trying to find a way to enable the touch screen on your Windows 11 tablet, laptop, or computer? This article will walk you through turning on the touch functionality if it’s been turned off, and what to do when you can’t get the touch screen to work.
How Do I Turn On Windows Touch Screen Functionality?
The touch screen functionality on your Windows 11 device can be turned on through Device Manager. Here’s how to do it.
-
Open the Start menu.
-
Type Device Manager in the Start menu’s search bar.
You can start typing as soon as the Start menu is open. There’s no need to click the search bar.
-
Select Device Manager.
-
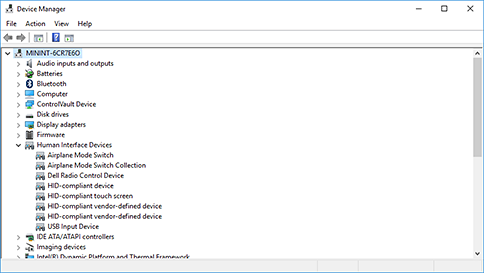
Expand the Human Interface Devices list.
-
Select the first HID-compliant touch screen item.
If you can’t see this option, it’s possible your Windows 11 device doesn’t have a screen that supports touch.
-
Select Action from the menu at the top.
-
Select Enable device.
-
Now select the second HID-compliant touch screen item from the list and repeat the last two steps (Action > Enable device). Your Windows 11 touch screen should now be activated.
How Do I Enable the Touchscreen on My Laptop Keyboard?
Unfortunately, there isn’t a designated key nor any keyboard shortcuts that switches the touch screen on or off in Windows 11. The only way to enable the touch functionality in Windows 11 is to follow the above steps by using the built-in system settings.
While all Microsoft’s Surface products have a touch screen, some Windows 11 laptops and computers don’t. Check with the manual and the store where you bought it from to see if it has this feature.
If you’re just wondering how to wake a Windows 11 device from Sleep and turn its screen on, all you need to do is press any key on your keyboard.
Why Is Touch Screen Not Working in Windows 11?
If the touch screen functionality isn’t working properly or at all in Windows 11, there are a couple of things you should check and try.
- Enable the touch screen via the above steps. The touch screen should be enabled by default when you get a new Windows 11 device, but it’s possible it was off by default.
- Update the touch screen driver. Right-click each HID-compliant touch screen in Device Manager and select Update Driver.
- Restart Windows 11. A quick restart can fix a lot of problems.
- Install the latest Windows 11 update. Windows updates can fix many hardware issues.
- Check the hardware. If your new Windows 11 tablet, laptop, or computer was cheaper than the other models, it might not have a touch screen.
- Calibrate your touch screen. A series of specific Windows touch settings could fix the problem.
- Troubleshoot your broken touch screen. Work your way through a series of Windows 11 touch screen solutions.
FAQ
-
How do you enable the touchscreen on Windows 10 and Windows 8?
To enable the touchscreen on Windows 10 or 8, start by opening the Device Manager. Then, select Human Interface Devices > HID-compliant touch screen > Action > Enable device.
-
How do I enable touchscreen for Photoshop?
Photoshop automatically provides touch capabilities on devices that have touchscreen capabilities enabled. Gestures you can use include two-finger pan, two-finger pan and zoom, two-finger pan and rotate, five-finger cycle screen mode, and two-finger free transform.
Thanks for letting us know!
Get the Latest Tech News Delivered Every Day
Subscribe
-
Введите диспетчер устройств в поле поиска на панели задач и щелкните элемент Диспетчер устройств.
-
Нажмите стрелку рядом с пунктом Устройства HID и выберите HID-совместимый сенсорный экран. (Их может быть несколько.)
-
В верхней части окна выберите вкладку Действие. Выберите Отключить устройство или Включить устройство, а затем нажмите Подтвердить. Если отображается несколько HID-совместимых сенсорных экранов, выполните шаги 2–3 и для этих устройств.
Сенсорный экран не работает? Устранение неполадок здесь.
Нужна дополнительная помощь?
Нужны дополнительные параметры?
Изучите преимущества подписки, просмотрите учебные курсы, узнайте, как защитить свое устройство и т. д.
В сообществах можно задавать вопросы и отвечать на них, отправлять отзывы и консультироваться с экспертами разных профилей.
This article edited on MiniTool official webpage mainly teaches you some knowledge about Windows 11 touch input. It tells you how to enable touch screen, touch keyboard, as well as use touch input with gestures. Move down for the details!
Update: The official Windows 11 is already available since October 5, 2021.
About Windows 11 Touch Input
For Win11 new technologies of inputting, besides voice input, people are also able to take advantage of an improved touch keyboard to type. Microsoft has improved the scaling layouts of its on-screen keyboard on Windows 11 and added more themes for it besides the traditional light and dark modes.
How to Use Touch Screen Windows 11?
First of all, a touch screen is only available on laptops, tablets, etc. computer devices that support touch screens; it is not possible on the desktop. You can check with the device manual or the store where you purchased it to see whether it has a touch input feature or not.
The following are the steps to quickly enable Windows 11 touch screen for touch input.
- Click on the Start menu icon on the taskbar and search “device manager” with the Windows Search utility within the Start menu. You can begin typing immediately when the Start menu is open without firstly clicking on the search bar at the top.
- Open Device Manager in the search result.
- In Device Manager, expand the Human Interface Devices and select the first HID-compliant touch screen. If you can’t see this option, it is probably that your device does not have a screen that supports touch. If you are sure that your Windows 11 device supports a touch screen, you may refer to this article to solve your problem: How to Fix HID Compliant Touch Screen Missing?
- Choose Action > Enable device on the top menu of the Device Manager.
Repeat the above process to enable all your HID-compliant touch screen items in Device Manager.
How to Enable Windows 11 Touch Keyboard?
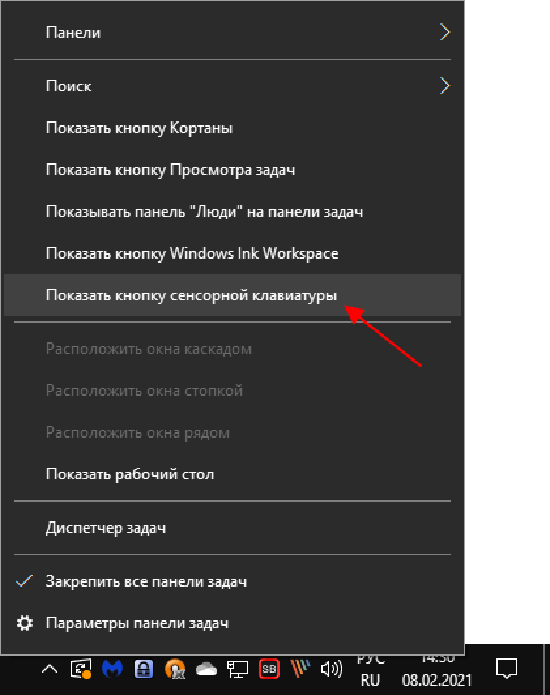
Generally, it is very simple to trigger an on-screen keyboard in Windows 11. Just click on the Touch keyboard icon on the taskbar! If you can’t see the on-screen keyboard icon in the taskbar, right-click on the taskbar and select the Show touch keyboard button option.
Or, you can navigate to Windows Settings > Personalization > Taskbar, unfold Taskbar corner icons, and turn on the Touch keyboard option. You can also reach this taskbar setting by right-clicking on the taskbar and choose Taskbar settings.
When you finally get your touch keyboard opened, you can do some customization to it. Just tap on the gear icon on the top left of the touch keyboard and you can change keyboard layout, enable handwriting, personalize theme and size, specialize typing preference (autocorrect), as well as switch language, etc.
Also read: Tutorial on How to Use the Touch Keyboard in Windows 10?
Windows 11 Touch Screen Gestures
Firstly, let’s see a video teaching you how to use screen gestures in Windows eleven.
- Select an item – Tap on the screen.
- Right-clicking – Use 1 finger to hold the target site for a few seconds.
- Open widgets – Swipe from left to right on the screen.
- Open notification/action center and calendar – Swipe from right to left on the screen.
- Show the desktop – Put 3 or 4 fingers on the screen and swipe them down to minimize all programs.
- See all open windows – Place 3 or 4 fingers on the screen and swipe them up.
- Open task view – When all your opened windows are on the screen, just put 4 fingers on the screen and swipe up. Or, just tap on the task view icon next to the Search icon on taskbar.
- Add new desktop – In the task view, just tap on the New desktop
- Switch between different desktops – Tap 4 fingers on the screen and swipe left or right.
- Snap a window to one side – In portrait mode, just grab the edge of the window which will automatically be roomed in and move it to the left/bottom or right /top side you want. Then, you can simply tap on another window to make it fulfill the other side. If you switch your device from portrait to landscape, it will automatically change the two windows from stacked view to side-by-side view.
- Scroll – Place 2 fingers on the screen and slide vertically or horizontally.
- Zoom in or zoom out – Place 2 fingers on the screen and pinch in or stretch out.
- Open Cortana – Tap 3 fingers on the screen.
Windows 11 Touch Input Not Working
If the touch screen on your Windows 11 does not work, you can try the below solutions to fix it.
Solution 1. Enable Touch Screen Functionality
The first method is to turn on the touch screen services by the instruction described above. The touch screen function should be on by default. Yet, it still has a chance to be off.
Solution 2. Update Touch Screen Driver
Secondly, a non-workable touch screen may result from that its driver is out of date. If so, you can just bring it back to work by updating its driver. In Device Manager, right-click on each HID-compliant touch screen and select Update driver.
Besides, you can try to disable and re-enable the touch screen driver or uninstall and reinstall its driver.
Solution 3. Restart Windows 11 Device
Sometimes, a restart of the device can deal with its issues.
Solution 4. Update Windows 11
Also, update the operating system (OS) usually handle many problems.
Solution 5. Check the Hardware
If you bought your machine at a comparatively cheaper price, your hardware equipment may be lower than others. That is to say, your computer may not support a touch screen.
Solution 6. Calibrate your Touch Screen
Sometimes, a set of specific Windows touch settings will solve Windows 11 touch input not working problem.
- Make sure all your human interface devices are connected to your computer including mouse, keyboard, trackpad, and so on.
- Search “calibrate” and launch the Calibrate screen for pen or touch input
- Select Calibrate in the default Display tab of the popup.
- Choose Touch input in the new window. If you are using a device that has a stylus such as Surface, you should select Pen input.
- If a User Account Control message pops up, just click the Yes
- Next, tap the crosshair in the upper-left corner of the screen. Then, tap it again each time it moves.
- If you are satisfied with the setting, just click on the Save the calibration data. If not, select the reset
Solution 7. Clean the Screen
Finally, your screen may be dirty and disturbed by dust. Then, just clean it with a soft cloth. Sometimes, you may need to remove its case or screen protector to return its availability. Also, make sure your hands are clean and dry without gloves.
Other Possible Solutions
- Dry the device out if it gets wet.
- Tap the edges of the device that has dropped.
- Disconnect peripherals of the device.
- Set the device in safe mode.
- Take the device for professional fix service.
Also read
- 5 Best Keyboards for Video Editing for Mac/Windows in 2023!
- What Is Windows 11 Simulator & Best Windows 11 Simulator
- Where to Get Windows 11 CD Key & How to Activate Win11 with It?
- What to Do If You Encounter Fake Windows 11 Downloader/Installer?
Windows 11 поддерживает работу с сенсорными экранами, но для активации этой функции может потребоваться настройка.
-
Убедитесь, что ваш компьютер или ноутбук оснащен сенсорным экраном и поддерживает работу с Windows 11.
-
Проверьте, включен ли сенсорный экран на устройстве. Для этого нажмите кнопку «Пуск» и выберите «Настройки» (иконка шестеренки). Затем выберите «Устройства» и «Сенсорный экран». Если сенсорный экран отключен, переключите кнопку в положение «Включено».
-
Если сенсорный экран всё ещё не работает, попробуйте перезагрузить компьютер или ноутбук и проверьте, работает ли он после перезагрузки.
-
Убедитесь, что в системе установлены все необходимые драйверы для сенсорного экрана. Обычно драйверы устанавливаются автоматически при подключении устройства, но если это не произошло, то нужно загрузить драйверы с сайта производителя устройства.
-
Если сенсорный экран всё ещё не работает, проверьте настройки калибровки сенсорного экрана. Для этого выберите «Пуск» и «Настройки», затем выберите «Сенсорный экран» и «Калибровка сенсорного экрана». Следуйте инструкциям на экране для калибровки сенсорного экрана.
-
Если все вышеперечисленные шаги не помогли, возможно, требуется обновить драйверы устройства или выполнить другие действия для устранения проблемы. В этом случае рекомендуется обратиться к документации устройства или к поддержке производителя.
В целом, включение сенсорного экрана в Windows 11 не должно вызвать серьезных проблем, но возможны некоторые трудности, связанные с настройками и драйверами. Если у вас возникли сложности, рекомендуется обратиться за помощью к специалистам или к поддержке производителя.
Режим планшета — это интересная функция, добавленная ещё в windows 10. Она понравилась пользователям и заслужила популярность. Режим позволяет пользователям использовать компьютер как планшет и очень удобна в работе.
После активирования режима планшета в Windows 11 значки на экране и расстояние между ними увеличиваются. Экран переворачивается, и многие задачи выполнять намного проще. Удобная функция полюбилась пользователям и с выходом новой ОС появились вопросы о возможности использования такого режима. Разработчики постарались и в новой windows 11 данный режим не нужно активировать, он начинает работу автоматически, стоит только отключить клавиатуру или другие источники ввода текста. На ноутбуке необходимо отключить клавиатуру с помощью кнопки.
Возможности режима планшета
При создании новой ОС 11 компания прислушалась к жалобам пользователей и внесла изменения:
Блокировка экрана
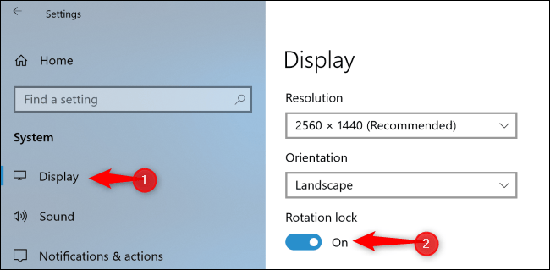
По умолчанию в системе будет включена функция авто поворота и в режиме планшета. Эта функция будет настраиваться теперь в любом режиме. Переворот страницы будет доступен теперь простым касанием пальцев в центре экрана. Пользователи жаловались на отсутствие настройки данного параметра отдельно от обычного использования компьютера. Проблема была устранена и для каждого режима работы можно будет установить собственный вариант.
Значки области уведомлений
Распространённая проблема — это строка уведомлений, мешавшая ранее. Теперь при входе в режим область оповещения авто изменяется. Высвечиваться будут только:
- Аккумулятор
- Сеть
- Громкость
- Центр уведомлений
Только то, что действительно важно. Если один из значков получит переполнение, пользователь вернётся к высшему уровню. Также в новой системе параметры области уведомлений будут настраиваться и какие значки останутся и будут ли реагировать на переполнение выбирается индивидуально. Есть возможность убрать их все, чтобы они не мешали работе. Даже закреплённые изготовителем значки можно будет сменить или отключить. Функция перехода на первый уровень из-за переполнения Шеврона также корректируется.
И хотя продвижение уведомлений будет заблокировано, любые другие приложения, выбранные индивидуально смогу оповещать пользователя. Исключение из правил-служба Location, но при условии включённой возможности повышать уровень, до значка батареи.
Если пользователь ставит “показывать всё в области уведомлений”, то вариант отображения вернётся к первоначальному варианту, как при выключенном режиме планшета.
Кнопка сенсорной клавиатуры
При переходе в режим планшета кнопка будет находиться в скрытом режиме. В параметрах настройки возможно контролировать данную функцию. В новой версии можно будет выделить знак сенсорной клавиатуры в удобном месте или определить местонахождение даже в панели задач.
Значки приложений
При изготовлении установлен параметр — скрытие приложений на панели задач при работе в вышеупомянутом режиме. Функция также может подвергаться изменениям в зависимости от предпочтений.
Включение и выключение режима
Поскольку режим планшета в Windows 11 не был актуален для пользователей компьютеров и ноутбуков в новой версии его изменили. Теперь он включается по умолчанию на устройствах, имеющих сенсорный дисплей. Использование режима на настольных устройствах невозможно. Чтобы работать в режиме планшета нужно использовать устройство с возможностью подключения и отключения клавиатуры. Чтобы настроить включение и выход из режима нужно зайти в настройки — система — дисплей.
Как установить ОС на планшет
Новую ОС можно использовать на планшетах и мобильных устройствах, несмотря на заявления компании о минимальном размере дисплея. Самый простой способ — с помощью программы Bocsh. Для этого нужно её скачать и установить на устройство. Потом скачать архив с BIOS и необходимые драйвера. Распаковку нужно сделать в папку SDL, которую первоначально нужно создать. Windows в виде IMG помещается в ту же папку. И в конце запустить готовый эмулятор. Это позволитиспользовать интерфейс windows.
Второй способ — установка windows в виде второй ОС на устройстве. Это сложно, но возможно. Устройство должно быть достаточно мощным, чтобы поддерживать сразу две системы, и не каждая модель для этого подойдёт. Для начала нужно сделать загрузочную флешку. Делается это с помощью софта Rufus. После скачивания программу нужно запустить и зайти во вкладку — устройства. Там должна отображаться подключённая флешка. Путь будет проложен автоматически, как и выбор дистрибутива. После этого процедура скачивания завершится.
После установки вернуть обратно будет невозможно, так что нужно сразу обдумать это решение. Сначала подключается флешка к устройству, потом через консоль UEFI нужно установить загрузку с флешки. Установка проводится так же, как и на компьютере. После установки установить драйвера и обновить.
Windows 11 установлена и готова к работе и режим планшета теперь будет активирован, как устройство мобильно.
