Урок 28. Настройка протокола RIP
В данном уроке мы разберем детально весь процесс настройки протоколов RIP и RIP v2, а также рассмотрим какие проблемы могут возникнуть в работе протокола исходя из топологии сети.
Настройка RIP
Попробуем настроить протокол RIP для изображенной ниже сети:

Настройка очень простая. Достаточно ввести всего лишь 2 команды. Настроим его на маршрутизаторе A:
Router_A(config)# router rip
Теперь надо указать какие сети он будет анонсировать (то есть объявлять соседям):
Router_A(config-router)# network 189.0.0.0
Router_A(config-router)# network 56.10.10.0
То же самое проделаем и с остальными маршрутизаторами. И на этом все. Протокол RIP настроен и сеть прекрасно работает.
Маршрутизатор, на котором запущен RIP рассылает обновления по адресу 255.255.255.255 на UDP порт 520:

Кроме того, протокол является классовым, то есть не передает по сети маски переменной длины (VLSM). То есть, если у нас имеется сеть 10.1.1.0/30, то маршрутизатор анонсирует сеть 10.0.0.0/8 — классовую сеть А.
Просмотр сведений о работе протокола
Посмотрим результат работы протокола — проверим таблицу маршрутизации:
Router_A# show ip route

Так как протокол является классовым, то в таблице мы видим адреса сети с классовой маской. Чтобы увидеть значения таймеров, а также версию протокола выполните команду ниже:
Router_A# show ip protocols

Чтобы увидеть сам процесс рассылки обновления достаточно выполнить:
Router# debug ip rip

Однако в данном режиме работы нагружается процессор, поэтому лучше использовать данную команду только для поиска неисправностей в работе маршрутизатора.
Настройка RIPv2
RIPv2 является улучшенной версией протокола RIP. Основные отличия протокола от предыдущей версии:
-
- Рассылка обновлений по многоадресному принципу (multicast) вместо широковещательной. Рассылка осуществляется по адресу 224.0.0.9. Принцип многоадресной рассылки основан на том, что только определенная группа устройств принимает и обрабатывает обновления, то есть только маршрутизаторы, на которых запущен RIP. Данный принцип можно сравнить с подпиской газеты или журнала. Например, возьмем многоквартирный дом, в котором только 10 квартир подписаны на еженедельную рассылку журнала. То есть журнал получат только те, кто хочет его почитать, а не все соседи сразу.
- Бесклассовый протокол, то есть поддерживает передачу масок в обновлениях.
- Аутентификация анонсирований. То есть маршрутизатор может принимать обновления только от авторизованных соседей. Достигается это с помощью установки паролей.
Чтобы включить протокол достаточно ввести следующие команды:
Router(config)# router rip
Router(config-router)# version 2
Настройка стандартного маршрута
Возьмем сеть предприятия, представленную на рисунке:

Только один маршрутизатор имеет выход в интернет. Все остальные маршрутизаторы выходят в интернет через него. Обычно между маршрутизаторами провайдера и клиента не настраивается протокол маршрутизации. Вместо этого используют маршрут по умолчанию или просто шлюз по умолчанию.
Причин тому несколько:
-
- Нет смысла нагружать локальные маршрутизаторы маршрутными таблицами провайдера. Это приведет к растрате ресурсов локальных маршрутизаторов.
- Кроме того, небезопасно и нерационально рассылать провайдеру информацию о локальной сети.
- Так как имеется всего лишь один выход во внешнюю сеть, то гораздо проще объявить всем локальным маршрутизаторам, чтобы пересылали запросы в неизвестную сеть через пограничный маршрутизатор.
Имеются 2 способа для установки стандартного маршрута по умолчанию.
1- й способ
В пограничном маршрутизаторе выполните команду:
Router(config)# ip route 0.0.0.0. 0.0.0.0 100.1.1.1
Мы просто указали “нулевую” сеть и “нулевую” маску. Как мы уже знаем это означает любая сеть с любой маской. Теперь посмотрим на таблицу маршрутизации:

Мы видим статический маршрут и шлюз последней надежды (gateway of last resort). Теперь любая сеть будет доступна для данного маршрутизатора.
Попробуем выполнить команду PING с любого маршрутизатора, чтобы узнать о доступности сети провайдера. PING не будет работать, так как у нас не установлен стандартный маршрут на остальных маршрутизаторах, то есть они ничего не знают о о данном маршруте. Поэтому его необходимо объявить. Для этого на пограничном маршрутизаторе выполните:
Router_A(config-rip)# default-information originate
Данная команда заставляет маршрутизатор объявлять о стандартном маршруте в своих объявлениях. Посмотрим таблицу в каждом маршрутизаторе и выполним PING:

2-й способ
Удалим предыдущий статический маршрут:
Router_A(config)# no ip route 0.0.0.0 0.0.0.0 100.1.1.1
Теперь снова создадим статический путь:
Router_A(config)# ip route 100.1.1.0 255.255.255.252 100.1.1.1
Укажем маршрутизатору стандартный путь:
Router_A(config)# ip default-network 100.0.0.0
При выполнении данной команды необходимо указывать классовую сеть. Теперь взглянем на таблицу:

Так как команду default-information originate никто не отменял, то остальные маршрутизаторы тоже узнают об этом маршруте:

В принципе ничего не изменилось, таблица такая же как и при первом способе.
Следует иметь в виду, что команда работает только в том случае, если маршрутизатор уже имеет маршрут к указанной сети.
Анонсирование подключенных сетей
Попробуем теперь выполнить PING с компьютера PC 1 на компьютер PC 4. Результат будет неуспешным. Посмотрим на таблицу в каждом маршрутизаторе:

В них отсутствует запись о подключенных сетях соседей 172.16.1.0 и 172.16.2.0. То есть эти сети не анонсируются протоколом RIP. Чтобы исправить ситуацию можно, конечно, включить RIP и на интерфейсах FastEthernet 0/0, но это нецелесообразно, так как сеть будет загружена ненужными объявлениями протокола. Но есть способ получше. Достаточно просто объявить всем маршрутизаторам о имеющихся подключенных сетях:
Router(config-rip)# redistribute connected
В данном случае PING работает, однако иногда его работа нестабильна.
В чем же причина?
Маршрутизатор A является транзитным, поэтому повнимательнее посмотрим на его таблицу маршрутов:

Вместо адресов 172.16.1.0 и 172.16.2.0 там всего лишь один адрес 172.16.0.0, который указывает на 2 разных интерфейса. В этом и заключается проблема. Протокол автоматически осуществляет суммирование похожих адресов (вспомни VLSM).
Кстати, таблица маршрутизации маршрутизаторов В и С не изменилась, однако PING на другие компьютеры более или менее работает. В чем причина?
Во-первых, у этих маршрутизаторов есть маршрут по умолчанию, то есть маршрутизатор А.
Во-вторых, маршрутизатор А благодаря технологии Split Horizont не отправит суммированный IP адрес своим же соседям, так как они уже имеют такой адрес. Кроме того, даже если бы маршрутизатор А и отправил обновления о суммированном адресе, то это бы все равно никак не повлияло на маршрутизаторы В и С.
Автосуммирование функция полезная, но в данном случае она только мешает. Отключим ее и посмотрим, что произойдет:
Router_A(router-rip)# no auto-summary
Теперь все в порядке:

Настройка авторизации
В протоколе версии 2 была реализована возможность для авторизации поступающих обновлений от соседних маршрутизаторов. Сделано это для повышения безопасности, а также для фильтрации обновлений старой версии RIP.
Существуют 2 режима авторизации:
-
- с установкой пароля открытым текстом.
- с использованием хэша MD5.
Для начала разберемся в чем же отличия этих двух вариантов.
На обоих маршрутизаторах настраивается один и тот же пароль. Однако в первом случае пароль передается между маршрутизаторами по сети открытым текстом (то есть не шифрованный) и может быть легко раскрыт любым сниффером:


Во втором случае пароль по сети вообще не передается. Вместо этого оба маршрутизатора на основе специального алгоритма (хэш-функции) и пароля генерируют последовательность, которая называется цифровым отпечатком или просто хэш, которая затем сравнивается соседним маршрутизатором:


Второй способ гораздо безопаснее первого, однако его легко можно взломать с помощью специальным программ.
Для настройки авторизации необходимо установить цепочку ключей, которые будут содержать пароли. Для повышения безопасности можно настроить “срок действия” каждого пароля:
Router(config)# key chain название цепочки
Router(config-keychain)# key номер
Router(config-keychain-key)# key-string пароль
Теперь на интерфейсе, на котором запущен RIP, включаем аутентификацию. Для этого мы указываем созданную цепочку ключей:
Router(config-if)# ip rip authentication mode (text | MD5)
Router(config-if)#ip rip authentication key-chain название цепочки
Для того, чтобы посмотреть какие ключи настроены выполните:
Router# show key chain
Вот и все.
Configuring Routing Information Protocol
Routing Information Protocol (RIP) is a commonly used routing protocol in small to medium TCP/IP networks. It is a stable protocol that uses a distance-vector algorithm to calculate routes.
- Finding Feature
Information - Prerequisites for RIP
- Restrictions for RIP
- Information About Configuring RIP
- How to Configure RIP
- Configuration Examples for RIP
- Additional References
- Feature Information for Configuring RIP
- Glossary
Finding Feature
Information
Your software release
may not support all the features documented in this module. For the latest
caveats and feature information, see
Bug Search Tool and the
release notes for your platform and software release. To find information about
the features documented in this module, and to see a list of the releases in
which each feature is supported, see the feature information table.
Use Cisco Feature
Navigator to find information about platform support and Cisco software image
support. To access Cisco Feature Navigator, go to
www.cisco.com/go/cfn.
An account on Cisco.com is not required.
Prerequisites for RIP
You must configure
ip
routing command before you configure RIP.
Restrictions for RIP
Routing Information Protocol (RIP) uses hop count as the metric to rate the value of different routes. The hop count is the number of devices that can be traversed in a route. A directly connected network has a metric of zero; an unreachable network has a metric of 16. This limited metric range makes RIP unsuitable for large networks.
Information About Configuring RIP
- RIP Overview
- RIP Routing Updates
- RIP Routing Metric
- Authentication in RIP
- Exchange of Routing Information
- RIP Route Summarization
- Split Horizon Mechanism
- Interpacket Delay for RIP Updates
- RIP Optimization over WAN Circuits
- Source IP Addresses of RIP Routing Updates
- Neighbor Router Authentication
- IP-RIP Delay Start Overview
- Offset-list
- Timers
RIP Overview
The Routing Information Protocol (RIP) uses broadcast UDP data packets to exchange routing information. Cisco software sends routing information updates every 30 seconds, which is termed advertising. If a device does not receive an update from another device for 180 seconds or more, the receiving device marks the routes served by the nonupdating device as unusable. If there is still no update after 240 seconds, the device removes all routing table entries for the nonupdating device.
A device that is running RIP can receive a default network via an update from another device that is running RIP, or the device can source the default network using RIP. In both cases, the default network is advertised through RIP to other RIP neighbors.
The Cisco implementation of RIP Version 2 (RIPv2) supports plain text and message digest algorithm 5 (MD5) authentication, route summarization, classless interdomain routing (CIDR), and variable-length subnet masks (VLSMs).
RIP Routing Updates
The Routing Information Protocol (RIP) sends routing-update messages at regular intervals and when the network topology changes. When a device receives a RIP routing update that includes changes to an entry, the device updates its routing table to reflect the new route. The metric value for the path is increased by 1, and the sender is indicated as the next hop. RIP devices maintain only the best route (the route with the lowest metric value) to a destination. After updating its routing table, the device immediately begins transmitting RIP routing updates to inform other network devices of the change. These updates are sent independently of the regularly scheduled updates that RIP devices send.
RIP Routing Metric
The Routing Information Protocol (RIP) uses a single routing metric to measure the distance between the source and the destination network. Each hop in a path from the source to the destination is assigned a hop-count value, which is typically 1. When a device receives a routing update that contains a new or changed destination network entry, the device adds 1 to the metric value indicated in the update and enters the network in the routing table. The IP address of the sender is used as the next hop. If an interface network is not specified in the routing table, it will not be advertised in any RIP update.
Authentication in RIP
The Cisco implementation of the Routing Information Protocol (RIP) Version 2 (RIPv2) supports authentication, key management, route summarization, classless interdomain routing (CIDR), and variable-length subnet masks (VLSMs).
By default, the software receives RIP Version 1 (RIPv1) and RIPv2 packets, but sends only RIPv1 packets. You can configure the software to receive and send only RIPv1 packets. Alternatively, you can configure the software to receive and send only RIPv2 packets. To override the default behavior, you can configure the RIP version that an interface sends. Similarly, you can also control how packets received from an interface are processed.
RIPv1 does not support authentication. If you are sending and receiving RIP v2 packets, you can enable RIP authentication on an interface.
The key chain determines the set of keys that can be used on the interface. Authentication, including default authentication, is performed on that interface only if a key chain is configured. For more information on key chains and their configuration, see the “Managing Authentication Keys” section in the “Configuring IP Routing Protocol-Independent Features” chapter in the
Cisco IOS IP Routing: Protocol-Independent Configuration Guide.
Cisco supports two modes of authentication on an interface on which RIP is enabled: plain-text authentication and message digest algorithm 5 (MD5) authentication. Plain-text authentication is the default authentication in every RIPv2 packet.
 Note |
Do not use plain text authentication in RIP packets for security purposes, because the unencrypted authentication key is sent in every RIPv2 packet. Use plain-text authentication when security is not an issue; for example, you can use plain-text authentication to ensure that misconfigured hosts do not participate in routing. |
Exchange of Routing Information
Routing Information Protocol (RIP) is normally a broadcast protocol, and for RIP routing updates to reach nonbroadcast networks, you must configure the Cisco software to permit this exchange of routing information.
To control the set of interfaces with which you want to exchange routing updates, you can disable the sending of routing updates on specified interfaces by configuring the
passive-interface router configuration command.
You can use an offset list to increase increasing incoming and outgoing metrics to routes learned via RIP. Optionally, you can limit the offset list with either an access list or an interface.
Routing protocols use several timers that determine variables such as the frequency of routing updates, the length of time before a route becomes invalid, and other parameters. You can adjust these timers to tune routing protocol performance to better suit your internetwork needs. You can make the following timer adjustments:
-
The rate (time, in seconds, between updates) at which routing updates are sent
-
The interval of time, in seconds, after which a route is declared invalid
-
The interval, in seconds, during which routing information about better paths is suppressed
-
The amount of time, in seconds, that must pass before a route is removed from the routing table
-
The amount of time for which routing updates will be postponed
You can adjust the IP routing support in the Cisco software to enable faster convergence of various IP routing algorithms, and hence, cause quicker fallback to redundant devices. The total effect is to minimize disruptions to end users of the network in situations where quick recovery is essential
In addition, an address family can have timers that explicitly apply to that address family (or Virtual Routing and Forwarding [VRF]) instance). The
timers-basic command must be specified for an address family or the system defaults for the
timers-basic command are used regardless of the timer that is configured for RIP routing. The VRF does not inherit the timer values from the base RIP configuration. The VRF will always use the system default timers unless the timers are explicitly changed using the
timers-basic command.
RIP Route Summarization
Summarizing routes in RIP Version 2 improves scalability and efficiency in large networks. Summarizing IP addresses means that there is no entry for child routes (routes that are created for any combination of the individual IP addresses contained within a summary address) in the RIP routing table, reducing the size of the table and allowing the router to handle more routes.
Summary IP address functions more efficiently than multiple individually advertised IP routes for the following reasons:
-
The summarized routes in the RIP database are processed first.
-
Any associated child routes that are included in a summarized route are skipped as RIP looks through the routing database, reducing the processing time required. Cisco routers can summarize routes in two ways:
-
Automatically, by summarizing subprefixes to the classful network boundary when crossing classful network boundaries (automatic summary).
Note |
Automatic summary is enabled by default. |
-
As specifically configured, advertising a summarized local IP address pool on the specified interface (on a network access server) so that the address pool can be provided to dialup clients.
When RIP determines that a summary address is required in the RIP database, a summary entry is created in the RIP routing database. As long as there are child routes for a summary address, the address remains in the routing database. When the last child route is removed, the summary entry also is removed from the database. This method of handling database entries reduces the number of entries in the database because each child route is not listed in an entry, and the aggregate entry itself is removed when there are no longer any valid child routes for it.
RIP Version 2 route summarization requires that the lowest metric of the «best route» of an aggregated entry, or the lowest metric of all current child routes, be advertised. The best metric for aggregated summarized routes is calculated at route initialization or when there are metric modifications of specific routes at advertisement time, and not at the time the aggregated routes are advertised.
The ip summary-address rip routerconfiguration command causes the router to summarize a given set of routes learned via RIP Version 2 or redistributed into RIP Version 2. Host routes are especially applicable for summarization.
See the «Route Summarization Example» section at the end of this chapter for examples of using split horizon.
You can verify which routes are summarized for an interface using the show ip protocols EXEC command. You can check summary address entries in the RIP database. These entries will appear in the database only if relevant child routes are being summarized. To display summary address entries in the RIP routing database entries if there are relevant routes being summarized based upon a summary address, use the show ip rip database command in EXEC mode. When the last child route for a summary address becomes invalid, the summary address is also removed from the routing table.
Split Horizon Mechanism
Normally, devices that are connected to broadcast-type IP networks and that use distance-vector routing protocols employ the split horizon mechanism to reduce the possibility of routing loops. The split horizon mechanism blocks information about routes from being advertised by a device out of any interface from which that information originated. This behavior usually optimizes communications among multiple devices, particularly when links are broken. However, with nonbroadcast networks, such as Frame Relay and the Switched Multimegabit Digital System (SMDS), situations can arise for which this behavior is less than ideal. In such situations, you may want to disable split horizon with the Routing Information Protocol (RIP).
If an interface is configured with secondary IP addresses and split horizon is enabled, updates might not be sourced by the secondary address. If split horizon is enabled, one routing update is sourced per network number.
Split horizon is not disabled by default for interfaces using any of the X.25 encapsulations. For all other encapsulations, split horizon is enabled by default.
Interpacket Delay for RIP Updates
By default, the software adds no delay between packets in a multiple-packet RIP update being sent. If you have a high-end router sending to a low-speed router, you might want to add such interpacket delay to RIP updates, in the range of 8 to 50 milliseconds.
RIP Optimization over WAN Circuits
Devices are used on connection-oriented networks to allow potential connectivity to many remote destinations. Circuits on the WAN are established on demand and are relinquished when the traffic subsides. Depending on the application, the connection between any two sites for user data could be short and relatively infrequent.
Source IP Addresses of RIP Routing Updates
By default, the Cisco software validates the source IP address of incoming Routing Information Protocol (RIP) routing updates. If the source address is not valid, the software discards the routing update. You must disable this functionality if you want to receive updates from a device that is not part of this network. However, disabling this functionality is not recommended under normal circumstances.
Neighbor Router Authentication
You can prevent your router from receiving fraudulent route updates by configuring neighbor router authentication. When configured, neighbor authentication occurs whenever routing updates are exchanged between neighbor routers. This authentication ensures that a router receives reliable routing information from a trusted source.
Without neighbor authentication, unauthorized or deliberately malicious routing updates could compromise the security of your network traffic. A security compromise could occur if an unfriendly party diverts or analyzes your network traffic. For example, an unauthorized router could send a fictitious routing update to convince your router to send traffic to an incorrect destination. This diverted traffic could be analyzed to learn confidential information about your organization or merely used to disrupt your organization’s ability to effectively communicate using the network. Neighbor authentication prevents any such fraudulent route updates from being received by your router.
When neighbor authentication has been configured on a router, the router authenticates the source of each routing update packet that it receives. This is accomplished by the exchange of an authenticating key (sometimes referred to as a password) that is known to both the sending and the receiving router.
There are two types of neighbor authentication used: plain text authentication and Message Digest Algorithm Version 5 (MD5) authentication. Both forms work in the same way, with the exception that MD5 sends a «message digest» instead of the authenticating key itself. The message digest is created using the key and a message, but the key itself is not sent, preventing it from being read while it is being transmitted. Plain text authentication sends the authenticating key itself over the wire.
Note |
Note that plain text authentication is not recommended for use as part of your security strategy. Its primary use is to avoid accidental changes to the routing infrastructure. Using MD5 authentication, however, is a recommended security practice. |
In plain text authentication, each participating neighbor router must share an authenticating key. This key is specified at each router during configuration. Multiple keys can be specified with some protocols; each key must then be identified by a key number.
In general, when a routing update is sent, the following authentication sequence occurs:
-
A router sends a routing update with a key and the corresponding key number to the neighbor router. In protocols that can have only one key, the key number is always zero. The receiving (neighbor) router checks the received key against the same key stored in its own memory.
-
If the two keys match, the receiving router accepts the routing update packet. If the two keys do not match, the routing update packet is rejected.
MD5 authentication works similarly to plain text authentication, except that the key is never sent over the wire. Instead, the router uses the MD5 algorithm to produce a «message digest» of the key (also called a «hash»). The message digest is then sent instead of the key itself. This ensures that nobody can eavesdrop on the line and learn keys during transmission.
Another form of neighbor router authentication is to configure key management using key chains. When you configure a key chain, you specify a series of keys with lifetimes, and the Cisco IOS software rotates through each of these keys. This decreases the likelihood that keys will be compromised. To find complete configuration information for key chains, refer to the «Managing Authentication Keys» section in the Configuring IP Routing Protocol-Independent Features module of the Cisco IOS IP Routing: Protocol-Independent Configuration Guide.
IP-RIP Delay Start Overview
The IP-RIP Delay Start feature is used on Cisco devices to delay the initiation of Routing Information Protocol Version 2 (RIPv2) neighbor sessions until the network connectivity between the neighbor devices is fully operational, thereby ensuring that the sequence number of the first message digest algorithm 5 (MD5) packet that the device sends to the non-Cisco neighbor device is 0. The default behavior for a device configured to establish RIPv2 neighbor sessions with a neighbor device using MD5 authentication is to start sending MD5 packets when the physical interface is up.
The IP-RIP Delay Start feature is often used when a Cisco device is configured to establish a RIPv2 neighbor relationship using MD5 authentication with a non-Cisco device over a Frame Relay network. When RIPv2 neighbors are connected over Frame Relay, it is possible for the serial interface connected to the Frame Relay network to be up while the underlying Frame Relay circuits are not yet ready to transmit and receive data. When a serial interface is up and the Frame Relay circuits are not yet operational, any MD5 packets that the device attempts to transmit over the serial interface are dropped. When MD5 packets are dropped because the Frame Relay circuits over which the packets need to be transmitted are not yet operational, the sequence number of the first MD5 packet received by the neighbor device after the Frame Relay circuits become active will be greater than 0. Some non-Cisco devices will not allow an MD5-authenticated RIPv2 neighbor session to start when the sequence number of the first MD5 packet received from the other device is greater than 0.
The differences in vendor implementations of MD5 authentication for RIPv2 are probably a result of the ambiguity of the relevant RFC (RFC 2082) with respect to packet loss. RFC 2082 suggests that devices should be ready to accept either a sequence number of 0 or a sequence number higher than the last sequence number received. For more information about MD5 message reception for RIPv2, see section 3.2.2 of RFC 2082 at the following url:
http://www.ietf.org/rfc/rfc2082.txt.
The IP-RIP Delay Start feature is supported over other interface types such as Fast Ethernet and Gigabit Ethernet.
Cisco devices allow an MD5-authenticated RIPv2 neighbor session to start when the sequence number of the first MD5 packet received from the other device is greater than 0. If you are using only Cisco devices in your network, you do not need to use the IP-RIP Delay Start feature.
Offset-list
An offset list is the mechanism for increasing incoming and outgoing metrics to routes learned via RIP. This is done to provide a local mechanism for increasing the value of routing metrics. Optionally, you can limit the offset list with either an access list or an interface.
Timers
Routing protocols use several timers that determine such variables as the frequency of routing updates, the length of time before a route becomes invalid, and other parameters. You can adjust these timers to tune routing protocol performance to better suit your internetwork needs. You can make the following timer adjustments:
-
The rate (time in seconds between updates) at which routing updates are sent
-
The interval of time (in seconds) after which a route is declared invalid
-
The interval (in seconds) during which routing information regarding better paths is suppressed
-
The amount of time (in seconds) that must pass before a route is removed from the routing table
-
The amount of time for which routing updates will be postponed
It also is possible to tune the IP routing support in the software to enable faster convergence of the various IP routing algorithms, and, hence, quicker fallback to redundant routers. The total effect is to minimize disruptions to end users of the network in situations where quick recovery is essential.
How to Configure RIP
- Enabling RIP and Configuring RIP Parameters
- Specifying a RIP Version and Enabling Authentication
- Summarizing RIP Routes
- Enabling or Disabling Split Horizon
- Disabling the Validation of Source IP Addresses
- Configuring Interpacket Delay
- Optimizing RIP over WAN
- Configuring IP-RIP Delay Start for Routers Connected by a Frame Relay Network
Enabling RIP and Configuring RIP Parameters
1.
enable
2.
configure
terminal
3.
router
rip
4.
network
ip-address
5.
neighbor
ip-address
6.
offset-list
[access-list-number | access-list-name] {in |
out}
offset
[interface-type
interface-number]
7.
timers basic
update
invalid
holddown
flush [sleeptime]
8.
end
DETAILED STEPS
| Command or Action | Purpose | |
|---|---|---|
| Step 1 | enable Example: Device> enable
|
Enables privileged EXEC mode.
|
| Step 2 | configure terminal Example: Device# configure terminal
|
Enters global configuration mode.
|
| Step 3 | router rip Example: Device(config)# router rip
|
Enables a RIP routing process and enters router configuration mode.
|
| Step 4 | network ip-address Example: Device(config-router)# network 10.1.1.0
|
Associates a network with a RIP routing process.
|
| Step 5 | neighbor ip-address Example: Device(config-router)# neighbor 10.1.1.2
|
Defines a neighboring device with which to exchange routing information.
|
| Step 6 | offset-list [access-list-number | access-list-name] {in | out} offset [interface-type interface-number] Example: Device(config-router)# offset-list 98 in 1 Ethernet 1/0 |
(Optional) Applies an offset list to routing metrics.
|
| Step 7 | timers basic update invalid holddown flush [sleeptime] Example: Device(config-router)# timers basic 1 2 3 4
|
(Optional) Adjusts routing protocol timers.
|
| Step 8 | end Example: Device(config-router)# end
|
Exits router configuration mode and returns to privileged EXEC mode.
|
Specifying a RIP Version and Enabling Authentication
1.
enable
2.
configure
terminal
3.
router
rip
4.
version
{1 |
2}
5.
exit
6.
interface
type
number
7.
ip
rip
send
version
[1]
[2]
8.
ip
rip
receive
version
[1]
[2]
9.
ip
rip
authentication
key-chain
name-of-chain
10.
ip
rip
authentication
mode
{text |
md5}
11.
end
DETAILED STEPS
| Command or Action | Purpose | |
|---|---|---|
| Step 1 | enable Example: Device> enable
|
Enables privileged EXEC mode.
|
| Step 2 | configure terminal Example: Device# configure terminal
|
Enters global configuration mode.
|
| Step 3 | router rip Example: Device(config)# router rip
|
Enters router configuration mode.
|
| Step 4 | version {1 | 2} Example: Device(config-router)# version 2 |
Enables the Cisco software to send only RIP Version 2 (RIPv2) packets.
|
| Step 5 | exit Example: Device(config-router)# exit
|
Exits the router configuration mode and enters the global configuration mode.
|
| Step 6 | interface type number Example: Device(config)# interface Ethernet 3/0
|
Specifies an interface and enters interface configuration mode.
|
| Step 7 | ip rip send version [1] [2] Example: Device(config-if)# ip rip send version 2
|
Configures an interface to send only RIPv2 packets.
|
| Step 8 | ip rip receive version [1] [2] Example: Device(config-if)# ip rip receive version 2
|
Configures an interface to accept only RIPv2 packets.
|
| Step 9 | ip rip authentication key-chain name-of-chain Example: Device(config-if)# ip rip authentication key-chain chainname
|
Enables RIP authentication.
|
| Step 10 | ip rip authentication mode {text | md5} Example: Device(config-if)# ip rip authentication mode md5
|
Configures the interface to use message digest algorithm 5 (MD5) authentication (or let it default to plain-text authentication).
|
| Step 11 | end Example: Device(config-if)# end
|
Exits interface configuration mode and returns to privileged EXEC mode.
|
Summarizing RIP Routes
RIP Version 2 supports automatic route summarization by default. The software summarizes subprefixes to the classful network boundary when classful network boundaries are crossed. If you have disconnected subnets, disable automatic route summarization to advertise the subnets. When route summarization is disabled, the software sends subnet and host routing information across classful network boundaries. To disable automatic summarization, use the no auto-summary command in router configuration mode.
Note |
Supernet advertisement (advertising any network prefix less than its classful major network) is not allowed in RIP route summarization, other than advertising a supernet learned in the routing tables. Supernets learned on any interface that is subject to configuration are still learned. For example, the following summarization is invalid: (invalid supernet summarization) Router(config)# interface Ethernet 1 Router(config-if)# ip summary-address rip 10.0.0.0 252.0.0.0 . . > |
SUMMARY STEPS
1.
enable
2.
configure
terminal
3.
interface
type
number
4.
ip
summary-address
rip
ip-address
network-mask
5.
exit
6.
router
rip
7.
no
auto-summary
8.
end
DETAILED STEPS
| Command or Action | Purpose | |
|---|---|---|
| Step 1 | enable Example: Router> enable
|
Enables privileged EXEC mode.
|
| Step 2 | configure terminal Example: Router# configure terminal
|
Enters global configuration mode.
|
| Step 3 | interface type number Example: Router(config)# interface Ethernet 3/0
|
Enters the interface configuration mode.
|
| Step 4 | ip summary-address rip ip-address network-mask Example: Router(config-if)# ip summary-address rip 10.2.0.0 255.255.0.0
|
Specifies the IP address and network mask that identify the routes to be summarized.
|
| Step 5 | exit Example: Router(config-if)# exit
|
Exits the interface configuration mode.
|
| Step 6 | router rip Example: Router(config)# router rip
|
Enters the router configuration mode.
|
| Step 7 | no auto-summary Example: Router(config-router)# no auto-summary
|
Used in router configuration mode, disables automatic summarization.
|
| Step 8 | end Example: Router(config-router)# end
|
Exits router configuration mode and returns to privileged EXEC mode.
|
Enabling or Disabling Split Horizon
To enable or disable split horizon, use the following commands in interface configuration mode, as needed.
SUMMARY STEPS
1.
enable
2.
configure
terminal
3.
interface
type
number
4.
ip split-horizon
5.
no
ip
split-horizon
6.
end
DETAILED STEPS
| Command or Action | Purpose | |
|---|---|---|
| Step 1 | enable Example: Router> enable
|
Enables privileged EXEC mode.
|
| Step 2 | configure terminal Example: Router# configure terminal
|
Enters global configuration mode.
|
| Step 3 | interface type number Example: Router(config)# interface Ethernet 3/0
|
Enters interface configuration mode.
|
| Step 4 | ip split-horizon Example: Router(config-if)# ip split-horizon
|
Enables split horizon.
|
| Step 5 | no ip split-horizon Example: Router(config-if)# no ip split-horizon
|
Disables split horizon.
|
| Step 6 | end Example: Router(config-if)# end
|
Exits interface configuration mode and returns to privileged EXEC mode.
|
Disabling the Validation of Source IP Addresses
Perform this task to disable the default function that validates the source IP addresses of incoming routing updates.
Note |
Split horizon for Frame Relay and SMDS encapsulation is disabled by default. Split horizon is not disabled by default for interfaces using any of the X.25 encapsulations. For all other encapsulations, split horizon is enabled by default. In general, changing the state of the default is not recommended unless you are certain that your application requires making a change in order to advertise routes properly. Remember that if split horizon is disabled on a serial interface (and that interface is attached to a packet-switched network), you
|
SUMMARY STEPS
1.
enable
2.
configure
terminal
3.
interface
type
number
4.
ip
split-horizon
5.
exit
6.
router
rip
7.
no
validate-update-source
8.
end
DETAILED STEPS
| Command or Action | Purpose | |
|---|---|---|
| Step 1 | enable Example: Router> enable
|
Enables privileged EXEC mode.
|
| Step 2 | configure terminal Example: Router# configure terminal
|
Enters global configuration mode.
|
| Step 3 | interface type number Example: Router(config)# interface Ethernet 3/0
|
Enters interface configuration mode.
|
| Step 4 | ip split-horizon Example: Router(config-if)# ip split-horizon
|
Enables split horizon.
|
| Step 5 | exit Example: Router(config-if)# exit
|
Exits interface configuration mode.
|
| Step 6 | router rip Example: Router(config)# router rip
|
Enters router configuration mode.
|
| Step 7 | no validate-update-source Example: Router(config-router)# no validate-update-source
|
Disables the validation of the source IP address of incoming RIP routing updates.
|
| Step 8 | end Example: Router(config-router)# end
|
Exits router configuration mode and returns to privileged EXEC mode.
|
Configuring Interpacket Delay
Perform this to configure interpacket delay.
SUMMARY STEPS
1.
enable
2.
configure
terminal
3.
interface
type
number
4.
exit
5.
router
rip
6.
output-delay
milliseconds
7.
end
DETAILED STEPS
| Command or Action | Purpose | |
|---|---|---|
| Step 1 | enable Example: Router> enable
|
Enables privileged EXEC mode.
|
| Step 2 | configure terminal Example: Router# configure terminal
|
Enters global configuration mode.
|
| Step 3 | interface type number Example: Router(config)# interface Ethernet 3/0
|
Enters interface configuration mode.
|
| Step 4 | exit Example: Router(config-if)# exit
|
Exits interface configuration mode.
|
| Step 5 | router rip Example: Router(config)# router rip
|
Enters router configuration mode.
|
| Step 6 | output-delay milliseconds Example: Router(config-router)# output-delay 8
|
Configures interpacket delay for outbound RIP updates.
|
| Step 7 | end Example: Router(config-router)# end
|
Exits router configuration mode and returns to privileged EXEC mode.
|
Optimizing RIP over WAN
There are two problems when RIP is not optimized:
-
Periodic broadcasting by RIP generally prevents WAN circuits from being closed.
-
Even on fixed, point-to-point links, the overhead of periodic RIP transmissions could seriously interrupt normal data transfer because of the quantity of information that passes through the line every 30 seconds.
To overcome these limitations, triggered extensions to RIP cause RIP to send information on the WAN only when there has been an update to the routing database. Periodic update packets are suppressed over the interface on which this feature is enabled. RIP routing traffic is reduced on point-to-point, serial interfaces. Therefore, you can save money on an on-demand circuit for which you are charged for usage. Triggered extensions to RIP partially support RFC 2091, Triggered Extensions to RIP to Support Demand Circuits
.
Perform the following task to enable triggered extensions to RIP and to display the contents of the RIP private database.
SUMMARY STEPS
1.
enable
2.
configure
terminal
3.
interface
serial
controller-number
4.
ip
rip
triggered
5.
end
6.
show
ip
rip
database
[prefix mask]
DETAILED STEPS
| Command or Action | Purpose | |
|---|---|---|
| Step 1 | enable Example: Router> enable
|
Enables privileged EXEC mode.
|
| Step 2 | configure terminal Example: Router# configure terminal
|
Enters global configuration mode.
|
| Step 3 | interface serial controller-number Example: Router(config)# interface serial3/0
|
Configures a serial interface.
|
| Step 4 | ip rip triggered Example: Router(config-if)# ip rip triggered
|
Enables triggered extensions to RIP.
|
| Step 5 | end Example: Router(config-if)# end
|
Returns to privileged EXEC mode.
|
| Step 6 | show ip rip database [prefix mask] Example: Router# show ip rip database
|
Displays the contents of the RIP private database.
|
Configuring IP-RIP Delay Start for Routers Connected by a Frame Relay Network
The tasks in this section explain how to configure a router to use the
IP-RIP Delay Start feature on a Frame Relay interface.
 Timesaver |
Cisco routers allow an MD5-authenticated RIPv2 neighbor session to |
- Prerequisites
- Restrictions
- Configuring RIPv2
- Configuring Frame Relay on a Serial Subinterface
- Configuring IP with MD5 Authentication for RIPv2 and IP-RIP Delay on a Frame Relay Subinterface
Prerequisites
Your router must be running Cisco IOS Release 12.4(12) or a later
release.
Note |
The IP-RIP Delay Start feature is supported over other interface |
Restrictions
The IP-RIP Delay Start feature is required only when your Cisco router
is configured to establish a RIPv2 neighbor relationship with a non-Cisco
device and you want to use MD5 neighbor authentication.
Configuring RIPv2
This required task configures RIPv2 on the router.
This task provides instructions for only one of the many possible permutations for configuring RIPv2 on your router.
SUMMARY STEPS
1.
enable
2.
configure
terminal
3.
router
rip
4.
network
ip-network
5.
version
{1 | 2}
6.
[no] auto-summary
DETAILED STEPS
| Command or Action | Purpose | |
|---|---|---|
| Step 1 | enable Example: Router> enable
|
Enables privileged EXEC mode.
|
| Step 2 | configure terminal Example: Router# configure terminal
|
Enters global configuration mode.
|
| Step 3 | router rip Example: Router(config)# router rip
|
Enables a RIP routing process, which places you in router configuration mode.
|
| Step 4 | network ip-network Example: Router(config-router)# network 192.168.0.0
|
Associates a network with a RIP routing process.
|
| Step 5 | version {1 | 2} Example: Router (config-router)# version 2
|
Configures the software to receive and send only RIP Version 1 or only RIP Version 2 packets.
|
| Step 6 | [no] auto-summary Example: Router(config-router)# no auto-summary
|
Disables or restores the default behavior of automatic summarization of subnet routes into network-level routes.
|
Configuring Frame Relay on a Serial Subinterface
This required task configures a serial subinterface for Frame Relay.
Note |
This task provides instructions for only one of the many possible |
SUMMARY STEPS
1.
enable
2.
configure
terminal
3.
interface
type
number
4.
no
ip
address
5.
encapsulation
frame-relay
[mfr
number
|
ietf]
6.
frame-relay
lmi-type
{cisco |
ansi |
q933a}
7.
exit
8.
interface
type
number/subinterface-number
{point-to-point |
multipoint}
9.
frame-relay
interface-dlci
dlci
[ietf |
cisco]
DETAILED STEPS
| Command or Action | Purpose | |
|---|---|---|
| Step 1 | enable Example: Router> enable
|
Enables privileged EXEC mode.
|
| Step 2 | configure terminal Example: Router# configure terminal
|
Enters global configuration mode.
|
| Step 3 | interface type number Example: Router(config)# interface serial3/0
|
Specifies an interface and enters interface configuration mode.
|
| Step 4 | no ip address Example: Router(config-if)# no ip address
|
Removes a previously configured IP address from the interface.
|
| Step 5 | encapsulation frame-relay [mfr number | ietf] Example: Router(config-if)# encapsulation frame-relay ietf
|
Specifies the type of Frame Relay encapsulation for the
|
| Step 6 | frame-relay lmi-type {cisco | ansi | Example: Router(config-if)# frame-relay lmi-type ansi
|
Specifies the type of Frame Relay local management interface
|
| Step 7 | exit Example: Router(config-if)# exit
|
Exits interface configuration mode.
|
| Step 8 | interface type number/subinterface-number {point-to-point | multipoint} Example: Router(config)# interface serial3/0.1 point-to-point
|
Specifies a subinterface and the connection type for the
|
| Step 9 | frame-relay interface-dlci dlci [ietf | cisco] Example: Router(config-subif)# frame-relay interface-dlci 100 ietf
|
Assigns a data-link connection identifier (DLCI) to a Frame Relay
|
Configuring IP with MD5 Authentication for RIPv2 and IP-RIP Delay on a Frame Relay Subinterface
1.
enable
2.
configure
terminal
3.
key
chain
name-of-chain
4.
key
number
5.
key-string
string
6.
exit
7.
exit
8.
interface
type
number
9.
no
cdp
enable
10.
ip
address
ip-address
subnet-mask
11.
ip
rip
authentication
mode
{text |
md5}
12.
ip
rip
authentication
key-chain
name-of-chain
13.
ip
rip
initial-delay
delay
14.
end
DETAILED STEPS
| Command or Action | Purpose | |||
|---|---|---|---|---|
| Step 1 | enable Example: Device> enable
|
Enables privileged EXEC mode.
|
||
| Step 2 | configure terminal Example: Device# configure terminal
|
Enters global configuration mode.
|
||
| Step 3 | key chain name-of-chain Example: Device(config)# key chain rip-md5
|
Specifies the name of a key chain and enters key chain configuration mode.
|
||
| Step 4 | key number Example: Device(config-keychain)# key 123456
|
Specifies the key identifier and enters key chain key configuration mode. The range is from 0 to 2147483647.
|
||
| Step 5 | key-string string Example: Device(config-keychain-key)# key-string abcde
|
Configures the key string.
|
||
| Step 6 | exit Example: Device(config-keychain-key)# exit
|
Exits key chain key configuration mode.
|
||
| Step 7 | exit Example: Device(config-keychain)# exit
|
Exits key chain configuration mode.
|
||
| Step 8 | interface type number Example: Device(config)# interface serial 3/0.1
|
Specifies a subinterface and enters subinterface configuration mode.
|
||
| Step 9 | no cdp enable Example: Device(config-subif)# no cdp enable
|
Disables Cisco Discovery Protocol options on the interface.
|
||
| Step 10 | ip address ip-address subnet-mask Example: Device(config-subif)# ip address 172.16.10.1 255.255.255.0
|
Configures an IP address for the Frame Relay subinterface.
|
||
| Step 11 | ip rip authentication mode {text | md5} Example: Device(config-subif)# ip rip authentication mode md5
|
Specifies the mode for RIPv2 authentication.
|
||
| Step 12 | ip rip authentication key-chain name-of-chain Example: Device (config-subif)# ip rip authentication key-chain rip-md5
|
Specifies a previously configured key chain for Routing Information Protocol Version (RIPv2) message digest algorithm 5 (MD5) authentication.
|
||
| Step 13 | ip rip initial-delay delay Example: Device(config-subif)# ip rip initial-delay 45
|
Configures the IP-RIP Delay Start feature on the interface. The device will delay sending the first MD5 authentication packet to the RIPv2 neighbor for the number of seconds specified by the
|
||
| Step 14 | end Example: Device(config-subif)# end
|
Exits the subinterface configuration mode and returns to privileged EXEC mode.
|
Configuration Examples for RIP
- Route Summarization Example
- Split Horizon Examples
- Address Family Timers Example
- Example: IP-RIP Delay Start on a Frame Relay Interface
Route Summarization Example
The following example shows how the ip summary-address riprouter configuration command can be used to configure summarization on an interface. In this example, the subnets 10.1.3.0/25, 10.1.3.128/25, 10.2.1.0/24, 10.2.2.0/24, 10.1.2.0/24 and 10.1.1.0/24 can be summarized as shown below while sending the updates over an interface.
Router(config)#interface GigabitEthernet 0/2
Router(config-if)#ip summary-address rip 10.1.0.0 255.255.0.0
Router(config-if)#ip summary-address rip 10.2.0.0 255.255.0.0
Router(config-if)#ip summary-address rip 10.3.0.0 255.255.0.0
Split Horizon Examples
Two examples of configuring split horizon are provided.
Example 1
The following configuration shows a simple example of disabling split horizon on a serial link. In this example, the serial link is connected to an X.25 network.
Router(config)# interface Serial 0
Router(config-if)# encapsulation x25

Router(config-if)# no ip split-horizon
Example 2
In the next example, the figure below illustrates a typical situation in which the
no
ip
split-horizon interface configuration command would be useful. This figure depicts two IP subnets that are both accessible via a serial interface on Router C (connected to a Frame Relay network). In this example, the serial interface on Router C accommodates one of the subnets via the assignment of a secondary IP address.
The Ethernet interfaces for Router A, Router B, and Router C (connected to IP networks 10.13.50.0, 10.155.120.0, and 10.20.40.0, respectively all have split horizon enabled by default, while the serial interfaces connected to networks 172.16.1.0 and 192.168.1.0 all have split horizon disabled with the
no
ip
split-horizon command.The figure below shows the topology and interfaces.
In this example, split horizon is disabled on all serial interfaces. Split horizon must be disabled on Router C in order for network 172.16.0.0 to be advertised into network 192.168.0.0 and vice versa. These subnets overlap at Router C, interface S0. If split horizon were enabled on serial interface S0, it would not advertise a route back into the Frame Relay network for either of these networks.
Configuration for Router A
interface ethernet 1
 ip address 10.13.50.1
!
interface serial 1
 ip address 172.16.2.2
 encapsulation frame-relay
 no ip split-horizon
Configuration for Router B
interface ethernet 2
 ip address 10.155.120.1
!
interface serial 2
 ip address 192.168.1.2
 encapsulation frame-relay
 no ip split-horizon
Configuration for Router C
interface ethernet 0
 ip address 10.20.40.1
!
interface serial 0
 ip address 172.16.1.1
 ip address 192.168.1.1 secondary
 encapsulation frame-relay
 no ip split-horizon
Address Family Timers Example
The following example shows how to adjust individual address family timers. Note that the address family «notusingtimers» will use the system defaults of 30, 180, 180, and 240 even though timer values of 5, 10, 15, and 20 are used under the general RIP configuration. Address family timers are not inherited from the general RIP configuration.
Router(config)# router rip
Router(config-router)# version 2
Router(config-router)# timers basic 5 10 15 20
Router(config-router)# redistribute connected
Router(config-router)# network 5.0.0.0
Router(config-router)# default-metric 10
Router(config-router)# no auto-summary
Router(config-router)#
Router(config-router)# address-family ipv4 vrf abc
Router(config-router-af)# timers basic 10 20 20 20
Router(config-router-af)# redistribute connected
Router(config-router-af)# network 10.0.0.0
Router(config-router-af)# default-metric 5
Router(config-router-af)# no auto-summary
Router(config-router-af)# version 2
Router(config-router-af)# exit-address-family
Router(config-router)#
Router(config-router)# address-family ipv4 vrf xyz
Router(config-router-af)# timers basic 20 40 60 80
Router(config-router-af)# redistribute connected
Router(config-router-af)# network 20.0.0.0
Router(config-router-af)# default-metric 2
Router(config-router-af)# no auto-summary
Router(config-router-af)# version 2
Router(config-router-af)# exit-address-family
Router(config-router)#
Router(config-router)# address-family ipv4 vrf notusingtimers

Router(config-router-af)# redistribute connected
Router(config-router-af)# network 20.0.0.0
Router(config-router-af)# default-metric 2
Router(config-router-af)# no auto-summary
Router(config-router-af)# version 2
Router(config-router-af)# exit-address-family
Router(config-router)#
Example: IP-RIP Delay Start on a Frame Relay Interface
Additional References
The following sections provide references related to configuring Routing Information Protocol.
Related Documents
|
Related Topic |
Document Title |
|---|---|
|
Protocol-independent features, filtering RIP information, key management (available in RIP Version 2), and VLSM |
Configuring IP Routing Protocol-Independent Features |
|
IPv6 Routing: RIP for IPv6 |
Cisco IOS IP Routing: RIP Configuration Guide |
|
RIP commands: complete command syntax, command mode, command history, defaults, usage guidelines, and examples |
Cisco IOS IP Routing: RIP Command Reference |
|
Configuring Frame Relay |
Cisco IOS Wide-Area Networking Configuration Guide |
Standards
|
Standard |
Title |
|---|---|
|
None |
— |
MIBs
|
MIB |
MIBs Link |
|---|---|
|
No new or modified MIBS are supported and support for existing MIBs has not been modified. |
To locate and download MIBs for selected platforms, Cisco IOS releases, and feature sets, use Cisco MIB Locator found at the following URL: http://www.cisco.com/go/mibs |
RFCs
|
RFC |
Title |
|---|---|
|
RFC 1058 |
Routing Information Protocol |
|
RFC 2082 |
RIP-2 MD5 Authentication |
|
RFC 2091 |
Triggered Extensions to RIP to Support Demand Circuits |
|
RFC 2453 |
RIP version 2 |
Technical Assistance
|
Description |
Link |
|---|---|
|
The Cisco Support website provides extensive online resources, including documentation and tools for troubleshooting and resolving technical issues with Cisco products and technologies. To receive security and technical information about your products, you can subscribe to various services, such as the Product Alert Tool (accessed from Field Notices), the Cisco Technical Services Newsletter, and Really Simple Syndication (RSS) Feeds. Access to most tools on the Cisco Support website requires a Cisco.com user ID and password. |
http://www.cisco.com/cisco/web/support/index.html |
Feature Information for Configuring RIP
The following table
provides release information about the feature or features described in this
module. This table lists only the software release that introduced support for
a given feature in a given software release train. Unless noted otherwise,
subsequent releases of that software release train also support that feature.
Use Cisco Feature Navigator to find information about platform
support and Cisco software image support. To access Cisco Feature Navigator, go
to
.
An account on Cisco.com is not required.
|
Feature Name |
Releases |
Feature Information |
|---|---|---|
|
IP-RIP Delay Start |
12.4(12), 15.0(1)M, 12.2(33)SRE, 15.0(1)SY |
The IP-RIP Delay Start feature is used on Cisco routers to delay the initiation of RIPv2 neighbor sessions until the network connectivity between the neighbor routers is fully operational, thereby ensuring that the sequence number of the first MD5 packet that the router sends to the non-Cisco neighbor router is 0. The default behavior for a router configured to establish RIPv2 neighbor sessions with a neighbor router using MD5 authentication is to start sending MD5 packets when the physical interface is up. The following commands were introduced or modified: |
|
IP Summary Address for RIPv2 |
12.0(7)T 12.1(3)T 12.1(14) 12.2(2)T 12.2(27)SBB 15.0(1)M 12.2(33)SRE 15.0S |
The IP Summary Adddress for RIPv2 feature introduced the ability to summarize routes. Summarizing routes in RIP Version 2 improves scalability and efficiency in large networks. Summarizing IP addresses means that there is no entry for child routes (routes that are created for any combination of the individual IP addresses contained within a summary address) in the RIP routing table, reducing the size of the table and allowing the router to handle more routes. The following commands were introduced or modified by this feature: |
|
Routing Information Protocol |
12.2(27)SBB 15.0(1)M 12.2(33)SRE 15.0S |
Routing Information Protocol (RIP) is a commonly used routing protocol in small to medium TCP/IP networks. It is a stable protocol that uses a distance-vector algorithm to calculate routes. |
|
Triggered RIP |
12.0(1)T 15.0(1)M 12.2(33)SRE 15.0S |
Triggered RIP was introduced to overcome constant RIP updates over expensive circuit-based WAN links. Triggered extensions to RIP cause RIP to send information on the WAN only when there has been an update to the routing database. Periodic update packets are suppressed over the interface on which this feature is enabled. RIP routing traffic is reduced on point-to-point, serial interfaces. The following commands were introduced or modified: |
Glossary
address
family
—A group of network protocols that share a common format of network address. Address families are defined by RFC 1700.
IS-IS
—Intermediate System-to-Intermediate System. OSI link-state hierarchical routing protocol based on DECnet Phase V routing, where routers exchange routing information based on a single metric, to determine network topology.
RIP
—Routing Information Protocol.RIP is a dynamic routing protocol used in local and wide area networks.
VRF
—VPN routing and forwarding instance. A VRF consists of an IP routing table, a derived forwarding table, a set of interfaces that use the forwarding table, and a set of rules and routing protocols that determine what goes into the forwarding table. In general, a VRF includes the routing information that defines a customer VPN site that is attached to a PE router.
Для начала, что же такое RIP?
RIP (англ. Routing information Protocol) — один из самых простых протоколов маршрутизации. Применяется в небольших компьютерных сетях, позволяет маршрутизаторам динамически обновлять маршрутную информацию (направление и дальность в хопах), получая ее от соседних маршрутизаторов.
Почему именно RIP? В чем его преимущества?
- Простота
Отсутствие в нем большой глубины, как в OSPF
- Поддержка Windows
Можно использовать, как способ доставки маршрутов до VPN-клиентов
- Несложно диагностировать
Кратко рассмотрим принцип работы RIP:
Маршрутизаторы, работающие через этот протокол, отправляют таблицы маршрутизации соседним устройствам для их обновления.
Если рассмотреть поэтапно:
- Посылает свои пакеты в нужный интерфейс и, в случае наличия соседнего устройства, он принимает эти широковещательные пакеты
- «Сосед» определяет количество переходов до нужной сети
- Отправляет свои маршруты в этот же интерфейс
- Следующий «сосед», принимая данный пакет, понимает, какое количество переходов нужно сделать до нужной сети.*
*есть ограничение на количество переходов (это связано с настройками по умолчанию и старостью протокола)
Настройка протокола RIP на роутерах MikroTik (RouterOS 7)
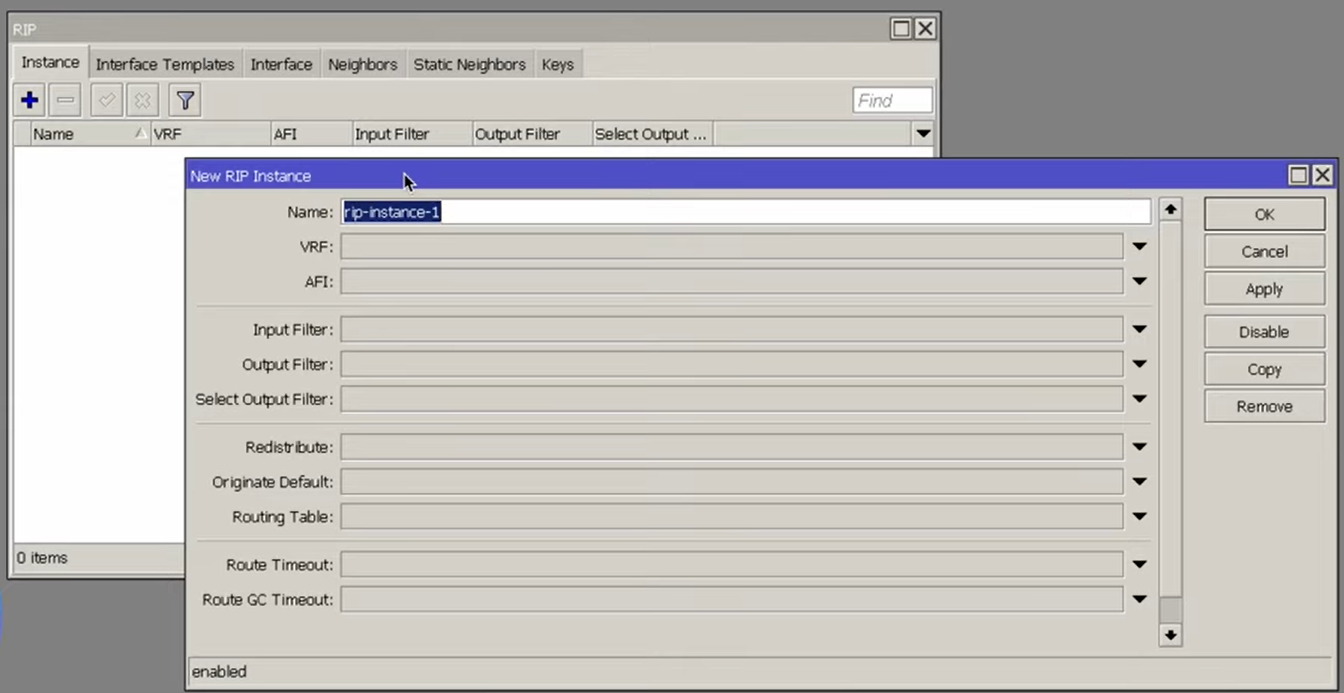
- Для начала создадим Instance, т.е. процесс для интерфейса или же таблиц маршрутизации
- Далее создаем шаблон интерфейса, где указываем тот интерфейс, на котором будет вещать протокол
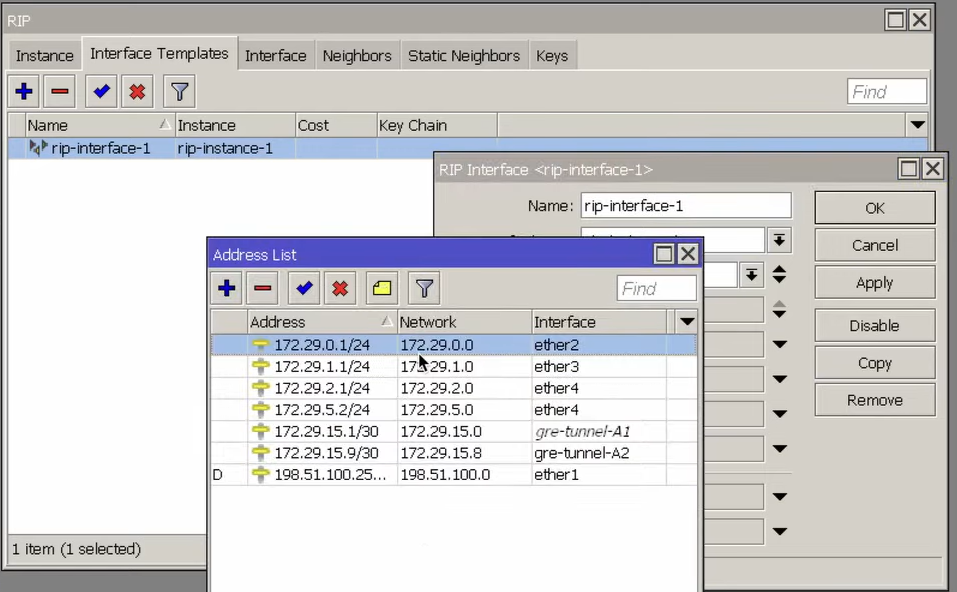
- Проверим, что этот IP-адрес принадлежит соседнему устройству
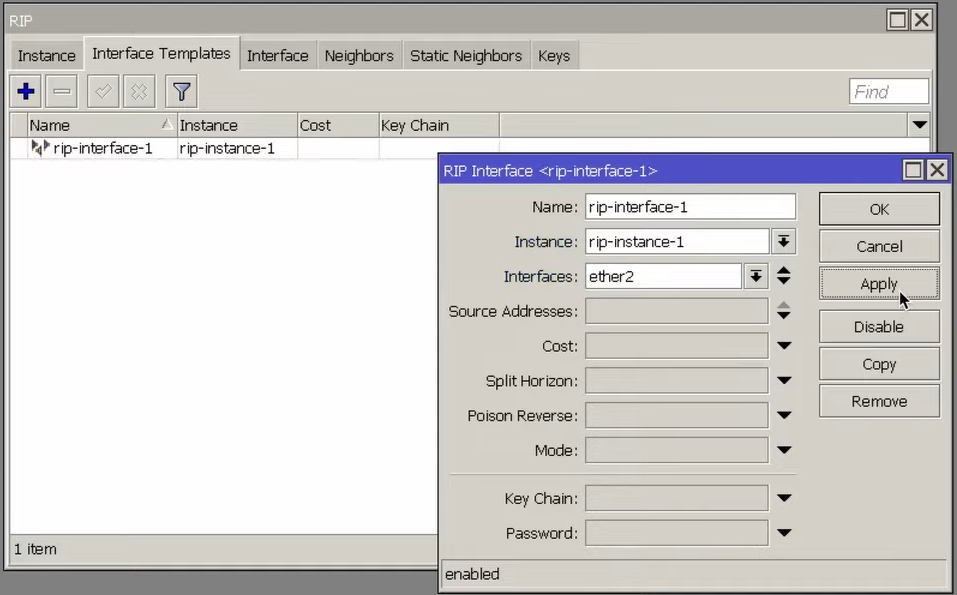
Как итог, на интерфейсе ether2 включен протокол RIP.
Отметим, что этот интерфейс должен иметь IP-адрес.
Как итог, на интерфейсе ether2 включен протокол RIP.
Настройка соседнего устройства (RouterOS 6)
- Указываем IP-адрес соседнего устройства
- Галочки у пункта Redistribute Connected Routes не должно быть
- В RouterOS 7 Вы должны увидеть полученный с RouterOS 6 маршрут
Дополнительная информация:
- Для того чтобы в RIP не поступали все маршруты, их можно отфильтровать
- Кроме этого, в настройках интерфейса есть некоторые опции, позволяющие повысить безопасность RIP протокола

Например, Authentication (доверять устройствам, которые используют такую же аутентификацию)
На этом базовый обзор протокола RIP закончен.
Протокол RIP (Routing Information Protocol) является одним из самых популярных протоколов динамической маршрутизации. Он позволяет обмениваться информацией о маршрутах между соседними маршрутизаторами, что позволяет автоматически настраивать таблицу маршрутизации.
Микротик является одним из самых распространенных и надежных маршрутизаторов, поддерживающих работу с протоколом RIP. Но настройка RIP на микротике может показаться непростой задачей для новичков.
В данной подробной инструкции мы расскажем, как настроить RIP на микротике. Мы покажем, как включить протокол RIP на микротике, настроить интерфейсы, объявить сети и провести простую проверку работоспособности сети.
Содержание
- Как настроить протокол RIP на маршрутизаторе MikroTik: подробная инструкция
- Подключение к маршрутизатору MikroTik
- Настройка основных параметров маршрутизатора
- Настройка интерфейсов маршрутизатора
- Создание и настройка протокола RIP
- Проверка и отладка настроек протокола RIP
- Дополнительные рекомендации по настройке протокола RIP на маршрутизаторе MikroTik
Как настроить протокол RIP на маршрутизаторе MikroTik: подробная инструкция
Шаг 1: Войдите в веб-интерфейс маршрутизатора MikroTik, используя браузер и IP-адрес устройства.
Шаг 2: Перейдите в меню «IP» на левой панели и выберите пункт «Routing».
Шаг 3: Во вкладке «RIP» нажмите на кнопку «Add new» для создания нового RIP-интерфейса.
Шаг 4: В поле «Interfaces» выберите интерфейсы, на которых необходимо включить протокол RIP.
Шаг 5: В поле «Networks» укажите сеть и маску подсети, которые будут обмениваться маршрутами через RIP. Нажмите на кнопку «+» для добавления новых сетей.
Шаг 6: В разделе «General settings» установите необходимые параметры протокола RIP, такие как метрика маршрута, таймеры обновления и идентификатор области.
Шаг 7: Нажмите на кнопку «Apply», чтобы применить настройки протокола RIP.
Шаг 8: Проверьте работу протокола RIP, введя команду «ip route print». В списке маршрутов должны появиться маршруты, полученные через протокол RIP.
Обратите внимание, что настройки протокола RIP должны соответствовать настройкам соседних маршрутизаторов, чтобы обеспечить правильное функционирование маршрутизации.
Подключение к маршрутизатору MikroTik
Для настройки RIP на маршрутизаторе MikroTik вам необходимо первоначально подключиться к устройству. Это можно сделать с помощью программы Winbox или через терминал.
С использованием программы Winbox:
1. Загрузите программу Winbox с официального сайта MikroTik и установите ее на ваш компьютер.
2. Запустите программу Winbox.
3. Введите IP-адрес вашего маршрутизатора в поле «Connect To», затем нажмите кнопку «Connect».
4. Введите имя пользователя и пароль для подключения к маршрутизатору. По умолчанию имя пользователя — admin, без пароля.
5. После успешного подключения вы будете перенаправлены на главный экран программы Winbox, где вы можете продолжить настройку RIP.
С использованием терминала:
1. Откройте терминал на вашем компьютере.
2. Введите команду ssh admin@ip-адрес-маршрутизатора для подключения к маршрутизатору по протоколу SSH. Если вы хотите подключиться по протоколу Telnet, то введите команду telnet ip-адрес-маршрутизатора.
3. Введите пароль для подключения к маршрутизатору.
4. После успешного подключения вы получите приглашение командной строки маршрутизатора в терминале, где вы можете продолжить настройку RIP.
После успешного подключения к маршрутизатору MikroTik, вы будете готовы начать настройку RIP.
Настройка основных параметров маршрутизатора
Перед началом настройки RIP на микротике необходимо установить основные параметры маршрутизатора, чтобы обеспечить правильную работу протокола. В этом разделе мы рассмотрим основные параметры, которые следует настроить.
1. Hostname (имя хоста): Имя хоста используется для идентификации маршрутизатора в сети. Чтобы задать имя хоста, введите следующую команду:
/system identity set name=ИМЯ_ХОСТА
2. IP-адрес интерфейса: Маршрутизатору необходимо иметь IP-адрес для обмена данными с другими устройствами в сети. Чтобы настроить IP-адрес для конкретного интерфейса, введите следующую команду:
/ip address add address=IP_АДРЕС/МАСКА_ПОДСЕТИ interface=ИНТЕРФЕЙС
3. Шлюз по умолчанию: Шлюз по умолчанию указывает маршрутизатору, через какой интерфейс отправлять пакеты в другие сети. Чтобы задать шлюз по умолчанию, введите следующую команду:
/ip route add gateway=IP_ШЛЮЗА
4. DNS-серверы: DNS-серверы используются маршрутизатором для разрешения доменных имен в IP-адреса. Чтобы настроить DNS-серверы, введите следующую команду:
/ip dns set servers=IP_АДРЕС_DNS_СЕРВЕРОВ
5. Настройка системного времени: Для корректной работы микротика и RIP протокола необходимо настроить системное время. Чтобы задать системное время, введите следующую команду:
/system clock set time=ВРЕМЯ
После настройки основных параметров маршрутизатора можно приступить к настройке RIP на микротике.
Настройка интерфейсов маршрутизатора
Перед началом настройки RIP на микротике необходимо сначала настроить интерфейсы маршрутизатора.
1. Подключитесь к микротику с помощью программы Winbox.
2. В левой панели выберите раздел «Interfaces».
3. Нажмите на кнопку «+» (Плюс), чтобы добавить новый интерфейс или выберите существующий интерфейс из списка для редактирования.
4. В открывшемся окне укажите необходимые настройки:
- Name — имя интерфейса (например, ether1).
- Type — тип интерфейса (например, ethernet).
- MAC Address — MAC-адрес интерфейса (можно оставить поле пустым, чтобы микротик сгенерировал MAC-адрес автоматически).
- MTU — максимальный размер пакета (можно оставить поле пустым, чтобы использовать значение по умолчанию).
- Master Port — основной порт (если этот интерфейс является виртуальным).
- Speed — скорость интерфейса (можно оставить поле пустым, чтобы использовать значение по умолчанию).
- Duplex — режим дуплекса интерфейса (можно оставить поле пустым, чтобы использовать значение по умолчанию).
- Comment — комментарий к интерфейсу (необязательное поле).
5. После заполнения всех необходимых настроек нажмите на кнопку «Apply» (Применить).
6. Повторите шаги 3-5 для каждого интерфейса, который вы хотите настроить.
После настройки интерфейсов можно переходить к настройке RIP на микротике.
Протокол маршрутизации RIP (Routing Information Protocol) широко используется для обмена информацией о маршрутах между сетями. Настройка протокола RIP на микротике может быть выполнена с помощью нескольких шагов:
- Включение протокола RIP на микротике. Для этого необходимо зайти в меню «IP» -> «Routes» и выбрать вкладку «RIP». Здесь нужно нажать кнопку «Enable», чтобы активировать протокол RIP.
- Настройка интерфейсов для работы с протоколом RIP. Для каждого интерфейса, через который будет проходить трафик RIP, необходимо включить протокол RIP на этом интерфейсе. Для этого нужно зайти в меню «Interfaces», выбрать нужный интерфейс и перейти на вкладку «RIP». Здесь нужно нажать кнопку «Enable» для включения протокола RIP на интерфейсе.
- Настройка параметров протокола RIP. Для этого нужно зайти в меню «IP» -> «Routing» -> «RIP» и перейти на вкладку «General». Здесь можно указать параметры работы протокола RIP, такие как таймеры обновления информации о маршрутах, максимальное количество переходов и другие параметры.
- Настройка фильтрации маршрутов. Если требуется настроить фильтрацию маршрутов, то необходимо зайти в меню «IP» -> «Routing» -> «RIP» -> «Filters». Здесь можно указать правила фильтрации для протокола RIP, чтобы настроить, какие маршруты будут обмениваться с другими устройствами.
После настройки протокола RIP на микротике, он будет начинать обмениваться информацией о маршрутах с другими устройствами, которые также используют протокол RIP. Это позволит маршрутизатору автоматически обновлять информацию о доступных маршрутах и передавать ее другим устройствам в сети.
Проверка и отладка настроек протокола RIP
После настройки протокола RIP на устройстве MikroTik необходимо выполнить проверку и отладку настроек для обеспечения правильной работы сети. В данном разделе мы рассмотрим основные инструменты и команды для этой цели.
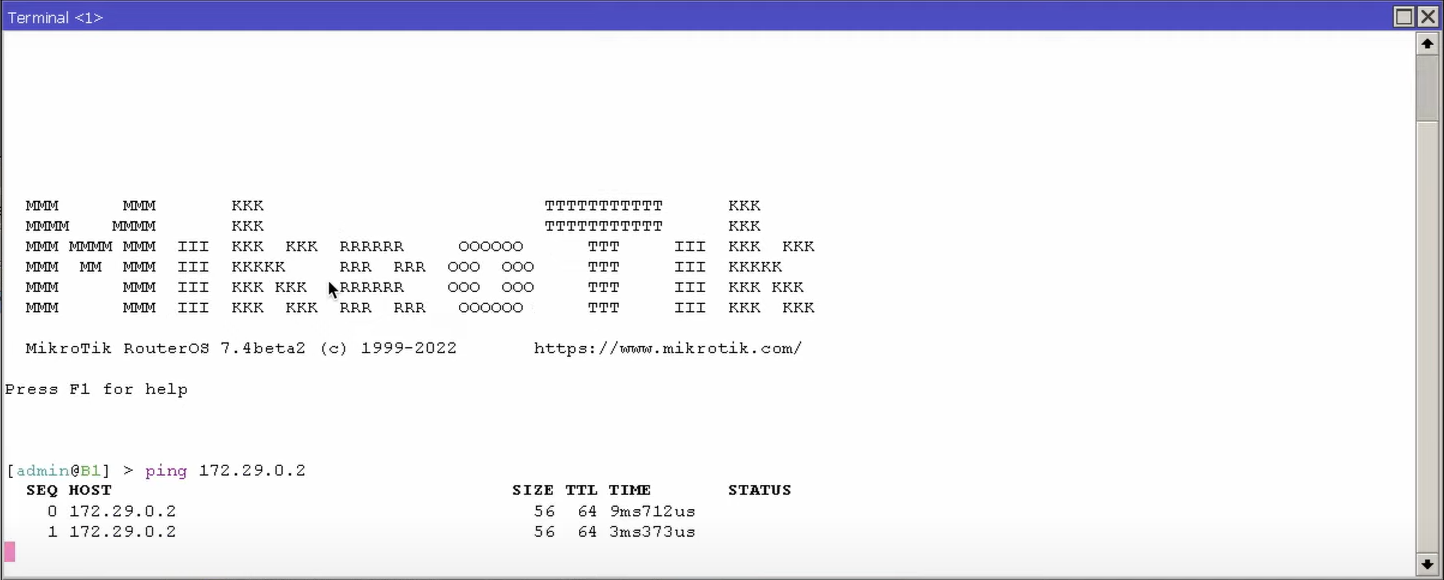
1. Проверка таблицы маршрутизации:
- Введите команду
/routing rip printдля просмотра текущих настроек протокола RIP. Убедитесь, что все интерфейсы, которые должны участвовать в обмене маршрутами, настроены и активны. - Используйте команду
/routing rip route printдля просмотра таблицы маршрутизации протокола RIP. Убедитесь, что сетевые маршруты корректно передаются между устройствами.
2. Проверка обмена маршрутами:
- Используйте команду
/routing rip neighbor printдля просмотра списка соседних устройств, с которыми происходит обмен маршрутами. Убедитесь, что все нужные соседние устройства отображаются в списке. - Проверьте соседство с помощью команды
/ping. Например, выполните команду/ping <IP-адрес>для проверки связи с соседним устройством. Убедитесь, что сетевая связь работает.
3. Отладка протокола RIP:
- Для получения более подробной отладочной информации можно использовать команду
/routing rip debug enable. Учтите, что такая отладка может снизить производительность устройства, поэтому рекомендуется отключать отладку после завершения. - При необходимости можно просмотреть журнал событий протокола RIP с помощью команды
/log print. Убедитесь, что в журнале нет ошибок или предупреждений.
Выполнив проверку и отладку настроек протокола RIP, вы сможете убедиться в их правильности и корректной работе сети. В случае возникновения проблем, вы можете использовать наработанные знания, чтобы идентифицировать и исправить ошибки.
Дополнительные рекомендации по настройке протокола RIP на маршрутизаторе MikroTik
1. Определите правильные метрики: При настройке протокола RIP важно правильно настроить метрики маршрутов. Метрика позволяет определить стоимость использования маршрута. Чем меньше значение метрики, тем предпочтительнее будет использовать этот маршрут. Поэтому, убедитесь, что установлены правильные значения для метрик маршрутов в вашей сети.
2. Ограничьте область распространения протокола: В случае использования протокола RIP в большой сети с несколькими AS (Autonomous System), рекомендуется ограничить область распространения этого протокола. Это позволит уменьшить объем информации, передаваемой между маршрутизаторами и уменьшить нагрузку на сеть.
3. Установите таймеры обновления и устаревания: Таймеры обновления и устаревания определяют частоту обновления и удаления устаревших записей о маршрутах. Рекомендуется настроить эти таймеры таким образом, чтобы минимизировать задержку в обновлении маршрутов, но при этом не перегружать сеть.
4. Аутентификация маршрутов: Для обеспечения безопасности сети, рекомендуется настроить аутентификацию маршрутов с помощью пароля или ключа. Это поможет предотвратить несанкционированное изменение маршрутов или атаки на протокол RIP.
Таблица 1: Рекомендации по настройке протокола RIP на маршрутизаторе MikroTik
| Рекомендация | Описание |
|---|---|
| 1. Определите правильные метрики | Настройте метрики маршрутов с учетом стоимости использования |
| 2. Ограничьте область распространения протокола | Ограничьте область распространения протокола RIP для уменьшения объема информации |
| 3. Установите таймеры обновления и устаревания | Настройте таймеры таким образом, чтобы минимизировать задержку обновления маршрутов |
| 4. Аутентификация маршрутов | Настройте аутентификацию маршрутов для обеспечения безопасности |
Следуя этим рекомендациям, вы сможете успешно настроить протокол RIP на маршрутизаторе MikroTik и обеспечить стабильное функционирование сети в вашей организации.
Базовая работа протокола RIP
Эта серия статей подробно объясняет основные понятия, принципы и операции протокола маршрутизации RIP с примерами. Узнайте, как работает RIP (Routing Information Protocol) и как обновляет таблицу маршрутизации из широковещательного сообщения шаг за шагом.
Маршрутизаторы используют таблицу маршрутизации для принятия решения о переадресации. Таблица маршрутизации содержит информацию о сетевых путях. Сетевой путь — это простой фрагмент информации, который говорит, какая сеть подключена к какому интерфейсу маршрутизатора.
Всякий раз, когда маршрутизатор получает пакет данных, он ищет в таблице маршрутизации адрес назначения. Если маршрутизатор найдет запись сетевого пути для адреса назначения, он переадресует пакет из связанного интерфейса. Если маршрутизатор не найдет никакой записи для адреса назначения, он отбросит пакет.
Существует два способа обновления таблицы маршрутизации: статический и динамический. В статическом методе мы должны обновить его вручную. В динамическом методе мы можем использовать протокол маршрутизации, который будет обновлять его автоматически. RIP — это самый простой протокол маршрутизации. В этой статье мы узнаем, как RIP обновляет таблицу маршрутизации.
В протоколе RIP маршрутизаторы узнают о сетях назначения от соседних маршрутизаторов через процесс совместного использования. Маршрутизаторы, работающие по протоколу RIP, периодически транслируют настроенные сети со всех портов. Список маршрутизаторов обновит их таблицу маршрутизации на основе этой информации.
Давайте посмотрим, как работает процесс RIP шаг за шагом. Следующий рисунок иллюстрирует простую сеть, работающую по протоколу маршрутизации RIP.
Когда мы запускаем эту сеть, маршрутизаторы знают только о непосредственно подключенной сети.
- OFF1 знает, что сеть 10.0.0.0/8 подключена к порту F0/1, а сеть 192.168.1.252/30 подключена к порту S0/0.
- OFF2 знает, что сеть 192.168.1.252/30 подключена к порту S0/0, а сеть 192.168.1.248/30 подключена к порту S0/1.
- OFF3 знает, что сеть 20.0.0.0/8 подключена к порту F0/1, а сеть 192.168.1.248/30 подключена к порту S0/0.
В отличие от статической маршрутизации, где мы должны настроить все маршруты вручную, в динамической маршрутизации все, что нам нужно сделать, это просто сообщить протоколу маршрутизации, какой маршрут мы хотим объявить. А остальное будет сделано автоматически, запустив динамический протокол. В нашей сети мы используем протокол маршрутизации RIP, поэтому он будет обрабатываться RIP.
Иногда RIP также известен как маршрутизация прослушки. Потому что в этом протоколе маршрутизации маршрутизаторы изучают информацию о маршрутизации от непосредственно подключенных соседей, а эти соседи учатся от других соседних маршрутизаторов.
Протокол RIP будет совместно использовать настроенные маршруты в сети через широковещательные передачи. Эти широковещательные передачи называются обновлениями маршрутизации. Прослушивающие маршрутизаторы обновят свою таблицу маршрутизации на основе этих обновлений.
Маршрутизатор выполняет несколько измерений, обрабатывая и помещая новую информацию о маршруте в таблицу маршрутизации. Мы объясним их позже в этой статье. Если маршрутизатор обнаружит новый маршрут в обновлении, он поместит его в таблицу маршрутизации.
Через 30 секунд (интервал времени по умолчанию между двумя обновлениями маршрутизации) все маршрутизаторы снова будут транслировать свои таблицы маршрутизации с обновленной информацией.
В данный момент времени:
- OFF1 будет транслироваться для 10.0.0.0/8, 192.168.1.248/30 и 192.168.1.252/30.
- OFF2 будет транслировать для 10.0.0.0/8, 20.0.0.0/8, 192.168.1.248/30 и 192.168.1.252/30.
- OFF3 будет транслироваться для 20.0.0.0/8, 192.168.1.248/30 и 192.168.1.252/30.
- OFF1 узнает о сети 20.0.0.0/8 из трансляции OFF2.
- У OFF2 нет ничего, чтобы обновить из трансляции OFF1 и OFF2.
- OFF3 узнает о сети 10.0.0.0/8 из трансляции OFF2.
Через 30 секунд маршрутизатор снова будет транслировать новую информацию о маршрутизации. На этот раз маршрутизаторам нечего обновлять. Эта стадия называется конвергенцией.
КОНВЕРГЕНЦИЯ
Конвергенция — это термин, который относится к времени, затраченному всеми маршрутизаторами на понимание текущей топологии сети.
МЕТРИКА ПРОТОКОЛА МАРШРУТИЗАЦИИ RIP
У нас может быть два или более путей для целевой сети. В этой ситуации RIP использует измерение, называемое метрикой, чтобы определить наилучший путь для целевой сети. RIP использует подсчет прыжков как метрику. Прыжки — это количество маршрутизаторов, необходимое для достижения целевой сети.
Например, в приведенной выше сети OFF1 есть два маршрута для достижения сети 20.0.0.0/8.
- Маршрут 1: — через OFF3 [на интерфейсе S0/1]. С прыжком — один.
- Маршрут 2: — через OFF2-OFF3 [на интерфейсе S0/0]. С прыжком — два.
Итак, по какому маршруту OFF1 доберется до места назначения? Маршрут 1 имеет один прыжок, в то время как маршрут 2 имеет два прыжка. Маршрут 1 имеет меньшее количество переходов, поэтому он будет помещен в таблицу маршрутизации.
Источник
Терминология протокола RIP (Routing Information Protocol)
Эта статья подробно объясняет функции и терминологию протокола RIP (административное расстояние, метрики маршрутизации, обновления, пассивный интерфейс и т.д.) с примерами.
RIP — это протокол маршрутизации вектора расстояния. Он делится информацией о маршруте через локальную трансляцию каждые 30 секунд.
Маршрутизаторы хранят в таблице маршрутизации только одну информацию о маршруте для одного пункта назначения. Маршрутизаторы используют значение AD и метрику для выбора маршрута.
АДМИНИСТРАТИВНАЯ ДИСТАНЦИЯ
В сложной сети может быть одновременно запущено несколько протоколов маршрутизации. Различные протоколы маршрутизации используют различные метрики для расчета наилучшего пути для назначения. В этом случае маршрутизатор может получать различную информацию о маршрутах для одной целевой сети. Маршрутизаторы используют значение AD для выбора наилучшего пути среди этих маршрутов. Более низкое значение объявления имеет большую надежность.
Давайте разберемся в этом на простом примере: А маршрутизатор изучает два разных пути для сети 20.0.0.0/8 из RIP и OSPF. Какой из них он должен выбрать?
Ответ на этот вопрос скрыт в приведенной выше таблице. Проверьте объявленную ценность обоих протоколов. Административное расстояние — это правдоподобие протоколов маршрутизации. Маршрутизаторы измеряют каждый источник маршрута в масштабе от 0 до 255. 0 — это лучший маршрут, а 255-худший маршрут. Маршрутизатор никогда не будет использовать маршрут, изученный этим (255) источником. В нашем вопросе у нас есть два протокола RIP и OSPF, и OSPF имеет меньшее значение AD, чем RIP. Таким образом, его маршрут будет выбран для таблицы маршрутизации.
МЕТРИКИ МАРШРУТИЗАЦИИ
У нас может быть несколько линий связи до целевой сети. В этой ситуации маршрутизатор может изучить несколько маршрутов, формирующих один и тот же протокол маршрутизации. Например, в следующей сети у нас есть два маршрута между ПК-1 и ПК-2.
ПК-1 [10.0.0.0/8] == Маршрутизатор OFF1 [S0/1 — 192.168.1.254] = = Маршрутизатор OFF3 [S0/1-192.168.1.253] = = ПК-2 [20.0.0.0/8]
ПК-1 [10.0.0.0/8] == Маршрутизатор OFF1 [S0/0 — 192.168.1.249] == Маршрутизатор OFF2 [S0/0 — 192.168.1.250] == Маршрутизатор OFF2 [S0/1 — 192.168.1.246] == Маршрутизатор OFF3 [S0/0 — 192.168.1.245] == ПК-2 [20.0.0.0/8]
В этой ситуации маршрутизатор использует метрику для выбора наилучшего пути. Метрика — это измерение, которое используется для выбора наилучшего пути из нескольких путей, изученных протоколом маршрутизации. RIP использует счетчик прыжков в качестве метрики для определения наилучшего пути. Прыжки — это количество устройств уровня 3, которые пакет пересек до достижения пункта назначения.
RIP (Routing Information Protocol) — это протокол маршрутизации вектора расстояния. Он использует расстояние [накопленное значение метрики] и направление [вектор], чтобы найти и выбрать лучший путь для целевой сети. Мы объяснили этот процесс с помощью примера в нашей первой части этой статьи.
Хорошо, теперь поймите концепцию метрики; скажите мне, какой маршрут будет использовать OFF1, чтобы достичь сети 20.0.0.0/8? Если он выбирает маршрут S0/1 [192.168.1.245/30], он должен пересечь устройство 3 уровня. Если он выбирает маршрут S0/0 [19.168.1.254/30], то ему придется пересечь два устройства уровня 3 [маршрутизатор OFF! и последний маршрутизатор OFF3], чтобы достичь целевой сети.
Таким образом, он будет использовать первый маршрут, чтобы достигнуть сети 20.0.0.0/8.
МАРШРУТИЗАЦИЯ ПО СЛУХАМ
Иногда RIP также известен как маршрутизация по протоколу слухов. Потому что он изучает информацию о маршрутизации от непосредственно подключенных соседей и предполагает, что эти соседи могли изучить информацию у своих соседей.
ОБНОВЛЕНИЯ ОБЪЯВЛЕНИЙ
RIP периодически транслирует информацию о маршрутизации со всех своих портов. Он использует локальную трансляцию с IP-адресом назначения 255.255.255.255. Во время вещания ему все равно, кто слушает эти передачи или нет. Он не использует никакого механизма для проверки слушателя. RIP предполагает, что, если какой-либо сосед пропустил какое-либо обновление, он узнает об этом из следующего обновления или от любого другого соседа.
ПАССИВНЫЙ ИНТЕРФЕЙС
По умолчанию RIP транслирует со всех интерфейсов. RIP позволяет нам контролировать это поведение. Мы можем настроить, какой интерфейс должен отправлять широковещательную передачу RIP, а какой нет. Как только мы пометим любой интерфейс как пассивный, RIP перестанет отправлять обновления из этого интерфейса.
РАСЩЕПЛЕНИЕ ГОРИЗОНТА
Split horizon-это механизм, который утверждает, что, если маршрутизатор получает обновление для маршрута на любом интерфейсе, он не будет передавать ту же информацию о маршруте обратно маршрутизатору-отправителю на том же порту. Разделенный горизонт используется для того, чтобы избежать циклов маршрутизации.
Чтобы понять эту функцию более четко, давайте рассмотрим пример. Следующая сеть использует протокол RIP. OFF1-это объявление сети 10.0.0.0/8. OFF2 получает эту информацию по порту S0/0.
Как только OFF2 узнает о сети 10.0.0.0/8, он включит ее в свое следующее обновление маршрутизации. Без разделения горизонта он будет объявлять эту информацию о маршруте обратно в OFF1 на порту S0/0.
Ну а OFF1 не будет помещать этот маршрут в таблицу маршрутизации, потому что он имеет более высокое значение расстояния. Но в то же время он не будет игнорировать это обновление. Он будет предполагать, что OFF1 знает отдельный маршрут для достижения сети 10.0.0.0/8, но этот маршрут имеет более высокое значение расстояния, чем маршрут, который я знаю. Поэтому я не буду использовать этот маршрут для достижения 10.0.0.0/8, пока мой маршрут работает. Но я могу воспользоваться этим маршрутом, если мой маршрут будет недоступен. Так что это может сработать как запасной маршрут для меня.
Это предположение создает серьезную сетевую проблему. Например, что произойдет, если интерфейс F0/1 OFF1 выйдет из строя? OFF1 имеет прямое соединение с 10.0.0.0/8, поэтому он сразу же узнает об этом изменении.
В этой ситуации, если OFF1 получает пакет для 10.0.0.0/8, вместо того чтобы отбросить этот пакет, он переадресует его из S0/0 в OFF2. Потому что OFF1 думает, что у OFF2 есть альтернативный маршрут для достижения 10.0.0.0/8.
OFF2 вернет этот пакет обратно в OFF1. Потому что OFF2 думает, что у OFF1 есть маршрут для достижения 10.0.0.0/8.
Это создаст сетевой цикл, в котором фактический маршрут будет отключен, но OFF1 думает, что у OFF2 есть маршрут для назначения, в то время как OFF2 думает, что у OFF1 есть способ добраться до места назначения. Таким образом, этот пакет будет бесконечно блуждать между OFF1 и OFF2. Чтобы предотвратить эту проблему, RIP использует механизм подсчета прыжков (маршрутизаторов).
КОЛИЧЕСТВО ПРЫЖКОВ
RIP подсчитывает каждый переход (маршрутизатор), который пакет пересек, чтобы добраться до места назначения. Он ограничивает количество прыжков до 15. RIP использует TTL пакета для отслеживания количества переходов. Для каждого прыжка RIP уменьшает значение TTL на 1. Если это значение достигает 0, то пакет будет отброшен.
Это решение только предотвращает попадание пакета в петлю. Это не решает проблему цикла маршрутизации.
Split horizon решает эту проблему. Если расщепление горизонта включено, маршрутизатор никогда не будет вещать тот же маршрут обратно к отправителю. В нашей сети OFF2 узнал информацию о сети 10.0.0.0/8 от OFF1 на S0/0, поэтому он никогда не будет транслировать информацию о сети 10.0.0.0/8 обратно в OFF1 на S0/0.
Это решает нашу проблему. Если интерфейс F0/1 OFF1 не работает, и OFF1, и OFF2 поймут, что нет никакого альтернативного маршрута для достижения в сети 10.0.0.0/8.
МАРШРУТ ОТРАВЛЕНИЯ
Маршрут отравления работает противоположном режиме расщепления горизонта. Когда маршрутизатор замечает, что какой-либо из его непосредственно подключенных маршрутов вышел из строя, он отравляет этот маршрут. По умолчанию пакет может путешествовать только 15 прыжков RIP. Любой маршрут за пределами 15 прыжков является недопустимым маршрутом для RIP. В маршруте, находящимся в неисправном состоянии, RIP присваивает значение выше 15 к конкретному маршруту. Эта процедура известна как маршрутное отравление. Отравленный маршрут будет транслироваться со всех активных интерфейсов. Принимающий сосед будет игнорировать правило разделения горизонта, передавая тот же отравленный маршрут обратно отправителю. Этот процесс гарантирует, что каждый маршрутизатор обновит информацию об отравленном маршруте.
ТАЙМЕРЫ RIP
Для лучшей оптимизации сети RIP использует четыре типа таймеров.
- Таймер удержания (Hold down timer)— RIP использует удерживающий таймер, чтобы дать маршрутизаторам достаточно времени для распространения отравленной информации о маршруте в сети. Когда маршрутизатор получает отравленный маршрут, он замораживает этот маршрут в своей таблице маршрутизации на период таймера удержания. В течение этого периода маршрутизатор не будет использовать этот маршрут для маршрутизации. Период удержания будет прерван только в том случае, если маршрутизатор получит обновление с той же или лучшей информацией для маршрута. Значение таймера удержания по умолчанию составляет 180 секунд.
- Route Invalid Timer — этот таймер используется для отслеживания обнаруженных маршрутов. Если маршрутизатор не получит обновление для маршрута в течение 180 секунд, он отметит этот маршрут как недопустимый маршрут и передаст обновление всем соседям, сообщив им, что маршрут недействителен.
- Route Flush Timer — этот таймер используется для установки интервала для маршрута, который становится недействительным, и его удаления из таблицы маршрутизации. Перед удалением недопустимого маршрута из таблицы маршрутизации он должен обновить соседние маршрутизаторы о недопустимом маршруте. Этот таймер дает достаточно времени для обновления соседей, прежде чем недопустимый маршрут будет удален из таблицы маршрутизации. Таймер Route Flush Timer по умолчанию установлен на 240 секунд.
- Update Timer -В RIP широковещательная маршрутизация обновляется каждые 30 секунд. Он будет делать это постоянно, независимо от того, изменяется ли что-то в маршрутной информации или нет. По истечении 30 секунд маршрутизатор, работающий под управлением RIP, будет транслировать свою информацию о маршрутизации со всех своих интерфейсов.
RIP — это самый старый протокол вектора расстояний. Для удовлетворения текущих требований к сети он был обновлен с помощью RIPv2. RIPv2 также является протоколом вектора расстояния с максимальным количеством прыжков 15.
Вы все еще можете использовать RIPv1, но это не рекомендуется. В следующей таблице перечислены ключевые различия между RIPv1 и RIPv2.
Источник