- Nmap Network Scanning
- Chapter 2. Obtaining, Compiling, Installing, and Removing Nmap
- Windows
While Nmap was once a Unix-only tool, a Windows version was
released in 2000 and has since become the second most popular Nmap
platform (behind Linux). Because of this popularity and the fact that
many Windows users do not have a compiler, binary executables are
distributed for each major Nmap release. We support Nmap on Windows 7
and newer, as well as Windows Server 2008 and newer. We also maintain
a guide for users
who must run Nmap on earlier Windows releases. While it has improved dramatically, the Windows port is not
quite as efficient as on Unix. Here are the known limitations:
-
Nmap only supports ethernet interfaces (including most
802.11 wireless cards and many VPN clients) for raw packet scans.
Unless you use the-sT -Pnoptions, RAS connections
(such as PPP dialups) and certain VPN clients are not supported. This
support was dropped when Microsoft removed raw TCP/IP socket support
in Windows XP SP2. Now Nmap must send lower-level ethernet frames
instead. -
When using Nmap without Npcap, you cannot
generally scan your own machine from itself (using a
loopback IP such as 127.0.0.1 or any of its
registered IP addresses). This is a Windows limitation that we
have worked around in Npcap, which is included in the Windows self-installer.
Users stuck without a Npcap installation can use a TCP
connect scan without pinging (-sT -Pn) as that uses
the high level socket API rather than sending raw
packets.
Scan speeds on Windows are generally comparable to those on
Unix, though the latter often has a slight performance edge. One
exception to this is connect scan (-sT), which is
often much slower on Windows because of deficiencies in the Windows
networking API. This is a shame, since that is the one TCP scan that
works over all networking types (not just ethernet, like the raw packet scans).
Connect scan performance can be
improved substantially by applying the Registry changes in the
nmap_performance.reg file included with Nmap. By default these changes are applied for you by the Nmap executable installer. This registry file
is in the nmap-<version>
directory of the Windows binary zip file, and
nmap-<version>/mswin32
in the source tarball (where <version> is the
version number of the specific release). These changes increase
the number of ephemeral ports reserved for user applications (such as
Nmap) and reduce the time delay before a closed connection can
be reused. Most people simply check the box to apply these changes in the executable Nmap installer, but you can also apply them by double-clicking on
nmap_performance.reg, or by running the command
regedt32 nmap_performance.reg. To make the changes by hand, add these three Registry DWORD values to
HKEY_LOCAL_MACHINE\SYSTEM\CurrentControlSet\Services\Tcpip\Parameters:
- MaxUserPort
-
Set a large value such as 65534 (0x0000fffe). See MS KB 196271.
- TCPTimedWaitDelay
-
Set the minimum value (0x0000001e). See MS KB 149532.
- StrictTimeWaitSeqCheck
-
Set to 1 so TCPTimedWaitDelay is checked.
Windows users have three choices for installing
Nmap, all of which are available from the
download page at https://nmap.org/download.html.
Windows Self-installer
Every Nmap release includes a Windows
self-installer named
nmap-<version>-setup.exe
(where <version> is the version number of the
specific release). Most Nmap users choose this option since it is so
easy. Another advantage of the self-installer is that it provides the option to install the Zenmap GUI and other tools. Simply run the installer file and let it walk you through
panels for choosing an install path and installing Npcap. The
installer was created with the open-source Nullsoft Scriptable
Install System. After it completes, read the section called “Executing Nmap on Windows” for instructions on executing Nmap on the
command-line or through Zenmap.
Command-line Zip Binaries
![[Note]](https://nmap.org/book/images/note.png) |
Note |
|---|---|
|
Most users prefer installing Nmap with the self-installer discussed previously. |
Every stable Nmap release comes with Windows
command-line binaries and associated files in a Zip archive. No
graphical interface is included, so you need to run
nmap.exe from a DOS/command window. Or you can
download and install a superior command shell such as those included
with the free
Cygwin
system available from https://www.cygwin.com. Here are the step-by-step instructions for installing and executing the Nmap .zip binaries.
Installing the Nmap zip binaries
-
Download the .zip binaries from
https://nmap.org/download.html. -
Extract the zip file into the directory you want
Nmap to reside in. An example would beC:\Program. A directory called
Files
nmap-should be created, which includes<version>
the Nmap executable and data files. -
For improved performance, apply the Nmap Registry
changes discussed previously. -
Nmap requires the free Npcap packet capture library.
We include a recent Npcap installer which is available in the zip file
asnpcap-,<version>.exe
where<version>is the Npcap version rather
than the Nmap version. Alternatively, you can obtain and install
the latest version fromhttps://npcap.com. -
Due to the way Nmap is compiled, it requires the
Microsoft Visual C++ Redistributable Package of runtime
components. Many systems already have this installed from other
packages, but you should runVC_redist.x86.exe
from the zip file just in case you need it.
Pass the/qoption to run these installers in quiet (non interactive) mode. -
Instructions for executing your compiled Nmap are
given in the section called “Executing Nmap on Windows”.
Compile from Source Code
Most Windows users prefer to use the Nmap binary self-installer,
but compilation from source code is an option, particularly if you plan to help with Nmap development. Compilation requires
Microsoft Visual C++ 2019, which is part of their commercial Visual Studio
suite. Any of the Visual Studio 2019 editions should work, including the free
Visual Studio 2019 Community.
Some of Nmap’s dependencies on Windows are inconvenient to build. For
this reason, precompiled binaries of the dependencies are stored in
Subversion, in the directory /nmap-mswin32-aux.
When building from source, whether from a source code release or from
Subversion, check out /nmap-mswin32-aux as
described below.
Compiling Nmap on Windows from Source
-
Download the Windows dependencies from Subversion with the command
svn checkout https://svn.nmap.org/nmap-mswin32-aux.
The build files are configured to look for dependencies in this
checked-out directory. If you want to build the dependencies yourself
instead, you will have to reconfigure the Visual Studio project files to
point to the alternate directory. -
Decide whether to obtain the Nmap source code by downloading the latest release from nmap.org, or using a Subversion client to retrieve even newer (but less tested) code from our repository. These instructions are for the web download approach, but using Subversion instead is straightforward (see the section called “Obtaining Nmap from the Subversion (SVN) Repository”).
-
Download the latest Nmap source distribution from
https://nmap.org/download.html. It has the name
nmap-or<version>.tar.bz2
nmap-. Those are the same tar file compressed using bzip2 or gzip, respectively. The bzip2-compressed version is smaller.<version>.tgz -
Uncompress the source code file you just downloaded. The
source code directory and thenmap-mswin32-auxmust
be in the same parent directory.
Recent releases of the free Cygwin distribution can handle both the.tar.bz2and.tgzformats. Use the command tar xvjf nmap-version.tar.bz2 or tar xvzf nmap-version.tgz, respectively. Alternatively, the common WinZip application can decompress these files. -
Open Visual Studio and the Nmap solution file (
nmap-).<version>/mswin32/nmap.sln -
Right click on
Solution 'nmap'in the Solution Explorer sidebar and choose “Configuration Manager”. Ensure that the active solution configuration isReleaseand then close the Configuration Manager. -
Build Nmap by pressing F7 or choosing “Build
Solution” from the GUI. Nmap should begin compiling, and
end with the line “-- Done --” saying
that all projects built successfully and there were zero
failures. -
The executable and data files can be found in
nmap-. You can copy them to a preferred directory as long as they are all kept together.<version>/mswin32/Release/ -
Ensure that you have Npcap installed. You can obtain it by
installing our binary self-installer or executing
npcap-from<version>.exe
our zip package. Alternatively, you can obtain the official installer at
https://npcap.com. -
Instructions for executing your compiled Nmap are
given in the next section.
If you wish to build an Nmap executable Windows
installer or Zenmap executable,
see docs/win32-installer-zenmap-buildguide.txt in the Nmap SVN repository.
Many people have asked whether Nmap can be compiled with the
gcc/g++ included
with Cygwin or other compilers. Some users have reported success with
this, but we don’t maintain instructions for building Nmap under
Cygwin.
Executing Nmap on Windows
Nmap releases now include the
Zenmap graphical user interface for Nmap.
If you used the Nmap installer and left the Zenmap field checked,
there should be a new Zenmap entry on your desktop and Start Menu.
Click this to get started. Zenmap is fully documented in
Chapter 12, Zenmap GUI Users’ Guide. While many users love Zenmap, others prefer
the traditional command-line approach to executing Nmap. Here are
detailed instructions for users who are unfamiliar with command-line
interfaces:
-
Make sure the user you are logged in as has
administrative privileges
on the computer (user should be a member of theadministratorsgroup). -
Open a command/DOS Window. Though it can be found in
the program menu tree, the simplest approach is to choose “Start”
-> “Run” and type cmd<enter>. Opening a Cygwin window (if you installed it) by clicking on the Cygwin icon on the desktop works too, although the necessary commands differ slightly from those shown here. -
Change to the directory you installed Nmap into. You can skip this step if Nmap is already in your command path (the Zenmap isntaller adds it there by default). Otherwise, type the following commands.
c:cd "\Program Files (x86)\Nmap"On Windows releases prior to Windows 7, specify
\Program Files\Nmapinstead. The directory will also be different if you chose to install Nmap in a non-default location. -
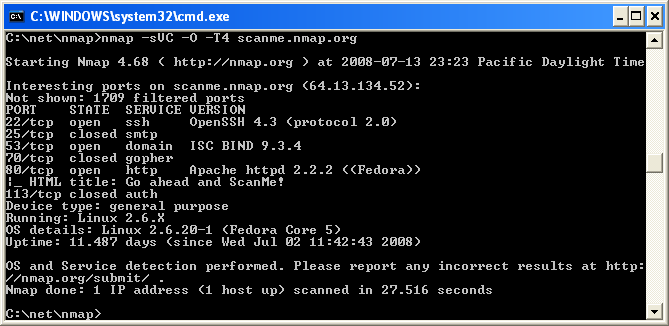
Execute nmap.exe. Figure 2.1 is a screen shot showing a simple example.
Figure 2.1. Executing Nmap from a Windows command shell
If you execute Nmap frequently, you can add the Nmap directory
(c:\Program Files (x86)\Nmap by default) to your command execution path:
-
Open the System Properties window to the Advanced tab by running
SystemPropertiesAdvanced.exe. -
Click the “Environment
Variables” button. -
Choose
Pathfrom the
System variablessection, then hit
edit. -
Add a semi-colon and then your Nmap directory (e.g.
c:\Program Files (x86)\Nmap) to the end of the value. -
Open a new command prompt and you should be able to execute a
command such as nmap scanme.nmap.org from any directory.
На чтение 2 мин Опубликовано
NMAP (Network Mapper), один из известных инструментов с открытым исходным кодом для выполнения сетевого сканирования, проверки безопасности и поиска уязвимостей в сетевой инфраструктуре.
Одним из популярных способов использования NMAP является поиск открытых портов в сети. NMAP можно установить на Windows, Linux, OSX
Содержание
- Установка NMAP
- Обнаружение версии
- Проверка информации сертификатов
- Проверка информации шифрования
Установка NMAP
Перейдите по ссылке загрузки nmap и загрузите последнюю стабильную версию
или, используйте прямую ссылку здесь, чтобы скачать nmap
Перейдите в папку, куда загружен файл
Щелкните правой кнопкой мыши на EXE-файле и нажмите «Run as administrator», чтобы запустить от имени администратора.
Он начнет процесс установки, примите лицензионное соглашение
Вы можете выбрать компоненты для установки, но было бы неплохо установить их все
По умолчанию он будет установлен в папке C:\Program Files (x86)\Nmap, но при необходимости измените его путь
Это начнет установку NMAP и после того, как она будет выполнена; вы получите подтверждение
Идем вперед и поиграем с инструментами, чтобы понять, как это работает.
Вот некоторые из примеров.
Обнаружение версии
Одним из применений NMAP является отразить отпечаток ОС и запущенных служб
# nmap -sV $target
-sV аргумент команды будет определять версии и состояние запущенных служб
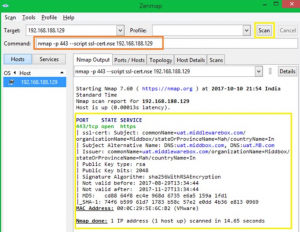
Проверка информации сертификатов
OpenSSL в основном используется для выполнения операций с сертификатами, например, генерации, проверки, модификации и т. д.
Однако вы также можете выполнять некоторые действия с NMAP.
# nmap -p $port –script ssl-cert.nse $target
Если вам интересно, ssl-cert.nse – это скрипт, который устанавливается вместе с NMAP.
Он доступен по умолчанию: C:\Program Files x86)\ Nmap\scripts
Проверка информации шифрования
Скрипт ssl-enum-cihpers.nse может использоваться для проверки информации шифрования SSL.
# nmap -p $port --script ssl-enum-ciphers.nse $target
Каждый набор шифров отображается с буквой (от A до F), указывающей силу соединения.
Оценка основана на криптографической силе обмена ключами и потокового шифрования.
Выбор алгоритма целостности сообщения (хеш) не является фактором.
Выходная линия, начинающаяся с наименьшей силы, показывает силу самого слабого шифрования.
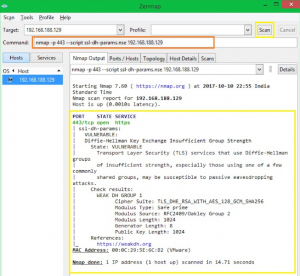
Чтобы обнаружить уязвимость DH (Diffie-Hellman), вы можете использовать синтаксис ниже:
# nmap -p $port --script ssl-dh-params.nse $target
Я надеюсь, что эта краткая инструкция поможет вам установить и ознакомиться с NMAP в операционной системе Windows.
Пожалуйста, не спамьте и никого не оскорбляйте.
Это поле для комментариев, а не спамбокс.
Рекламные ссылки не индексируются!
Nmap is computer software that is used to scan networks. It was developed by Gordon Lyon. It is written in C, C++, Python, and Lua. Its initial release was in 1997, and its stable release was in 2021. Its latest version is 7.92. It is free software used for security purposes of networks. It can be run on different operating systems like Windows, Mac, Linux, etc. It is used to protect computers by discovering hosts and services on a computer network by sending data packets and analyzing the responses. Some of the basic features of Nmap are:
- It discovers hosts on a network.
- It also scans open ports on the target hosts.
- It also finds the application name and the version number by interacting with network services on remote devices.
- It also finds the OS and hardware characteristics of the network devices.
- It also does scriptable interaction with the target with the help of NSE(Nmap Scripting Engine) and Lua programming languages.
- It is open-source software and is available for most operating systems.
Installing Nmap on Windows
Follow the below steps to install Nmap on Windows:
Step 1: Visit the official website using the URL https://nmap.org/download.html on any web browser the click on nmap-7.92-setup.exe. Downloading of this executable file will start soon. It is a 21.8 MB file so it will take some minutes.
Step 2: Now check for the executable file in downloads in your system and run it.
Step 3: It will prompt confirmation to make changes to your system. Click on Yes.
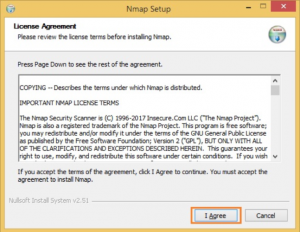
Step 4: The next screen will be of License Agreement, click on I Agree.
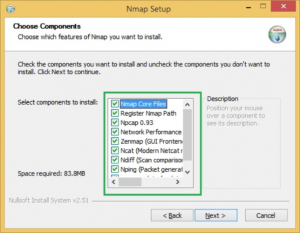
Step 5: Next screen is of choosing components, all components are already marked so don’t change anything just click on the Next button.
Step 6: In this step, we choose the installation location of Nmap. By default, it uses the C drive but you can change it into another drive that will have sufficient memory space for installation. It requires 84.3 MB of memory space.
Step 7: After this installation process it will take a few minutes to complete the installation.
Step 8: Npcap installation will also occur with it, the screen of License Agreement will appear, click on I Agree.
Step 9: Next screen is of installation options don’t change anything and click on the Install button.
Step 10: After this installation process it will take a few minutes to complete the installation.
Step 11: After completion of installation click on the Next button.
Step 12: Click on the Finish button to finish the installation of Npcap.
Step 13: After completion of the installation of Nmap click on Next button.
Step 14: Screen for creating shortcut will appear, click on Next button.
Step 15: Click on the Finish button to finish the installation of Nmap.
Step 16: Nmap is successfully installed on the system and an icon is created on the desktop.
Step 17: Run the software and see the interface.
So this is how you have successfully installed Nmap on your windows system.
Last Updated :
05 Jan, 2022
Like Article
Save Article
In this post, you will learn how to install and use Nmap on a Windows operating system. I’ll also show you how to run a Nmap scan on your Windows Servers and Active Directory Domain Controllers.
Can you use Nmap on Windows 10?
Yes, Nmap can be installed and used on Windows operating systems such as Windows 10, Server 2012, and newer. Nmap started as a Linux tool but support for Windows and other operating systems was added. Nmap is still the most popular on Linux as it is the most commonly used OS by penetration testers and black hat hacking. If you are not into Linux no worries you can still use Nmap on Windows and the commands are the same.
Here are the steps to install Nmap on Windows. I’ll be installing Nmap on my Windows 10 virtual machine (hyper-v). These steps should be the same no matter what Windows version you are running.
Step 1. Download Nmap Windows Installer
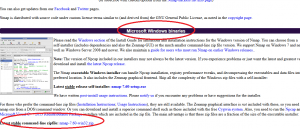
You can download the installer from the Nmap download page. Under the Microsoft Windows binaries section look for the setup.exe next to the “Latest stable release self-installer”. The version numbers get updated overtime so it may be different than the screenshot below.
Step 2: Run the setup.exe file
Here are the screen prompts after running the setup file.
1. License Agreement screen – click “I Agree”
2. Choose Components screen – leave defaults and click “Next”
3. Choose Install Location screen – The default is fine, you can change the install location if you want. Click “Install”
Nmap will install then you will be prompted to install Ncap.
4. License Agreement for Ncap screen – click “I Agree”.
Ncap is a component Nmap needs to capture raw network packets.
5. Npcap Install options screen – leave defaults and click “Install”.
Once Npcap install is completed click “Next”
Click Finish.
Click Next
Create Shortcuts – Click Next (uncheck the boxes if you don’t want to add the shortcuts)
Click Finish.
That completes the installation of Nmap. Now let’s check out some basic Nmap commands.
Nmap Basic Windows Commands
Nmap has many command-line options, way too many to cover in this guide. You don’t need to know every Nmap option to run some great scans on your network. Below are some basic and common scans I’ll be demonstrating in the example sections below. I’m using subnets and IP addresses on my network, you will need to change these to match your network. Host Discovery (find active devices on the network)
1. Host Discovery (find active devices on the network)
nmap -sn 192.168.100.0/24
This command will find all active devices on the 192.168.100.0/24 network.
2. Port Scan (find open ports)
nmap 192.168.100.10
This will do a TCP port scan of the most popular 1000 ports. The ports are listed in the nmap-services file. If you want to scan specific ports you can use the -p option, here is an example of scanning port 80.
nmap -p 80,443 192.168.100.21
3. Get services and version information
nmap -sV 192.168.100.21
This is a great command to get version information on services running on the target hosts. For example, it will show what version is running on port 80, 443, and so on).
4. OS Detection
nmap -O 192.168.100.21
This command will try to guess the operating system the target host is running.
Pretty simple commands right?. Now Let’s jump into some real world examples.
Example 1: Nmap Scan Windows Application Server
The diagram below is the network I’ll be scanning. I have Nmap installed on the Windows 10 computer and I’ll be running scans on the Windows Application and Active Directory Server.
First, let’s run a scan on the network to find available hosts.
nmap -sn 192.168.100.0/24
In the screenshot above it scanned all 256 IP addresses on my network in 2.19 seconds and found 6 active hosts. When using Nmap discovering hosts on your network is a good place to start and this command does it extremely fast.
Next, I’ll run a port scan on IP 192.168.100.21 to see if there are any open ports.
nmap 192.168.100.21
Remember this command will scan the most popular 1000 ports, in most cases, this command should find services running on remote hosts. You can see the scan found 4 open ports on this server, port 80, 135, 139, and 445.
Now let’s run a scan to get more details about what is running on these ports.
This scan is telling us that port 80 is running Microsoft IIS. Very cool! In addition, we can see Windows RPC and netbios ssn information
This command will also tell you the OS it is running. The services can also help determine the OS. To get more details on the OS, Nmap has a scan just for this.
nmap -O 192.168.100.21
This command doesn’t always provide the best OS version information. You can add the –osscan-guess option to run a more aggressive OS scan.
nmap -O -osscan-guess 192.168.100.21
This provides more details and we can confirm it is a Windows system but Nmap doesn’t do a good job of determining the version of Windows. This server is running 2019 version 1809.
Example 2: Nmap Scan Active Directory Server
Now let’s look at some examples of scanning an Active Directory server, first I’ll run a port scan.
nmap 192.168.100.10
The scan found 11 open ports and 989 closed ports. You might be able to look at the ports and determine what this server is used for. LDAP and Kerberos are associated with authentication so that is a good indication this is a domain controller.
Next, I’ll run a scan to get more details on the services running.
nmap -sV 192.168.100.10
Now we have more details on the services, you can see it’s running Microsoft Active Directory, the service command also shows the host name and the OS is Windows.
Summary
In this post, I provided steps for installing Nmap on Windows, basic Nmap commands, and several network scanning examples. The Windows Nmap version functions very much like the popular Linux version in fact the command are all the same. Nmap does have a GUI version but that was beyond the scope of this article and maybe I’ll cover it in a separate post. The command line is the preferred option for scanning hosts so I do recommend sticking with it over the GUI version.
Related Nmap Articles
- Nmap Cheat Sheet
- Nmap Port Scanning Guide
