Вопрос: Как настроить VPN IPSec между DIR и DFL?
Ответ:
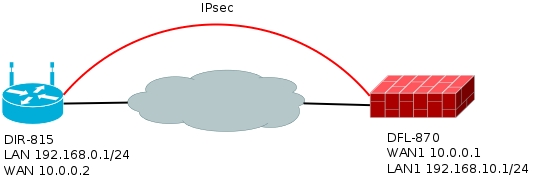
Пример будет приведен на устройствах DIR-815/AC и DFL-870, для топологии приведенной на рисунке ниже. В примере подразумевается, что WAN и LAN на обоих устройствах настроен.
Настройка DIR-815/AC
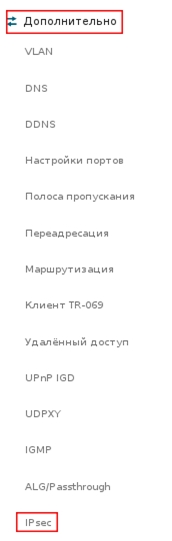
Пройдите в web интерфейсе Дополнительно → IPSec
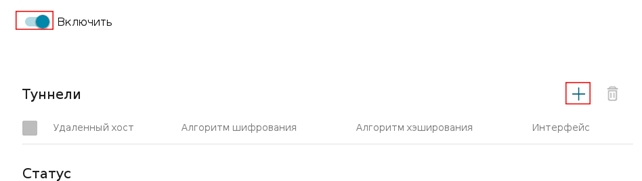
Включите IPSec, и нажмите кнопку «+»
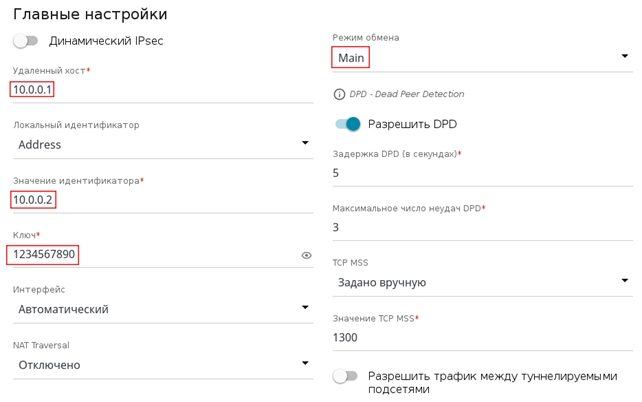
Заполните поля следующим образом:
Удаленный хост: 10.0.0.2 (IP адрес удаленного устройства)
Значение идентификатора: 10.0.0.1 (указывается IP адрес на WAN интерфейсе)
Ключ: 1234567890
Режим обмена: Main
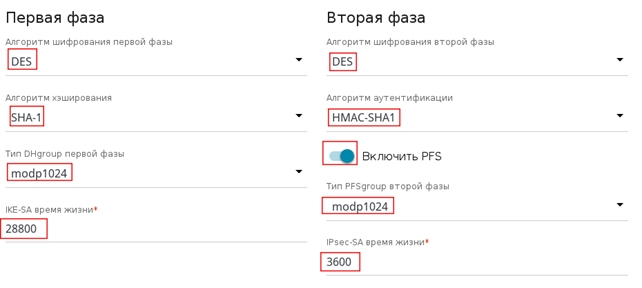
Установить настройки шифрования для этого тоннеля следующим образом:
Первая фаза
Алгоритм шифрования: DES
Алгоритм хеширования: SHA-1
Тип DH Group первой фазы: modp 1024
IKE-SA время жизни: 28800
Вторая фаза
Алгоритм шифрования: DES
Алгоритм аутентификации: HMAC-SHA1
PFS — включен
PFS group: modp 1024
IPSec-SA время жизни: 3600
Нажмите на кнопку «+» и укажите Локальная подсеть 192.168.0.0/24 , удаленная подсеть 192.168.10.0/24 и нажмите кнопку Сохранить.

Нажмите кнопку Применить
Настройка DFL-870.
Создание объектов.
Пример для CLI.
add Address IP4Address remote_dev Address=10.0.0.2
add Address IP4Address remote_net Address=192.168.0.0/24
add PSK tunkey Type=ASCII PSKAscii=1234567890
add IKEAlgorithms ike_des DESEnabled=Yes SHA1Enabled=Yes
add IPsecAlgorithms ipsec_des DESEnabled=Yes SHA1Enabled=yes
Пример для Web интерфейса.
Пройдите в Web интерфейсе Objects → Address book, нажмите кнопку Add и выберите IP4 Address.
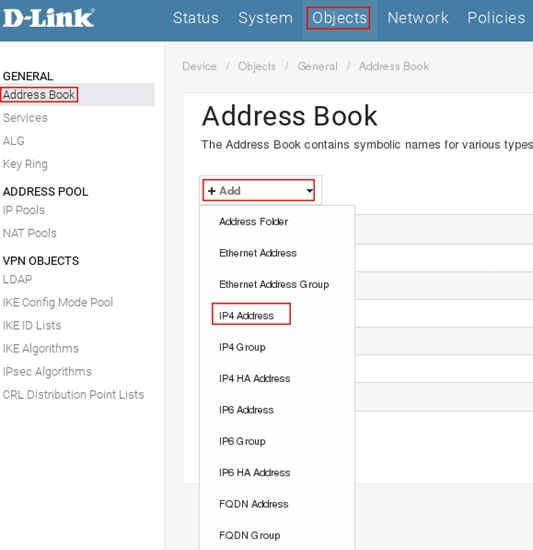
Заполните поля следующим образом:
| Name: remote_dev Address: 10.0.0.2 |
 |
Нажмите кнопку Ок.
Аналогичным образом создайте объект remote_net со следующими параметрами:
Name: remote_net
Address: 192.168.0.0/24
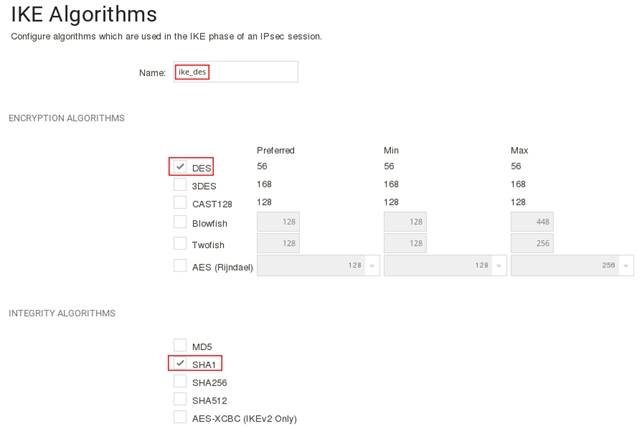
Пройдите в Web интерфейсе Objects → IKE Algorithms, нажмите кнопку Add и выберите IKE Algorithms
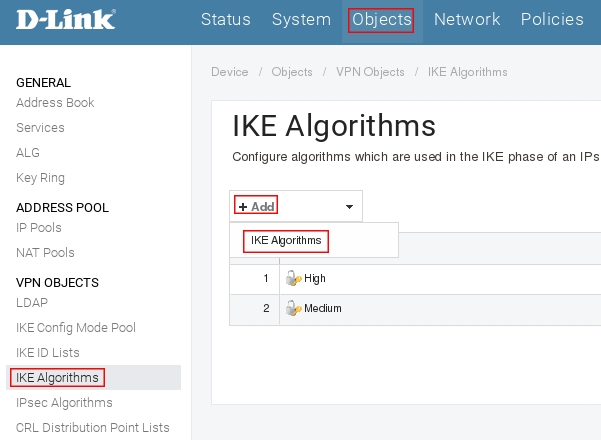
Включите протокол шифрование DES и контроль целостности sha1, в поле name укажите ike_des, затем нажмите кнопку Ок.
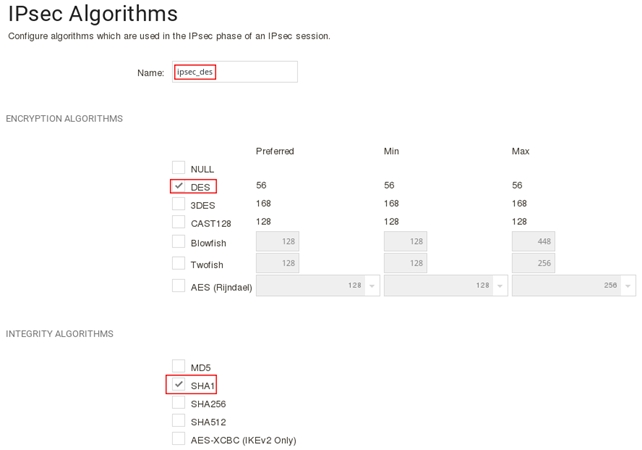
Пройдите в Web интерфейсе Objects → IPsec Algorithms, нажмите кнопку Add и выберите IPsec Algorithms.
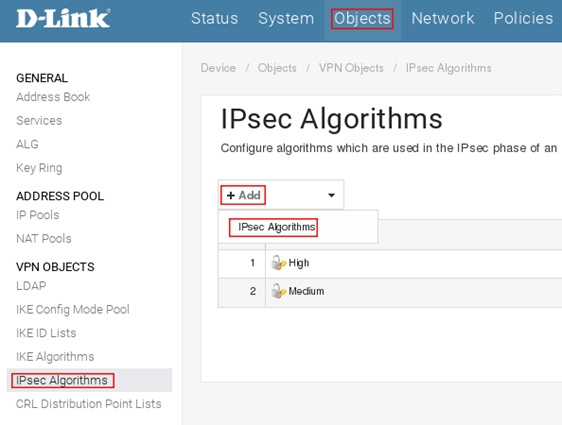
Включите протокол шифрование DES и контроль целостности sha1, в поле Name укажите ipsec_des, затем нажмите кнопку Ок.
Пройдите в Web интерфейсе Objects → Key Ring, нажмите кнопку Add и выберите Pre-Shared Key
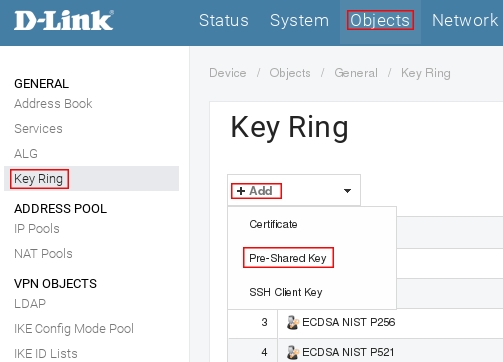
Заполните поля следующим образом:
Name: tunkey
Type: Passphrase (выбрать из выпадающего меню)
Shared Secret: 1234567890
Confirm Secret: 1234567890

Нажмите кнопку Ок.
Настройка IPsec тоннеля.
Пример для CLI.
add Interface IPsecTunnel tun PSK=tunkey LocalNetwork=InterfaceAddresses/lan1_net RemoteNetwork=remote_net RemoteEndpoint=remote_dev IKEAlgorithms=ike_des IPsecAlgorithms=ipsec_des
Пример для Web интерфейса.
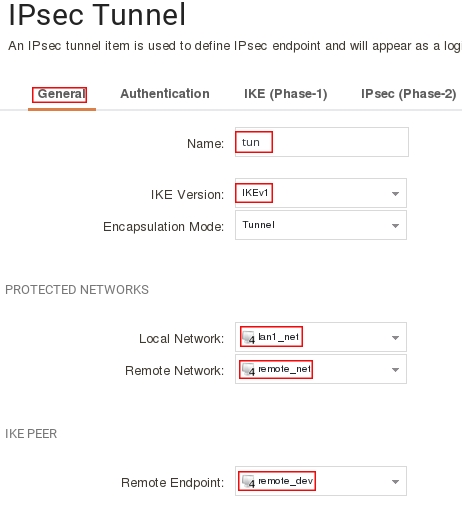
Пройдите в Web интерфейсе Network → Interfaces and VPN → IPsec нажмите кнопку Add и выберите Ipsec Tunnel.
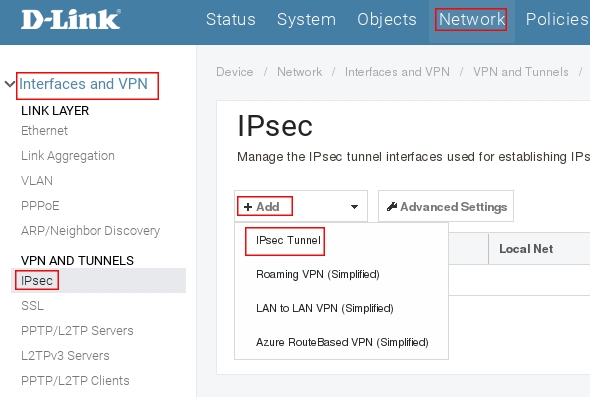
Заполните поля на вкладке General следующим образом:
Name: tun
IKE Version: IKEv1
Local Network: lan1_net (выбрать из выпадающего меню)
Remote Network: remote_net (выбрать из выпадающего меню)
Remote Endpoint: remote_dev (выбрать из выпадающего меню)
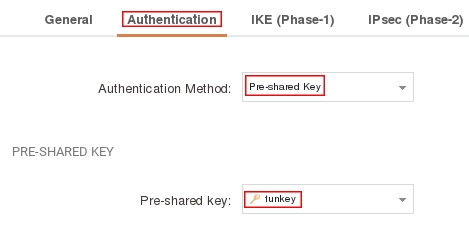
Пройдите на вкладку Authentication и заполните поля следующим образом:
Authentication Method: Pre-shared Key
Pre-shared Key: tunkey
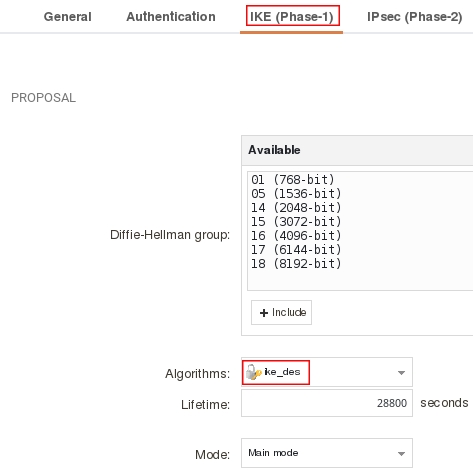
Пройдите на вкладку IKE (Phase-1) и в поле Algorithms укажите ike_des
Пройдите на вкладку IPsec (Phase-2) и в поле Algorithms укажите IPsec_des
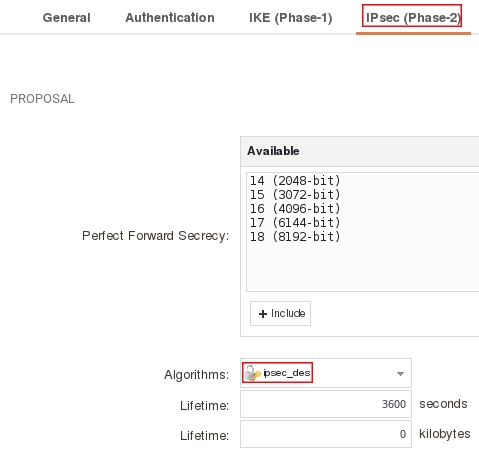
Нажмите кнопку Ок.
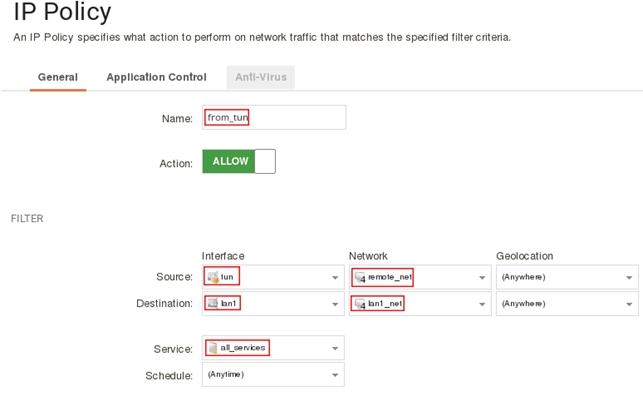
Настройка IP политик.
Пример для CLI.
add IPPolicy Name=from_tun SourceInterface=tun SourceNetwork=remote_net DestinationInterface=lan1 DestinationNetwork=InterfaceAddresses/lan1_net Service=all_services Action=Allow
add IPPolicy Name=to_tun SourceInterface=lan1 SourceNetwork=InterfaceAddresses/lan1_net DestinationInterface=tun DestinationNetwork=remote_net Service=all_services Action=Allow
Пример для Web интерфейса.
Пройдите в Web интерфейсе Policies → Firewalling → Main IP Rules, нажмите кнопку Add и выберите IP Policy.
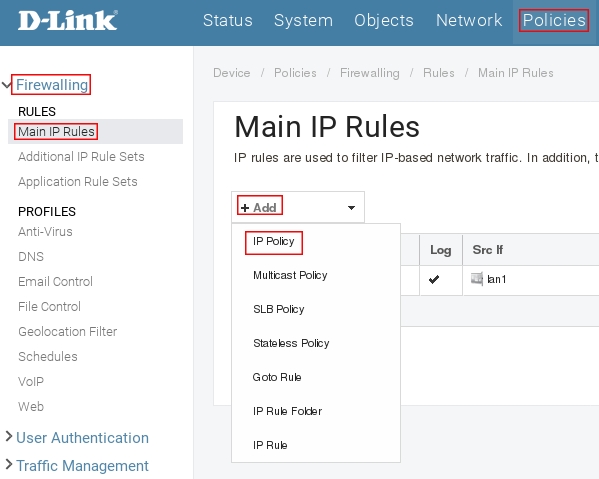
Заполните поля как показано на рисунке ниже затем нажмите кнопку Ок.
Нажмите кнопку Add и выберите IP Policy, заполните поля как показано на рисунке ниже.
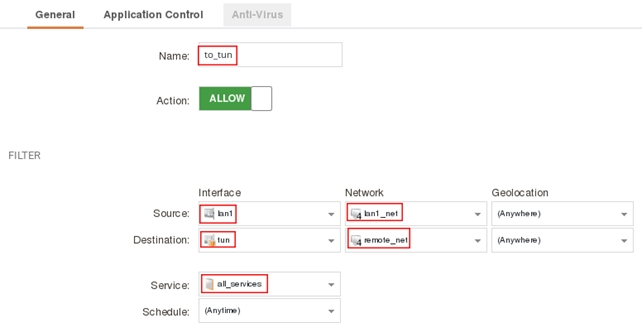
Нажмите кнопку Ок.
Сохраните и активируйте настройки.
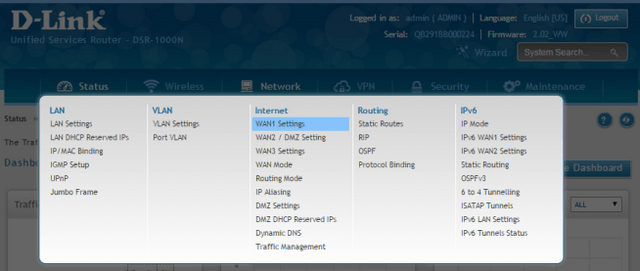
Step 1 – Setup WAN port setup DSR1
Network > WAN1 Settings
Step 2 – Here you will need to select the ISP Connection Type
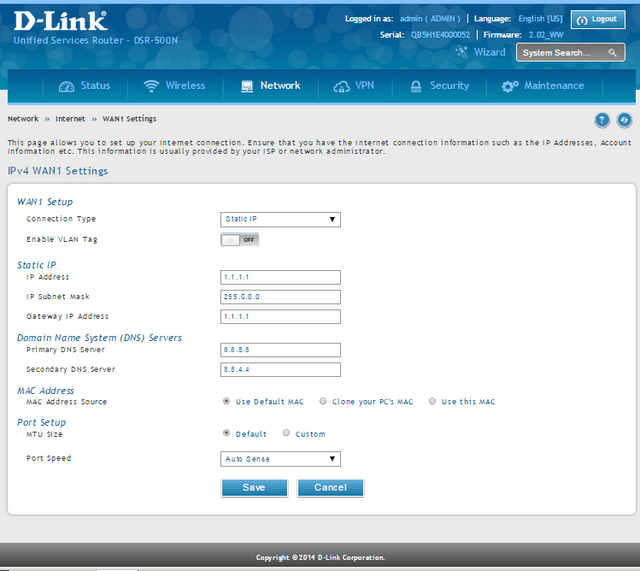
Wan1 Setup:
Connection Type: Static IP (In our example it was set as static)
IP Address: 1.1.1.1
IP Subnet Mask: 255.0.0.0
Domain Name System (DNS) Servers
Primary DNS Server: 8.8.8.8 (Google DNS)
Secondary DNS Server: 8.8.4.4 (Google DNS)
Click on “Save”
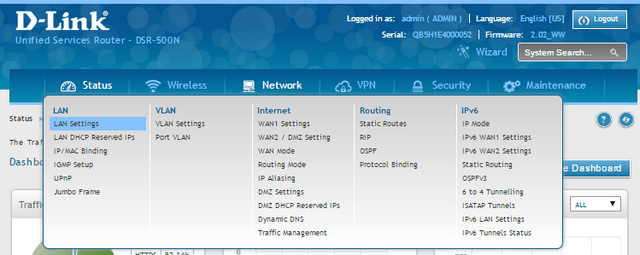
Step 3 – Setup LAN Configuration DSR1
Network > LAN Settings
Step 4 – Enter an IP address for the LAN interface and DHCP Server

In our example we have given the IP: 192.168.10.1
IP Address Setup:
IP Address: 192.168.10.1
Subnet Mask: 255.255.255.0
DHCP Setup:
DHCP Mode: DHCP Server
Starting IP Address: 192.168.10.2
Ending IP Address: 192.168.10.254
Default Gateway: 192.168.10.1
Click on “Save”
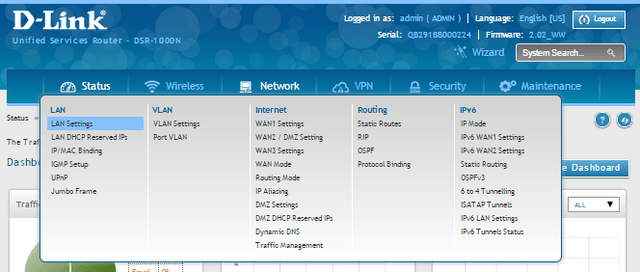
Step 4 – Setup WAN port setup DSR2
Network > WAN1 Settings
Step 5 – Here you will need to select the ISP Connection Type
Wan1 Setup:
Connection Type: Static IP (In our example it was set as static)
IP Address: 1.1.1.1
IP Subnet Mask: 255.0.0.0
Domain Name System (DNS) Servers
Primary DNS Server: 8.8.8.8 (Google DNS)
Secondary DNS Server: 8.8.4.4 (Google DNS)
Click on “Save”
Step 6 – Setup LAN Configuration DSR2
Network > LAN Settings
Step 7 – Enter an IP address for the LAN interface and DHCP Server

In our example we have given the IP: 192.168.10.1
IP Address Setup:
IP Address: 192.168.20.1
Subnet Mask: 255.255.255.0
DHCP Setup:
DHCP Mode: DHCP Server
Starting IP Address: 192.168.20.2
Ending IP Address: 192.168.20.254
Default Gateway: 192.168.20.1
VPN IPsec Setup – DSR1:
Step 8 – You will now need to setup an IPsec Policy
VPN > Policies
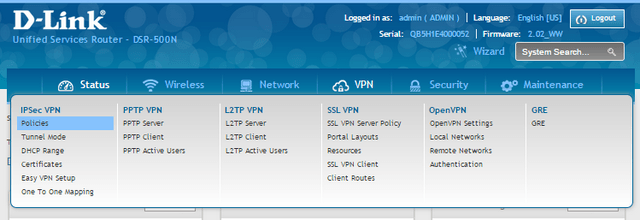
Step 9 – Click “Add New IPSec Policy” to configure a new IPsec Policy

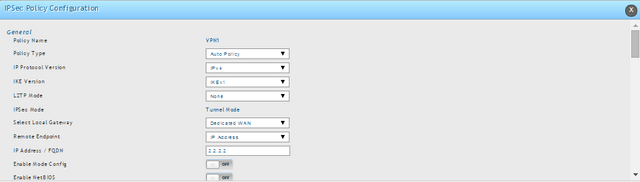
IPSec Policy Configuration
General
Policy Name: VPN1
Policy Name: Auto Policy
IP Protocol Version: IPv4
IKE Version: IKEv1
L2TP Version: None
IPSec Model Tunnel Model
Select Local Gateway: Dedicated WAN
Remote Endpoint: 2.2.2.2
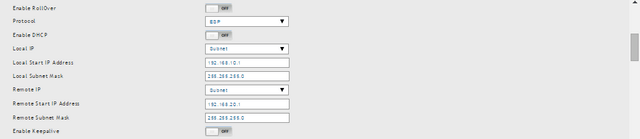
Enable DHCP: Off
Local IP: Subnet
Local Start IP Address: 192.168.10.1 (LAN IP Address of DSR1)
Local Subnet Mask: 255.255.255.0
Remote IP: Subnet
Remote Start IP Address: 192.168.20.1
Remote Subnet Mask: 255.255.255.0
Enable Keepalive: Off
Phase 1 (IKE SA Parameters)
Exchange Mode: Main
Direction Type: Both
Nat traversal: On
NAT Keep Alive Frequency: 20
Remote Identifier Type: Local Wan IP
Remote Identifier Type: Remote Wan IP

Encryption Algorithm
DES: On 3DES: On
AES-128: On AES-192: On
AES-256: On
BLOWFISH: Off
CAST128: Off

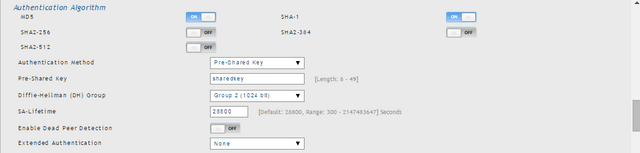
Authentication Algorithm
MD5: On SHA-1: On
SHA2-256: Off SHA2-384: Off
SHA2-512: Off
Authentication Method: Pre-Shared Key
Pre-Shared Key: sharedkey
Diffie-Hellman (DH) Group: Group: Group 2 (1024 bit)
SA-Lifetime: 28800
Enable Dead Peer Detection: Off
Extended Authentication: None
Phase2 – (Auto Policy Parameters)
SA Lifetime: 3600 Seconds
![]()
Encryption Algorithm
DES: On None: Off
3DES: On AES-128: On
AES-192: On AES-256: On
TWOFISH (128): Off TWOFISH (192): Off
TWOFISH (256): Off
BLOWFISH: Off
Integrity Algorithm
MD5: On SHA1: On
SHA2-224: Off SHA2-256: Off
SHA2-384: Off SHA2-512: Off
PFS Key Group: Off

Click “Save”
VPN IPsec Setup – DSR2:
Step 10 – You will now need to setup an IPsec Policy for the second DSR
VPN > Policies
Step 11 – Click “Add New IPSec Policy” to configure a new IPsec Policy

IPSec Policy Configuration
General
Policy Name: VPN2
Policy Name: Auto Policy
IP Protocol Version: IPv4
IKE Version: IKEv1
L2TP Version: None
IPSec Model Tunnel Model
Select Local Gateway: Dedicated WAN
Remote Endpoint: 2.2.2.2
Enable DHCP: Off
Local IP: Subnet
Local Start IP Address: 192.168.10.1 (LAN IP Address of DSR1)
Local Subnet Mask: 255.255.255.0
Remote IP: Subnet
Remote Start IP Address: 192.168.20.1
Remote Subnet Mask: 255.255.255.0
Enable Keepalive: Off

Phase 1 (IKE SA Parameters)
Exchange Mode: Main
Direction Type: Both
Nat traversal: On
NAT Keep Alive Frequency: 20
Remote Identifier Type: Local Wan IP
Remote Identifier Type: Remote Wan IP
Encryption Algorithm
DES: On 3DES: On
AES-128: On AES-192: On
AES-256: On
BLOWFISH: Off
CAST128: Off
Authentication Algorithm
MD5: On SHA-1: On
SHA2-256: Off SHA2-384: Off
SHA2-512: Off
Authentication Method: Pre-Shared Key
Pre-Shared Key: sharedkey
Diffie-Hellman (DH) Group: Group: Group 2 (1024 bit)
SA-Lifetime: 28800
Enable Dead Peer Detection: Off
Extended Authentication: None
Phase2 – (Auto Policy Parameters)
SA Lifetime: 3600 Seconds
![]()
Encryption Algorithm
DES: On None: Off
3DES: On AES-128: On
AES-192: On AES-256: On
TWOFISH (128): Off TWOFISH (192): Off
TWOFISH (256): Off
BLOWFISH: Off
CAST128: Off
Integrity Algorithm
MD5: On SHA1: On
SHA2-224: Off SHA2-256: Off
SHA2-384: Off SHA2-512: Off
PFS Key Group: Off
Click “Save”
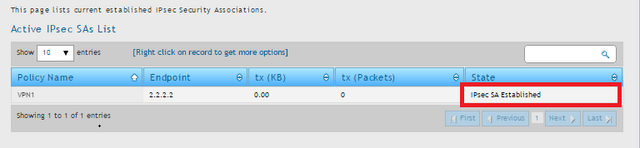
Step 12 – To view if the VPN connection has been established
STATUS > Active VPNs
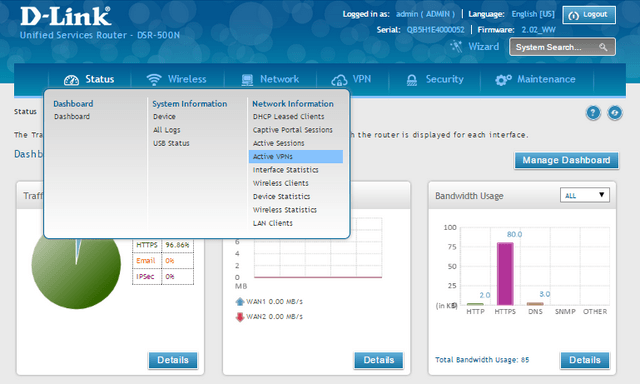
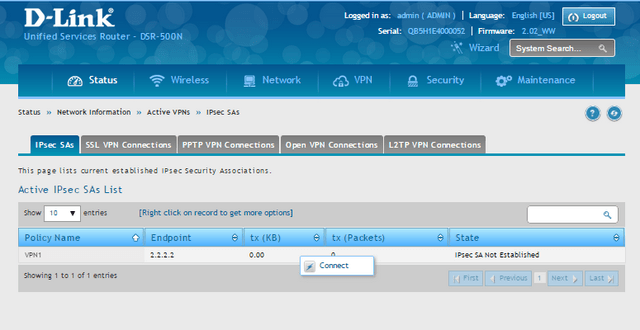
Step 13 – If you see “IPsec SA Not Established”, Right-Click on a record then click “Connect”

What is the IPsec built into the router for?
The IPsec protocol is one of the most important, used and secure VPN protocols that we can configure. IPsec will allow us to establish virtual private networks, or to connect remotely with company resources. All IPsec communications will be encrypted and authenticated, in this way, we will be providing security to the data channel and also when establishing all communications. IPsec works above the network layer, although to be able to access the IPsec service it is necessary to use the UDP 500 and 4500 protocols, since they are the default ports for this type of virtual private network.
In the case of the IPsec of this professional router, we will have the possibility of configuring the router in a fairly advanced way, configuring both phase 1 and phase 2, with different types of authentication (PSK or RSA), in addition, we can upload a CA with their corresponding digital certificates for the authentication of the different clients.
The first thing we have to do to configure the IPsec server so that the clients connect, is to enter the router via https://192.168.10.1. The default username and password is “admin”, but you must change the password after the first login. Once we have accessed the router firmware, we must go directly to the “VPN” section where we must go to the specific IPsec menus. Below, you can see step by step everything we must do.
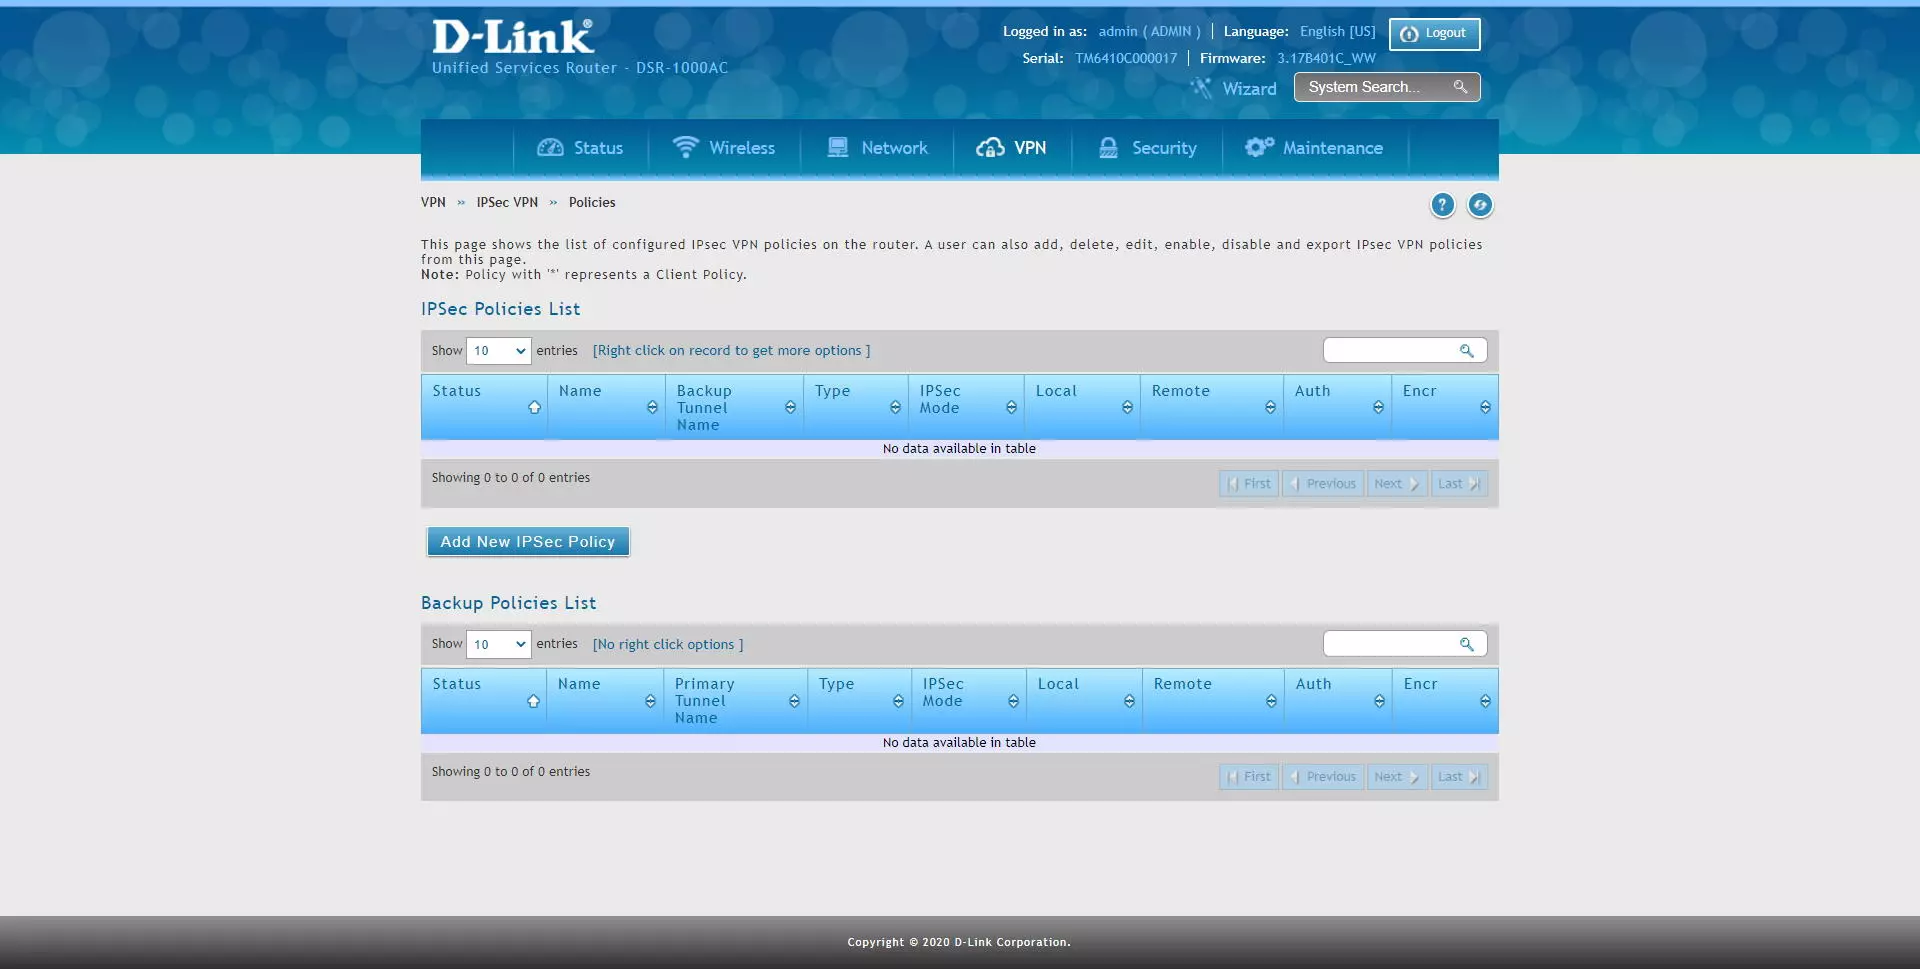
IPsec Configuration on D-Link DSR-1000AC Router
The first thing we must do to configure IPsec is to go to the “VPN / IPsec / Policies” section and a complete menu will appear where all the IPsec tunnels that we have created will be, and a button to create new IPsec tunnels to start performing VPN .

If you want to create a VPN server with IPsec to connect from Windows to the company, or to redirect traffic, we have to create a specific profile for IPsec and that is compatible with the Shrew VPN Client program, one of the most complete with respect to IPsec IKEv1 because it has all the authentication methods. In the IPsec / Policies menu, we must click on «Add New IPsec Policy»
And perform the following configuration:
- Policy Name: we give a name to the VPN profile
- Policy Type: Auto Policy
- IP protocol version: IPv4
- IKE version: IKEv1
- L2TP mode: none
- IPsec Mode: Tunnel Mode
- Select Local Gateway: Dedicated WAN
- Remote Endpoint: FQDN
- IP address / FQDN: 0.0.0.0 (this means any origin)
- Enable mode config: OFF

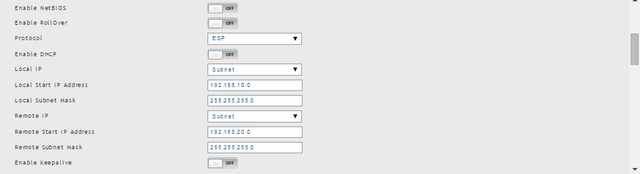
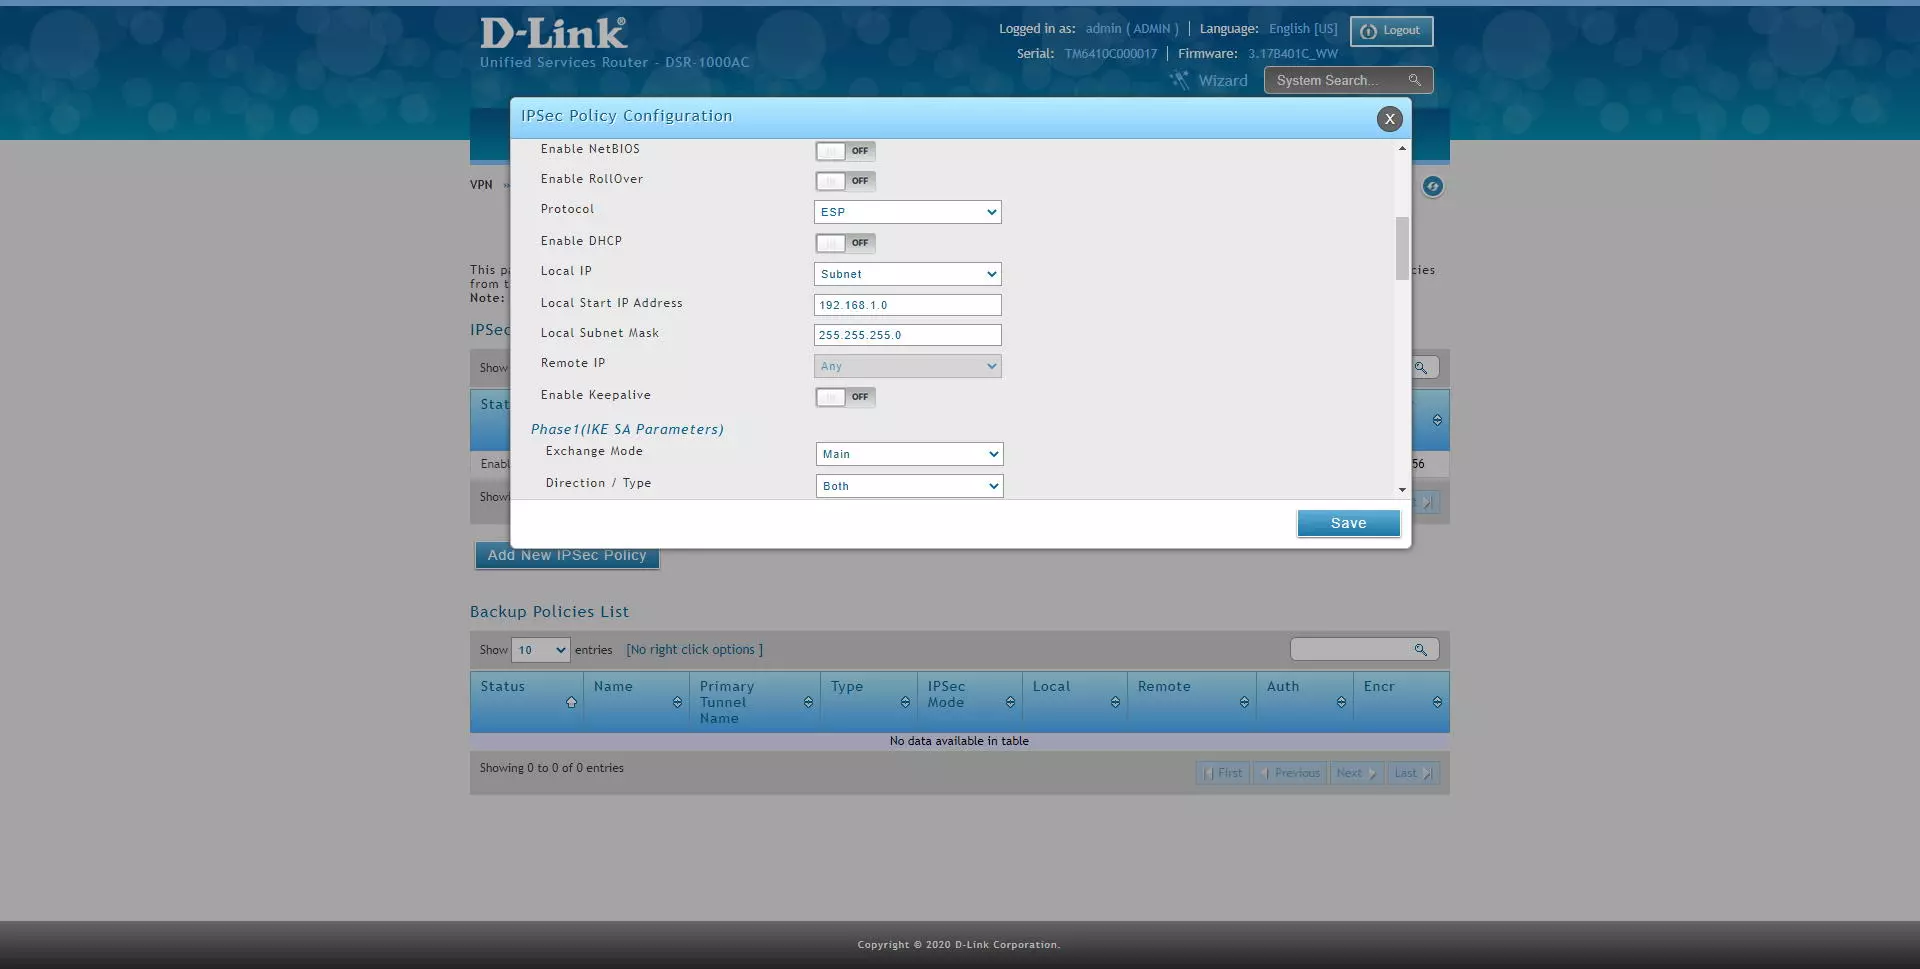
- Enable NetBIOS: OFF
- Enable RollOver: OFF
- Protocol: ESP
- Enable DHCP: OFF
- Local IP: Subnet
- Local start IP address: 192.168.1.0 (this would be our local network to share with the “remote” user)
- Local subnet Mask: 255.255.255.0 (or whatever mask we use on this subnet)
- Remote IP: any
- Enable Keepalive: we can activate or deactivate it, we leave it OFF.
Once we have configured the main IPsec parameters, we now need to configure IKE phase 1 with the SA parameters.
- Phase1 (IKE SA Parameters)
- Exchange Mode: Main (this is very important, we put Main and not Aggresive)
- Direction / Type: Both
- Phase1 (IKE SA Parameters)
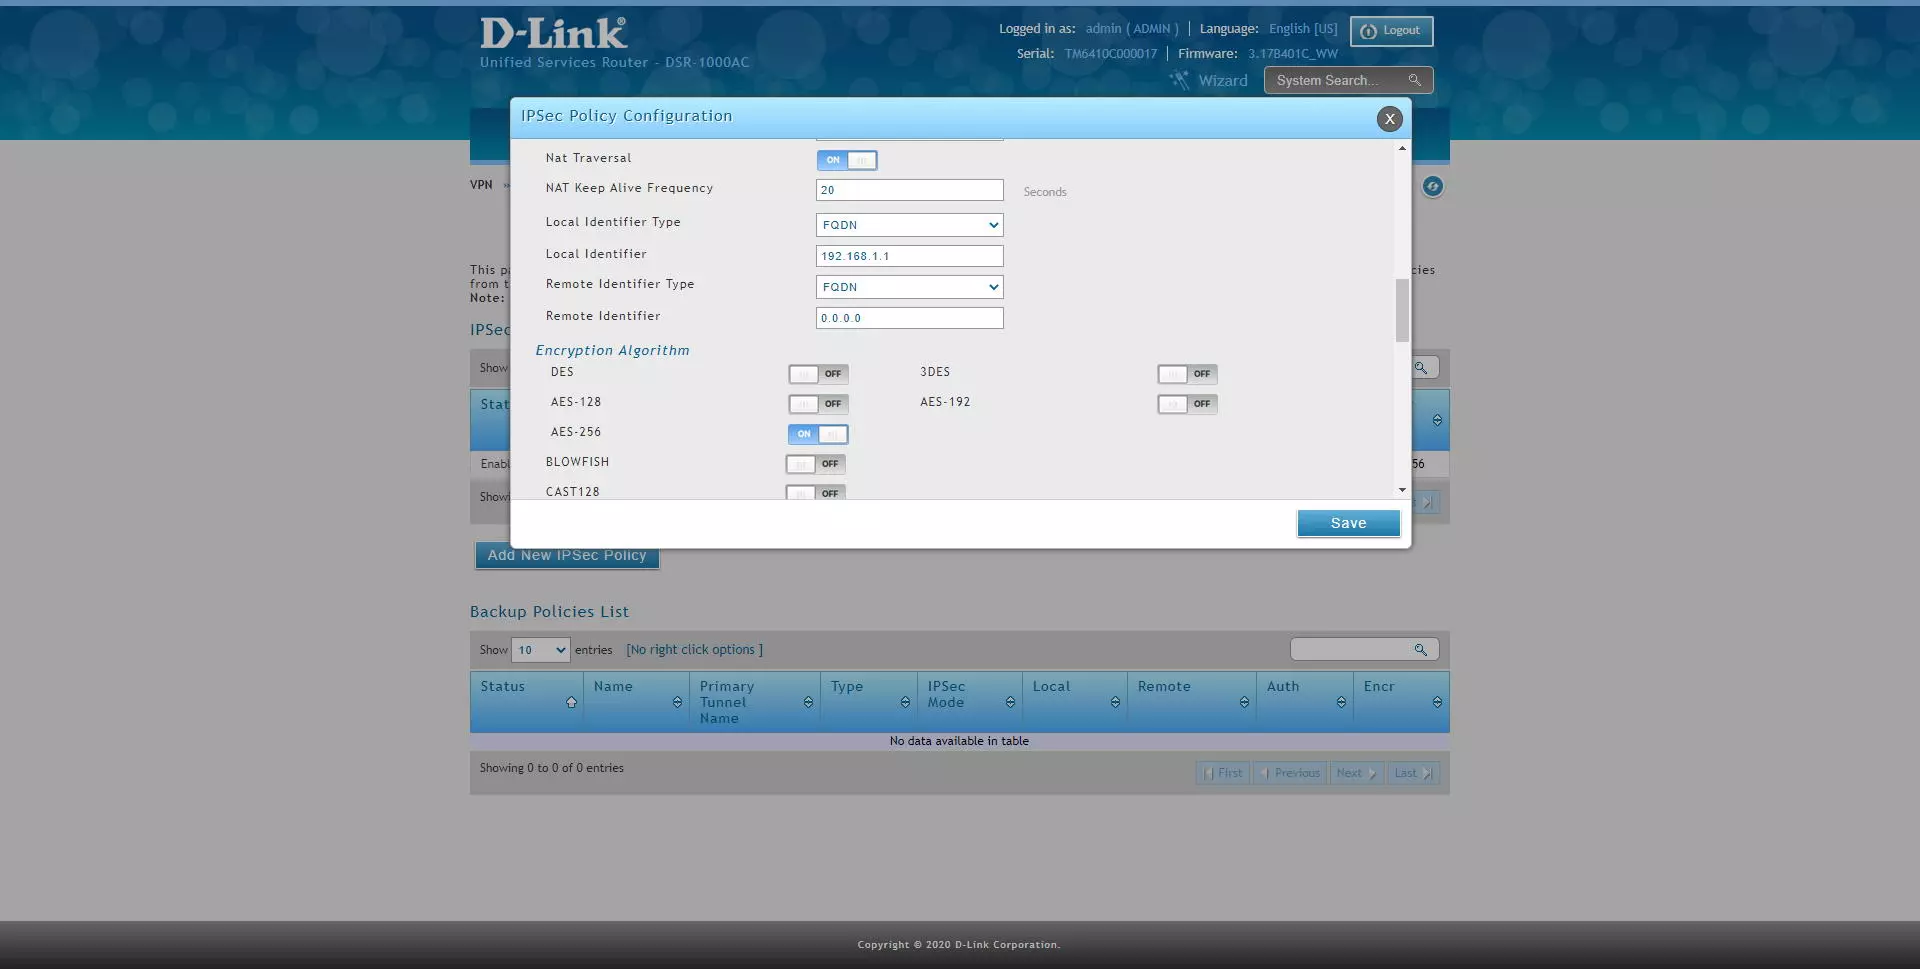
- NAT Traversal: ON
- NAT Keep Alive Frequency: 20 seconds
- Local Identifier Type: FQDN
- Local Identifier: 192.168.1.1 (we will have to put this later in the “remote identifier” of the client).
- Remote Identifier Type: FQDN
- Remote Identifier: 0.0.0.0 (any)
- Encryption: enable AES-128, AES-192 and AES-256 only.
- Phase1 (IKE SA Parameters)
- Authentication Algorithm: enable SHA2-256, SHA2-512
- Authentication method: Pre-Shared Key
- Pre-Shared Key: 12345678 (or whatever key you want)
- Diffie-Hellmann Group: DH Group 14 minimum
- SA-Lifetime: default, 28800 seconds
- Enable Dead Peer detection: optional
- Extended Authentication: None
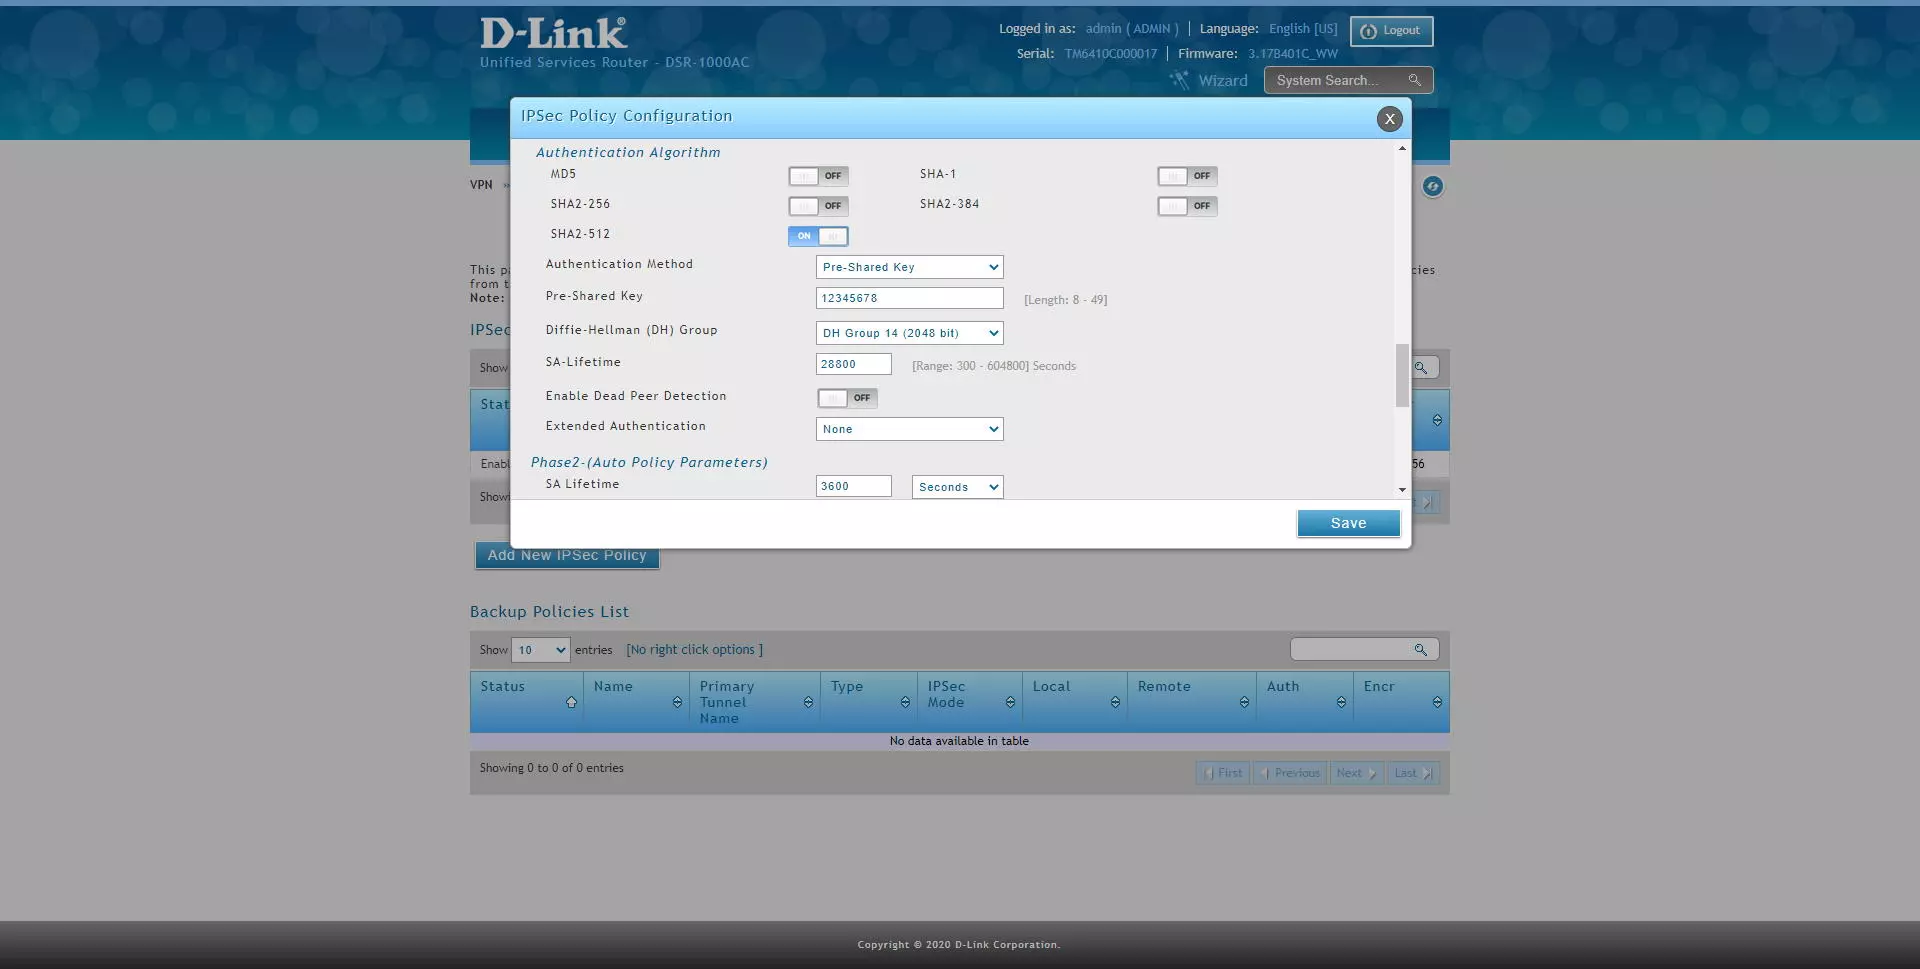
- Phase2 (Auto Policy Parameters)
- Encryption Algorithm: enable AES-128, AES-192 and AES-256, the rest do not.
- Authentication Algorithm: enable SHA2-256 or SHA2-512.
- PFS Key Group: DH Group 2 minimum.
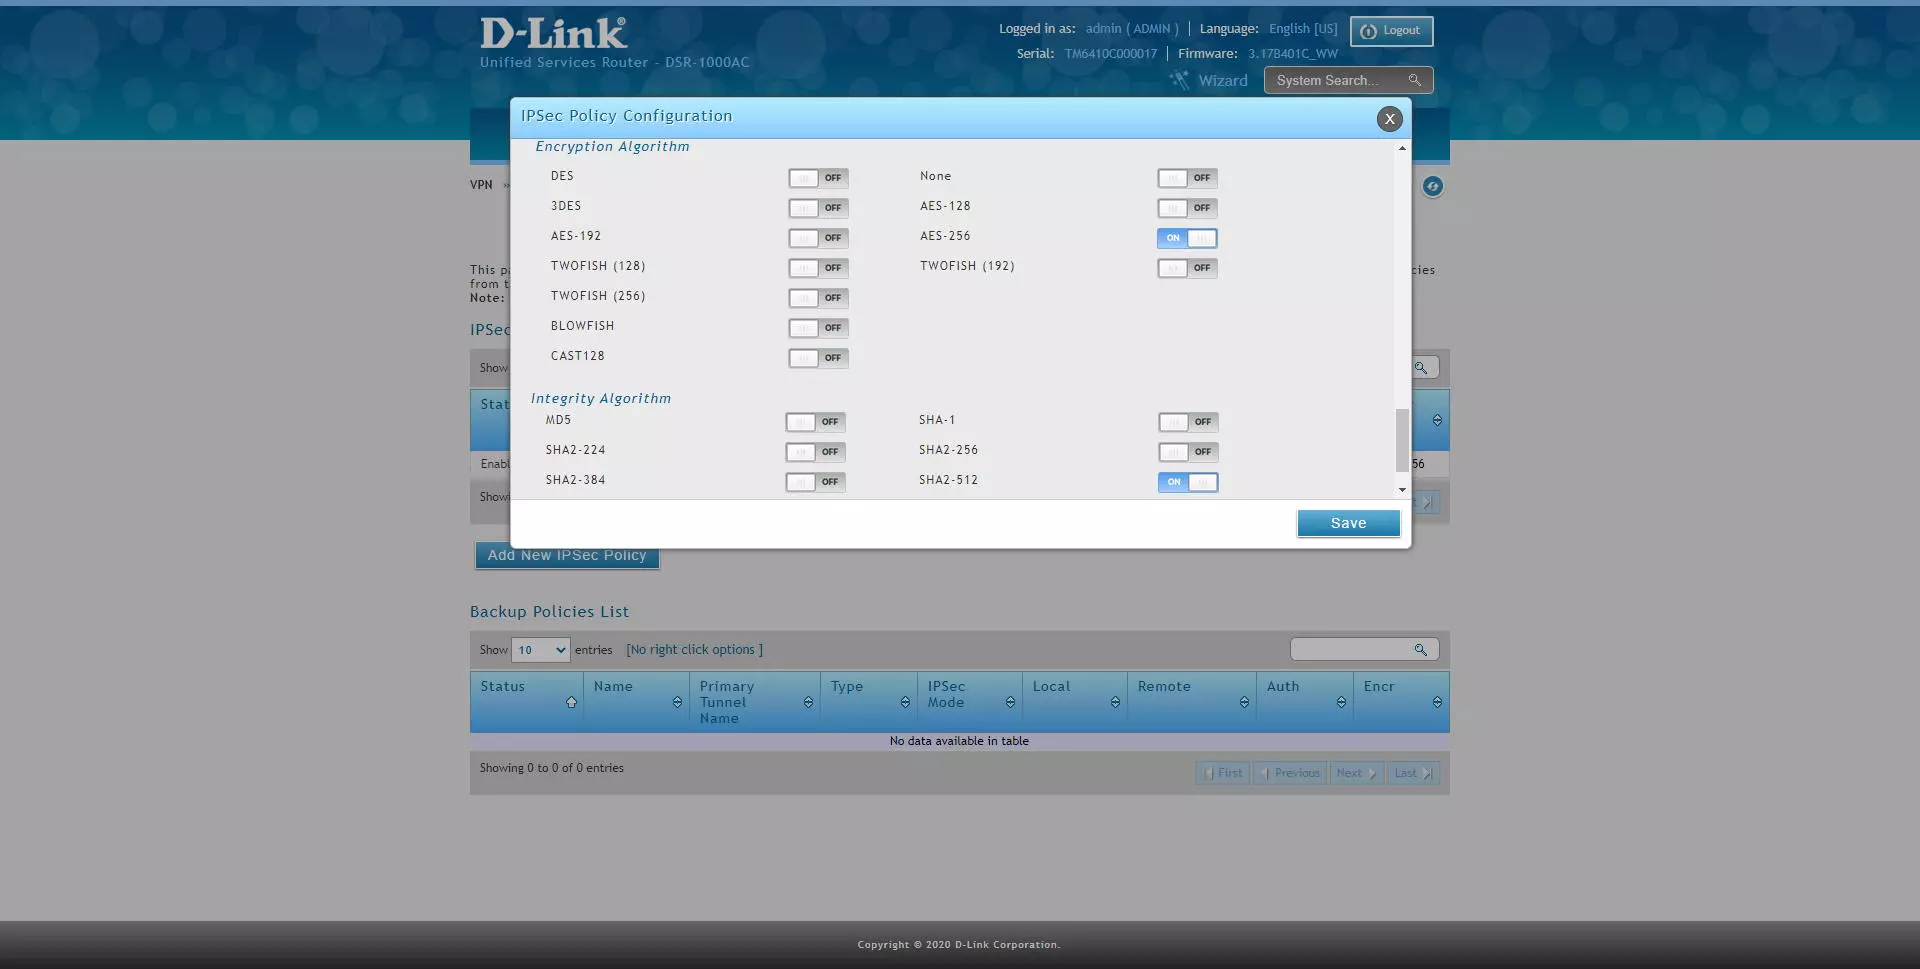
The final configuration would be the following:

Once we have correctly configured the IPsec VPN server, we now have to connect via VPN with the Shrew client for Windows.
Configuring the IPsec VPN Client with Shrew on Windows 10
The first thing we have to do is get into the Shrew’s official website and download the program for Windows 10, the installation of this program is like any other, and it is completely free, so we do not have to pay anything to download or use it. Once installed in our operating system, we open it and click on “Add” to add a new IPsec profile to the program.
In the «General» menu we must put the following:
- Host name or IP Address: we have to put our domain Dyn or No-IP, or directly the public IP.
- Port: we leave it at 500
- Auto configuration: disabled
- Local host: Use an existing adapt and current address

In the «Client» menu we must put the following:
- Firewall Options:
- NAT Traversal: enable
- NAT Transversal Port: 4500
- Keep-alive packet rate: 15 seconds
- IKE Fragmentation: enable
- Maximum packet size: 540 bytes
- Other options: check both options.

In the «Name Resolution» menu we must put the following:
- Disable DNS and also WINS.

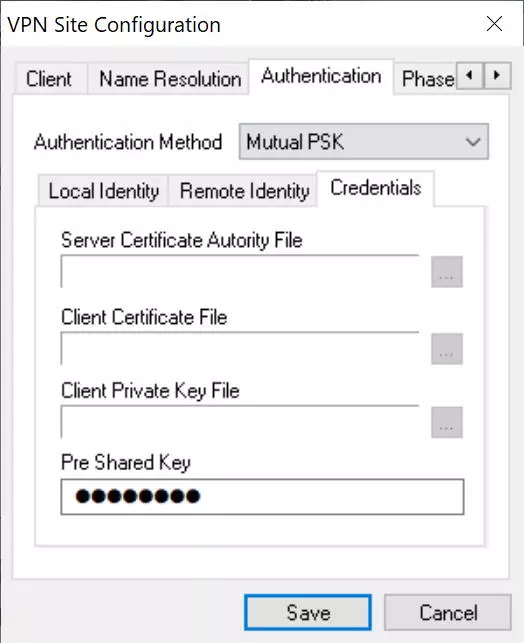
In the «Authentication» menu we must put the following:
- Authentication method: Mutual PSK
- Local Identity: IP address, and click on «Use a discovered local host address».


- Credentials: we introduce the passcode (12345678) in the «Pre-shared Key» section
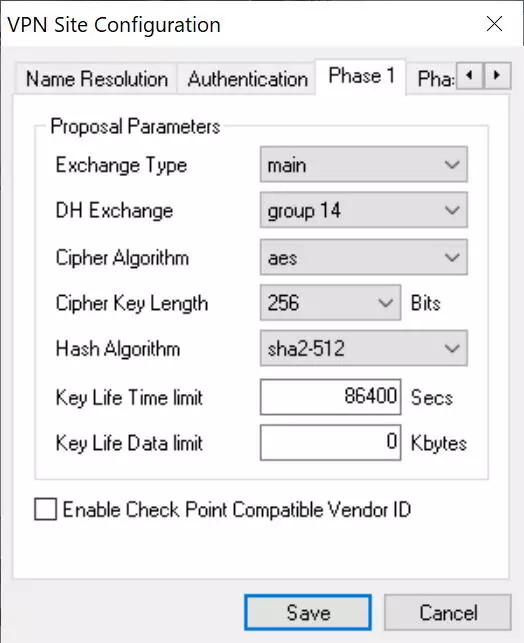
- In the “Phase 1” menu we must put everything exactly the same as in the router that we have previously configured.
- Exchange Type: main
- DH Exchange: group 14
- Cipher Algorithm: AES
- Cipher Key Length 256 bits
- Hash algorithm SHA2-512
- Key Life Time Limit: 86400, by default.
- Key Life Data Limit: 0, by default.
- In the «Phase 2» menu we must put everything exactly the same as in the router that we have previously configured.
- Transform Algorithm: ESP-AES
- Transform Key Length: 256 bits
- HMAC Algorithm: SHA2-512
- PFS Exchange: Group 2
- Compress Algorithm: disables for security
- Key Life Time Limit: 3600, by default.
- Key Life Data Limit: 0, by default.

- In the «Policy» menu we must put everything exactly the same as in the router that we have previously configured.
- Policy Generation Level: auto
- Check the option “Obtain Topology Automatically or tunnel”
If we want to access only the main remote network (192.168.1.0) we remove the option “Obtain Topology Automatically or tunnel” and manually put it below, clicking on “Add” and selecting “include” and the address of the subnet.

Once everything is configured, click on “Save” and we can start connecting.
To connect, we simply double click and in the «Connect» section we click on «Connect» and wait a few seconds.

A record of all the actions being carried out will appear, and finally it will indicate “Tunnel enabled”.

If we click on the «Network» tab, it will appear that the connection has been established correctly, as you can see here:
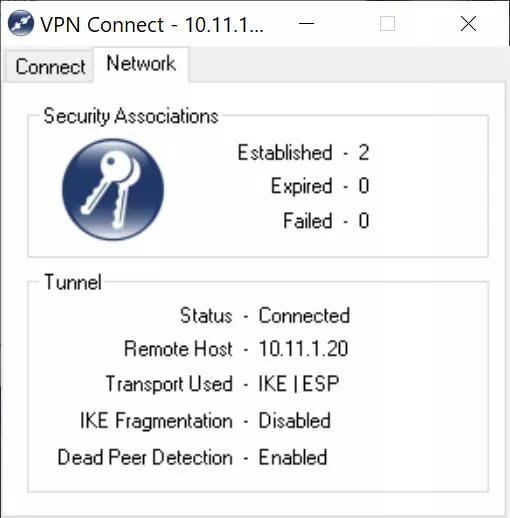
At this time we will already be securely connected to the local company or office network, thanks to the IPsec VPN protocol that we have just configured in the D-Link DSR-1000AC router. Other configurations that we could make based on this, is to configure different access policies to the different subnets, this must be done in the router itself. We could also configure an IPsec client on a mobile phone, but in these cases IPsec IKEv1 is used with xAuth, and it requires a different configuration in the router.
Вопрос: Пошаговая настройка IPSec между файерволами серии DFL и маршрутизаторами серии DSR
Ответ:
В качестве исходных данных для построения возьмём следующие данные:
1. «Центральный офис» оборудован файрволом DFL (в примере DFL‐860E, прошивка 2.40.01.08).
Параметры сети:
— Локальная сеть 192.168.9.0/24, шлюз по умолчанию в сети 192.168.9.1
— IP‐адрес выданный провайдером на WAN‐порт: 192.168.98.3
2. «Филиал» оборудован маршрутизатором DSR (в примере DSR‐500, прошивка 1.06.43WW):
Параметры сети:
— Локальная сеть 192.168.15.0/24, шлюз по умолчанию в сети 192.168.15.1
— IP‐адрес выданный провайдером на WAN‐порт: 192.168.98.2
3. Настраиваться будет туннель стандарта IPSec.
Основные параметры туннеля:
— Режим передачи\инкапсуляции данных: туннельный
— Режим шифрования данных в обоих стадиях IPSec: AES‐128
— Режим аутентификации в обоих стадиях IPSec: SHA1
— Использование ключей DH: используем 5 группу на обеих стадиях.
— Метод аутентификации – по ключу. Ключ в примере будет использоваться
«qwerty123».
— Время жизни первой стадии IPSec: 28800 сек.
— Время жизни второй стадии IPSec: 3600 сек.
Настройка туннеля со стороны DFL.
1. Создаём объект ключа аутентификации в разделе «Objects=> Authentication Objects»:

2. Создаём объект, описывающий методы аутентификации для первой стадии IPSec в разделе «Objects=>VPN Objects=>IKE Algorithms»:

3. Создаём объект, описывающий методы аутентификации для второй стадии IPSec в разделе «Objects=>VPN Objects=>IPsec Algorithms»:

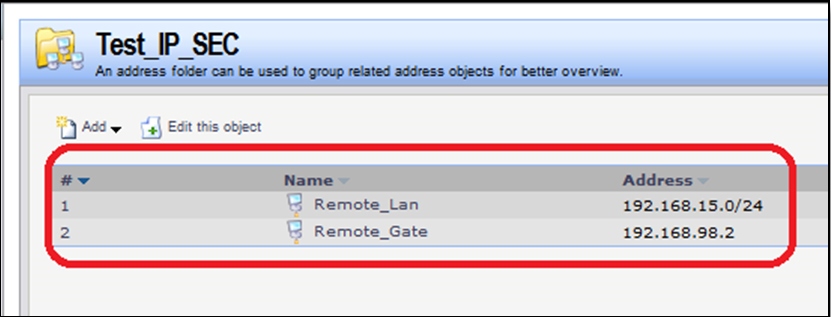
4. Создаём объекты, ip-адресов и сетей, а так же адрес удалённого шлюза (в нашем случае это будет192.168.98.2). Для удобства последующего администрирования создаём сначала отдельный каталог для этих объектов, а уже в нём будет созданы все объекты. Всё эти каталоги и объекты создаются в разделе «Objects=> Address Book»

Объект «lan_net» создавать нет необходимости, т.к. он уже создан для Lan интерфейса. Если пробрасываться в IPSec туннель будет не вся сеть, а только часть, то создаём тут же ещё 1 объект, который будет описывать локальный сегмент.
5. Создаём интерфейс IPSec в разделе «Interfaces=>IPsec».

Заполняем на первой закладке «General» поля ранее созданными объектами. Теоретически, часть данных можно было вписать в поля руками, не создавая объектов. В основном это касается адресов. Однако, если Вам придётся что-то менять, Вам придётся менять данные в ручную везде. В случае использования объектов, Вы можете просто поменять необходимые значения в объектах.
В закладе «Authentication» выбираем метод аутентификации по ключу и в выпадающем списке выбираем ранее созданный объект.
В закладке IKE Setting выбираем режим работы DH group 5 для IKE, разрешаем использование PFS и так же выбираем DH group 5. Разрешаем использование «Dead Peer Detection» (обнаружение зависших туннелей).


Остальные параметры оставляем по умолчанию.
6. Т.к. по умолчанию DFL блокирует всё, что не разрешено — создаём правила, которые разрешат трафик между сегментами.

Обращаем Ваше внимание, что правила должны быть расположены в правильном порядке с Вашими правилами.
Настройка туннеля со стороны DSR.
1. Настройка IPSec в маршрутизаторах серии DSR расположена в разделе «Setup», в подразделе «VPN Settings=>IPsec=>IPsec Policies»

Добавляем новую политику IPSec:

2. В открывшемся окне в разделе General:
Поле «Policy Name» — заполняем имя, которое нам будет удобнов. В примере: «TEST_IPSec»
Поля «IKE Version» — в нашем случае используется IPv4, соответственный параметр должен быть выбран. Так же для связи с DFL должен быть выбран «IKEv1».
Поле «IPsec Mode» — выбираем режим «Tunnel Mode»
Поле «Select Local Gateway» — выбираем интерфейс, который будет исходящий для нашего соединения. Если Вы используете WAN1, то должен быть выбран «Dedicated WAN».
Поле «Remote Endpoint» — указываете удалённый шлюз. В данном случае это будет адрес DFL: 192.168.98.3
Поле «Protocol» — выбираем ESP (шифрование данных)
В полях «Local Start IP Address» и «Local Subnet Mask» — заполняем локальные данные для этой точки. В нашем случае это 192.168.15.0 и 255.255.255.0 соответственно.
В полях «Remote Start IP Address» и «Remote Subnet Mask» — заполняем данные для удалённой сети. В нашем случае это 192.168.9.0 и 255.255.255.0 соответственно.

3. Раздел «Phase1(IKE SA Parameters)».
Поле «Exchange Mode» — выбираете тип «Main».
Поле «Direction / Type» — выбираете «Both».
Поле «Nat Traversal» — устанавливаем «On», если Ваш маршрутизатор DSR находится за NAT, иначе устанавливаем «Off».

Поле «Encryption Algorithm» — алгоритм шифрования в первой стадии IPSec. В нашем примере – AES-128.
Поле «Authentication Algorithm» — алгоритм аутентификации. Выбираем – «SHA-1».
Поле «Authentication Method» — устанавливаем в «Pre-shared key» и заполняем поле «Pre-shared key» значением из нашего примера «qwerty123».
Поле «Diffie-Hellman (DH) Group» — в соответствии с нашим примером выбираем «Group 5».
Поле «SA-Lifetime (sec)» — устанавливаем значение время жизни первой стадии – 28800 сек.
Поле «Enable Dead Peer Detection» — устанавливаем «птичку», т.е. разрешаем использование.

4. Раздел «Phase2-(Auto Policy Parameters)».
Поле «SA Lifetime» — устанавливаем время равное 3600 sec.
Поле «Encryption Algorithm» — алгоритм шифрования второй стадии IPSec – AES-128.
Поле «Authentication Algorithm» — алгоритм аутентификации. Выбираем – «SHA-1».
Поле «PFS Key Group» — устанавливаем «птичку», выбираем «Group 5».

5. Сохраняем соединение

Настройка закончена. Можно проверить соединение.
Обратите внимание, что все параметры безопасности с обеих сторон должны быть одинаковы. Иначе соединение не будет устанавливаться.
Всем привет! В этом посте я расскажу, как организовать безопасный ipsec-туннель между D-link DFL-260E (актуально для линейки устройств DFL: 210\260E\800\860E) и Mikrotik 450G. Будет много картинок и рабочий пример конфига. Так что, если у вас есть интерес к сабжу – велкам под кат.
Схема сети
Пусть у нас имеется две локальных сети, которые нужно объединить через IPsec туннель.
Сеть A (DFL – 192.168.0.1/24) и сеть B (Mikrotik – 192.168.1.1/24). Выглядит это все примерно так:
Также обращаю внимание, что у вас должно быть два публичных статических белых адреса для обоих маршрутизаторов. В принципе, если у вас в этой схеме будет два Mikrotik, то это не обязательно, т.к. в свежих версиях они поддерживают такую фишку, как IP Cloud, где в роли IPsec-endpoint может выступать не ip адрес, а символическое имя. Но у меня был DFL, поэтому статика.
Подготовка
Во время активного изучения сабжа на этих железках я узнал про несколько грабель. Первые из них состоят в том, что по-умолчанию DFL-260e (прошивка RU) не подерживает необходимые для IPSec алгоритмы шифрования (3Des, AES), а работает только с теми(NULL, DES), которые подвластны нашим чекистам. Полноценное шифрование доступно в общемировой (WW) прошивке. Так что первым делом обновляем прошивку стандартными средствами. На российском FTP D-Link вы их не найдете. Я нашел свежую прошивку на этом сайте. Качал версию 6310-DFL-260E_Ax_FW_v2.60.02.02-upgrade.img
После обновления роутер перезагрузится и вы увидите новый интерфейс. Настройки должны сохраниться Не скажу, что он стал симпатичнее, но менее топорный это точно.
DFL-210, DFL-800, DFL-1600. How to setup IPSec VPN connection with DI-80xHV
Настраиваем на нём доступ в интернет, работу LAN, DHCP, т.е. всё, как обычно. Единственный момент, у меня были какие-то грабли при предыдущей настройке, поэтому у меня вся сеть сидит не в LAN сегменте, а в DMZ. Знаю, что неправильно, граблей уже и не помню, поэтому держите в уме, что в сети А, DMZ – это по сути LAN.
Теперь займемся подготовкой Mikrotik. Там уже не просто прошивка, а вполне себе система пакетного менеджмента, поэтому обновляем пакеты в System -> Packages.
ПО обновили, доступ к интернету настроили с обоих концов, проверили пинги по публичным адресам из обеих подсетей. Тогда всё ок, можно начинать.
Настраиваем туннель со стороны DFL-260E
Первым делом создаём в адресной книги объекты удалённой сети (Network) и точки туннеля (Endpoint).
К чести D-link, он умеет работать с endpoint с динамическим IP адресом. Для этого надо перед IP прописать в виде dns:hostname.com
Дальше создаём в Objects -> Address book -> Keyring) PSK-key, по сути пароль от туннеля.
После этого определем алгоритмы шифрования IKE (Objects -> VPN objects -> IKE Algrithms)…
и алгоритмы шифрования IPSec (Objects -> VPN objects -> IPSec Algrithms).
Теперь у нас есть все данные, чтобы создавать сам туннель (Network -> VPN and tunnels -> IPSec).
После сохранения и применения настроек (Configuration -> Apply configuration) у вас среди маршрутов должны появиться автоматические маршруты созданные для туннеля.
Осталось добавить правила, чтобы трафик мог ходить по туннелю (Network -> Policies -> Firewalling). Я разрешил пинг везде, а для тоннелей создал отдельную папку с правилами.
Ок, применяем настройки и идём настраивать другой конец.
Настраиваем Mikrotik
Подклбчаемся по WinBox / WebFig к роутеру и идём в IP -> IPSec -> Policies. Добавляем туда новую политику для ipsec.
Теперь идём в IP->IPSec->Peers и добавляем DFL-ку.
Дальше добавляем сведения об используемых алгоритмах шифрования.
Теперь идём в Interfaces и добавляем IPIP-туннель.
Настройки применяются мгновенно, так что по идее после этого мы должны увидеть сертификаты поднятого туннеля со стороны Mikrotik…
И со стороны DFL (Status->Subsystems->IPSec)…
Дальше настраиваем Firewall. Столбец “In Interface” = ether1-gateway (интерфейс, торчащий в интернет).
Не забываем про NAT для новой сети (порядок правил важен, надо выше masquerade).
Это кусок дефолтовой конфигурации, я его не трогал.
Маршруты выставились так:
Теперь, чтобы трафик шел от Mikrotik в сторону DFL нужно добавить соответствующий маршрут. В графе Dst Address пишем сеть назначения (сеть DFL), в поле gateway указываем интерфейс туннеля, а в поле Pref.Source указываем адрес Mikrotik с этой стороны туннеля.
Если будете настраивать динамический конец туннеля (IPCloud), то оно в секции IP.
Если вы внесли изменения в тоннель и он упал
Немного о возможных ошибках в логах DFL:
1. statusmsg=«No proposal chosen» — не правильно выбраны методы шифрования
2. reason=«Invalid proposal» — то же, что и п.1
3. reason=«IKE_INVALID_COOKIE» — туннель уже был поднят, но после этого были внесены изменения в его настройки. Заходим на DFL «Status->IPsec->Habratest_cloud_IPsec->справа вверху страницы List all active IKE SAs» и удаляем устаревший IKE SA. Перезагружаем DFL
Заключение
Что мне понравилось в Microtik, так это продуманность. Да, есть грабли, но в общем чувствуется, что железка создана что называется админом для админа. Одно то, что в Firewall показывается в real-time режиме количество пакетов по каждому правилу чего стоит. Конечно лучше использовать железки одного вендора, но, как показала практика связать DFL и Mikrotik вполне реально. За рамками статьи остались вопросы бенчмаркинга туннелей, и переача трафика последовательно через несколько туннелей, но думаю в будущем я посвещу отдельную статью этим вопросам.
Дальше приведу пример конфига Microtik, а ссылки, вы, как всегда найдёте в конце статьи. Удачи, траварищи!
Конфигурация Microtik
|
1 2 3 4 5 6 7 8 9 10 11 12 13 14 15 16 17 18 19 20 21 22 23 24 25 26 27 28 29 30 31 32 33 34 35 36 37 38 39 40 41 42 43 44 45 46 47 48 49 50 51 52 53 54 55 56 57 58 59 60 61 62 63 64 65 66 67 68 69 70 71 72 73 74 75 76 77 78 79 80 81 82 83 84 85 86 87 88 89 90 91 92 93 94 95 96 97 98 99 100 101 102 103 104 105 106 107 |
[admin@MikroTik] > export # nov/11/2015 11:13:16 by RouterOS 6.33 # software id = INCX-QEFK # /interface ethernet set [ find default—name=ether1 ] name=ether1—gateway set [ find default—name=ether2 ] name=ether2—master—local set [ find default—name=ether3 ] master—port=ether2—master—local name=ether3—slave—local set [ find default—name=ether4 ] master—port=ether2—master—local name=ether4—slave—local set [ find default—name=ether5 ] master—port=ether2—master—local name=ether5—slave—local /interface ipip add allow—fast—path=no !keepalive local—address=192.168.1.1 name=ipip—tunnel1 remote—address=\ 192.168.0.1 /ip neighbor discovery set ether1—gateway discover=no /ip ipsec proposal set [ find default=yes ] enc—algorithms=aes—128—cbc pfs—group=none /ip pool add name=dhcp ranges=192.168.1.100—192.168.1.254 /ip dhcp—server add address—pool=dhcp disabled=no interface=ether2—master—local name=default /snmp community set [ find default=yes ] name=snmp_secured /system logging action add memory—lines=100 name=ipsec target=memory /ip address add address=192.168.1.1/24 comment=«default configuration» interface=ether2—master—local \ network=192.168.1.0 add address=213.79.xx.92/29 comment=External—at—eth1 interface=ether1—gateway network=\ 213.79.xx.88 /ip cloud set ddns—enabled=yes /ip dhcp—client add comment=«default configuration» dhcp—options=hostname,clientid disabled=no interface=\ ether1—gateway /ip dhcp—server network add address=192.168.1.0/24 comment=«default configuration» gateway=192.168.1.1 netmask=24 /ip dns set allow—remote—requests=yes servers=62.117.122.49,212.45.2.5 /ip dns static add address=192.168.1.1 name=router /ip firewall filter add chain=forward comment=«Allow PING forward from IPSEC tolan» dst—address=192.168.1.0/24 \ protocol=icmp src—address=192.168.0.0/24 add chain=output comment=«Allow PING outbound» protocol=icmp add chain=input comment=«Allow WinBox from external» dst—port=8291 protocol=tcp add chain=input comment=«Allow WebFig from external» dst—port=80 protocol=tcp add chain=input comment=«Allow snmp from external» dst—port=161 protocol=udp add chain=input comment=«Allow IPSEC-esp» protocol=ipsec—esp add chain=input comment=«Allow IKE» dst—port=500 protocol=udp add chain=input comment=«Allow IPSEC-ah» disabled=yes protocol=ipsec—ah add chain=input comment=«Allow UDP» protocol=tcp add chain=input comment=«default configuration» protocol=icmp add chain=input comment=«default configuration» connection—state=established,related add action=drop chain=input comment=«default configuration» in—interface=ether1—gateway add action=fasttrack—connection chain=forward comment=«default configuration» \ connection—state=established,related add chain=forward comment=«default configuration» connection—state=established,related add action=drop chain=forward comment=«default configuration» connection—state=invalid add action=drop chain=forward comment=«default configuration» connection—nat—state=!dstnat \ connection—state=new in—interface=ether1—gateway /ip firewall nat add chain=srcnat comment=«For IPSEC tunnel» dst—address=192.168.0.0/24 log=yes out—interface=\ ether1—gateway src—address=192.168.1.0/24 add action=masquerade chain=srcnat comment=«default configuration» out—interface=\ ether1—gateway /ip ipsec peer add address=77.37.xx.78/32 enc—algorithm=aes—128 local—address=0.0.0.0 mode—config=\ request—only secret=SOMESECRET /ip ipsec policy set 0 disabled=yes add dst—address=192.168.0.0/24 sa—dst—address=77.37.xx.78 sa—src—address=213.79.xx.92 \ src—address=192.168.1.0/24 tunnel=yes /ip route add comment=«Default route» distance=10 gateway=ether1—gateway add disabled=yes distance=1 dst—address=192.168.0.0/24 gateway=ipip—tunnel1 pref—src=\ 192.168.0.1 /ip service set telnet disabled=yes set ftp disabled=yes set ssh disabled=yes /snmp set contact=Andrey enabled=yes location=Home trap—version=2 /system clock set time—zone—name=Europe/Moscow /system logging add action=ipsec topics=ipsec /tool graphing interface add allow—address=192.168.0.0/24 interface=ipip—tunnel1 add allow—address=192.168.0.0/24 interface=ether1—gateway /tool graphing resource add allow—address=192.168.0.0/24 /tool mac—server set [ find default=yes ] disabled=yes add interface=ether2—master—local add interface=ether3—slave—local add interface=ether4—slave—local add interface=ether5—slave—local /tool mac—server mac—winbox set [ find default=yes ] disabled=yes add interface=ether2—master—local add interface=ether3—slave—local add interface=ether4—slave—local add interface=ether5—slave—local /tool romon port set [ find default=yes ] cost=100 forbid=no interface=all secrets=«» add cost=100 disabled=yes forbid=no interface=all secrets=«» |
Ссылки
http://www.dlinkmea.com/site/index.php/site/productDetails/209
Настройка vpn ipsec между Mikrotik RouterOS и D-Link DFL-860e
Настройка роутера микротик RB751/RB951 на примере провайдера InterZet
http://habrahabr.ru/sandbox/67736/
http://wiki.pcsinfo.hr/doku.php/mikrotik/ipip_with_ipsec_transport_mikrotik_to_mikrotik
http://it-mehanika.ru/index.php?option=com_content&view=article&id=194:-ipsec-mikroti-g-draytek-vigor&catid=50:mikrotik&Itemid=29http://mikrotik.ru/forum/viewtopic.php?f=15&t=4928&sid=3c27171adab308c3b9b0697e8da6af06&start=10
VPN:IPsec_(аутентификация_с_помощью_сертификата)