By default, the Windows Firewall with Advanced Security blocks ICMP Echo Requests (Pings) from the network. In this post, we will show you how to allow Pings (ICMP Echo requests) through your Windows Firewall using Command Prompt or via the Windows Firewall with Advanced Security UI.
Should I enable ICMP?
For many network administrators, they consider the Internet Control Message Protocol (ICMP) a security risk, and therefore as a security measure, should have ICMP always be blocked at the firewall. In as much as ICMP is widely known to have some security issues associated with it, and for just that reason, ICMP should be blocked; it’s still no reason to block all ICMP traffic!
What ICMP types should I allow?
Apart from Type 3 and Type 4 – the only essential ICMP traffic you need to allow in and out of your firewall on your Windows 10/11 PC, everything else is either optional or should be blocked. Bear in mind that to send ping requests, you need to allow type 8 OUT and type 0 IN.
Generally, the way the ping command works amongst other network tools, is simply by sending special packets known as Internet Control Message Protocol (ICMP) Echo Requests to a target device, and then wait for that receiving device to respond and send back an ICMP Echo Reply packet. This action of pinging, apart from testing whether a network-connected device is active, it also measures the response time and outputs the result for you to review.
We can allow Pings (ICMP Echo requests) through your Firewall on Windows 10 or Windows 11 PC in either of two ways. We’ll explore this topic under the methods outlined below as follows.
Note: If you have a third-party security software with its own firewall installed on your system or just another type of dedicated third-party firewall program installed, you’ll need to open ports in that firewall instead of the in-built Windows Firewall.
1] Allow Pings (ICMP Echo requests) through Firewall on Windows PC via Windows Firewall with Advanced Security UI
To allow Pings (ICMP Echo requests) through Firewall on Windows PC via Windows Firewall with Advanced Security user interface, do the following:
- Click Start or press the Windows key on the keyboard.
- Type windows firewall, and then select Windows Defender Firewall from the top of the search result.
- Click the Advanced settings link on the left side of the Control Panel window that opens.
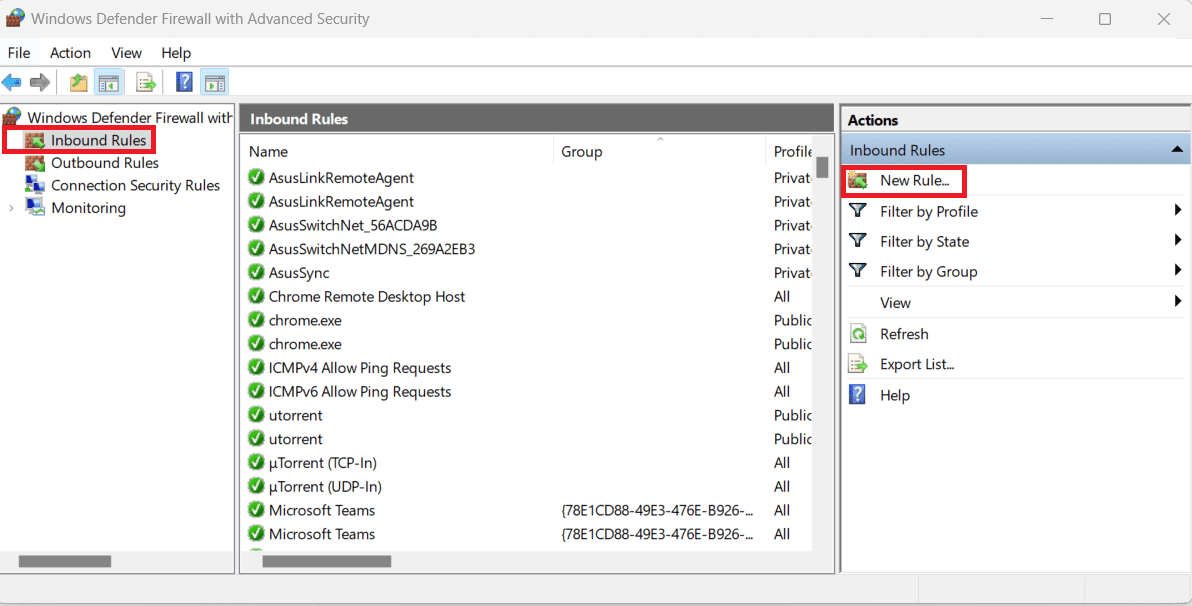
- In the left pane, right-click Inbound Rules and choose New Rule.
- In the New Inbound Rule window, select Custom.
- Click Next.
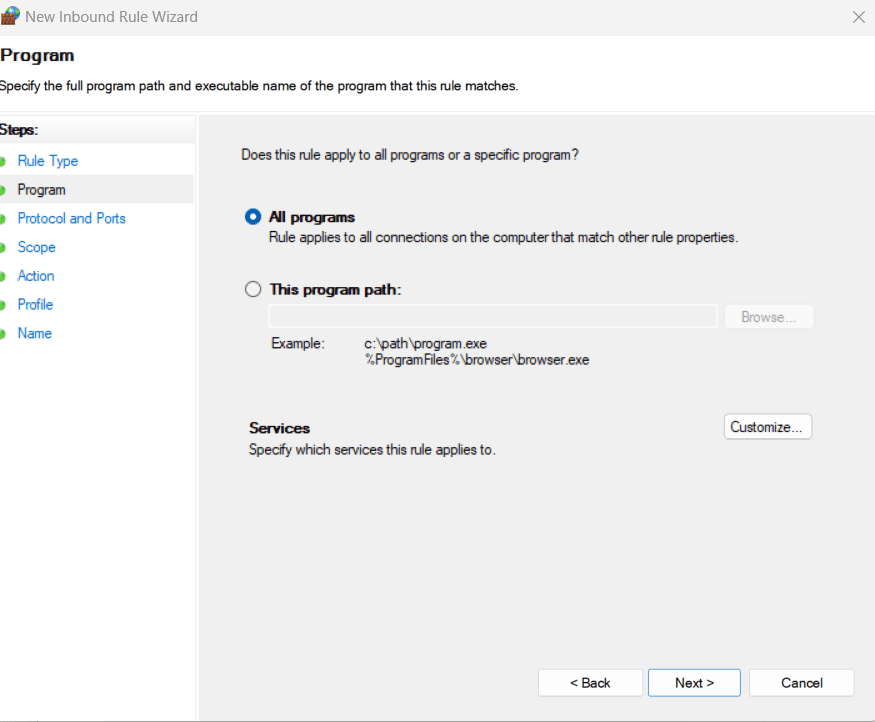
- On the Does this rule apply to all programs or specific programs? page, make sure the radio button is selected for All programs.
- Click Next.
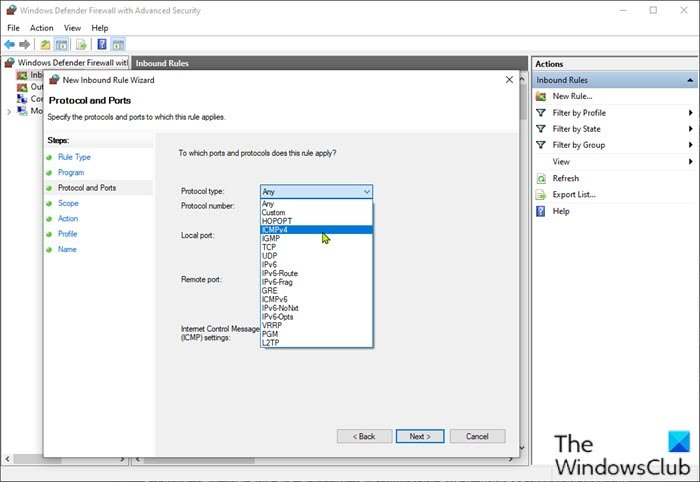
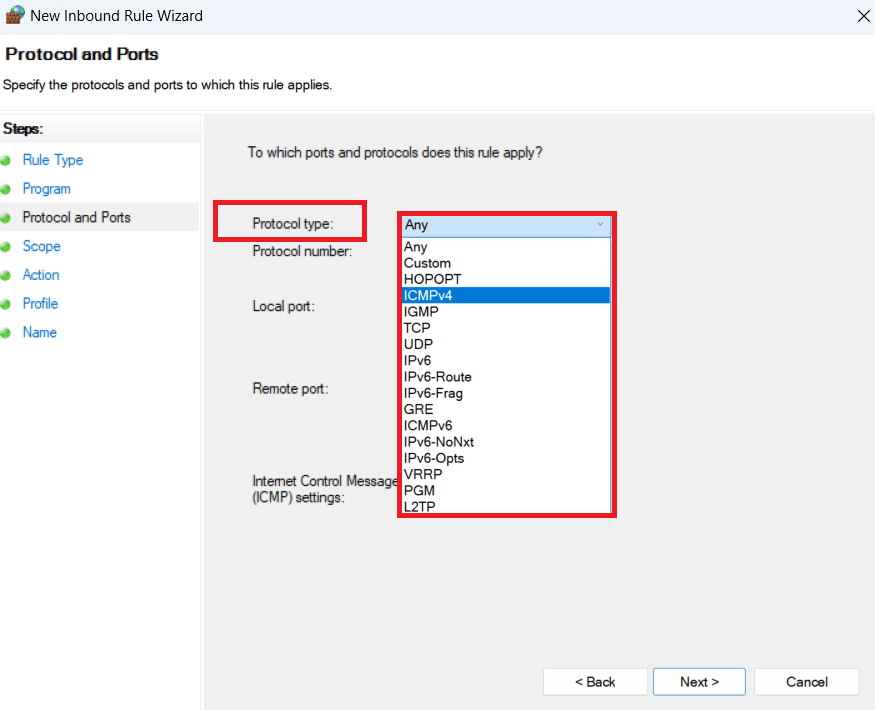
- On the To which ports and protocol does this rule apply? page, click the Protocol type drop-down, and select ICMPv4.
- Click the Customize button.
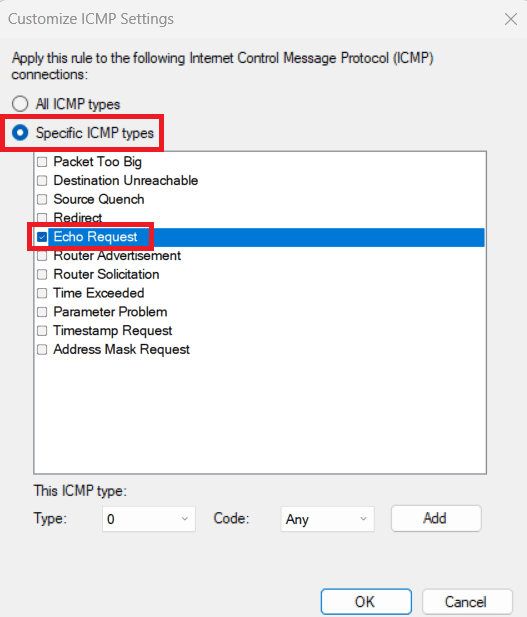
- In the Customize ICMP Settings window, select the Specific ICMP types option.
- In the list of ICMP types, enable Echo Request.
- Click OK.
- Back on the To which ports and protocol does this rule apply? page, click Next.
- On the page that appears, select the radio button for Any IP address option for under the Which local IP addresses does this rule apply to? and Which remote IP addresses does this rule apply to? sections.
If you want, you can configure specific IP addresses to which your PC will respond to a ping request. Other ping requests are ignored.
- On the What action should be taken when a connection matches the specified conditions? page, make sure the radio button is selected for Allow the connection option.
- Click Next.
- On the When does this rule apply page, check/uncheck the available options per your requirement.
- Click Next.
- At the final screen, you need to give your new rule a name, and optionally provide a description. It’s recommended to add ICMPv4 to the rule name to differentiate from the ICMPv6 rule that you will create also.
- Click the Finish button.
Now, you can go ahead and create the ICMPv6 rule by repeating the steps above, but this time at the To which ports and protocol does this rule apply? page, click the Protocol type drop-down, and select ICMPv6 instead.
- Exit Windows Defender Firewall when done.
If at anytime you want to disable the rule, open Windows Firewall with Advanced Security Control Panel, select Inbound Rules on the left, and locate the rules you created in the middle pane, right-click the rule and choose Disable. These rules can also be deleted – but it’s best just disabling the rules instead, so you can easily and quickly re-enable them without recreating them.
2] Allow Pings (ICMP Echo requests) through Firewall on Windows PC using Command Prompt
This is the fastest way to create an exception for ping requests on Windows 11/10.
To allow Pings (ICMP Echo requests) through Firewall on Windows PC using Command Prompt, do the following:
- Press Windows key + R to invoke the Run dialog.
- In the Run dialog box, type cmd and then press CTRL + SHIFT + ENTER to open Command Prompt in admin/elevated mode.
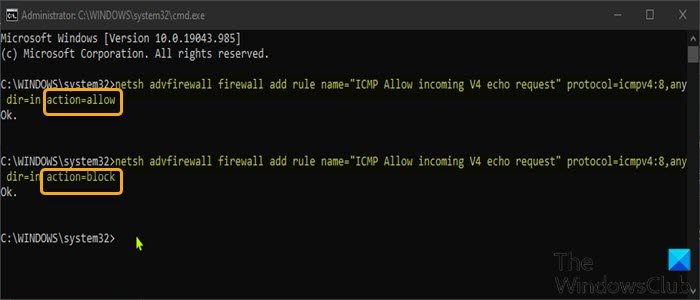
- In the command prompt window, type or copy and paste the command below and hit Enter to create the ICMPv4 exception.
netsh advfirewall firewall add rule name="ICMP Allow incoming V4 echo request" protocol=icmpv4:8,any dir=in action=allow
- To create the ICMPv6 exception, run the command below:
netsh advfirewall firewall add rule name="ICMP Allow incoming V6 echo request" protocol=icmpv6:8,any dir=in action=allow
Changes takes effect immediately without system reboot.
- To disable ping requests for the ICMPv4 exception, run the command below:
netsh advfirewall firewall add rule name="ICMP Allow incoming V4 echo request" protocol=icmpv4:8,any dir=in action=block
- To disable ping requests for the ICMPv6 exception, run the command below:
netsh advfirewall firewall add rule name="ICMP Allow incoming V6 echo request" protocol=icmpv6:8,any dir=in action=block
If at anytime you want to disable a rule but have forgotten the name of the rule, you can run the command below to see a list of all rules:
netsh advfirewall firewall show rule name=all
That’s it on how to allow Pings (ICMP Echo requests) through Windows Firewall!
Read: Unable to Ping IP on Windows 11
What is ICMP attack?
An ICMP attack (also referred to as a Ping flood attack), is a common Denial-of-Service (DoS) attack in which a threat actor maliciously attempts to overwhelm a targeted device with ICMP echo-requests (pings).
— Advertisement —
Hello! This time I’m going to talk to you about security in Windows 10. It is well known that the system offers multiple layers of security to keep the privacy of our information safe. Certainly, this entails control over network connections. These are really useful for exchanging information and sending data. However, sometimes these connections can fail and so it is imperative to get the error. One of the resources used for this task is PING. It is a basic Internet program that allows a user to verify that a particular IP address exists and can accept requests. This app verifies whether the IP address of a host is currently operational, and how long it takes to respond. Ping works by sending an Internet Control Message Protocol (ICMP) Echo Request to a specified interface on the network and waiting for a reply.
Additionally, it can be used for troubleshooting to test connectivity and determine response time. However, most administrator users consider the ICMP protocol to be potentially unsafe and prefer to block these calls. For this reason, the Windows 10 firewall by default has a security policy of blocking such requests. This is easy to check, trying to ping our computer from a remote machine, we’ll see the following message:
However, it is not advisable to completely block these calls. Therefore, here I show you how to enable and disable ping in Windows 10.
Enable ping in windows 10. Command line mode.
The first thing we need to do is to open a Command Prompt as administrators. Once there, we have to create a rule for IPv4 addressing and another for IPv6. All right, to create the first rule you just have to type the following command in the console:
netsh advFirewall Firewall add rule name="OSRadar Rule PING IPv4" protocol=icmpv4:8,any dir=in action=allow
If everything was done correctly, the CMD should look like this:
Next, we will create the rule for IPv6 addressing:
netsh advFirewall Firewall add rule name="OSRadar Rule PING IPv6" protocol=icmpv6:8,any dir=in action=allow
We have correctly applied the rules for the ping command. We can check that it works, pinging from a remote computer:
To disable the exception for IPv4 addresses, just type the following commanding in the CMD:
netsh advFirewall Firewall add rule name="OSRadar Rule PING IPv4" protocol=icmpv4:8,any dir=in action=block
In the case of IPv6 addressing, the command to write will be the following:
netsh advFirewall Firewall add rule name="OSRadar Rule IPv6" protocol=icmpv6:8,any dir=in action=block
Please note that you can choose the name you want for the rules. If you want to see every rule in the system in detail, just write the following in the terminal:
netsh advFirewall Firewall show rule name=all
Enable ping in windows 10. Graphic mode.
It is also possible to create specific rules to enable and disable ping by entering the Windows 10 Firewall Advanced Security Configuration. With this intention, just type Firewall on the search bar:
Immediately the Firewall options will be displayed. As we did before, we have to create a rule for IPv4 and another for IPv6.
So first, select the Inbound Rules option in the left column and right-click the mouse to create a New Rule:
A rule creation wizard will start. Please select Custom in the rule type and press Next to continue.
On the next screen select All programs and press Next to continue.
In the protocol type, select ICMPv4 and then click on customize.
In the pop-up screen activate the Specific ICMP types box and navigate until you activate the Echo Request option. Press accept to apply the changes.
Next, we can define which specific IP addresses this rule will apply, on the contrary, we will allow the requests of all the addresses. Once the selection is made, press next to continue.
Now select Allow the connection and press Next to continue
In the following screen, we have to select when the new rule will be applied. Please check the 3 available options and press next to continue.
Finally, we only have to assign a name to the rule and press Finish to close the wizard.
Finally, we can see the rule created correctly. To create the exception for IPv6 addressing, we have to repeat the same process but in the protocol and ports window, we have to select ICMPv6.
To disable any of the created rules, just right-click on it and choose Disable Rule.
Conclusion
Finally, we have seen how to enable and disable ping in Windows 10. This will allow us to manage and administer our connections using this command. Finally, we have seen how to enable and disable ping in Windows 10. This will allow us to manage and administer our connections using this command. Consequently, we will be able to monitor the levels of security and data protection on our computers. This is all for now, before saying goodbye I invite you to review our tutorial on bash in Windows 10
If you’re trying to ping your windows instance and you cannot, one of the likely reasons is that ICMP is blocked by the firewall. Here is how you can enable ICMP in your Windows Firewall.
To allow ICMP (ping) through the Windows Firewall, follow these steps:
Open the Windows Firewall GUI
- Open the Windows Start menu and type “Windows Firewall” into the search box.
- Click on “Windows Firewall with Advanced Security” in the search results.
Add a new inbound rule to allow Allow ICMP (ping) Through Windows Firewall
- In the Windows Firewall with Advanced Security window, click on the “Inbound Rules” section in the left-hand panel.
- In the right-hand panel, click on the “New Rule” button.
- In the “New Inbound Rule Wizard” window, select the “Custom” option and click “Next”.
- In the “Protocol and Ports” section, select the “ICMPv4” protocol and select the “Customize” option.
- In the “Customize ICMP Settings” window, check the box next to “Echo Request” and click “OK”.
- In the “Protocol and Ports” section, click “Next”.
- In the “Action” section, select the “Allow the connection” option and click “Next”.
- In the “Profile” section, select the network profile that applies to your situation (for example, if you want to allow ICMP on a public network, select the “Public” profile).
- In the “Name” section, give the rule a name (for example, “Allow ICMP”) and click “Finish”
Test the rule
- Ping your machine and see if you can get through
Conclusion
After you have completed these steps, ping should be allowed through the Windows Firewall. Note that this process may vary depending on the version of Windows that you are using.
Are you unable to test network connectivity because the firewall blocks the ping? Know how to allow ICMP echo request through Windows 11 firewall.
The ping command is a popular method to troubleshoot network connectivity issues and check the stability of the internet connection. However, with the built-in Windows Firewall enabled on your Windows 11 computer, the ping requests will get blocked by default.
To remove this impediment, you need to enable ping in the Windows firewall. Check out how to allow ICMP echo request with top methods. But first, let’s have a basic understanding of the ping request and its safety to fix network problems more effectively and efficiently.
What Is Ping Request, and Should You Allow It in Firewall?
A ping request, or Internet Control Message Protocol (ICMP) echo request, is a kind of network packet. It is transferred between devices to test the connectivity between those devices.
Ping requests are often used to diagnose network problems, network responsiveness, and packet loss, while for an ordinary user, the common use of ICMP request is to determine network latency. This command-line utility is available on most operating systems, including Windows, Linux, and macOS.
Now comes the burning question of whether to allow ping through the Windows 11 firewall or not. Computers that allow ICMP echo request are comparatively more vulnerable to cyber attacks if it has a poorly configured firewall or it got other security vulnerabilities. But allowing ping requests through the Windows Firewall can help you test network connectivity or troubleshoot network issues.
For this reason, you can allow ping requests on computers belonging to a secure environment and with a properly configured firewall. Otherwise, it’s better to block ping requests if you’re using public WiFi.
How to Allow Ping Through Win 11 Firewall With Best Approaches
There are different methods to allow ICMP echo request through the firewall of your Windows 11 PC. You can choose any of these depending on your choice and convenience.
Method 1: Allow Ping From Windows Security Settings
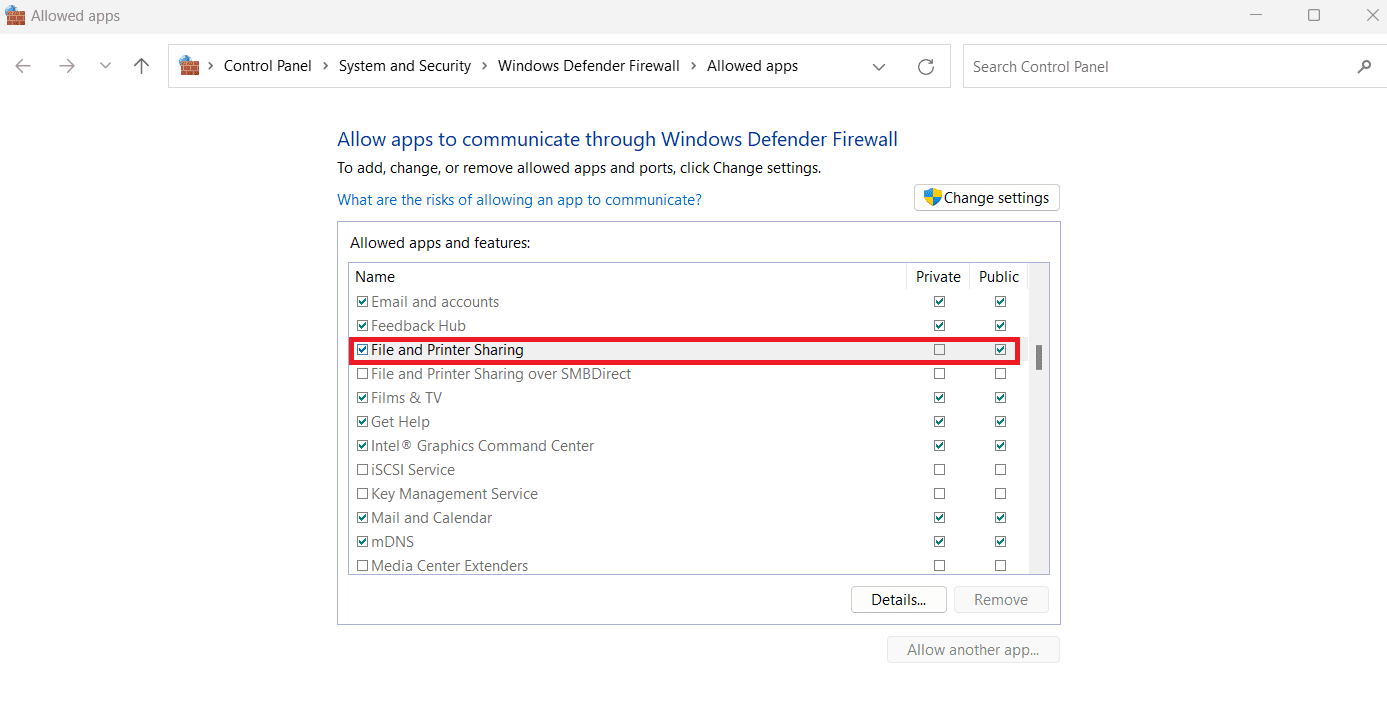
The most commonly used approach to allow ping in Windows 11 firewall is to change settings for apps that are allowed to go through the firewall.
- Type Windows Security on the Windows 11 search bar and hit Enter.
- Windows Security app will open. Select Firewall & network protection from the left panel.
- Click on Allow an app through firewall hyperlink.
- Allowed apps window will appear on your screen.
- Click on the Change settings button.
- Scroll through the list to find the File and Printer Sharing option.
- Now, make sure to tick the boxes next to this option.
- Click on the OK button to save the changes and allow ping through the firewall.
Method 2: Enable ICMP Echo Request Using Command Prompt
It’s also feasible to enable the ping with the help of a command prompt on a Windows 11 computer or laptop.
- Press Windows + R keys to open the Run box and type cmd there.
- Now, press Ctrl + Shift + Enter keys to open the command prompt with Admin access.
- Type the following command and hit Enter:
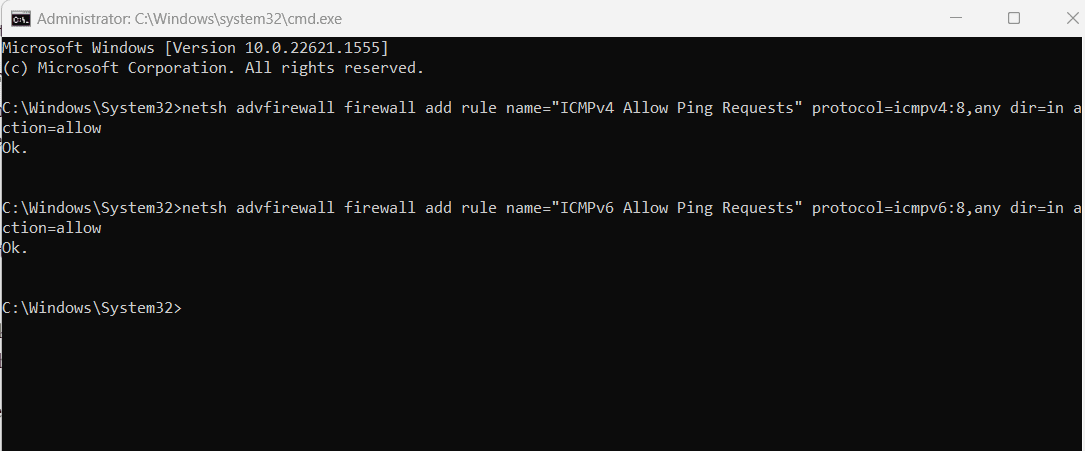
netsh advfirewall firewall add rule name="ICMPv4 Allow Ping Requests" protocol=icmpv4:8,any dir=in action=allow
- Next, type this command and press the Enter key to allow another type of ICMP request:
netsh advfirewall firewall add rule name="ICMPv6 Allow Ping Requests" protocol=icmpv6:8,any dir=in action=allow
- Once the commands are executed successfully on the command prompt, you can easily enable ping through the Windows 11 firewall.
Method 3: Allow Ping Through Firewall Using Advanced Settings
There is another technique that allows ping to go through the firewall by running the advanced security settings for Windows Defender Firewall. For that, you need to follow these steps:
- First, you need to open the Run box by pressing Windows + R keys.
- Type wf.msc and press Enter.
- Windows Defender Firewall with Advanced Security window will appear on your screen.
- On the right panel, under the actions section, click on New Rule.
- New Inbound Rule Wizard will pop up on the screen.
- Select the Custom button and click on Next.
- Choose All programs button and click on Next.
- Click on the Protocol type to open the drop-down list.
- From there, select ICMPv4 or ICMPv6, depending on which one you want to allow.
- Click on the Customize… button on the same screen.
- On the Customize ICMP Settings wizard, select the Specific ICMP types button.
- Check the Echo Request option and click OK.
- This wizard will close you’ll be taken to the Inbound Rule Wizard. Click Next.
- With Any IP address option being selected for both options, click on Next.
- Select Allow the connection option before clicking on Next.
- Under the Profile section, select Domain, Private, and Public before clicking Next.
- Add a name for this new rule and click on the Finish button.
Method 4: Allow ICMP Echo Request Using PowerShell
If you’re more comfortable with using PowerShell, you can use that to allow ICMP echo request.
- Type PowerShell in your search bar.
- On the right panel, click on Run as Administrator.
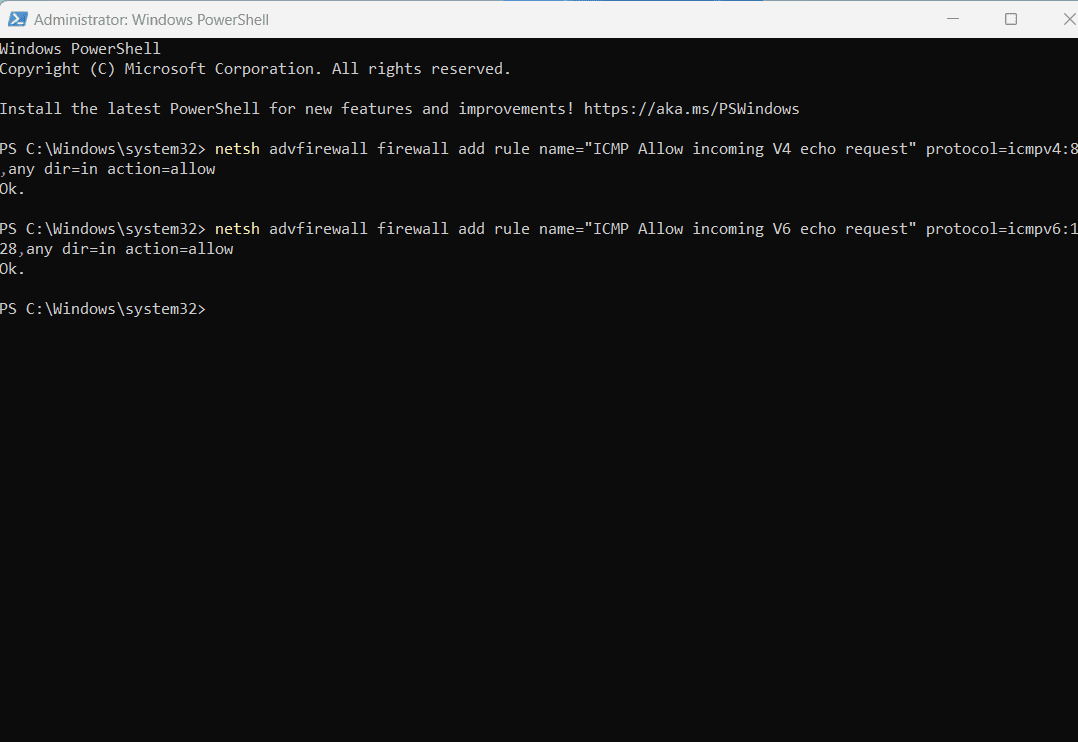
- Once the PowerShell window opens, type the following code before hitting Enter:
netsh advfirewall firewall add rule name="ICMP Allow incoming V4 echo request" protocol=icmpv4:8,any dir=in action=allow
- It’ll create a new firewall rule for allowing incoming ICMPv4 echo requests.
- Now, you can type another code to allow ping over IPv6.
netsh advfirewall firewall add rule name="ICMP Allow incoming V6 echo request" protocol=icmpv6:128,any dir=in action=allow
- Press Enter and let the command get executed.
- Close the PowerShell window.
Method 5: Allow Ping Using Local Group Policy
You can also allow ping through the firewall using the local group policy editor.
- Open the Run box by pressing Windows + R keys.
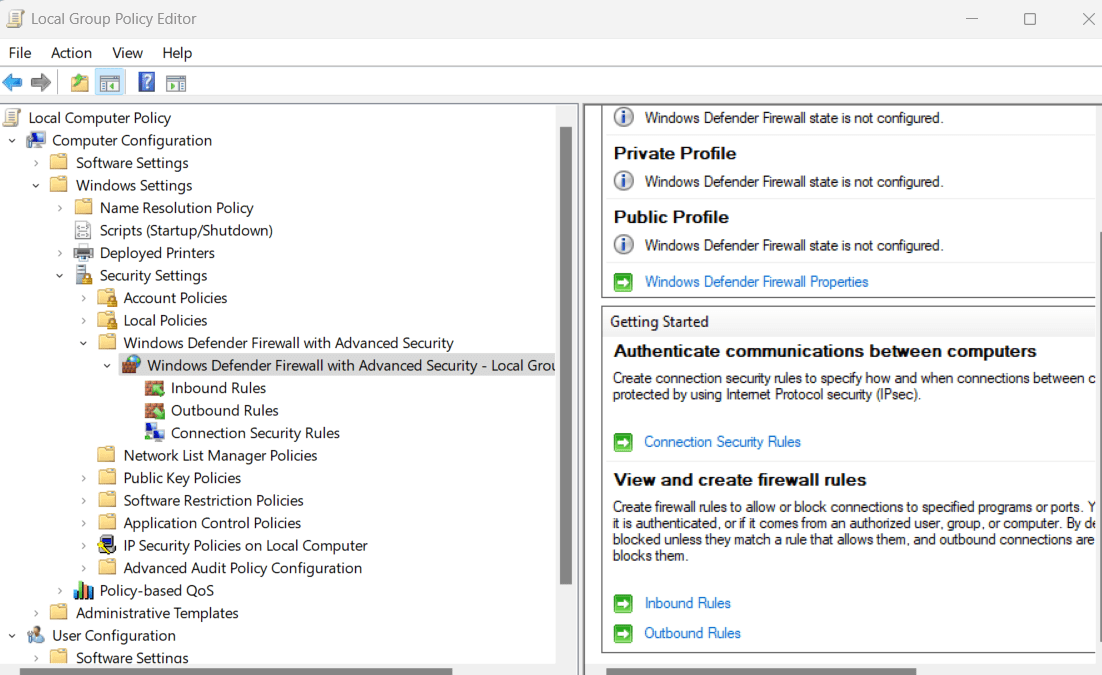
- Type gpedit.msc and hit Enter to open the Local Group Policy Editor.
- On the left panel, select Computer Configuration.
- Double-click on Windows Settings to expand that.
- Choose Security Settings and double-click to expand Windows Firewall with Advanced Security.
- Select the Inbound Rules and right-click on it.
- Click on New Rule…
- In the new wizard, select the Custom button and click on Next.
- Select All Programs and click on Next.
- Open the Protocol type drop-down menu and choose ICMPv4 or ICMPv6, depending on which one you want to allow.
- Click on Customize button from the same screen.
- Select the Specific ICMP types button and tick the box for Echo Request. Click on Next.
- Select Any IP address for both options and click on Next again.
- Click on the radio button for Allow the connection button and click Next.
- Tick the boxes for all the options: Domain, Private, Public.
- Finally, add a name for the new rule and click on Finish to complete the process for allowing ping.
Conclusion
Allowing ping request may not be the safest choice in all situations, but you must allow it to some extent for network troubleshooting. It also helps you understand if there is some network latency issue. Now that you know how to allow ping through Windows 11 firewall, you shouldn’t have any trouble enabling ICMP echo request.
Which method did you find to be the most useful? Tell us in the comment section. Don’t forget to share this article with your friends and colleagues. Up next, how to fix Windows Online Troubleshooting Service is disabled.
By default, the built-in Windows Defender Firewall blocks all inbound ICMP traffic. As a result, if you try to ping the Windows host from a different device, the computer will not respond to the ICMP echo request (with the Request timed out description). In this article, we’ll look at how to enable or disable host network connectivity checks (ICMP echo requests) using the ping command on Windows 10/11 and Windows Server 2022/2019/2016.
You can use the graphical MMC snap-in, the command line, and the PowerShell console to manage the rules of the Windows Firewall. Let’s look at all three ways of enabling and disabling ICMP rules in the firewall.
How to Allow Ping in Windows Firewall
Search for Firewall in the quick search bar and open the Windows Defender Firewall with Advanced Security snap-in (or press Win+R and run the wf.msc command).
Select Inbound Rules in the left pane and find the File and Printer Sharing (Echo Request – ICMPv4-In) rule. As you can see, the rules for both ICMPv4 and ICMPv6 are available here for both the Domain and the Private network profiles. All of these rules are disabled by default.
You can turn on a firewall rule by right-clicking on it and selecting Enable Rule.
You can remotely check the availability of this computer using the ping command. Now Windows Firewall is not blocking ICMP requests and you can see that the remote host is accessible over the network.
By default, this rule allows ICMP echo requests from any source on the local network. If you want to restrict the list of computers that are allowed to send ICMP requests, or allow ICMP ping for external IP addresses, you can edit the existing rules.
- Open the properties of the firewall rule and go to the ‘Scopes’ tab;
- As you can see, the rule allows ICMP replies for all hosts on the Local subnet;
- You can edit the list of accepted IP addresses in Remote IP Address;
- This is where you can add specific IP addresses, ranges of IP addresses, or subnets.
You can enable and disable the Windows Defender firewall rule from the command line.. Open the elevated cmd prompt or PowerShell console. To allow ICMPv4 ping for all network profiles, run the command:
netsh advfirewall firewall set rule name="File and Printer Sharing (Echo Request - ICMPv4-In)" new enable=yes
You should see the following message:
Updated 2 rule(s).
Ok.
You must also enable the ICMP rule for the IPv6 protocol if it is used in your network communications:
netsh advfirewall firewall set rule name="File and Printer Sharing (Echo Request - ICMPv6-In)" new enable=yes
Separate cmdlets for managing Windows Firewall rules are available in the built-in NetSecurity PowerShell module. To allow ICMP ping for all profiles, run the following commands:
Enable-NetFirewallRule -displayName "File and Printer Sharing (Echo Request - ICMPv4-In)"

Enable-NetFirewallRule -displayName "File and Printer Sharing (Echo Request - ICMPv6-In)"
Disable ICMP Ping in Windows Firewall
You can disable ICMP echo request rules from the Windows Defender Firewall graphical console. Select all the rules in the list (by holding down the CTLR key), right click and select Disable Rule.
It is also possible to disable the ICMP ping rules from the command prompt:
netsh advfirewall firewall set rule name="File and Printer Sharing (Echo Request - ICMPv4-In)" new enable=no

netsh advfirewall firewall set rule name="File and Printer Sharing (Echo Request - ICMPv6-In)" new enable=no
Or with PowerShell:
Disable-NetFirewallRule -displayName "File and Printer Sharing (Echo Request - ICMPv4-In)"

Disable-NetFirewallRule -displayName "File and Printer Sharing (Echo Request - ICMPv6-In)"

Cyril Kardashevsky
I enjoy technology and developing websites. Since 2012 I’m running a few of my own websites, and share useful content on gadgets, PC administration and website promotion.
