 Одним из самых неприятных для меня «нововведений» Windows 11 стало отключение возможности перетаскивать файлы (Drag and Drop) на значки открытых программ в панели задач. Если ранее, отыскав в проводнике нужный файл, я мог перетащить его на значок свёрнутой программы, и она открывалась, готовая «принять» этот файл, теперь это не работает.
В предварительных сборках это можно было исправить в редакторе реестра, но этот способ больше не работает. Есть информация, что в будущих версиях ОС эту функциональность вернут. Однако для того, чтобы включить поддержку перетаскивания файлов уже сейчас, придётся прибегнуть к сторонним средствам — бесплатной утилите Windows11DragAndDropToTaskbarFix.
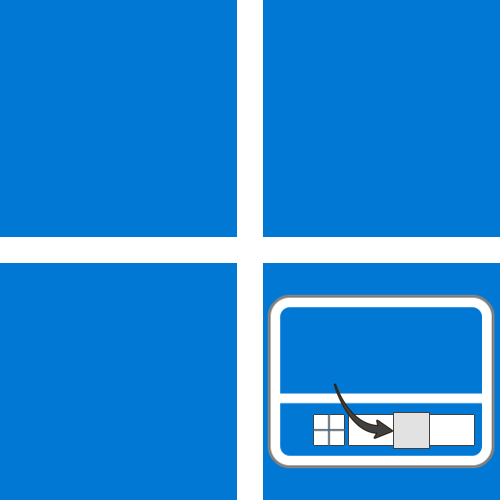
Включение поддержки Drag and Drop для панели задач в Windows11DragAndDropToTaskbarFix
Единственная задача бесплатной программы Windows11DragAndDropToTaskbarFix — вернуть прежнее поведение панели задач Windows 11 при перетаскивании файлов на значки открытых программ. Использование очень простое:
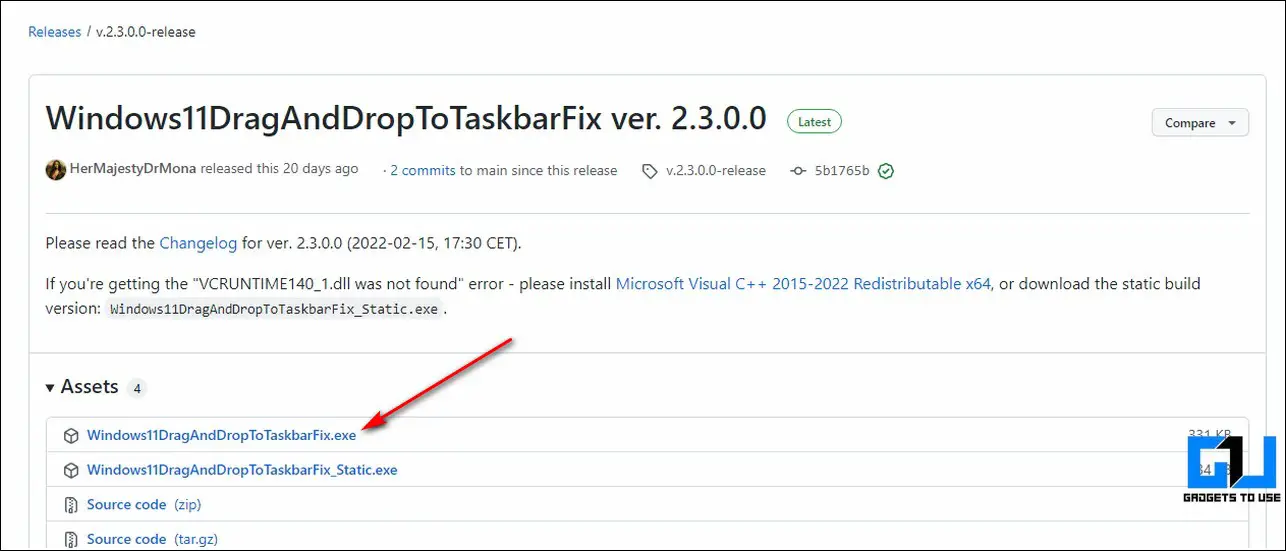
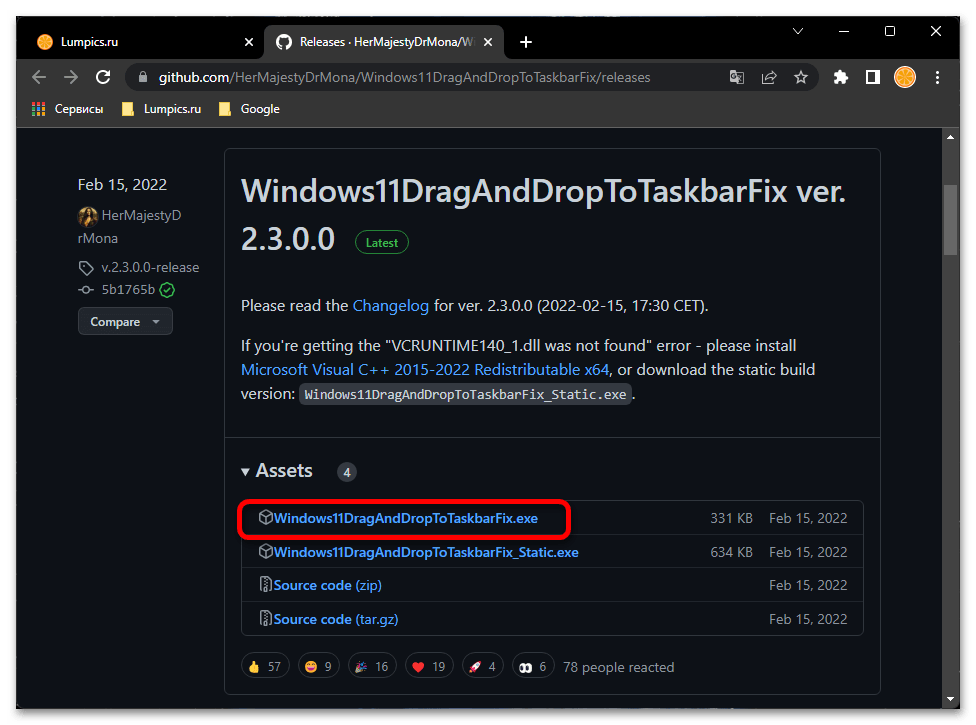
- Скачайте последнюю версию утилиты с официальной страницы разработчика и сохраните файл в удобное вам расположение. Учитывайте, что фильтр SmartScreen в Microsoft Edge и Windows могут блокировать загрузку и запуск файла как малоизвестного.
- Запустите программу (при сообщениях о том, что система не обнаружила файлы VCRUNTIME140_1.DLL и другие, используйте эту инструкцию). После запуска откроется окно командной строки, которое через короткое время само закроется.

- Сразу после этого вы сможете перетаскивать файлы и другие элементы на значки открытых программ в панели задач Windows 11.


Дополнительно, в папке с программой вы можете создать файл конфигурации с именем Windows11DragAndDropToTaskbarFixConfig.txt и добавить в него параметры, такие как включение автоматического запуска Windows11DragAndDropToTaskbarFix при входе в систему. Подробнее о файле конфигурации можно прочитать на официальной странице.
В моем тесте утилита исправно работает, из замеченных нюансов:
- При перетаскивании файлов всё так же отображается красный перечеркнутый значок «запрета действия» (но на работоспособность не влияет).
- В отзывах о проблемах с программой на GitHub есть информация о том, что при использовании нескольких мониторов, на втором монитора программа может работать неправильно.
При работе утилита не показывает своих значков в панели задач или области уведомлений: если вам требуется закрыть её, используйте диспетчер задач.
Windows 11 introduced a ton of new features along with a design refresh during its release. For example, you can batch rename files and password-protect your folders in Windows 11. But one essential feature seems to be missing – Drag and Drop.
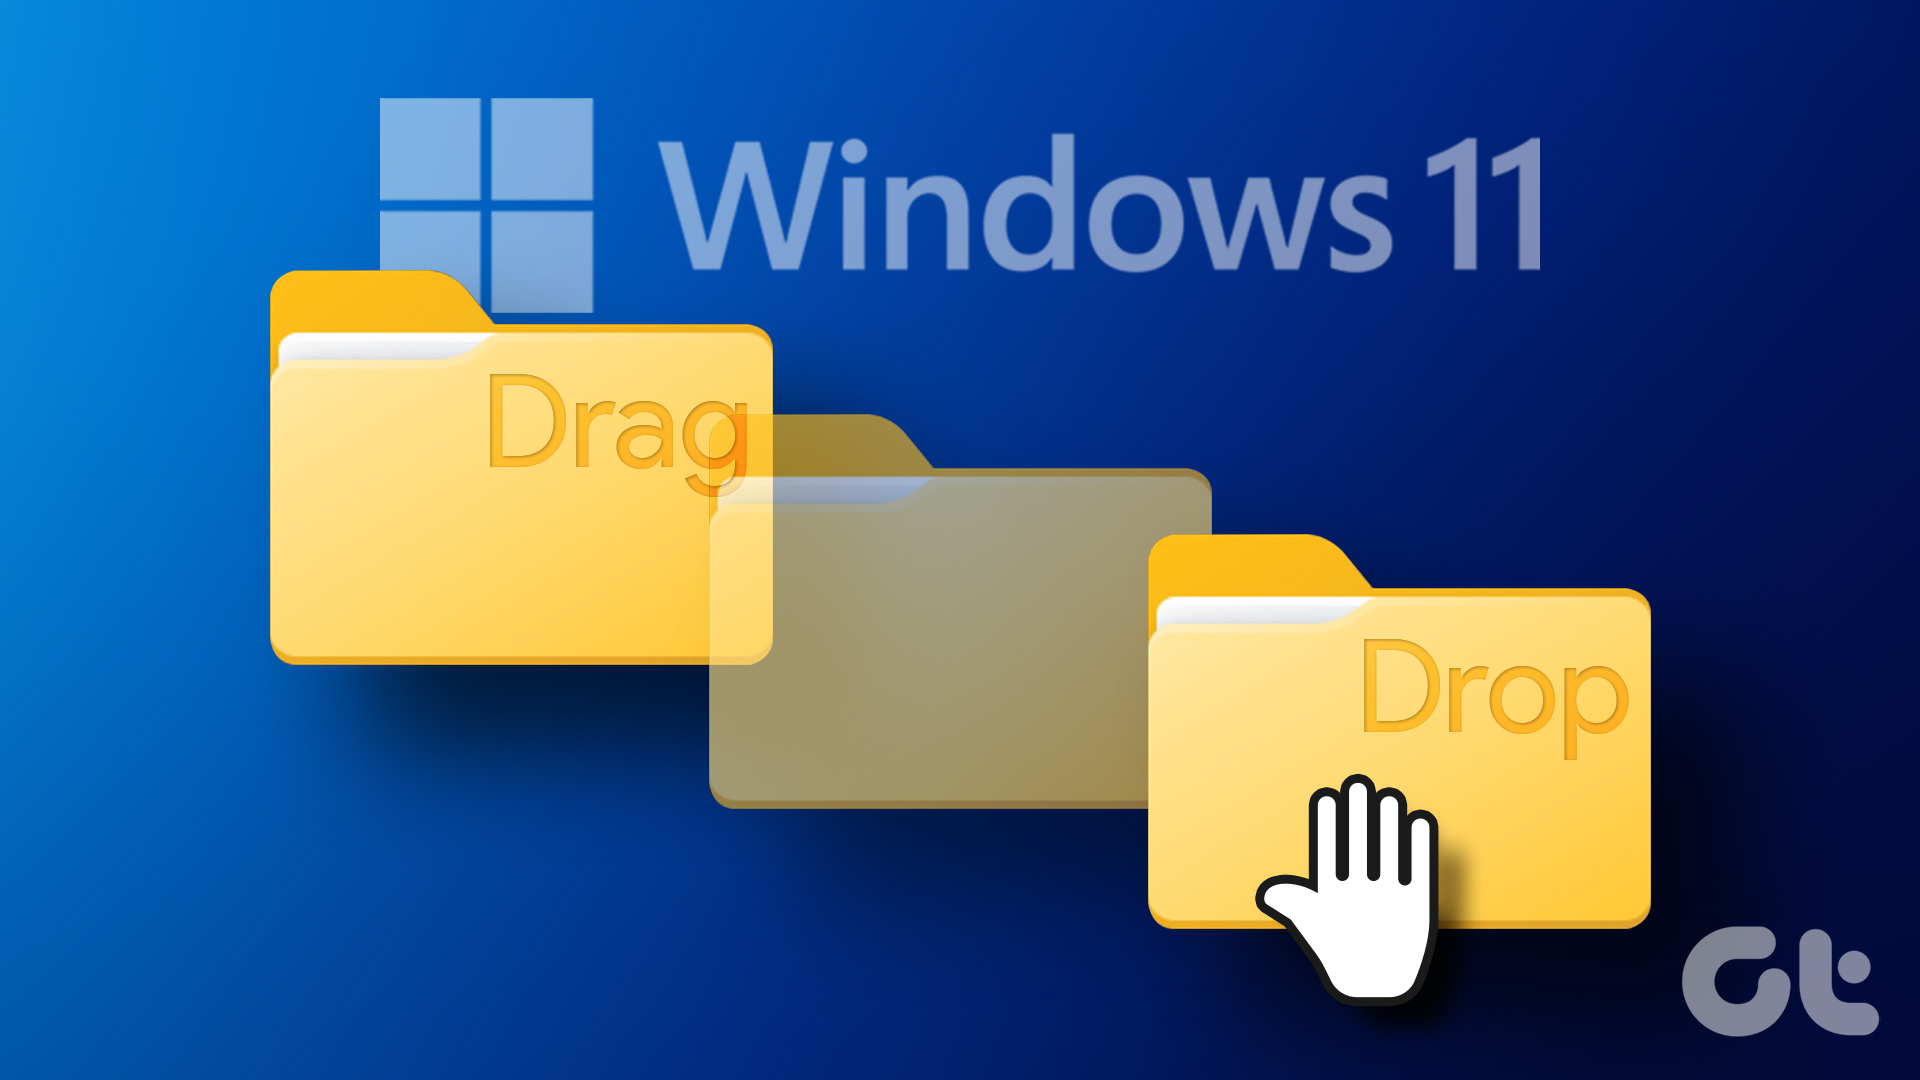
It is difficult drag and drop files to the Taskbar on Windows 11 computers. In this post, we bring you the three best ways to enable Drag and Drop in Windows 11 so that your usage becomes smoother.
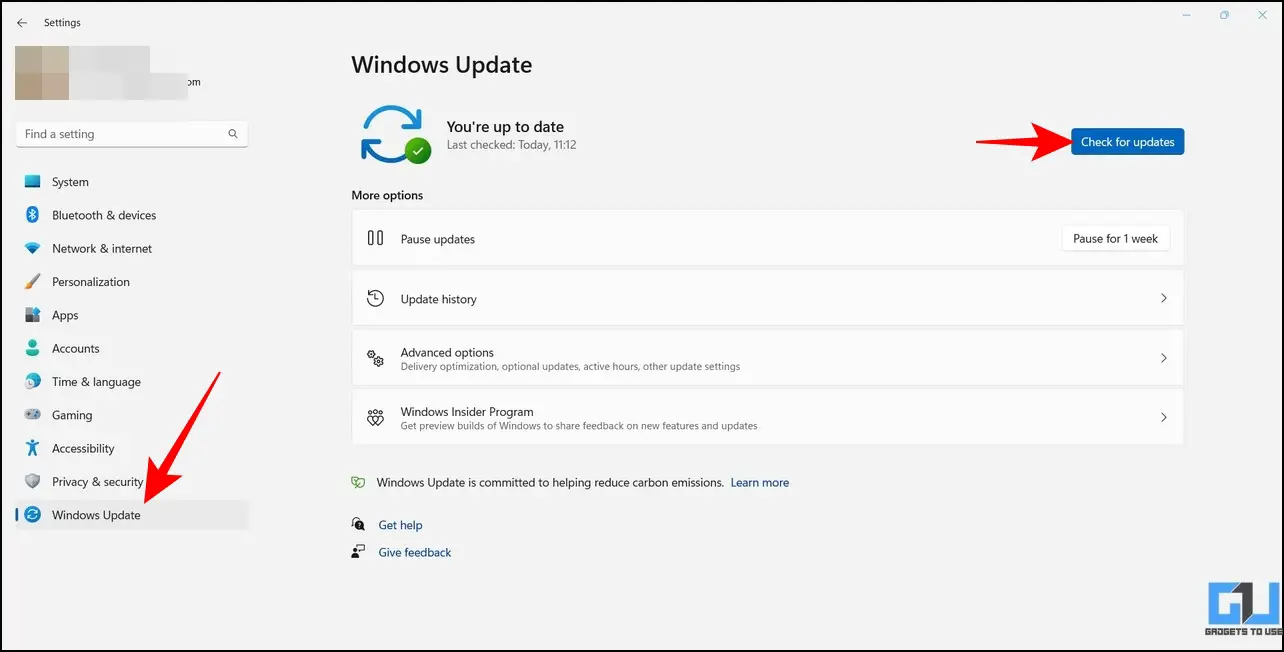
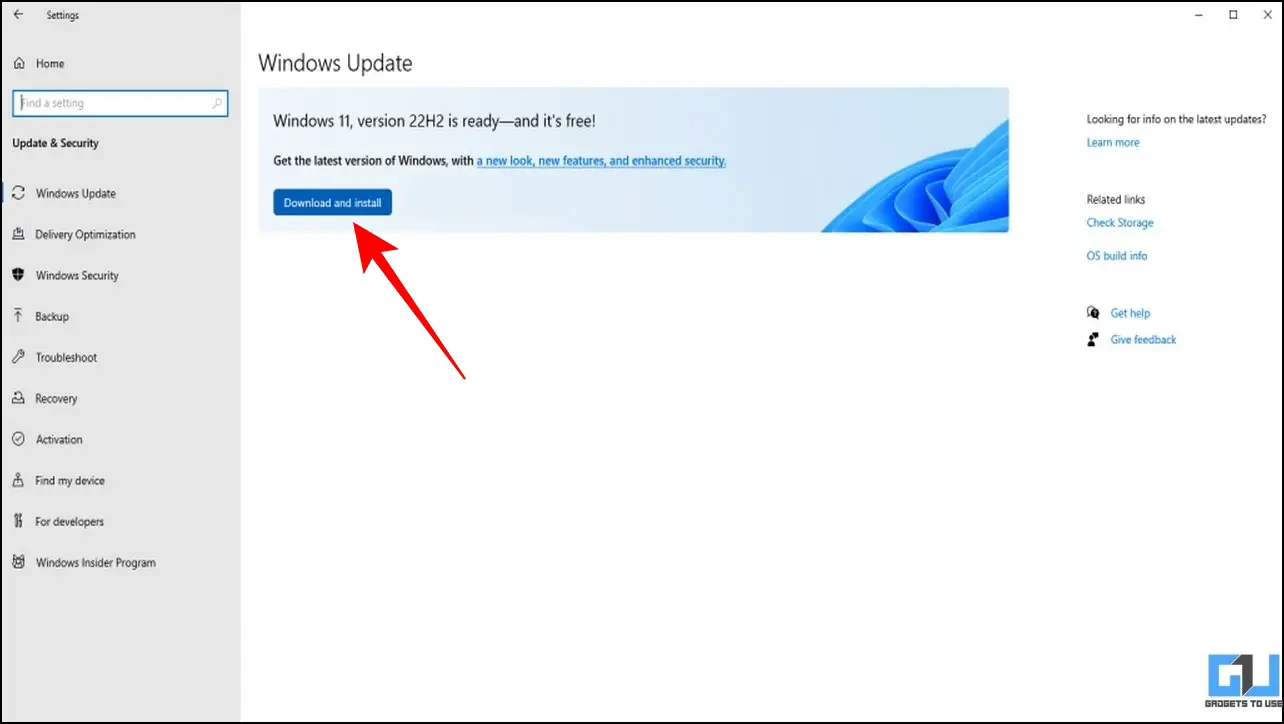
1. Update to Windows 11 22H2
After a lot of users expressed their concerns regarding this feature, Microsoft released the Windows 11 22H2 update for everyone. This update brings a lot of new features, including the much-demanded Drag and Drop to the Taskbar. Here’s how you can update your Windows 11 PC to enjoy this feature.
Step 1: Click the Windows icon in the taskbar, type Settings in the Search bar, and press Enter.

Step 2: Click on Windows Update in the top-right corner.

Step 3: If you see the update for Windows 11 22H2, download and install it.

Step 4: After the installation completes, you can drag and drop files to the Taskbar.
In case you don’t wish to install this new update but still enable Drag and Drop, keep reading the next solutions.
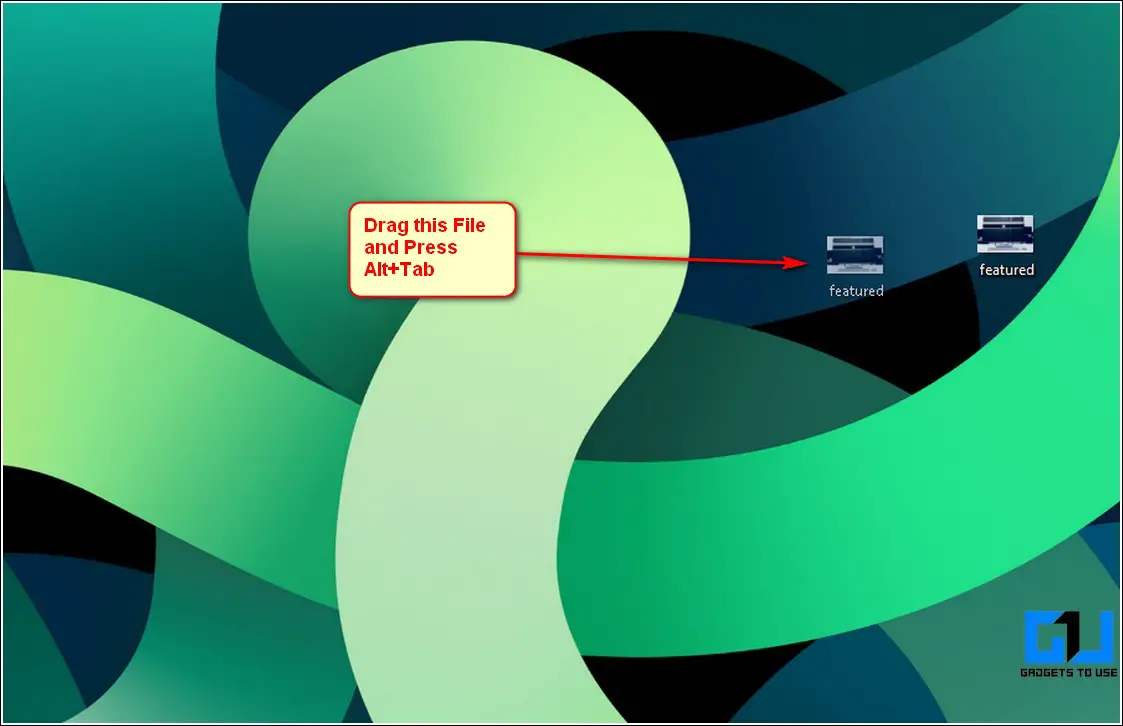
2. Use Alt + Tab Shortcut
Alt + Tab is the command for switching between windows of apps and folders on your Windows computer. This feature has been there for quite a long time, and you can use it intelligently to drag and drop files on Windows 11. Here’s how.
Step 1: Open the file location from where you want to drag and drop it.

Step 2: Select, drag and keep pressing the mouse button.

Step 3: Press and hold Alt + Tab on your keyboard to navigate between different windows. Keep pressing the mouse button to hold the selected file.

Step 4: Release Alt + Tab when you are in the desired file location.
Step 5: Release the mouse button to drop the file in that location.
3. Use Registry Editor
Registry Editor is a centralized database on your Windows computer that stores critical information, options, settings, and details of all the applications. You can check and fix many system errors by adjusting a few settings in Registry Editor. You can change the drag-and-drop sensitivity settings if you want to enable the Drag and Drop feature on your Windows 11 computer.
Do note that changing the Registry Editor can cause irreversible damage to your Windows computer. We recommend moving ahead with the steps mentioned below only if you have a thorough knowledge of Registry Editor.
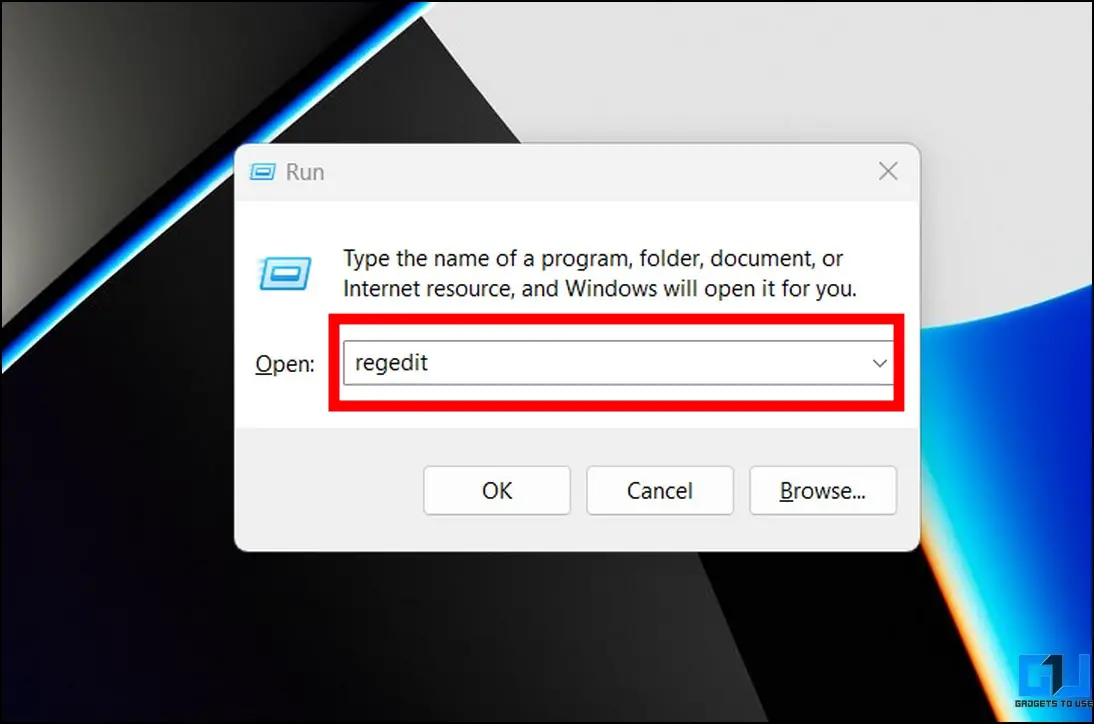
Step 1: Press Windows + R to open the Run dialog box.
Step 2: Type regedit and press Ok.

The Registry Editor window will open on your screen. We strongly suggest following every step carefully.
Step 3: Click on ‘HKEY_LOCAL_MACHINE from the left pane.

Step 4: Select Software from the list of folder options.

Step 5: Under Software, scroll down and click on Microsoft.

Step 6: Scroll down and click on Shell.

Step 7: Click on Update.

Step 8: Under Update, click on Packages.

Ifyou aren’t able to see any folders during the process, type the following file patch in the Search Bar on the top:
HKEY_LOCAL_MACHINE\SOFTWARE\Microsoft\Windows\CurrentVersion\Shell \Update\Packages
Step 9: In the Packages folder, right-click in the empty space on the right side.

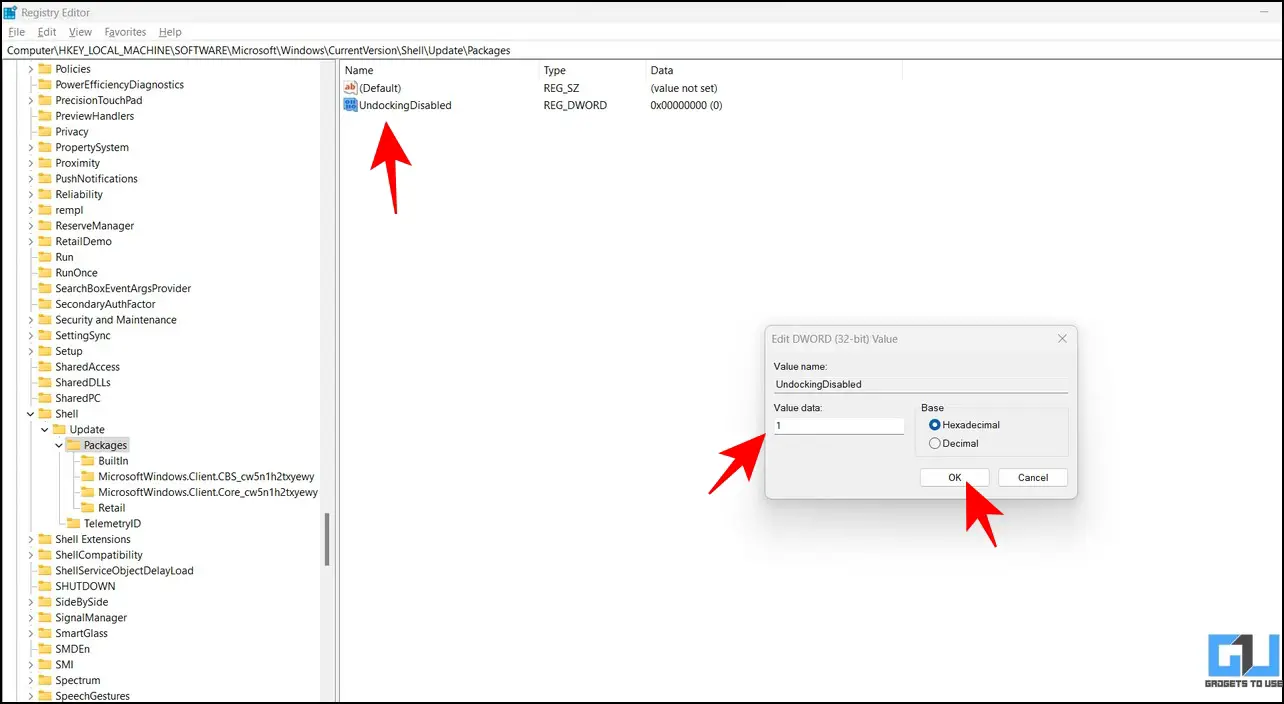
Step 10: Click on New. Then click on DWORD (32-bit) Value.

That’ll create a ‘New Value’ key in the Registry Editor.

Step 11: Right-click the new value and select Rename.

Step 12: Rename the new value as UndockingDisabled.

Step 13: Right-click on the renamed value and select Modify.

Step 14: Change the Value Data from 0 to 1. Then click Ok.

Step 15: Close the window and restart your PC by right-clicking the Start icon and selecting Restart.

After your computer restarts, you will notice that the taskbar looks like the one in Windows 10. But do note that Start, Search and Cortana will not open from the Taskbar. Rest everything on the taskbar will open as usual.
You can now drag and drop files to the taskbar easily.
If you want to restore the Windows 11 default taskbar, here’s how to do it.
Step 1: Open Registry Editor again by typing regedit in the Run Command Box.
Step 2: Go to the Packages folder where you have saved the UndockingDisabled value.
Step 3: Right-click on UndockingDisabled and select Delete.

Step 4: Click on Delete again to confirm your choice.

Step 5: Close the window and restart your PC by clicking the Start icon in the Taskbar.
The default Windows 11 taskbar will be restored. You can check our post suggesting solutions for Registry Editor not working in Windows 11 if you face any issues.
Drag and Drop Files
These methods will help you to enable the drag and drop functionality on your Windows 11 PC. While it’s entirely your choice, we suggest updating your computer to the latest Windows 11 22H2 version to enjoy this feature.
Despite Windows 11’s new useful features, Microsoft removed some existing ones, such as the Drag and Drop file feature, creating inconvenience for basic navigation activities. That said, if you’re unhappy about the same and wish to bring it back, this explainer has precisely what you need. In this article, we have demonstrated several effective methods to get the Drag and Drop feature on Windows 11 taskbar. Additionally, you can learn to install Windows 11 on Unsupported Systems with just a single tool.
How to Get Drag and Drop Feature on Windows 11 Taskbar
With the help of several tools and tweaks, restoring the drag-and-drop feature on Windows 11 is pretty simple. Follow these methods to achieve the same.
Upgrade to the Windows 11 22H2 Update
After getting a boatload of user requests to restore the drag-and-drop taskbar functionality, Microsoft has finally rolled it out in its 22H2 feature update. Here’s how you can update your system to experience it.
1. Press the Windows + I key to open the Settings app and expand Windows Update in the left sidebar to check for new system updates.
2. Wait a few seconds to receive the latest 22H2 update. Click the Download and Install button to upgrade your system.
3. If you haven’t received the 22H2 update yet, follow the next methods to achieve the same.
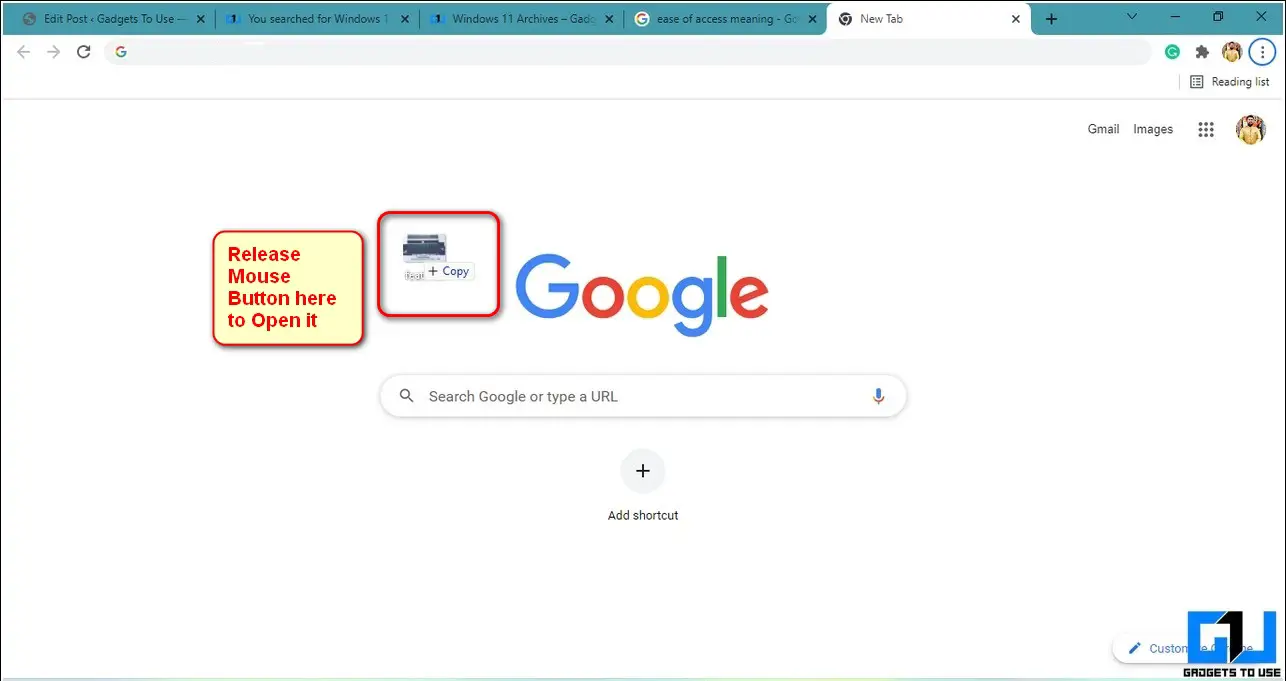
Try Alt+Tab Method to Simulate the Drag and Drop Feature
One of the simplest workarounds to achieve this functionality in Windows 11 is to use the Alt + Tab method. Here’s what you need to do:
1. Click and drag the file you wish to use in the desired app using this feature.
2. Now, press the mouse button and drag the file, switch your window by pressing the Alt+Tab key combination, and open your desired app window.
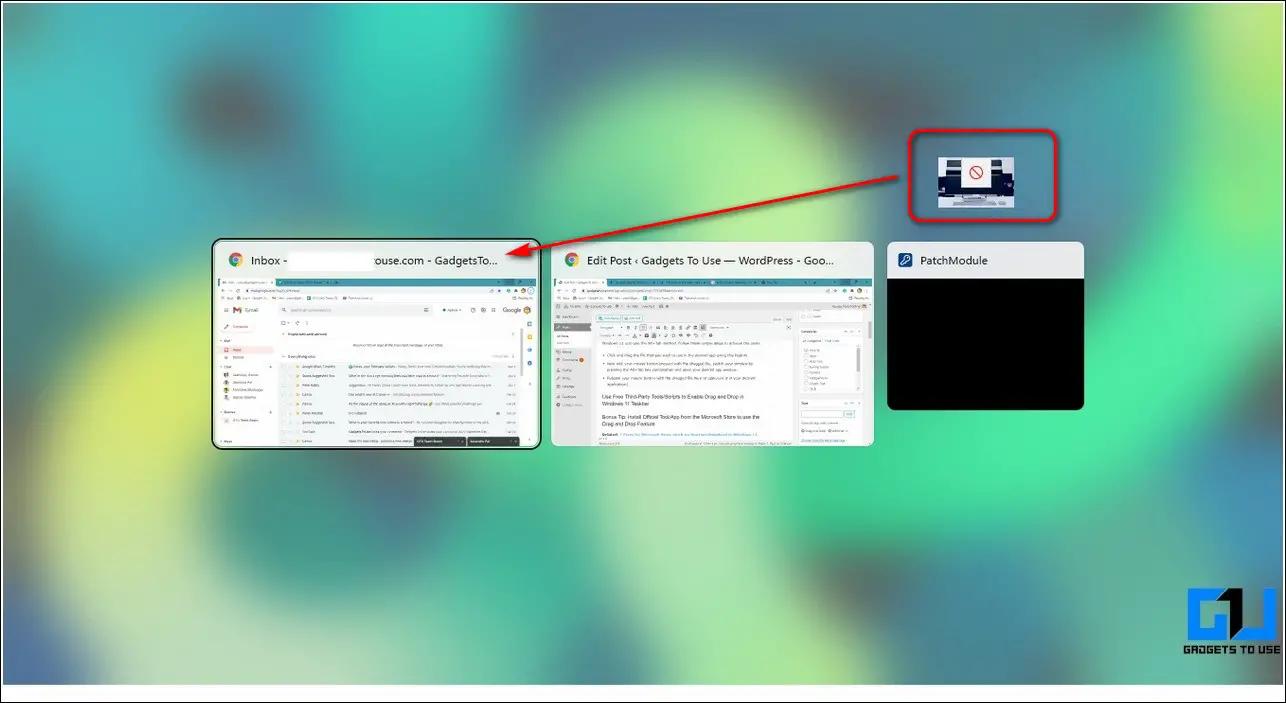
3. Release your mouse button with the dragged inside the opened window to open/use it in your desired application. That’s it. You’ve successfully opened your file inside your desired application using the drag and drop feature similar to taskbar functionality.
Use Free Third-Party Tools/Scripts to Enable Drag and Drop Feature
Another effective fix to enable the drag-and-drop feature in Windows 11 taskbar is to use a free tool/script available on GitHub. Follow these steps to achieve the same.
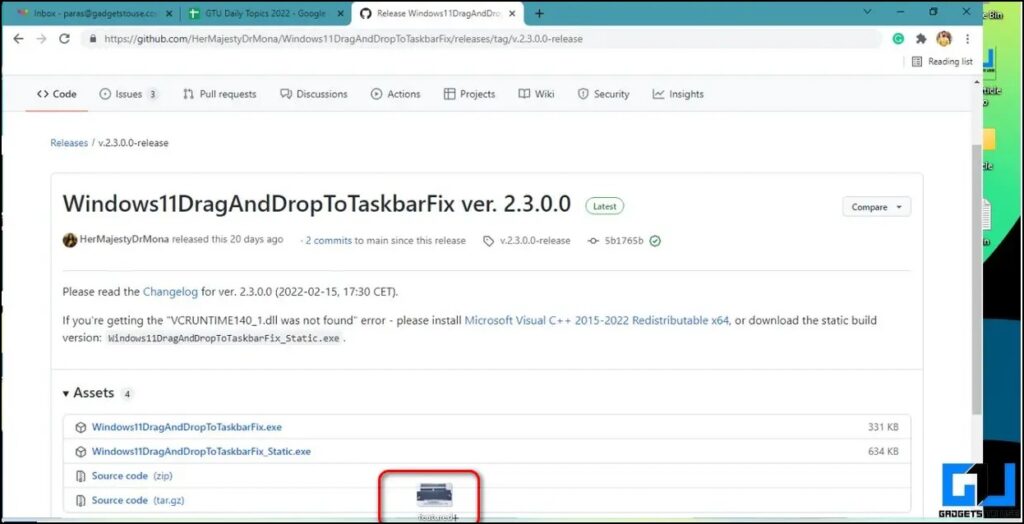
1. Access the GitHub page for the Windows 11 Taskbar Fix.
2. Next, click the Windows11DragAndDropToTaskbarFix.exe file to download it.
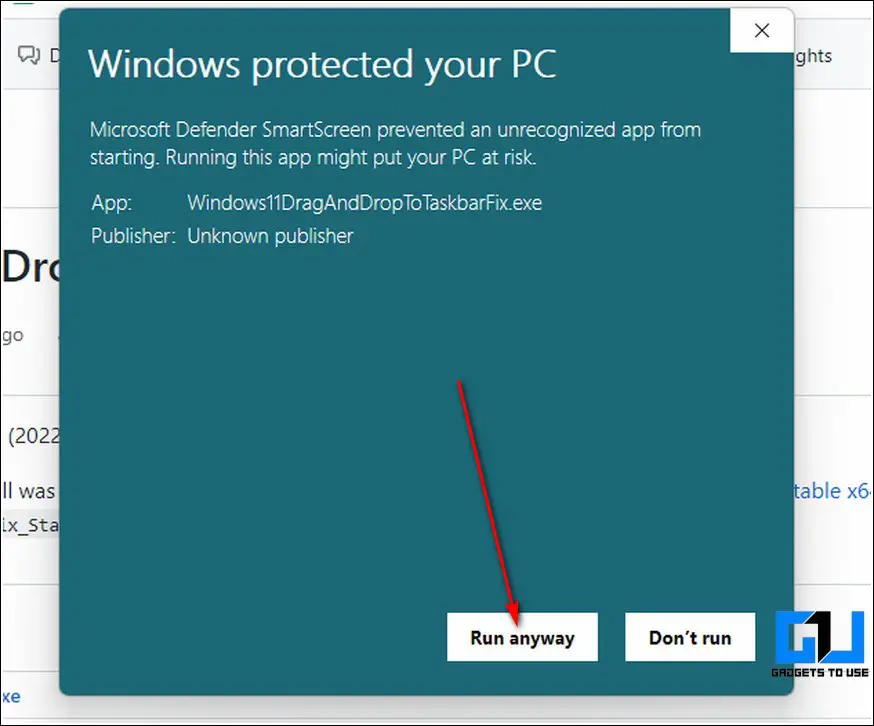
3. Double-click on the downloaded file to install it. Click on the Run Anyway button if prompted by the Microsoft Installer.
4. That’s it. The tool will now start automatically on your Windows 11 system. Try dragging a file to your taskbar and then pick the desired app window in which you wish to open it. Congrats. You can now easily use this feature in your Windows 11 taskbar.
Tweak the Windows Registry Files
Besides downloading third-party tools and scripts, you can also tweak Windows Registry files to revive the drag-and-drop taskbar feature. Here’s what you need to follow.
1. Open the Run window by pressing the Windows + R hotkeys and type ‘regedit‘ to run the Registry Editor window.
2. Next, copy and paste the following path in the navigation bar and hit the enter key.
HKEY_LOCAL_MACHINE\SOFTWARE\Microsoft\Windows\CurrentVersion\Shell \Update\Packages
3. Right-click the Packages folder to create a new DWORD (32-Bit value).

4. Name this key as ‘UndockingDisabled‘ and set its value to 1. Click the OK button to save changes.
5. Restart your system to experience changes.
Note: Enabling the drag-and-drop taskbar functionality using this method makes the Start and Search taskbar icons static, i.e., you can not click to use them. To revert changes, you can delete the created Undocking Disbaled in the Registry Editor app and reboot your system.
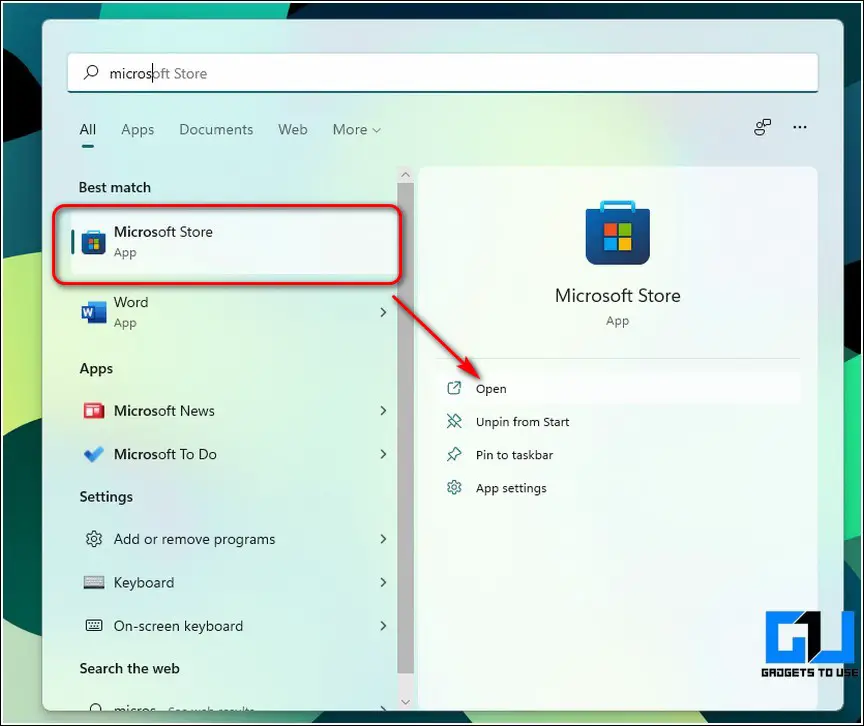
Install the Official Microsoft Store App to get Drag and Drop Feature
Another working method to enable the drag and drop feature in your Windows 11 taskbar is to use an official Microsoft app providing the same. Follow these steps for an easy fix.
1. Open the Microsoft Store app on your Windows 11 system.
2. Next, search for the Drag and Drop Toolbar for Windows 11 app and click the Get button to install it to your system.
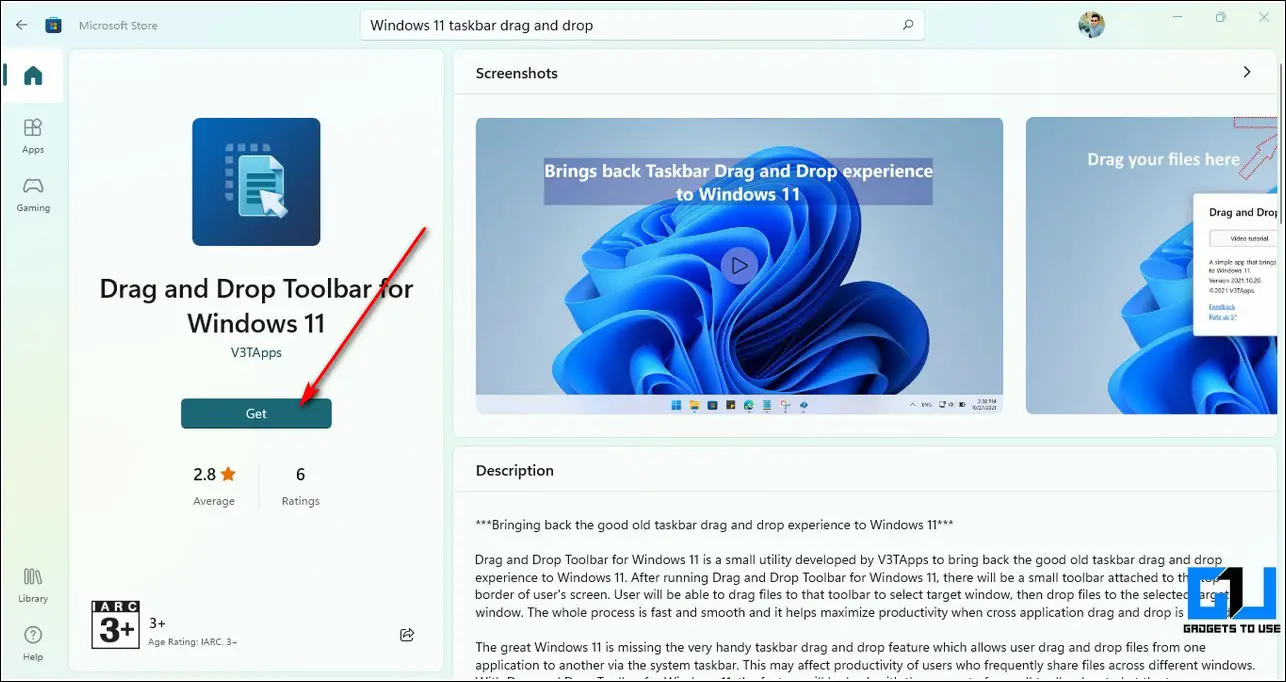
3. This app will now launch a separate notch-shaped taskbar at the top-middle center of your screen.
4. You can drag your file to this mini taskbar to open your file in the desired application.
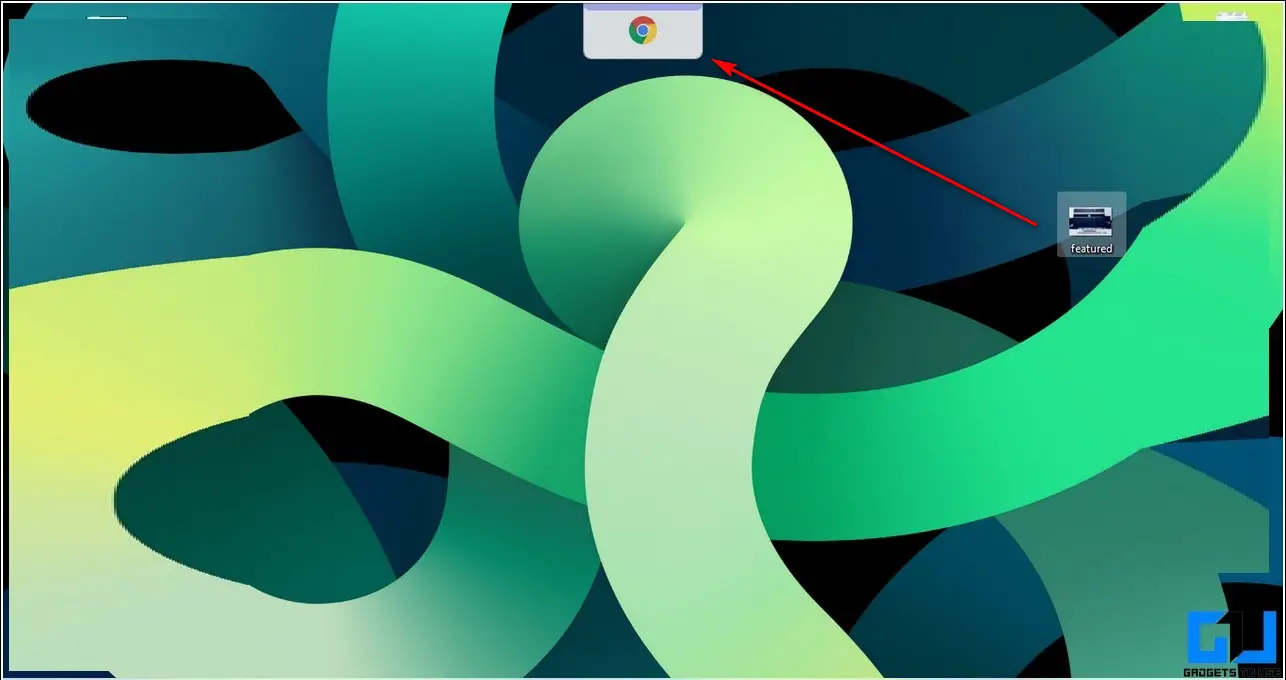
5. Your dragged file will instantly open in your chosen application.
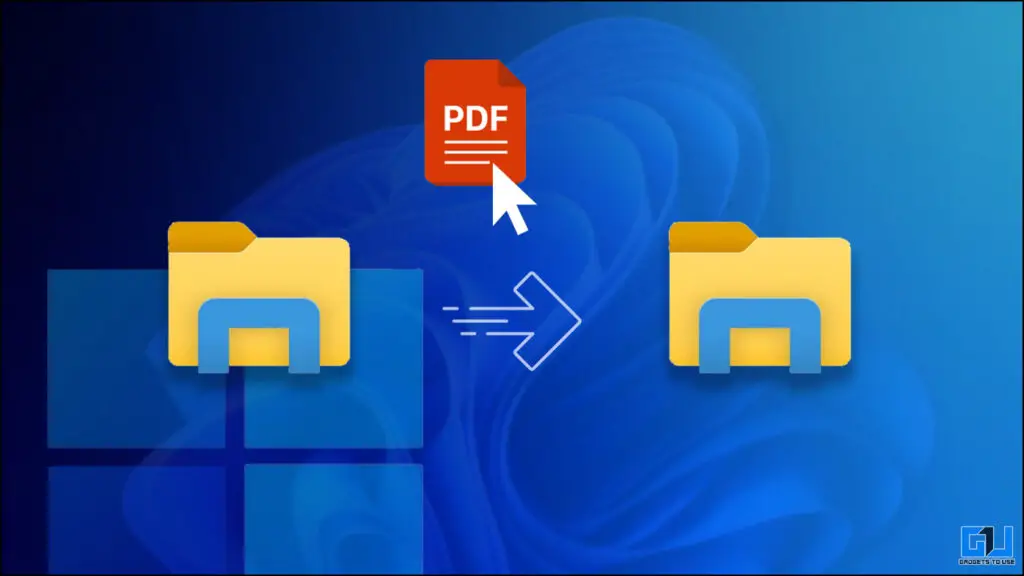
Bonus: Switch Screen Layout to Drag and Drop files Quickly
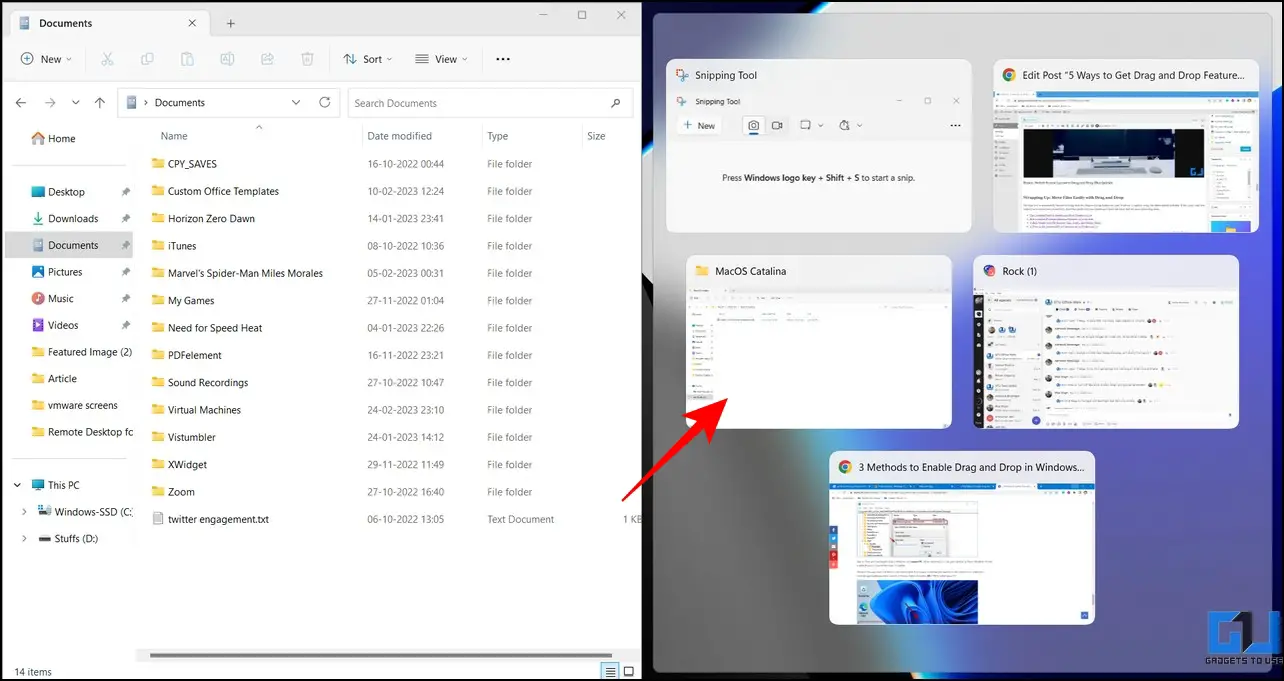
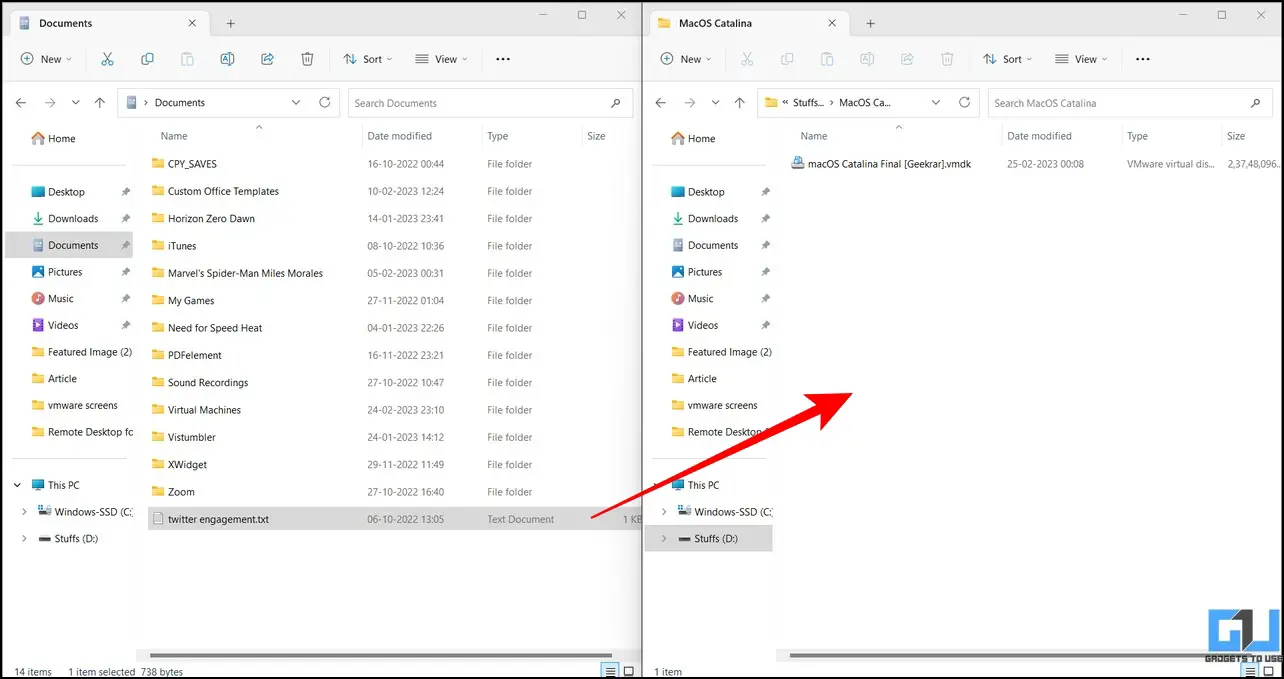
Besides using the taskbar to drag and drop files, you can switch your current screen layout on Windows 11 to open two or more folders for exchanging files. Follow these easy steps to achieve the same.
1. Open your desired folder and hover the mouse cursor over the Maximize/Minimize button to switch screen layouts.
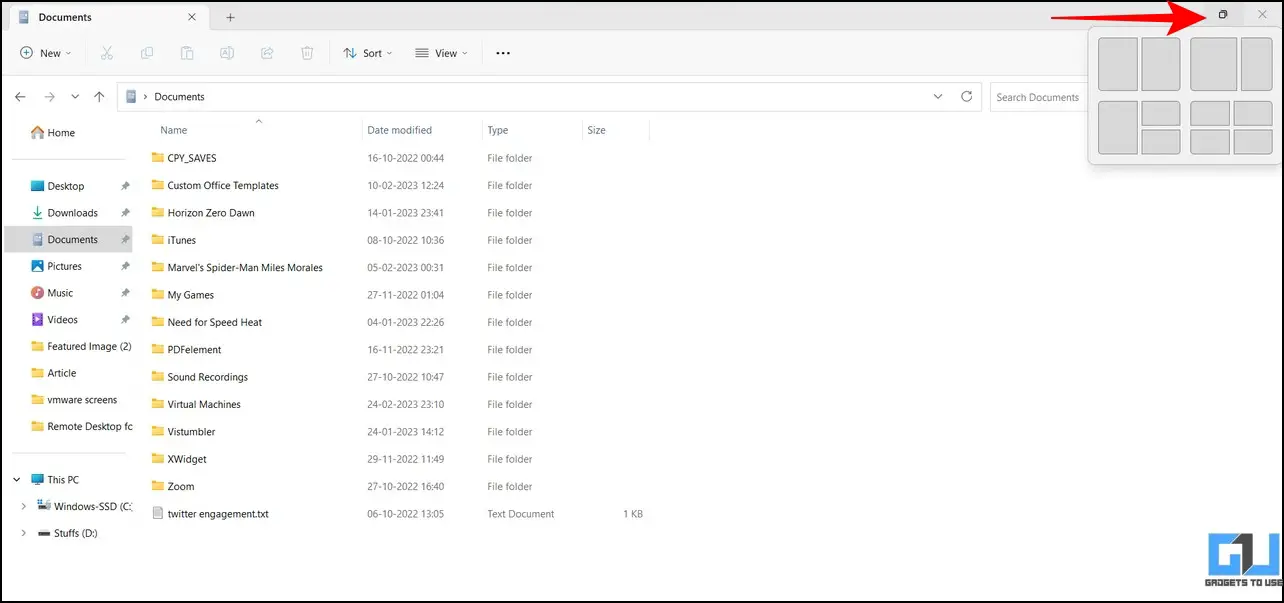
2. Pick your preferred split screen layout and open the folders to exchange files between them.
3. Finally, drag your file from one folder to another to transfer it.
FAQs
Q: How to enable the drag-and-drop feature in Windows 11 taskbar?
A: You need to install the 22H2 update of Windows 11, to get the drag-and-drop feature. In case you have not received the update, follow the other easy methods in this explainer to enable the drag-and-drop feature on Windows 11 taskbar.
Q: How to use the GitHub tool to use drag and drop on Windows 11?
A: GitHub’s taskbar fixer tool tweaks the system to make drag and drop available to Windows 11 users. For more details, refer to the method listed above.
Wrapping Up: Move Files Easily with Drag and Drop
We hope you’ve successfully learned to bring back the drag-and-drop feature on your Windows 11 taskbar using the above-tested methods. If this quick read has helped you to boost your productivity, share this guide with your friends and check the below link for more interesting reads. Stay subscribed to GadgetsToUse for more such reads.
You might be interested in the following:
- The Complete Guide to Install macOS on Windows 11/10
- 6 Ways to Pin Any App or Feature to Taskbar in Windows 11
- 15 Best Windows 11 File Explorer Tips, Tricks, and Hidden Hacks
- 11 Ways to Fix Internal SSD not showing up in Windows 10/11
You can also follow us for instant tech news at Google News or for tips and tricks, smartphones & gadgets reviews, join GadgetsToUse Telegram Group, or for the latest review videos subscribe GadgetsToUse Youtube Channel.
Непонятно, по каким причинам в Windows 11 разработчики Microsoft решили убрать возможность перетаскивания файлов на панель задач (ПЗ), но вернуть ее можно только с помощью специализированной утилиты, о чем мы и расскажем далее.
Скачать Windows11DragAndDropToTaskbarFix со страницы разработчика на GitHub
- Откройте сайт, ссылка на который дана выше, и кликните по надписи «Windows11DragAndDropToTaskbarFix.exe» в блоке «Assets».

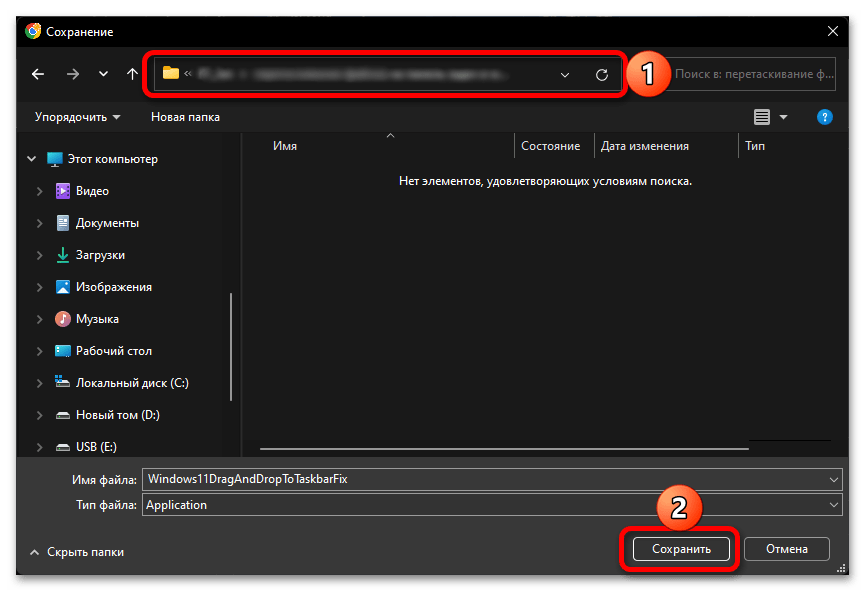
Если того затребуют настройки используемого вами браузера, укажите место для сохранения установочного файла на диске ПК.
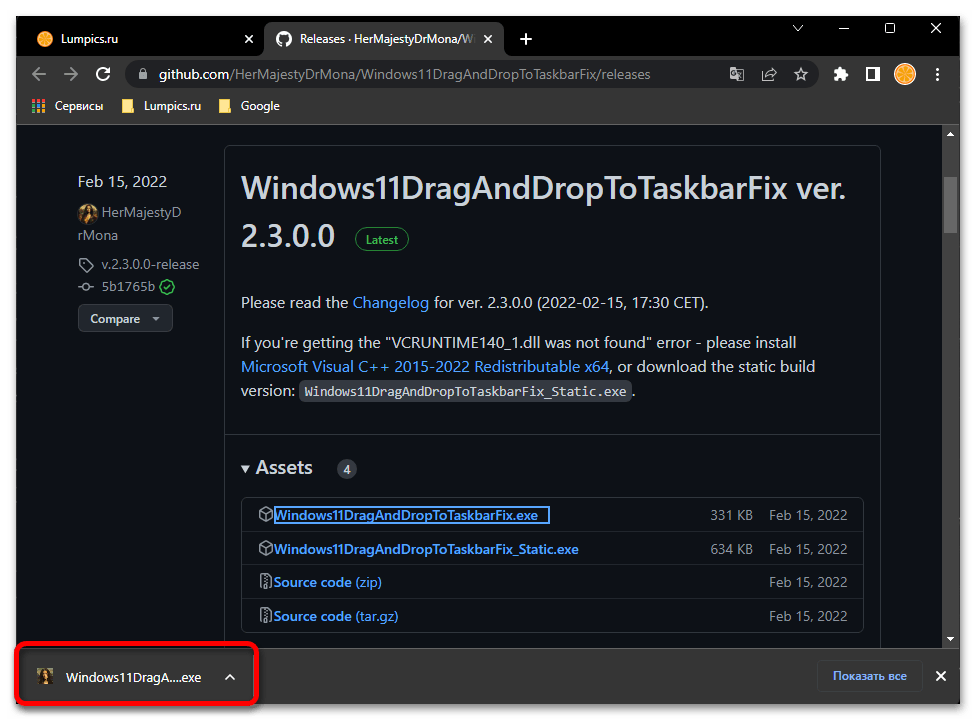
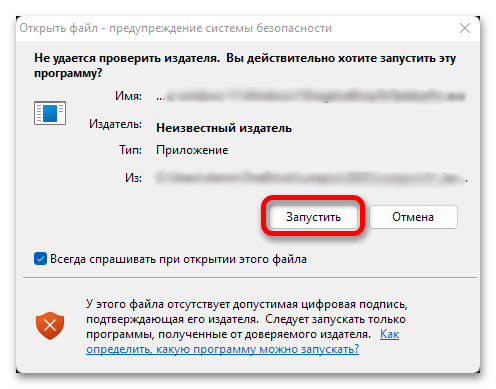
- Когда приложение будет скачано, запустите его,

и подтвердите данное действие в окне с запросом от операционной системы.

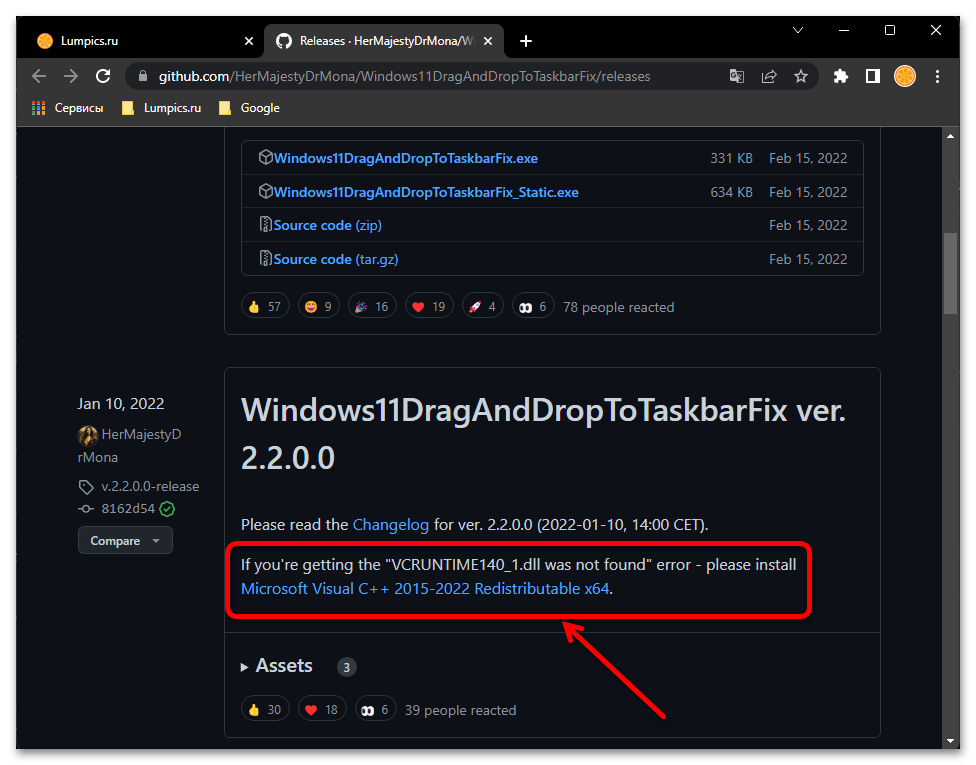
Обратите внимание! Если на данном этапе возникнет ошибка, связанная с библиотекой
VCRUNTIME140_1.dll, вернитесь на страницу, ссылка на которую дана в начале настоящей инструкции, прокрутите ее немного ниже, скачайте файл «Microsoft Visual C++ 2015-2022 Redistributable x64» и выполните установку данного компонента. Затем повторно запустите «Windows11DragAndDropToTaskbarFix.exe». - Windows11DragAndDropToTaskbarFix устанавливается моментально и помещается в системный трей. Никаких дополнительных действий не требуется, вы сразу же сможете перетаскивать файлы на панель задач, в чем достаточно просто убедиться.
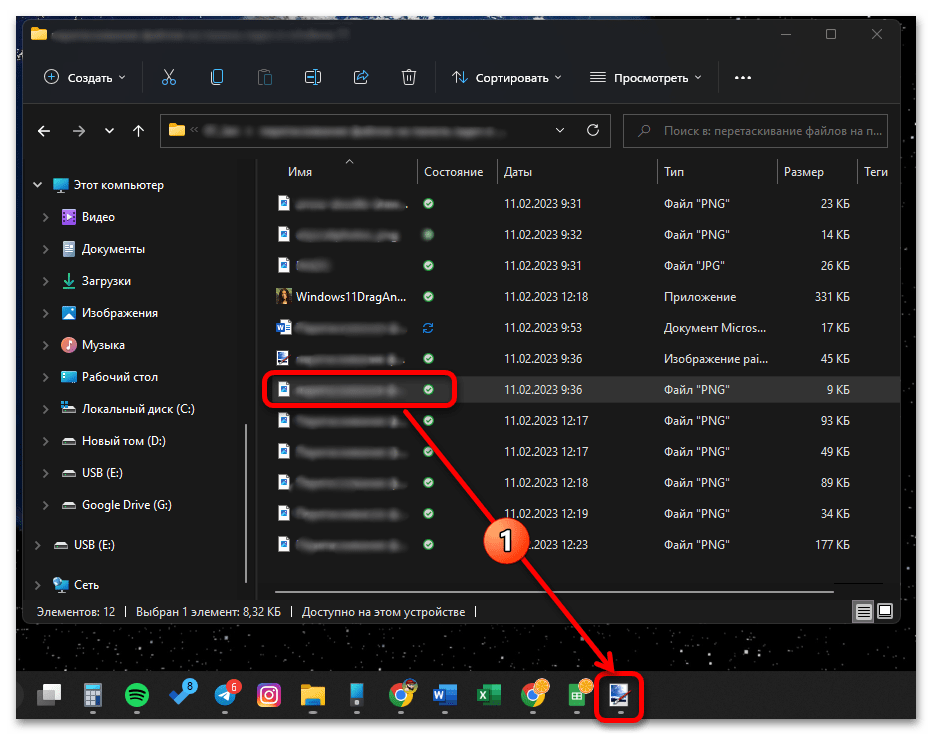
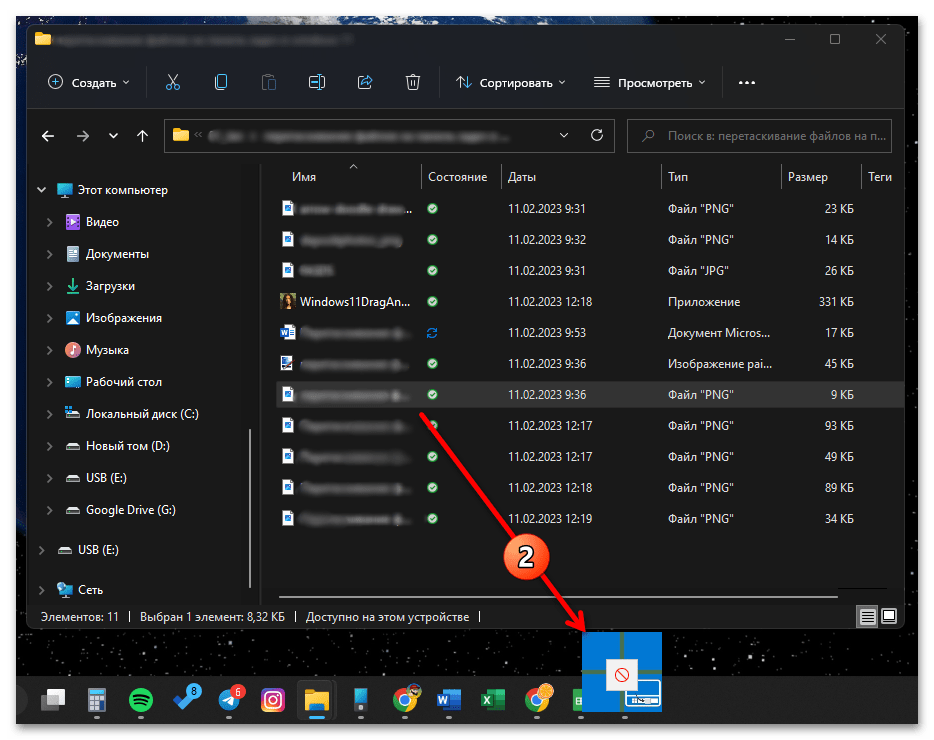
Откройте папку с нужным файлом, кликните по нему левой кнопкой мышки (ЛКМ) и потащите на ярлык программы в ПЗ,

в которой его требуется открыть.

Несмотря на то что поверх ярлыка ненадолго отобразиться значок, сигнализирующий о запрете перемещения, нужное приложение будет развернуто и вы сможете открыть в нем выбранный файл.

Windows11DragAndDropToTaskbarFix не имеет собственного интерфейса, запускается вместе с ОС Windows 11 и работает в фоне. По необходимости вы можете изменить его настройки, для чего нужно развернуть системный трей, нажать правой кнопкой мышки (ПКМ) по ярлыку приложения и выбрать пункт «Configure».

Сразу же после этого будет открыт текстовый файл конфигурации и страница разработчика на GitHub, где представлены общие рекомендации по настройке.


Обратите внимание! Если под перетаскиванием файлов на панель задач вы подразумеваете не их открытие в программах, а закрепление в данной области, ознакомьтесь с представленной по ссылке ниже инструкцией и выполните предложенные в ней рекомендации.
Подробнее: Как закреплять на файлы, папки и ярлыки на панели задач в Виндовс 11
Еще статьи по данной теме:
Помогла ли Вам статья?
Выпустив Windows 11 Microsoft заметно сократила список возможностей таскбара, которые были доступны в Windows 10 и даже более ранних версиях ОС. У многих вызвало недоумение вырезание drag’n’drop. Но её можно вернуть.
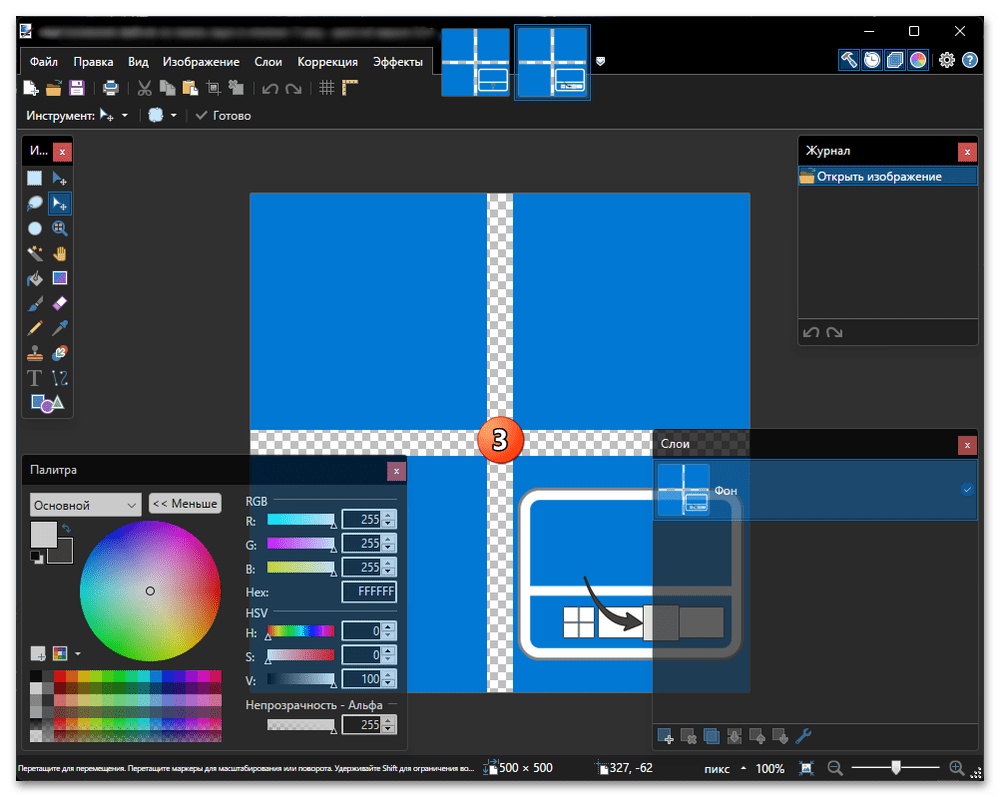
Типичный сценарий, когда, скажем, у вас открыт Photoshop, но его окно свёрнуто, потому что в данный момент вы находитесь в проводнике, просматриваете эскизы иллюстраций, чтобы одну из картинок перетащить мышью в графический редактор. То есть тащим иконку на кнопку Photoshop на таскбаре, чтобы открыть изображение на редактирование. Аналогично можно делать со многими другими рабочими приложениями.
Windows 11 даёт возможность использования только группировки значков на панели задач, что лишает пользователи возможности перетаскивания файла напрямую в программу. Но это можно обойти лайфхаком, либо исправить.
Мы знаем два рабочих способа.
Такие новости мы постоянно публикуем в Telegram. Подписывайтесь на канал, чтобы ничего не пропустить 
- Продолжим объяснение на том же примере с Photoshop. Чтобы перенести файл в окно программы можно подхватить необходимое изображение левой кнопкой мыши и немного протащить его по экрану. Затем не отпуская его, нажать сочетание клавиш «Alt»+«Tab», выбрав в диалоговом окне Photoshop. Далее продолжаем движение мышью — Photoshop открывает нужный файл. Таким образом мы получили костыльную drag’n’drop реализацию.
- Используем сторонние приложения, которые дают кастомизировать и изменять таскбар и меню «Пуск». Одним из самых популярных сегодня стало StartAllBack. Для новичков лицензия будет стоить 4,99 доллара. Приложение даст множество возможностей, которые были в Widndows 10 и даже более. Либо можно использовать бесплатный аналог ExplorerPatcher. Где его скачать и как установить, мы писали ранее. Эти приложения дадут совершенно привычный drag’n’drop, вернув возможность отмены группировки значков, как нас скриншоте к этой статье.
Источник: Droidnews.ru.
👍 / 👎
Тогда можно поддержать её лайком в соцсетях. На новости сайта вы ведь уже подписались?
Или хотя бы оставить довольный комментарий, чтобы мы знали, какие темы наиболее интересны читателям. Кроме того, нас это вдохновляет. Форма комментариев ниже.
Что с ней так? Своё негодование вы можете высказать на zelebb@gmail.com или в комментариях. Мы постараемся учесть ваше пожелание в будущем, чтобы улучшить качество материалов сайта. А сейчас проведём воспитательную работу с автором.
Если вам интересны новости мира ИТ так же сильно, как нам, подписывайтесь на Telegram-канал. Там все материалы появляются максимально оперативно. Или, может быть, удобнее «Вконтакте»?
Читайте нас где удобно
Ещё на эту тему было
- Как запретить OneDrive перехватывать клавишу PrtSc?
- Microsoft сделает Windows более безопасной
- Как передавать файлы со смартфона на ПК и обратно по Bluetooth?
- Приложение просмотра фото Windows желтит кадры. Как починить?
- Windows 11, наконец, догнала по скорости работы windows 10
- Поддерживает ли ваш ПК DirectStorage? Microsoft выпустила утилиту для проверки
- Windows 11 может получить новый инструмент контроля приватности
- Скачать Windows 11 и Windows 10 с сайта Microsoft из России больше невозможно
- В обновлении Windows 11 появятся папки на рабочем столе, как в Android
- Обновление Windows 11 даст больше эффектов прозрачности для сторонних приложений
Для тех, кто долистал
Ай-ти шуточка бонусом. Время от времени Google вызывает из своего гарема нового производителя и заставляет делать ему Nexus.