Поддержка протокола DNS over HTTPS (DoH) появилась в последнем билде Windows 10 2004 (May 2020 Update). Начиная с этой версии, Windows 10 может выполнять разрешение имен через HTTPS с помощью встроенного клиента DoH. В этой статье мы расскажем для чего нужен протокол DNS over HTTPS, как его включить и использовать в Windows 10.
Когда ваш компьютер обращается к серверу DNS для разрешения имен, этот обмен данными происходит в открытом виде. Злоумышленник может подслушать ваш трафик, определить какие ресурсы вы посещали, или манипулировать DNS трафиком по типу main-in-the-middle. Протокол DNS over HTTPS предполагает усиление защиты приватности данных пользователей за счет шифрования всех DNS запросов. Протокол DoH инкапсулирует запросы DNS в HTTPS трафик и отправляет из DNS серверу (нужен специальный DNS сервер с поддержкой DoH).
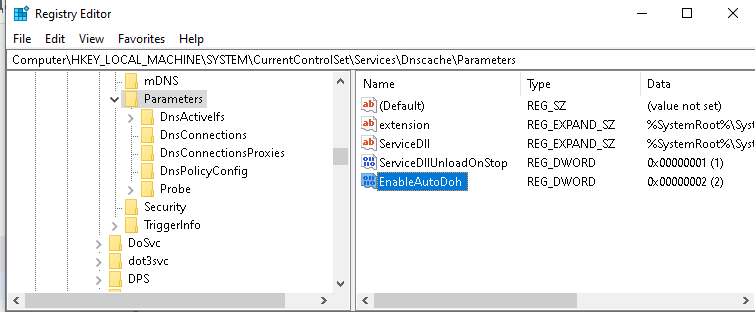
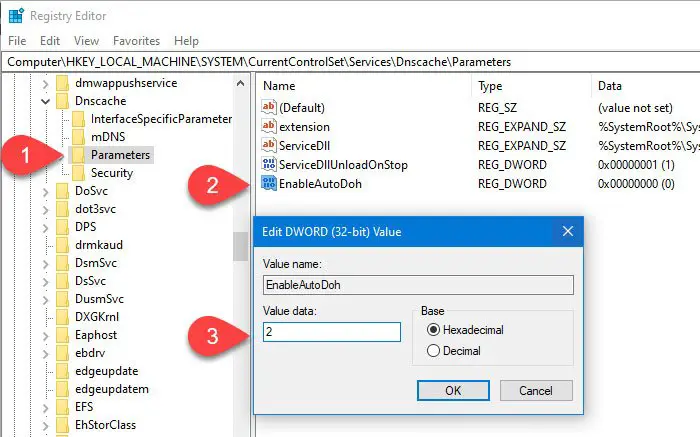
В Windows 10 2004 пока нет параметра групповой политики или опции в графическом интерфейсе для включения DNS-over-HTTPS. Пока можно включить DoH только через реестр:
- Запустите
regedit.exe
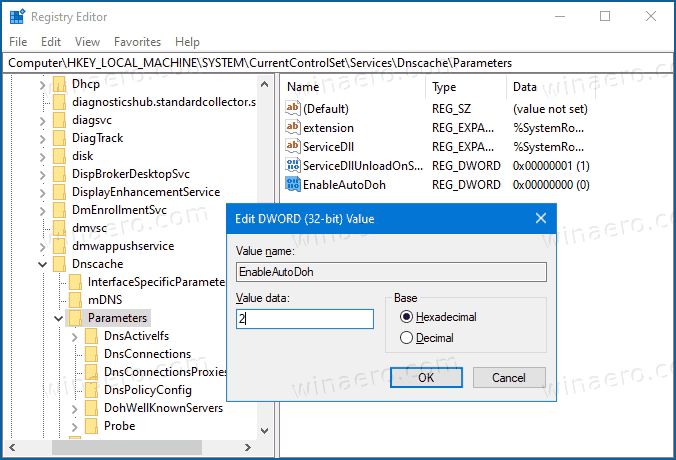
; - Перейдите в ветку реестра HKEY_LOCAL_MACHINE\SYSTEM\CurrentControlSet\Services\Dnscache\Parameter;
- Создайте DWORD параметр с именем EnableAutoDoh и значением 2;

Также вы можете создать этот параметр реестра с помощью комнадлета New-ItemProperty:
$AutoDohPath = 'HKLM:\SYSTEM\CurrentControlSet\Services\Dnscache\Parameters'
$AutoDohKey = 'EnableAutoDoh'
New-ItemProperty -Path $AutoDohPath -Name $AutoDohKey -Value 2 -PropertyType DWord -Force
- Затем нужно перезапустить службу DNS клиент. Для этого нужно перезагрузить компьютер, т.к. нормально перезапустить службу dnscase у меня не получится (командлет
Restart-Service -Name Dnscache –force
выдает ошибку “Collection was modified; enumeration operation may not execute”).
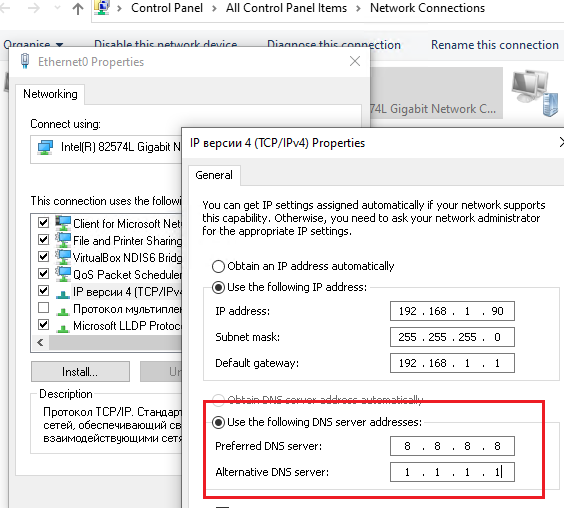
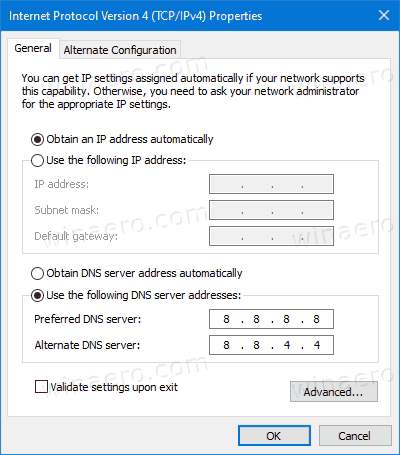
Затем нужно изменить настройки DNS вашего сетевого подключения. Нужно указать DNS сервера с поддержкой DNS over HTTPS. Пока далеко не все DNS сервера поддерживают DoH. В таблице ниже перечислен список общедоступных DNS с поддержкой DNS over HTTPS.
| Провайдер | IP адреса DNS серверов с поддержкой DNS over HTTPS |
| Cloudflare | 1.1.1.1, 1.0.0.1 |
| 8.8.8.8, 8.8.4.4 | |
| Quad9 | 9.9.9.9, 149.112.112.112 |
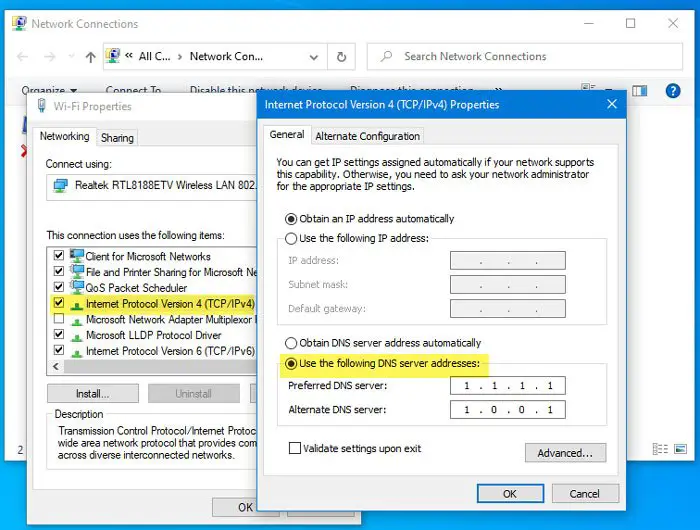
Откройте панель настройки сети — Control Panel -> Network and Internet -> Network and Sharing Center (или
ncpa.cpl
). Затем в свойствах сетевого адаптера измените текущие адреса DNS серверов на адреса DNS серверов с поддержкой DoH.
Вы можете изменить адреса DNS серверов в настройках сетевого адаптера с помощью PowerShell (см. статью о настройке сети с помощью PowerShell):
$PhysAdapter = Get-NetAdapter -Physical
$PhysAdapter | Get-DnsClientServerAddress -AddressFamily IPv4 | Set-DnsClientServerAddress -ServerAddresses '8.8.8.8', '1.1.1.1'
Теперь клиент DNS начинает использовать для разрешения имен протокол HTTPS по порту 443 вместо обычного 53 порта.
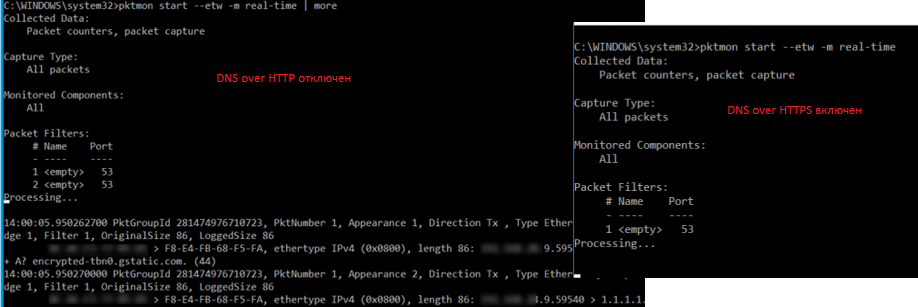
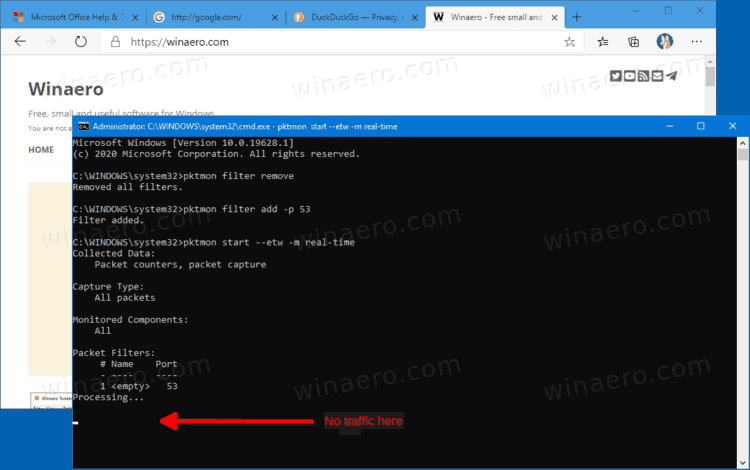
С помощью утилиты захвата сетевого трафика PktMon.exe (о которой мы говорили ранее) вы можете проверить, что с компьютера теперь не отправляются DNS запросы по порту 53.
Удалите все текущие фильтры Packet Monitor:
pktmon filter remove
Создайте новый фильтр для классического DNS порт 53:
pktmon filter add -p 53
Запустите мониторинг трафика в реальном времени (трафик выводится в консоль):
pktmon start --etw -p 0 -l real-time
Если вы правильно настроили DNS over HTTPS, то трафик по порту 53 должен отсутствовать (на скриншоте ниже показан вывод в консоль при отключённом DoH и при включенном).
DNS over HTTPS за последний год реализован во всех популярных браузерах (Google Chrome, Mozilla Firefox, Microsoft Edge, Opera). В каждом из этих браузеров вы можете включить поддержку DoH. Таком образом все DNS запросы от браузера будут шифроваться (DNS трафик других приложений по прежнему будет идти в открытом текстовом виде).
Больше все проблем технологии DNS over HTTPS и DNS over TLS создадут администраторам корпоративных сетей, которым станет сложнее блокировать доступн к внешним ресурсам из внутренних сетей. Также не понятно, что парирует делать Роскомнадзор, чья методика глубокой проверки и управления сетевым трафиком Deep Packet Inspection (DPI) перестанет работать при переходе протокола DNS на рельсы шифрованного https.
Windows 10 теперь включает поддержку DNS через HTTPS для повышения конфиденциальности в Интернете, и вот как включить эту функцию.
DNS over HTTPS (DoH) — это сетевой протокол, предназначенный для шифрования запросов системы доменных имен (DNS) с использованием протокола HTTPS (Hypertext Transfer Protocol Secure). Основная цель DoH — защитить эти запросы — повысить конфиденциальность и безопасность пользователей, не позволяя злоумышленникам просматривать и манипулировать DNS-трафиком, исходящим с вашего устройства.
Веб-браузеры, такие как Google Chrome и Mozilla Firefox, уже поддерживают этот дополнительный уровень безопасности, а Windows 10 теперь поддерживает DoH на уровне системы начиная со сборки 20185 с использованием приложения «Параметры».
В этом руководстве вы узнаете, как включить DNS через HTTPS в Windows 10, чтобы сделать вашу работу в сети более конфиденциальной.
Включить DNS через HTTPS в Параметрах Windows 10
Начиная со сборки 20185, вы можете включить DNS через HTTPS в настройках свойств сети без необходимости изменять реестр.
Чтобы включить шифрование DNS через HTTPS (DoH) в Windows 10, выполните следующие Шаги:
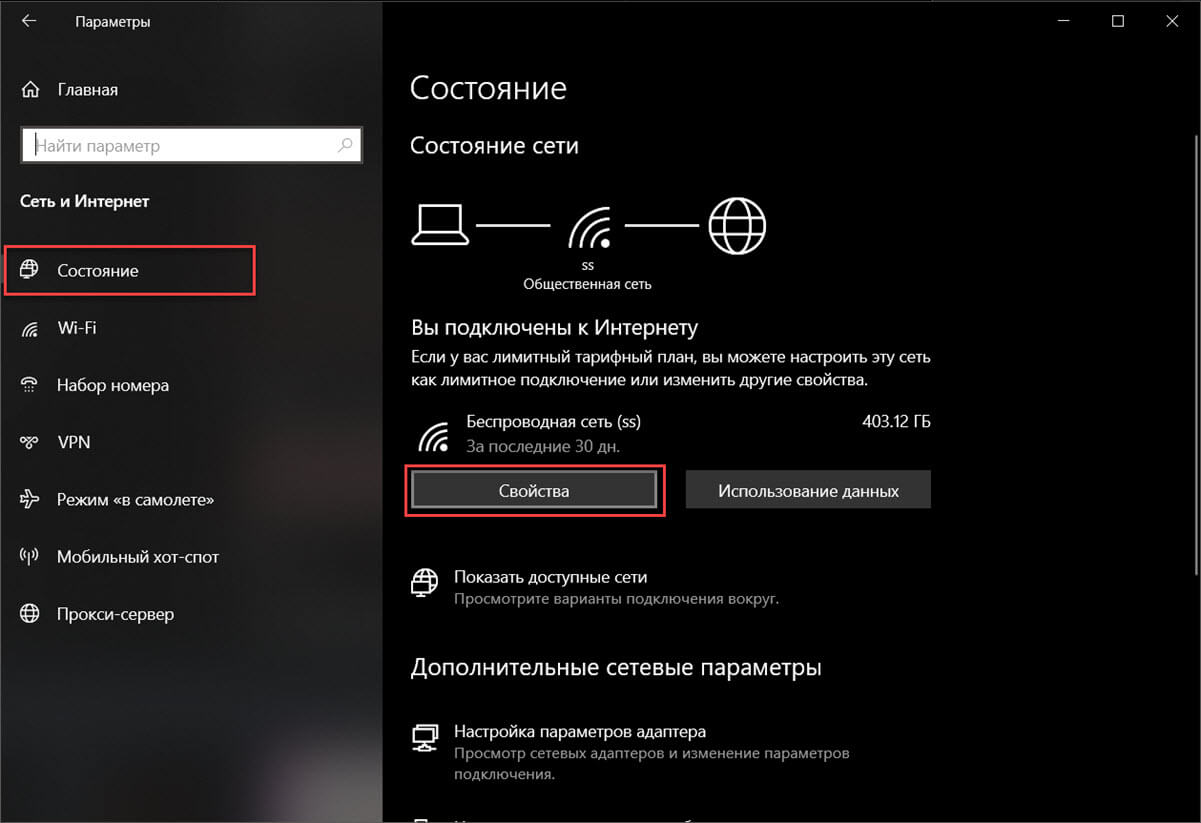
Шаг 1: Откройте «Параметры».
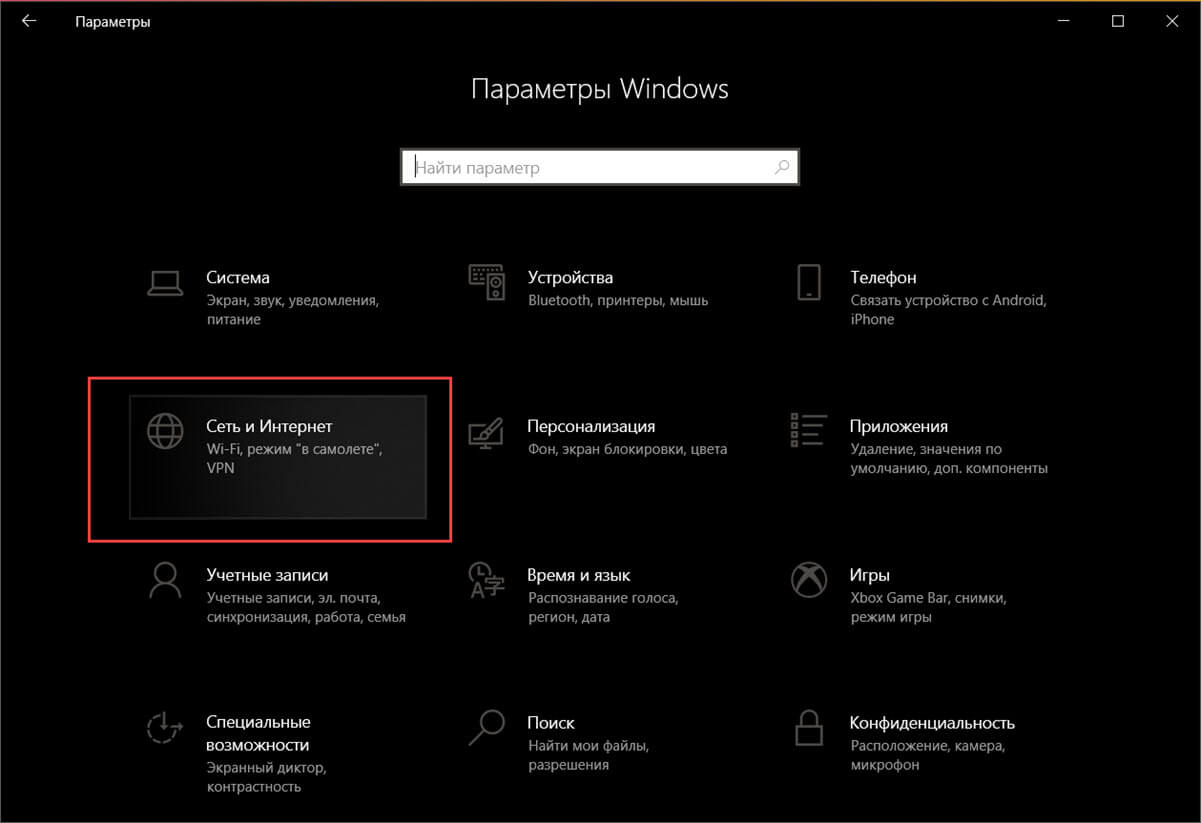
Шаг 2: Перейдите в раздел «Сеть и Интернет» → «Состояние».
Шаг 3: В разделе «Состояние сети» нажмите кнопку «Свойства» для вашего активного подключения.
Шаг 4: В разделе «Параметры DNS сети» нажмите кнопку «Изменить».

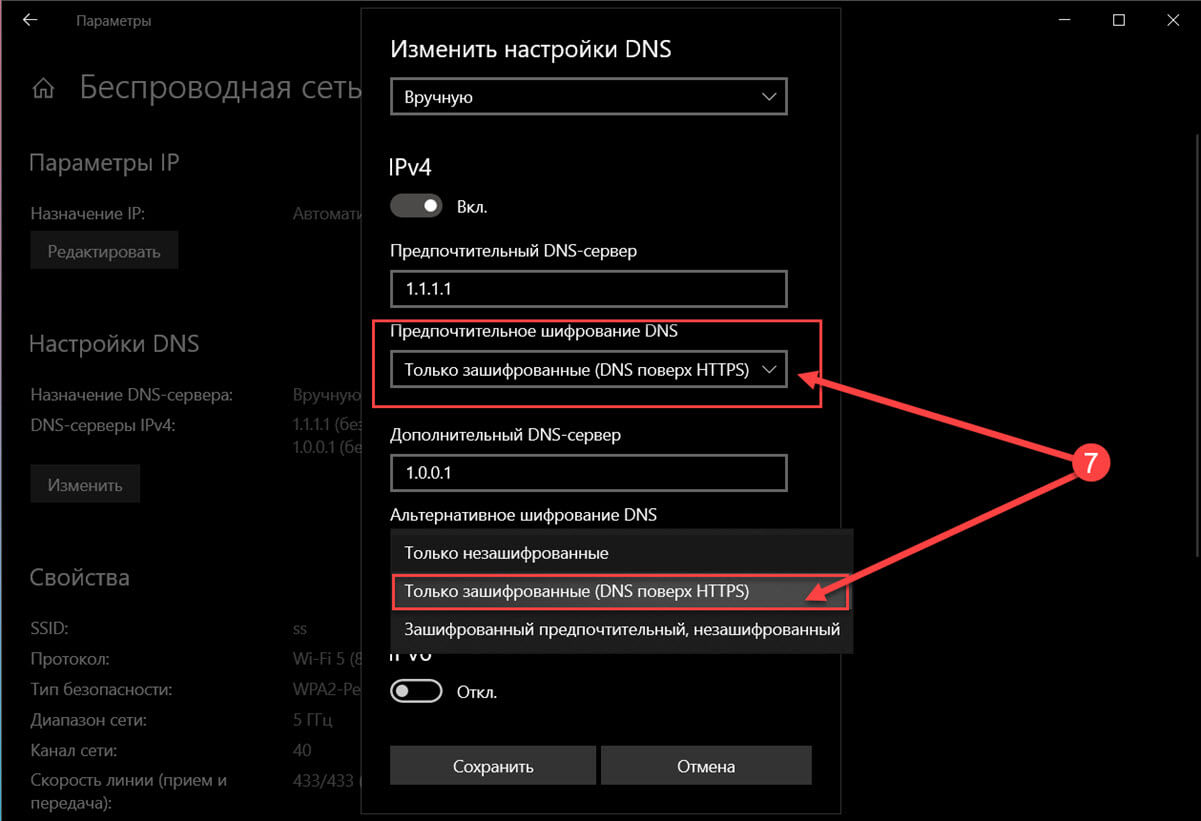
Шаг 5: Используйте раскрывающееся меню и выберите параметр «Вручную».
Шаг 6: Передвиньте ползунок переключателя IPv4 в положение «Вкл.».
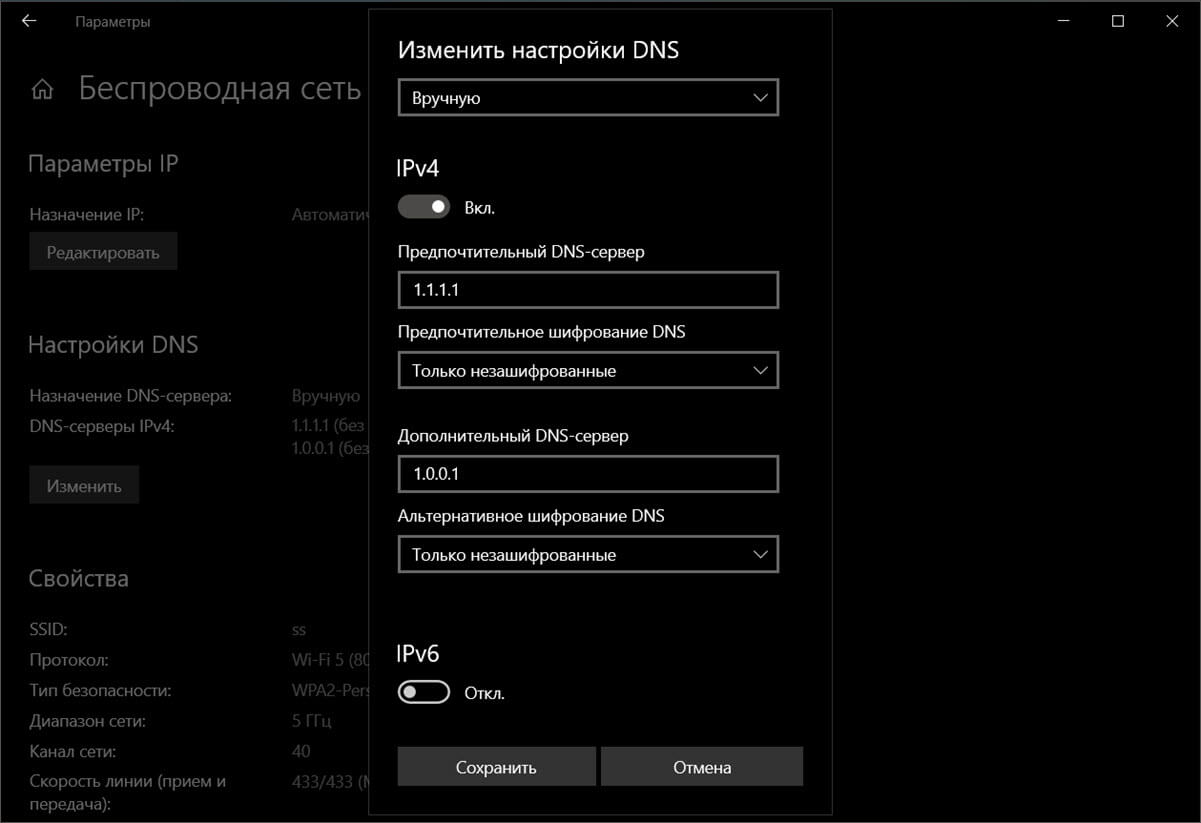
Шаг 7: В разделах «Предпочитаемый DNS-сервер» и «Альтернативный DNS-сервер» укажите первичный и вторичный IP-адрес DoH одной из поддерживаемых служб:
Cloudflare:
- 1.1.1.1
- 1.0.0.1
Google:
- 8.8.8.8
- 8.8.4.4
Quad9:
- 9.9.9.9
- 149.112.112.112
Шаг 8: Используйте раскрывающееся меню «Предпочтительное шифрование DNS» и выберите вариант «Только зашифрованные (DNS через HTTPS)».
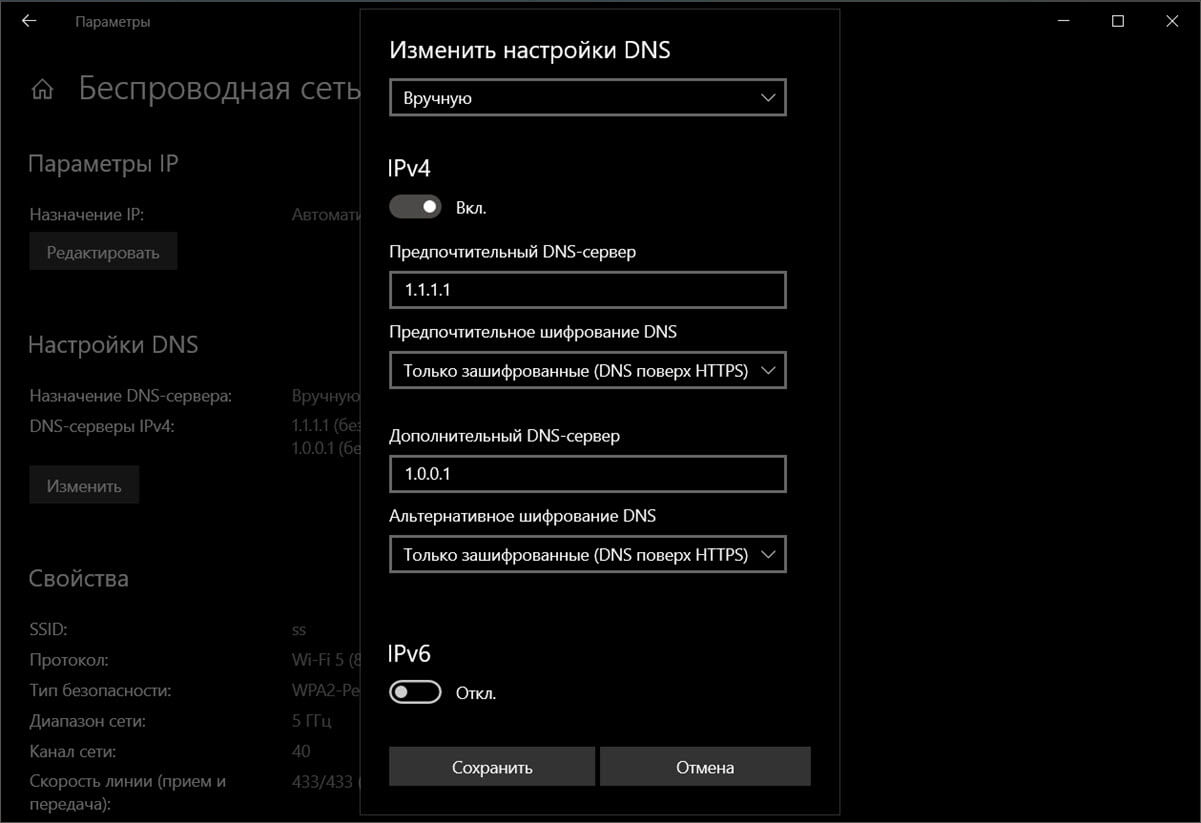
Вы также можете выбрать другие параметры шифрования, в том числе:
- «Только не зашифрованные»: весь трафик DNS передается без шифрования.
- «Только зашифрованные (DNS через HTTPS)»: весь трафик DNS передается с шифрованием (рекомендуется).
- «Зашифрованный предпочтительный, не зашифрованный»: трафик DNS передается в зашифрованном виде, но позволяет отправлять запросы без шифрования.
Примечание: Если вы не видите настройки предпочтительного шифрования, откройте свойства активного сетевого подключения и добавьте адреса DNS серверов для протокола IPv4.

Вернитесь в свойства активного подключения и нажмите ссылку «Изменить параметры DNS для всех сетей», в разделе «Настройки DNS» снова нажмите кнопку «Изменить».
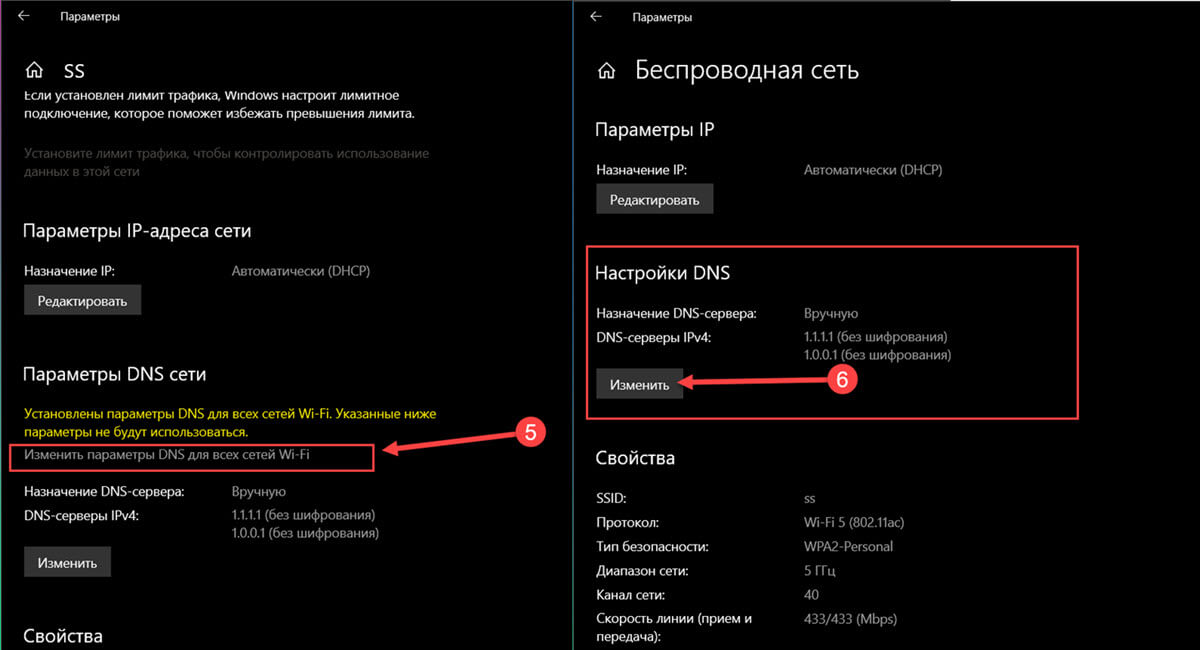
Используйте раскрывающееся меню «Предпочтительное шифрование DNS» и выберите параметр «Только зашифрованные (DNS через HTTPS)».
Шаг 8: (Необязательно) Включите тумблер IPv6 .
В разделах «Предпочитаемый DNS» и «Альтернативный DNS» укажите первичный и вторичный IP-адрес DoH одной из поддерживаемых служб:
Cloudflare:
- 2606: 4700: 4700 :: 1111
- 2606: 4700: 4700 :: 1001
Google:
- 2001: 4860: 4860 :: 8888
- 2001: 4860: 4860 :: 8844
Quad9:
- 2620: fe :: fe
- 2620: fe :: fe: 9
Windows 10 IPv6 DNS через HTTPS
Windows 10 IPv6 DNS через HTTPS
Шаг 9: Нажмите кнопку «Сохранить».
После того, как вы выполните эти шаги, Windows 10 начнет шифрование DNS-трафика по протоколу HTTPS.
Как проверить, что DNS over HTTPS работает
Чтобы проверить, работает ли DoH, выполните следующие действия:
Шаг 1: Откройте «Параметры».
Шаг 2: Перейдите в раздел «Сеть и Интернет» → «Состояние».
Шаг 3: В разделе «Состояние сети» нажмите кнопку «Свойства» для активного подключения.
Шаг 4: В разделе «Настройки DNS» адрес DNS-серверов IPv4 должен включать метку «зашифровано».

Выполнив эти шаги, вы поймете, правильно ли работает DNS через HTTPS.
В Windows 10 DoH был впервые представлен в сборке 19628, и вам нужно было использовать реестр для включения этой функции. Начиная со сборки 20185, вы можете настроить эту функцию с помощью приложения «Параметры», выполнив указанные выше действия.
Если опция недоступна, это потому, что вы используете версию Windows 10, которая не поддерживает эту функцию. DNS через HTTPS доступен в приложении «Параметры», начиная со сборки 20185 и более поздних. Вы можете проверить версию, которую вы используете перейдя в «Параметры» → «Система» → «О системе» или с помощью команды «winver» в диалоговом окне «Выполнить».
Рекомендуем: Как в Windows 10 — полностью скрыть DNS-трафик от посторонних глаз, используя шифрование.
If you have been waiting for a system-wide DNS over HTTPS service for your Windows 11/10 computer, here is good news for you. Now you can enable and test DNS over HTTPS in Windows 11/10 with a little tweak. If you are a part of the Windows Insider Program, you can check it today, whereas stable version users might have to wait a bit.
DNS over HTTPS or DoH helps you to get rid of the ISP monitoring. Currently, it is possible to enable DNS over HTTPS in Firefox, Chrome, Edge, Opera, etc. browsers. However, now you can do the same as a system-wide setting in Windows 11/10.
DoH prevents ISPs from tracking the users’ activity by bypassing the default DNS service. Whenever you connect to the internet, it gets through a DNS service, which is provided by the ISP, by default, and this is how the ISP keeps an eye on you. If you want to get rid of that, you should use DNS over HTTPS.
To enable and test DNS over HTTPS in Windows 11/10, follow these steps-
- Open Registry Editor on your PC.
- Navigate to the Dnscache\Parameters key.
- Create a new DWORD value.
- Name it as EnableAutoDoh.
- Set the value to
- Add the DNS server in the Control Panel.
- Restart your computer.
- Open elevated Command Prompt.
- Reset network traffic filters.
- Add a new traffic filter for Port 53.
- Start real-time traffic logging.
To know more about these steps in detail, read on.
As this feature is under development, users need to create a new Registry value to turn on the DoH service. For that, you need to open the Registry Editor on your PC and navigate to this path-
HKEY_LOCAL_MACHINE\SYSTEM\CurrentControlSet\Services\Dnscache\Parameters
Here you need to create a new DWORD (32-bit) value.
Right-click on the space, select New, and choose the DWORD (32-bit) Value. After that, name it as EnableAutoDoh.
Now, you need to set the value to 2. For that, double-click on EnableAutoDoh, type 2, and click the OK button.
Then, you need to change the default DNS settings on your computer.
For that, press Win+R, type ncpa.cpl, and hit the Enter button. Next, right-click on the currently connected network and select Properties.
Double-click on the Internet Protocol Version 4 (TCP/IPv4) or Internet Protocol Version 6 (TCP/IPv6). It depends on which version of IP your ISP is using.
Next, select Use the following DNS server addresses radio button, and enter the IP addresses as follows:
Google:
8.8.8.8
8.8.4.4
2001:4860:4860::8888
2001:4860:4860::8844
Cloudflare
1.1.1.1
1.0.0.1
2606:4700:4700::1111
2606:4700:4700::1001
Quad9
9.9.9.9
149.112.112.112
2620:fe::fe
2620:fe::fe:9
Read : How to set up and use CloudFlare’s new DNS service 1.1.1.1.
After that, click the OK button, close all the windows, and restart your computer as it is the best way to restart the DNS service.
Now, you need to open an elevated Windows PowerShell or Command Prompt window and execute this command-
pktmon filter remove
The pktmon command will reset the current network traffic filters.
Next, use the following command to add a traffic filter for port 53.
pktmon filter add -p 53

At this point, you are almost set. Now, you need to start logging the real-time traffic so that you can understand the monitoring process-
pktmon start --etw -m real-time
All the port 53 packets should be redirected and printed to the command line.
However, if you want to test a DoH server that isn’t in the official auto-promotion list, you need to register it first from your computer. For that, you can enter the following command-
netsh dns add encryption server=<your-server’s-IP-address> dohtemplate=<your-server’s-DoH-URI-template>
Don’t forget to make the necessary changes in this command. Now, you can verify the addition by using this command-
netsh dns show encryption server=<your-server’s-IP-address>
It should show the new template that you just added. After that, you can go through the real-time traffic logging step.
I hope this tutorial will help you.
Read:
- How to use the DNS over HTTPS (DoH) in Windows 11
- How to enable DNS over TLS in Windows 11.
Credit and thanks for feature work to Alexandru Jercaianu and Vladimir Cernov
If you have been waiting to try DNS over HTTPS (DoH) on Windows 10, you’re in luck: the first testable version is now available to Windows Insiders! If you haven’t been waiting for it, and are wondering what DoH is all about, then be aware this feature will change how your device connects to the Internet and is in an early testing stage so only proceed if you’re sure you’re ready. Having said that, if you want to see the Windows DoH client in action and help us create a more private Internet experience for our customers, here is what you need to do:
Step 1: How do I get a Windows build with DoH support?
First, make sure your Microsoft account is part of the Windows Insider Program. If you know you are already a Windows Insider, make sure you are in the Fast ring and go to Step 2. If not, go here and follow the instructions for the Fast ring so you can get the latest Insider Preview build.
Once this is done, run Windows Update, reboot, and verify you’re running Build 19628 or higher. You can do this by clicking here or by going to the Settings app -> System -> About.
Step 2: How do I turn on the DoH feature?
Once you know your Windows install has our DoH client, we need to activate it. You can do that by:
- Opening the Registry Editor
- Navigate to the HKEY_LOCAL_MACHINE\SYSTEM\CurrentControlSet\Services\Dnscache\Parameters registry key
- Create a new DWORD value named “EnableAutoDoh”
- Set its value to 2
Please note: the registry keys and values described here are only for enabling DoH client testing on Insider builds. When the DoH client is made available in general release builds, registry configuration of DoH will not be supported.

Step 3: How do I add DoH servers to Windows?
Now that the DoH client is active, Windows will start using DoH if you already have one of these servers configured:
|
Server Owner |
Server IP addresses |
|
Cloudflare |
1.1.1.1 1.0.0.1 2606:4700:4700::1111 2606:4700:4700::1001 |
|
|
8.8.8.8 8.8.4.4 2001:4860:4860::8888 2001:4860:4860::8844 |
|
Quad9 |
9.9.9.9 149.112.112.112 2620:fe::fe 2620:fe::fe:9 |
You can configure Windows to use any of these IP addresses as a DNS server through the Control Panel or the Settings app. The next time the DNS service restarts, we’ll start using DoH to talk to these servers instead of classic DNS over port 53. The easiest way to trigger a DNS service restart is by rebooting the computer.
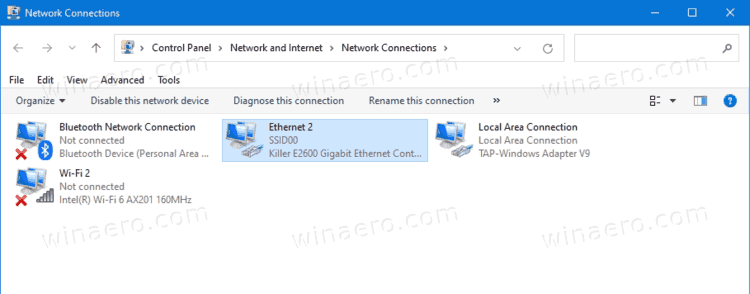
To add a DNS server in the Control Panel:
- Go to Network and Internet -> Network and Sharing Center -> Change adapter settings.
- Right click on the connection you want to add a DNS server to and select Properties.
- Select either “Internet Protocol Version 4 (TCP/IPv4)” or “Internet Protocol Version 6 (TCP/IPv6)” and click Properties.
- Ensure the “Use the following DNS server addresses” radio button is selected and add the DNS server address into the fields below.
Step 4: How do I know DoH is working?
Now that you have Windows configured to use DoH, you should be able to verify it’s working by seeing no more plain text DNS traffic from your device. You can do this by using Packetmon, a network traffic analyzer included with Windows.
Start by opening a new Command Prompt or PowerShell window. Run the following command to reset any network traffic filters PacketMon may already have in place.
pktmon filter removeRun the following command to add a traffic filter for port 53, the port classic DNS uses (and which should now be silent since we’re only using DoH).
pktmon filter add -p 53Run the following command to start a real-time logging of traffic. All port 53 packets will be printed to the command line. If your device is only configured with DoH servers, this should show little to no traffic.
pktmon start --etw -m real-timeStep 5: How do I use a DoH server that isn’t on the auto-promotion list?
If you’re trying to test a DoH server that isn’t already on our auto-promotion list, such as your ISP’s DoH servers, you can add it to our list manually using the command line. First, identify the IP address and the DoH URI template for the server you want to add. Then, run the following command as an administrator:
netsh dns add encryption server=<your-server’s-IP-address> dohtemplate=<your-server’s-DoH-URI-template>You can verify the template was applied to the well-known DoH server list by running this command, which should show you the template being used for a given IP address:
netsh dns show encryption server=<your-server’s-IP-address>Now when Windows is configured to use that IP address as a DNS server, it will use DoH instead of classic DNS.
You can enable DNS over HTTPS in Windows 10 (DoH) in Windows 10 using one of the methods available in the OS, including Settings and Registry. DNS-over-HTTPS is a relatively young web protocol. Its primary goal is to increase user privacy and security by preventing eavesdropping and manipulation of DNS data by man-in-the-middle attacks by using the HTTPS protocol to encrypt the data between the DoH client and the DoH-based DNS resolver.
The plan to support DoH in Windows 10 was revealed with a number of principles Microsoft is going to use when implementing the feature in the OS. Microsoft planned to implement support for encryption of DNS traffic back in 2019, but users were able to try this new feature only in 2020. So Windows 10 Build 19628 was the first build to include the DoH support.
This post will show you how to enable and configure the DNS over HTTPS (DoH) feature on Windows 10.
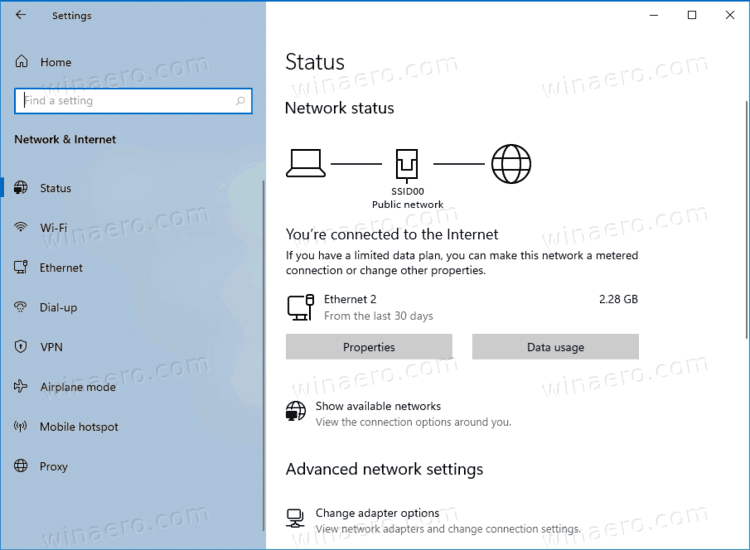
- Open the Settings app. You can press Win + I to open it faster.
- Navigate to Network & internet > Status.

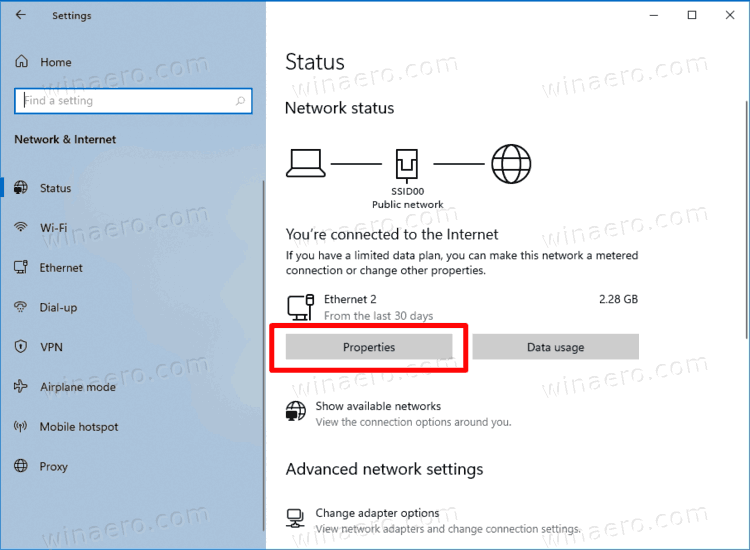
- Click on Properties.
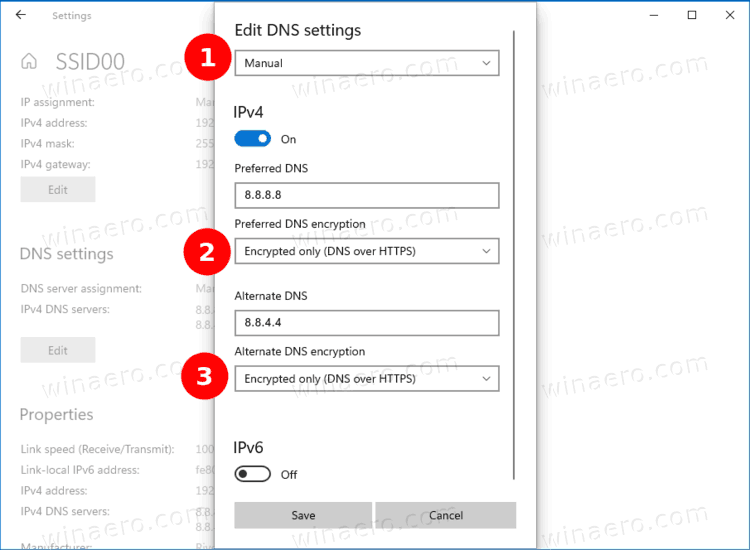
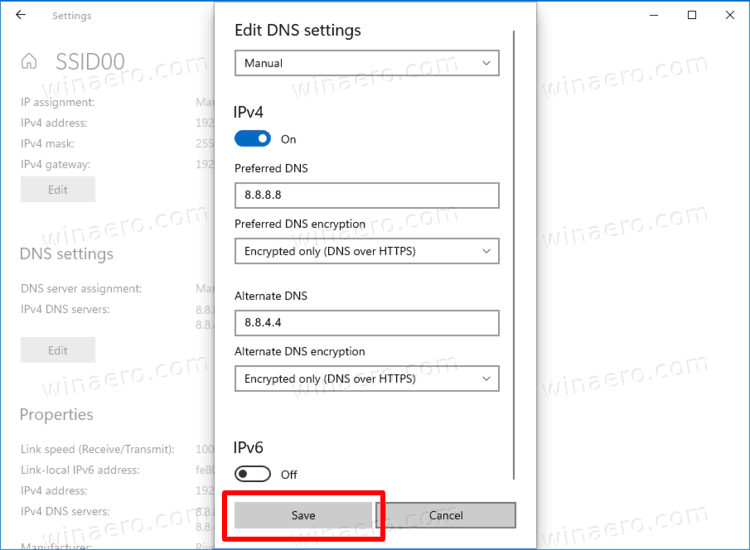
- On the next page, click on the Edit button under DNS settings.
- Select Manual.
- Specify DNS servers that support DoH (see the list in the next chapter).
- Select Encrypted only (DNS over HTTPS) from the In the Preferred DNS encryption drop-down menu for each of the servers.
- If you are using IPv6 DNS, repeat the previous step for the its configuration.
- Finally, click on the Save button.
You are done. To find that DoH actually works, scroll down the contents of the network settings page. You should see «Encrypted» next to the DNS address value on the Properties page.
The list of public DNS server that support encryption can be found in the table below.
The list of DoH-enabled servers
You can use the following public DNS over HTTPS servers.
| Server Owner | IPv4 addresses | IPv6 addresses |
| Cloudflare | 1.1.1.1
1.0.0.1 |
2606:4700:4700::1111
2606:4700:4700::1001 |
| 8.8.8.8
8.8.4.4 |
2001:4860:4860::8888
2001:4860:4860::8844 |
|
| Quad9 | 9.9.9.9
149.112.112.112 |
2620:fe::fe
2620:fe::fe:9 |
However, if your Windows 10 version doesn’t allow to turn on DNS over HTTPS in Settings, e.g. the options are missing, you can apply a Registry tweak to do the same. It is an alternative method to the Settings app.
Turn on DNS over HTTPS in the Registry
- Open the Registry Editor. Press Win + R and type
regeditin the Run box. - Go to the following Registry key.
HKEY_LOCAL_MACHINE\SYSTEM\CurrentControlSet\Services\Dnscache\Parameters. - On the right, modify or create a new 32-Bit DWORD value EnableAutoDoh.
- Set its value to
2.
- Restart Windows 10.
This will activate DNS over HTTPS, so Windows 10 will start sending and receiving DNS traffic through secure, encrypted servers. However, you need to change the DNS server address to one from the above mentioned table. Here is how you can set a DNS server address.
Change Server Address after enabling DoH
- Open the classic Control Panel. Press Win + R and type
controlin the Run box, then hit Enter. - Go to Control Panel\Network and Internet\Network and Sharing Center.
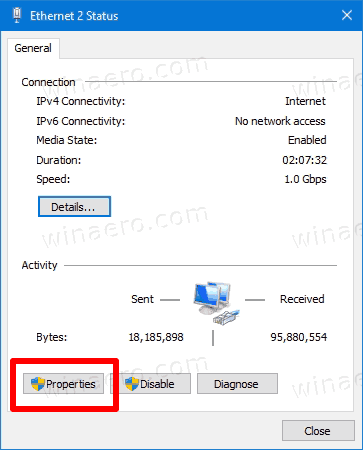
- On the right, click on Change adapter properties.

- In the Network Connections window, double-click your network connection.

- Click Properties in the next window.

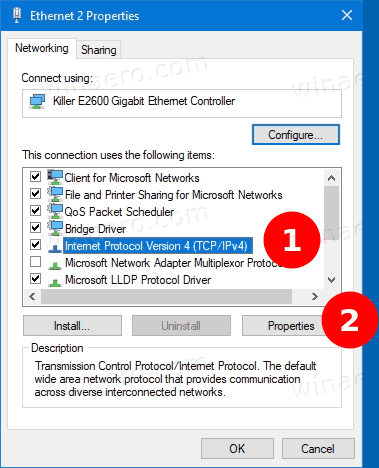
- In Adapter Properties, select the Internet Protocol Version 4 (TCP/IPv4) entry, and click on the Properties button.

- Select the option «Use the following DNS server addresses:» on the General tab. Enter the DNS server address that supports DoH.

- If your network configuration includes IPv6, specify the IPv6 servers for the Internet Protocol Version 6 (TCP/IPv6) option.
- Click OK to apply the change.

You are done.
Finally, you can check if DNS over HTTPS works for you after applying the Registry tweak and the above mentioned changes. You can verify it’s working by seeing no more plain text DNS traffic from your device.
Verify that your DNS over HTTPS settings work
- Open a command prompt as Administrator.
- Type and run the following command to reset network traffic filter:
pktmon filter remove. - Type and run the following command to add a traffic filter for port 53, the port classic DNS uses:
pktmon filter add -p 53. - Run the following command to start a real-time logging of traffic:
pktmon start --etw -m real-time. - All port 53 packets will be printed to the command line. If DoH works, you should not see traffic here.

That’s it.
Related articles:
- Enable DNS over HTTPS in Microsoft Edge
- How to Enable DNS over HTTPS (DoH) in Opera
- Enable DNS over HTTPS in Chrome (DoH)
- Enable DNS over HTTPS in Firefox
Support us
Winaero greatly relies on your support. You can help the site keep bringing you interesting and useful content and software by using these options:
If you like this article, please share it using the buttons below. It won’t take a lot from you, but it will help us grow. Thanks for your support!