Configuring the Cisco IOS DHCP Server
Cisco routers running Cisco IOS software include Dynamic Host Configuration Protocol (DHCP) server and relay agent software. The Cisco IOS DHCP server is a full DHCP server implementation that assigns and manages IP addresses from specified address pools within the router to DHCP clients. The DHCP server can be configured to assign additional parameters such as the IP address of the Domain Name System (DNS) server and the default router.
This module describes the concepts and the tasks needed to configure the Cisco IOS DHCP server.
- Finding Feature Information
- Prerequisites for Configuring the DHCP Server
- Information About the Cisco IOS DHCP Server
- How to Configure the Cisco IOS DHCP Server
- Configuration Examples for the Cisco IOS DHCP Server
- Additional References
- Feature Information for the Cisco IOS DHCP Server
Finding Feature Information
Your software release may not support all the features documented in this module. For the latest feature information and caveats, see the release notes for your platform and software release. To find information about the features documented in this module, and to see a list of the releases in which each feature is supported, see the Feature Information Table at the end of this document.
Use Cisco Feature Navigator to find information about platform support and Cisco software image support. To access Cisco Feature Navigator, go to www.cisco.com/go/cfn. An account on Cisco.com is not required.
Prerequisites for Configuring the DHCP Server
Before you configure the Cisco IOS DHCP server, you should understand the concepts documented in the «DHCP Overview» module.
The Cisco IOS DHCP server and relay agent are enabled by default. You can verify if they have been disabled by checking your configuration file. If they have been disabled, the no service dhcp command will appear in the configuration file. Use the service dhcp command to reenable the functionality if necessary.
Port 67 (the server port) is closed in the Cisco IOS DHCP/BOOTP default configuration. There are two logical parts to the service dhcp command: service enabled and service running. The DHCP service is enabled by default, but port 67 is not opened until the DHCP service is running. If the service is running, the show ip sockets details or show sockets detail command displays port 67 as open.
The Cisco IOS DHCP relay agent will be enabled on an interface only when the ip helper-address is configured. This command enables the DHCP broadcast to be forwarded to the configured DHCP server.
Information About the Cisco IOS DHCP Server
- Overview of the DHCP Server
- DHCP Attribute Inheritance
- DHCP Server Address Allocation Using Option 82
Overview of the DHCP Server
TheCisco IOS DHCP server accepts address assignment requests and renewals and assigns the addresses from predefined groups of addresses contained within DHCP address pools. These address pools can also be configured to supply additional information to the requesting client such as the IP address of the DNS server, the default router, and other configuration parameters. The Cisco IOS DHCP server can accept broadcasts from locally attached LAN segments or from DHCP requests that have been forwarded by other DHCP relay agents within the network.
DHCP Attribute Inheritance
The DHCP server database is organized as a tree. The root of the tree is the address pool for natural networks, branches are subnetwork address pools, and leaves are manual bindings to clients. Subnetworks inherit network parameters and clients inherit subnetwork parameters. Therefore, common parameters (for example, the domain name) should be configured at the highest (network or subnetwork) level of the tree.
Inherited parameters can be overridden. For example, if a parameter is defined in both the natural network and a subnetwork, the definition of the subnetwork is used.
Address leases are not inherited. If a lease is not specified for an IP address, by default, the DHCP server assigns a one-day lease for the address.
DHCP Server Address Allocation Using Option 82
The Cisco IOS DHCP server can allocate dynamic IP addresses based on the relay information option (option 82) information sent by the relay agent.
Automatic DHCP address allocation is typically based on an IP address, whether it be the gateway address (giaddr field of the DHCP packet) or the incoming interface IP address. In some networks, it is necessary to use additional information to further determine which IP addresses to allocate. By using option 82, the Cisco IOS relay agent has long been able to include additional information about itself when forwarding client-originated DHCP packets to a DHCP server. The Cisco IOS DHCP server can also use option 82 as a means to provide additional information to properly allocate IP addresses to DHCP clients.
How to Configure the Cisco IOS DHCP Server
- Configuring a DHCP Database Agent or Disabling Conflict Logging
- Excluding IP Addresses
- Configuring DHCP Address Pools
- Configuring Manual Bindings
- Configuring DHCP Static Mapping
- Customizing DHCP Server Operation
- Configuring a Remote Router to Import DHCP Server Options from a Central DHCP Server
- Configuring DHCP Address Allocation Using Option 82
- Configuring a Static Route with the Next Hop Dynamically Obtained Through DHCP
- Clearing DHCP Server Variables
Configuring a DHCP Database Agent or Disabling Conflict Logging
Perform this task to configure a DHCP database agent.
A DHCP database agent is any host (for example, an FTP, TFTP, or rcp server) or storage media on the DHCP server (for example, disk0) that stores the DHCP bindings database. You can configure multiple DHCP database agents, and you can configure the interval between database updates and transfers for each agent.
Automatic bindings are IP addresses that have been automatically mapped to the MAC addresses of hosts that are found in the DHCP database. Automatic binding information (such as lease expiration date and time, interface index, and VPN routing and forwarding [VRF] name) is stored on a database agent. The bindings are saved as text records for easy maintenance.
An address conflict occurs when two hosts use the same IP address. During address assignment, DHCP checks for conflicts using ping and gratuitous Address Resolution Protocol (ARP). If a conflict is detected, the address is removed from the pool. The address will not be assigned until the administrator resolves the conflict.
 Note |
We strongly recommend using database agents. However, the Cisco IOS server can run without them. If you choose not to configure a DHCP database agent, disable the recording of DHCP address conflicts on the DHCP server by using the no ip dhcp conflict logging command in global configuration mode. If there is conflict logging but no database agent configured, bindings are lost across router reboots. Possible false conflicts can occur causing the address to be removed from the address pool until the network administrator intervenes. > |
SUMMARY STEPS
1. enable
2. configure terminal
3. Do one of the following:
- ip dhcp database url [timeout seconds | write-delay seconds]
- or
- no ip dhcp conflict logging
DETAILED STEPS
| Command or Action | Purpose | |
|---|---|---|
|
|
Example: Router> enable |
Enables privileged EXEC mode.
|
|
|
Example: Router# configure terminal |
Enters global configuration mode.
|
|
|
Example: Router(config)# ip dhcp database ftp://user:password@172.16.1.1/router-dhcp timeout 80 Example: Example: Router(config)# no ip dhcp conflict logging |
Configures a DHCP server to save automatic bindings on a remote host called a database agent. or Disables DHCP address conflict logging.
|
Excluding IP Addresses
Perform this task to specify IP addresses (excluded addresses) that the DHCP server should not assign to clients.
The IP address configured on the router interface is automatically excluded from the DHCP address pool. The DHCP server assumes that all other IP addresses in a DHCP address pool subnet are available for assigning to DHCP clients.
You need to exclude addresses from the pool if the DHCP server should not allocate those IP addresses. An example usage scenario is when two DHCP servers are set up to service the same network segment (subnet) for redundancy. If the two DHCP servers do not coordinate their services with each other using a protocol such as DHCP failover, then each DHCP server must be configured to allocate from a nonoverlapping set of addresses in the shared subnet. See the «Configuring Manual Bindings Example» section for a configuration example.
SUMMARY STEPS
1. enable
2. configure terminal
3. ip dhcp excluded-address low-address [high-address]
DETAILED STEPS
| Command or Action | Purpose | |
|---|---|---|
|
|
Example: Router> enable |
Enables privileged EXEC mode.
|
|
|
Example: Router# configure terminal |
Enters global configuration mode.
|
|
|
Example: Router(config)# ip dhcp excluded-address 172.16.1.100 172.16.1.103 |
Specifies the IP addresses that the DHCP server should not assign to DHCP clients.
|
Configuring DHCP Address Pools
- Configuring a DHCP Address Pool
- Configuring a DHCP Address Pool with Secondary Subnets
- Troubleshooting Tips
- Verifying the DHCP Address Pool Configuration
Configuring a DHCP Address Pool
Perform this task to configure a DHCP address pool. On a per-address pool basis, specify DHCP options for the client as necessary.
You can configure a DHCP address pool with a name that is a symbolic string (such as «engineering») or an integer (such as 0). Configuring a DHCP address pool also puts the router into DHCP pool configuration mode—identified by the (dhcp-config)# prompt—from which you can configure pool parameters (for example, the IP subnet number and default router list).
DHCP defines a process by which the DHCP server knows the IP subnet in which the DHCP client resides, and it can assign an IP address from a pool of valid IP addresses in that subnet. The process by which the DHCP server identifies which DHCP address pool to use to service a client request is described in the «Configuring Manual Bindings» task.
The DHCP server identifies which DHCP address pool to use to service a client request as follows:
- If the client is not directly connected (the giaddr field of the DHCPDISCOVER broadcast message is nonzero), the DHCP server matches the DHCPDISCOVER with a DHCP pool that has the subnet that contains the IP address in the giaddr field.
- If the client is directly connected (the giaddr field is zero), the DHCP server matches the DHCPDISCOVER with DHCP pools that contain the subnets configured on the receiving interface. If the interface has secondary IP addresses, the subnets associated with the secondary IP addresses are examined for possible allocation only after the subnet associated with the primary IP address (on the interface) is exhausted.
Cisco IOS DHCP server software supports advanced capabilities for IP address allocation. See the «Configuring DHCP Address Allocation Using Option» section for more information.
Before You Begin
Before you configure the DHCP address pool, you need to:
-
Identify DHCP options for devices where necessary, including the following:
- Default boot image name
- Default routers
- DNS servers
- NetBIOS name server
- Primary subnet
- Secondary subnets and subnet-specific default router lists (see «Configuring a DHCP Address Pool with Secondary Subnets» for information on secondary subnets).
- Decide on a NetBIOS node type (b, p, m, or h).
- Decide on a DNS domain name.
Note |
You cannot configure manual bindings within the same pool that is configured with the network DHCP pool configuration command. To configure manual bindings, see «Configuring Manual Bindings». |
SUMMARY STEPS
1. enable
2. configure terminal
3. ip dhcp pool name
4. utilization mark high percentage-number [log]
5. utilization mark low percentage-number [log]
6. network network-number [{mask | /prefix-length} [secondary]]
7. domain-name domain
8. dns-server address [address2 … address8]
9. bootfile filename
10. next-server address [address2 … address8]
11. netbios-name-server address [address2 … address8]
12. netbios-node-type type
13. default-router address [address2 … address8]
14. option code [instance number] {ascii string | hex string | ip-address}
15. lease {days [hours [minutes]] | infinite}
16. end
DETAILED STEPS
| Command or Action | Purpose | |
|---|---|---|
|
|
Example: Router> enable |
Enables privileged EXEC mode.
|
|
|
Example: Router# configure terminal |
Enters global configuration mode.
|
|
|
Example: Router(config)# ip dhcp pool 1 |
Creates a name for the DHCP server address pool and enters DHCP pool configuration mode.
|
|
|
Example: Router(dhcp-config)# utilization mark high 80 log |
(Optional) Configures the high utilization mark of the current address pool size.
|
|
|
Example: Router(dhcp-config)# utilization mark low 70 log |
(Optional) Configures the low utilization mark of the current address pool size.
|
|
|
Example: Router(dhcp-config)# network 172.16.0.0 /16 |
Specifies the subnet network number and mask of the DHCP address pool.
|
|
|
Example: Router(dhcp-config)# domain-name cisco.com |
Specifies the domain name for the client.
|
|
|
Example: Router(dhcp-config)# dns server 172.16.1.103 172.16.2.103 |
Specifies the IP address of a DNS server that is available to a DHCP client.
|
|
|
Example: Router(dhcp-config)# bootfile xllboot |
(Optional) Specifies the name of the default boot image for a DHCP client.
|
|
|
Example: Router(dhcp-config)# next-server 172.17.1.103 172.17.2.103 |
(Optional) Configures the next server in the boot process of a DHCP client.
|
|
|
Example: Router(dhcp-config)# netbios-name-server 172.16.1.103 172.16.2.103 |
(Optional) Specifies the NetBIOS WINS server that is available to a Microsoft DHCP client.
|
|
|
Example: Router(dhcp-config)# netbios-node-type h-node |
(Optional) Specifies the NetBIOS node type for a Microsoft DHCP client.
|
|
|
Example: Router(dhcp-config)# default-router 172.16.1.100 172.16.1.101 |
(Optional) Specifies the IP address of the default router for a DHCP client.
|
|
|
Example: Router(dhcp-config)# option 19 hex 01 |
(Optional) Configures DHCP server options.
|
|
|
Example: Router(dhcp-config)# lease 30 |
(Optional) Specifies the duration of the lease.
|
|
|
Example: Router(dhcp-config)# end |
Returns to global configuration mode.
|
Configuring a DHCP Address Pool with Secondary Subnets
Perform this task to configure a DHCP address pool with secondary subnets.
For any DHCP pool, you can configure a primary subnet and any number of secondary subnets. Each subnet is a range of IP addresses that the router uses to allocate an IP address to a DHCP client. The DHCP server multiple subnet functionality enables a Cisco IOS DHCP server address pool to manage additional IP addresses by adding the addresses to a secondary subnet of an existing DHCP address pool (instead of using a separate address pool).
Configuring a secondary DHCP subnetwork places the router in DHCP pool secondary subnet configuration mode—identified by the (config-dhcp-subnet-secondary)# prompt—from which you can configure a default address list that is specific to the secondary subnet. You can also specify the utilization rate of the secondary subnet, which allows pools of IP addresses to dynamically increase or reduce in size depending on the address utilization level. This setting overrides the global utilization rate.
If the DHCP server selects an address pool that contains multiple subnets, the DHCP server allocates an IP address from the subnets as follows:
- When the DHCP server receives an address assignment request, it looks for a free address in the primary subnet.
- When the primary subnet is exhausted, the DHCP server automatically looks for a free address in any secondary subnets maintained by the DHCP server (even though the giaddr does not necessarily match the secondary subnet). The server inspects the subnets for address availability in the order in which the subnets were added to the pool.
- If the giaddr matches a secondary subnet in the pool, the DHCP server allocates an IP address from that secondary subnet (even if IP addresses are available in the primary subnet and irrespective of the order in which secondary subnets where added).
SUMMARY STEPS
1. enable
2. configure terminal
3. ip dhcp pool name
4. utilization mark high percentage-number [log]
5. utilization mark low percentage-number [log]
6. network network-number [mask | / prefix-length]
7. domain-name domain
8. dns-server address [address2 … address8]
9. bootfile filename
10. next-server address [address2 … address8]
11. netbios-name-server address [address2 … address8]
12. netbios-node-type type
13. default-router address [address2 … address8]
14. option code [instance number] {ascii string | hex string | ip-address}
15. lease {days [hours] [minutes]| infinite}
16. network network-number [{mask | / preix-length} [secondary]]
17. override default-router address [address2 … address8]
18. override utilization high percentage-numer
19. override utilization low percentage-number
20. end
DETAILED STEPS
| Command or Action | Purpose | |
|---|---|---|
|
|
Example: Router> enable |
Enables privileged EXEC mode.
|
|
|
Example: Router# configure terminal |
Enters global configuration mode.
|
|
|
Example: Router(config)# ip dhcp pool 1 |
Creates a name for the DHCP server address pool and enters DHCP pool configuration mode.
|
|
|
Example: Router(dhcp-config)# utilization mark high 80 log |
(Optional) Configures the high utilization mark of the current address pool size.
|
|
|
Example: Router(dhcp-config)# utilization mark low 70 log |
(Optional) Configures the low utilization mark of the current address pool size.
|
|
|
Example: Router(dhcp-config)# network 172.16.0.0 /16 |
Specifies the subnet network number and mask of the DHCP address pool.
|
|
|
Example: Router(dhcp-config)# domain-name cisco.com |
Specifies the domain name for the client.
|
|
|
Example: Router(dhcp-config)# dns server 172.16.1.103 172.16.2.103 |
Specifies the IP address of a DNS server that is available to a DHCP client.
|
|
|
Example: Router(dhcp-config)# bootfile xllboot |
(Optional) Specifies the name of the default boot image for a DHCP client.
|
|
|
Example: Router(dhcp-config)# next-server 172.17.1.103 172.17.2.103 |
(Optional) Configures the next server in the boot process of a DHCP client.
|
|
|
Example: Router(dhcp-config)# netbios-name-server 172.16.1.103 172.16.2.103 |
(Optional) Specifies the NetBIOS Windows Internet Naming Service (WINS) server that is available to a Microsoft DHCP client.
|
|
|
Example: Router(dhcp-config)# netbios-node-type h-node |
(Optional) Specifies the NetBIOS node type for a Microsoft DHCP client.
|
|
|
Example: Router(dhcp-config)# default-router 172.16.1.100 172.16.1.101 |
(Optional) Specifies the IP address of the default router for a DHCP client.
|
|
|
Example: Router(dhcp-config)# option 19 hex 01 |
(Optional) Configures DHCP server options.
|
|
|
Example: Router(dhcp-config)# lease 30 |
(Optional) Specifies the duration of the lease.
|
|
|
Example: Router(dhcp-config)# network 10.10.0.0 255.255.0.0 secondary |
(Optional) Specifies the network number and mask of a secondary DHCP server address pool.
|
|
|
Example: Router(config-dhcp-subnet-secondary)# override default-router 10.10.0.100 10.10.0.101 |
(Optional) Specifies the default router list that is used when an IP address is assigned to a DHCP client from this secondary subnet.
|
|
|
Example: Router(config-dhcp-subnet-secondary)# override utilization high 60 |
(Optional) Sets the high utilization mark of the subnet size.
|
|
|
Example: Router(config-dhcp-subnet-secondary)# override utilization low 40 |
(Optional) Sets the low utilization mark of the subnet size.
|
|
|
Example: Router(config-dhcp-subnet-secondary)# end |
Returns to privileged EXEC mode.
|
Troubleshooting Tips
If you are using secondary IP addresses under a single loopback interface and using secondary subnets under a DHCP pool, use one DHCP pool to configure networks for all the secondary subnets instead of one pool per secondary subnet. The network network-number [{mask | /prefix-length} [secondary]] command must be configured under a single DHCP address pool rather than multiple DHCP address pools.
The following is the correct configuration:
!
ip dhcp pool dhcp_1
 network 172.16.1.0 255.255.255.0
 network 172.16.2.0 255.255.255.0 secondary
 network 172.16.3.0 255.255.255.0 secondary
 network 172.16.4.0 255.255.255.0 secondary
!
interface Loopback111
 ip address 172.16.1.1 255.255.255.255 secondary
 ip address 172.16.2.1 255.255.255.255 secondary
 ip address 172.16.3.1 255.255.255.255 secondary
 ip address 172.16.4.1 255.255.255.255 secondary
The following is the incorrect configuration:
!
ip dhcp pool dhcp_1
 network 172.16.1.0 255.255.255.0
 lease 1 20 30
 accounting default
!
ip dhcp pool dhcp_2
 network 172.16.2.0 255.255.255.0
 lease 1 20 30
 accounting default
!
ip dhcp pool dhcp_3
 network 172.16.3.0 255.255.255.0
 lease 1 20 30
 accounting default
!
ip dhcp pool dhcp_4
 network 172.16.4.0 255.255.255.0
 lease 1 20 30
 accounting default
!
interface Loopback111
 ip address 172.16.1.1 255.255.255.255 secondary
 ip address 172.16.2.1 255.255.255.255 secondary
 ip address 172.16.3.1 255.255.255.255 secondary
 ip address 172.16.4.1 255.255.255.255 secondary
Verifying the DHCP Address Pool Configuration
Perform this task to verify the DHCP address pool configuration. These show commands need not be entered in any specific order.
SUMMARY STEPS
1. enable
2. show ip dhcp pool [name]
3. show ip dhcp binding [address]
4. show ip dhcp conflict [address]
5. show ip dhcp database [url]
6. show ip dhcp server statistics [type-number]
DETAILED STEPS
| Command or Action | Purpose | |
|---|---|---|
|
|
Example: Router> enable |
Enables privileged EXEC mode.
|
|
|
Example: Router# show ip dhcp pool |
(Optional) Displays information about DHCP address pools.
|
|
|
Example: Router# show ip dhcp binding |
(Optional) Displays a list of all bindings created on a specific DHCP server.
|
|
|
Example: Router# show ip dhcp conflict |
(Optional) Displays a list of all address conflicts.
|
|
|
Example: Router# show ip dhcp database |
(Optional) Displays recent activity on the DHCP database.
|
|
|
Example: Router# show ip dhcp server statistics |
(Optional) Displays count information about server statistics and messages sent and received.
|
Configuring Manual Bindings
An address binding is a mapping between the IP address and MAC address of a client. The IP address of a client can be assigned manually by an administrator or assigned automatically from a pool by a DHCP server.
Manual bindings are IP addresses that have been manually mapped to the MAC addresses of hosts that are found in the DHCP database. Manual bindings are stored in NVRAM on the DHCP server. Manual bindings are just special address pools. There is no limit on the number of manual bindings, but you can configure only one manual binding per host pool.
Automatic bindings are IP addresses that have been automatically mapped to the MAC addresses of hosts that are found in the DHCP database. Because the bindings are stored in volatile memory on the DHCP server, binding information is lost in the event of a power failure or upon router reload for any other reason. To prevent the loss of automatic binding information in such an event, store a copy of the automatic binding information on a remote host called a DHCP database agent. The bindings are periodically written to the database agent. If the router reloads, the bindings are read back from the database agent to the DHCP database on the DHCP server.
Note |
We strongly recommend using database agents. However, the Cisco IOS DHCP server can function without database agents. |
Some DHCP clients send a client identifier (DHCP option 61) in the DHCP packet. To configure manual bindings for such clients, you must enter the client-identifier DHCP pool configuration command with the appropriate hexadecimal values identifying the DHCP client. To configure manual bindings for clients who do not send a client identifier option, you must enter the hardware-address DHCP pool configuration command with the appropriate hexadecimal hardware address of the client.
In Cisco IOS Release 12.4(22)T and later releases the DHCP server sends infinite lease time to the clients for which manual bindings are configured.
In Cisco IOS Release 15.1(1)S1 and later releases, the DHCP server sends lease time configured using the lease command to the clients for which manual bindings are configured.
Note |
You cannot configure manual bindings within the same pool that is configured with the networkcommand in DHCP pool configuration mode. See the «Configuring DHCP Address Pools» section for information about DHCP address pools and the network command. |
SUMMARY STEPS
1. enable
2. configure terminal
3. ip dhcp pool pool-name
4. host address [mask| / prefix-length]
5. client-identifier unique-identifier
6. hardware-address hardware-address [protocol-type | hardware-number]
7. client-name name
DETAILED STEPS
| Command or Action | Purpose | |||
|---|---|---|---|---|
|
|
Example: Router> enable |
Enables privileged EXEC mode.
|
||
|
|
Example: Router# configure terminal |
Enters global configuration mode.
|
||
|
|
Example: Router(config)# ip dhcp pool pool1 |
Creates a name for the DHCP server address pool and places you in DHCP pool configuration mode.
|
||
|
|
Example: Router(dhcp-config)# host 172.16.0.1 |
Specifies the IP address and subnet mask of the client.
|
||
|
|
Example: Router(dhcp-config)# client-identifier 01b7.0813.8811.66 |
Specifies the unique identifier for DHCP clients.
|
||
|
|
Example: Router(dhcp-config)# hardware-address b708.1388.f166 ethernet |
Specifies a hardware address for the client.
|
||
|
|
Example: Router(dhcp-config)# client-name client1 |
(Optional) Specifies the name of the client using any standard ASCII character.
|
- Troubleshooting Tips
Troubleshooting Tips
You can determine the client identifier by using the debug ip dhcp server packet command. In the following example, the client is identified by the value 0b07.1134.a029:
Router# debug ip dhcp server packet

DHCPD:DHCPDISCOVER received from client 0b07.1134.a029 through relay 10.1.0.253.
DHCPD:assigned IP address 10.1.0.3 to client 0b07.1134.a029.
.
.
.
Configuring DHCP Static Mapping
The DHCP—Static Mapping feature enables assignment of static IP addresses without creating numerous host pools with manual bindings by using a customer-created text file that the DHCP server reads. The benefit of this feature is that it eliminates the need for a long configuration file and reduces the space required in NVRAM to maintain address pools.
This section contains the following task:
A DHCP database contains the mappings between a client IP address and hardware address, referred to as a binding. There are two types of bindings: manual bindings that map a single hardware address to a single IP address, and automatic bindings that dynamically map a hardware address to an IP address from a pool of IP addresses. Manual (also known as static) bindings can be configured individually directly on the router or, by using the DHCP—Static Mapping feature, these static bindings can be read from a separate static mapping text file. The static mapping text files are read when a router reloads or the DHCP service restarts. These files are read-only.
The read static bindings are treated just like the manual bindings, in that they are:
- Retained across DHCPRELEASEs from the clients.
- Not timed out.
- Deleted only upon deletion of the pool.
- Provided appropriate exclusions for the contained addresses, which are created at the time of the read.
Just like automatic bindings and manual bindings, the static bindings from the static mapping text file are also displayed by using the show ip dhcp binding command.
Perform this task to create the static mapping text file. You will input your addresses in the text file, which is stored in the DHCP database for the DHCP server to read. There is no limit on the number of addresses in the file. The file format has the following elements:
- Time the file was created
- Database version number
- IP address
- Hardware type
- Hardware address
- Lease expiration
- End-of-file designator
See the table below for more details about the format of the text file.
The following is a sample static mapping text file:
*time* Jan 21 2005 03:52 PM
*version* 2
!IP address    Type    Hardware address     Lease expiration
10.0.0.4 /24   1       0090.bff6.081e       Infinite
10.0.0.5 /28   id      00b7.0813.88f1.66    Infinite
10.0.0.2 /21   1       0090.bff6.081d       Infinite
*end*
| Table 1 | Static Mapping Text File Field Descriptions |
|
Field |
Description |
|---|---|
|
*time* |
Specifies the time the file was created. This field allows DHCP to differentiate between newer and older database versions when multiple agents are configured. The valid format of the time is Mm dd yyyy hh:mm AM/PM. |
|
*version* 2 |
Database version number. |
|
IP address |
Static IP address. If the subnet mask is not specified, a natural mask is assumed depending on the IP address. There must be a space between the IP address and mask. |
|
Type |
Specifies the hardware type. For example, type «1» indicates Ethernet. The type «id» indicates that the field is a DHCP client identifier. Legal values can be found online at http://www.iana.org/assignments/arp-parameters in the «Number Hardware Type» list. |
|
Hardware address |
Specifies the hardware address. When the type is numeric, it refers to the hardware media. Legal values can be found online at http://www.iana.org/assignments/arp-parameters in the «Number Hardware Type» list. When the type is «id,» this means that we are matching on the client identifier. For more information about the client identifier, please see RFC 2132, DHCP Options and BOOTP Vendor Extensions , section 9.14, located at http://www.ietf.org/rfc/rfc2132.txt , or the client-identifier command reference page. . If you are unsure what client identifier to match on, use the debug dhcp detail command to display the client identifier being sent to the DHCP server from the client. |
|
Lease expiration |
Specifies the expiration of the lease. «Infinite» specifies that the duration of the lease is unlimited. |
|
*end* |
End of file. DHCP uses the *end* designator to detect file truncation. |
- Configuring the DHCP Server to Read a Static Mapping Text File
Configuring the DHCP Server to Read a Static Mapping Text File
Perform this task to configure the DHCP server to read the static mapping text file.
Before You Begin
The administrator should create the static mapping text file in the correct format and configure the address pools before performing this task.
Before editing the file, you must disable the DHCP server using the no service dhcp command.
Note |
The static bindings must not be deleted when a DHCPRELEASE is received or must not be timed out by the DHCP timer. The static bindings should be treated just like manual bindings created by using the ip dhcp pool command. |
SUMMARY STEPS
1. enable
2. configure terminal
3. ip dhcp pool name
4. origin file url
5. end
6. show ip dhcp binding [address]
DETAILED STEPS
| Command or Action | Purpose | |||
|---|---|---|---|---|
|
|
Example: Router> enable |
Enables privileged EXEC mode.
|
||
|
|
Example: Router# configure terminal |
Enters global configuration mode.
|
||
|
|
Example: Router(config)# ip dhcp pool pool1 |
Assigns a name to a DHCP pool and enters DHCP configuration mode.
|
||
|
|
Example: Router(dhcp-config)# origin file tftp://10.1.0.1/static-bindings |
Specifies the URL from which the DHCP server can locate the text file.
|
||
|
|
Example: Router(dhcp-config)# end |
Returns to privileged EXEC mode.
|
||
|
|
Example: Router# show ip dhcp binding |
(Optional) Displays a list of all bindings created on a specific DHCP server.
|
Examples
The following example shows the address bindings that have been configured:
Router# show ip dhcp binding
00:05:14:%SYS-5-CONFIG_I: Configured from console by console
Bindings from all pools not associated with VRF:
IP address  Client-ID/            Ls expir   Type    Hw address           User name
10.9.9.4/8  0063.7363.2d30.3036.  Infinite   Static  302e.3762.2e39.3634. 632d.4574.8892.
10.9.9.1/24 0063.6973.636f.2d30.  Infinite   Static  3036.302e.3437.3165. 2e64.6462.342d.
The following sample shows each entry in the static mapping text file:
*time* Jan 21 2005 22:52 PM
!IP address     Type        Hardware address                              Lease expiration
10.19.9.1 /24    id          0063.6973.636f.2d30.3036.302e.3437
10.9.9.4         id          0063.7363.2d30.3036.302e.3762.2e39.3634.632d  Infinite
*end*
Router# debug ip dhcp server
Loading abc/static_pool from 10.19.192.33 (via Ethernet0):
[OK - 333 bytes]
*May 26 23:14:21.259: DHCPD: contacting agent tftp://10.19.192.33/abc/static_pool (attempt 0)
*May 26 23:14:21.467: DHCPD: agent tftp://10.19.192.33/abc/static_pool is responding.
*May 26 23:14:21.467: DHCPD: IFS is ready.
*May 26 23:14:21.467: DHCPD: reading bindings from                              tftp://10.19.192.33/abc/static_pool.
*May 26 23:14:21.707: DHCPD: read 333 / 1024 bytes.
*May 26 23:14:21.707: DHCPD: parsing text line
*time* Apr 22 2002 11:31 AM
*May 26 23:14:21.707: DHCPD: parsing text line ""
*May 26 23:14:21.707: DHCPD: parsing text line
!IP address Type Hardware address Lease expiration
*May 26 23:14:21.707: DHCPD: parsing text line
"10.9.9.1 /24 id 0063.6973.636f.2d30.3036.302e.3437"
*May 26 23:14:21.707: DHCPD: creating binding for 10.9.9.1
*May 26 23:14:21.707: DHCPD: Adding binding to radix tree (10.9.9.1)
*May 26 23:14:21.707: DHCPD: Adding binding to hash tree
*May 26 23:14:21.707: DHCPD: parsing text line
"10.9.9.4 id 0063.7363.2d30.3036.302e.3762.2e39.3634.632d"
*May 26 23:14:21.711: DHCPD: creating binding for 10.9.9.4
*May 26 23:14:21.711: DHCPD: Adding binding to radix tree (10.9.9.4)
*May 26 23:14:21.711: DHCPD: Adding binding to hash tree
*May 26 23:14:21.711: DHCPD: parsing text line "Infinite"
*May 26 23:14:21.711: DHCPD: parsing text line ""
*May 26 23:14:21.711: DHCPD: parsing text line
!IP address Interface-index Lease expiration VRF
*May 26 23:14:21.711: DHCPD: parsing text line "*end*"
*May 26 23:14:21.711: DHCPD: read static bindings from tftp://10.19.192.33/abcemp/static_pool.
Customizing DHCP Server Operation
By default, the DHCP server pings a pool address twice before assigning a particular address to a requesting client. If the ping is unanswered, the DHCP server assumes (with a high probability) that the address is not in use and assigns the address to the requesting client.
By default, the DHCP server waits 2 seconds before timing out a ping packet.
You can configure the DHCP server to ignore and not reply to received Bootstrap Protocol (BOOTP) requests. This functionality is beneficial when there is a mix of BOOTP and DHCP clients in a network segment and there is a BOOTP server and a Cisco IOS DHCP server servicing the network segment. The BOOTP server is configured with static bindings for the BOOTP clients and the BOOTP clients are intended to obtain their addresses from the BOOTP server. However, because a DHCP server can also respond to a BOOTP request, an address offer may be made by the DHCP server causing the BOOTP clients to boot with the address from the DHCP server, instead of the address from the BOOTP server. Configuring the DHCP server to ignore BOOTP requests means that the BOOTP clients will receive address information from the BOOTP server and will not inadvertently accept an address from a DHCP server.
The Cisco IOS software can forward these ignored BOOTP request packets to another DHCP server if the ip helper-address interface configuration command is configured on the incoming interface.
SUMMARY STEPS
1. enable
2. configure terminal
3. ip dhcp ping packets number
4. ip dhcp ping timeout milliseconds
5. ip dhcp bootp ignore
DETAILED STEPS
| Command or Action | Purpose | |
|---|---|---|
|
|
Example: Router> enable |
Enables privileged EXEC mode.
|
|
|
Example: Router# configure terminal |
Enters global configuration mode.
|
|
|
Example: Router(config)# ip dhcp ping packets 5 |
(Optional) Specifies the number of ping packets the DHCP server sends to a pool address before assigning the address to a requesting client.
|
|
|
Example: Router(config)# ip dhcp ping timeout 850 |
(Optional) Specifies the amount of time the DHCP server waits for a ping reply from an address pool.
|
|
|
Example: Router(config)# ip dhcp bootp ignore |
(Optional) Allows the DHCP server to selectively ignore and not reply to received BOOTP requests.
|
Configuring a Remote Router to Import DHCP Server Options from a Central DHCP Server
The Cisco IOS DHCP server can dynamically configure options such as the DNS and WINS addresses to respond to DHCP requests from local clients behind the customer premises equipment (CPE). Previously, network administrators needed to manually configure the Cisco IOS DHCP server on each device. The Cisco IOS DHCP server was enhanced to allow configuration information to be updated automatically. Network administrators can configure one or more centralized DHCP servers to update specific DHCP options within the DHCP pools. The remote servers can request or «import» these option parameters from the centralized servers.
This section contains the following tasks:
- Configuring the Central DHCP Server to Update DHCP Options
- Configuring the Remote Router to Import DHCP Options
Configuring the Central DHCP Server to Update DHCP Options
Perform this task to configure the central DHCP server to update DHCP options.
SUMMARY STEPS
1. enable
2. configure terminal
3. ip dhcp pool name
4. network network-number [mask | / prefix-length]
5. dns-server address [address2 … address8]
DETAILED STEPS
| Command or Action | Purpose | |
|---|---|---|
|
|
Example: Router> enable |
Enables privileged EXEC mode.
|
|
|
Example: Router# configure terminal |
Enters global configuration mode.
|
|
|
Example: Router(config)# ip dhcp pool 1 |
Creates a name for the DHCP server address pool and enters DHCP pool configuration mode.
|
|
|
Example: Router(dhcp-config)# network 172.16.0.0 /16 |
Specifies the subnet network number and mask of the DHCP address pool.
|
|
|
Example: Router(dhcp-config)# dns server 172.16.1.103 172.16.2.103 |
(Optional) Specifies the IP address of a DNS server that is available to a DHCP client.
|
Configuring the Remote Router to Import DHCP Options
Perform this task to configure the remote router to import DHCP options from a central DHCP server.
SUMMARY STEPS
1. enable
2. configure terminal
3. ip dhcp pool pool-name
4. network network-number [mask | / prefix-length]
5. import all
6. exit
7. interface type number
8. ip address dhcp
9. end
10. show ip dhcp import
DETAILED STEPS
| Command or Action | Purpose | |
|---|---|---|
|
|
Example: Router> enable |
Enables privileged EXEC mode.
|
|
|
Example: Router# configure terminal |
Enters global configuration mode.
|
|
|
Example: Router(config)# ip dhcp pool pool1 |
Creates a name for the DHCP server address pool and enters DHCP pool configuration mode.
|
|
|
Example: Router(dhcp-config)# network 172.30.0.0 /16 |
Specifies the subnet network number and mask of the DHCP address pool.
|
|
|
Example: Router(dhcp-config)# import all |
Imports DHCP option parameters into the DHCP server database.
|
|
|
Example: Router(dhcp-config)# exit |
Exits DHCP pool configuration mode.
|
|
|
Example: Router(config)# interface FastEthernet 0/0 |
Configures an interface and enters interface configuration mode.
|
|
|
Example: Router(config-if)# ip address dhcp |
Specifies that the interface acquires an IP address through DHCP.
|
|
|
Example: Router(config-if)# end |
Returns to privileged EXEC mode.
|
|
|
Example: Router# show ip dhcp import |
Displays the options that have been imported from the central DHCP server.
|
Configuring DHCP Address Allocation Using Option 82
- DHCP Address Allocation Using Option 82 Feature Design
- Enabling Option 82 for DHCP Address Allocation
- Troubleshooting Tips
- Defining the DHCP Class and Relay Agent Information Patterns
- Troubleshooting Tips
- Defining the DHCP Address Pool
DHCP Address Allocation Using Option 82 Feature Design
DHCP provides a framework for passing configuration information to hosts on a TCP/IP network. Configuration parameters and other control information are carried in tagged data items that are stored in the options field of the DHCP message. The data items themselves are also called options. Option 82 is organized as a single DHCP option that contains information known by the relay agent.
This feature is designed to allow the Cisco IOS DHCP server to use option 82 information to help determine which IP addresses to allocate to clients. The information sent via option 82 will be used to identify which port the DHCP request came in on. This feature does not parse out the individual suboptions contained within option 82. Rather, the address allocation is done by matching a configured pattern byte by byte.
The feature introduces a new DHCP class capability, which is a method to group DHCP clients based on some shared characteristics other than the subnet in which the clients reside.
In an example application, DHCP clients are connected to two ports of a single switch. Each port can be configured to be part of two VLANs: VLAN1 and VLAN2. DHCP clients belong to either VLAN1 or VLAN2 and it is assumed that the switch can differentiate the VLAN that a particular DHCP Discover message belongs to (possibly through Layer 2 encapsulation). Each VLAN has its own subnet and all DHCP messages from the same VLAN (same switch) will have the giaddr field set to the same value indicating the subnet of the VLAN.
The problem is that for a DHCP client connecting to port 1 of VLAN1, it must be allocated an IP address from one range within the VLAN’s subnet, whereas a DHCP client connecting to port 2 of VLAN1 must be allocated an IP address from another range. Both these two IP address ranges are part of the same subnet (and have the same subnet mask). In the normal DHCP address allocation, the DHCP server will look only at the giaddr field and thus will not be able to differentiate between the two ranges.
To solve this problem, a relay agent residing at the switch inserts the relay information option (option 82), which carries information specific to the port, and the DHCP server must inspect both the giaddr field and the inserted option 82 during the address selection process.
The Cisco IOS software will look up a pool based on IP address (giaddr or incoming interface IP address) and then match the request to a class or classes configured in the pool in the order the classes are specified in the DHCP pool configuration.
When a DHCP address pool has been configured with one or more DHCP classes, the pool becomes a restricted access pool, which means that no addresses will be allocated from the pool unless one or more of the classes in the pool is matched. This design allows DHCP classes to be used for either access control (no default class is configured on the pool) or to provide further address range partitions with the subnet of the pool.
Multiple pools can be configured with the same class, eliminating the need to configure the same pattern in multiple pools.
The following capabilities are supported for DHCP class-based address allocation:
- Specifying the full relay agent information option value as a raw hexadecimal string by using the relay-information hex command in the new relay agent information configuration mode.
- Support for bitmasking the raw relay information hexadecimal value.
- Support for a wildcard at the end of the hexadecimal string specified by the relay-information hex command.
If the relay agent inserts option 82 but does not set the giaddr field in the DHCP packet, the DHCP server interface must be configured as a trusted interface by using the ip dhcp relay information trusted global configuration command. This configuration prevents the server from dropping the DHCP message.
Enabling Option 82 for DHCP Address Allocation
By default, the Cisco IOS DHCP server can use information provided by option 82 to allocate IP addresses. To reenable this capability if it has been disabled, perform the task described in this section.
SUMMARY STEPS
1. enable
2. configure terminal
3. ip dhcp use class
DETAILED STEPS
| Command or Action | Purpose | |
|---|---|---|
|
|
Example: Router> enable |
Enables privileged EXEC mode.
|
|
|
Example: Router# configure terminal |
Enters global configuration mode.
|
|
|
Example: Router(config)# ip dhcp use class |
Controls whether DHCP classes are used for address allocation.
|
Troubleshooting Tips
If DHCP classes are configured in the pool, but the DHCP server does not make use of the classes, verify if the no ip dhcp use classcommand was configured.
Defining the DHCP Class and Relay Agent Information Patterns
Perform this task to define the DHCP class and relay agent information patterns.
Before You Begin
You must know the hexadecimal value of each byte location in option 82 to be able to configure the relay-information hex command. The option 82 format may vary from product to product. Contact the relay agent vendor for this information.
SUMMARY STEPS
1. enable
2. configure terminal
3. ip dhcp class class-name
4. relay agent information
5. relay-information hex pattern [*] [bitmask mask]
6. Repeat Steps 3 through 5 for each DHCP class you need to configure.
DETAILED STEPS
| Command or Action | Purpose | |
|---|---|---|
|
|
Example: Router> enable |
Enables privileged EXEC mode.
|
|
|
Example: Router# configure terminal |
Enters global configuration mode.
|
|
|
Example: Router(config)# ip dhcp class CLASS1 |
Defines a DHCP class and enters DHCP class configuration mode.
|
|
|
Example: Router(dhcp-class)# relay agent information |
Enters relay agent information option configuration mode.
|
|
|
Example: Router(dhcp-class-relayinfo)# relay-information hex 01030a0b0c02050000000123 |
(Optional) Specifies a hexadecimal value for the full relay information option.
|
|
|
|
—
|
Troubleshooting Tips
Use the debug ip dhcp server class command to display the class matching results.
Defining the DHCP Address Pool
Perform this task to define the DHCP address pool.
SUMMARY STEPS
1. enable
2. configure terminal
3. ip dhcp pool name
4. network network-number [mask | / prefix-length]
5. class class-name
6. address range start-ip end-ip
7. Repeat Steps 5 and 6 for each DHCP class you need to associate to the DHCP pool.
DETAILED STEPS
| Command or Action | Purpose | |
|---|---|---|
|
|
Example: Router> enable |
Enables privileged EXEC mode.
|
|
|
Example: Router# configure terminal |
Enters global configuration mode.
|
|
|
Example: Router# ip dhcp pool ABC |
Configures a DHCP address pool on a Cisco IOS DHCP server and enters DHCP pool configuration mode.
|
|
|
Example: Router(dhcp-config)# network 10.0.20.0 |
Configures the subnet number and mask for a DHCP address pool on a Cisco IOS DHCP server.
|
|
|
Example: Router(dhcp-config)# class CLASS1 |
Associates a class with a pool and enters DHCP pool class configuration mode.
|
|
|
Example: Router(dhcp-pool-class)# address range 10.0.20.1 10.0.20.100 |
(Optional) Sets an address range for a DHCP class in a DHCP server address pool.
|
|
|
|
Each class in the DHCP pool will be examined for a match in the order configured.
|
Configuring a Static Route with the Next Hop Dynamically Obtained Through DHCP
Perform this task to configure a static route to use a DHCP default gateway as the next-hop router.
This task enables static routes to be assigned using a DHCP default gateway as the next-hop router. This behavior was not possible before the introduction of this feature because the gateway IP address is not known until after the DHCP address assignment. A static route could not be configured with the command-line interface (CLI) that used that DHCP-supplied address.
The static routes are installed in the routing table when the default gateway is assigned by the DHCP server. The routes remain in the routing table until the DHCP lease expires, at which time the routes are removed.
When a DHCP client releases an address, the corresponding static route (the route configured with the ip routecommand) is automatically removed from the routing table. If the DHCP router option (option 3 of the DHCP packet) changes during the client renewal, the DHCP default gateway changes to the new IP address supplied in the renewal.
This feature is particularly useful for VPN deployments such as Dynamic Multipoint VPNs (DMVPNs). This feature is useful when a nonphysical interface like a multipoint generic routing encapsulation (mGRE) tunnel is configured on the router and certain traffic needs to be excluded from going to the tunnel interface.
Before You Begin
Verify all DHCP client and server configuration steps. Ensure that the DHCP client and server are properly defined to supply a DHCP router option 3 of the DHCP packet.
Note |
|
SUMMARY STEPS
1. enable
2. configure terminal
3. ip route prefix mask {ip-address | interface-type interface-number [ip-address]} dhcp [distance]
4. end
5. show ip route
DETAILED STEPS
| Command or Action | Purpose | |
|---|---|---|
|
|
Example: Router> enable |
Enables privileged EXEC mode.
|
|
|
Example: Router# configure terminal |
Enters global configuration mode.
|
|
|
Example: Router(config)# ip route 209.165.200.225 255.255.255.255 dhcp |
Assigns a static route for the default next-hop router when the DHCP server is accessed for an IP address.
|
|
|
Example: Router(config)# end |
Returns to privileged Exec mode.
|
|
|
Example: Router# show ip route |
(Optional) Displays the current state of the routing table.
|
Clearing DHCP Server Variables
Perform this task to clear DHCP server variables.
SUMMARY STEPS
1. enable
2. clear ip dhcp binding {address | *}
3. clear ip dhcp conflict {address | *}
4. clear ip dhcp server statistics
DETAILED STEPS
| Command or Action | Purpose | |
|---|---|---|
|
|
Example: Router> enable |
Enables privileged EXEC mode.
|
|
|
Example: Router# clear ip dhcp binding * |
Deletes an automatic address binding from the DHCP database.
|
|
|
Example: Router# clear ip dhcp conflict 172.16.1.103 |
Clears an address conflict from the DHCP database.
|
|
|
Example: Router# clear ip dhcp server statistics |
Resets all DHCP server counters to 0.
|
Configuration Examples for the Cisco IOS DHCP Server
- Configuring the DHCP Database Agent Example
- Excluding IP Addresses Example
- Configuring DHCP Address Pools Example
- Configuring a DHCP Address Pool with Multiple Disjoint Subnets Example
- Configuring Manual Bindings Example
- Configuring Static Mapping Example
- Configuring the Option to Ignore all BOOTP Requests Example
- Importing DHCP Options Example
- Configuring DHCP Address Allocation Using Option 82 Example
- Configuring a Static Route with the Next-Hop Dynamically Obtained Through DHCP Example
Configuring the DHCP Database Agent Example
The following example shows how to store bindings on host 172.16.4.253. The file transfer protocol is FTP. The server should wait 2 minutes (120 seconds) before writing database changes.
ip dhcp database ftp://user:password@172.16.4.253/router-dhcp write-delay 120
Excluding IP Addresses Example
In the following example, server A and server B service the subnet 10.0.20.0/24. Splitting the subnet equally between the two servers, server A is configured to allocate IP addresses 10.0.20.1 to 10.0.20.125 and server B is configured to allocate IP addresses 10.0.20.126 to 10.0.20.254.
Server A
ip dhcp excluded-address 10.0.20.126 10.0.20.255
!
ip dhcp pool A
 network 10.0.20.0 255.255.255.0
Server B
ip dhcp excluded-address 10.0.20.0 10.0.20.125
!
ip dhcp pool B
 network 10.0.20.0 255.255.255.0
Configuring DHCP Address Pools Example
In the following example, three DHCP address pools are created: one in network 172.16.0.0, one in subnetwork 172.16.1.0, and one in subnetwork 172.16.2.0. Attributes from network 172.16.0.0—such as the domain name, DNS server, NetBIOS name server, and NetBIOS node type—are inherited in subnetworks 172.16.1.0 and 172.16.2.0. In each pool, clients are granted 30-day leases and all addresses in each subnetwork, except the excluded addresses, are available to the DHCP server for assigning to clients. The table below lists the IP addresses for the devices in three DHCP address pools.
| Table 2 | DHCP Address Pool Configuration Example |
|
Pool 0 (Network 172.16.0.0) |
Pool 1 (Subnetwork 172.16.1.0) |
Pool 2 (Subnetwork 172.16.2.0) |
|||
|---|---|---|---|---|---|
|
Device |
IP Address |
Device |
IP Address |
Device |
IP Address |
|
Default routers |
— |
Default routers |
172.16.1.100 172.16.1.101 |
Default routers |
172.16.2.100 172.16.2.101 |
|
DNS server |
172.16.1.102 172.16.2.102 |
— |
— |
— |
— |
|
NetBIOS name server |
172.16.1.103 172.16.2.103 |
— |
— |
— |
— |
|
NetBIOS node type |
h-node |
— |
— |
— |
— |
ip dhcp database ftp://user:password@172.16.4.253/router-dhcp write-delay 120
ip dhcp excluded-address 172.16.1.100 172.16.1.103
ip dhcp excluded-address 172.16.2.100 172.16.2.103
!
ip dhcp pool 0
 network 172.16.0.0 /16
 domain-name cisco.com
 dns-server 172.16.1.102 172.16.2.102
 netbios-name-server 172.16.1.103 172.16.2.103
 netbios-node-type h-node
!
ip dhcp pool 1
 network 172.16.1.0 /24
 default-router 172.16.1.100 172.16.1.101
 lease 30
!
ip dhcp pool 2
 network 172.16.2.0 /24
 default-router 172.16.2.100 172.16.2.101
 lease 30
Configuring a DHCP Address Pool with Multiple Disjoint Subnets Example
Multiple disjoint subnets in a DHCP pool can be used in any of the following network topologies:
- IP address pooling—The DHCP client and server reside on the same subnet.
- DHCP relay—The DHCP client and DHCP server communicate through a DHCP relay agent where the relay interface is configured with secondary IP addresses.
- Hierarchical DHCP—The DHCP server is configured as the DHCP subnet allocation server, and the DHCP client and DHCP subnet allocation server communicate through an on-demand address pool (ODAP) router.
In the following example, one DHCP address pool named pool3 is created; the primary subnet is 172.16.0.0/16, one secondary subnet is 172.16.1.0/24, and another secondary subnet is 172.16.2.0/24.
- When the IP addresses in the primary subnet are exhausted, the DHCP server inspects the secondary subnets in the order in which the subnets were added to the pool.
- When the DHCP server allocates an IP address from the secondary subnet 172.16.1.0/24, the server uses the subnet-specific default router list that consists of IP addresses 172.16.1.100 and 172.16.1.101. When the DHCP server allocates an IP address from the subnet 172.16.2.0/24, however, the server uses the pool-wide list that consists of the four IP addresses from 172.16.0.100 to 172.16.0.103.
- Other attributes from the primary subnet 172.16.0.0/16—such as the domain name, DNS server, NetBIOS name server, and NetBIOS node type—are inherited in both of the secondary subnets.
- DHCP clients are granted 30-day leases on IP addresses in the pool. All addresses in each subnet, except the excluded addresses, are available to the DHCP server for assigning to clients.
The table below lists the IP addresses for the devices in the DHCP address pool that consists of three disjoint subnets.
| Table 3 | DHCP Address Pool Configuration with Multiple Disjoint Subnets Example |
|
Primary Subnet (172.16.0.0/16) |
First Secondary Subnet (172.16.1.0/24) |
Second Secondary Subnet (172.16.2.0/24) |
|||
|---|---|---|---|---|---|
|
Device |
IP Address |
Device |
IP Address |
Device |
IP Address |
|
Default routers |
172.16.0.100 172.16.0.101 172.16.0.102 172.16.0.103 |
Default routers |
172.16.1.100 172.16.1.101 |
Default routers |
172.16.0.100 172.16.0.101 172.16.0.102 172.16.0.103 |
|
DNS server |
172.16.1.102 172.16.2.102 |
— |
— |
— |
— |
|
NetBIOS name server |
172.16.1.103 172.16.2.103 |
— |
— |
— |
— |
|
NetBIOS node type |
h-node |
— |
— |
— |
— |
ip dhcp database ftp://user:password@172.16.4.253/router-dhcp write-delay 120
ip dhcp excluded-address 172.16.0.100 172.16.1.103
ip dhcp excluded-address 172.16.1.100 172.16.1.101
!
ip dhcp pool pool3
 network 172.16.0.0 /16
 default-router 172.16.0.100 172.16.2.101 172.16.0.102 172.16.0.103
 domain-name cisco.com
 dns-server 172.16.1.102 172.16.2.102
 netbios-name-server 172.16.1.103 172.16.2.103
 netbios-node-type h-node
 lease 30
!
 network 172.16.1.0 /24 secondary
  override default-router 172.16.1.100 172.16.1.101
  end
!
 network 172.16.2.0 /24 secondary
Configuring Manual Bindings Example
The following example shows how to create a manual binding for a client named example1.cisco.com that sends a client identifier in the DHCP packet. The MAC address of the client is 02c7.f800.0422 and the IP address of the client is 172.16.2.254.
ip dhcp pool pool1
 host 172.16.2.254
 client-identifier  01b7.0813.8811.66
 client-name example1
The following example shows how to create a manual binding for a client named example2.cisco.com that do not send a client identifier in the DHCP packet. The MAC address of the client is 02c7.f800.0422 and the IP address of the client is 172.16.2.253.
ip dhcp pool pool2
 host 172.16.2.253
 hardware-address 02c7.f800.0422 ethernet
 client-name example1
Because attributes are inherited, the two preceding configurations are equivalent to the following:
ip dhcp pool pool1
 host 172.16.2.254 255.255.255.0
 hardware-address 02c7.f800.0422 ieee802
 client-name client1
 default-router 172.16.2.100 172.16.2.101
 domain-name cisco.com
 dns-server 172.16.1.102 172.16.2.102
 netbios-name-server 172.16.1.103 172.16.2.103
 netbios-node-type h-node
Configuring Static Mapping Example
The following example shows how to restart the DHCP server, configure the pool, and specify the URL at which the static mapping text file is stored:
no service dhcp
service dhcp
ip dhcp pool abcpool
 origin file tftp://10.1.0.1/staticfilename
Note |
The static mapping text file can be copied to flash memory on the router and served by the TFTP process of the router. In this case, the IP address in the origin file line must be an address owned by the router and one additional line of configuration is required on the router:tftp-server flash static-filename |
Configuring the Option to Ignore all BOOTP Requests Example
The following example shows two DHCP pools that are configured on the router and that the router’s DHCP server is configured to ignore all received BOOTP requests. If a BOOTP request is received from subnet 10.0.18.0/24, the request will be dropped by the router (because the ip helper-address command is not configured). If there is a BOOTP request from subnet 192.168.1.0/24, the request will be forwarded to 172.16.1.1 via the ip helper-address command.
version 12.2
service timestamps debug uptime
service timestamps log uptime
no service password-encryption
!
hostname Router
!
ip subnet-zero
!
ip dhcp bootp ignore
!
ip dhcp pool ABC
   network 192.168.1.0 255.255.255.0
   default-router 192.168.1.3
   lease 2
!
ip dhcp pool DEF
   network 10.0.18.0 255.255.255.0
!
ip cef
!
interface FastEthernet0/0
 no ip address
 shutdown
 duplex half
!
interface Ethernet1/0
 ip address 10.0.18.68 255.255.255.0
 duplex half
!
interface Ethernet1/1
 ip address 192.168.1.1 255.255.255.0
 ip helper-address 172.16.1.1
 duplex half
!
interface Ethernet1/2
 shutdown
 duplex half
!
interface Ethernet1/3
 no ip address
 shutdown
 duplex half
!
interface FastEthernet2/0
 no ip address
 shutdown
 duplex half
!
ip route 172.16.1.1 255.255.255.255 e1/0
no ip http server
no ip pim bidir-enable
!
call rsvp-sync
!
mgcp profile default
!
dial-peer cor custom
!
gatekeeper
 shutdown
!
line con 0
line aux 0
line vty 0 4
!
end
Importing DHCP Options Example
The following example shows a remote and central server configured to support the importing of DHCP options. The central server is configured to automatically update DHCP options, such as DNS and WINS addresses, within the DHCP pools. In response to a DHCP request from a local client behind CPE equipment, the remote server can request or «import» these option parameters from the centralized server. See the figure below for a diagram of the network topology.
| Figure 1 | DHCP Example Network Topology |
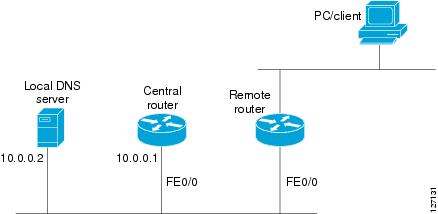
Central Router
!do not assign this range to DHCP clients
ip dhcp-excluded address 10.0.0.1 10.0.0.5
!
ip dhcp pool central
! Specifies network number and mask for DHCP clients
 network 10.0.0.0 255.255.255.0
! Specifies the domain name for the client
 domain-name central
! Specifies DNS server that will respond to DHCP clients when they need to correlate host ! name to ip address
 dns-server 10.0.0.2
!Specifies the NETBIOS WINS server
 netbios-name-server 10.0.0.2
!
interface FastEthernet0/0
 ip address 10.0.0.1 255.255.255.0
 duplex auto
 speed auto
Remote Router
ip dhcp pool client
! Imports DHCP option parameters into DHCP server database
 import all
 network 172.16.2.254 255.255.255.0
!
interface FastEthernet0/0
 ip address dhcp
 duplex auto
 speed auto
Configuring DHCP Address Allocation Using Option 82 Example
This example configures two DHCP classes. CLASS1 defines the group of DHCP clients whose address requests contain the relay agent information option with the specified hexadecimal values. CLASS2 defines the group of DHCP clients whose address requests contain the configured relay agent information suboptions. CLASS3 has no pattern configured and is treated as a «match to any» class. This type of class is useful for specifying a «default» class.
In the following example, the subnet of pool ABC has been divided into three ranges without further subnetting of the 10.0.20.0/24 subnet. If there is a DHCP Discover message from the 10.0.20.0/24 subnet with option 82 matching that of class CLASS1, an available address in the range from 10.0.20.1 to 10.0.20.100 will be allocated. If there is no free address in CLASS1’s address range, the DHCP Discover message will be matched against CLASS2, and so on.
Thus, each class in the DHCP pool will be examined for a match in the order configured by the user. In pool ABC, the order of matching is CLASS1, CLASS2, and finally CLASS3. In pool DEF, class CLASS2 does not have any address range configured. By default, the address range for a particular class is the pool’s entire subnets. Therefore, clients matching CLASS2 may be allocated addresses from 11.0.20.1 to 11.0.20.254.
Multiple pools can be configured with the same class, eliminating the need to configure the same patterns in multiple pools. In the future, further classification method may be implemented. For example, there may be a need to specify that one or more pools should be used only to service a particular class of devices (for example, cable modems and IP phones).
! Defines the DHCP classes and relay information patterns
ip dhcp class CLASS1
 relay agent information
  relay-information hex 01030a0b0c02050000000123
  relay-information hex 01030a0b0c02*
  relay-information hex 01030a0b0c02050000000000 bitmask 0000000000000000000000FF
ip dhcp class CLASS2
 relay agent information
  relay-information hex 01040102030402020102
  relay-information hex 01040101030402020102
ip dhcp class CLASS3
 relay agent information
! Associates the DHCP pool with DHCP classes
ip dhcp pool ABC
 network 10.0.20.0 255.255.255.0
 class CLASS1
  address range 10.0.20.1 10.0.20.100
class CLASS2
  address range 10.0.20.101 10.0.20.200
 class CLASS3
  address range 10.0.20.201 10.0.20.254
ip dhcp pool DEF
 network 172.64.2.2 255.255.255.0
 class CLASS1
  address range 172.64.2.3 172.64.2.10
 class CLASS2
Configuring a Static Route with the Next-Hop Dynamically Obtained Through DHCP Example
The following example shows how to configure two Ethernet interfaces to obtain the next-hop router IP address from the DHCP server:
ip route 10.10.10.0 255.255.255.0 dhcp 200
ip route 10.10.20.1 255.255.255.255 ethernet 1 dhcp
Additional References
The following sections provide references related to configuring the Cisco IOS DHCP server.
Related Documents
|
Related Topic |
Document Title |
|---|---|
|
DHCP commands: complete command syntax, command mode, command history, defaults, usage guidelines, and examples |
Cisco IOS IP Addressing Services Command Reference |
|
DHCP conceptual information |
«DHCP Overview» module |
|
DHCP relay agent configuration |
«Configuring the Cisco IOS DHCP Relay Agent» module |
|
DHCP server on-demand address pools |
«Configuring the DHCP Server On-Demand Address Pool Manager» module |
|
DHCP client configuration |
«Configuring the Cisco IOS DHCP Client» module |
|
DHCP advanced features |
«Configuring DHCP Services for Accounting and Security» module |
|
DHCP enhancements for edge-session management |
«Configuring DHCP Enhancements for Edge-Session Management» module |
|
DHCP options |
«DHCP Options» appendix in the Network Registrar User’s Guide , Release 6.1.1 |
Standards
|
Standards |
Title |
|---|---|
|
No new or modified standards are supported by this functionality. |
— |
MIBs
|
MIBs |
MIBs Link |
|---|---|
|
No new or modified MIBs are supported by this feature, and support for existing MIBs has not been modified by this feature. |
To locate and download MIBs for selected platforms, Cisco IOS releases, and feature sets, use Cisco MIB Locator found at the following URL: http://www.cisco.com/go/mibs |
RFCs
|
RFCs |
Title |
|---|---|
|
RFC 951 |
Bootstrap Protocol (BOOTP) |
|
RFC 1542 |
Clarifications and Extensions for the Bootstrap Protocol |
|
RFC 2131 |
Dynamic Host Configuration Protocol |
|
RFC 2132 |
DHCP Options and BOOTP Vendor Extensions |
Technical Assistance
|
Description |
Link |
|---|---|
|
The Cisco Support website provides extensive online resources, including documentation and tools for troubleshooting and resolving technical issues with Cisco products and technologies. To receive security and technical information about your products, you can subscribe to various services, such as the Product Alert Tool (accessed from Field Notices), the Cisco Technical Services Newsletter, and Really Simple Syndication (RSS) Feeds. Access to most tools on the Cisco Support website requires a Cisco.com user ID and password. |
http://www.cisco.com/cisco/web/support/index.html |
Feature Information for the Cisco IOS DHCP Server
The following table provides release information about the feature or features described in this module. This table lists only the software release that introduced support for a given feature in a given software release train. Unless noted otherwise, subsequent releases of that software release train also support that feature.
Use Cisco Feature Navigator to find information about platform support and Cisco software image support. To access Cisco Feature Navigator, go to www.cisco.com/go/cfn. An account on Cisco.com is not required.
| Table 4 | Feature Information for the Cisco IOS DHCP Server |
|
Feature Name |
Releases |
Feature Configuration Information |
|---|---|---|
|
DHCP Address Allocation Using Option 82 |
12.3(4)T 12.2(28)SB 12.2(33)SRB |
The Cisco IOS DHCP server can allocate dynamic IP addresses based on the relay information option (option 82) information sent by the relay agent. The following commands were introduced or modified: address range, class, ip dhcp class, ip dhcp use class, relay agent information, relay-information hex. |
|
DHCP Server Import All Enhancement |
12.2(15)T 12.2(33)SRC |
The feature is an enhancement to the import all global configuration command. Before this feature was introduced, the options imported through the import all command were overwritten by those imported by another subsystem. Through this feature, options imported by multiple subsystems can coexist in the DHCP address pool. When the session is terminated or the lease is released, the imported options are cleared. |
|
DHCP Server Multiple Subnet |
12.4(15)T 12.2(33)SRB |
This feature enables multiple subnets to be configured under the same DHCP address pool. The following commands were introduced or modified: network(DHCP), override default-router. |
|
DHCP Server Option to Ignore all BOOTP Requests |
12.2(8)T 12.2(28)SB |
This feature allows the Cisco IOS DHCP server to selectively ignore and not reply to received Bootstrap Protocol (BOOTP) request packets. The following command was introduced or modified: ip dhcp bootp ignore. |
|
DHCP Static Mapping |
12.3(11)T 12.2(28)SB 12.2(33)SRC |
Configuring static mapping pools enables the DHCP server to read the static bindings from a separate text file (similar in format to the DHCP database file) that is stored in these special pools. The following command was introduced or modified: origin. |
|
DHCP Statically Configured Routes Using a DHCP Gateway |
12.3(8)T 12.2(28)S 12.2(33)SRC |
This feature enables the configuration of static routes that point to an assigned DHCP next-hop router. The following commands were introduced or modified: ip route, show ip route. |
Cisco and the Cisco logo are trademarks or registered trademarks of Cisco and/or its affiliates in the U.S. and other countries. To view a list of Cisco trademarks, go to this URL: www.cisco.com/go/trademarks. Third-party trademarks mentioned are the property of their respective owners. The use of the word partner does not imply a partnership relationship between Cisco and any other company. (1110R)
Any Internet Protocol (IP) addresses and phone numbers used in this document are not intended to be actual addresses and phone numbers. Any examples, command display output, network topology diagrams, and other figures included in the document are shown for illustrative purposes only. Any use of actual IP addresses or phone numbers in illustrative content is unintentional and coincidental.
Протокол DHCP используется для автоматического назначения IPv4/IPv6 адресов сетевым устройства. Вы можете развернуть DHCP сервер на отдельном хосте с Windows Server или Linux. Но в качестве DHCP сервера можно использовать и различное сетевое оборудование, которое уже установлено в вашей сети. В этой статье мы покажем, как настроить DHCP сервер на маршрутизаторе Cisco с операционной системой Cisco IOS.
Настройка маршрутизатора Cisco выполняет из командной строки Cisco IOS. Подключитесь к своему маршрутизатору Cisco по telnet/ssh и перейдите в режим конфигурирования.
Router #configure terminal
По-умолчанию сервис DHCP сервера в Cisco IOS включен. Если он отключен, можно включить его командой:
Router(config)# service dhcp
Далее вы должны создать DHCP пулы, из которых можно выдавать IP адреса клиентам. Допустим, вы хотите, чтобы ваш маршрутизатор выдавал IP адреса в подсети 192.168.1.0/24 начиная с адреса 192.168.1.11.
Создайте новый DHCP пул:
Router(config)# ip dhcp pool LAN1
Далее нужно указать IP подсеть, адрес шлюза и адрес DNS сервера:
Router(dhcp-config)# network 192.168.1.0 255.255.255.0
Router(dhcp-config)# default-router 192.168.1.1
Router(dhcp-config)# dns-server 192.168.1.10
Можно дополнительно указать различные настройки DHCP пула, например:
- Доменное имя:
Router (dhcp-config)#domain-name my-domain.com - Срок аренды DHCP адресов клиентами (DHCP lease time, по-умолчанию время аренды — 1 день):
Router(dhcp-config)# lease 2 - Адрес сервера NetBIOS WINS (для сетей Microsoft):
Router(dhcp-config)# netbios-name-server 192.168.1.10
Чтобы закончить настройку DHCP зоны, выполните:
Router (dhcp-config)#exit
Совет. Обратите внимание, что DHCP сервис на маршрутизаторе Cisco не привязан к конкретному сетевому интерфейсу.
Чтобы исключить определенный диапазон IP или один IP адрес из DHCP пула, выдаваемого клиентам:
Router(config)#ip dhcp excluded-address 192.168.1.1 192.168.1.10
Router(config)#ip dhcp excluded-address 192.168.1.254
Вы можете создавать DHCP резервации для клиентов. Следующие команды создадут DHCP резервацию IP адреса для определенного MAC адреса устройства.
Router(config)# ip dhcp pool LAN1
Router(config-pool)#host 192.168.1.15 255.255.255.0
Router(config-pool)#client-identifier 0100.0321.1234.cb
Router(config-pool)#client-name ko-man01
В качестве аргумента client-identifier указывается уникальный MAC адрес устройства. Если устройство с этим MAC адресом запросит аренду адреса у вашего DHCP сервера, ему будет назначен конкретный IP адрес.
Совет. Обратите внимание, что для Windows клиентов перед MAC адресом указывается 01, а для Linux/Unix устройства – 00.
Резервация IP адреса для Linux хоста создается так:
Router(config)# ip dhcp pool LAN1
Router(config-pool)#host 192.168.1.16 255.255.255.0
Router(config-pool)#hardware-address 00.0321.1234.bb
Router(config-pool)#client-name apache-server
Теперь можно попробовать запросить аренду адреса с клиента DHCP в этой же сети. В Windows чтобы обновить IP адрес используются команды ipconfig:
ipconfig /release
ipconfig /renew
Посмотреть полученный IP адрес можно с помощью команды:
ipconfig /all
На скриншоте видно, что клиенту Windows был назначен IP адрес 192.168.1.30 DHCP севером 192.168.1.1.
На маршрутизаторе Cisco вы можете вывести список всех IP адресов и сопоставленных с ними MAC адресов, которые были выданы DHCP сервером:
router#show ip dhcp binding
IP address Client-ID/ Lease expiration Type
Hardware address
192.168.1.30 0050.2CA5.F573 Jul 19 2020 12:25 AM Automatic
Можно сбросить назначенный клиенту IP адрес:
Router# clear ip dhcp binding 192.168.1.30
Или полностью очистить таблицу соответствия физических адресов и адресов, выданных DHCP-сервером из своего пула:
Router#clear ip dhcp binding
Для просмотра статистики DHCP сервера используйте команду:
Router# show ip dhcp server statistics
Время на прочтение
4 мин
Количество просмотров 104K
В статье я хочу рассмотреть использование DHCP-сервера на базе маршрутизатора Cisco в корпоративной сети…
1. Теория
Как следует из названия, протокол DHCP (Dynamic Host Configuration Protocol) используется для динамической конфигурации параметров сетевых устройств.
Работа протокола DHCP начинается с того, что клиент, которому необходима динамическая конфигурация, шлет запрос DISCOVERY. Выглядит он следующим образом:
Frame 34 (342 bytes on wire, 342 bytes captured)

Ethernet II, Src: 02:00:4c:4f:4f:50 (02:00:4c:4f:4f:50), Dst: Broadcast (ff:ff:ff:ff:ff:ff)

#МАС-адрес получателя широковещательный

Internet Protocol, Src: 0.0.0.0 (0.0.0.0), Dst: 255.255.255.255 (255.255.255.255)

#IP-адрес также широковещательный

User Datagram Protocol, Src Port: bootpc (68), Dst Port: bootps (67)

#UDP-порты 68 и 67 определяют клиента и сервер

Client IP address: 0.0.0.0 (0.0.0.0)

#указывается текущий адрес клиента, может содержать не нулевое значение если, например, у клиента есть ip-адрес и он продлевает время его аренды

Your (client) IP address: 0.0.0.0 (0.0.0.0)

#в этом поле указывается адрес, выдаваемый DHCP-сервером при ответе

Next server IP address: 0.0.0.0 (0.0.0.0)

#адрес самого DHCP-сервера

Relay agent IP address: 0.0.0.0 (0.0.0.0)

#адрес Relay-агента, если имеется (будет рассмотрен далее)

Client MAC address: 02:00:4c:4f:4f:50 (02:00:4c:4f:4f:50)

#МАС-адрес клиента
Дальше идет поле опций, номера опций могут быть в диапазоне от 0 до 255, каждая опция имеет свое назначение:
Option: (t=50,l=4) Requested IP Address = 192.168.13.2

#опция 50 имеет длину 4 байта, в ней указывается IP-адрес, который хотел бы получить клиент по возможности

Option: (t=12,l=8) Host Name = "MainHost"

#опция 12 имеет длину 8 байт, в ней указывается текущее имя хоста, которое может быть изменено после конфигурации

Option: (t=55,l=11) Parameter Request List

#опция 55, в ней содержится список запрашиваемых клиентом параметров, в данной ситуации клиент запрашивает 11 параметров, каждому из которых соответствует номер опции

В ответ сервер шлет предложение OFFER, в котором указывает адрес, который он назначает клиенту, а также заполняет опции соответствующими значениями:

Клиент может получить несколько предложений OFFER от разных DHCP-серверов (если их несколько), какому из серверов отдать предпочтение, выбирает сам клиент. Обычно клиент выбирает тот сервер, от которого он первым получил предложение.
После того, как клиент определяет для себя сервер, с которого он хочет получить конфигурацию, он отправляет запрос REQUEST. Запрос отправляется широковещательно, чтобы его могли получить все DHCP-сервера, а адрес того сервера, который выбрал клиент, указывается в специальной опции:
Option: (t=54,l=4) DHCP Server Identifier = 192.168.13.1
Таким образом клиент говорит всем серверам в широковещательном домене, какому из них он отдал предпочтение.
Следующим шагом является подтверждение запроса (сообщение ACK) со стороны сервера. Сервер также широковещательно рассылает подтверждение, но в теле сообщения явным образом указывает МАС-адрес клиента:
Client MAC address: 02:00:4c:4f:4f:50 (02:00:4c:4f:4f:50)
При назначении адресов и клиент и сервер проверяют их уникальность. Предположим, на сервере сконфигурирован пул адресов, который начинается с адреса 192.168.13.2. Первый адрес пула назначен вручную одним из пользователей сети. При назначении такого адреса по DHCP произойдет конфликт, поэтому, для развязания конфликтов существует следующий механизм:

После получения сообщения DISCOVERY (строка 1), сервер выбирает первый адрес из пула (в данном случае 192.168.13.2) и отправляет на него ARP-запрос (строка 2)
Так как компьютер с таким адресом существует в сети, сервер получает ответ (строка 3).
Чтобы убедиться в наличии в сети узла с адресом 192.168.13.2 сервер отправляет на этот адрес Echo-Request (строка 4) и получает ответ (строка 5).
В таком случае, сервер берет следующий свободный адрес из пула (в данном случае 192.168.13.3) и отправляет на него ARP-запрос (строка 6)
Не дождавшись ответа (прошло почти 15 сек.) сервер считает адрес свободным и предлагает его клиенту в сообщении REQUEST (строка 7).
Клиент, подтвердив получение адреса (строка  и дождавшись подтверждения от сервера (строка 9), также проверяет, не занят ли кем-то выданный адрес.
Это делается путем отправки ARP-запросов клиентом (строки 10-12), если ответ на запрос не пришел, клиент назначает себе на интерфейс полученный адрес.
2. Базовая настройка на маршрутизаторе Cisco
Рассмотрим самый простой случай, когда на маршрутизаторе конфигурируется один пул адресов и сервер находится в том же широковещательном домене, что и клиенты:
!в режиме глобальной конфигурации определим адреса, которые будут исключены из пула, в данном случае это адреса 192.168.13.1 и 192.168.13.10...192.168.13.15

ip dhcp excluded-address 192.168.13.1

ip dhcp excluded-address 192.168.13.10 192.168.13.15

!создадим пул адресов с именем lan_pool1

ip dhcp pool lan_pool1

!определим подсеть, из которой будут выдаваться адреса

network 192.168.13.0/24

!определим адрес шлюза по-умолчанию

ip default-router 192.168.13.1

!определим адреса DNS-серверов

dns-server 192.168.13.10 192.168.13.11

!определим имя домена

domain-name example.ua

!определим время аренды адреса 5 дней (по-умолчанию 1 день)

lease 5
При такой конфигурации сервер будет выдавать адреса только тем клиентам, запрос от которых пришел через интерфейс, адрес которого находится в той же сети, что и сконфигурированный пул.
На этом пока все, спасибо за внимание и за инвайт :). В дальнейшем планирую подробнее описать работу DHCP-Relay и ряд специфических опций.
Материал из Xgu.ru
Перейти к: навигация, поиск
| Данная страница находится в разработке. Эта страница ещё не закончена. Информация, представленная здесь, может оказаться неполной или неверной. Если вы считаете, что её стоило бы доработать как можно быстрее, пожалуйста, скажите об этом. |
DHCP (Dynamic Host Configuration Protocol/протокол динамической конфигурации узла) — это сетевой протокол, позволяющий компьютерам автоматически получать IP-адрес и другие параметры, необходимые для работы в сети TCP/IP.
Содержание
- 1 Настройка DHCP-сервера на маршрутизаторе Cisco
- 1.1 Включение DHCP-сервера на маршрутизаторе Cisco
- 1.2 Базовые настройки DHCP-сервера на маршрутизаторе Cisco
- 1.2.1 Настройка пула DHCP
- 1.2.1.1 Исключение IP-адресов
- 1.2.2 Ручное резервирование IP-адресов
- 1.2.3 Настройка агента DHCP базы данных
- 1.2.1 Настройка пула DHCP
- 1.3 Дополнительные настройки DHCP
- 1.3.1 Параметры конфигурации DHCP
- 1.3.2 Настройка загрузочного файла для DHCP-сервера
- 1.3.3 Настройка идентификации конфликтов IP-адресов
- 1.3.4 Очистка таблицы соответствия динамически выданных адресов
- 1.4 Просмотр информации про DHCP
- 1.4.1 Просмотр информации, о выданных адресах
- 1.4.2 Просмотр информации о конфликтах, при назначении IP-адресов
- 1.4.3 Информация о состоянии базы IP-адресов
- 1.4.4 Просмотр статистики DHCP-сервера:
- 2 Настройка DHCP в Linux
- 3 Настройка DHCP в Windows 2003
- 4 Примеры конфигураций
- 4.1 Пример конфигурации маршрутизатора Cisco
- 5 Материалы по DHCP на Xgu.ru
[править] Настройка DHCP-сервера на маршрутизаторе Cisco
[править] Включение DHCP-сервера на маршрутизаторе Cisco
По умолчанию на маршрутизаторах Cisco включена функциональная возможность DHCP-сервера.
Если же она не активирована, то это возможно сделать командой:
Router(config)# service dhcp
Отключить данную функциональную возможность:
Router(config)# no service dhcp
[править] Базовые настройки DHCP-сервера на маршрутизаторе Cisco
- Настройка соединения между коммутатором и маршрутизатором
- Настройка DHCP-сервера
Пример топологии (данная топология не является рекомендацией, а используется просто в качестве примера):

Необходимо настроить порт коммутатора fa0/11 для передачи трафика нескольких VLAN маршрутизатору.
На интерфейсе маршрутизатора fa0/0:
- Создать интерфейс для каждого VLAN’а (подсети)
- Настроить инкапсуляцию 802.1q и указать номер VLAN’а
- Задать на них адрес из соответствующей подсети
Подробное описание процедуры настройки VLAN’ов на коммутаторах и маршрутизаторах Cisco можно прочитать на странице VLAN.
[править] Настройка пула DHCP
Настройка DHCP-пула на маршрутизаторе (аналогичным образом настраиваются пулы для каждой подсети) и указание шлюза по умолчанию для клиентов:
Router(config)# service dhcp
Router(config)# ip dhcp pool guest
Router(config-pool)# network 192.168.20.0 255.255.255.0
Router(config-pool)# default-router 192.168.20.1
Как дополнительные параметры в пуле можно описать:
- Имя домена для DHCP-клиента — domain-name
- DNS-сервер — dns-server
- Сервер WINS для сетей microsoft — netbios-name-server
Router(config-pool)# domain-name test.kv.ua
Router(config-pool)# dns-server 192.168.20.101
Router(config-pool)# netbios-name-server 192.168.20.101
[править] Исключение IP-адресов
Исключить из пула адрес интерфейса маршрутизатора и DNS-сервера:
Router(config)# ip dhcp excluded-address 192.168.20.1
Router(config)# ip dhcp excluded-address 192.168.20.101
[править] Ручное резервирование IP-адресов
Есть возможность вручную сопоставить определенный MAC-адрес с необходимым IP-адресом.
Router(config)# ip dhcp pool Test
Router(config-pool)#host 192.168.2.4 255.255.255.0
Router(config-pool)#client-identifier 0100.0476.106c.bc
Router(config-pool)#client-name Test
В данной конструкции необходимо указать:
- адрес, который будет сопоставлен с физическим адресом: host address [mask | prefix-length]
- физический адрес (идентификатор) сетевой карты: client-identifier unique-identifier
- имя клиента: client-name name
|
|
Для microsoft сетей идентификатором данной сети является 01 ПЕРЕД MAC-адресом. Для UNIX сетей необходимо проставлять 00 |
То есть, для компьютера с MAC-адресом 00.04.76.10.6c.bc, который работает в среде Windows строчка client-identifier будет выглядеть как:
Router(config-pool)#client-identifier 0100.0476.106c.bc
Для компьютера с MAC-адресом 00.04.76.10.6c.bc который работает в среде UNIX строчка client-identifier будет выглядеть как:
Router(config-pool)#client-identifier 0000.0476.106c.bc
Пример:
Router(config)#ip dhcp pool glh-pc-5443
Router(config-pool)#host 10.84.130.10 255.255.255.0
Router(config-pool)#client-identifier 0100.2264.15c4.96
Router(config-pool)#client-name glh-pc-5443
Router(config-pool)#domain-name glh.sm.aval

Router(config)#ip dhcp pool glh-pc-5436
Router(config-pool)#host 10.84.130.15 255.255.255.0
Router(config-pool)#client-identifier 0100.2264.15c3.64
Router(config-pool)#client-name glh-pc-5436
Router(config-pool)#domain-name glh.sm.aval

Router(config)#ip dhcp pool glh-pc-2342
Router(config-pool)#host 10.84.130.42 255.255.255.0
Router(config-pool)#client-identifier 0100.0cf1.7ffd.03
Router(config-pool)#client-name glh-pc-2342
Router(config-pool)#domain-name glh.sm.aval

Router(config)#ip dhcp pool glh-pc-2325
Router(config-pool)#host 10.84.130.101 255.255.255.0
Router(config-pool)#client-identifier 0100.07e9.594f.bf
Router(config-pool)#client-name glh-pc-2325
Router(config-pool)#domain-name glh.sm.aval
|
|
Для каждого статического соответствия необходимо создавать отдельный пул. |
[править] Настройка агента DHCP базы данных
База данных DHCP-агента может находится как на любом сетевом ресурсе (ftp, TFTP, или RCP сервере), так и на flash памяти. При этом база DHCP-сервера содержит всю его информацию. Имеется возможность настроить DHCP-сервер на использование нескольких агентов, для обновления и размещения баз DHCP-сервера несколькими агентами.
Для настройки агента базы DHCP-сервера и параметров агента, используется команда:
Router(config)# ip dhcp database url [timeout seconds | write-delay seconds]
Например:
router(config)#ip dhcp database ftp://user:password@172.16.1.1/router-dhcp timeout 80
для отключения агента базы данных DHCP-сервера:
Router(config)# no ip dhcp conflict logging
[править] Дополнительные настройки DHCP
Время аренды IP-адреса от 0 до 365 дней(в эмуляторе PT — не поддерживается):
(dhcp-config)# lease 5
[править] Параметры конфигурации DHCP
Возможно так же описывать dhcp-options — Параметры конфигурации DHCP. Это необходимо делать с помощью ключевого слова options название значение
Пример:
Router(config)#ip dhcp pool phone2
Router(config-pool)#host 10.84.202.22 255.255.255.224
Router(config-pool)#client-identifier 0100.0ab8.268f.c7
Router(config-pool)#dns-server 10.84.242.102
Router(config-pool)#default-router 10.84.242.102
Router(config-pool)#domain-name pech3.xgu.ru
Router(config-pool)#client-name phone2
Router(config-pool)#option 66 ip 10.44.2.1 10.44.2.2
Для выдачи клиентам статических маршрутов необходимо использовать опцию 33
Router(config)#ip dhcp pool poolname
Router(config-pool)#network 172.17.0.0 255.255.248.0
Router(config-pool)#default-router 172.17.0.1
Router(config-pool)#dns-server 10.84.242.102
Router(config-pool)#domain-name pech3.xgu.ru
Router(config-pool)#option 33 ip 10.84.242.102 172.17.0.1
Router(config-pool)#option 31 hex 01
Опция 31 говорит клиенту периодически проверять информацию у сервера DHCP о маршрутах и шлюзе по умолчанию.
[править] Настройка загрузочного файла для DHCP-сервера
Что бы задать имя загрузочного образа загрузочного файла необходимо выполнить команду
bootfile filename
Пример
Router(config)#ip dhcp pool sm7.sm.aval
Router(dhcp-config)#bootfile SM7
[править] Настройка идентификации конфликтов IP-адресов
Во время процесса назначения адреса DHCP-сервер проверяет, что предлагаемый адрес не используется. Для этого он до отправки ответа DHCP-клиенту посылает по предлагаемому адресу серию ping-пакетов. Если адрес уже используется, то он протоколируется как конфликтный и не предлагается до тех пор, пока администратор сети не разрешит конфликт. По умолчанию DHCP-сервер пингует IP-адрес из пула дважды, прежде чем назначает его клиенту. Если ответа на запрос ICMP не было, то DHCP-сервер считает, что адрес не используется и присваивает его клиенту, который его запрашивал.
По умолчанию DHCP-сервер ждет две секунды ответ, а затем повторяет ICMP запрос.
Эти параметры можно изменить.
Изменить количество отправляемых ICMP запросов (0 отключает ping):
ip dhcp ping packets <0-10>
Изменение таймаута между запросами:
Router(config)# ip dhcp ping timeout 300
[править] Очистка таблицы соответствия динамически выданных адресов
Очистки таблицы соответствия физических адресов и адресов выданных с пула DHCP-сервером:
Router#clear ip dhcp binding
Очистить привязку для конкретного IP-адреса:
Router# clear ip dhcp binding 10.84.168.181
[править] Просмотр информации про DHCP
[править] Просмотр информации, о выданных адресах
Просмотр информации об адресах, которые были выданы DHCP-сервером:
Router# show ip dhcp binding
Если для этой команды указать в качестве необязательного параметра IP-адрес, то будет показана информация о привязке для этого конкретного адреса.
Router# show ip dhcp binding 10.84.130.42
В выводимой информации показываются текущие данные о выделенных и назначенных адресах, соответствующий МАС-адрес DHCP-клиента и время истечения срока аренды адреса
IP address Hardware address Lease expiration Type
192.168.1.89 afa0.9802.32de Jun 11 2012 12:00 AM Automatic
192.168.1.156 afa0.9478.43ae Jun 11 2012 1:00 AM Automatic
[править] Просмотр информации о конфликтах, при назначении IP-адресов
Router# show ip dhcp conflict

IP address Detection Method Detection time
192.168.1.126 PingJul 02 2000 12:28 AM
192.168.1.254 Gratuitous ARP Jul 02 2000 01:12 AM
В столбце Detection Method указывается метод, использованный DHCP-сервером для определения конфликтности адреса. Если указан метод обнаружения ping, то это говорит о том, что перед назначением адреса DHCP-сервер сделал попытку пропинговать этот адрес и получил успешный ответ. Метод обнаружения Gratuitious ARP (метод беспричинного разрешения адреса) означает, что до выделения адреса DHCP-сервер обнаружил в своей ARP-таблице текущую и достоверную ARP-запись для этого адреса. Наличие ссылки на любой из этих методов говорит о том, что адрес, вероятно,используется (может быть, это результат несанкционированного использования, а возможно,кто-то забыл внести адрес в список исключаемых адресов).
[править] Информация о состоянии базы IP-адресов
Если раньше было описано место хранения базы данных DHCP:
Router(config)#ip dhcp database url [timeout seconds | write-delay seconds]
то возможно посмотреть информацию о состоянии этой базы данных:
Router# show ip dhcp database

URL      : ftp://ftp.sm.aval/sm7/basessm7.txt
Read     : Never
Written  : Feb 27 2009 11:20 AM
Status   : Last write succeeded. Agent information is up-to-date.
Delay    : 120 seconds
Timeout  : 300 seconds
Failures : 0
Successes: 400
[править] Просмотр статистики DHCP-сервера:
Router# show ip dhcp server statistics
Memory usage         27543
Address pools        1
Database agents      1
Automatic bindings   13
Manual bindings      0
Expired bindings     365
Malformed messages   0
Secure arp entries   0

Message              Received
BOOTREQUEST          0
DHCPDISCOVER         460
DHCPREQUEST          8355
DHCPDECLINE          2
DHCPRELEASE          0
DHCPINFORM           2130

Message              Sent
BOOTREPLY            0
DHCPOFFER            460
DHCPACK              10329
DHCPNAK              5
[править] Настройка DHCP в Linux
[править] Настройка DHCP в Windows 2003
[править] Примеры конфигураций
[править] Пример конфигурации маршрутизатора Cisco
!
version 12.4
!
hostname Router
!
!
ip dhcp excluded-address 192.168.20.1
ip dhcp excluded-address 192.168.30.1
ip dhcp excluded-address 192.168.40.1
ip dhcp excluded-address 192.168.50.1
ip dhcp excluded-address 192.168.90.1
!
ip dhcp pool guest
   network 192.168.20.0 255.255.255.0
   default-router 192.168.20.1
!
ip dhcp pool marketing
   network 192.168.30.0 255.255.255.0
   default-router 192.168.30.1
!
ip dhcp pool sales
   network 192.168.40.0 255.255.255.0
   default-router 192.168.40.1
!
ip dhcp pool restricted
   network 192.168.50.0 255.255.255.0
   default-router 192.168.50.1
!
ip dhcp pool unauthenticated
   network 192.168.90.0 255.255.255.0
   default-router 192.168.90.1
!
!
!
interface FastEthernet0/0
 ip address 192.168.1.1 255.255.255.0
!
interface FastEthernet0/0.20
 encapsulation dot1Q 20
 ip address 192.168.20.1 255.255.255.0
!
interface FastEthernet0/0.30
 encapsulation dot1Q 30
 ip address 192.168.30.1 255.255.255.0
!
interface FastEthernet0/0.40
 encapsulation dot1Q 40
 ip address 192.168.40.1 255.255.255.0
!
interface FastEthernet0/0.50
 encapsulation dot1Q 50
 ip address 192.168.50.1 255.255.255.0
!
interface FastEthernet0/0.90
 encapsulation dot1Q 90
 ip address 192.168.90.1 255.255.255.0
!
[править] Материалы по DHCP на Xgu.ru
- DHCP
- Опция 82 DHCP
- DHCP snooping
- Win2k3 DHCP
| |
|
|---|---|
| Устройства | Cisco 871 • Cisco Router • Cisco Switch • Сisco Сatalyst • Cisco IPS • Cisco ASA • PIX • Dynamips |
| Безопасность (коммутаторы и маршрутизаторы) |
Cisco Security • Port security • DHCP snooping • Dynamic ARP Protection • IP Source Guard • Аутентификация при доступе к сети • 802.1X в Cisco • Zone-Based Policy Firewall • Cisco NAT • NAT в Cisco • Cisco SSH |
| Cisco ASA | Cisco ASA/NAT • Cisco ASA/Troubleshooting • Cisco ASA/IPS • Cisco ASA failover • Cisco ASA/Transparent firewall • Cisco ASA/Site-to-Site_VPN • Cisco ASA/Easy_VPN • Cisco ASA/WebVPN • Объединение OSPF-сетей туннелем между двумя системами ASA (без GRE) • Центр сертификатов на Cisco ASA |
| VPN | IPsec в Cisco • Cisco IOS Site-to-Site VPN • DMVPN • Cisco Easy VPN • Cisco Web VPN • Cisco ipsec preshared |
| Канальный уровень | CDP • VLAN в Cisco • ISL • VTP • STP в Cisco • Cisco Express Forwarding • Агрегирование каналов • Зеркалирование трафика • QinQ • Frame Relay |
| Сетевой уровень | Маршрутизация в Cisco • RIP • EIGRP • IS-IS • OSPF • BGP • PIM • Multicast • GLBP • VRRP • HSRP • DHCP • IPv6 • IPv6 vs IPv4 • Резервирование Интернет-каналов без использования BGP • Использование BGP для резервирования Интернет-каналов |
| Разное | Режим ROMMON в Cisco • Опция 82 DHCP • 802.1X и RADIUS • SNMP в Cisco • QoS в Cisco • EEM • Troubleshooting • Автоматизация работы устройств Cisco • Cisco NTP • Cisco IP SLA • Cisco Enhanced Object Tracking |
In this article, we will discuss the overview of DHCP and will focus to implement How to Configure DHCP Server on a Cisco Router step by step. Let’s discuss it one by one.
Overview :
DHCP (Dynamic Host Configuration Protocol) configuration is performed on routers to assign an IP address, subnet mask, gateway address ad DNS server address to the host systems. With this configuration, the dynamic IP address is assigned, which enables the administrator to easily connect a new host in the configured network.
How to Configure DHCP Server on a Cisco Router :
Steps are provided below, which can be followed to configure DHCP on the Cisco Router to assign a dynamic IP address to host systems deployed in the network:
Step-1 :
A network topology is created in the Cisco Packet Tracer, which includes a router, a switch, and three host systems connected to a network.
Network Topology
Step-2 :
Command Line Interface of the router is accessed and high-lighted commands are executed to successfully configure the DHCP. At first, the ‘IP DHCP pool pool_name’ command is executed. After this, the network address is defined along with its subnet mask. And further, the ‘default-router IP-address’ command is used to define the default route address.
Creation of DHCP pool
Step-3 :
In this step, a range of IP addresses is excluded from the addresses defined in the subnet mask of the DHCP pool. Excluded IP addresses will be not assigned to any host system in the network.
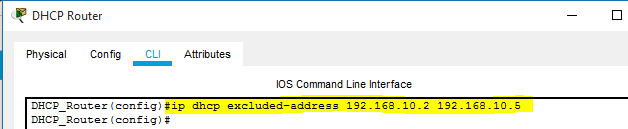
Command used to exclude IP range
Step-4 :
The interface of the router connected with the switch is assigned with the IP address defined as the default router during the DHCP configuration. This route will be taken by the data packets to reach their destination system. Also, the ‘no shutdown command is used to change the state of the connected interface to up.
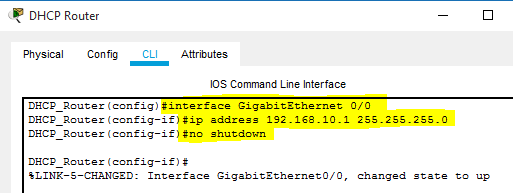
Assigning of IP address to router’s interface
Step-5 :
A successful connection is established between all the devices connected in a network. In further steps, host systems in the network are assigned with dynamic IP and default gateway address by the DHCP service configured on the router.
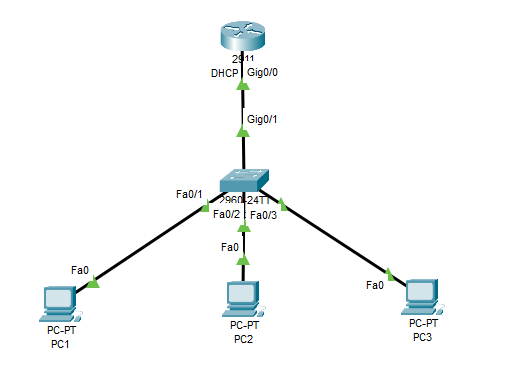
All the devices are successfully connected
Step-6 :
Desktop settings of a host system are accessed and the DHCP option is selected. DHCP request forwarded by the system is acknowledged and IP address, associated subnet mask, and default gateway address are assigned to it.
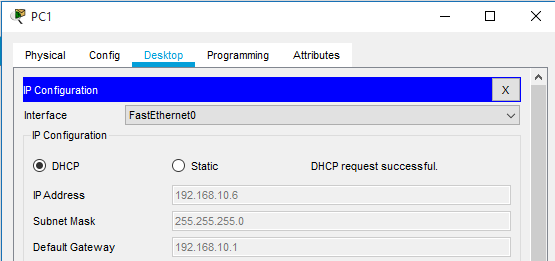
The dynamic IP address assigned to the Host System
Another host system deployed in the network is assigned with required logical addresses through the DHCP server configured on Cisco Router. In addition, IP addresses defined in the excluded range are not assigned to the computer systems.
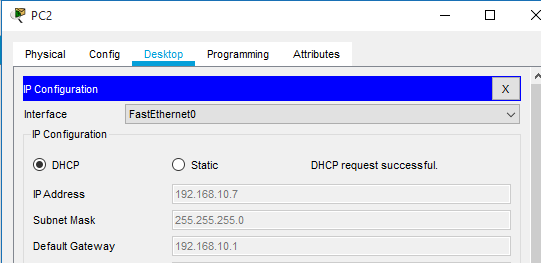
Logical addresses are assigned to the Host System
Step-7 :
To check the connectivity between the host systems, the ‘ping’ command is used to exchange data packets. All the data packets are successfully transferred, which ensures that a communication channel is established.
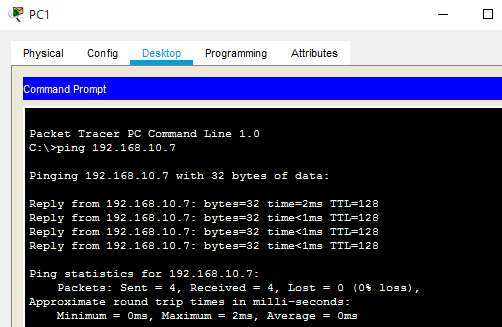
Connectivity Testing
Last Updated :
31 Aug, 2021
Like Article
Save Article