 Доброго времени суток!
Realtek HD — это, наверное, один из самых популярных аудио-драйверов, позволяющий тонко настраивать уровень и качество звука в Windows. Чтобы открыть его параметры — необходимо запустить диспетчер Realtek, ссылка на который должна быть либо в трее (рядом с часами), либо в панели управления* ОС Windows.
* К слову сказать, ссылка на диспетчер управления аудио-драйвером (в панели управления, либо в трее) — должна быть для любого звукового драйвера, если, конечно, у вас установлена его полная версия!
Но, в последнее время (из-за того, что Windows 10 «ставит» драйвера самостоятельно) — ссылки на диспетчер управления звуком Realtek нет! А впрочем, могут быть «виноваты» и сбойные версии ПО…
Собственно, ниже разберу последовательно, что и как сделать, чтобы заветная ссылка (ярлык, иконка) появилась…
В помощь!
Значок громкости не реагирует или вообще пропал… Что делать — https://ocomp.info/propal-znachok-gromkosti.html

*
Что делать, если нет значка Realtek HD
❶
«Ручная» проверка
И так, если в панели управления и в трее нет диспетчера Realtek (а вы помните, что вы его устанавливали) — попробуйте зайти на диск «C:\», и в папке «Program Files» найти каталог «Realtek». Если такой каталог есть: скорее всего в нем должен быть файл «RtkNGUI64.exe» — попробуйте запустить его, кликнув на нем ЛКМ (прим.: это и есть диспетчер).
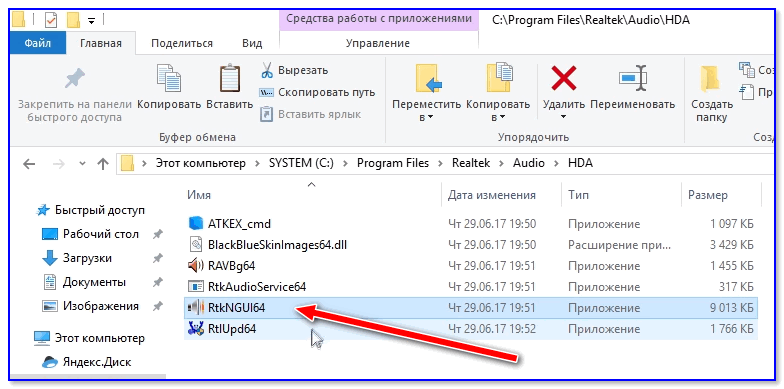
Пробуем вручную запустить диспетчер
Если диспетчер запустится, и вы сможете приступить к настройке звука — просто создайте ярлык для этой программы (кликнув на ней ПКМ), чтобы не искать ее каждый раз.
❷
Удаление «старой» версии драйвера
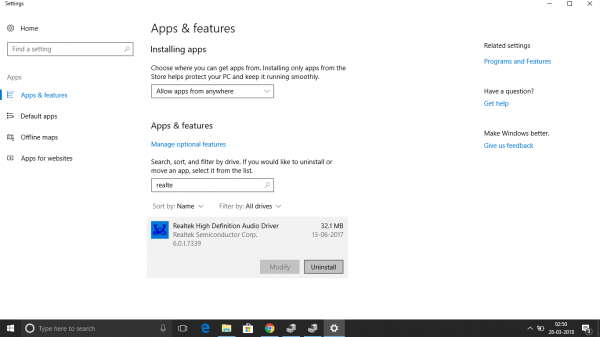
Далее, какая бы не была у вас версия драйвера, рекомендую ее полностью удалить. Это можно сделать из панели управления Windows. См. скриншот ниже.
Примечание: кстати, последняя версия драйвера Realtek 2.82 — сбойная. У меня на ПК при ее установке не появляется значок на диспетчер управления звуком!

Удаляем старый драйвер
Если драйвер попросит перезагрузить ПК — соглашайтесь!
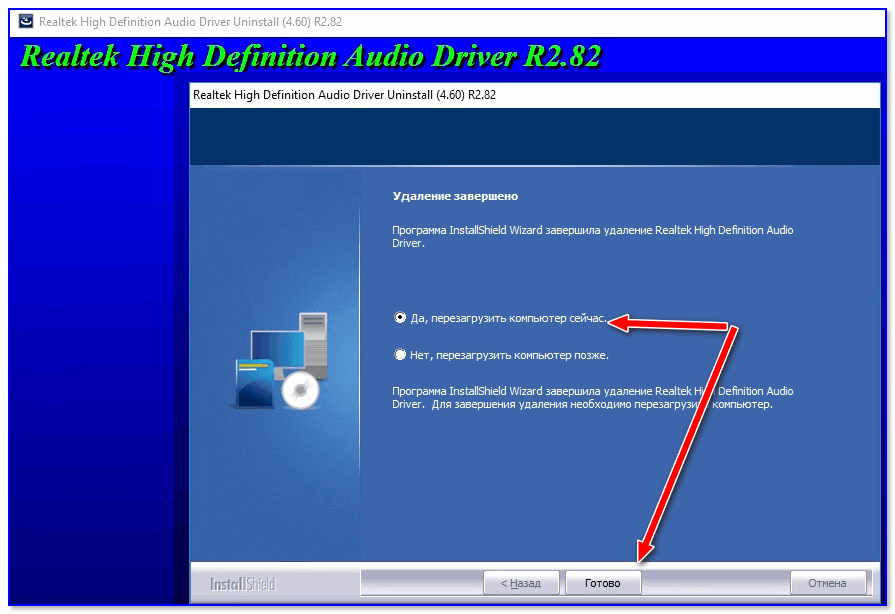
Готов
❸
Загрузка новой версии драйвера
Если у вас ПК
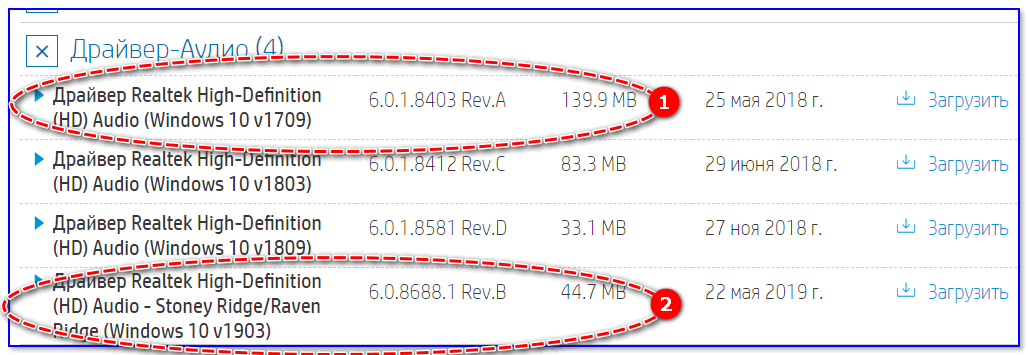
Протестировав несколько версий драйвера от Realtek — оказалось, что «сбойная» из них только одна, последняя 2.82 (и то, только на некоторых машинах!). Проверив несколько более старых версий аудио-драйверов, удалось определить, что 2.81 — вполне корректно-работающий выпуск. Ссылки на них привел ниже.
- Realtek HD 2.82 (ссылка на офиц. сайт). Сначала можно попробовать ее, если не заработает — удалите драйвер (см. шаг 1, 2 выше), и установите 2.81 версию.
- ⭐Realtek HD 2.81 ✔ (ссылка на techspot.com). Корректно-работающая версия аудио-драйвера. Рекомендую!
Если у вас ноутбук
В этом случае рекомендую определить его точную модель, а затем на официальном сайте производителя найти для него аудио-драйвера. Загружать посоветовал бы сразу несколько версий (особенно тот пакет, который весит* больше остальных).
- *В моем случае их несколько: что интересно, если установить просто последнюю версию от 22 мая — то ссылка на диспетчер управления звуком не появится!
- Если же установить сначала самый первый выпуск (весит больше остальных), а затем до-обновить его самой последней версией — то все будет корректно работать!
Драйвер аудио для ноутбука HP
❹
Установка новой версии аудио-драйвера
Непосредственно сама установка аудио-драйвера не представляет ничего сложного — достаточно запустить исполняемый файл и дождаться завершения работы мастера. После, перезагрузить ПК/ноутбук.
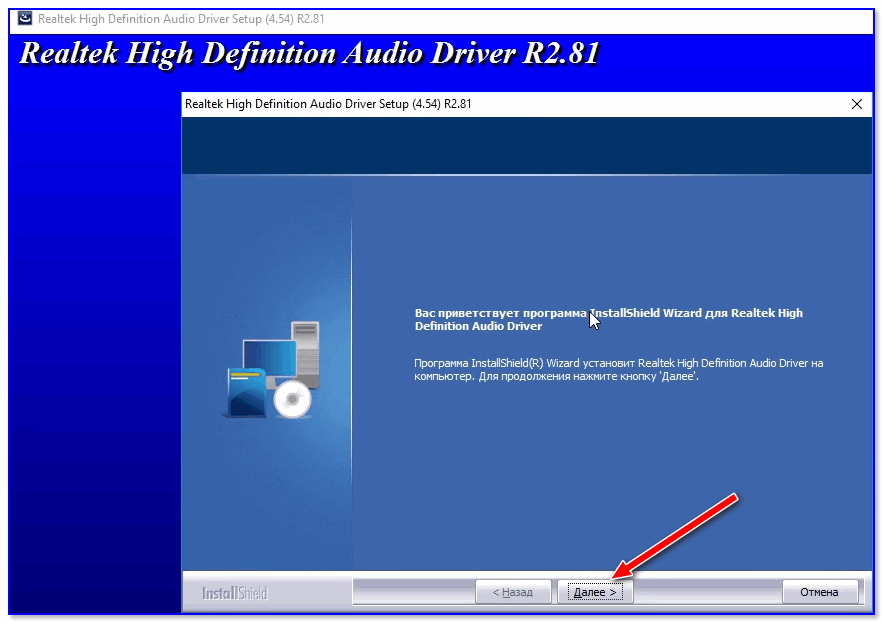
Установка другой версии Realtek HD 2.81
После перезагрузки, рекомендую сразу открыть панель управления, перевести режим отображения в «Крупные значки» и посмотреть, появилась ли ссылка на диспетчер Realtek (в моем случае, после установки версии 2.81 — все заработало!).
Примечание: если в панели управления значка не появилось — то откройте настройки драйвера, запустив файл RtkNGUI64.exe/RAVCpl64.exe из папки C:\Program Files\Realtek\Audio\HDA (как это мы делали в ШАГЕ 1).
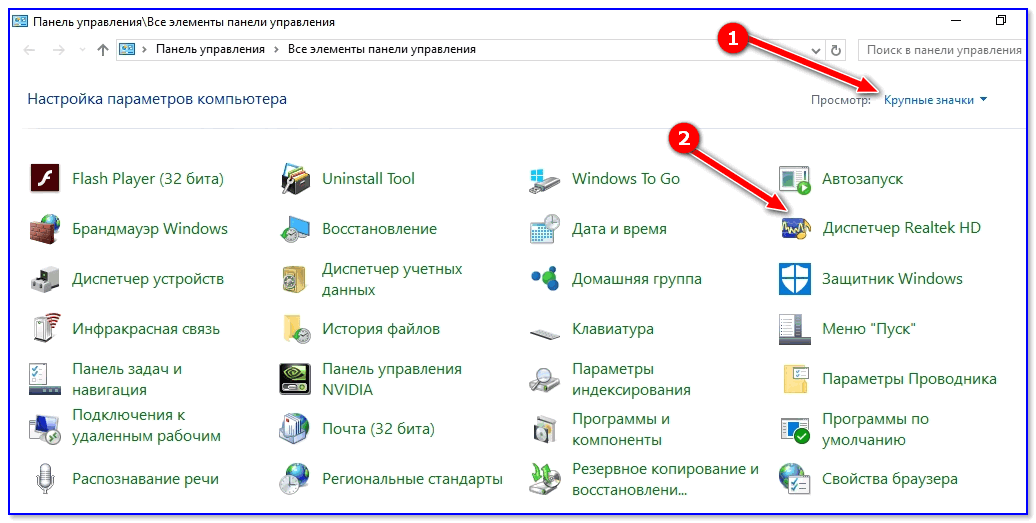
Диспетчер Realtek HD появился!
Собственно, далее можно приступить к точечной настройке звука (задача решена?!).
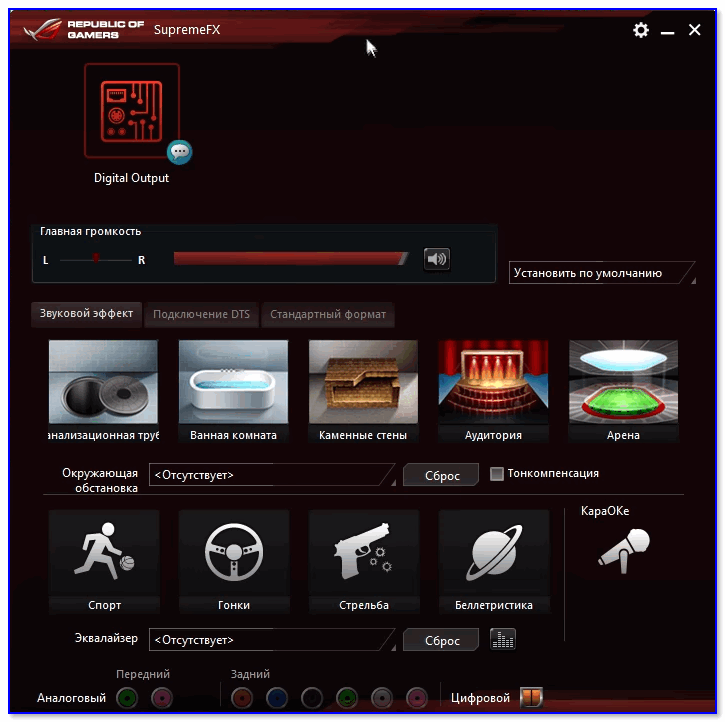
Точечная настройка звука — Realtek HD
*
PS (обновл. от 04.2022)
В последних версиях Windows 10/11 консоль для управления Realtek также появилась в магазине Microsoft Store* (📌ссылка на нее). После ее установки — в меню ПУСК и в ПОИСКЕ Windows появится ссылка на панель Realtek (в которой и будут все основные параметры звука). См. пример ниже.
📌 В помощь!
Как открыть магазин приложений Microsoft Store (и, если его нет, то установить) — см. инструкцию
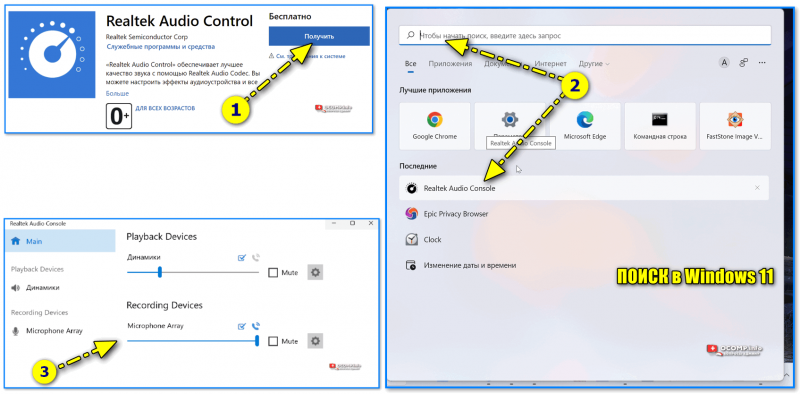
Realtek Audio Console — контрольная панель от Realtek
*
На сим сегодня всё… Дополнения по теме — лишними не будут!
Удачи!
👋
Первая публикация: 28.10.2019
Корректировка: 04.2022


Explore tested solutions to solve Realtek HD Audio Driver errors
by Vlad Turiceanu
Passionate about technology, Windows, and everything that has a power button, he spent most of his time developing new skills and learning more about the tech world. Coming… read more
Updated on
- The Realtek HD Audio Driver can stop working properly if it isn’t updated regularly.
- After updating the driver, make sure to restart the Audio service.
- Another solution is to reinstall the Realtek driver altogether.
XINSTALL BY CLICKING THE DOWNLOAD
FILE
The Realtek HD Audio Driver is one of the most common pieces of software for changing and tweaking audio settings on your PC. However, there are some difficulties that might cause Windows 11’s Realtek audio driver to stop functioning properly.
A variety of factors might contribute to Realtek HD Audio Driver issues. The majority of the challenges may be addressed by taking the steps outlined in this guide. Keep up with us!
Is Realtek audio driver compatible with Windows 11?
Realtek HD Audio Driver is the most user-friendly audio driver software that enhances sound quality and provides Dolby or Surround sound support via a sound card.
This driver is completely compatible with Windows 11, and this is not the cause of different issues with the driver. Here are the most common causes:
- Outdated drivers – Driver updates go hand in hand with OS ones. Thus, if your OS will update but your drivers won’t, it might cause miscommunications across your device. In this case, it is advised to update your Realtek audio driver.
- Enhancement audio settings – There are multiple audio enhancement software and settings that may cause issues with the driver. Thus, we will show you below how to disable them.
- Corrupted drivers – Corrupted drivers are another reason which causes your OS to unsuccessfully communicate with your driver. By reinstalling the driver or installing another one, you will be able to fix this issue.
- Wrong port connections – Make sure that you connect the audio cable to the right port and not the one for an audio input, which is usually pink.
How do I fix my Realtek audio driver in Windows 11?
- Is Realtek audio driver compatible with Windows 11?
- How do I fix my Realtek audio driver in Windows 11?
- 1. Check the audio output
- 2. Restart the Audio service
- 3. Update the driver
- 4. Reinstall the Realtek driver or use your manufacturer’s
- 5. Disable Audio Enhancements
- 6. Run the Audio Troubleshooter
- 7. Run System Restore
- 8. Update Windows
- What to do if there’s no sound at all?
Before moving on to more complex troubleshooting solutions, make sure to do the following:
How we test, review and rate?
We have worked for the past 6 months on building a new review system on how we produce content. Using it, we have subsequently redone most of our articles to provide actual hands-on expertise on the guides we made.
For more details you can read how we test, review, and rate at WindowsReport.
- Check the audio output, unplug and reconnect the device, then connect it to another system to test its functionality.
- Remove any third-party antivirus software and opt for a better one that’s optimized for Windows 11 and won’t interfere with your audio.
1. Check the audio output
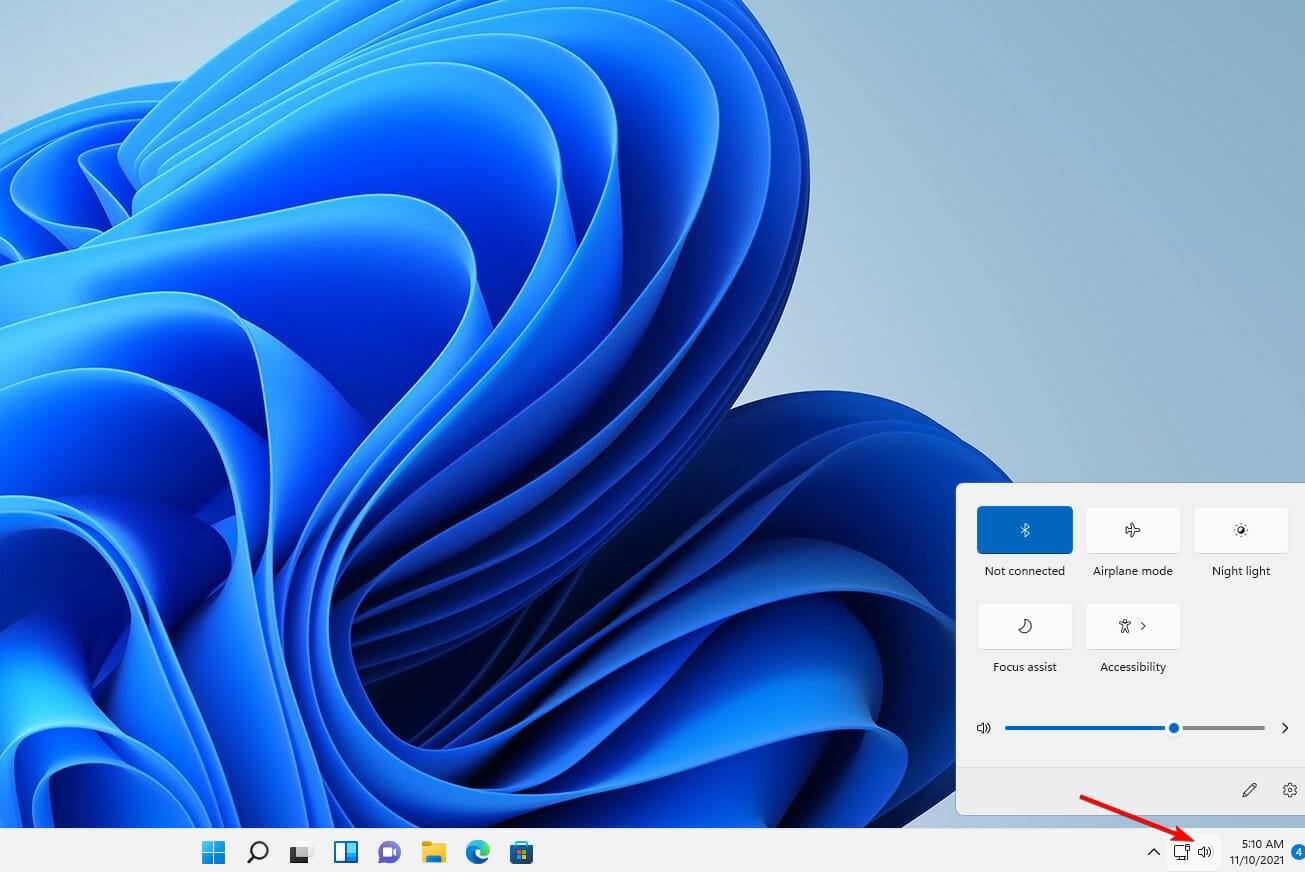
- Click on the Volume icon in the Taskbar. Alternatively, you can press Windows + A to launch it.

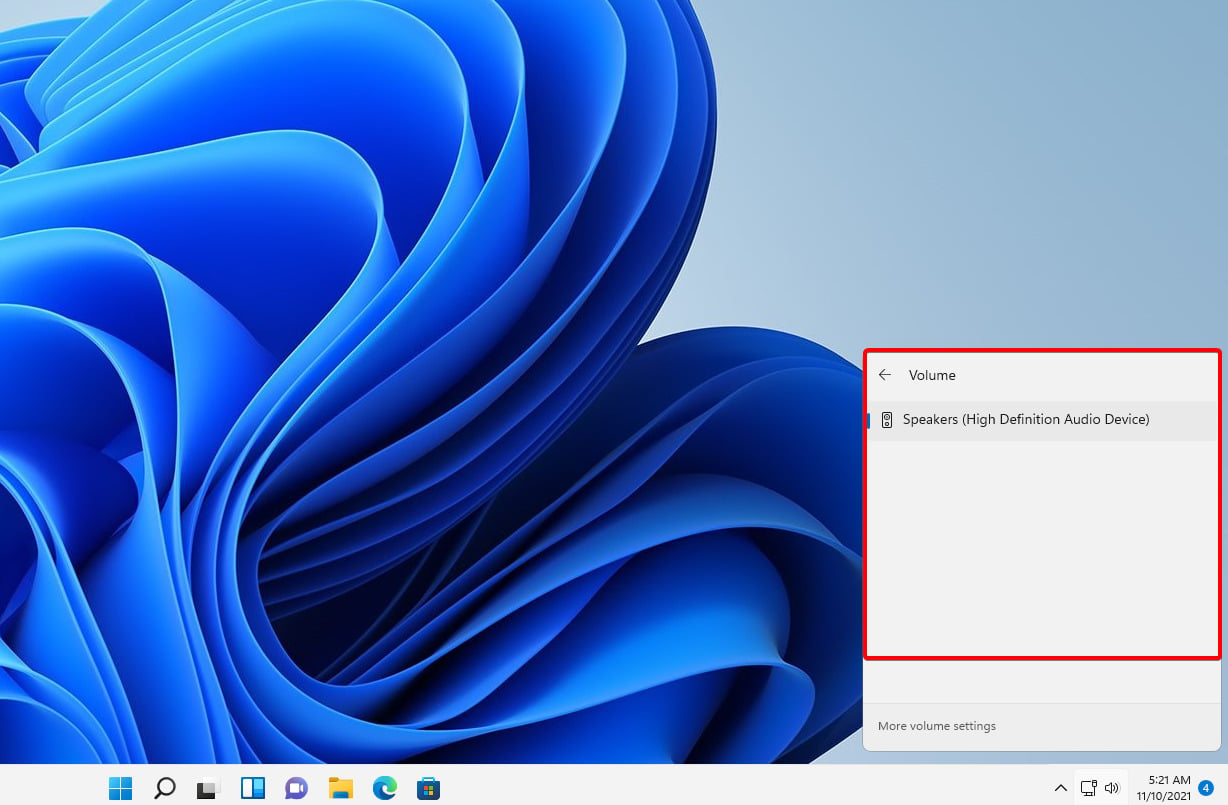
- In the Quick Menu, click on the carrot arrow icon next to the volume level.
- It will prompt you with a list of audio devices connected to the system. Select the desired device.

If selecting the desired device did not resolve the audio issue, it is possible that other system faults, for which we have provided alternative solutions, were the source of the problem.
2. Restart the Audio service
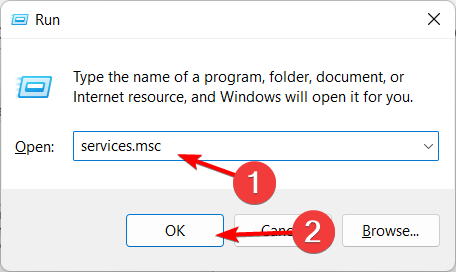
- Press the Windows key + R, which opens Run. Then enter services.msc in the open box, and click the OK button.

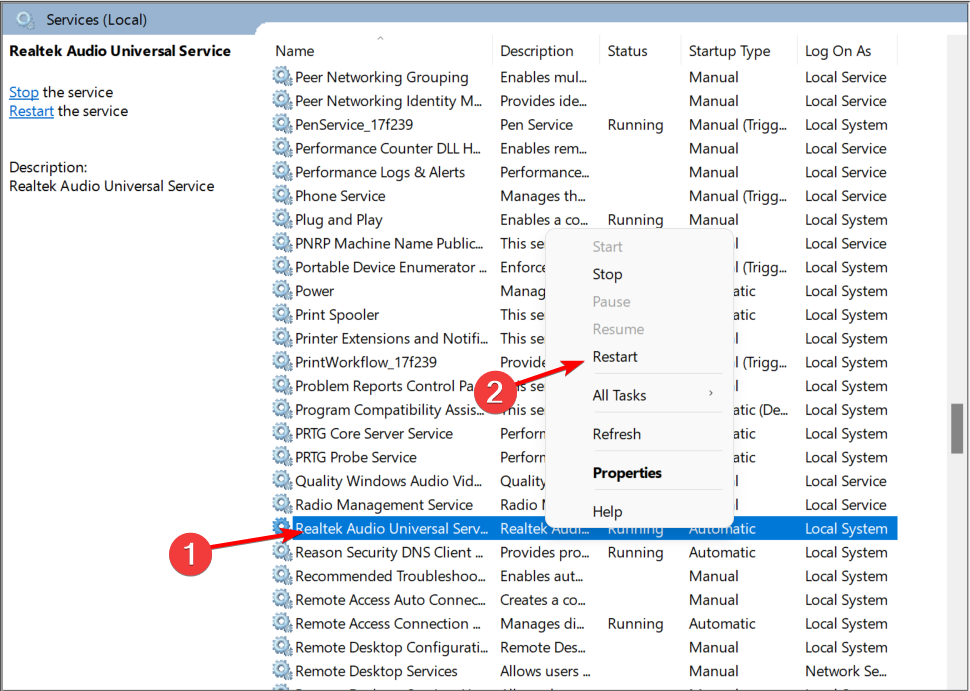
- Find the Realtek audio service, right-click it and select Restart.

3. Update the driver
If it isn’t constantly updated, the Realtek HD Audio Driver may stop functioning correctly. Follow these easy steps to correctly update the driver and fix the issue!
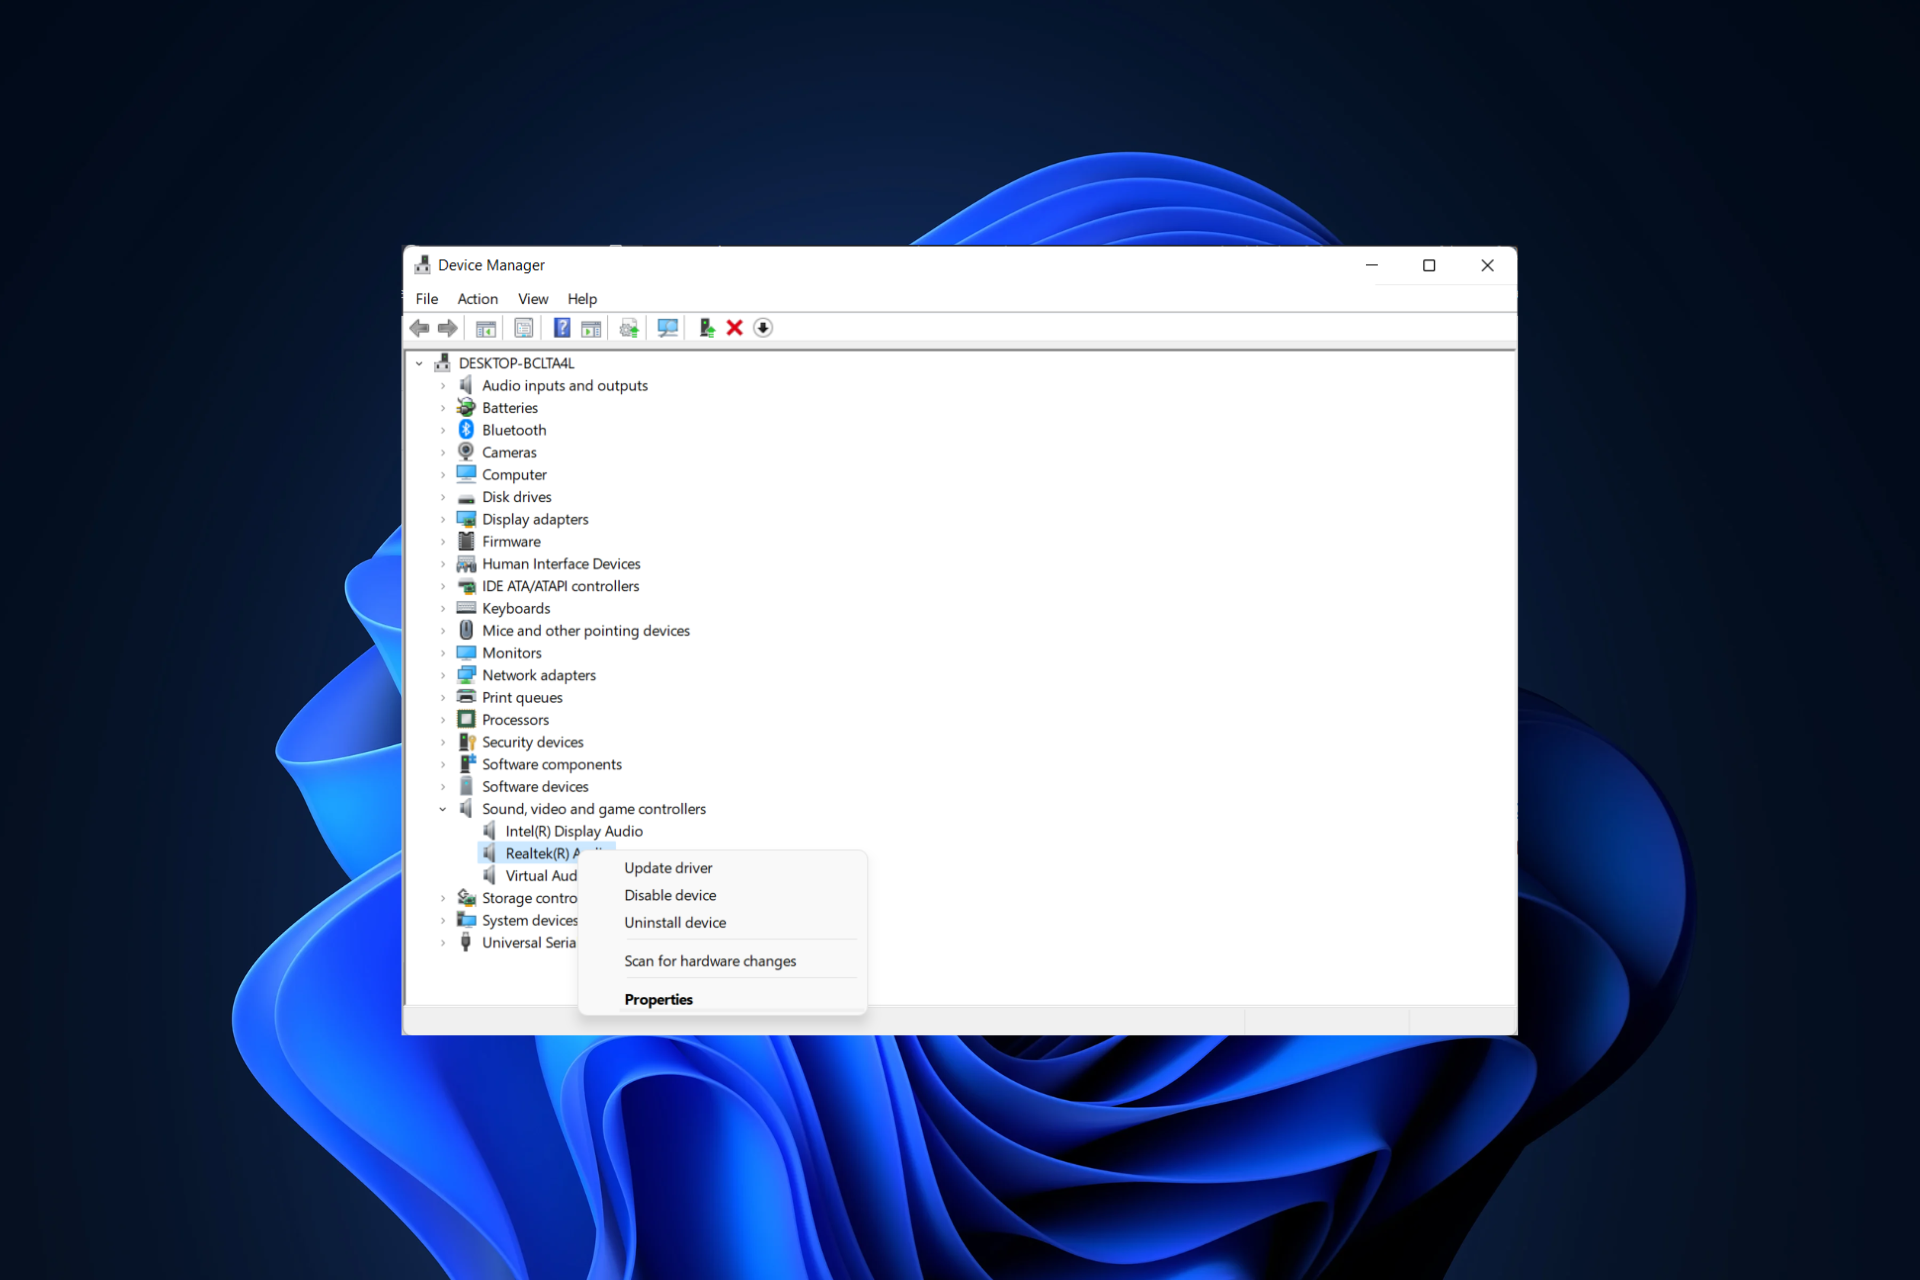
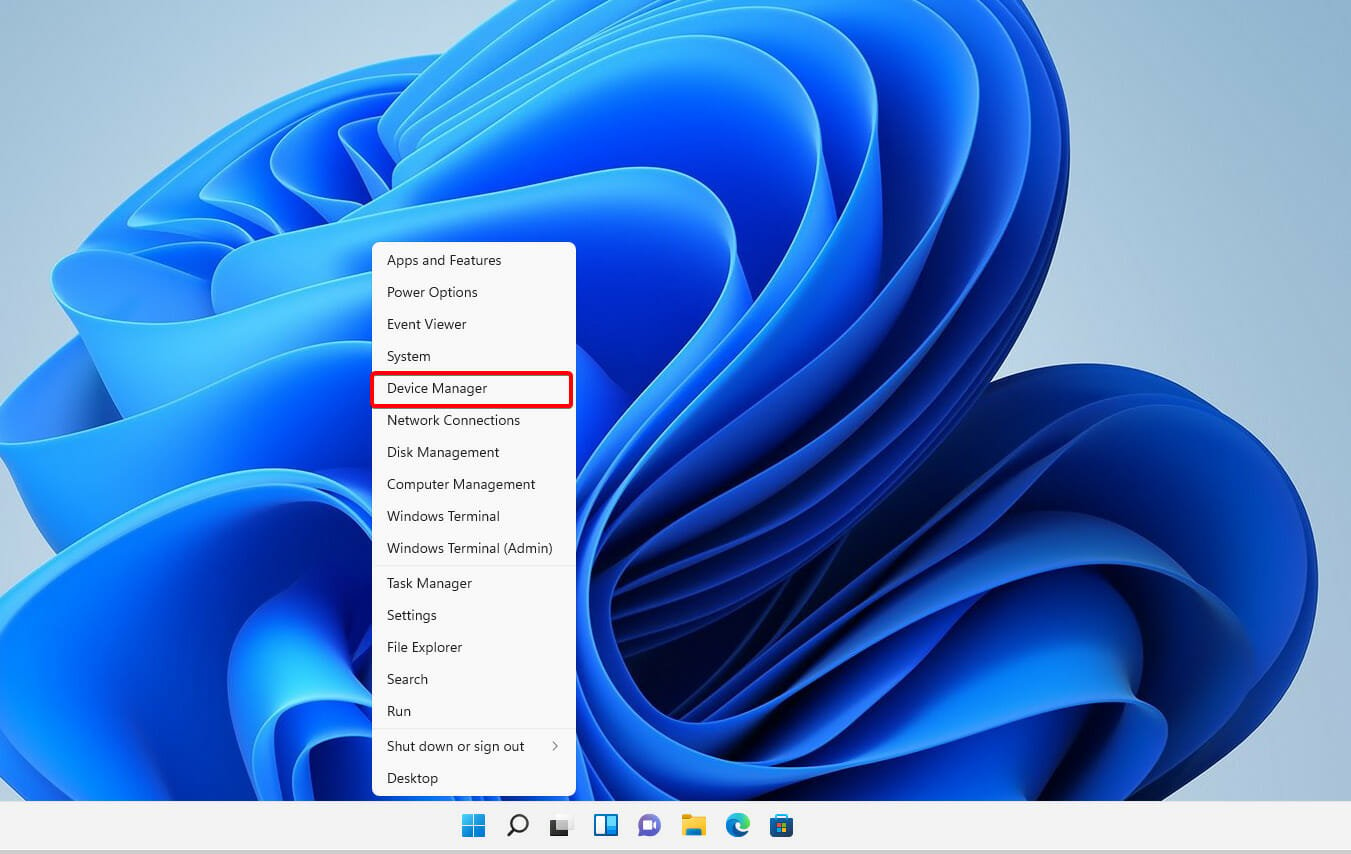
1. Right-click on the Start icon in the Taskbar or press Windows + X to launch the Quick Access menu then select Device Manager.
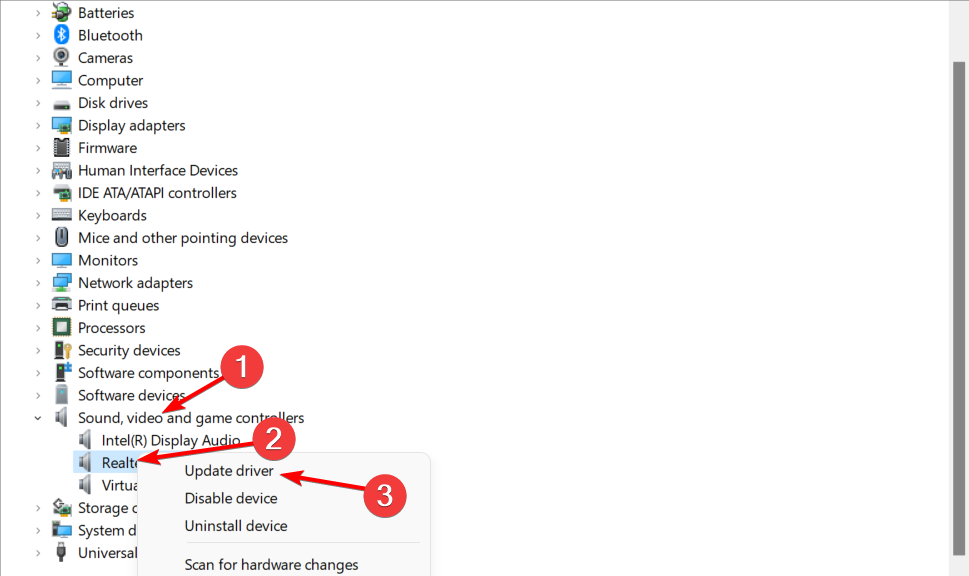
2. Locate and double-click the Sound, video, and game controllers option. Right-click on the Realtek Audio device and select Update driver from the context menu.
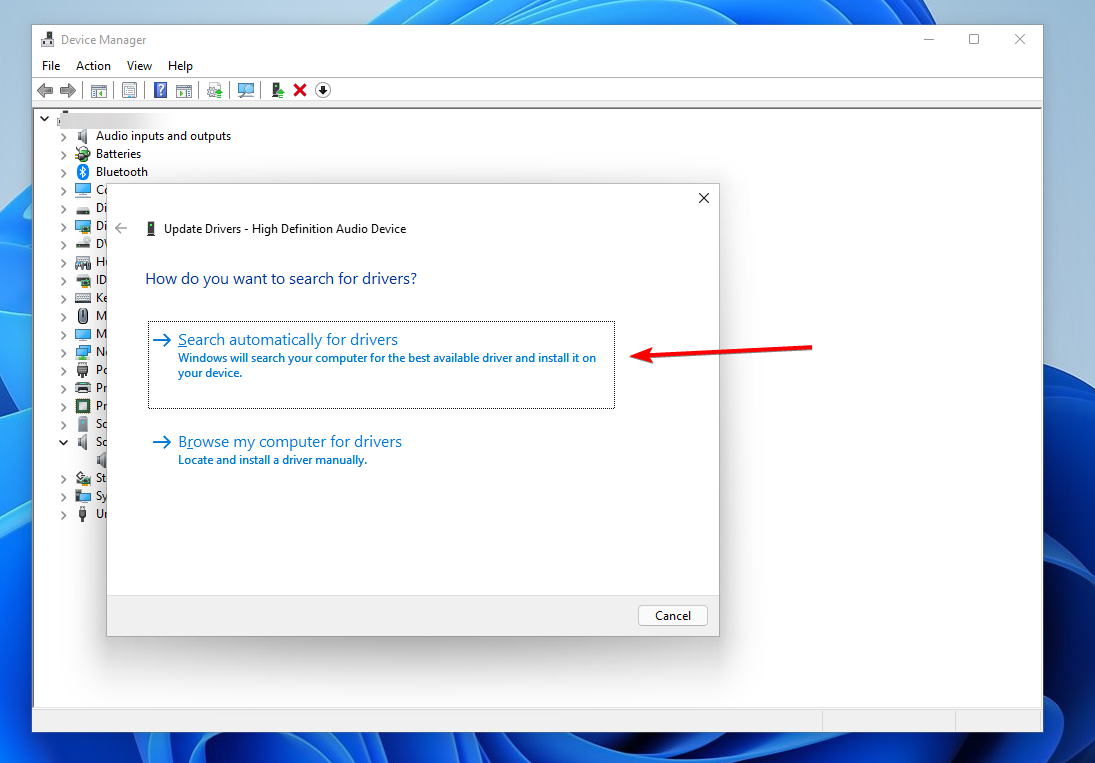
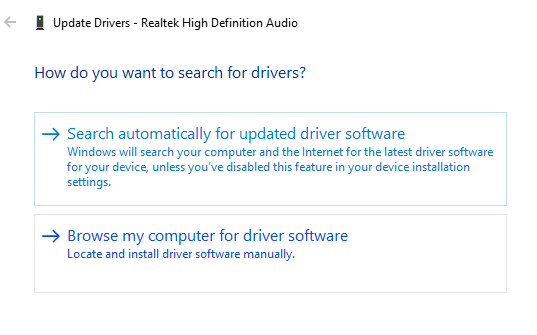
3. Select the Search automatically for drivers option as Windows will find the best drivers on your system. Reboot your PC afterward.
We strongly advocate using a specialist program such as Outbyte Driver Updater to do automatic scans for out-of-date drivers.

Outbyte Driver Updater
Safely update the Realtek driver as well as all other outdated drivers on your system.
4. Reinstall the Realtek driver or use your manufacturer’s
- Right-click on the Start icon in the Taskbar or press Windows + X to launch the Quick Access menu. Select Device Manager from the list of options displayed.

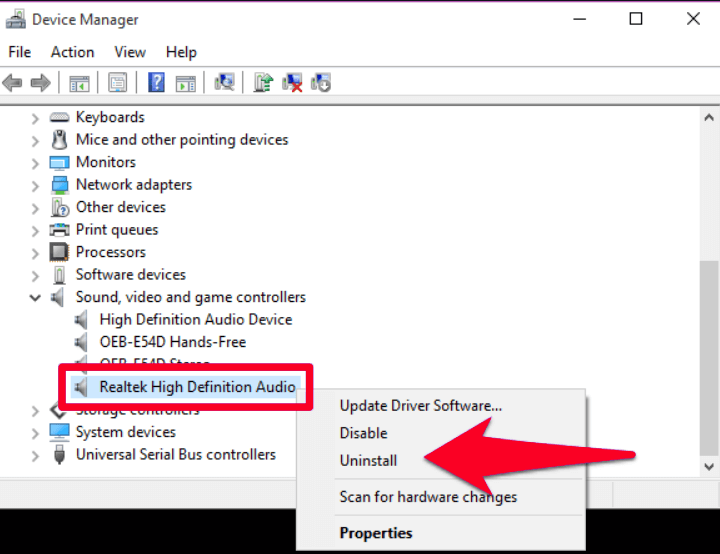
- Locate and double-click on the Sound, video, and game controllers option. Right-click on the Realtek Audio device and select Uninstall device from the context menu.

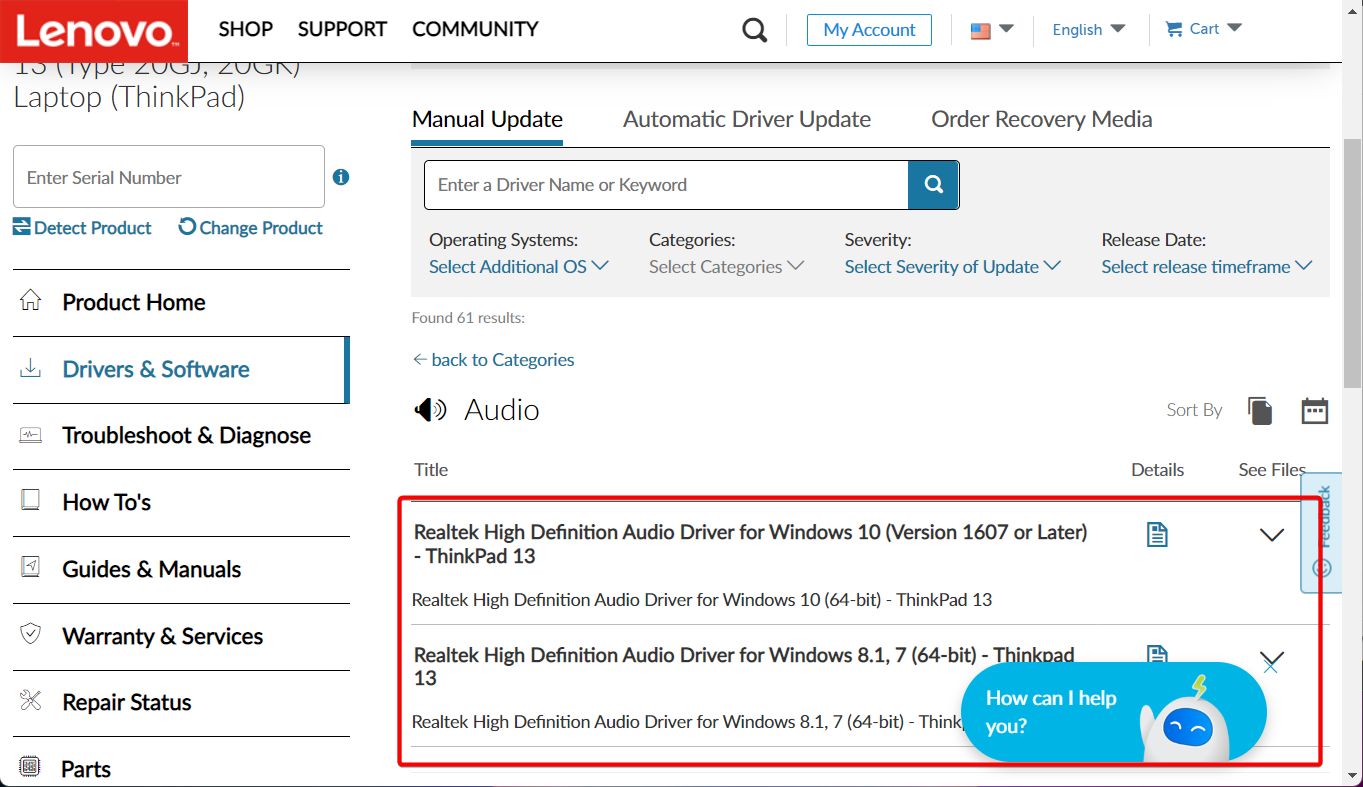
- You can now either reboot your PC to automatically reinstall the Realtek driver, or head to your manufacturer’s website and search for an audio driver and download it. For example, here is Lenovo’s support page where you can find all drivers.


After you have completed the procedures outlined above, restart your computer. Windows will automatically update the driver to the most recent version available. It will also remove any corrupted driver files that may have been present.
- Realtek HD Audio Manager is missing [Solved]
- Fix: No speaker or headphones are plugged in [Full Guide]
- Headphones not detected in Windows 10 or 11 [Easy Fix]
5. Disable Audio Enhancements
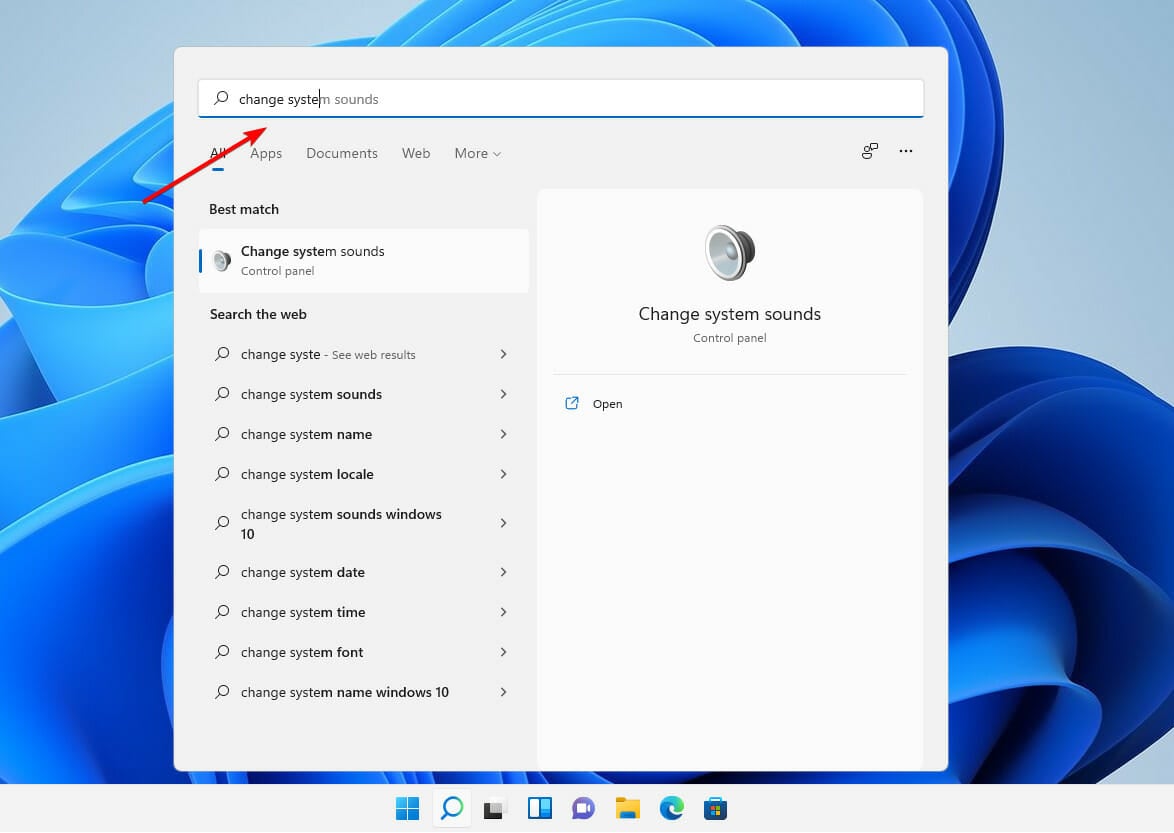
- Press on the Windows key + S, and search for Change system sounds.

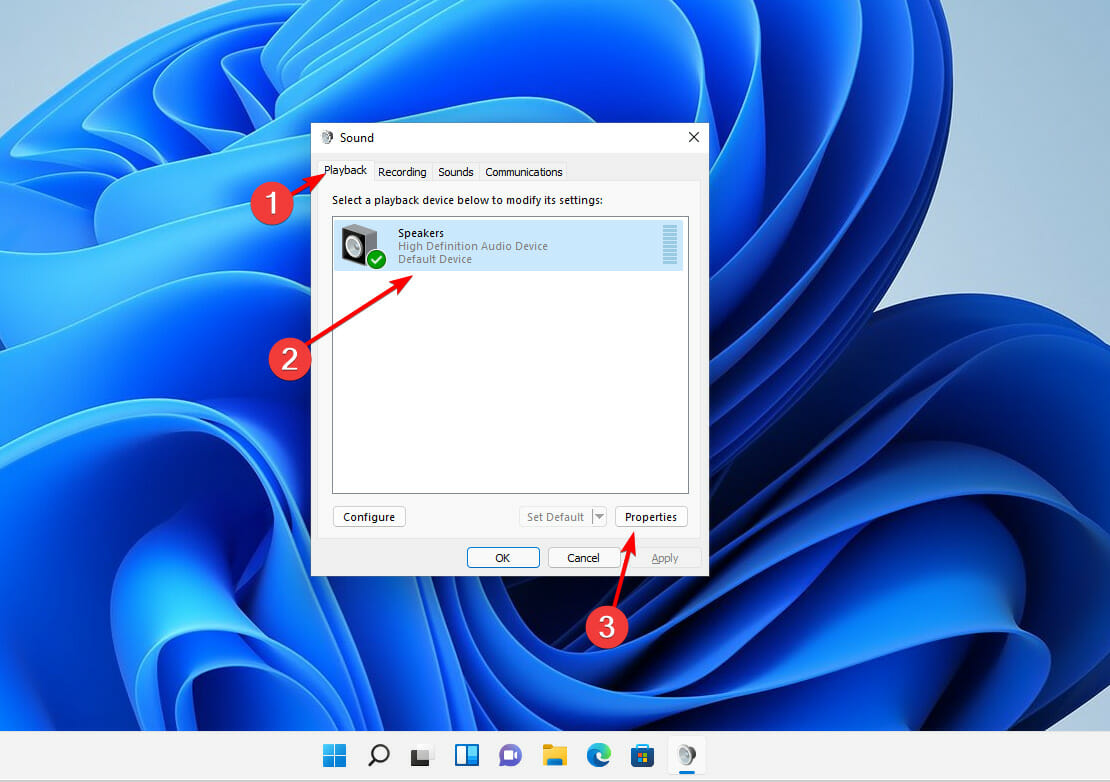
- Inside the Sound panel, navigate to the Playback tab, then select the speaker you are having trouble with, and click on Properties at the bottom.

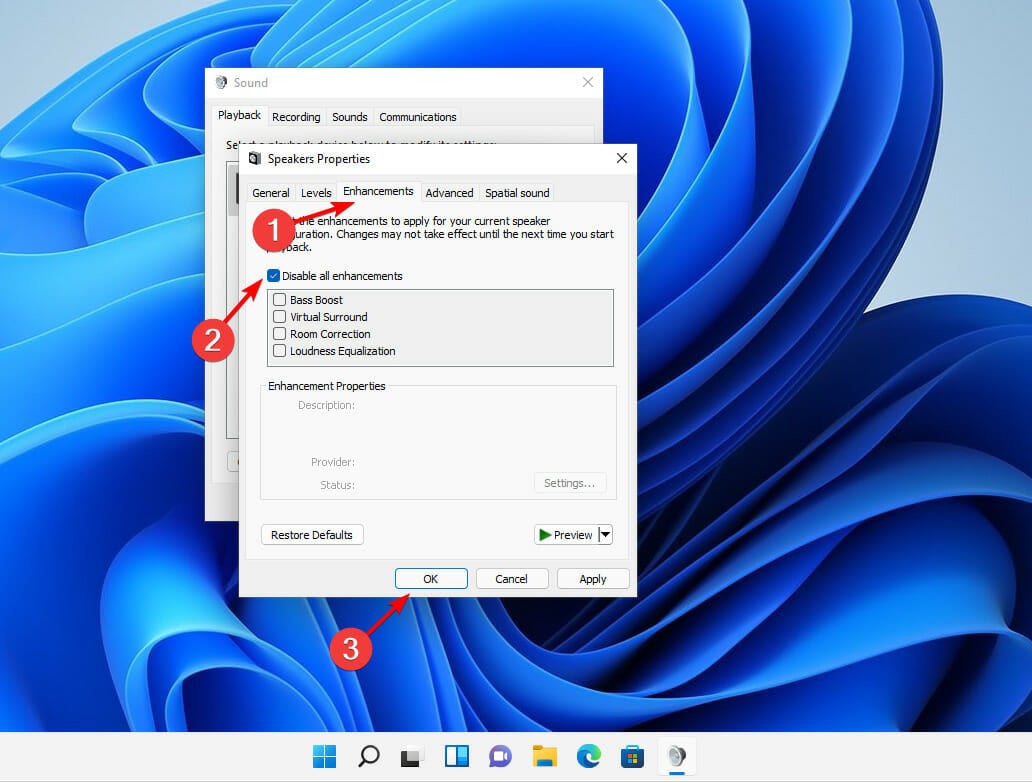
- Click on the Enhancements tab, then tick the checkbox for Disable all enhancements, and click the OK at the bottom to save the changes and close the window.

6. Run the Audio Troubleshooter
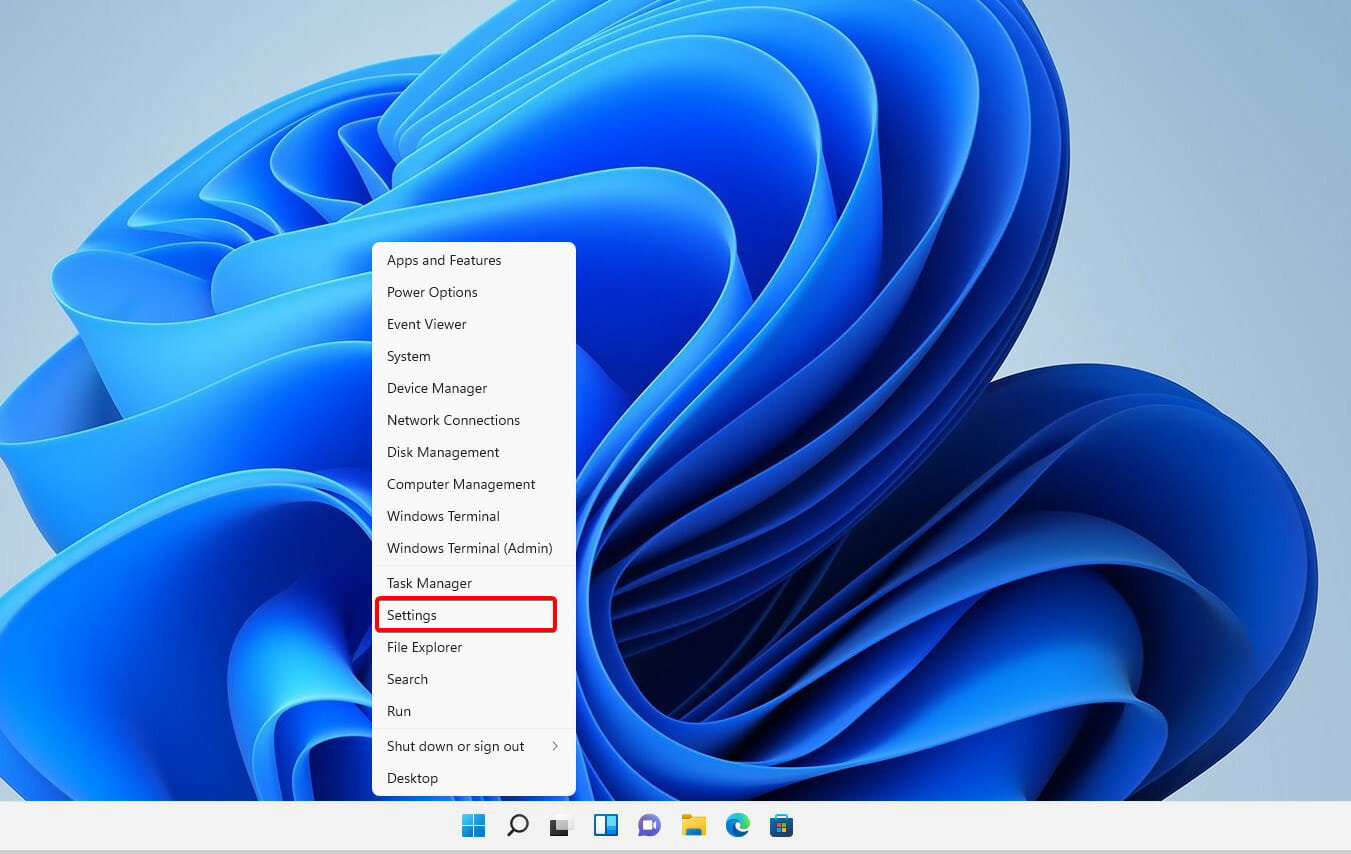
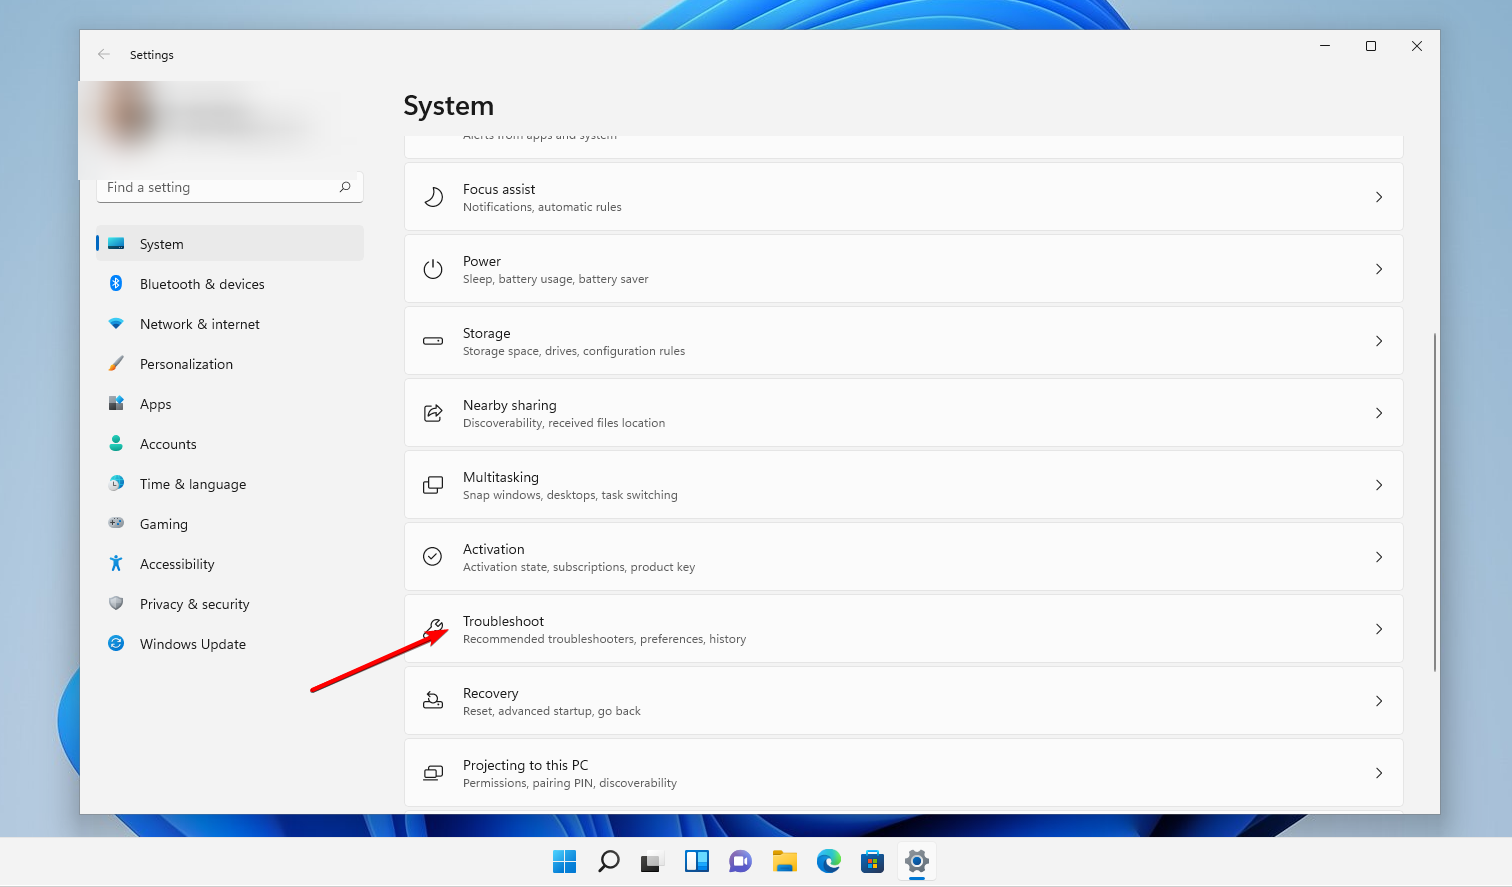
- Right-click on the Start icon in the Taskbar or press Windows + X to launch the Quick Access menu. From the list of options, select Settings.
- The System tab will be open by default. Scroll down on the right side of the window and select Troubleshoot from the list of options.

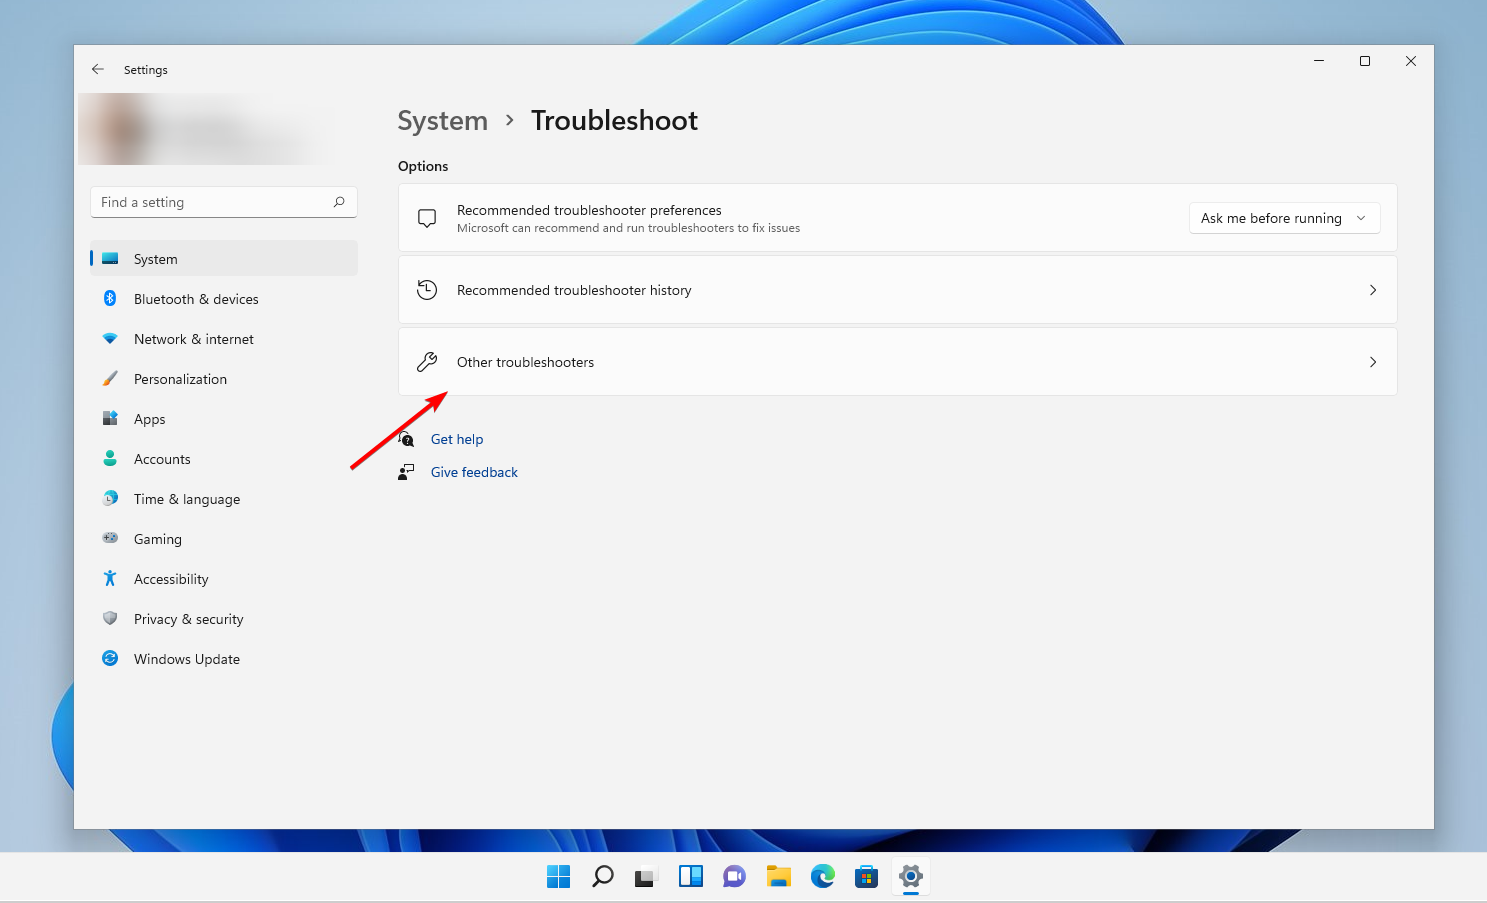
- Tap on Other troubleshooters.

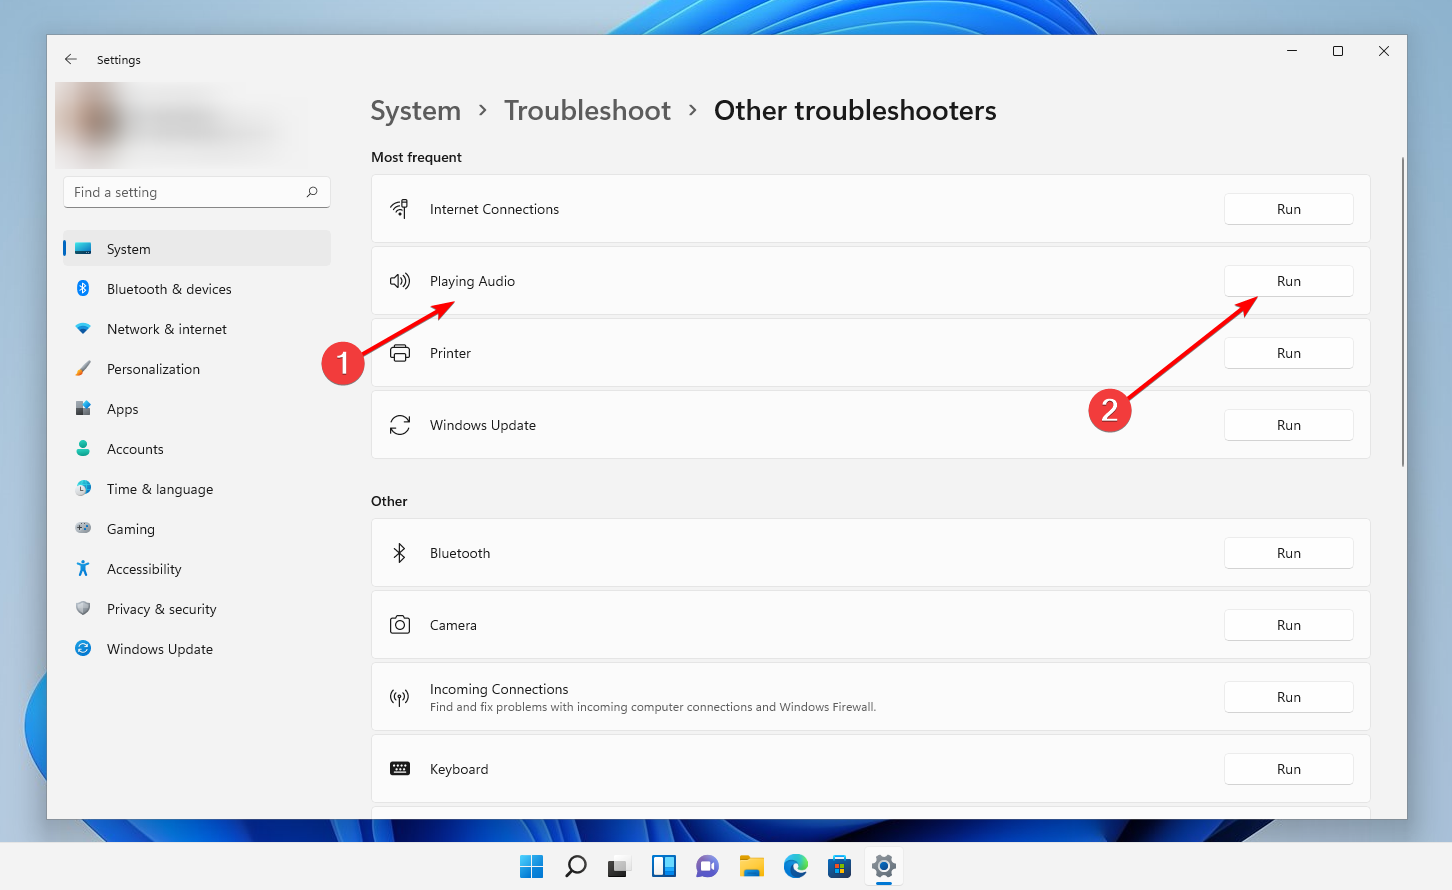
- Locate the Playing Audio troubleshooter and click on Run next to it.

- Select the audio output device you are having issues with and click on Next at the bottom.
Windows will now identify any issues with the device or configured settings and fix them. Instructions will be displayed once the errors are found, so make sure to follow them carefully.
7. Run System Restore

NOTE
System Restore will not delete any files on the system, however, recently installed applications, changes in settings, and driver updates may be removed.
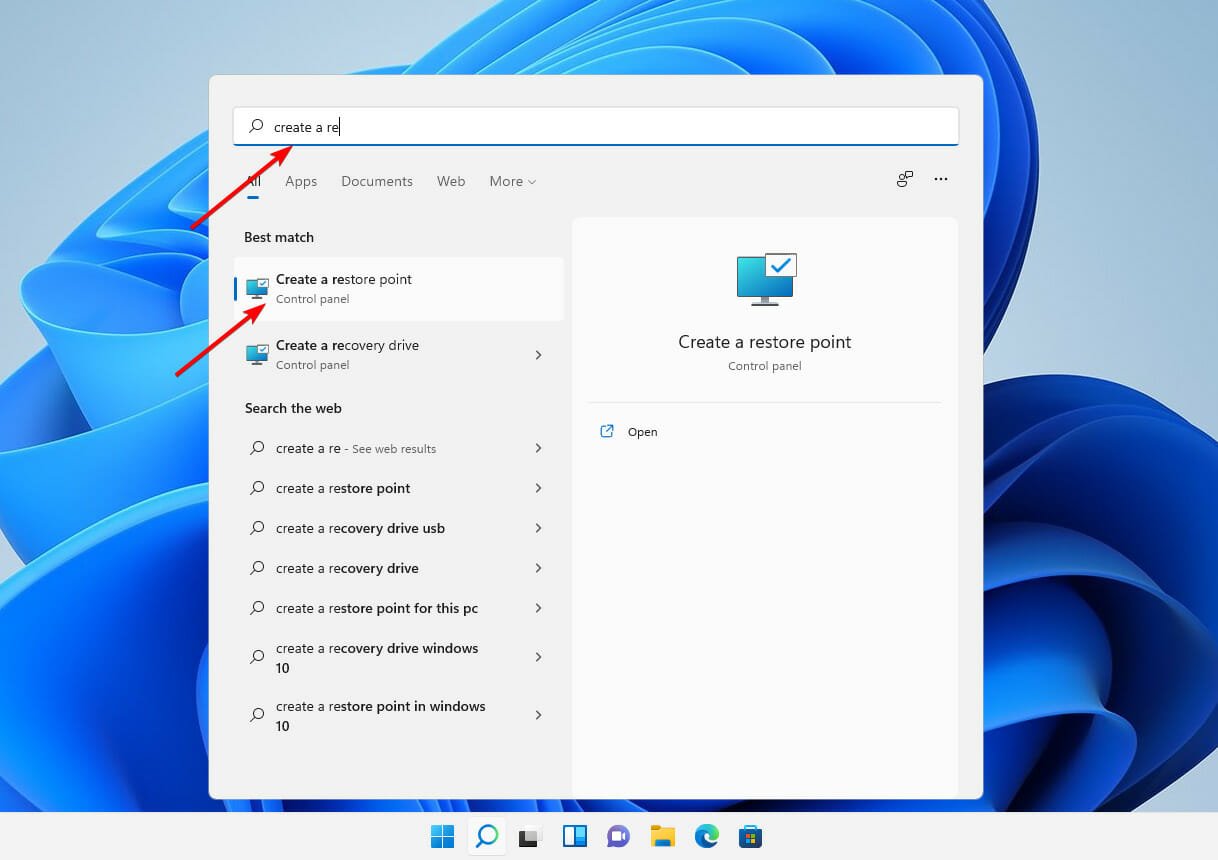
- Press on the Windows key + S, search for Create a restore point, and click on the relevant search result.

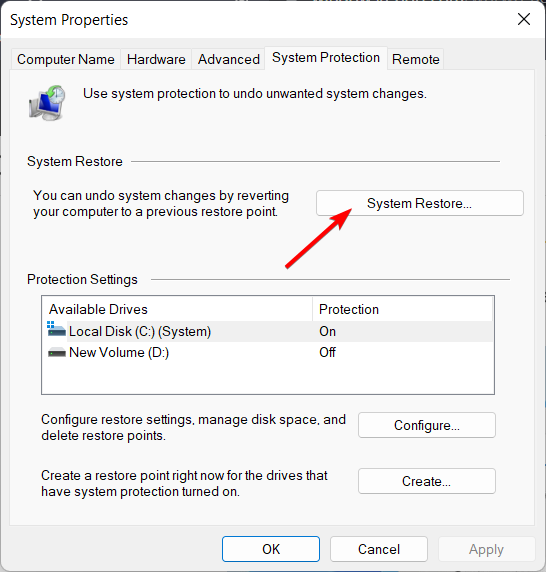
- The System Protection tab will automatically open. Click on System Restore under it.

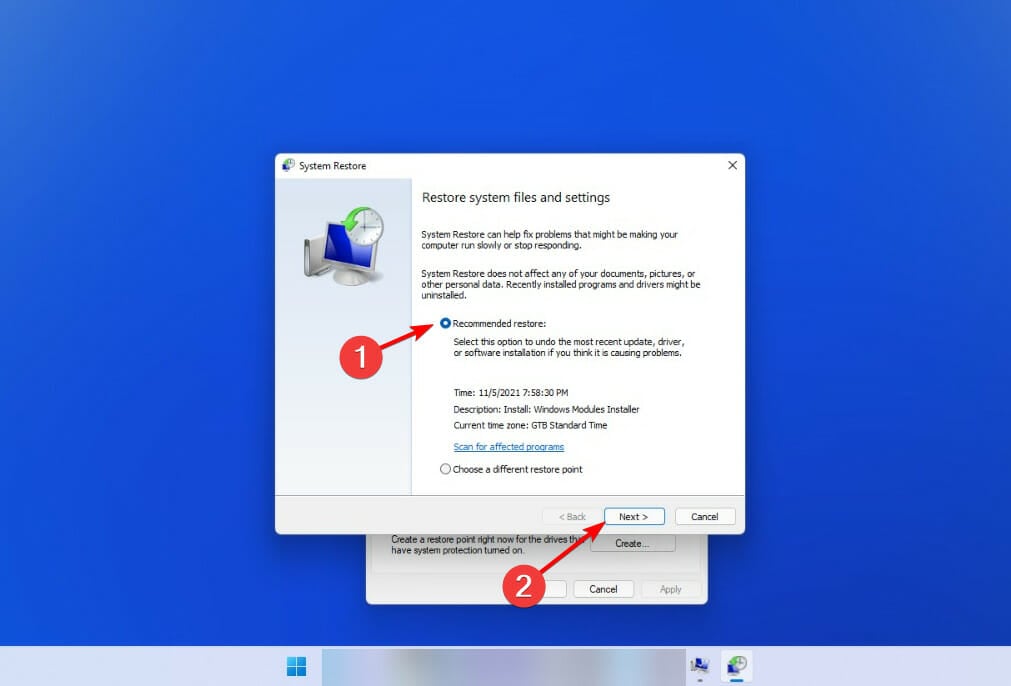
- The Recommended restore point will be selected by default, but you can select another one by clicking on the Choose a different restore point option. After this, click on Next at the bottom.

- If everything looks fine, click on Finish at the bottom.
After your system has been successfully restored, the Realtek audio problem will be immediately repaired by the operating system. In case you don’t have a restore point created, check our guide on how to create a restore point in Windows 11.
8. Update Windows
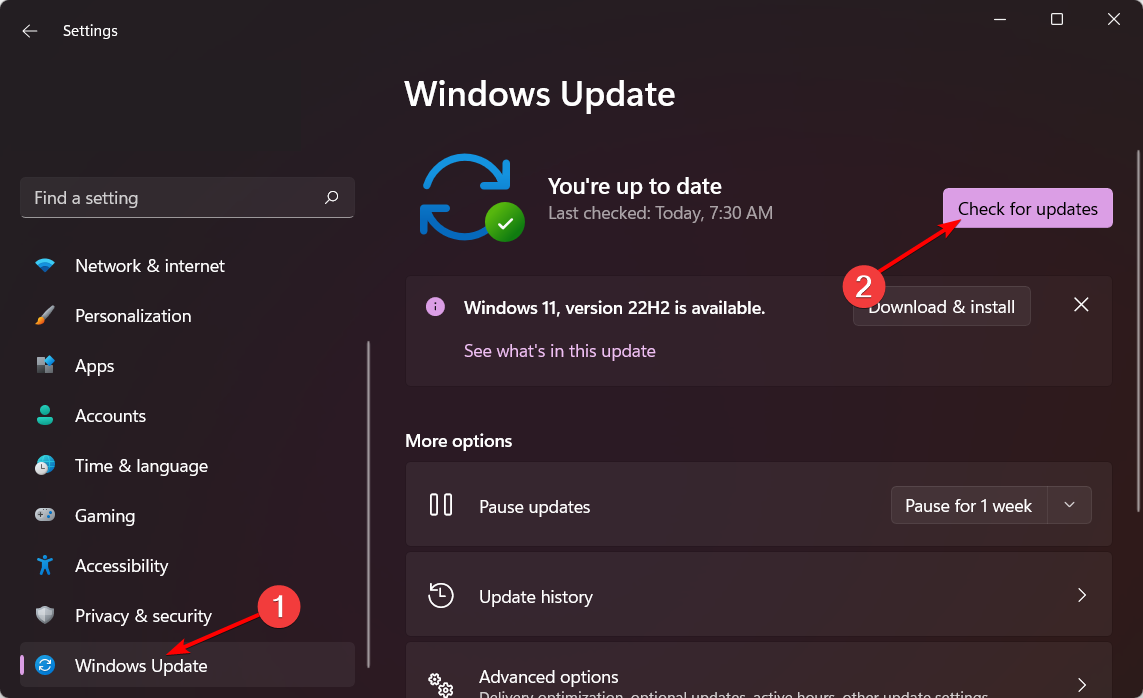
- Press Windows + I to open the Settings app. Click the Windows Update section then click Check for updates on the right.

- Reboot your PC afterward. The Realtek audio driver not working in Windows 11 issue will be fixed.
What to do if there’s no sound at all?
If you notice your sound has been missing altogether after installing Windows 11, you might want to check in with Microsoft’s help center.
The help service will offer you more actions to take in order to solve the sound issues at hand. To talk with its support team, click the Get support link on the Contact Microsoft Support page. Thereafter, click the Contact Support button after entering a description.
We hope that these methods were helpful in resolving your Realtek HD Audio Driver issues. Let us know what you think in the comment section below, and which solution worked best for you!
![]()
In this article, we show you how & where to download and reinstall Realtek HD Audio Manager for your Windows 11 and Windows 10 operating systems. This post also includes suggestions for the following issues:
-
Realtek HD Audio Manager icon missing
-
Realtek HD Audio Manager missing
-
Realtek HD Audio Manager not opening.
Realtek HD Audio Driver is the most commonly used sound driver for managing the sound settings for the Windows system. Realtek High Definition Audio Manager comes packed along with the Realtek Audio driver. This basically is the most commonly used sound driver that is loaded with incredible features and supports a six-channel Digital to Analog Converter (DAC) with 16.20.24-bit Pulse Code Modulation in channel audio of 5.1.
Fundamentally, the sound driver eases the sound control play on the Windows desktop and is known to offer high-quality sound to your system or headphone through the audio card. It is tagged with your audio device or adapter to enhance the sound experience. Recently, Windows users have reported difficulty in accessing the sound driver. The users have also had the Realtek HD Audio Manager icon lost or gone astray from the taskbar, system tray, and notification section. The issue might have probably been triggered either after the Windows update or due to a change in the native audio driver or sound card.
You may want to create a system restore point before you begin.
Before downloading the new drivers, uninstall all the current drivers. To avoid duplicate conflicts among several drivers, one must check the driver version and uninstall the duplicate audio drivers as well. To do this follow these steps-
Click on the Start button and navigate to Device Manager. You can also access it via the Control Panel.
Expand Sound, video and game controllers from the list in Device Manager.
Under this, locate the audio driver Realtek High Definition Audio.
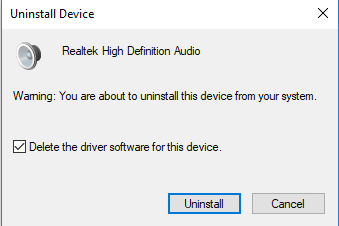
Right-click on it and select Uninstall device from the drop-down menu.

Check the option with Delete the driver software for this device and hit the uninstall button.
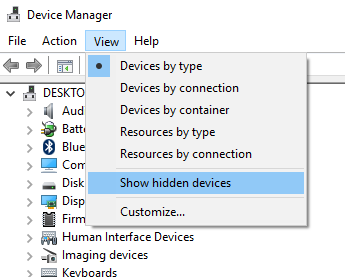
Now go to the Views tab and click on Show hidden devices from the drop-down menu.
Now search for duplicate audio drivers if any. Right-click on it and hit the Uninstall option.
Restart the system.
You can download the Realtek HD Audio Manager utility from here. Click on the executable file to start its installation. Should you face compatibility issues, you may install it in Compatibility Mode.

Realtek audio driver download
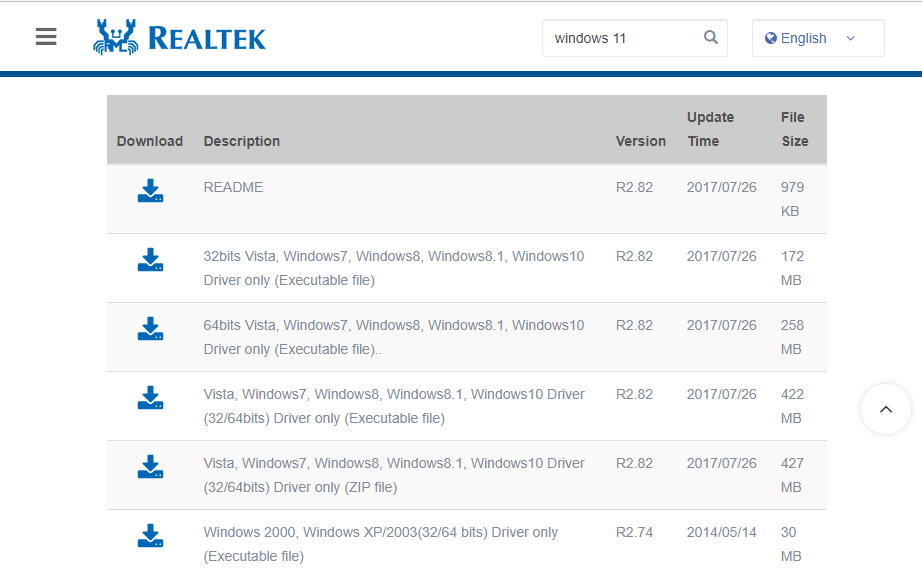
To manually download the Realtek HD Audio drivers, you need to visit the official website of Realtek. You must check the following two places for its availability on realtek.com – or visit a dell.com link.
Visit realtek.com here and see if your software is available.
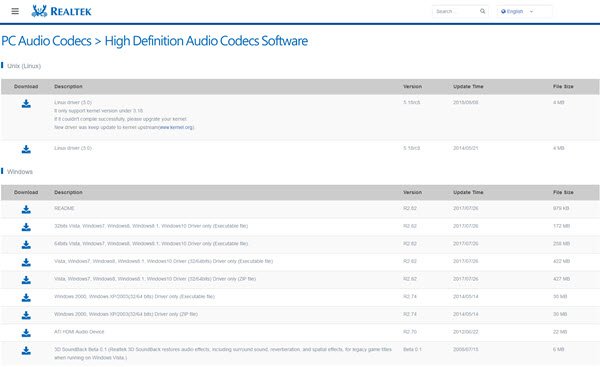
If it is, then download it. If not, then search for High Definition Audio Codecs here on realtek.com/en/downloads. It is important to download the correct drivers.
The download page will list the available audio drivers for download.
TIP: You can also download the here from dell.com/support.
Once the downloading process is complete, double-click on the setup files and follow the instructions to complete the installation.
If, despite reinstalling the Realtek HD Audio, if you still find the component missing, or no Speaker icon or Display icon, or if you find difficulty opening it, follow these suggestions.
How do I reinstall Realtek after uninstalling?
To reinstall Realtek after uninstalling, go to the Device Manager and select Action tab at the top. Choose Scan for hardware changes and let Windows automatically detect and reinstall the Realtek HD Definition Audio driver. If this does not help, download its setup file and install it as explained in this post.
Fix Realtek HD Audio Manager issues
1] Disable Microsoft UAA Bus Driver for HD Audio & fix driver conflicts
In the Device Manager, expand the System Devices
Search and locate Microsoft UAA Bus Driver for High Definition Audio.
Right-click on it and click Disable from the drop-down.
Open Windows Settings and go to Apps & Features
Click on Realtek High Definition Audio Driver and hit the option with Uninstall the driver.
Now navigate to Device Manager and right-click on the disabled Microsoft driver.
Click on Uninstall from the drop-down menu.
Having done this, now reinstall the Realtek HD Audio Driver
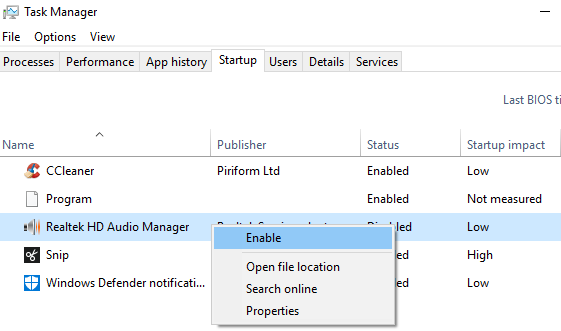
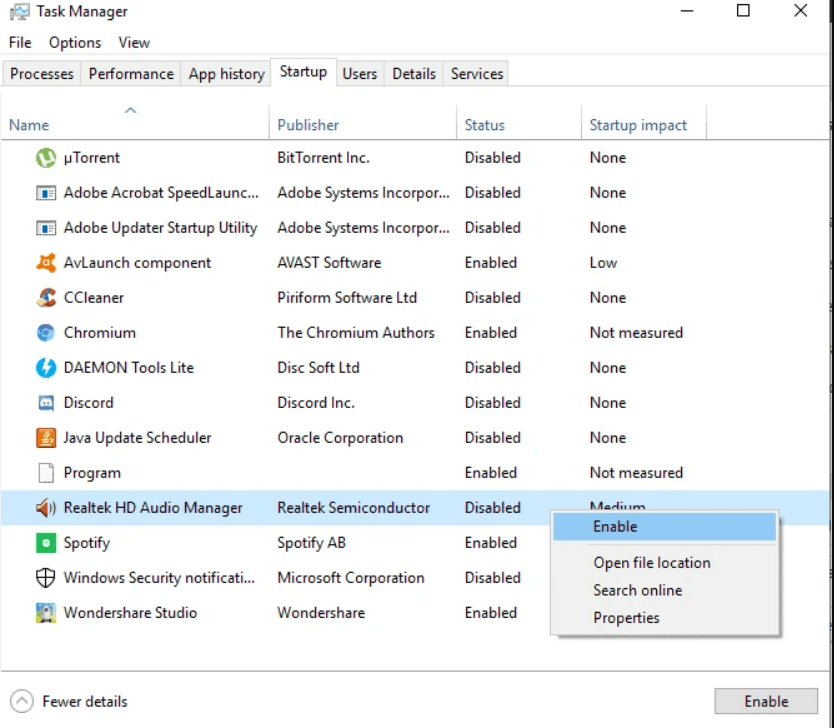
2] Enable the startup in Task Manager
Go to Start and open the Task Manager.
Navigate to the Startup tab.
Search and locate the Realtek HD Audio Manager.
If the status is Disabled, right-click on it and click on Enable option from the drop-down menu.
Restart the system.
Fix: Install Realtek HD Audio Driver Failure, Error 0xC0000374.
3] Update the Sound driver software
If the Realtek HD Audio is still missing, then do the following.
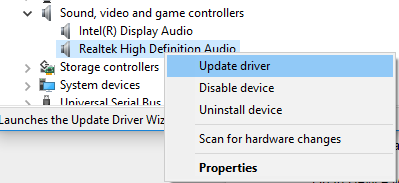
Open Device Manager.
Expand Sound, video, and game controllers.
Right-click on Realtek High Definition Audio and click on Update driver from the drop-down menu.
Assuming that you have the latest driver setup file on your computer, choose Browse my computer for driver software.
Choose and select Let me pick from a list of available drivers on my computer.
Search and pick the latest driver by date and then click Next to update.
This can also resolve issues with Surround sound, if any.
Read: How to use Realtek HD Audio Manager to boost up your PC Sound.
4] Add Legacy hardware
Go to Device Manager.
Search and click on the Sound, video and game controllers.
Click on the Action tab.
Search and click on Add legacy hardware from the drop-down menu.
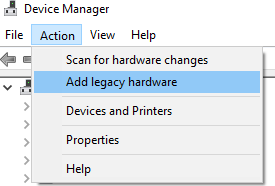
Click on the Next button and select the radio button for Search for and install the hardware automatically (Recommended).
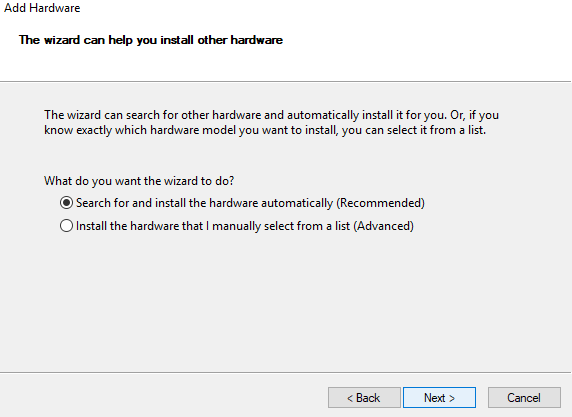
Click on Next and manually install the driver again.
Why can’t I find Realtek HD Audio Manager?
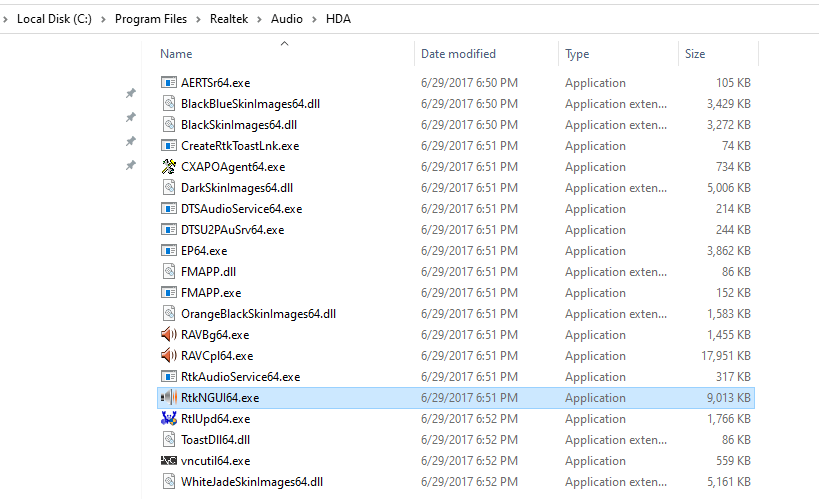
If you are not able to find the Realtek HD audio manager in Control Panel, you can find it in File Explorer. Go to C:\Program Files\Realtek\Audio\HDA. Double-click on RtkNGUI64.exe. You will find Realtek HD audio manager. If you still can’t find Realtek audio manager, then you may need to reinstall Realtek audio manager by updating your Realtek HD audio driver.
Read: NVIDIA drivers not downloading, installing, detected, loading or working.
Do I need Realtek HD Audio Manager?
Realtek High definition audio driver is essential for connecting the audio systems in your Windows PC with sound cards and speakers. If there are no problems with the audio, then this driver may not be needed for running your Desktop audio.
How do I add Realtek to Device Manager?
To add Realtek to Device Manager, go to the Device Manager, scroll down to “Sound, video and game controllers” and find “Realtek High Definition Audio”.
Related: NVIDIA drivers not downloading or working.
How do I redownload Realtek Audio Manager?
To redownload Realtek audio driver Windows, you have to press the Windows key + X hotkeys. Then, select Device Manager on the menu. Double-click Sound, video and game controllers to expand that category. Further, right-click Realtek High Definition Audio and select the Uninstall device option. After completing this, restart your Windows PC after uninstalling the Realtek audio driver. Then reinstall the Realtek audio driver manually.
This should help fix audio driver issues and improve sound quality – but should you need any Driver Support, please feel free to ask us and we will try our best to help you.
Read next: Where to download drivers for Windows 11.
Диспетчер Realtek HD – это программа, являющаяся частью драйверов для звуковой карты Realtek и позволяющая управлять настройками звука. В Диспетчере Realtek HD можно изменить конфигурацию подключенных динамиков, микрофона, а также передней и задней панели с аудио-разъемами.
После перехода на Windows 10 у некоторых пользователей возникают проблемы с запуском данной программы. В основном из-за того, что пользователи просто не могут найти нужный значок. В данной статье мы рассмотрим эту проблему и расскажем, как открыть Диспетчер Realtek HD на Windows 11 или Windows 10.
Иконка на Панели задач
Если все работает правильно, то Диспетчер Realtek HD должен отображаться на Панели задач вашей Windows 11 или Windows 10. Чтобы найти его нажмите на стрелку вверх в правой части Панели задач и кликните по иконке с изображением динамика. После этого Диспетчер Realtek HD должен запуститься.

Если такой иконки нет, то возможно она отключена в настройках Панели задач. Чтобы это исправить кликните правой кнопкой мышки по пустому пространству на Панели задач и выберите пункт «Параметры Панели задач».

В результате откроется окно «Параметры» в разделе «Персонализация — Панель задач».
Windows 10
Если у вас Windows 10, то здесь нужно пролистать настройки вниз к блоку «Область уведомлений» и кликнуть по ссылке «Выберите значки, отображаемые в панели задач».

После этого появится список программ, которые отображают свои иконки в области уведомлений Панели задач. Здесь нужно найти программу «Диспетчер Realtek HD» и включить ее.

После этого значок программы «Диспетчер Realtek HD» должен появиться на Панели задач. Если этого не произошло, то можете попробовать другие способы запуска данной программы.
Windows 11
В Windows 11 иконка Диспетчера Realtek HD включается схожим образом. Кликаем правой кнопкой мышки по панели задач и выбираем «Параметры Панели задач».
![]()
После этого в окне «Параметры» нужно открыть раскрывающийся список «Переполнение угла панели задач», найти в списке Диспетчер Realtek HD и включить его.
Панель управления
Классический способ запуска Диспетчера Realtek HD – это запуск через Панель управления. Для того чтобы открыть Панель управления в Windows 10 или Windows 11 нужно нажать комбинацию клавиш Win-R и выполнить команду «control».

Также Панель управления можно найти в меню «Пуск» с помощью поиска.

После запуска Панели управления нужно перейти в раздел «Оборудование и звук».

В данном разделе должна находиться программа Диспетчер Realtek HD.

Название Диспетчера Realtek HD в Панели управления может немного отличаться, например, в нашем случае он называется «Диспетчер HD».
Папка с драйвером на диске
В крайнем случае можно попробовать найти Диспетчер Realtek HD в папке с драйвером на диске. По умолчанию драйвер звуковой карты от Realtek устанавливается в следующую папку:
C:\Program Files\Realtek\Audio\HDA\
Попробуйте открыть данную папку и запустить в ней программу «RAVCpl64.exe», которая и отвечает за работу Диспетчер Realtek HD.

При необходимости можно создать ярлык данной программы на рабочем столе или закрепить ее в меню «Пуск».
Если указанные выше способы не помогают, и найти Диспетчер Realtek HD не получается, то возможно у вас не установлен драйвер. Попробуйте выполнить установку драйвера и повторить описанные действия.
Посмотрите также:
- Как установить звуковую карту
- Как подключить колонки к ноутбуку
- Как настроить звук на компьютере с Windows 7 или 10
- Как обновить драйвер видеокарты
- Как удалить драйвера видеокарты
Автор
Александр Степушин
Создатель сайта comp-security.net, автор более 2000 статей о ремонте компьютеров, работе с программами, настройке операционных систем.
Остались вопросы?
Задайте вопрос в комментариях под статьей или на странице
«Задать вопрос»
и вы обязательно получите ответ.
In recent years, Realtek HD Audio Manager has become increasingly popular among audio enthusiasts and computer users alike. With its ability to manage and customize sound settings, users can easily control their audio experience.
Unfortunately, some users have been experiencing a problem where the Realtek HD Audio Manager missing from their system due to outdated or incompatible drivers.
This can be especially frustrating for those who depend on the program for their audio needs. In this blog, how to resolve the Realtek HD audio manager missing problem.
To repair corrupted Windows system files, we recommend Advanced System Repair:
This software is your one stop solution to fix Windows errors, protect you from malware, clean junks and optimize your PC for maximum performance in 3 easy steps:
- Download Advanaced System Repair rated Excellent on Trustpilot.
- Click Install & Scan Now to install & scan issues causing the PC problems.
- Next, click on Click Here to Fix All Issues Now to fix, clean, protect and optimize your PC effectively.
Prerequisite: How to Verify if Your PC Has Realtek HD Audio Manager
Before you start to troubleshoot the Realtek HD Audio Manager is missing Windows 11 issue, first check if your PC has Realtek HD audio manager already or not. You can do this by following these instructions.
- Go to File Explorer (Windows + E keys) and navigate to the C:\Program Files\Realtek\Audio\HDA path.
- Then, find and double-click on RtkNGUI64.exe. This opens the Realtek HD audio manager.
Here are a few effective instructions to fix Realtek HD Audio Manager issue on your Windows PC. Follow them in the same order to troubleshoot it in simpler clicks.
Table of Contents
Solution 1: Enable Realtek HD Audio Manager in Task Manager
If the Realtek HD audio manager is disabled it won’t show up and Windows OS start showing the Realtek HD audio manager missing message on the screen. So, here it is suggested to enable the Realtek driver.
Many users find it difficult to enable Realtek HD Audio Manager in Task Manager. Fortunately, it’s a relatively straightforward process.
- First, you need to open the Task Manager by pressing the Ctrl+Shift+Esc keys simultaneously.
- Once the Task Manager window opens, click on the Startup Here you can see all the applications that are running at the startup of your computer.
- Find Realtek HD Audio Manager in the list and right-click on it. Next, select Enable to turn on the application.
Now, you should be able to access the Realtek HD Audio Manager directly from the Start menu.
Solution 2: Enable the Display Icon in Control Panel
You may also face the Realtek HD audio manager problem if the display icon is disabled in the control panel. So, here it is suggested to check and enable the display icon in the control panel.
Follow as instructed below.
- In the search box type control panel, launch the Control Panel on your PC and set the View by option to Small icons.
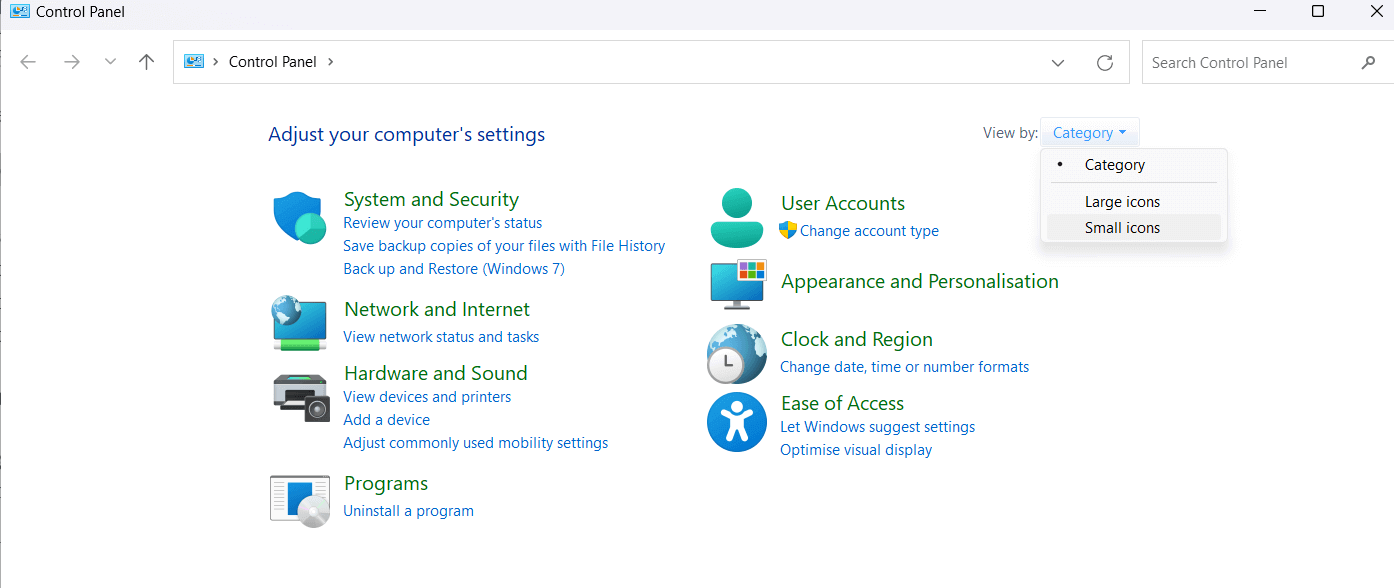
- And, click on Realtek HD Audio Manager on your Control Panel and press the I icon.

- Then ensure that the Display icon in the notification area option is selected in the Information window. If it is deselected, click on OK.
- Finally, check if the Realtek HD Audio Manager opens on your taskbar.
Solution 3: Update Realtek High-Definition Audio Driver
Still, if the Realtek High Definition Audio Driver is missing on your PC, try updating the Realtek HD audio driver. The outdated driver many times start causing issue and stop functioning properly.
Follow the steps as instructed below.
- Press Windows + X to open Device Manager on your PC and expand Sound, video and game controllers
- Then, right-click on the Realtek High Definition Audio driver and press the Update driver option.
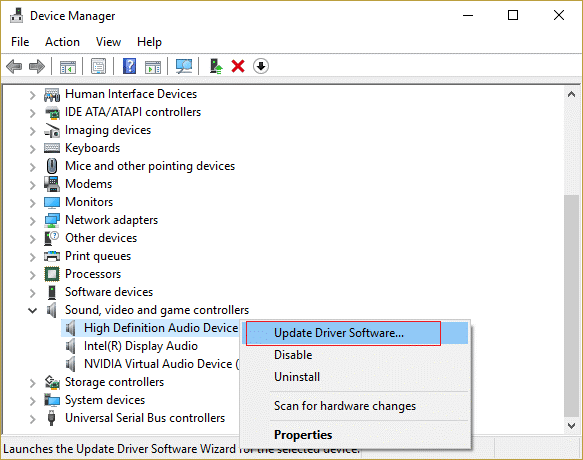
- On the next screen, click on Search automatically for the updated driver software option and follow the on-screen instructions to install the necessary driver on your PC.
- Reboot your PC to save all the recent changes.
Solution 4: Download Realtek Driver from Microsoft Update Catalog
If updating the driver did not help you to troubleshoot the issue, you can now directly download the Realtek Driver from the Microsoft Update Catalog as instructed below. Before that, you want to know the current version of the Realtek Audio driver on your PC. Follow the instructions to proceed.
- Press Windows + X to open the Device manager and go to the Sound, video and game controllers categories as you did in the earlier solution.
- Now double-click on “Realtek(R) Audio” to analyze the driver version.
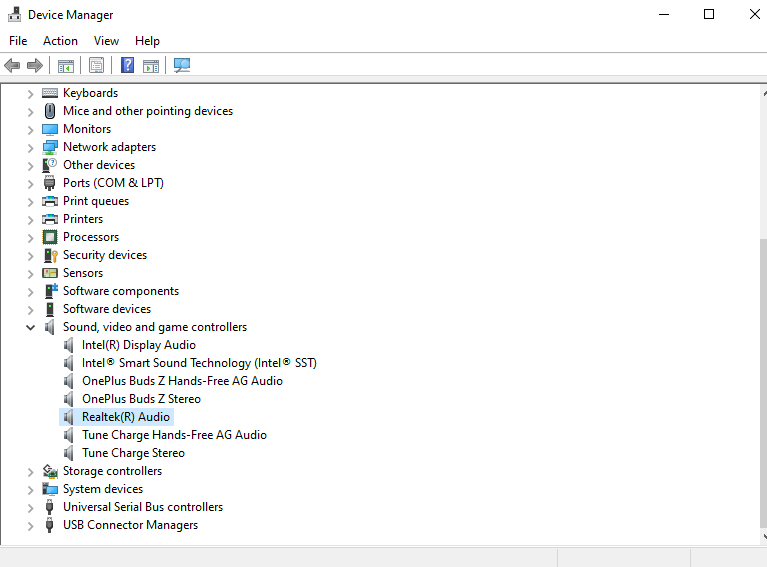
- Then, switch to the Driver tab in the Realtek(R) Audio Properties
- Next, note down the Driver Date and Driver Version
- Minimize the Device Manager window, open your browser, and navigate to Microsoft Update Catalog.
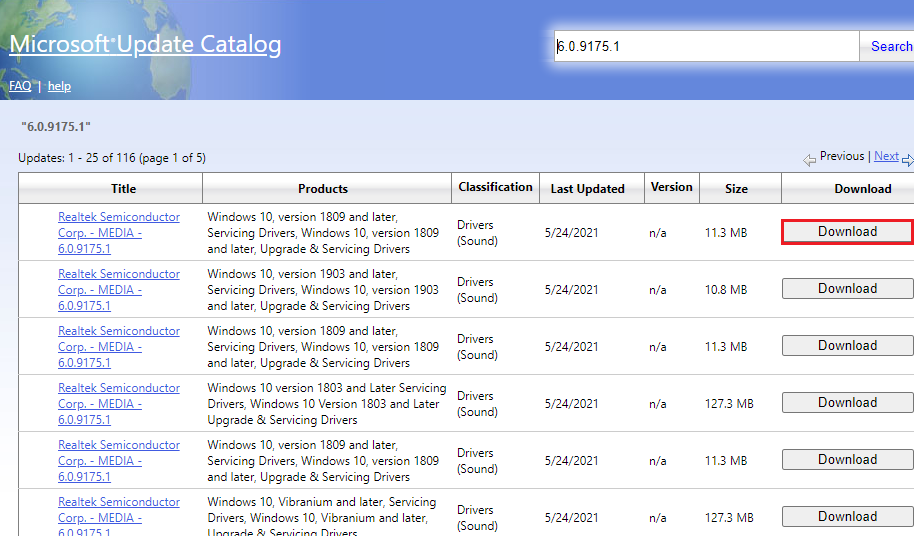
- Then, type in the driver version in the search menu and click on Search to find all the driver updates.
- In the upcoming window, check for the latest update of your driver and click on the Download button beside the driver.
- In the next window, click on the driver’s name to begin the download process.
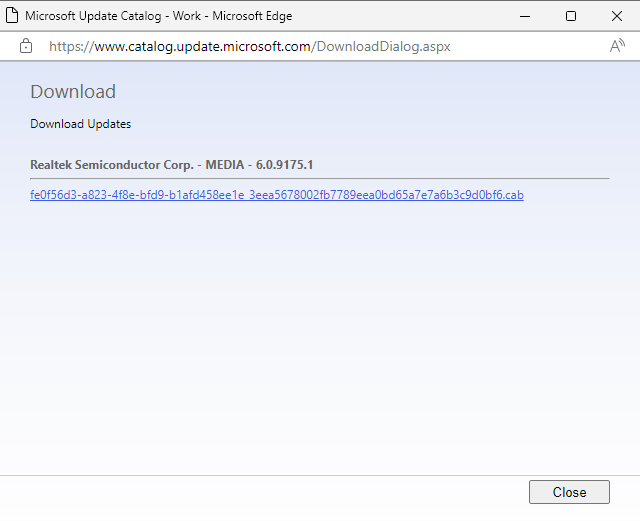
- Now, the audio driver will be downloaded as a zip file.
- Then, again go to the Realtek(R) Audio category in the Device Manager and then, click on the Update driver Follow the upcoming instructions to install the new driver and restart your computer.
Solution 5: Run Audio Troubleshooter
Running the audio troubleshooter can help to diagnose and resolve any issues that may be causing the Realtek HD audio manager missing problem from your computer. The troubleshooter will check for any hardware or software conflicts that could be causing the problem, and if any are identified, it will provide recommendations for resolving them.
Additionally, the troubleshooter can also check for any corrupt or missing drivers, and if any are found, it will provide instructions for downloading and installing the necessary drivers.
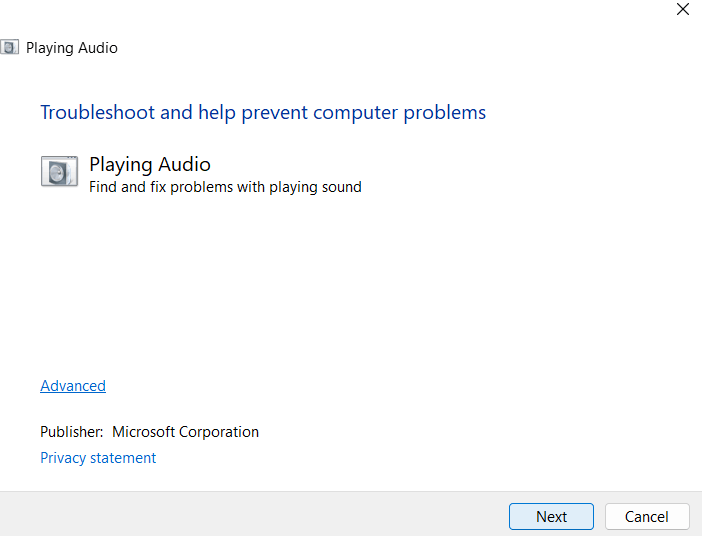
- Type Audio troubleshooter in the search bar and click on Find and fix problems with playing sound from the results to open the troubleshooter.

- Then, click on Next, then choose the device you want to troubleshoot, and follow the upcoming instructions.
- Wait until the troubleshooting process is complete and check if the Realtek High Definition audio manager is found on your PC.
How to Reinstall Realtek HD Audio Manager?
If you are wondering how to reinstall Realtek HD audio manager, this section is for you. Firstly, uninstall the Realtek HD Audio Manager as instructed below.
- Go to the Device Manager on your PC and navigate to the Sound, video and game controllers driver section.
- Then, right-click on the Realtek High Definition Audio driver and select the Uninstall device.
- Next, confirm the prompt Delete the driver software for this device by clicking on OK.
- Follow the on-screen instructions to uninstall the device from your PC. Once done, in the device manager window, click on View and select Show hidden devices Ensure that you have duplicate drivers in it and if there are any, uninstall them.
- Restart your computer and move forward to any one of these options to install the drivers again.
Option 1: Download and Install the Driver Manually
If all these solutions did not help you how to get the Realtek HD audio manager missing issue, you can download the Realtek software from its official website as instructed below.
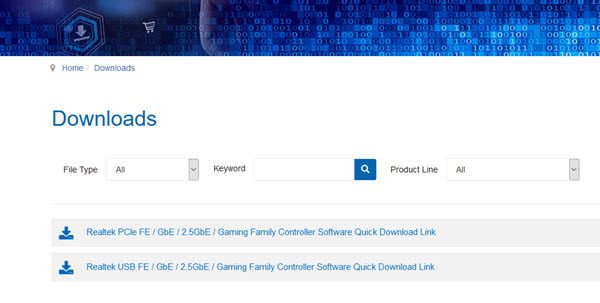
- Go to your browser and navigate to the official Realtek download
- Then, choose the appropriate Realtek software based on your computer version and download it.
Option 2: Automatically Update Realtek Audio Driver
If you do not want to update device drivers manually, you can update them with the Driver Updater tool. Driver Updater automatically detects, downloads, and installs the correct drivers for your hardware. It scans your computer’s hardware and checks to see if there are any missing, mismatched, or outdated drivers. If any are found, it will then download and install the correct drivers for each piece of hardware.
Get Driver Updater to Update the Drivers Automatically
Make Your Windows PC/Laptop Error-Free
If after following the above-given fixes your system starts running slow, crashing, or freezing then it is suggested to scan your system with the PC Repair Tool.
This is an advanced repair utility that fixes various computer problems like stubborn Windows errors, protects you from virus/malware, and DLL error, repair corrupt registry entries, and many other errors and issues in the Windows system.
This not only fixes errors but also optimizes Windows PC performance.
Get PC Repair Tool, to improve Windows PC/laptop performance
To Wrap up
The Realtek HD Audio Manager is missing Windows 11 or 10 issue can often be a difficult issue to diagnose and resolve. Here we tried our best to list down the complete information regarding missing Realtek HD Audio Manager and how to reinstall Realtek HD Audio Manager on Windows.
Hope the article turns out to be helpful for you, follow the step-by-step instructions and resolve the problem in no time.
We would love to help you with more queries and suggestions regarding this article. Feel free to reach us on our Facebook Page.
Good Luck..!

Hardeep has always been a Windows lover ever since she got her hands on her first Windows XP PC. She has always been enthusiastic about technological stuff, especially Artificial Intelligence (AI) computing. Before joining PC Error Fix, she worked as a freelancer and worked on numerous technical projects.