![]()
Загрузить PDF
![]()
Загрузить PDF
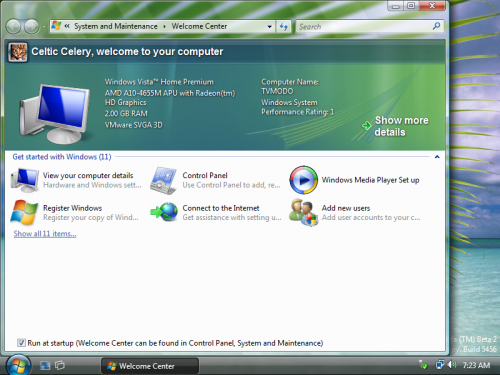
Windows Aero — это графическая тема Windows, представленная в Windows Vista. Она создает полупрозрачные окна и добавляет эффекты минимизации и максимизации. Как правило, Windows Aero включена по умолчанию; если нет, ее можно быстро активировать. Если Aero снижает быстродействие системы, отключите некоторые или все эффекты.
-

1
Убедитесь, что компьютер соответствует требованиям. Aero потребляет немало системных ресурсов, поэтому сначала убедитесь, что характеристики компьютера соответствуют минимальным требованиям. Чтобы просмотреть список оборудования компьютера, нажмите ⊞ Win+Pause.[1]
- 1-гигагерцевый (ГГц) 32-разрядный (x86) или 1 ГГц x64 процессор.
- 1 ГБ системной памяти.
- Видеокарта DirectX 9 со 128 МБ памяти.
- Windows Vista Домашняя Расширенная или лучше (Домашняя Базовая и Начальная не поддерживают Aero)
-
2
Щелкните правой кнопкой мыши по рабочему столу.
-
3
Выберите «Персонализация» в меню.
-
4
Щелкните по «Цвет и внешний вид Windows».
-
5
Выберите «Windows Aero» в списке цветовых схем.
-
6
Нажмите Применить.
Реклама


-
1
Откройте меню «Пуск».
-
2
Введите sysdm.cpl и нажмите ↵ Enter.
-
3
Перейдите на вкладку Дополнительно.
-
4
Нажмите Параметры в разделе «Быстродействие».
-
5
Снимите флажки у эффектов, которые хотите отключить. Отключение определенных эффектов поможет повысить производительность.
- Отключите «Эффект прозрачности», чтобы максимально увеличить быстродействие системы, но помните, что это одна из ключевых функций, которые делают Aero уникальной графической темой.
- Установите флажок у «Обеспечить наилучшее быстродействие», чтобы отключить все эффекты Aero.
-
6
Нажмите Применить. Возможно, вам придется подождать несколько минут, чтобы изменения вступили в силу.
Реклама


Советы
- Чтобы использовать Windows Flip 3D, нажмите ⊞ Win+Tab ↹, а затем отпустите Tab ↹ (то есть удерживайте нажатой ⊞ Win). В 3D-списке отобразятся все открытые окна. Чтобы прокрутить список, воспользуйтесь колесиком мыши или клавишами со стрелками. Чтобы открыть одно из окон, просто нажмите на его картинку.
- Другой интересной функцией является «Живые миниатюры». Наведите указатель мыши на окно на панели задач — откроется маленькая миниатюра окна.
Реклама
Предупреждения
- Windows Vista Aero может замедлять работу системы, особенно это касается эффекта прозрачности. Используйте Aero, только если действительно хотите этого.
Реклама
Об этой статье
Эту страницу просматривали 8144 раза.
Была ли эта статья полезной?
Windows Aero is a Windows graphical theme that was introduced in Windows Vista. It creates translucent windows and adds effects to minimizing and maximizing. Windows Aero is usually enabled by default, but if it wasn’t you can quickly enable it with just a few clicks. If you find that Aero is causing performance problems, you can disable some or all of the effects.
-
1
Ensure your computer meets the requirements. Aero can be a little taxing on your system, so you’ll want to be sure you meet the following requirements before enabling it. You can see what your current hardware setup is by pressing ⊞ Win+Pause.
- 1-gigahertz (GHz) 32-bit (x86) processor or 1-GHz 64-bit (x64) processor
- 1 GB of system memory
- DirectX 9 graphics card with 128 MB memory
- Windows Vista Home Premium or better (Home Basic and Starter do not support Aero)
-
2
Right-click on your desktop.
-
3
Select «Personalize».
-
4
Click the «Windows Color and Appearance» link.
-
5
Select «Windows Aero» from the list of schemes.
-
6
Click .Apply.


-
1
Open your Start menu.
-
2
Type .sysdm.cpl and press ↵ Enter.
-
3
Click the .Advanced tab.
-
4
Click the .Settings button in the Performance section.
-
5
Uncheck any effects you want to disable. Disabling certain effects can help increase your performance.
- Disabling «Transparent glass» will give you the best performance increase, but it is also one of the key features that makes Aero unique.
- You can select the «Adjust for best performance» option to disable all of the Aero effects.
-
6
Click .Apply after you have made your selections. You may have to wait a few moments for your changes to take effect.


Add New Question
-
Question
My system meets the requirements but the Aero theme isn’t even available to choose. Why?

The problem is likely not with your system, but that you don’t have the latest version of Windows Vista installed.
-
Question
What about in VBox? ( short for Virtualbox ) I Cant see the theme in the customization, the Graphics and gaming graphics are 1.0 and my score is 1.0 and doesnt work on 64 bit. help.
AmongUsIsC00l
Community Answer
Make sure you have Virtual Box Guest additions installed. If it still fails, try out VMware Workstation.

Ask a Question
200 characters left
Include your email address to get a message when this question is answered.
Submit
Video
-
To use Windows Flip 3D, press ⊞ Win+Tab ↹, then let go of Tab ↹ while keeping ⊞ Win held. You will see all of your open Windows arranged in a 3D list. To scroll, use your mouse’s scroll wheel or the arrow keys on the keyboard. To open one of those windows simply click on the picture.
-
Other features include the «Live Thumbnails». Move your mouse pointer over the window in the Taskbar, and a little «thumbnail» will show the window, animations and all.
-
Using Windows Vista Aero can sometimes slow down your system’s performance, especially the Glass effect. Use Aero only if you really want to.
About this article
Thanks to all authors for creating a page that has been read 264,262 times.
Is this article up to date?
Windows Vista – это мощная операционная система, доступная на современном рынке программного обеспечения, но многие люди знают и любят Vista только благодаря потрясающему графическому интерфейсу Aero. К сожалению, этот графический интерфейс Aero отсутствует в Windows Vista Home Basic Edition. Тем не менее, здесь есть учебник о том, как вы можете предоставить вашему Home Basic Edition функцию Aero.
Включить Aero в Windows Vista Home Basic
Это внешний вид Vista Basic без эффекта свечения на любой кнопке. Внешний вид Vista Standard сильно отличается от внешнего вида Vista Aero, так как эффект стекла отсутствует, и Flip 3D поставляется с ним.

Если вы хотите активировать Vista Standard Look на своей домашней базовой машине, следуйте этим инструкциям:
ТРЕБОВАНИЯ: Требования к оборудованию для Vista Standard Look:
- Ваша графическая карта должна поддерживать DirectX 9.
- Ваша видеокарта должна поддерживать Pixel Shader 2.0, но большинство новых видеокарт поддерживают.
- Ваша графическая карта должна поддерживать WDDM (модель драйвера дисплея Windows Vista).
- Настройки графики должны быть 32-битными.
- Ваша графическая карта должна иметь 60 МБ графической памяти (128 МБ для Aero).
- Вы также должны иметь память не менее 512 МБ (RAM).
- Если у вас нет поддержки Pixel Shader 2.0 на вашей видеокарте, я также советую вам попробовать эту настройку.
ПРОЦЕДУРА:
- Откройте редактор реестра, нажав Win Key + R и набрав Regedit.exe. Нажмите продолжить на UAC.
- Перейдите к HKEY_CURRENT_USER> Программное обеспечение> Microsoft> Windows> DWM.
- В правой части откройте ключ Composition и измените его на 1. Теперь откройте CompositionPolicy и установите его значение равным 2.
- Теперь создайте значение DWORD с именем Glass и присвойте ему значение 1, а другое значение DWORD с именем ForceSoftwareD3D и присвойте ему значение 0.

5. Теперь нажмите кнопку «Пуск», введите services.msc в поле поиска и нажмите клавишу ввода.
6. Теперь найдите Desktop Manager Windows Session Manager и нажмите кнопку перезагрузки.
Перезагрузите Windows, и теперь вы сможете увидеть вариант Vista Standard в Windows Color & Appearance.

Когда вы применяете стандартный вид, ваша Windows будет выглядеть так:

Для Glass Effect требуется много графической карты и памяти (ОЗУ), поэтому я рекомендую иметь не менее 70 МБ графической карты и 480 МБ памяти.

В первой настройке вы создали DWORD-значение Glass, но этот взлом реестра редко включает Glass в Vista Home Basic, поэтому я предлагаю вам скачать VistaGlazz. Это утилита, которая позволяет пользователю применять сторонние визуальные темы и каким-то образом включает Vista Glass Effect в Maximized Windows.
ПРИМЕЧАНИЕ. Невозможно каким-либо образом включить полный эффект Windows Glass на Windows Vista Home Basic.
Также попробуйте эту настройку реестра, чтобы включить эффект стекла на неподдерживаемых графических картах.
- Откройте редактор реестра, нажав кнопку Пуск + R и набрав Regedit.exe.
- Перейдите к HKEY_LOCAL_MACHINE> Программное обеспечение> Windows> DWM.
- Создайте значение DWORD с именем EnableMachineCheck и присвойте ему значение 0. Также создайте другое значение DWORD с именем Glass и присвойте ему значение 1.
- Перезагрузите Windows
После того, как вы исправите файлы с помощью Vista Glazz, он включит Glass Effect на вашем компьютере Home Basic в Maximized Windows.

Как видите, эффект «Стекло» включен, но только в развернутой Windows. Вы также заметите, что на панели задач также будет отображаться эффект стекла при развертывании любого окна.
В Vista Home Premium \ Ultimate \ Business есть новая функция, известная как Flip 3D . Flip 3D является альтернативой стандартной функции alt + tab. В Vista Home Basic Flip 3D недоступен, и его даже нельзя включить через любой вид настройки реестра. Вы можете попробовать альтернативную бесплатную программу SmartFlip.
Живая панель задач – еще одна интересная функция, доступная только в Vista Home Premium \ Ultimate \ Business. Эта функция GUI выдает небольшой предварительный просмотр свернутой Windows или приложения. Как и Flip 3D и Glass, эта функция также не может быть активирована в Vista Home Basic через любой твик реестра. В Vista Home Basic при наведении курсора на любое свернутое окно или приложение просто появляется имя этого окна или приложения. Однако вы можете установить бесплатную Visual ToolTip. Используя Visual ToolTip, вы даже можете контролировать размер предварительного просмотра, который вы хотите просмотреть.
Автор: Абхишек Двиведи
Windows Aero is a pleasing graphical user interface that includes transparencies, taskbar thumbnails, animations, and other features.
Windows Aero is the default theme in most editions of Windows Vista. If you want to turn off Aero for performance gain, use these steps.
Switching to Windows Vista Basic scheme
- Right-click on the Desktop and click Personalize
- Click Window Color and Appearance
- Click Open classic appearance properties for more color options
- Select Windows Vista Basic and click OK.
All Windows Vista features (like Taskbar thumbnails, Glass effect, etc) that require Aero will be disabled.
Shortcuts to enable and disable Aero
You can use the following command-line to disable Aero:
net stop uxsms
To switch Aero On, use this command:
net start uxsms
Note: The above commands need to be run from an elevated Command Prompt. This stops the Desktop Window Manager Session Manager service, which in turn disables Aero and switches automatically to the Windows Vista Basic scheme. If need to create desktop shortcuts to the above commands, make sure that you right-click on the shortcut and choose Run as Administrator in order to run it.
Enable or Disable Aero Transparency
To disable the Aero Transparency (whilst still having other Aero features enabled), use these steps:
- Right-click on the Desktop and choose Personalize
- Click the Window Color and Appearance
- Uncheck the option named Enable transparency
Shortcuts to enable and disable Aero Transparency
To disable Aero Transparency, use this command/shortcut:
rundll32.exe dwmApi #104
To enable Aero Transparency, use any one of these commands:
rundll32.exe dwmApi DwmEnableComposition
rundll32.exe dwmApi #102
One small request: If you liked this post, please share this?
One «tiny» share from you would seriously help a lot with the growth of this blog.
Some great suggestions:
- Pin it!
- Share it to your favorite blog + Facebook, Reddit
- Tweet it!
So thank you so much for your support. It won’t take more than 10 seconds of your time. The share buttons are right below. 
Ramesh Srinivasan is passionate about Microsoft technologies and he has been a consecutive ten-time recipient of the Microsoft Most Valuable Professional award in the Windows Shell/Desktop Experience category, from 2003 to 2012. He loves to troubleshoot and write about Windows.
Ramesh founded Winhelponline.com in 2005.
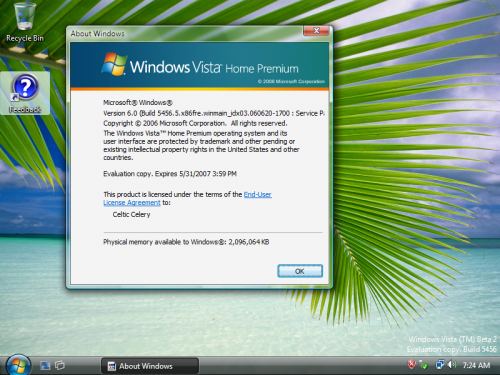
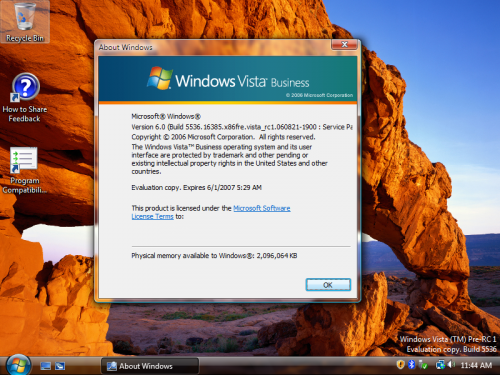
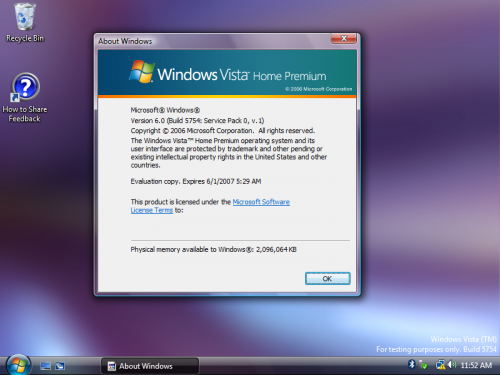
This is a small tutorial for enabling Aero Glass in most post-reset Vista Builds, namely the builds from the 50xx range onwards.
This tutorial was tested with the following builds: (Professional/Ultimate unless otherwise noted)
5048
5219
5231.0 (by ovctvct)
5231.2 (Ultimate & Enterprise Server)
5259.0 (also by fred30w and ovctvct)
5259.3 (by ovctvct)
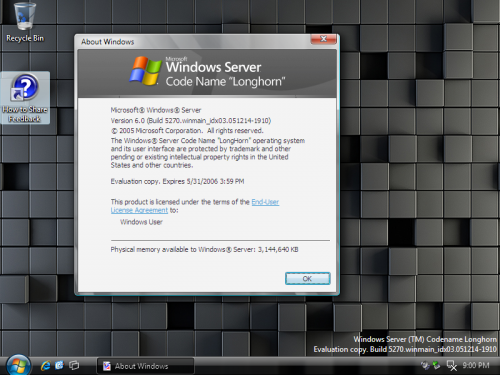
5270 (Ultimate & Enterprise Server) (Ultimate also by ovctvct)
5381 (Home Premium)
5384 (Enterprise Server)
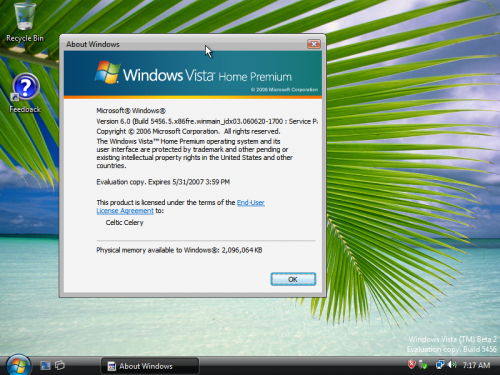
5456 (Home Premium & Ultimate) (Ultimate also by ovctvct)
5472 (Ultimate & Home Premium) (Ultimate also by fred30w)
5536 (Business & Ultimate) (Ultimate also by ovctvct)
5552 (Home Premium)
5600 (Datacenter Server & Ultimate) (Ultimate by ovctvct and Arths)
5728
5754 (Home Premium & Ultimate)
5757 (Datacenter Server)
6001.16406 (Enterprise Server)
6001.16510 (Web Server)
6001.17051 (x64 Web Server)
You will need the following items:
1. A relatively recent version of VMware Workstation. (10 or 11 will work)
2. The WDDM Display Drivers from Workstation 11. You can get an ISO that has them here: https://mega.nz/#!CMQzyDTJ!rQ72sAqgHi5Q … Z-OcA5XjSk
If you are using an AMD64 (x64) build, you can get the x64 drivers here:
https://mega.nz/#!3FAmlIZR!fIkxmXF1X5R9 … rfEUgDuhPA
3. The install DVD of your desired build.
Builds 5381 & later:
1. First, start creating your VM, but make sure to select Custom in the first screen.
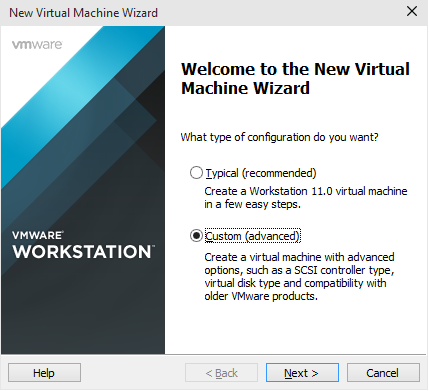
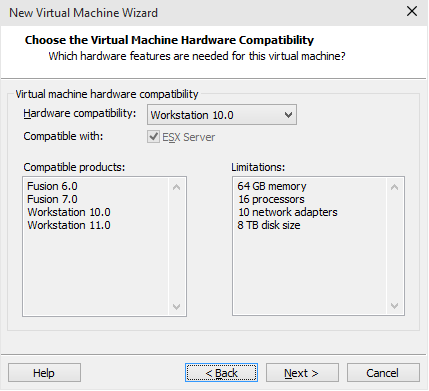
2. Set the HW compatibility to Workstation 10.0 (for 11 users). You do not need to change the compatibility in earlier versions.
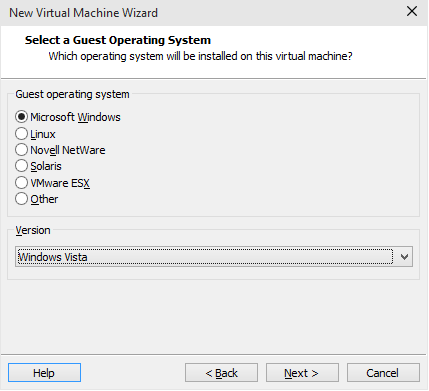
3. Set the Guest OS option to ‘Windows Vista’.
4. Install the build as normal, including setting the BIOS Date.
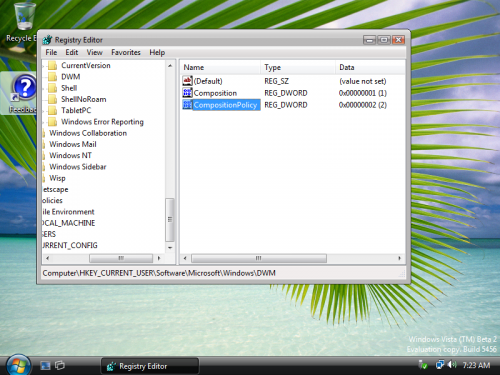
5. After installing, open regedit and browse to Computer\HKEY_CURRENT_USER\Software\Microsoft\Windows\DWM.
6. Over there, create a DWORD key named CompositionPolicy and set its value to 2.
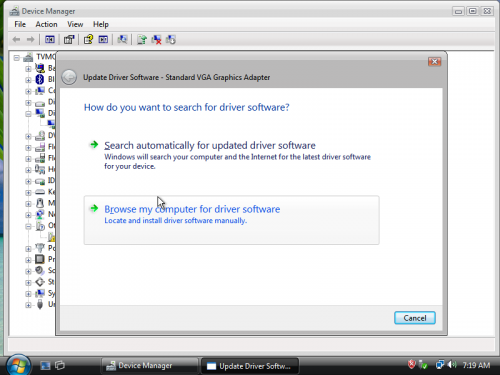
7. Open Device Manager, browse to the ‘Display Adapters’ section, and right-click on the name of your display adapter. Select ‘Update Driver Software’ on the menu that comes up.
8. Select ‘Browse my computer for driver software’ and mount the ISO containing the display drivers from the ‘Items you need’ section.
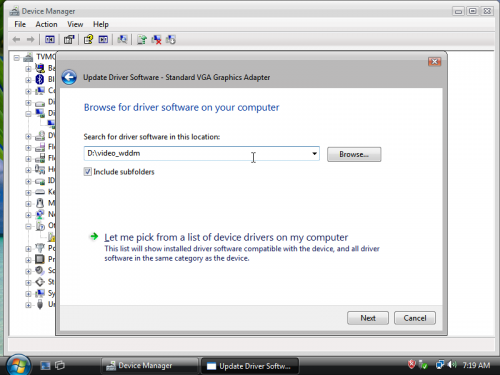
9. Point the installer to the ‘video_wddm’ folder of the root of the ISO and click ‘Next’. After the display driver installs, reboot the VM.
10. Aero Glass should be automatically enabled. It will be a bit slow, but it works.
Here’s the ones for 5536 and 5754 as well:
Builds 5048, 5219-5270: (Thanks to fred30w and ovctvct!)
1. Follow Steps 1-4 of the previous guide. NOTE: For 5231.X, use ‘Workstation 6.0’ as the compatibility mode!
2. After installing, open regedit. From here, it branches off into two different paths, depending on which build you want to use:
Builds 5048, 5219 & 5231.X:
![]() Browse to HKEY_LOCAL_MACHINE\Software\Microsoft\DWM. (if the key does not exist, create it.)
Browse to HKEY_LOCAL_MACHINE\Software\Microsoft\DWM. (if the key does not exist, create it.)
![]() Over there, create a DWORD key named EnableMachineCheck and set its value to 0.
Over there, create a DWORD key named EnableMachineCheck and set its value to 0.
Builds 5259.X & 5270:
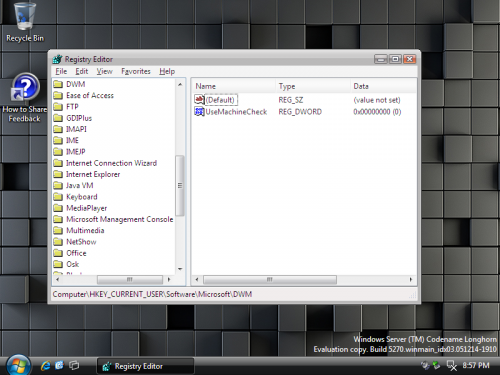
![]() Browse to HKEY_CURRENT_USER\Software\Microsoft\DWM. (if the key does not exist, create it.)
Browse to HKEY_CURRENT_USER\Software\Microsoft\DWM. (if the key does not exist, create it.)
![]() Over there, create a DWORD key named UseMachineCheck and set its value to 0.
Over there, create a DWORD key named UseMachineCheck and set its value to 0.
3. After this, open Device Manager, browse to the ‘Display Adapters’ section, and right-click on the name of your display adapter. Select ‘Update Driver Software’ on the menu that comes up.
4. Select the options required to choose your driver manually. (Sorry, but there is no screenshot for this one as these builds use different interfaces. 5048 & 5219 use the XP-style interface while the later builds use the Vista-style.)
5. When you have to install the driver, mount the ISO you downloaded way back in the beginning and point it to the ‘video_xpdm’
in the root directory of the ISO.
6. You will receive an error about the drivers not being signed. Ignore it.
7. After the driver installs, reboot the computer. You should have Aero Glass enabled unless if you use 5048.
8. (Thanks to ovctvct!) If you use 5048, open services.msc and enable the ‘User Experience Session Management’ service by setting it to automatically start on start up.
9. After you reboot, you must log off and log on again on every startup to enable Aero.
All other builds: (ones which are not listed at the top, that is)
I don’t know whether they work with these methods or not, as I don’t have the builds themselves or they do not work for me. (5112, 5308.60 and 5365 are applicable for the second category.) If someone can provide a conclusion, I’d gladly provide credit for them. ![]()
(PS: This started out as an experiment for lulz on 5456, but it turned into a reliable way to enable Aero Glass.)
UPDATE: Reuploaded the ISO, with the fix suggested by fred30w applied. Thanks, fred30w!