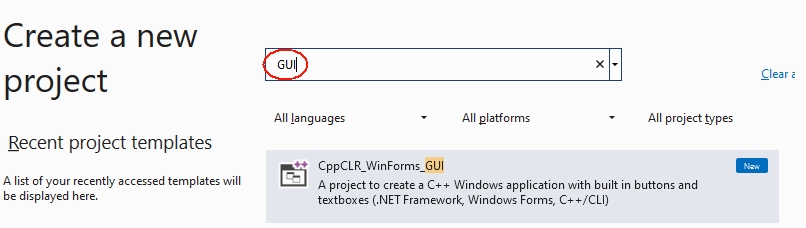
Search code, repositories, users, issues, pull requests…
Provide feedback
Saved searches
Use saved searches to filter your results more quickly
Sign up

До сих пор мы создавали только консольные приложения.
Но программисты на C# широко используют формы для создания пользовательских интерфейсов.
И в сегодняшней статье мы создадим простое оконное приложение.
В примерах используем русскую версию программы Visual Studio 2012.
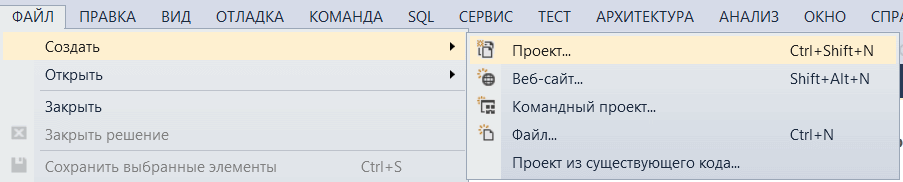
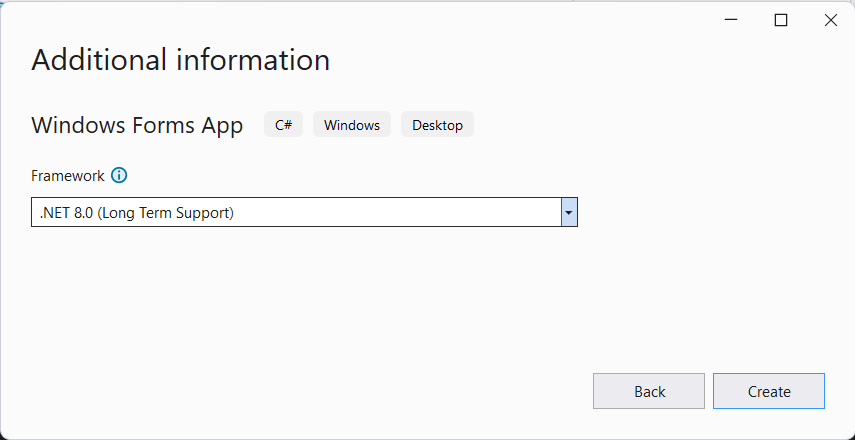
Первый шаг — начать новый проект и создать форму. Для чего откройте Visual Studio и выберите Файл-> Создать -> Проект, а в диалоговом окне нового проекта выберите Visual C#- Windows и выберите Приложение Windows Forms. Введите имя проекта в нижней части диалогового окна и нажмите кнопку ОК. На следующем рисунке показано, как создать новую форму в Visual Studio.
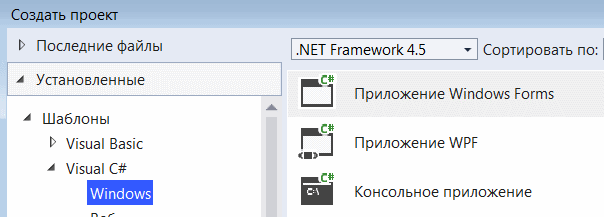
В диалоговом окне Новый проект выберите Приложение Windows Forms».
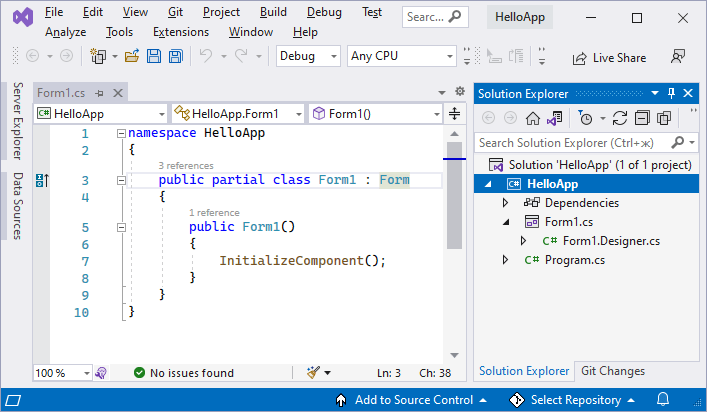
После выбора приложения Windows Forms вы можете увидеть форму по умолчанию (Form1) в своем новом проекте C#. Форма Windows Form, которую вы видите в представлении «Конструктор», представляет собой визуальное представление окна, которое открывается при открытии вашего приложения.
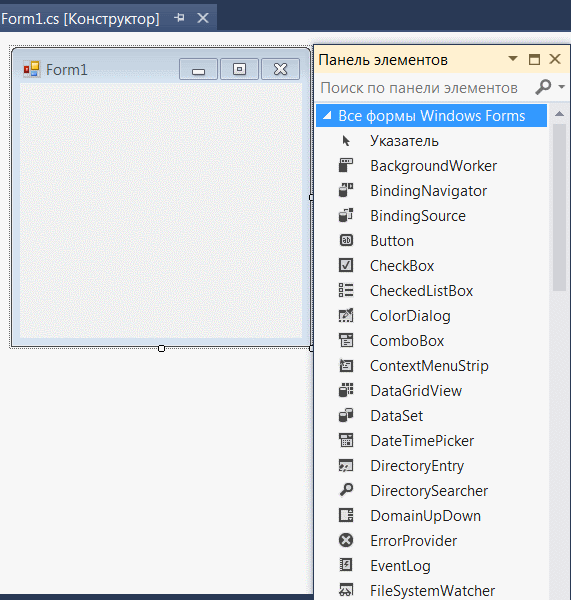
Каждый раз, когда вы создаете приложение Windows, Visual Studio будет отображать пустую форму по умолчанию, на которую вы можете перетащить элементы управления на основную форму приложения и настроить их размер и положение.
Если вы хотите установить какие-либо свойства формы, вы можете использовать окно свойств Visual Studio, чтобы изменить их. Есливы не видите окно Свойств, в меню ВИД щелкните Окно свойств. В этом окне перечислены свойства выбранной в данный момент формы Windows или элемента управления, и здесь вы можете изменить существующие значения.
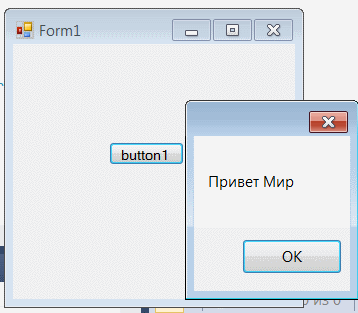
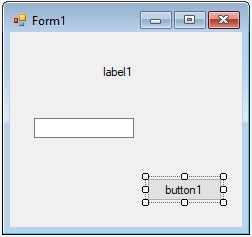
Далее на вкладке ВИД открываем панель элементов. Находим там виджет Button и перетаскиваем его на форму. Дважды щелкаем по новому элементу и открываем окно с кодом кнопки.
private void button1_Click(object sender, EventArgs e)
{
// вводим следующий код
MessageBox.Show("Привет Мир");
}
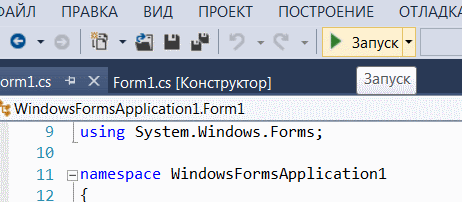
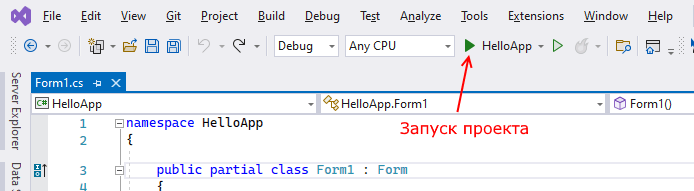
Запускаем приложение.
При нажатии на кнопку на экране должно появиться приветствие.
Результат:
Таким образом мы наглядно увидели возвожности создания оконных приложений с C# и Visual Studio, а также привязали к форме кнопку реагирующей на нажатие.
-

Создано 12.10.2021 11:38:18
-
Михаил Русаков

Копирование материалов разрешается только с указанием автора (Михаил Русаков) и индексируемой прямой ссылкой на сайт (http://myrusakov.ru)!
Добавляйтесь ко мне в друзья ВКонтакте: http://vk.com/myrusakov.
Если Вы хотите дать оценку мне и моей работе, то напишите её в моей группе: http://vk.com/rusakovmy.
Если Вы не хотите пропустить новые материалы на сайте,
то Вы можете подписаться на обновления: Подписаться на обновления
Если у Вас остались какие-либо вопросы, либо у Вас есть желание высказаться по поводу этой статьи, то Вы можете оставить свой комментарий внизу страницы.
Если Вам понравился сайт, то разместите ссылку на него (у себя на сайте, на форуме, в контакте):
-
Кнопка:
Она выглядит вот так:
-
Текстовая ссылка:
Она выглядит вот так: Как создать свой сайт
- BB-код ссылки для форумов (например, можете поставить её в подписи):

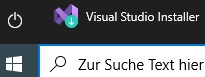
In Visual Studio up to version 2010, Templates for Windows Forms projects are pre-installed, but not as of Visual Studio 2012. For these newer versions of Visual Studio you have to install an extension.
This tutorial is for Visual Studio 2022, but applies essentially the same to other versions of Visual Studio (2019, 2017, 2015 and earlier).
Installing the extension for Windows Forms projects with C++
This extension is installed in Visual Studio 2022 under Extensions|Manage Extensions
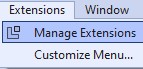
After clicking Download at “C++ Windows Forms for Visual Studio 2022 .NET Framework”
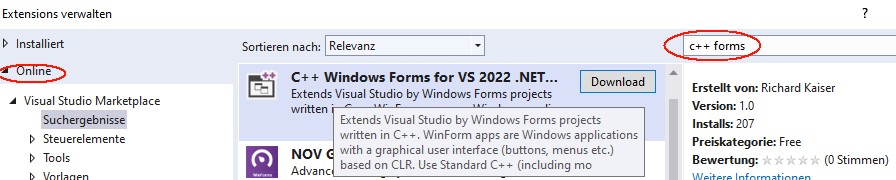
and closing Visual Studio you get the message

Click Modify to install the extension.
After the next start of Visual Studio under File|New|Project you will find the CppCLR_WinformsProject template:

With this template you can create Windows Forms projects written in C++. Such a project creates a Windows application with a graphical user interface (buttons, menus, etc.), for example:

Standard C++ (including almost all extensions of C++11, C++14, C++17) is used as programming language for the business logic. Only for accessing Windows controls C++/CLI is necessary. This is a simple C++ dialect for the .NET Framework.
The book „C++ mit Visual Studio 2019 und Windows Forms-Anwendungen“
The following is a brief excerpt from my book (in German)
which is still up to date with Visual Studio 2022. All examples and projects can be created and compiled in Visual Studio 2022 as in Visual Studio 2019.
Installing Visual Studio for Windows Forms Projects
In order to create Windows Forms projects in Visual Studio, particular components must be installed during the installation of Visual Studio. If this was forgotten during the installation, start the Visual Studio Installer either under Windows|Start
or in Visual Studio under File|New|Project|Create new project (at the end of the project list)

In the installer, check .NET desktop development, desktop development with C++ and C++/CLI support:

Create a Windows Forms project
After restarting Visual Studio, Windows Forms projects are available under Create New Project or File|New|Project:
Click the Next button. Then you will be prompted to enter the name of the project and a directory:

After clicking the Create button, Visual Studio looks something like this:
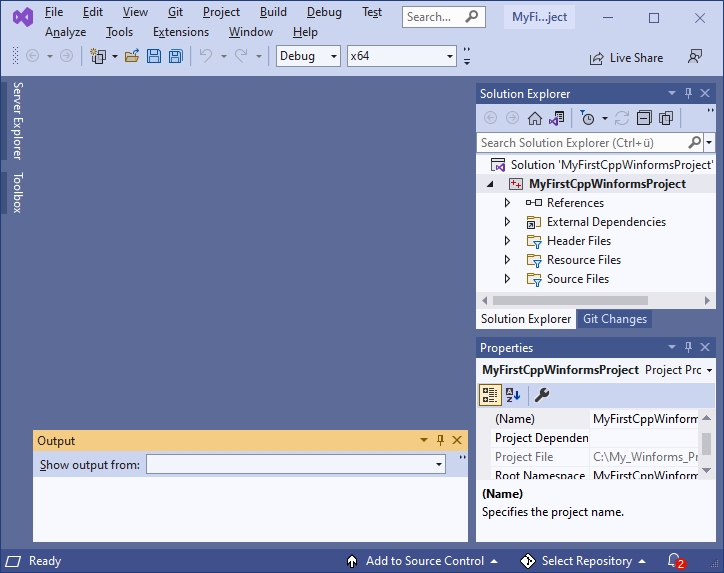
If you now click on Form1.h in the Solution Explorer, the form is displayed:
Normally, everything is done and you can continue with the next section. However, if you get something like this

you have clicked Form1.h too fast. Close this window

and click again on Form1.h in the Solution Explorer.
Visual Programming: A first small program
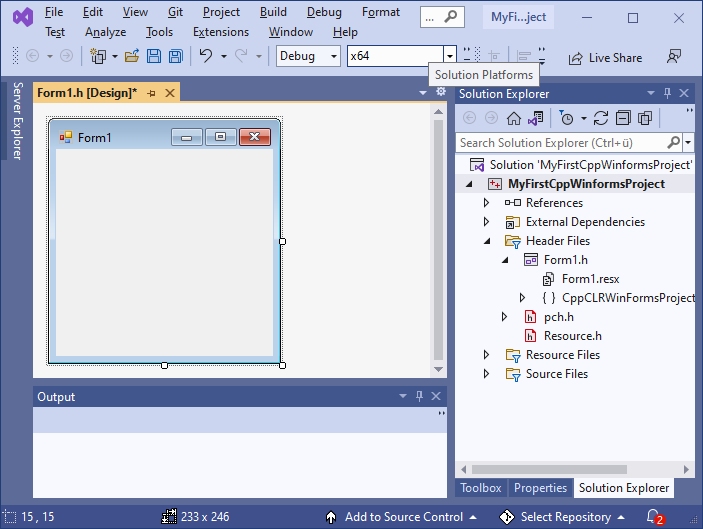
Now, before we get started with our first little program, let’s rearrange Visual Studio a bit to make it easier to use.
After installing Visual Studio, the Toolbox is offered at the left margin.
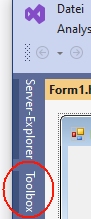
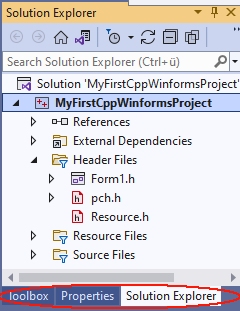
To prevent the toolbox from covering the form, drag the toolbox to the frame with the Solution Explorer (press the left mouse button on the title bar of the toolbox, then move to the title bar of the Solution Explorer with the mouse button pressed and release the mouse button).
Drag the properties window analogously to the Solution Explorer.
Since we initially only need the Toolbox, Solution Explorer and Properties window, you can close all other windows here (e.g. Git Explorer, etc.). Then the right frame looks something like this:
With the Windows Forms project from Section 1.4, Visual Studio then looks like this:
Next, we will now write a first small program.
The form (here Form1) is the starting point for all Windows Forms applications. It corresponds to the window that is displayed when the program is started:
![]()
Controls from the Toolbox can be placed on a form. The Toolbox contains essentially all the controls commonly used in Windows. They are located in various groups (e.g. General Controls, Containers, etc.), which can be expanded and collapsed. Most of these controls (such as a button) are displayed on the form while the program is running. If you stop with the mouse pointer briefly on a line of the toolbox, a small hint appears with a short description:
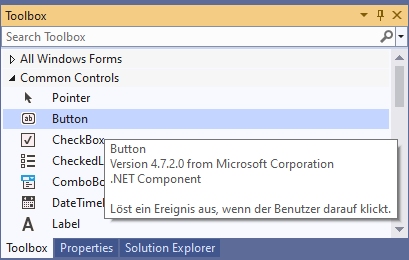
To place an element from the toolbox on the form, simply drag it from the toolbox onto the form. Or click on it in the toolbox first and then click on the position in the form where you want the upper left corner to be.
Example: After placing a Label (line seven in Common Controls, with the capital A), a TextBox (fourth line from the bottom, labelled ab) and a Button (second line labelled ab) on the form, it looks something like this:
By playing around like this, you have already created a real Windows program – not a particularly useful one, but still. You can start it as follows:
- with Debug|Start Debugging from the menu, or
- with F5 from any window in Visual Studio or
- by starting the exe file generated by the compiler.
This program already has many features that you would expect from a Windows program: You can move it with the mouse, resize and close it.
Do not forget to close your program before you continue editing it. As long as the program is still running, you cannot restart the compiler or modify the form.
This way of programming is called visual programming. While conventional programming means developing a program solely by writing instructions (text) in a programming language, visual programming means composing it wholly or in part from out-of-the-box graphical controls.
With Visual Studio, the user interface of a Windows Forms program can be designed visually. This allows you to see how the program will look later at runtime as soon as you design it. The instructions that are to take place as a response to user input (mouse clicks, etc.), on the other hand, are written conventionally in a programming language (e.g. C++).
The Properties Window
The control that was clicked last on a form (or in the pull-down menu of the Properties window) is called the currently selected control. You can identify it by the small squares on its edges, the so-called drag handles. You can drag them with the mouse to change to resize the control. A form becomes the currently selected control by clicking on a free position in the form.
Example: In the last example, button1 is the currently selected control.
In the Properties window (context menu of the control on the form, or View|Properties window – do not confuse with View|Property pages).
the properties of the currently selected control are displayed. The left column contains the names and the right column contains the values of the properties. With F1 you get a description of the property.
The value of a property can be changed via the right column. For some properties, you can type the new value using the keyboard. For others, after clicking on the right column, a small triangle is displayed for a pull-down menu, through which a value can be selected. Or an icon with three dots „…“ is displayed, which can be used to enter values.
Example:
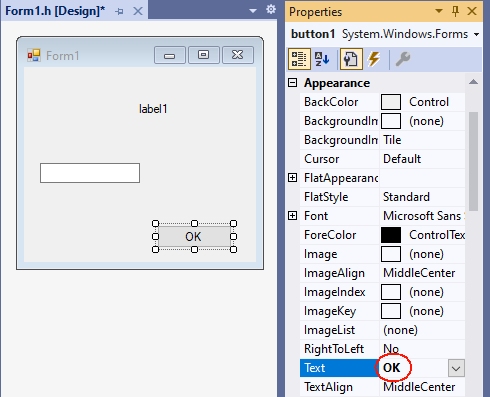
- For the Text property, you can enter a text with the keyboard. For a button this text is the inscription on the button (e.g. „OK“), and for a form the title line (e.g. „My first C++ program“).
- For the BackColor property (e.g. from a button) you can select the background color via a pull-down menu.
- If you click the right column of the Font property and then the „…“ icon, you can select the font of the Text property.
A control on the form is not only adjusted to its properties in the Properties panel, but also vice versa: if you resize it by dragging the drag handles on the form, the values of the corresponding properties (Location and Size in the Layout section) in the Properties panel are automatically updated.
First steps in C++
Next, the program from Section 1.5 is to be extended so that instructions are executed in response to user input (e.g., a button click).
Windows programs can receive user input in the form of mouse clicks or keyboard input. All inputs are received centrally by Windows and passed on to the program. This triggers a so-called event in the program.
Such an event can be assigned a function that is called when the event occurs. This function is also called an event handler.
For the time being, our program should only react to the clicking of a button. The easiest way to get the function called for this event is to double-click on the button in the form. The cursor is then placed at the beginning of the function. This causes Visual Studio to generate the following function and display it in the editor:
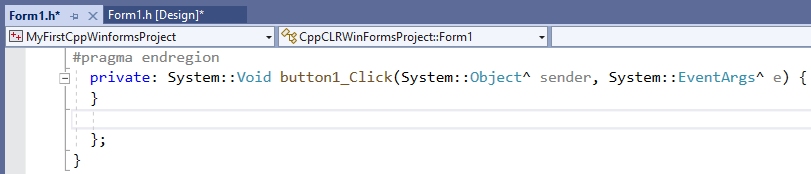
Between the curly brackets „{“ and „}“ you then write the statements to be executed when the Click event occurs.
Essentially all instructions of C++ are possible here. In the context of this simple tutorial, only some elementary instructions are to be introduced, which is necessary for the basic understanding of Visual Studio. If terms like „variables“ etc. are new to you, read on anyway – from the context you will surely get an intuitive idea which is sufficient for the time being.
A frequently used instruction in programming is the assignment (with the operator „=“), which is used to assign a value to a variable. Initially, only those properties of controls that are also displayed in the properties window are to be used as variables. These variables can then be assigned the values that are also offered in the properties window in the right column of the properties.
For the BackColor property, the allowed values are offered after the pull-down menu is expanded:
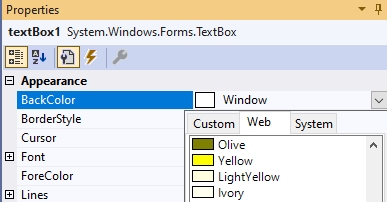
These values can be used in the program by specifying them after Color::. If you now write the statement
textBox1->BackColor = Color::Yellow;between the curly brackets
private: System::Void button1_Click(System::Object^  sender, System::EventArgs^  e)
{
 textBox1->BackColor = Color::Yellow;
}
the BackColor property of textBox1 gets the value Color::Yellow, which stands for the color yellow, when button1 is clicked during the execution of the program. If you now start the program with F5 and then click button1, the TextBox actually gets the background color yellow.
Even if this program is not yet much more useful than the first one, you have seen how Visual Studio is used to develop applications for Windows. This development process always consists of the following activities:
- You design the user interface by placing controls from the Toolbox on the form (drag and drop) and adjusting their properties in the Properties window or the layout with the mouse (visual programming).
- You write in C++ the instructions that should be done in response to user input (non-visual programming).
- You start the program and test whether it really behaves as it should.
The period of program development (activities 1. and 2.) is called design time. In contrast, the time during which a program runs is called the runtime of a program.
A simple Winforms application
Next, a simple Winforms application is to be created based on the previous explanations. It contains a button and TextBoxes for input and output:

However, you do not have to create this project yourself. If you install the Visual Studio extension

a project template with exactly this project is available in Visual Studio:
You can use this project as a basis for many applications by adding more controls and functions.
The main purpose of this project is to show how the application logic is separated from the user interface:
- The functions, classes, etc. of the application logic are written in standard C++ and are contained in a header file that is added to the project.
- The instructions for the user interface, on the other hand, are written primarily in C++/CLI and are often included in the form class in Form1..
- The functions of the header file are called when clicking a button.
The following is a simplified version of chapter 2.11 from my book „C++ mit Visual Studio 2019 und Windows Forms-Anwendungen“. There I recommend such a project for the solutions of the exercises. In the header file of such a project you can include the solutions of several exercises or distribute them to different header files. For each subtask you can put a button (or menu options) on the form. This way you don’t have to create a new project for each subtask.
Of course, outsourcing your own instructions to an extra file (as in 3.) and accessing the controls via function parameters is somewhat cumbersome: however, it leads to clearer programs than if all instructions are located in the form file within the Form1 class. This saves many programming errors that lead to obscure error messages, and makes it easier to search for errors.
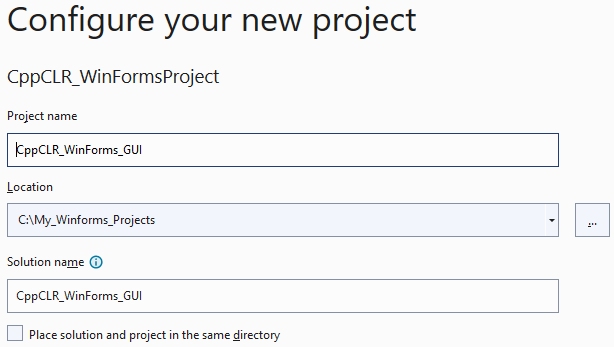
1. Create the project
Create a new project with File|New|Project|CppCLR_WinformsProject (see section 1.1).
The following examples assume a project named CppCLR_Winforms_GUI.
2. Design the user interface (the form)
The form is then designed to contain all the controls needed to input and output information and start actions. This is done by dragging appropriate controls from the toolbox onto the form.
For many projects (e.g. the exercises from my book) the following controls are sufficient:
- A multiline TextBox (see Section 2.3.2 of my book) to display the results.
- A single-line TextBox for entering data
- One or more buttons (or menu options, etc.) to start the instructions
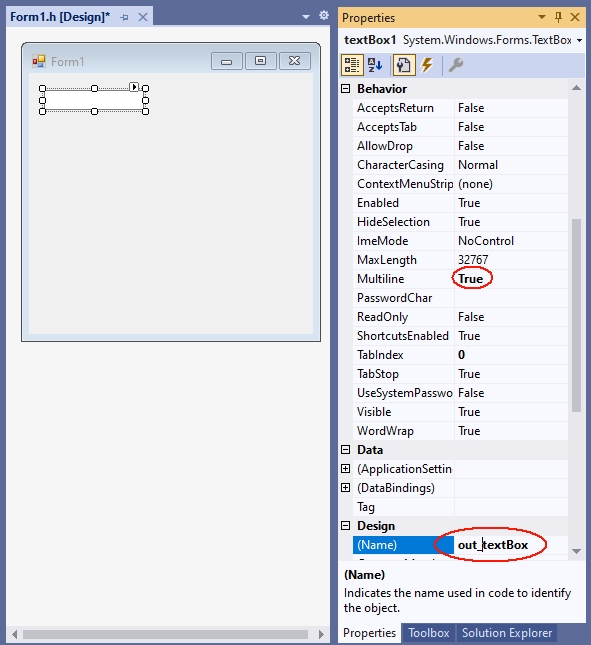
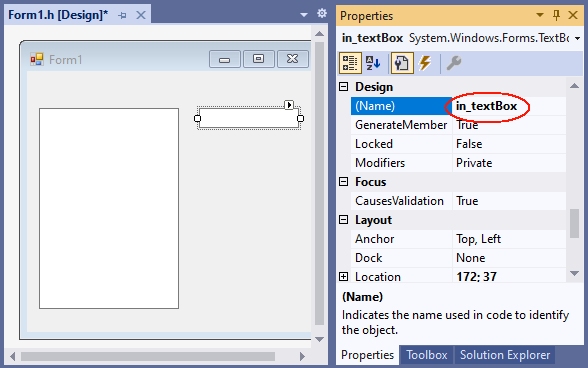
A TextBox becomes multiline TextBox by the value true of the MultiLine property. The TextBox for output is to be named out_textBox:
The TextBox for entering data will be named in_textBox:
Since the function plus_1 is called when the button is clicked, it is given the caption „plus 1“ and the name button_plus1:

The functions, declarations, classes etc. of the so-called application logic are placed in a separate header file, which is added to the project with Project|Add new element|Visual C++|Code as header file(.h) with the name Header1.h. In practice, however, you should group functions and classes that belong together conceptually in a header file, and then give the header file a more meaningful name than Header.h.
The application logic is then included in the header file. These are mostly functions, classes, etc. written in C++. In our first example, this should be a function with the name plus_1, which returns the value of the argument increased by 1:
In a C++ Windows Forms project, the application logic consists primarily of functions, classes, etc. written in C++, without C++/CLI language elements. In our first example, this should be a function named plus_1, which returns the value of the argument incremented by 1:
int plus_1(int x)
{
  return x + 1;
}
Diese Datei wird dann vor dem namespace des Projekts mit einer #include-Anweisung in die Formulardatei (z.B. Form1.h) aufgenommen:
This file is then included in the form file (e.g. Form1.h) before the namespace of the project with an #include statement:
#pragma once
#include "Header1.h" // <-- manuell einfügen. nach dem Eintippen von
                     // "#include " bietet Visual Studio die Datei an.
namespace CppCLRWinFormsProject {
  using namespace System;
    ...
}
4. Calling the functions
By double-clicking the button on the form, Visual Studio creates the function (the event handler) that will be called when the button is clicked when the program is running:
private: System::Void button_plus_1_Click(System::Object^ sender, System::EventArgs^ e)
{
}
In this event handler you then call the corresponding function. In this simple tutorial this is the function plus_1 from the file Header.h.
- If this function uses user input, you read it in via a TextBox. In this simple tutorial, it will be a number that is read from the in_TextBox.
- If a parameter of the called function does not have type String (the type of the property in_textBox->Text), the string must be converted to the type of the parameter. This is possible with one of the Convert:: functions.
- The results are to be displayed in the out_textBox. This can be done with the function out_textBox->AppendText. The string that AppendText expects can be created with String::Format. In the first argument (a string) you specify {0} for the first value after the string, {1} for the second and so on.
private: System::Void button_plus_1_Click(System::Object^ sender, System::EventArgs^ e)
{
int n = Convert::ToInt32(in_textBox->Text);
int result = plus_1(n);
out_textBox->AppendText(String::Format("plus_1({0})={1}\r\n",n,result));
}
If you enter a number in the input field after starting this program with F5 and then click on the button, the value incremented by 1 is displayed in the output text box:
For each further function whose result is to be displayed, a button is placed on the form and given a suitable name (Name property) and a suitable label (Text property). This function is then called in the associated event handler.
With this all relevant parts of the ??? CppCLR_Winforms_GUI are presented. You can enhance it as you like with additional controls (buttons, menus, etc.). See chapter 2 of my book for more information.
5. GUI and application logic not so strictly separated
In the version created under 1. to 4. the application logic is strictly separated from the user interface: The access to the user interface with C++/CLI is exclusively done in Form1.h. In Header1.h, however, only standard C++ is used. This has in particular the advantage that one can use this header also in other platforms (e.g. console applications, Qt, Mac).
However, in the early stages of a project, when there is still a lot of experimenting going on, it can be a bit cumbersome if you have to change the calls in another file every time you change a parameter list. And for applications that are not intended to be used for other platforms at all, this strict separation doesn’t help much. This often applies to exercise tasks as well.
This jumping back and forth between different files can be avoided by relaxing the strict separation between the application logic and the user interface by including access to the controls in the header file as well.
Accessing controls in a header file is enabled by inserting
using namespace System;
using namespace System::Windows::Forms;
into the header file at the beginning. Then you can also use the types of the controls in the header file (e.g. as parameters) and include the statements that were in the buttonClick function in Form1.h under 4.
This procedure is implemented in the Header2.h file:
#pragma once
using namespace System;
using namespace System::Windows::Forms;

int plus_2(int x)
{
  return x + 2;
}

void plus_2_Click(TextBox^ in_textBox, TextBox^ out_textBox)
{
int n = Convert::ToInt32(in_textBox->Text);
int result = plus_2(n);
out_textBox->AppendText(String::Format("plus_2({0})={1}\r\n", n, result));
}
Here you pass a parameter for the control to the function. Please note that you must specify a ^ after the name of a .NET type (e.g. TextBox, Button). In the function you then address the control under the name of the parameter.
This function can be called when a button is clicked:
private: System::Void button_plus_1_Click(System::Object^ sender, System::EventArgs^ e)
{
plus_2_Click(in_textBox, out_textBox);
}
6. Analogy to console applications
Comparing of this Windows Forms project with a corresponding console application shows the analogy of the two types of projects. This analogy shows how to convert a console application into a forms application: If you have a console program like
#include<iostream>
int main()
{
int n;
std::cin >> n;
int result = plus_2(n);
std::cout << "plus_2(" << n << ") = " << result << std::endl;
return 0;
}
you can port it to a form application with relatively little effort. You just need to replace the I/O statements and call the functions in response to a ButtonClick, etc:
private: System::Void button_plus_1_Click(System::Object^ sender, System::EventArgs^ e)
{
int n = Convert::ToInt32(in_textBox->Text);
int result = plus_1(n);
out_textBox->AppendText(String::Format("plus_1({0})={1}\r\n",n,result));
}
Excerpt from the preface to my book „C++ mit Visual Studio 2019 und Windows Forms-Anwendungen“
The preface to my book (in German)
teaches C++ with Windows Forms applications in more detail.
Preface
The starting point for this book was the desire for a C++ textbook in which programs for a graphical user interface (Windows) are developed from the beginning, and not console applications as is usually the case. Programs in which inputs and outputs are done via a console are like stone-aged DOS programs for many beginners and discourage them from wanting to deal with C++ at all.
Windows Forms applications are an ideal framework for C++ programs with an attractive user interface: access to Windows controls (Buttons, TextBoxes etc.) is easy. The difference to a standard C++ program is mostly only that inputs and outputs are done via a Windows control (mostly a TextBox)
textBox1->AppendText(„Hello World“);
while in standard C++ the console is used with cout:
cout << "Hello world" << endl;
But not only students can benefit from C++ with a graphical user interface. With Windows Forms projects, existing C or C++ programs can be enhanced with a graphical user interface without much effort. And those who know C or C++ and do not want to learn a new language for a GUI can make their existing programs more beautiful and easier to use with simple means.
C++ has developed rapidly in recent years: The innovations of C++11, C++14, C++17 and C++20 have brought many improvements and new possibilities. Much of what was good and recommended in 2010 can be made better and safer today.
As a book author and trainer who has accompanied this whole evolution, you notice this particularly clearly: many things that have been written in the past should be done differently today. True, it would still be compiled. But it is no longer modern C++, which corresponds to the current state of the art and uses all the advantages.
This book introduces C++ at the Visual Studio 2019 level in May 2020. This is the scope of C++17.
Последнее обновление: 11.11.2022
Для создания графических приложений на C# можно использовать .NET CLI, но также можно
использовать бесплатную и полнофункциональную среду разработки — Visual Studio Community 2022, которая в ряде случаев облегчает проектирование
приложения. Так, загрузим установщик Visual Studio по адресу:
https://www.visualstudio.com/en-us/downloads.

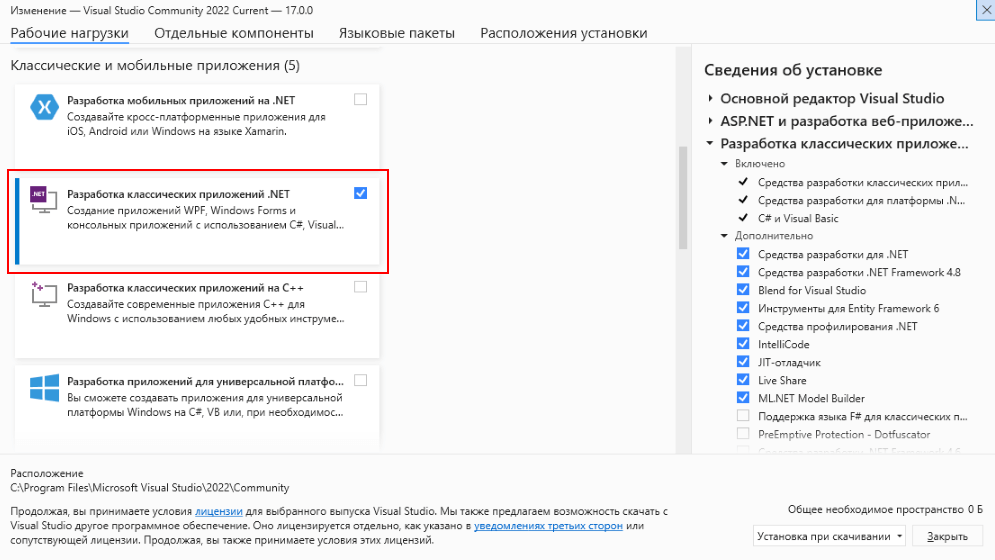
Чтобы добавить в Visual Studio поддержку проектов для Windows Forms и C# и .NET 7, в программе установки среди рабочих нагрузок нужно
выбрать только пункт Разработка классических приложений .NET. Можно выбрать и больше опций или вообще все опции, однако стоит
учитывать свободный размер на жестком диске — чем больше опций будет выбрано, соответственно тем больше места на диске будет занято.
После установки среды и всех ее компонентов, запустим Visual Studio и создадим проект графического приложения.
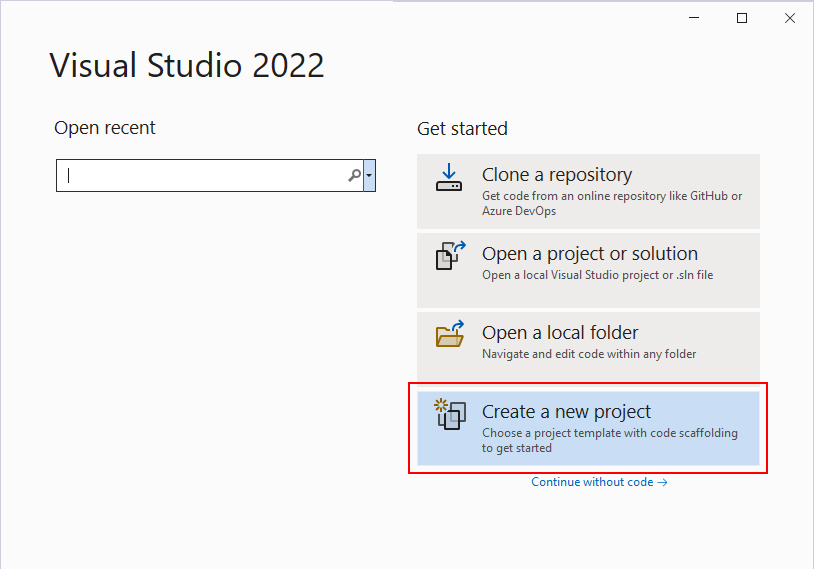
На стартовом экране выберем Create a new project (Создать новый проект)
На следующем окне в качестве типа проекта выберем Windows Forms App:

Стоит отметить, что среди шаблонов можно увидеть еще тип Windows Forms App (.NET Framework) — его НЕ надо выбирать, необходим именно тип
Windows Forms App.
Далее на следующем этапе нам будет предложено указать имя проекта и каталог, где будет располагаться проект.
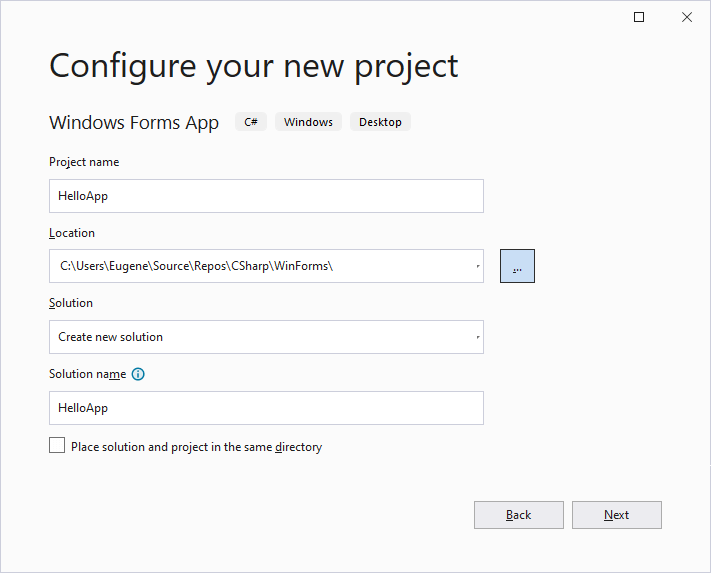
В поле Project Name дадим проекту какое-либо название. В моем случае это HelloApp.
На следующем окне Visual Studio предложит нам выбрать версию .NET, которая будет использоваться для проекта. Выберем последнюю на данный момент версию — .NET 7.0 и нажмен на кнопку Create (Создать) для создания проекта.
После этого Visual Studio откроет наш проект с созданными по умолчанию файлами:
Справа находится окно Solution Explorer, в котором можно увидеть структуру нашего проекта. Практически этот тот же проект, который создается с
помощью .NET CLI:
-
Dependencies — это узел содержит сборки dll, которые добавлены в проект по умолчанию.
Эти сборки как раз содержат классы библиотеки .NET, которые будет использовать C# -
Form1.Designer.cs: он содержит определение компонентов формы, добавленных
на форму в графическом дизайнере -
Далее идет файл единственной в проекте формы — Form1.cs, который по умолчанию открыт в центральном окне.
-
Program.cs определяет точку входа в приложение
Запуск приложения
Чтобы запустить приложение в режиме отладки, нажмем на клавишу F5 или на зеленую стрелочку на панели Visual Studio.
После этого запустится пустая форма Form1 по умолчанию.

После запуска приложения студия компилирует его в файл с расширением exe. Найти данный файл можно, зайдя в папку проекта и далее в каталог
\bin\Debug\net7.0-windows
Рассмотрев вкратце создание проекта графического приложения, мы можем перейти к обзору основных компонентов и начнем мы с форм.
В данной теме рассмотрены особенности создания приложения типа Windows Forms Application с поддержкой языка C++. Такой тип приложения поддерживает все преимущества технологии .NET Framework.
Выполнение
1. Загрузить Microsoft Visual Studio.
В результате будет создано окно с активной вкладкой Start Page (рисунок 1).
 Рисунок 1. Окно Microsoft Visual Studio
2. Создание приложения типа Windows Forms Application
Чтобы создать новый проект (решение) на языке C++, нужно выбрать последовательность команд (рис. 2):
File -> New Project...
Система Microsoft Visual Studio предлагает разные виды шаблонов приложения для программирования на языке C++ (рис. 2).
 Рисунок 2. Вызов команды создания нового проекта
В результате откроется окно «New Project» (рисунок 3), в котором нужно выбрать шаблон «Visual C++» и тип приложения Windows Forms Application.
В поле «Location:» надо задать путь к папке, в которой будет сохранен проект. В нашем случае задан следующий путь
C:\Programs\CPP
В поле Name задается имя приложения. В нашем случае это имя «MyApp01«.
Если включена опция «Create directory for solution» (создать директорию для решения), то проект будет сохранен в папке
C:\Programs\CPP\MyApp01
В поле «Solution name:» задается имя решения. Решение (solution) может объединять в себе несколько проектов. В нашем случае имя решения остается таким как и имя проекта.
 Рисунок 3. Окно «New Project» создания нового проекта
3. Основные элементы оконного интерфейса для работы с программой
После выбора «ОК» в предыдущем окне «New Project«, система Microsoft Visual Studio создаст весь необходимый код для работы приложения типа Windows Forms Application.
В результате окно Microsoft Visual Studio примет вид как показано на рисунке 4.
В окне, в центре отображается основная форма приложения. На этой форме можно размещать компоненты. Компоненты размещаются на панели Toolbox (левая часть экрана).
Свойства формы или компонента отображаются в утилите Solution Explorer (правая часть экрана). Изменяя эти свойства, можно влиять на вид формы, поведение формы, реализовывать обработчики событий формы и прочее.
 Рисунок 4. Основные элементы окна приложения
4. Вызов режима ввода кода
На данный момент активным есть режим проектирования формы. Чтобы перейти в режим набора текста программы, нужно вызвать команду Code с меню View (рисунок 5):
View -> Code
 Рисунок 5. Команда перехода в режим набора текста программы
Другой вариант вызова команды перехода в режим набора текста, это клик на соответствующей кнопке в Solution Explorer (рисунок 6).
 Рисунок 6. Кнопка перехода в режим набора текста программы
В результате отобразится текст программы.
 Рисунок 7. Режим просмотра текста программы
5. Текст модуля «Form1.h«
При создании проекта, система Microsoft Visual Studio генерирует программный код, который сохраняется в различных файлах.
Главным файлом, в котором программист создает собственный код программы, есть файл «Form1.h«. Этот файл соответствует главной форме приложения. На главной форме размещаются различные компоненты. С помощью этих компонент реализуется решение конкретной задачи. При создании проекта создается пустая форма (рисунок 6). Кроме главной формы можно создавать другие формы и добавлять их к проекту.
Листинг файла «Form1.h» следующий.
#pragma once

namespace MyApp01 {
  using namespace System;
  using namespace System::ComponentModel;
  using namespace System::Collections;
  using namespace System::Windows::Forms;
  using namespace System::Data;
  using namespace System::Drawing;

  /// <summary>
  /// Summary for Form1
  /// </summary>

  public ref class Form1 : public System::Windows::Forms::Form
  {
  public:
    Form1(void)
    {
      InitializeComponent();
      //
      //TODO: Add the constructor code here
      //
    }

    protected:
      /// <summary>
      /// Clean up any resources being used.
      /// </summary>

      ~Form1()
      {
        if (components)
        {
          delete components;
        }
      }

    private:
      /// <summary>
      /// Required designer variable.
      /// </summary>

      System::ComponentModel::Container ^components;

#pragma region Windows Form Designer generated code
      /// <summary>
      /// Required method for Designer support - do not modify
      /// the contents of this method with the code editor.
      /// </summary>

      void InitializeComponent(void)
      {
        this->components = gcnew System::ComponentModel::Container();
        this->Size = System::Drawing::Size(300,300);
        this->Text = L"Form1";
        this->Padding = System::Windows::Forms::Padding(0);
        this->AutoScaleMode = System::Windows::Forms::AutoScaleMode::Font;
      }
#pragma endregion
    };
}
Объясним некоторые фрагменты кода в тексте программы.
В вышеприведенном тексте создается пространство имен MyApp01 с помощью оператора
namespace MyApp01 {
...
}
В этом пространстве имен подключаются другие пространства имен из библиотеки .NET Framework:
System
System::ComponentModel
System::Collections
System::Windows::Forms
System::Data
System::Drawing
В пространстве имен MyApp01 создается класс с именем Form1. Этот класс соответствует главной форме приложения Form1.
Класс содержит конструктор, который вызывает метод
InitializeComponent();
В методе InitializeComponent() создается компонента-форма (переменная components), которая есть контейнером. Это означает, что на форме могут размещаться другие компоненты (кнопки, метки, поля ввода и т.д.). Также в методе InitializeComponent() настраиваются параметры формы: название заголовка, размер (300 * 300 пикселей), шрифт по умолчанию.
Деструктор класса ~Form1() уничтожает форму (переменная components) с помощью оператора delete.
6. Файлы, которые создаются в проекте
После создания проекта типа Windows Forms Application система Microsoft Visual Studio создает несколько файлов.
 Рисунок 8. Файлы C++, которые создаются в проекте типа Windows Forms Application
Как было сказано раньше, главным файлом есть файл «Form1.h» (см. п. 5). Также, согласно правилам языка C++, создается файл реализации «MyApp01.cpp«. В этом файле есть главная функция main(). Этот файл содержит код отображающий главную форму.
Листинг файла «MyApp01.cpp» следующий:
// MyApp01.cpp : main project file.
#include "stdafx.h"
#include "Form1.h"

using namespace MyApp01;

[STAThreadAttribute]

int main(array<System::String ^> ^args)
{
  // Enabling Windows XP visual effects before any controls are created
  Application::EnableVisualStyles();
   Application::SetCompatibleTextRenderingDefault(false);

  // Create the main window and run it
  Application::Run(gcnew Form1());
  return 0;
}
Файл «MyApp01.vcxproj«. Это главный файл проектов на Visual C++, которые генерируются с использованием мастера приложений (Application Wizard). В нем содержится информация о версии Visual C++, в которой сгенерирован файл, информация о платформах, настройках и особенностях (характеристиках) проекта выбранных с помощью мастера приложений (Application Wizard).
Файл «MyApp01.vcxproj.filters«. Это есть файл фильтров для сгенерированных проектов на Visual C++ с использованием мастера приложений (Application Wizard). В нем содержится информация об ассоциации между файлами в вашем проекте и фильтрами. Эта ассоциация используется в интегрированной среде, чтобы показать группирование файлов с одинаковыми расширениями.
Файл «AssemblyInfo.cpp«. Содержит пользовательские атрибуты для модификации данных сборки.
Файли «StdAfx.h» и «StdAfx.cpp«. Они используются для создания файла скомпилированных заголовков (PCH) с именем «MyApp01.pch» и скомпилированных типов названных «StdAfx.obj«.
7. Запуск проекта на выполнение
Для запуска проекта на выполнение используется команда Start Debuggin из меню Debug (клавиши F5).
⇑