Поддержка документов XPS по умолчанию появилась еще в Windows Vista и была доступной вплоть до апрельского обновления Windows 10. Сам XPS представляет собой основанный на XML формат для работы с графическими документами, позиционируемый Microsoft как альтернатива более «тяжелому» PDF. Особой популярности формат так и не приобрел, и в Windows 10 1083 Microsoft приняла решение не включать XPS Viewer, если установка операционной системы выполняется с нуля, то есть с установочного диска.
Если вы хотите использовать в чисто установленной Windows 1083 XPS Viewer, вам нужно будет добавить его вручную.
Если установка новой версии выполнялась через Центр обновления, никаких действий не потребуется, так как компонент для работы с документами XPS по-прежнему будет доступен.
В «чистой» системе модуль устанавливается следующим образом.
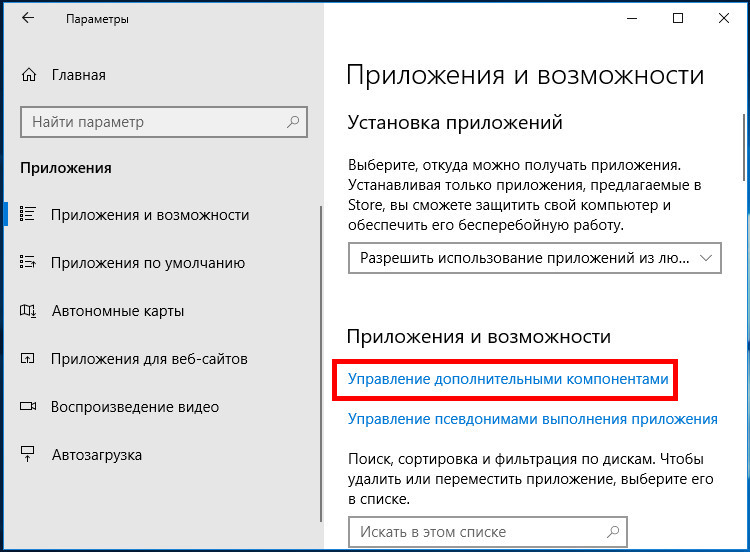
Откройте приложение «Параметры», зайдите в раздел «Приложения и возможности» и нажмите ссылку «Управление дополнительными компонентами».
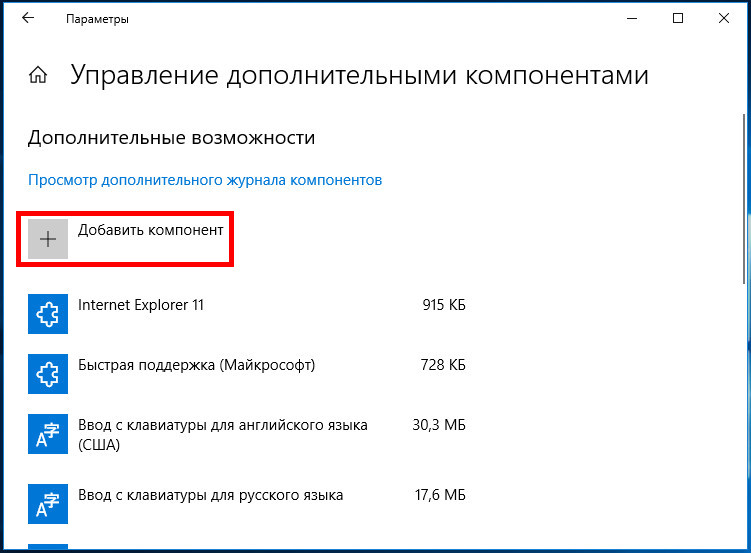
В следующем окне нажмите «Добавить компонент».
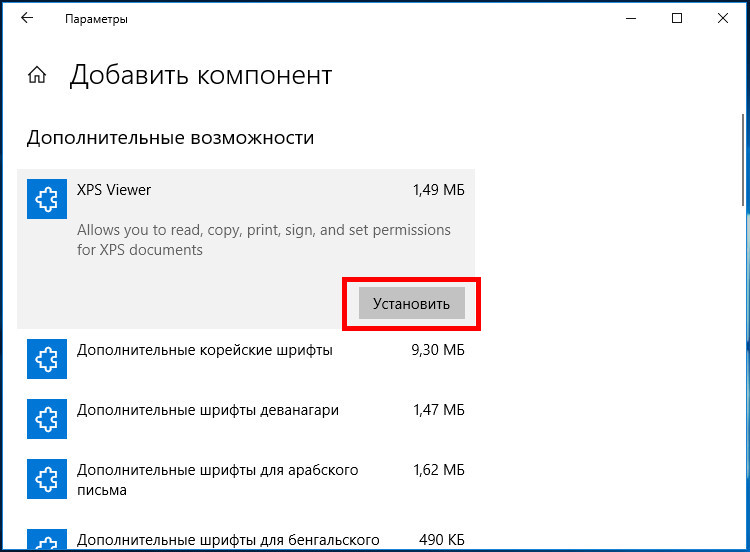
Выберите из списка XPS Viewer (он должен идти в списке первым) и нажмите кнопку «Установить».
Если при установке вдруг возникнут какие-то проблемы, воспользуйтесь консольной утилитой DISM.
Откройте командную строку от имени администратора и выполните в ней такую команду:
dism /Online /Add-Capability /CapabilityName:XPS.Viewer~~~~0.0.1.0

Через пару минут компонент будет установлен, и вы сможете запустить его командой xpsrchvw.exe в окошке «Выполнить» или просто открыв привычным способом любой файл XPS.
![]() Загрузка…
Загрузка…
The XPS Viewer Feature on Demand (FOD) component allows you to read, copy, print, sign, and set permissions for XPS documents. This article explains installing the XPS Viewer in Windows 10 and 11.
Installing the “XPS Document Writer” via the classic Windows Features dialog (i.e., OptionalFeatures.exe) doesn’t install the XPS Viewer. They’re two different components.
The XPS Viewer FOD component can be installed using different methods. Follow one of the options below.
Method 1: Using Settings
- Open Settings, and click Apps.
- Click “Optional features.”

- Click “View features.”

- In the “Add an optional feature” dialog, type
xps.
- Select the “XPS Viewer” checkbox, and click Next.
- On the next screen, click Install.


The above steps and screenshots are from Windows 11.
On Windows 10, follow the steps below:
- Open Settings, Apps & Features.
- Click “Optional features”. If “XPS Viewer” is not already installed, it won’t appear in the “Installed Features” listing.
- Click “Add a feature.”
- Type
xps - Select the “XPS Viewer” checkbox.
- Click “Install.”
Method 2: Using DISM
To install the XPS Viewer using DISM, ensure the system is connected to the internet. And then, run the following commands from the admin Command Prompt:
dism /online /remove-capability /capabilityname:XPS.Viewer~~~~0.0.1.0
dism /online /add-capability /capabilityname:XPS.Viewer~~~~0.0.1.0
The above commands uninstall XPS Viewer and reinstall XPS Viewer by downloading the source files from Windows Update.
Method 3: Using DISM (using CAB file) offline
Methods 1 and 2 require internet access to download the FOD packages. To install the XPS Viewer or other FOD packages on a computer that’s offline (i.e., with no internet access), you must use the .cab file. The FOD .cab files will be available in the Windows FOD ISO.
The download links for the Language and Optional Features ISOs are below:
Windows 11, version 22H2 Language and Optional Features ISO (Link Source)
22621.1.220506-1250.ni_release_amd64fre_CLIENT_LOF_PACKAGES_OEM.iso
Windows 10, version 2004 (and later) Features on Demand #1 ISO (Link Source)
19041.1.191206-1406.vb_release_amd64fre_FOD-PACKAGES_OEM_PT1_amd64fre_MULTI.iso
Instructions
- Download the appropriate FOD ISO and mount the ISO. To mount the ISO, right-click on it and click “Mount”. The cab file name for the XPS Viewer is mentioned below:
XPS Viewer – FOD Info
Feature name: XPS Viewer
Capability name: XPS.Viewer~~~~0.0.1.0
CAB file name: Microsoft-Windows-Xps-Xps-Viewer-Opt-Package~31bf3856ad364e35~amd64~~.cab
Note
The above CAB file will be present in the
rootfolder of the Windows 10 FOD ISO. Whereas in the Windows 11 FOD ISO, this file is located under theLanguagesAndOptionalFeaturesfolder. - Suppose the FOD ISO’s mounted drive-letter is
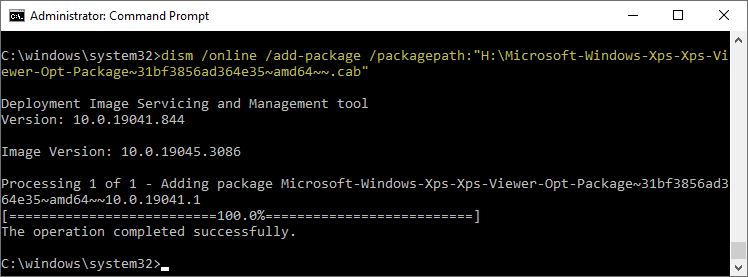
H:\. To install the XPS Viewer FOD component, run the following command:Windows 11
dism /online /add-package /packagepath:"H:\LanguagesAndOptionalFeatures\Microsoft-Windows-Xps-Xps-Viewer-Opt-Package~31bf3856ad364e35~amd64~~.cab"
Windows 10
dism /online /add-package /packagepath:"H:\Microsoft-Windows-Xps-Xps-Viewer-Opt-Package~31bf3856ad364e35~amd64~~.cab"
You’ll see the following output:
Deployment Image Servicing and Management tool
Version: 10.0.19041.844

Image Version: 10.0.19045.3086

Processing 1 of 1 - Adding package Microsoft-Windows-Xps-Xps-Viewer-Opt-Package~31bf3856ad364e35~amd64~~10.0.19041.1
[==========================100.0%==========================]
The operation completed successfully.
That’s it!
One small request: If you liked this post, please share this?
One «tiny» share from you would seriously help a lot with the growth of this blog.
Some great suggestions:
- Pin it!
- Share it to your favorite blog + Facebook, Reddit
- Tweet it!
So thank you so much for your support. It won’t take more than 10 seconds of your time. The share buttons are right below. 
Формат XPS был разработан компанией Microsoft в 2006 году как альтернатива формату PDF. Файлы данного типа основаны на XML (английская аббревиатура XPS расшифровывается как «XML Paper Specification») и представляют собой формат для работы с графическими документами. По сравнению с популярным форматом PDF файлы XPS проще и легче, а еще считаются более безопасными, так как не поддерживают скрипты.
Ввиду того, что XPS не самый распространенный формат документов, у многих пользователей возникает вопрос: в какой программе можно открыть файл этого типа? Мы расскажем о стандартных средствах для просмотра XPS-файлов, имеющихся в операционной системе Windows 10, а также рассмотрим, какими сторонними приложениями можно воспользоваться для этих целей.
Формат XPS поддерживается по умолчанию во всех версиях Microsoft, включая Windows 10. Просмотреть файл этого формата проще всего при помощи стандартного приложения «Средство просмотра XPS».
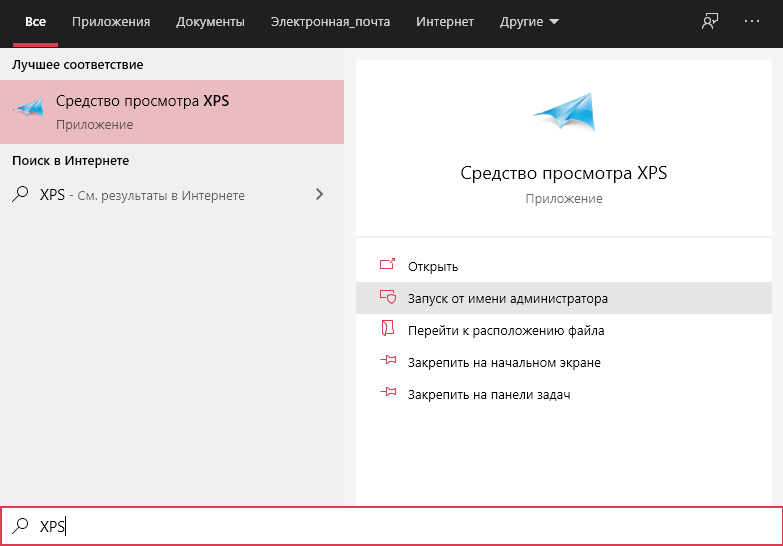
- Для его открытия воспользуемся системным поиском. Нажимаем иконку с лупой в панели задач или клавиши «Windows» + «S». В строке ввода начинаем набирать название программы и, когда оно появится в результатах поиска, кликаем на него.
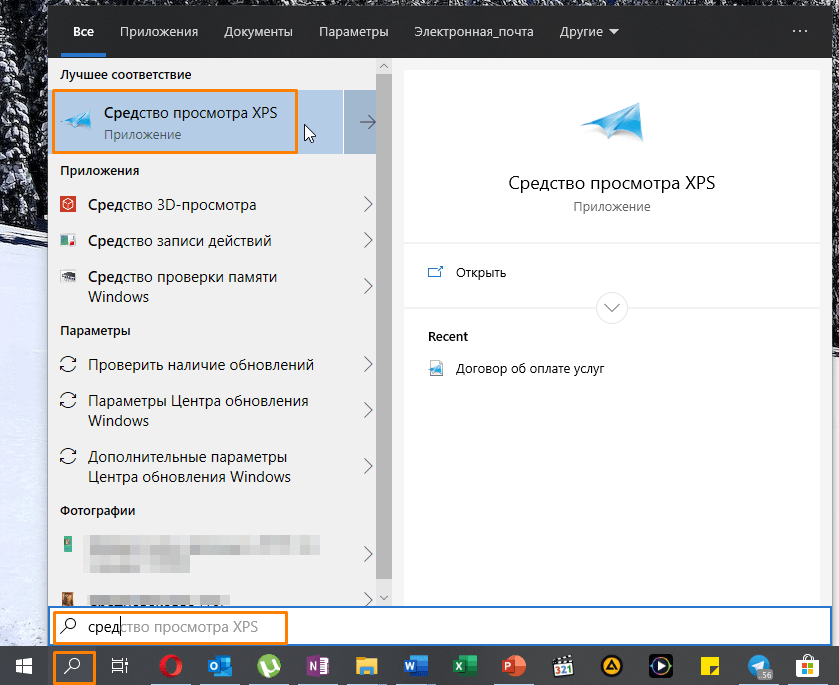
Ищем «Средство просмотра XPS» в Windows 10
- После запуска программы выбираем команду «Файл» — «Открыть».
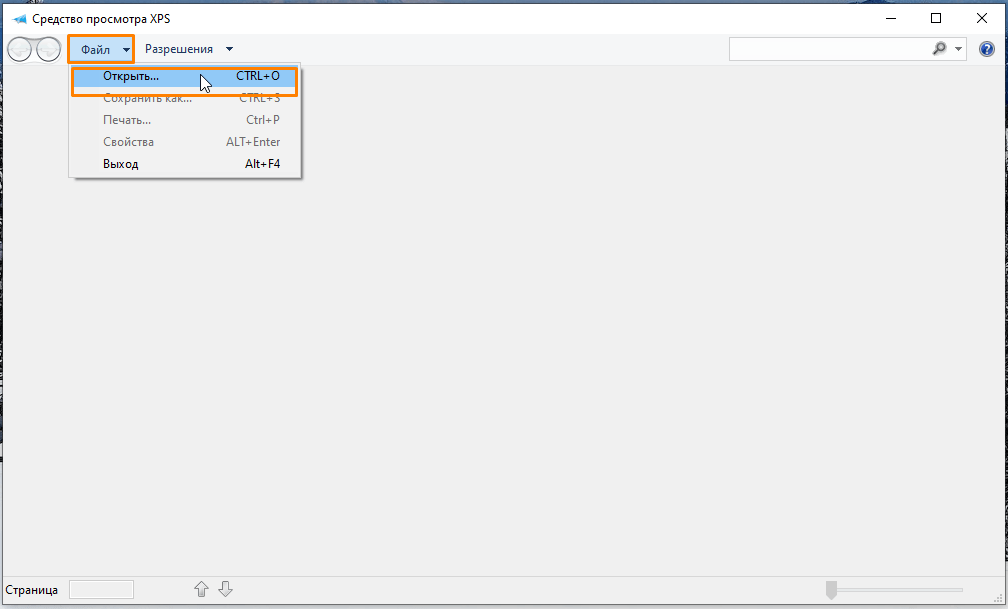
Выбираем команду для открытия документа
- В окне «Открытие» переходим на нужный диск и открываем папку, где хранится искомый XPS-файл, выделяем его и нажимаем кнопку «Открыть».
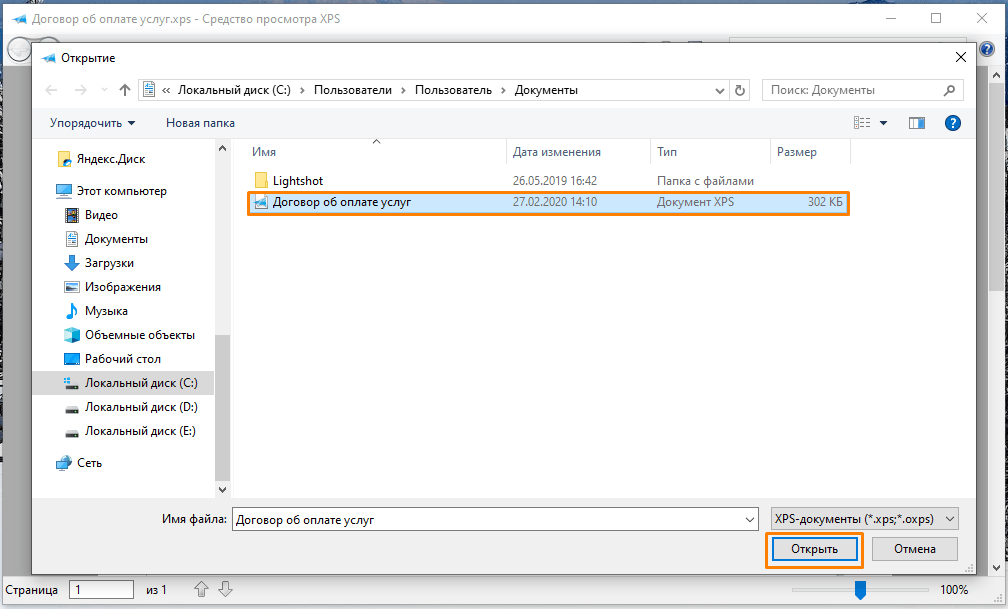
Находим и открываем файл XPS
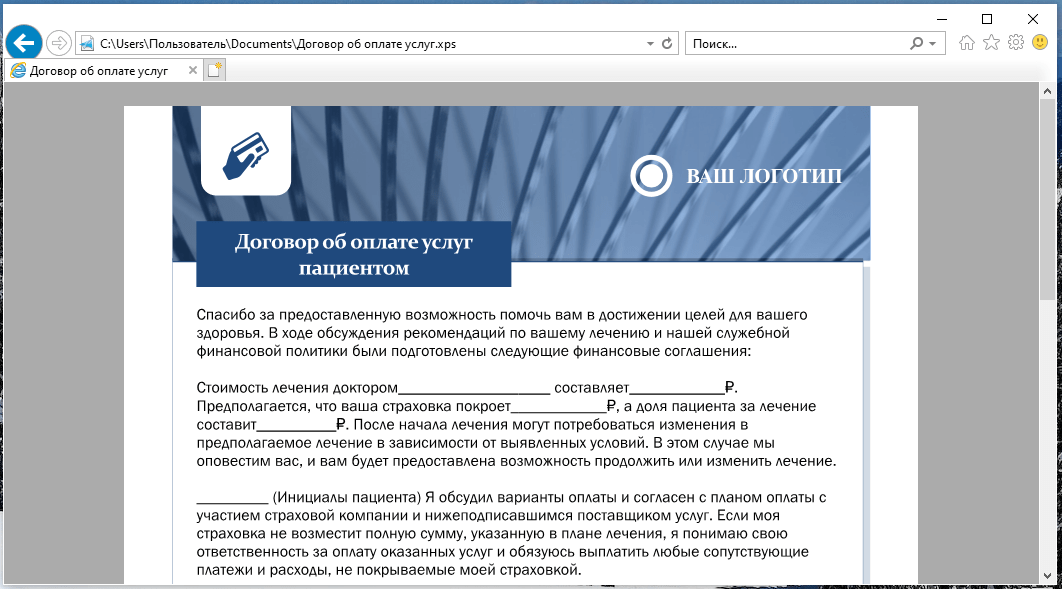
- Выбранный файл отобразится в окне программы «Средство просмотра XPS».
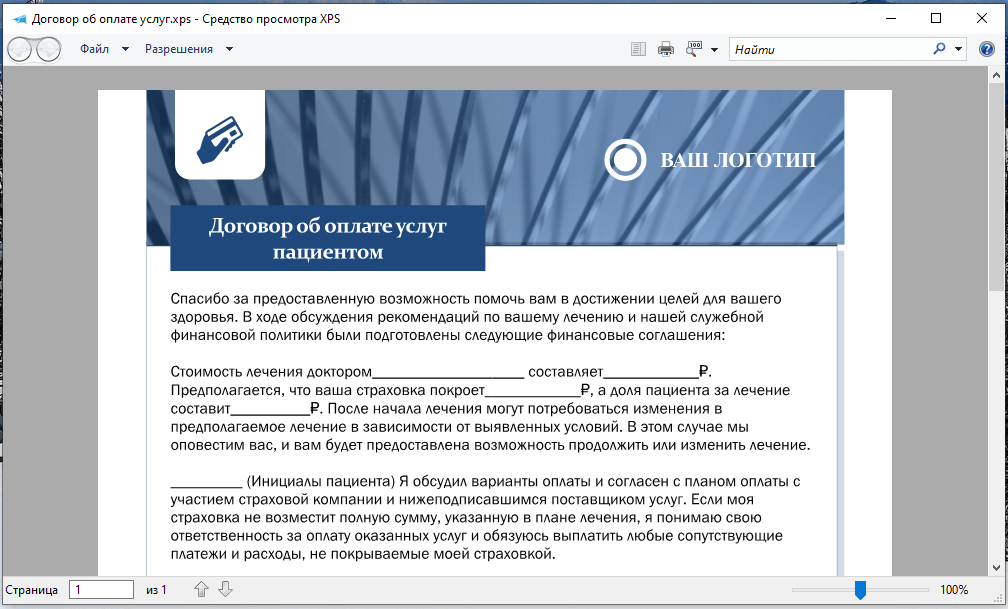
Файл XPS открыт для просмотра
- Если на этапе 1 вам не удалось найти приложение «Средство просмотра XPS», нужно установить его в «Параметрах» Windows. Кликнем правой клавишей мыши на кнопку «Пуск» и выберем в списке пункт «Приложения и возможности».
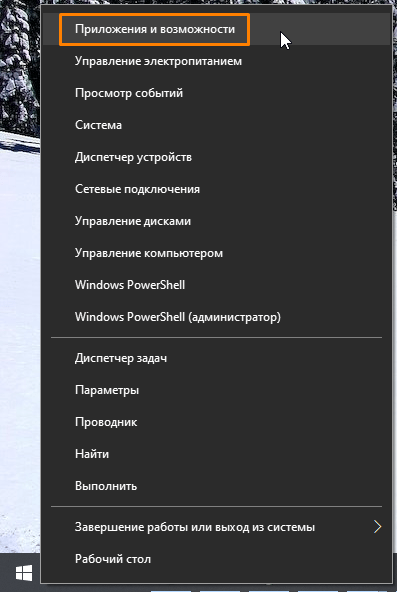
Открываем «Приложения и возможности»
- В открывшемся окне жмем на ссылку «Дополнительные возможности».
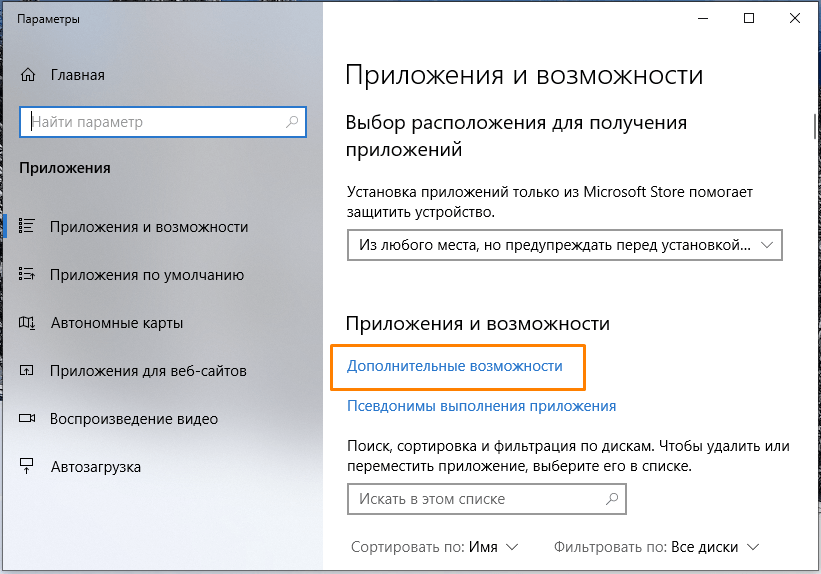
Переходим в категорию настроек «Дополнительные возможности»
- Пролистываем список до пункта «Средство просмотра XPS», кликаем на него и нажимаем кнопку «Установить». Теперь приложение «Средство просмотра XPS» будет доступно.
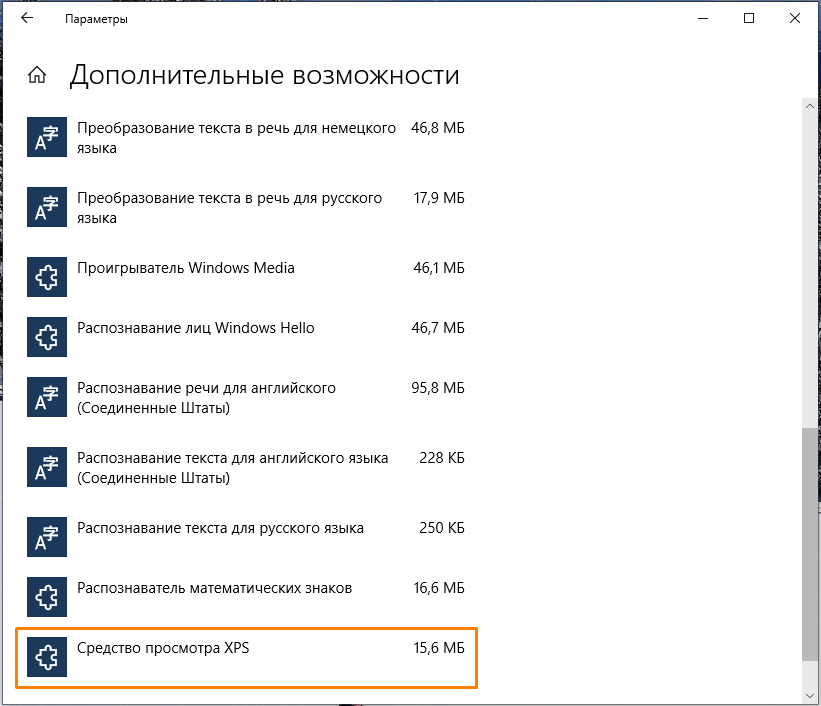
Находим и устанавливаем приложение «Средство просмотра XPS»
Браузер «Internet Explorer»
Во всех версиях Windows имеется стандартный веб-браузер «Internet Explorer», который при наличии в системе установленного компонента «.NET Framework» версии 3 или выше также можно использовать в качестве средства просмотра файлов XPS.
- Ищем «Internet Explorer» через системный поиск, описанным ранее способом, и запускаем браузер.
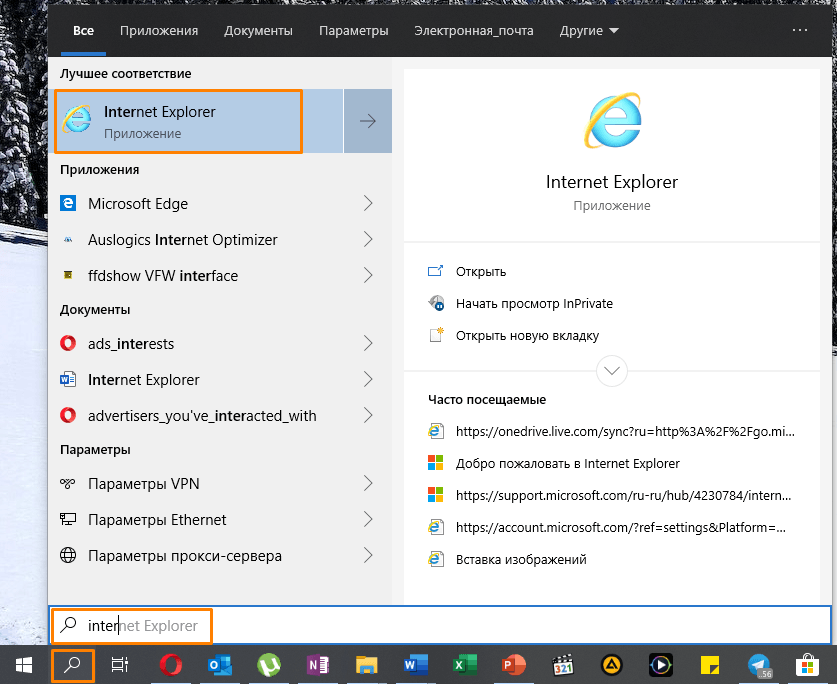
Находим «Internet Explorer» через системный поиск
- Вы можете просто перетащить XPS-файл из окна «Проводника» Windows в окно браузера.
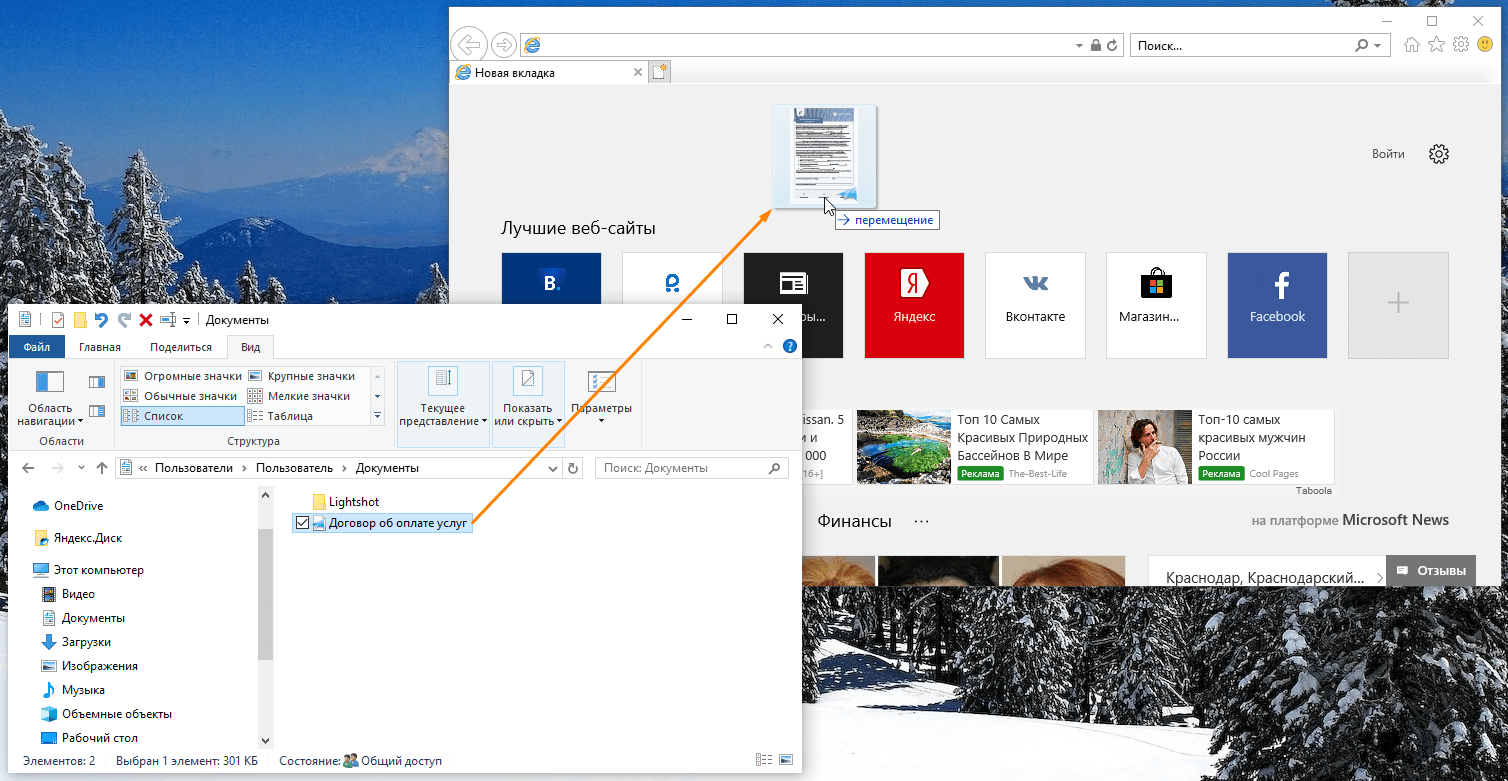
Открываем XPS-файл в «Internet Explorer»
Просматриваем файл XPS в браузере
Программы из магазина приложений «Microsoft Store»
Многие приложения для работы с форматом PDF позволяют открывать и XPS-файлы. Большой выбор таких программ представлен в официальном магазине приложений Windows 10 «Microsoft Store».
- Кликаем на файл XPS в «Проводнике» Windows правой кнопкой мыши и выбираем в его контекстном меню команду «Открыть с помощью».
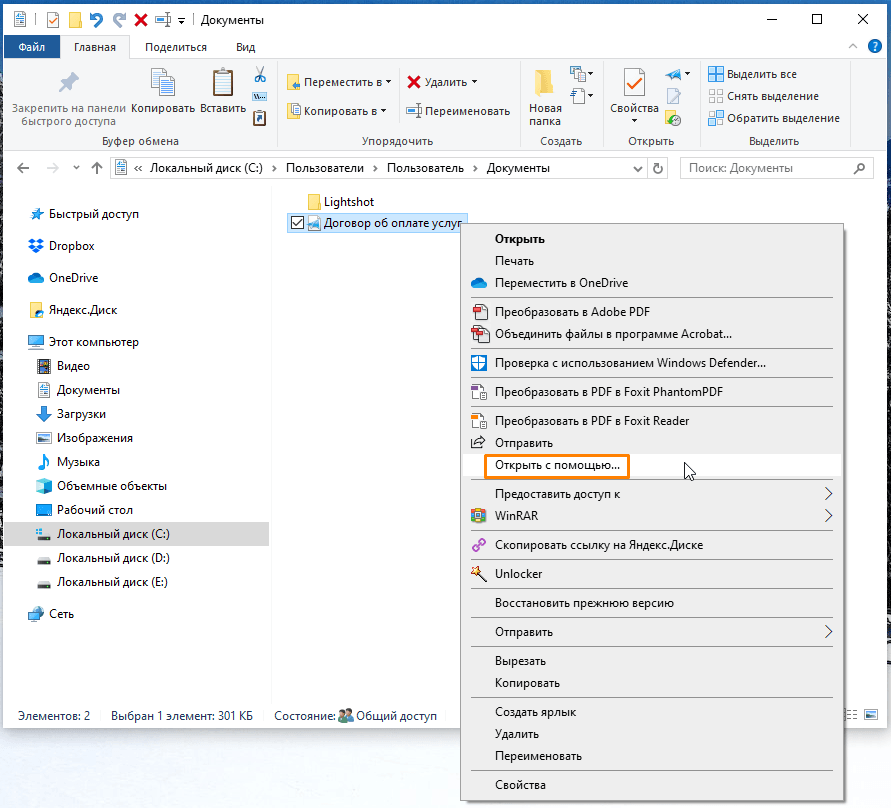
Кликаем команду «Открыть с помощью»
- Далее указываем, что для открытия этого файла мы хотим найти приложения в «Microsoft Store», и нажимаем кнопку «ОК».
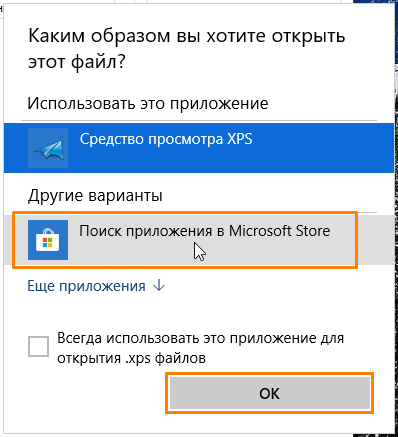
Выбираем «Поиск приложения в Microsoft Store»
- Запустится магазин приложений с подборкой программ, поддерживающих формат XPS. Выбираем одну из них, например, «Perfect PDF Reader».
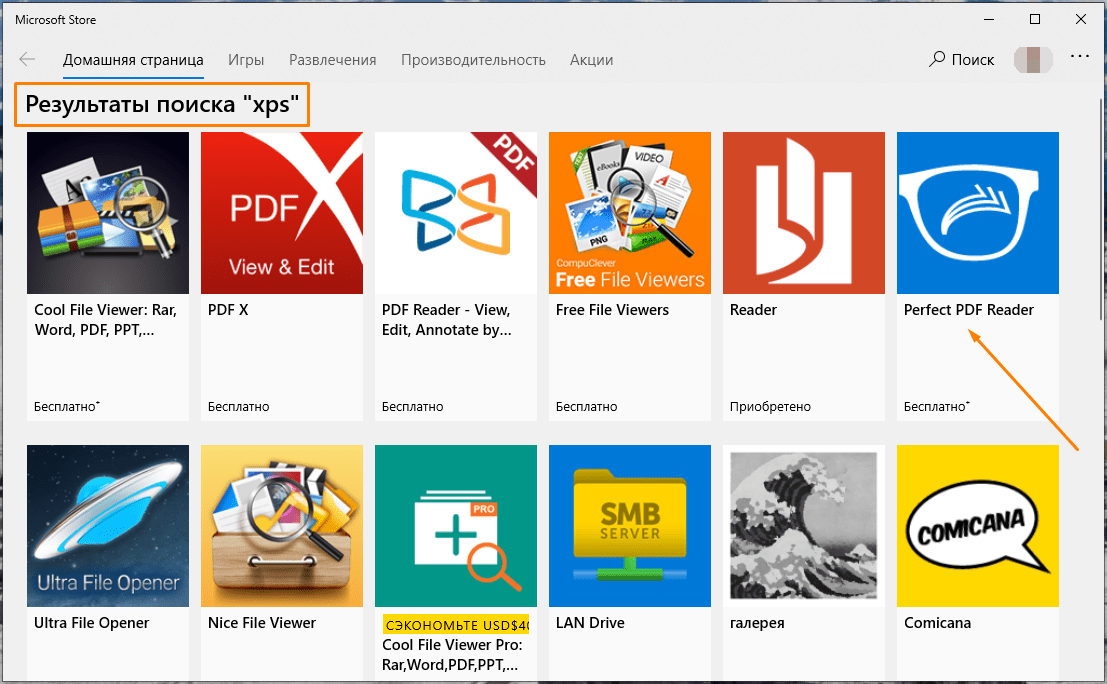
Выбираем одну из программ из результатов поиска «XPS»
- В описании программы указаны форматы, с которыми она работает. Для установки приложения нажимаем кнопку «Получить».
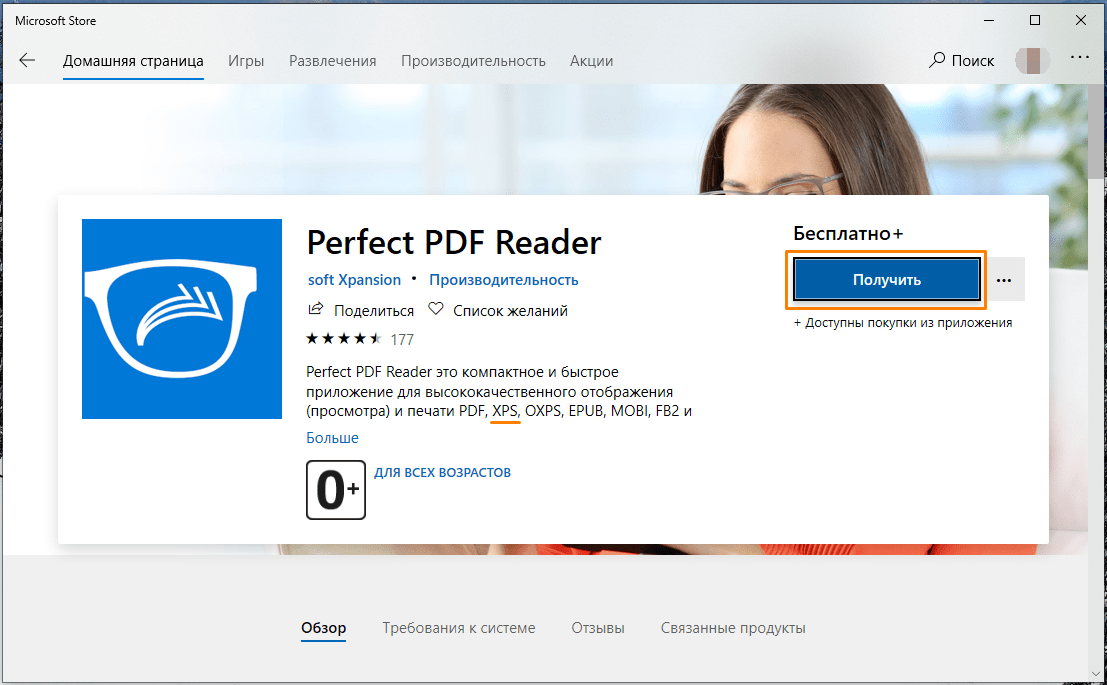
Жмем на кнопку «Получить» для скачивания и установки приложения
- После окончания установки становится доступной кнопка «Запустить».
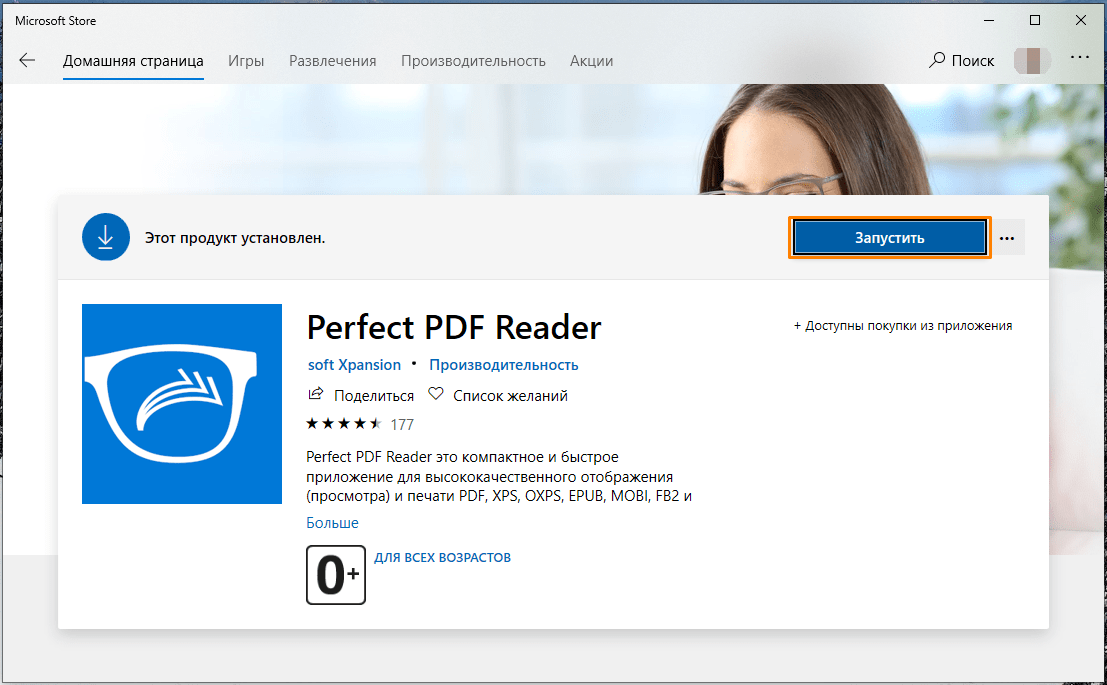
Запускаем установленное приложение
- В окне программы «Perfect PDF Reader» кликаем на стрелку в кружке, а затем на появившейся слева панели выбираем команду «Открыть».
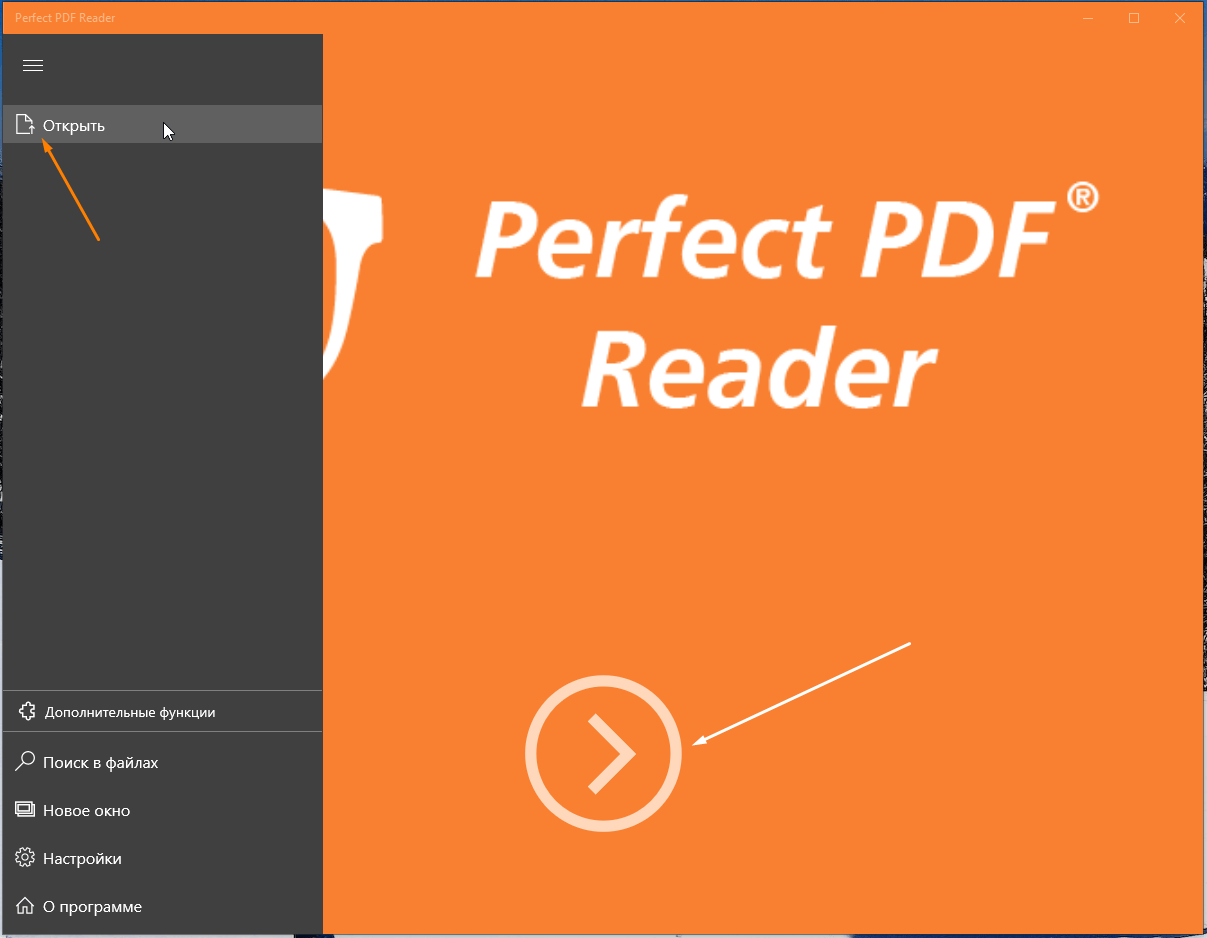
Выбираем команду «Открыть»
- Переходим к расположению нужного файла в формате XPS и дважды кликаем по нему. Файл откроется в окне программы «Perfect PDF Reader».
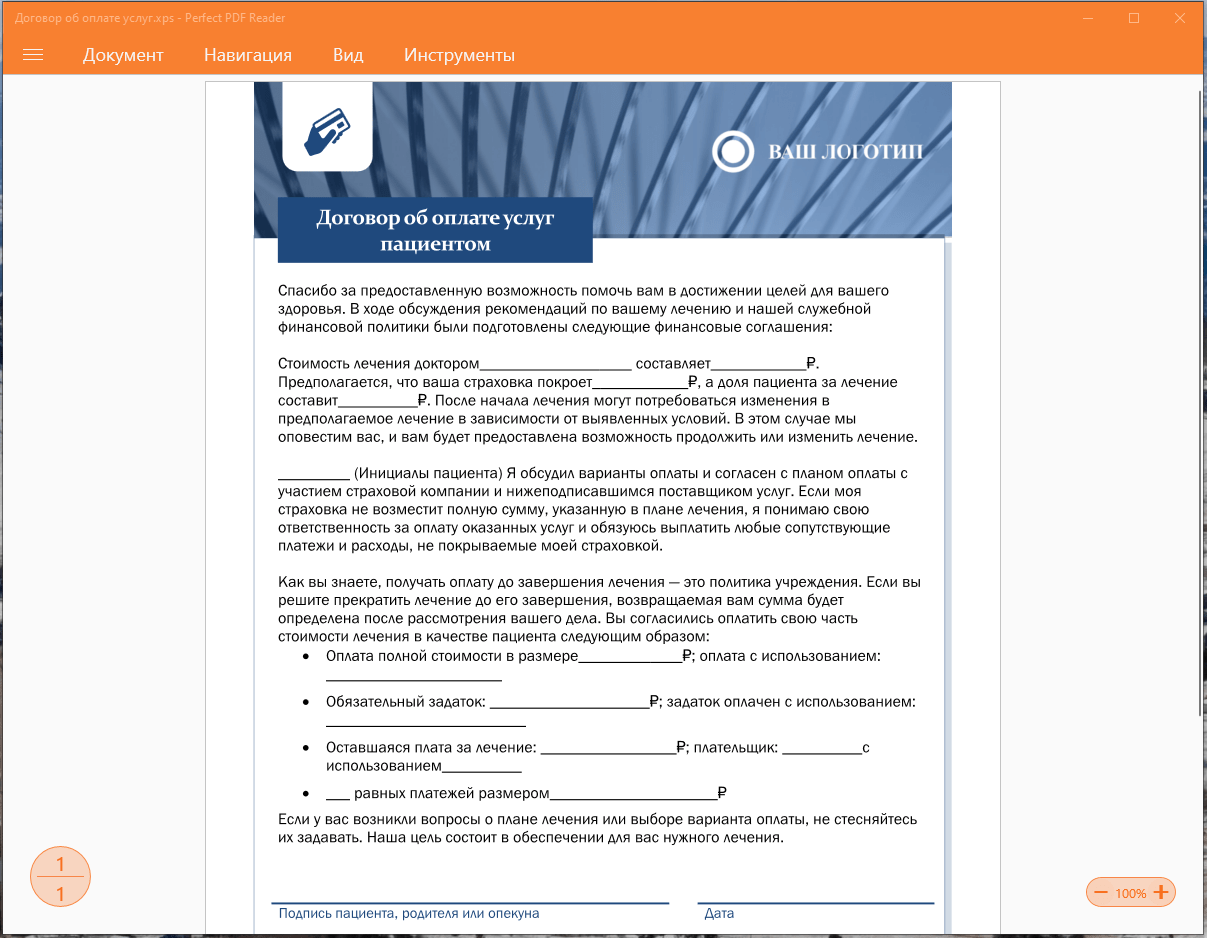
Просматриваем XPS-файл в приложении «Perfect PDF Reader»
Мы разобрали три способа открытия файлов XPS в Windows 10 — в вашем распоряжении как стандартные средства просмотра, так и сторонние приложения.
![]() Загрузка …
Загрузка …
Post Views: 23 858
Непосредственно Майкрософт предложили альтернативу классическим PDF. Файл XPS представляет собой основанный на XML формат для работы с графическими документами. В сравнении с PDF файл XPS является более лёгким. Поддержка данного формата по умолчанию присутствует во всех версиях системы включительно до Windows 10.
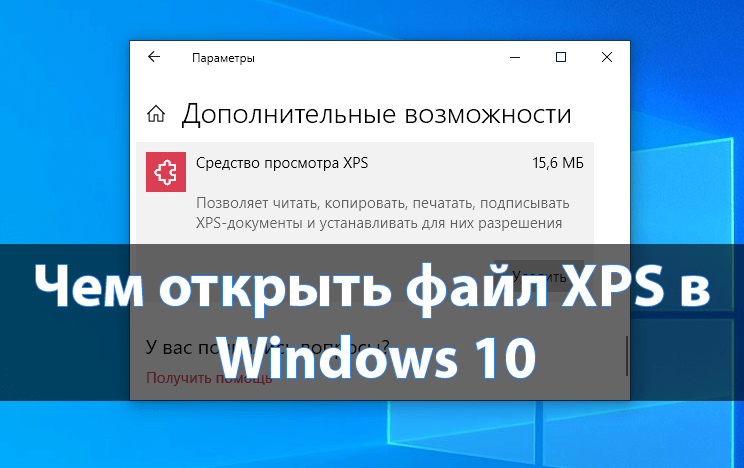
Эта статья расскажет, чем открыть файл XPS в Windows 10. Для их просмотра используется уже установленное средство просмотра XPS. Теперь же пользователям придётся его включить в компонентах начиная с версии 1803 Windows 10. Расположение программ и компонентов было несколько перенесено в обновлённые параметры системы.
XPS Viewer (средство просмотра) уже давно использовалось для просмотра файлов XPS. Оно позволяет читать, копировать, печатать, подписывать XPS-документы и устанавливать для них разрешения. После обновления операционной системы его нужно будет включить в разделе программы и компоненты Windows 10.
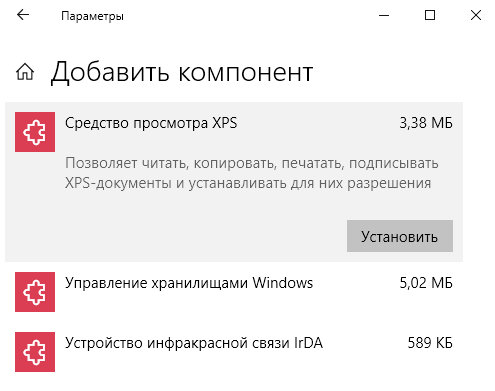
Параметры системы
Перейдите в расположение Параметры > Приложения > Приложения и возможности > Дополнительные возможности. Теперь нажмите Добавить компонент и выделив Средство просмотра XPS ткните Установить.
Важно! Расположение программ и компонентов в разных версиях операционной системы может незначительно отличаться. Так как дополнительных компонентов немало, возможность их установки точно есть.
Командная строка
В принципе можно воспользоваться классической командной строкой, запущенной от имени администратора. В открывшемся окне достаточно выполнить команду: DISM /Online /Add-Capability /CapabilityName:XPS.Viewer~~~~0.0.1.0.
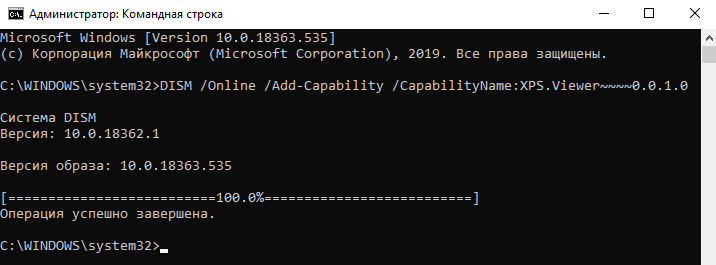
Дождитесь завершения процесса установки выбранного компонента. Будьте внимательны, для установки компонентов нужно подключение к Интернету. Если же нужного компонента нет в системе, он будет загружен с сервером Майкрософт.
Как открыть файл XPS в Windows 10
Теперь можно запустить XPS Viewer, выполнив команду: xpsrchvw.exe в окне Win+R. При необходимости используя поиск найдите приложение Средство просмотра XPS.
В открывшемся окне средства просмотра нажиме Файл > Открыть. В проводнике укажите расположение и выберите XPS-документ. В принципе можно используя контекстное меню открыть с помощью выбрать нужное приложение.
Большинство классических приложений для работы с PDF позволяют открыть файл формата XPS. Дополнительно не составит проблем возможность выполнения конвертации неизвестного XPS в привычный PDF. Для быстрой конвертации можно воспользоваться онлайн-сервисами или соответствующим программным обеспечением.
Например, популярный STDU Viewer умеет просматривать файлы в формате XPS. А также Internet Explorer 11 позволяет просматривать XPS-файлы, если установлен компонент NET Framework 3.5 для Windows 10.
Заключение
Документ содержит данные, записанную в формате XPS (XML Paper Specification). Этот формат может содержать метки, а также данные, необходимые для печати документа. Файл формата XPS похож на файл .PDF, но основан уже на XML вместо PostScript.
Для просмотра содержимого XPS-документа можно воспользоваться стандартными средствами операционной системы. Дополнительно можно использовать и множество сторонних программ: классических для рабочего стола и доверенных с Microsoft Store.
(2 оценок, среднее: 5,00 из 5)
Администратор и основатель проекта Windd.pro. Интересуюсь всеми новыми технологиями. Знаю толк в правильной сборке ПК. Участник программы предварительной оценки Windows Insider Preview. Могу с лёгкостью подобрать комплектующие с учётом соотношения цены — качества. Мой Компьютер: AMD Ryzen 5 3600 | MSI B450 Gaming Plus MAX | ASUS STRIX RX580 8GB GAMING | V-COLOR 16GB Skywalker PRISM RGB (2х8GB).
Wondering how to enable XPS Viewer on Windows 10?
XPS is a file format similar to PDF that Microsoft released with the Windows Vista update in 2007. There wasn’t a big difference between the two in terms of features and interface, except that PDF offers enhanced portability.
Unfortunately, not many people were fans of XPS, and the company eventually abandoned the format. With the Windows 10 version 1803 update, users could no longer view XPS files unless the computer was upgraded from version 1709.
So, if you’ve set up a new device or performed a clean installation, XPS Viewer would not be available on your computer anymore. Lucky for you, we’ve compiled a list of methods to reinstall or enable the app even if Windows no longer supports it.
So, let’s get to it right away!
1. Enable XPS Viewer on Windows 10 via Settings.
You need dedicated viewing software to read, print, or change the permissions of any file format. Since the latest system update has disabled the XPS Viewer, you’d have to reinstall it to view such files on your computer again.
Here’s how you can do that using Windows Settings:
- First, press Windows+i on your keyboard or type ’settings’ on the search bar to enter Settings.
- Now, from the multiple options appearing on your screen, select Apps.
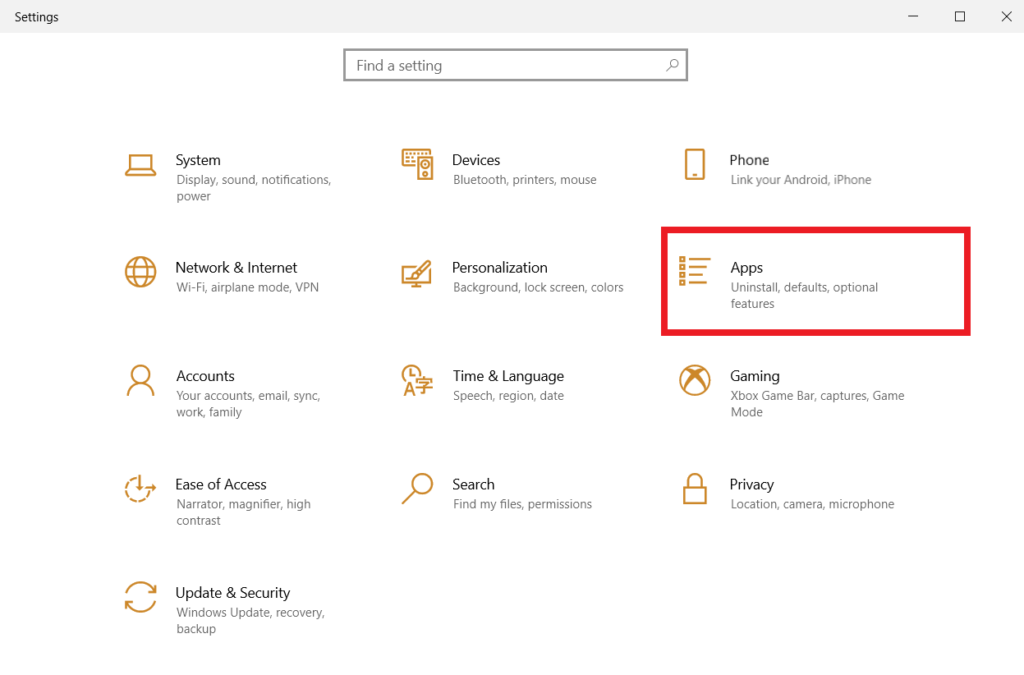
- From the panel on the left side, click on Apps & features tab.
- From there, go to Optional Features under Apps & features on the right panel.
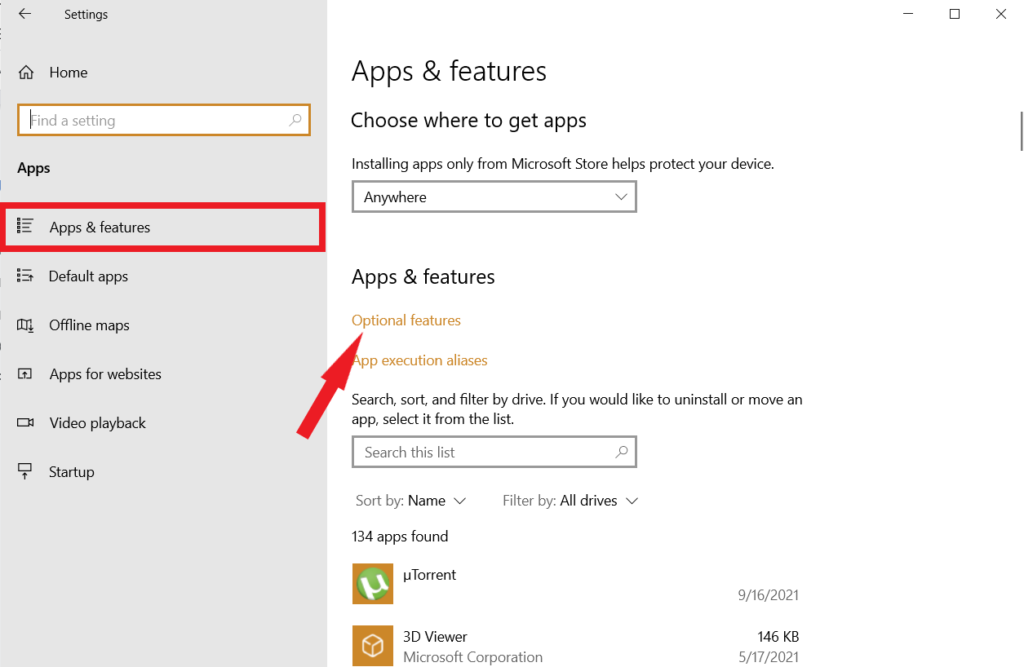
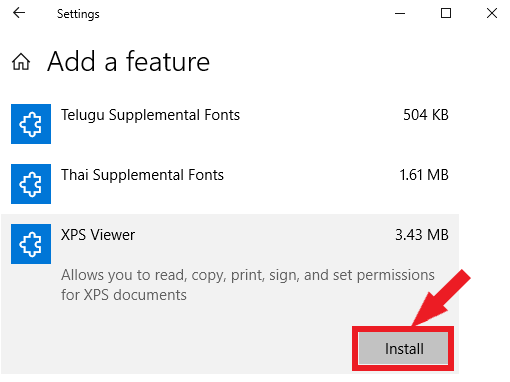
- Then, you’ll come across a list of features already enabled on your computer with an Add a feature option at the top-left corner of the window. Click on it.
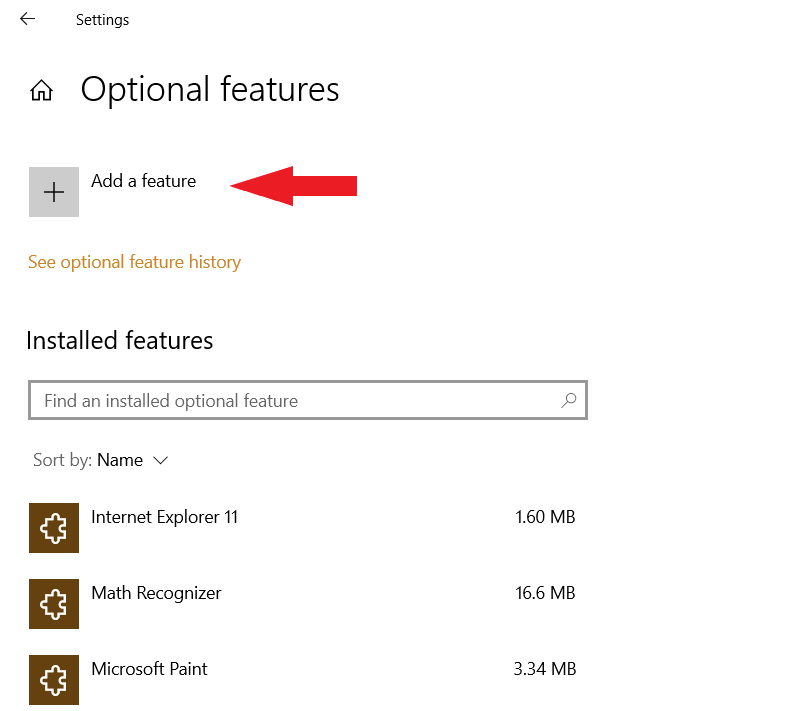
- Use the search bar or scroll down to find XPS Viewer, then select it.
- Finally, click the Install button, and your computer will start downloading the feature.
Once downloaded, you should be able to open an XPS or OXPS file easily.
2. Use Command Prompt To Enable XPS Viewer.
Sometimes, users are unable to find the XPS Viewer listed when scrolling through the list of features in the Settings. Other times, the feature fails to install on your computer.
Whatever the reason, you don’t have to worry. Another method to enable XPS Viewer on Windows 10 is done through the Command Prompt. To do so, you’ll need to run the software as an administrator.
Here are the steps you need to follow:
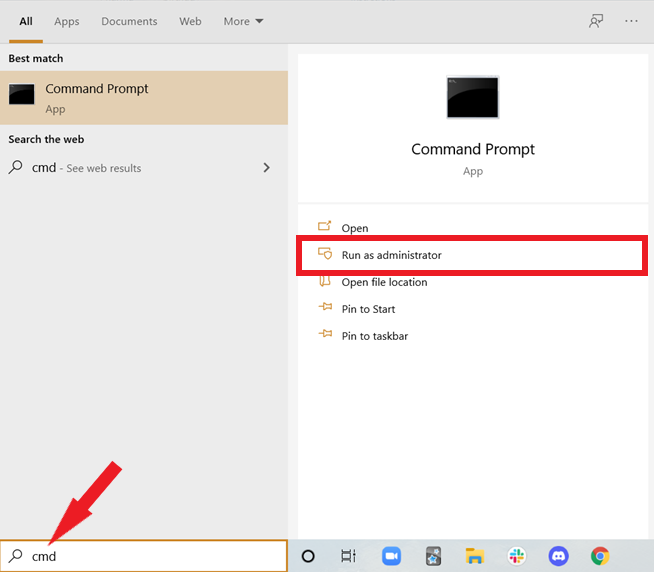
- To begin, open the Start menu by clicking on the Windows icon located at the bottom-left of the screen or by pressing the Windows key on your keyboard.
- Now, type cmd in the search bar.
- Then, click on the Run as administrator option to run the app under full rights.
- When the Command Prompt window opens, type the following command and press Enter.
Dism /Online /Add-Capability /CapabilityName:XPS.Viewer~~~~0.0.1.0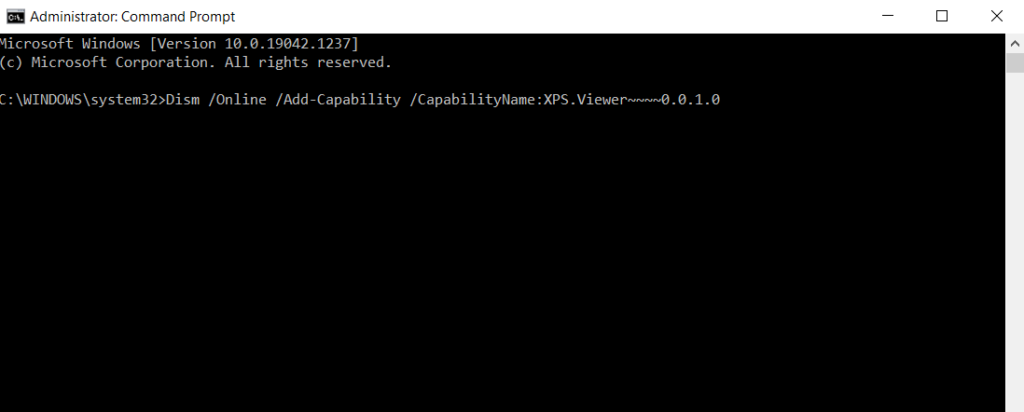
After that, XPS Viewer should get installed on your computer.
3. Use Windows Powershell To Enable XPS Viewer.
If you’re an old Windows user, you must be familiar with Windows PowerShell. It was first released in 2006 and is quite similar to Command Prompt. You can use this automation software to enable XPS Viewer.
Simply input the required command in the associated scripting language to perform the task.
These are the steps you should follow:
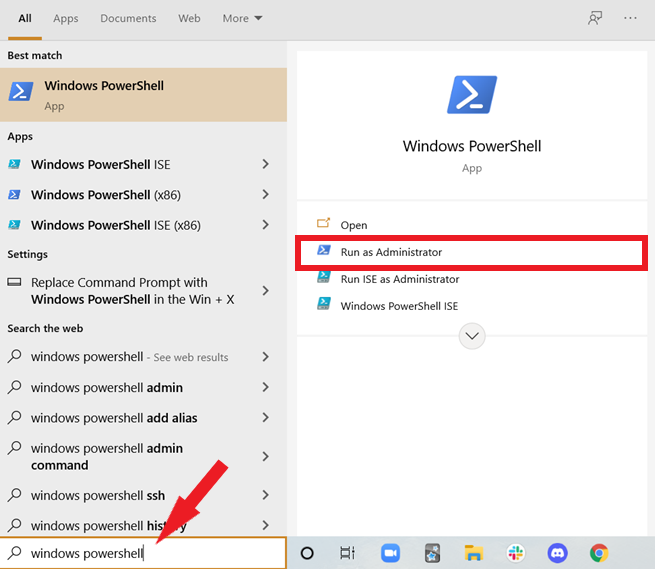
- Start by pressing Windows key+i or directly click on the Search Bar at the bottom left of the screen.
- Then, type Microsoft Powershell so that a list of options appears on the right panel.
- From there, click on Run as administrator since you need special permissions to perform tasks.
- When the app opens and you come across the PowerShell console, type the following command:
dism / Online / Add-Capability /CapabilityName:XPS.Viewer~~~~0.0.1.0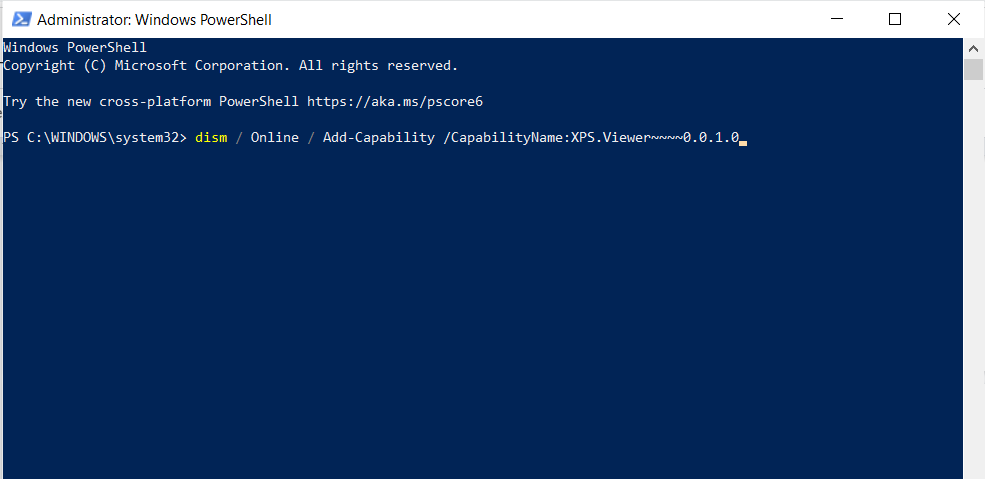
- Finally, press Enter to begin the installation.
XPS Viewer will then be downloaded on your computer and can easily be accessed on the Desktop.
4. Enable XPS Viewer From Windows Update.
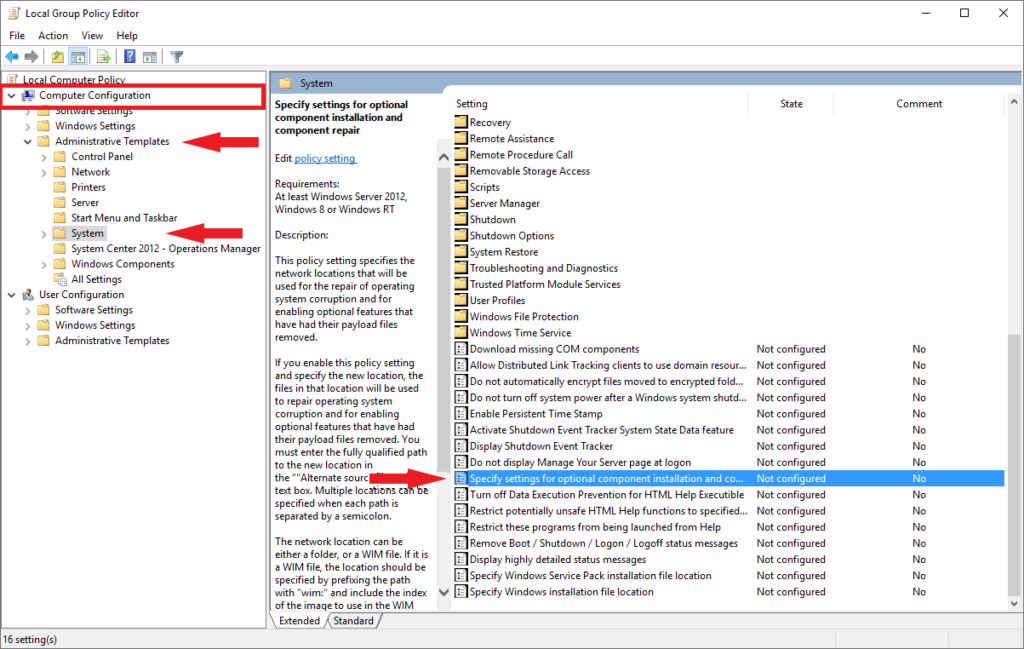
If your computer has Windows 10 Pro or Windows Enterprise, the method to install XPS Viewer can be pretty different. Moreover, you’ll need to alter a few more settings in the Group Policy Editor if the computer you’re using belongs to a domain.
This is what you need to do:
- To start, type ’Run’ in the search box and click Open. You can also press the Windows key and R simultaneously as a shortcut.
- When the Run command box opens, type gpedit.msc and click OK.

- Scroll down the left pane and click on the drop-down arrow of Computer Configuration.
- Now, click on Administrative Templates and then on System.
- Then, select Specify settings for optional component installation and component repair on the right pane.
- In the next window, select Enabled and check the box that says Download repair content and optional features directly from Windows Update instead of Windows Server Update Services (WSUS).
- Finally, click on Apply, then OK, and restart your computer.
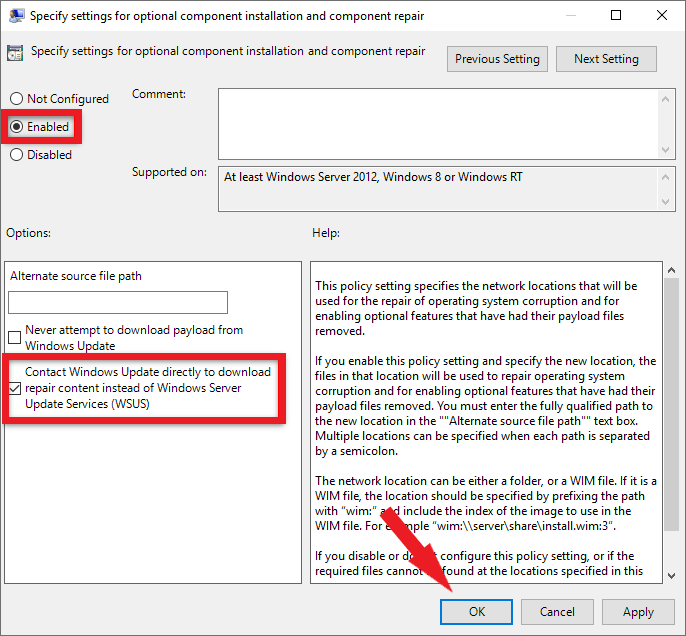
You can then install the XPS Viewer like you would on any other computer with Windows 10.
5. Use Microsoft XPS Document Writer (MXDW).
Microsoft XPS Document Writer is a driver installed in Windows OS. You can use this to protect the XPS files’ content and print the documents even when Microsoft doesn’t support the format.
You need to enable the driver manually by following the steps below:
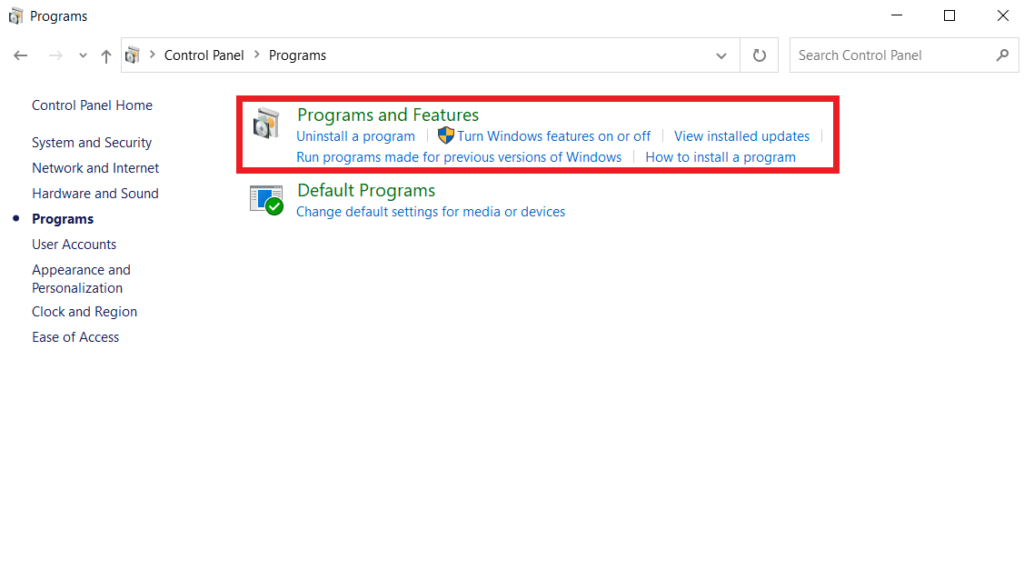
- First, type ’Control Panel’ in the search bar and click Open.
- Then, select Programs at the bottom-left of the window.
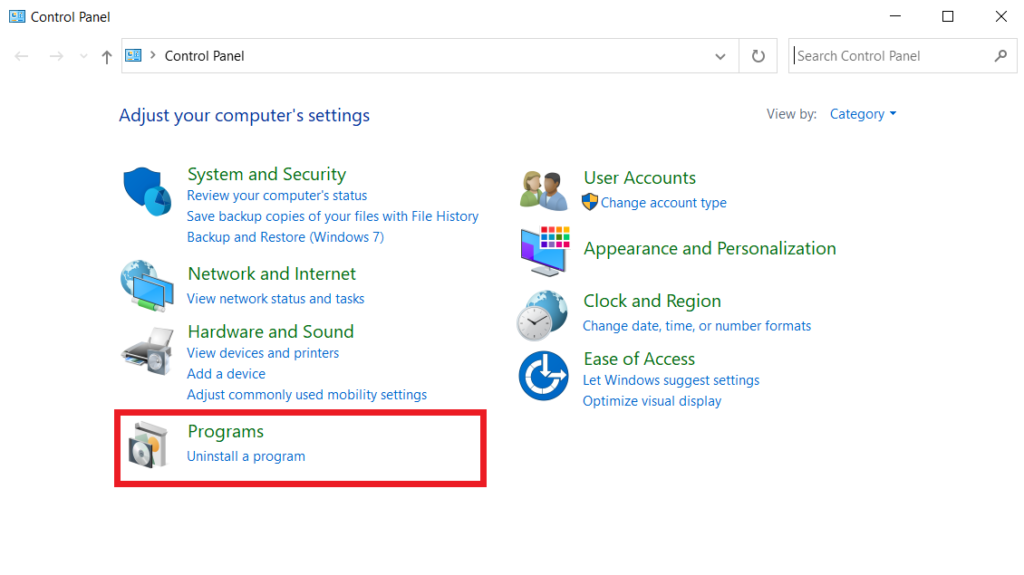
- From there, go to Programs and Features.
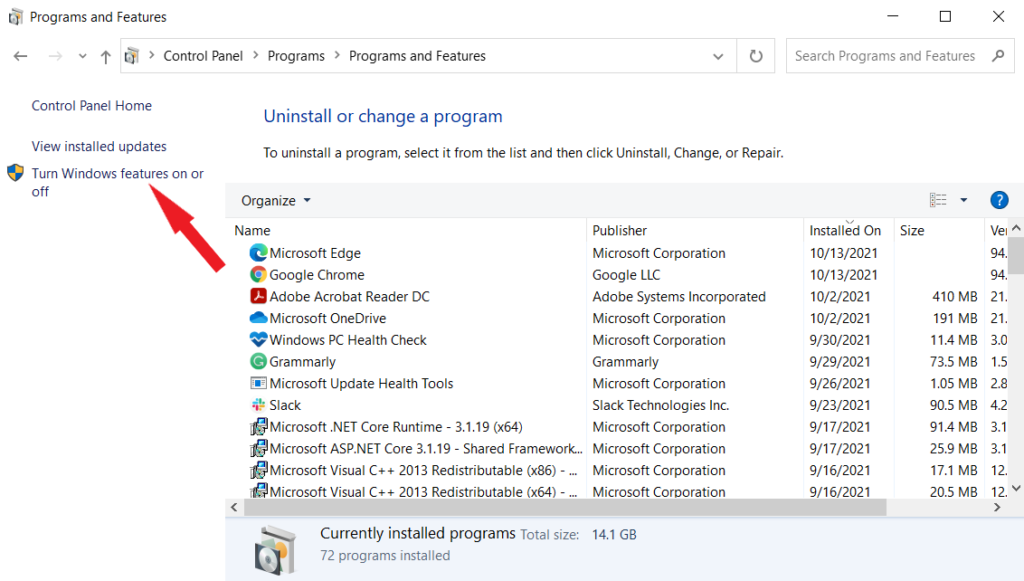
- Now, from the left pane, select Turn Windows Features on or off.
- Finally, a pop-up window will open. Scroll down and check the box next to Microsoft XPS Document Writer and click OK.
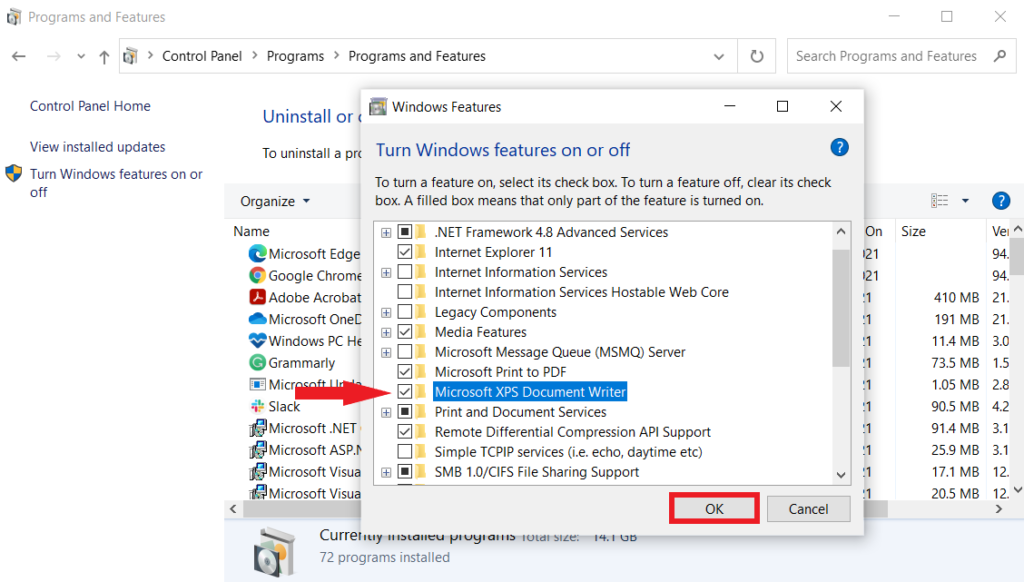
It will take only a couple of seconds for the MXDW to get installed. After that, a Print to XPS option will appear in print pages, and you can select it to save files in XPS format.
6. Use PDF Converter.
Although Microsoft no longer supports the XPS Viewer, you can still easily install it using one of the above methods. However, since there will be no more maintenance or updates on the program, it’s better to convert your XPS files to PDF format, so they remain readable even if the XPS Viewer crashes.
Here’s how to do it:
- First, right-click on the file you wish to convert and select Open with XPS Viewer.
- Then, click on the Printer icon at the top panel or press Ctrl+P on your keyboard.
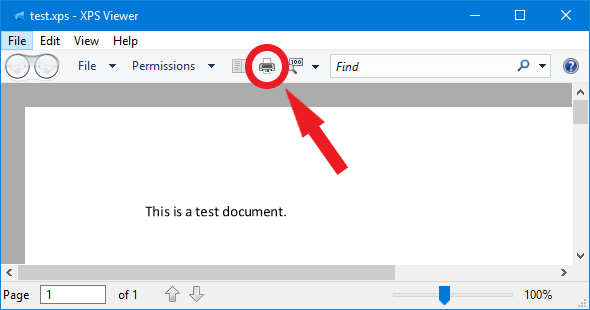
- A selection box will then appear on your screen. From there, in the General tab, go to Microsoft Print to PDF under Select Printer.
- Lastly, click the Print button.
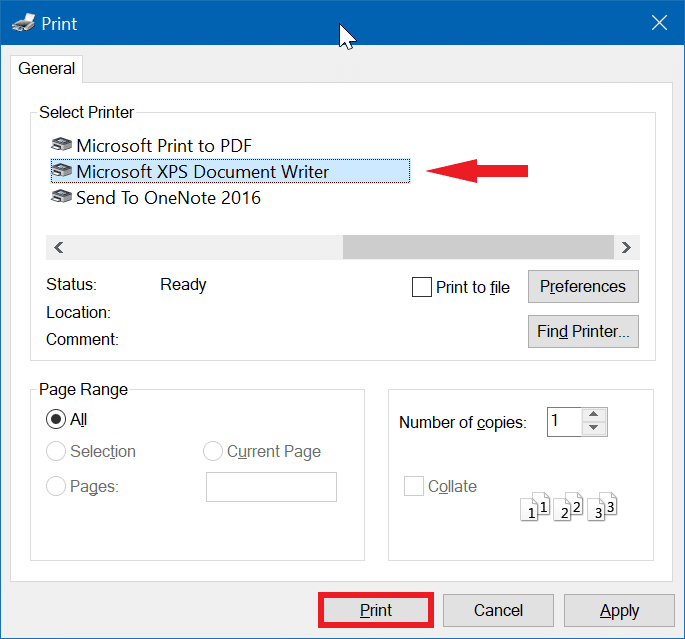
This will convert the format of your XPS file to PDF. Repeat the steps to convert the remaining files on your computer.
There you have it! A complete guide on how to enable XPS Viewer on Windows 10. Hopefully, at least one of the methods has proven to be successful. If you still have any confusion, leave a comment down below, and we’ll do our best to help you through it.
If this guide helped you, please share it. 🙂
-

Aimen Choudhry is an architecture student who has always been fascinated by science. She now finds her therapy researching and writing about the latest technology and the issues that come alongside. Otherwise, you’ll find her playing video games, listening to music, or watching fantasy/sci-fi movies.
