Mac owners often need to run their favorite Windows applications that are not supported on macOS. However, it is possible to do so if Windows is installed on the Mac computer. There are three common methods to run Windows on a Mac computer: use Parallels Desktop, install Windows on the Boot Camp partition, or install Windows on a VirtualBox VM or VMware Fusion VM.
This blog post explains how to install Windows 10 as a guest OS on a macOS virtual machine using VMware Fusion and combine the advantages of both Windows and macOS operating systems.
Requirements
Before proceeding with installing VMware Fusion, check system requirements. In this section, I list the requirements for VMware Fusion 12, the latest version at the time of writing this blog post. If your macOS version is older than 10.5 Catalina, install an older VMware Fusion version supported by your macOS.
Requirements for VMware Fusion 12:
- A Mac computer manufactured in 2011 or later (except 2012 Mac Pro Quad Core with the Intel Xeon W3565 Processor); 2010 Mac Pro Six Core, Eight Core, and Twelve Core with a graphics card that supports Metal.
- Processor (CPU) architecture must be Intel x86-64
- 4 GB of memory, but we recommend at least 8 GB of memory to install VMware Fusion on macOS. Keep in mind that you need more RAM to run VMware guest operating systems. Windows 10 running as a guest OS requires at least 4 GB of RAM.
- 750 MB of free disk space to install VMware Fusion and additional disk space to store virtual machine files.
- Your macOS must be compatible with the VMware Fusion version you are going to install. VMware Fusion 12 can be installed on macOS 10.15 Catalina and macOS 11.0 Big Sur.
- The ISO installation image of Windows 10.
Preparing the Environment
I’m using macOS 10.15 Catalina as the host operating system and Windows 10 20H2 Professional x64 as the guest operating system in the tutorial.
What is a guest operating system? The difference between host and guest operating systems is that a host OS is installed on the hardware, and a guest OS is running on a virtual machine that uses virtualized hardware. I’m using VMware Fusion 12.1.0 as a VMware hypervisor to run a Windows 10 VM on macOS.
You can download the VMware Fusion 12 installer from the official VMware website.
You can download the installation ISO image of Windows 10 from the Microsoft website.
In my case, I have a separate disk partition to store installation files and virtual machines on Mac. The name of this disk partition is disk_d. You can create a separate partition or create custom folders in your home user folder to store installation files and virtual machines.
For convenience, I’ve renamed installation files to avoid using long names. In my tutorial, the names of the installation files are:
VMware Fusion: VMwareFusion12-1-0.dmg
Windows 10: windows_10_20h2_x64.iso
Now we are ready to start installation and configuration.
Installing VMware Fusion
Boot macOS on your Mac. Locate the VMware Fusion installation file in Finder, and double click this file to open the installer (in my case – VMwareFusion12-1-0.dmg). Wait until the installer opens.

When you see the VMware Fusion installer window, double click the corresponding icon to install VMware Fusion.

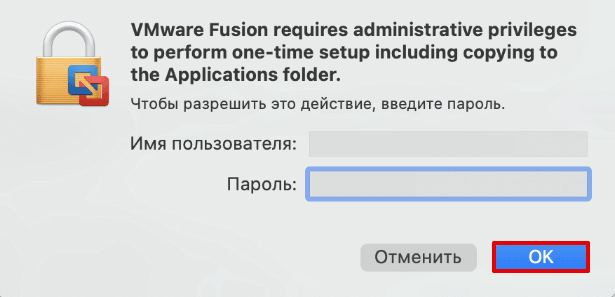
Enter the credentials of your macOS user account to grant administrative privileges to the installer, and hit OK to continue.

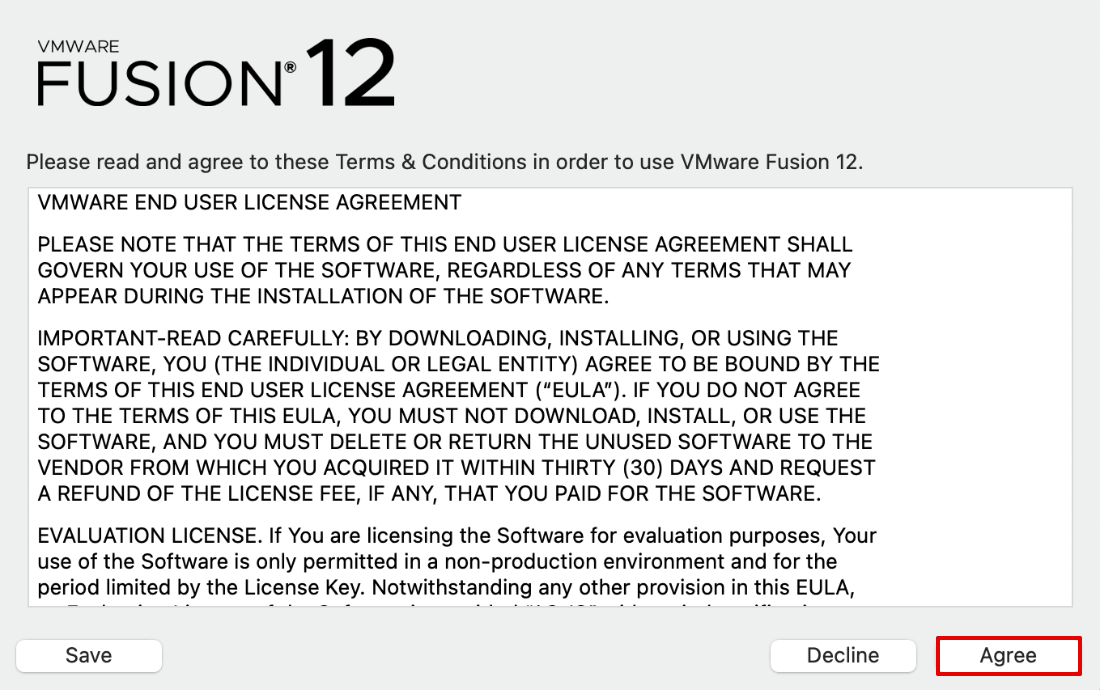
Read the End User License Agreement (EULA), and click Agree to continue.

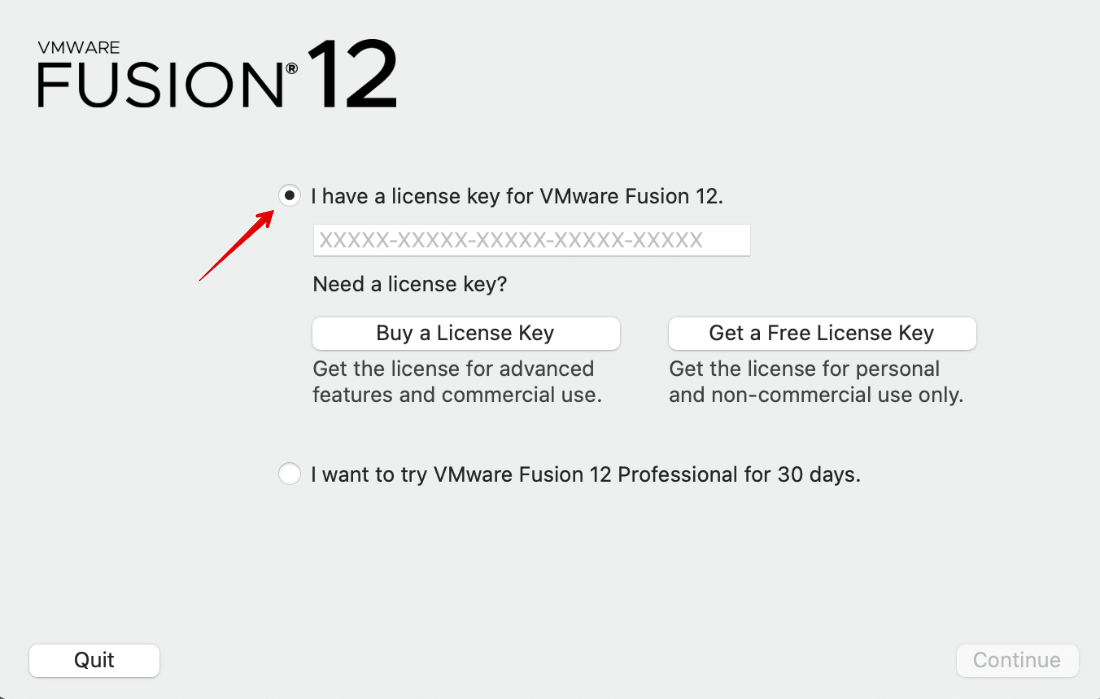
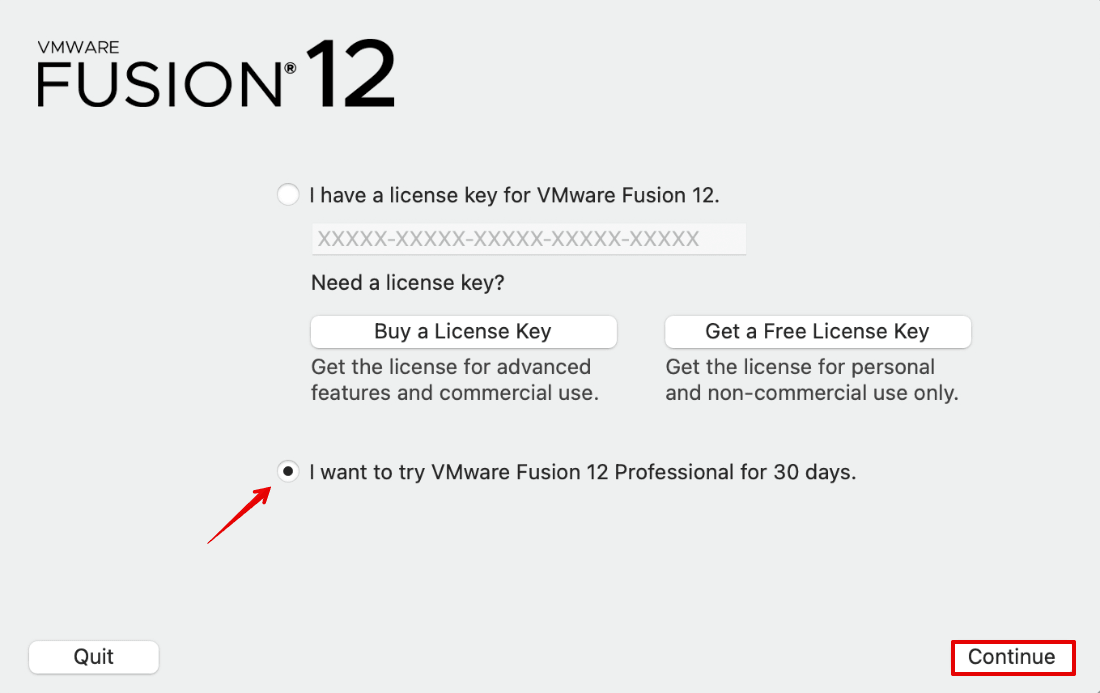
Define the license options to install VMware Fusion on macOS. If you don’t have a license key, select the second option: I want to try VMware Fusion 12 Professional for 30 days.
If you have a license key for VMware Fusion or VMware Fusion Pro, select the option I have a license key for VMware Fusion 12 and enter your license key. If the key is valid, the corresponding green icon appears. You can also enter a license key after finishing the installation in the graphical VMware Fusion user interface. In my case, I’m using a license key for VMware Fusion Pro.
Click Continue to proceed.

The macOS security notification messages pop up. You have to allow all access needed for macOS VMware Fusion to work properly.
“VMware Fusion” wants access to control “System Events”. Allowing control will provide access to documents and data in “System Events”, and to perform actions with that app.
Click OK.
Unable to access Accessibility. For optimal performance of your keyboard and mouse inside your virtual machine, give VMware Fusion access to your system’s accessibility features. If you do not give this access now, you can go to the Security & Privacy System Preferences later.
Click OK.
“VMware Fusion” would like to control this computer using accessibility features. Grant access to this application in Security & Privacy preferences, located in System Preferences.
Click Open System Preferences.

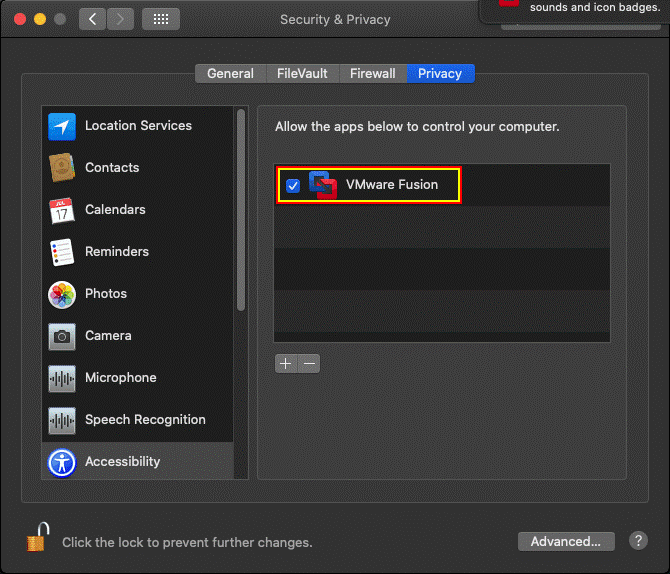
Once the Security & Privacy window opens, in the Privacy tab you can see that VMware Fusion is not selected in the list of allowed apps and is inactive. You should also see a request to enable VMware Fusion notifications. Click Allow because important information may be displayed in notifications when you work with VMware Fusion. In order to provide VMware Fusion with access, click the lock to make changes in the privacy settings (this icon is located in the bottom left corner of the window).

Now the privacy settings are unlocked. Select VMware Fusion in the list of allowed apps (select the corresponding checkbox). Now you can close the Security & Privacy settings window.
VMware Fusion is now installed, and you can run the application.
Creating a VM and Installing a VM Guest OS
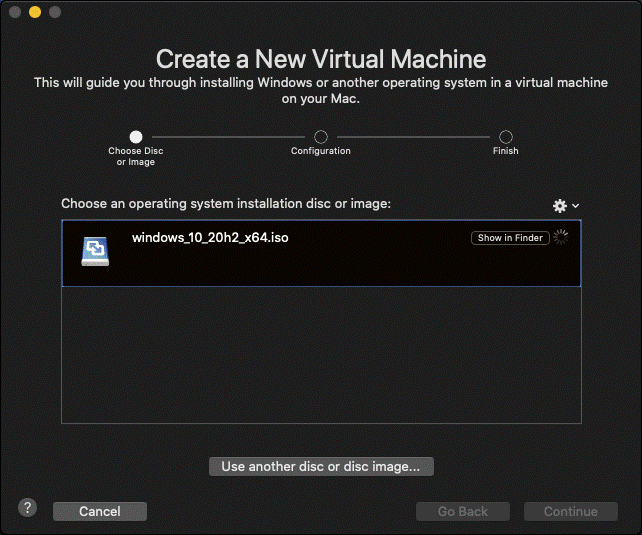
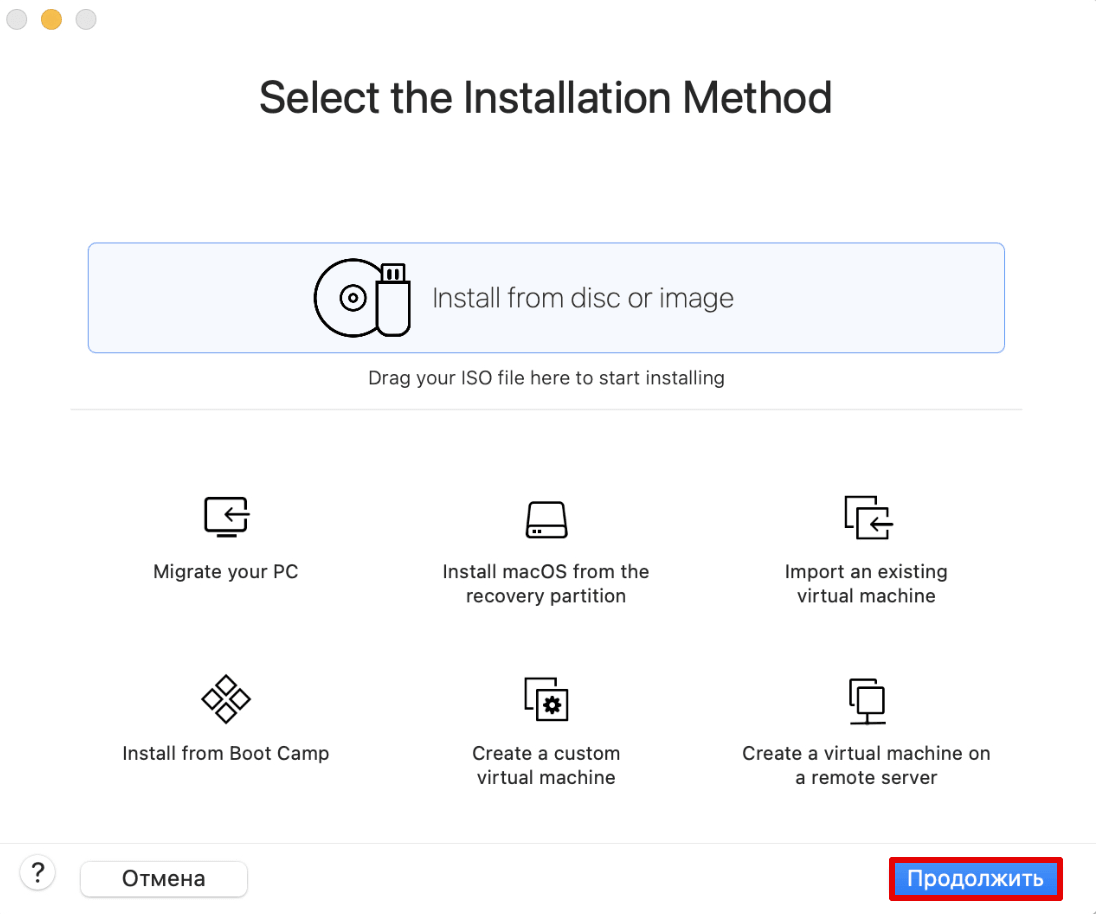
Open VMware Fusion in the Launchpad or click the icon in the Dock. In the main window of VMware Fusion, you can see a big area with the text: Install from disc or image. This is what you need to start creating a virtual machine and installing a guest operating system. Open the folder containing the Windows 10 installation image in Finder, then drag and drop the Windows 10 ISO image to this area of the VMware Fusion window.

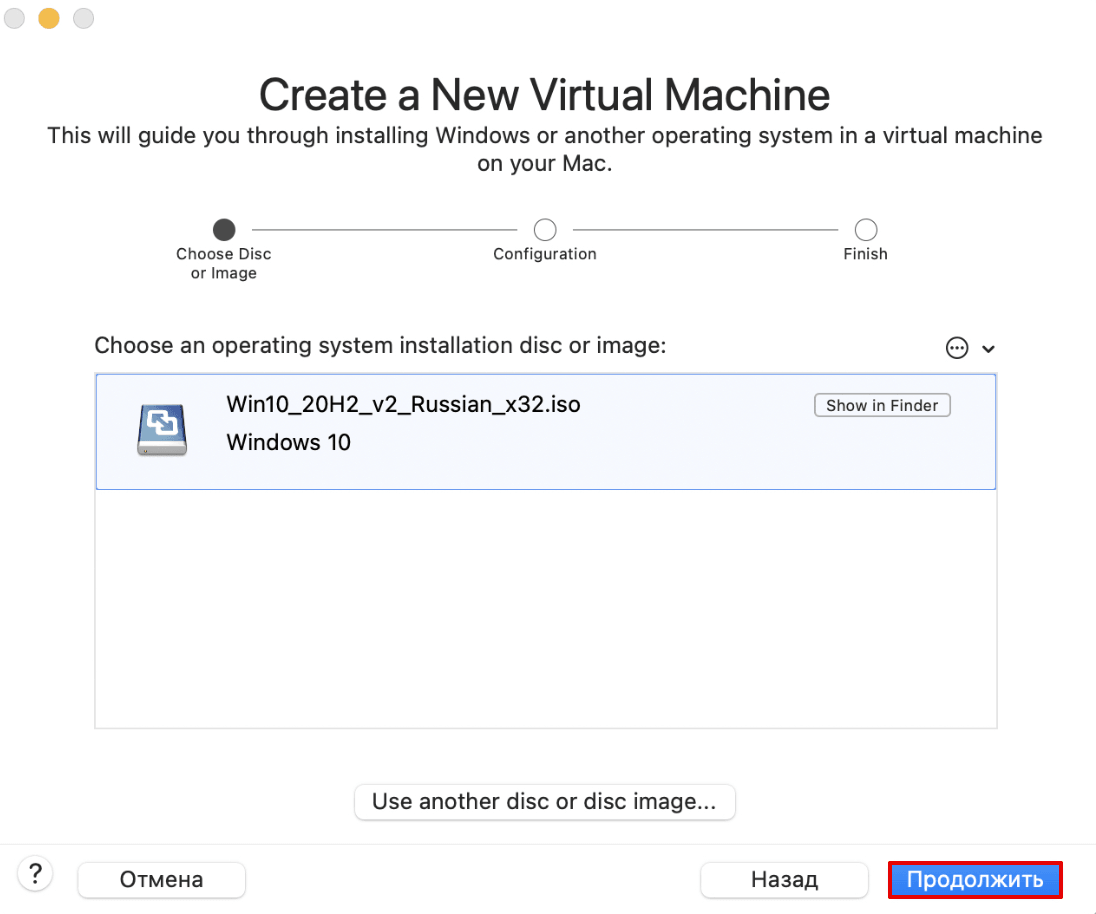
Create a New Virtual Machine. A new VM installation wizard opens in VMware Fusion. The ISO installation image is already selected after the drag and drop.
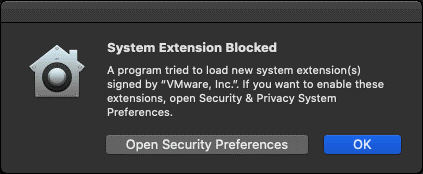
System Extension Blocked. The alert message is displayed.
A program tried to load new system extension(s) signed by “VMware, Inc.”. If you want to enable these extensions, open Security & Privacy System Preferences.
Click Open Security Preferences to allow access for VMware Fusion. Otherwise, you cannot continue the configuration of a new VM.
Click the lock icon to unlock access to the settings just as you did before.
Enter your credentials to unlock Security & Privacy preferences, and click Unlock.

The following message is displayed: System software from developer “VMware, Inc.” was blocked from loading. Click the Allow button near this message to unlock VMware Fusion and allow the required access. Then you can close the Security & Privacy window.

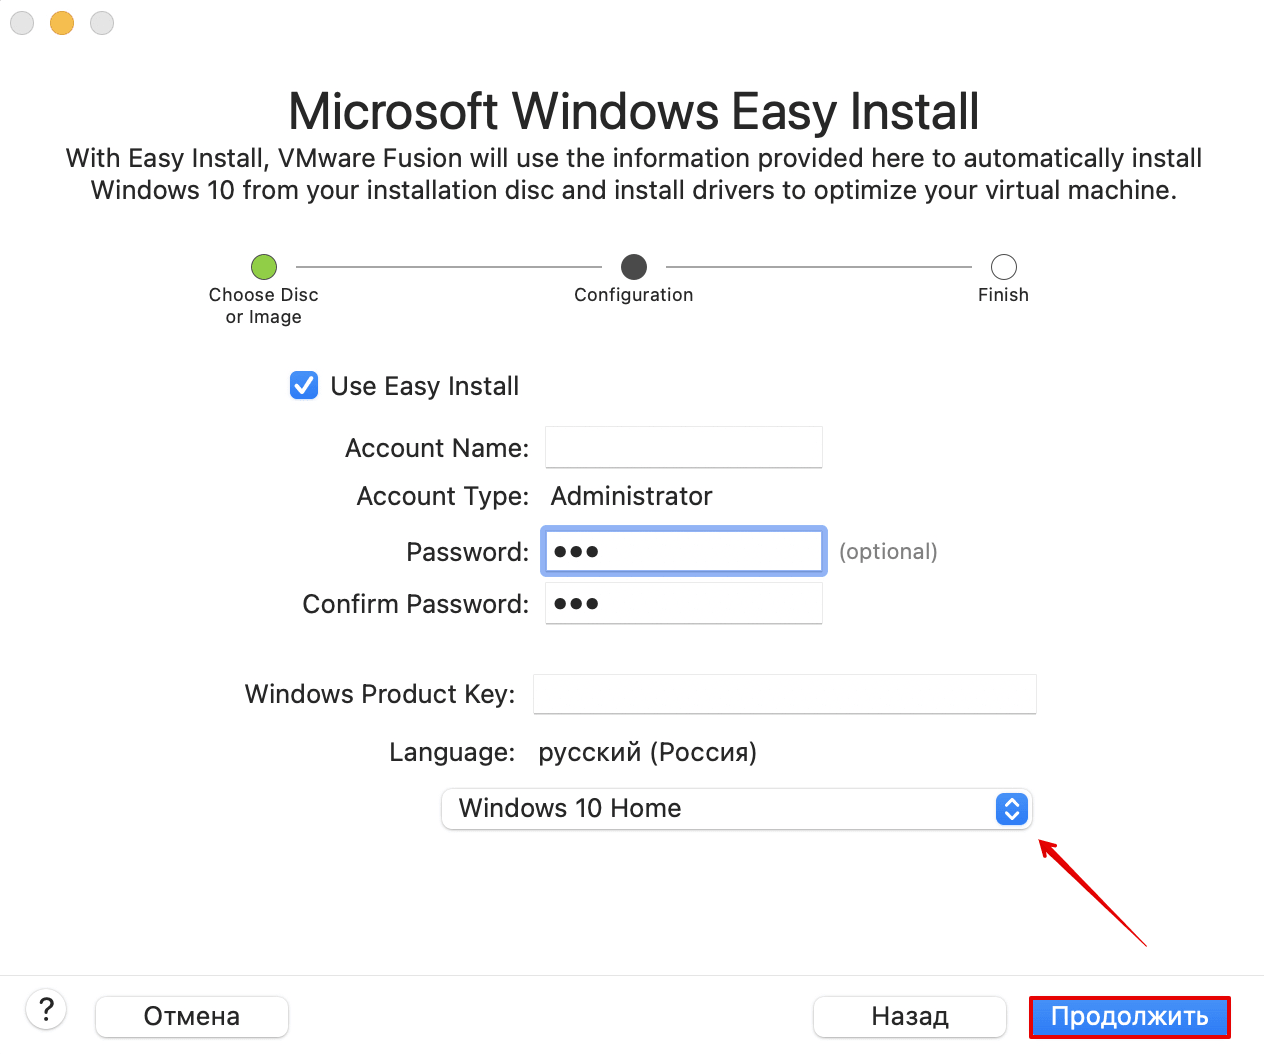
Now you can go back to the VMware Fusion window and the new VM installation wizard. By default, VMware Fusion suggests using Easy Install to create a VM and install a guest operating system. Easy Install requires minimum user interaction during the installation process, but in this case, a user has the lowest level of control. You can enter some settings such as a user name, password, the Windows product key, select the needed language. Then the entire process of VM creation and guest operating system installation is completed automatically by VMware Fusion.
In my example, I’m not using Easy Install to fully control the VM creation and guest operating system installation process (and for a better understanding of configuration). Once the needed option is selected (we unselect the Use Easy Install checkbox), click Continue.
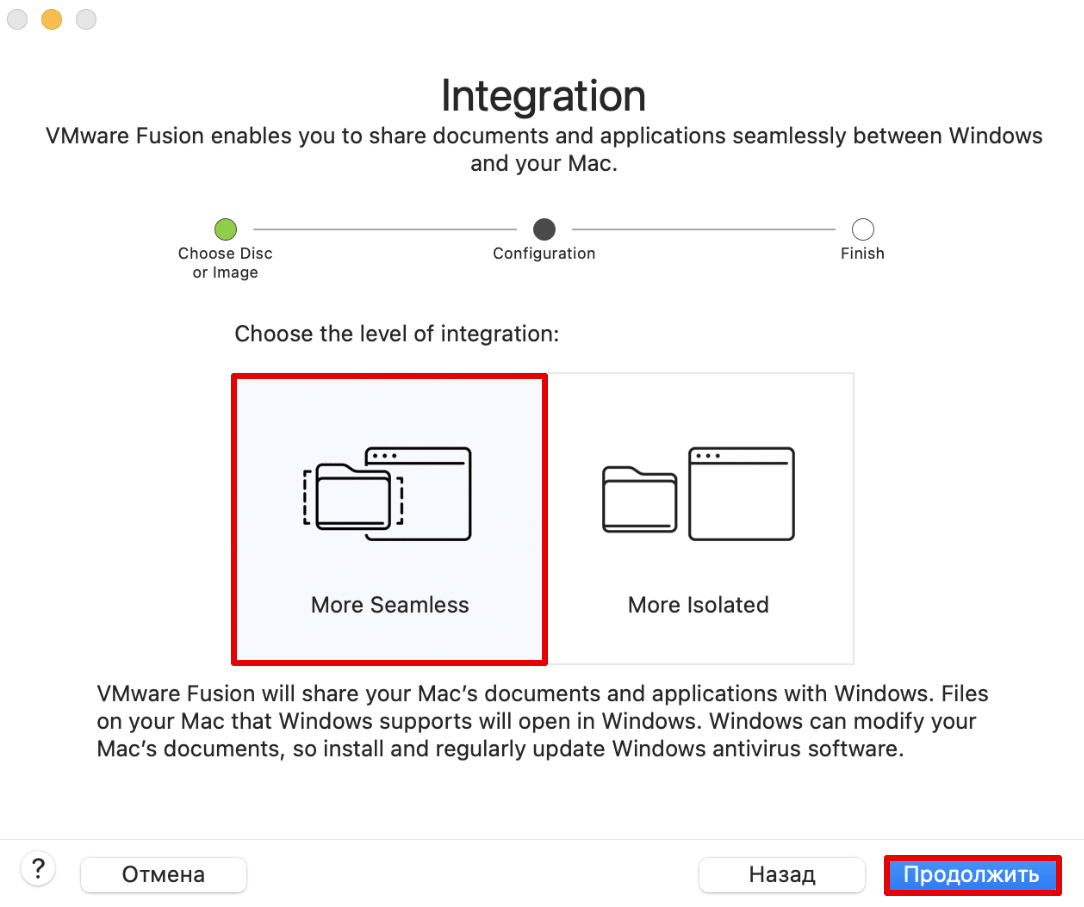
If you use Easy Install, then you can select one of the two provided options:
More Seamless. If you use this option, Mac user folders such as Desktop, Documents, and Downloads are shared between the host OS and guest OS with write permissions for guest Windows users. The Seamless option provides more convenience, including the ability to use the Unity mode. You should use antivirus software because if a guest OS is infected, the shared files can be corrupted on the host OS (and vice versa). Read about ransomware to learn more.
More Isolated. This option is better from the security point of view. User folders are not shared automatically, but you can drag and drop files between the host OS and guest OS without violating the isolation.
You can select one of these two options of Mac integration settings only at the step of creating a virtual machine. As I’m not using Easy Install, I explain how to configure a VM created with the More Isolated option.

Choose Firmware Type. Select Legacy BIOS or UEFI depending on your needs. Select BIOS to use MBR (Master Boot Record) or select UEFI to use GPT (GUID Partition Table) for disk partitioning. We use BIOS for our Windows 10 VM we are creating now. Hit Continue.

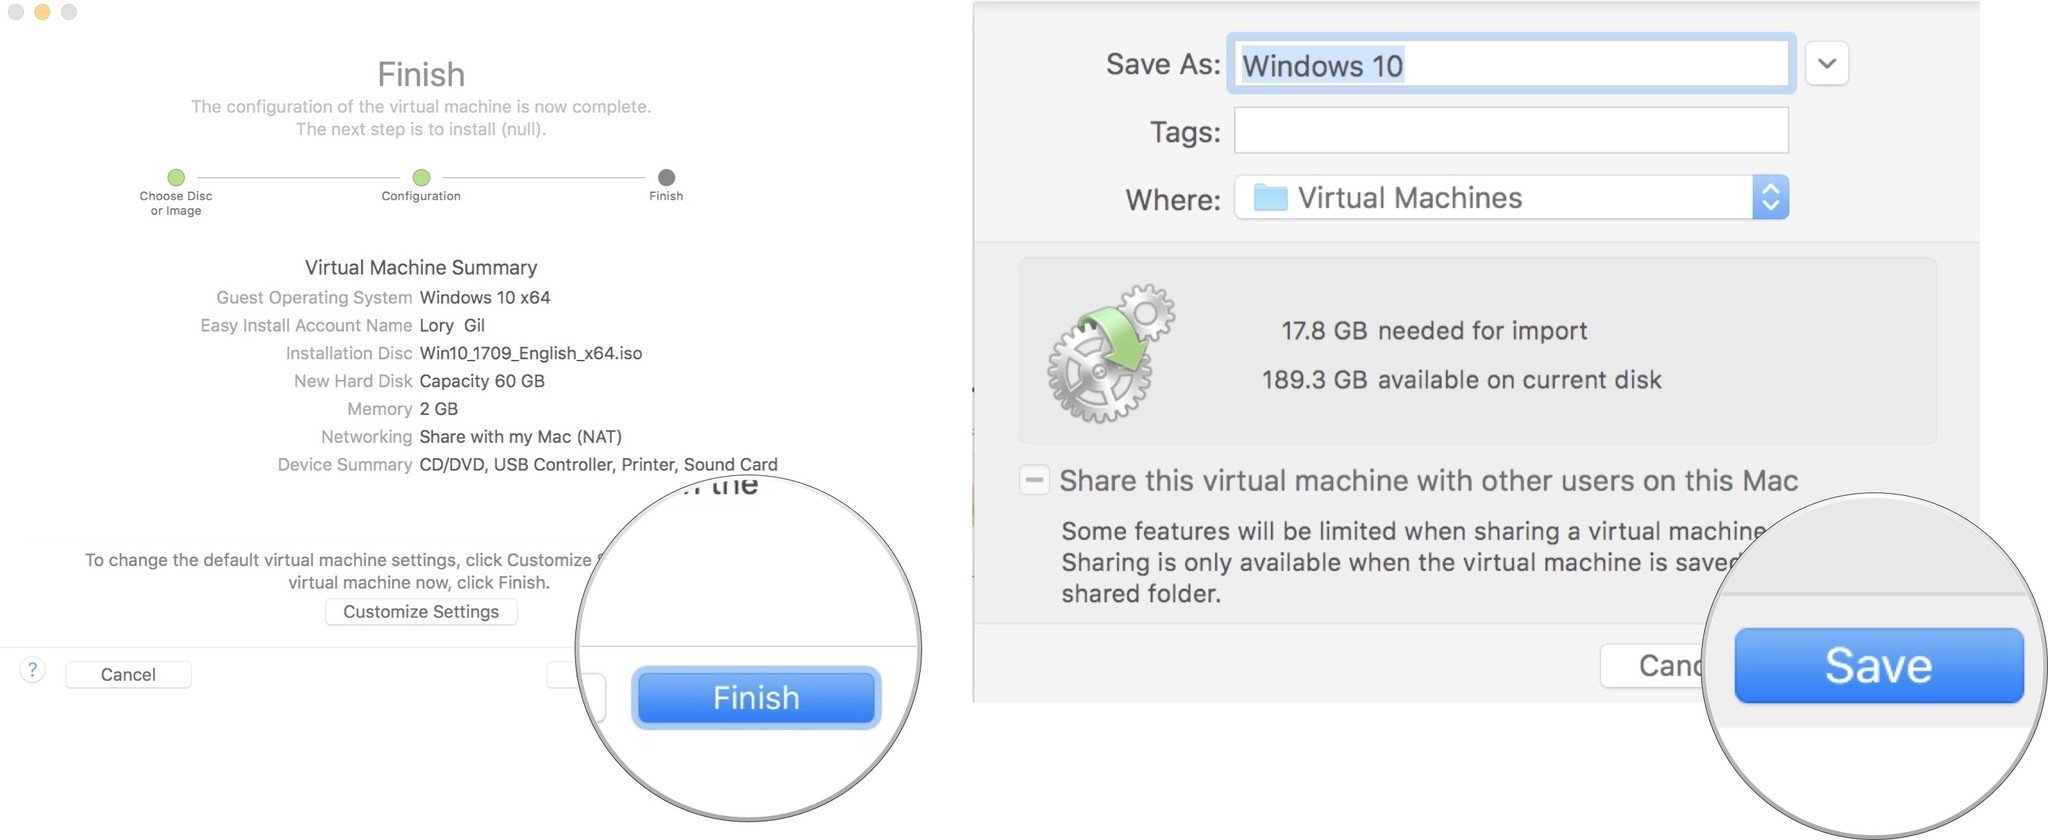
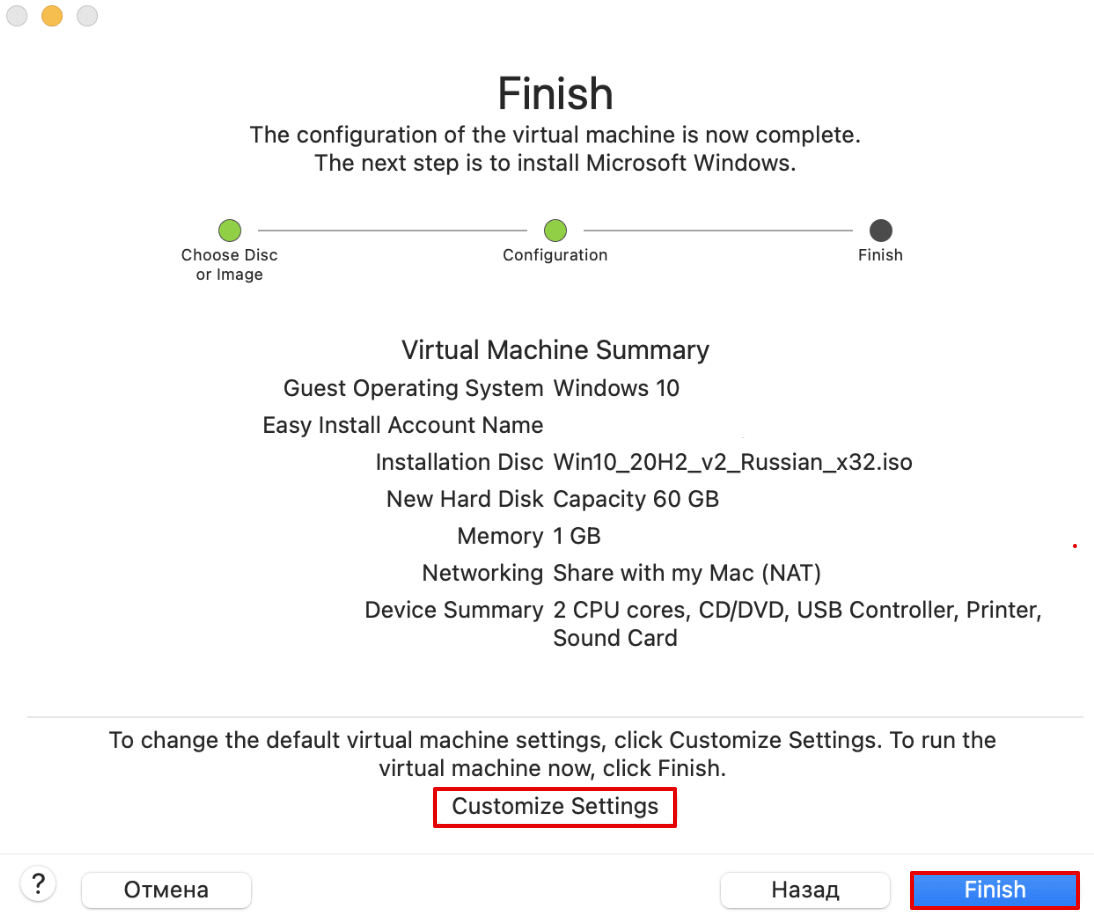
Finish. The configuration of the virtual machine is now complete. Click Customize settings to define the path to store VM files before you click the Finish button.

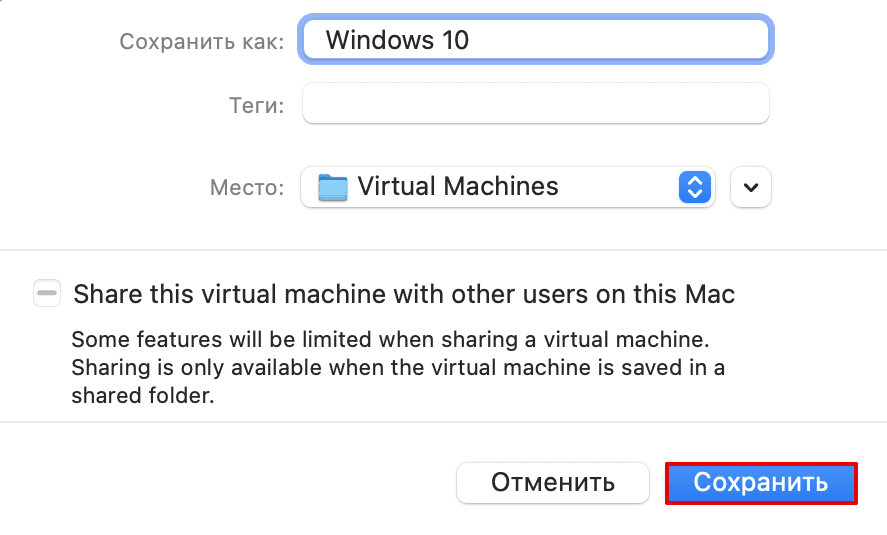
Select a folder to store your VM files. In my case, I will store VM files in /Volumes/disk_d/VM/
Note: In VMware Workstation, you can select a folder to store VM configuration files and virtual disk files at different steps of the new VM wizard with the ability to use different folders to store these files. However, in VMware Fusion, all VM files and virtual disks are automatically stored in one selected folder. The default location to store VM files in macOS is your_home_directory/Virtual Machines/
Hit Save to save VM location, and then click Finish to finish VM creation and close the wizard.

Probably you have noticed that unlike VMware Workstation and VMware ESXi, there were no virtual hardware configuration options in the new VM creation wizard. In order to configure VM settings, including virtual hardware, click Virtual Machine > Settings in VMware Fusion right after creating a new VM and closing the New VM wizard.

VM settings are displayed in a separate window. You can configure the virtual disk size (60 GB are provisioned for a Windows 10 VM by default). Let’s configure processor and memory settings for our Windows 10 VM by clicking the Processors & Memory icon.

Select 4096 MB of memory and 2 processor cores for a VM to run Windows 10 (this configuration may vary). You can expand advanced options to enable nested virtualization and other useful features for your VM. Close the window after finishing configuration.

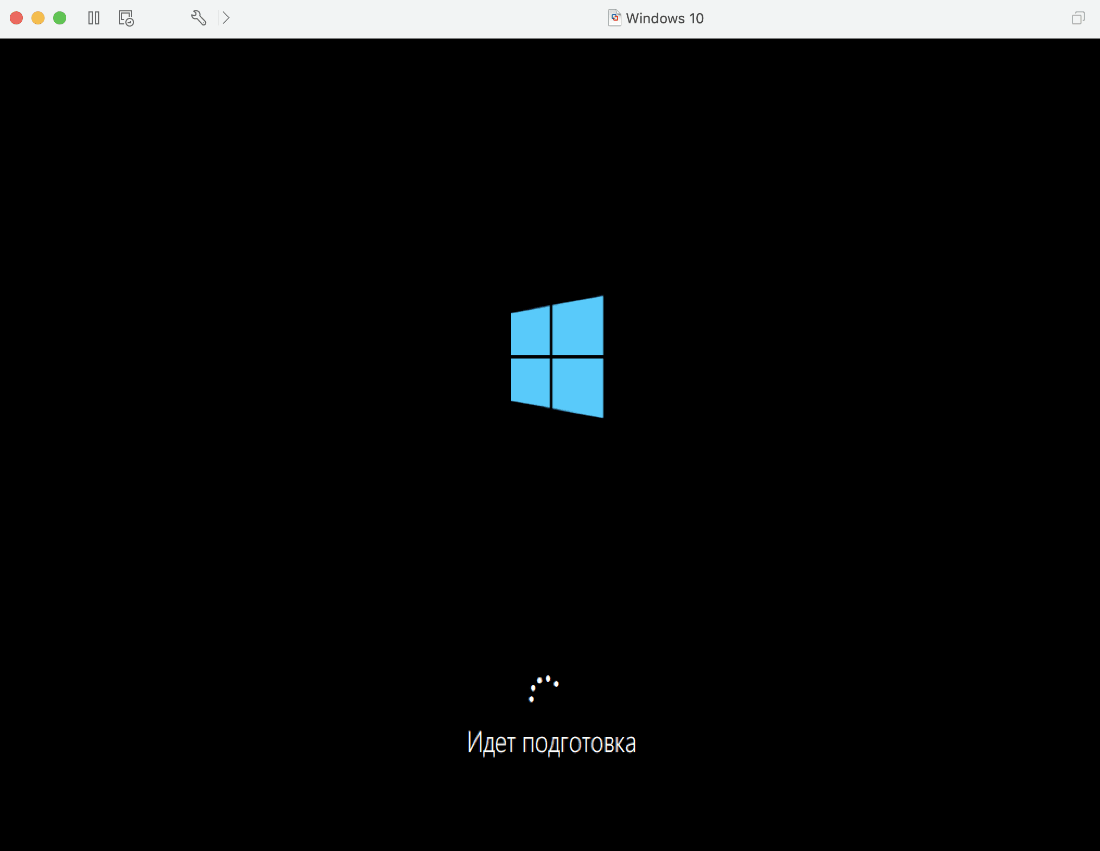
Once you have finished configuring a virtual machine, including virtual hardware, start the VM, boot from the Windows 10 installation ISO image selected automatically with the current configuration, and install Windows 10 as a guest operating system on the VM. Click the Play button to start a virtual machine.

You can see error messages after an attempt to start a VM.
Could not open /dev/vmmon: Broken pipe. Please make sure that the kernel module ‘vmmon’ is loaded.
Transport (VMDB) error – 14: Pipe connection has been broken.

These errors are displayed due to the security configuration of macOS. Issues related to macOS security settings require manual configuration. In order to fix this issue and avoid these errors when starting a VM, go to Security & Privacy settings once again. Click the Apple button, and click System Preferences.

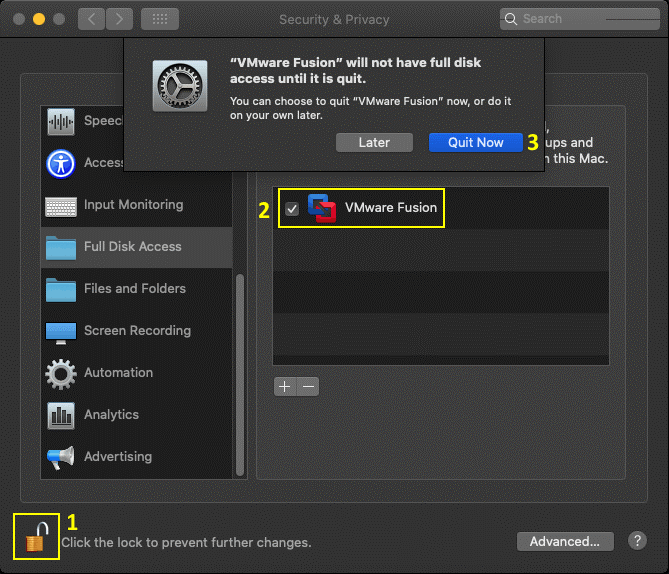
In the Security & Privacy window, select the Privacy tab, then select Full Disk access in the left pane of the window. Click the lock icon to unlock settings (similarly as you did multiple times before).
Once settings become active, select the checkbox near VMware Fusion to allow full disk access for this virtualization application. If VMware Fusion is running now, a notification message is displayed:
“VMware Fusion” will not have full disk access until it is quit.
You can choose to quit “VMware Fusion” now or do it on your own later.
Click Quit Now to close VMware Fusion and apply security settings when running VMware Fusion next time.
Open VMware Fusion, and start your new VM once again. Now the VM should start correctly without displaying any errors.
Once the VM is booted from the Windows 10 installation ISO image, you should see the Windows setup GUI (graphical user interface). Installation of Windows 10 as a guest operating system on VMware Fusion is similar to the installation of Windows 10 on a physical machine. We disconnect the machine from the internet until finishing the installation of Windows 10.
Select a language to install, time and currency format, and keyboard or input method. We use English (United States) in this example. Click Next at each step to continue.

Activate Windows. If you have bought the Windows 10 license, you can enter the product key now. If you don’t have a license key, click I don’t have a product key to select the trial mode and continue.
Select the Operating system you want to install. Select the needed Windows 10 edition. I select Windows 10 Pro in my case.

There is a difference between Windows 10 editions and Windows 10 N or KN editions (N – Europe, KN – Korea). Due to the European anti-competitive practices, Microsoft released special Windows 10 N editions for Europe marked with the N letter. These Windows 10 N editions don’t include Windows Media Player and related features. Windows 10 editions (without N in the name) include Windows Media Player, Voice Recorder, Music, Video, and Skype.
Windows 10 N and KN editions are provided without media technologies. You can download and install these multimedia components from the Microsoft website manually (a special Media Feature Pack is provided) after installing Windows 10 on your computer or virtual machine.
The product keys for Windows 10 Pro and Windows 10 Pro N are different (this rule is true for other Windows 10 and Windows 10 N editions).
Applicable notices and license terms. Read the license agreement and select the I accept the license terms checkbox.
Which type of installation do you want? Select Custom: Install Windows only (advanced) to perform a clean installation.

Where do you want to install Windows? Now you should create a partition table with the configuration that is suitable for you. You can see the 60 GB empty virtual hard disk (or another size virtual disk if you configured that in VM settings). Click New to create a new partition and enter the partition size, then click Apply. Windows automatically creates the first 50 MB service partition prior to your custom partition. If you don’t want to have this additional service partition on your disk, you can delete the service partition. It is especially useful when you use the MBR partition table with a limit of four partitions, but you need to use the same amount for your work without wasting one as the service partition. However, you cannot simply select the 50 MB partition and click Delete.
In order to delete the 50 MB partition, first, delete your custom partition (the size of my partition to install Windows 10 is 59.9 GB). The name of my custom partition is Drive 0 Partition 2.

Then select the service partition (Drive 0 Partition 1: System Reserved) and click Extend. We extend the first partition to the maximum possible size. Click Apply to save settings.
Now we have one 60 GB partition on our virtual disk to install Windows 10. Later you can create new virtual disks for a VM in VMware Fusion, create partitions, and format them in a guest operating system after finishing Windows 10 installation. Select the partition where Windows 10 must be installed, and hit Next. Wait until the installer copies all the needed files and installs Windows.

Let’s start with region. Select your location. I choose the United States.

Is this the right keyboard layout? Select the needed keyboard layout. I use the US keyboard layout for my Windows 10 installation.
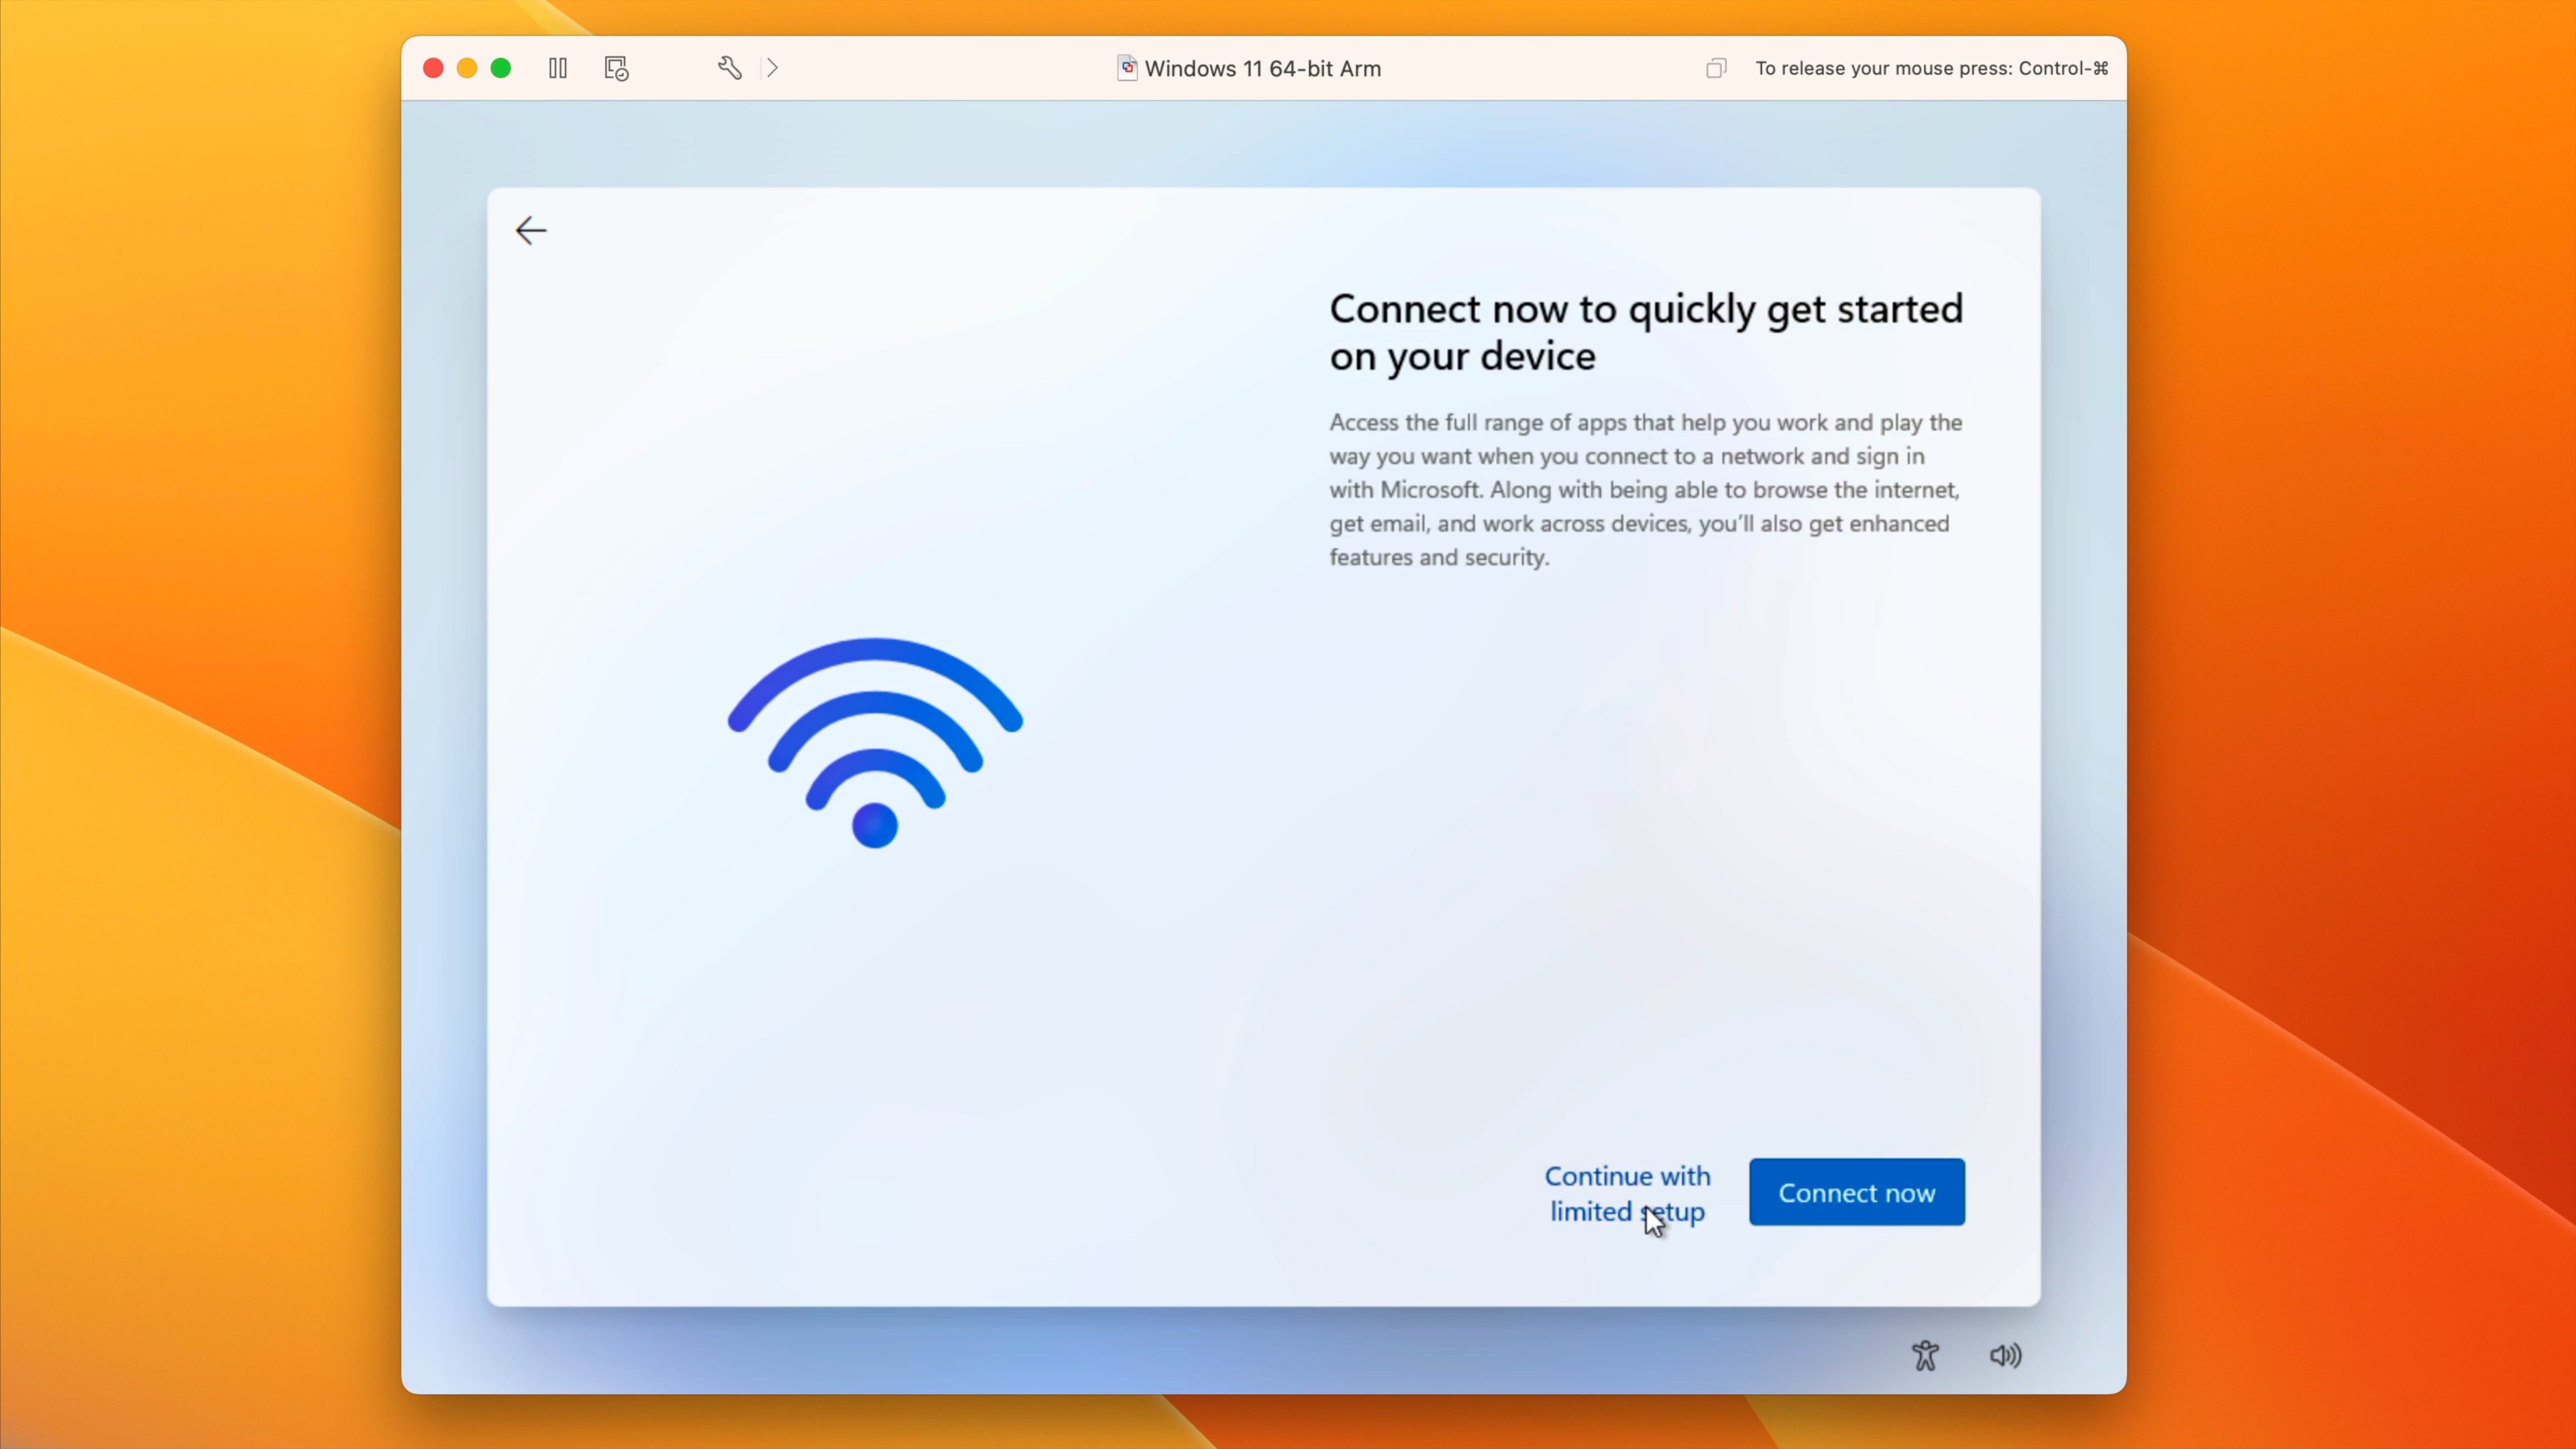
Let’s connect you to a network. I disable the internet connection until I finish Windows 10 installation and click I don’t have internet. We can configure the internet connection and download needed updates later after completing the installation.

There’s more to discover when you connect to the internet. Windows 10 persistently asks you to enable an internet connection. However, we are not going to turn on the internet until finishing installing the VMware guest operating system. Click Continue with limited setup.
Who’s going to use this PC? Enter a name for your local user account on the Windows machine, for example, user1. We disconnected the internet and are not using the Microsoft account.

Create a super memorable password. Enter a strong password and remember the password. It is recommended that you use a password that contains at least 8 characters, including uppercase, lowercase letters, digits, and special characters.
Confirm your password. Enter your password once again. Then Windows 10 asks you to create three security questions for the user account.

Choose privacy settings for your device. Deselect all settings that collect your data and send the data to Microsoft.
Let Cortana help you get things done. Select Not now to disable Cortana.

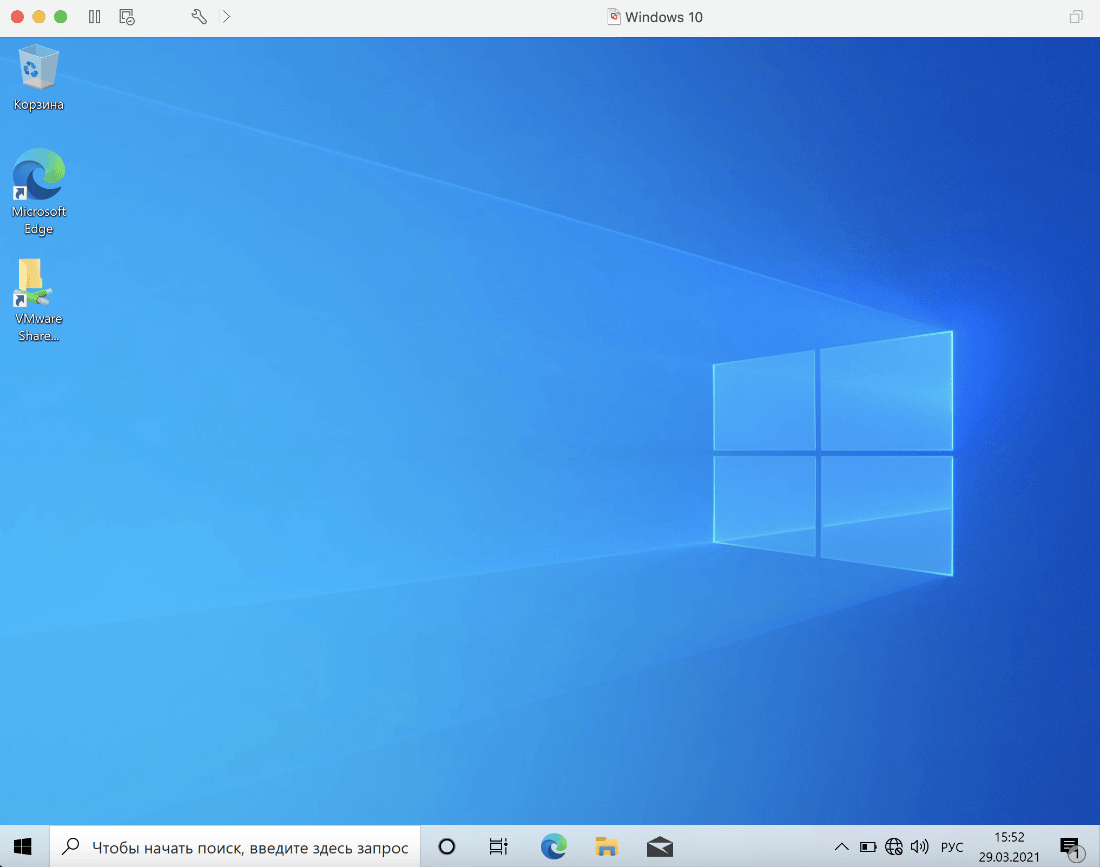
Windows 10 is now installed as the VMware guest operating system. You can see Windows desktop and other elements of the graphical user interface of Windows 10 in the window of VMware Fusion running on macOS. Now you have to install VMware Tools for higher performance and better guest OS user experience.
Installing VMware Tools
VMware Tools is a set of drivers and tools developed to improve VM performance and provide better user experience. Read more about VMware Tools in this blog post.
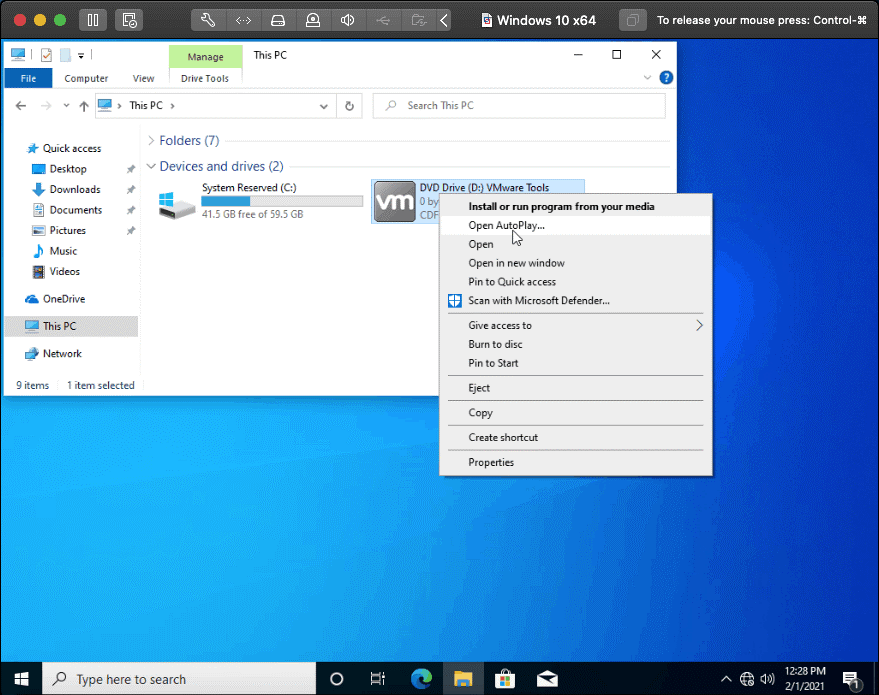
While the VM is powered on and Windows 10 is running as a guest OS in VMware Fusion, click Virtual Machine > Install VMware Tools.
The following message is displayed: Click Install to connect the VMware Tools installer CD to this virtual machine.
Click Install.

A virtual ISO CD image is mounted in a guest OS. Open the autorun or run setup64.exe on a virtual CD to launch the VMware Tools installer.
The installation wizard for VMware Tools opens. The welcome screen is displayed first. Hit Next at each step of the wizard to continue.
Choose Setup Type. Select Typical (the default option) that is suitable for most cases. You can perform the complete installation to install all program features of VMware Tools.

Ready to install VMware Tools. Click Install to start the process of VMware Tools installation.
Completed the VMware Tools Setup Wizard. You must restart your system for the VMware Tools configuration changes made to take effect. Click Finish, then click Yes to restart your Windows 10 guest OS now.

Configuring Shared Folders
Let’s configure Shared Folders to better integrate a host OS and guest OS in case we use the More Seamless mode of Easy Install. Shared Folders allow you to copy files from a host OS to a guest OS and vice versa more conveniently. In addition, you can use drag and drop without the need to share folders and configure permissions manually in the operating system.
In VMware Fusion, go to Virtual Machine > Settings, then click Sharing to open the configuration of Shared Folders.

Select the Enable Shared Folders checkbox. Click + and select a folder that is accessible from your Mac and that you want to share with your Windows guest. In the bottom of the window, go to a Mirrored Folders section. Here select the checkboxes near macOS user folders that you want to share and provide write access in your guest Windows system.

After configuring Shared Folders, you can see a shortcut to the VMware Shared Folders directory created on the Windows desktop of the guest operating system. The folders stored on the Mac desktop are now displayed on the Windows desktop of the guest OS.

You can expand the guest OS window to the Full Screen mode (View > Full Screen) or enter the Unity mode (View > Unity) to see Windows 10 application windows in the macOS GUI as if you were using one common desktop environment. Suspend or shut down a VM when you want to close the VM and VMware Fusion. VMware Fusion is a powerful virtualization application. It also supports running Windows 10 installed on a Boot Camp partition as a virtual machine when you work in macOS as a host OS. VMware Fusion supports nested virtualization allowing you to run a VM inside a VM.
Another advantage of VMs in VMware Fusion is the ability to copy VM files and run VMs on other Mac computers with VMware Fusion; Windows and Linux computers – with VMware Workstation or Player installed. With VM snapshots, you can test applications and roll back changes to one of the previous snapshots. You can use VMware Fusion to connect to ESXi hosts and vCenter Servers by clicking File > Connect to Server. VMware Fusion supports many guest operating systems, including different versions of Windows, Linux, and FreeBSD.
If you use Windows or Linux as a host OS, you can use VirtualBox or VMware Workstation to run macOS as a VM on your computer. If you run virtual machines on VMware ESXi, don’t forget to back them up. To ensure comprehensive protection for your VMware vSphere VMs, download the Free Edition of NAKIVO Backup & Replication that includes licenses for 10 workloads and 5 Microsoft 365 accounts and is absolutely FREE for one year!
Conclusion
This blog post covers the installation of Windows 10 as a guest operating system running in VMware Fusion on Mac OS X. For this, you have to check system requirements, download installation images of VMware Fusion and Windows 10, install VMware Fusion, create a virtual machine, and install Windows 10 as a guest OS in VMware Fusion. If you want to use the default VM configuration for a Windows 10 VM, you can use Easy Install, which requires minimum user interaction, and automatically installs a guest OS. If you want full control over the installation process and to be able to configure everything manually, don’t use Easy Install. VMware Fusion is a powerful virtualization application that provides you with a lot of configurable features.

(Image credit: iMore)
Virtual machines are a great alternative to partitioning your hard drive to install Windows using Boot Camp. It means you can use Windows in a window (excuse the pun) or even full screen if you want, and you don’t have to cut the amount of space your hard drive has for your current computing needs.
I recently explained how to get the Parallels Desktop virtual machine on your Mac. If you’re interested in Parallels, check out my installation guide:
How to run Windows 10 on your Mac using Parallels Desktop 15
I’m covering all the major virtual machines for your benefit and this time it’s all about VMWare’s Fusion 11.5 virtual machine software. They’re similar, but have a few different steps in the set up process.
Here’s how to get VMWare’s Fusion 11.5 on your Mac and then install and run Windows 10 from within your macOS operating system without having to switch hard drive partitions.
- Check your system and hardware requirements
- Before you start: Back up your Mac
- How to run Windows 10 on Mac using Fusion 11.5
Check your system and hardware requirements
Before you get started with installation of Fusion 11.5, make sure your Mac meets the minimum system requirements for both hardware and software.
The minimum system requirements for installing and using VMware Fusion 11.5 are:
Hardware
- All Macs launched in 2011 or later are supported (except the 2012 Mac Pro «Quad Core» using the Intel Xeon W3565 Processor. The CPU architecture is incompatible).
- Also supports the 2010 Mac Pro «Six Core», «Eight Core» and «Twelve Core» models.
- Minimum 4GB of RAM
- 750MB free disk space for VMware Fusion and at least 5GB for each virtual machine
Software
- Mac OS X 10.13 or later
- Operating system installation media (disk or disk image) for virtual machines.
- Microsoft Windows is not included with VMware Fusion.
- Recommended graphics hardware for Windows DirectX 10 or OpenGL 3.3 support:
- NVIDIA 8600M or better
- ATI 2600 or better
- Minimum requirements for Metal support.
Before you start: Back up your Mac
This is one of those awful mistakes that people make, thinking that they don’t need to back up their Mac before doing something big. First off, you should be backing up your Mac on a regular basis, but even if you don’t do so multiple times per day, you should definitely do so right now, before you continue with this guide. Seriously. Back it up.
How to back up your Mac
How to run Windows 10 on Mac using Fusion 11.5
You’ll need a copy of Fusion 11.5 or Fusion 11.5 Pro in order to install it on your Mac. Fusion 11.5 costs $79.99 and the pro version costs $159.99. The main differences between them is in the advanced features. The Pro version includes extra features specific for multiple-computer use. For example, if you to be able to create linked clones on different Macs or if you need to network your computers together. You can buy the full license right now or download a free 30-day trial and make your full purchase later. If you have an older version of Fusion, you can upgrade for less.
- Buy Fusion 11.5
- Buy Fusion 11.5 Pro
You’ll also need a copy of Windows 10. You might already have a full copy or you might need to buy a copy. VMWare requires that you have a copy on a disk, drive, or an ISO image file in order to run it on your Mac.
Download Windows 10
- Navigate to the Microsoft Windows 10 ISO download page from your web browser.
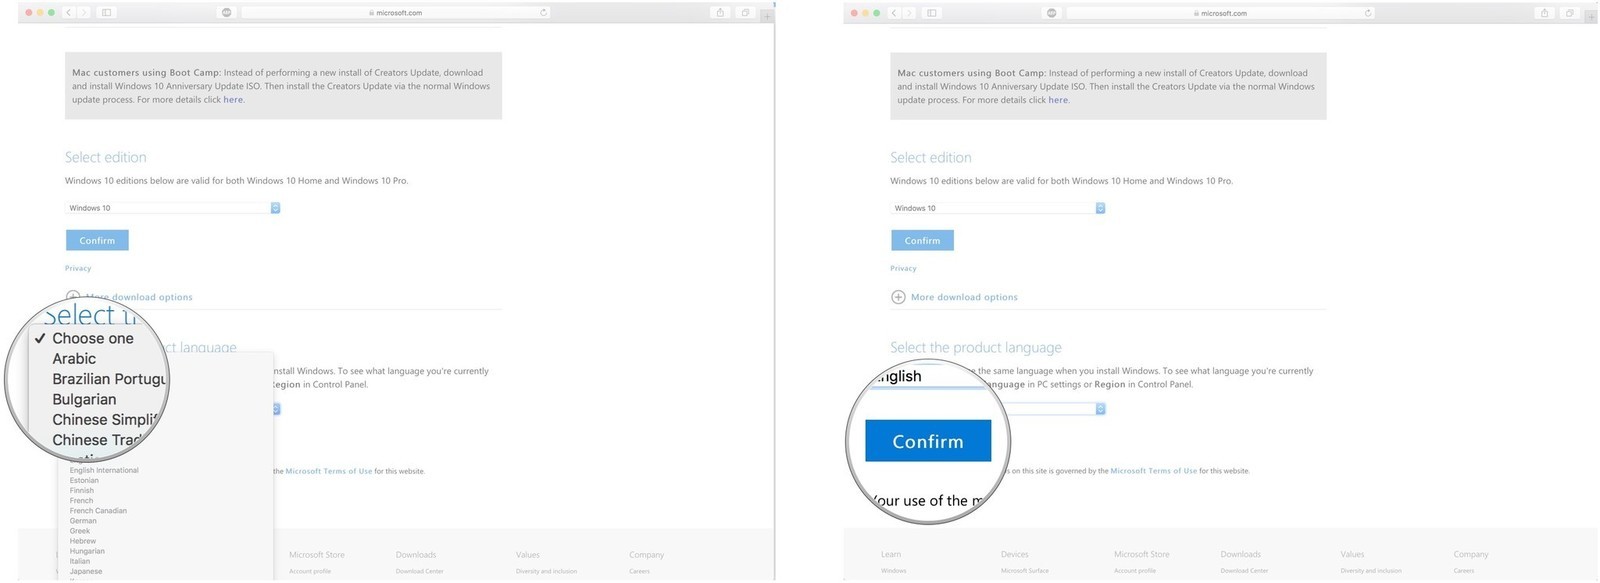
- Click on Select Edition and select Windows 10.
- Click Confirm.
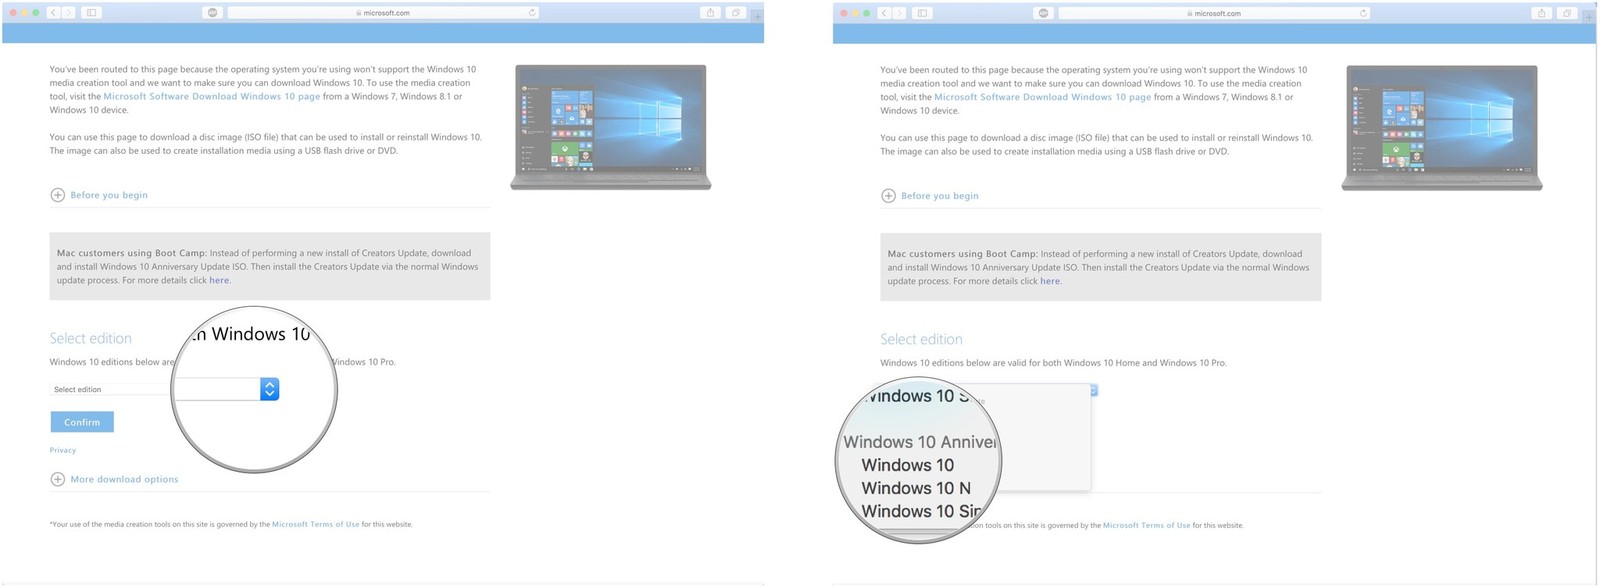
- Click on Select the product language and select your language.
- Click Confirm.
- Click on 64-bit Download.
- Click Save to start the download.
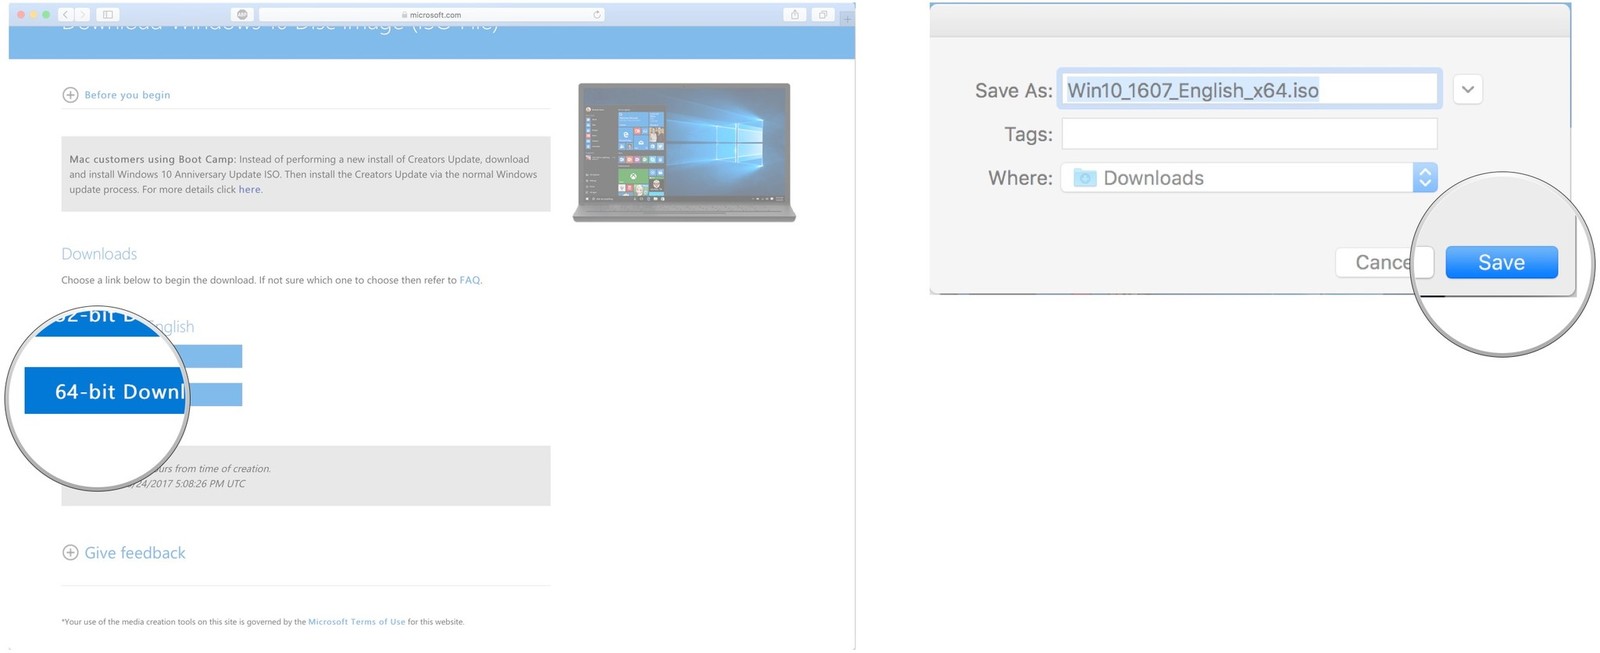
This may take a while, so have a cup of tea and watch an episode of Black Mirror while you wait.
Download and install VMWare Fusion 11.5
The first step is to download Fusion 11.5. You can buy a full license right now or download the free 30-day trial to get started.
Get VMWare’s Fusion 11.5
Once the program download is complete, follow these steps to install Fusion 11.5 on your Mac.
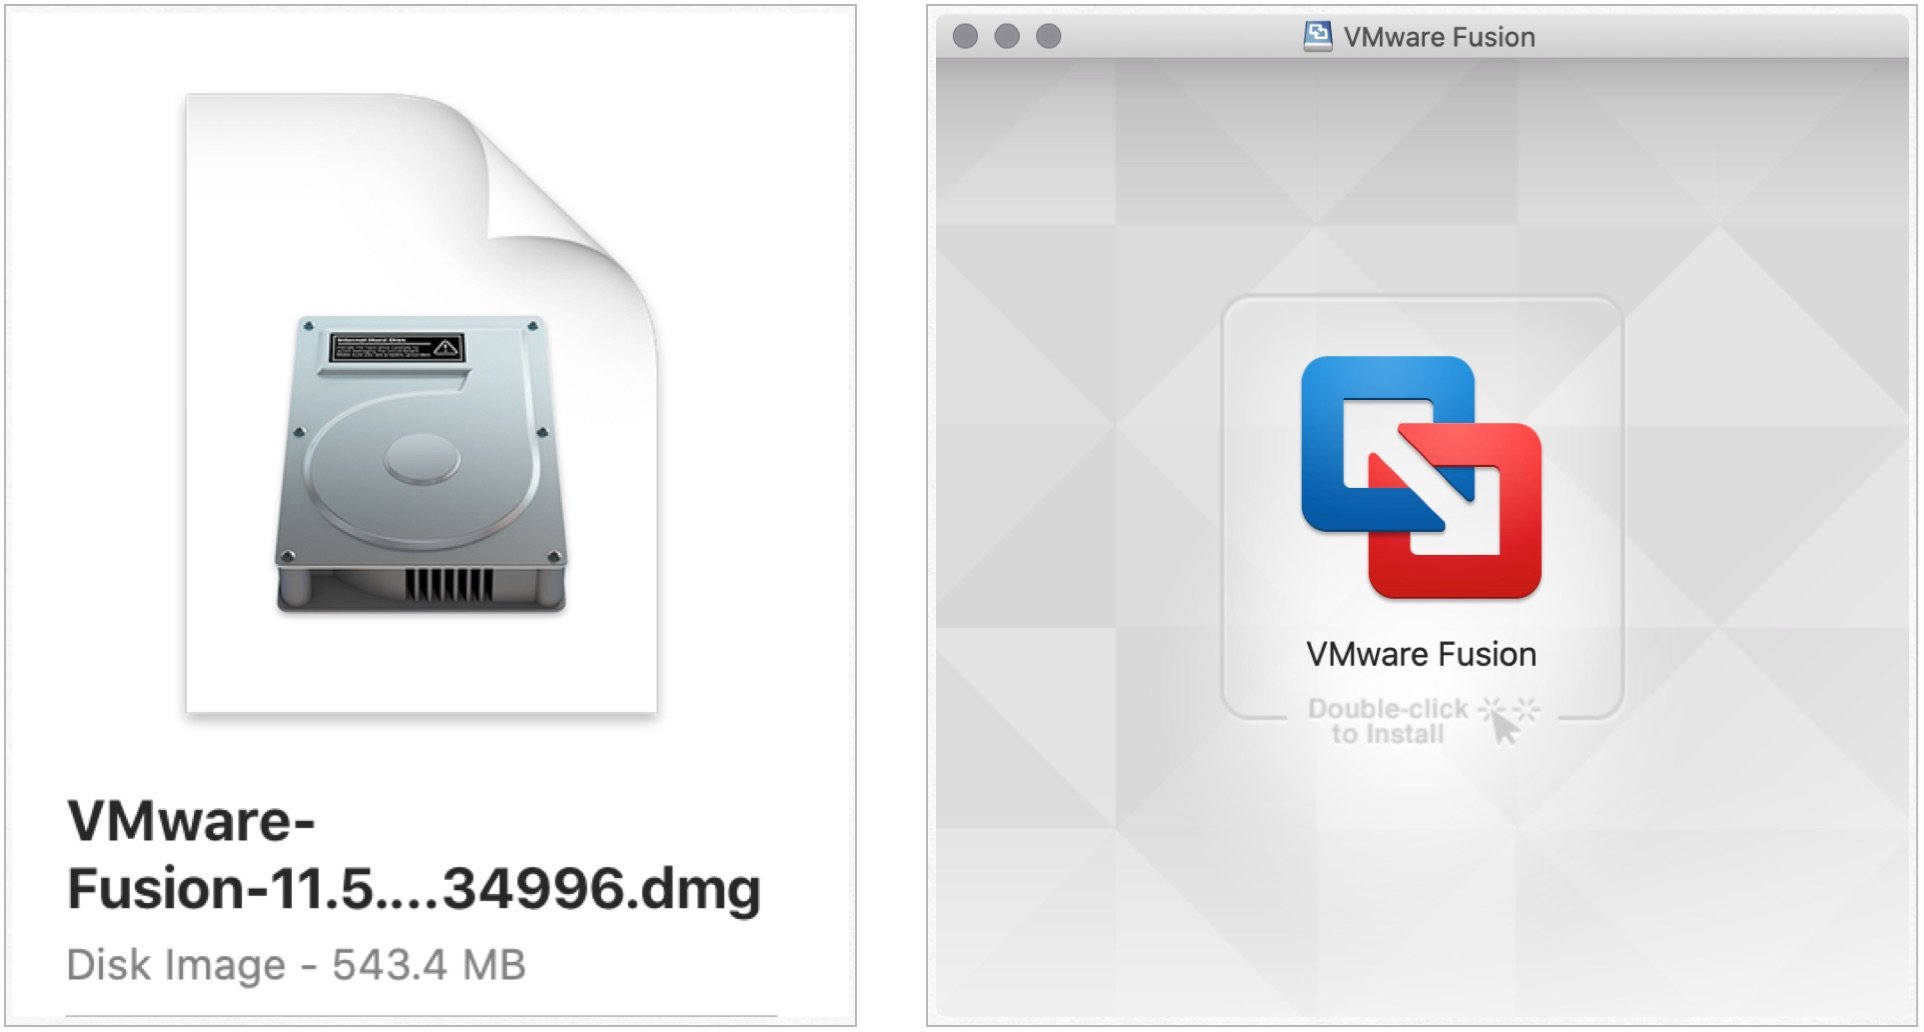
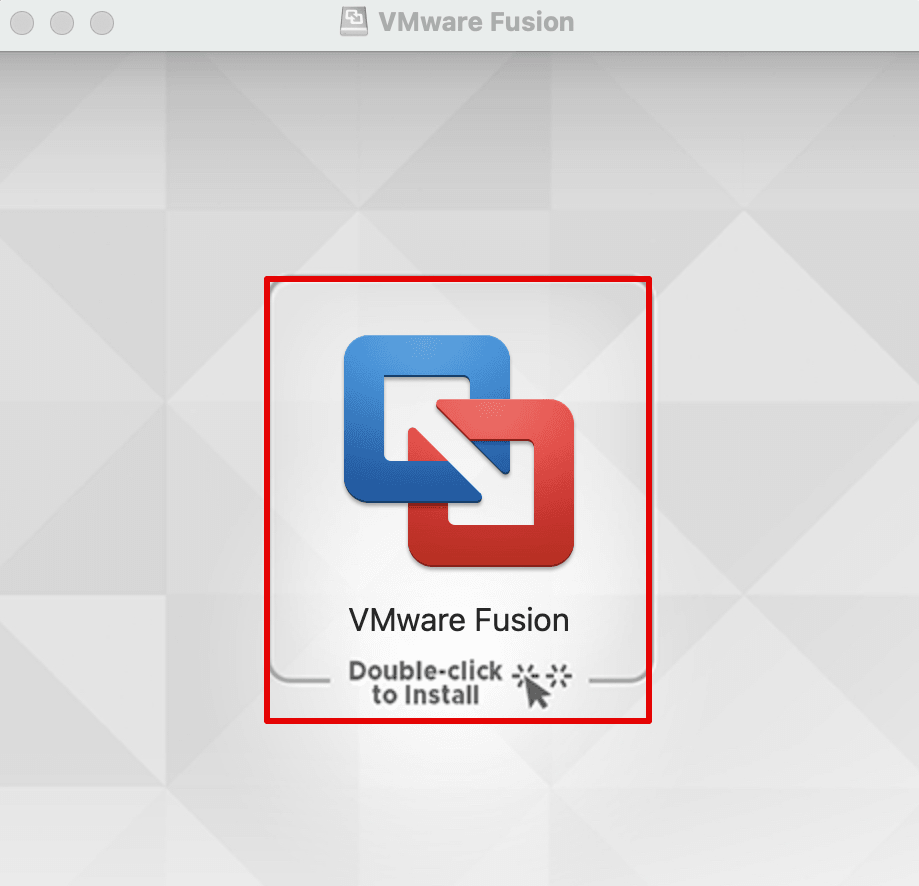
- Double-click on the VMwareFusion.dmg file to open it (it might be in finder or on your desktop. You can search for it in Spotlight if its not easy to find).
- Double-click on Double-click to Install.
- Click Open if prompted to confirm that you want to open the application.
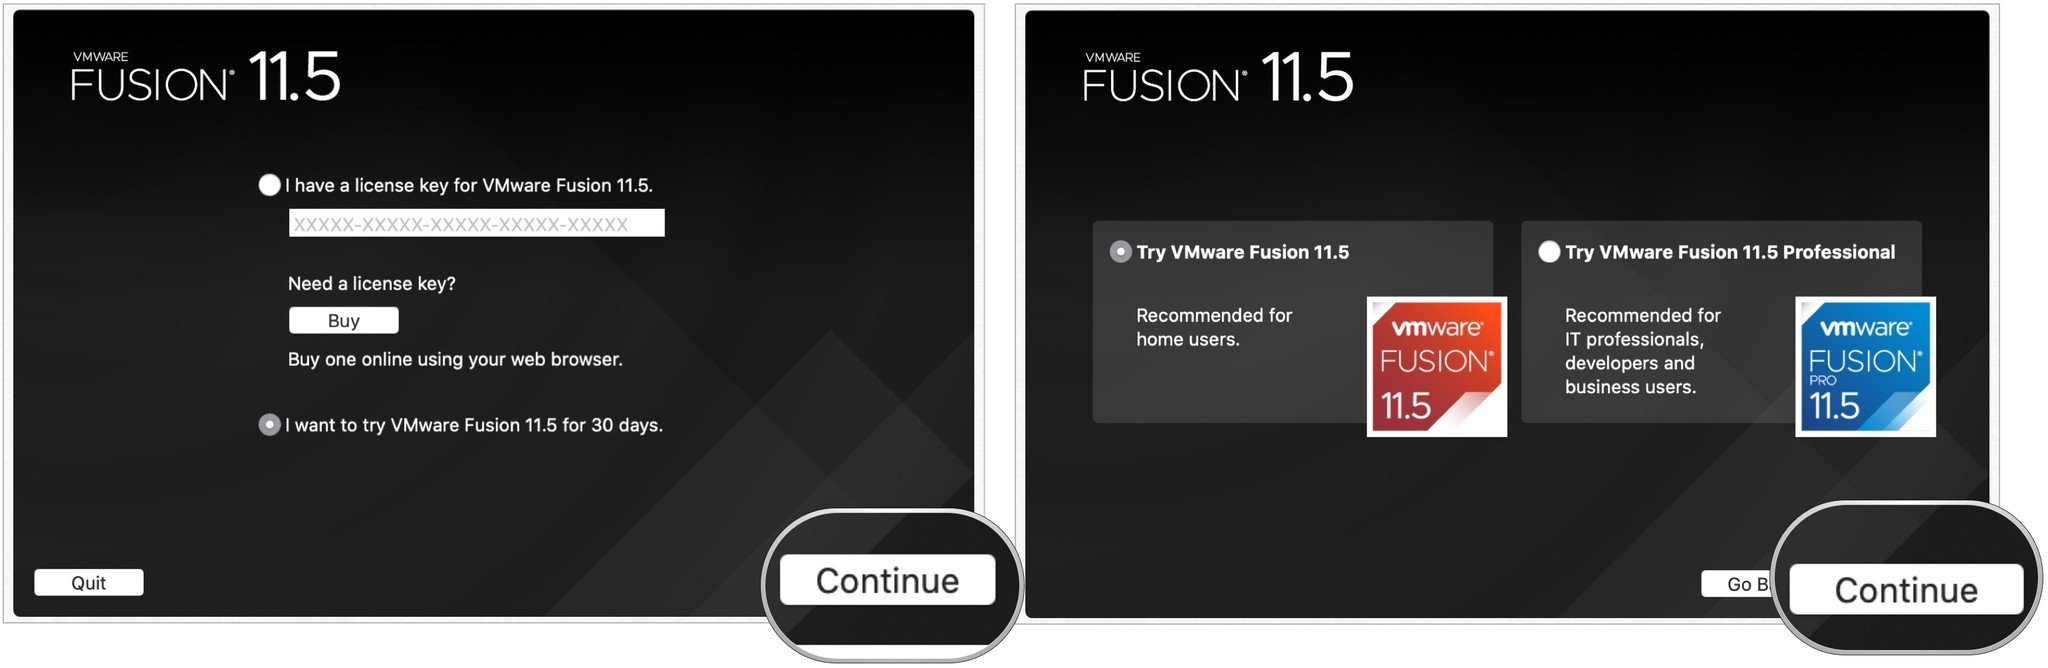
- Click one of the options for how you want to install Fusion 11.5, either with a license key, by purchasing now, or by using the free 30-day trial.
- Click Continue.
- Select whether you want to install Fusion 11.5 or Fusion 11.5 Pro if you’re running a trial version.
- Click Continue.
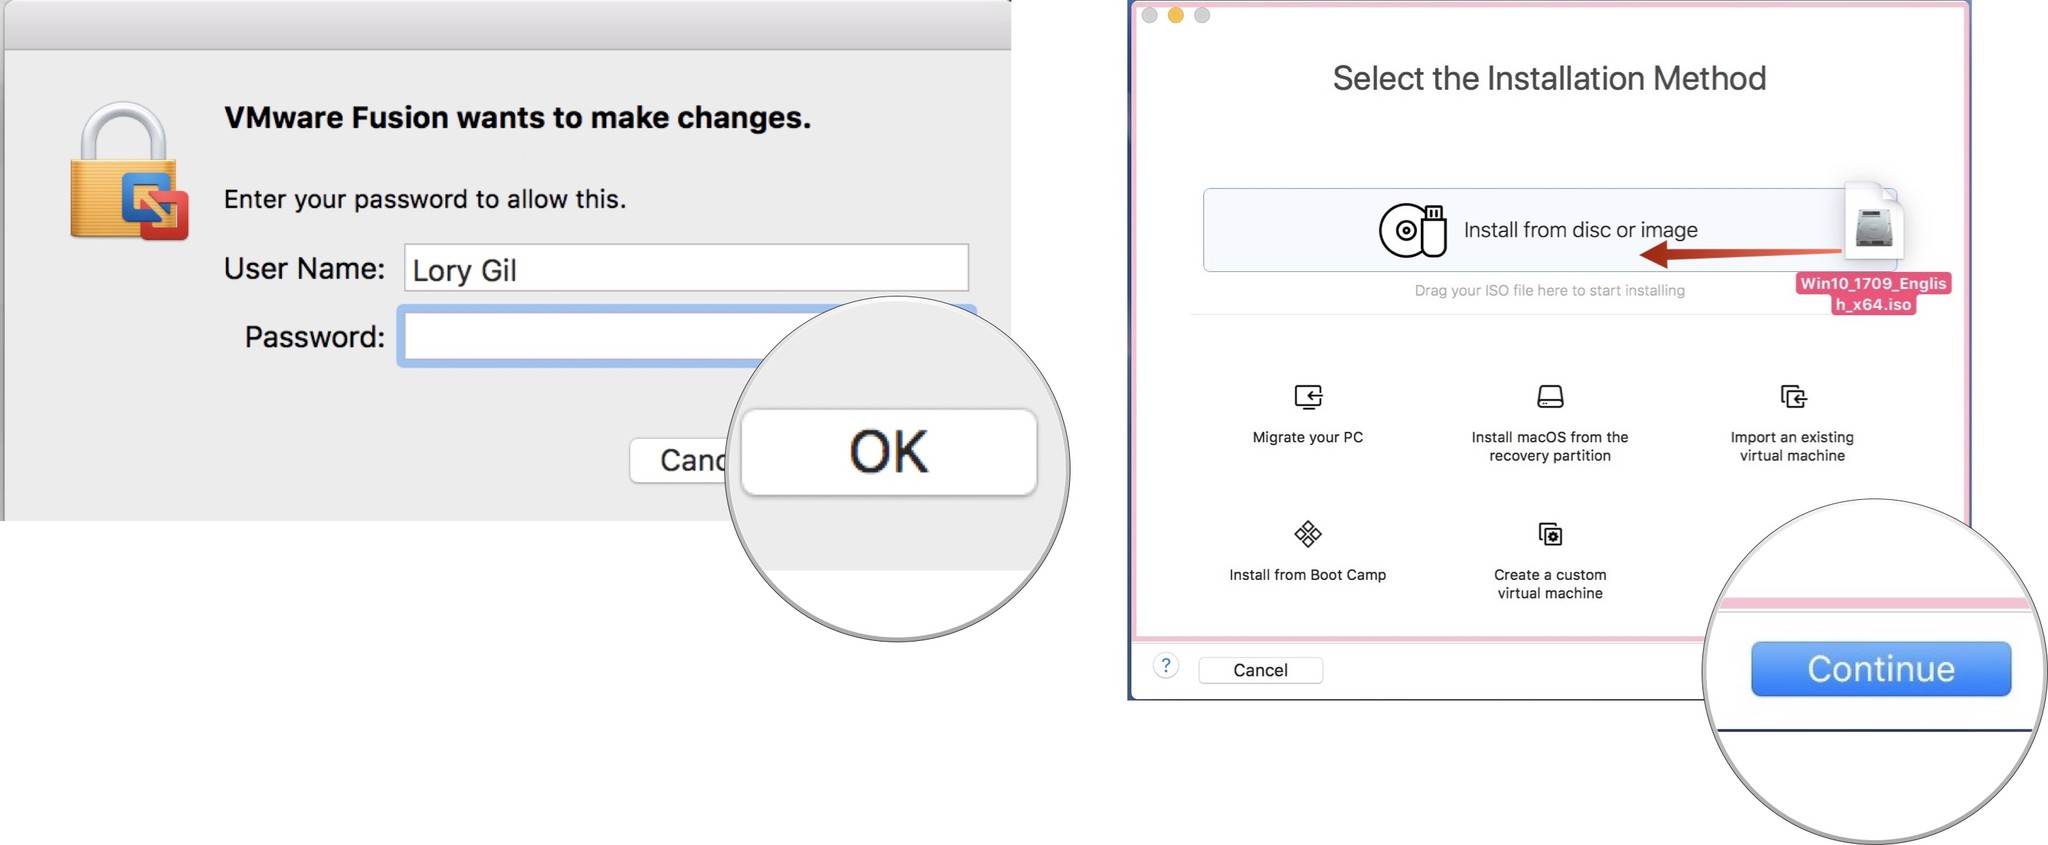
- Enter your Mac log in credentials when prompted.
- Click OK.
- Drag the ISO Windows 10 file to the Installation Method Window.If you’re installing from a different method, select that method and follow the steps to install.
- Click Continue.
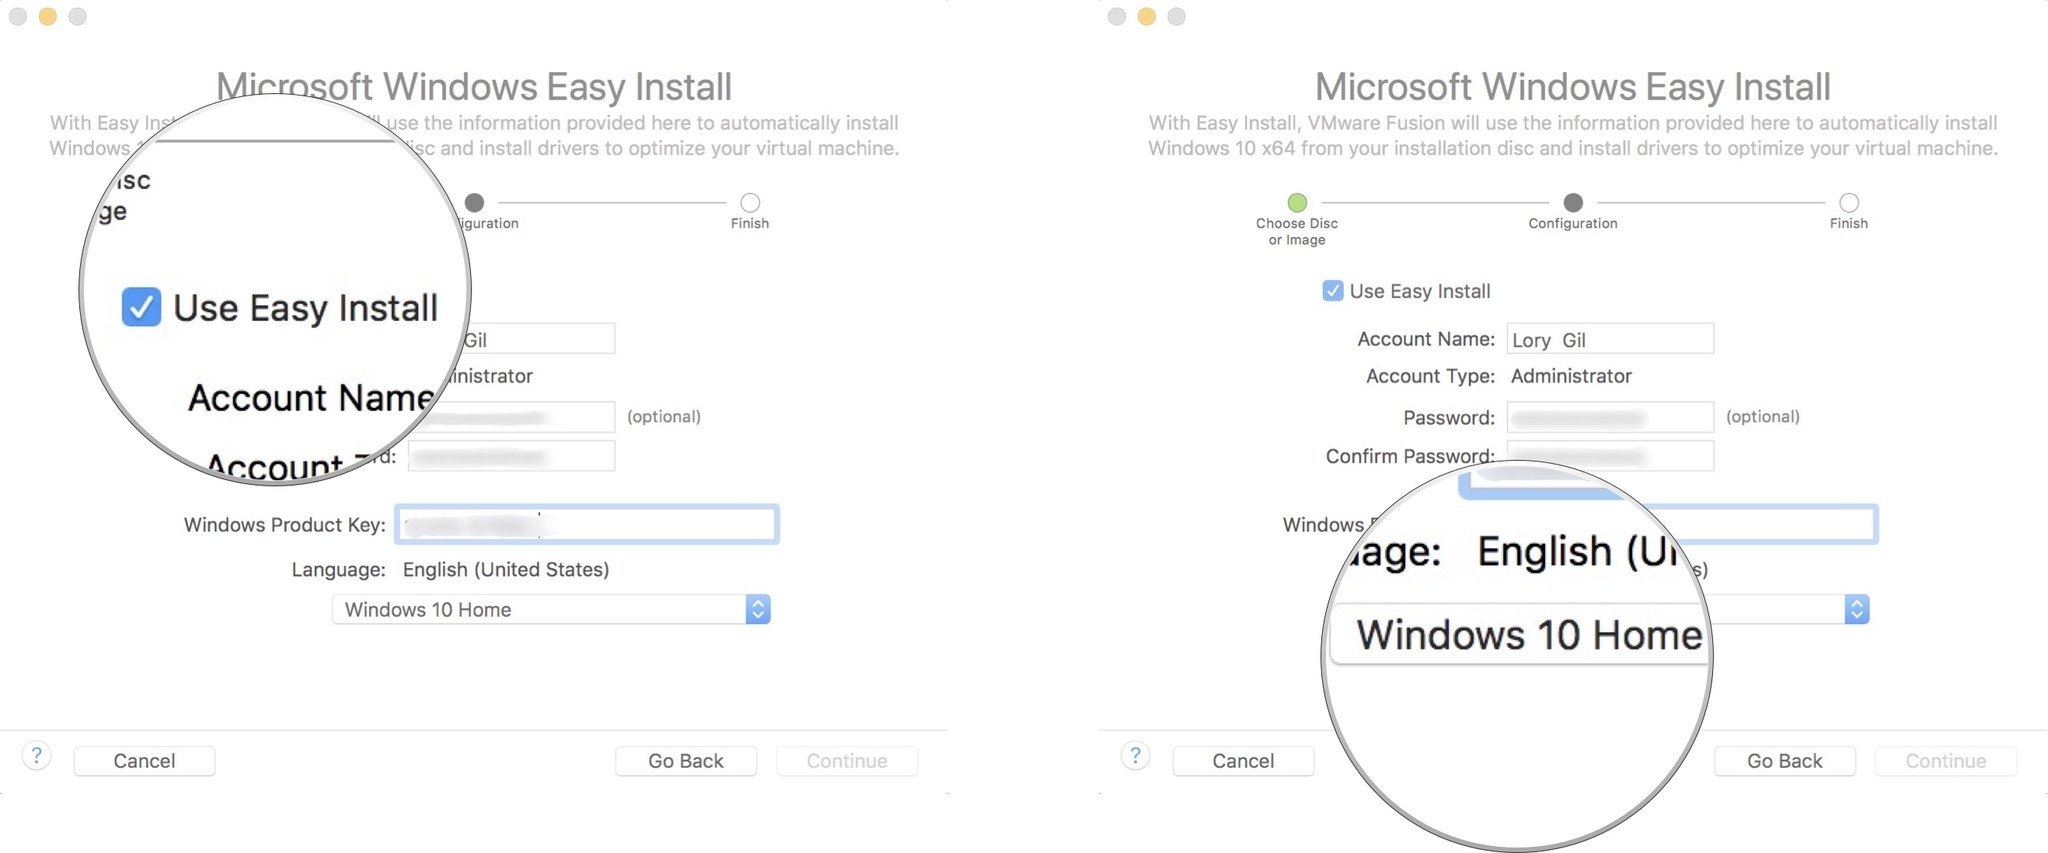
- Tick the box for Use Easy Install. If you feel comfortable setting up the installation settings manually, uncheck the box.
- Create a Windows login account name and password.
- Enter the Windows Product Key.
- Select the Windows version you’re using.
- Select the level of integration. If you want to share your Mac documents with Windows, you’ll want More Seamless. If you prefer to keep Windows and Mac data separate, use More Isolated.
- Click Continue.
- Click Finish.
- Click Save to save this new virtual machine to your Virtual Machines folder.
After Windows finishes installing in the virtual machine, Windows 10 will pop up in a new window. It sort of looks like you’re just using a new program or web browser, but you’ve got a virtual simulation of Windows 10, in its entirety right on your Mac!
Any questions?
Do you have any questions about how to run Windows 10 on your Mac using VMware’s Fusion 11.5? Put them in the comments and I’ll help you out.
iMore offers spot-on advice and guidance from our team of experts, with decades of Apple device experience to lean on. Learn more with iMore!
Lory is a renaissance woman, writing news, reviews, and how-to guides for iMore. She also fancies herself a bit of a rock star in her town and spends too much time reading comic books. If she’s not typing away at her keyboard, you can probably find her at Disneyland or watching Star Wars (or both).
Most Popular
VMware ― это программное обеспечение для виртуализации. Прежде чем рассказать о VMware и показать процесс установки, разберёмся, что такое виртуализация.
Виртуализация — это создание изолированного окружения внутри одного физического устройства. То есть с помощью виртуализации можно создать на одном физическом устройстве (компьютере или сервере) несколько изолированных операционных систем. Подробнее о виртуализации читайте в статье Что такое виртуальная машина.
Использовать технологию виртуализации помогает виртуальная машина. Эту программу нужно установить на устройство перед настройкой виртуализации. С её помощью также можно управлять виртуализацией. ОС, на базе которой создаётся новая среда, называется хостовой системой, а дополнительная среда — гостевой.
Для чего используют виртуализацию и виртуальные машины
Современные ВМ просты в установке и эксплуатации, поэтому их используют не только в профессиональной деятельности, но и для бытовых нужд. Для чего используют ВМ:
- Для запуска программ, которые созданы для других операционных систем. Например, у вас macOS, а вы хотите использовать программу для Windows.
- Для создания резервных копий. Недоработанные программы могут нарушать работу системы. Если вы используете новые программы, позаботьтесь о том, чтобы у вас была возможность быстро вернуть все данные в то состояние, в котором они были до её использования. Резервную копию виртуальной машины сделать легко. Нужно только скопировать папку с её файлами.
- Для тестирования новых программ. Виртуальные машины работают изолированно от хостовой ОС. Это позволяет защитить основную систему от поломок, которые могут вызвать недоработанные программы. То есть, если вы загрузили на гостевую систему программу с ошибками, хостовая не пострадает. А так как резервные копии с виртуальных машин делаются легко, можно будет откатить гостевую систему до состояний, которое было до загрузки некачественной программы. Тоже самое происходит и с программами, которые заражены вирусом. Так как операционные системы изолированы, вирус не сможет выйти за рамки гостевой системы.
- Для тестирования разработанной программы на других операционных системах. Так как разные ОС отличаются по своим техническим характеристикам, при создании программного продукта разработчики тестируют его на разных системах. Это позволяет обнаружить возможные ошибки и проблемы для всех ОС и доработать продукт до выпуска.
- Для запуска игр, которые предназначены для других ОС и их старых версий. Например, вы захотели поиграть в игру десятилетней давности, а у вас Windows 10. Многие старые игры не идут на новых версиях ОС. В этой ситуации можно установить на виртуальную машину Windows более ранней версии и играть на ней.
Несмотря на преимущества использования этой технологии, есть несколько минусов:
- Программа требует много аппаратных ресурсов, чтобы одновременно запускать несколько OS. Гостевая система использует ресурсы устройства, на котором она установлена (процессор, память). Перед установкой виртуальной машины проверьте, что ресурсов основной системы хватит на обе ОС.
- ОС в виртуальных машинах могут работать медленнее. Разработчики стараются решить эту проблему с помощью новых современных программ, но разница в производительности между основной и гостевой системой есть до сих пор.
Первым продуктом для виртуализации стала программа VMware Workstation. Она позволяла любому пользователю установить на своём ПК одну или несколько виртуальных машин. Позже, для более требовательных проектов, появилась версия VMware Workstation Pro. Обе этих версии были предназначена для Windows и Linux.
Со временем всё больше пользователей стали использовать ПК на macOS. Для них подходила только программа для виртуализации Parallels Desktop. Создатели VMware не могли упустить растущий рынок. Чтобы удовлетворить потребности пользователей macOS, они разработали специальную программу для виртуализации — VMware Fusion.
Возможности VMware Fusion
- Поддерживает 32- и 64-битную гостевую систему.
- Поддерживает все версии Windows (с версии 3.11) и большинство распространённых дистрибутивов Linux и Solaris.
- Поддерживает высокоскоростной интерфейс USB 2.0.
- Поддерживает Drag&Drop файлов между хостовой и гостевой операционной системой (включая Linux). Можно создавать общие папки с основной ОС.
- Можно создавать снимки состояния виртуальной машины (снапшоты).
- Может отображать Windows-приложения как окна в основной системе macOS.
- Поддерживает механизм Boot Camp.
- Можно играть в 3D-игры для Windows с поддержкой DirectX 8.1.
- Поддерживает соединение AirPort и Wi-Fi. Каждая виртуальная машина может иметь до десяти виртуальных сетевых адаптеров.
В 2020 году вышла новая версия VMware Fusion 12. В отличие от старых версий, она включает в себя следующие возможности:
- Поддержка macOS Big Sur и Catalina.
- Для macOS Big Sur теперь не нужно устанавливать kernel extensions. Контейнеры и кластеры Kubernetes сразу находятся в Apple API.
- Улучшена работа с контейнерами и движком Kubernetes.
- Поддержка DirectX 11 и OpenGL 4.1.
- Работает с eGPU. Fusion 12 Player и Fusion 12 Pro поддерживают устройства eGPU.Теперь требовательные к графике задачи можно перенести с интегрированного или дискретного GPU на внешнюю графическую карту.
- Совместимость с vSphere 7.
- Поддержка USB 3.1 и прочие улучшения. В Fusion поддерживаются виртуальные устройства USB 3.1, их можно пробрасывать в виртуальные машины с полной поддержкой драйверов.
Чаще всего VMware Fusion используют для установки Windows. Ниже мы расскажем, как установить VMware Fusion на macOS и как развернуть на этой виртуальной машине Windows 10.
Как установить VMware Fusion
-
1.
Скачайте виртуальную машину VMWare Fusion с официального сайта.
-
2.
Чтобы запустить процесс загрузки, двойным щелчком кликните по иконке приложения:

VMware Mac -
3.
Программа запросит пароль администратора. Введите его и нажмите ОК:
-
4.
Программа платная. Если вы уже приобрели её, выберите пункт I have a license key for VMware Fusion 12 и введите ключ, который вы получили после покупки. Нажмите Continue:
Если нет, вы можете перейти на сайт и купить продукт. Также у программы есть пробная версия на 30 дней. Чтобы использовать пробную версию, выберите пункт I want to try VMware Fusion 12 Professional for 30 days. Затем нажмите Continue:
-
5.
Ознакомьтесь с пользовательским соглашением и нажмите Agree:
-
6.
Снова введите пароль администратора.
-
7.
Нажмите Done:
Готово, вы установили VMware Fusion 12 на свой компьютер.
Как установить Windows 10 на VMware Fusion 12
-
1.
Скачайте образ Windows 10 в формате ISO с официального сайта. Загрузка может занять несколько часов.
-
2.
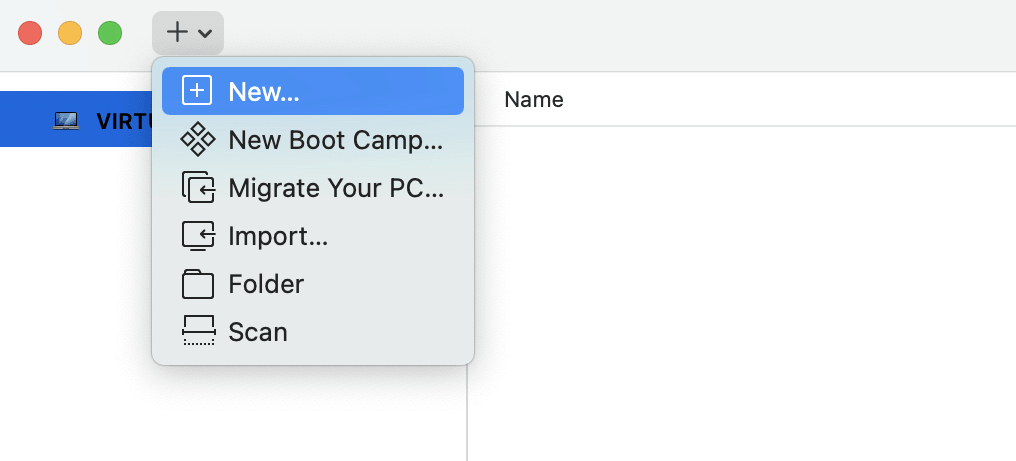
В верхнем меню нажмите на выпадающий список и выберите New:
-
3.
Выберите «Install from disc or image» и нажмите Продолжить:
-
4.
Перетащите в окно файл со скачанным образом Windows 10. Нажмите Продолжить:
-
5.
Придумайте пароль для входа в систему Windows. Выберите язык и версию Windows, например Windows 10 Home. Нажмите Продолжить:
-
6.
Выберите способ интеграции системы More Seamless или More Isolated.
More Seamless ― VMware Fusion будет предоставлять доступ к документам и приложениям вашего Mac в Windows. Файлы на вашем компьютере macOS, которые поддерживаются Windows, будут открываться на созданной виртуальной машине. Windows сможет изменять документы вашего Mac. При выборе такого способа интеграции нужно будет уделить много внимания безопасности, так как установленные программы на виртуальной машине будут влиять на основную OS.
More Isolated ― VMware Fusion не будет делиться документами и приложениями между macOS и Windows. Обе системы будут полностью изолированы друг от друга. Чтобы скопировать файлы, нужно будет перетаскивать файлы вручную.
Если вы планируете использовать виртуальную машину для тестирования новых программ, лучше выбрать More Seamless.
Нажмите Продолжить:
-
7.
Укажите параметры машины. Если вас устраивают настройки по умолчанию, нажмите Finish. Если вы хотите что-то изменить, например объём памяти виртуальной машины, нажмите Customize Setting. После настройки нажмите Finish:
-
8.
Введите имя виртуальной машины (любое). Нажмите Сохранить:
После этого запустится процесс установки ОС. Дождитесь его окончания.
Готово, Windows 10 на VMware Fusion установлена:
Помогла ли вам статья?
Спасибо за оценку. Рады помочь 😊
👍
In this hands-on tutorial, I’ll show you how to run Windows 11 for ARM using VMware Fusion Player 13, an application that includes a free personal license option. The downside to VMware Fusion Player, is that it doesn’t include 3D support for Windows 11 on ARM, but that may not be an issue for you if you’re just need to run a one-off app or other basic software.
If you’re looking to run games, in general, Parallels Desktop 18 remains the better option due to its support of DirectX 11. The downside to using Parallels for running Windows 11 on ARM? It is a paid application that requires a subscription for the version that most people will want to use. You can read and watch our full Parallels Desktop 18 Windows 11 on ARM tutorial for more details.
Table of contents
- How to download the Windows 11 for ARM ISO using Parallels Desktop for Mac
- Install Windows 11 for ARM using VMware Fusion Player
- Configure Windows 11, install network and display drivers
- Conclusion
How to download the Windows 11 for ARM ISO using Parallels Desktop for Mac
Before Parallels Desktop 18 was released with support for Windows 11 for ARM, obtaining a Windows 11 ISO involved numerous time-consuming steps. You can read my full tutorial on Cellular if you’d like to see just how involved this process used to be, but it’s intense. Today, it’s much easier to gain access to a Windows 11 ISO, because Parallels provides one for you and conveniently saves the ISO to your Mac’s ~/Downloads folder. Although this ISO is intended to be used with Parallels Desktop 18, it can be used with other virtual machines, like VMware fusion, as well.
Video: How to install Windows 11 for ARM using VMware Fusion Player (free)
Subscribe to 9to5mac on YouTube for more videos
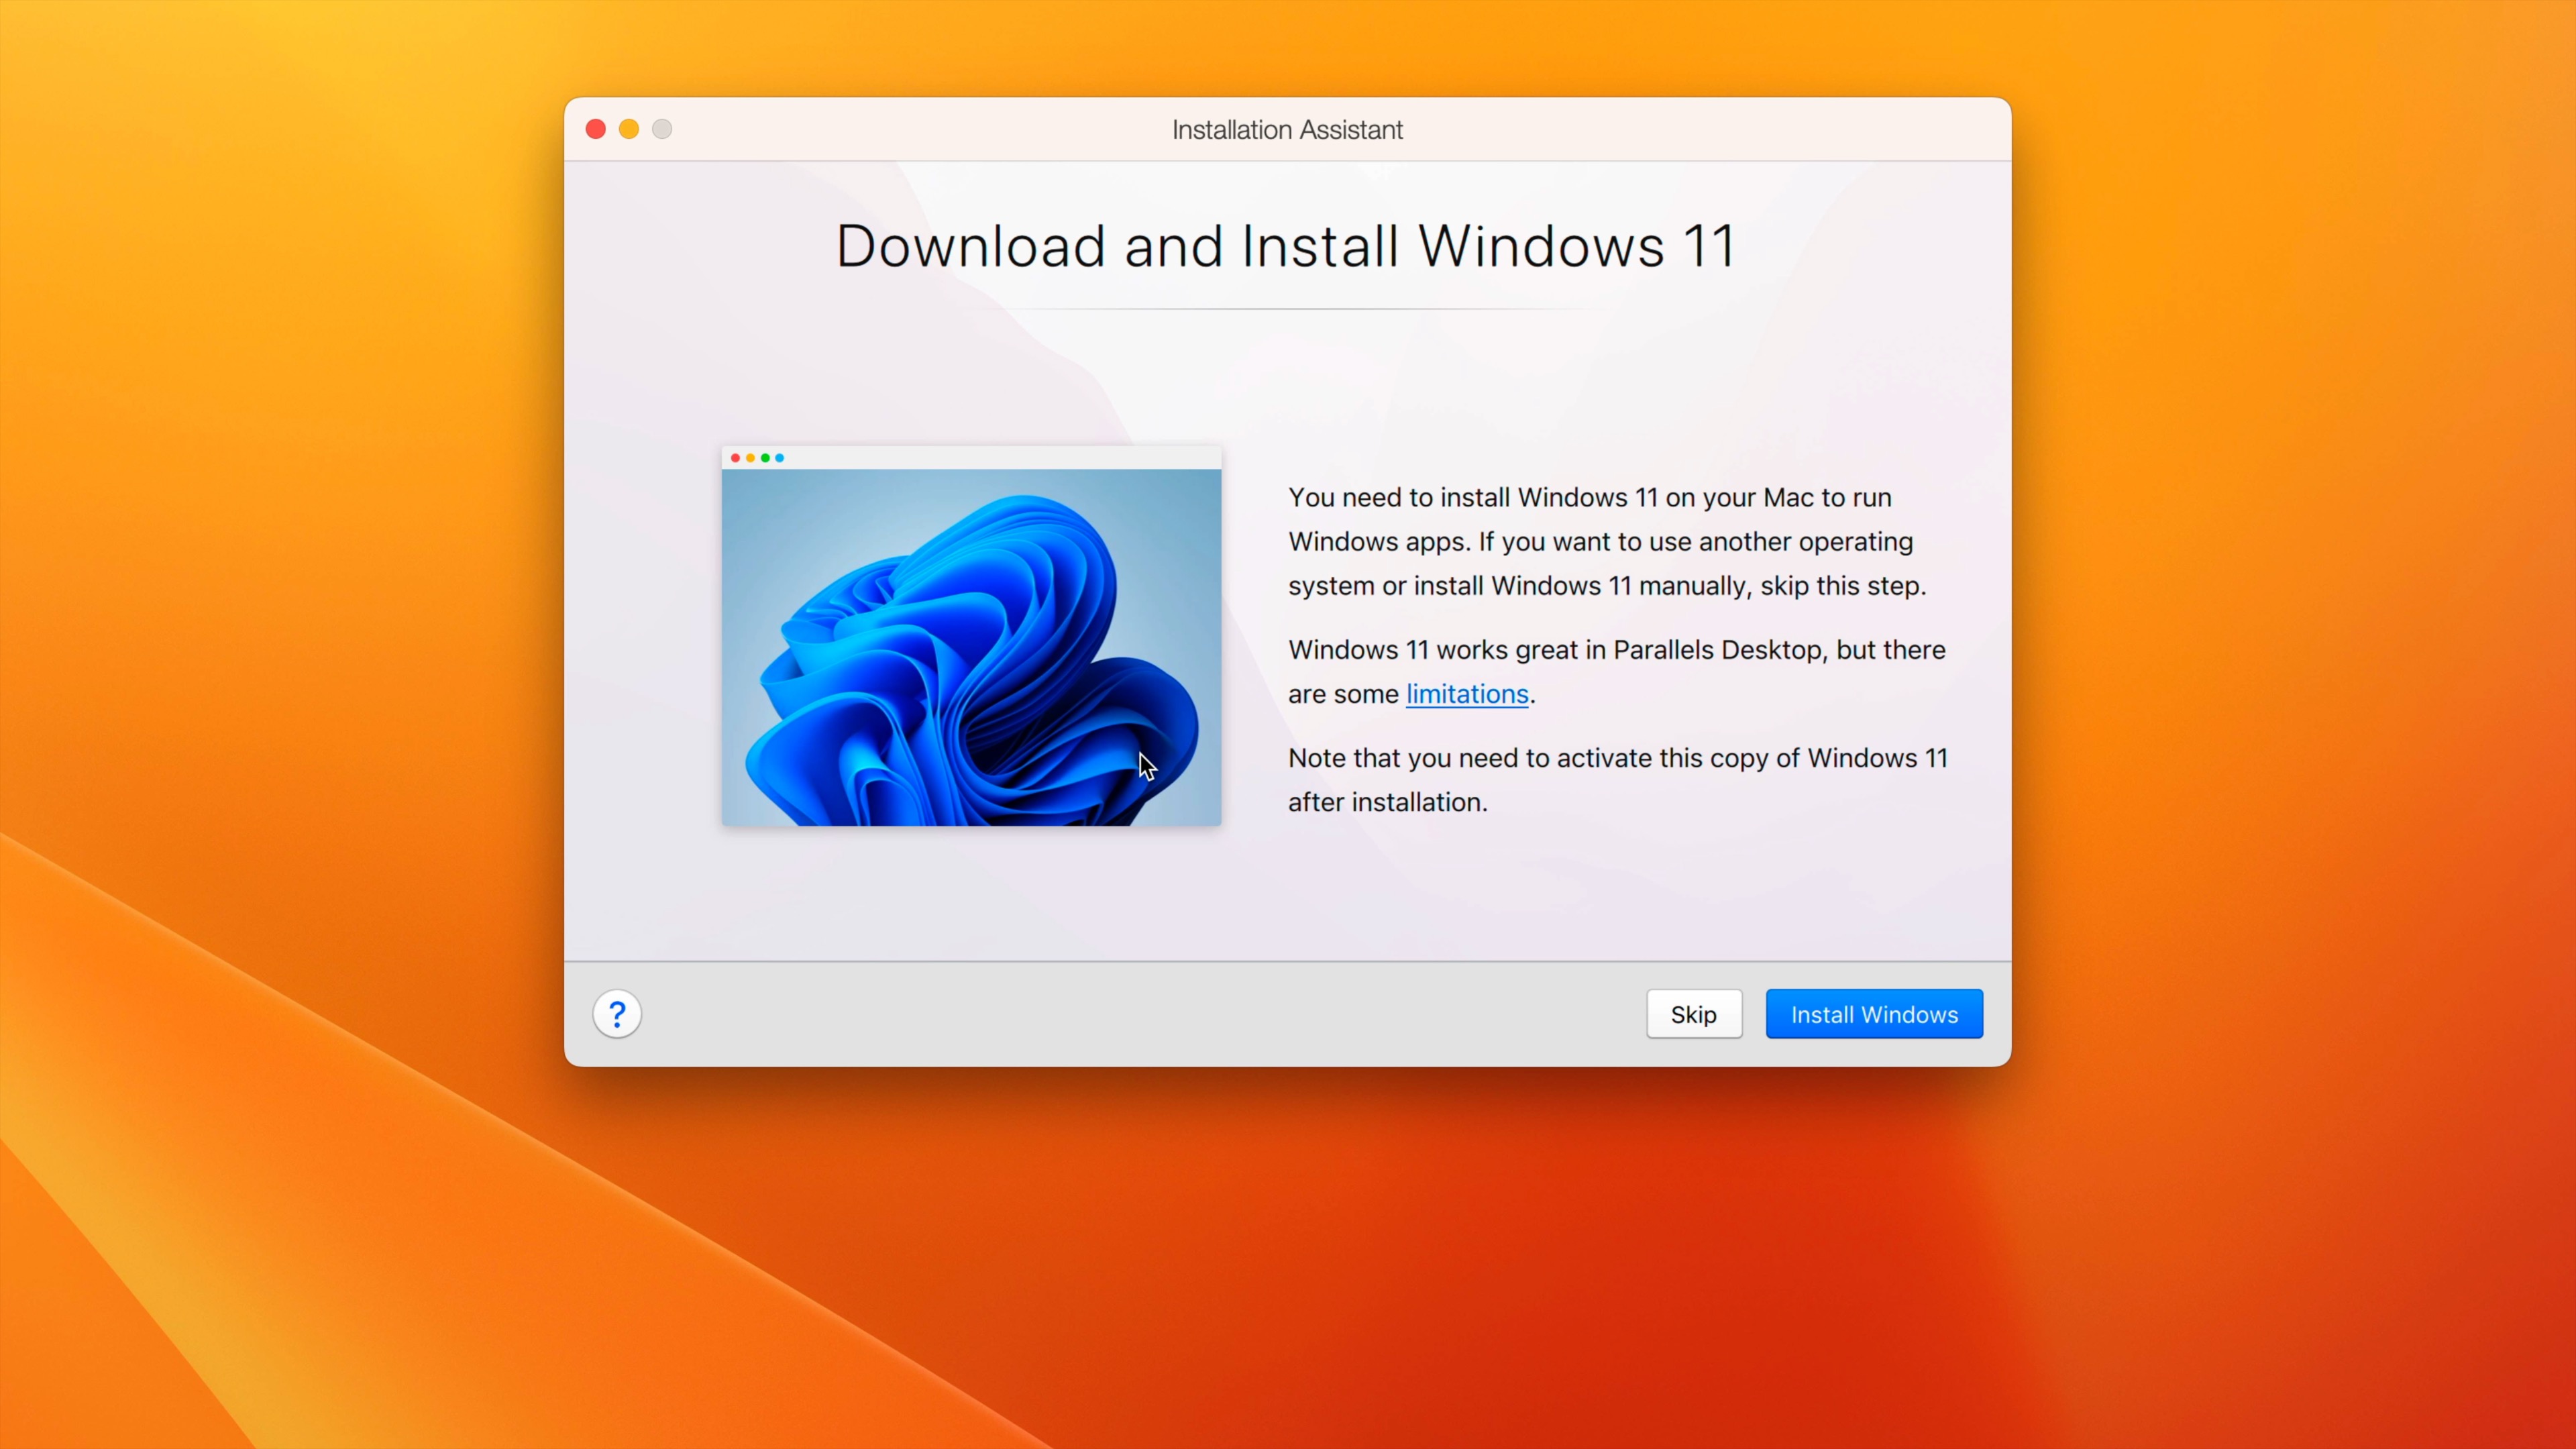
Step 1: Visit the Parallels Desktop for Mac installer page and click Download Free Trial.
Step 2: Open your Mac’s Downloads folder, and mount the image by clicking on Install Parallels Desktop.dmg
Step 3: Double-click Install Parallels Desktop and click Open.
Step 4: Uncheck Participate in Customer Experience Program (optional) on the EULA pop-up, and click Accept. The Parallels Desktop 18 application will then download and Install. You’ll first be prompted to enter your administrator password to continue. After entering your password click OK.
Step 5: After a brief initialization process, Parallels will start and prompt you to download and install Windows 11. Click the blue Install Windows button in the bottom right-hand corner to begin the download of the Windows 11 for ARM64 ISO.
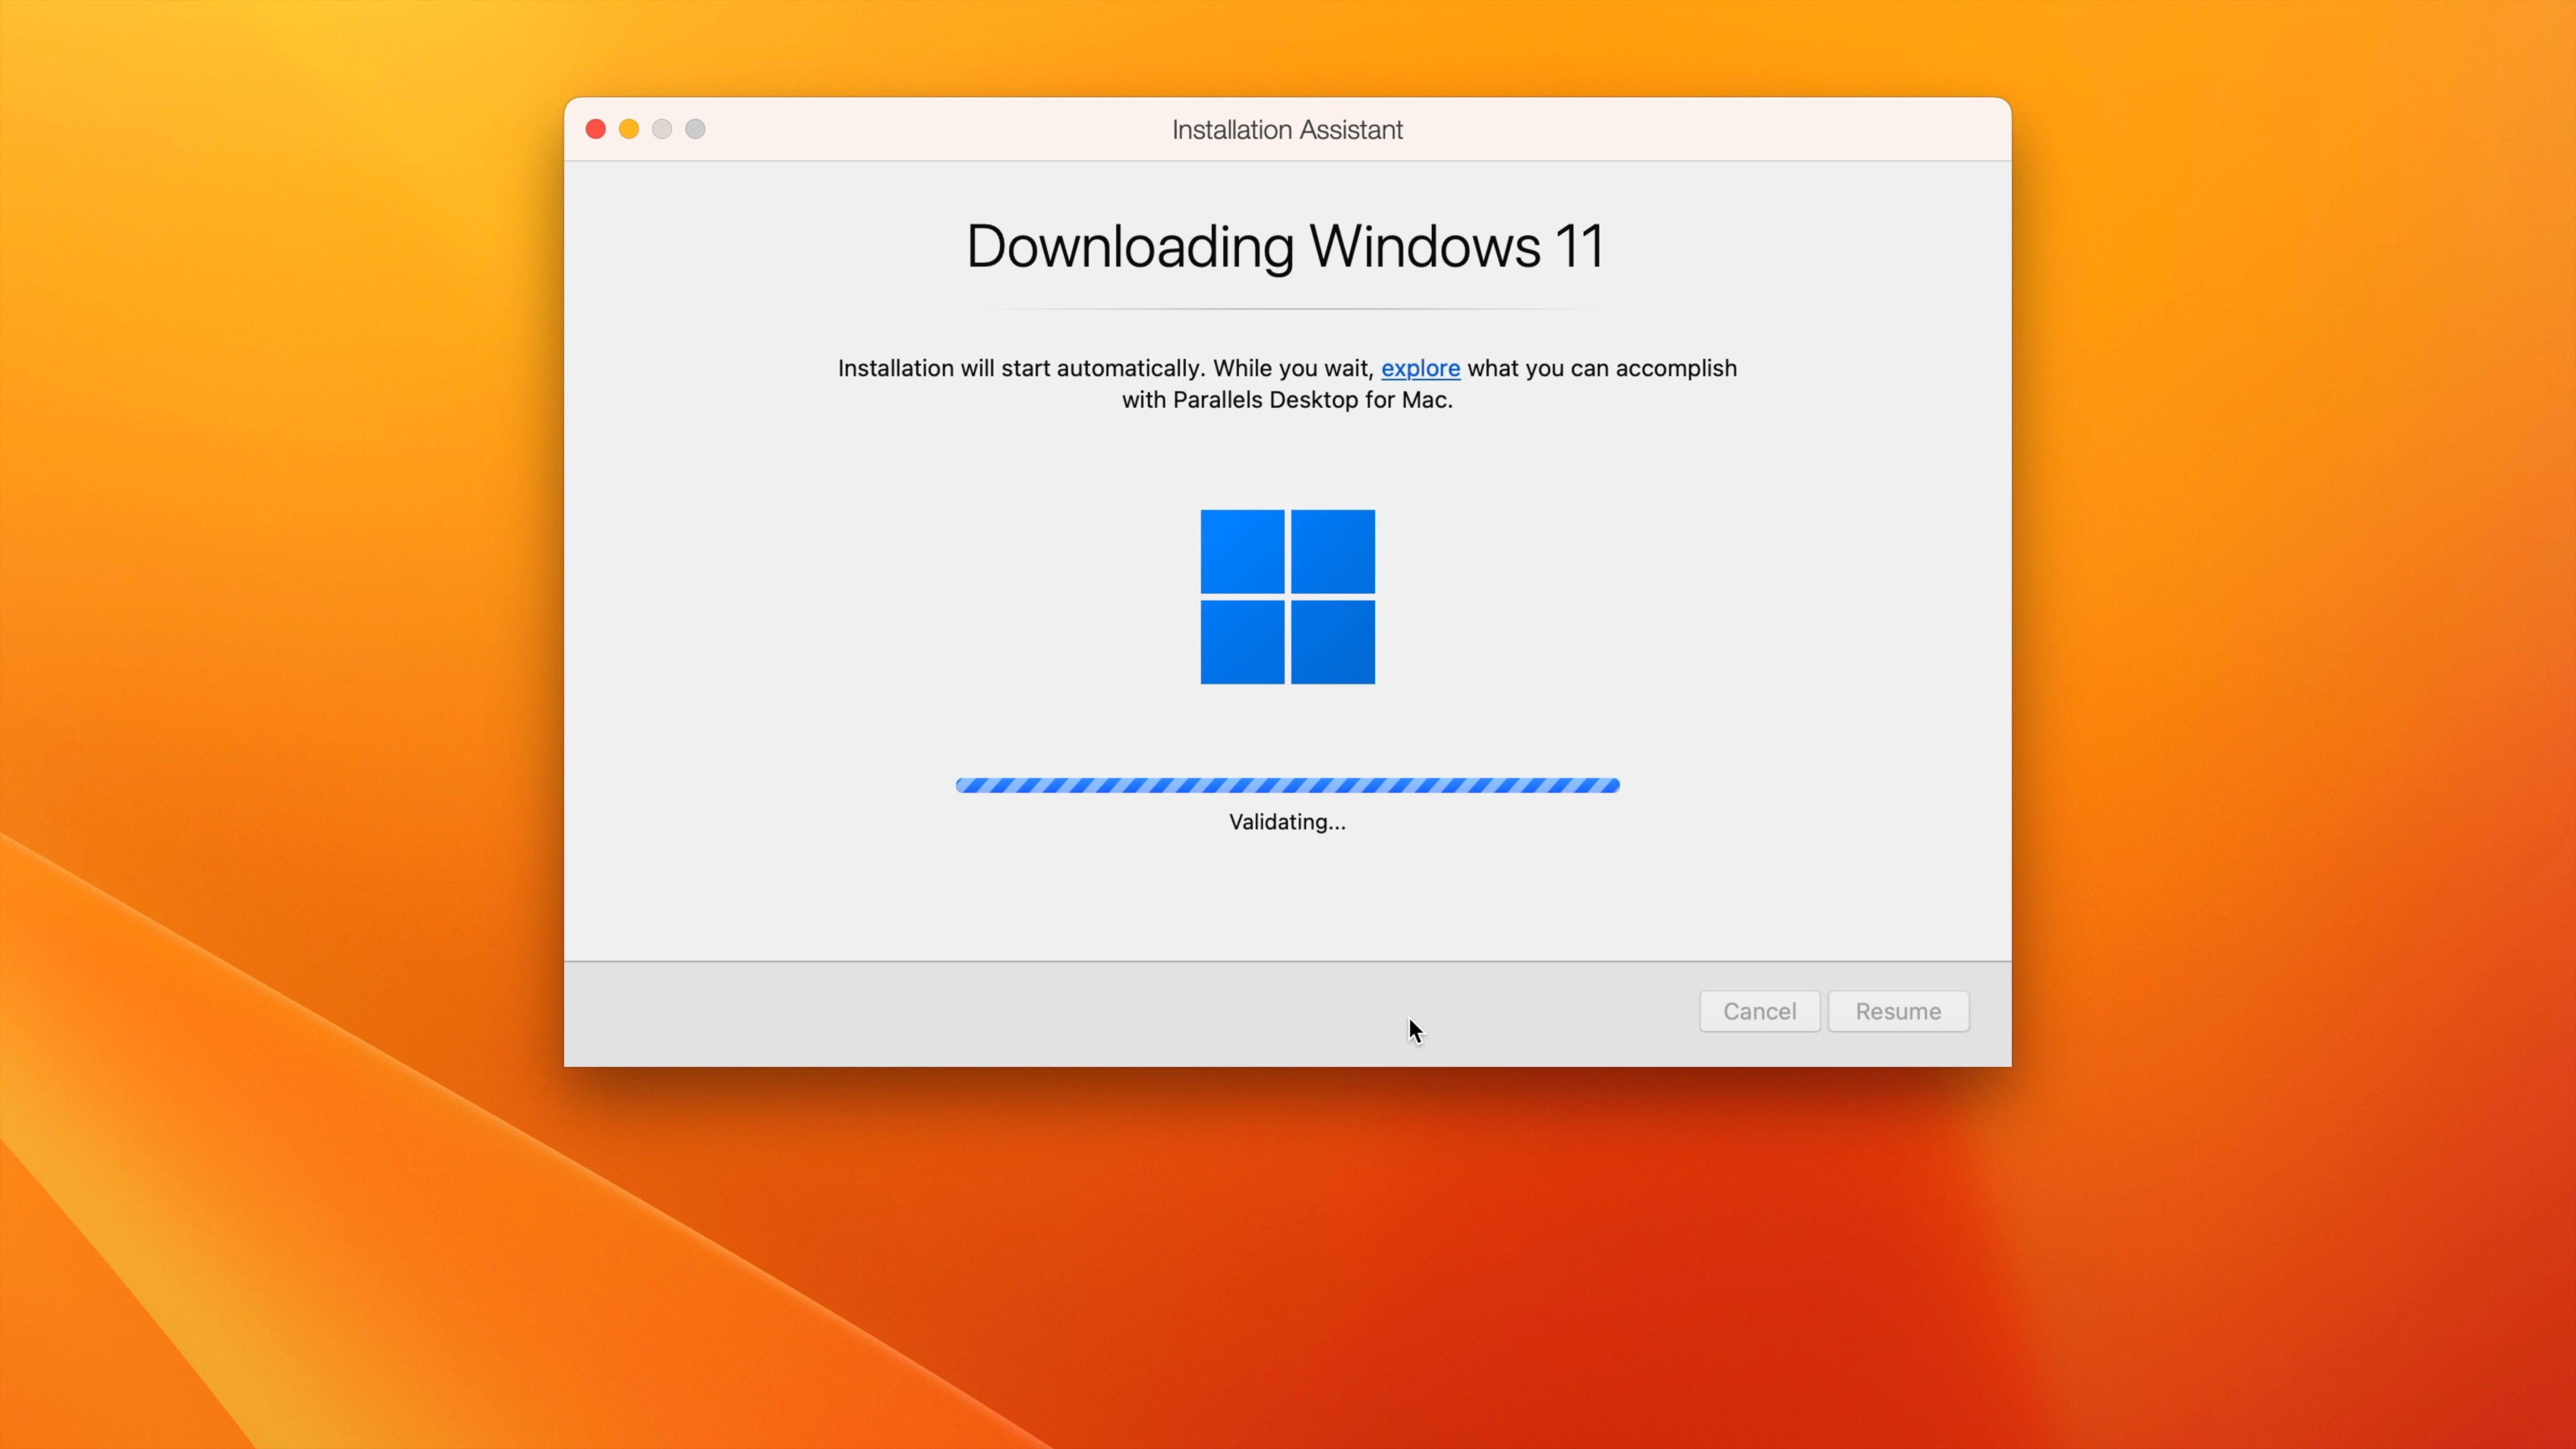
Step 6: Once the Windows 11 for ARM download is completed, the download will validate, and Windows Setup will start automatically to attempt the install. Since we’re only using Parallels to facilitate the Window 11 for ARM64 ISO download, you’ll want to stop the installation.
Step 7: Confirm that the Windows 11 for ARM64 ISO is in the ~/Downloads folder on your Mac. Then Click Windows 11 in the menu bar and select Quit Windows 11 to stop the install and close Parallels.
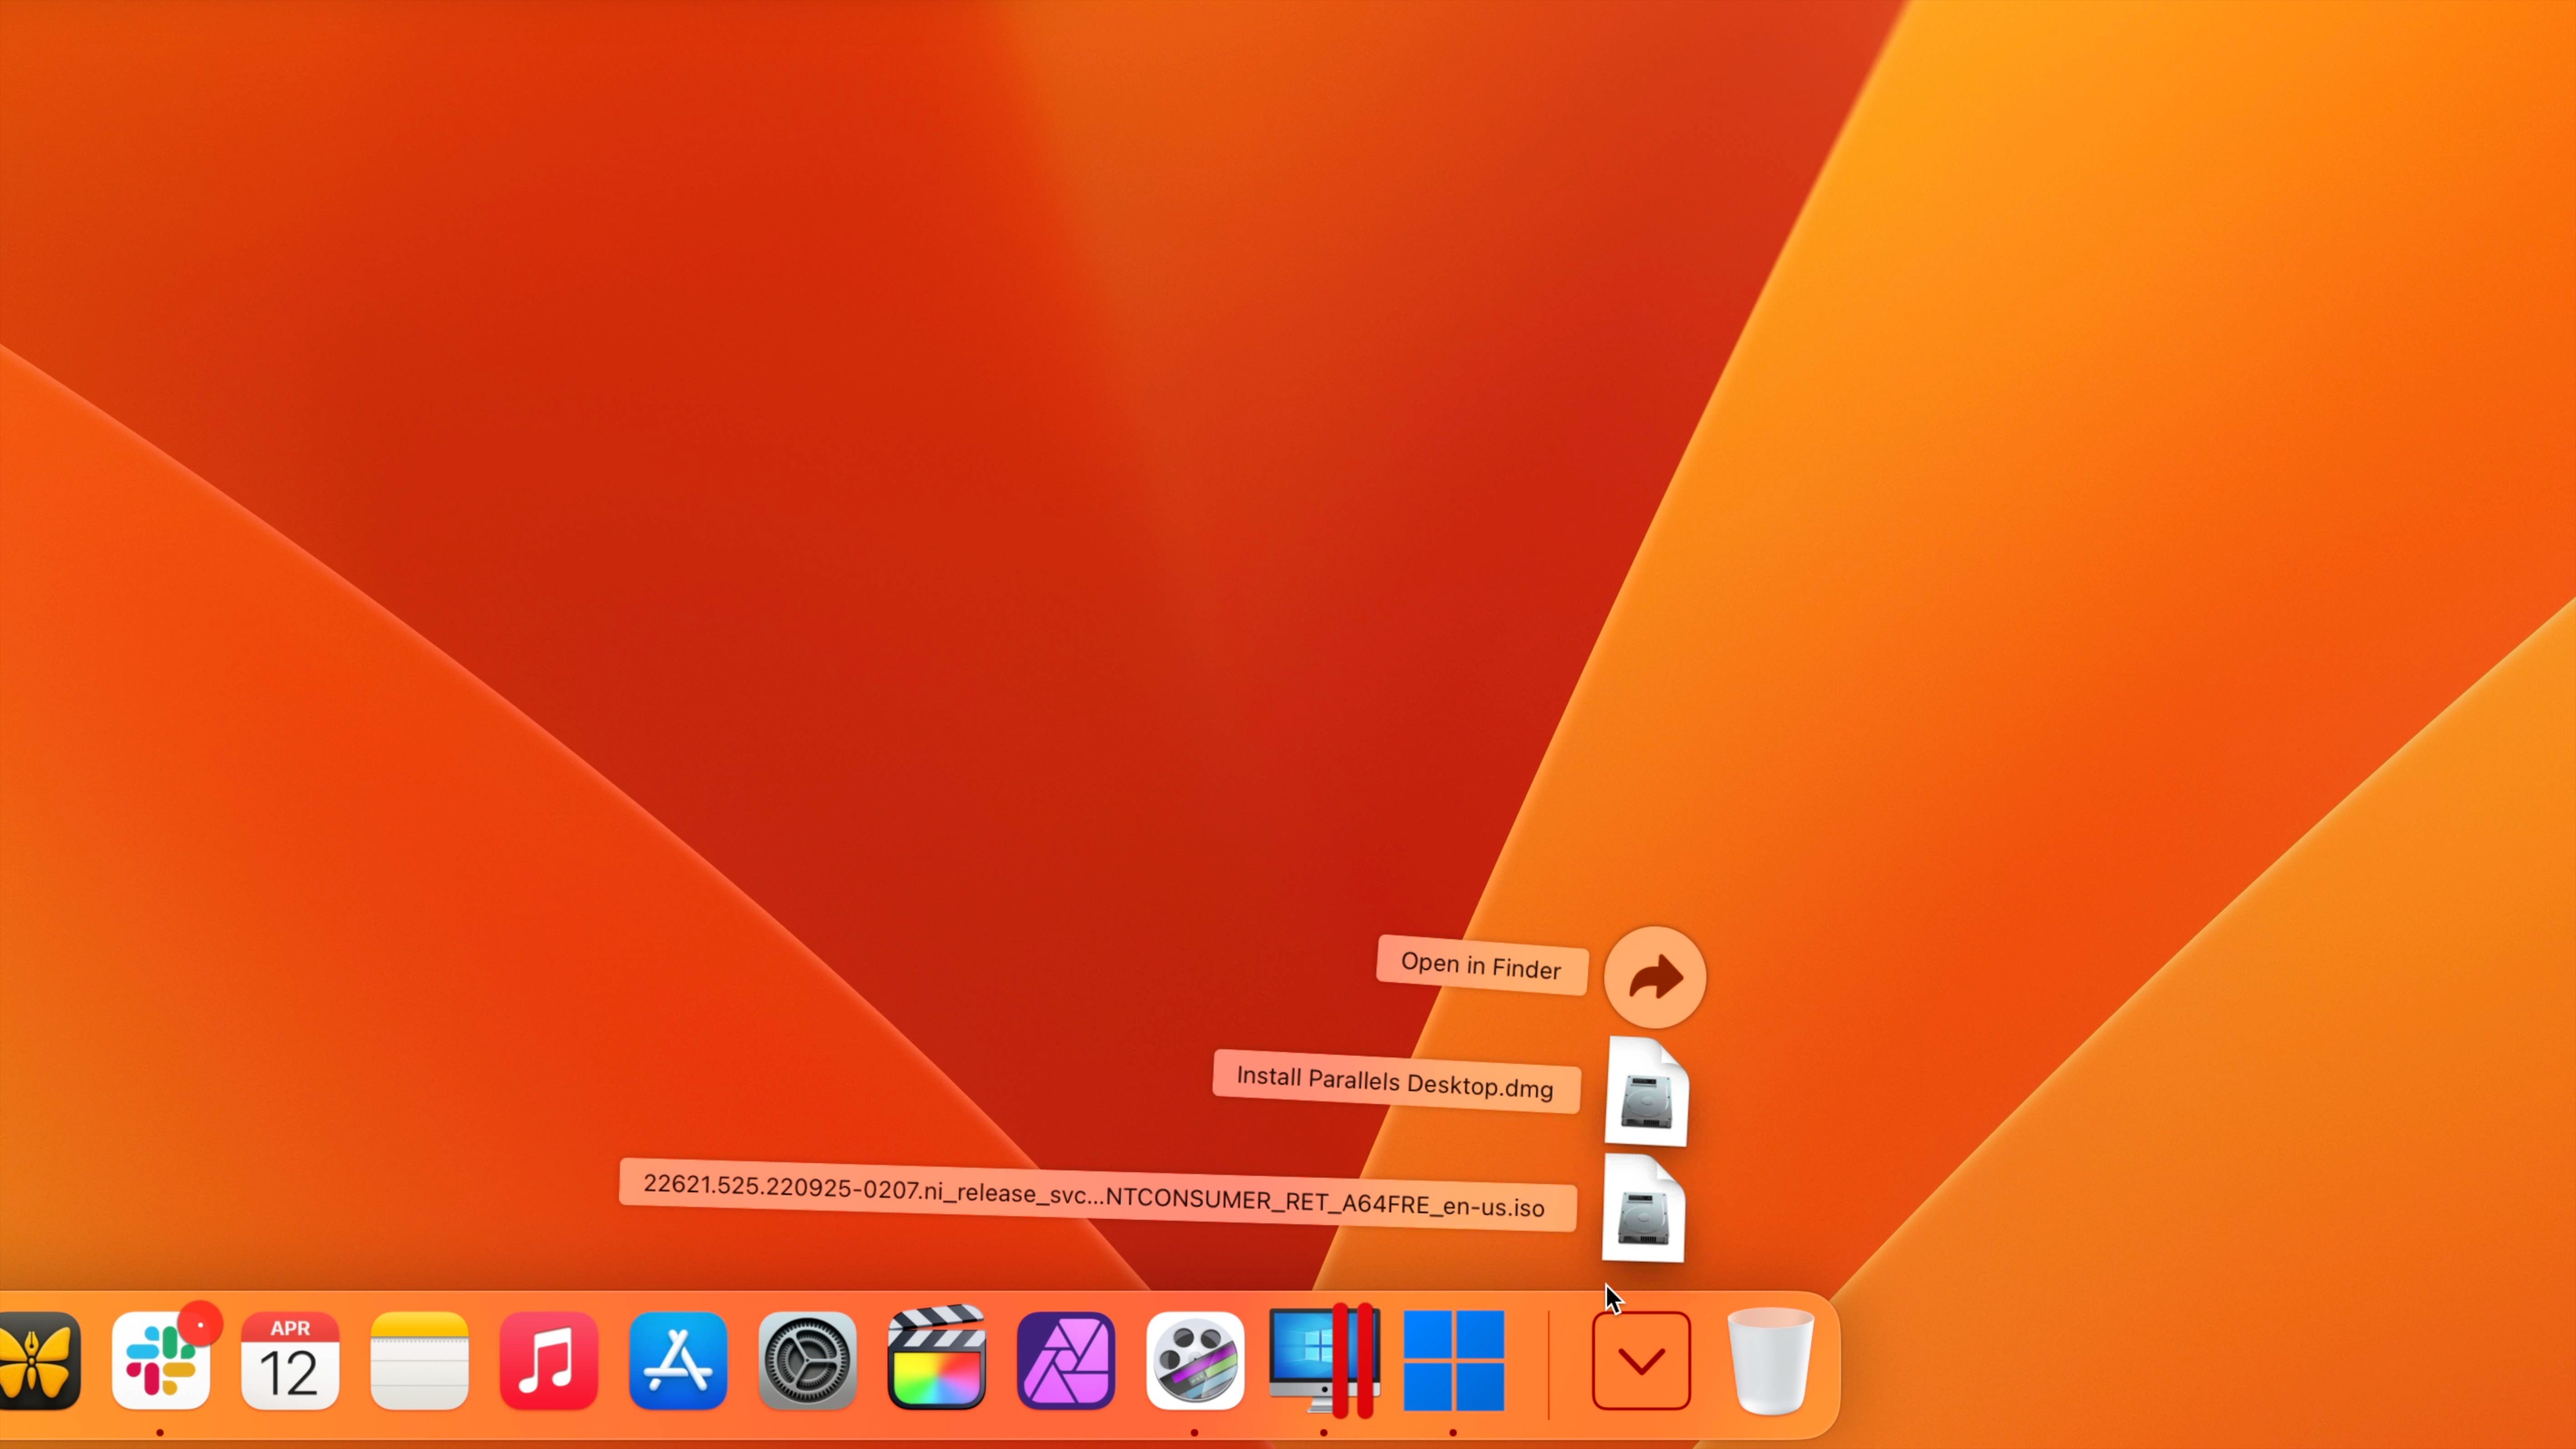
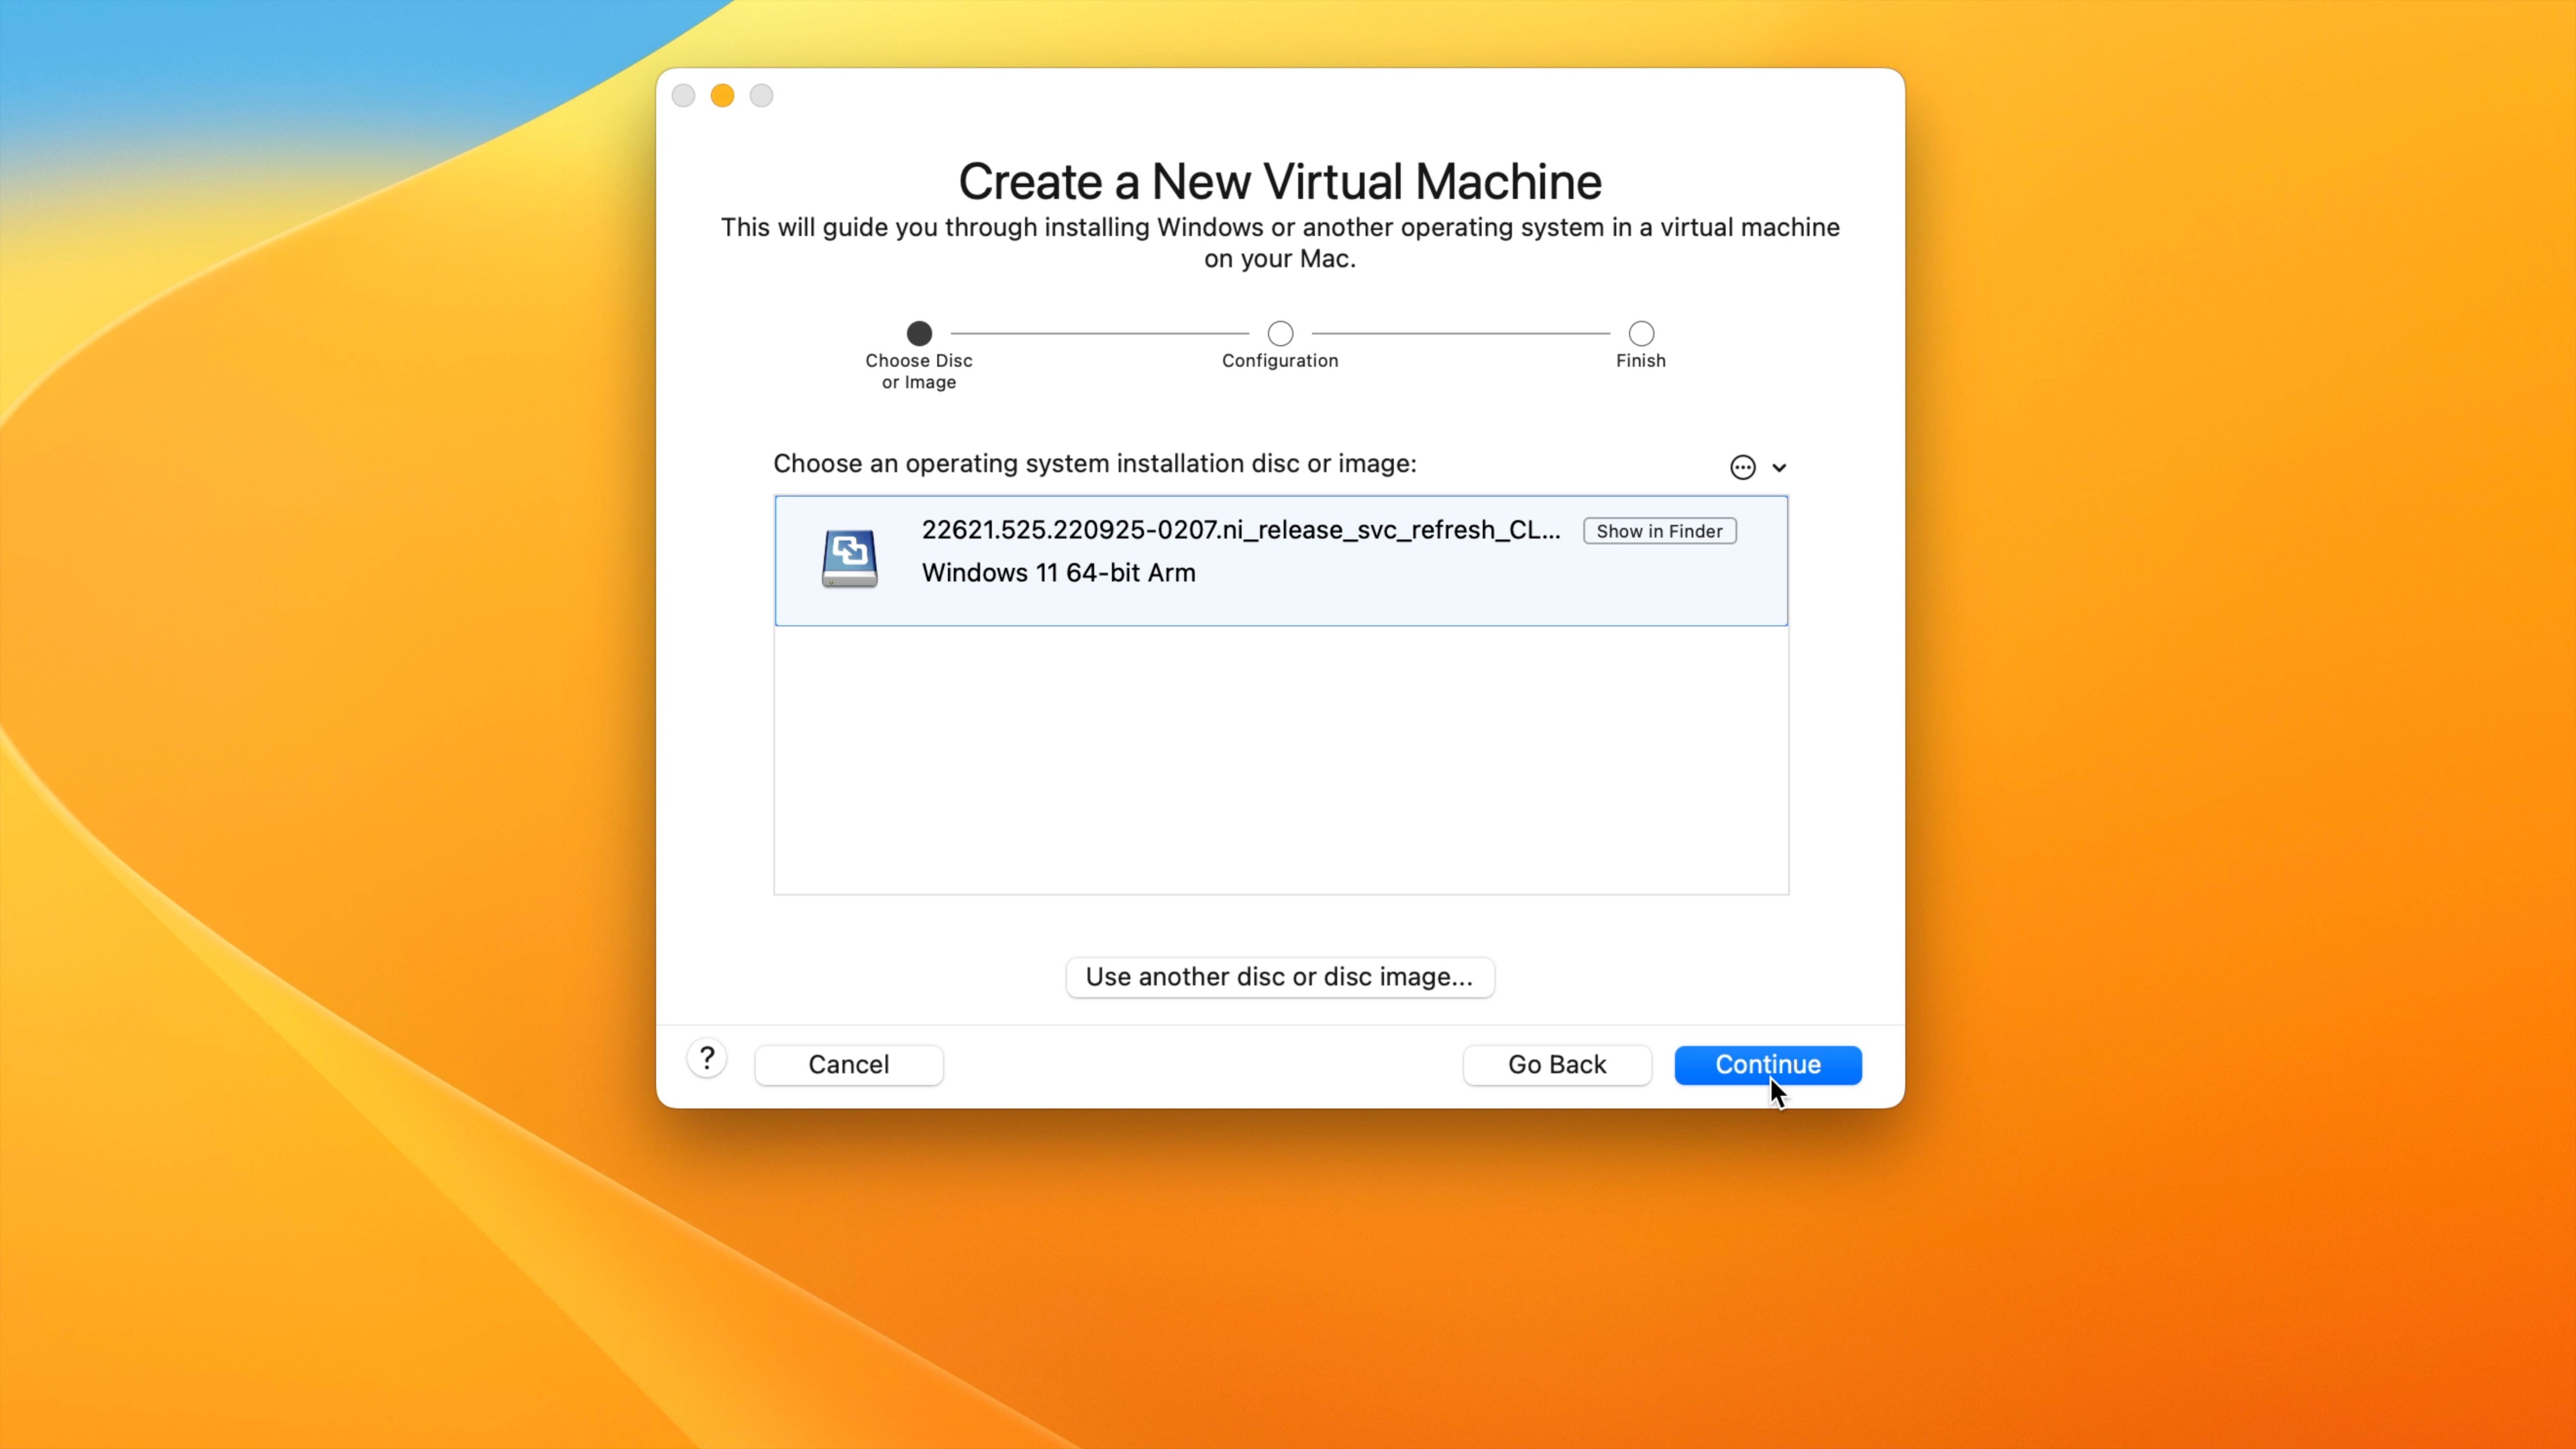
Note: In my example, the Windows 11 for ARM ISO is named:
22621.525.220925-0207.ni_release_svc_refresh_CLIENTCONSUMER_RET_A64FRE_en-us.iso
… but that name of your ISO may be different depending on when you perform the download.
Optional: You can delete the ~/Parallels folder and its contents after the ISO is downloaded if you’d like to save space. You may also completely uninstall Parallels Desktop for Mac if you don’t plan on further using it.
Install Windows 11 for ARM using VMware Fusion Player
Step 1: Visit the VMware Fusion Player 13 page. In order to Download VMware Fusion Player and utilize the personal use license, you’ll need to create and/or login with a VMware account. Once you do, then register for a Personal Use License.
Step 2: Under the License and Downloads tab, click the Manually Download button under the VMware Fusion Player binaries section.
Step 3: Double-click the VMware-Fusion.dmg found in ~/Downloads to mount the image. Once mounted, double-click the VMware Fusion icon to begin the install process.
Step 4: On the are you sure you want to open it prompt, click Open and then enter the administrator password and click OK. A brief initialization will be performed.
Step 5: On the VMware Fusion 13 EULA screen, click Agree in the bottom right-hand corner.
Step 6: Paste the personal license key created in Step 1 in the license key field. This key can be found under the License Information section of the License and Download tab on the VMware Fusion Player website. Click Continue in the bottom right-hand corner and then click Done.
Step 7: The Select the Installation Method screen will now be displayed. Drag the Windows 11 for ARM64 ISO that you downloaded in the previous section to the Install from disc or image portion of the screen and click Continue and Continue again.
Step 8: On the Choose Firmware Type screen, keep the default UEFI selection and click Continue.
Step 9: On the Choose Encryption screen, click Auto Generate Password, and click Continue.
Step 10: On the Finish page, click Customize Settings, type a name for your Virtual Machine, and click Save. Next, configure the Processors and Memory resources as desired, and close the Settings page.
Step 11: On the Virtual Machine window, click the Play button, or click Virtual Machine → Start Up in the menu bar. Press any key when you see the press any key to boot from CD prompt.
Step 12: Windows will boot into its setup utility. Configure language options if needed, and click Next and then click Install now.
Step 13: Windows 11 will start setup. On the initial Windows Setup screen click I don’t have a product key (unless you actually do have one).
Step 14: Select between Windows 11 Home, or Windows 11 Pro. If you plan on purchasing a license, Windows 11 Home is the cheaper option, and most of the Pro features tread closer to the small business/enterprise side of things. Click Next once you’ve made your selection, and click Next again after clicking the checkbox to accept Microsoft’s Software License Terms.
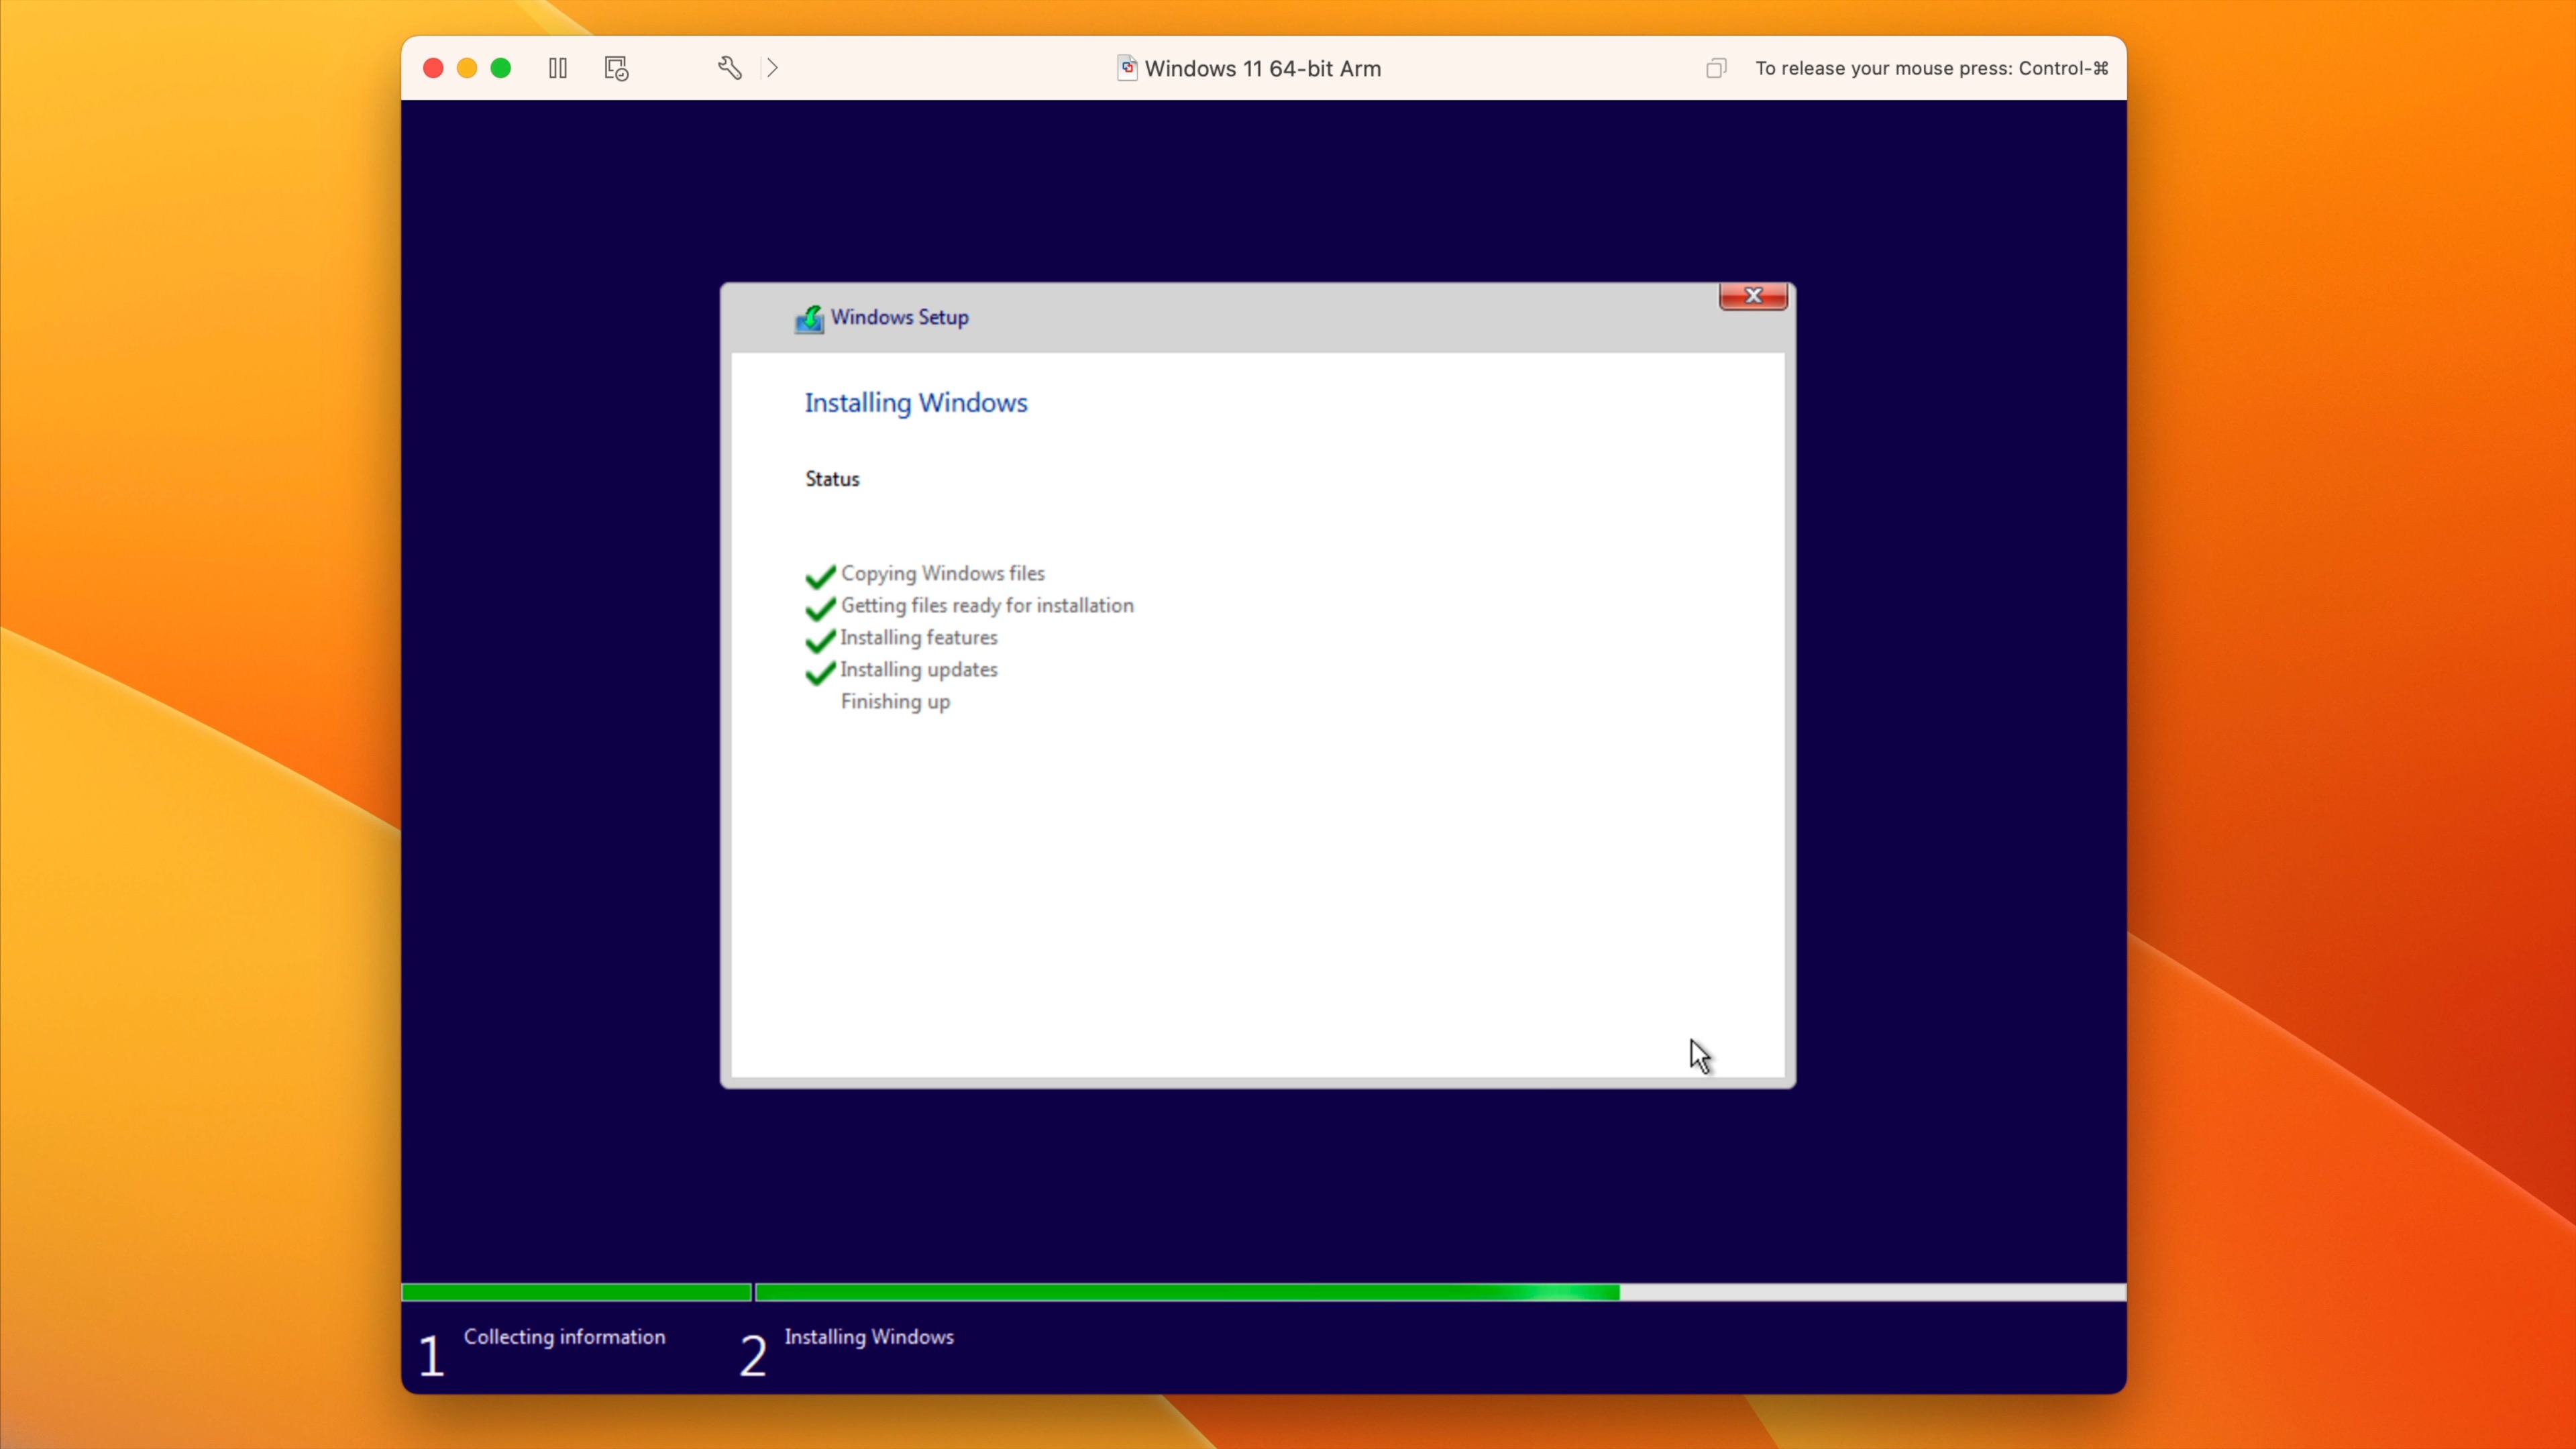
Step 15: Select Custom Install Windows only (advanced) and on the Where do you want to install Windows page, click Next. Windows Setup will proceed to copy files, and install Windows 11. Once the installation is completed you’ll be prompted to reboot.
Configure Windows 11, install network and display drivers
Windows for ARM doesn’t include the needed VMXNet3 virtual network driver, so you’ll need to bypass network enrollment to get through the Windows setup successfully. Once Windows is at the Home Screen, we’ll use PowerShell to make it possible to install VMware tools, which will then install the needed network and display drivers.
Step 1: While on the Is this the right country or region? page, press Shift+F10. If your keyboard is set up as default, and you’re using a Magic Keyboard or MacBook, you’ll need to press Fn+Shift+F10 instead. Doing so will open the Windows Command Prompt.
Step 2: At the command prompt, type the following and press Return:
OOBE\BYPASSNRO
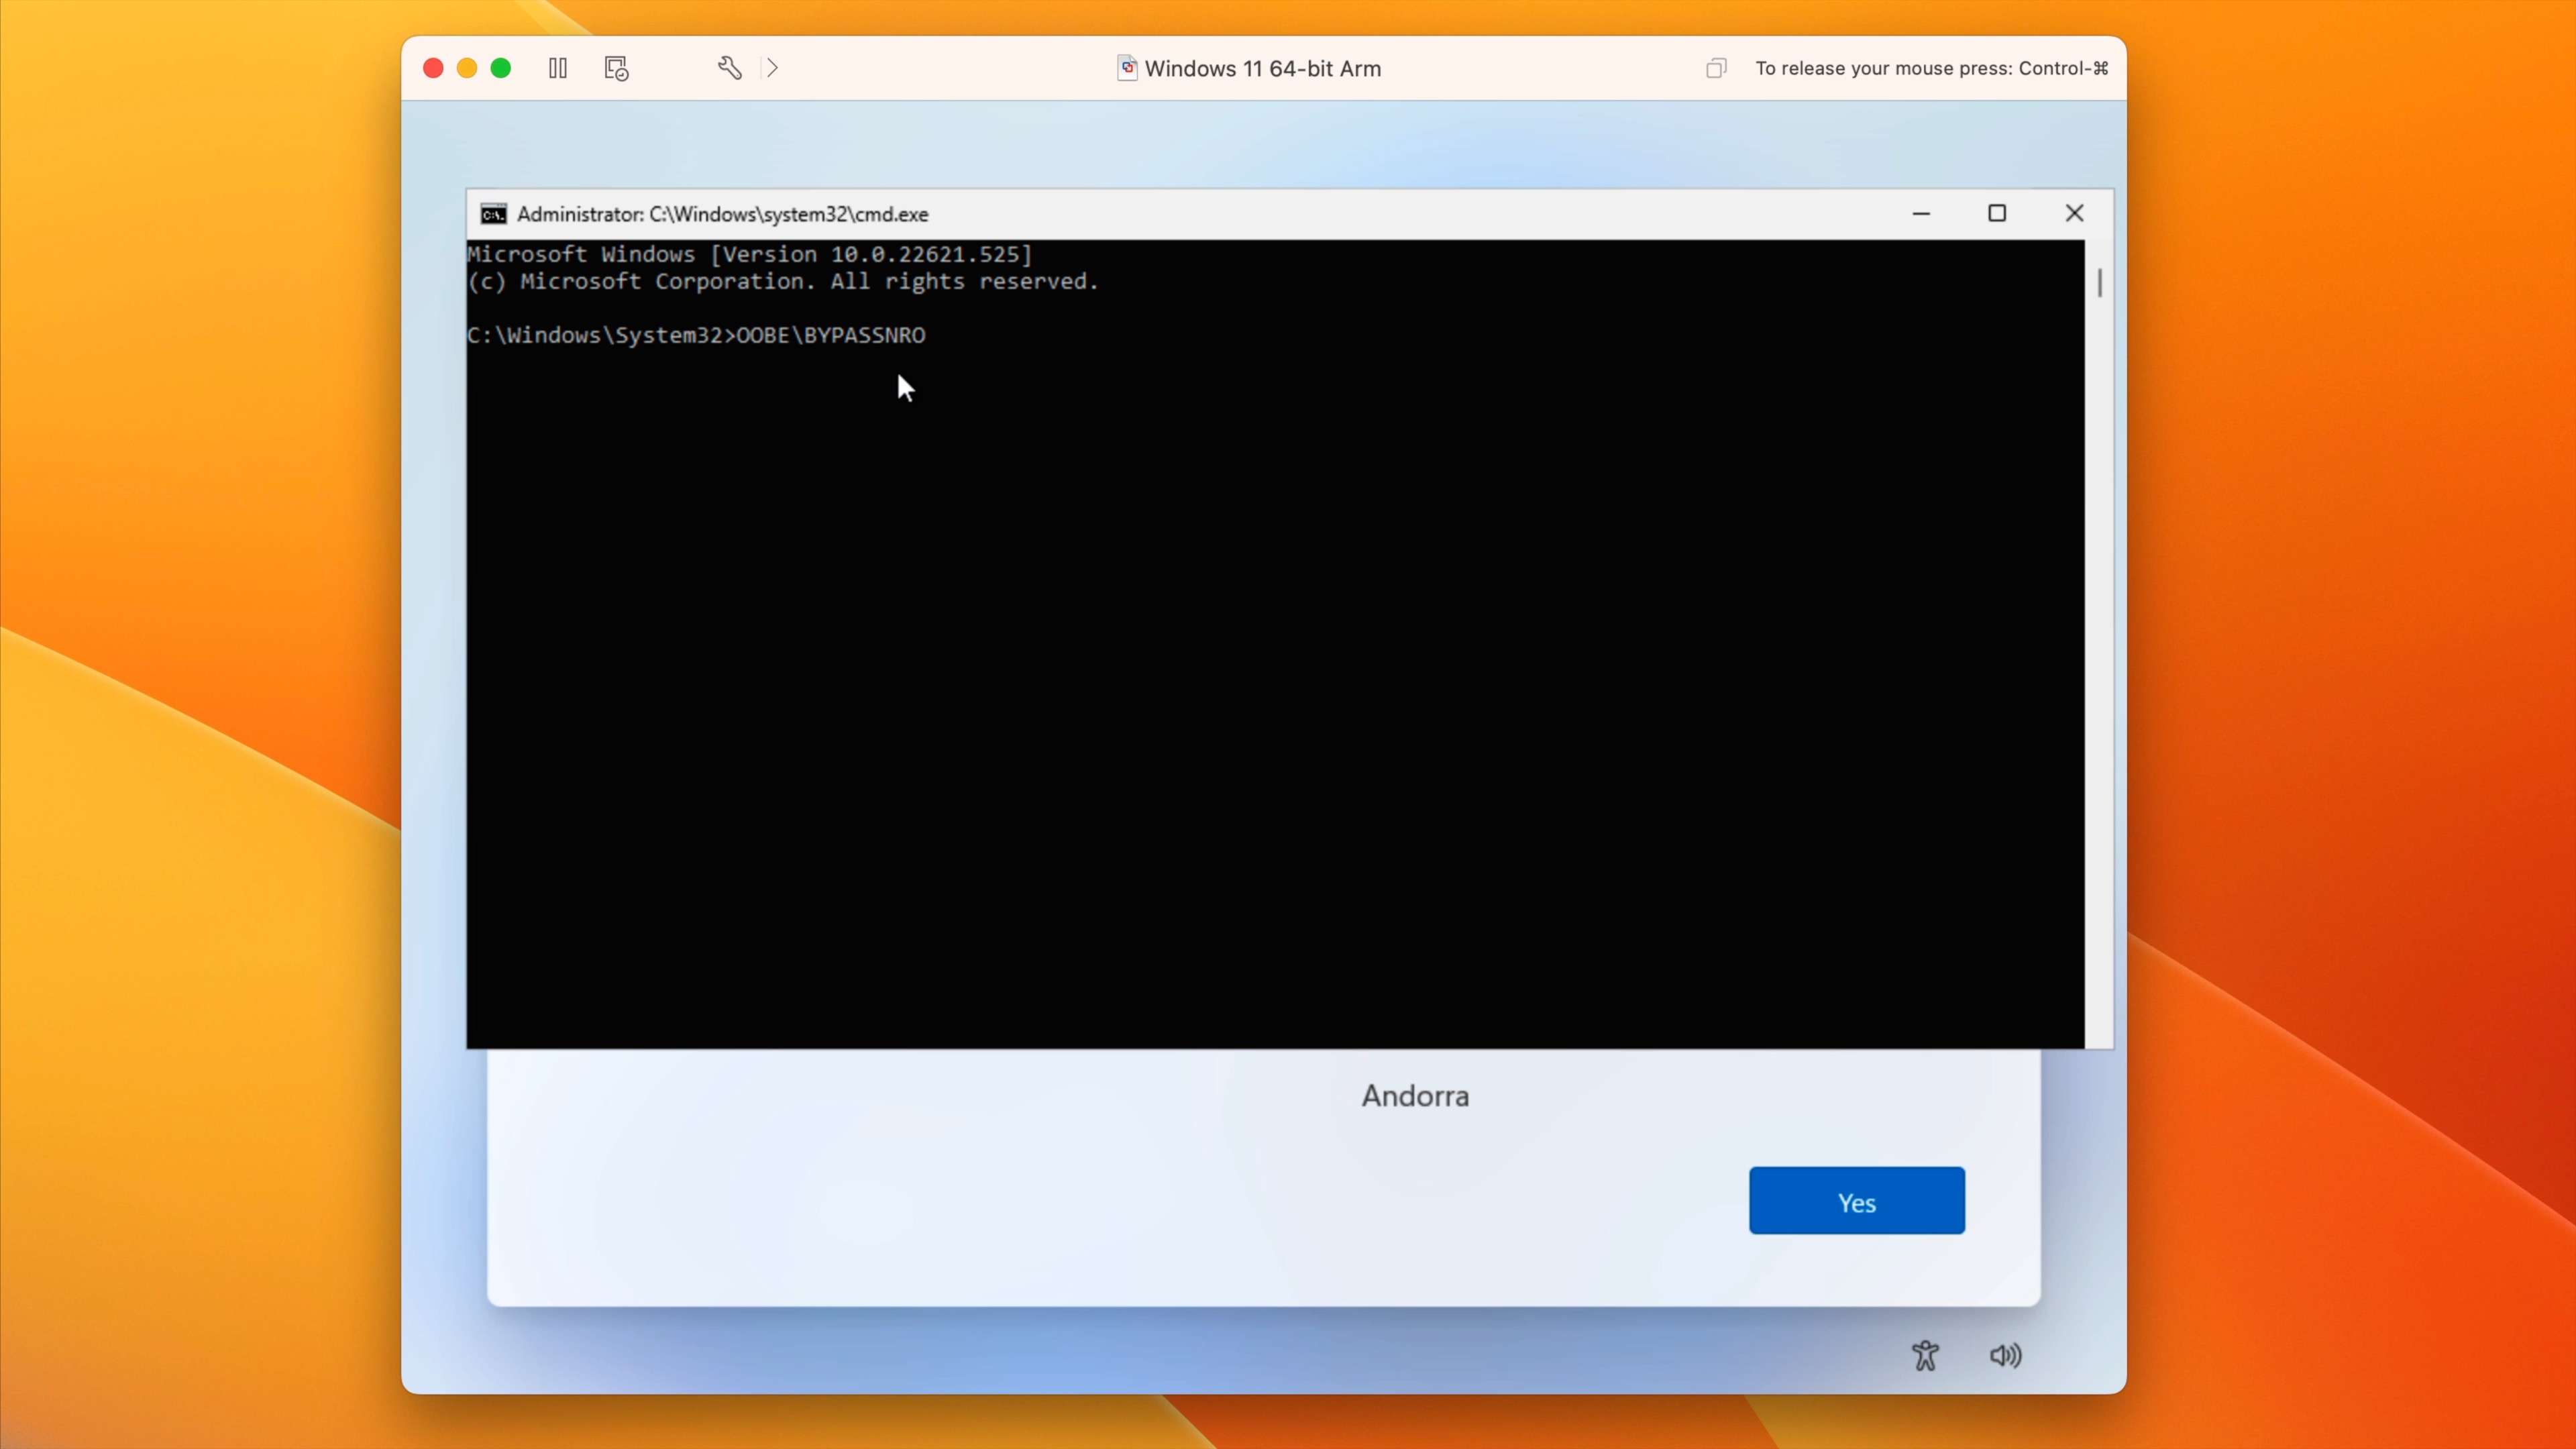
Step 3: Windows will reboot and restart Windows Setup. Select your Country and keyboard layout and click Yes. On the second keyboard layout page click Skip.
Step 4: On the Let’s connect you to a network page, click I don’t have internet at the bottom of the page and click Continue with limited setup on the next page.
Step 5: Enter your name and click Next. You may assign a password now, or leave the password field blank and click Next.
Step 6: Disable all of the privacy settings and click Accept. Windows will now continue to get things ready in the background. This may take a while, just be patient, and eventually you’ll be brought to the Windows desktop.
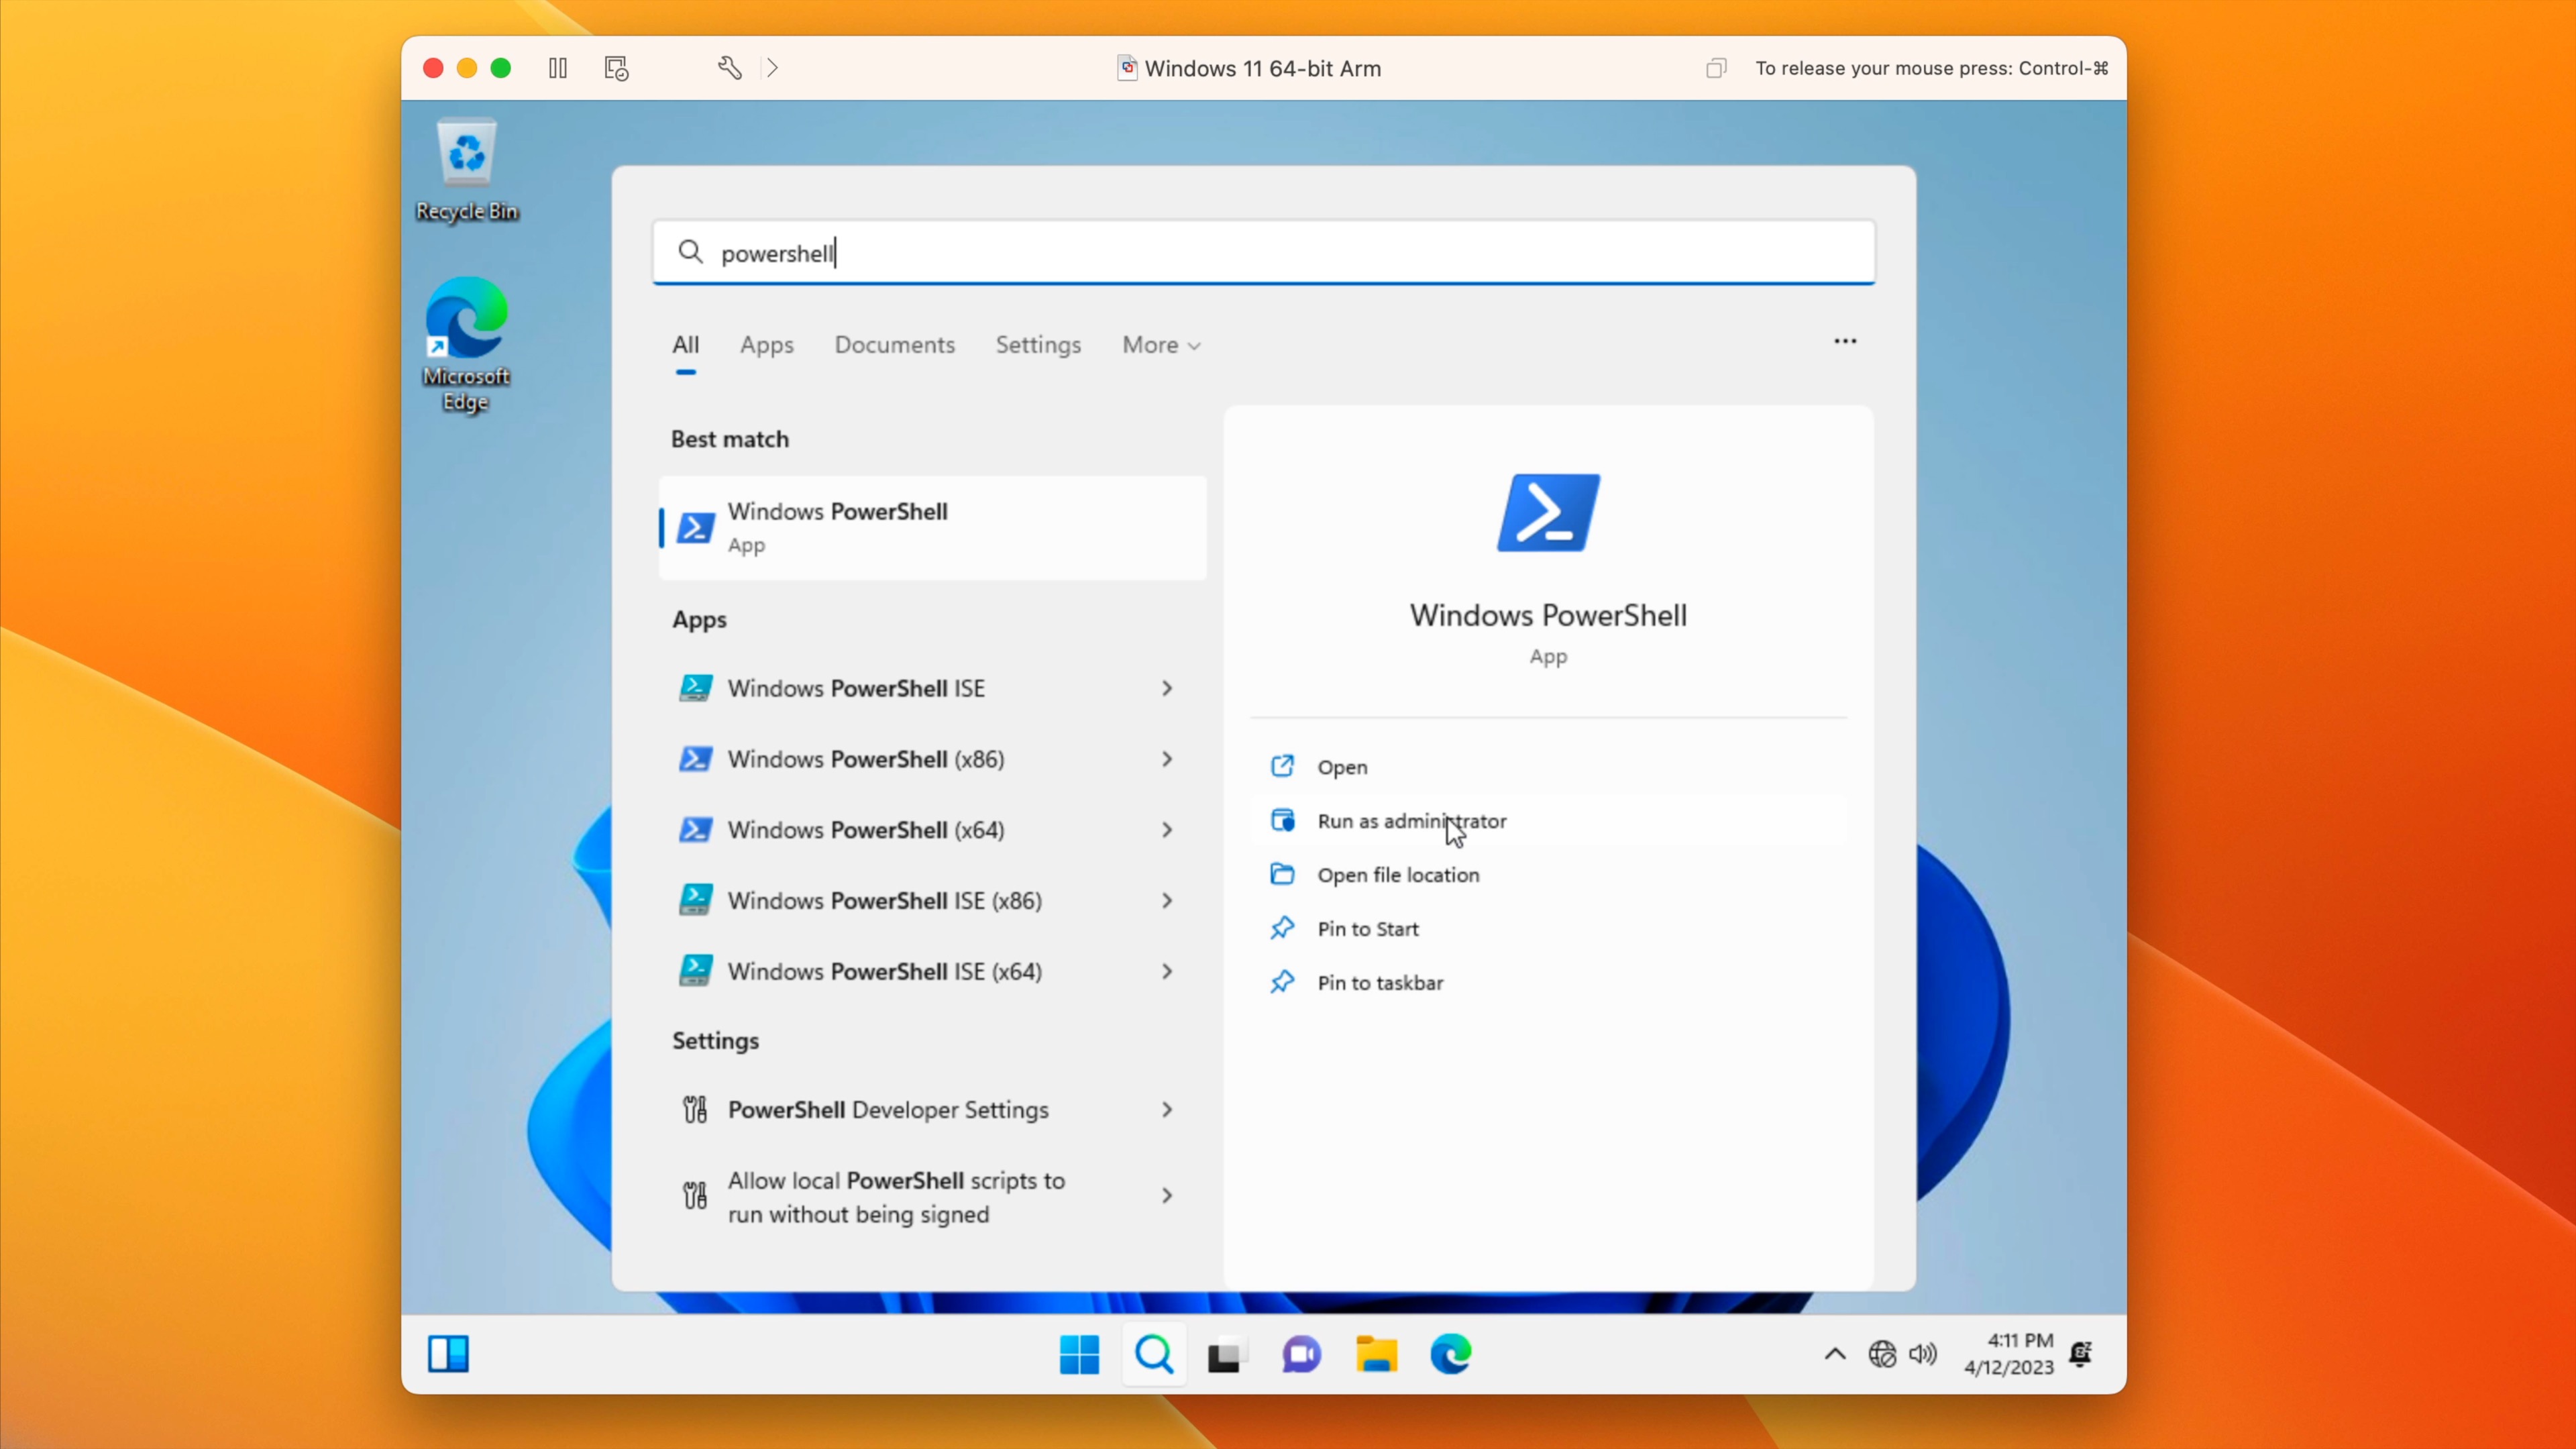
Step 7: Open the Start Menu, type “PowerShell” in the search box, and click Run as administrator for PowerShell. Click Yes on the User Account Control pop up, and PowerShell will open.
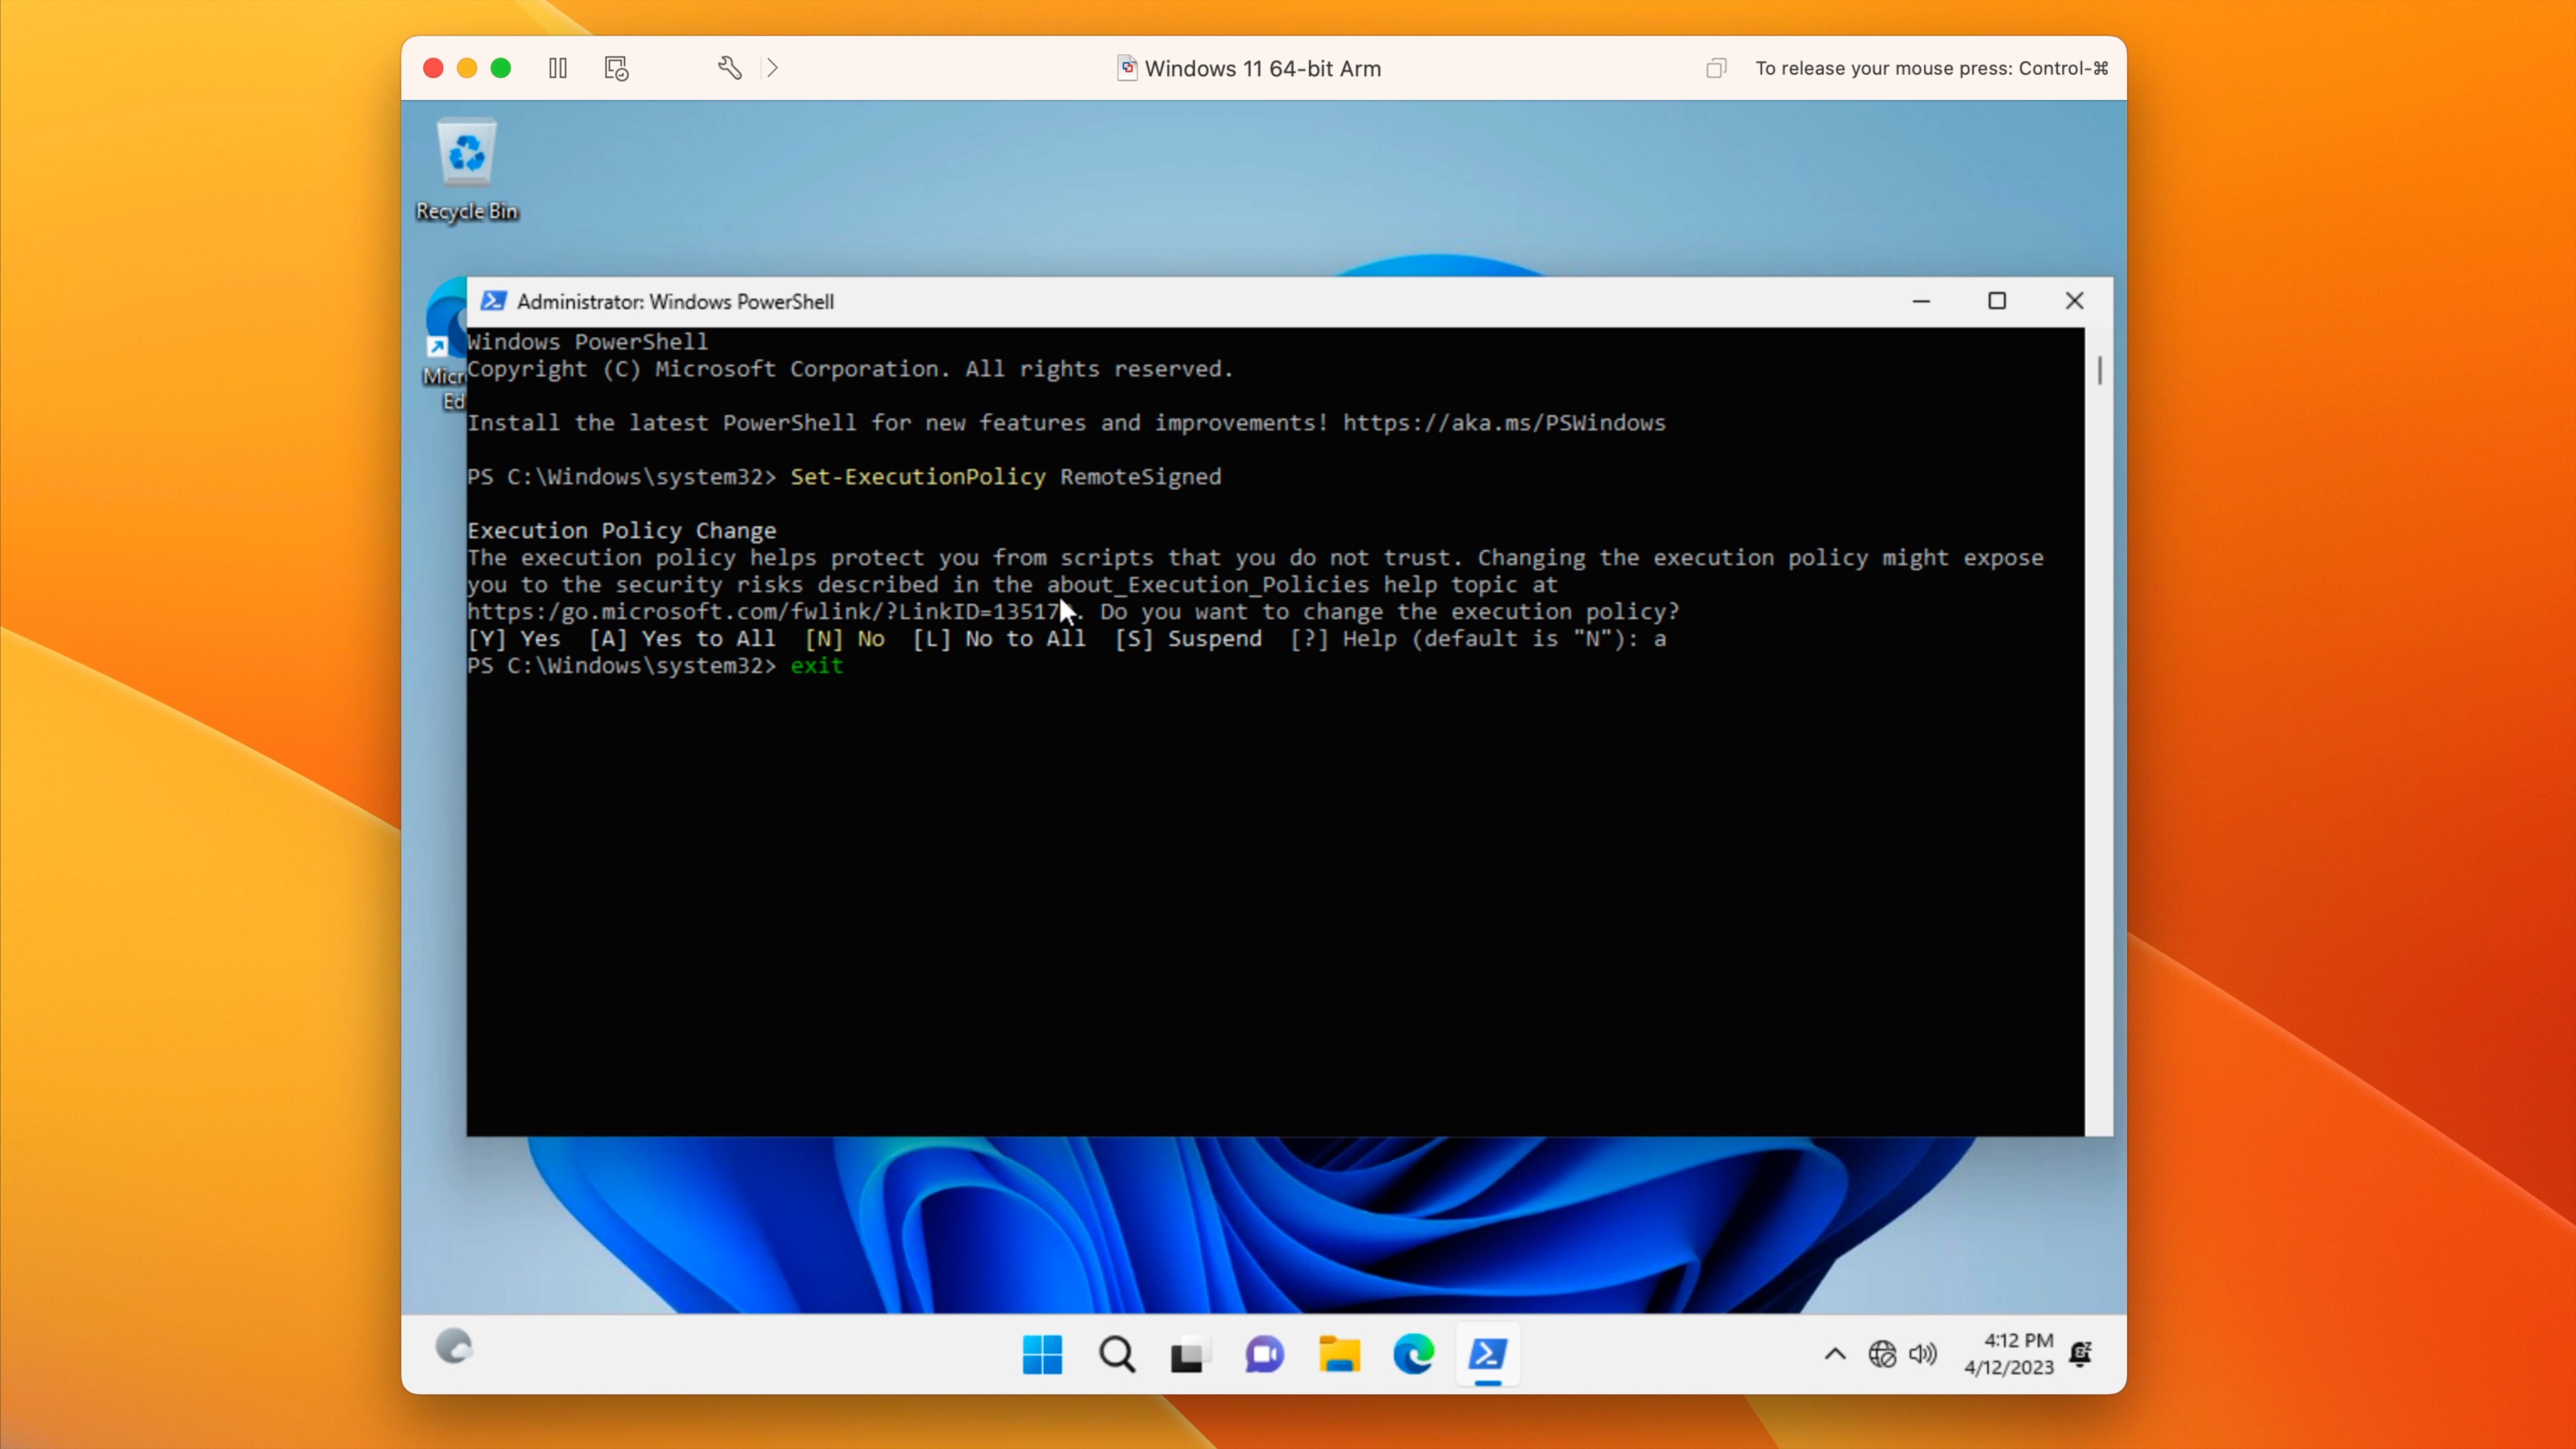
Step 8: At the PowerShell command prompt, type the following and press Return on your keyboard:
Set-ExecutionPolicy RemoteSigned
You’ll next be asked if you want to change the execution policy. Type “A” to indicate Yes to All, and press Return on your keyboard and then close the PowerShell window.
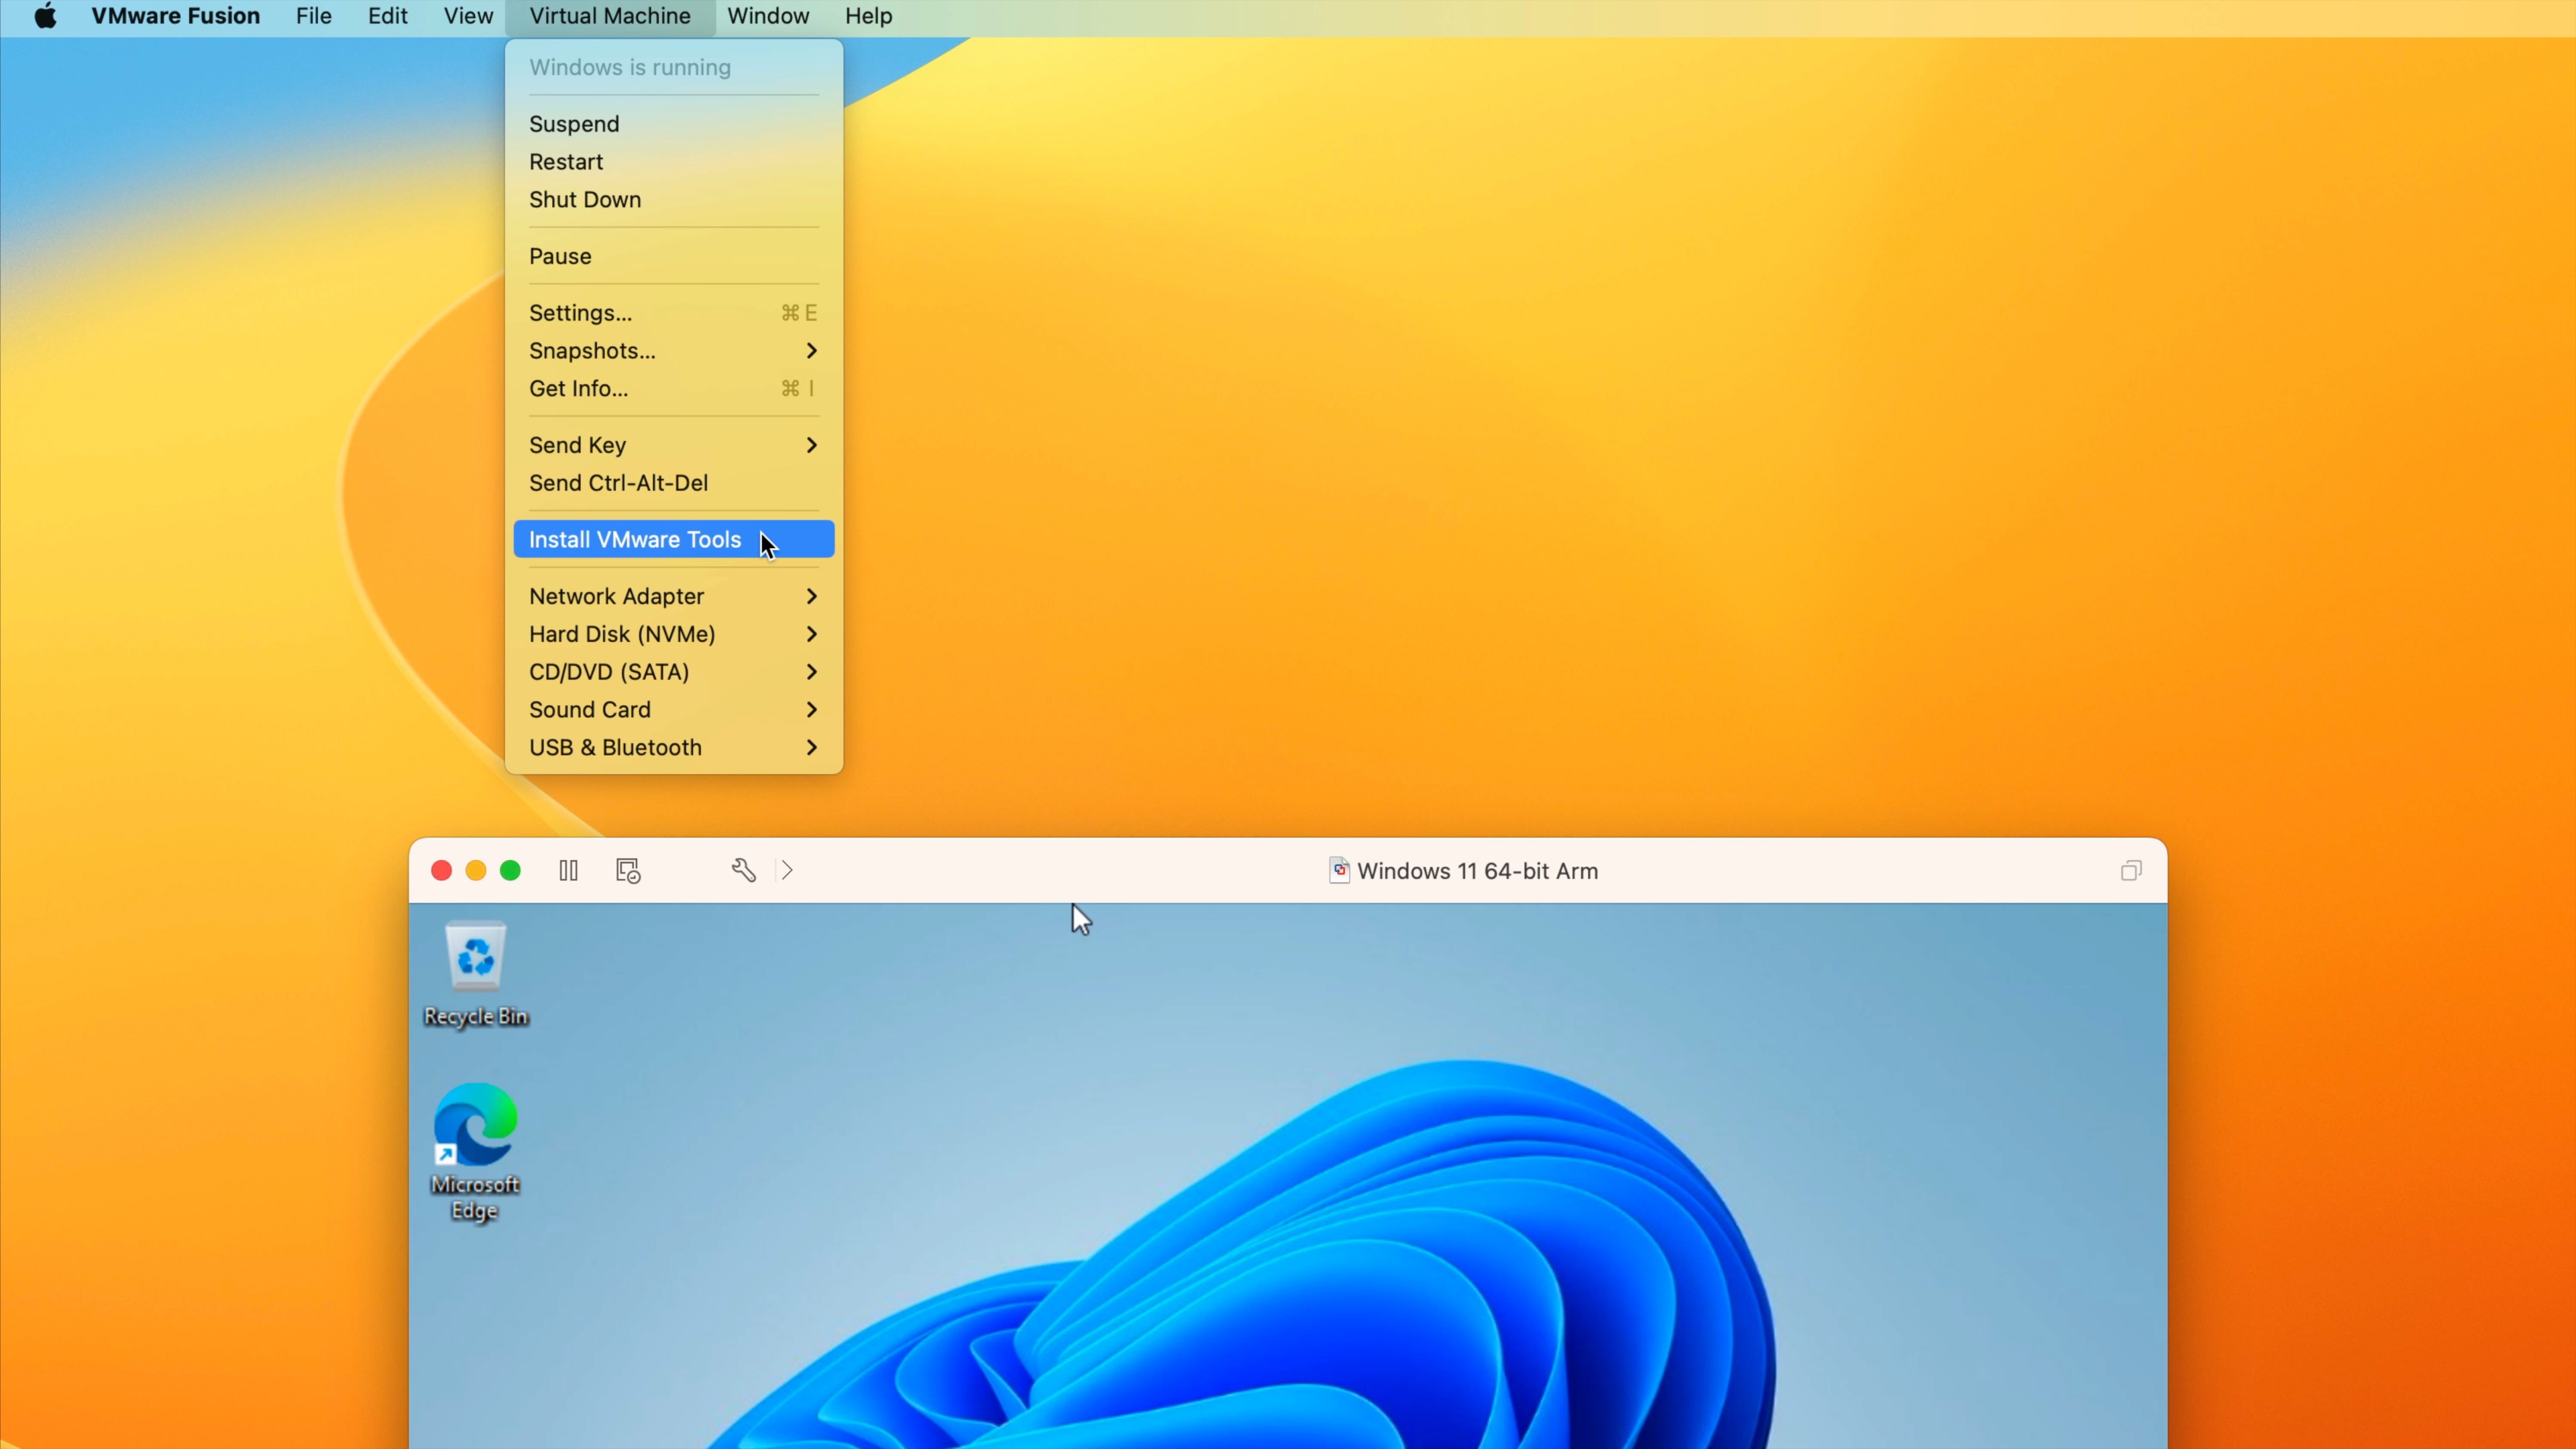
Step 9: In the Mac menu bar click Virtual Machine → Install VMware Tools. Click the Install button on the pop-up that appears to mount the virtual DVD-ROM drive.
Step 10: Open Widows Explorer and select the DVD drive. Scroll down until you see the “setup” PowerShell script. Right click on setup, select Run with PowerShell, then click Yes on the User Account Control pop-up.
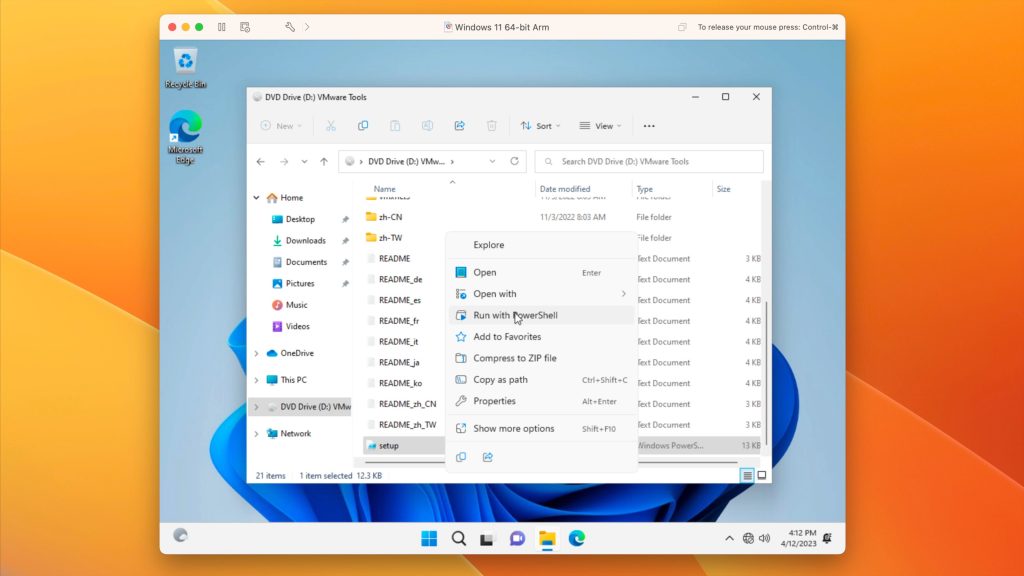
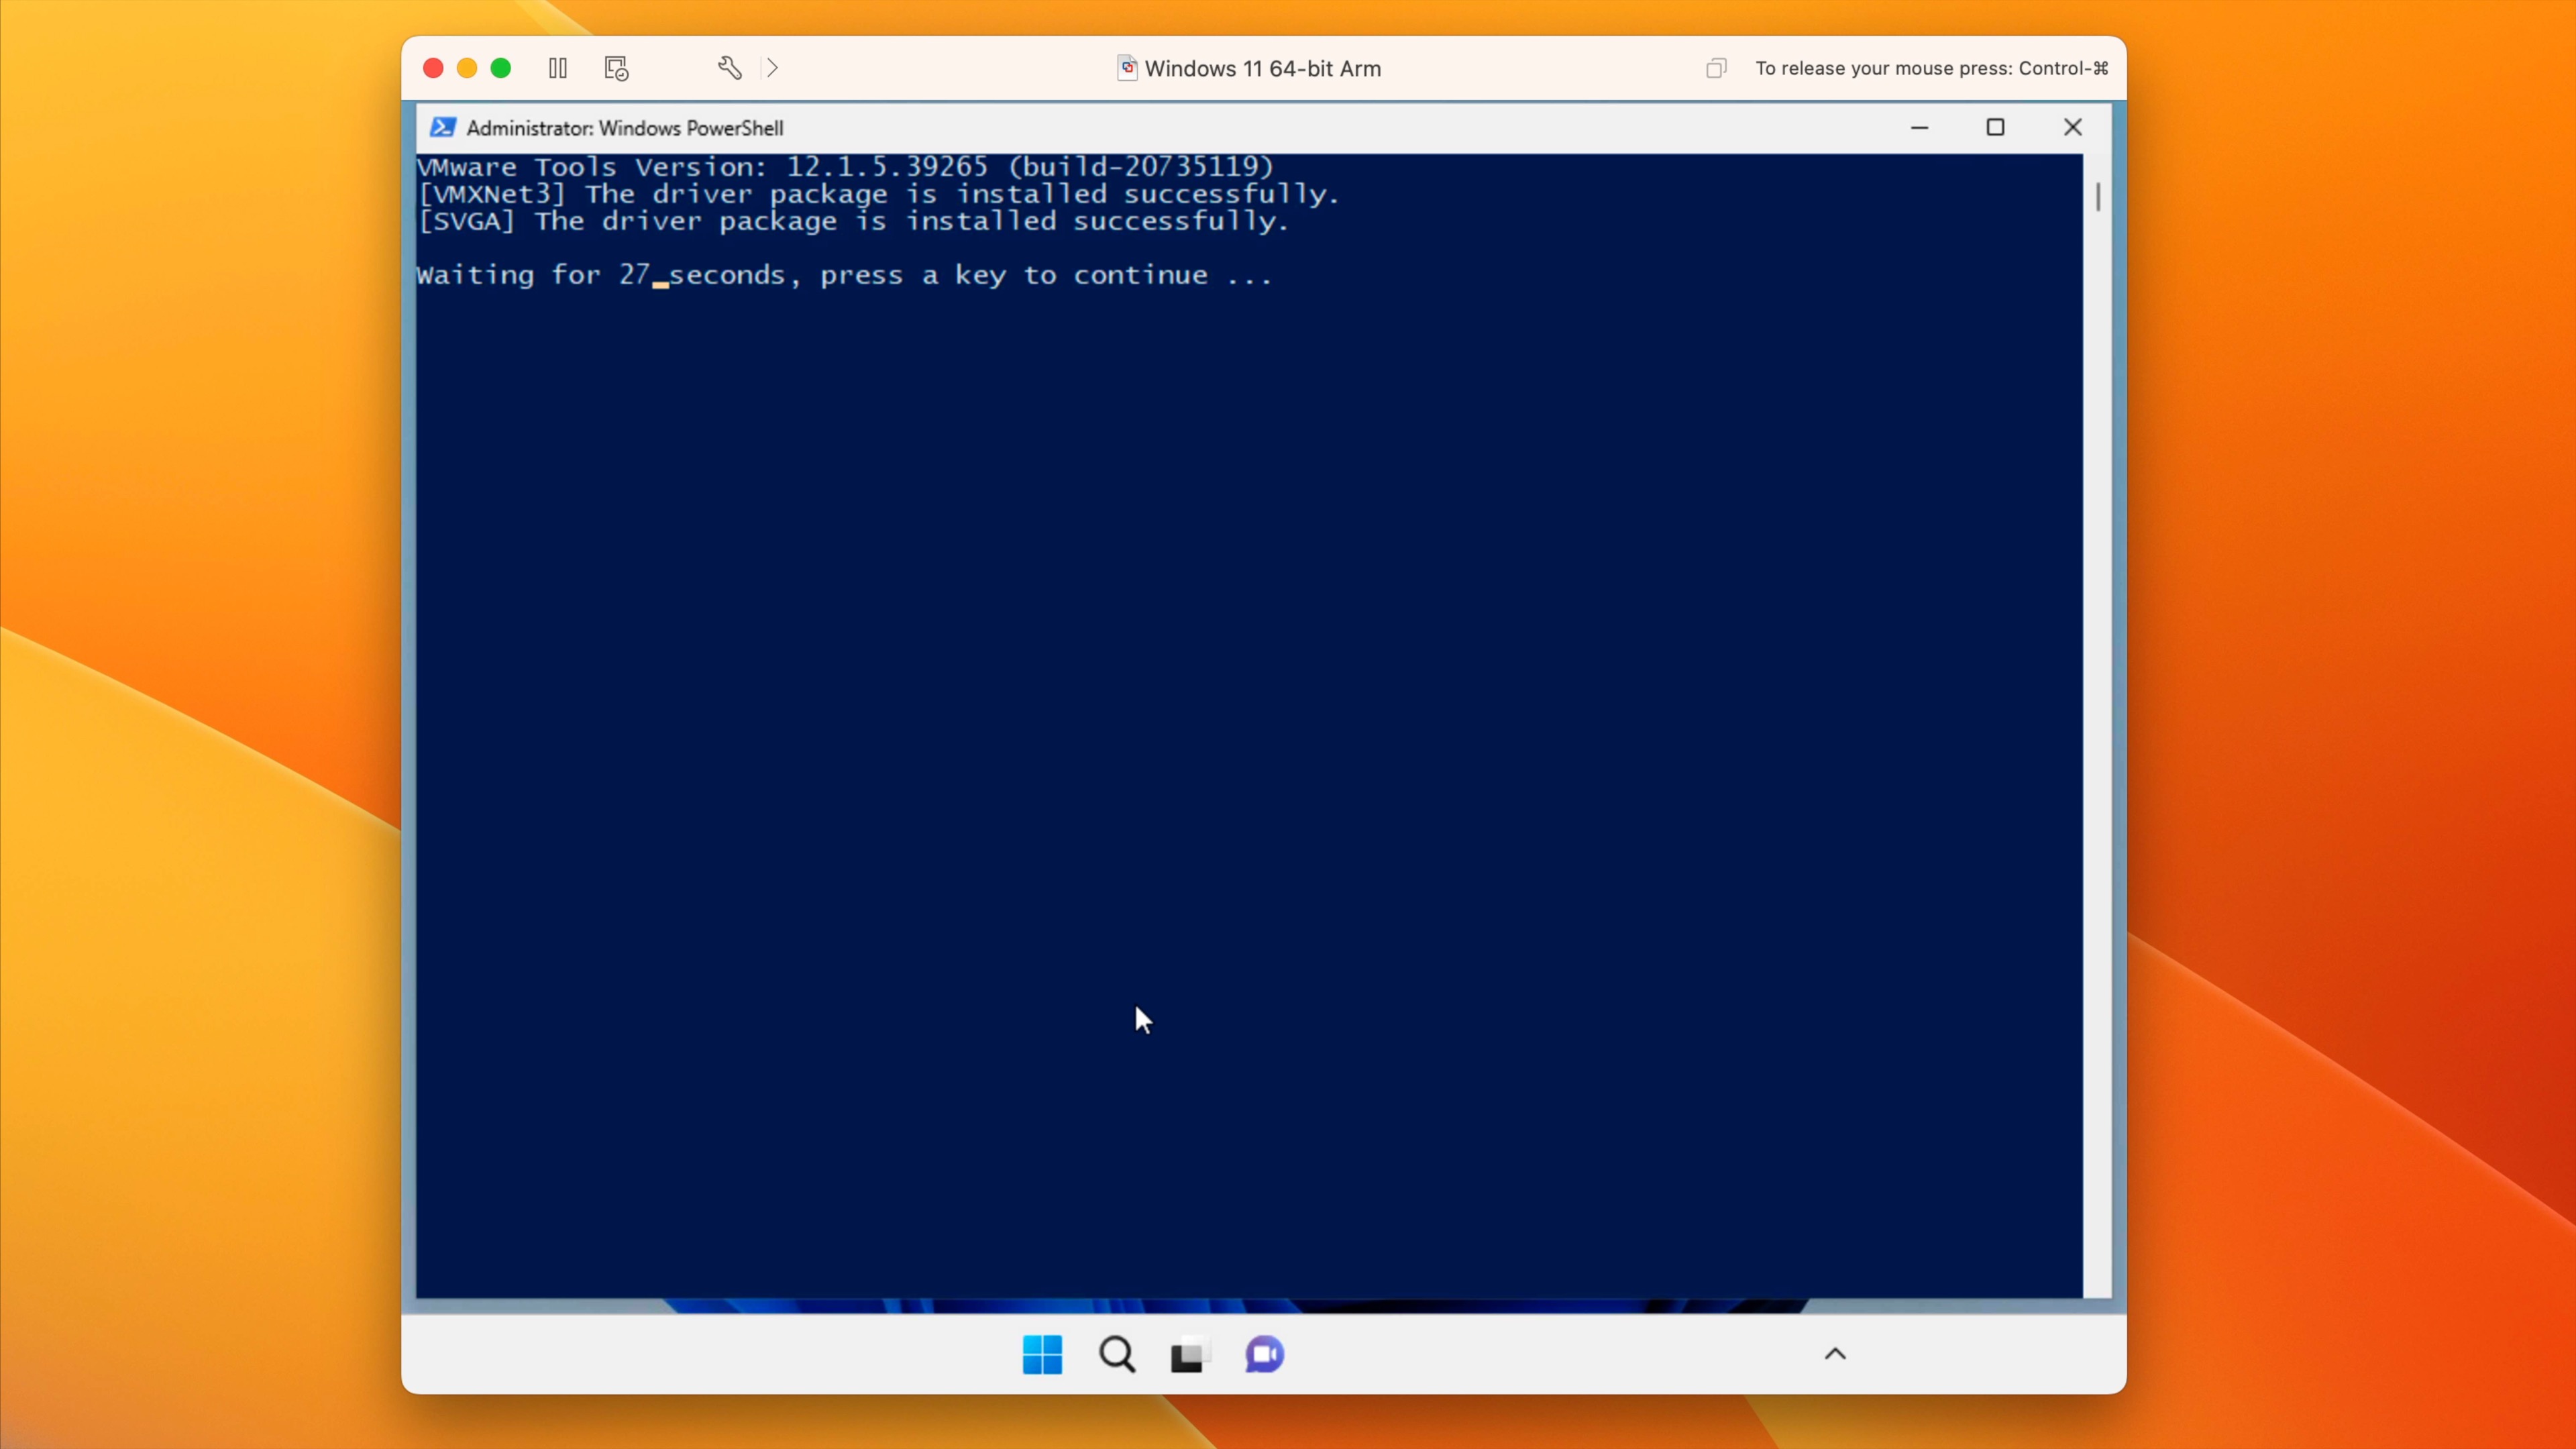
Step 11: Powershell will open and VMware Tools will install the VMXNet3 driver package and SVCGA driver package. Once installed, the PowerShell window will automatically dismiss after a period of time, or you can press any key when prompted to dismiss the Window manually.
You should now have full network access, along with the needed display drivers.
Step 12: Go to Start → Settings → Windows Update → Check for updates to download the latest drivers and software updates from Microsoft.
Conclusion
If you’re a gamer, then Parallels Desktop is my recommended solution for running Windows 11 on a Mac feature Apple Silicon. Parallels has access to DirectX 11, which means 3D gaming is far more viable when running Windows via Parallels as opposed to VMware Fusion Player. But remember that, in most use cases, Parallels requires a subscription fee on top of whatever you end up paying for a valid Windows 11 license, should you choose to license Windows. If you do not, you’ll get the watermark of shame in the bottom right-hand corner until you purchase the necessary license.
Related: Run Windows 11 on Apple Silicon w/ Parallels Desktop 18
Subscribe to 9to5mac on YouTube for more videos
VMware Fusion Player, on the other hand, is a much more budget-friendly solution, with a free personal license, and no subscription fees. It’s also relatively easy to get setup, but isn’t dead simple like Parallels is with its tighter Microsoft integration. VMware Fusion Player is a solid option if you’re not worried about gaming, and would like to run lightweight one-off Windows applications that aren’t available on macOS.
What do you think? Are you considering or currently running Windows on your Mac with Apple Silicon? Sound off down below in the comments with any thoughts, suggestions, observations, or questions.
Add 9to5Mac to your Google News feed.
FTC: We use income earning auto affiliate links. More.
Let’s start this post with a discussion of why people want to run Windows on mac. Well, there are many reasons for this. Apple is known for its quality products, and MacBooks are considered the best available laptops in the market. When it comes to the operating system, Mac is popular, but what about Windows? Windows is dominating. Windows has the largest community than any other operating system. Especially in the gaming landscape. As per the report, more than 96% of gamers use Windows. In general, Windows tops the list. It has taken more than 76% of the market. Mac is ranked second with 17% of the market share. There are many people who want to buy MacBook with Windows 11, the latest Windows operating system for desktop users. That is just possible only in dreams at this point in time. However, we are here to help you succeed in your dream. Well, there are many ways to run Windows 11 on Mac. Don’t worry. We are here to show you how to run Windows 11 on mac using VMWare Fusion. Let’s get started.
Microsoft introduced lots of security features to make Windows 11 secure more than any other Windows operating system. One such security feature is TPM. To run Windows 11, it is necessary to have a TPM v2.0 (Trusted Platform Module) hardware module on your computer. Since we are dealing with a Virtual Machine in this scenario, no need to worry so much. VMWare has a couple of workarounds to run Windows 11 on mac using VMWare platforms like VMWare Fusion. Thanks to VMWare for this wonderful workaround.

Reasons To Run Windows On Mac:
If you’re a Mac user, there are plenty of reasons to run Windows on your Mac. Whether you need to use specific Windows-only software for work or you want to take advantage of the stability and performance of a Mac, running Windows 11 on your Mac is a great solution. Here are five reasons to do it.
- There are users who need both Mac & Windows to manage their work.
- Newly migrated users from Windows to Mac or Mac to Windows want to run Windows on Mac.
- Mac provides the best hardware, but Windows is the most popular.
- Gamers may want to run Windows on Mac as most games support only Windows.
- You can get the best of both worlds with a Mac/Windows hybrid.
Prerequisites To Run Windows 11 On Mac:
Basically, you need a Windows 11 ISO image, VMware Fusion with a free license, and of course a MacBook. That’s all.
- Windows 11 ISO image: It is a must to have a Windows ISO image. Visit the Microsoft web page to download the Windows 11 ISO image. Click here to download.
- VMware Fusion player: VMWare team is offering a free license for personal use. Click here to register and download the VMware Fusion player with a license. Please don’t ignore to verify the compatible version of VMware Fusion.
- MacBook: A MacBook with a minimum of 8GB of RAM and 250 GB of storage disc is required. We recommend having 16GB of RAM and 256 GB of storage. Because you may need 4 GB of RAM and 100 GB of storage to run a VM (Virtual Machine). There is a dependency on intel processors, you can’t run Windows x86 on an M1 chip.
Time needed: 30 minutes
How to Run Windows 11 on MAC using VMWare Fusion?
Let’s begin the actual post for which you are here. Let’s see how to run Windows 11 on mac using VMWare Fusion. We presumed that you have installed VMWare Fusion on your mac. If you feel you need assistance in installing VMWare Fusion on mac, please visit this post.
- Create New VM for Windows 11 on VMWare Fusion
Let’s create a new Virtual Machine on VMware Fusion.
Open Virtual Machine Library –> Click on ‘+‘ –> In the drop down list Click on ‘New‘.
- Select the Virtual Machine Installation Method in VMWare Fusion
New VM Installation Wizard opens and Lists of Installation Methods. Click on ‘Create a custom virtual Machine‘ and click on ‘Continue’.

- Choose the Operating System to be Used in this Virtual Machine
Select ‘Microsoft Windows’, since Windows 11 is not made available in VMware, select latest Client Operating System ‘Windows 10 and later x64‘ and click on ‘Continue‘.

- Choose Firmware Type to Boot the Virtual Machine
Select the Boot firmware as ‘UEFI‘ and select ‘UEFI Select Boot‘. Click on ‘Continue‘

- Select Virtual Disk to be Used in this Virtual Machine
Select ‘Create a new virtual disk‘ and click on ‘Continue‘.

- Take a Look at the Virtual Machine Summary
For Modification, Click on ‘Customize Settings’.
-
Save the VM with a name
Rename VM as ‘Windows 11’ and click on ‘Save’ again click on ‘Finish’ to complete the wizard

- Mount CD/DVD(SATA on VMWare Fusion
Open for VM settings, click on ‘CD/DVD(SATA)‘ to import the downloaded Windows 11 ISO image.

- Import Windows 11 ISO image to CD/DVD(SATA on VMWare Fusion
Select ‘Connect CD/DVD Drive’ and browse the ISO file. Click on ‘Show All’.

- Choose the Startup Disk to Boot Windows 11
Click on ‘Startup Disk’ to change the Startup Disk of VM.

- Power On the VM on VMWare Workstaion
Select ‘CD/DVD’ and click on ‘Restart’ to Start the VM with mounted ISO image.

- Begin the Installation of Windows 11 on VMWare Fusion
As soon as the VM powered on Windows 11 Installation will get started from the ISO image stored in CD/DVD. Select Language, Time Zone and Keyboard, click on ‘Next‘.

- Click on ‘Install Now’ Button to begin the installation of Windows 11 on VMWare Fusion on mac

- Enter the Product Key
Update valid Product Key (if you have). You can Activate Windows with Product Key even after OS installation. Click on ‘I Don’t have a product key‘ if you want to continue without the product key.

- Select the Versions of Windows 11 to Install
Select the Version of Windows 11 to install and click on ‘Next‘.

- Error Message will Appear “This PC can’t run Windows 11”
This error will appear due to System Requirement Failure and get below message. Click on ‘Back‘ to go back to OS Versions selection window.

- Create Registry Keys to bypass the System Requirement Validation which helps to Install Windows 11
Click on ‘Shift + fn + F10′ keys simultaneously in keyboard to open CMD window. Type ‘regedit‘ and click on ‘Enter‘ to open Registry Editor.

- In Registry Editor, navigate to ‘Computer\HKEY_LOCAL_MACHINE\SYSTEM\Setup‘.

- Create a New Key ‘LabConfig’ under key ‘Setup’
To create New key, Right click on ‘Setup‘ –> Select ‘New‘ –> Select ‘Key‘ –> Rename to ‘LabConfig‘

- A New Key ‘LabConfig’ is created under key ‘Setup’

- Create 4 Bypass Entries under key ‘LabConfig’ to Bypass System Requirement Validation
Right-click on the newly created ‘LabConfig‘ key and select ‘New‘ –>DWORD (32-bit) Value –> Rename to ‘BypassTPMCheck‘.

- Configure ‘BypassTPMCheck Registry Key To Disable TPM Check in the Windows 11 installation Process
Double click on ‘BypassTPMCheck‘ and change the Value date to ‘1‘ and select Base as ‘Hexadecimal‘ –> click ‘OK‘.
Note: By Enforcing value to 1, we have disabled TPM check successfully.
- TPM Check is Bypassed in the Windows 11 installation Process

- Create other 3 DWORD (32-bit) Value under ‘LabConfig’ key to bypass Secure Boot, CPU and RAM
To enforce Secure Boot check, create New DWORD (32-bit) Value ‘BypassSecureBootCheck‘ and set Value data as ‘1‘
To enforce CPU check, create New DWORD (32-bit) Value ‘BypassCPUCheck‘ and set Value data as ‘1‘
To enforce RAM check, create New DWORD (32-bit) Value ‘BypassRAMCheck‘ and set Value data as ‘1‘
- Continue the Installation of Windows 11 on VMWare Fusion
Now we can continue to install Windows 11 without any roadblocks. Accept the Licence Agreement and click on ‘Next‘.

- Choose the Type of Installation you Want
Click on ‘Custom: Install Windows only (advanced)‘ to make changes in the Drive Partitions. It up to you how do you want to install the Windows 11.

- Partition the Disk
Selecting complete 60 GB for OS drive and click on ‘Next‘. Based on requirement you can change the Drive Partitions.

- Installation of Windows 11 begins and in Progress
- Set up a Microsoft Account or a Local Account
After Windows 11 Installation, configure with profile with Microsoft account / Local account.

- Installation of Windows 11 is Completed Successfully on mac using VMWare Fusion


We hope this post would help you know how to run Windows 11 on MAC using VMWare Fusion. Please share this post if you find this interested. Visit our social media page on Facebook, LinkedIn, Twitter, Telegram, Tumblr, Medium & Instagram, and subscribe to receive updates like this.
Frequently Asked Questions:
1. What is VMware Fusion?
VMware Fusion is a virtualization software developed by VMware that allows users to run multiple operating systems, including Windows, Linux, and other macOS versions, on a single Mac host. It provides an easy and seamless way to run Windows applications on a Mac without the need for rebooting or partitioning.
2. Can I run Windows 11 on my Mac using VMware Fusion?
Yes, you can run Windows 11 on your Mac using VMware Fusion. You’ll need to have a compatible Mac and a licensed copy of Windows 11. Follow the steps provided in the guide to set up and install Windows 11 in a virtual machine using VMware Fusion.
3. What are the system requirements for running Windows 11 on VMware Fusion?
To run Windows 11 on VMware Fusion, your Mac must meet the following requirements:
1. A Mac with macOS 10.15 Catalina or later
2. VMware Fusion 12 or later
3. At least 4 GB of RAM (8 GB recommended)
4. At least 64 GB of free disk space for the Windows 11 virtual machine
5. A 64-bit Windows 11 ISO file or installation media
6. A Windows 11 product key or a valid Microsoft account
4. Can I use my existing Windows 10 virtual machine to upgrade to Windows 11 on VMware Fusion?
Yes, you can upgrade your existing Windows 10 virtual machine to Windows 11, provided your virtual machine meets the minimum system requirements for Windows 11. Make sure to back up your virtual machine before proceeding with the upgrade.
5. How do I share files between my Mac and the Windows 11 virtual machine on VMware Fusion?
To share files between your Mac and the Windows 11 virtual machine, you can enable the “Shared Folders” feature in VMware Fusion. This allows you to create a shared folder on your Mac that can be accessed from the Windows 11 virtual machine.
6. Can I run macOS and Windows 11 side by side using VMware Fusion?
Yes, VMware Fusion allows you to run macOS and Windows 11 side by side in separate virtual machines. This enables you to switch between macOS and Windows 11 applications seamlessly without the need for rebooting your Mac.
7. Can I use peripherals, such as USB devices and printers, with my Windows 11 virtual machine on VMware Fusion?
Yes, VMware Fusion supports connecting USB devices and printers to your Windows 11 virtual machine. When you connect a USB device or printer to your Mac, VMware Fusion will prompt you to choose whether to connect the device to your Mac or the Windows 11 virtual machine.
8. How do I uninstall Windows 11 from my Mac if I no longer need it?
To uninstall Windows 11 from your Mac, simply delete the virtual machine containing Windows 11 in VMware Fusion. This will remove Windows 11 and all associated files from your Mac. Before doing this, make sure to back up any important data stored in the Windows 11 virtual machine.
9. Is it possible to install Windows 11 on an M1 Mac using VMware Fusion?
VMware Fusion does not currently support running Windows 11 on Apple Silicon (M1) Macs. However, you can use alternative virtualization software, such as Parallels Desktop, to run Windows 11 on an M1 Mac.
10. Can I use VMware Fusion to run other operating systems, such as Linux, on my Mac?
Yes, VMware Fusion supports running various operating systems, including different Linux distributions, on your Mac. You can create multiple virtual machines, each running a different operating system, and switch between them as needed.

Arun KL
Hi All, I am Arun KL, an IT Security Professional. Founder of “thesecmaster.com”. Enthusiast, Security Blogger, Technical Writer, Editor, Author at TheSecMaster. To know more about me. Follow me on LinkedIn