This article will examine how to set up and configure Windows Vista x64 Ultimate on a new virtual machine using Oracle VM VirtualBox 7.0 on the Windows 11 or 10 operating system.
How to Set Up Windows Vista x64 Ultimate on Windows 11 / 10 using Oracle VM VirtualBox 7
In November 2006, Microsoft introduced the Windows Vista operating system, comprehended by its codename Longhorn, to cater to its user base.
The main features of this system include the Windows Aero theme, a new graphical interface, and SuperFetch, which offers faster application launch than older systems. Offering a better visual interface with the Aero theme, this operating system has many improvements for users to manage their computers more easily.
Furthermore, Windows Vista encompasses Media Player 11, enabling users to enhance their media experience, along with Internet Explorer 7, which provides enhanced security measures for a more efficient and secure Internet browsing experience.
Since its release in 2006, Windows Vista has obtained Service Pack 1 (SP1) in 2008 to enhance system security and reliability. Later, it released Service Pack 2 (SP2) on May 26, 2009, which supports Bluray and Bluetooth new technologies. After all these improvements, Microsoft completely ended support for the Vista distribution on April 11, 2017.
When Microsoft’s Vista system is compared to other systems, significant changes have been made thanks to the visual user interface or the Sidebar tool that allows adding essential tools.
There are still users who use the Vista system today. Still, many of them no longer use Vista due to the increasing system vulnerabilities and security concerns due to the developing technology.
Installing Windows Vista system on a physical computer can be dangerous regarding data security in today’s technology age. Therefore, you can install and experience this system on virtual machines using software from developers who offer Oracle VM VirtualBox or other virtualization solutions.
How to Create a New Virtual Machine for Windows Vista OS
Irrespective of the platform or operating system version employed on your host computer, installing older and newer Windows, Linux, and macOS systems is feasible through virtual machines.
After downloading and installing VirtualBox, a free software developed by Oracle company, on your host system, you must create a virtual computer for the Vista system.
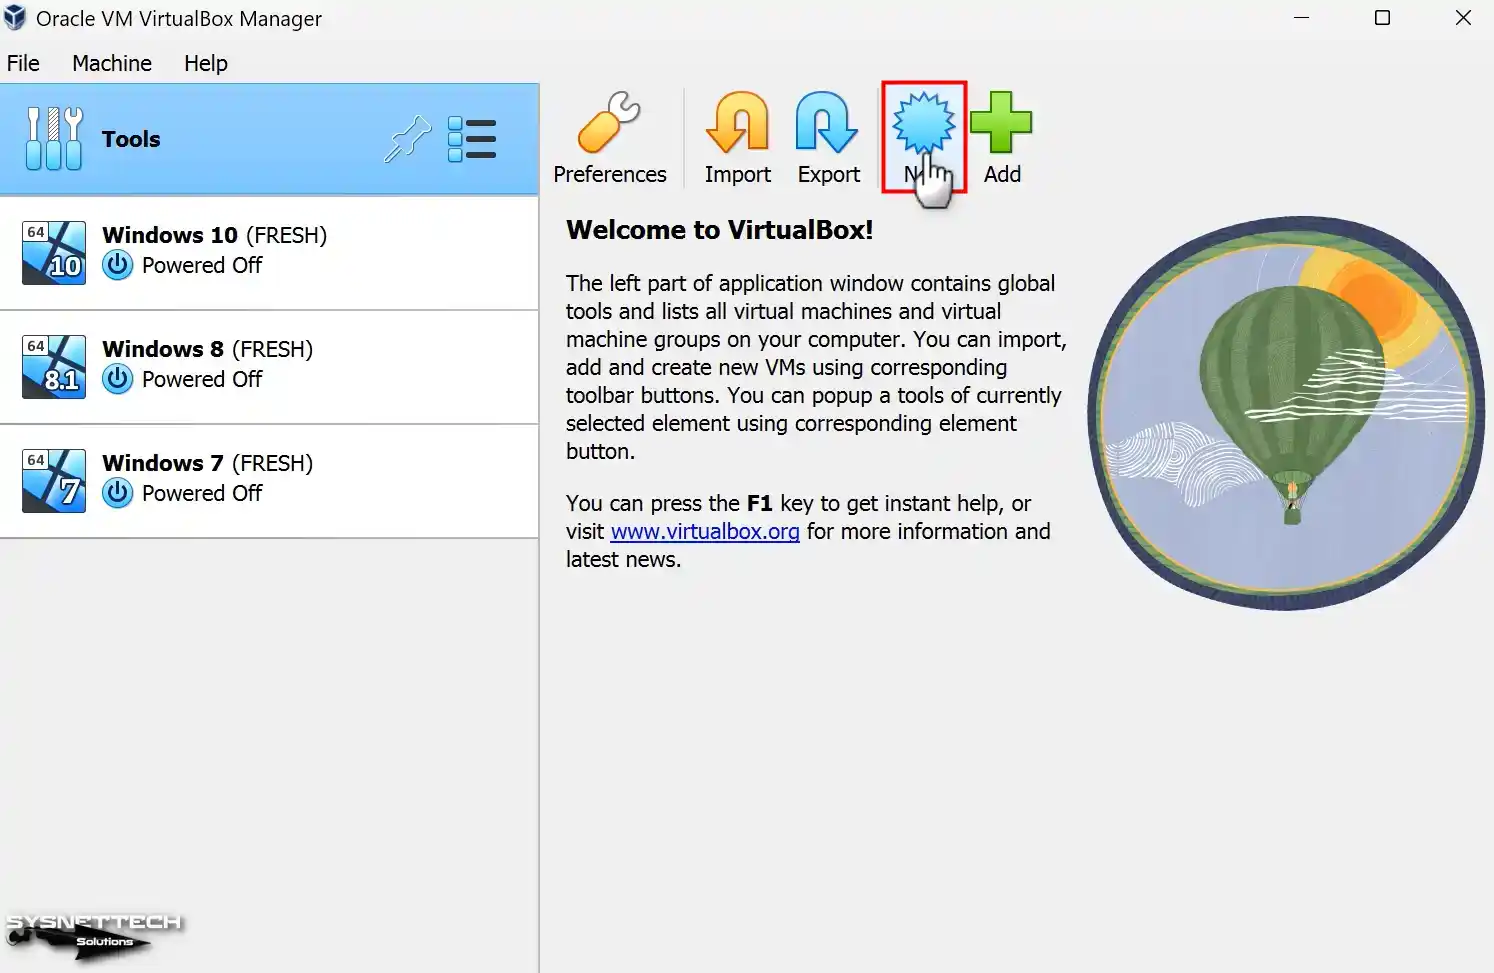
Step 1
After running your VirtualBox program, click Machine / New from the tool menu or click New with the big icon on the right to start the virtual PC preparation wizard.
Step 2
The initial step involves selecting the desired platform and system version for installation to commence the preparation of the Virtual PC. Upon entering the name of the operating system you wish to install in the designated Name field, the program will promptly ascertain the system type through automated means.
If the system’s architecture cannot be selected automatically after typing WindowsVista in the Name field, manually choose 64-Bit from the Version field. Then, click Other from the drop-down menu from ISO Image to add an ISO file.
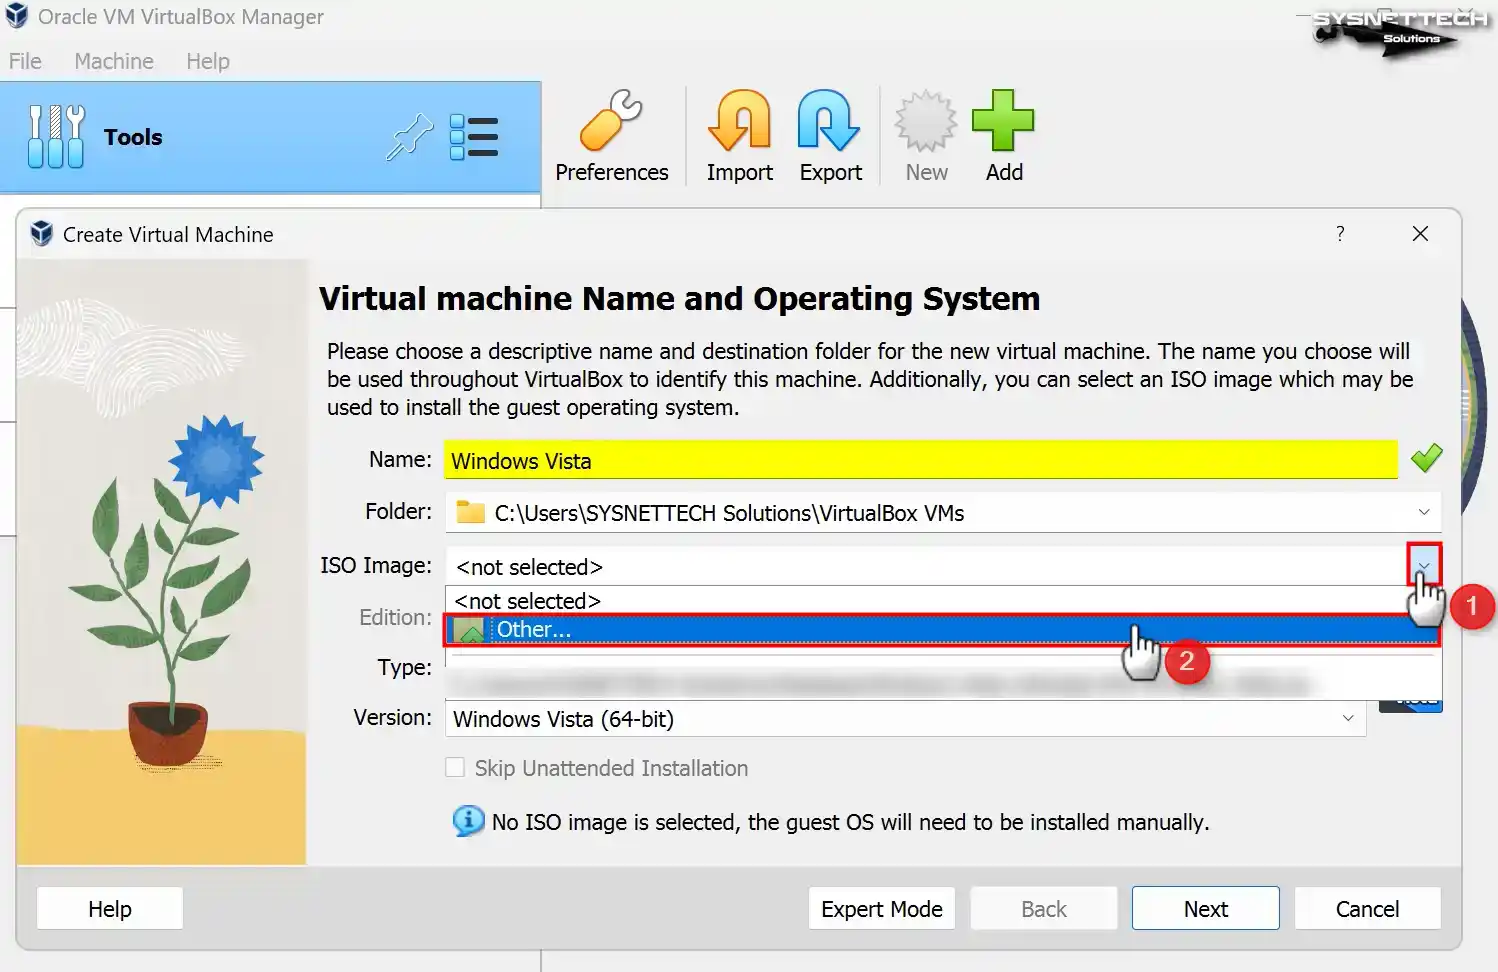
Step 3
Select the Windows Vista ISO file you downloaded to your computer from the table below the article and add it.

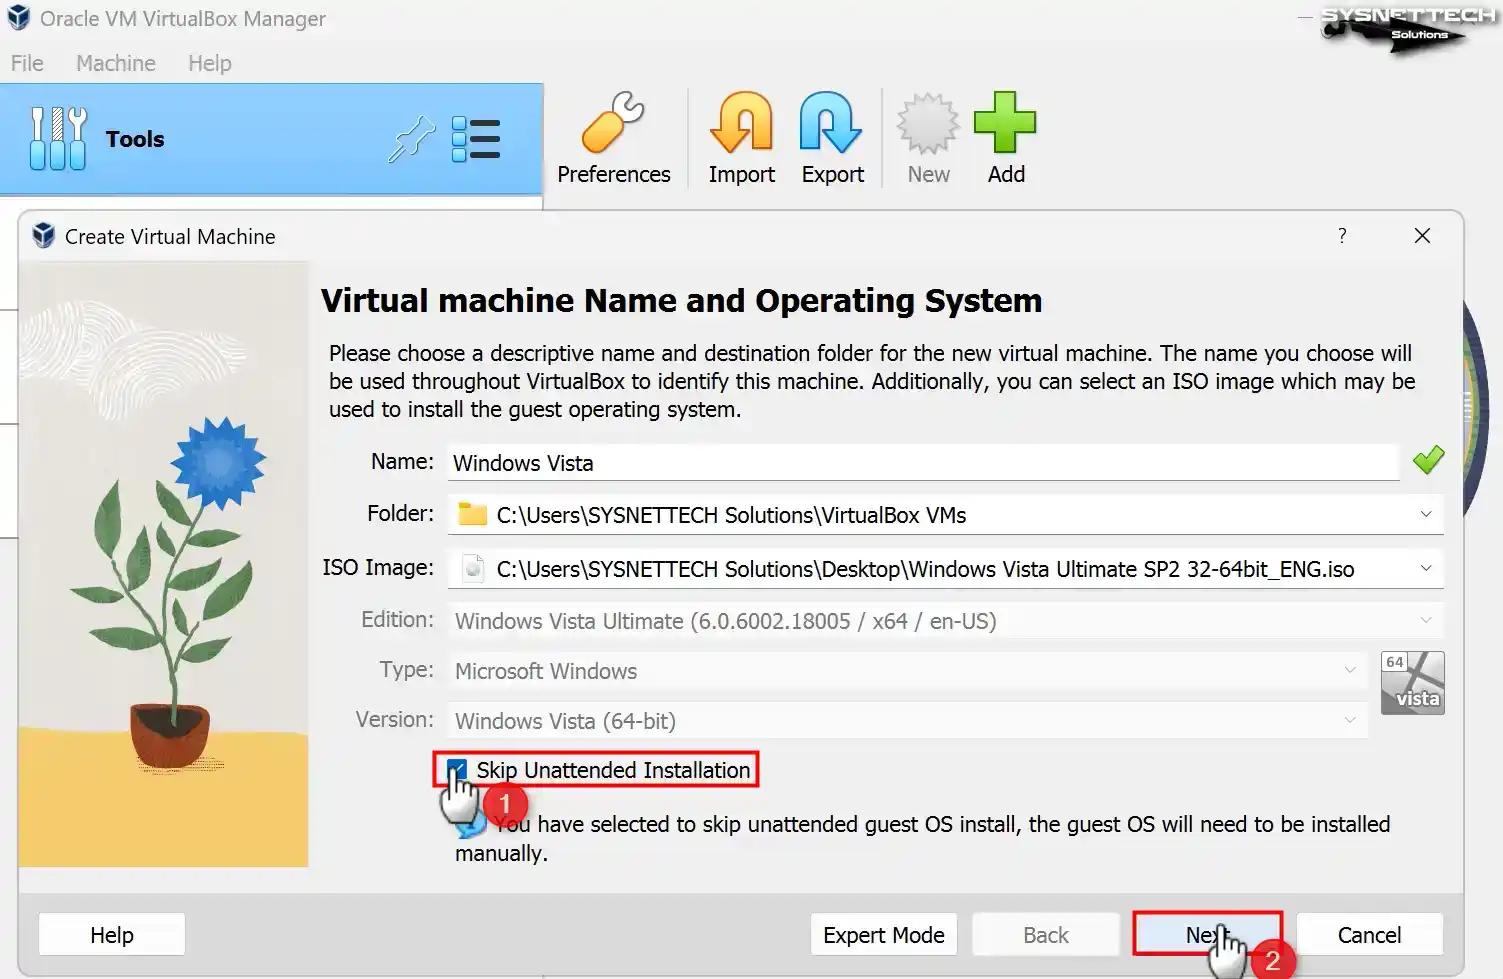
Step 4
Since VirtualBox 7.x version has a new user interface, you can preconfigure some system settings. However, if you prefer to install the system manually, select Skip Unattended Installation and click Next.
Step 5
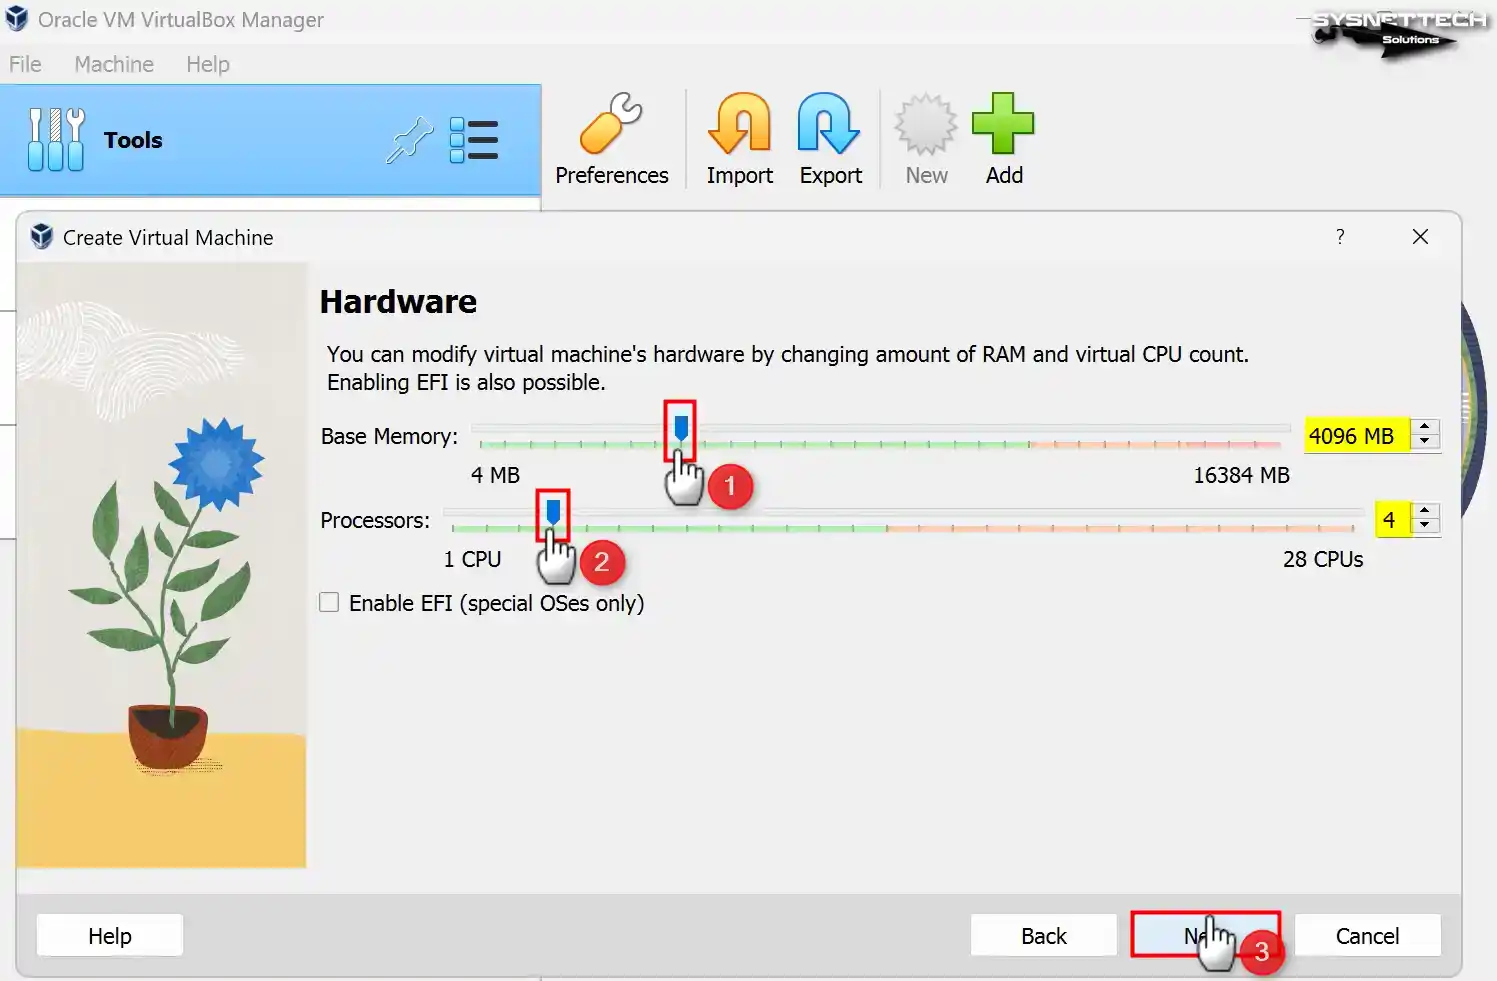
Depending on the hardware features of your host computer, specify a suitable RAM size and the number of virtual processor cores for the virtual machine and click Next.
Step 6
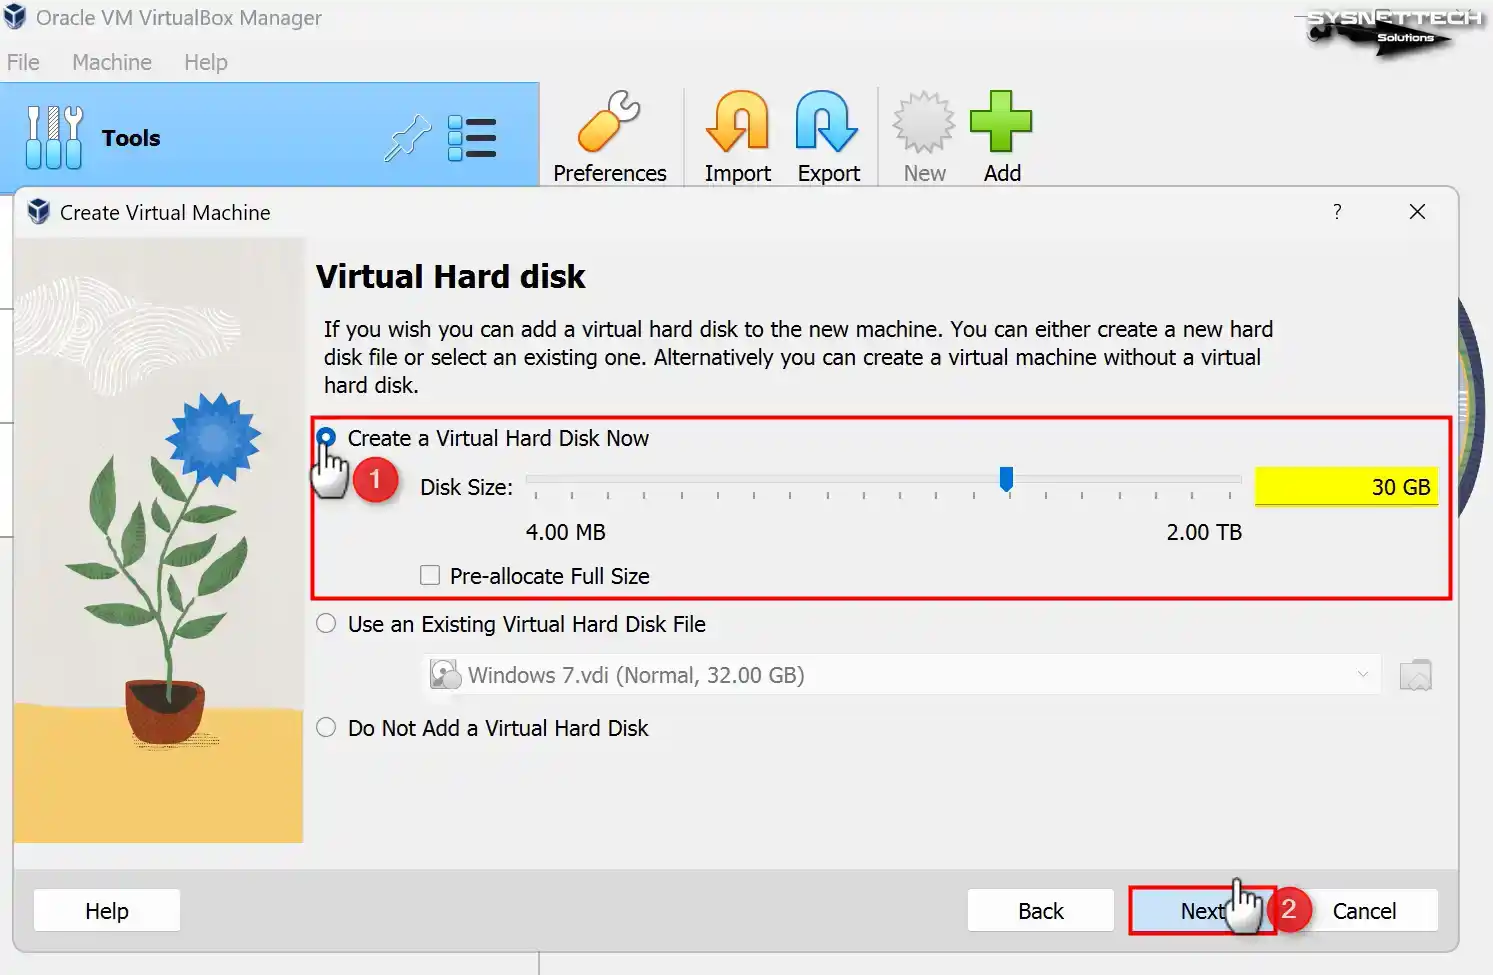
Since you will install Windows Vista from scratch, you must create a new virtual hard disk. If you have the disk of a VM you have installed before, you can add it with the Add an existing virtual disk file option. Configure the virtual disk size as a minimum of 30 GB and continue.
If you are using one of the 6.x versions of VirtualBox, since the interface is different, select the VDI (VirtualBox Disk Image) virtual disk type recommended by Oracle at this stage and is selected by default and click Next.
To back up the virtual hard disk on your host computer, choose the Dynamically Allocated or Fixed Size. If you want the disk size assigned to the virtual disk to be separated from your host disk, you can select the Fixed Size. This option will slightly increase the performance of the virtual computer. Still, it will unnecessarily fill the capacity of your host disk.
Select the Dynamically Allocated option, which allows the disk space allocation from the host disk if the VM needs it, and click Next.
Step 7
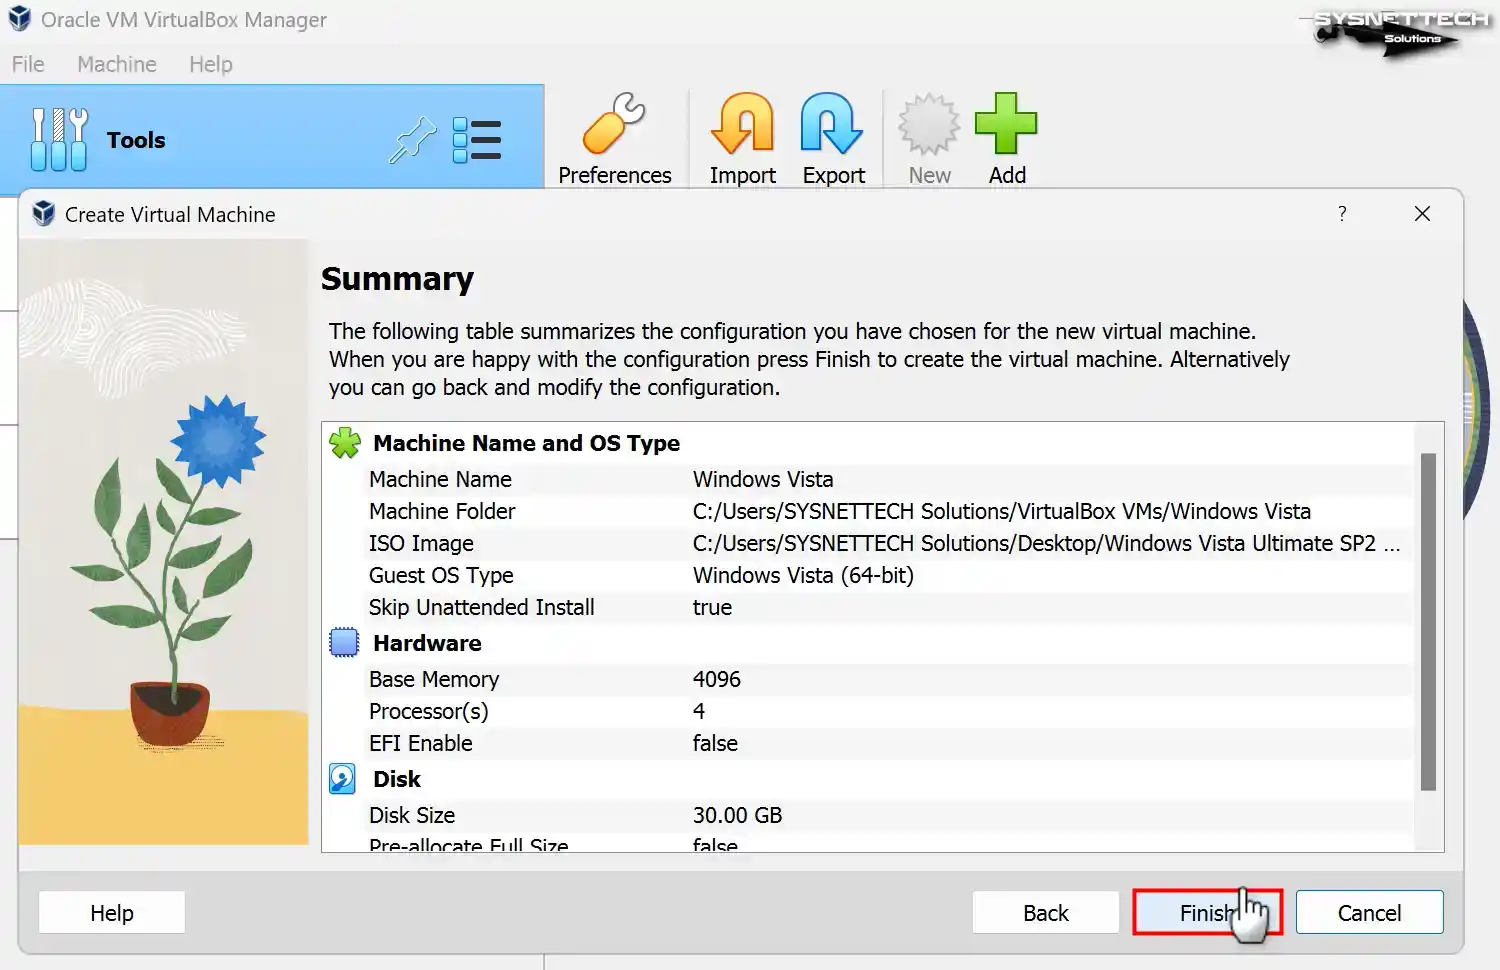
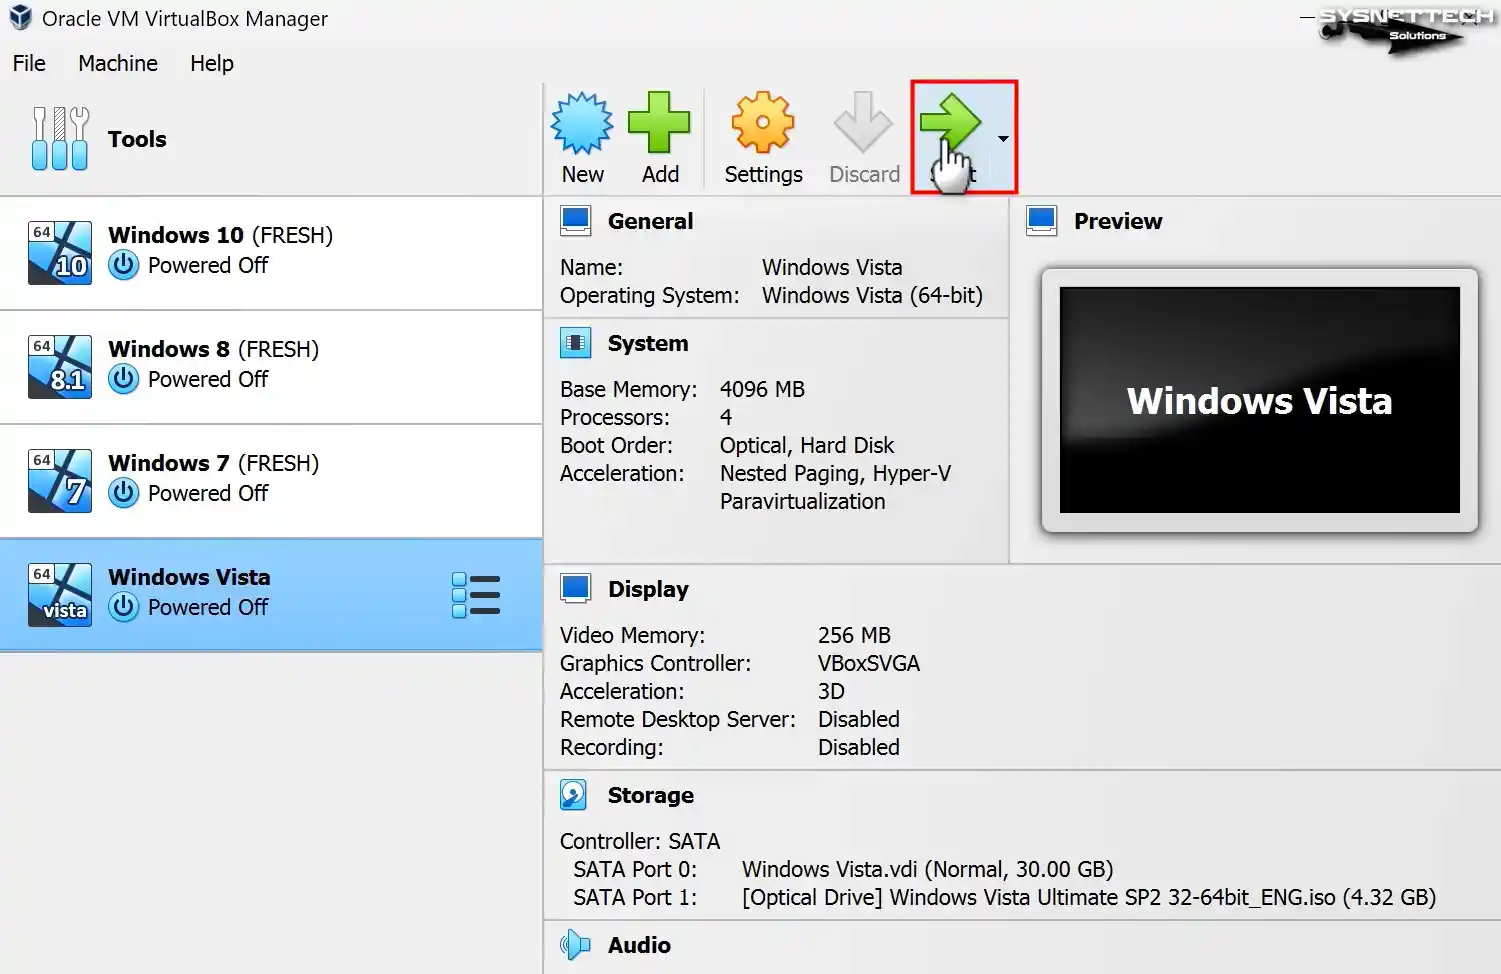
After creating your virtual machine, check the settings of the Windows Vista guest machine and close the VM wizard.
Step 8
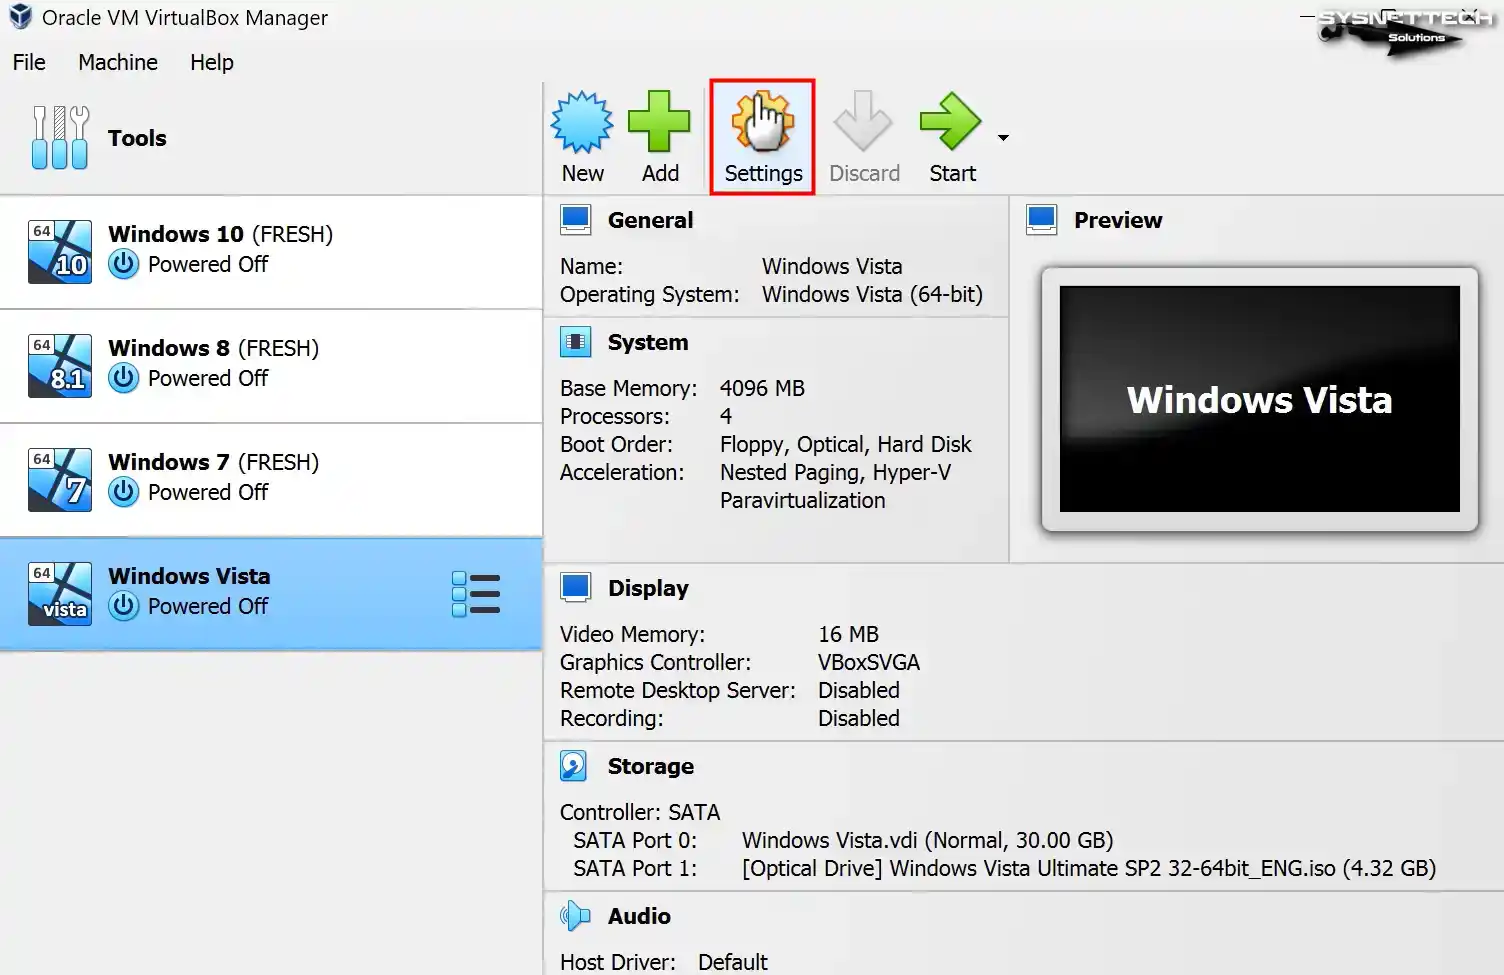
To configure the settings of the Windows Vista virtual system more professionally, open Settings.
Step 9
Configure the Shared Clipboard and Drag and Drop options as Bidirectional for file and text copying between the host and your virtual PC.

Step 10
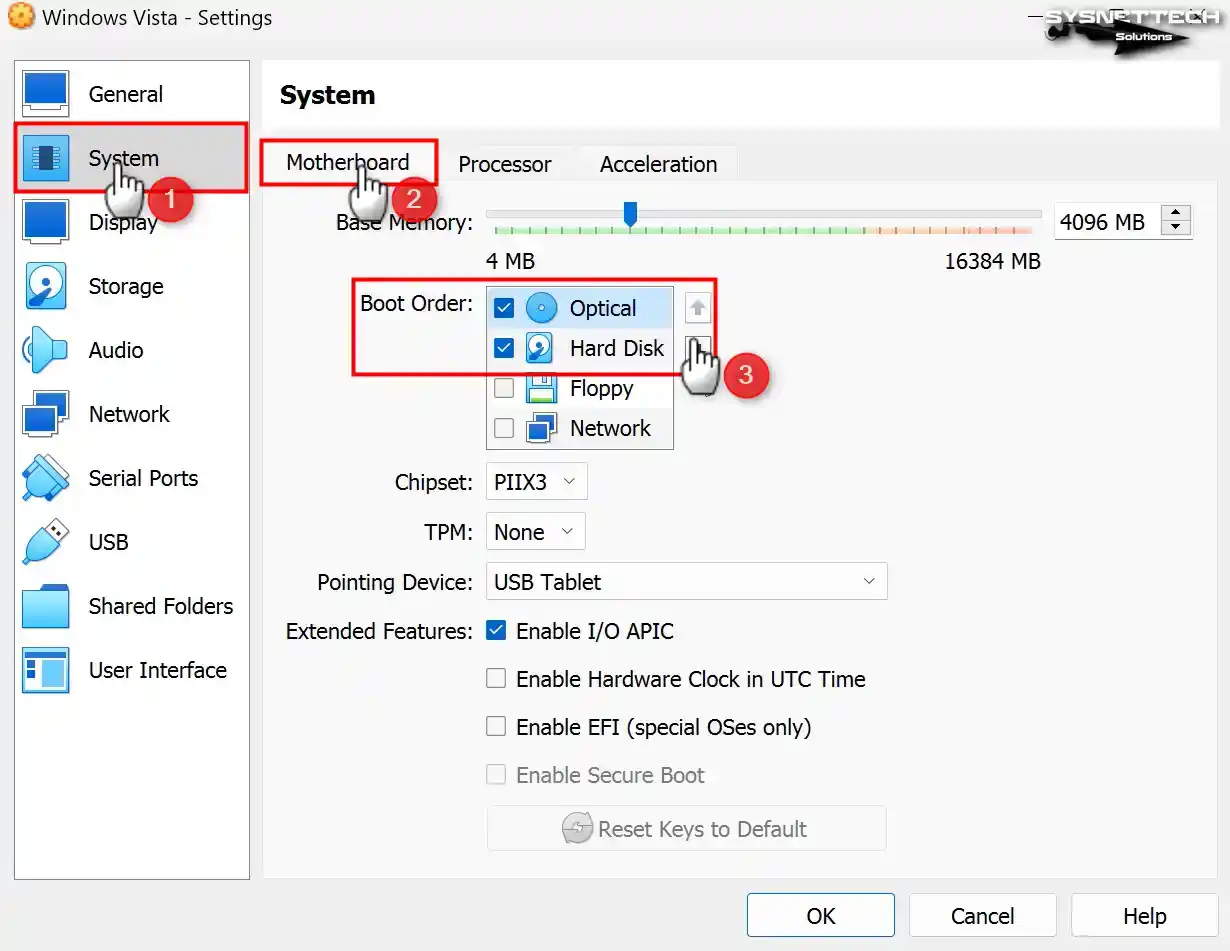
Disable the Floppy device from the Boot Order section of the Motherboard hardware and download it to the bottom row. Since you will be adding the ISO image file of the system on Optical, set it to the first place.
Step 11
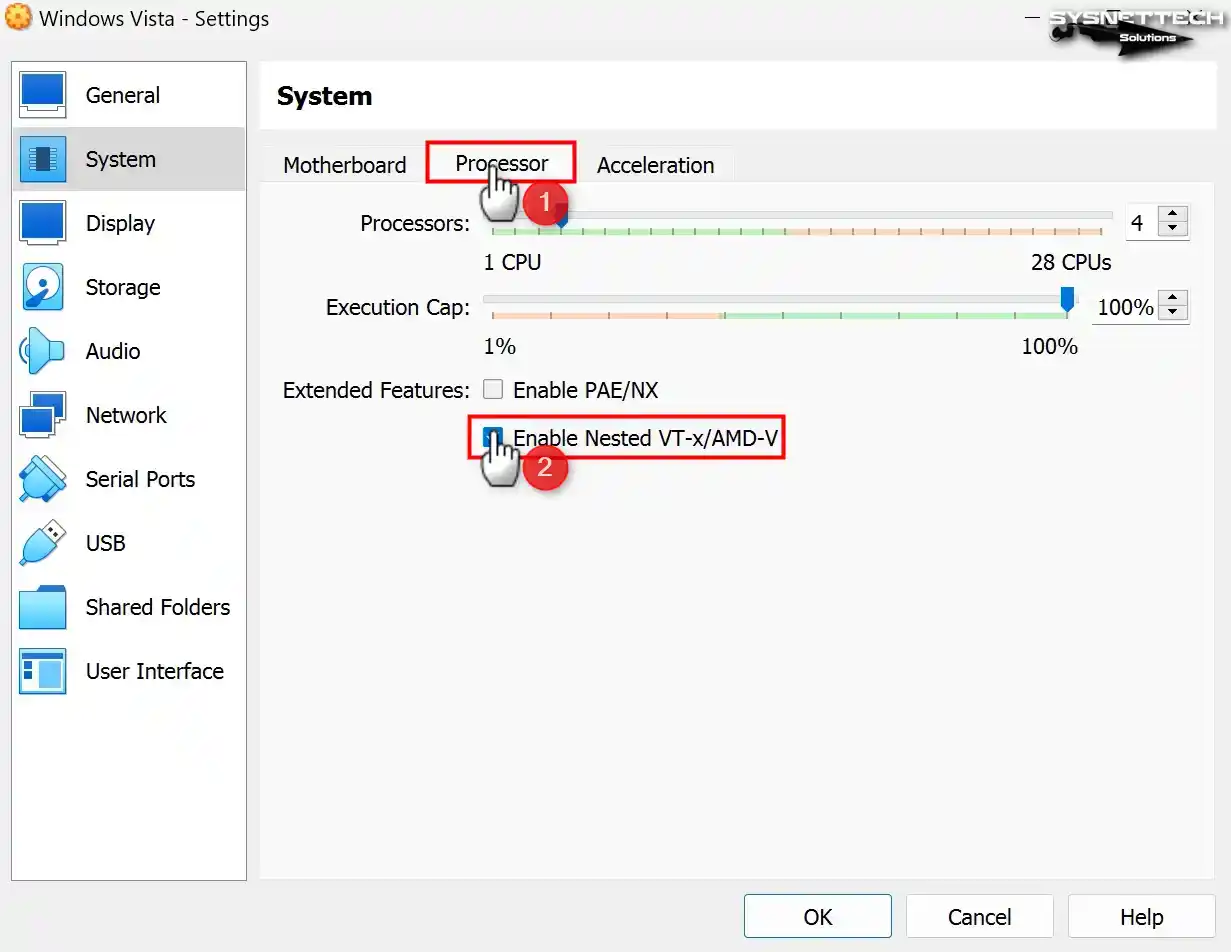
If you will use a virtualization program on the guest machine, enable the Nested VT-x/AMD-V feature.
Step 12
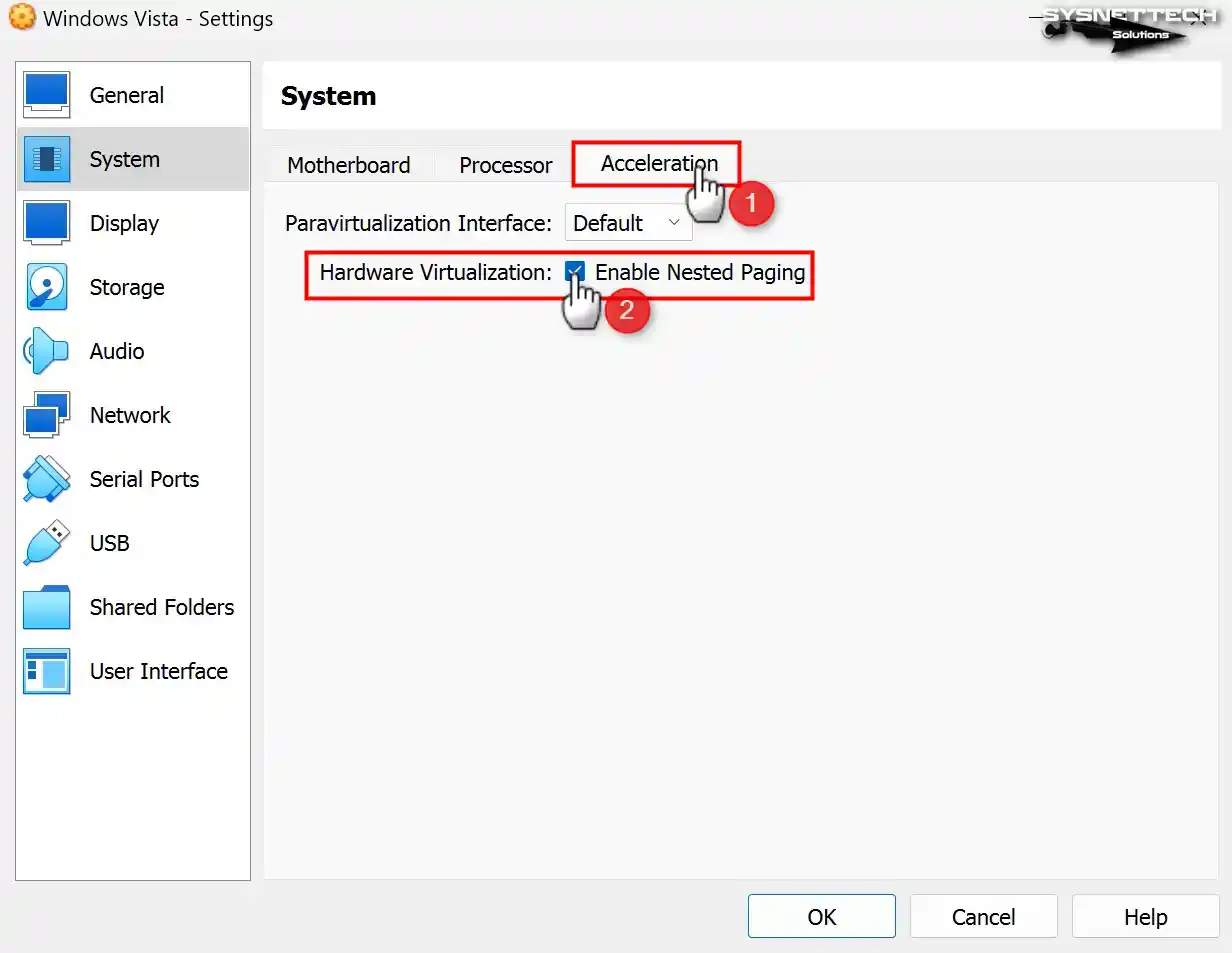
Enable Nested Paging for better memory management between the host and VM.
Step 13
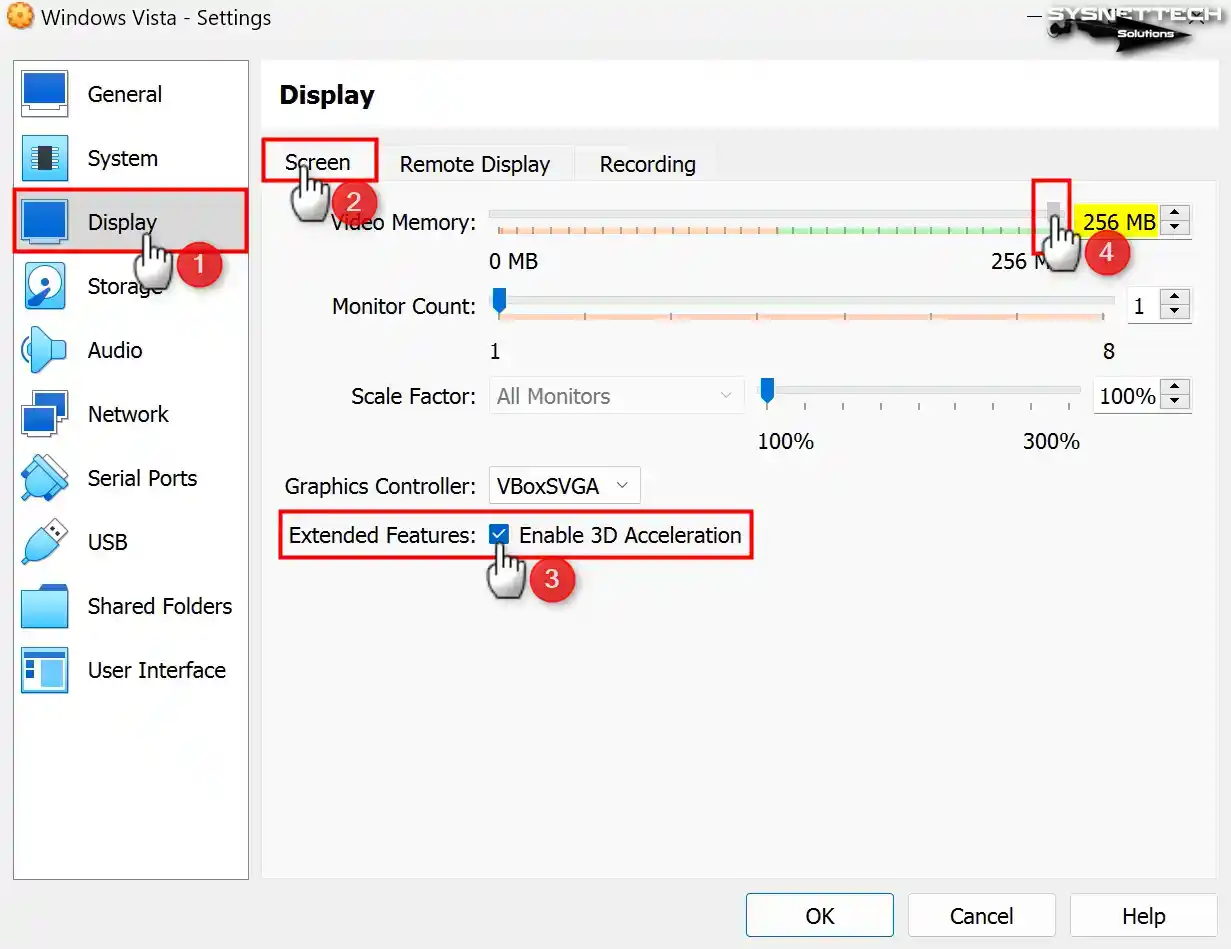
After enabling the 3D Acceleration feature in the Display / Screen tab, configure the graphics memory of the virtual GPU device to 256 MB.
Step 14
To improve the disk performance of the virtual machine, enable the Host I/O Cache on the SATA controller of the Storage device.
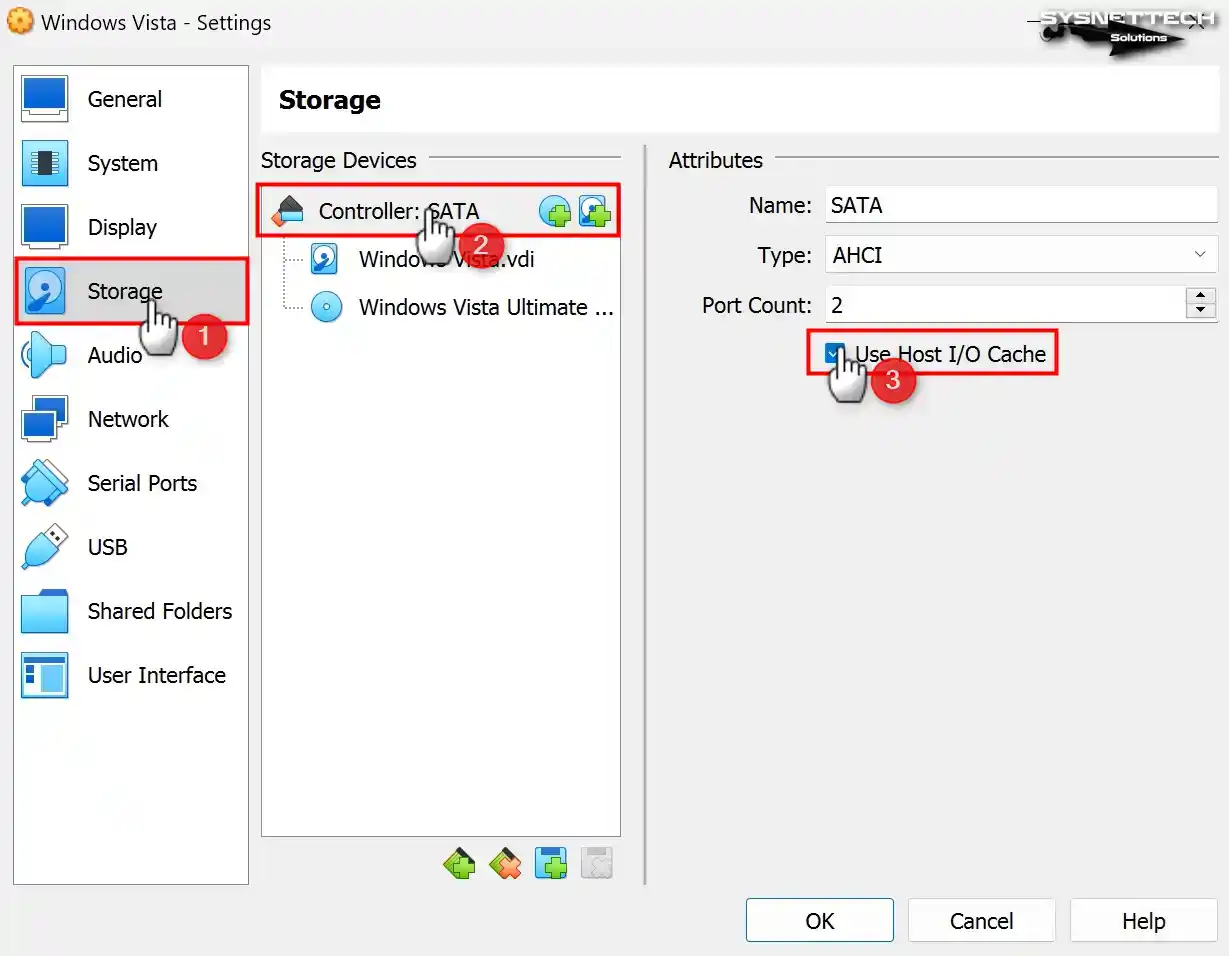
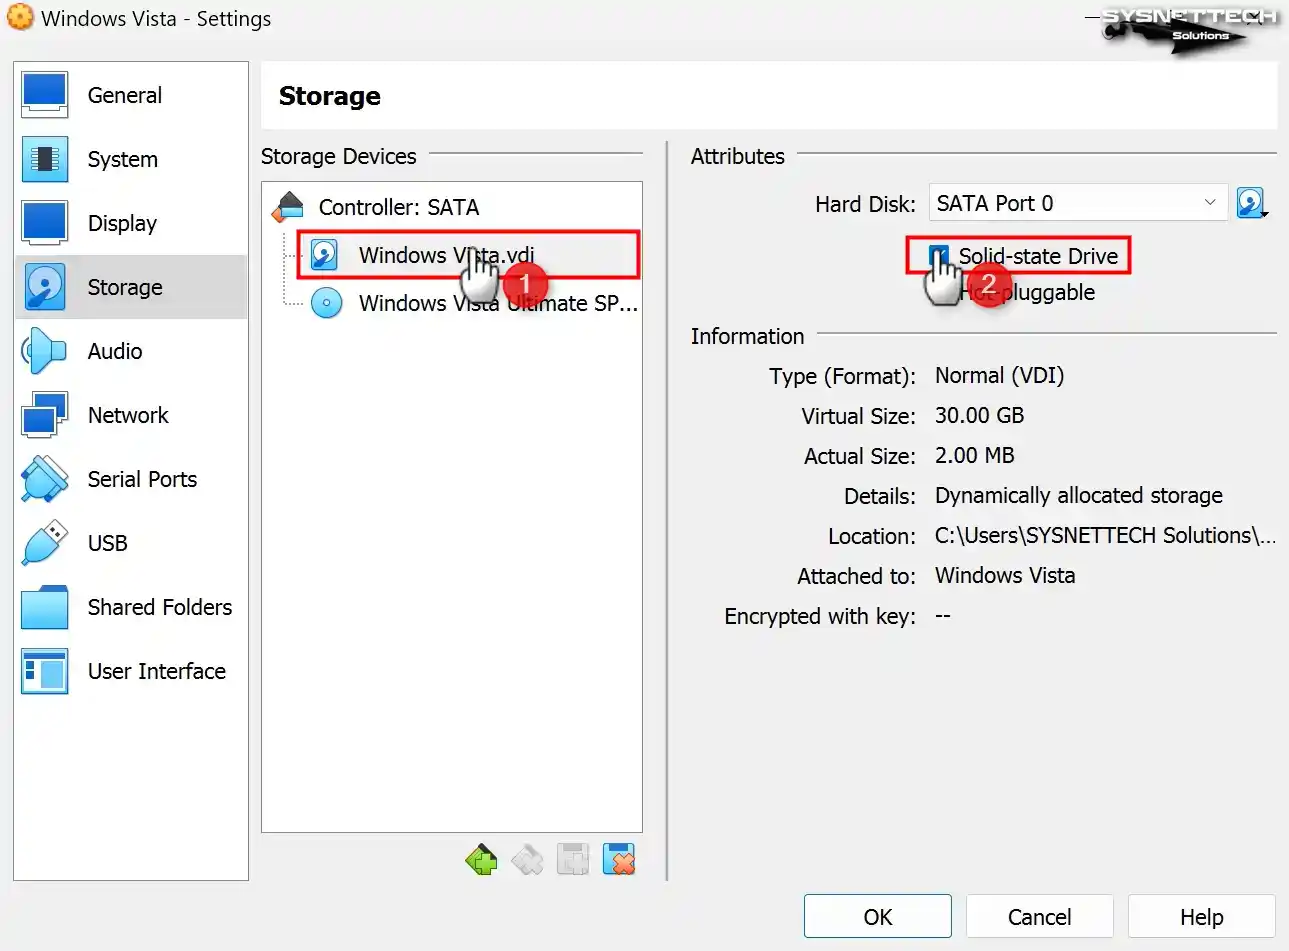
Step 15
Also, configure the WindowsVista.vdi virtual disk file as Solid-State Drive (SSD).
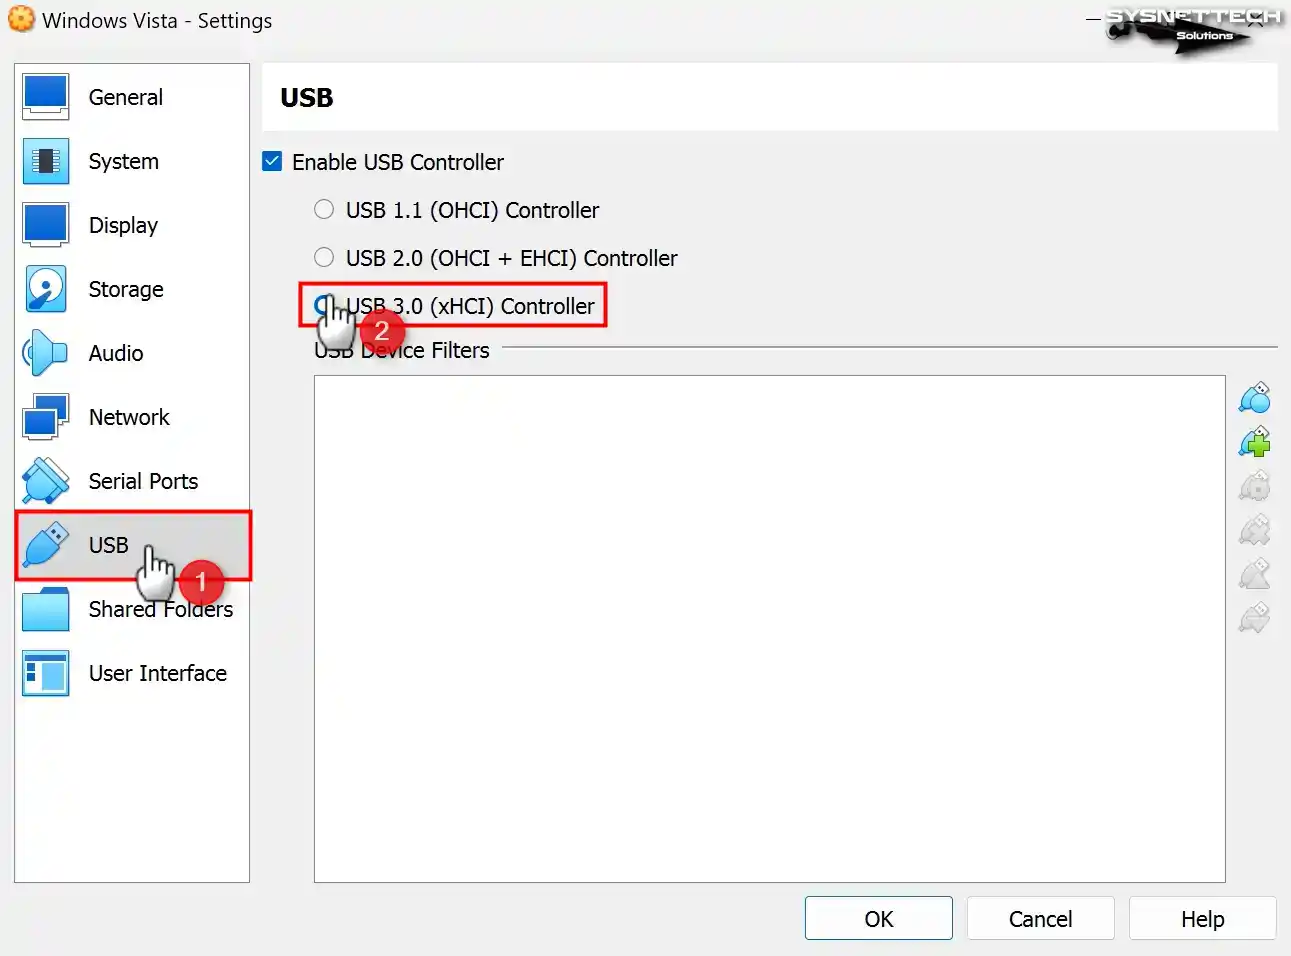
Step 16
To activate USB 3.0 functionality in Windows Vista, navigate to the USB device settings, select the appropriate 3.0 type (xHCI), and disable the corresponding settings.
Step 17
Run your guest machine by clicking the Start button to proceed to the steps of installing Windows Vista with VirtualBox. When the Startup Disk window opens, select the Vista image file and click the Start button again.
How to Install Windows Vista
After configuring the virtual machine appropriately, you can install the system, mimicking the process as if you were installing it on a physical computer starting from this point.
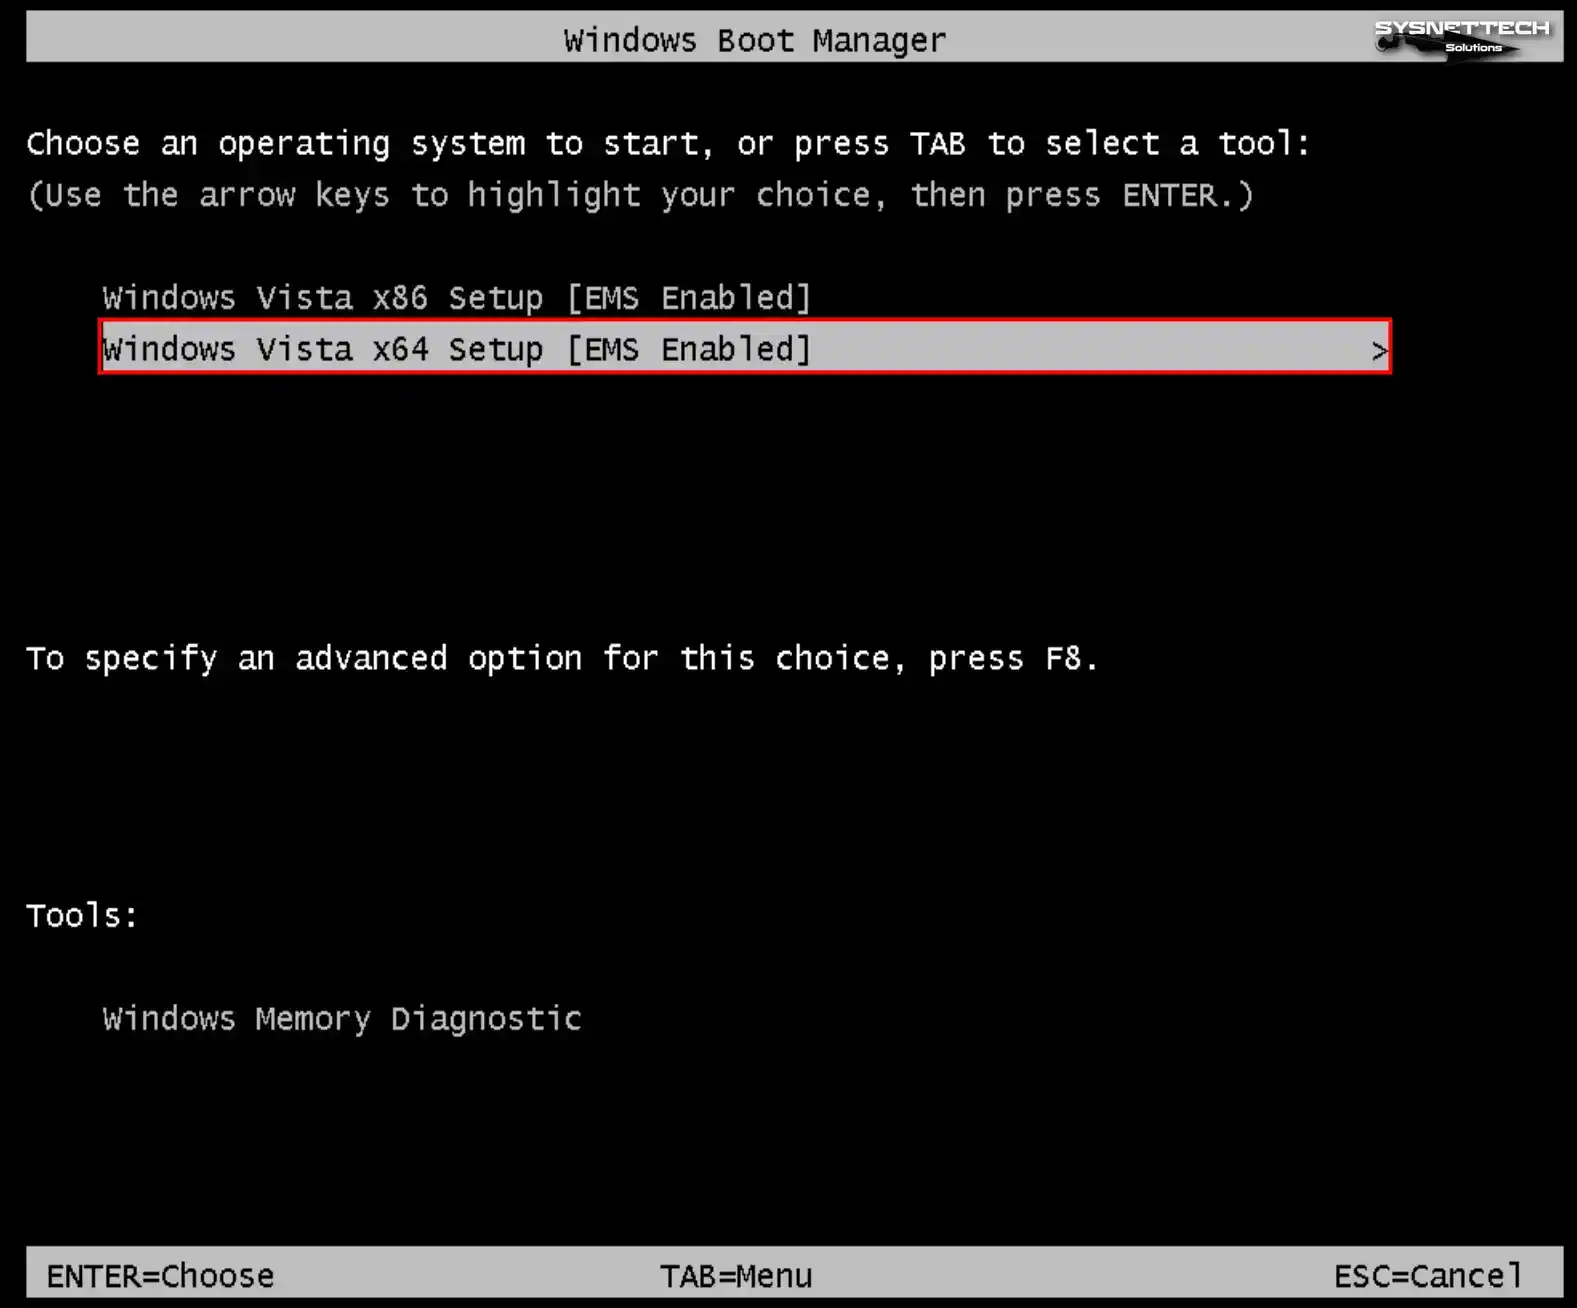
Step 1
The Windows Boot Manager screen will open after starting your virtual computer and selecting your startup disk. Press Enter on the Windows Vista x64 Setup option on this screen and start the installation.
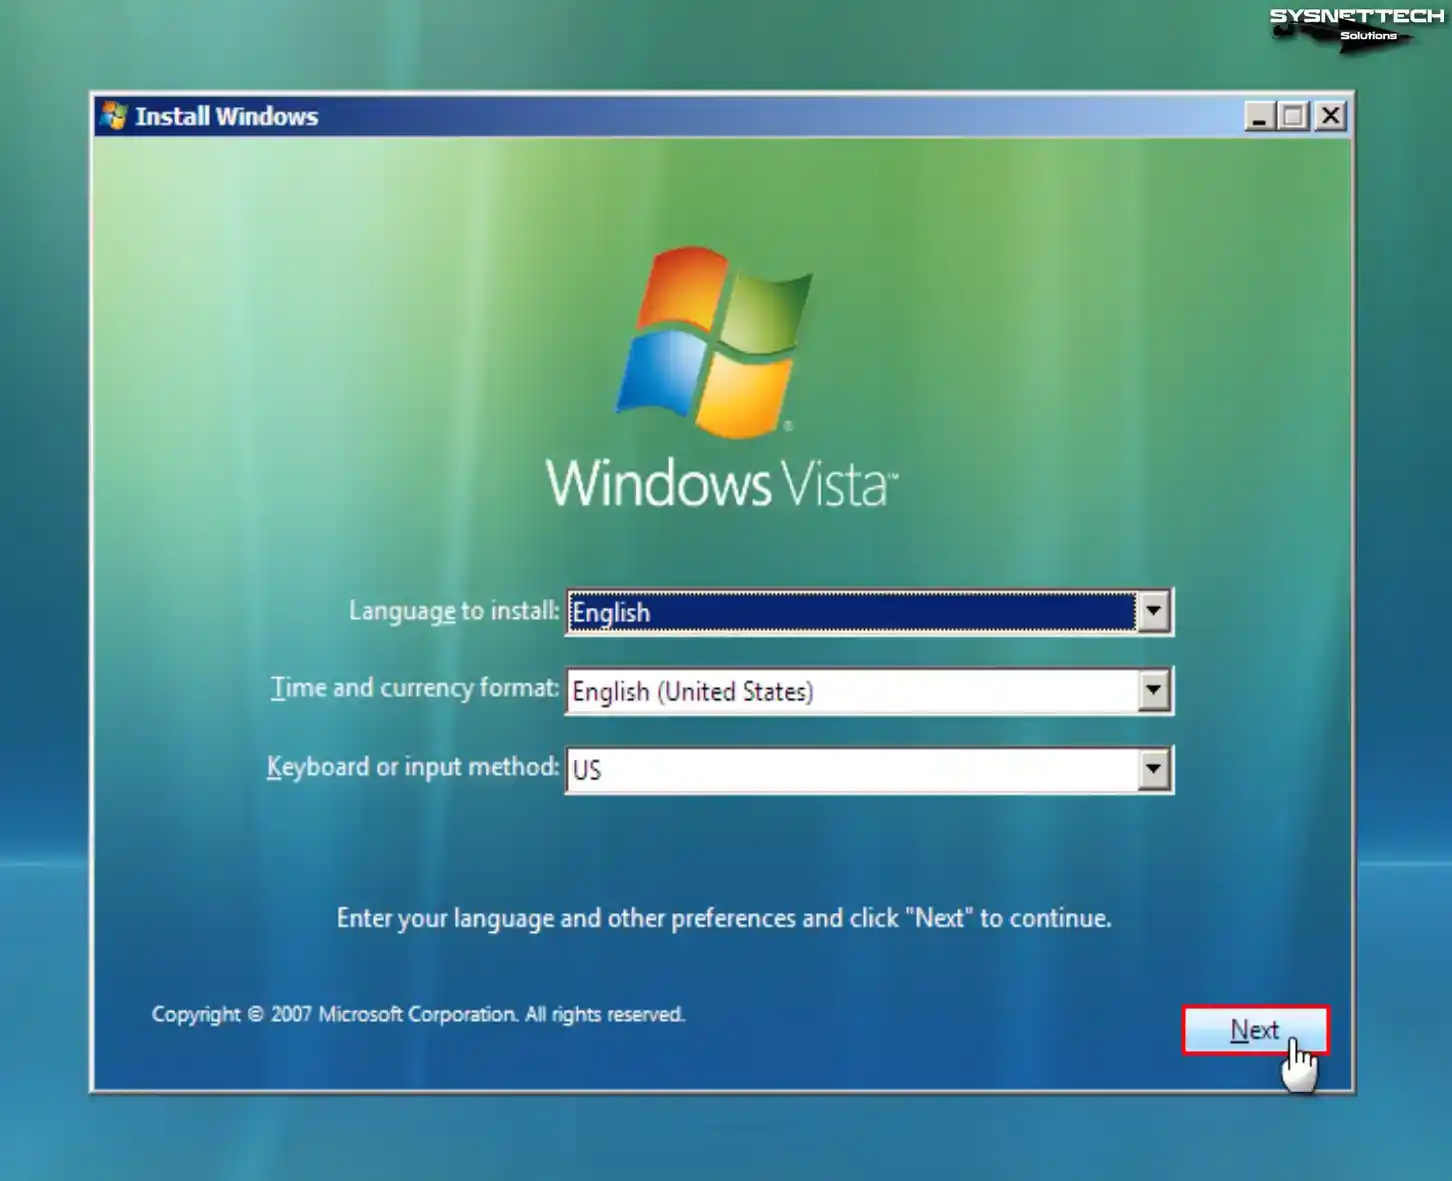
Step 2
In the Install Windows window, select the display language you want to use for your system, your current date format, and your keyboard layout, and click Next.
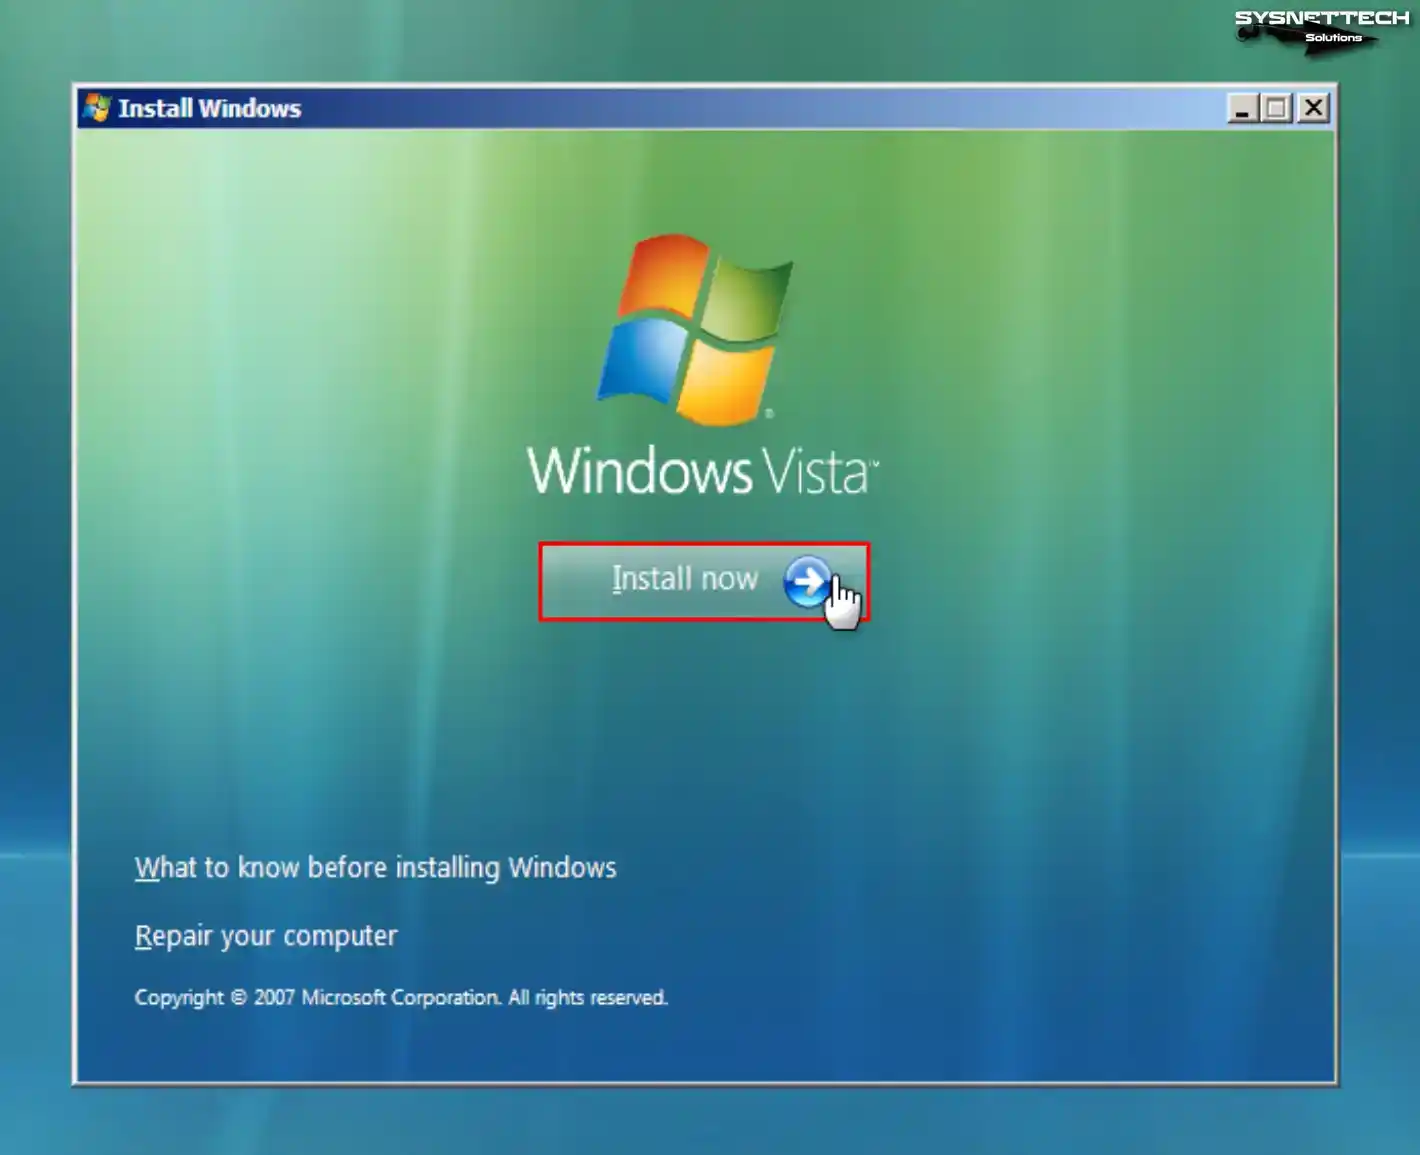
Step 3
Click the Install Now button to run Windows Vista on your guest machine and continue.
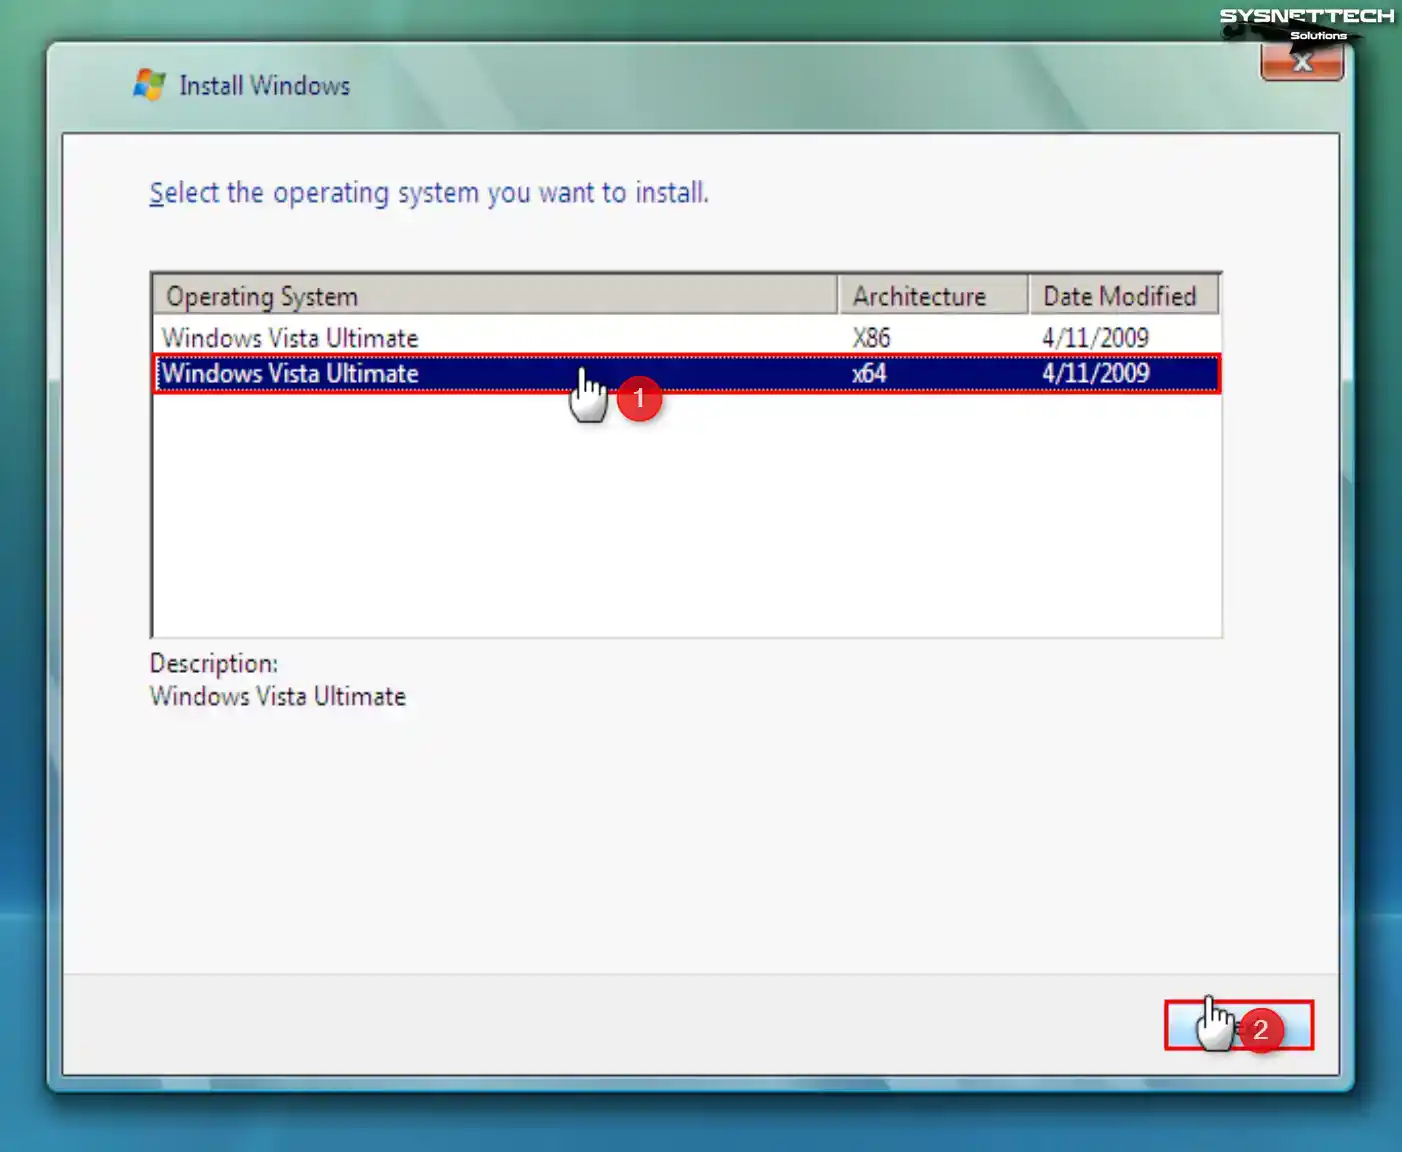
Step 4
In this window, you must select the Windows Vista architecture you want to install. Select the Windows Vista Ultimate x64 architecture and click Next.
Step 5
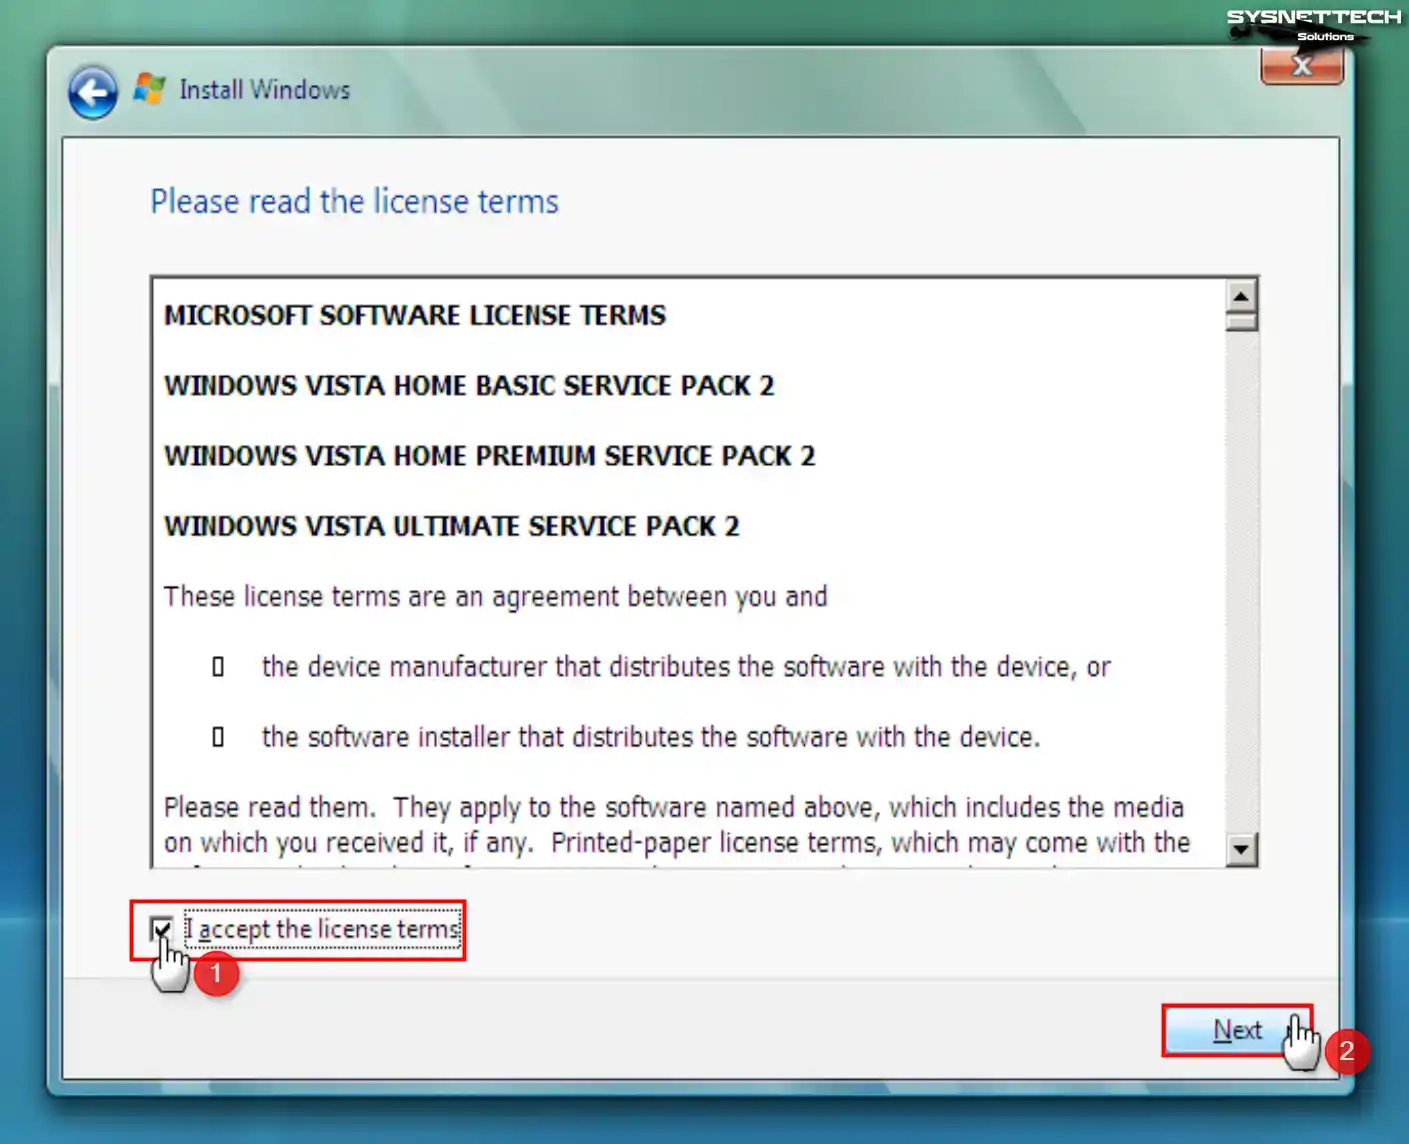
Accept the license agreement of Microsoft Windows Vista software and click Next again.
Step 6
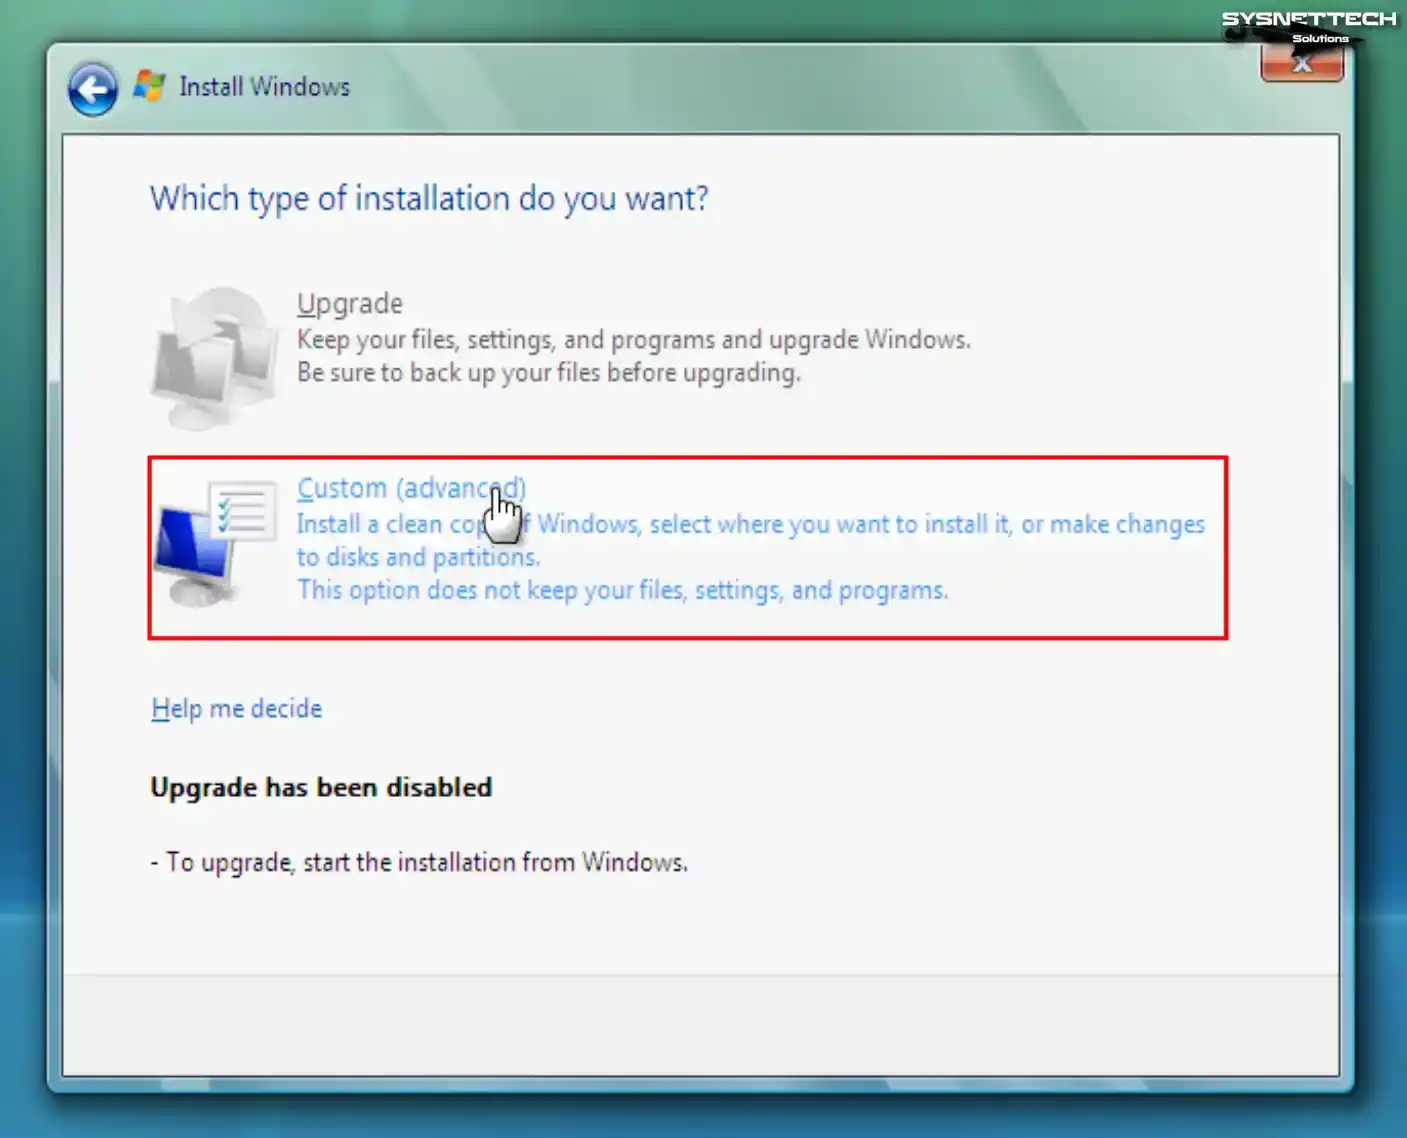
The Upgrade option is disabled because you will install a clean Windows Vista. Click Custom (Advanced) to proceed to configure settings such as disk configuration and continue.
Step 7
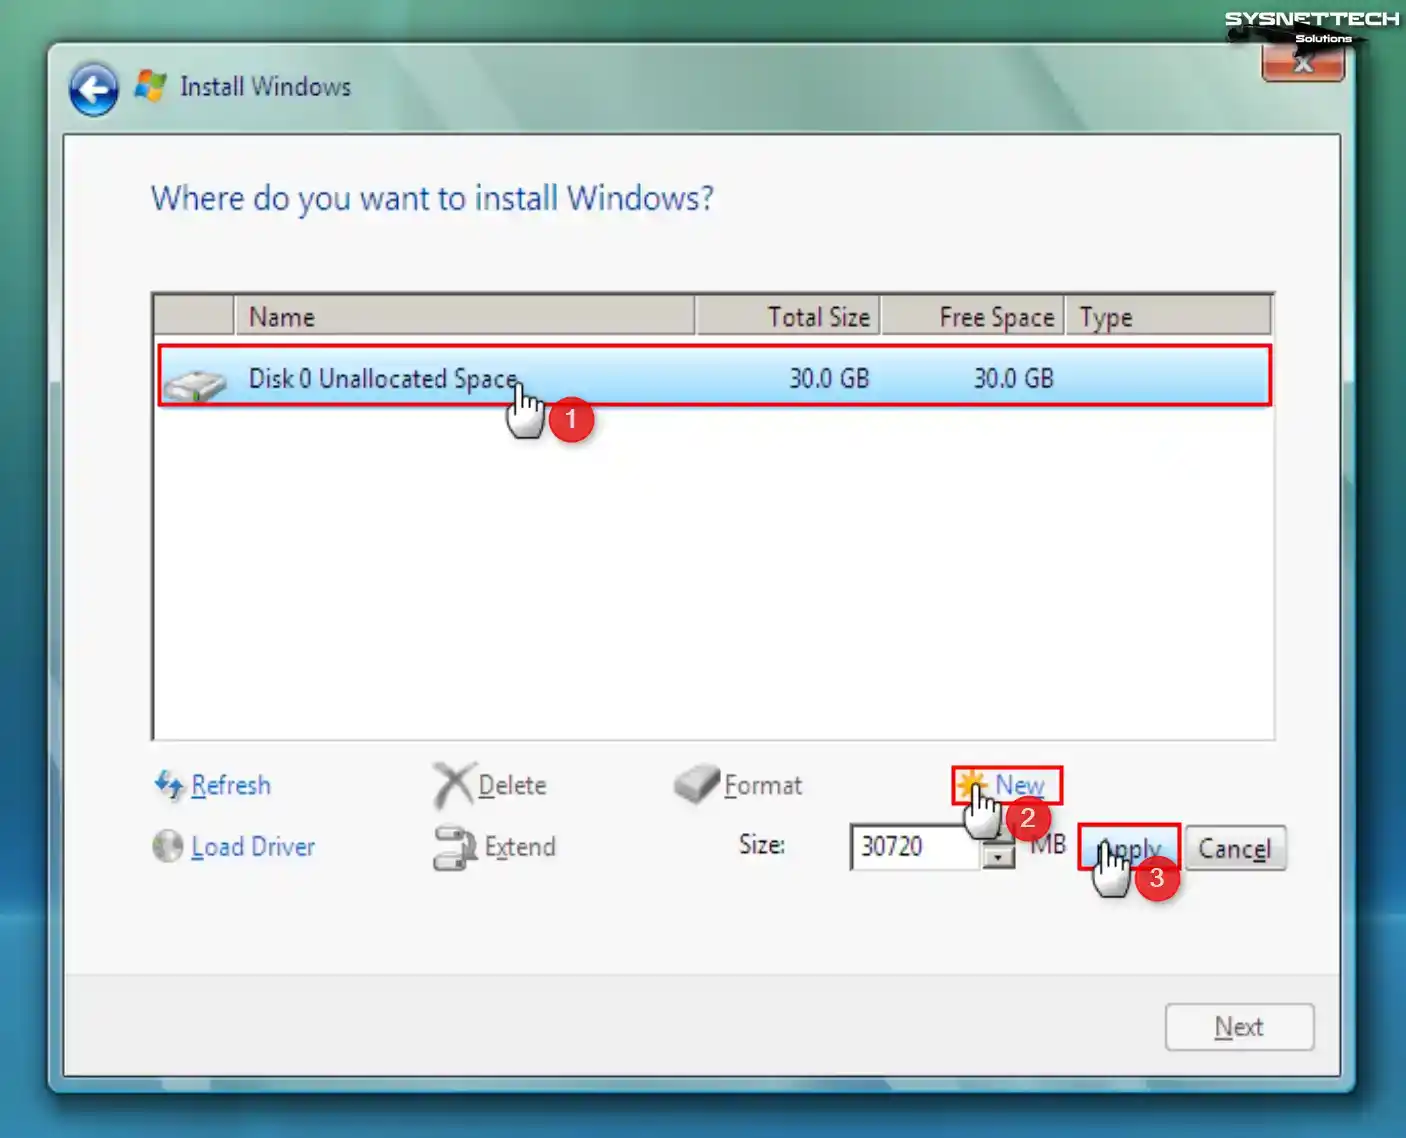
Click Drive Options in the disk configuration window. To configure the unallocated disk space, click New, then click the Apply button to ensure the disk space the system automatically determined.
Step 8
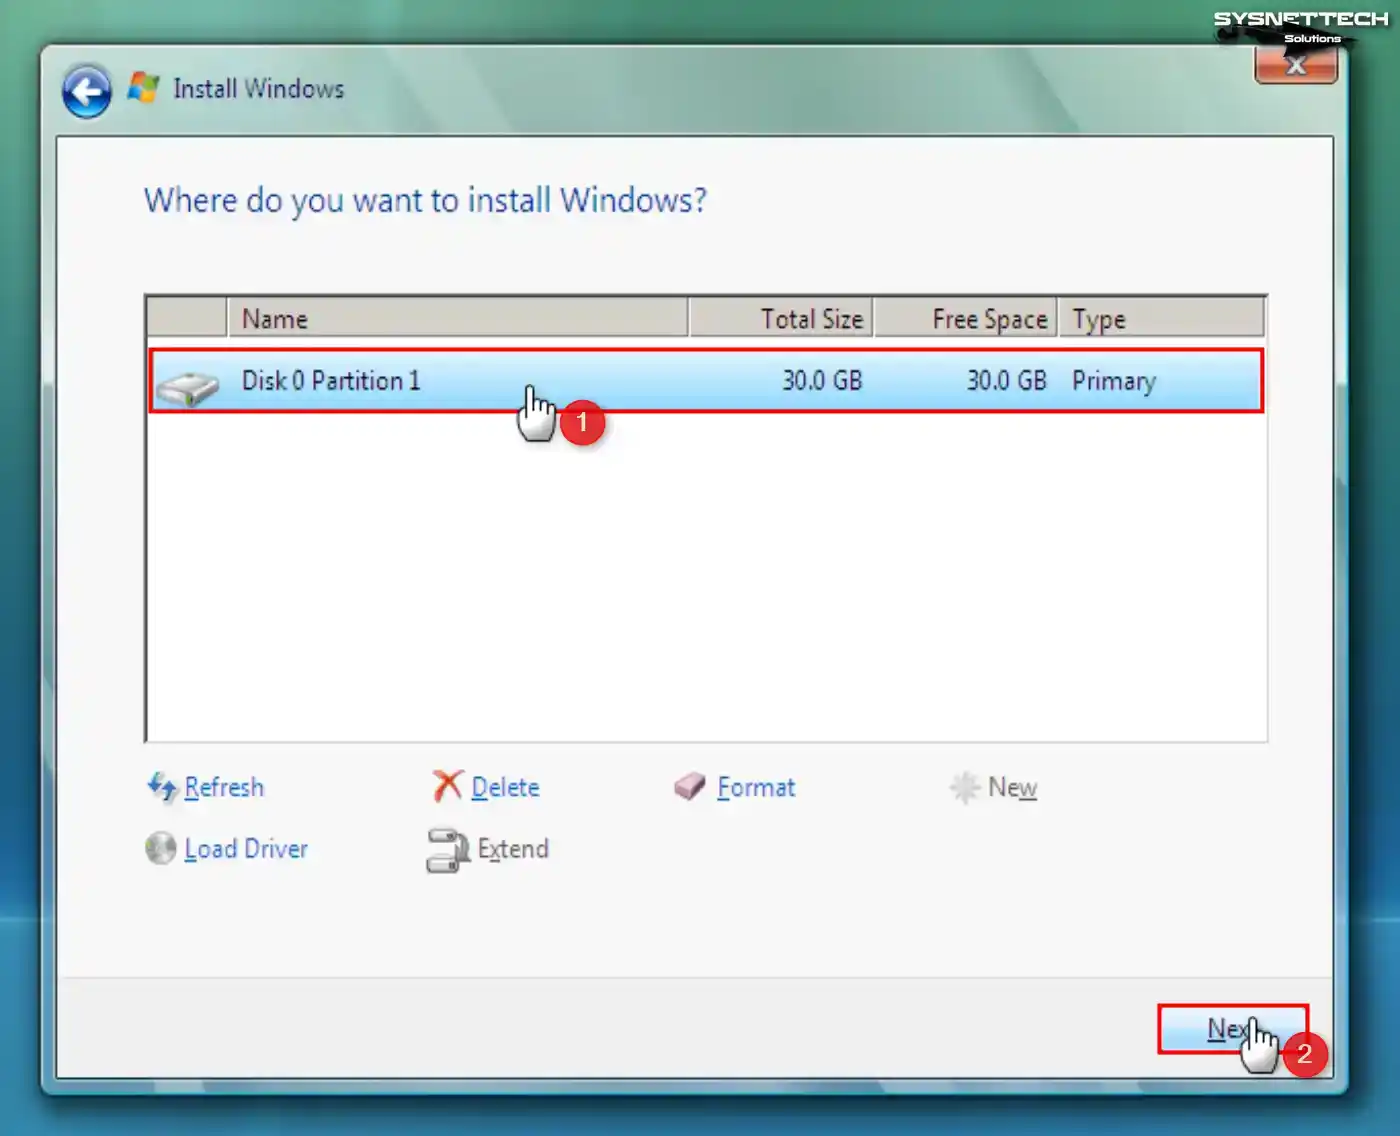
After creating a new disk space on the virtual HDD, select Disk 0 Partition 1 and click Next.
Step 9
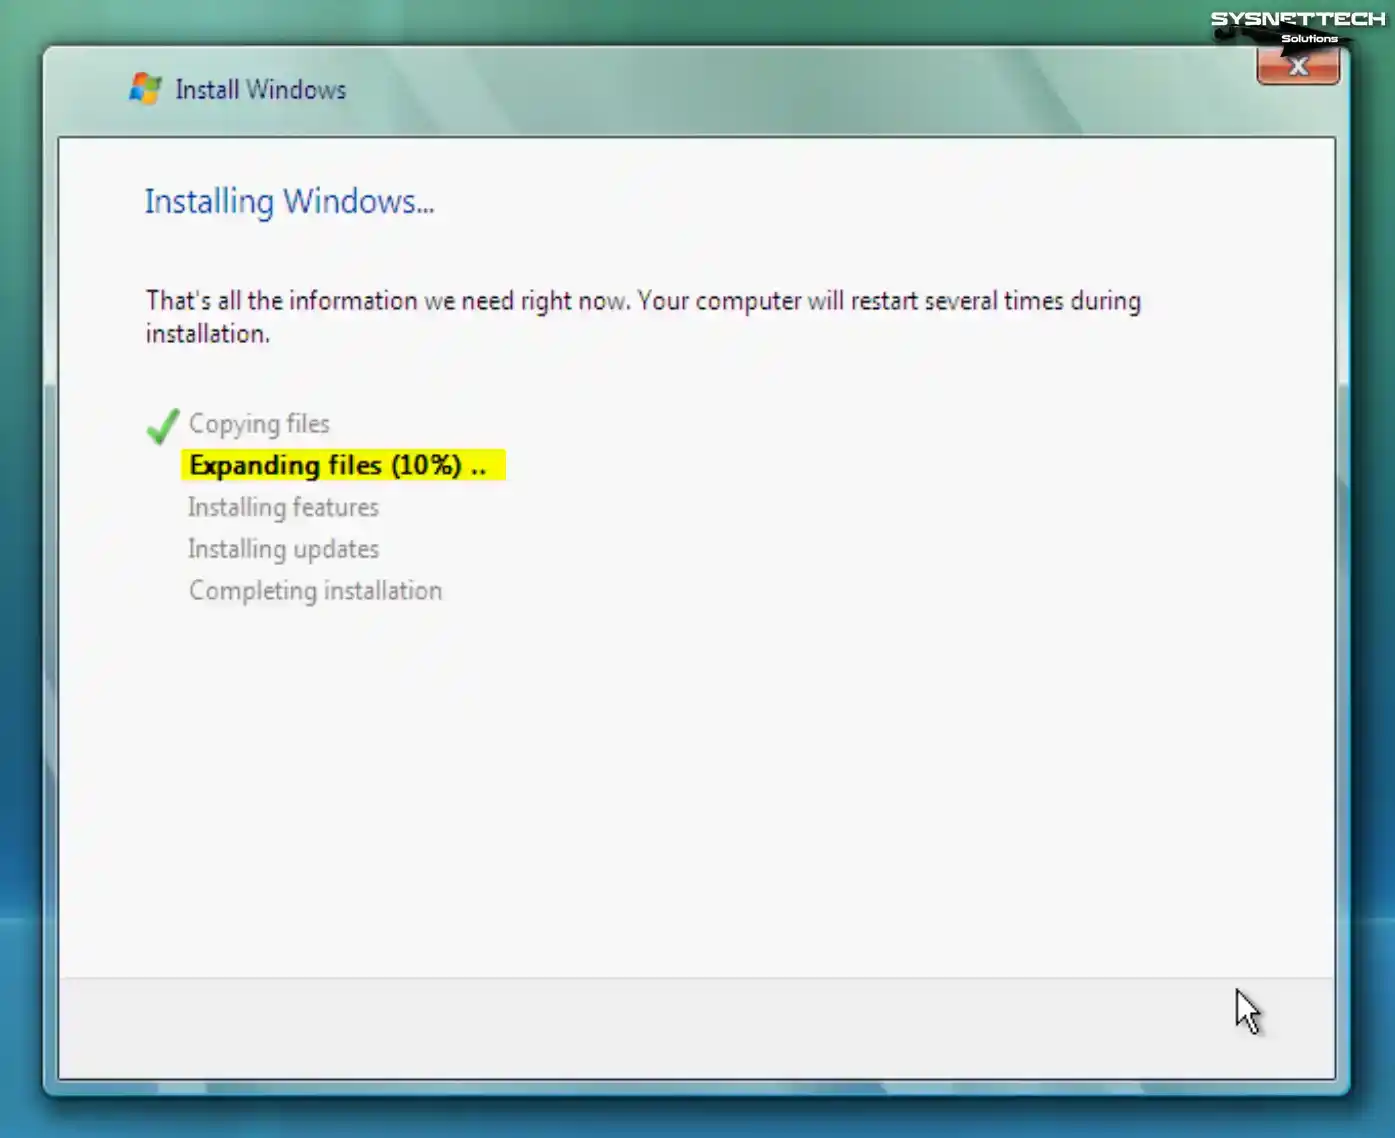
Wait while the setup wizard expands the system files for Windows.
Step 10
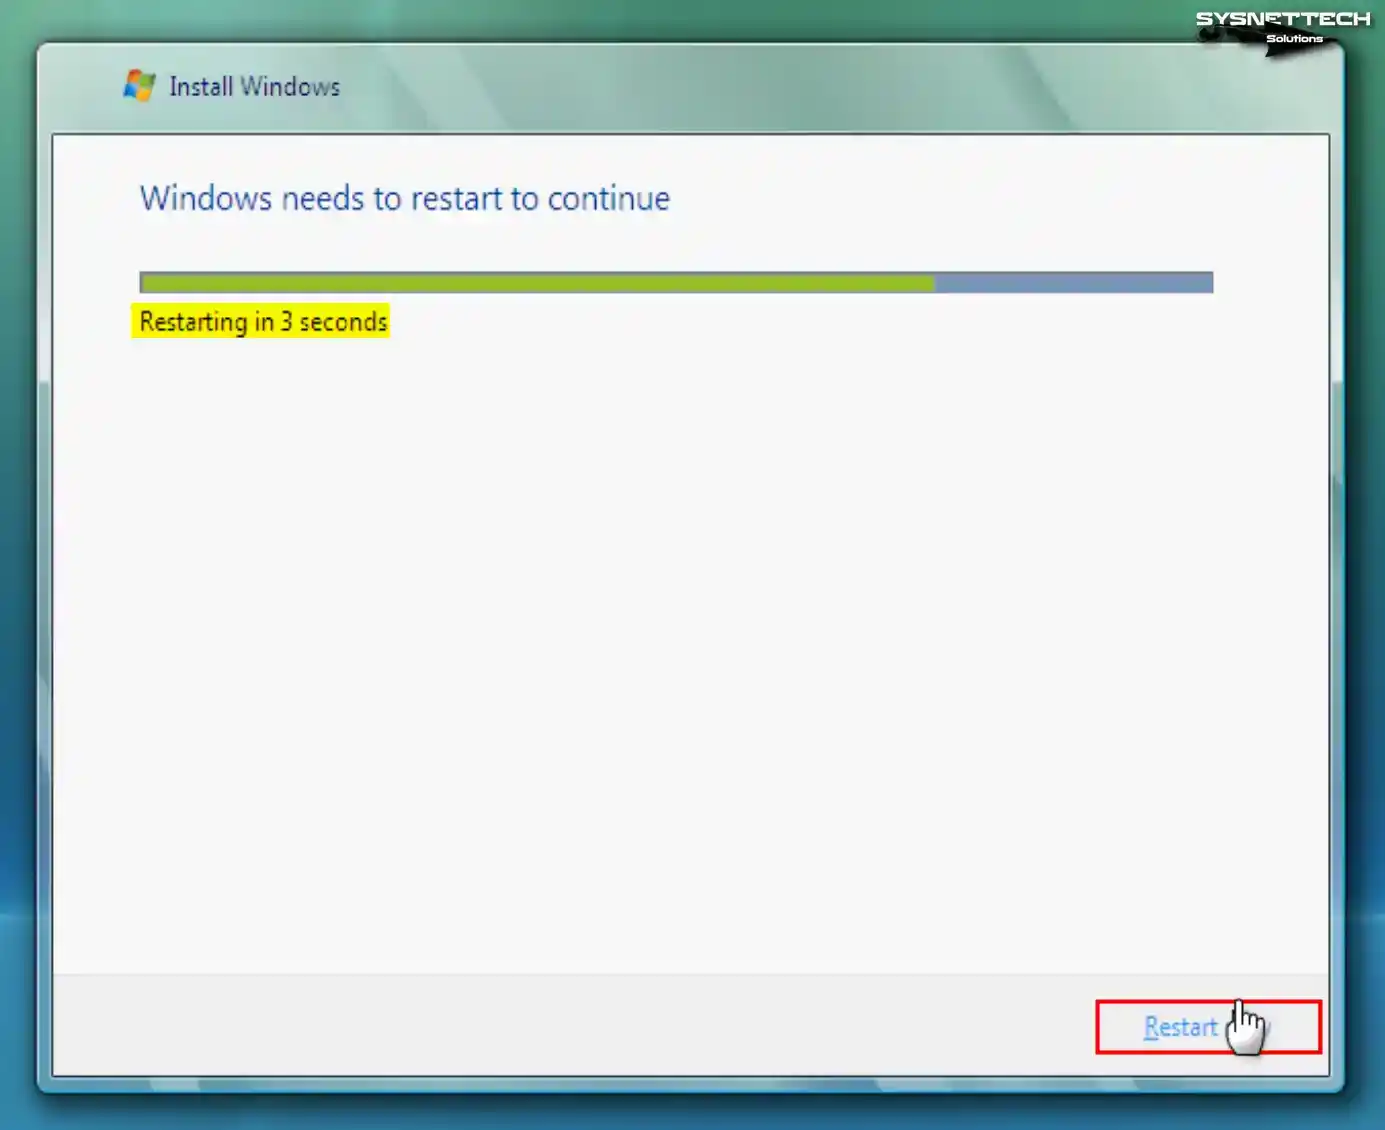
Your guest machine will restart automatically when the specified timer expires. Click the Restart Now button to renew your virtual system immediately.
Step 11
Type a new username for your Windows Vista system, select a profile picture, and click Next.

Step 12
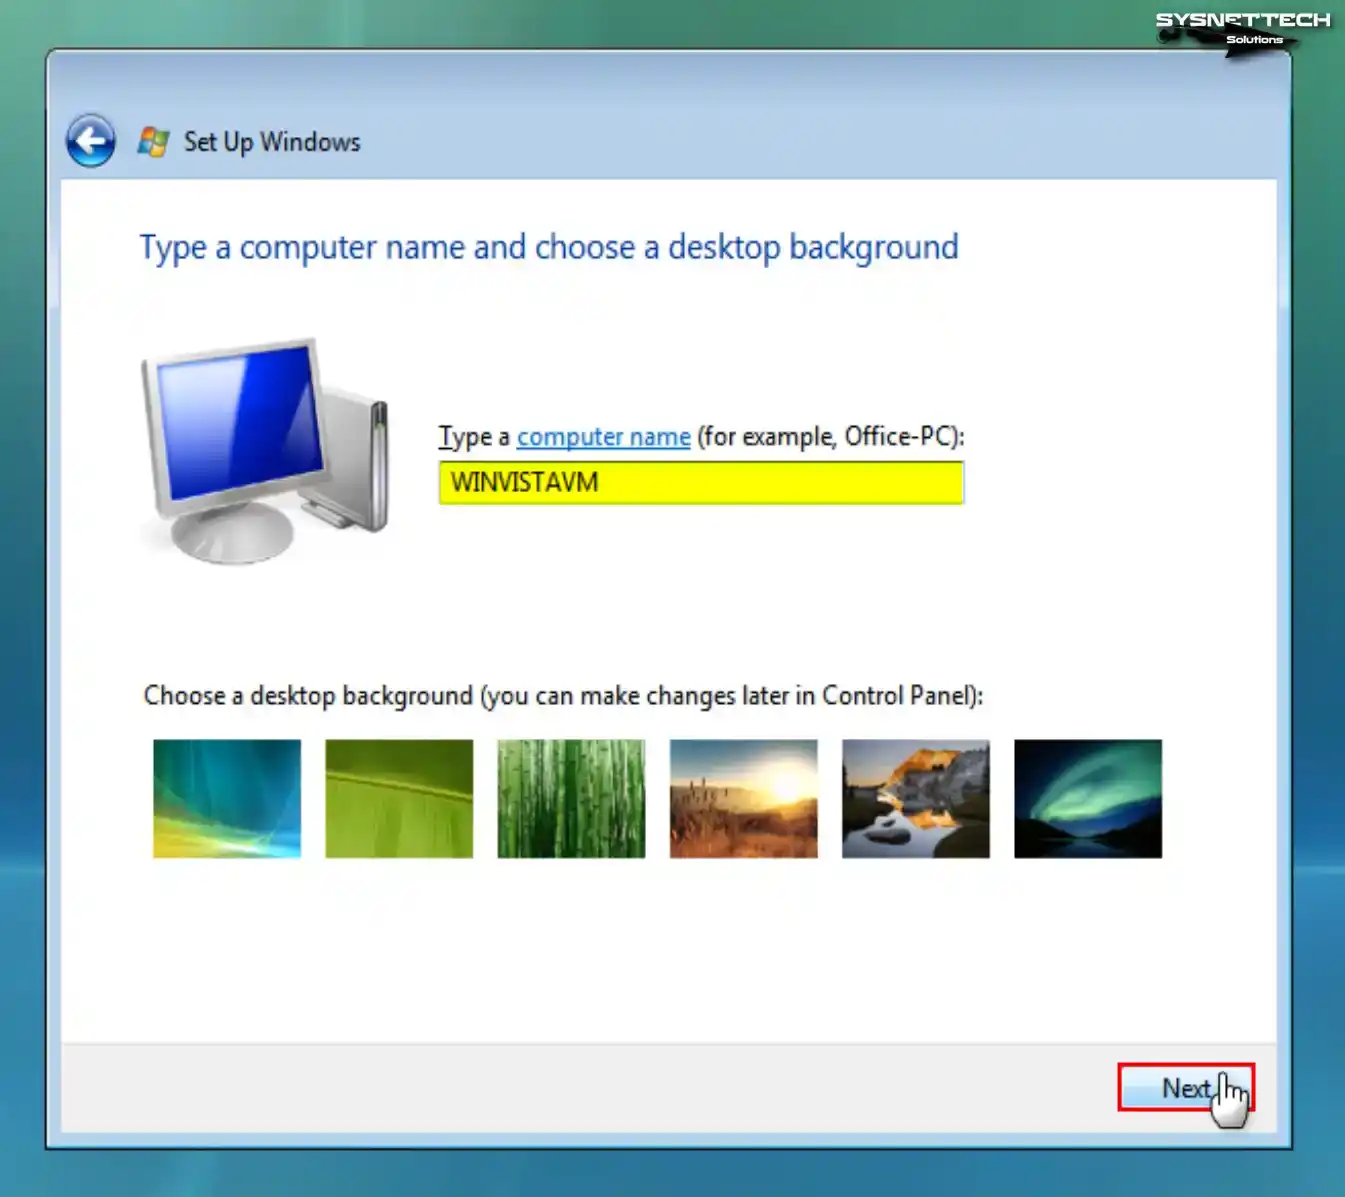
In the same way, type your computer name, select your background wallpaper, and click Next again.
Step 13
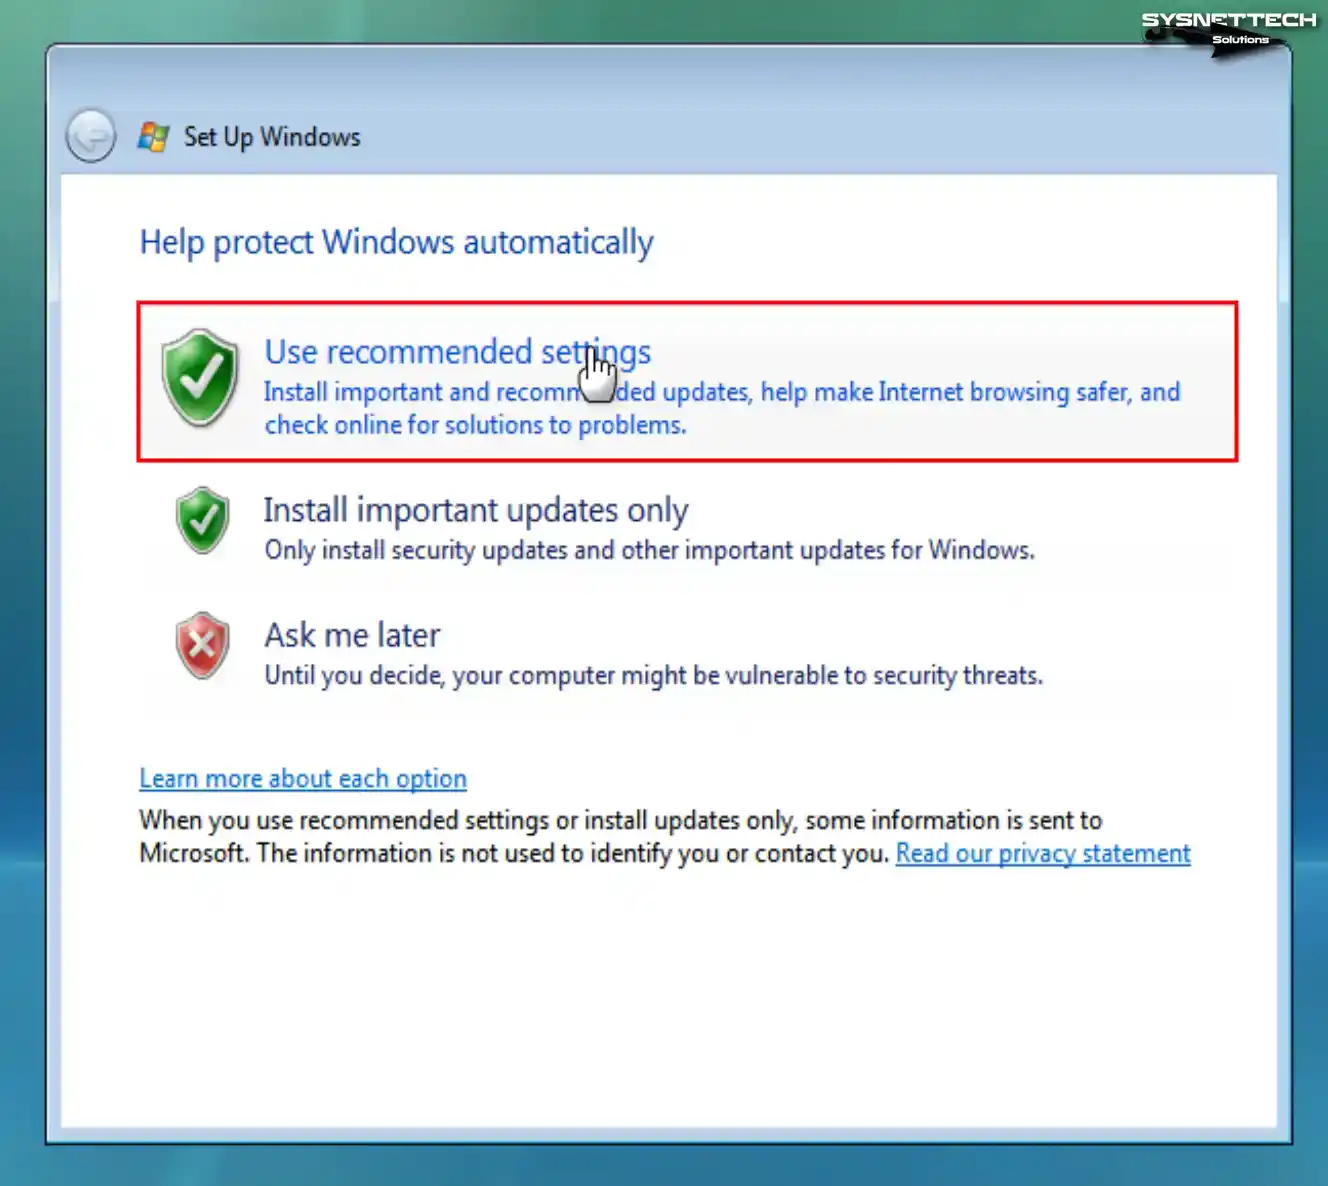
Specify in this window how you want to select the Windows Update settings for your system. Even though the extended support of Windows Vista has ended, choose Use Recommended Settings at this stage.
Step 14
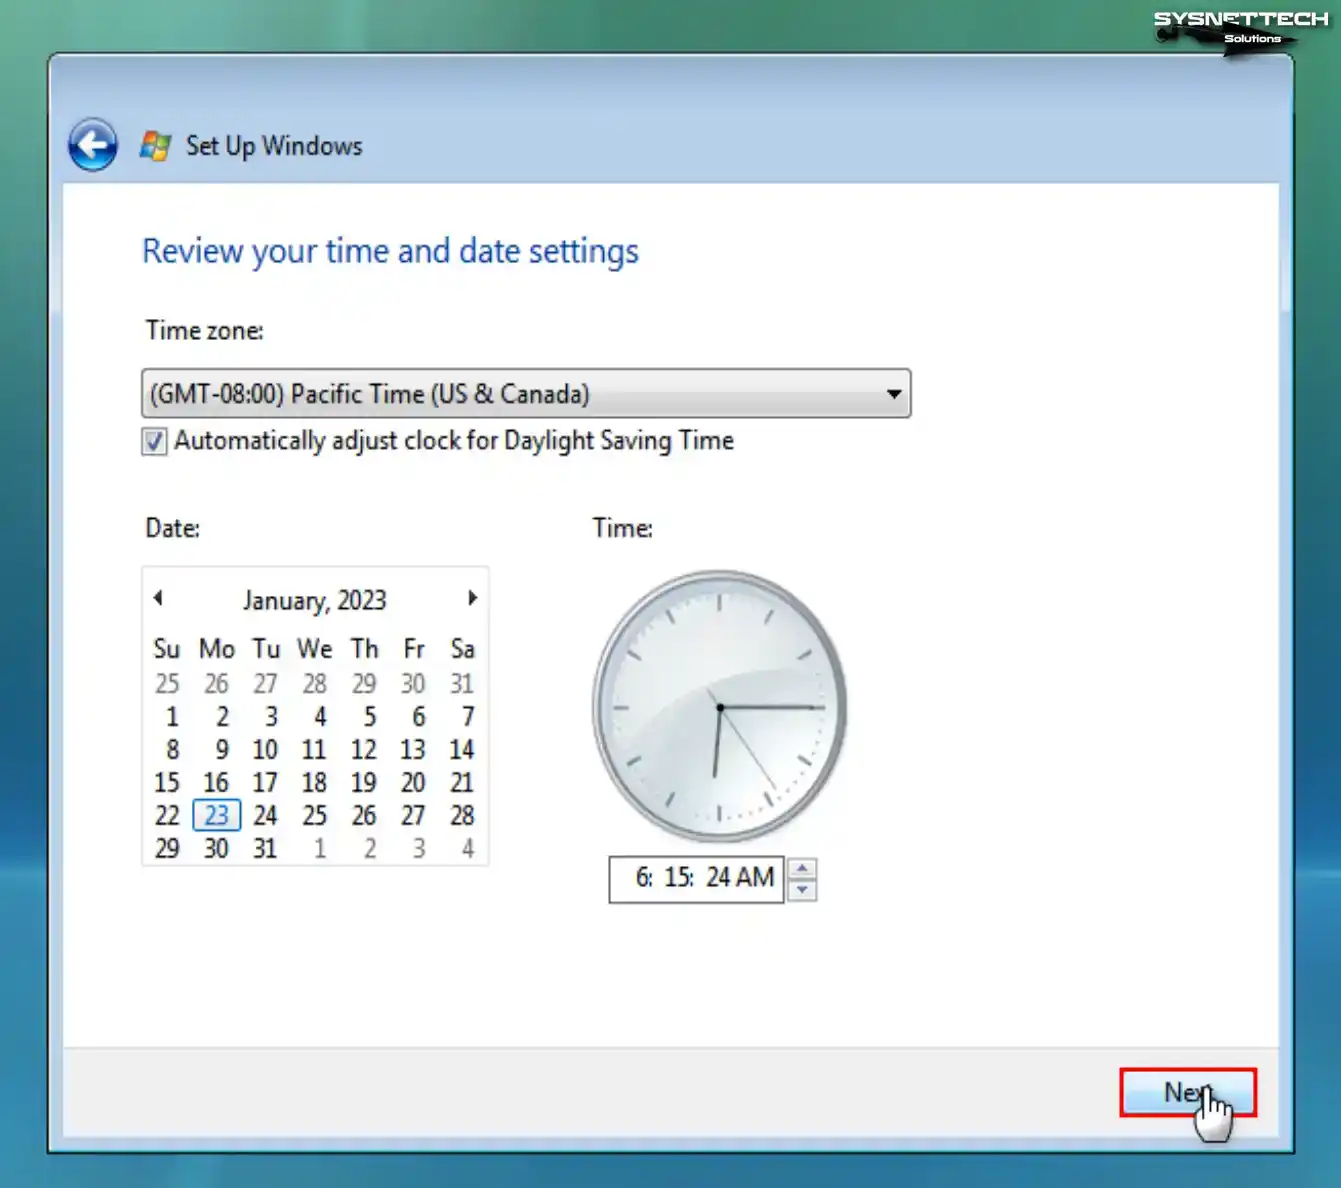
Configure your Windows virtual machine’s date and time settings according to your country and click Next.
Step 15
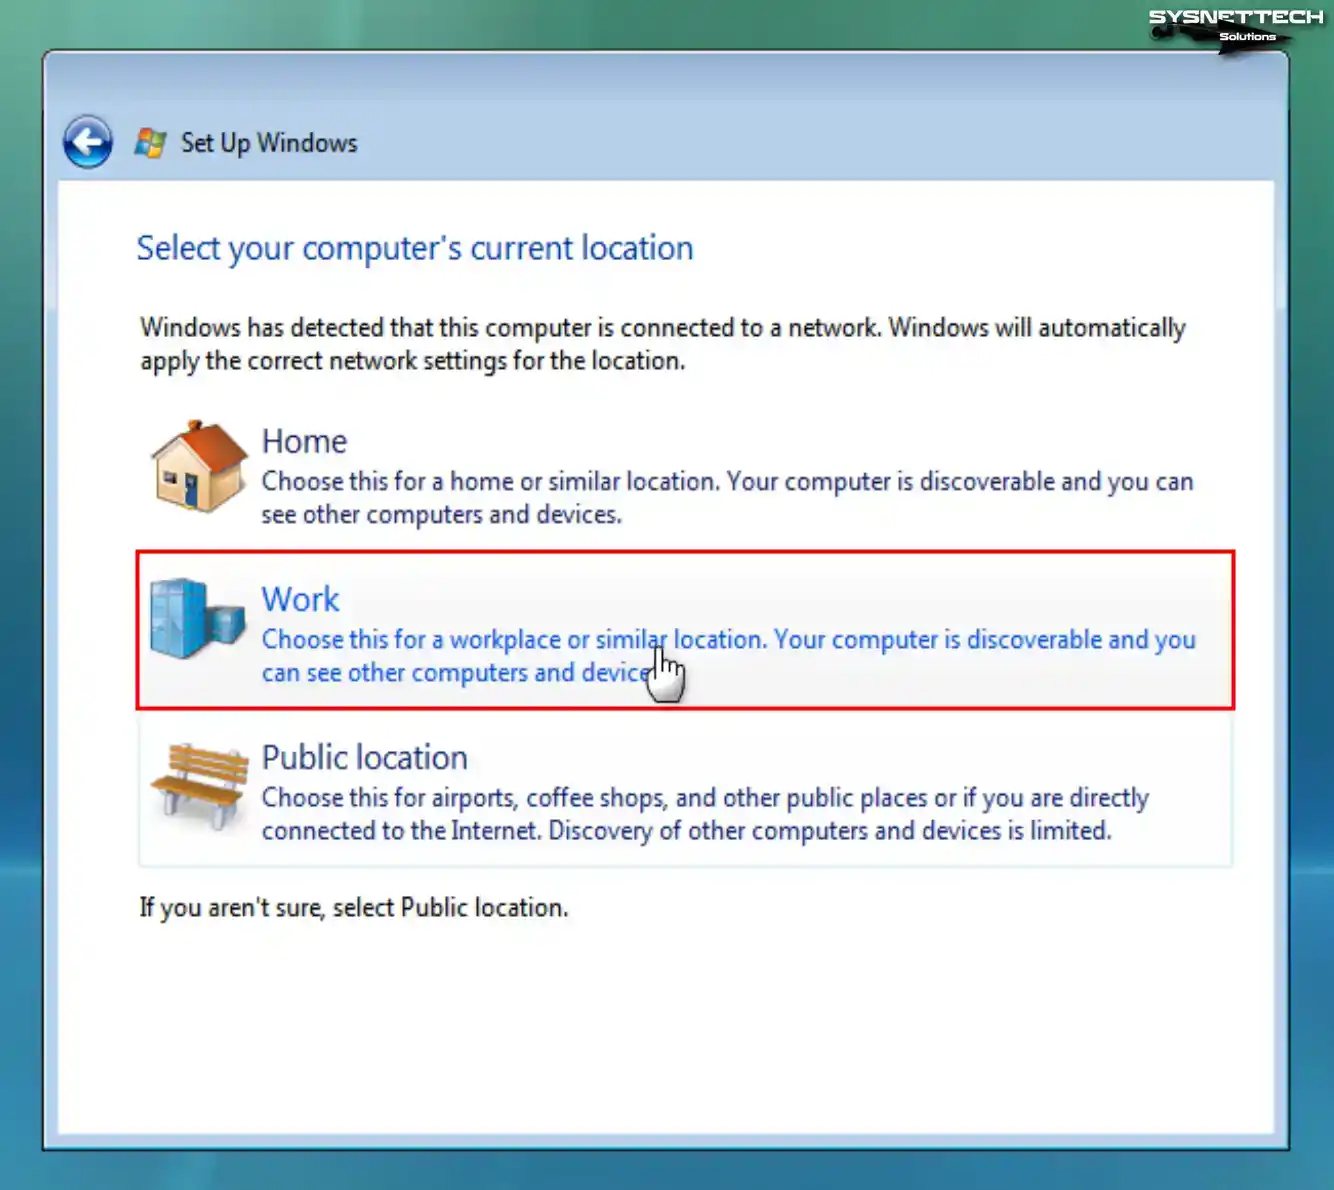
Specify the current location of your virtual computer as Home, Work, or Public, and continue.
Step 16
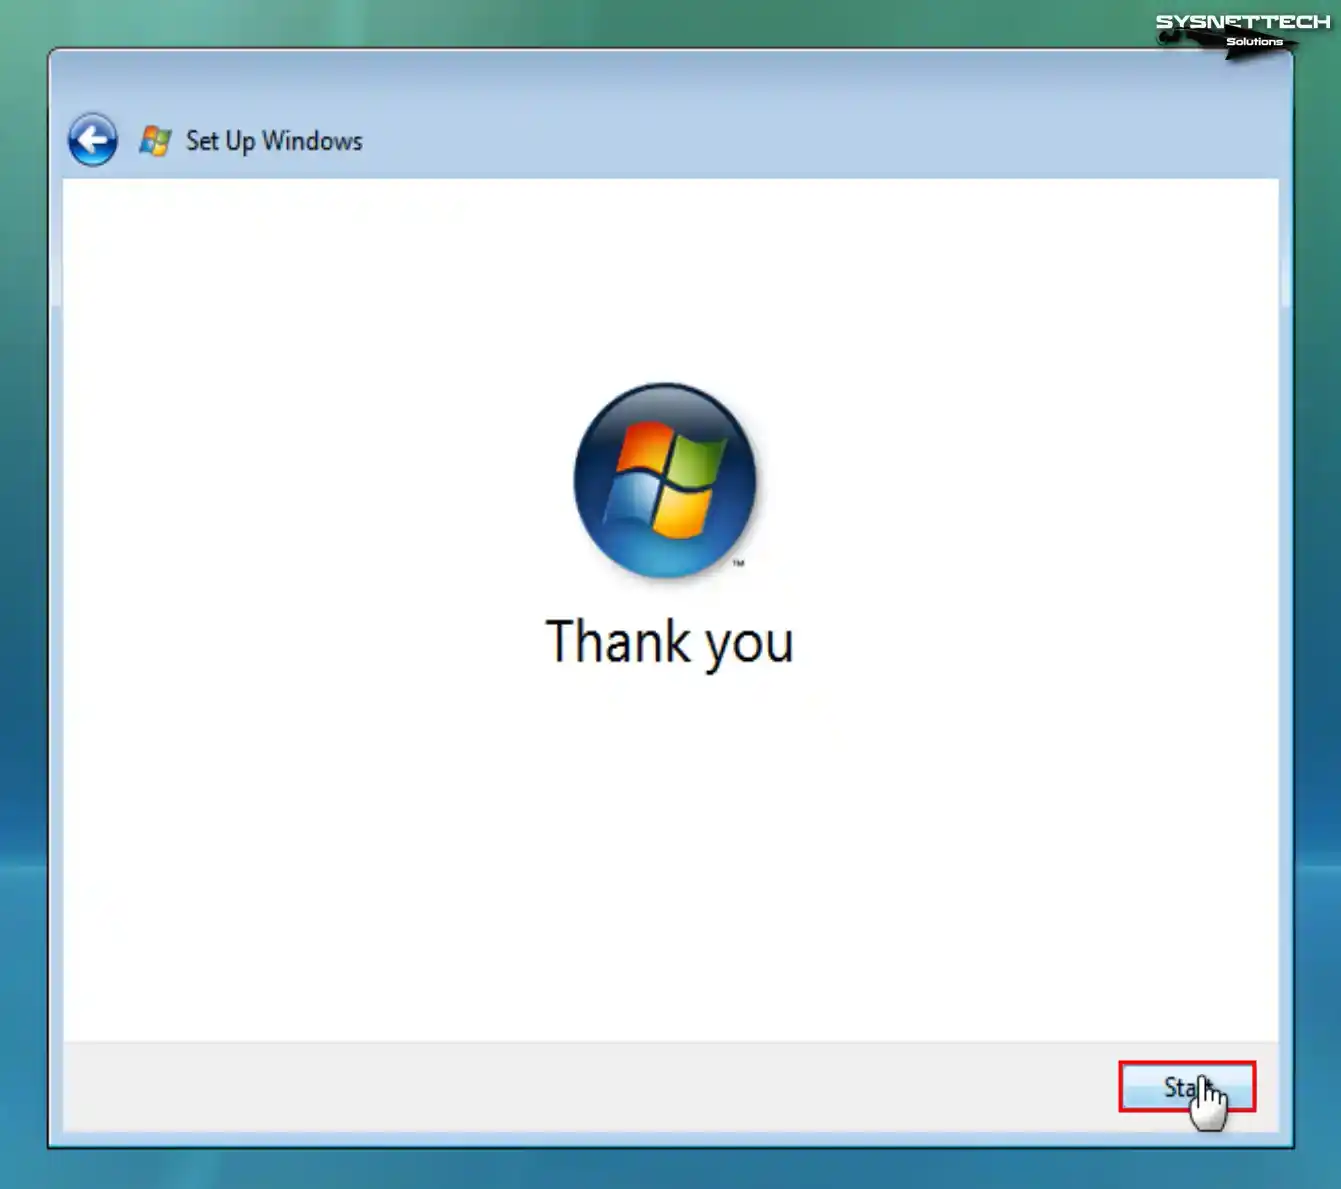
Click the Start button to determine the performance of your Windows Vista virtual system and prepare the desktop.
Step 17
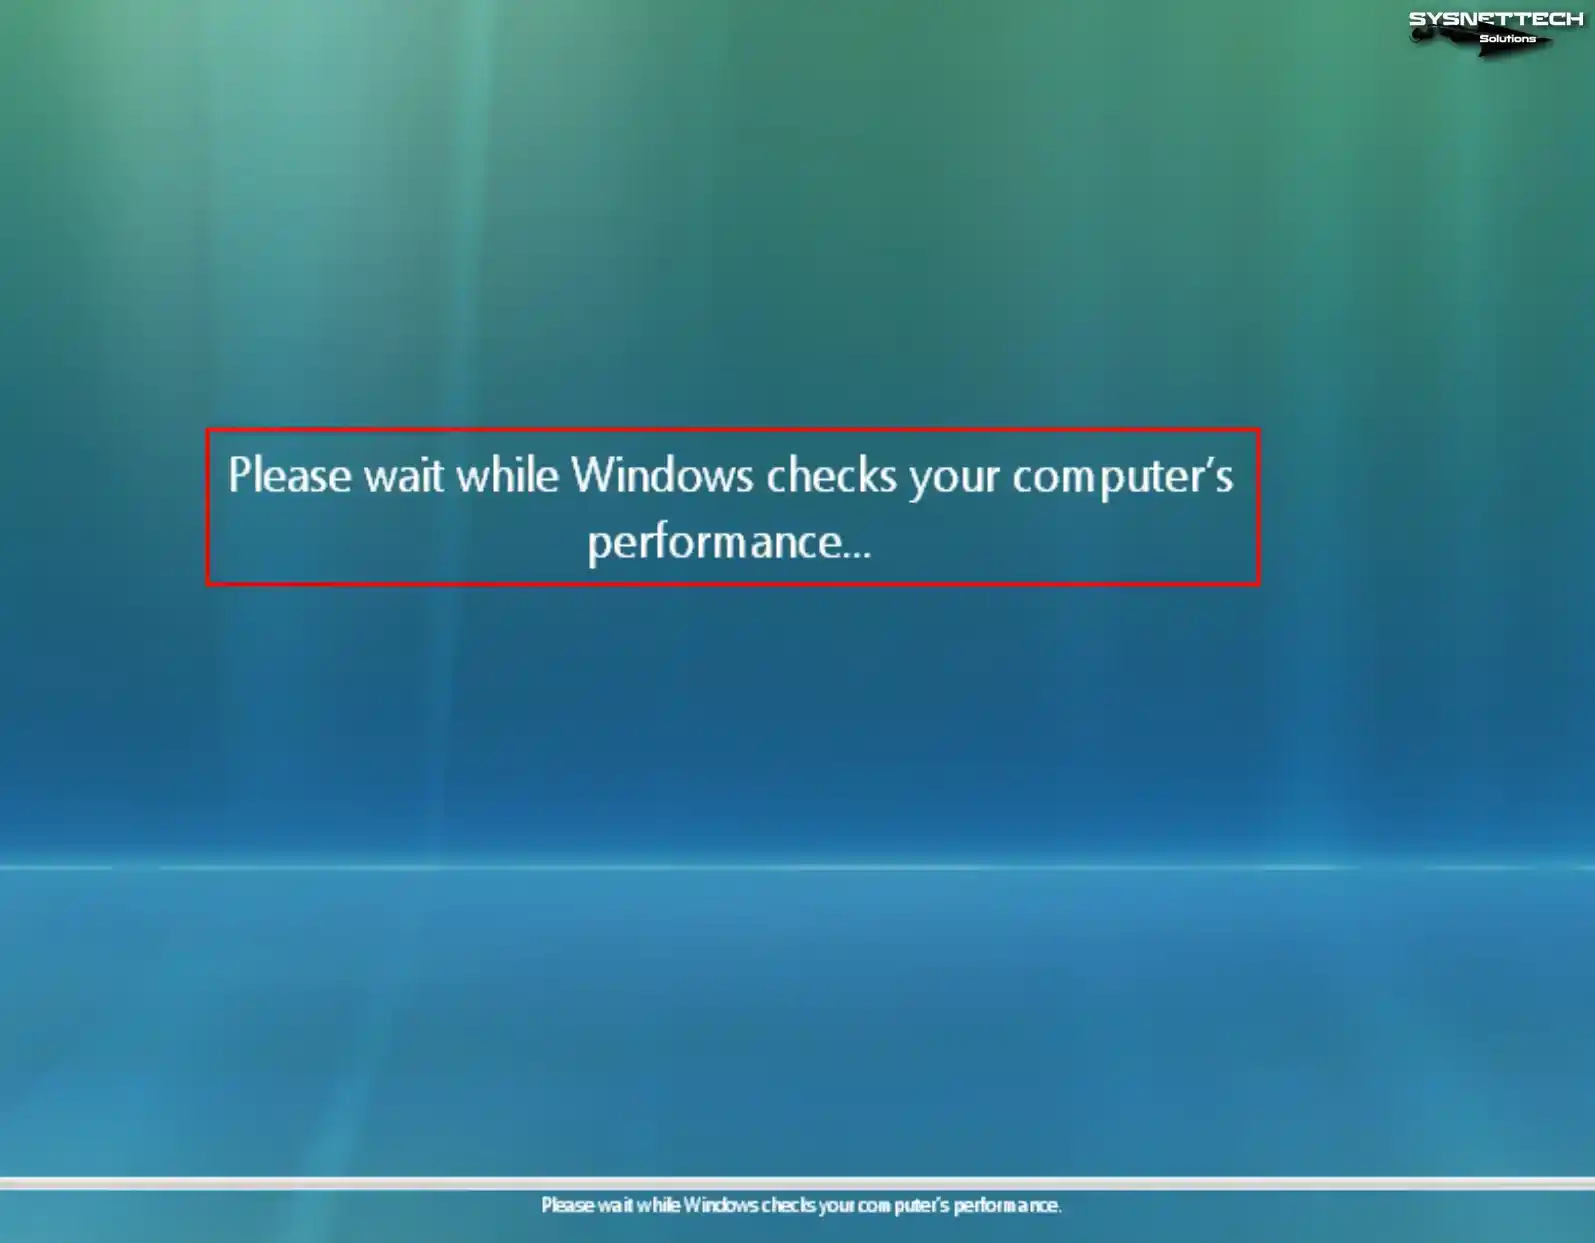
Wait while the Windows wizard checks the guest machine’s performance.
Step 18
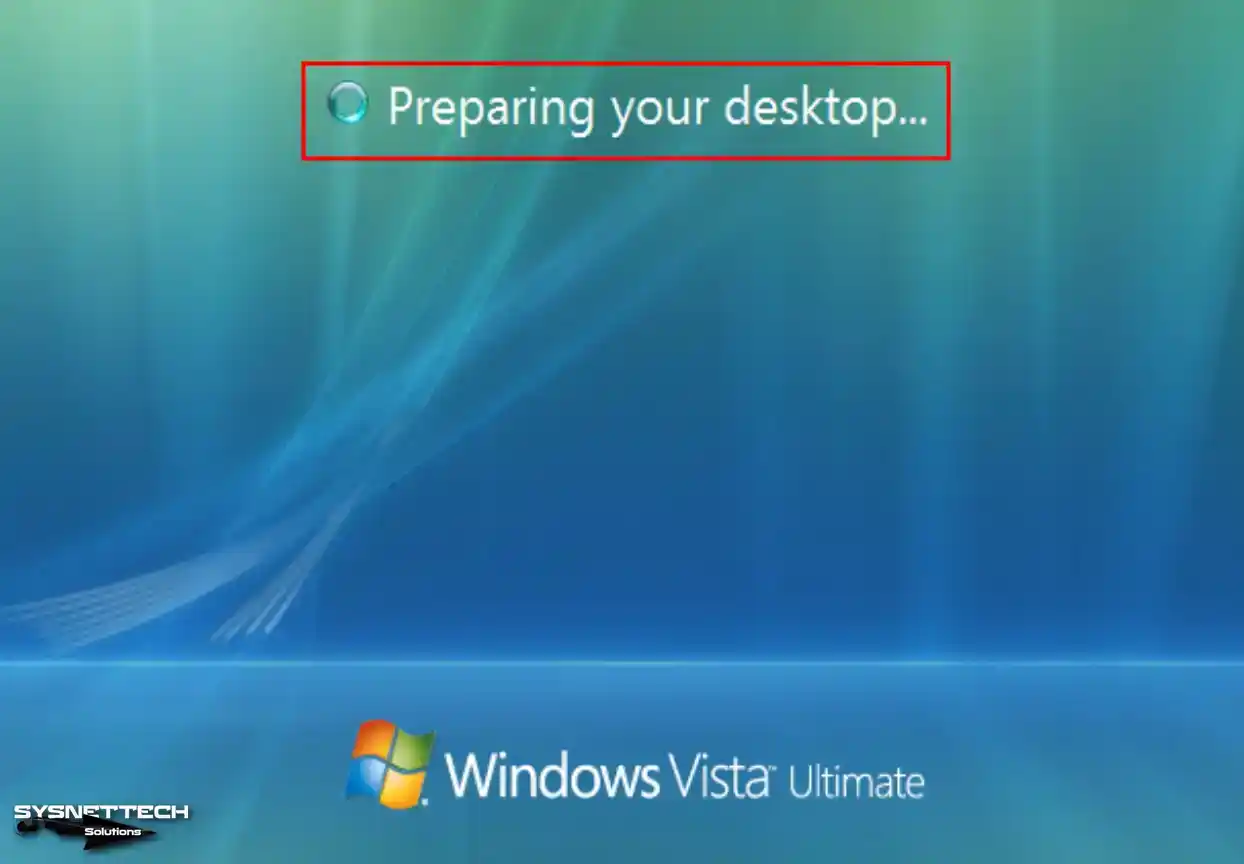
Wait while the desktop of your Vista system is being prepared.
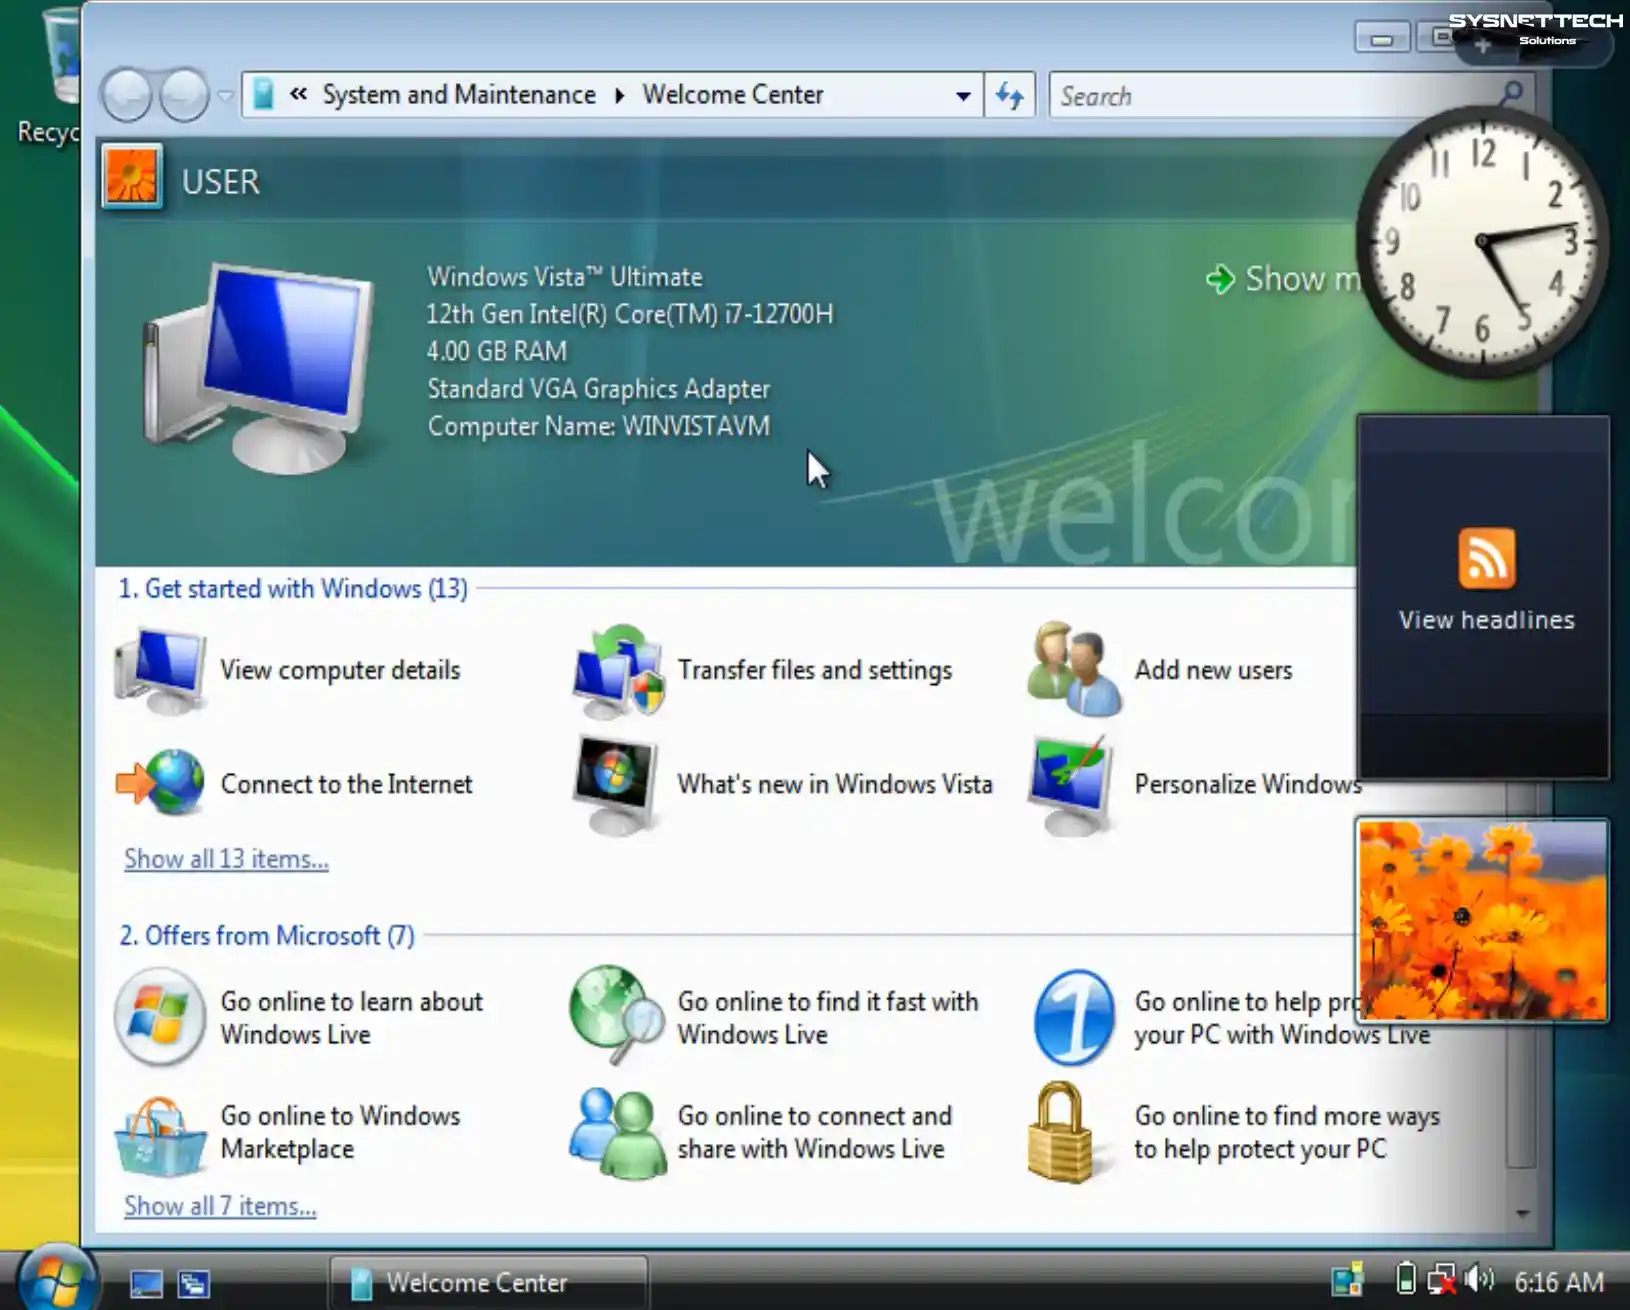
Step 19
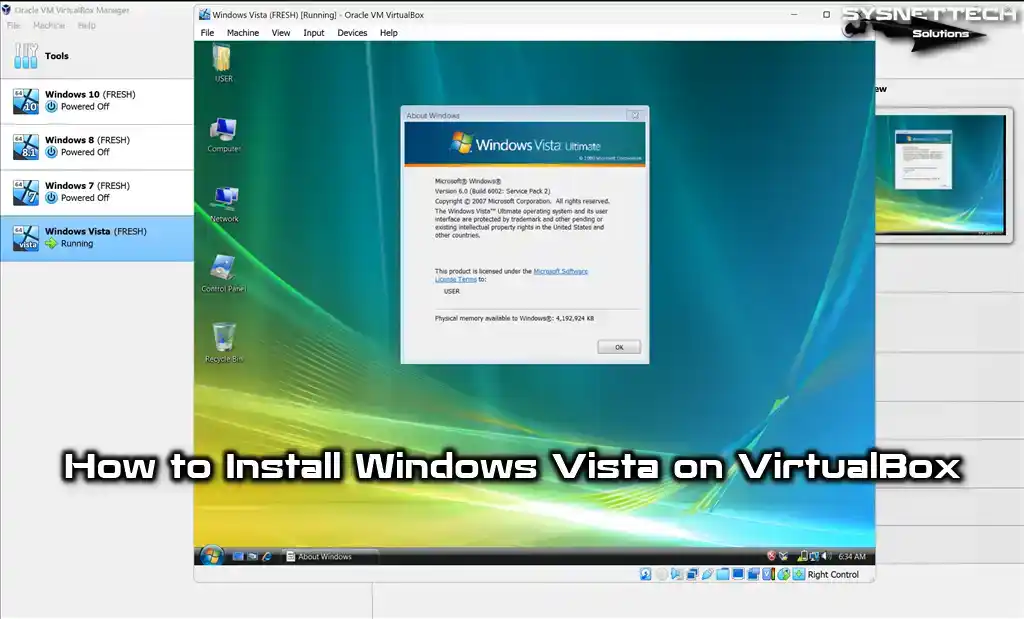
After the installation steps, the first boot view of the Windows Vista operating system will be as follows.
How to Install Guest Additions
Upon successfully installing a Windows or Linux operating system using VirtualBox, it is essential to establish the Guest Additions software to enable the utilization of the host hardware within the virtual machine.
Step 1
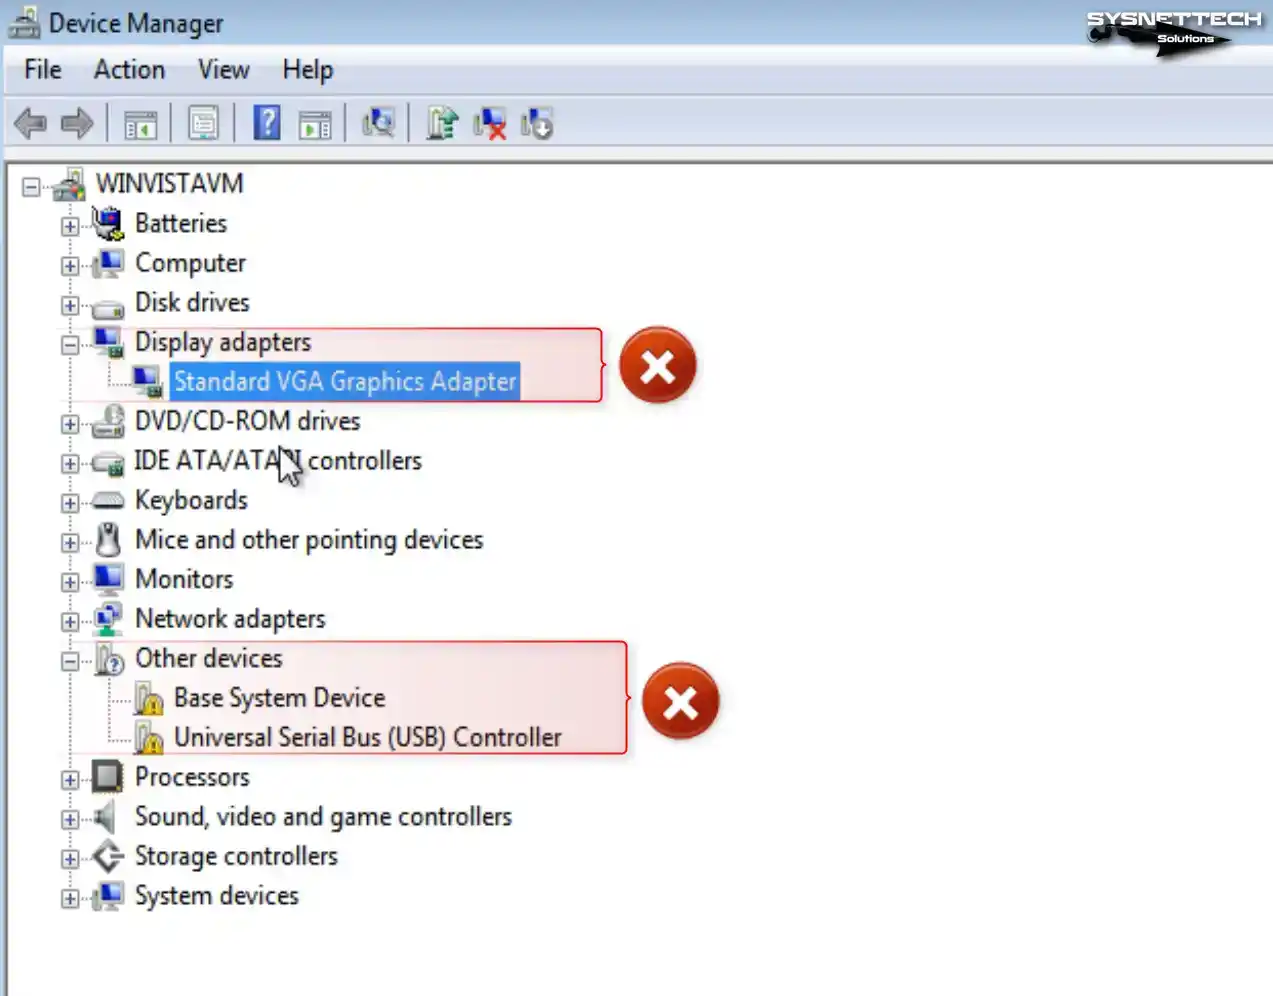
After installing Windows Vista, when you open Device Manager and view the drivers, you can see that the Base System Device device is not installed and the virtual graphics adapter software under Display Adapter is not installed correctly.
Step 2
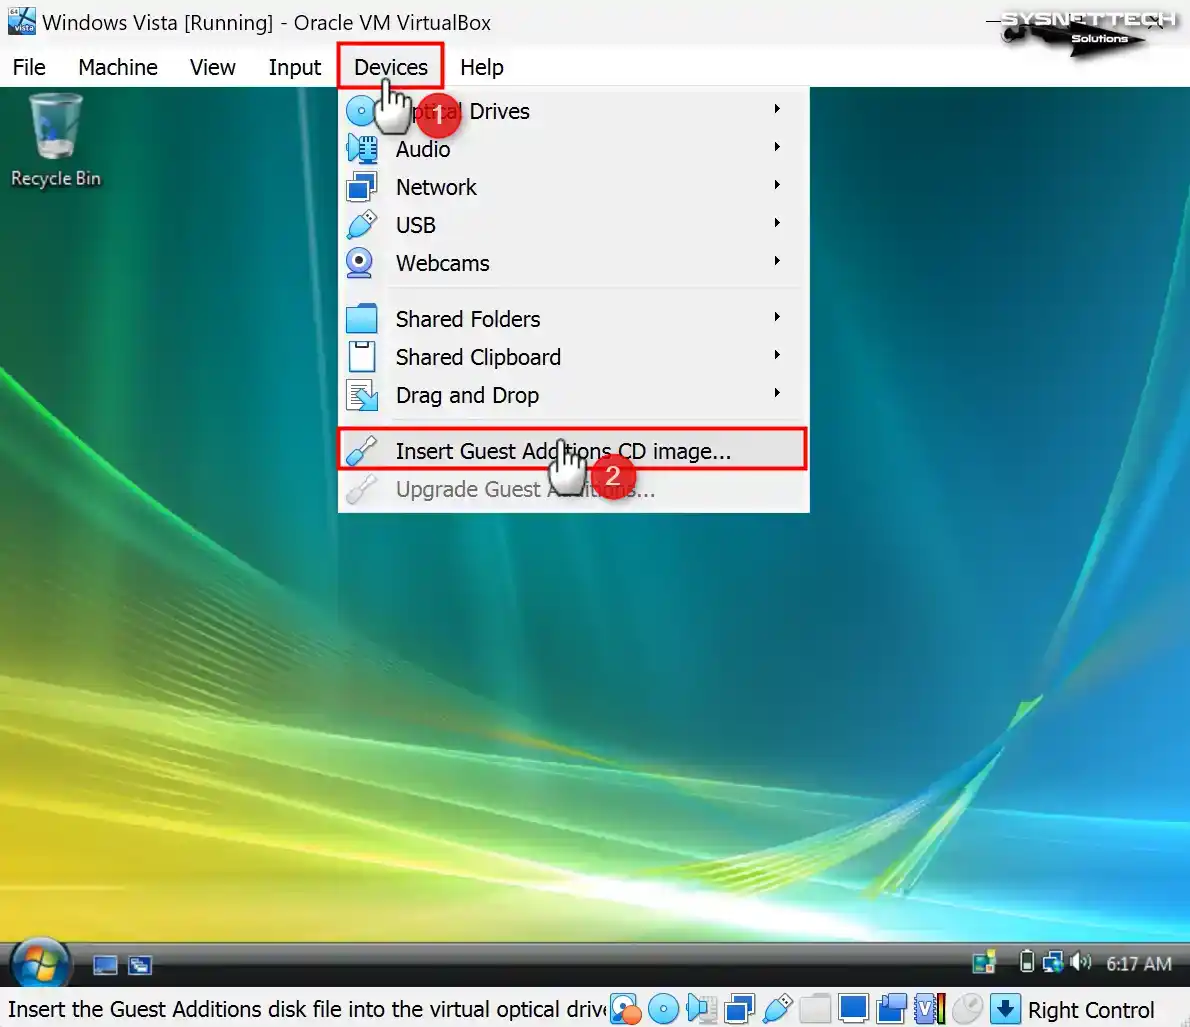
Click Devices / Insert Guest Additions CD Image from VirtualBox’s tool menu.
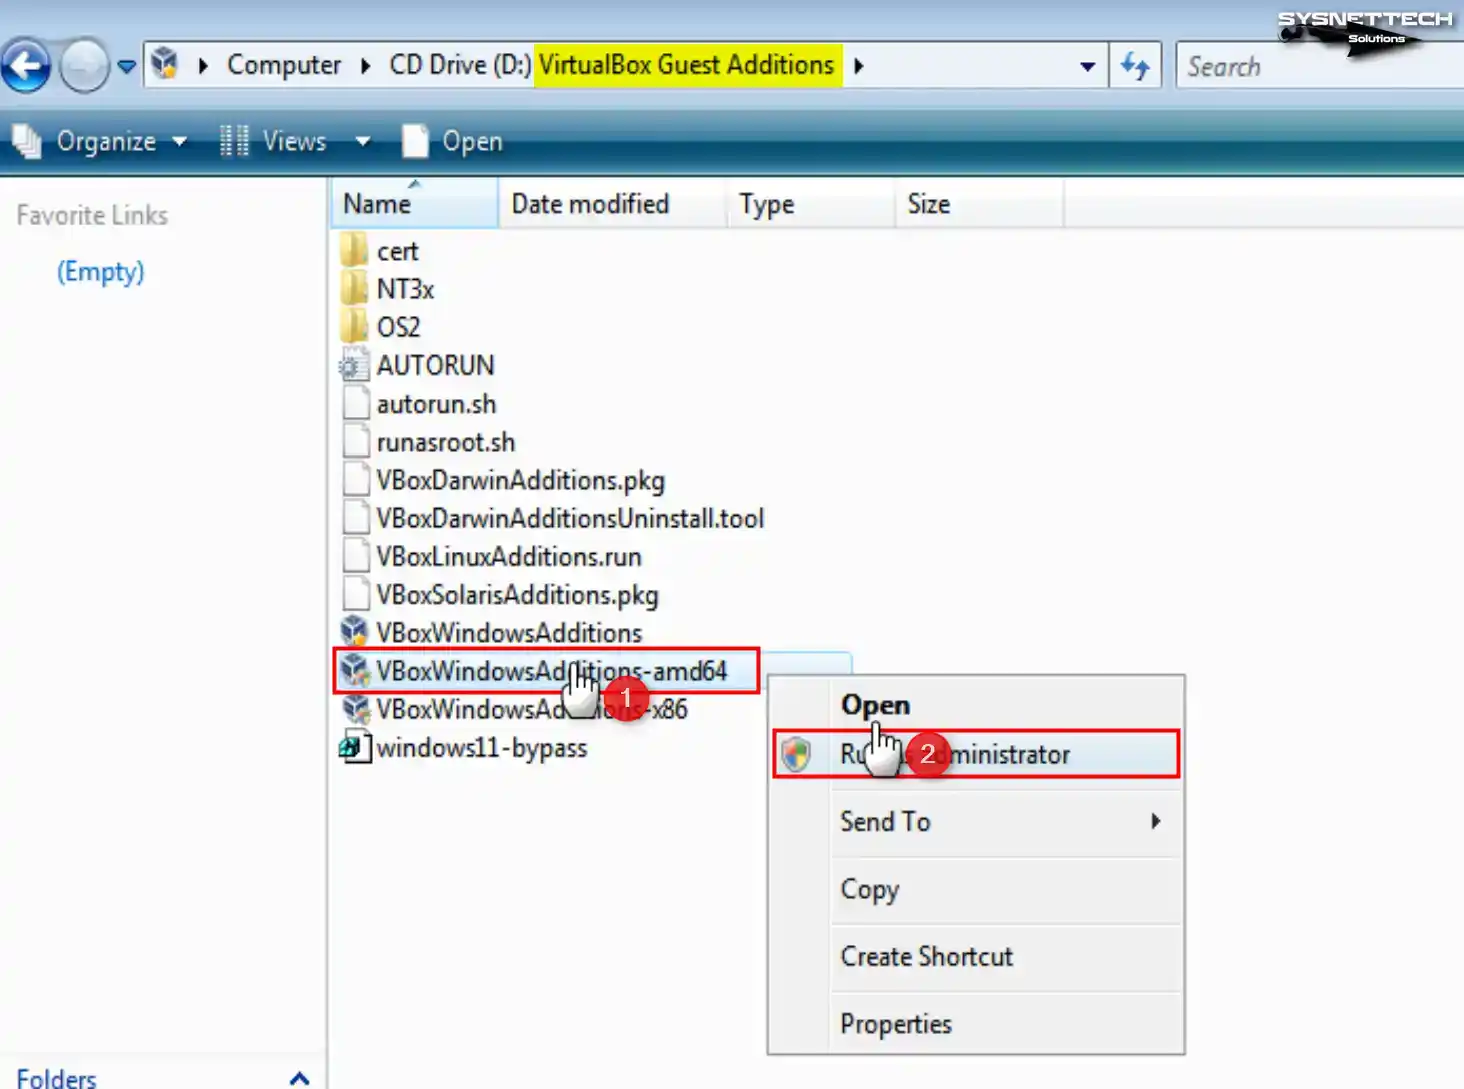
While installing Vista in 6.x versions, you will get an Installation Aborted error at this stage. This error is because the latest versions of the Oracle program no longer fully support the Vista system. To fix this problem, you need to download and install the old version guest additions image file.
To download an older version of the Guest Additions software, visit this address and select version 6.1.0_RC1 or one of the other versions. Download the VBoxGuestAdditions_6.1.0_RC1.iso file to your host system.
To proceed, kindly right-click the CD/DVD icon at the bottom right of your guest machine and then select the “Choose a disk file” option. Select and open the old version guest addition image file that you downloaded to your host computer.
Step 3
If the installation wizard does not form automatically, open My Computer and run the VBoxWindowsAdditions_amd64 file as administrator after viewing the contents of VirtualBox Guest Additions.
Step 4
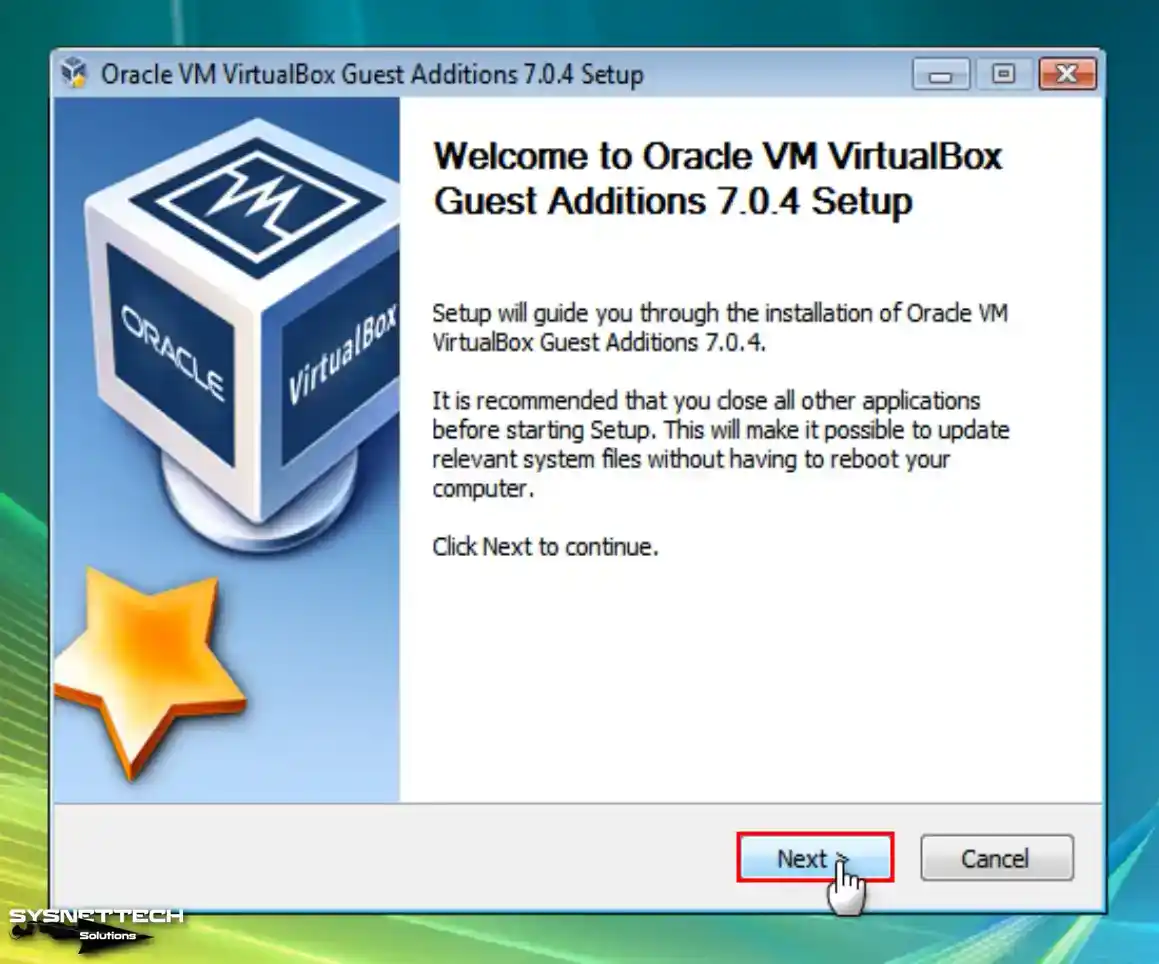
After running the setup file, when the guest add-ons setup wizard opens, click Next to continue the installation.
Step 5
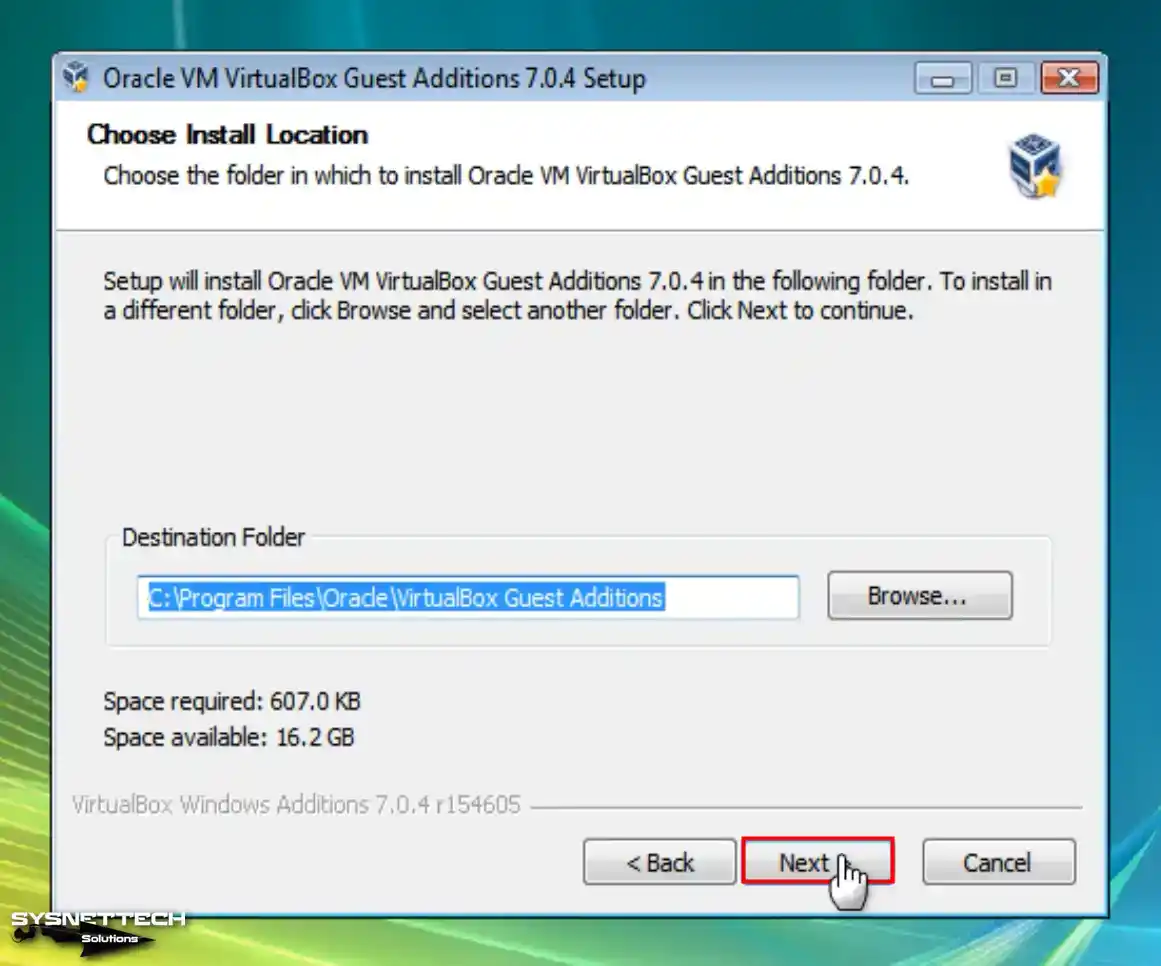
Do not change the installation location of the Guest software and click Next.
Step 6
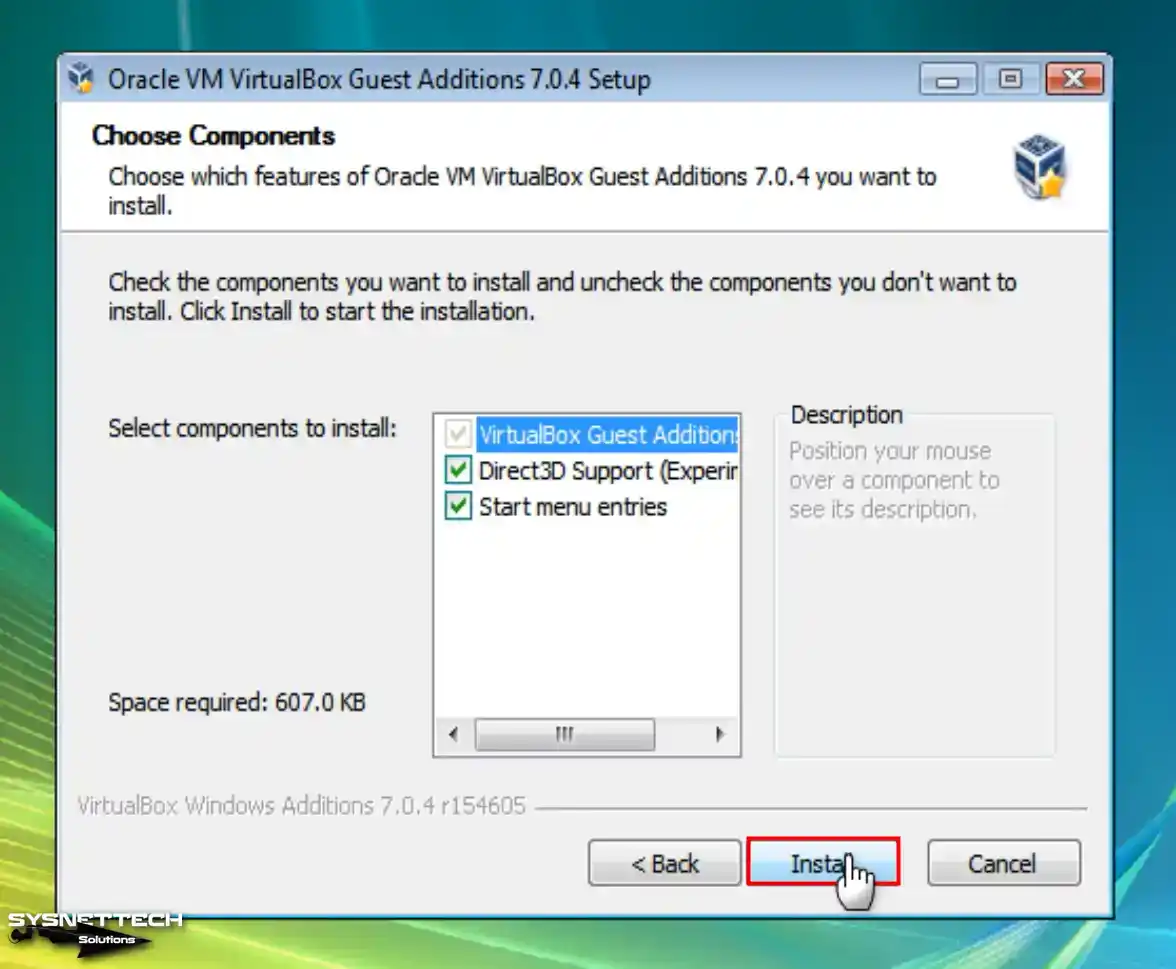
Check Direct3D support in the Choose Components window and click the Install button.
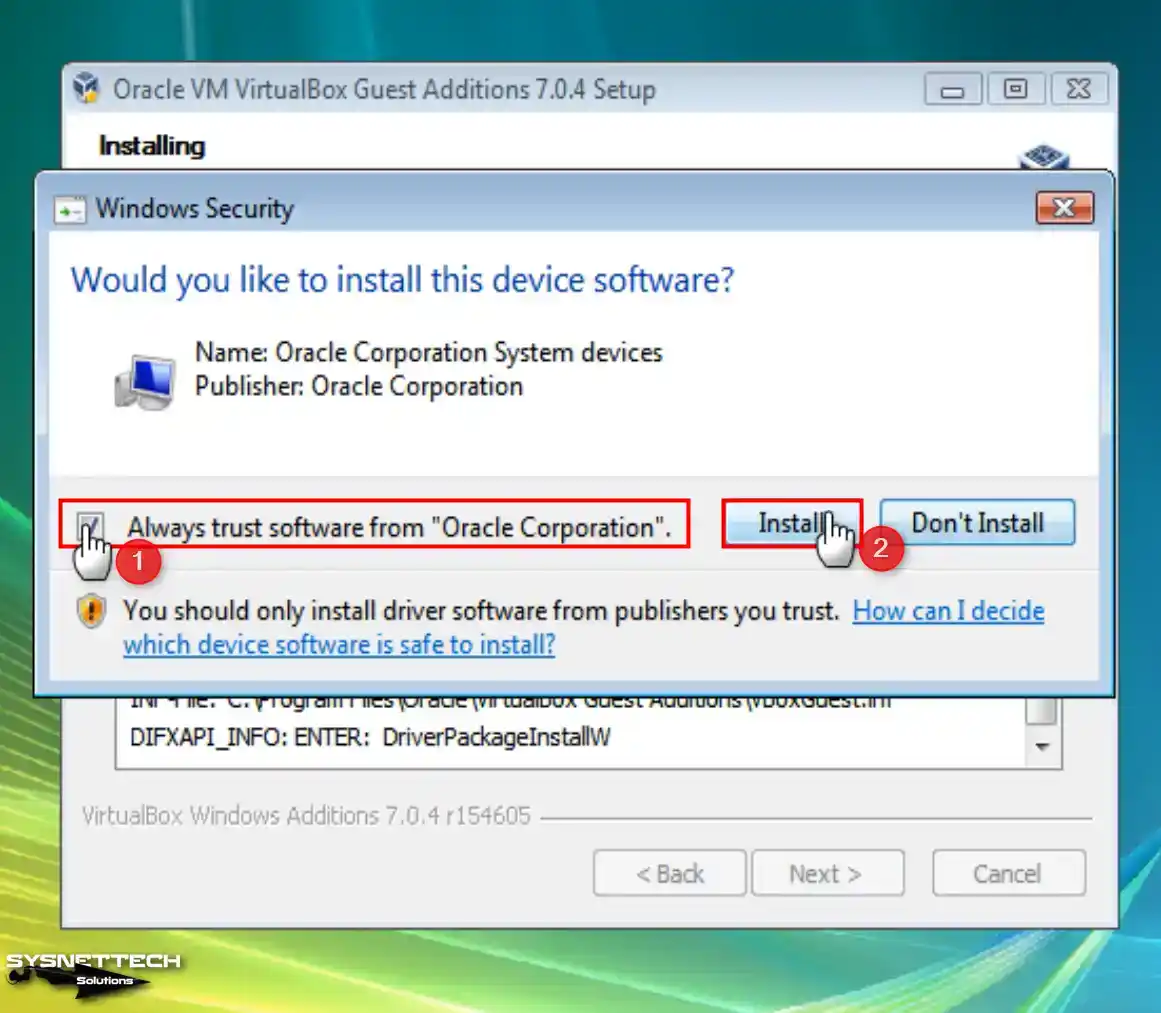
Step 7
Check the Always Trust Oracle software option when installing the virtual machine drivers and click the Install button.
If Windows Security warns against installing unsigned drivers, click Install this driver software.
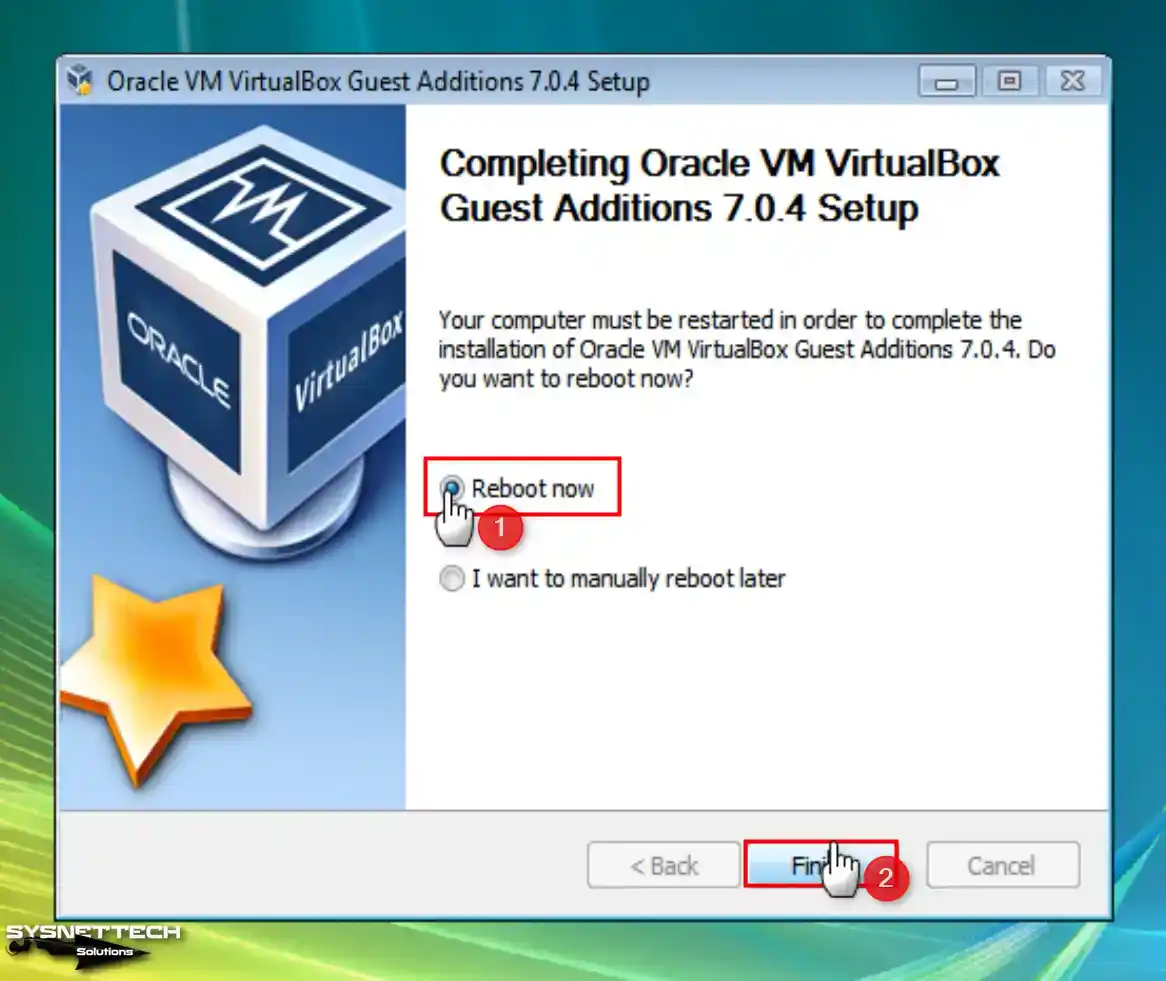
Step 8
After installing guest additions on your virtual PC, restart your VM for the modifications to take effect.
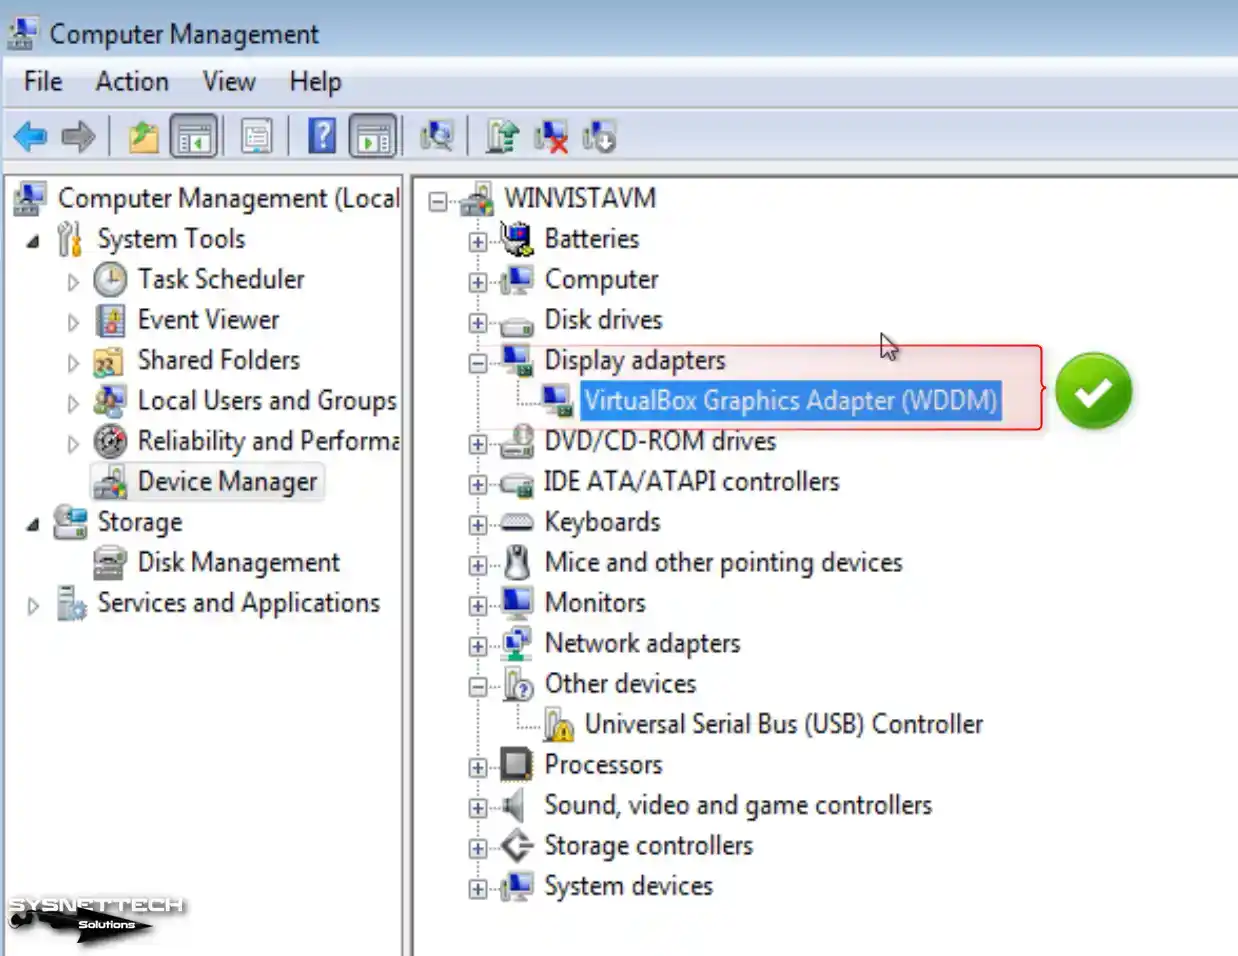
Step 9
Upon examining the Device Manager following the boot-up of your virtual system, you will observe that all the drivers have been installed successfully.
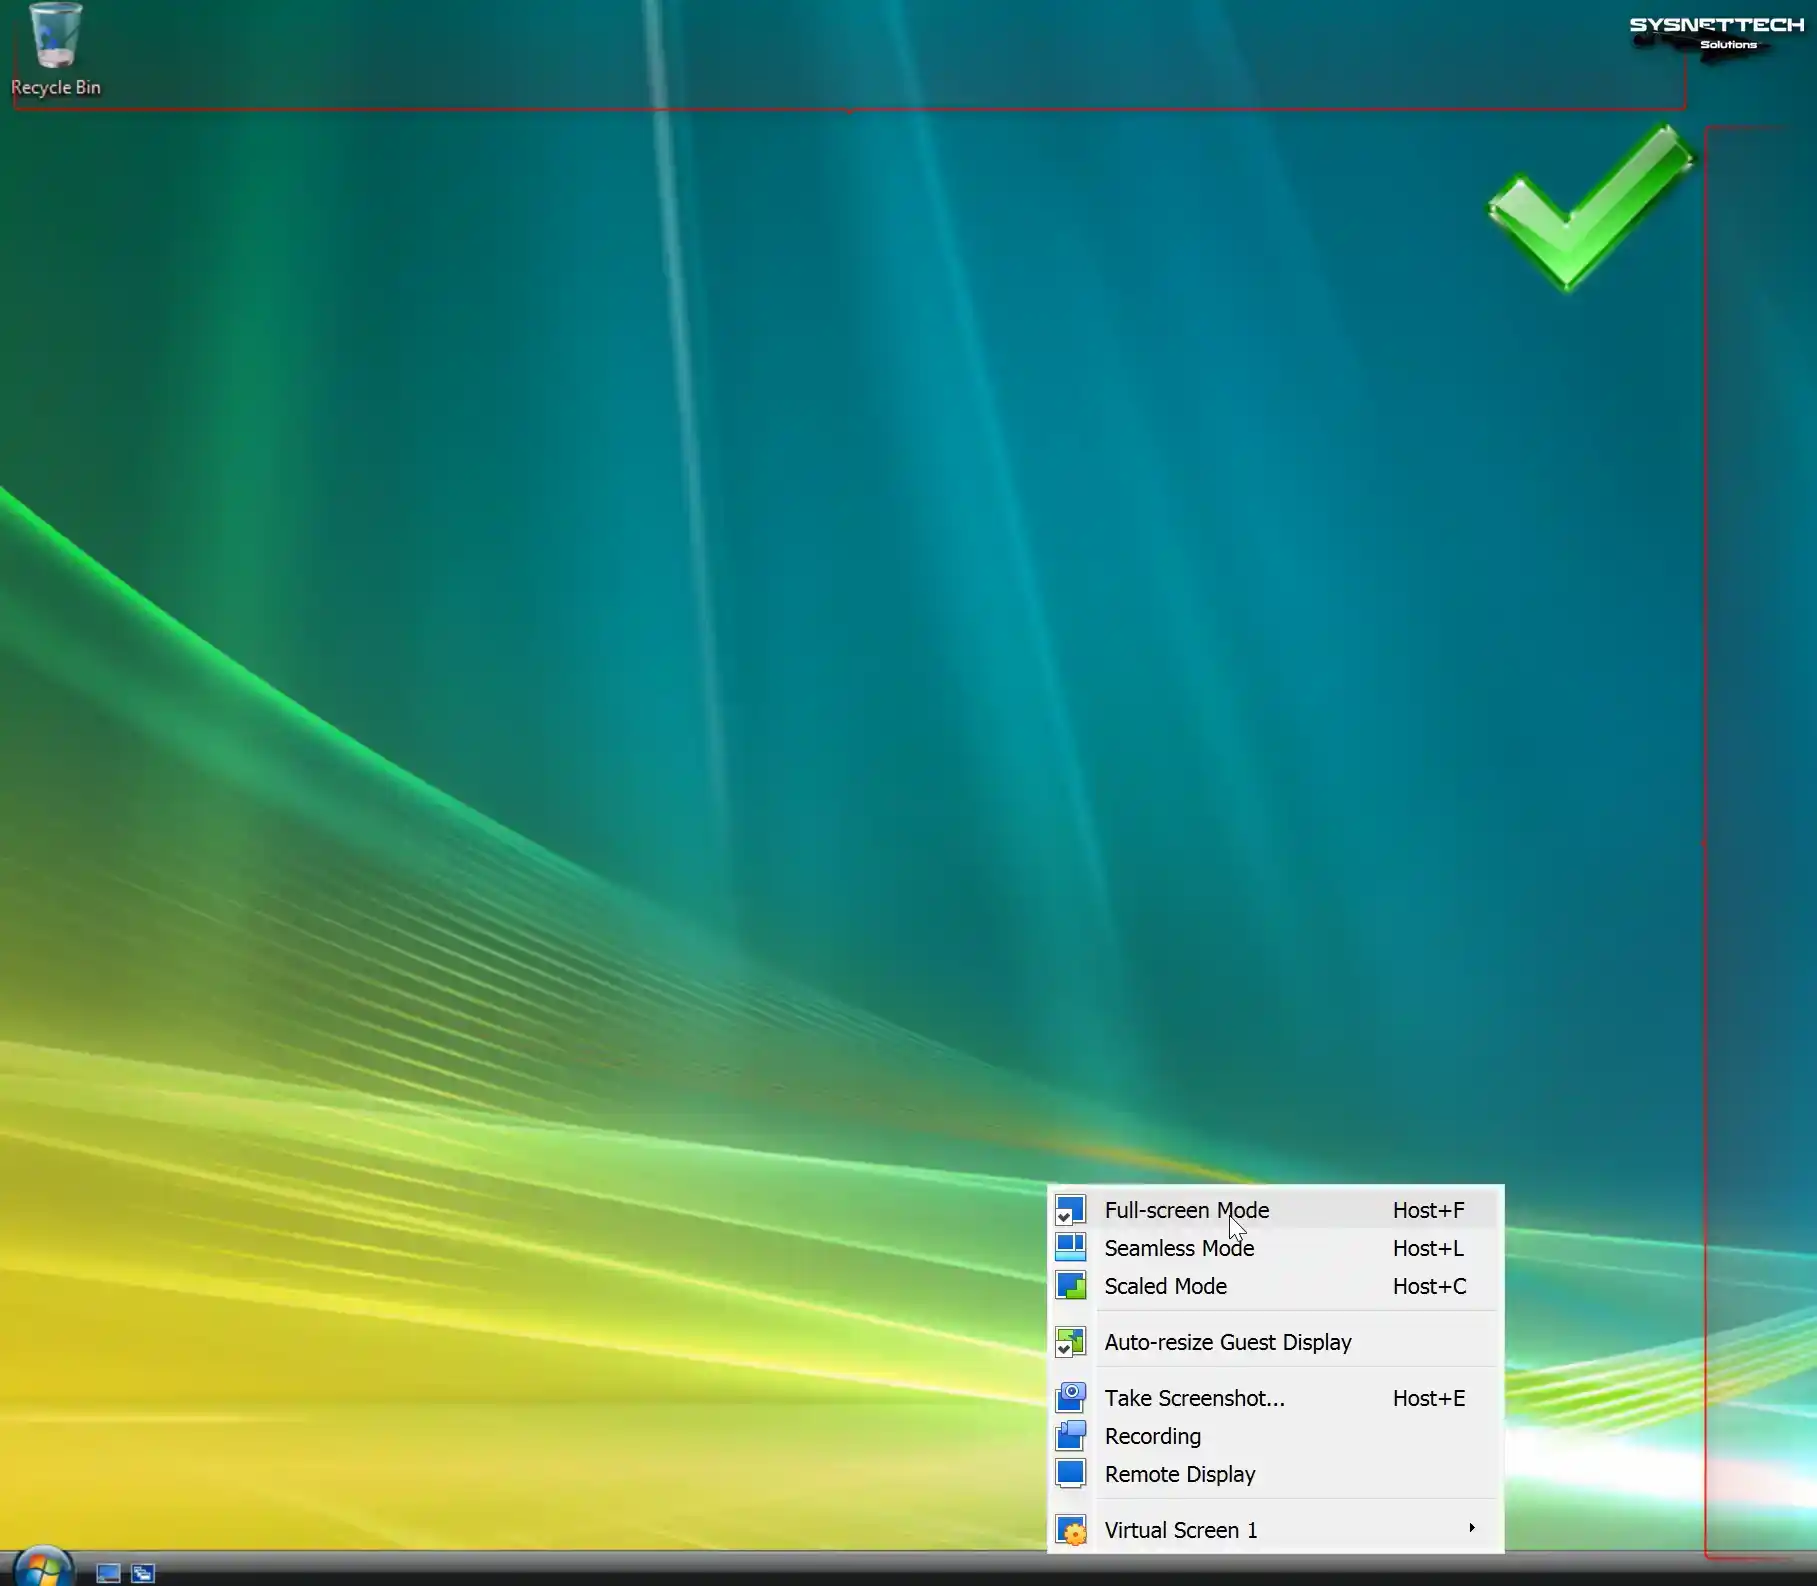
Step 10
To adapt your Windows Vista virtual computer to your host’s screen, click View / Full-Screen Mode from the tool menu and check the screen resolution.
Step 11
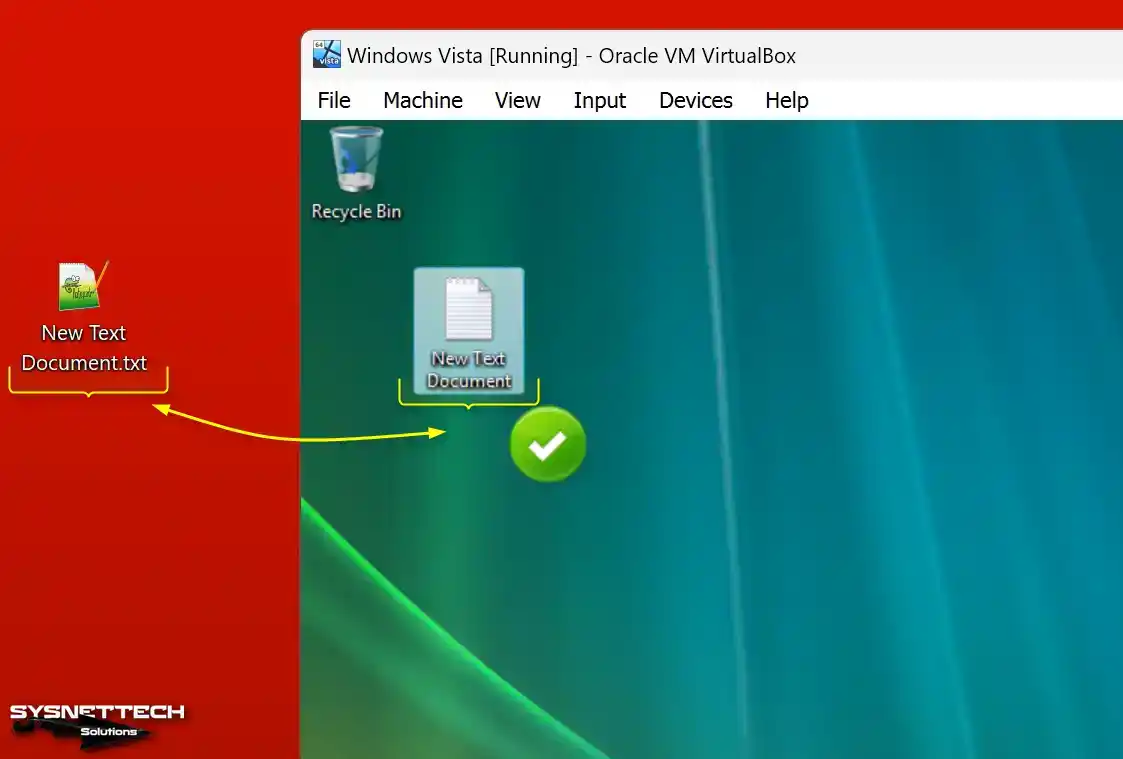
After installing the necessary software for your virtual machine, try to copy a text document from your host PC by dragging and dropping it into your guest machine. The file transfer works if you see +Copy next to the file, as in the image below.
How to Test Internet Connection
A network connection may not be established when the services of the VirtualBox program installed on your host system do not work correctly. For this reason, checking your Internet connection after each new guest machine installation is helpful.
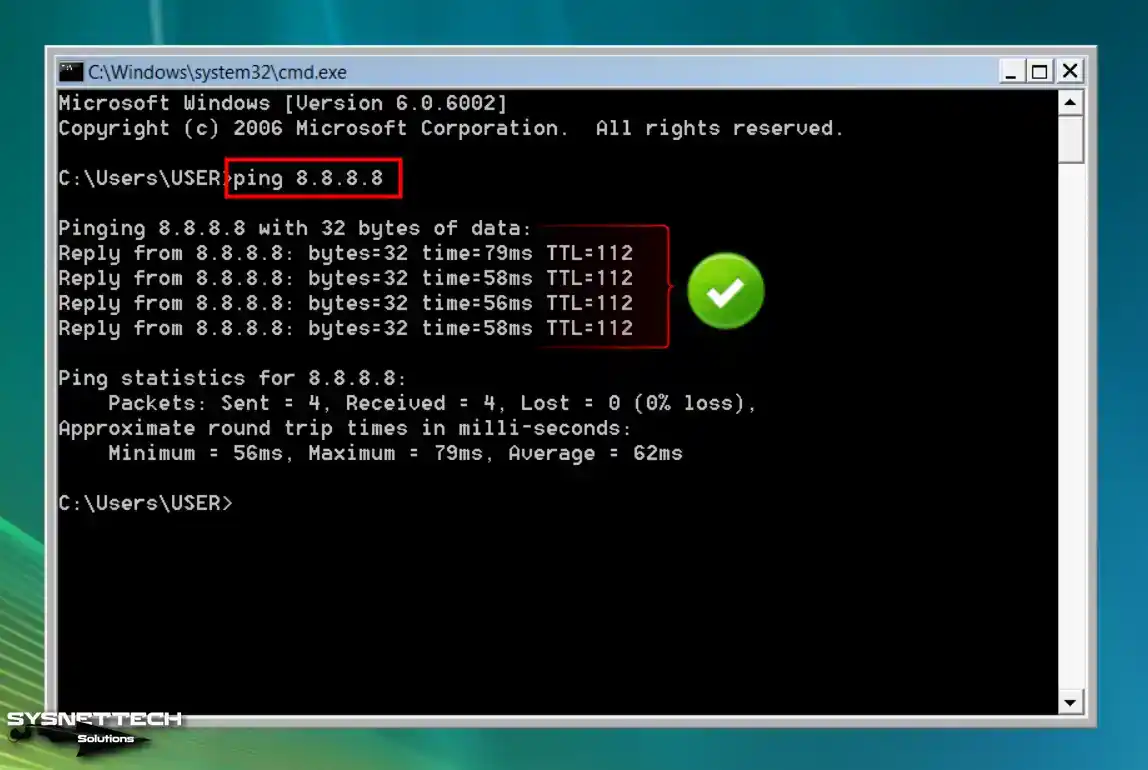
Step 1
After typing cmd in the search box in the start menu on your Windows Vista system, run the tool and test your Internet connection by pinging Google servers using the ping 8.8.8.8 command.
Step 2
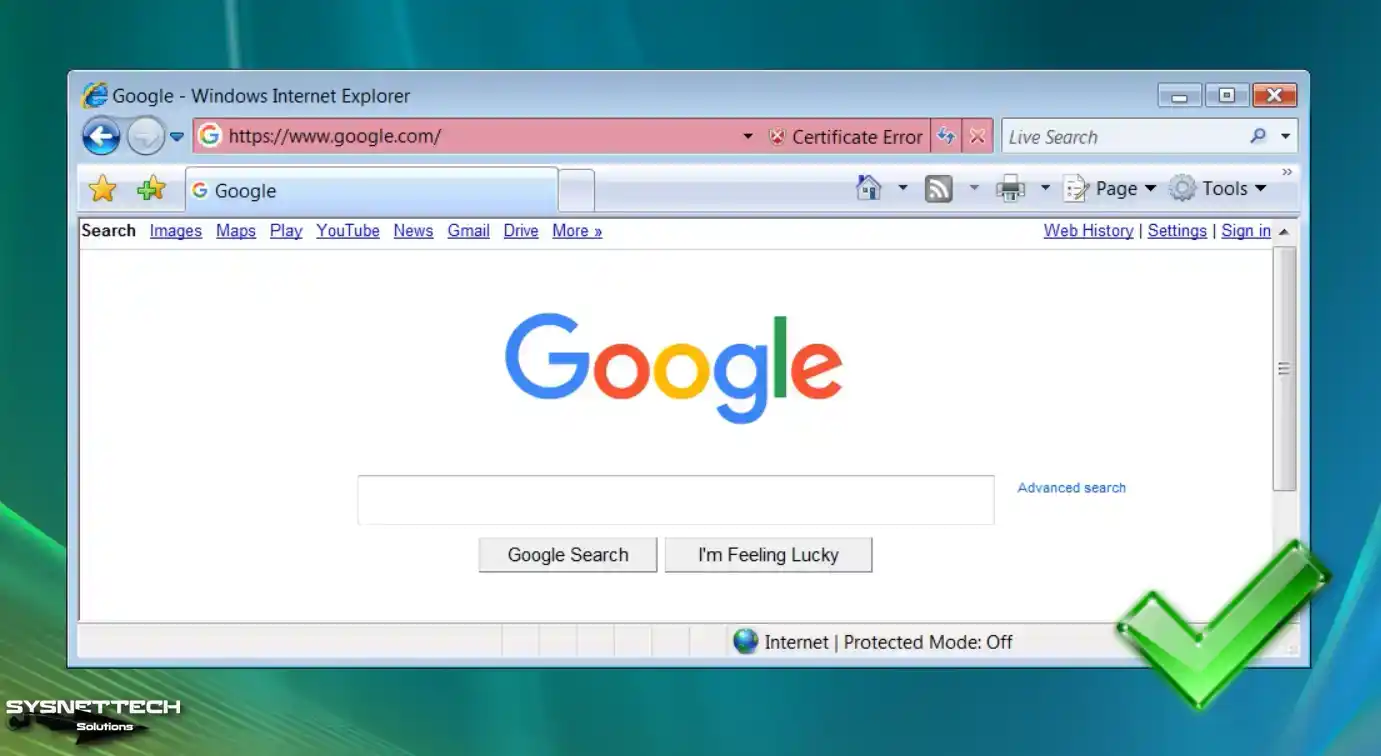
When the ping test is successful, open the Internet Explorer browser installed by default on your system and verify your connection by visiting the Google search engine.
How to Configure Shared Folder
After setting up a virtual PC with VirtualBox, we recommend using the Shared Folder feature for more efficient and error-free file copying between the host and the VM. With the assistance of the Shared Folder characteristic, you can access a folder on your host PC directly from your virtual computer.
Step 1
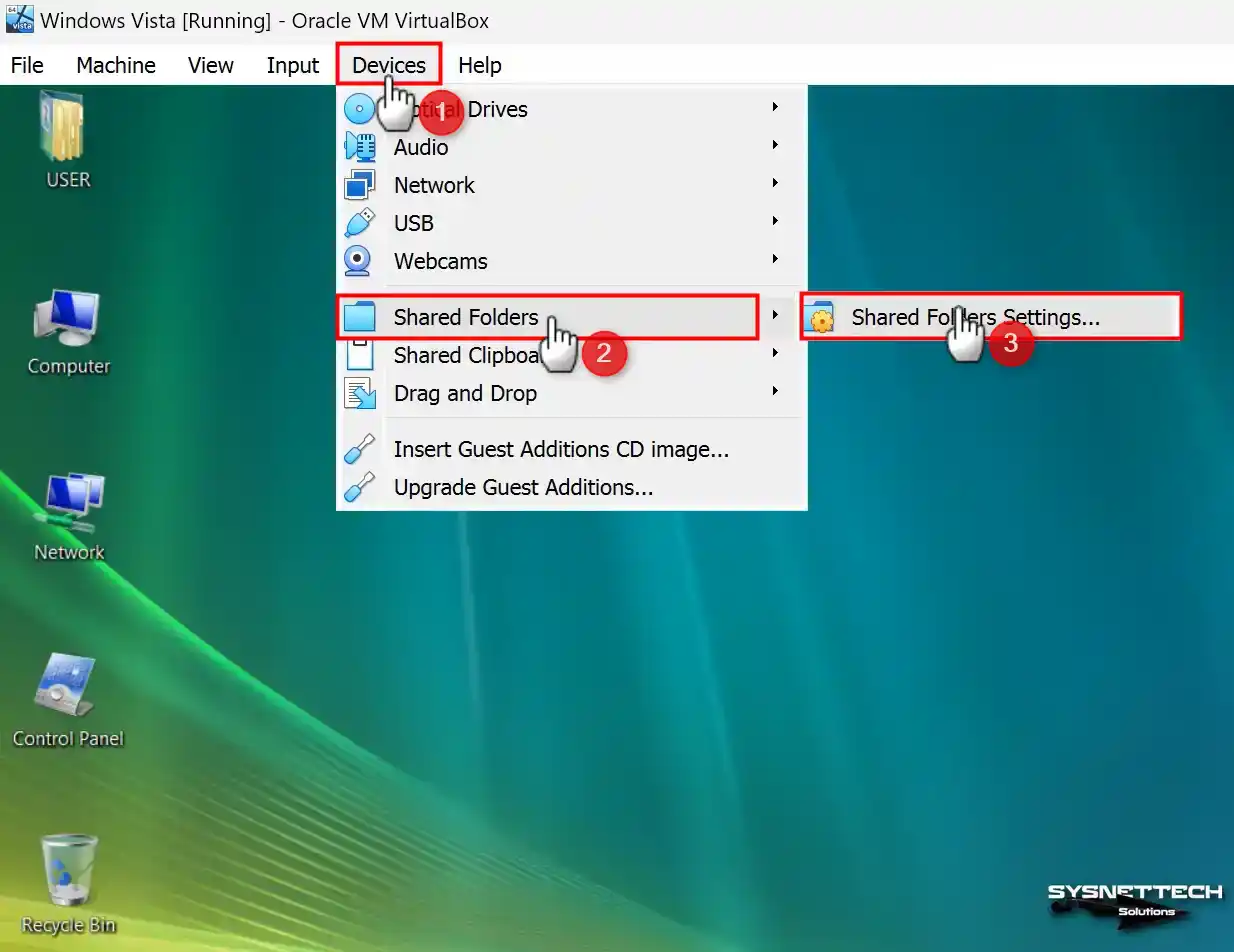
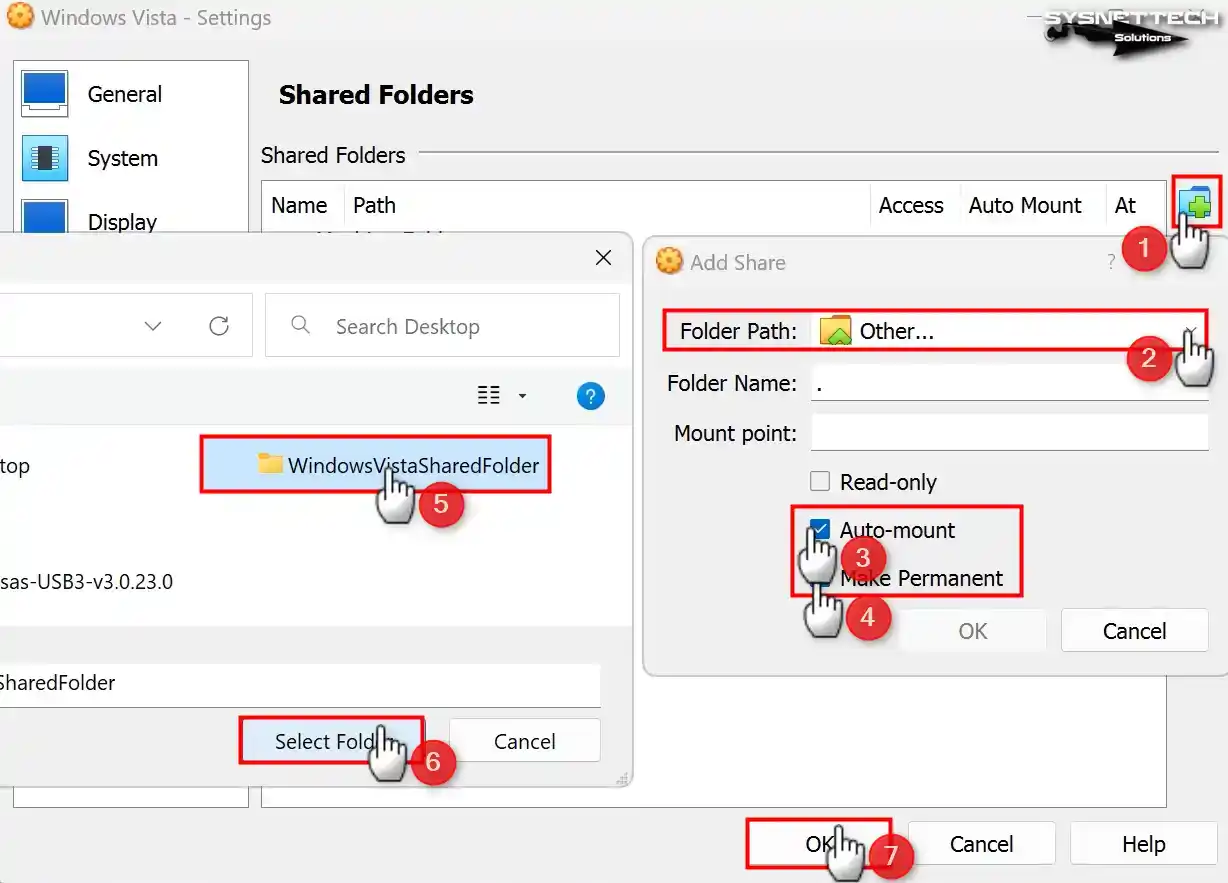
While your guest machine is running, click Devices / Shared Folders / Shared Folders Settings.
Step 2
When the Shared Folder window opens, click the green + button to open the Add Share window. In the Folder Path section, add the location of the folder you created on your host and enable Auto-Mount and Make Permanent options to use the public folder as a network drive.
Step 3
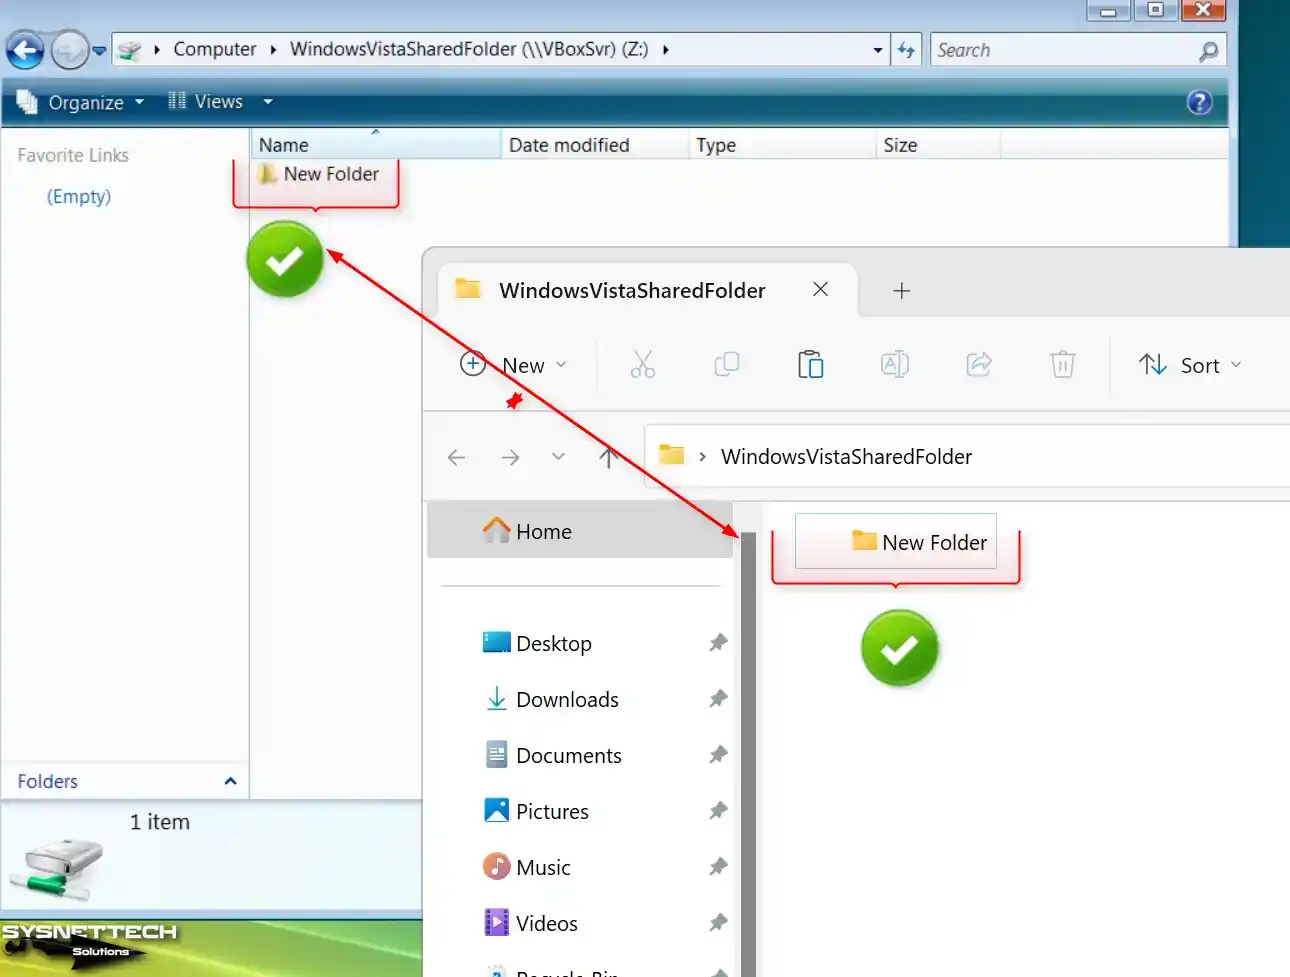
When you view the shared folder on My Computer in the virtual machine, you can see that it is added as a network drive in the Network Location section. Likewise, you can see that the public folder is active in VBOXSVR over Network.

Step 4
Create a new folder in Shared Folder and check the folder in the Host and VM.
How to Enable and Install USB 3.0 Driver
You must change the default controller before using USB 3.0/3.1 storage or other Windows Vista guest machine devices. Officially there is no USB 3.0 driver support for WinVista. Still, you can enable support by changing the controller type on the Oracle software.
Suppose you attempt to connect a USB 3.0/3.1 supported flash stick to your virtual machine without enabling 3.0 support. In that case, you will encounter an error pointing out that your storage device cannot be added.
Step 1
Upon inspecting the Device Manager, it will become evident that the driver cannot be installed, even if USB 3.0 is enabled.
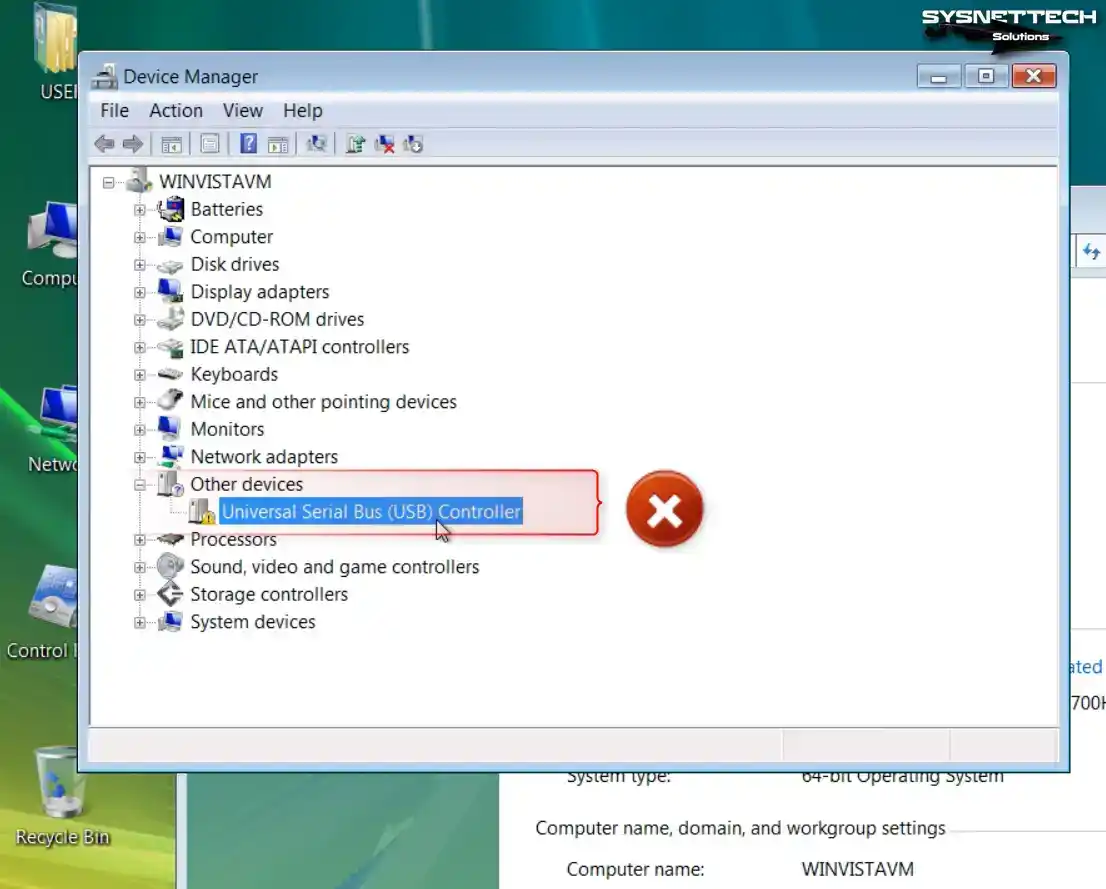
Step 2
To fix the USB problem, shut down your Windows Vista system entirely and then the Oracle software. Then, open PowerShell in the location where the virtualization program is installed and change the USB chip type by executing the command below.
./VBoxManage setextradata 'Windows Vista' VBoxInternal/Devices/usb-xhci/0/Config/ChipType uPD720201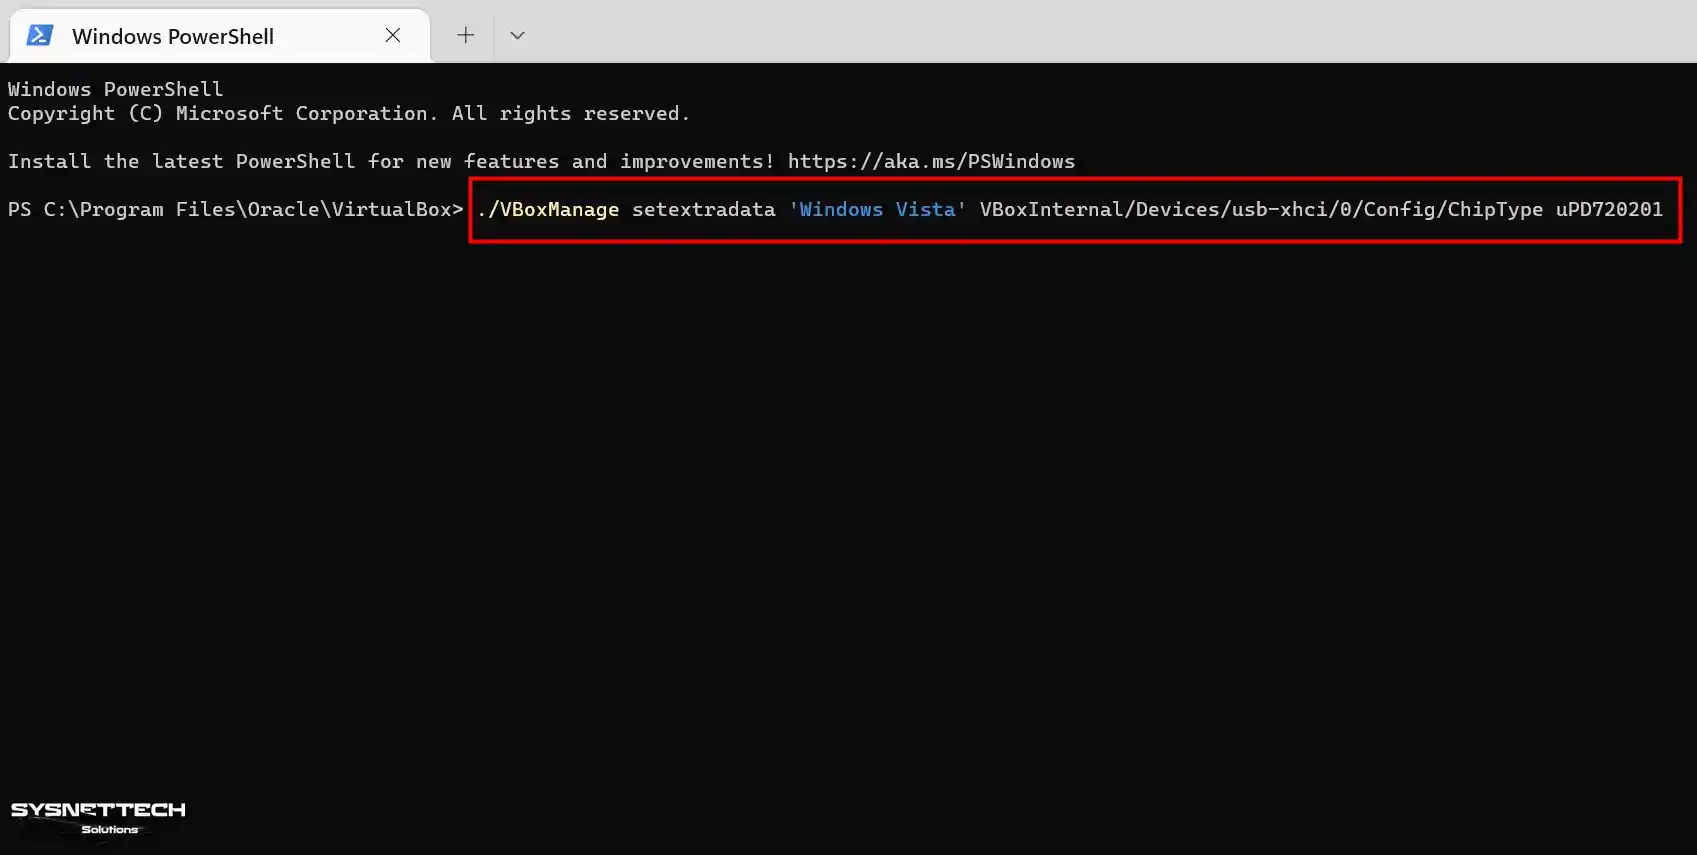
Step 3
Obtain the USB 3.0 Driver specifically designed for Windows Vista x64 by downloading it from the table at the bottom of the article. After extracting the archived file to the folder, run the RENESAS-USB3-Host-Driver-30230-setup file as administrator.
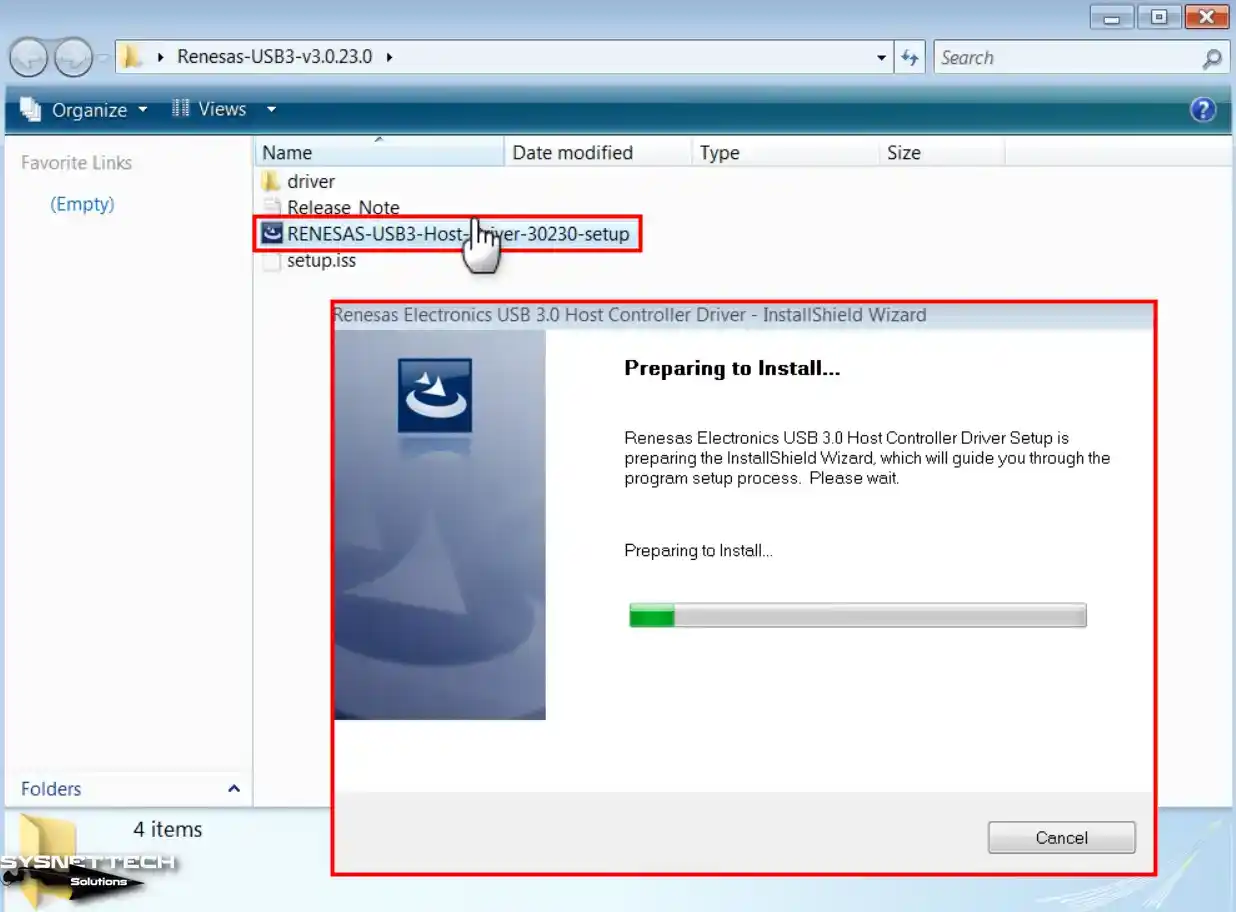
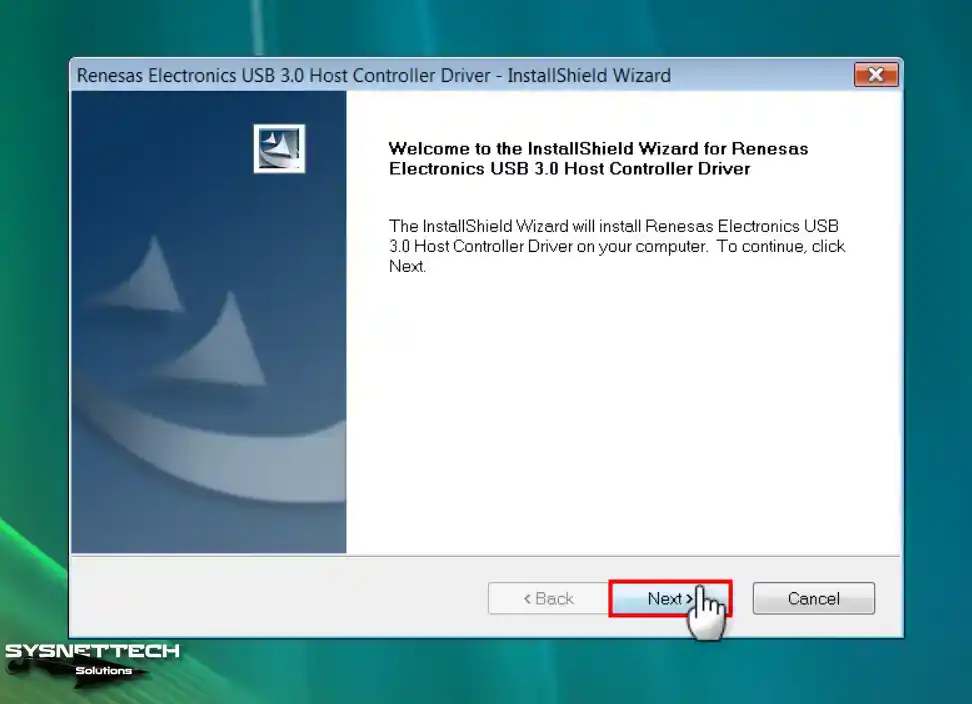
Step 4
Click Next when the Renesas USB Driver wizard opens.
Step 5
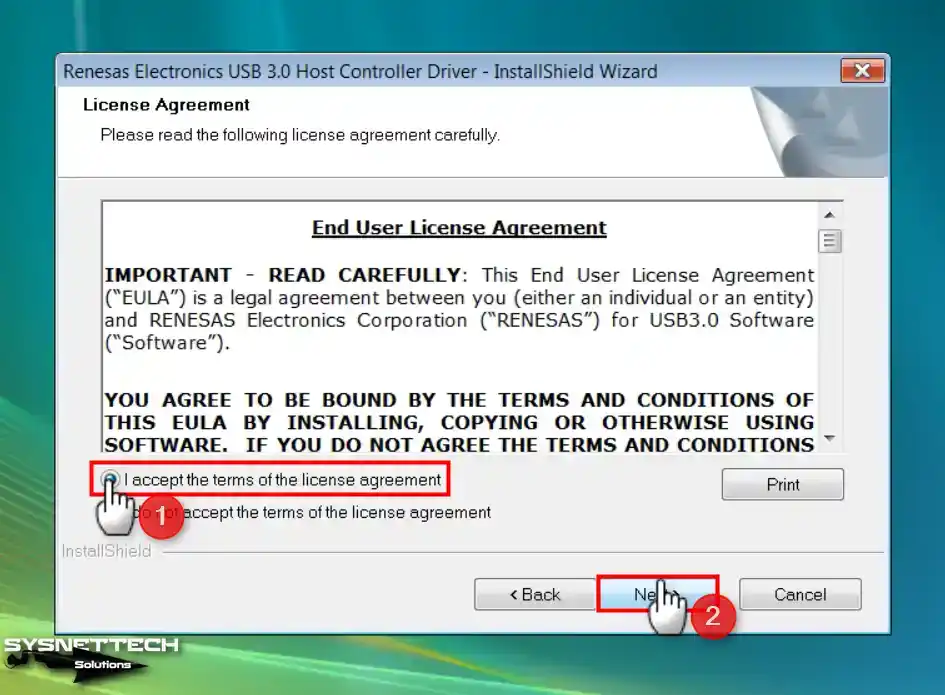
Accept the license agreement of Renesas Electronics USB 3.0 software and click Next again.
Step 6
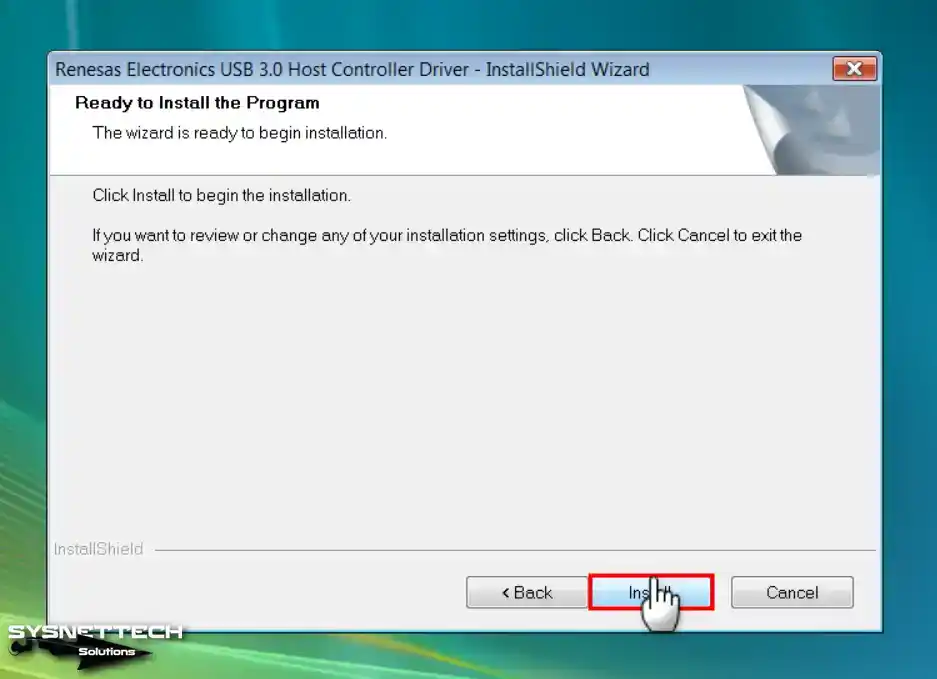
Click the Install button to build the driver for the USB hardware.
Step 7
After completing the Renesas Driver installation, click Finish.

Step 8
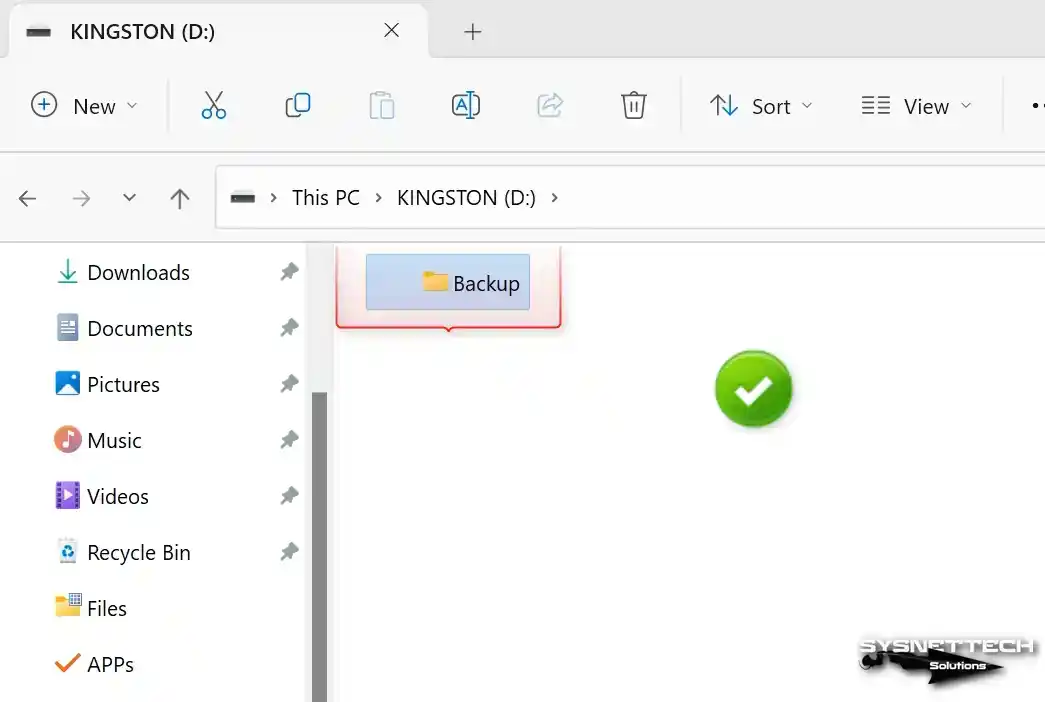
Plug a USB 3.x supported flash memory into your host computer and create a folder named Backup.
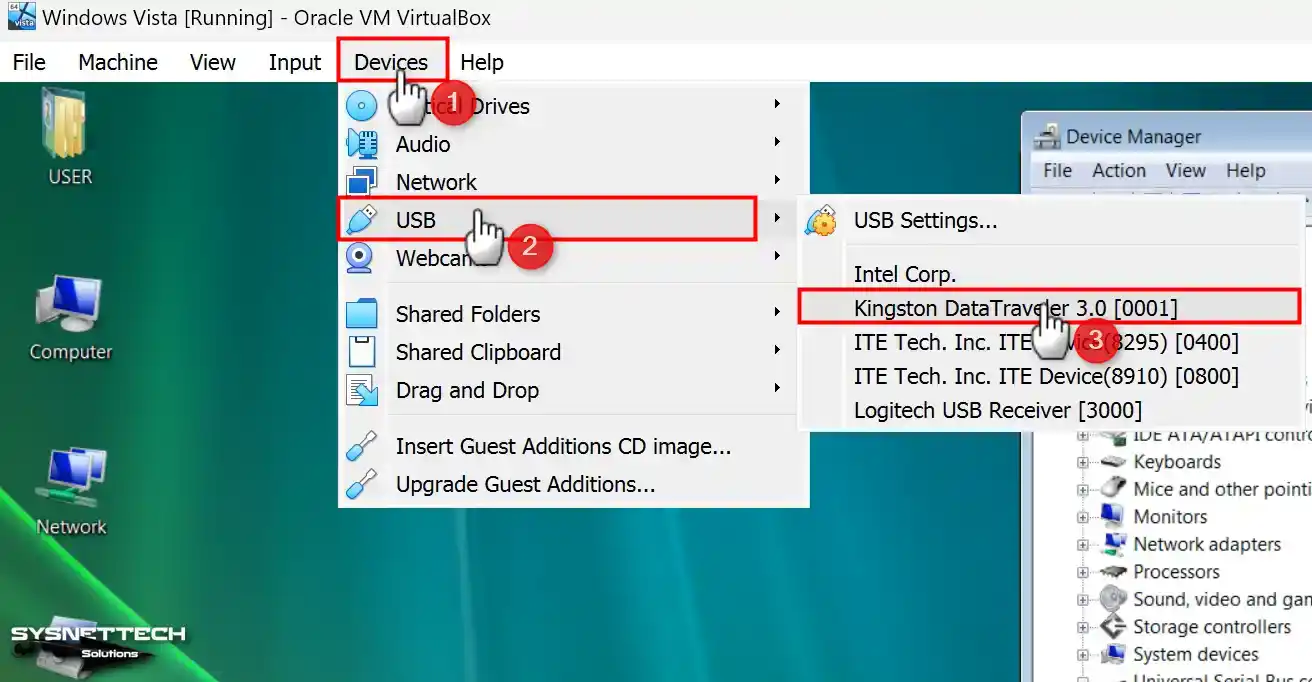
Step 9
Click Devices / USB / Kingston DataTraveler 3.0 (Name of Your USB Device) to connect the USB memory you have inserted in your host to the virtual computer.
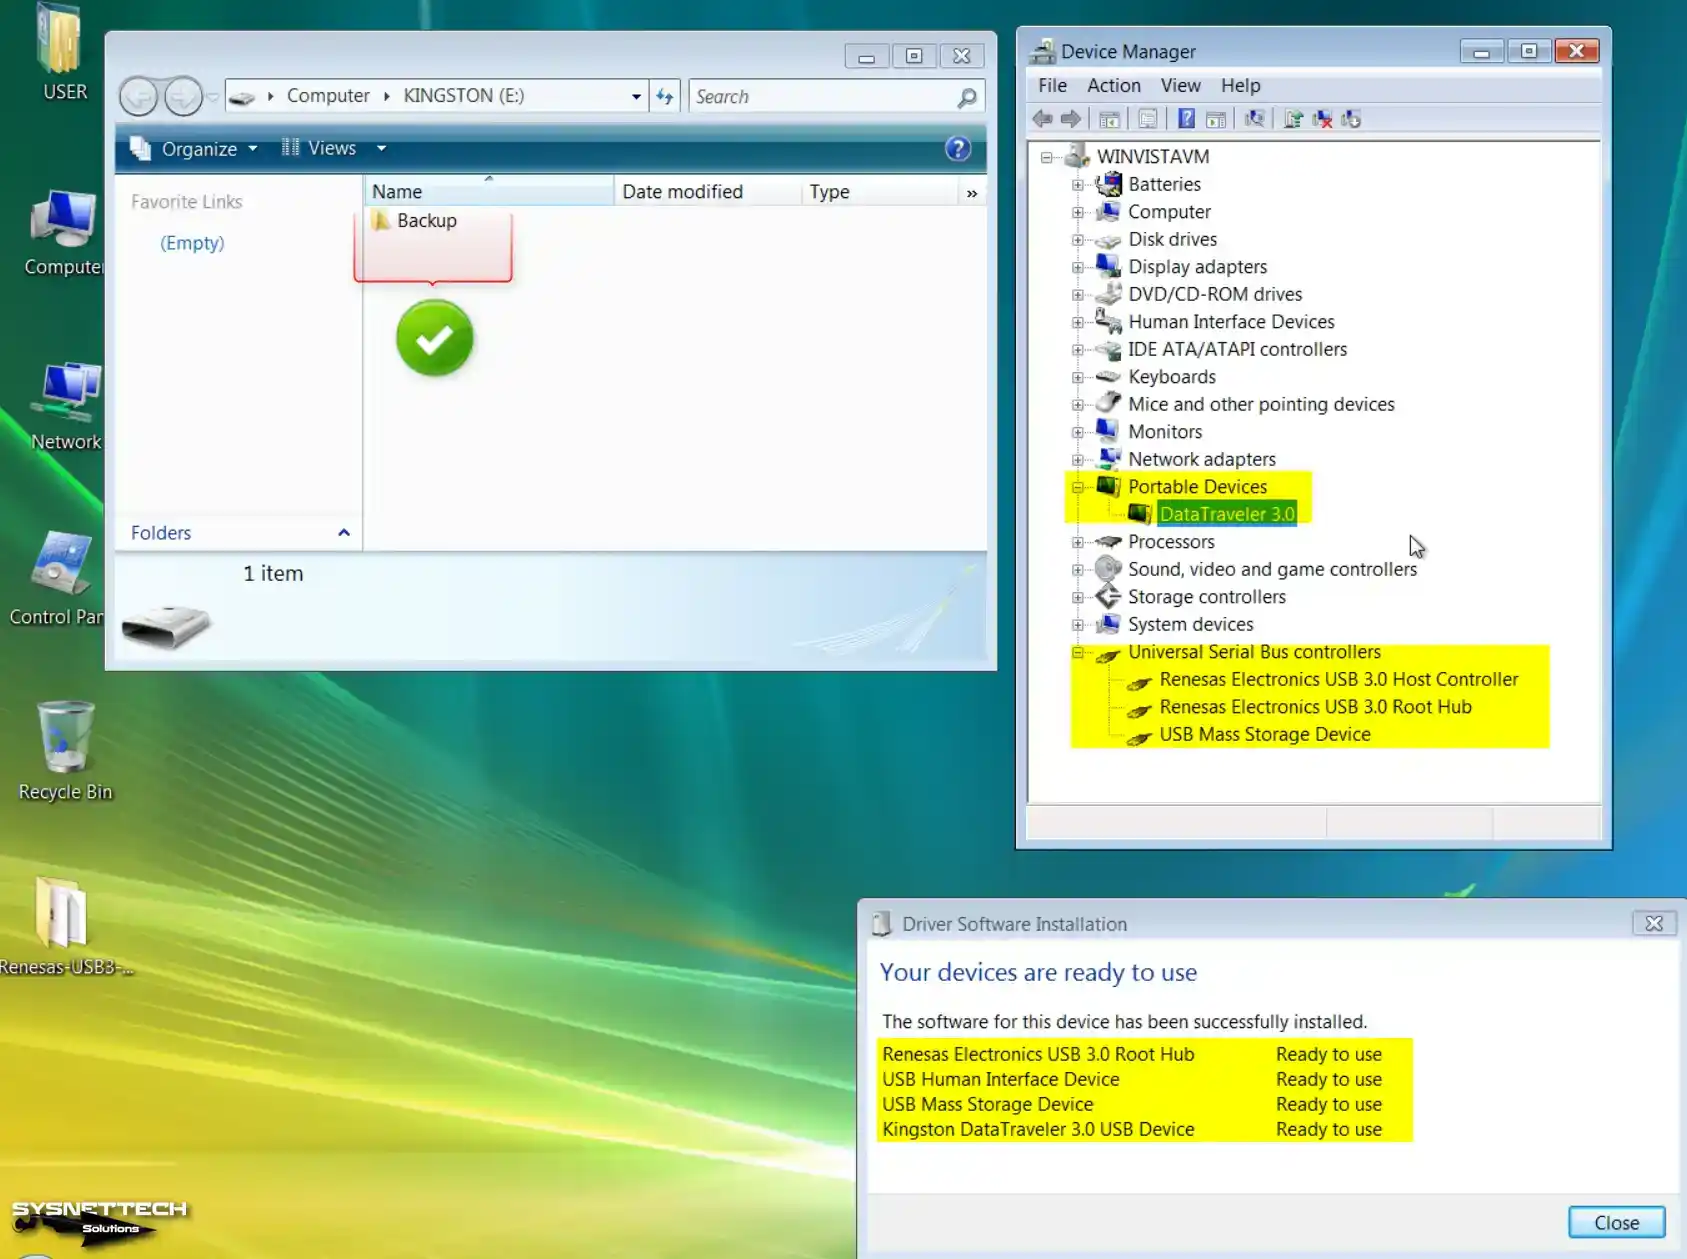
Step 10
Upon inserting the flash memory device into your virtual system, the device will be recognized and ready for use once the USB Mass Storage Device driver is established. When you view My Computer on the guest machine, you can see that the KINGSTON branded USB memory is usable by the system.
How to Change Intel Audio Controller to Realtek ICH AC97 to Fix Sound Problem in VirtualBox 6.x Versions
The default Intel Audio controller defined in the Windows Vista virtual machine causes system sounds to malfunction and echo.
- After turning off your virtual PC, open its settings and click on the Audio device, then change the Audio Controller setting to ICH AC97 and close the window.
- After running your virtual PC, you will see that the Multimedia Audio Controller device driver is not installed under Other Devices on Device Manager. To fix this problem, install the ICH AC97 audio controller driver for Windows Vista x64.
- Download the Realtek AC97 Audio Driver from the table at the bottom of the article and copy it to your VM. Then, after extracting the archived file to the folder, run the Setup file in the 6305_Vista_PG537 folder as an administrator.
- When the Realtek AC’97 Audio 6.0.1.6305 x64 Edition setup wizard opens, click Next to continue.
- Click Install this driver software anyway when you receive an unsigned driver warning during the audio driver installation.
- After installing the sound driver for Vista, restart your virtual system.
- When you recheck Device Manager on your guest machine, you can see that the Realtek AC’97 Audio device works under Sound, Video, and Game Controller.
Video
Installing Old Versions
VirtualBox Version
YouTube Video
Slide
Download Windows Vista ISO, USB, and Audio Driver
Windows Vista Ultimate x64 EN ISO
Windows Vista x64 USB 3.0 Driver
Windows Vista x64 AC97 Sound Driver
Related Articles
♦ How to Install Windows 10 with VirtualBox
♦ How to Install Windows 8 with VirtualBox
♦ How to Install Windows 7 with VirtualBox
♦ How to Install Windows XP with VirtualBox
♦ How to Install Windows 95 with VirtualBox
Windows Vista – популярная операционная система, которая была выпущена компанией Microsoft в 2006 году. Несмотря на то, что сейчас она уже не является самой актуальной версией ОС Windows, некоторым пользователям все еще может быть интересно попробовать ее на своем компьютере. В этом случае можно воспользоваться программой VirtualBox, которая позволяет создавать виртуальные машины и устанавливать на них различные операционные системы.
Установка Windows Vista на VirtualBox довольно проста и не требует специальных навыков или опыта. В этом гайде мы подробно расскажем, как выполнить данную операцию. Прежде всего, убедитесь, что у вас установлен VirtualBox на вашем компьютере. Если вы еще не установили его, вы можете скачать его с официального сайта разработчика и следовать инструкциям по установке.
Первым шагом является скачивание образа Windows Vista. Вы можете найти его на официальном сайте Microsoft или воспользоваться другими источниками. Убедитесь, что вы загрузили версию системы, соответствующую вашему компьютеру – 32-битную или 64-битную. Когда загрузка завершится, вам понадобится разархивировать файл с образом.
Содержание
- Шаг 1: Установка VirtualBox на компьютер
- Инструкция по установке VirtualBox на ваш компьютер
- Шаг 2: Скачивание образа Windows Vista
- Как скачать официальный образ Windows Vista для установки
Шаг 1: Установка VirtualBox на компьютер
Перед тем, как установить операционную систему Windows Vista на VirtualBox, необходимо установить саму виртуализационную программу VirtualBox на ваш компьютер:
- Перейдите на официальный сайт VirtualBox по адресу https://www.virtualbox.org.
- Выберите страницу загрузки (Downloads) и найдите последнюю версию для вашей операционной системы.
- В разделе «VirtualBox X.X.XX platform packages» нажмите на ссылку, соответствующую вашей операционной системе (например, Windows).
- Скачайте установочный файл VirtualBox и запустите его.
- В появившемся окне установщика нажмите «Next», чтобы начать процесс установки.
- Ознакомьтесь с условиями лицензионного соглашения, выберите «I accept the terms» и нажмите «Next».
- Выберите путь, куда будет установлена программа VirtualBox, или оставьте значение по умолчанию, и нажмите «Next».
- Выберите компоненты, которые вы хотите установить (рекомендуется оставить значения по умолчанию), и нажмите «Next».
- Выберите, хотите ли вы создать ярлык на рабочем столе и/или в меню «Пуск», и нажмите «Next».
- На следующем экране нажмите «Install», чтобы начать установку.
- После завершения установки, выберите «Finish», чтобы закрыть установщик.
Теперь у вас установлена программа VirtualBox на вашем компьютере и вы готовы перейти ко второму шагу установки Windows Vista на VirtualBox.
Инструкция по установке VirtualBox на ваш компьютер
Шаг 1: Загрузите установочный файл
Перейдите на официальный сайт VirtualBox и загрузите установочный файл для вашей операционной системы. Убедитесь, что вы скачиваете версию, совместимую с вашей системой.
Шаг 2: Запустите установку
Откройте скачанный установочный файл и следуйте инструкциям мастера установки. Вам может потребоваться предоставить административные права, чтобы завершить процесс установки.
Шаг 3: Настройте VirtualBox
После установки запустите VirtualBox. Вам будет предложено создать новую виртуальную машину или открыть существующую. Если у вас еще нет виртуальной машины, создайте новую, следуя инструкциям мастера создания виртуальной машины.
Шаг 4: Установите операционную систему
После создания виртуальной машины выберите ее в списке и нажмите кнопку «Старт». Затем следуйте инструкциям мастера установки операционной системы.
Шаг 5: Настройте параметры виртуальной машины
После установки операционной системы откройте настройки виртуальной машины и настройте ее параметры, такие как количество выделенной оперативной памяти и размер виртуального жесткого диска.
Шаг 6: Запустите виртуальную машину
После настройки виртуальной машины нажмите кнопку «Старт» для запуска. У вас должен появиться экран с загрузкой операционной системы, и вы сможете начать использовать VirtualBox на вашем компьютере.
Теперь вы знаете, как установить VirtualBox на ваш компьютер. Не забудьте также загрузить и установить гостевые дополнения VirtualBox для оптимальной работы операционной системы в виртуальной среде.
Удачи!
Шаг 2: Скачивание образа Windows Vista
Перед тем, как начать установку Windows Vista на VirtualBox, вам необходимо скачать образ операционной системы. Образы Windows Vista могут быть найдены на официальном сайте Microsoft или на других надежных источниках.
1. Откройте ваш любимый веб-браузер и перейдите на официальный сайт Microsoft.
2. Нажмите на раздел «Скачать» или «Поддержка» и найдите Windows Vista.
3. Выберите необходимую версию Windows Vista: Starter, Home Basic, Home Premium, Business, Enterprise или Ultimate.
4. Убедитесь, что выбрана версия, которая совместима с вашей системой (32-бит или 64-бит).
5. Щелкните по ссылке для скачивания образа Windows Vista.
Примечание: Убедитесь, что вы обладаете правом скачивать и использовать Windows Vista соответствующим образом. Использование пиратской версии Windows Vista незаконно и может иметь серьезные юридические последствия.
Как скачать официальный образ Windows Vista для установки
Чтобы установить Windows Vista на VirtualBox, вам потребуется официальный образ операционной системы Windows Vista. Убедитесь, что вы скачиваете файл из надежного источника, чтобы избежать проблем с безопасностью и качеством.
Чтобы скачать официальный образ Windows Vista, выполните следующие шаги:
- Откройте веб-браузер и перейдите на официальный сайт Microsoft.
- Находите раздел «Скачать» или «Получить Windows».
- Вам может потребоваться создать учетную запись Microsoft или войти, если у вас уже есть учетная запись.
- Введите ключ продукта, если вам он был предоставлен (обычно он находится на коробке или в электронном письме).
- Выберите версию Windows Vista, которую вы хотите скачать.
- Нажмите кнопку «Скачать» или «Получить», чтобы начать загрузку официального образа Windows Vista.
После завершения загрузки у вас будет официальный образ Windows Vista, который вы можете использовать для установки в VirtualBox. Убедитесь, что сохраните файл в надежном месте на вашем компьютере, чтобы вы могли легко найти его при установке.
Файл виртуального диска VHD можно создать по разному, но по моему самый простой способ, это использование утилиты
Disk2vhd v2.01 от Марк Руссиновича.
и запускаем её.
В главном окне снимаем галочку с «Use Vhdx», если не хотите создать файл нового формата VHDX.
В левой части окна отмечаем галочкой диск C:\ с установленной Windows Vista.
Даём имя будущему файлу виртуального диска «Windows Vista».
Жмём на кнопку проводника в правой части окна.
Сохраним виртуальный файл на переносном винчестере USB буква диска (E:).
Начинается процесс создания виртуального диска VHD.
Файл виртуального диска с Windows Vista создан.
Подключаем переносной жёсткий диск USB с файлом VHD к ноутбуку с Windows 10. Устанавливаем виртуальную машину VirtualBox 5.0.4 на ноутбук и настраиваем её
Скачиваем последнюю версию виртуальной машины VirtualBox 5.0 и устанавливаем её на ноутбук с Windows 10
в процессе установки виртуальной машины нет никаких подводных камней, жмите всё время Далее.
Создаём виртуальную машину.
В главном окне VirtualBox жмём «Создать».

Даём имя виртуальной машине «Windows Vista»
выбираем
Тип: «Microsoft Windows».
Версия: «Windows Vista» (64-bit)».
и жмём «Next»

Можете выделить виртуальной машине побольше памяти, например 1024 Мб.
«Next»

Отмечаем пункт «Использовать существующий виртуальный жёсткий диск» и жмём на кнопку проводника справа.

В открывшемся проводнике находим на переносном жёстком диске USB файл виртуального диска VHD с Windows Vista, выделяем его левой мышью и жмём «Открыть».

«Создать»

Виртуальная машина «Windows Vista» создана, перед запуском машины расскажу про один важный момент.
В переносе VHD, созданного путём конвертирования физического диска есть один значительный момент.
На старых компьютерах использовался режим жёсткого диска IDE
VirtualBox при создании виртуальной машины Vista устанавливает режим SATA
Если у Вас на старом компьютере с Windows Vista был режим IDE, то при создании виртуальной машины нужно Sata поменять на IDE.

Запускаем виртуальную машину.

И Windows Vista запускается.


Для более стабильной работы виртуальной машины установите «Дополнения гостевой ОС», после этого вы сможите создавать общие папки, подгонять размер экрана гостевой ОС и т.д.

Также после установки «Дополнений гостевой ОС» перейдите в режим полного экрана, работать так будет более комфортно.


Что делать, если Windows Vista на виртуальной машине загрузится с ошибкой
Друзья, такое вполне возможно и в этом случае одно из возможных решений — восстановить загрузчик операционной системы и нам понадобиться ISO-образ Windows Vista, если такого образа у вас нет, то вполне сойдёт ISO-образ Windows 7, но команды для восстановления будут разные. Давайте сначала восстановим загрузчик Windows Vista с помощью ISO-образа операционной системы, а в конце статьи для этих целей применим ISO-образ Win 7, так как я уверен, что многие пользователи с трудом смогут найти ISO-образ Висты.
В главном окне VirtualBox выбираем нашу виртуальную машину «Windows Vista» и жмём «Настроить»

Вкладка «Система»
Изменяем порядок загрузки:
1. Оптический диск.
2. Жёсткий диск.
«ОК».

Вкладка «Носители»
Первый носитель, виртуальный диск VHD, выступающий в роли жёсткого диска.
Второй носитель нужно выбрать, им будет ISO-образ Windows Vista.
Выделяем левой мышью пустое поле и жмём на значок дисковода.

«Выбрать образ оптического диска»

В открывшемся проводнике находим ISO-образ Windows Vista, выделяем его левой мышью и жмём «Открыть».

Виртуальная машина настроена.
«ОК».

Восстановление загрузчика Windows Vista
Запускаем VirtualBox

Появляется предложение загрузиться с ISO-образа Windows Vista — «Press any key to boot from CD or DVD», соглашаемся и нажимаем любую клавишу на клавиатуре.

«Далее»

«Восстановление системы»

«Далее»

«Командная строка»

В открывшейся командной строке вводим команды:
diskpart
lis vol (видим, что буква дисковода с ISO-образом Windows Vista является (D:).
exit
D:\boot\bootsect /nt60 All (этой командой мы восстанавливаем загрузчик Windows Vista).
exit
Закрываем командную строку и перезагружаемся.

После наших действий Windows Vista должна загрузиться.
Если у вас нет ISO-образа Windows Vista, то для восстановления загрузки вполне сойдёт ISO-образ Windows 7.
Укажите в настройках виртуальной машины, а именно на вкладке «Носители» ISO-образ Windows 7.

Запустите виртуальную машину.
В начальном окне установки Windows 7 жмём клавиатурное сочетание Shift + F10, появляется окно командной строки.

Вводим команды:
diskpart
lis vol (видим, что Windows Vista находится на Томе 1, буква диска C:)
sel vol 1 (выбираем Томе 1)
activ (делаем его активным)
exit (выходим из diskpart)
bootrec /fixmbr (утилита bootrec записывает совместимую с Windows 7 и Windows Vista главную загрузочную запись (Master Boot Record, MBR) в системный раздел.
bootrec /fixboot (утилита bootrec записывает в системный раздел новый загрузочный сектор, совместимый с Windows 7 и Windows Vista).
bcdboot C:\Windows (файлы загрузки Windows Vista создаются на диске C:)

Выходим из командной строки и перезагружаемся.
Загружается Windows Vista !

In this informative piece, we will guide you through installing Windows Vista on a new virtual machine created using the reliable and user-friendly Oracle VM VirtualBox virtualization program. Follow our step-by-step instructions to ensure a successful installation.
After installing the Guest Additions software on the guest machine, you can easily exchange files between the physical and virtual devices. Also, you can use the screen resolution in full-screen mode or autoscaled mode on the guest’s machine.
After installing and running Oracle VM VirtualBox on your computer, you can start the operating system installation you want by clicking Machine / New from the tool menu of the program with the virtual computer creation wizard.
Follow this video or the steps below to create a new VM and install Windows Vista on it.
Step 1: First of all, download the ISO file of the Windows Vista operating system to your computer from this link or a source on the Internet.
Step 2: After running the virtual PC program, click the New button on its menu or shortcut tools to start the VM creation wizard.
Step 3: In the Name and Operating System window, type WindowsVista in the Name section and select the value in the Version section according to the platform of the system you will install. If you want to store the VM in a different location, you can change the installation location in Machine Folder.
Step 4: In the Memory Size window, set a suitable RAM value for the Windows Vista virtual machine according to the RAM capacity of your physical computer. Do not forget to choose 4 GB or higher as the minimum RAM value.
Step 5: Create a new virtual disk for the Windows Vista VM in the Hard Disk window. Since the Create a virtual hard disk option is selected by default, continue directly with Next in this step. If you have a virtual computer installed before, you can add your virtual disk file with the option to add an existing virtual HDD.
Step 6: In the Hard Disk File Type window, select the VDI (VirtualBox Disk Image) option, which is enabled by default. VHD, one of the other disk types in this window, is a virtual disk file used by Microsoft. VMDK is the type of virtual disk used by other virtualization software such as VMware Workstation / Player. Since VDI is the most suitable option for Oracle VM VirtualBox software, continue with the default option.
Step 7: In the File Location and Size window, you can change the location where the virtual HDD will be stored. Suppose you want to keep the site of the virtual disk in a different place than the installation location. In that case, you can click the folder icon and select the desired location on your physical computer. Configure the virtual disk size to a minimum of 30 GB for Windows Vista.
Step 8: After creating the Windows Vista virtual computer, click Settings to add the ISO file to the VM and make other essential settings.
Step 9: For text, or file copy operations, set the Shared Clipboard and Drag and Drop options to Bidirectional to enable file sharing in the General / Advanced section of the virtual machine’s settings.
Step 10: Configure the first boot device as the Optical drive in System / Motherboard settings and turn off the Floppy device.
Step 11: Click System / Processor to set the number of virtual processors and configure this value to 4 or higher.
Step 12: To better render 3D graphics in Display / Screen settings, enable the Acceleration option and configure the Video Memory value as 256 MB.
Step 13: Check that the SATA controller’s I/O Cache feature is enabled in the Storage settings. Set the WindowsVista.vdi virtual disk file as SSD (Solid-State Drive) and finally click on Empty to add the Windows ISO file to the VM, then click the DVD icon and add the ISO file.
Step 14: After preparing the Windows Vista VM, click the Start button and start the installation.
Related Posts
1. How to Install Windows 7
2. How to Install Windows 98
3. How to Install Windows 95
4. How to Install Windows ME
5. How to Install Windows XP