You wanted to test something in the windows server operating system; maybe you want to create a domain controller, a DHCP server, or even a DNS server.
The best way to test the windows server configuration is to perform them on a LAB environment. And Some of you may not have lab access, so your available option would be to virtualize the windows server on a hypervisor.
That way, whatever you do on the machine will stay in a virtualized environment. There are multiple hypervisors you can use to spin up the Windows server. And in my last article, we had covered how you can install the windows server on a KVM host. And In this blog, we are going to install the windows server on a VirtualBox.
Can you run Windows Server in VirtualBox?
You can run most operating systems with VirtualBox, provided it should be bootable or a virtual hard disk. Most of the users out there will have Windows server ISO file, and it works perfectly fine. However, you have a choice from Microsoft to download the virtual hard disk in VHD format. You can use that as well to install the windows server on the VirtualBox. And the windows server works great with the VirtualBox.
To get better performance after the installation of the windows, you will also have to install the VirtualBox guest additions. We will cover that as well in this article.
How do I download windows server images for VirtualBox?
You can go to Microsoft windows server evaluation center and download the Version of your choice. When you choose the Version, you will have multiple options; you can either select ISO or VHD. After choosing the Version, you will have to submit the form and post which you will get a link to download the software.
When it comes to the installation, compared to the ISO installation, the VHD file is the easiest way; however, the VHD file size is about 8GB, so you need to be mindful of that.
We will see how we can install the windows server 2019 with both the ISO file and the Virtual hard disk file.
Though we are installing the windows server 2019 in a VirtualBox, the steps mentioned here are identical for other Version of windows as well, such as windows server 2016,2012 and so on.
Prerequisite.
- Download and install the VirtualBox.
- Download the windows server image (Either ISO or VHD)
- Installation using the ISO file.
- How to install windows server using virtual hard disk (VHD) in VirtualBox?
Installation using the ISO file.
1. Creation of Windows server VM in VirtualBox.
Open VirtualBox and click on New or CTRL+N to start the windows server VM installation.
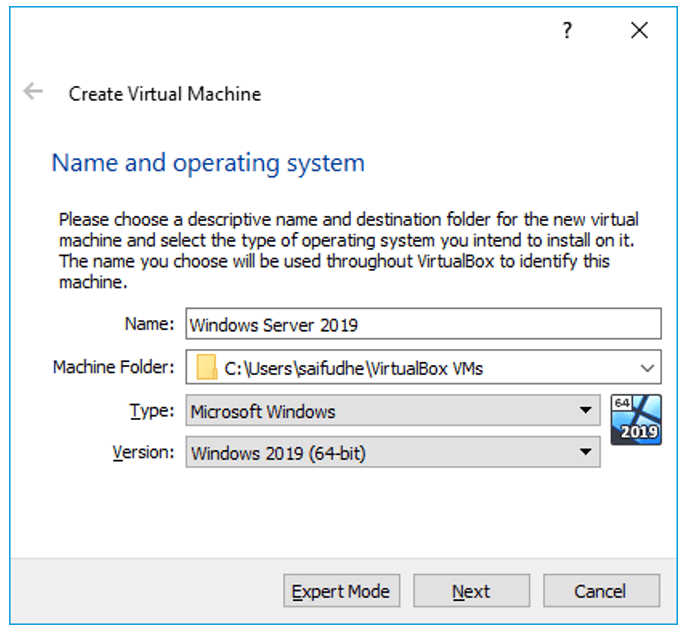
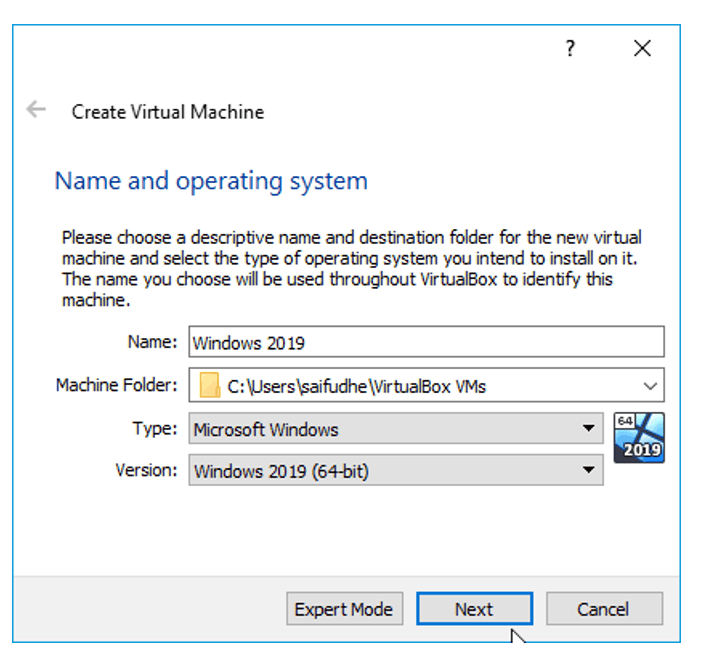
A new Create Virtual machine window will pop up; you can choose either Guided Mode or Expert Mode. We are using the Guided Mode for our lab.
- Enter the name of the VM.
- Select the folder where you want to keep the VM Hard disk files, I left as a default folder.
- Choose the Type as Microsoft Windows.
- Version as Windows 2019 (64bit), for other Version of windows server you may choose them here. For Example, Windows 2016 (64bit)
After specifying the above, you may Click on Next.
2. Specify the Memory.
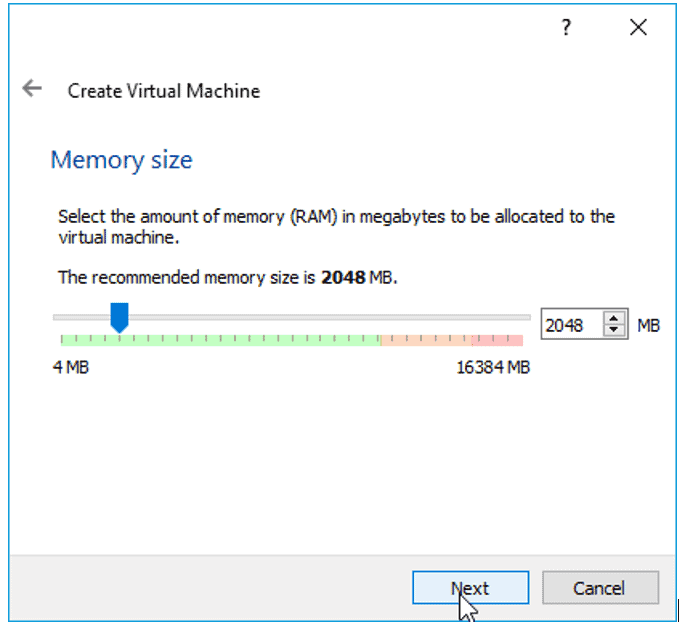
You now have to define the Memory for the VM; since I most likely use it for a small Lab, I am fine with 2gigs of RAM. However, if you plan to do more stuff with it, you may need to increase the RAM accordingly.
3. Create virtual Hard disk.
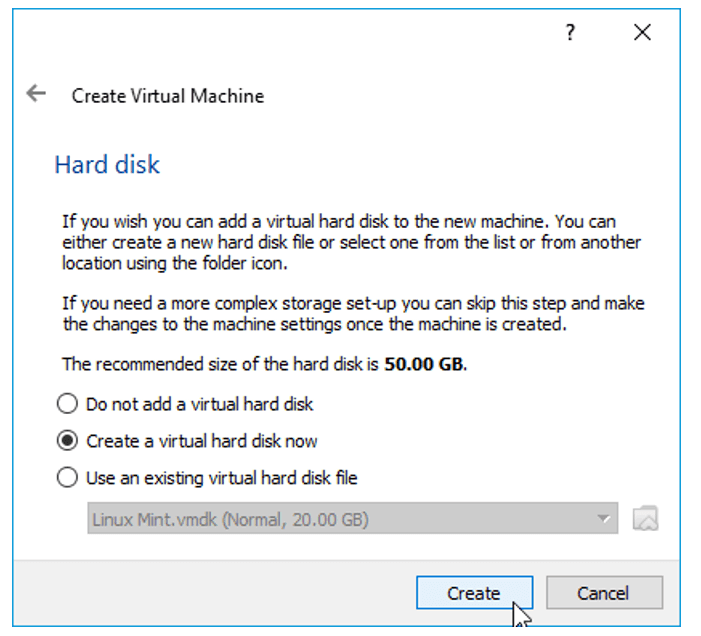
We will create a virtual hard disk for our VM; in the hard disk wizard. Select the option à Create a virtual hard disk now and Click on create.
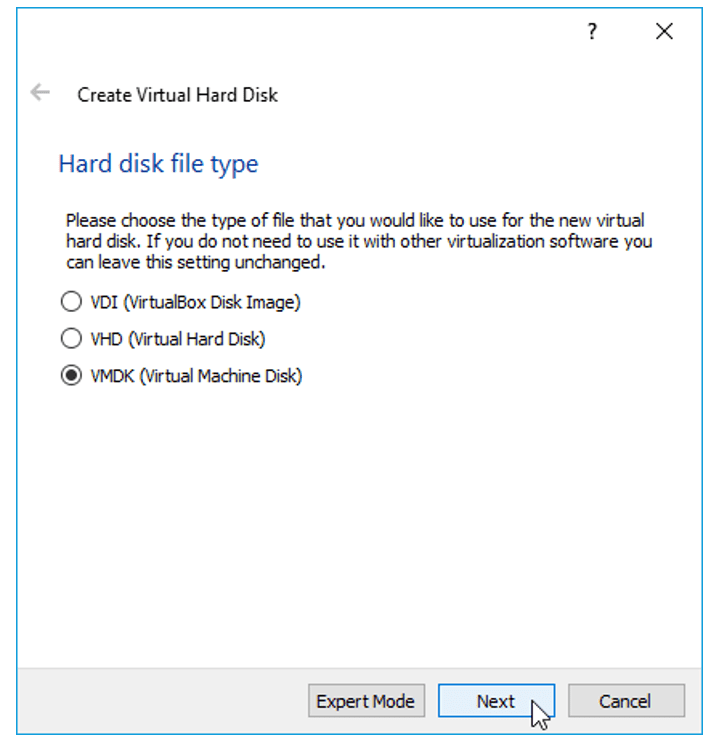
By default, the hard disk type would be VDI, and you may choose the default Value itself if you are planning to use the VirtualBox as your permanent hypervisor.
But I would recommend choosing VMDK so that you have an option to move from the VirtualBox to other hypervisors of your choice. Now Select VMDK and Click on the option Next.
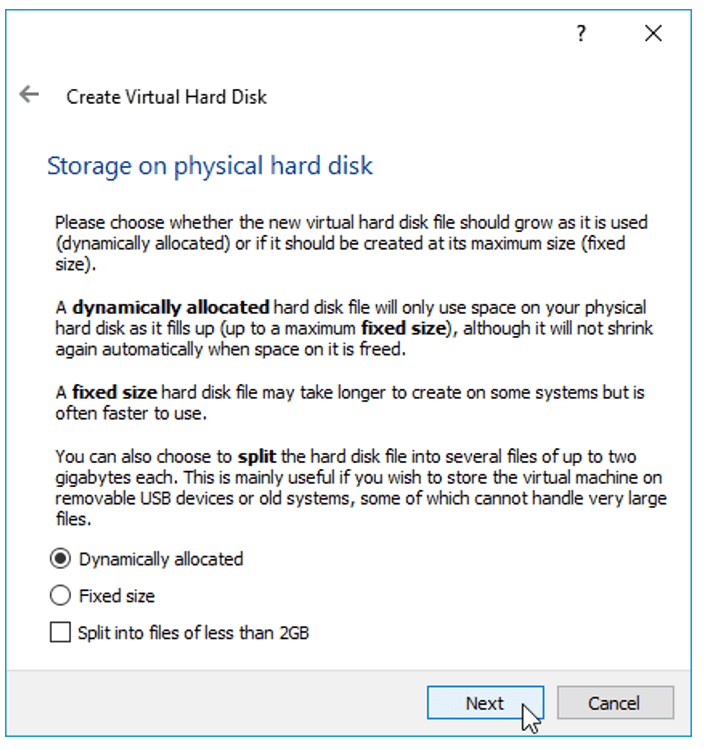
On Storage on Physical hard disk, Choose the default value Dynamically allocated and Click on Next.
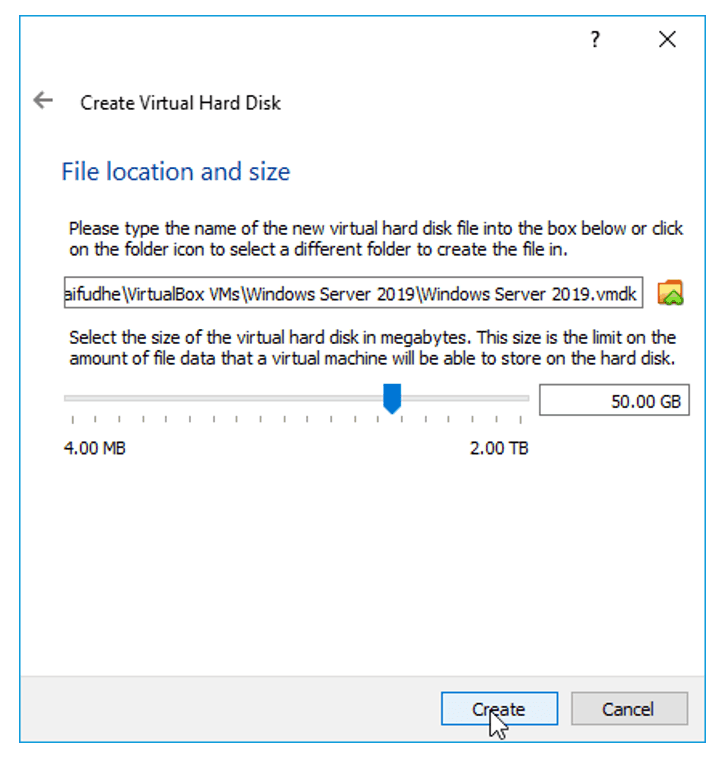
We will now define how much storage you want to provision for the windows server; I choose 50GB which is more than enough for me.
If you feel that you might need some extra space, you choose more based on your requirements and Click on Create.
You will be able to see the windows server VM instance is created.
4. Increase the CPU.
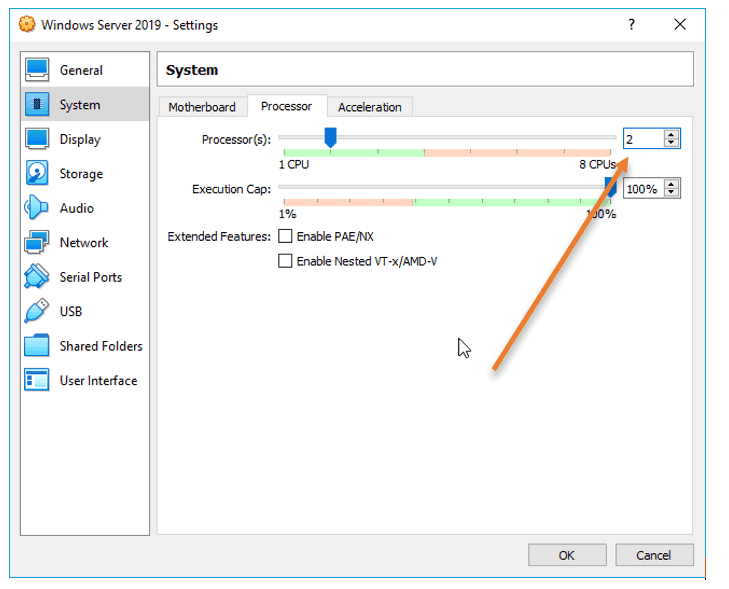
By default, the VirtualBox would assign only one processor to the VM, and I need to add one more processor. That way, then the performance would be good. If you do not need more CPU, you may skip this step.
Right-Click on the VM and Click on settings.
Click on System and choose the Processor tab, and in the processor count, increase it to two.
5. Attach the windows server image to the virtualbox.
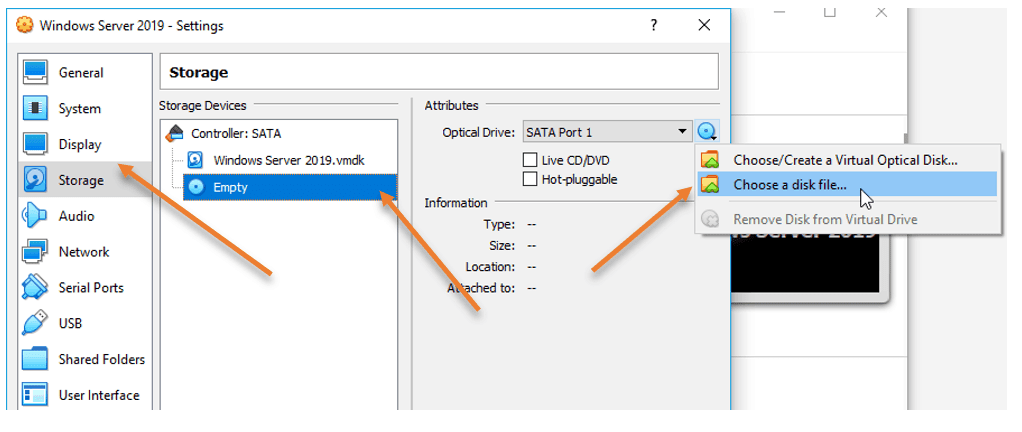
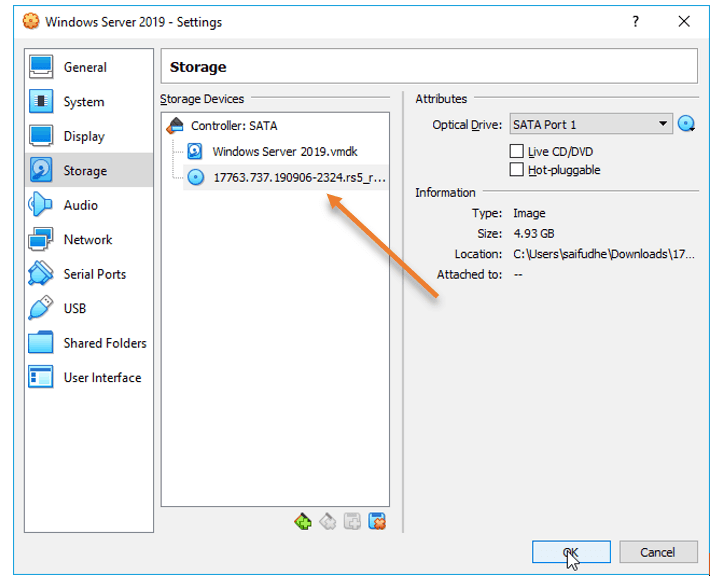
On the same VirtualBox settings, Click on storage.
Under storage devices, Choose the Empty Disk.
In the attributes, Click on the Disk icon to choose a disk file.
And attach the ISO that we have downloaded earlier and Click on Ok.
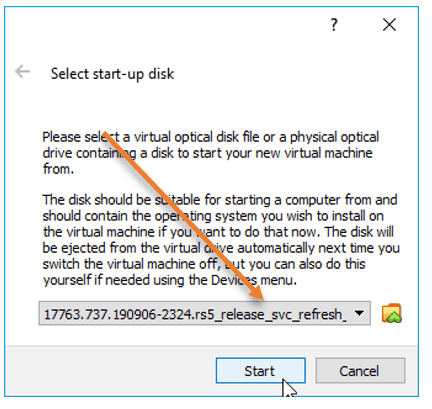
Right-Click on the VM and Click on start.
From the start-up disk, choose the ISO image that we have attached and click on start. The VirtualBox instance will boot the windows server image.
6. Begin the windows installation.
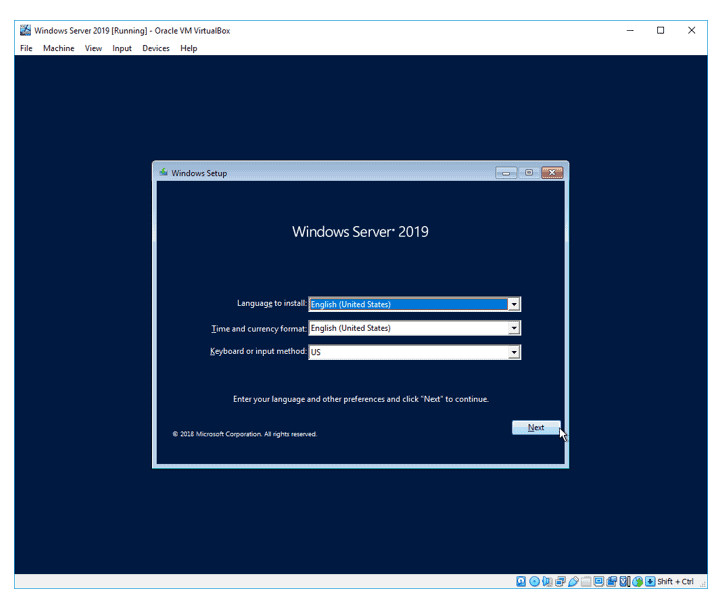
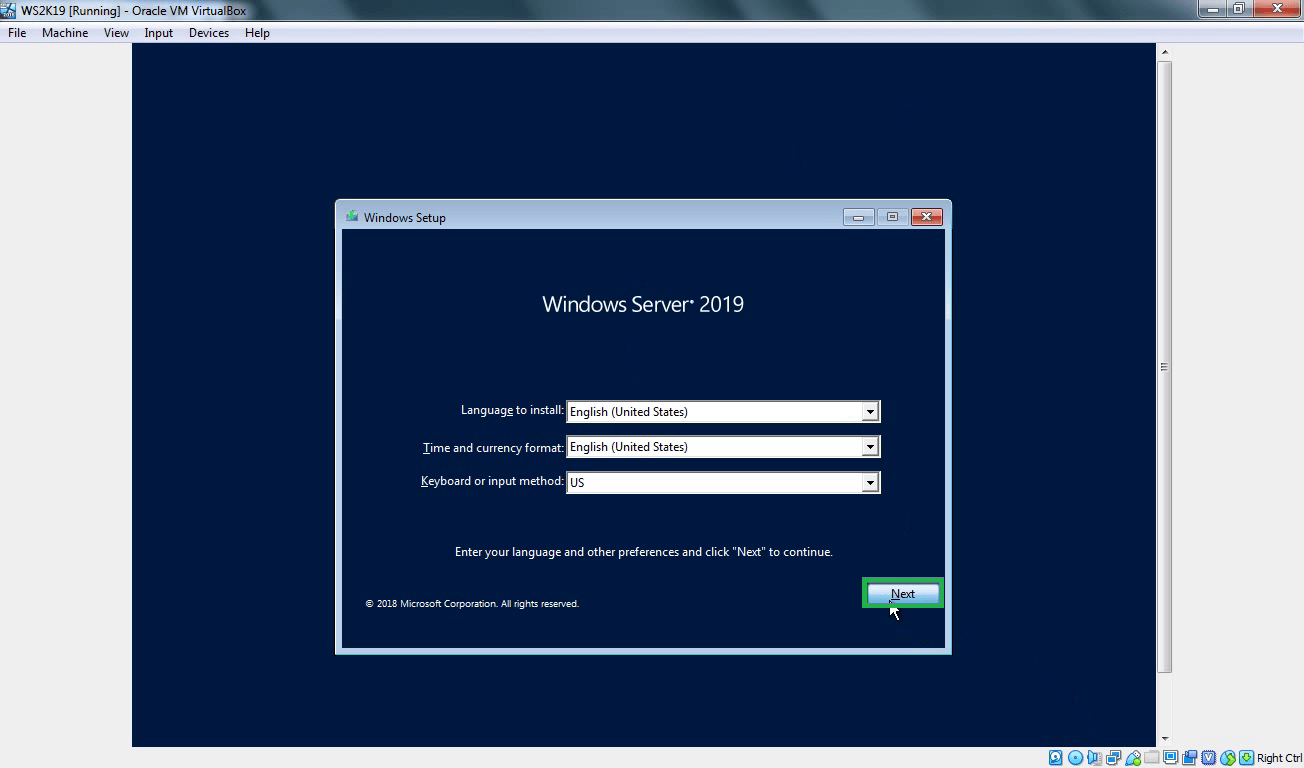
After a few seconds, you should see the windows installation screen, Choose the language, and Click on Next.
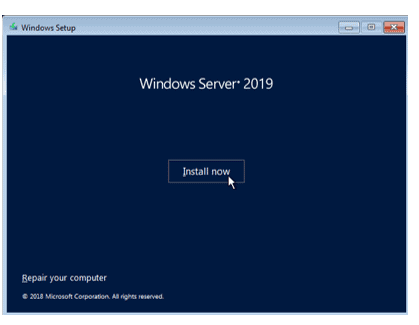
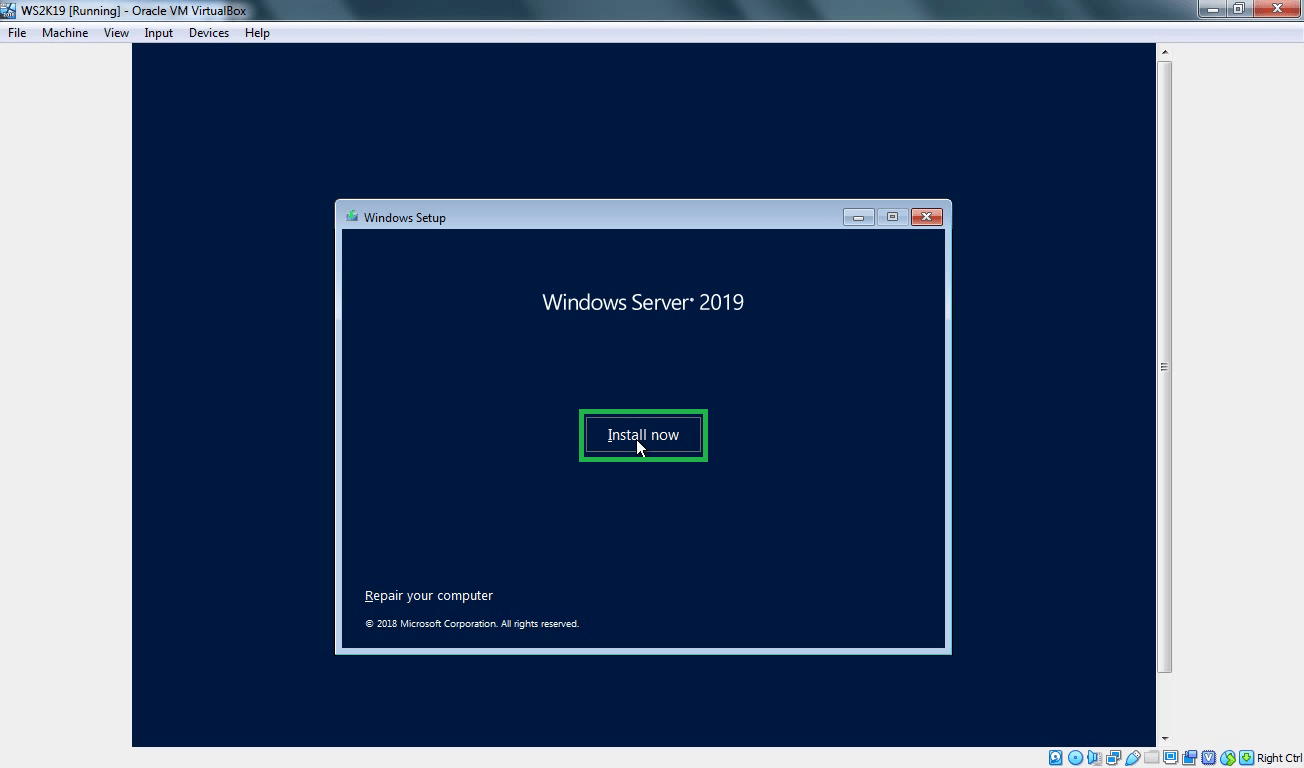
You can click on Install now.
7. Choose the Version – GUI or CLI.
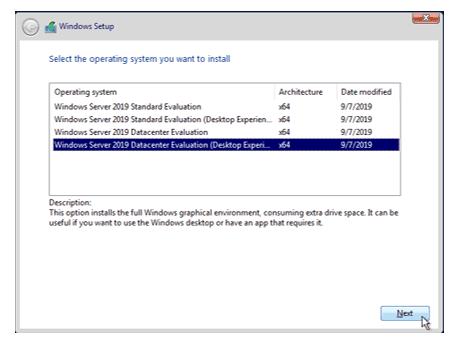
You will be presented with the different Versions of windows server 2019 on the screen. You must be a little careful here.
If you want to install the windows server with GUI, you may choose Desktop experience, or if you are ok with CLI, you may select the other options.
I need GUI access; hence I selected Windows server 2019 Datacenter evaluation (Desktop Experience)
After you decided on the versions, you may Click on Next.
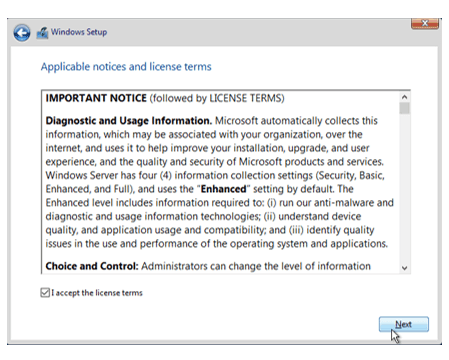
Accept the license agreement and Click on Next.
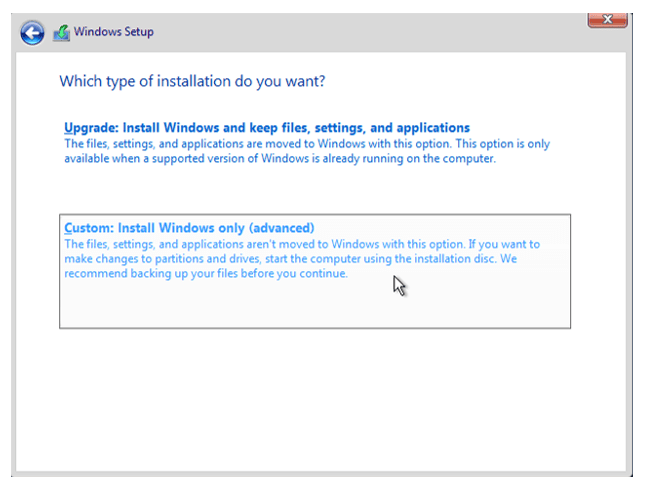
Choose the installation as Custom.
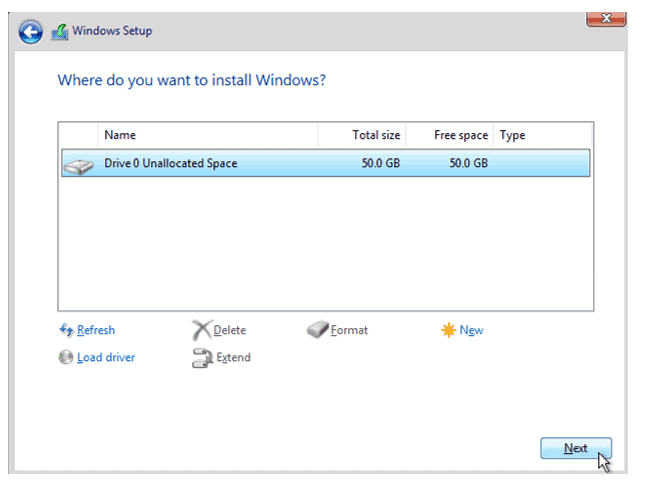
Choose hard disk that we have defined earlier, Click on Next.
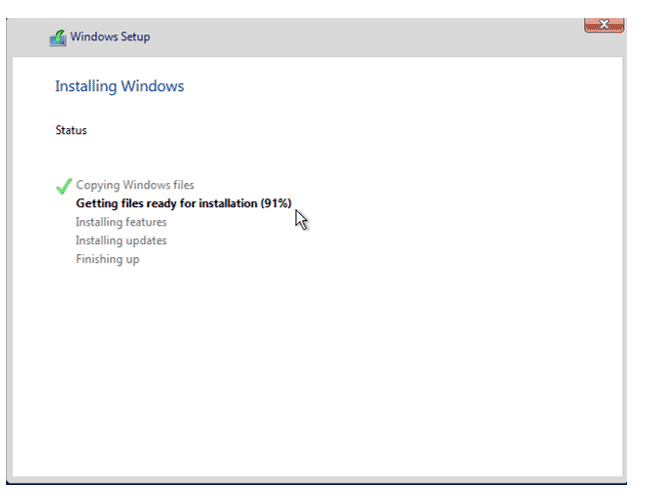
The windows server installation will now begin; this will take some time to finish.
8. Setup the admin password.
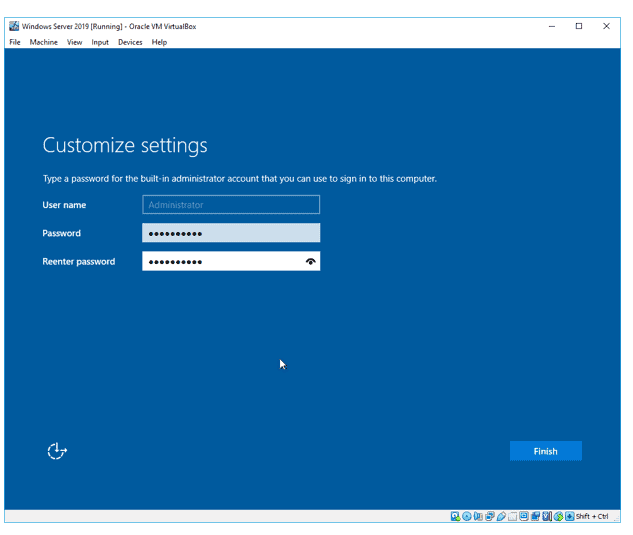
After the installation, you will be prompted to enter the Administrator password. Set the administrator password and Click on Finish.
9. Remove the ISO file.
Installation of Windows server 2019 in Oracle VirtualBox is completed; you may now log in to the windows server.
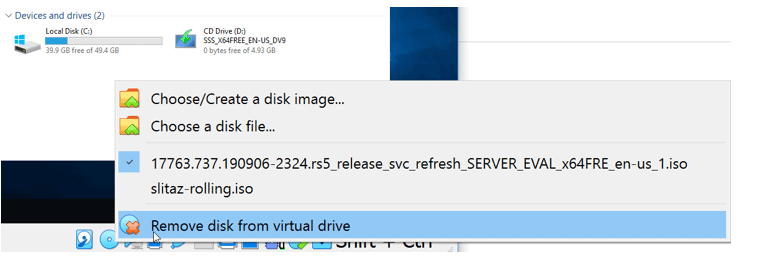
Let’s remove the windows server ISO file that we had attached during the installation.
On the bottom corner of the VirtualBox window, right-click and click on the disk icon and click on Remove disk from virtual drive.
10. Installation of VirtualBox Guest additions.
Finally, we will have to install the VirtualBox guest addition, which will improve the performance of the windows server VM.
To install the VirtualBox guest additions, you may log in to the windows host.
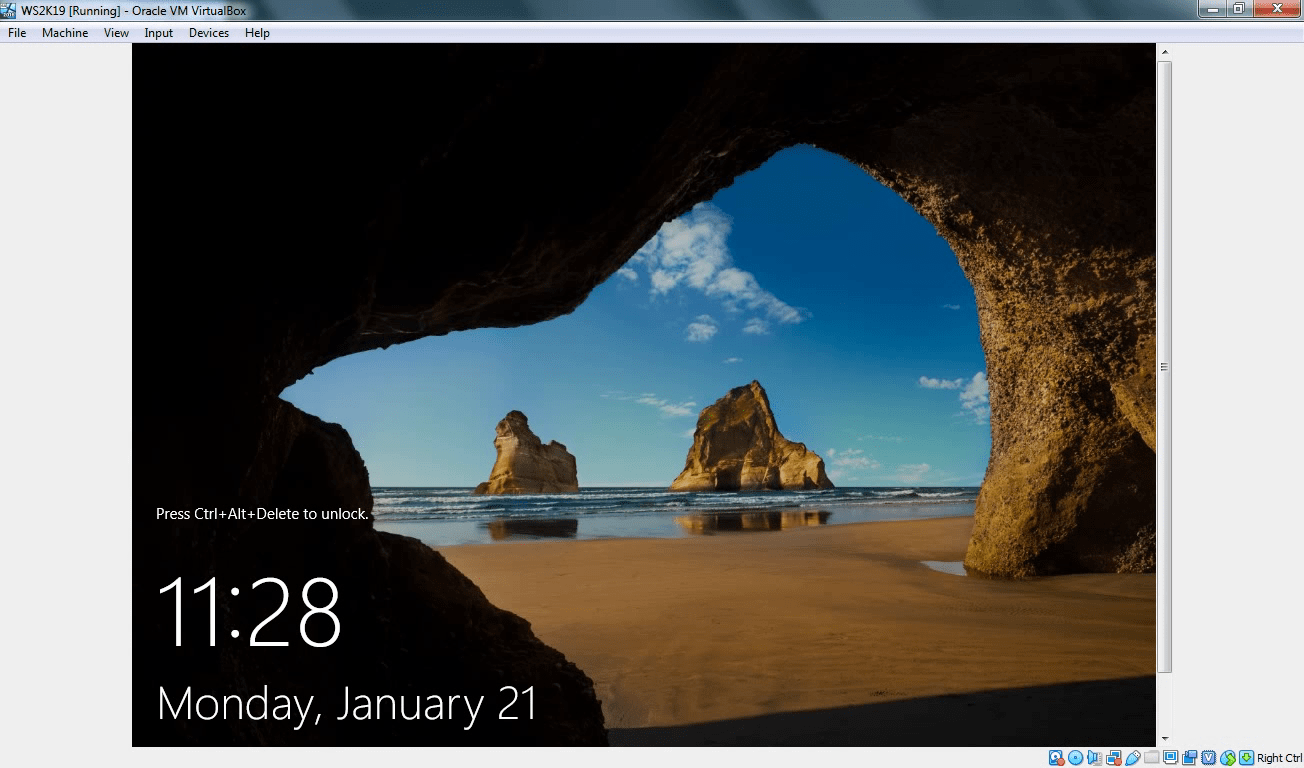
Click on Input–> Keyboard–> Insert Ctrl+Alt+Del
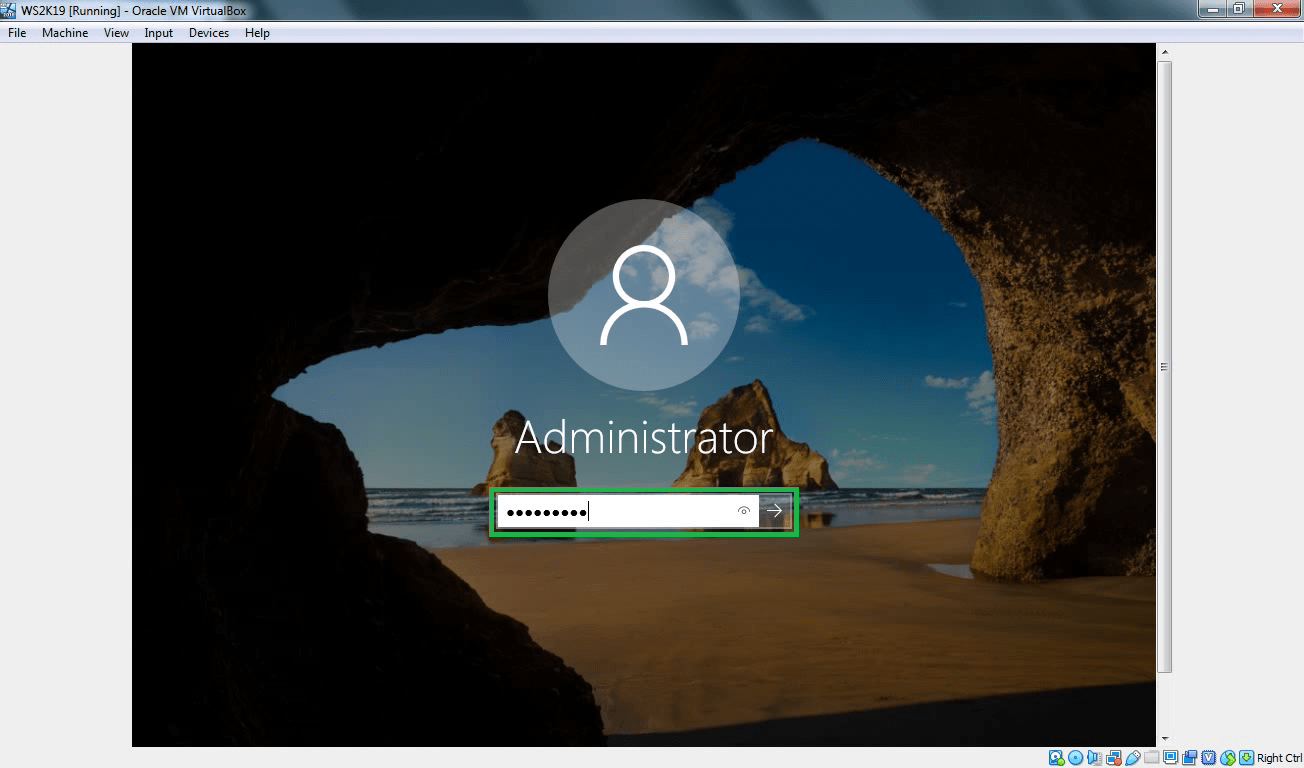
You will be prompted to enter the admin password that we had set up earlier.
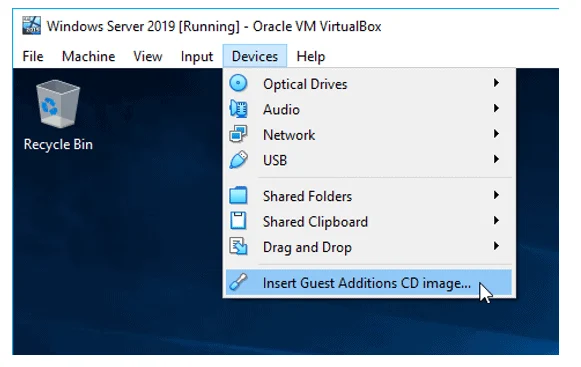
After logging in, Click on Devices > Insert Guest Additions CD image…
It will attach the Guest addition installation disk to the Windows server VM.
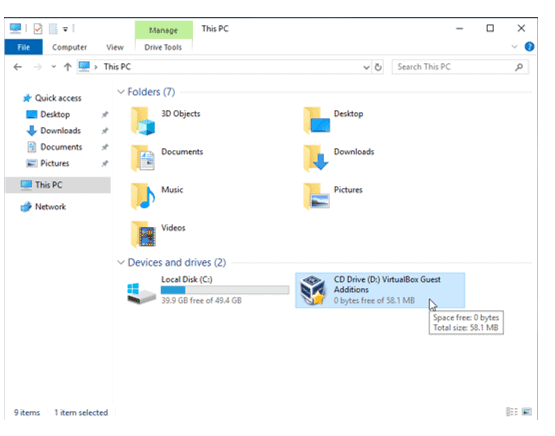
Open This PC, and you should see the VirtualBox Guest additions CD drive and double click on it.
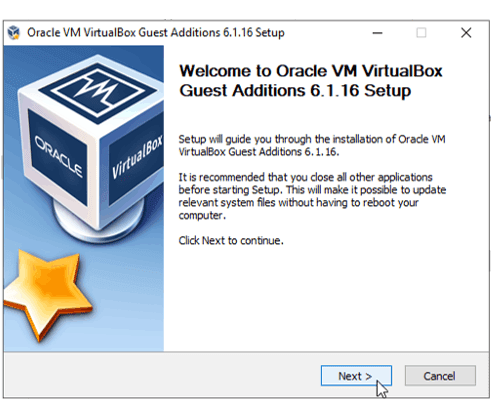
Double click on the Virtualbox Guest addition installation setup file to install the VirtualBox guest additions on your windows server machine.
It is a typical software installation and nothing too complex here; you may click on next on all the drive installation prompt that you get.
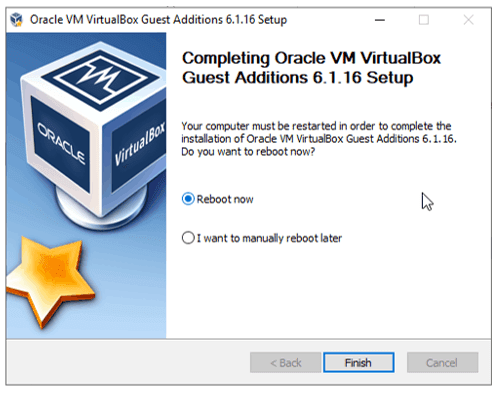
After the installation, you may now go ahead and reboot the VM, and you should be good to go.
How to install Windows Server using Virtual Hard Disk (VHD) in VirtualBox?
We have successfully installed the windows server 2019 on the VirtualBox hypervisor using ISO image. We now will go ahead and install the virtual machine using the virtual hard disk. We already have a VHD file downloaded from the Microsoft site.
1. Creation of the VM.
On the VirtualBox, Click on New.
- Name the VM and the location where you want to save the virtual machine.
- Type as Windows.
- Version: Windows 2019 (64bit)
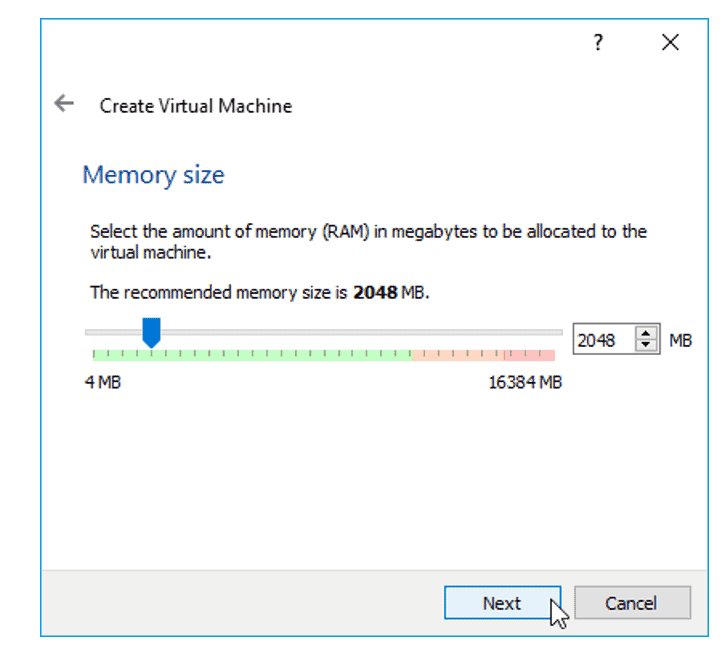
2. Define the memory size.
We can provide a Memory of 2GB or more, and I am choosing 2GB for now.
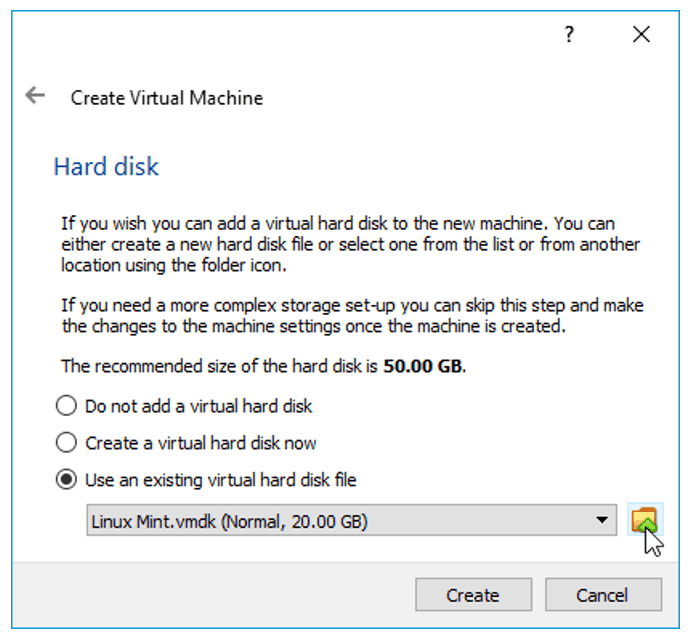
3. Attach the Virtual Hard disk.
When we chose the ISO method of installation, we created a new hard disk in the VirtualBox.
But right now, we already have the virtual hard disk file, We need to attach that here.
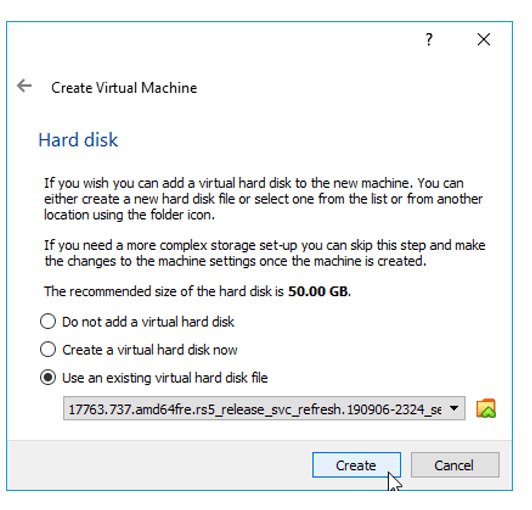
Select use existing virtual hard disk file and click on the browse button next to the drop-down.
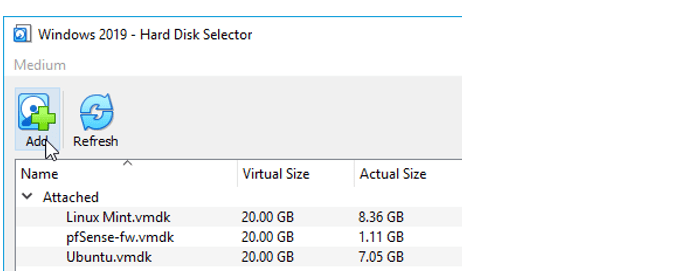
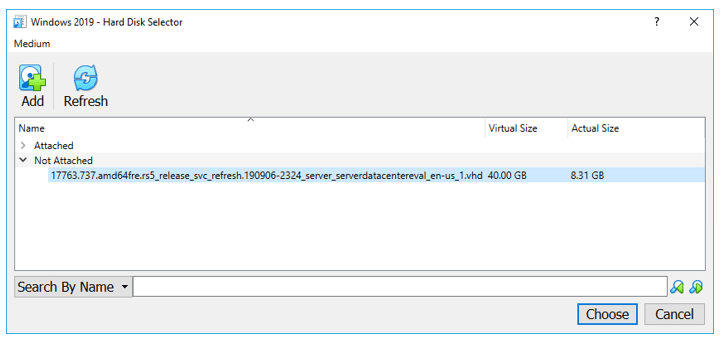
You will not see the virtual hard disk in the new pop up; Click on Add.
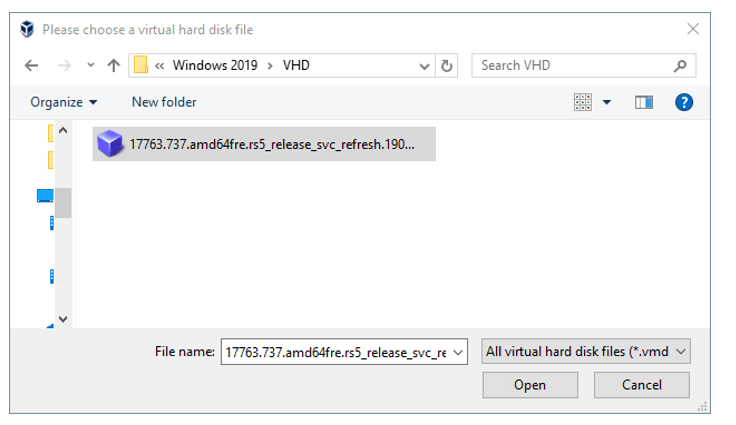
And Select the VHD file which we downloaded from Microsoft.
The new image is added under the not attached section.
Select the image and Click on Choose.
You need to make sure the new virtual hard disk is selected under ‘use existing hard disk file’
Click on Create.
4. Choose the region and Accept the license.
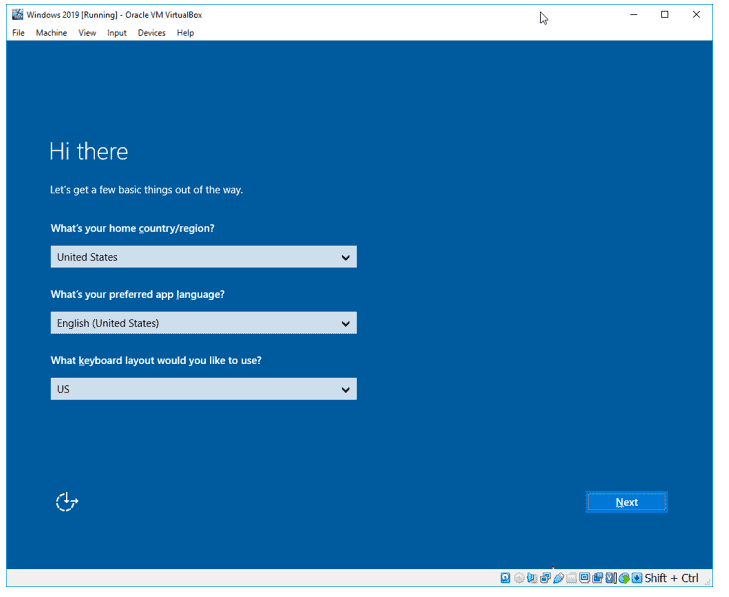
Once you power on the machine, you will get an option to Choose the region, Language, Layout and Click on Next.
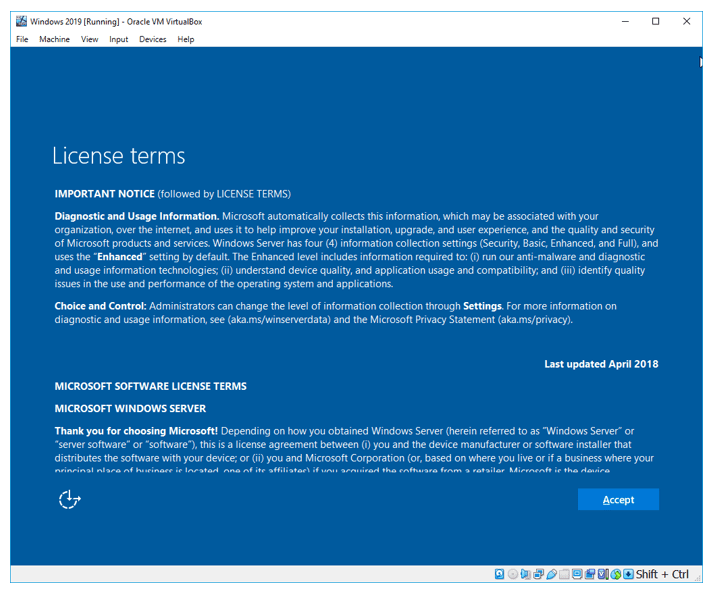
You have to accept the license before you continue.
Follow the Step 8 above to set the admin password. Enter the password and Click on Finish.
Your VirtualBox is ready to use, and you still need to install the VirtualBox guest additions following Step 10 above which is important.
Oracle VM VirtualBox is a free and open-source hosted hypervisor for x86 virtualization, developed by Oracle Corporation. You may want to run multiple VMs on your operating system, with the type 2 virtualization type, this is possible. To achieve this, the following steps below need to be performed. To proceed, ensure you have VirtualBox installed on your device. On how to perform Post OS Installation configuration of Windows Server 2019 Properties, how to install Windows Server 2016 Operating System. Also, you may be interested in my YouTube video on how to setup Windows Server 2019 on a VMware Workstation. On how to install and configure Ubuntu Linux, see the visit link.
Part A: Prepare the Virtualbox environment to hold the windows folders for the new VM. Click on “New” from the Oracle VM VirtualBox Manager. See this guide for how to install Windows Server 2022 on VMware Workstation.
Enter the name, version, desired path to host the VMs and click on continue
Select the memory size as shown below. You can type in the memory size or use the bar to increase it as well.
Click on “create a virtual hard disk now”
This will open the hard disk type window as shown below.
– I will select VDI (Virtual Disk image)
Choose if you wish the hard disk to dynamically increase or use a fixed hard disk file size. I will be using a fixed size which will be entered in the next page
Enter the Hard Disk size of your choice as shown below
– You can also change the file location if you wish from here.
Next, this will create the VM as shown below
Now the VM creation process is complate and VM successfull created.
Part B: To access and attached the Windows Server 2019 ISO file, the following steps should be followed.
Click on the Server and Click or settings or
– Right click on the server and select settings
Click on storage
– Click on Empty under the control IDE
– Select the Disk icon and choose the Operating system you wish to install as shown below
As you can see below, the ISO image has been selected. We can now proceed with our installation.
– Click on “ok”. Next, select the VM and click on start to continue the installation of Windows Server 2019.
This will load windows and prompt for the steps in Part C below.
Part C: This step is similar to installing Windows 10, Windows Server 2008, 2012, 2016 on Virtualbox. On the Windows Setup page,
– Select the language to install
– Time and currency format
– Keyboard or input method
Click on Next and Click on “Install now“
Note: Here you could click on repair your computer if this is the approach you need to take or use “Reset this PC”. See how to repair Windows 10 locally for similar steps. Select the operating system you wish to install and click on Next.
Accept the license agreement as shown below and click on next
Select custom install as shown below to install Windows
– Pick Custom: Install Windows only (advanced)
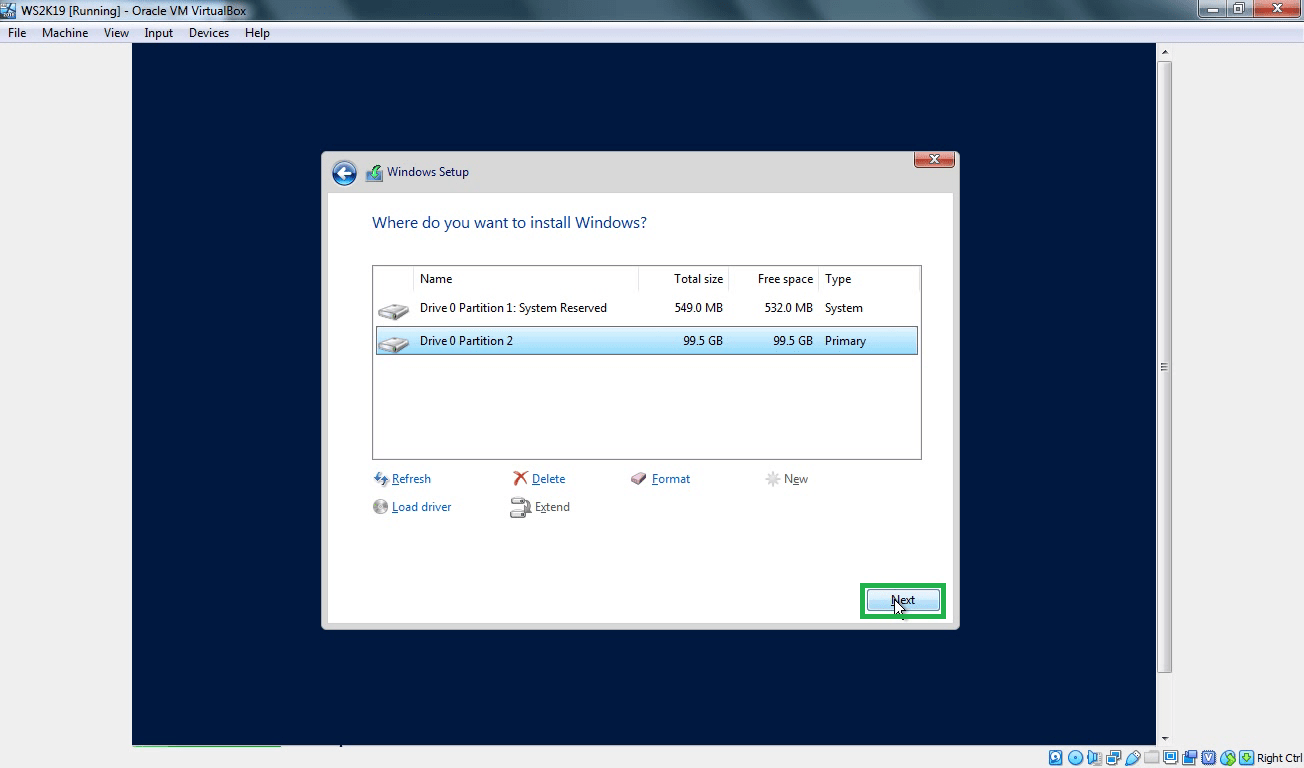
Select the Drive to install Windows and click on Next
Note: You can create an additional drive and install Windows on it. You can also format, delete and extend drives in this window.
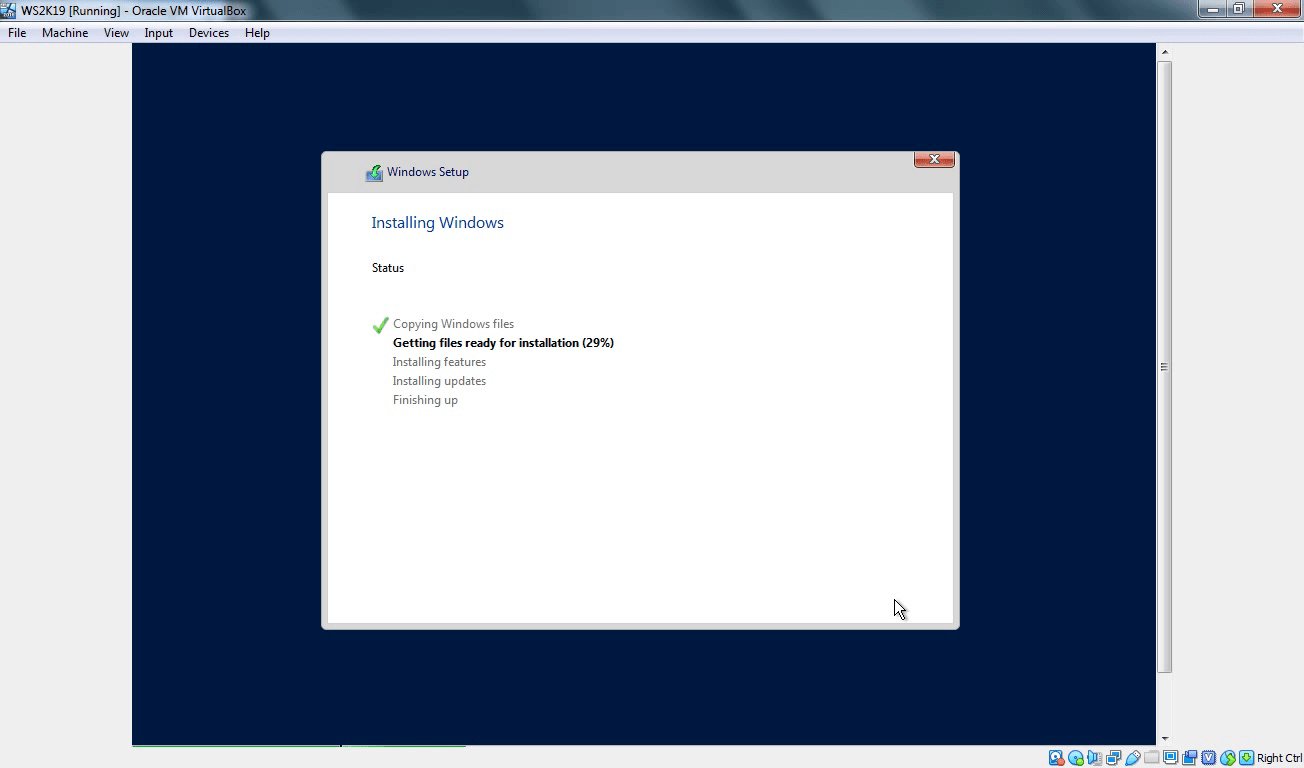
After this step, Windows will be installed unto the system.
When this step complete, the the device will reboot after few seconds
– Note: You can restart immediately
This will prepare and get windows ready as shown below
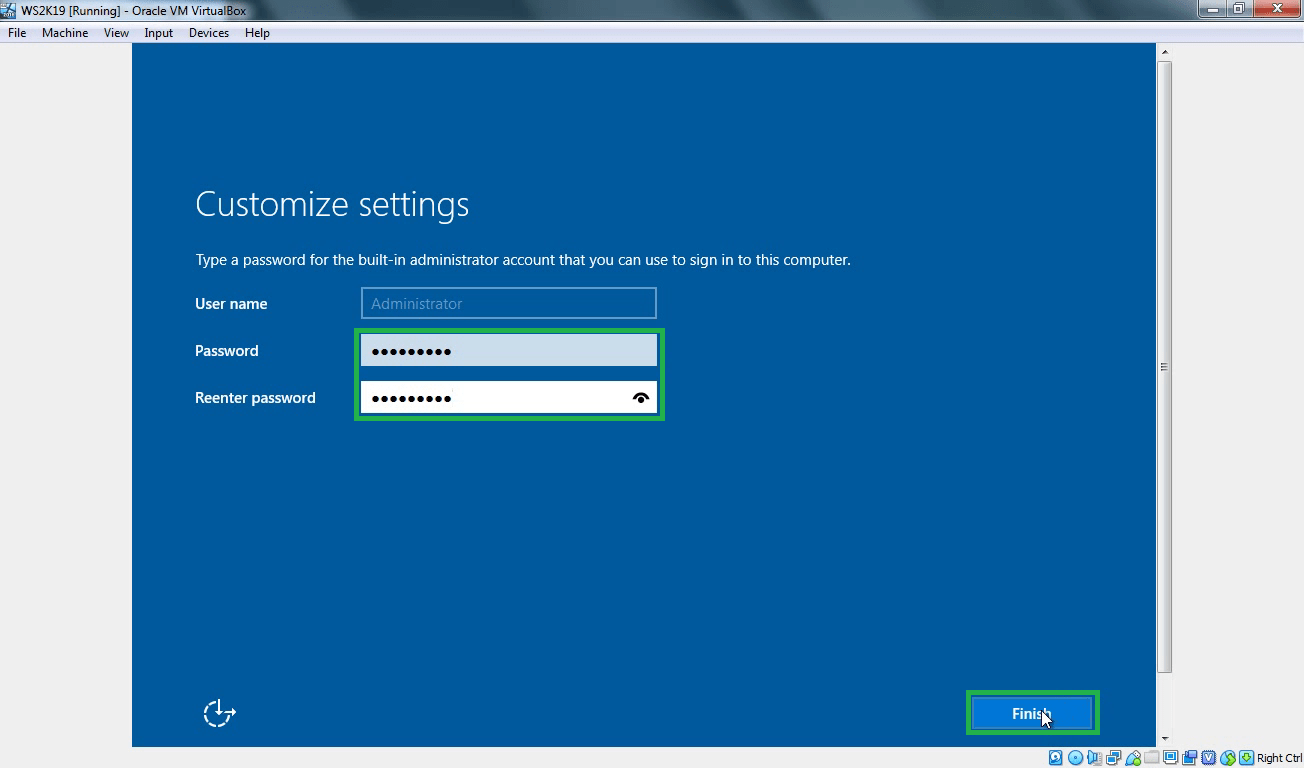
the customise settings window will be displayed. Enter the Password and click on finish to complete Windows Server 2019 Installation.
The Windows Server 2019 setup is now complete as shown below.
To access the login windows, use the Contl+Alt+Del and enter your password to access Windows. Refer to this guide for the Post OS Installation and configuration of Windows Server 2019 Properties (Configure TCP/IP Parameters).
I hope you found this blog post helpful. If you have any questions, please let me know in the comment session.
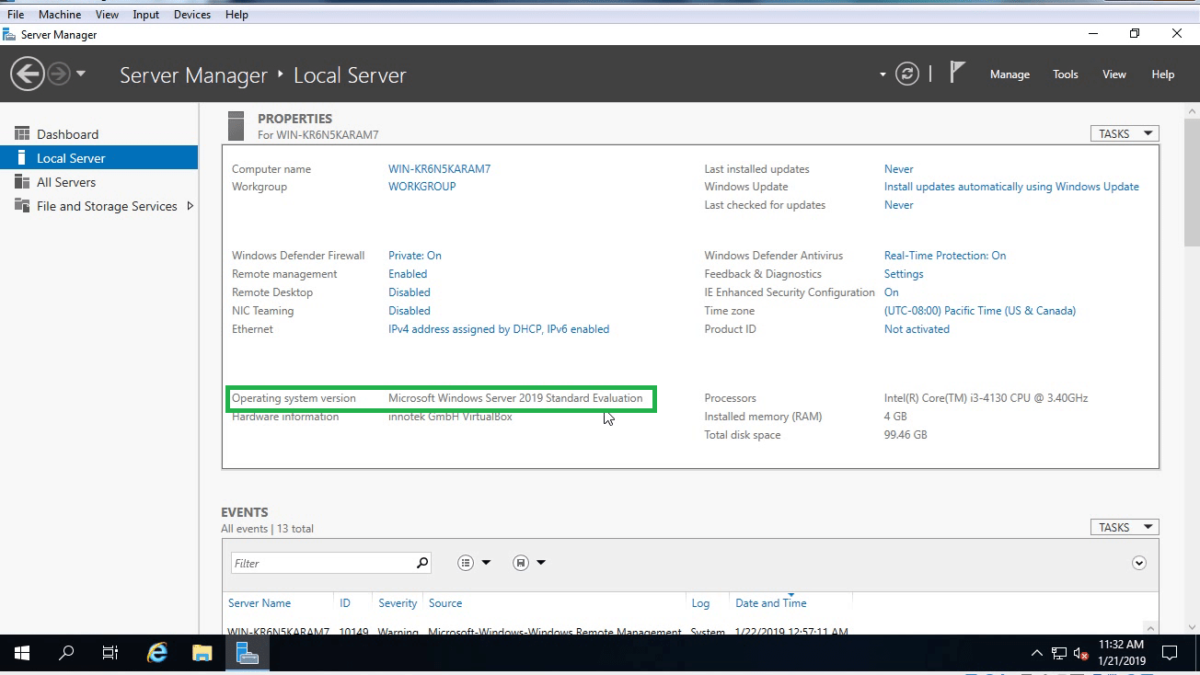
In this post, we will see the process to install windows server 2019 in Virtual Box. But before we start installation let’s check minimum system requirement to install windows server 2019.
Minimum system requirement to install windows server 2019.
- Processor: At least 1.4 GHz or faster 64-bit supported processor
- RAM: 512 MB
- Free Space: 32 GB of available free disk space.
How to install Windows Server 2019
First download Windows server 2019 Evaluation edition ISO image from Microsoft TechNet Evaluation Center. https://www.microsoft.com/en-US/evalcenter/evaluate-windows-server-2019
Link to download Oracle VirtualBox: Click Here
Start your VirtualBox and create one VM with below configuration.
- Name: As you wish
- Type:- Microsoft Windows
- Version:- Windows 2016 (64-bit)
- RAM:- 2048 MB
- Create Dynamically Expanding VDI with size 100 GB
After creating VM click on start.
Mount the ISO image which we have downloaded earlier.
Step:1 On Windows Setup console select the installation language, time and currency format and keyboard layout. You can simply use default settings which will be OK.
Step:2 Click on Install now to start the installation process.
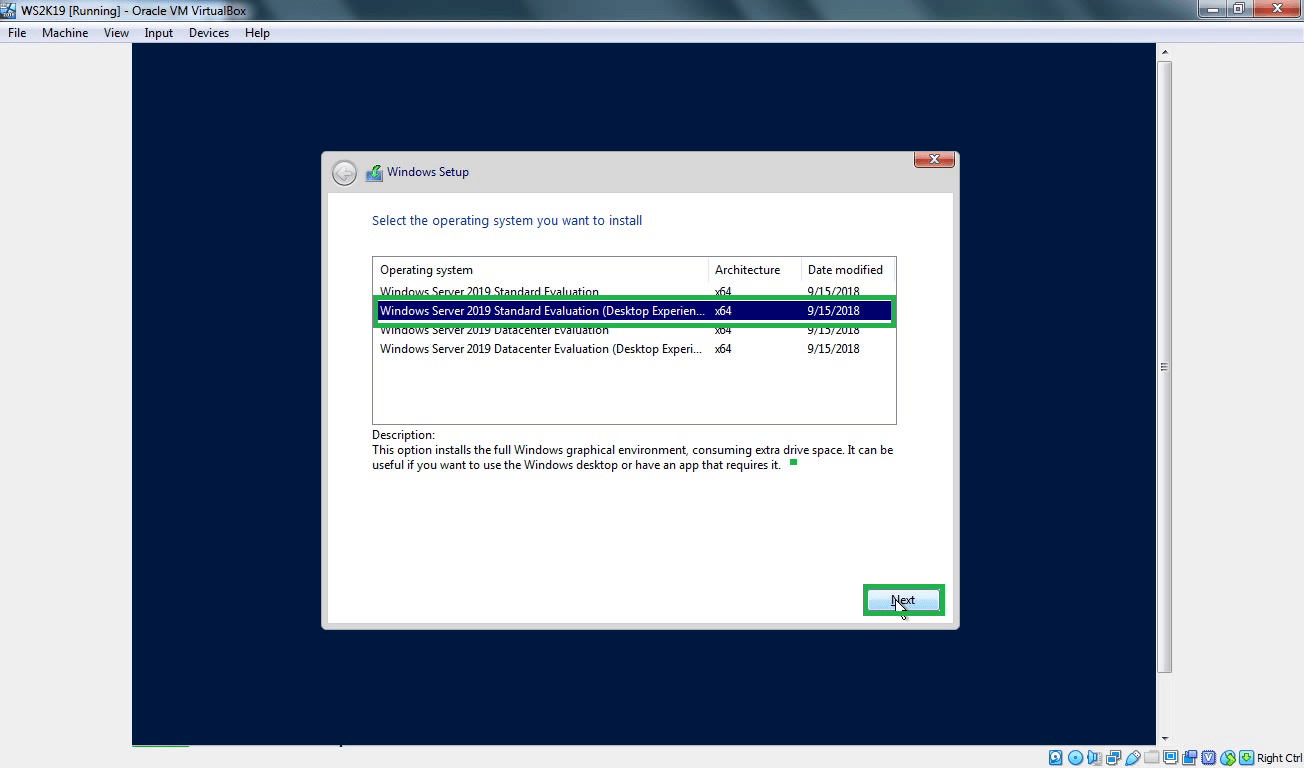
Step:3 Select the operating system which you want to install. (First option will install windows server without a graphical user interface.)
If you want GUI to manage server select second option i.e. Windows Server 2019 Standard Evaluation (Desktop Experience).
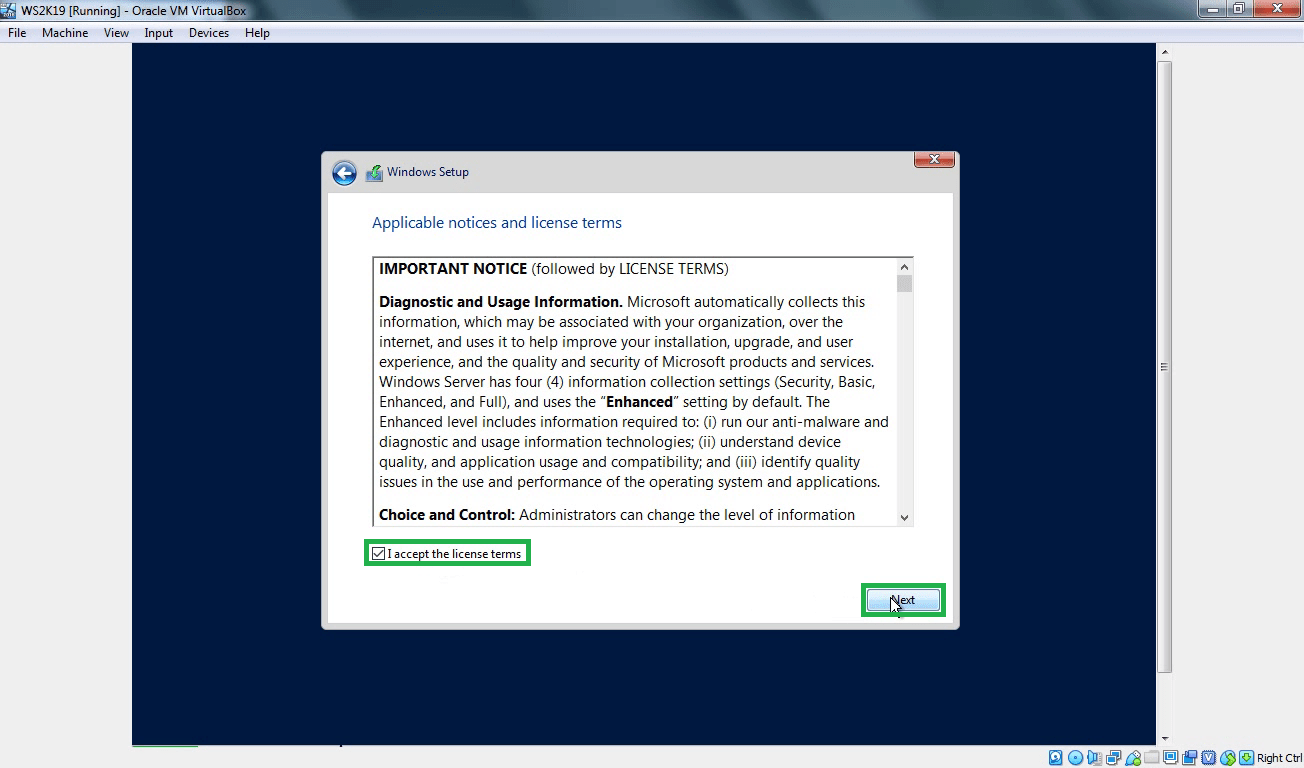
Step:4 Select Accept the license terms and click on next.
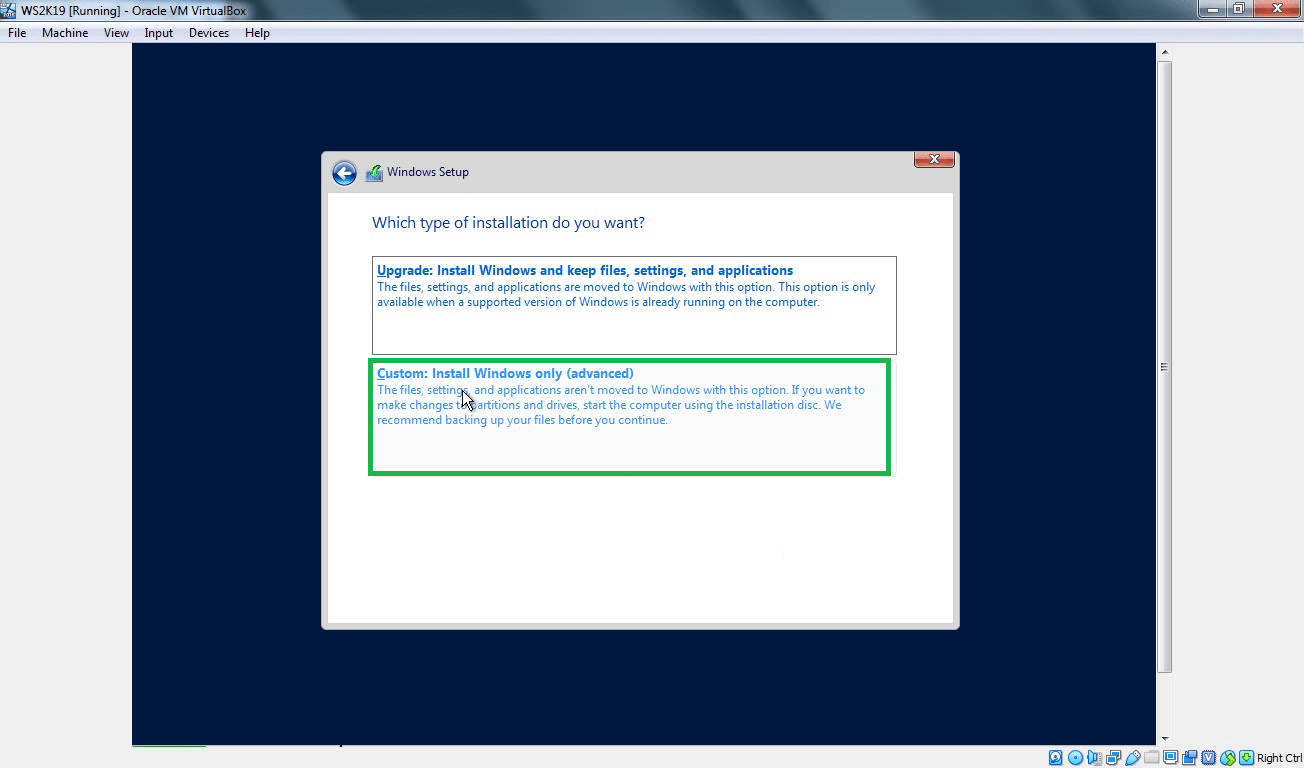
Step:5 For a fresh installation of server 2019 we need to select the second option, Custom: Install Windows Only and then click on next.
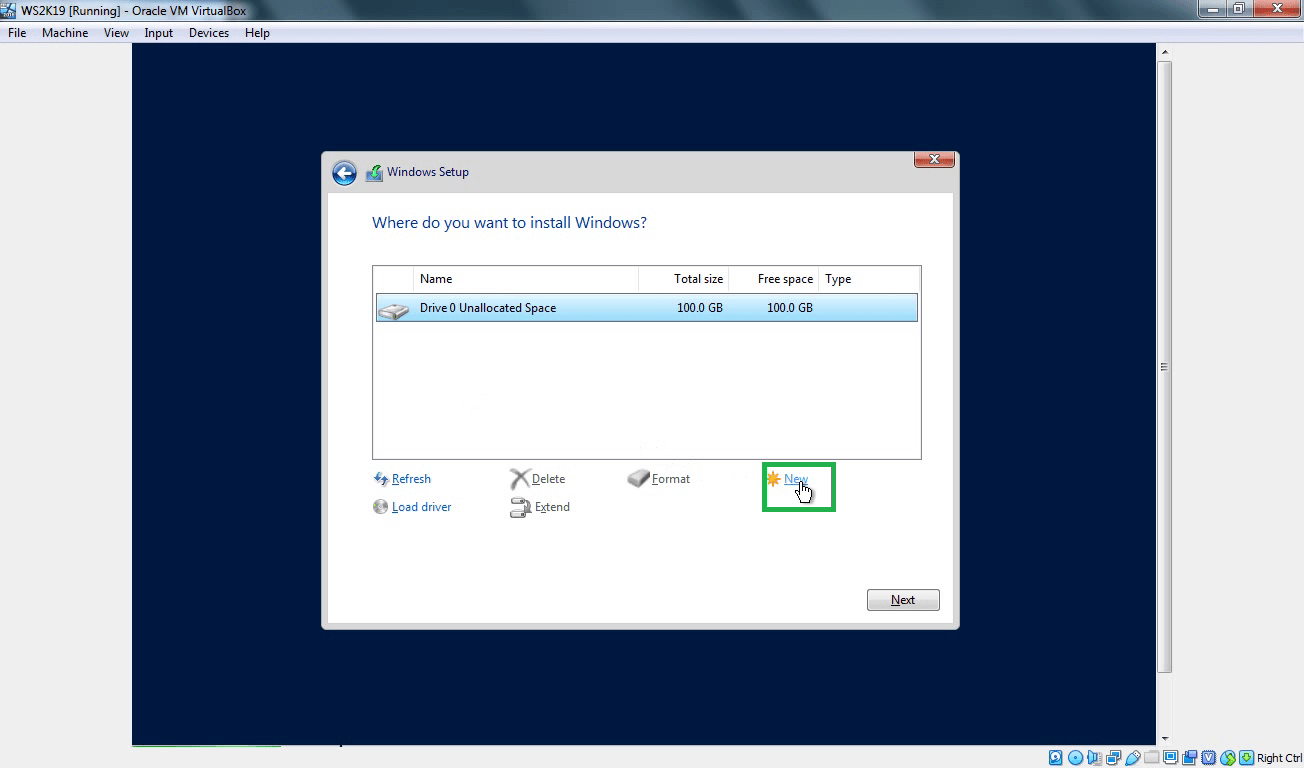
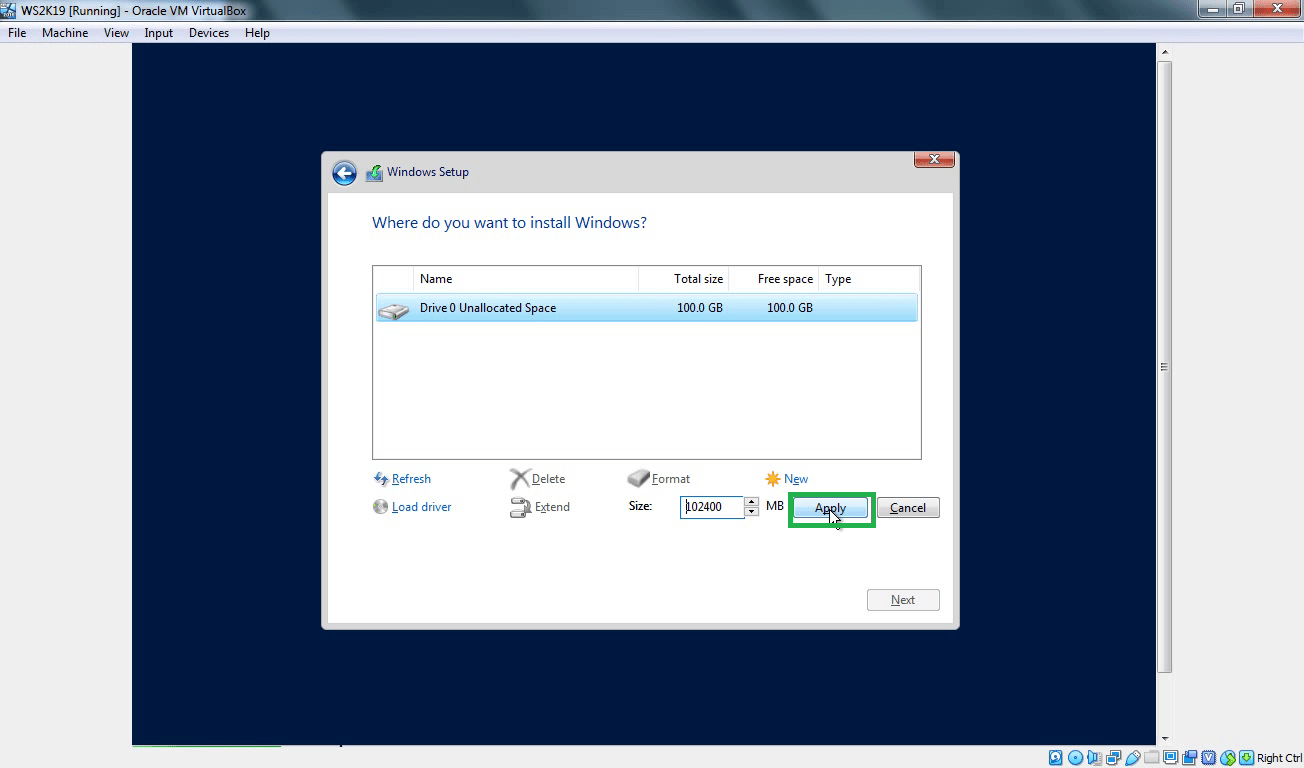
Step:6 Select your virtual hard disk and click on New to create a new partition to install server 2019.
Step:7 For this demo, I am creating only one partition of 100 GB in size.
Step:8 After creating a partition, Click on Next to continue.
The installation process will take some time to complete the process. Once installation completes server will restart automatically.
At next boot, you will see below screen asking to set Administrator account password for windows server 2019.
Step:9 Specify the password of your choice to protect Administrator account of Windows Server 2019.
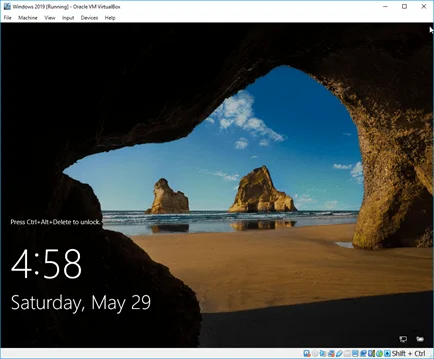
Congratulations! Now you are ready to log in first time on your newly installed Windows Server 2019.
Now press CTRL + ALT + Delete key combination.
Specify the administrator account password and hit the enter key to login to Windows Server 2019.
Here we go.
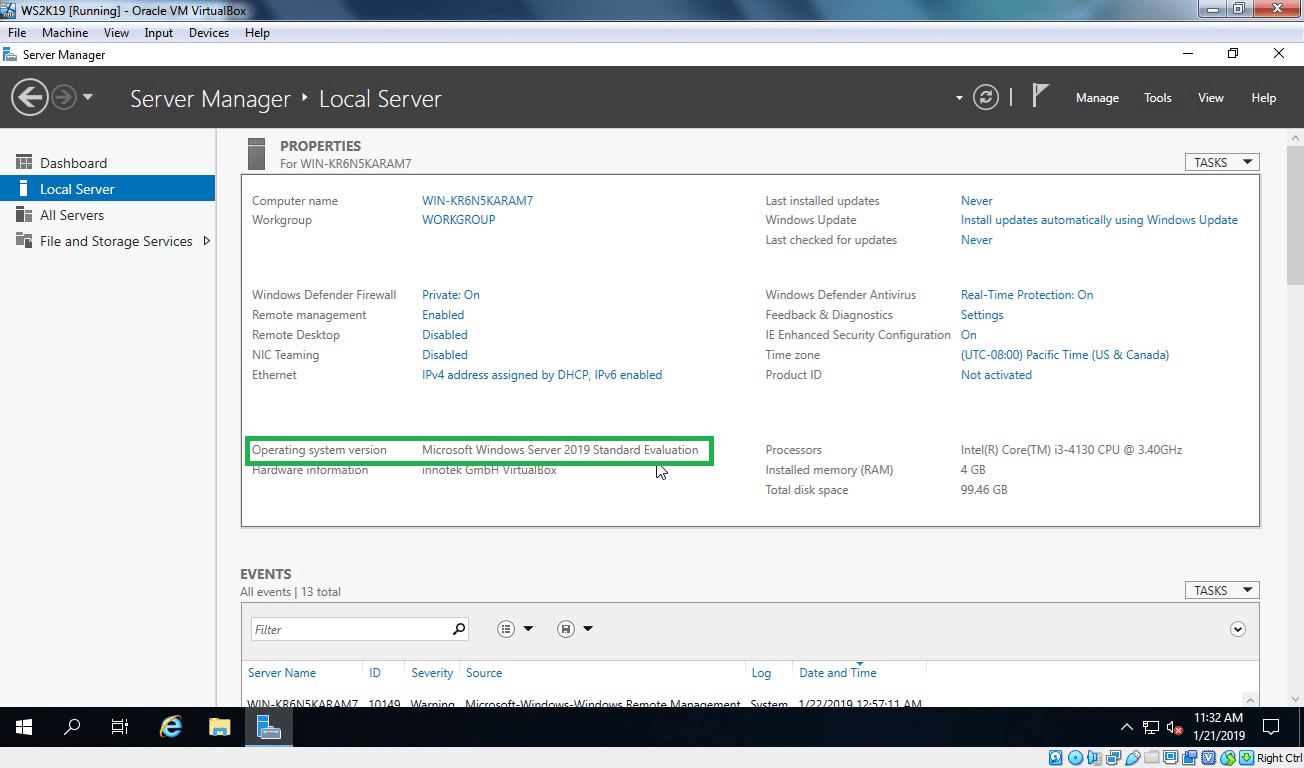
We have successfully installed Windows Server 2019 in Oracle Virtualbox.
Post Views: 7,500
In a previous post, I’ve covered how to build an Ubuntu VM and install SQL Server on it.
In this post I’m going through the steps required for setting up a Windows Server 2019 VM in Oracle VirtualBox on a Windows 10 host.
Prerequisites
- Oracle VirtualBox – I’m currently using version 6.1.40
- Windows Server 2019 evaluation ISO
- Sufficient drive space – In my example I’ll be creating two dynamically allocated virtual disks (C drive – 80GB, D drive – 40GB)
Creating the VM
I’ll start by building a new VM.

I then specify the VM’s name, its folder, OS type and version – Windows Server 2019 64-bit.
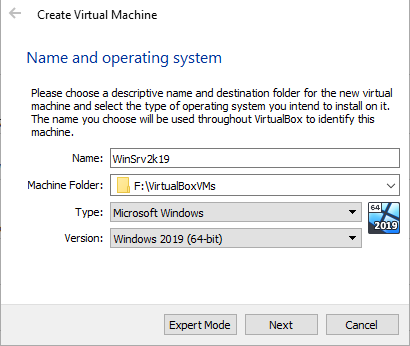
I proceed by allocating 8GB of RAM to the VM.
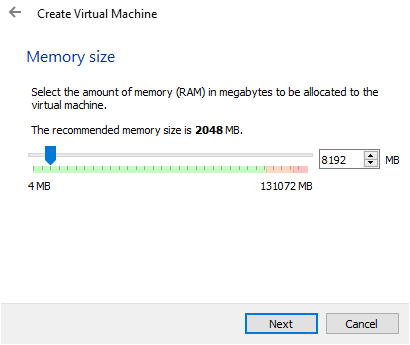
In the next prompt I leave “Create a virtual hard disk now.” and press “Create”. Then leave the hard disk file type as VDI (VirtualBox Disk Image) and press “Next”. And set the storage to “Dynamically allocated” before pressing “Next” again.
I set the size of the virtual disk to 80GB – this will be my C drive.

After the VM is created, I right click on it and go into its settings.

In the “Processor” tab of the “System” section I increase the core count to 4.

Now to add a second virtual disk drive – this will be the 40GB D drive.
I go into the “Storage” section and press the “add hard disk” button.

Then, in the “hard disk creator” menu, I press “Create Disk Image”.

Afterwards I follow the same steps as when creating the initial virtual disk for the VM. I leave VDI as the disk file type, press “Next”, set it to “Dynamically allocated”, set its size to 40GB and then press “Create”.

Once created, I select the new disk and click “Choose” to attach it to the VM.

Now the VM has 2 disk drives and one optical drive.
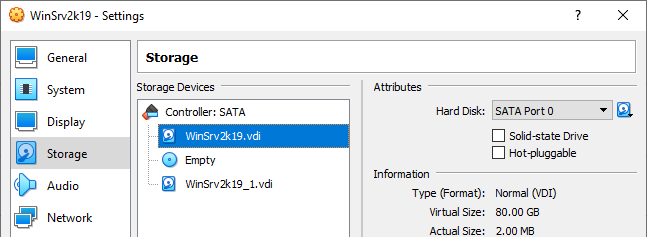
While I’m in the “Storage” section, I also attach the Windows Server 2019 Evaluation ISO by selecting the optical drive, expanding the disk drop-down menu and clicking on “Choose a disk file…”.

This opens up a file explorer window in which I can navigate to where I’ve downloaded the “WinSRV2019_latest_release_svc_refresh_SERVER_EVAL_x64FRE_en-us_1.iso” file so that I can attach it to the VM’s optical drive.

Afterwards, I navigate to the Network section set the network as bridged since I want the VM to be accessible from the rest of the LAN.
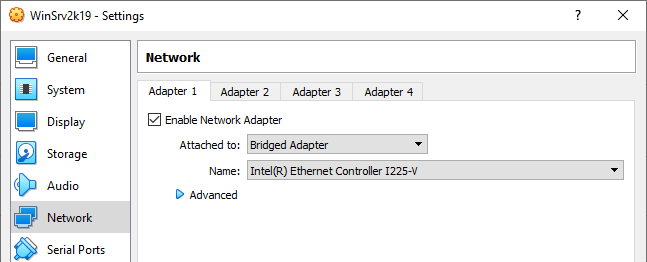
This concludes the configuration part of blank VM.
Installing Windows Server 2019
Time to start up the VM and proceed with the OS installation part.

Once VM boots up I elect the language and regional settings that I want to use.
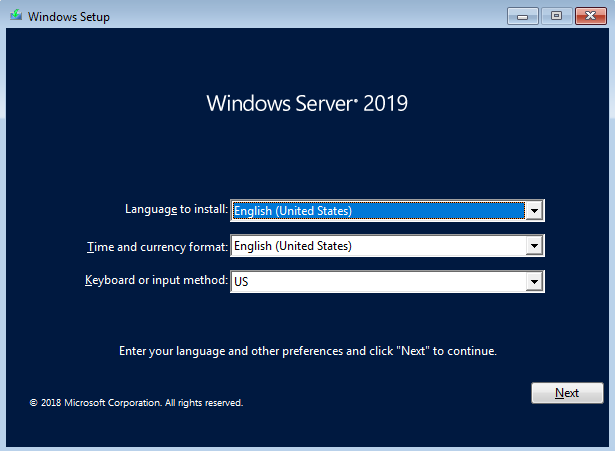
And click “Install now” in the next screen.

I opt to install the Windows Server 2019 Standard Evaluation with desktop experience.

Accept the EULA.
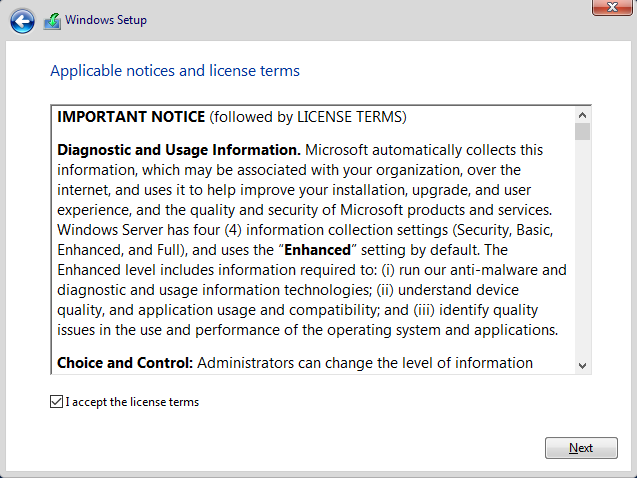
For installation type I click on “Custom”, because there’s really no previous version of the OS to upgrade from.

I then proceed with the partition configuration part.
First, I select the disk that’s going to end up being the system drive, click on “New” and then “Apply” in order to create a new partition.

Click “Ok” on the prompt informing me about the creation of additional system partitions.

Proceed to do the same for the second partition.

Now I can select the partition on which the OS should be installed and click on “Next” to begin the installation.

After the install process finishes, the VM reboots and a prompt to “press any key to boot from CD/DVD” appears, I just wait for the prompt to time-out since I want to boot directly in Windows.
Once the OS boots up, it asks for an admin password to be set up.
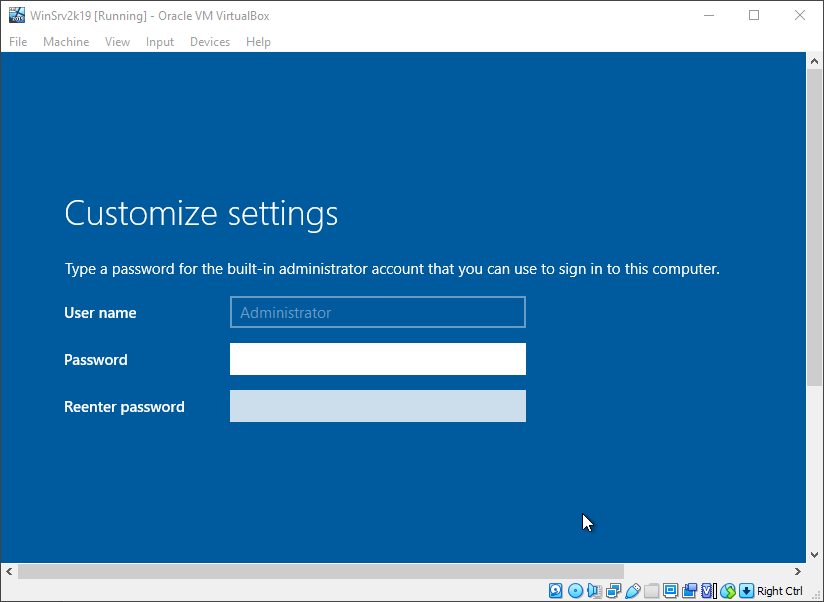
At the logon screen I send the Ctrl+Alt+Delete input to the VM.

And log into Windows. At this point I can eject the installation media and mount the VBoxGuestAdditions disk. If it doesn’t show up in the drop down list, it is located in “C:\Program Files\Oracle\VirtualBox\”.

Once the disk is mounted, I navigate to it in File Explorer and proceed with the installation of the guest additions. I reboot the VM when the install process prompts me.
One last and optional part – after the VM boots up again I run the following commands in admin PowerShell to rename the VM, but also make sure that the current network profile is set to private so that the firewall won’t block me if I try to connect to SQL Server or anything else that I might install later.
|
Rename-Computer WinSrv2k19 get-netconnectionprofile | Select -ExpandProperty name | %{ set-netconnectionprofile -name $_ -networkcategory «private» } |

В этом видео вы научитесь устанавливать операционную систему Windows Server 2019 на VirtualBox.
-
Виктор Черемных -
16 января, 2021 -
No Comments
Добавить комментарий
Группа в VK
Обнаружили опечатку?
Сообщите нам об этом, выделите текст с ошибкой и нажмите Ctrl+Enter, будем очень признательны!
Свежие статьи
Облако меток
Похожие статьи
Мониторинг ресурсов и служб в Windows
В этом видео мы научимся пользоваться программами для мониторинга ресурсов Windows, сведений о системе, а также познакомимся со службами Windows. Монитор ресурсов — инструмент, позволяющий
