Excel for Microsoft 365 Word for Microsoft 365 Outlook for Microsoft 365 PowerPoint for Microsoft 365 Word 2021 Word 2019 Excel 2016 Word 2016 Outlook 2016 PowerPoint 2016 Office 2016 Excel 2013 Word 2013 Outlook 2013 PowerPoint 2013 Office 2013 Excel 2010 Word 2010 Outlook 2010 PowerPoint 2010 Office 2010 Excel 2007 Word 2007 Outlook 2007 PowerPoint 2007 Office 2007 More…Less
Microsoft Office has a feature that lets you send Outlook, Word, Excel, and PowerPoint files as Internet faxes. This feature relies on having the Windows Fax Printer Driver or Fax Services installed on the computer to send the faxes. If the Windows Fax feature is not enabled for your version of Windows, you can enable it.
-
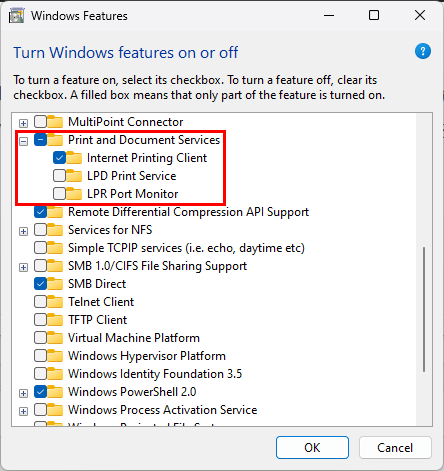
In Control Panel, click Programs, and then click Programs and Features.
Note: In Classic view, double-click Programs and Features.
-
Click Turn Windows features on or off.
-
In the Windows Features dialog box, under Print and Document Services, select the Windows Fax and Scan check box.
-
Click OK.
Need more help?
Want more options?
Explore subscription benefits, browse training courses, learn how to secure your device, and more.
Communities help you ask and answer questions, give feedback, and hear from experts with rich knowledge.
You are here:
Home » Windows 11 » How To Install Windows Fax And Scan In Windows 11
Windows Fax and Scan utility has been part of the Windows operating system for a long time. However, it’s not part of the new Windows 11.
In Windows 11, the Windows Fax and Scan tool has been replaced with the Scan app. Yes, the Scan app is also present in recent versions of Windows 10. In Windows 10, however, both Scan and Windows Fax and Scan are available, unlike in Windows 11.
Most users will not miss the Windows Fax and Scan utility as the new Scan app offers everything available in Windows Fax and Scan tool, considering that the Fax features are no longer needed.
The Scan app is a good one. It even lets you automatically save scanned documents as PDFs. That said, it rarely fails to recognize the connected scanner or shows “Something went wrong” during the scan process.
If you often need to scan documents and pictures and prefer the old Windows Fax and Scan tool over the new Scan app, Windows 11 offers an option to install the Windows Fax and Scan tool. The thing is that Windows Fax and Scan has been made optional feature. In short, it’s not installed out of the box, but you can install it.
This guide shows you how to install Windows Fax and Scan tool in Windows 11.
NOTE: The Windows Fax and Scan tool can coexist with the Scan app. So, no need to remove it. That said, if you do not like it, you can uninstall it by going to Settings > Apps > Installed apps page.
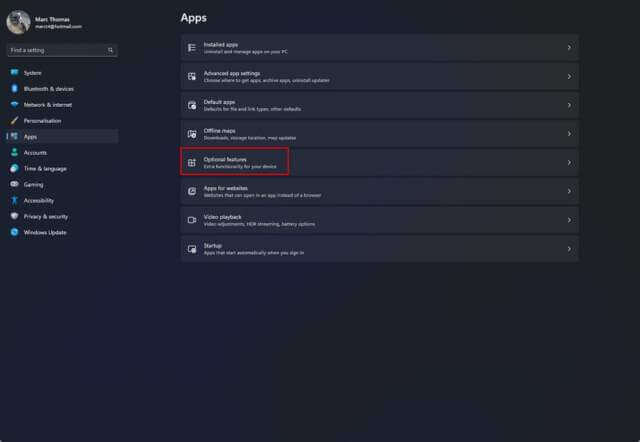
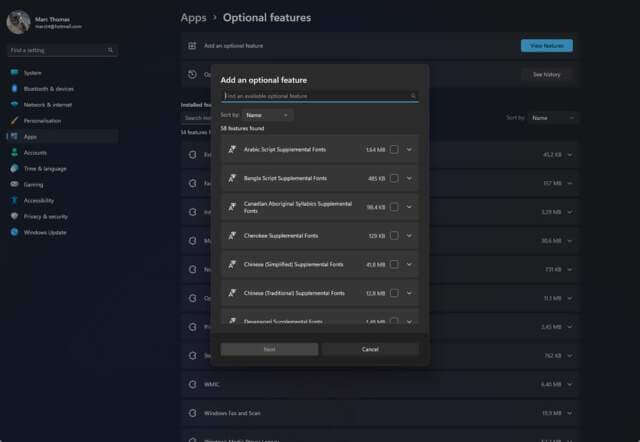
Step 1: Navigate to Windows 11 Settings > Apps > Optional features page.
Step 2: Here, click View features button present next to the Add an optional feature.
Step 3: In the resulting dialog, scroll down the list to see Windows Fax and Scan entry.
Select the check box next to the entry and then click the Next button.
Step 4: Here, click on the Install button to install the Windows Fax and Scan.
On the Settings > Apps > Optional features page, you can see the status of the installation progress. Windows 11 might take a few minutes to complete the installation.
Step 5: Once installed, you can launch Windows Fax and Scan using search.
How to change scan settings in Windows 10/11 guide might also interest you.
Windows Fax And Scan was first introduced in Windows Vista back in 2007 and has been an integral part of Windows ever since… if you can find it. Some may wonder why I’m writing about a program that’s 16 years old, especially since hardly anyone uses Fax anymore, apart from during the pandemic when the beleaguered machines saw a mini-resurgence, but that’s another story. It’s the scanning part of the program that I enjoy using, but in recent versions of Windows 11 it isn’t available by default and you have to go looking for it.
Avoid The Windows Scan App
Clearly, Microsoft wants you to move on and never touch their legacy programs ever again, but they can’t fool me. I recently carried out a clean Windows 11 installation on a machine I use solely for VHS digitalisation, scanning, and other customer-based work, only to find that Windows Fax And Scan (WFS) was not available through traditional routes, no matter how hard I tried. In the end, I was forced to install the quite atrocious Windows Scan from the Microsoft Store until I could find a solution.
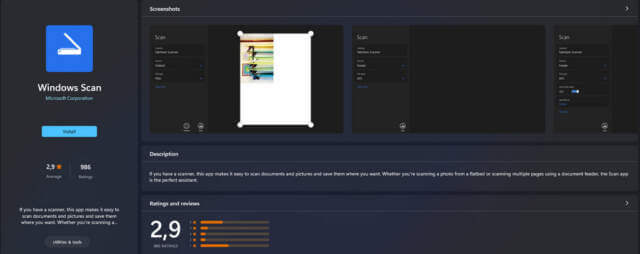
Let’s get one thing clear – a computer program is usually a fully featured, serious piece of software, which is what WFS is, but more on that in a minute. Windows Scan on the other hand is a hideous piece of software masquerading as a scanning program, but in reality, is nothing more than a dumbed-down crap app.

If WFS isn’t available, the normal route would be to look in Windows Optional Features by hitting the Win key + R, then typing optionalfeatures and looking in Print and Document Services, but in recent Windows updates to Windows settings, that has been changed. When installed, WFS.exe would normally be found in the Windows/System32 folder, by the way.
Instead, we need to go to Windows settings, Win + I, select Apps, then Optional Features, and finally, View Features. In the Search bar, you can specify which feature or program you are looking for.
I can’t replicate the WFS installation here because once it’s installed, it doesn’t show up in the list for some reason, but you can be sure that the program is there and will install as it did for me. The reason I enjoy this little program is that it’s simple to use, and has many useful features such as file type to Save as, and cropping of the preview image, among other features. Besides, one gets used to using programs that one feels comfortable with.
In conclusion, if you want to use an excellent scanning program with plenty of features that are sadly lacking in the Store app, this is the way to go.
—
Installing Windows Fax and Scan on Windows 10 is relatively simple and can be accomplished in a few steps. The first step is to make sure that a fax modem is connected to the computer and it is properly setup.
If you are using a USB fax modem, ensure that the device is plugged in and drivers have been installed. After the modem is connected and setup, the next steps are:
1. Click on the Start menu icon and type “Windows Features” in the search box.
2. Select “Turn Windows features on or off” from the list of options.
3. Scroll down the list and check the box next to “Fax Services”.
4. Click OK and wait while the features are installed.
5. When Windows is finished, click on the Start menu icon once more and type “Windows Fax and Scan”.
6. Run the program and follow the on-screen instructions to setup the fax service.
With these steps, your computer should be configured and ready to use Windows Fax and Scan. Have fun with your new fax service!
Yes, Windows 10 does have Windows Fax and Scan. It is a feature included with the Windows 10 Operating System and can be found in the Control Panel under Hardware and Sound. Once you open the program, you can access the support documentation and tutorials to get the most out of your Windows Fax and Scan experience.
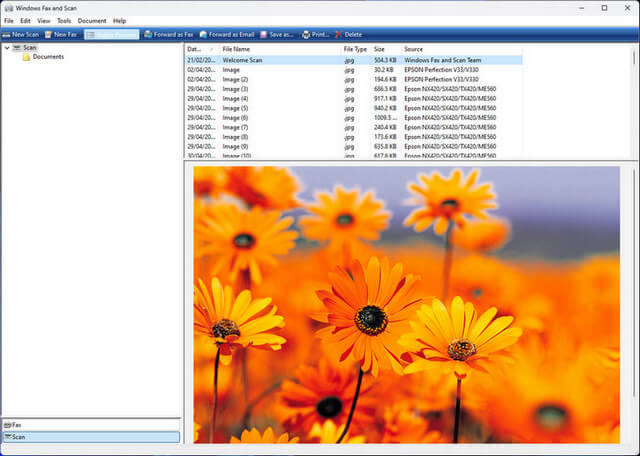
Windows Fax and Scan allows you to send and receive faxes from any computer with an internet connection and a fax modem, including a VoIP modem, and automatically converts incoming faxes into PDF files for easy viewing, printing, and saving.
You can also scan documents and images directly into the Windows Fax and Scan program, where they can be printed, emailed, or saved.
Can’t find Windows Fax and Scan in Windows features?
If you’re unable to find Windows Fax and Scan in your Windows features, there are a few steps you can take resolve this issue. The first step is to make sure that the Windows Fax and Scan feature is enabled in your Windows features.
To do this, open Control Panel, select “Programs”, click on “Turn Windows features on or off”, and check the box next to “Fax Services”. If you don’t see the Windows Fax and Scan feature listed here, then it may not be available on your version of Windows.
If this is the case, you can install third-party software to send and receive faxes. You can search online for fax software that is compatible with your version of Windows and compatible with any hardware device you would like to use for faxing.
Additionally, some printers have built-in faxing abilities, so you may be able to use your printer to send and receive faxes. You can check your printer’s user manual for more information about its faxing capabilities.
Finally, some online fax services allow you to send and receive faxes without any additional hardware or software. You can search online for a list of online fax services that meet your needs and budget.
Regardless of your chosen solution, it’s important to remember that if you’re unable to find Windows Fax and Scan in your Windows features, there are still options available to you.
Is there a free fax app for Windows 10?
Yes, there is a free fax app for Windows 10. The free version of FaxBurner is available for Windows 10 users, and it offers a variety of features that can help you send and receive faxes quickly and easily.
It allows you to send up to 10 pages per fax, and it even offers a free toll-free number so that people can send you faxes without incurring charges. You’ll be able to view and print incoming faxes, and the app also allows you to send documents in a variety of formats so that you don’t have to worry about the file type being incompatible.
FaxBurner is an easy to use app with a helpful and responsive support team, so you can rest assured that your faxing needs are taken care of.
How do I know if I have a fax modem on my computer?
To determine if your computer has a fax modem, you will need to check your system specs and look for an installed modem. If your computer has a modem, you can use it as a fax modem. To confirm that it is a fax modem, you may need to look up the specifications for your modem and make sure that it has a fax capability.
You may also try to find a program or feature that specifically allows you to send and receive faxes. If your computer does not have a modem installed, you may need to purchase one and install it. Once the modem is installed, you will be able to use it for your fax documents.
How do I add a fax printer in Windows 10?
To add a fax printer in Windows 10, you’ll need to first make sure you have a fax modem installed on your computer. This can be done by checking the Device Manager for a Modem section with an actual modem listed.
If you don’t have a modem listed, you can purchase a USB or PCI / PCIe modem from an online or local seller and install it according to the manufacturer’s instructions.
Once your modem is installed and you have it working with an internet connection, you will need to install a fax printer for Windows 10. You can do this either through the Windows 10 Settings menu or by using the Control Panel.
From the Settings menu, click the “Devices” category, then select “Printers & Scanners”. Click “Add Printer”, then select “Fax Printer” from the list of available printers. Enter your fax modem’s information and select the port that it’s connected to.
When the process completes, you should now have a fax printer in Windows 10 ready to use.
If you are using the Control Panel, select “Hardware and Sound”, then “Add a Printer”. Choose the “Add a local printer” option, followed by selecting “Create a new port” and “Fax” from the list. Enter your modem’s information and when the process completes, click “Finish” to create your fax printer.
Once your fax printer is set up and you have verified that it is working, you can use it to send and receive faxes with your Windows 10 PC.
How can I fax from Windows for free?
To fax from Windows for free, you will need an online fax service. And most of them are free to use. With an online fax service, you can send documents as email attachments and receive incoming faxes in your online fax account inbox.
Additionally, some online fax services also provide mobile apps that allow you to send documents from your smartphone.
To get started with faxing from Windows for free, you will need to find an online fax service that you can use. Do your research and compare different services to find one that offers the features you need for free.
Most of the free services have limits on the number of pages you can send, but this may be suitable if you only need to fax from time to time.
Once you have found an online fax service, signing up is usually fast and free. You will need to provide an email address or create one if you do not already have one. After signing up, you will be assigned your own fax number and have the ability to receive and send faxes from Windows for free.
Using an online fax service is easy and convenient. All you need to do is select the file you want to send, attach it to your email and enter the recipient’s fax number. Within minutes, your fax will leave your computer and be sent to the designated destination.
Can I fax for free with Windows 10?
No, you cannot fax for free with Windows 10. Faxing with Windows 10 requires additional software, a fax modem, and access to a telephone line. Additionally, most fax services require a monthly subscription fee.
For those who still need to occasionally use a fax, there are a few options for faxing with Windows 10. One option is to use an online fax service, such as eFax, which allows you to send and receive faxes without needing a fax modem or a physical phone line.
Another option is to use a physical fax machine connected to a Windows 10 machine using a fax modem. This option requires a certain amount of technical know-how, so it is not recommended for those who are unfamiliar with the process.
Ultimately, it is not possible to fax for free using Windows 10. If you need to occasionally send or receive faxes, an online fax service may be the best option.
Can I send a fax from my computer for free?
Yes, you can send faxes from your computer for free. Some require you to sign up for an account and possibly purchase credits, while others offer free plans. The services vary in feature compatibility, such as multiple users and international calling, so it’s important to research and find the one best suited to your needs.
Generally, these services allow you to upload documents from your computer, attach a cover page, and send the fax. It’s also possible to use a scanner or smartphone camera to create a digital copy of the document and send it viafax.
Some services provide call tools with video or audio communication functionality, making it possible to make and receive calls over the internet. In most cases, the recipient will receive a printed hard copy, as well as an email notification.
How do I fax from Windows 10 without a phone line?
If you are looking to fax from Windows 10 without a phone line, you can use an online faxing service. There are a variety of online faxing services available that can help you send faxes from your PC with no phone line required.
These services allow you to send and receive faxes electronically via the internet, therefore eliminating the need for any kind of fax machine or a phone line. To get started, you will need a computer with an internet connection and an online faxing service.
After you’ve set up your account with one of these services, you can easily create a fax, attach your files, enter the recipient’s fax number, and send. The recipient will then receive your document in their fax machine just as they normally would with a paper fax.
For added convenience, many of these services also provide mobile apps so you can send a fax on the go. These features are included with many monthly subscriptions, so you should be able to find an affordable option that fits your faxing needs.
How do I send a fax from my printer to my computer?
In order to send a fax from your printer to your computer, there are several options that you can use.
First, you can use an online fax service such as eFax. This is a convenient and easy-to-use option that requires no additional hardware or software. All you need to do is connect your printer to your computer, and then sign up for an eFax account.
Once your account is set up, you’ll be able to send and receive faxes from your printer.
Second, you can use a dedicated fax machine. This option is more costly and requires the purchase of a fax machine, but you will have the convenience of having a physical document sent directly to your computer.
Once your fax machine is connected to your computer, you can send documents directly from the printer to your computer.
Third, you can use a phone line. This is a more involved option than using an online fax service, because you need to first connect a telephone line to your printer and then connect it to your computer.
Additionally, any documents that you send via this method need to be scanned and emailed to your computer.
Finally, you can use a third-party software. While this takes more time to set up, it may be the best solution if you have a large number of documents to send and receive.
Whichever of these faxing options you choose, you can easily send a fax from your printer to your computer.
Windows fax and scan — это удобный инструмент, предоставляемый операционной системой Windows, который позволяет сканировать и отправлять факсы прямо с вашего компьютера без дополнительного оборудования. Это очень полезное приложение для тех, кто регулярно работает с факсами и хочет сэкономить время и ресурсы.
Установка Windows fax and scan невероятно проста и занимает всего несколько шагов. Ниже описано, как установить это приложение на вашем компьютере.
Шаг 1: Откройте меню Пуск и найдите «Панель управления» в списке программ. Нажмите на него, чтобы открыть панель управления Windows.
Шаг 2: В панели управления найдите раздел «Программы» и щелкните по нему, чтобы открыть список доступных программ.
Шаг 3: В списке программ найдите раздел «Включение или отключение компонентов Windows» и щелкните по нему.
Шаг 4: В открывшемся окне «Компоненты Windows» найдите пункт «Факс и сканер» и поставьте флажок напротив него. Затем нажмите кнопку «OK».
После этих простых шагов Windows fax and scan будет установлен на вашем компьютере и готов к использованию! Теперь вы можете начать сканировать документы и отправлять факсы прямо с вашего компьютера, не прибегая к дополнительным устройствам.
Содержание
- Проверка наличия программы
- Загрузка и установка Windows fax and scan
- Запуск программы после установки
- Настройка параметров соединения
- Добавление принтера и сканера
- Отправка и прием факсов
- Импорт и экспорт контактов
- Решение проблем и обновление программы
- Вопрос-ответ
- Могу ли я отправлять факсы через интернет с помощью Windows fax and scan?
Проверка наличия программы
Перед установкой Windows fax and scan необходимо проверить наличие данной программы на компьютере.
Существует несколько способов проверки наличия программы:
-
Поиск в меню Пуск. Необходимо открыть меню Пуск, ввести «Windows fax and scan» в поле поиска и нажать Enter. Если программа есть на компьютере, она будет отображаться в результате поиска.
-
Проверка в списке программ. Можно открыть список всех программ, установленных на компьютере. Для этого нужно открыть меню Пуск, щелкнуть на пункте «Все программы» или «Программы», и найти в списке Windows fax and scan. Если программа присутствует в списке, значит она уже установлена на компьютер.
-
Поиск в списке установленных обновлений. В операционной системе Windows можно проверить наличие программы в списке установленных обновлений. Для этого нужно открыть «Панель управления», выбрать раздел «Установленные обновления» и пролистать список в поиске Windows fax and scan.
Если программа Windows fax and scan не найдена ни в одном из указанных мест, то она, скорее всего, не установлена на компьютере. В таком случае ее необходимо установить перед использованием.
Загрузка и установка Windows fax and scan
Шаг 1: Первым делом, убедитесь, что у вас установлена операционная система Windows, поддерживающая функцию Windows fax and scan. Она доступна в операционных системах Windows Vista, 7, 8 и 10.
Шаг 2: Откройте меню «Пуск» и найдите пункт «Панель управления». Щелкните на нем, чтобы открыть панель управления вашей операционной системы.
Шаг 3: В панели управления найдите раздел «Программы» или «Программы и компоненты». Щелкните на нем, чтобы открыть список установленных программ и компонентов.
Шаг 4: В списке программ и компонентов найдите раздел «Windows компоненты» или «Включение или отключение компонентов Windows». Щелкните на нем, чтобы открыть список доступных для установки компонентов Windows.
Шаг 5: В появившемся списке компонентов Windows найдите и установите флажок напротив опции «Windows fax and scan».
Шаг 6: После установки флажка напротив опции «Windows fax and scan», нажмите кнопку «OK» или «Применить» для начала процесса установки.
Теперь Windows fax and scan будет установлен на ваш компьютер. Вы сможете найти его в меню «Пуск» либо воспользоваться поиском для быстрого доступа. Установка процесса Windows fax and scan займет некоторое время, так что будьте терпеливы.
Запуск программы после установки
После успешной установки Windows fax and scan на ваш компьютер, вы можете приступить к запуску программы. Для этого выполните следующие действия:
- Перейдите в меню «Пуск» и выберите программу «Windows fax and scan».
- Если вы не нашли программу в списке, выполните поиск по ее названию в поле поиска «Пуск».
- После открытия программы вы увидите основное окно «Windows fax and scan».
Основное окно программы предоставляет вам доступ к различным функциям и инструментам, необходимым для работы с факсами и сканерами. В левой части окна вы найдете панель навигации, которая содержит разделы «Факс», «Сканер» и «Контакты».
Для использования функций программы «Windows fax and scan», вы можете выбрать один из разделов панели навигации. Например, если вам необходимо отправить факс, выберите раздел «Факс» и следуйте инструкциям на экране.
Также в основном окне программы вы можете добавить и управлять контактами для более удобной работы с факсами и сканерами.
Итак, после установки Windows fax and scan, вам доступны все его функции и инструменты. Вы можете использовать их в зависимости от ваших потребностей и задач, связанных с работой с факсами и сканерами.
Настройка параметров соединения
После установки программы Windows Fax and Scan необходимо настроить параметры соединения для использования факс-сервиса на компьютере. Это позволит вам отправлять и принимать факсы с помощью программы.
Для начала откройте программу Windows Fax and Scan и выберите в меню пункт «Инструменты» -> «Настройка факса». В появившемся окне выберите «Создать новое подключение к факс-модему» и нажмите «Далее».
На следующем шаге выберите тип факс-модема, который у вас установлен на компьютере, например, внутренний или внешний. Если вы не знаете, какой тип модема у вас, обратитесь к документации к компьютеру или модему.
Затем выберите порт, к которому подключен факс-модем. Обычно это COM-порт или USB-порт. Если у вас несколько доступных портов, выберите тот, к которому подключен ваш факс-модем.
После выбора типа модема и порта, введите имя и номер факса. Эти данные будут использоваться при отправке факсов. Если нет конкретных требований, введите ваше имя в поле «От кого» и ваш номер телефона в поле «Мой номер».
После ввода всех необходимых данных нажмите «Готово», чтобы завершить настройку параметров соединения. Теперь вы можете использовать программу Windows Fax and Scan для отправки и приема факсов на своем компьютере.
Добавление принтера и сканера
Для использования функции факса и сканирования в операционной системе Windows вам необходимо сначала подключить принтер или сканер к компьютеру. Вот несколько шагов, которые помогут вам добавить устройство в систему и начать использовать его:
- Подключите устройство к компьютеру. Проверьте, что принтер или сканер подключен к компьютеру правильно с помощью кабеля USB или другой подходящей технологии подключения.
- Откройте раздел «Устройства и принтеры». Нажмите на кнопку «Пуск» в левом нижнем углу экрана, затем выберите пункт «Панель управления». В окне «Панель управления» найдите и выберите раздел «Устройства и принтеры».
- Добавьте новое устройство. В разделе «Устройства и принтеры» нажмите на кнопку «Добавить принтер» или «Добавить сканер».
- Выберите ваше устройство. В появившемся окне выберите ваше устройство из списка предоставленных вариантов. Если вашего устройства нет в списке, убедитесь, что оно правильно подключено и работает, а затем попробуйте нажать на кнопку «Обновить» или выполните другие инструкции, предложенные системой.
- Завершите установку. Следуйте инструкциям на экране, чтобы завершить установку устройства. Обычно это включает в себя соглашение с лицензией, указание имени устройства и другие настройки.
После завершения этих шагов ваше устройство будет добавлено в систему и будет готово к использованию с функцией факса и сканирования в операционной системе Windows.
Отправка и прием факсов
Факсимильная связь (факс) – это технология, которая позволяет отправлять и получать документы на дальние расстояния с помощью телефонной сети. Функцию отправки и приема факсов можно использовать на компьютере с установленной программой Windows Fax and Scan.
Отправка факса. Чтобы отправить факс с помощью Windows Fax and Scan, необходимо:
- Подключить компьютер к телефонной линии или модему.
- Открыть программу Windows Fax and Scan.
- Щелкнуть по кнопке «Отправить факс» на панели инструментов.
- Выбрать контакт из адресной книги или ввести номер получателя вручную.
- Прикрепить необходимые документы к факсу.
- Нажать на кнопку «Отправить».
Прием факса. Чтобы принять факс с помощью Windows Fax and Scan, необходимо:
- Убедиться, что компьютер подключен к телефонной линии или модему.
- Открыть программу Windows Fax and Scan.
- Щелкнуть по кнопке «Прием факса» на панели инструментов.
- Подождать, пока программа просканирует линию на наличие входящих факсов.
- Выбрать факс, который нужно принять, и нажать на кнопку «Принять».
Примечание: Для отправки и приема факсов с помощью Windows Fax and Scan необходимо иметь модем или подключение к телефонной линии. Дополнительно, могут потребоваться настройки правильных параметров модема или подключения. Пожалуйста, обратитесь к документации или оператору связи для получения более подробной информации.
Импорт и экспорт контактов
В Windows fax and scan есть возможность импорта и экспорта контактов, что позволяет удобно управлять своим списком контактов и передавать его на другие компьютеры.
Для импорта контактов в программу Windows fax and scan необходимо выполнить следующие шаги:
- Откройте программу Windows fax and scan.
- Выберите раздел «Контакты» на панели навигации.
- Выберите вкладку «Импорт» в верхней части окна.
- Выберите формат файла, из которого вы хотите импортировать контакты.
- Укажите путь к файлу и нажмите кнопку «Импортировать».
После этих действий контакты из выбранного файла будут импортированы в программу Windows fax and scan и станут доступными для использования.
Для экспорта контактов из программы Windows fax and scan необходимо выполнить следующие шаги:
- Откройте программу Windows fax and scan.
- Выберите раздел «Контакты» на панели навигации.
- Выберите контакты, которые вы хотите экспортировать.
- Выберите вкладку «Экспорт» в верхней части окна.
- Выберите формат файла, в который вы хотите экспортировать контакты.
- Укажите путь к файлу и нажмите кнопку «Экспортировать».
После выполнения этих действий выбранные контакты будут экспортированы в указанный файл и будут доступны для использования на других устройствах или программных платформах.
Решение проблем и обновление программы
Для того чтобы установить Windows fax and scan на компьютер, необходимо удостовериться, что операционная система соответствует требованиям программы. Проверьте, что у вас установлена подходящая версия Windows, а также наличие необходимых для работы компонентов.
Если у вас возникают проблемы с установкой или работой программы, рекомендуется проверить наличие обновлений операционной системы. Возможно, разработчики выпустили исправления, которые могут исправить сбои или ошибки программы.
Если обновления не решают проблемы, рекомендуется обратиться в службу поддержки или форум пользователям. Возможно, другие пользователи столкнулись с аналогичными проблемами и уже нашли решение. Также, необходимо проверить официальный сайт программы на наличие обновлений или руководств по устранению неполадок.
Если после обновления и поиска решений проблемы продолжаются, возможно, вам потребуется переустановить программу с нуля. Для этого необходимо удалить текущую версию программы с компьютера и затем установить ее заново. Перед удалением рекомендуется сделать резервную копию данных, чтобы не потерять важные документы или настройки.
Если переустановка не помогает, можно попробовать использовать альтернативные программы для работы с факсами и сканерами. В интернете существует множество других программ, которые могут заменить Windows fax and scan и выполнять аналогичные функции. Перед установкой новой программы рекомендуется ознакомиться с ее функциональностью и требованиями к системе, чтобы избежать возможных проблем или несовместимости.
Вопрос-ответ
Могу ли я отправлять факсы через интернет с помощью Windows fax and scan?
Нет, Windows fax and scan не предоставляет возможности отправлять факсы через интернет. Это приложение предназначено только для отправки и получения факсов посредством подключения к модему или аналоговой телефонной линии.