This article will examine how to set up and configure Windows 2000 Professional on a new virtual machine using Oracle VM VirtualBox 7.0 on the Windows 11 or 10 operating system.
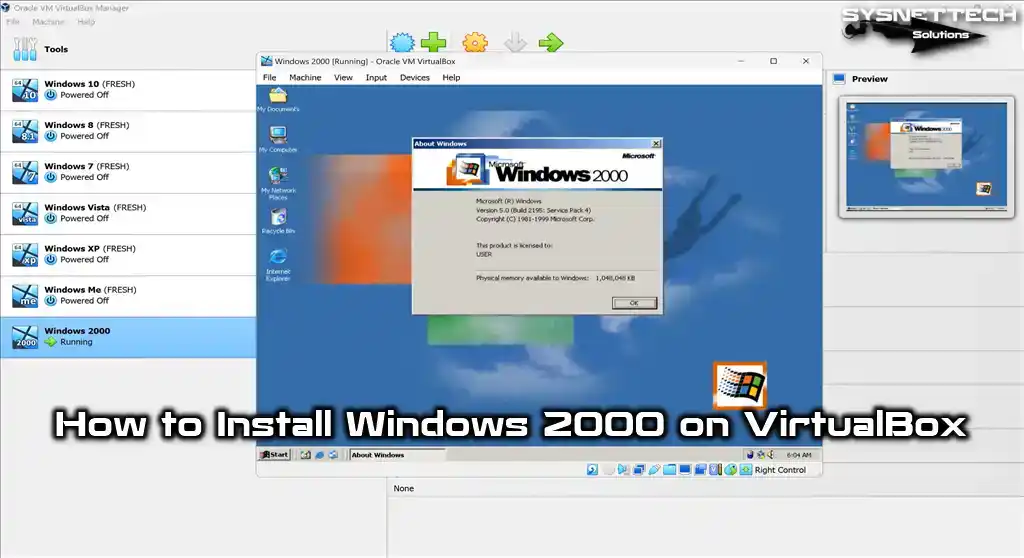
How to Set Up Windows 2000 on Windows 11 / 10 using Oracle VM VirtualBox 7.0
Windows 2000 was unveiled by Microsoft on February 17, 2000, initially named Windows NT 5.0, but it is now more commonly recognized as Win2K.
The Windows 200 system, where file encryption, NTFS file system, and file compression features were improved, was primarily successful in corporate companies. Although it provides many new improvements compared to previous Windows versions regarding system security, it could have been a better system for home users due to system crashes.
The direct support of the Windows 2000 operating system, which works very well on the server computers of the companies, was terminated on June 30, 2005, and its extended support was closed on July 13, 2010.
Windows 2000 is a version that was not released as an update to Windows 98 or Windows 98 SE and included four different versions;
- Windows 2000 Professional
- Windows 2000 Server
- Windows 2000 Advanced Server
- Windows 2000 Datacenter
Windows 2000 Professional Edition was developed for desktop and laptop computers for personal use. However, nowadays, there is no point in installing this operating system on your physical computer because a platform without support can always get you in trouble.
If you desire to utilize Windows 2000, you can install a virtual device using virtualization programs like VirtualBox or VMware.
How to Create a New Virtual Machine for Windows 2000 OS
After successfully installing VirtualBox on your host computer, launch the virtual machine wizard to prepare the Windows 2000 operating system on your new VM.
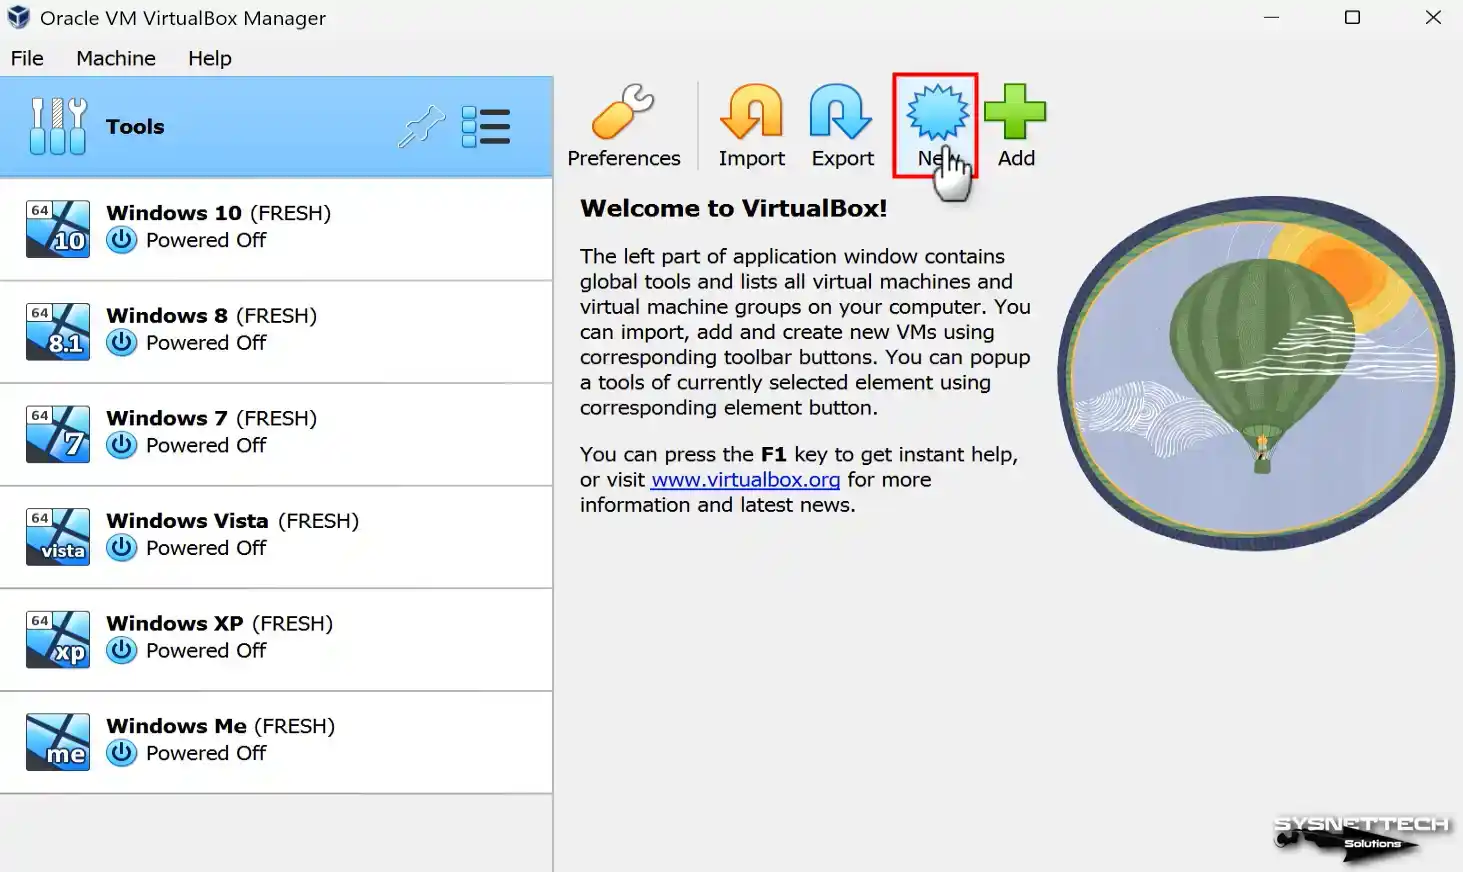
Step 1
After running Oracle VM VirtualBox, open the virtual machine creation wizard by clicking the Machine / New option from the tool menu or the blue New icon.
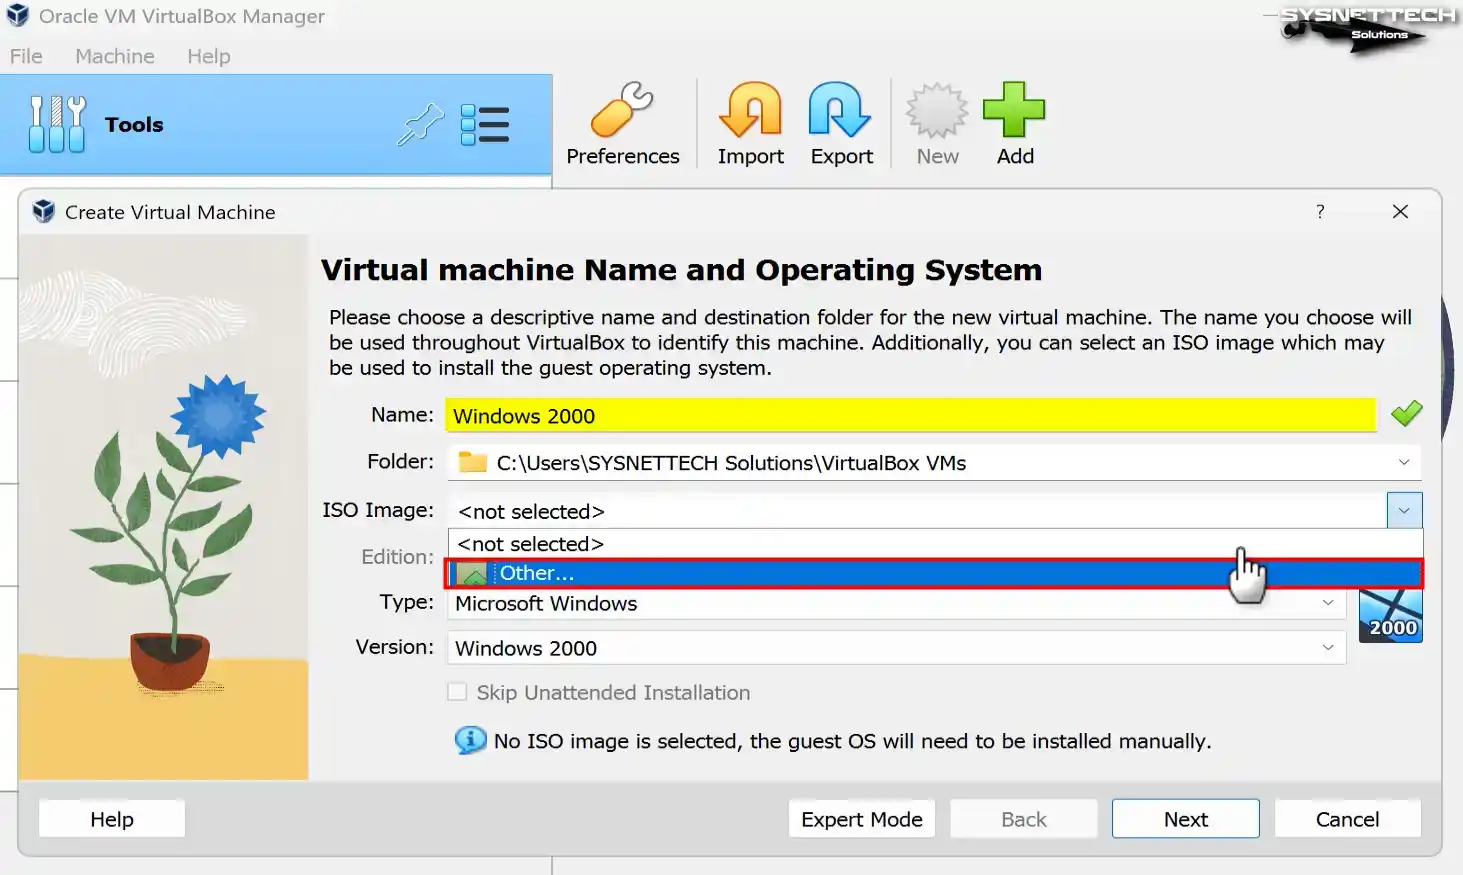
Step 2
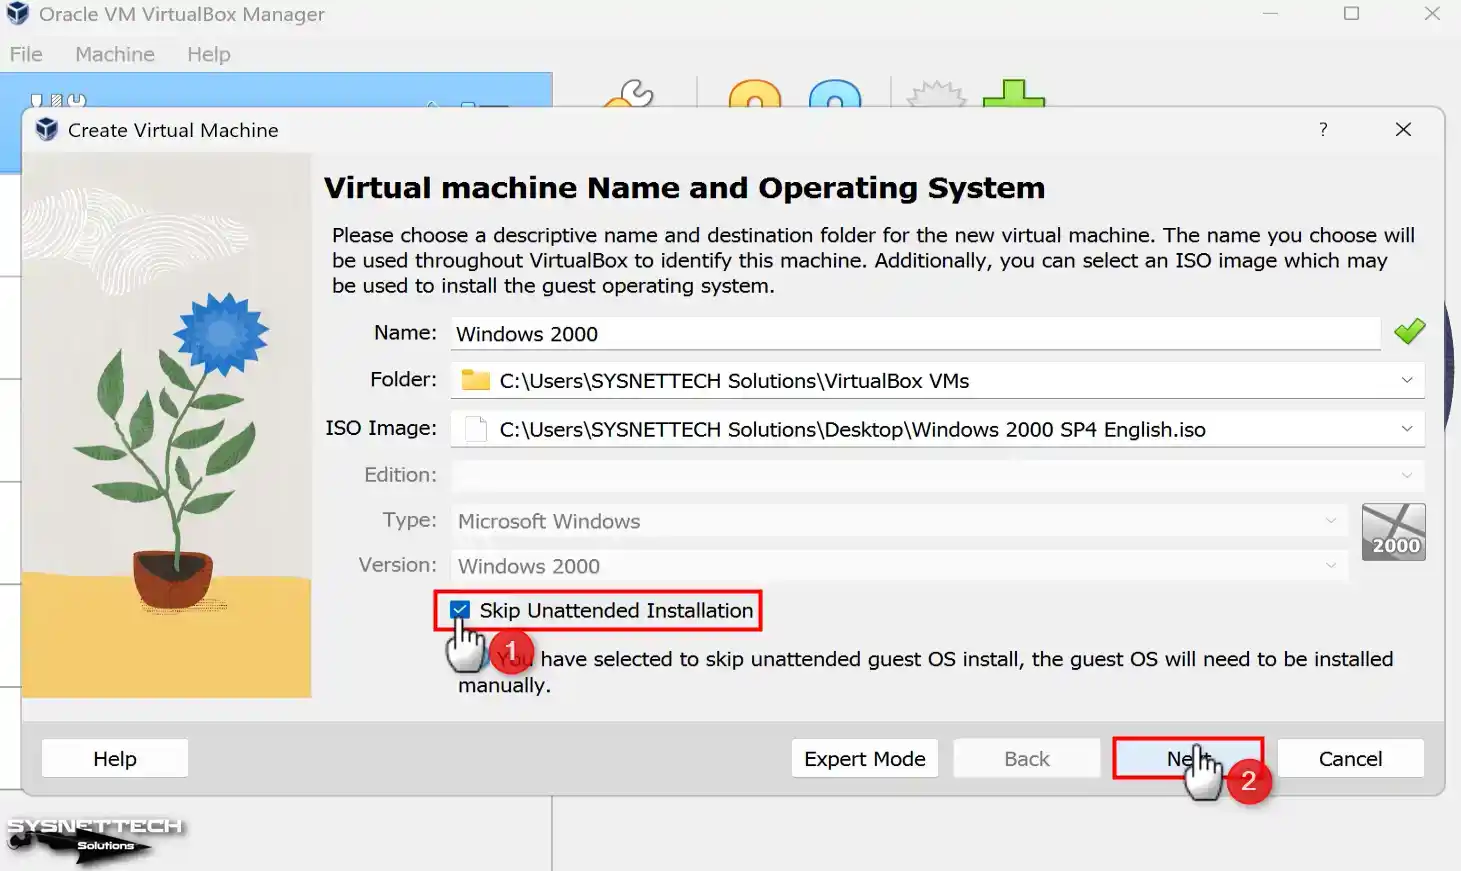
Kindly provide a title for the operating system you intend to install. After that, select the required edition from the “Version” area and proceed by clicking the “Next” button. Also, configure the location of the virtual system you will install from the Folder section to the host disk or an external HDD or SSD.
Select Other from the ISO Image section to add the Windows 2000 ISO file to the guest operating system you have prepared.
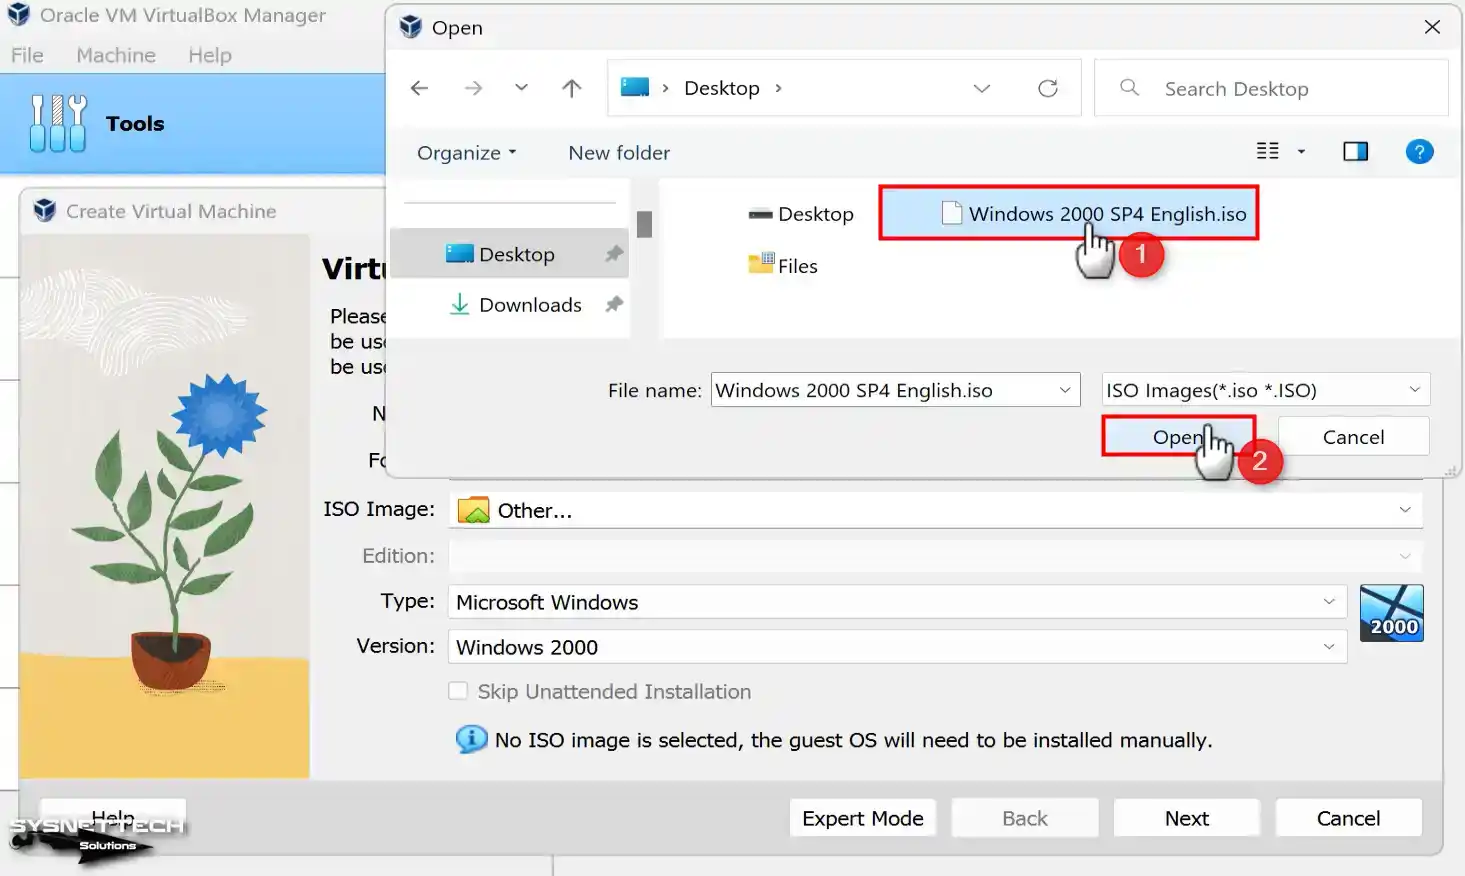
Step 3
From the table below the article, select the Windows 2000 image file you downloaded to your computer and open it.
Step 4
The Windows 2000 system will be determined when you add the image file. However, check Skip Unattended Installation to continue with manual system installation and click Next.
Step 5
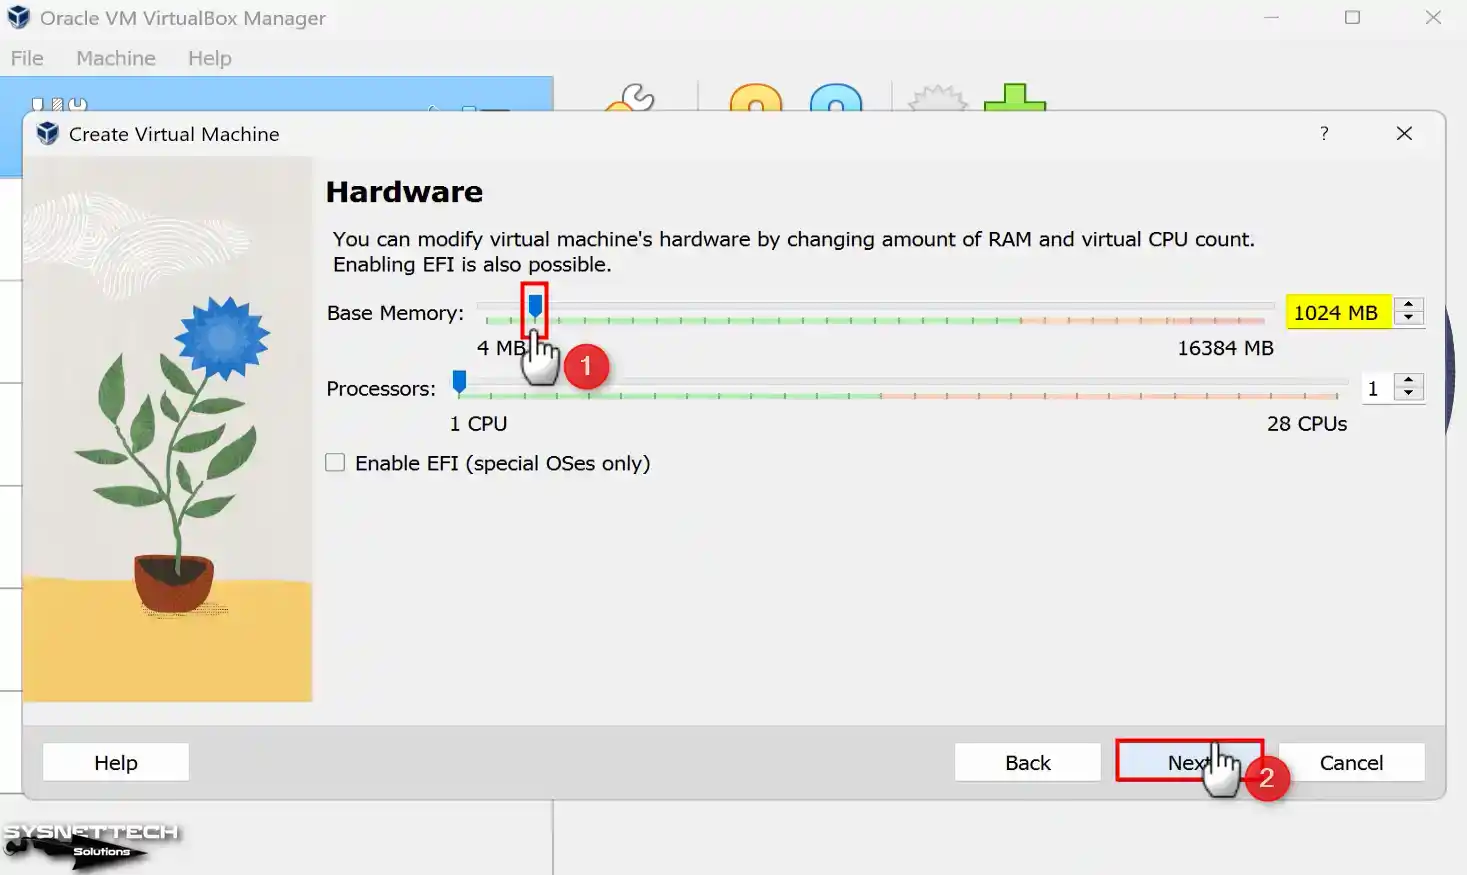
In the Memory Size window, configure the RAM size of 1 GB (1024 MB) for the Windows 2000 VM and click Next. You can enhance the performance of your guest system by increasing the number of virtual processors in this window.
Step 6
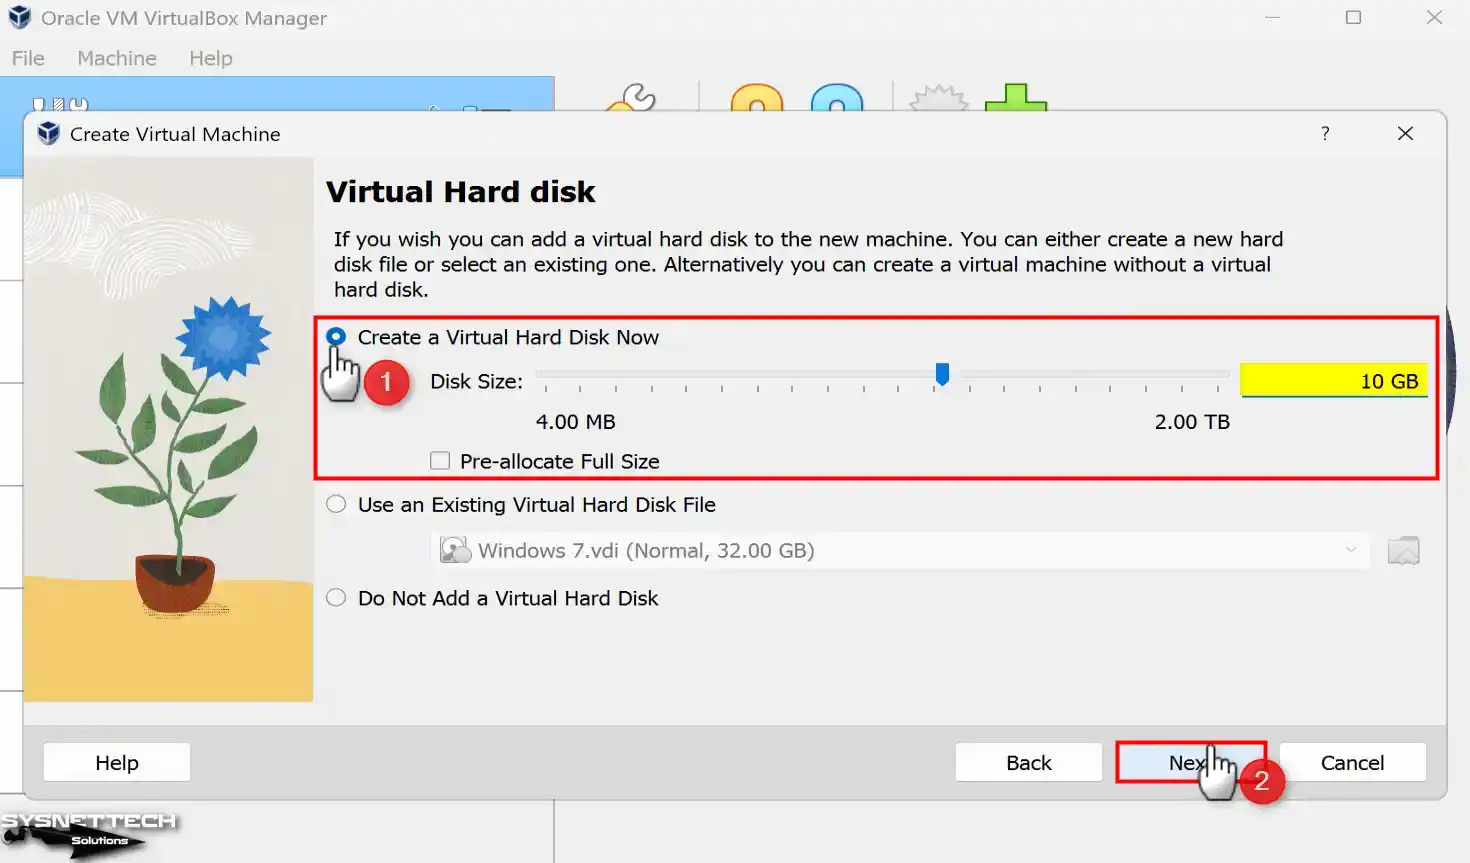
To create a new virtual disk for a clean Win2K installation, select Create a virtual hard disk now and click the Create button after configuring the disk size. If you have previously installed a Win2000 VM, you can add the virtual disk from this window.
In the 6.x versions of VirtualBox, select VDI (VirtualBox Disk Image) as the virtual hard disk file type during disk configuration. Configuring the virtual disk to Fixed Size improves virtual machine performance on computers with old hardware. However, since Fixed Size will reduce the capacity of the host disk, you can select the Dynamically Allocated option to allocate disk space from your host’s disk only as much as necessary.
Step 7
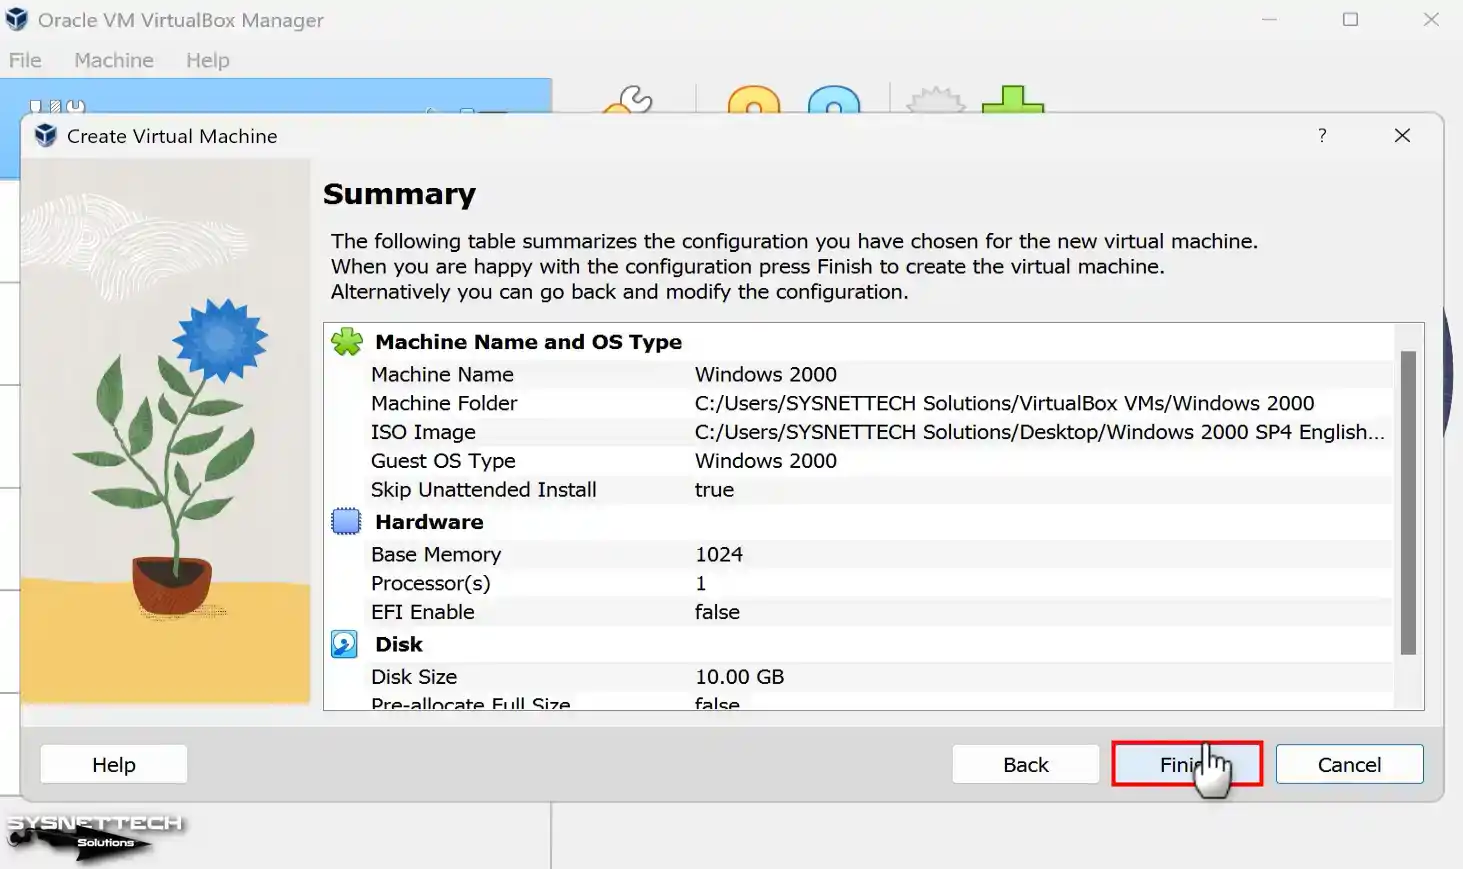
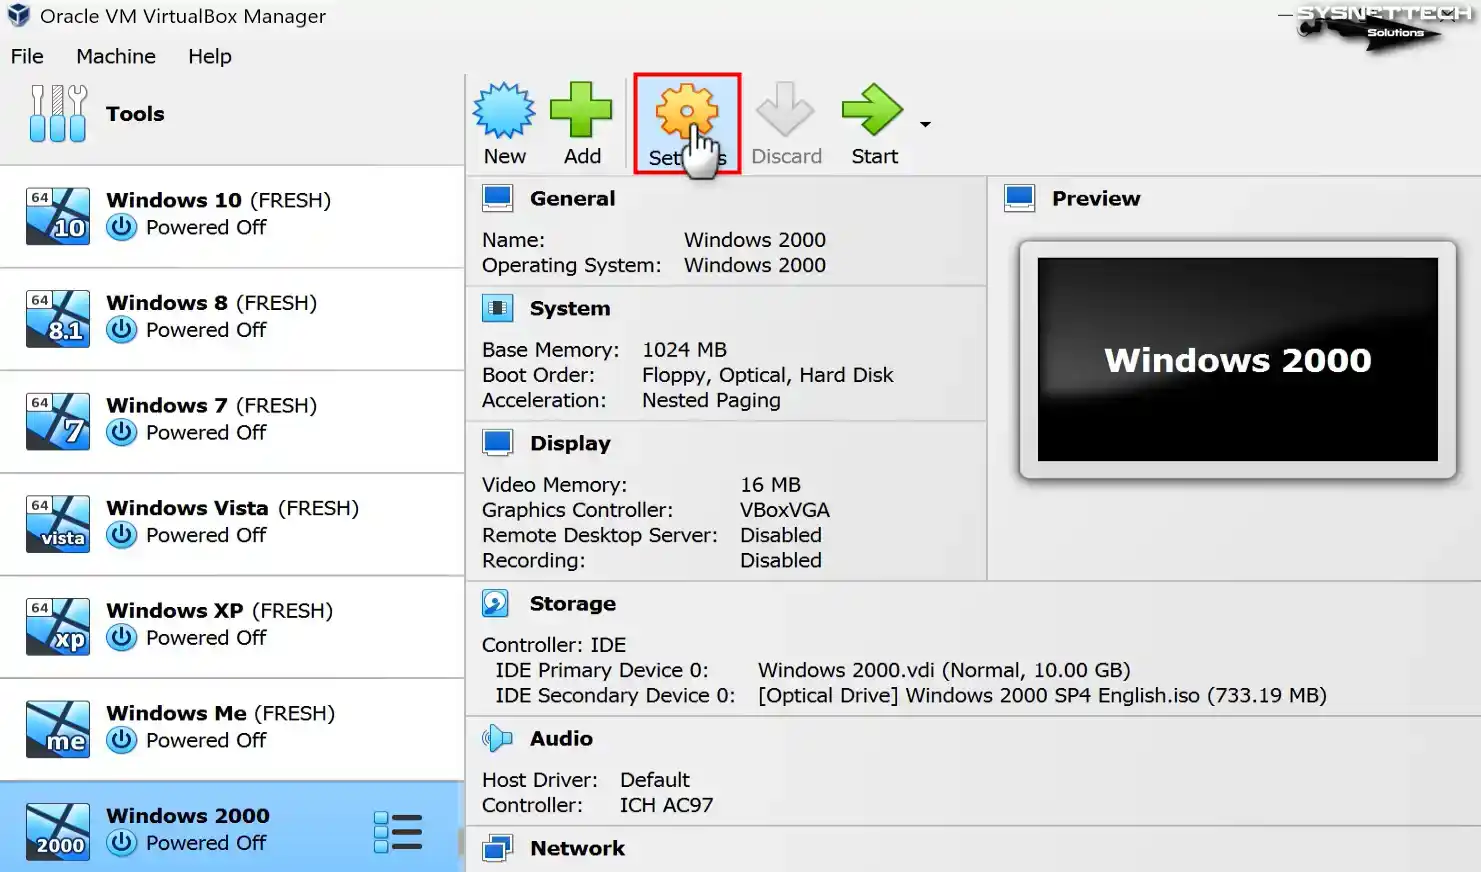
After checking the hardware summary of the Windows 2000 virtual system, click Finish to close the window.
Step 8
Click Settings to better adjust the settings of the virtual machine.
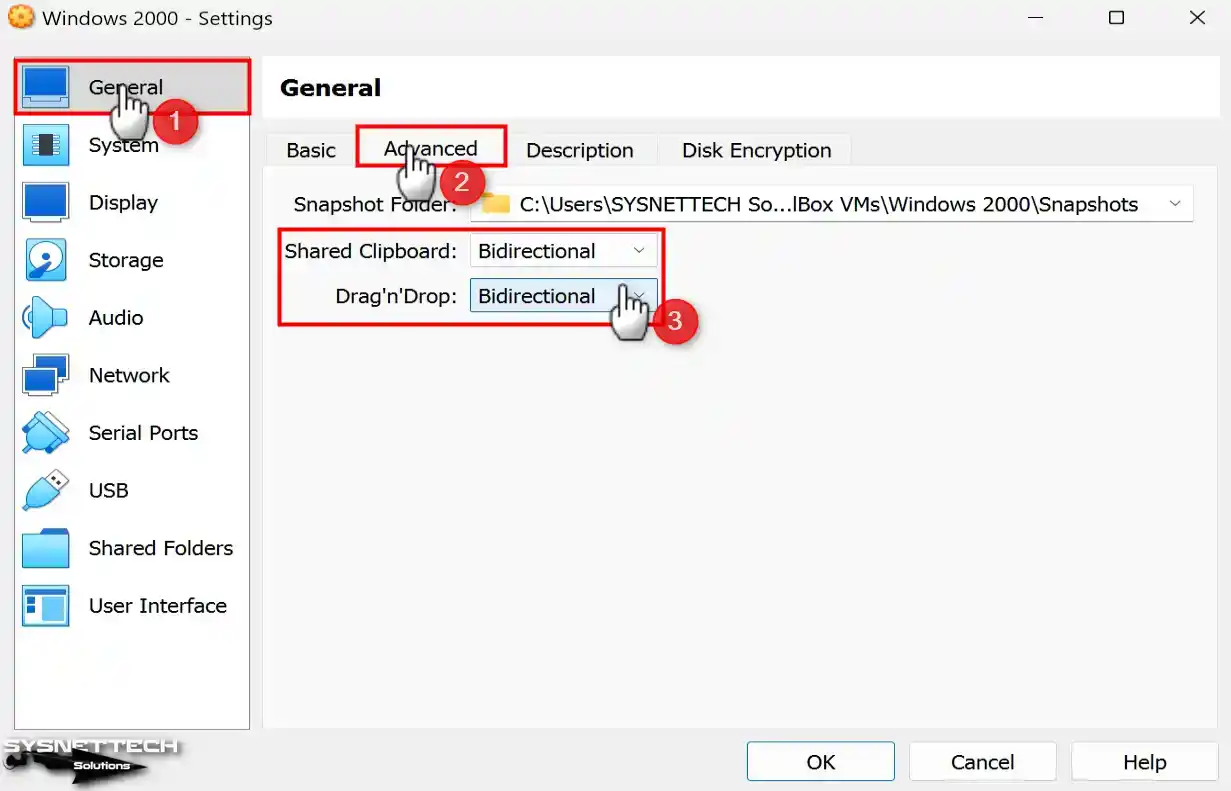
Step 9
In the General / Advanced tab, configure the file transfer and text copying features as Bidirectional between the virtual machine and the host PC by drag-drop or copy-paste method.
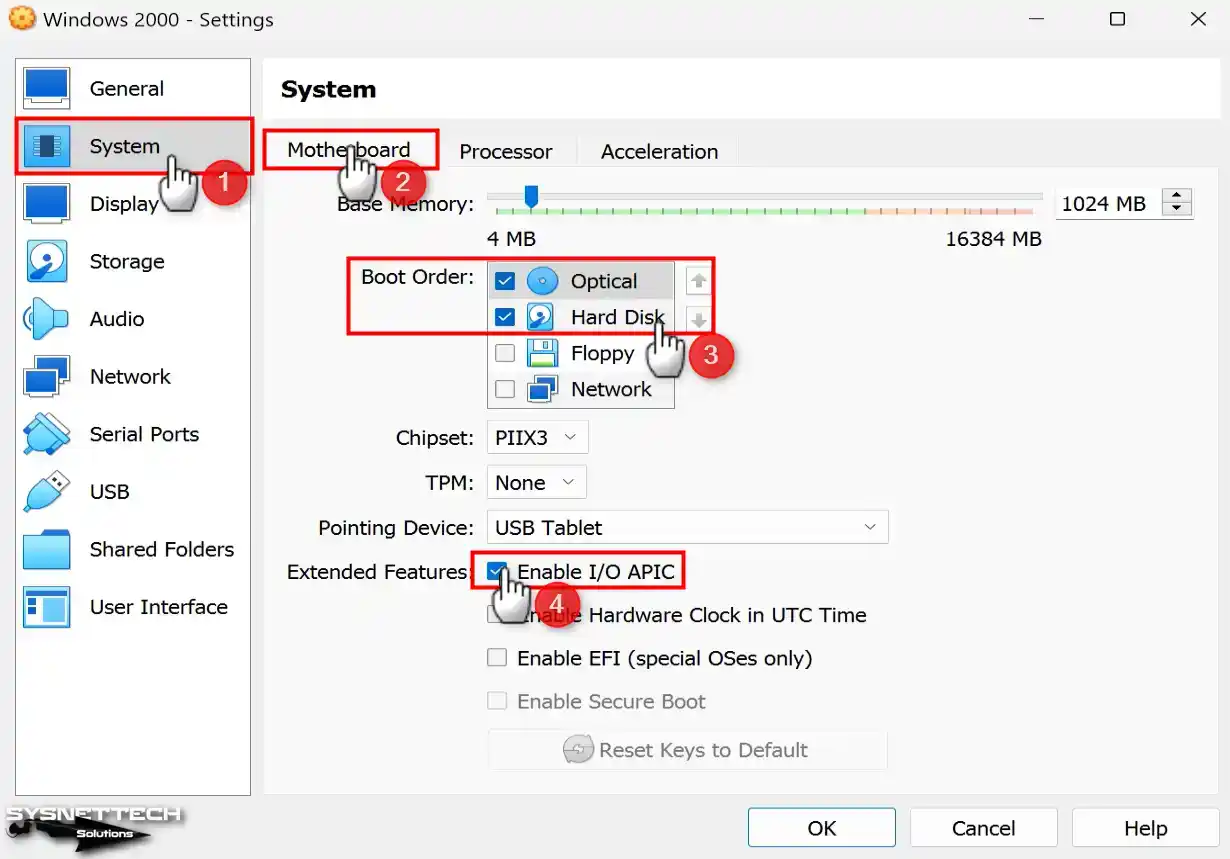
Step 10
On the System / Motherboard tab, configure the Optical device as the first row in the Boot Order section and disable Floppy.
Also, if you will use more than one virtual processor on a Windows 2000 VM, check the Enable I/O APIC option in the Extended Features section.
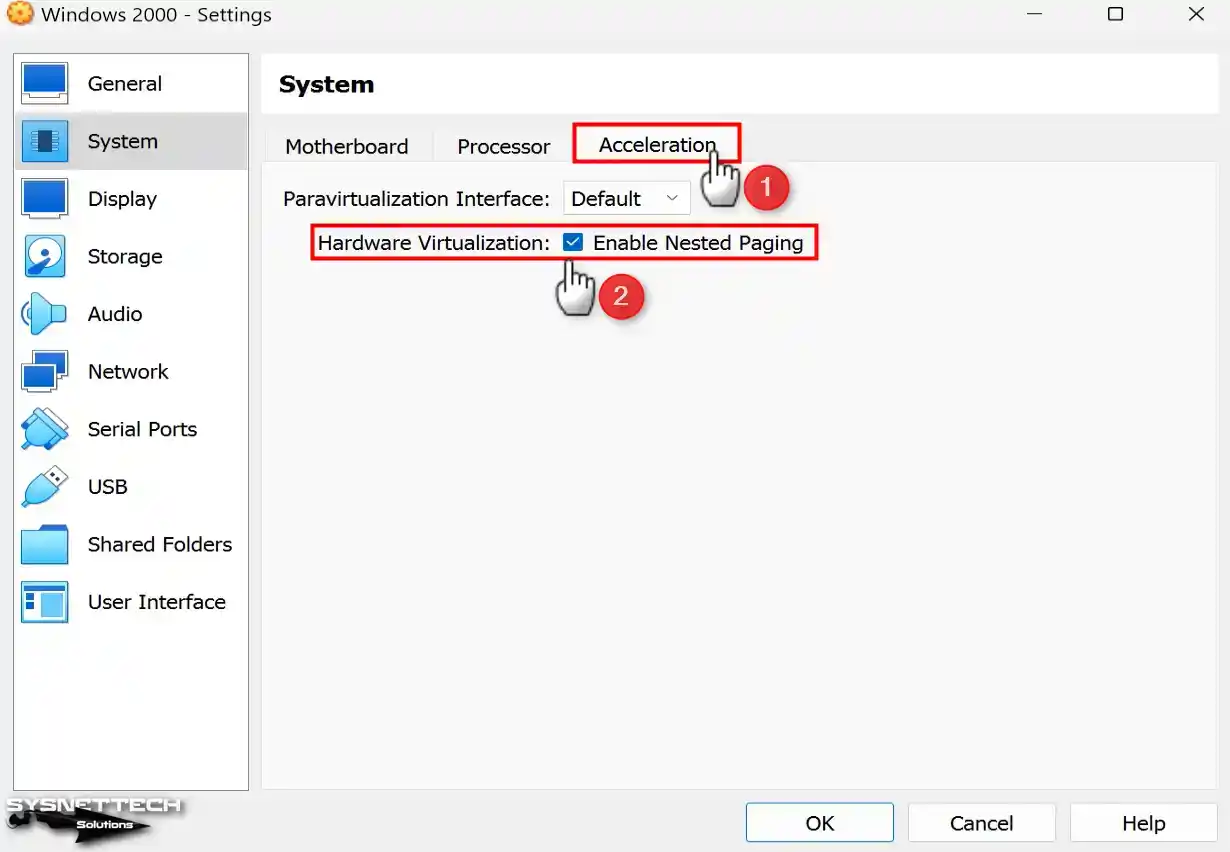
Step 11
Enable Nested Paging in the Acceleration tab for better memory management between the host and VM.
Step 12
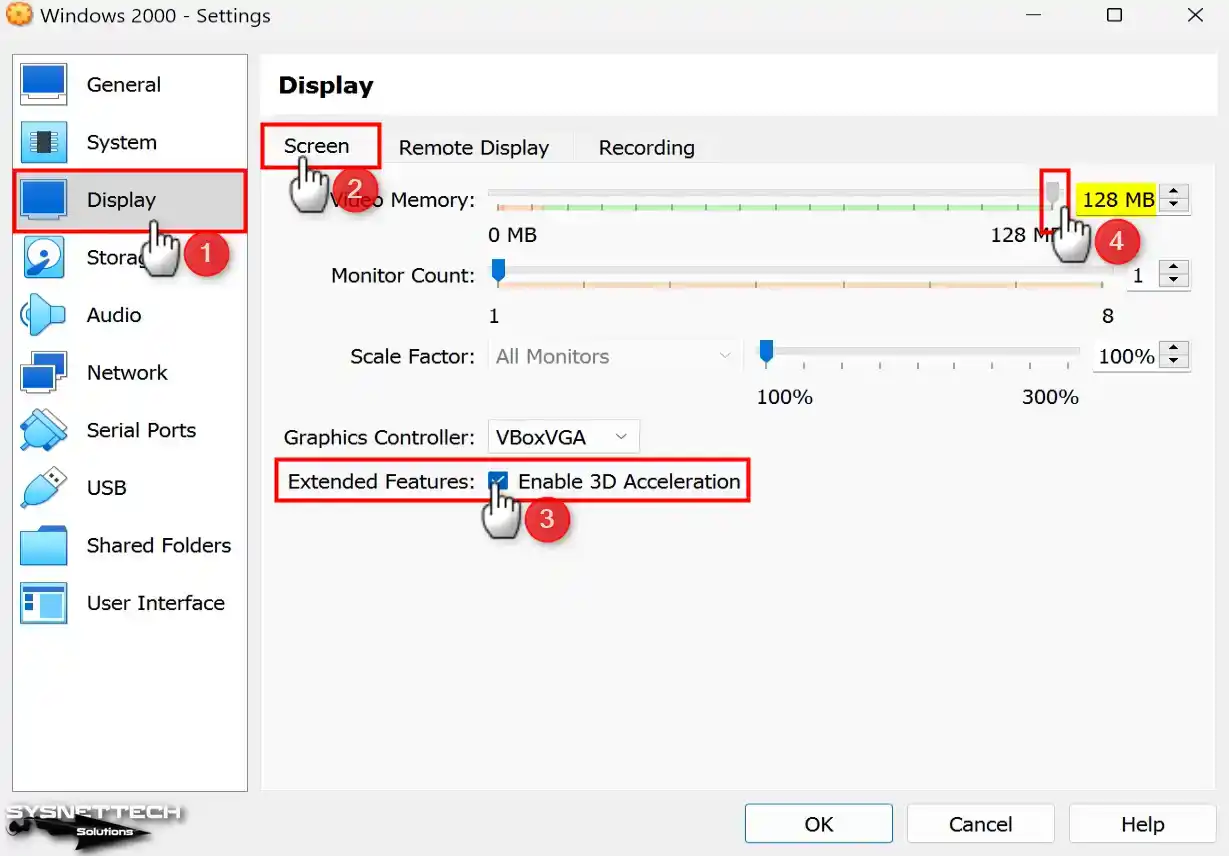
For better graphics rendering in the virtual machine, enable the 3D Acceleration option and configure the Video Memory value to 128 MB.
Step 13
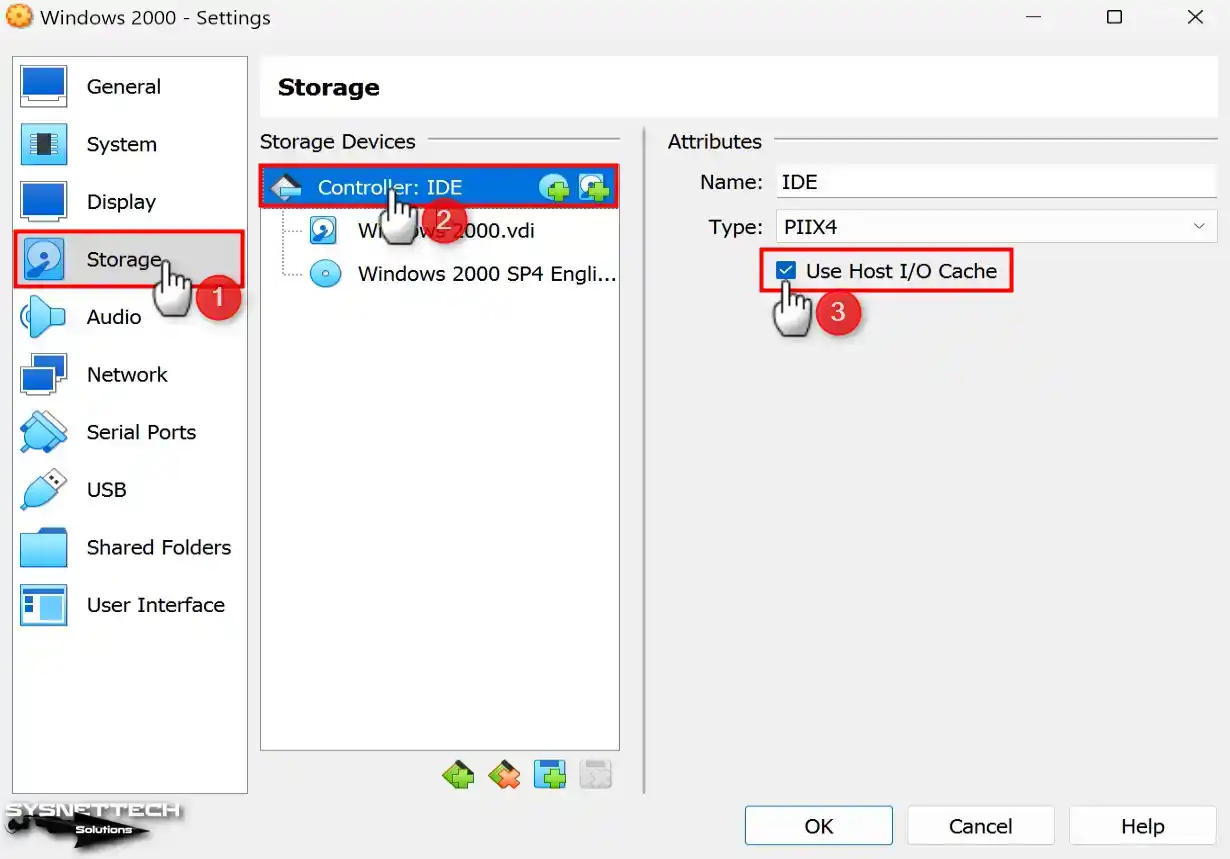
Check that the Host I/O Cache feature is enabled for the IDE controller in the Storage settings.
Step 14
Configure the Windows2000.vdi virtual disk file type as SSD (Solid-State Drive).

Step 15
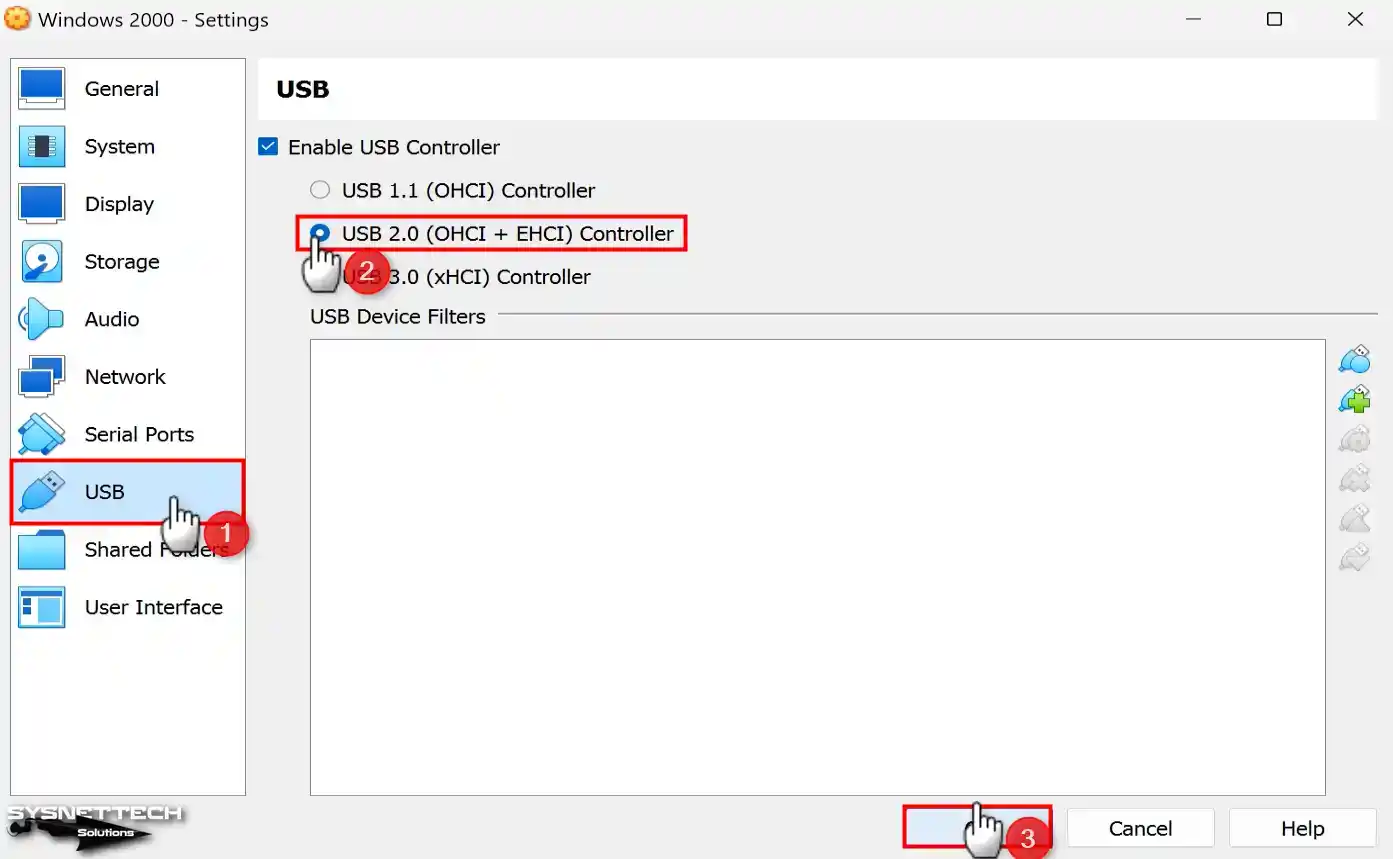
Select the USB 2.0 (OHCI + EHCI) Controller to connect your USB devices to your virtual system.
Step 16
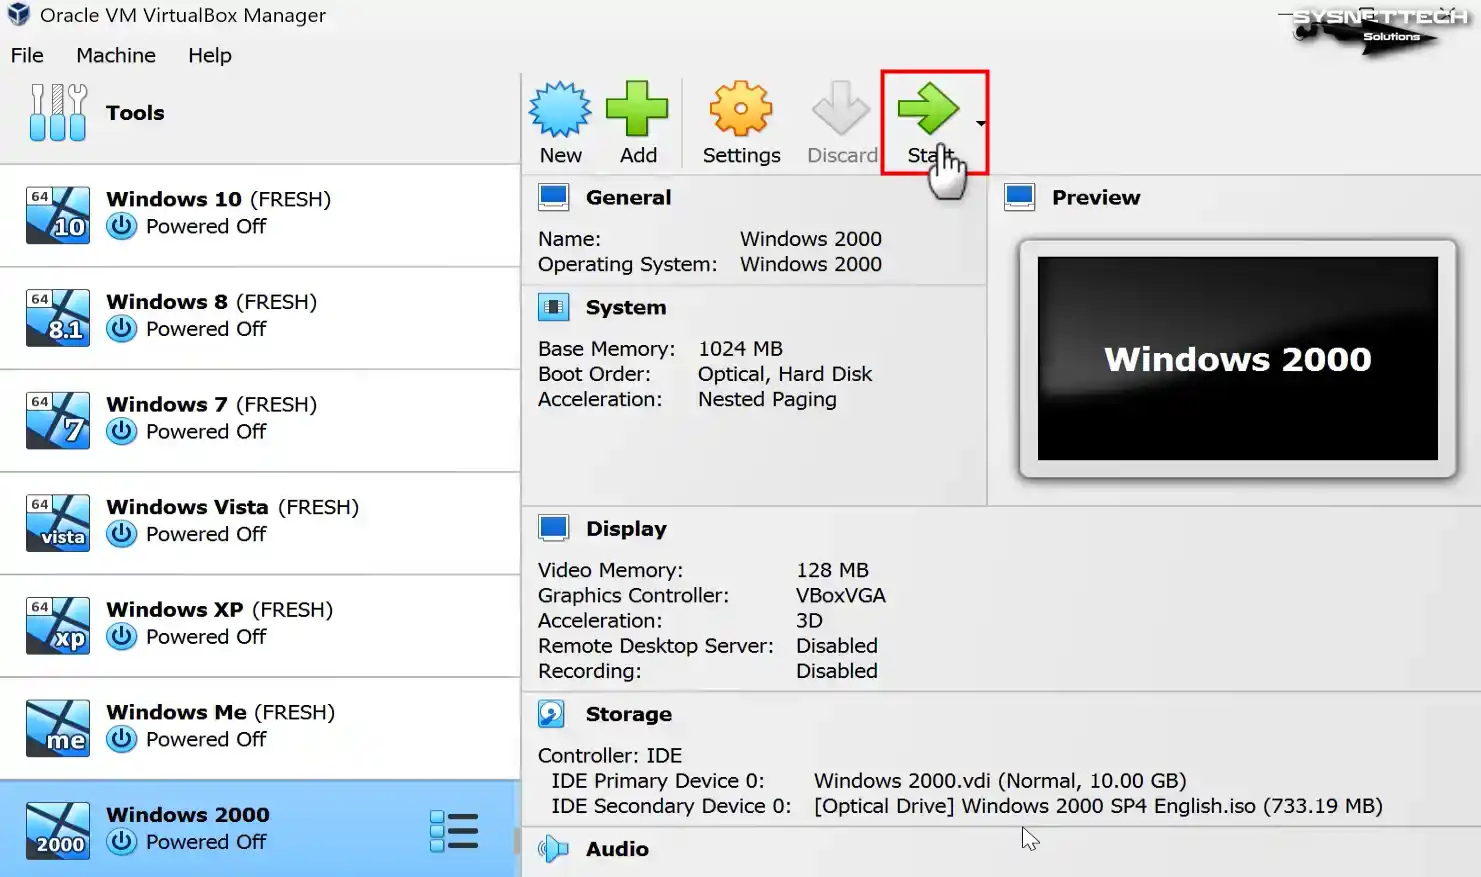
To install Windows 2000 with VirtualBox, run the virtual machine you created by clicking the Start button.
How to Install Windows 2000
After configuring the virtual machine correctly, from this step, you can install the Win2000 system as if you were installing Windows on a physical computer.
Step 1
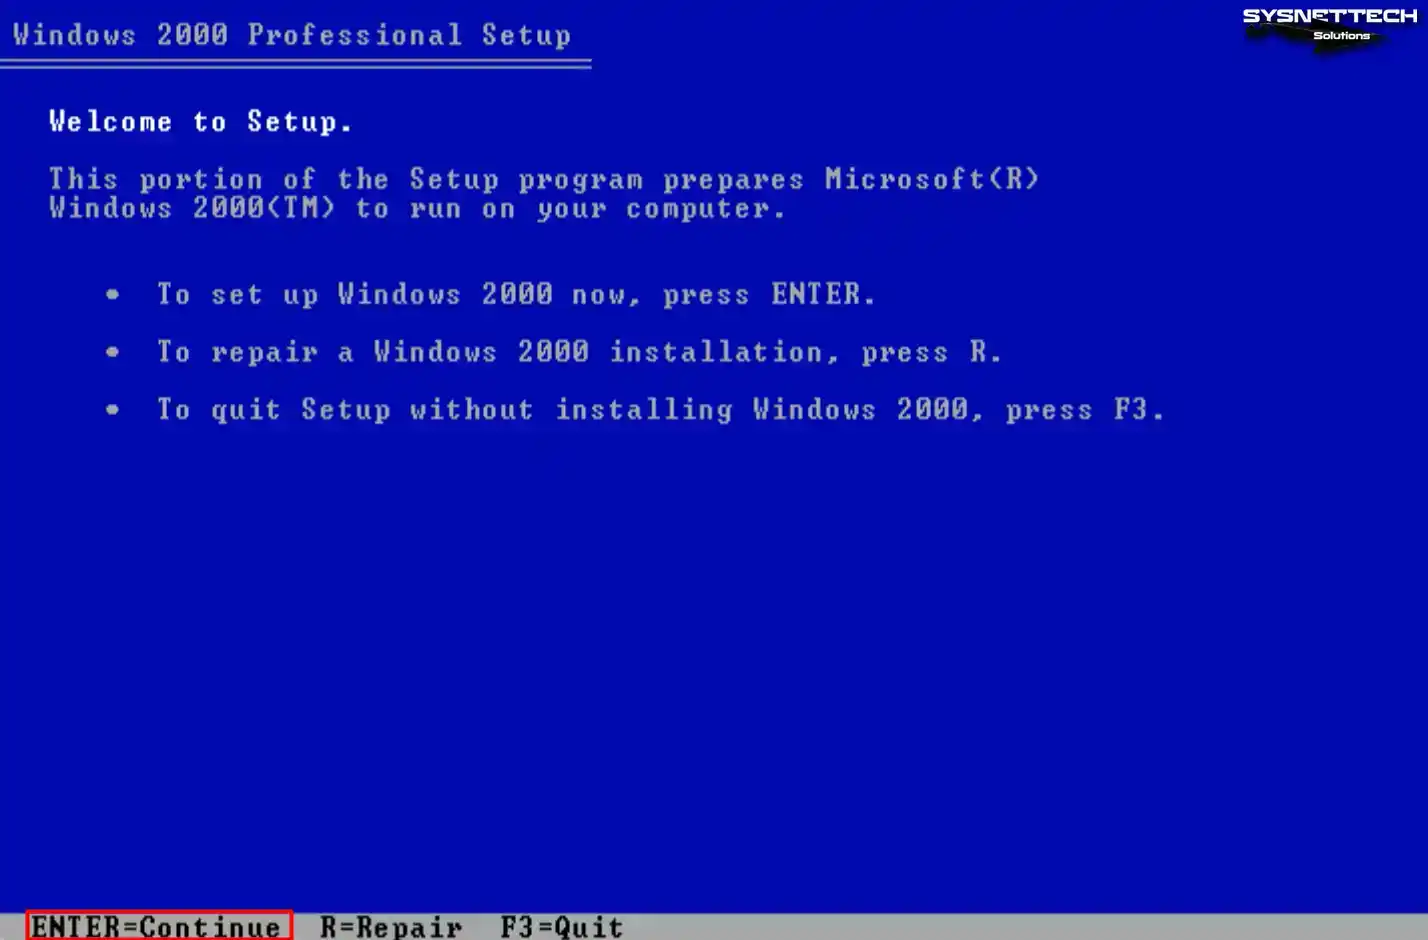
In the Windows 2000 Professional Setup screen, press Enter to start the installation or press R to repair your system. You can press F3 to close the wizard screen and exit it.
Step 2
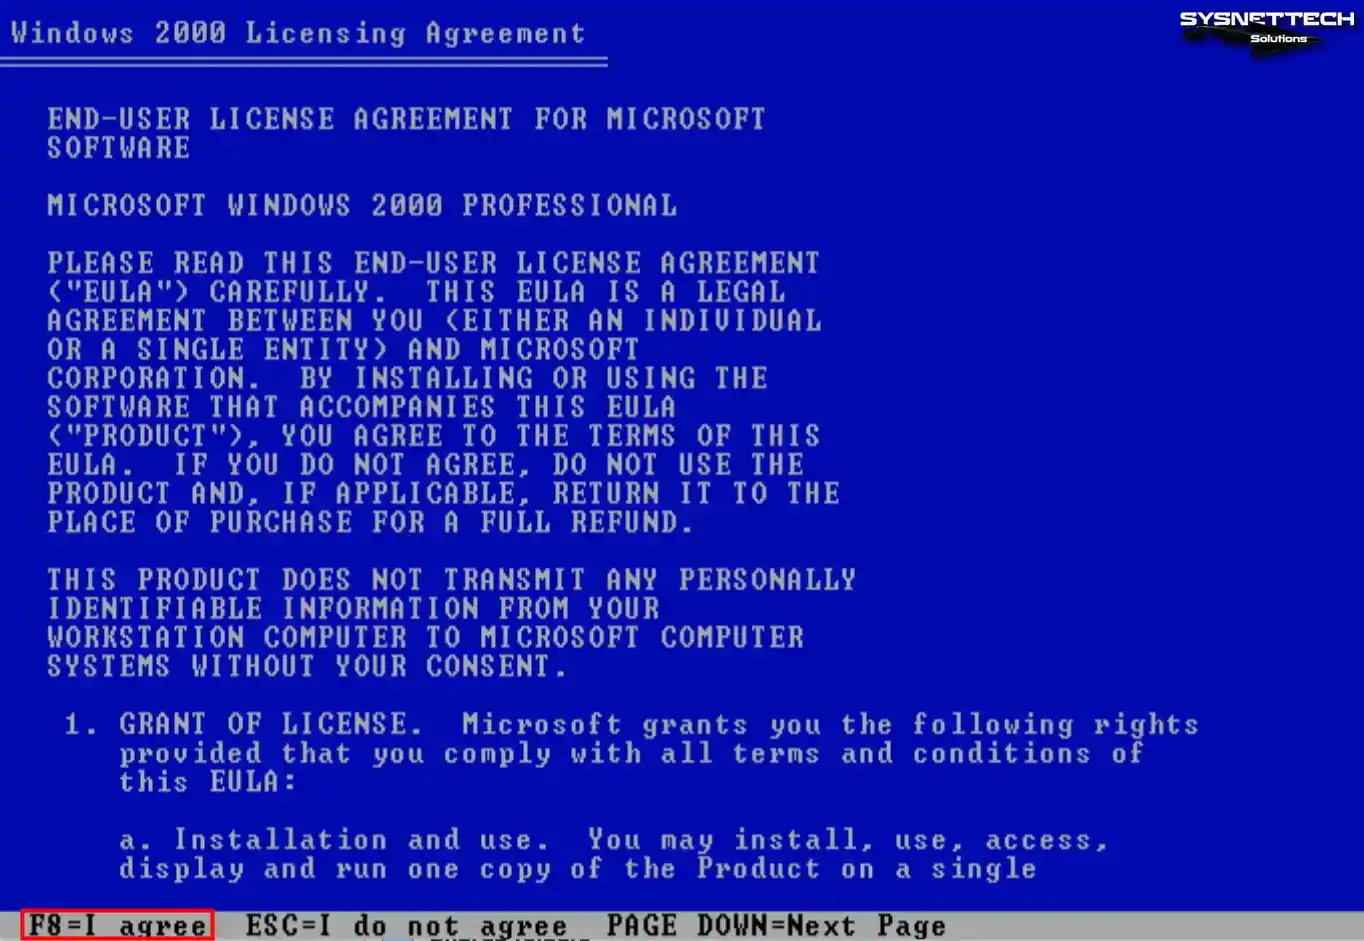
Press the Page Down key to explore the full text of the Windows 2000 operating system license agreement. If you want to approve the license agreement directly, press F8 and continue.
Step 3
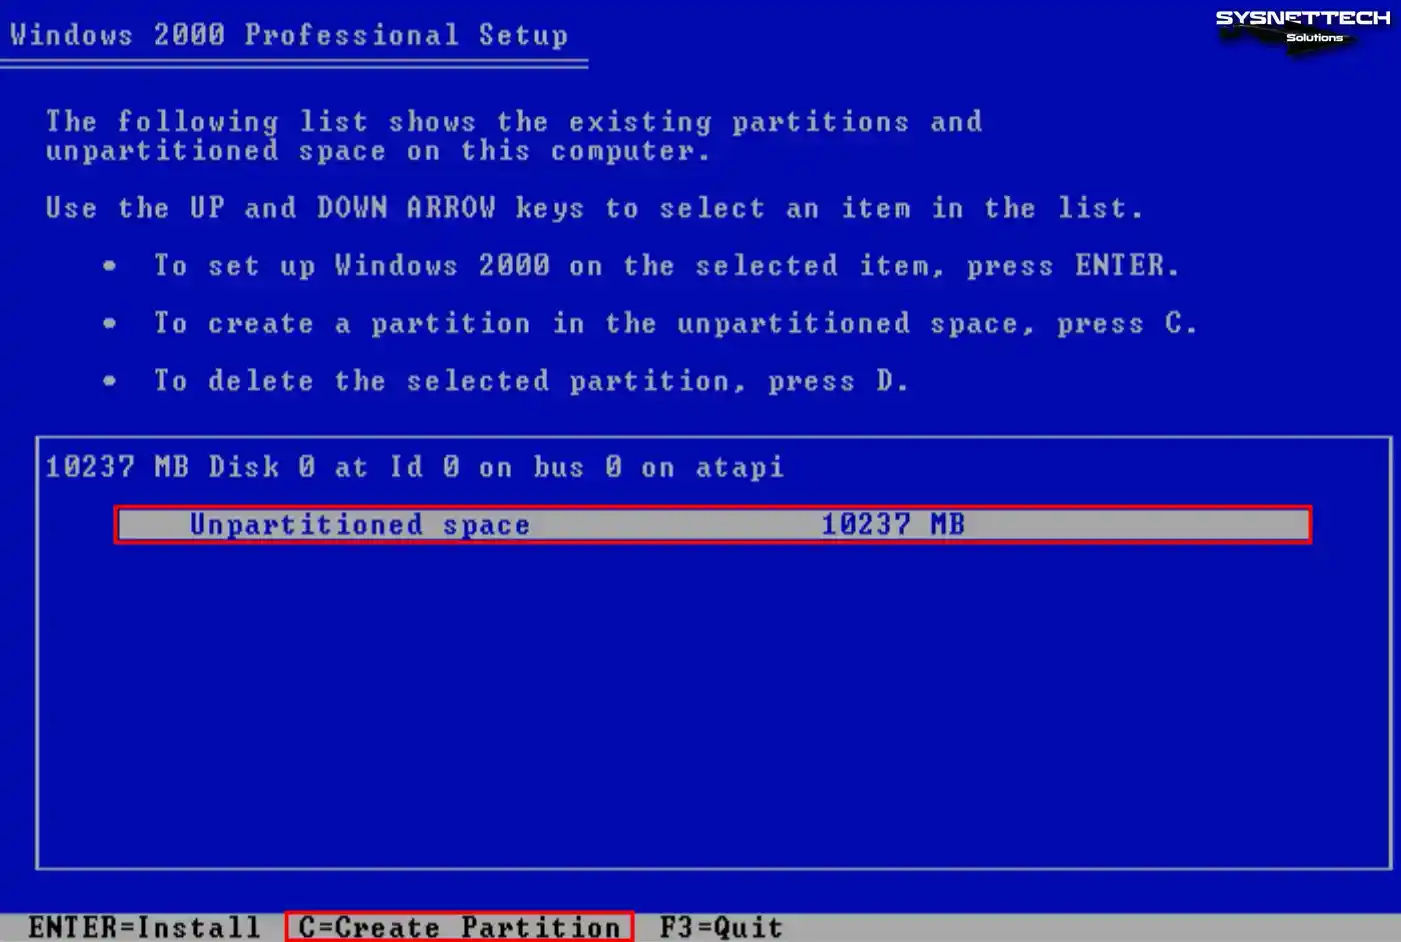
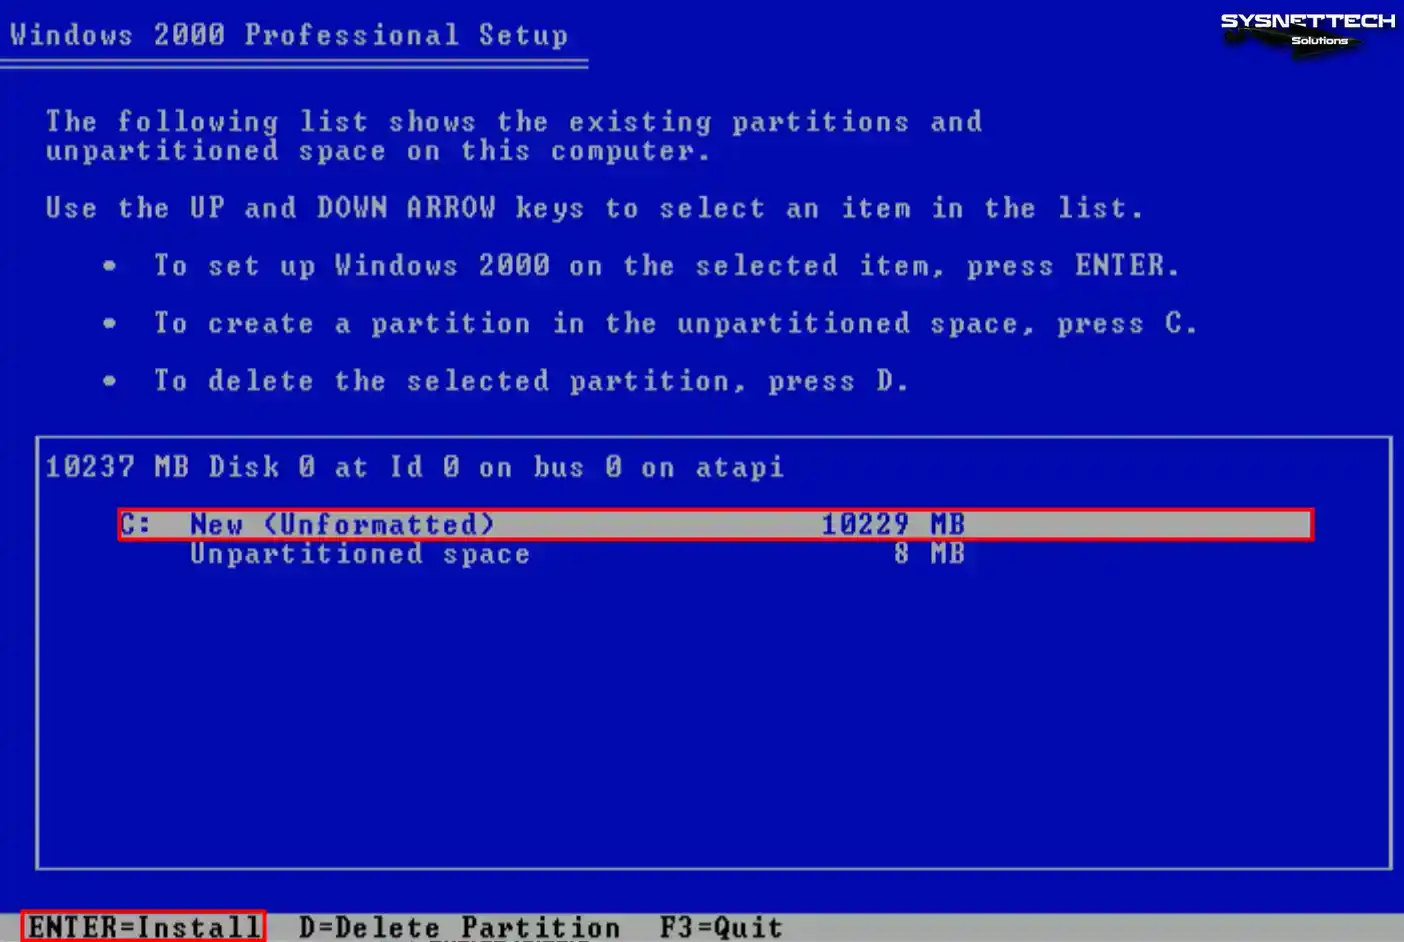
Press the C key to edit the unallocated disk space in the disk configuration window.
Step 4
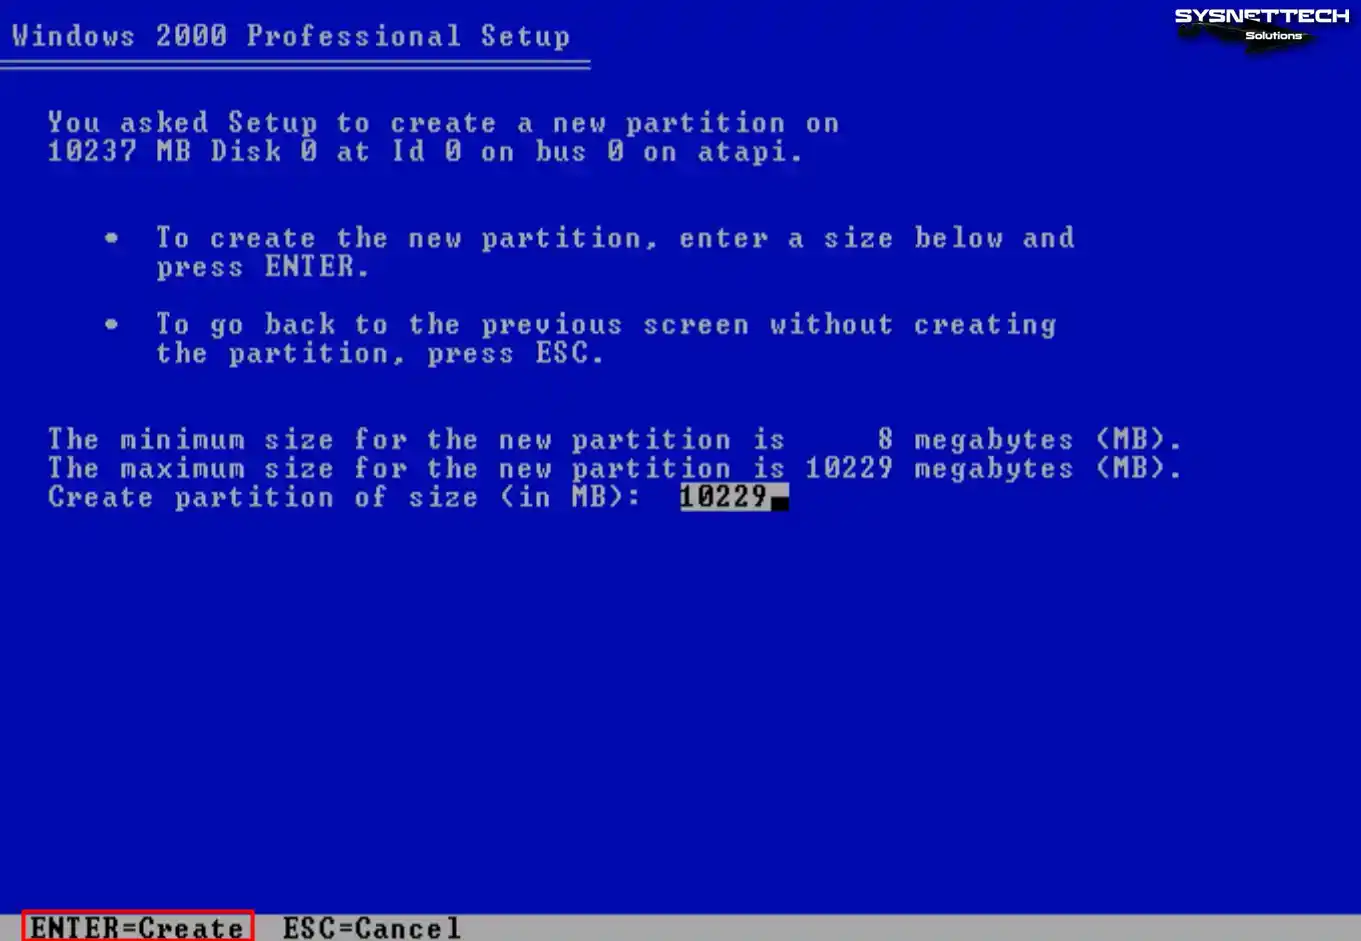
Press Enter to confirm the disk space usage determined automatically by the installation wizard.
Step 5
After creating a new Partition on your virtual disk, press Enter to start the installation.
Step 6
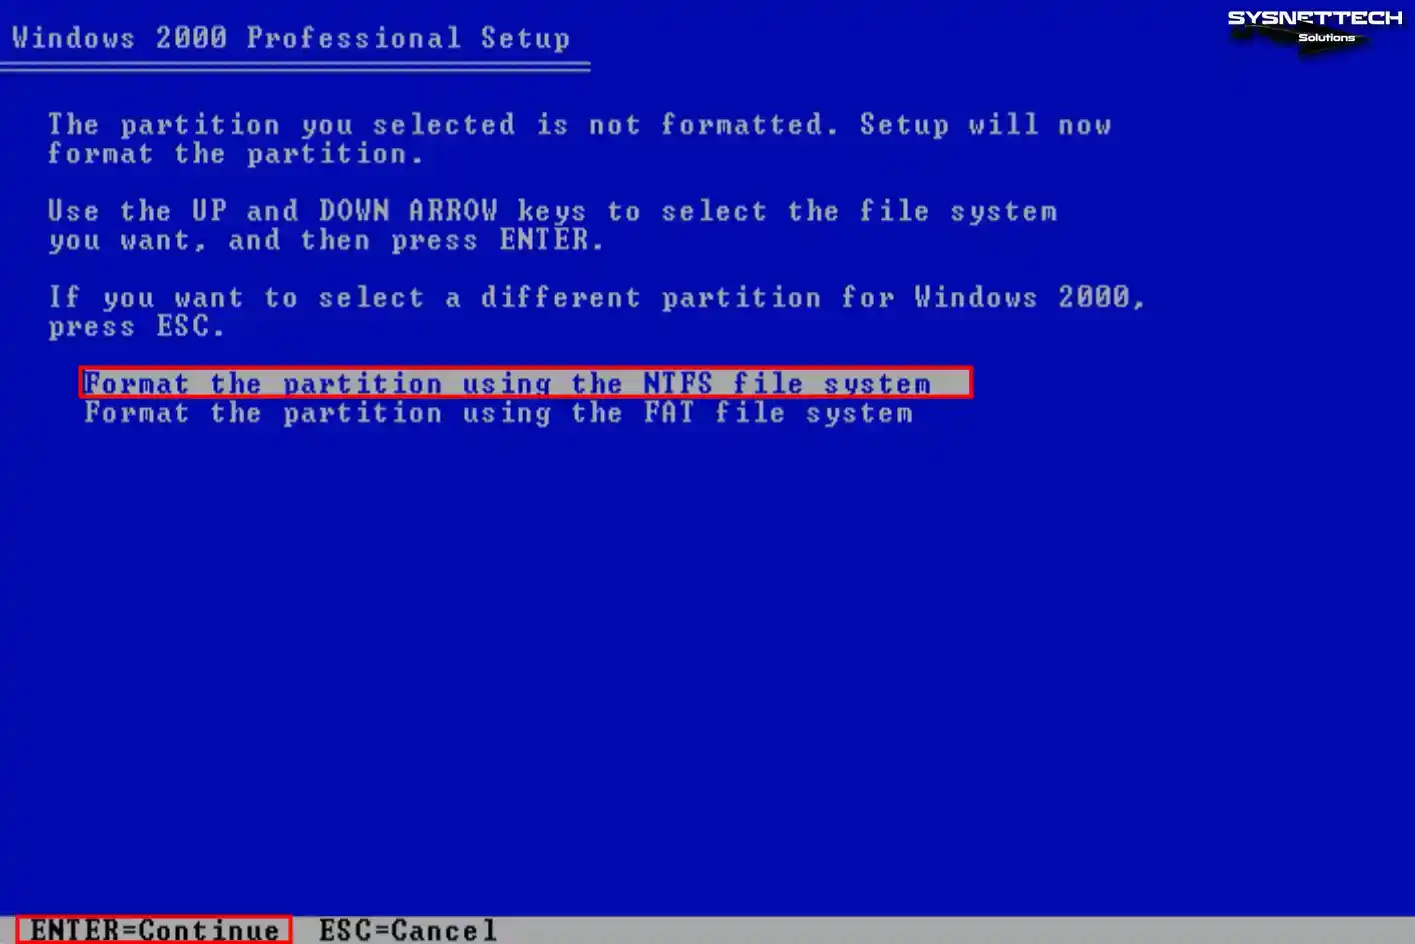
Press Enter again on the appropriate option to format the disk of the virtual system using the NTFS file format.
Step 7
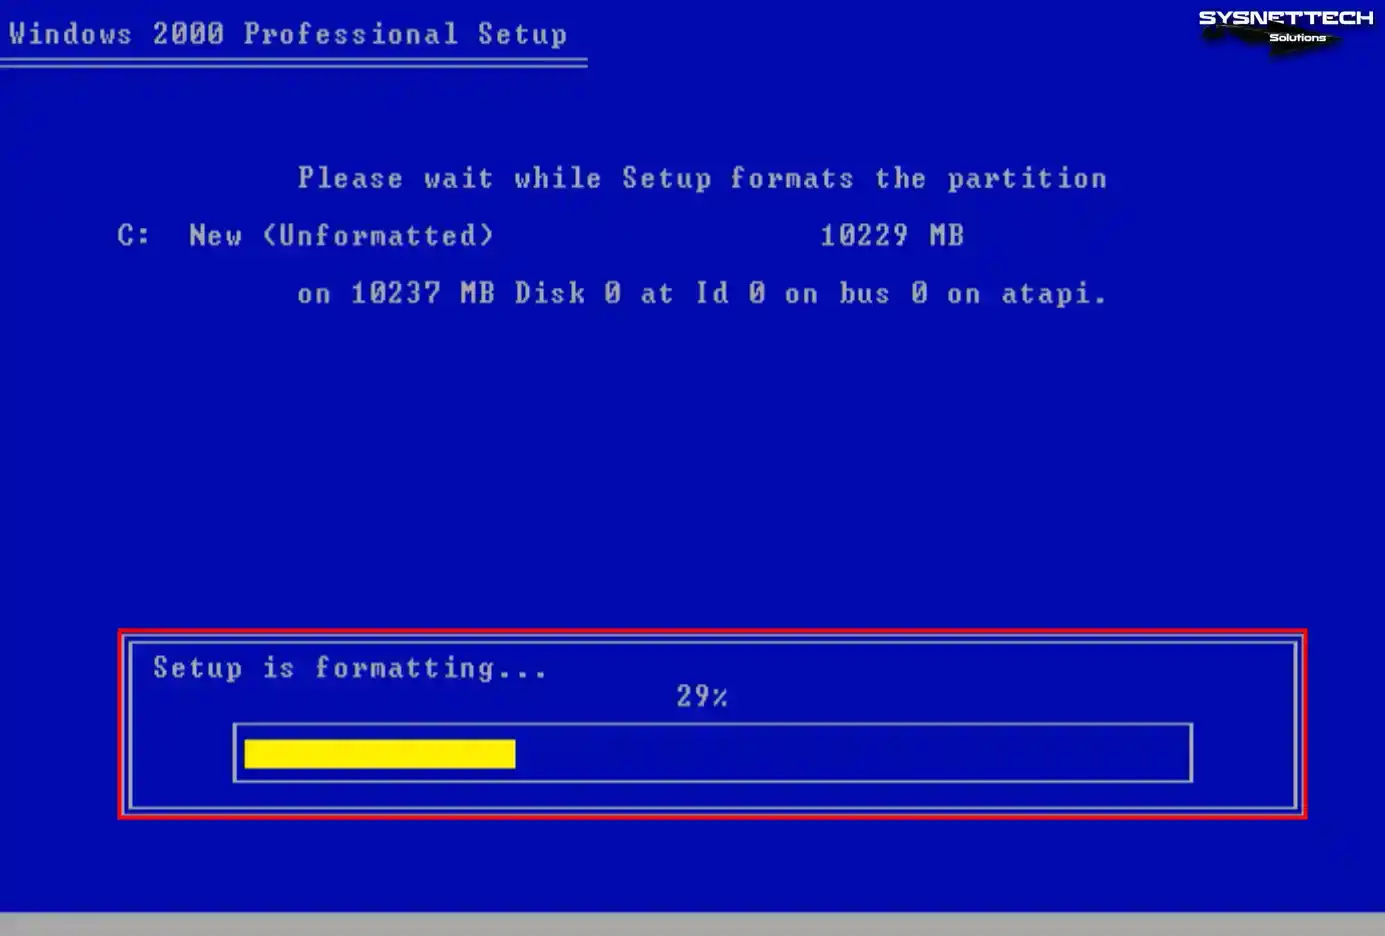
Wait while the setup wizard formats the virtual disk.
Step 8
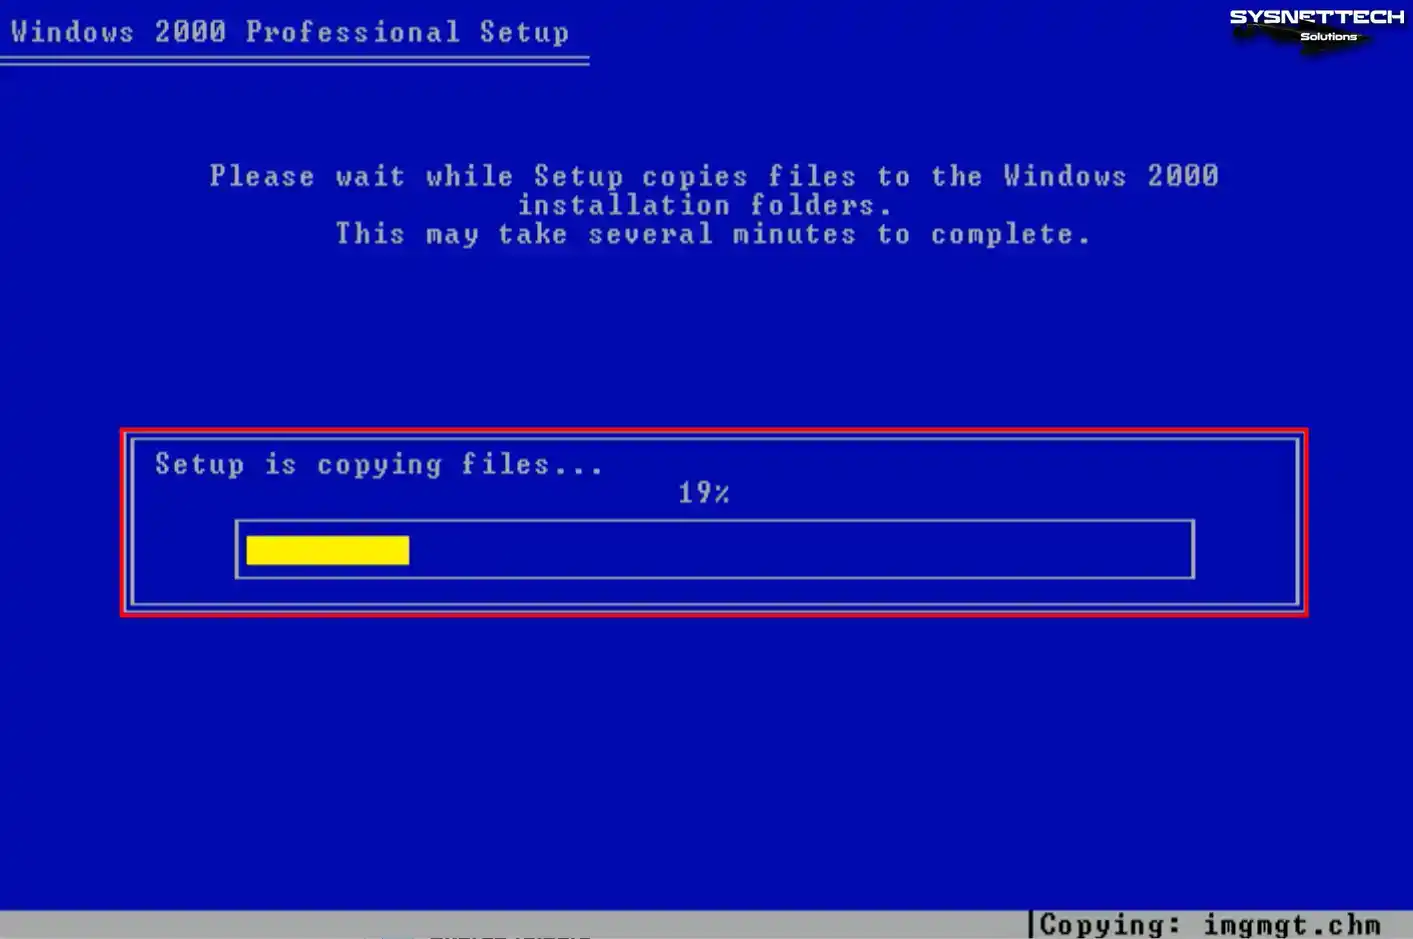
Copying Windows 2000 system files may take time, depending on the performance of your host computer. Do not turn off your virtual computer while the system files are copied.
Step 9
After copying the system files, your virtual system will automatically reboot in 15 seconds.
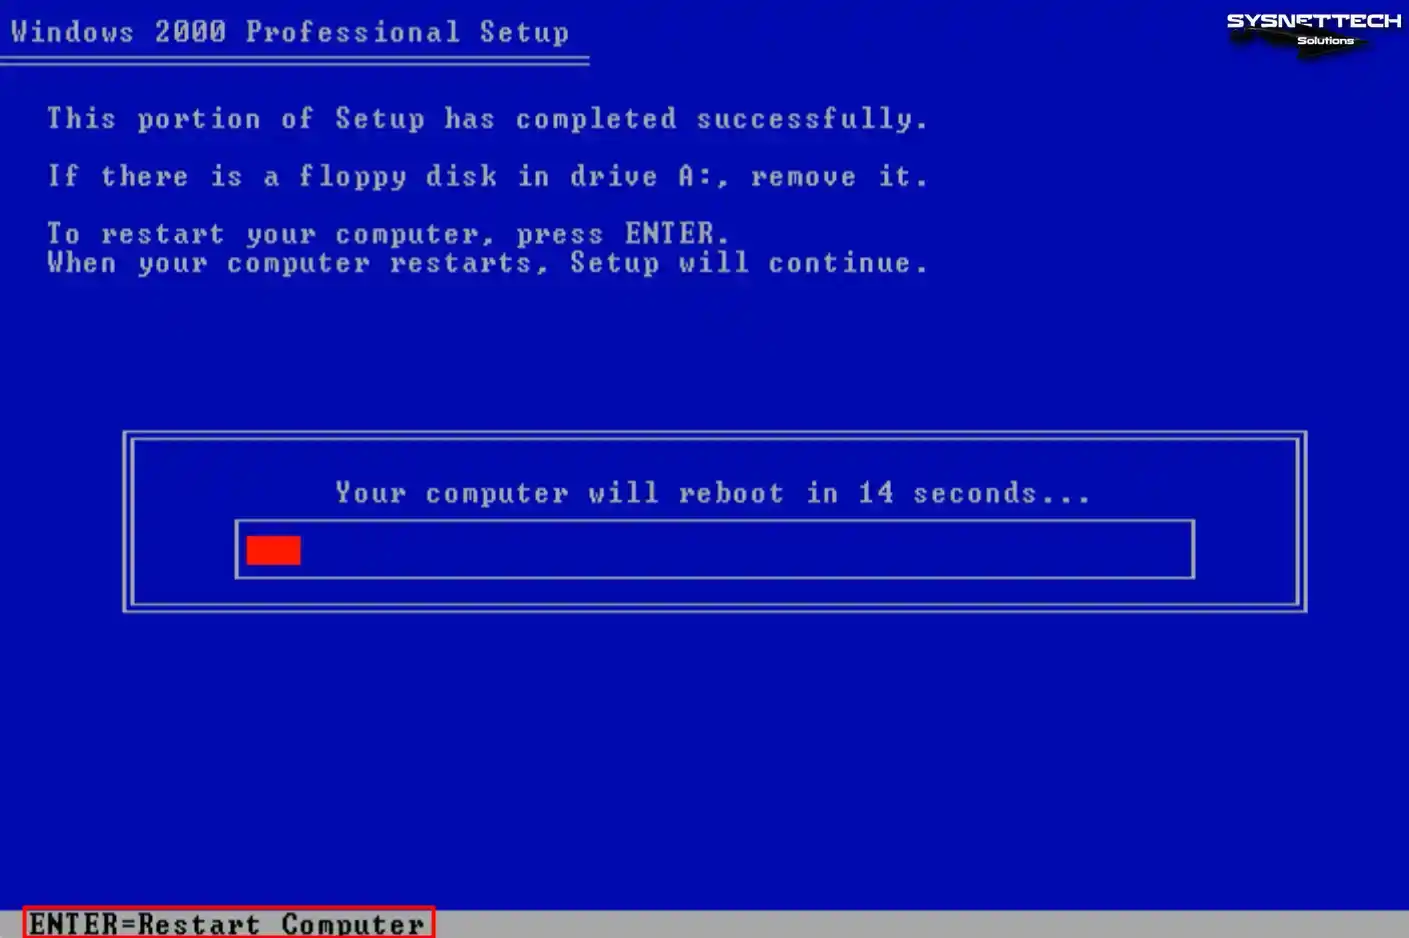
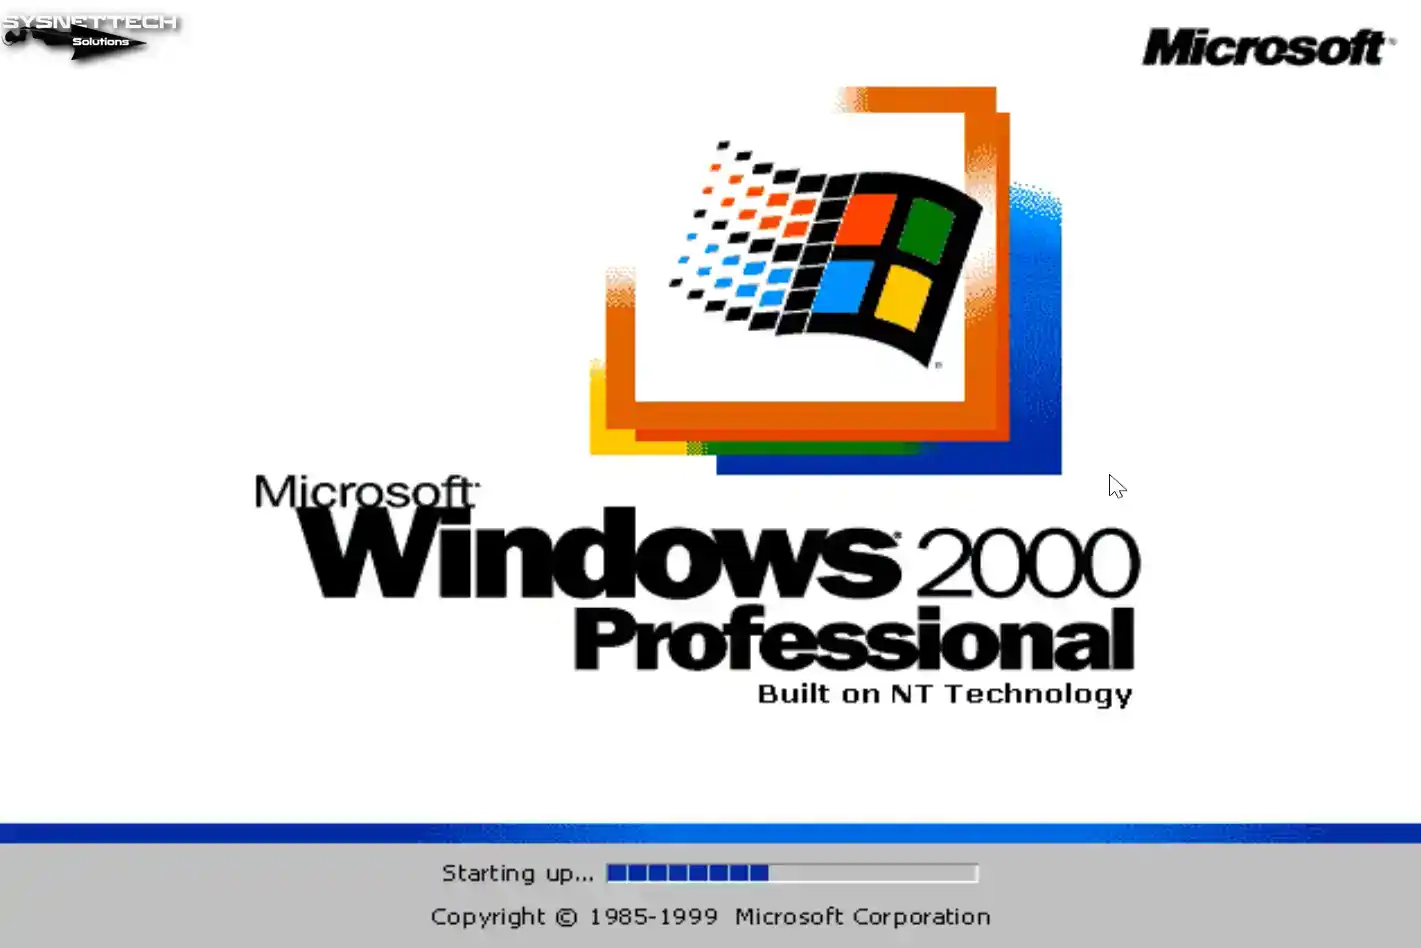
Step 10
After your virtual PC restarts, wait while Microsoft Windows 2000 Professional opens.
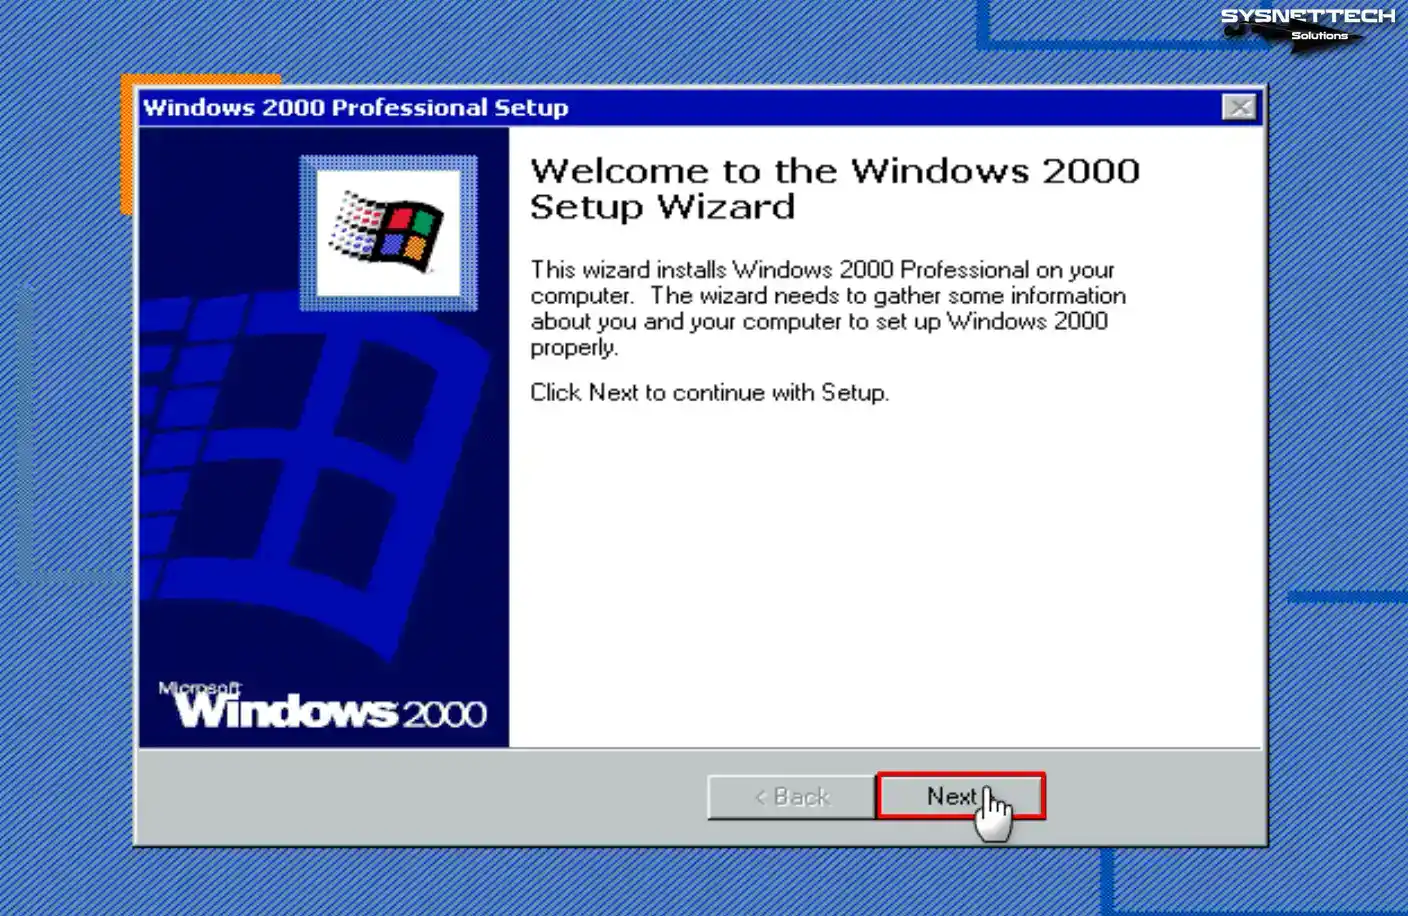
Step 11
Click Next in the window stating that some information will be collected so the Windows 2000 system can function correctly.
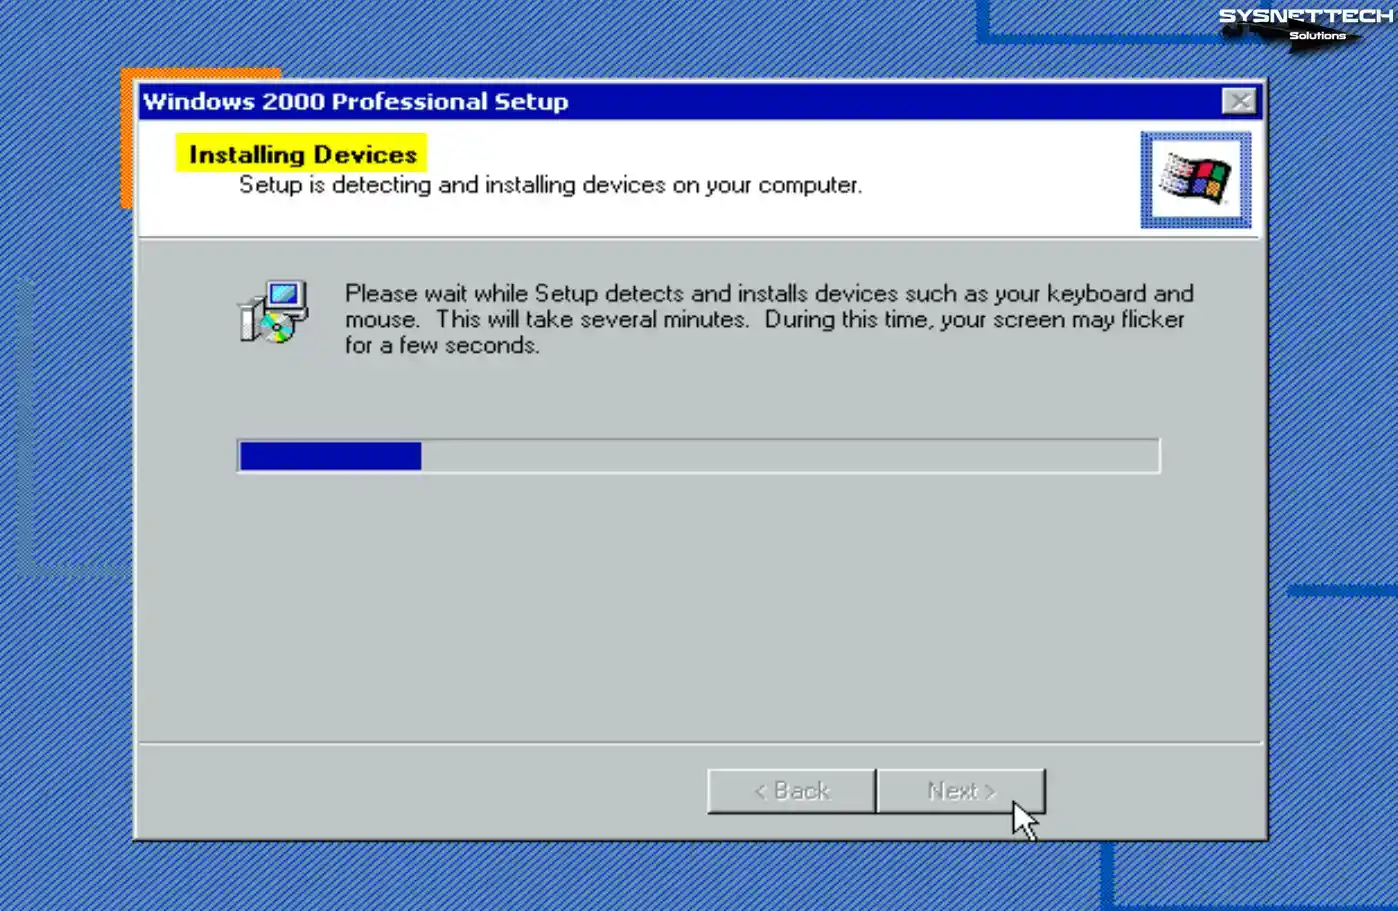
Step 12
At this stage, the installation wizard will scan your system’s hardware and install the drivers.
Step 13
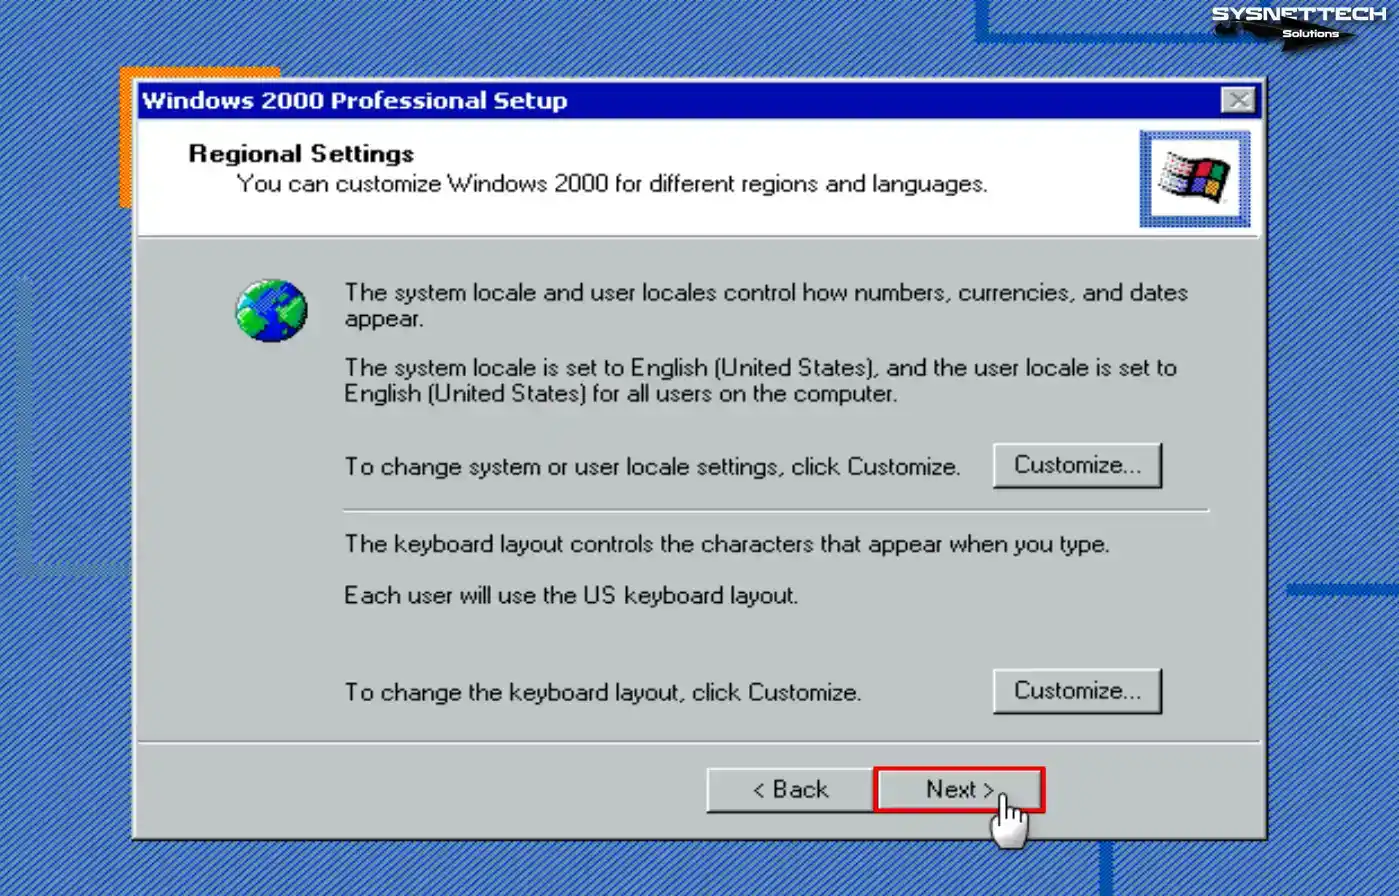
Configure your country in the region settings window via the Customize button. Also, change the keyboard layout of your host computer and click Next.
Step 14
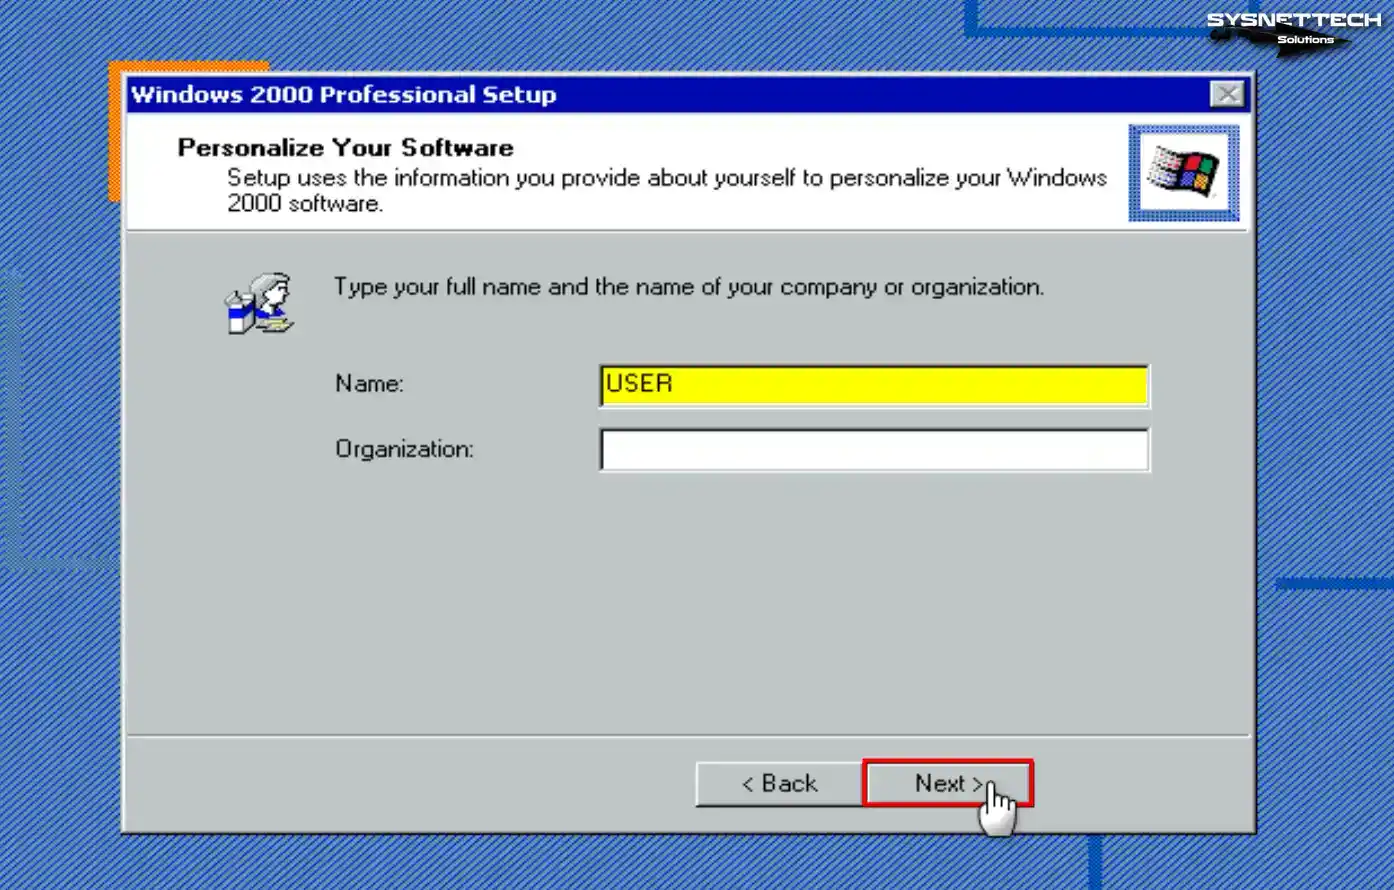
If you will only use the virtual PC, type your username in this step and continue.
Step 15
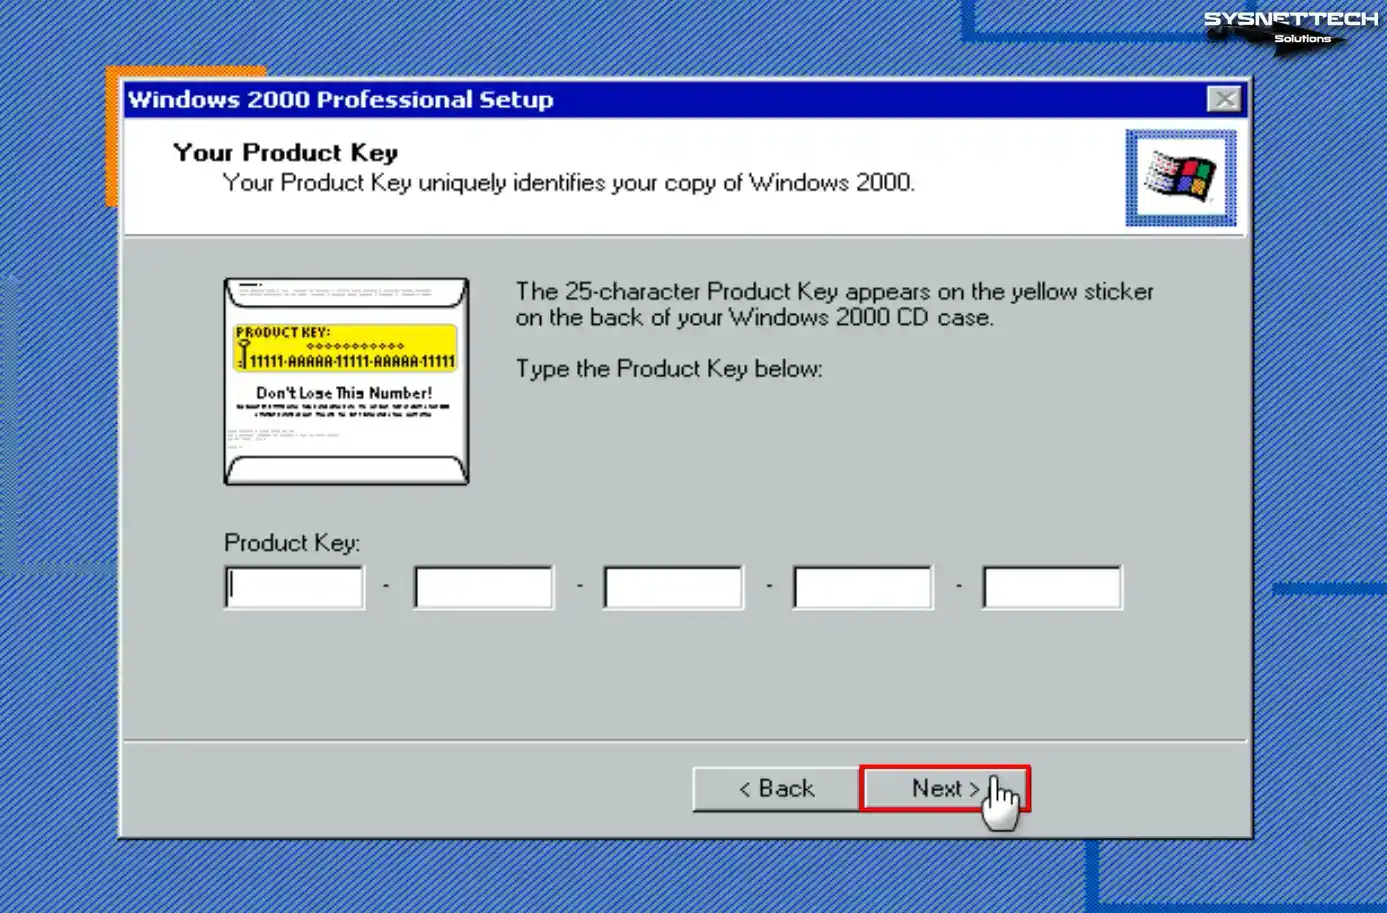
Type your Windows 2000 Pro SP4 product key and click Next.
Step 16
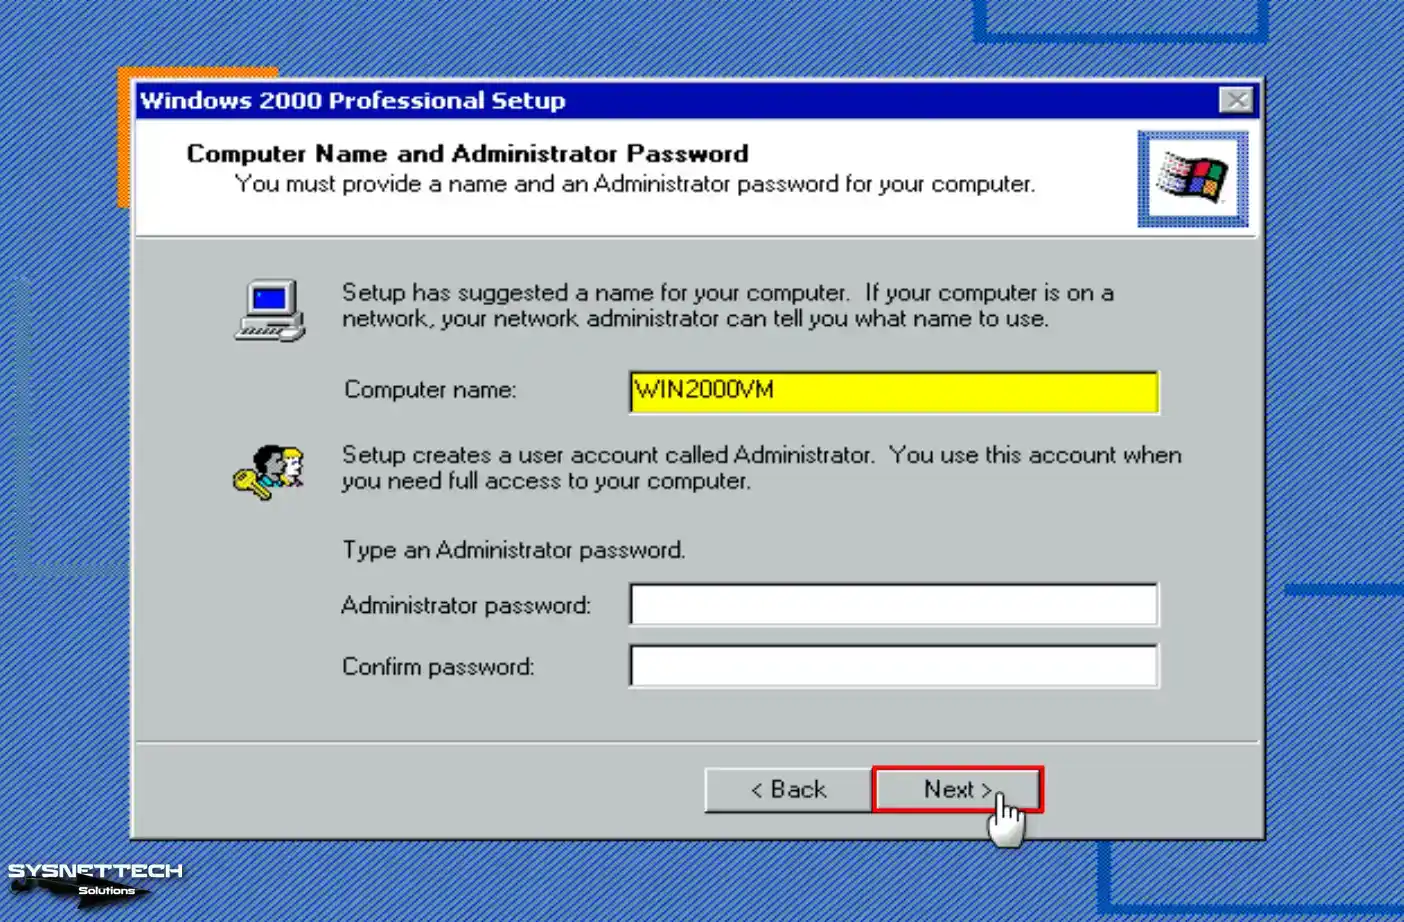
Note that the computer’s name differs if multiple computers are on the network. If you wish to put a password for the administrator account of the system software, create a strong passcode and click Next.
Step 17
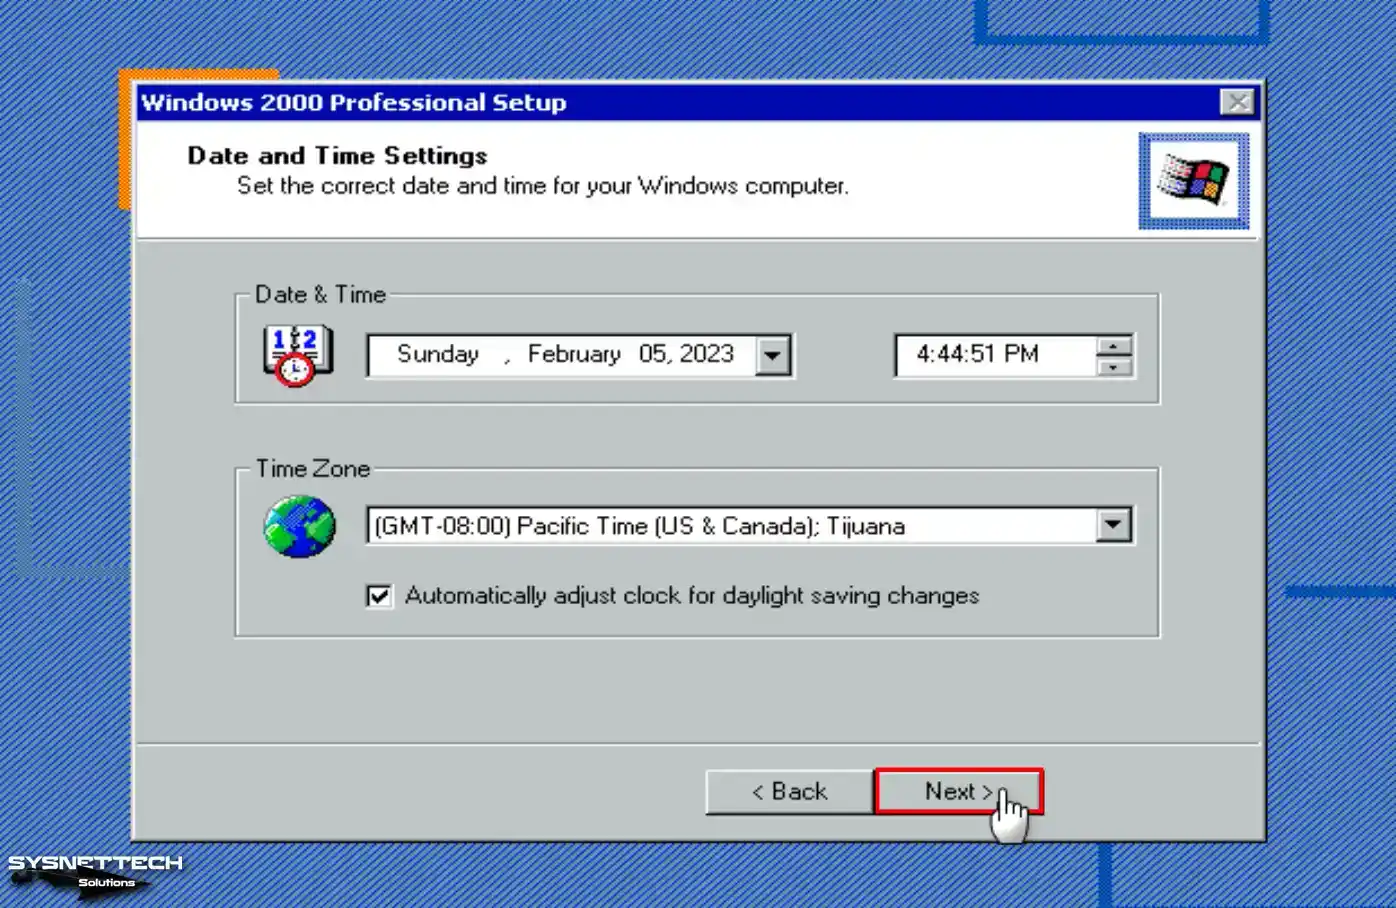
Configure your time settings according to the location of the country you live in and click Next after checking that the system date is correct.
Step 18
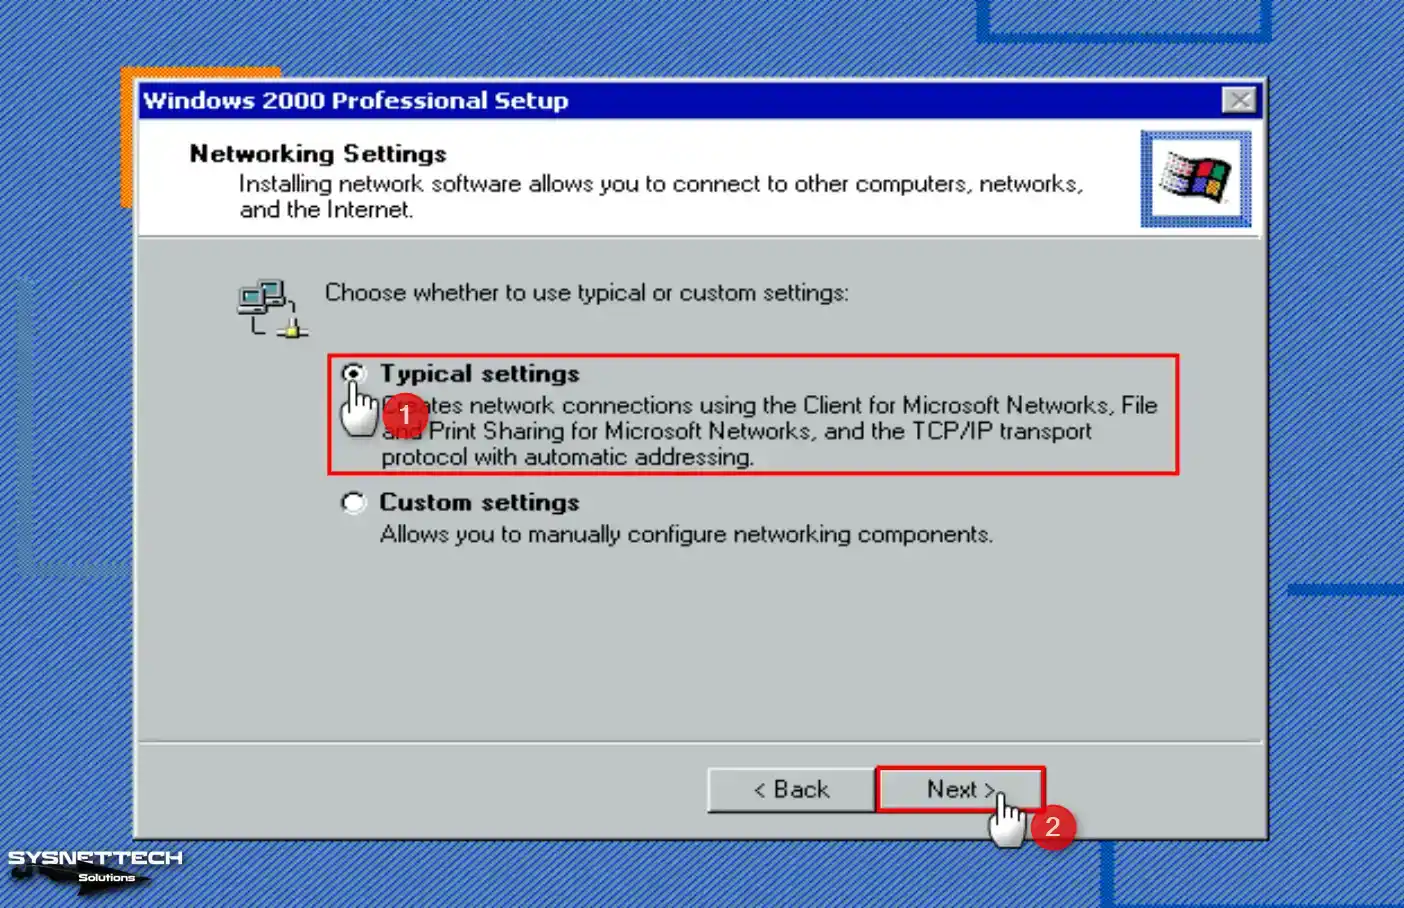
Select Typical Settings for your network settings and continue.
Step 19
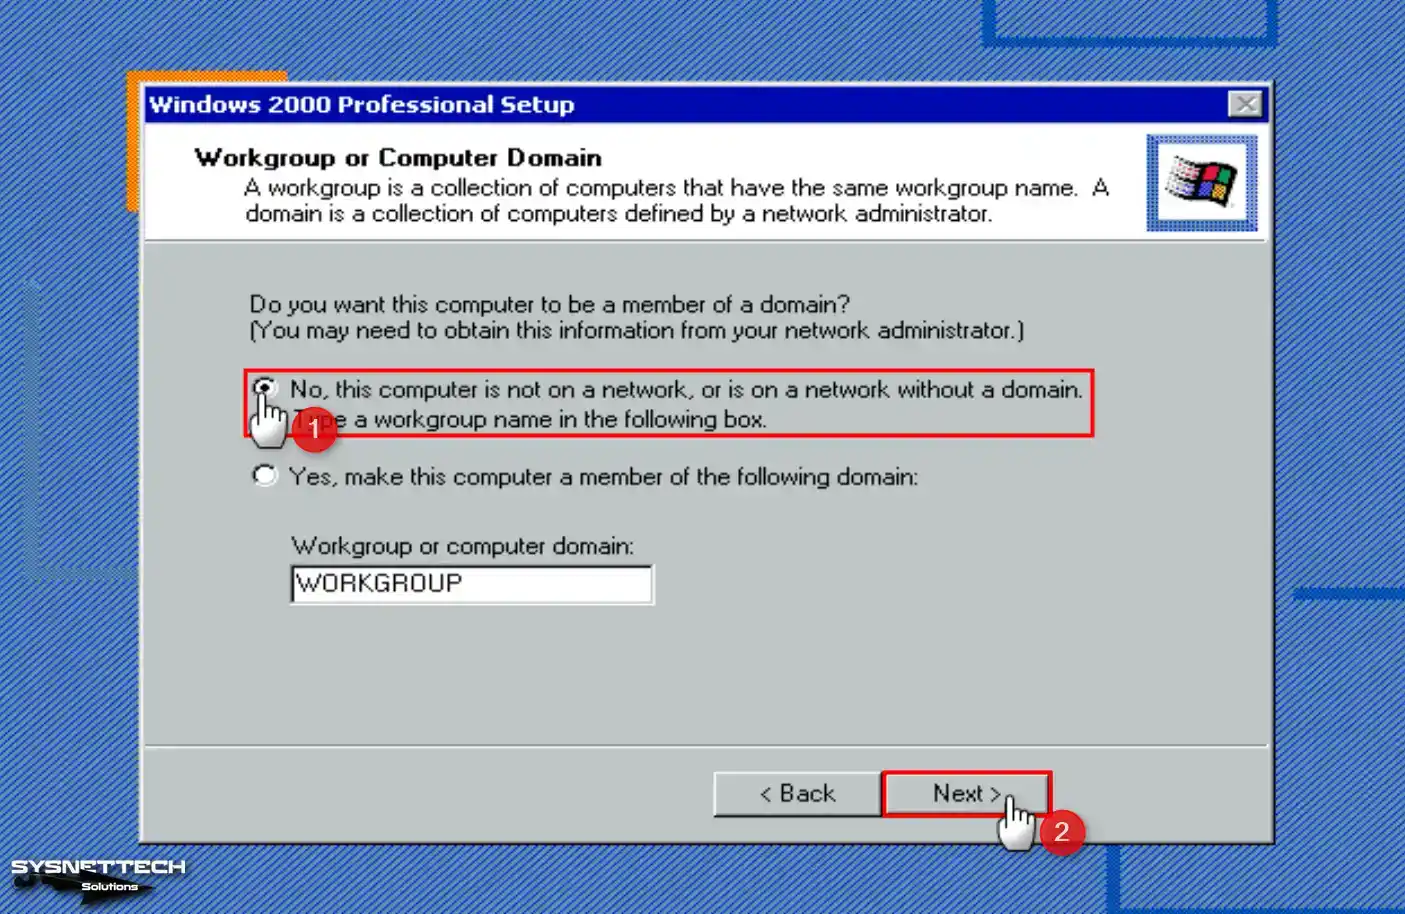
If there is no server running an Active Directory service in your network environment, configure Workgroup with the No option.
Step 20
Wait while the setup wizard configures your virtual system’s start menu items, shortcuts, registry components, and settings.

Step 21
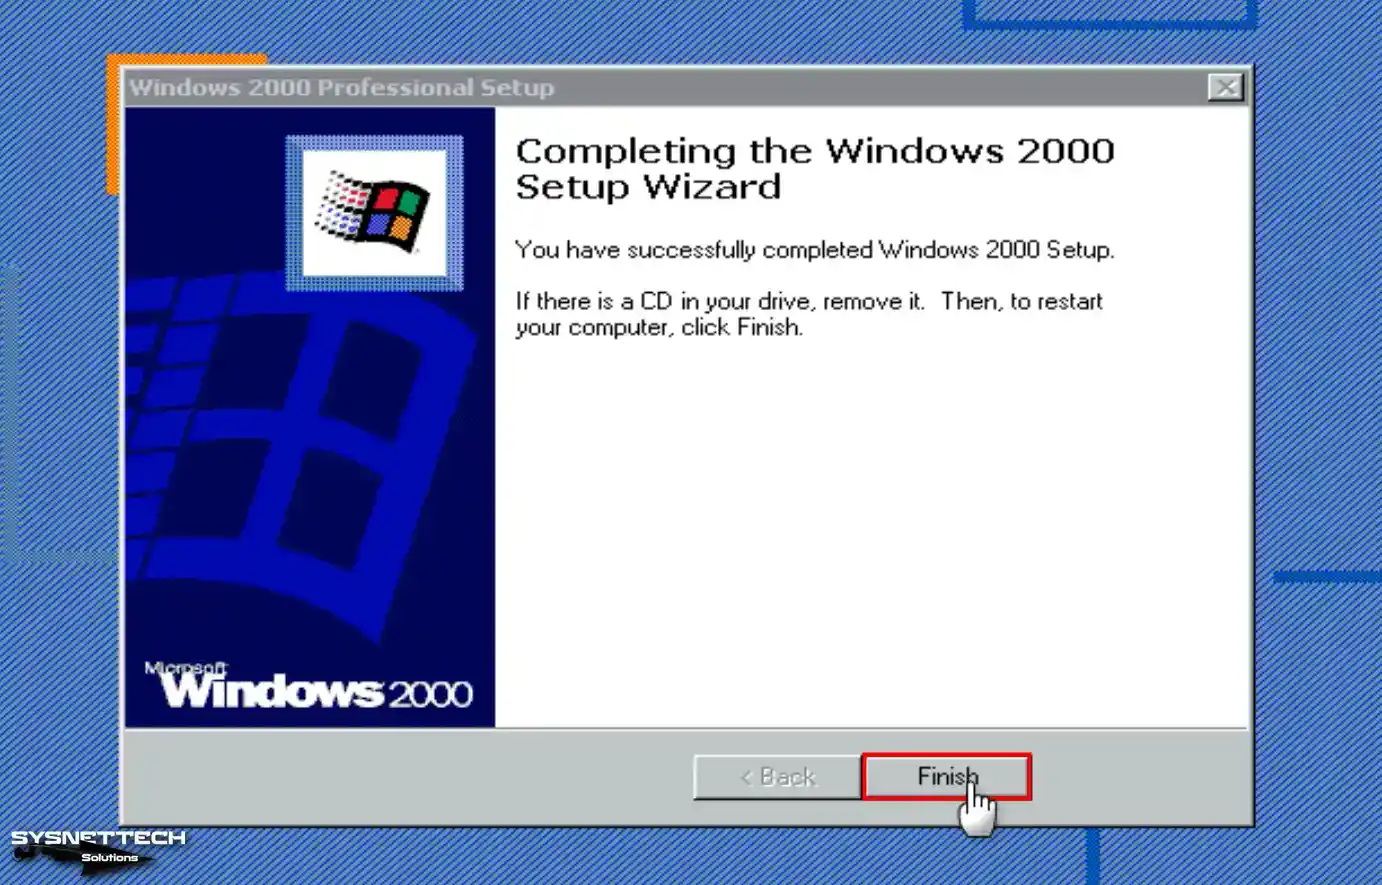
Click Finish when the Win2K installation wizard is complete, and restart your virtual PC.
Step 22
After your system boots up, your network connections will be configured and prepared.

Step 23
Click Next when the Network Identification wizard opens to connect your virtual computer to a network.
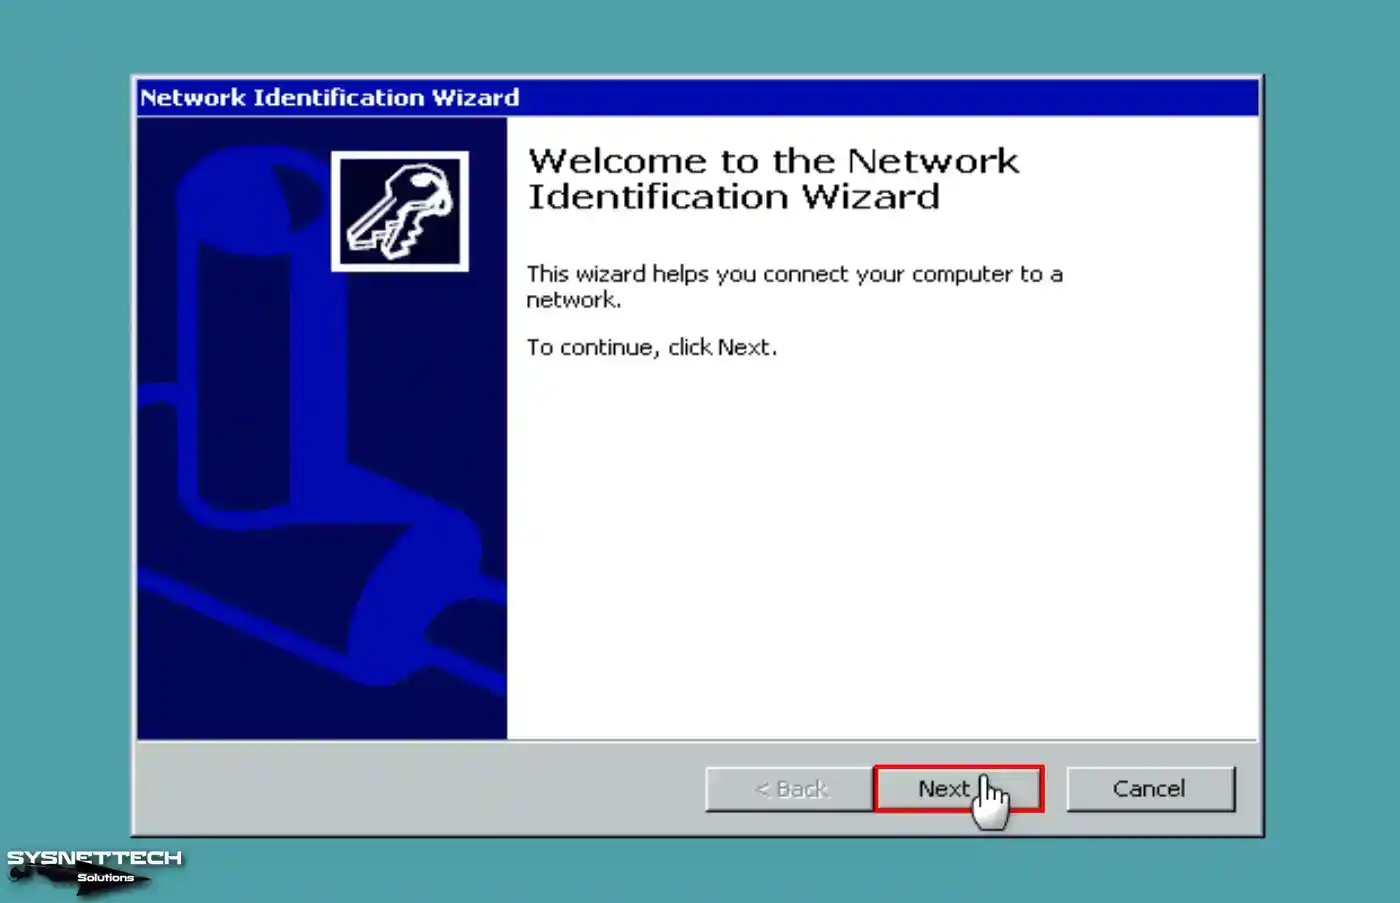
Step 24
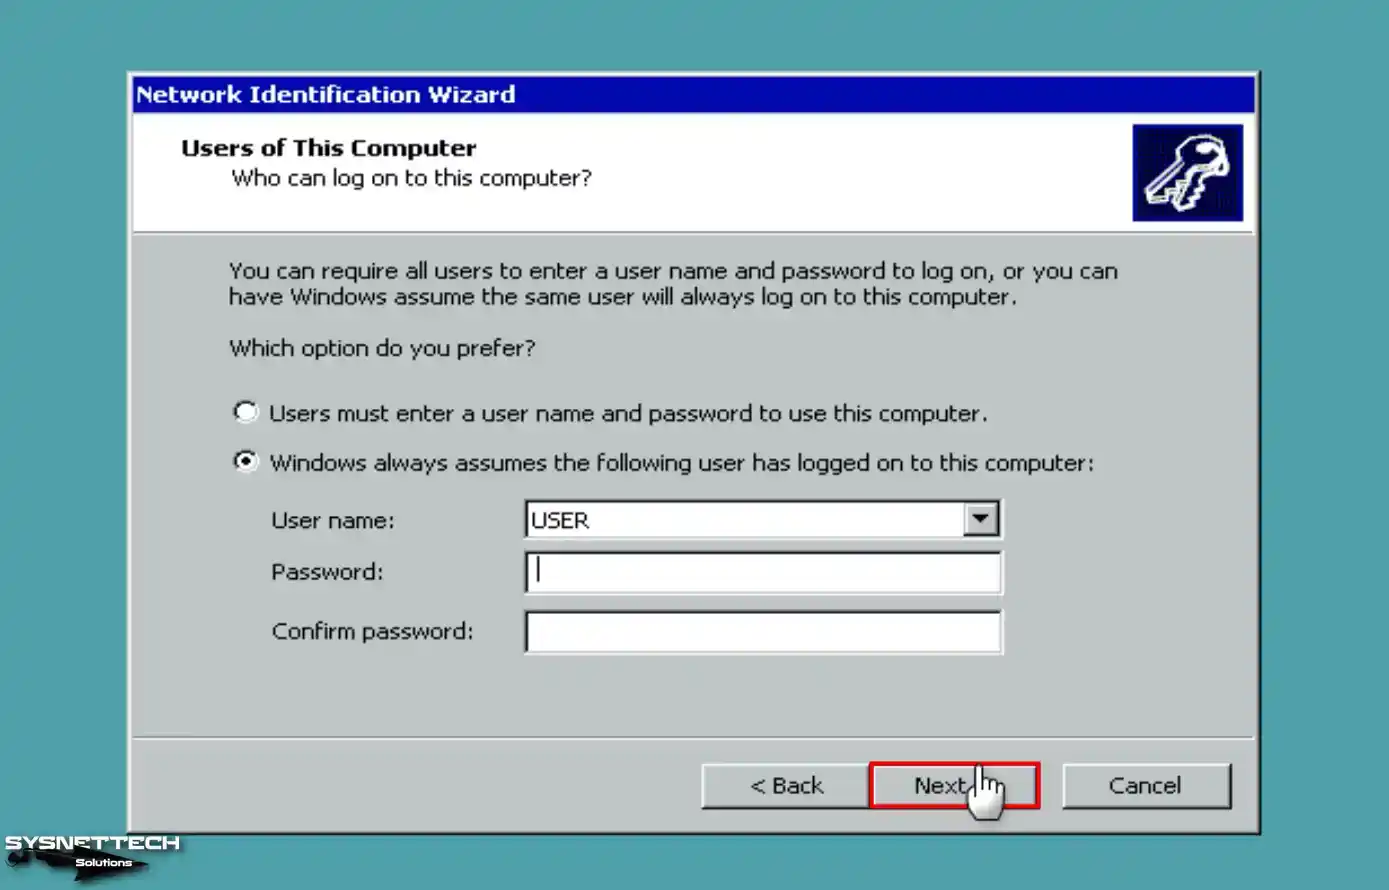
You can check the option above to have users using the virtual machine enter a username and password. Otherwise, if no one else will use a VM, you can use your default user account for login information.
Step 25
After completing the network diagnostic wizard, click Finish again and continue.

Step 26
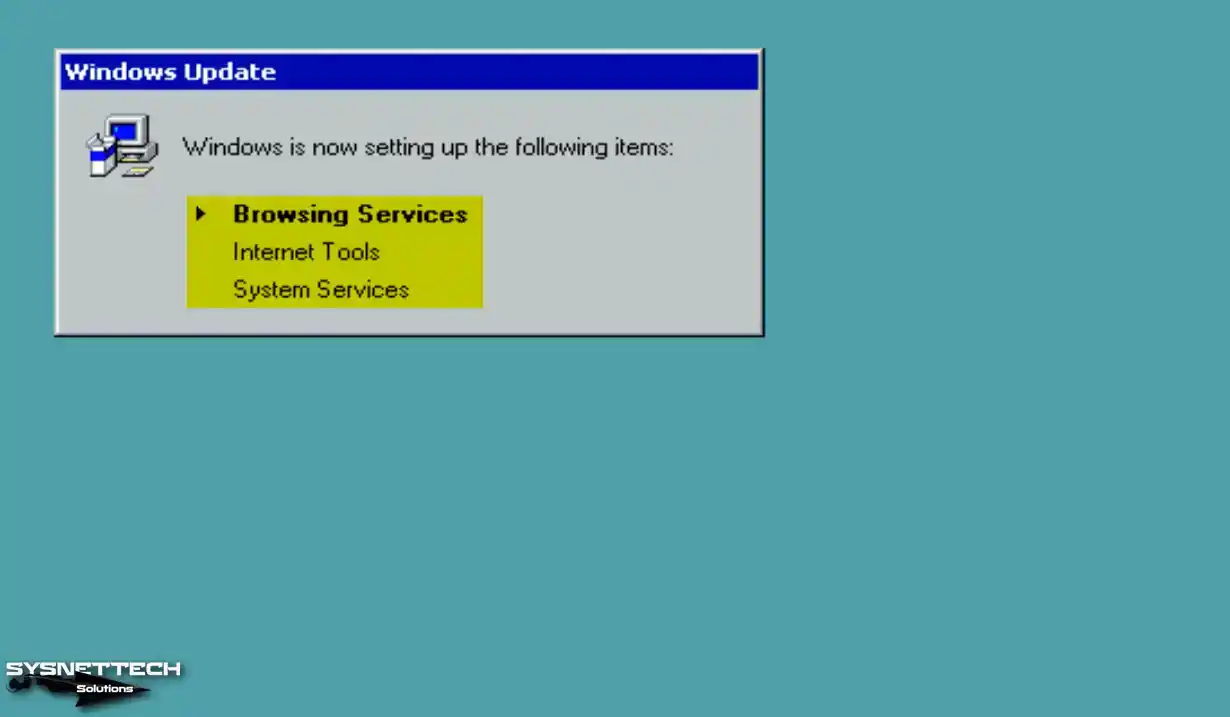
While your virtual system boots up, wait while Windows configures Internet tools and system services.
Step 27
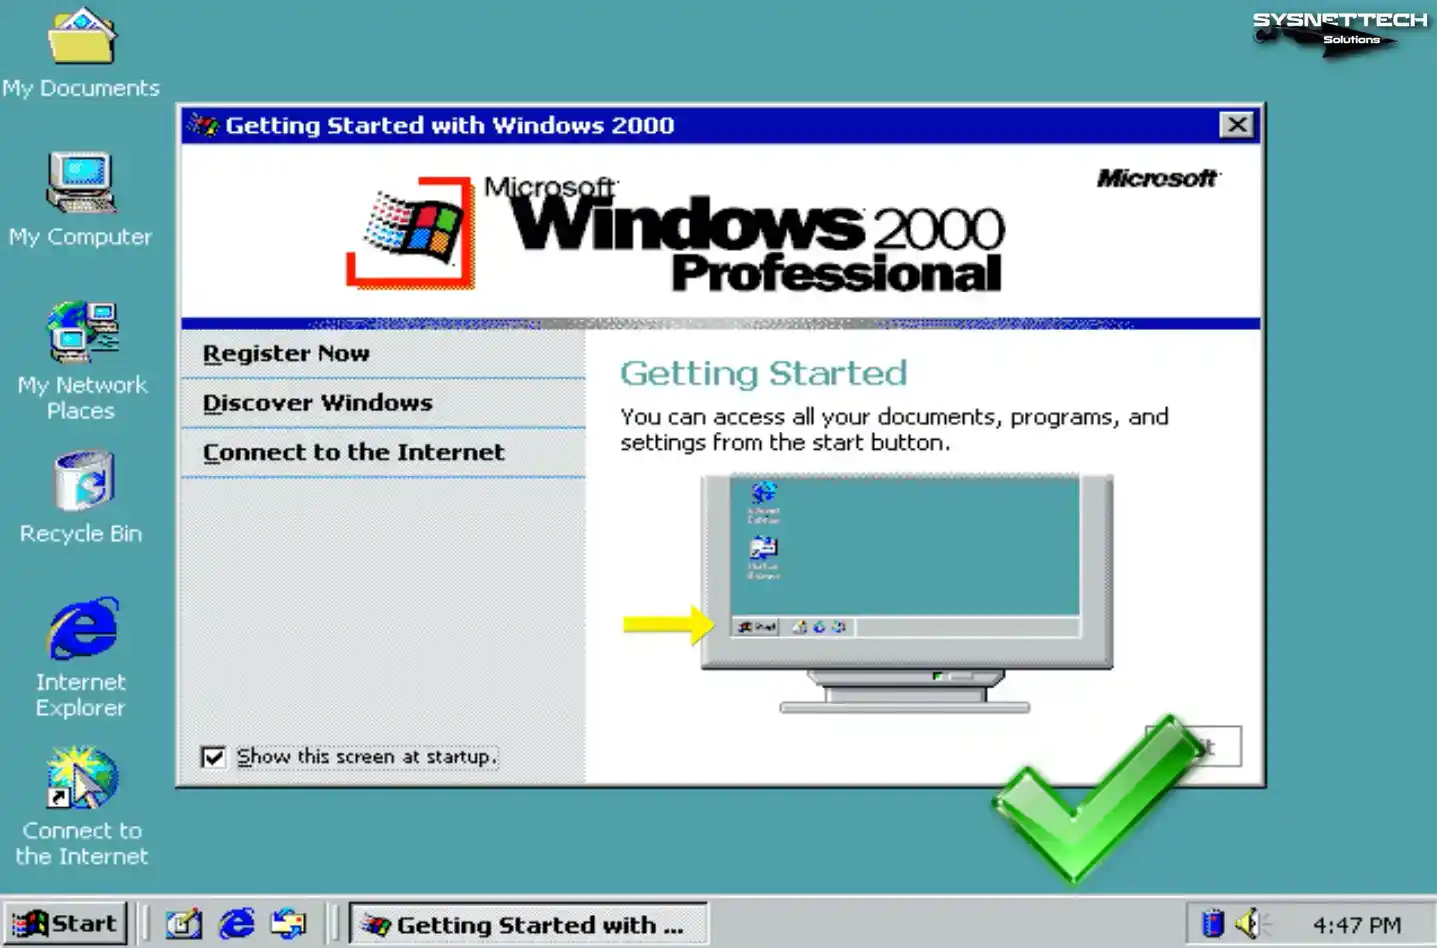
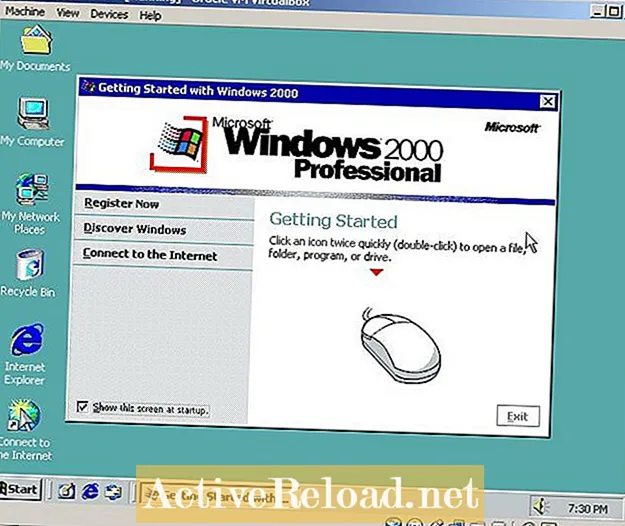
After Windows has configured the necessary settings, your desktop environment will be ready, as in the image below.
Step 28
To examine the OS version and build number, right-click the My Computer symbol and choose Properties.

How to Install Guest Additions
After installing Windows 2000 on the virtual machine, you must deploy the Guest Additions software to use your host computer’s hardware on the virtual PC. This software is only required for Guest machines installed on the VM.
Step 1
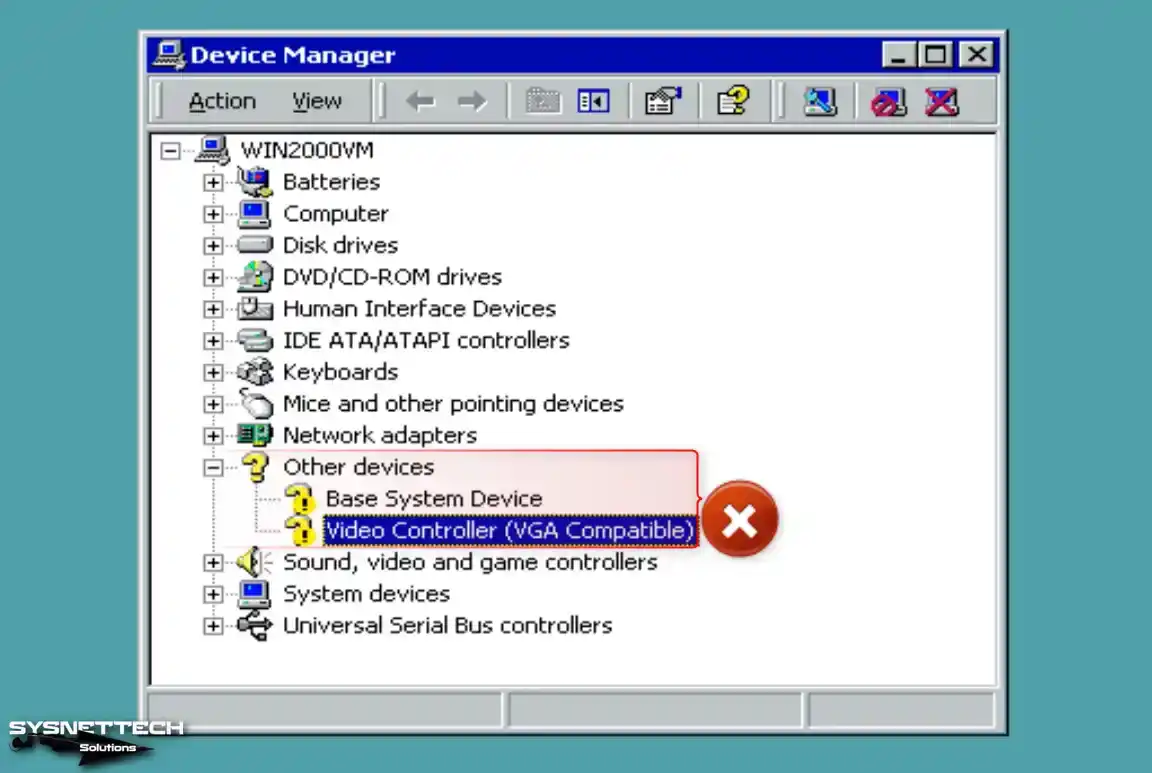
Before installing, you must check the drivers are not automatically installed on your guest machine. On my computer, click the right button, then Manage, then open the Computer Management tool and click Device Manager, then check the drivers with the exclamation mark.
Step 2
Click Devices / Insert Guest Additions CD image from the tool menu of the Win2K guest machine.

Step 3
If the Guest Additions installation wizard does not open automatically, double-click the VBox_GAs image in My Computer to start the wizard.

Step 4
When the Oracle VM VirtualBox Guest Additions wizard opens, click Next to continue the installation.

Step 5
Constantly installing guest additions in the default location can avoid any problems, so click Next directly in the install location window.

Step 6
In this window, select the components you want to install and continue. If you enable Direct3D support, you need to install Guest Additions in safe mode.
Note: Always click the Yes button if you encounter the Digital Signature Not Found window during installation.

Step 7
After installing the Guest Additions software on Windows 2000, restart your virtual system.

Step 8
Suppose the image quality of the virtual machine is lower than the default. In that case, VirtualBox will notify you as in the window below. To change the color mode of the virtual machine from 8 Bit to 32 Bit, open Display Properties and change the value in Colors to True Color (32-bit).
Step 9
When you view Device Manager again, you can see that all drivers have been successfully installed.

Step 10
After installing the required driver package for the virtual machine, you can seamlessly transfer files between the host and your simulated computer using the convenient drag-and-drop method. Alternatively, you can easily copy text from any file and effortlessly paste it into the VM’s file.

Step 11
If you want to make the screen resolution of your Windows 2000 virtual computer full-screen according to your host’s monitor, click View / Full-Screen Mode from the tool menu and check.

How to Configure and Check Internet Connection
Internet connection may be required for virtual systems you set up with Oracle VM VirtualBox. Usually, the network settings are configured automatically after installation, but checking your link is still a good idea.
Step 1
After clicking the start menu, find CMD via the search box and run it. After opening the CMD command prompt, execute the ping 8.8.8.8 command and check your Internet connection by pinging the Google servers.

Step 2
Double-click the Internet Explorer shortcut after verifying your Internet connection, and the Internet Connection Wizard will open. In this window, select I want to connect to the Internet via a LAN connection option and click Next.

Step 3
In the next window, check the I connect via LAN option again and click Next.

Step 4
Configure the proxy server settings of your virtual computer as Automatic Discovery and continue.

Step 5
Select the No choice to avoid setting up an Internet mail account.

Step 6
After completing the Internet connection wizard, click Finish and close it.

Step 7
When you close the wizard, and the Internet Explorer browser opens, you can test your connection by visiting the Google search engine website.
How to Configure Shared Folder
Creating a Shared Folder in the virtual machine lets you transfer files quickly through your host computer.
Step 1
Click Devices / Shared Folders / Shared Folder Settings on your Windows 2000 guest machine.

Step 2
In the Shared Folder window, click the green + button to open the Add Share window. Select a shared folder you created in the Folder Path location setting on your host’s desktop or another site.
Configure the shared folder as a network drive by checking the Auto-Mount and Make Permanent options.

Step 3
When you check the public folder on my computer, you can see the SharedFolder on the “VBoxSvr” location.
When you create a file or folder within the shared folder you established on your host, you can confirm the success of the sharing process by checking its presence in the corresponding location on your VM.

Step 4
This time click on My Network Places and go to the Shared Folder as indicated in the image below and check the access.

How to Use USB Flash Memory
You can use your USB flash drives or external storage devices inserted in your host on your virtual PC.
Step 1
First, insert a flash drive into your host’s USB 2.0 port and click Devices / USB / Kingston DataTraveler on your guest’s machine.

Step 2
To connect your flash drive to the guest operating system, click Devices / USB / Name of your USB from the Oracle tool menu.

Step 3
The flash memory you plug into your host’s USB 2.0 port will be automatically recognized on your Windows 2000 virtual computer. When you check My Computer, you can see your Removable Disk device. In the device manager underneath Disk Drives, you can see that the USB memory is working fine.
How to Increase Graphics Memory to 256 MB
When you install old operating systems such as Windows 2000 with Oracle software, the graphics memory can be 128 MB by default. You can increase this value by 256 MB by using the PowerShell tool from the location where your virtualization program is installed.
Step 1
Press Windows + R and then Run the DirectX Diagnostic Tool by executing the dxdiag command after opening it.
First, check that the Total Memory value in the Display tab in the DirectX tool is 128 MB.

Step 2
Open the location where Oracle VM VirtualBox is installed and click the right button while holding down the Shift key. Click the “Open PowerShell windows here” option in the open window.
Execute the following command in the PowerShell tool and change the Windows 2000 graphics memory to 256 MB.
./VBoxManage modifyvm 'Windows 2000' --vram 256
Step 3
After restarting your guest machine, execute the dxdiag command and check your virtual PC’s total GPU/Graphics memory value.

Video
Installing Old Versions
VirtualBox Version
YouTube Video
Slide
Related Articles
♦ How to Install Windows Millennium on VirtualBox
♦ How to Install Windows XP on VirtualBox
♦ How to Install Windows 7 on VirtualBox
♦ How to Install Windows Vista on VirtualBox
♦ How to Install Windows 8 on VirtualBox

Содержание
- Виртуальная машина Windows 2000
- Создание виртуальной машины для Windows 2000 Professional
- Установка Windows 2000 Professional на виртуальную машину
- Установите Windows 2000 Professional в VirtualBox
Джеремайя — младший сетевой администратор, который пользуется всем, что связано с технологиями и смежными областями, включая экологически чистую энергию и экономичные автомобили.
Виртуальная машина Windows 2000
Windows 2000 Professional может быть полезна для работы со старым устаревшим программным обеспечением, несовместимым с более новыми версиями Windows. Установить Windows 2000 Professional в Oracle VM очень просто. VirtualBox, работающий в Windows XP, Vista или 7.


Присвоение имени новой виртуальной машине и выбор ОС и версии
Создание виртуальной машины для Windows 2000 Professional
Первое, что потребуется, — это копия Oracle VM VirtualBox, которая доступна бесплатно в Интернете. Затем вам понадобится установочный компакт-диск Windows 2000 Professional или, возможно, резервная копия образа диска с исходного компакт-диска, а также ключ активации. Когда у вас будет все это, нам нужно будет создать новую виртуальную машину в VirtualBox.
Нажмите «Создать» в верхнем левом углу окна диспетчера виртуальных машин VirtualBox. Вы можете назвать свою новую виртуальную машину как угодно, но если вы назовете ее в честь операционной системы, которую вы будете устанавливать на нее (в нашем случае Windows 2000), она автоматически выберет Microsoft Windows в качестве «Операционной системы» и Windows 2000 в качестве операционной системы. «Версия». Эти две настройки просто помогают мастеру в создании виртуальной машины.
Пройдите через мастер, приняв рекомендуемый по умолчанию объем ОЗУ или выбрав больший или меньший объем для своих нужд. Вам будет предложено создать или выбрать существующий образ виртуального диска для использования с вашей новой виртуальной машиной. Это просто большой файл (размером несколько гигабайт, 4 ГБ по умолчанию для Windows 2000), который действует как виртуальный жесткий диск для операционной системы и любых программ, на которые нужно установить.
Вам будет предложено выбрать тип виртуального жесткого диска и будет ли виртуальный диск выделяться динамически или иметь фиксированный размер. Просто выберите тип изображения по умолчанию. Что касается использования динамического или фиксированного распределения, выберите фиксированное распределение. При использовании динамического выделения размер виртуального жесткого диска может увеличиваться (но не уменьшаться, когда дополнительное пространство больше не требуется) по мере необходимости, но может стать фрагментированным и повлиять на производительность виртуальной машины. Вы, опять же, можете выбрать диск фиксированного размера большего или меньшего размера, однако я настоятельно рекомендую как минимум 2 ГБ, если вы решите использовать виртуальный жесткий диск меньшего размера, чем 4 ГБ. Продолжайте работу с мастером, пока не завершите создание новой виртуальной машины.
Установка Windows 2000 Professional на виртуальную машину


Выбор пустого виртуального жесткого диска для установки Windows 2000
Установите Windows 2000 Professional в VirtualBox
Теперь мы, наконец, готовы загрузить нашу виртуальную машину и установить Windows 2000 Professional. Выберите свою виртуальную машину и нажмите «Пуск» в верхнем левом углу окна диспетчера виртуальных машин VirtualBox или дважды щелкните виртуальную машину, чтобы запустить ее. Когда вы впервые запустите новую виртуальную машину, вас встретит мастер «Первый запуск». Этот мастер поможет вам выбрать установочный компакт-диск или образ компакт-диска. При установке с компакт-диска выберите соответствующий дисковод на главном компьютере. Если вместо этого используется образ компакт-диска, перейдите к месту расположения образа и выберите его.
Завершите работу мастера «Первый запуск», и ваша виртуальная машина продолжит загрузку с установочного компакт-диска или образа. Начнется загрузка программы установки и, в конечном итоге, до вас спросят, как вы хотите отформатировать пустой виртуальный жесткий диск. У вас есть возможность форматирования с использованием старых файловых систем FAT или NTFS. FAT действительно полезен только для дисков, которые будут использоваться совместно с более старыми версиями Windows (которые не поддерживают NTFS) или Linux. Выберите NTFS и разрешите программе установки отформатировать виртуальный жесткий диск.
После успешного форматирования виртуального жесткого диска программа установки скопирует установочные файлы на виртуальный жесткий диск. Как только это будет завершено, программа установки перезагрузит виртуальную машину. На этом этапе вам может потребоваться извлечь установочный компакт-диск (или отключить образ компакт-диска), если ваша виртуальная машина попытается загрузиться и снова запустить программу установки. Виртуальная машина должна загрузиться с виртуального жесткого диска для завершения установки. После запуска этого процесса вы можете повторно вставить установочный компакт-диск или перемонтировать образ. Отсюда программа установки поможет вам настроить раскладку клавиатуры, настройки даты и времени, а также создать учетную запись администратора и присоединить виртуальную машину к рабочей группе или домену.
По завершении процесса установки Windows 2000 Professional продолжит загрузку на рабочий стол.
Эта статья точна и правдива, насколько известно автору. Контент предназначен только для информационных или развлекательных целей и не заменяет личного или профессионального совета по деловым, финансовым, юридическим или техническим вопросам.
This informative piece will guide you to successfully run Windows 2000 on a new virtual machine utilizing the highly efficient Oracle VM VirtualBox virtualization program. With our easy-to-follow instructions, you’ll be up and running quickly!
Windows 2000 or Win2K was developed for offices, workstations, and servers and is a highly stable NT core operating system version that is easy to use by general users. Service Pack 4 (5.0.2195.6717) is the last release, and extended support ended in July 2010.
It is not an operating system developed for users in general, but after the failure of the previous system, it started to attract available users as well.
Unlike the Windows 9x series running on DOS, the NT series started to attract a lot of attention from users with its high stability. Since then, Windows 2000 Professional, released for both workstations and clients, replaced Windows Me and subsequently led to the development of Windows XP SP1.
You can install and experience the Windows 2000 SP4 operating system on the virtual machine using the VirtualBox program by following this video or the steps below.
Step 1: First, download the ISO file of the Windows 2000 operating system from this link or a source on the Internet to your computer.
Step 2: After running the Oracle software, click the New button on its menu or shortcut tools and start the VM creation wizard.
Step 3: In the Name and Operating System window, type Windows2000 in the Name field and change the installation location in Machine Folder if you want to store the VM in a different place.
Step 4: In the Memory Size window, set a suitable RAM value for the Windows 2000 virtual machine according to the RAM capacity of your physical computer. Set a 4 GB RAM size as the minimum RAM value and continue.
Step 5: In the Hard Disk window, you must create a new virtual disk for the Windows 2000 virtual computer. Since the Create a virtual hard disk option is selected by default, continue directly with Next in this step. If you have a guest machine installed before, you can add your virtual disk file with the option to add an existing virtual HDD.
Step 6: Select the VDI (VirtualBox Disk Image) option in the Hard Disk File Type window. VHD, one of the other disk types in this window, is a virtual disk file used by Microsoft. VMDK, on the other hand, is the type of virtual disk used by other virtualization software such as VMware Workstation. Since the VDI disk type is the most suitable option for Oracle VM VirtualBox software, it is helpful to choose it.
Step 7: In the File Location and Size window, you can change the location where the virtual hard disk device will be stored. If you want to keep the virtual disk in a different place, click on the folder icon and select the folder you created on your physical computer. Finally, configure the capacity of the Win2K virtual disk to 4 GB.
Step 8: After creating the Windows 2000 virtual computer, click Settings to add the Windows ISO installation media to the guest machine and to make other virtual hardware settings.
Step 9: In the General / Advanced window, set the Shared Clipboard and Drag and Drop options to Bidirectional to enable file sharing between the virtual machine and the host physical computer.
Step 10: Set the first boot device as an Optical drive in the System / Motherboard window and turn off the Floppy device.
Step 11: If you want to configure more than one virtual processor number for Win2K virtual computer, enable I/O APIC on Motherboard hardware and configure this value as four virtual CPUs in the System / Processor tab.
Step 12: In the Display / Screen settings, enable the Acceleration option to better render 3D graphics in the VM and configure the Video Memory value as 128 MB.
Step 13: After making sure that the I/O Cache feature of the IDE controller is enabled in the storage settings, set the WindowsVista.vdi virtual disk file as SSD (Solid-State Drive) and finally click on Empty and then the DVD icon to add the Windows ISO file to the VM and click the image file. Add.
Step 14: After preparing the Windows 2000 virtual PC, click the Start button and start the installation.
Related Posts
1. How to Take and Use Snapshots
2. How to Install Windows 98
3. How to Install Windows 95
4. How to Fix Internet Connection in Windows 95
5. How to Fix Display Resolution in Windows 95
In this article, we will examine how to set up and configure Windows 2000 Professional on a new virtual machine using Oracle VM VirtualBox 7.0 on the Windows 11 operating system.

How to Set Up Windows 2000 on Windows 11 / 10 using Oracle VM VirtualBox 7.0
Windows 2000, originally called Windows NT 5.0, was released on February 17, 2000. This operating system from Microsoft is also known as Win2K.
The Windows 200 system, where file encryption, NTFS file system, and file compression features were improved, was mostly successful in corporate companies. Although it provides many new improvements compared to previous Windows versions in terms of system security, it was not a very useful system for home users due to system crashes.
The main support of the Windows 2000 operating system, which works very well on the server computers of the companies, was terminated on 30 June 2005, and its extended support was terminated on 13 July 2010.
Windows 2000 is a version that was not released as an update to Windows 98 or Windows 98 SE and includes four different versions;
- Windows 2000 Professional
- Windows 2000 Server
- Windows 2000 Advanced Server
- Windows 2000 Datacenter
Windows 2000 Professional edition was developed for desktop and laptop computers for personal use. However, nowadays there is no point in installing this operating system on your physical computer because a system without support can always get you in trouble.
So, if you want to use Windows 2000, you can install and use the virtual machine using virtualization programs such as VirtualBox or VMware.
How to Create a New Virtual Machine for Windows 2000
After installing VirtualBox on your host computer, you can open the virtual machine wizard and create a new VM and then install the Windows 2000 system.
Step 1
After running Oracle VM VirtualBox, open the virtual machine creation wizard by clicking the Machine / New option from the tool menu or the blue New icon.

Step 2
Type a name for the operating system you will install, select the operating system from the Version sections and click the Next button. Also, configure the location of the virtual system you will install from the Folder section to the host disk or an external HDD or SSD.
Select Other from the ISO Image section to add the Windows 2000 ISO file to the guest operating system you have prepared.

Step 3
From the table below the article, select the Windows 2000 image file you downloaded to your computer and open it.

Step 4
As soon as you add the image file, the Windows 2000 system will be determined automatically. However, if you want to continue with manual system installation, check Skip Unattended Installation and click Next.

Step 5
In the Memory Size window, configure the RAM size of 1 GB (1024 MB) for the Windows 2000 VM and click Next. You can also increase the performance of your guest system by increasing the number of virtual processors in this window.

Step 6
To create a new virtual disk for a clean Win2K installation, select Create a virtual hard disk now and click the Create button after configuring the disk size. If you have previously installed a Win2000 VM, you can add the virtual disk from this window.
In the 6.x versions of VirtualBox, select VDI (VirtualBox Disk Image) as the virtual hard disk file type during disk configuration. Configuring the virtual disk to Fixed Size improves virtual machine performance on computers with old hardware. However, since Fixed Size will reduce the capacity of the host disk, you can select the Dynamically Allocated option to allocate disk space from your host’s disk only as much as necessary.

Step 7
After checking the hardware summary of the Windows 2000 virtual system, click Finish to close the window.

Step 8
Click Settings to better adjust the settings of the virtual machine.

Step 9
In the General / Advanced tab, configure the file transfer and text copying features as Bidirectional between the virtual machine and the host PC by drag-drop or copy-paste method.

Step 10
On the System / Motherboard tab, configure the Optical device as the first row in the Boot Order section and disable Floppy.
Also, if you are going to use more than one virtual processor on a Windows 2000 VM, check the Enable I/O APIC option in the Extended Features section.

Step 11
Enable Nested Paging for better memory management between the host and VM in the Acceleration tab.

Step 12
For the better rendering of graphics in the virtual machine, enable the 3D Acceleration option and configure the Video Memory value to 128 MB.

Step 13
Check that the Host I/O Cache feature is enabled for the IDE controller in the Storage settings.

Step 14
Configure the Windows2000.vdi virtual disk file type as SSD (Solid-State Drive).

Step 15
Select the USB 2.0 (OHCI + EHCI) Controller to connect your USB devices to your virtual system.
 Controller")
Step 16
To install Windows 2000 with VirtualBox, run the virtual machine you created by clicking the Start button.

How to Install Windows 2000
After configuring the virtual machine correctly, from this step, you can install the Win2000 system as if you were installing Windows on a physical computer.
Step 1
In the Windows 2000 Professional Setup screen, press Enter to start the installation or press R to repair your system. You can press F3 to close the installation screen and end the installation.

Step 2
To read the full text of the license agreement of the Windows 2000 operating system, you must press the Page Down key. If you want to accept the license agreement directly, press F8 and continue.

Step 3
Press the C key to edit the unallocated disk space in the disk configuration window.

Step 4
Press Enter to confirm the disk space usage determined automatically by the installation wizard.

Step 5
After creating a new Partition on your virtual disk, press Enter to start the installation.

Step 6
Press Enter again on the relevant option to format the disk of the virtual system using the NTFS file format.

Step 7
Wait while the setup wizard formats the virtual disk.

Step 8
Copying Windows 2000 system files may take time depending on the performance of your host computer. Do not turn off your virtual computer while the system files are being copied.

Step 9
After the system files are copied, your virtual system will automatically reboot in 15 seconds.

Step 10
After your virtual PC restarts, wait while Microsoft Windows 2000 Professional opens.

Step 11
Click Next in the window that states that some information will be collected so that the Windows 2000 system can function properly.

Step 12
At this stage, the installation wizard will scan your system’s hardware and install the drivers.

Step 13
Configure the country you live in in the region settings window via the Customize button. Also, change the keyboard layout of your host computer and click Next.

Step 14
If you are only going to use the virtual PC, type your username in this step and continue.

Step 15
Type your Windows 2000 Pro SP4 product key and click Next.

Step 16
If you have more than one computer on the network, note that the computer’s name is different from the others. Also, if you want to set a password for the administrator account of the operating system, create a strong password and click Next.

Step 17
Configure your time settings according to the location of the country you live in and click Next after checking that the system date is correct.

Step 18
Select Typical Settings for your network settings and continue.

Step 19
If there is no server running an Active Directory service in your network environment, configure Workgroup with the No option.

Step 20
Wait while the setup wizard configures your virtual system’s start menu items and shortcuts, registry components, and settings.

Step 21
Click Finish when the Win2K installation wizard is complete and restart your virtual PC.

Step 22
After your system boots up, your network connections will be configured and prepared.

Step 23
Click Next when the Network Identification wizard opens to connect your virtual computer to a network.

Step 24
You can check the option above to have users who will use the virtual machine enter a username and password. Otherwise, if no one else is going to use a VM, you can use your default user account for login information.

Step 25
After completing the network diagnostic wizard, click Finish again and continue.

Step 26
While your virtual system boots up, wait while Windows configures Internet tools and system services.

Step 27
After Windows has configured the necessary settings, your desktop environment will be ready as in the image below.

Step 28
You can check the operating system version and version after right-clicking on My Computer and then clicking Properties.

How to Install Guest Additions
After installing Windows 2000 on the virtual machine, you need to install the Guest Additions software in order to use the hardware of your host computer on the virtual PC. This software is only required for Guest machines that you have installed on the VM.
Step 1
Before proceeding with the installation, you need to check the drivers that are not automatically installed on your guest machine. On my computer, first, click the right button and then Manage, then open the Computer Management tool and click Device Manager, then check the drivers with the exclamation mark.

Step 2
Click Devices / Insert Guest Additions CD image from the tool menu of the Win2K guest machine.

Step 3
If the Guest Additions installation wizard does not open automatically, double-click the VBox_GAs image in My Computer to start the wizard.

Step 4
When the Oracle VM VirtualBox Guest Additions wizard opens, click Next to continue with the installation.

Step 5
Always installing guest additions in the default location can avoid any problems, so click Next directly in the install location window.

Step 6
In this window, select the components you want to install and continue. If you want to enable Direct3D support, you need to install Guest Additions in safe mode.
NOTE: If you encounter the Digital Signature Not Found window during installation, always click the Yes button.

Step 7
After installing the Guest Additions software on Windows 2000, restart your virtual system.

Step 8
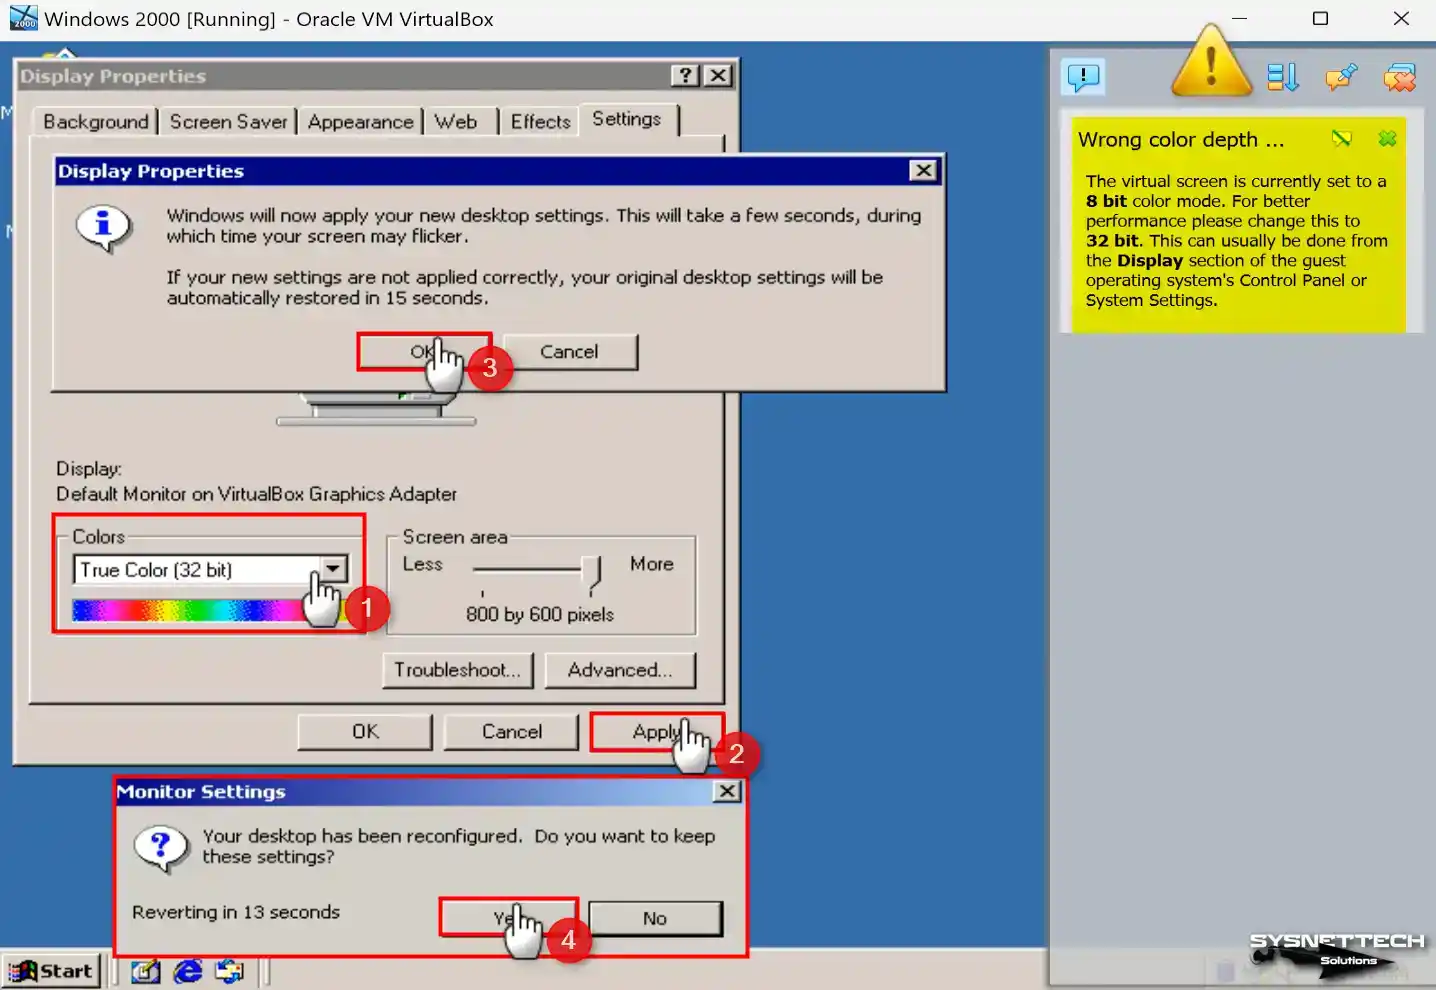
If the image quality of the virtual machine is lower than the default, VirtualBox will warn you with a notification as in the window below. To change the color mode of the virtual machine from 8 Bit to 32 Bit, open Display Properties and change the value in Colors to True Color (32-bit).

Step 9
When you view Device Manager again, this time you can see that all drivers have been successfully installed.

Step 10
After installing the necessary software for the virtual machine, you can now transfer files between the host and your virtual computer by drag and drop, or you can copy the text or texts in any file and paste them into the file in the VM.

Step 11
If you want to make the screen resolution of your Windows 2000 virtual computer full-screen according to your host’s monitor, click View / Full-Screen Mode from the tool menu and check.

How to Configure and Check Internet Connection
Internet connection may be required for virtual systems you set up with Oracle VM VirtualBox. Normally, the network settings are configured automatically after installation, but it’s still a good idea to check your connection.
Step 1
After clicking the start menu, find CMD via the search box and run it. After opening the CMD command prompt, execute the ping 8.8.8.8 command and check your Internet connection by pinging the Google servers.

Step 2
After verifying your Internet connection, double-click the Internet Explorer shortcut and Internet Connection Wizard will open. In this window, select I want to connect to the Internet via a LAN connection option and click Next.

Step 3
In the next window, check the I connect via LAN option again and click Next.

Step 4
Configure the proxy server settings of your virtual computer as Automatic Discovery and continue.

Step 5
If you do not want to set up an Internet mail account, select the No option.

Step 6
After completing the Internet connection wizard, click Finish and close it.

Step 7
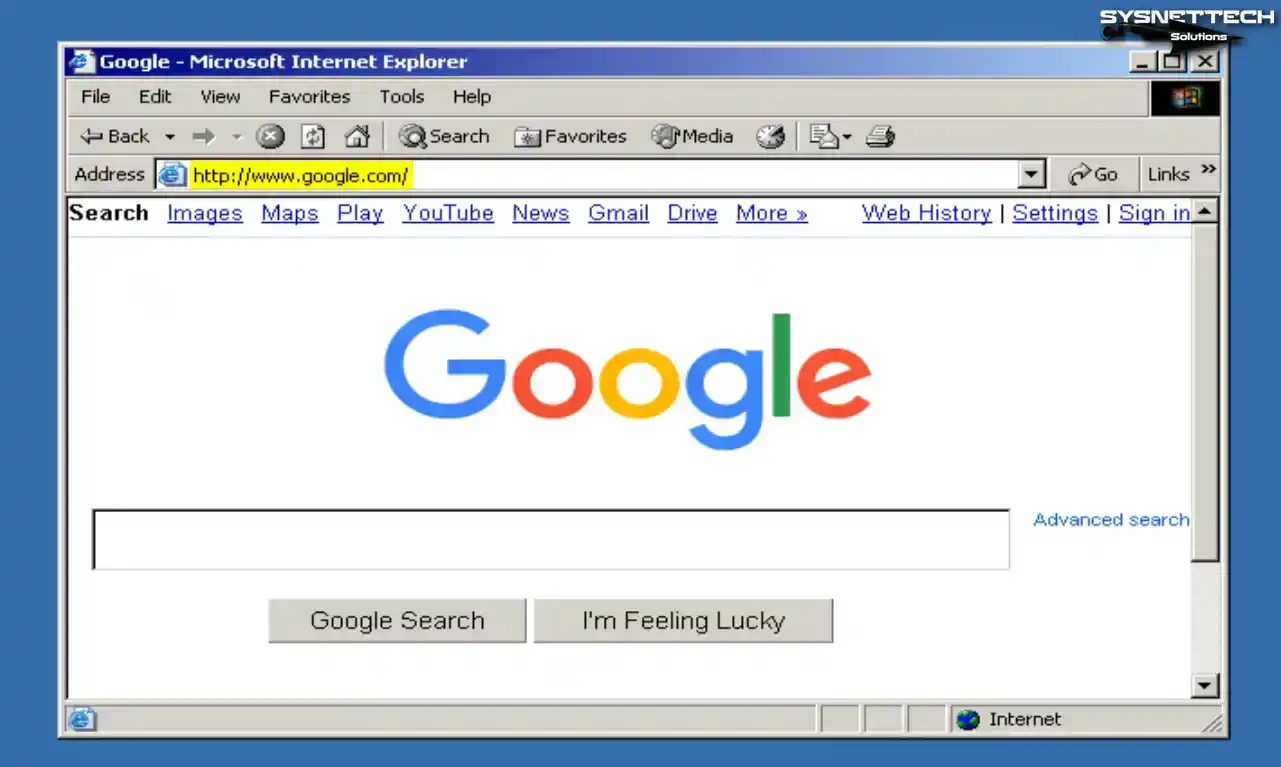
As soon as you close the wizard and the Internet Explorer browser opens, you can test your connection by visiting the Google search engine website.

How to Configure Shared Folder
By creating a Shared Folder in the virtual machine, you can transfer files more easily through your host computer.
Step 1
Click Devices / Shared Folder / Shared Folder Settings on your Windows 2000 guest machine.

Step 2
In the Shared Folder window, click the green + button to open the Add Share window and select a common folder that you created in the Folder Path location setting on your host’s desktop or other location.
Configure the shared folder as a network drive by checking the Auto-Mount and Make Permanent options.

Step 3
When you check the public folder on my computer, you can see the SharedFolder on the “VBoxSvr” location.
Create any file or folder in the shared folder you created on your host and when you check it from the location on your VM, you can see that the share is successful.

Step 4
This time click on My Network Places and go to the Shared Folder as indicated in the image below and check the access.

How to Use USB Flash Memory
You can use your USB flash drives or external storage devices that you have inserted in your host on your virtual PC.
Step 1
First, insert a flash drive into your host’s USB 2.0 port and click Devices / USB / Kingston DataTraveler on your guest machine.

Step 2
To connect your flash drive to the guest operating system, click Devices / USB / Name of your USB from the Oracle tool menu.

Step 3
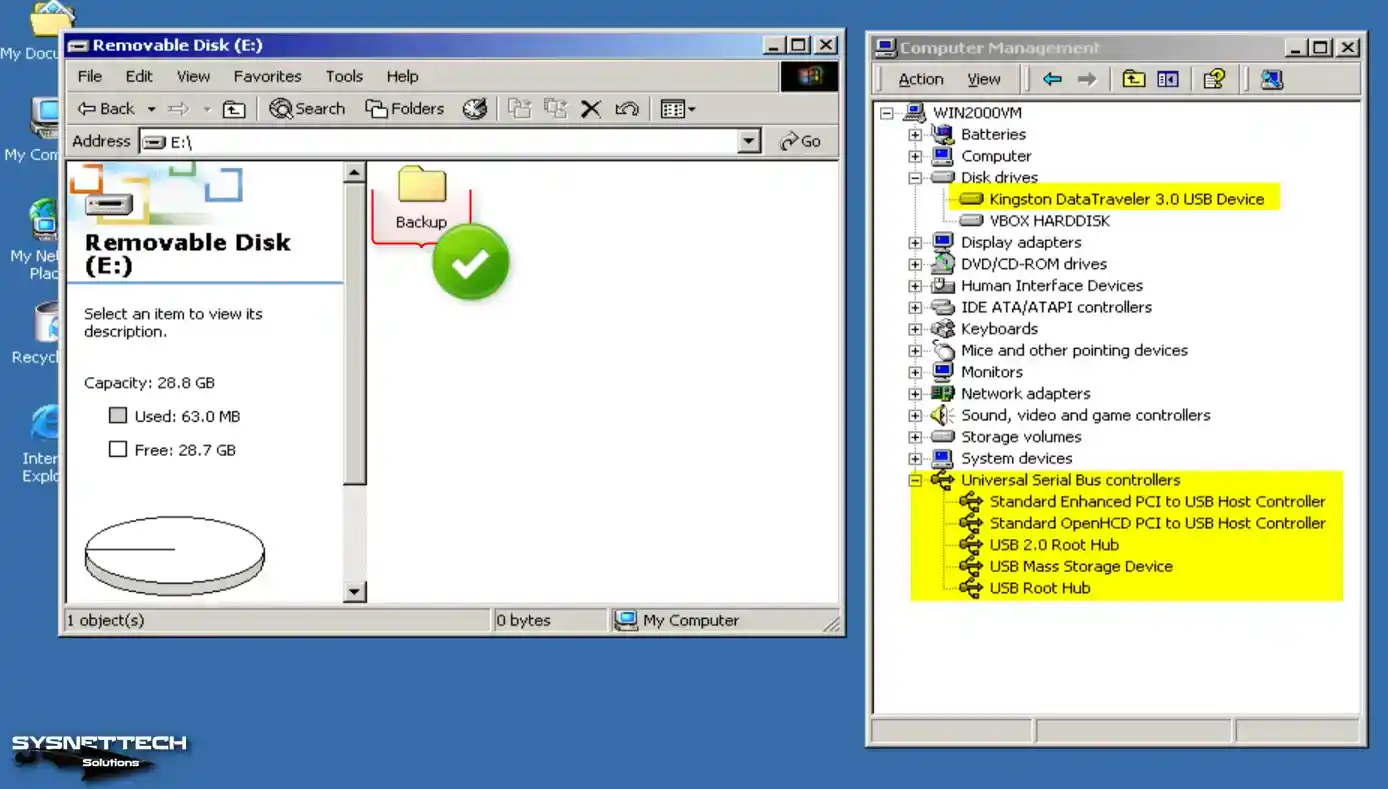
The flash memory that you plug into your host’s USB 2.0 port will be automatically recognized on your Windows 2000 virtual computer. When you check My Computer, you can see your Removable Disk device and in the device manager under Disk Drives, you can see that the USB memory is working fine.

How to Increase Graphics Memory to 256 MB
When you install old operating systems such as Windows 2000 with Oracle software, the graphics memory can be 128 MB by default. You can increase this value by 256 MB by using the PowerShell tool from the location where your virtualization program is installed.
Step 1
Press Windows + R and then Run the DirectX Diagnostic Tool by executing the dxdiag command after opening it.
First, check that the Total Memory value in the Display tab in the DirectX tool is 128 MB.

Step 2
Open the location where Oracle VM VirtualBox is installed and click the right button while holding down the Shift key there. In the window that opens, click “Open PowerShell windows here”.
Execute the following command in the PowerShell tool and change the Windows 2000 graphics memory to 256 MB.
./VBoxManage modifyvm 'Windows 2000' --vram 256
Step 3
After restarting your guest machine, execute the dxdiag command and check the total GPU/Graphics memory value of your virtual PC.

Video
Installing Old Versions
VirtualBox Version
YouTube Video
Slide
Related Articles
♦ How to Install Windows Millennium on VirtualBox
♦ How to Install Windows XP on VirtualBox
♦ How to Install Windows 7 on VirtualBox
♦ How to Install Windows Vista on VirtualBox
♦ How to Install Windows 8.1 on VirtualBox
Как-то давным-давно я пробовал установить себе Windows 2000 и посмотреть, что это такое. Сейчас я хочу просто показать, как её установить. Естественно я не буду её ставить на свой ПК или ноутбук, для этого есть классное изобретение – виртуальная машина. Покажу на примере VirtualBox. Ну что, узнаем, как установить Windows 2000?
Сначала нам эту древнюю ОС нужно откуда-то взять. Скачать Windows 2000 можно по этой ссылке. Там есть и ключи для системы и много чего полезного. Когда скачаете, можете записать на флешку, диск или установить на виртуальную машину, как я. Если не знаете, как ставить, например, на VirtualBox, прочтите статью об установке Windows XP на виртуальную машину.
Итак, допустим, вы запустили установку. Перед глазами мы видим синее окно, где нам предлагают:
- Приступить к установке Windows 2000 (нужно нажать Enter);
- Восстановить Windows 2000 (нужно нажать R);
- Выйти из программы установки. Если вы передумали, то нажимаем F3.

Нам нужен первый вариант. Жмём Enter.
Соглашаемся с лицензионным соглашением, нажав кнопку F8.

Появляется раздел, где необходимо разметить диск. При неразмеченной области нажмите клавишу «C».
Выбираем объем для системного диска. Думаю, 10 Гб бы хватило с лихвой. Это же Windows 2000. Но у меня памяти много, я оставлю 20 Гб. Жмём Enter.

В окне работы с дисками появился раздел «С:» неотформатированный. Чтобы его форматировать нажмите Enter.

Выбираем опцию «Форматировать раздел в системе NTFS».

Пошел процесс форматирования.

Сразу же начинается процесс копирования файлов на диск. Это еще не установка.

Компьютер перезагружается.

Ход установки Windows 2000
Запуск Windows 2000, а точнее установка этой операционной системы. Немного подождите, когда все инициализируется.
Наконец появилось окошко с выбором языка. Так как интерфейс окна русский, я менять ничего не будут. Просто нажму Далее.

Задаем имя и организацию. Имя обязательно.

Вводим ключ продукта. У меня он уже был в архиве документом. У вас должен быть там же. Если вы качали оттуда же. Вы можете попробовать переписать ключ со скриншота, как у меня.

Вот ключи:
W3P8R-TQW69-YX2KY-M4GR8-6WFHJ
GTH3Q-2MKP3-DPK7B-X4PB7-GX99J
В следующем окне вводим имя компьютера, а если хотите и пароль.

Указываем дату и время, а также часовой пояс. Можно отметить галочку «Автоматический переход на летнее время и обратно».

Пошла установка сетевых компонентов.

Окно сетевых параметров просит указать типичные параметры или особые. В нашем случае выбираем первый вариант.

Отмечаем первый пункт «Нет, этот компьютер не участвует в сети или сеть не имеет доменов».

Началась установка компонентов, точнее, полноценная установка Windows 2000.


Конец установки.

Наконец-то после перезагрузки появляется рабочий стол. Короче говоря, всё по стандарту – Корзина, Мои документы, Мой компьютер и Пуск. Что еще нужно для комфортной работы? Ну конечно, не браузер Internet Explorer хрен знает какой версии.

Теперь вы знаете, как установить Windows 2000 на своей ПК. Всем удачи в общем. Если есть какие-то вопросы задавайте. Думаю, Windows 95 мы устанавливать не будем. Эта версия край. Ее все равно никто не использует, но просто посмотреть на ход установки можно.
( 4 оценки, среднее 3.75 из 5 )