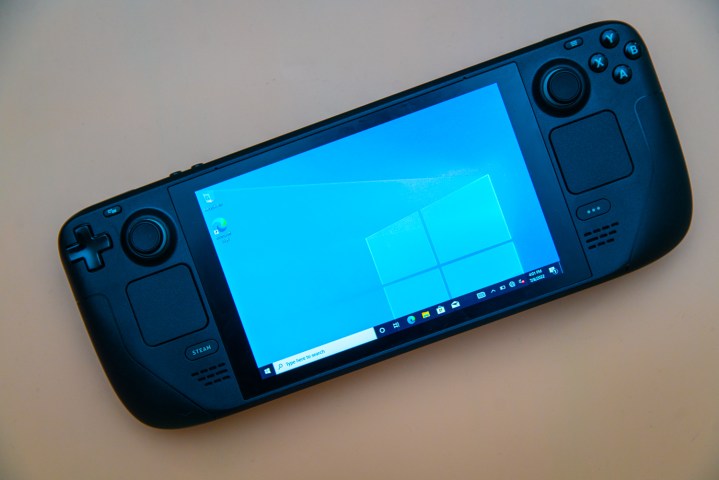
Steam Deck от Valve уже пользуется успехом у пользователей, которые добираются до работы и семьи на поезде, а возможность использовать свою библиотеку Steam на ходу очень заманчива.
Тем не менее, было выпущено новое обновление, которое позволяет пользователям устанавливать Windows 10 или Windows 11 на КПК, что позволяет использовать на деке другие приложения, а не только игры Steam.
Тем не менее, это не простое дело — легко запутаться в шагах, необходимых для установки Windows на КПК, поэтому мы составили это руководство, чтобы помочь вам.

- Приготовьте SD-карту и устройство чтения SD-карт
- Поместите Windows ISO на SD-карту
- Загрузите Windows из вашего Steam Deck
Steam Deck — действительно впечатляющая машина, нуждающаяся в более продвинутом программном обеспечении. Хотя это медленно приближается к нужному месту, вы можете захотеть скорее этим пользоваться. Вот как установить Windows 10 и 11 в Steam Deck, а также некоторая информация, которую вы действительно должны знать, прежде чем делать это.
В этом руководстве мы рассмотрим, как установить Windows с помощью MicroSD. Это не единственный способ сделать это, но, поскольку программное обеспечение все еще обновляется и меняется, наличие отдельного диска для загрузки Windows имеет смысл для долгосрочного использования. Это даст вам немного больше пространства для маневра за счет некоторой скорости загрузки.
- Микро SD
- Устройство чтения SD-карт
- Steam Deck
Как установить Windows 10 и 11 на Steam Deck
- Перейдите по этой ссылке и выберите версию Windows, которую хотите использовать. Я бы порекомендовал Windows 10 на данный момент, но Steam Deck может работать с Windows 11. После того, как вы выбрали нужную версию, перейдите к опции «Загрузить инструмент сейчас» и сохраните ее в нужном месте на своем компьютере. Не размещайте это на SD-карте.
- Скачайте Руфус по этой ссылке. Это позволит вам загружать Windows с USB-накопителя или, что более важно, с SD-карты.
- Зайдите на эту страницу Steam и скачайте там все драйвера. Это избавит вас от некоторых хлопот в долгосрочной перспективе и может избежать некоторых разочарований, когда у вас все загрузится. На данный момент есть драйверы для GPU, Wi-Fi, BlueTooth и SD Card Reader. Скачайте их все и поместите на свою Micro SD.
- Подключите SD-карту к компьютеру через картридер. Отсюда откройте Rufus и выберите SD-карту в меню устройства. Затем пройдите вниз и вправо, где написано «Выбрать», и выберите ISO-образ Windows, который вы установили ранее.
- Щелкните меню «Параметры образа» и выберите «Windows To Go». Затем в разделе «Схема разделов» выберите MBR. После этого откройте «Дополнительные свойства диска» и выберите параметр «Использовать MBR Rufus с идентификатором BIOS». Нажмите «Начать» и дождитесь окончания.
- Полностью отключите Steam Deck. Для этого удерживайте кнопку питания и нажмите, чтобы выключить.
- Подождите, пока Rufus завершит работу, затем извлеките SD-карту и вставьте ее в нижнюю часть Steam Deck.
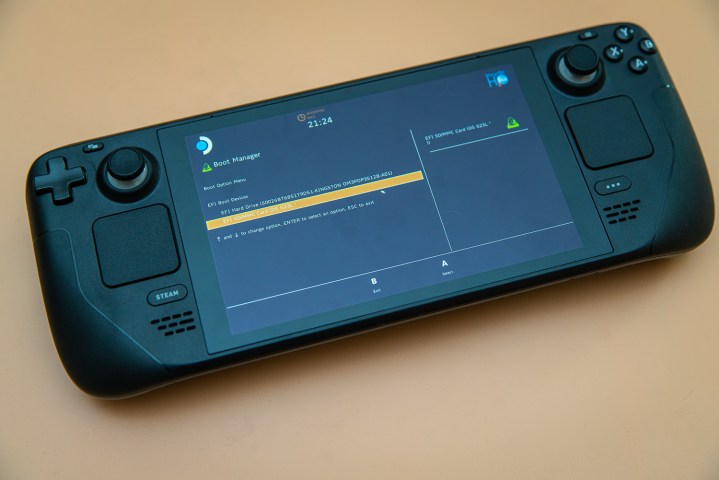
Boot manager
- Удерживайте нажатой кнопку громкости и кнопку включения, и Steam Deck должен войти в ваш «boot manager». Это может занять несколько секунд при первой загрузке, поэтому не беспокойтесь, если экран на секунду станет черным. Поскольку это все еще новое оборудование, могут возникать некоторые ошибки или проблемы.
- Из «Менеджера загрузки» спуститесь вниз и выберите свою SD-карту. Он должен автоматически начать работать при загрузке Windows. В первый раз, когда я сделал это, моя Steam Deck выключилась на полпути, и мне просто пришлось запустить ее снова, чтобы она заработала. Логотип Steam Deck будет переворачиваться при загрузке, показывая, что Windows переводится в портретный режим. Это хороший знак.
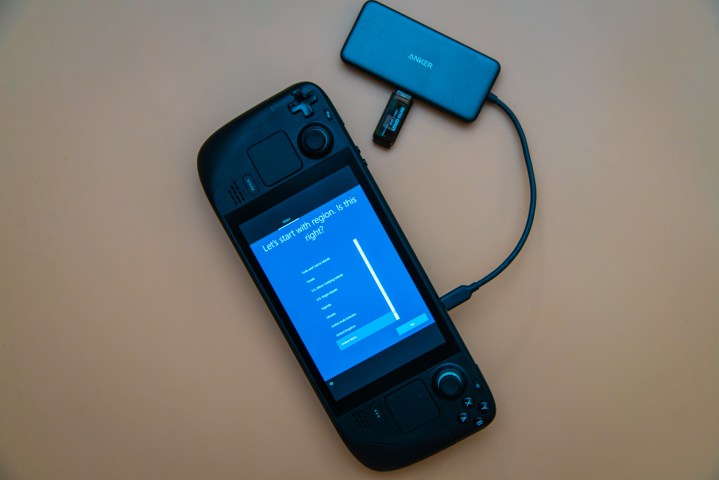
- После этого вам просто нужно продолжить установку Windows. Вы можете использовать сенсорную панель или боковые панели для перемещения мыши и триггеров для щелчка. Здесь вы можете использовать клавиатуру и мышь, но это не обязательно, чтобы все работало. Пропустите настройку Wi-Fi, поскольку сначала придется установить драйверы, а затем выполните установку. Теперь у вас есть Windows 11 на вашем Steam Deck.
Что делать после установки Windows?
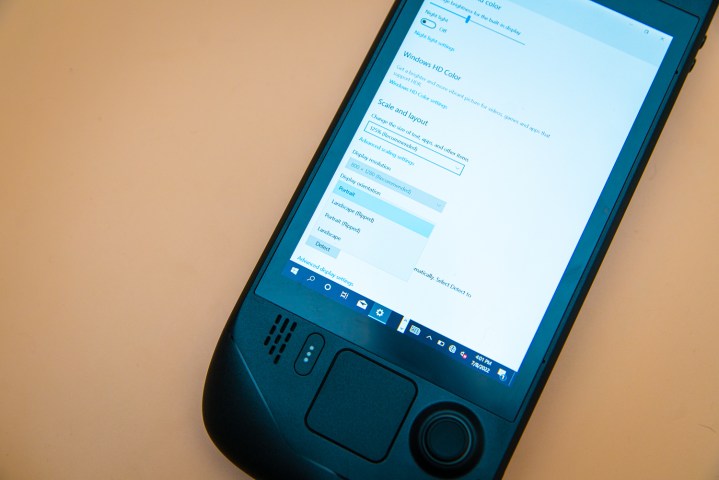
Сначала вы должны изменить ориентацию экрана на альбомную. Щелкните левой кнопкой мыши левым триггером, а затем нажмите «Настройки отображения». Если вы не можете заставить это работать, зайдите в меню «Пуск» и найдите его в настройках. Затем прокрутите вниз, чтобы отобразить и изменить его на альбомную ориентацию.
После того, как это будет сделано, у вас не будет доступа к Wi-Fi, Bluetooth и некоторым другим вещам, поэтому зайдите в проводник и найдите их на своей SD-карте (мы поместили их туда в подготовительной части этого руководства). Извлеките их все и установите их, чтобы все заработало. После установки драйвера графического процессора он может перевернуть экран обратно в портретный режим. Измените его обратно на пейзаж, и вы готовы к работе.
Последние мысли
Важно отметить, что Windows в Steam Deck — это то, что она все еще находится на ранней стадии. Постоянно будут выходить новые драйвера и обновления. Просто выключите Steam Deck, извлеките SD-карту и обновите все файлы, а затем установите их снова.
Конечно, вы можете установить их прямо из Steam Deck. На данный момент в нем по-прежнему отсутствует аудиодрайвер (уже исправили), поэтому вам, возможно, придется настроить Steam Deck с динамиком BlueTooth, чтобы получить наилучшие впечатления.
хостинг с тестовым периодом
Windows 11 and Windows 10 work on the Steam Deck with official Vale drivers, too. It’s not as simple as hitting a download button, though. In this guide, we’re going to show you how to install Windows on the Steam Deck, both to the internal solid-state drive (SSD) and from a microSD card.
Contents
- Boot from a microSD card or USB drive
- How to install Windows on the Steam Deck’s SSD
- How to recover SteamOS on the Steam Deck
- Troubleshooting Windows on Steam Deck
Windows isn’t perfect on the Steam Deck, but installing the OS (or booting from it with a microSD card) can help turn the Steam Deck into a laptop replacement. We’re going to show you how to do a full installation to the SSD, as well as how to boot to Windows from a microSD card. The latter will keep the original SteamOS install intact.
Before diving in, keep in mind that Windows 11 isn’t technically supported on the Steam Deck. Windows 11 requires TPM, and the Steam Deck doesn’t have that enabled. You can still install Windows 11 with the instructions below, but you may not receive Windows updates.
Don’t fancy going through all these steps? Why not to try the Asus ROG Ally instead. It has native Windows 11 support, and it’s faster, too.
Jacob Roach / Digital Trends
Boot from a microSD card or USB drive
Before actually installing Windows on the Steam Deck, I recommend you boot from a microSD card or USB drive first. This is completely reversible, so you can try out Windows without erasing anything on your Steam Deck. Windows isn’t perfect on the Steam Deck, and reinstalling SteamOS is a big task on its own.
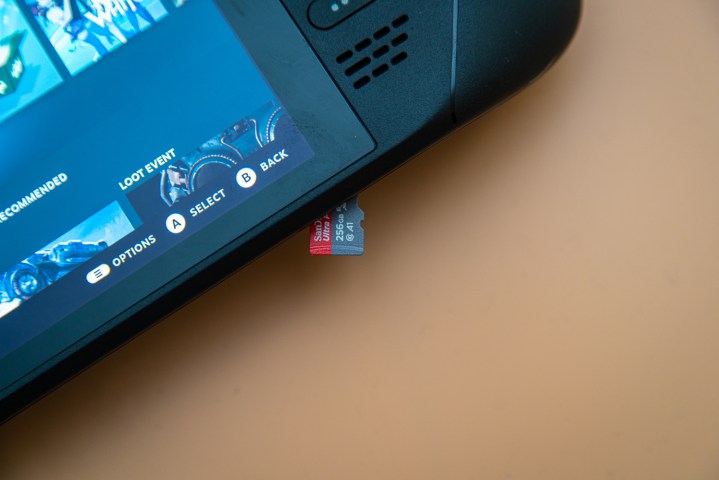
I’m using a microSD card, but any UHS-1 microSD card (check the label) or USB 3.0 drive with at least 32GB of storage will work. The Steam Deck supports Windows 10 and Windows 11, and the process is the same regardless of which OS you use. I’m using Windows 10 here.
Step 1: Head to Microsoft’s website and download the Windows 10 media creation tool. If you want to use Windows 11, download the Windows 11 creation tool (under Create Windows 11 installation media).
Step 2: Download Rufus, which is what will allow you to create a bootable version of Windows on your microSD card or USB drive.
Step 3: Download the Windows drivers for Steam Deck from Valve. Put them all in a folder together on a spare USB drive for access later.
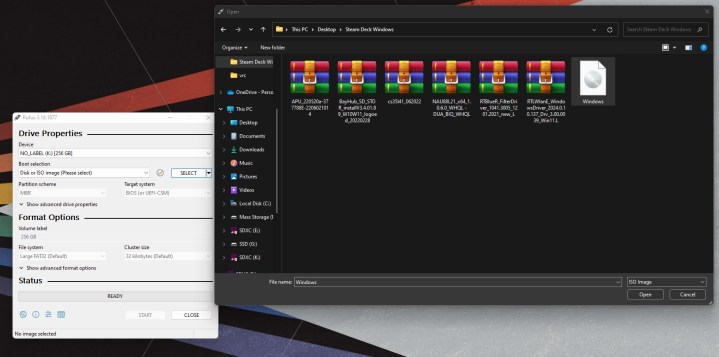
Image used with permission by copyright holder
Step 4: Open the Windows Media Creation Tool and select Create installation media. On the next page, choose ISO file, and choose a place to store it on your PC. Wait until the process is done, and make sure to keep a note about where you stored the ISO.
Step 5: Plug in your microSD card or USB drive and open Rufus. Note: Continuing here will erase all data on your microSD card/USB drive. In Rufus, select your microSD card or USB drive under Device. Then, choose Select next to the Boot selection section. Navigate to your Windows ISO that you created earlier.
Under Image option, select Windows To Go. Then, choose MBR under Partition scheme. Rename the drive if you want, and select Ready to start the flashing process.

Image used with permission by copyright holder
Step 6: Once it’s done, eject the microSD card and insert it in the Steam Deck. Turn off your Steam Deck completely, and then hold down the Volume down button as your power it on. This will enter the boot manager.
Jacob Roach / Digital Trends
Step 7: Select your SD card to boot into Windows. It will boot in portrait mode on the Steam Deck.
Windows doesn’t actually install here, so proceed through the setup process as normal by selecting your language, keyboard layout, etc. A keyboard and mouse help a lot here, but you can get through the setup with just the touchscreen.
Step 8: Once you’re in Windows, head to Settings > System > Display and find the Display orientation option. Select Landscape to flip the screen to the proper orientation.
Jacob Roach / Digital Trends
Step 9: Finally, plug in the USB drive that you stored the Windows drivers on. Plug it in using your USB-C hub (not directly into the Steam Deck) and install the drivers.
That’s it. When you reboot your Steam Deck, it will go back to SteamOS, but you can always boot into Windows provided you go through the boot manager.
Don’t mix up this process with dual booting. The Steam Deck doesn’t support dual booting at the moment, so you’ll need to choose either Windows or SteamOS if you want a permanent solution.

Jacob Roach / Digital Trends
How to install Windows on the Steam Deck’s SSD
If you want Windows only on the Steam Deck, you can install it directly to the SSD. You’ll need to erase all of the data on the SSD to do so, though, including your games, settings, and SteamOS itself. Valve has promised a native dual-booting option with a future SteamOS 3 release, but this hasn’t arrived yet.
It’s possible to restore SteamOS on the Steam Deck, but it’s a bit of a hassle. If you just want to experiment with Windows, use the method above. If you’re willing to dive into the full experience and don’t mind deleting your data, continue on.
Step 1: To start, you need to create a Windows installation drive. We outline how to do that in our guide on how to install Windows 11, but the process is straightforward.
Download the Windows media creation tool and create an installer on your USB drive. You’ll need a USB drive with at least 16GB of storage, but the tool will walk you through the steps otherwise.
Step 2: Power down your Steam Deck completely and connect your USB drive with a USB hub. Although you can connect the drive directly, I strongly recommend connecting it with a USB-C hub to avoid any issues. A keyboard and mouse are good for installation, too, and a USB-C hub will allow you to connect those peripherals.
Step 3: Power on the Steam Deck while holding the Volume down button to enter the boot manager. Select your USB drive with the Windows installer to continue.
Jacob Roach / Digital Trends
Step 4: Like before, Windows will boot in portrait mode. Select the Windows version you want and then choose Install now. I highly recommend connecting a keyboard and mouse here. You can get through installation with the touchscreen, but the Steam Deck’s keyboard and the touchpads won’t work.
You’ll be asked to activate Windows after. Enter your product key if you have it, or choose I don’t have a product key to continue.
Step 5: On the following screen, choose Custom: install Windows only. You’ll need to delete partitions on the Steam Deck in order to install Windows.
Important: This will delete all of the data on your Steam Deck, including your games, settings, and any saves/media that haven’t been uploaded to Steam Cloud. It’s possible to restore SteamOS later, but you’ll need to reinstall all of your games and reconfigure your settings.
Step 6: Choose a partition you want to delete and select Delete. I recommend choosing the largest of how ever many partitions you have. The 512GB model, at least, comes with eight partitions.
Step 7: Choose the partition you deleted, which should show up as Unallocated space, and select Next. Windows will begin installing on the drive.
Step 8: After a bit of time and an automatic reboot, you’ll load into the normal Windows setup. Proceed as you would above, selecting your keyboard layout, and language, and skipping the Wi-Fi section.
Jacob Roach / Digital Trends
Step 9: Windows is installed at this point, so all you need is a bit of cleanup. Head to Settings > System > Display and switch Display Orientation to Landscape.
Grab another USB drive with the Windows drivers for Steam Deck, and install them as well. SteamOS is gone now, so you’ll need to restore it if you want to go back.
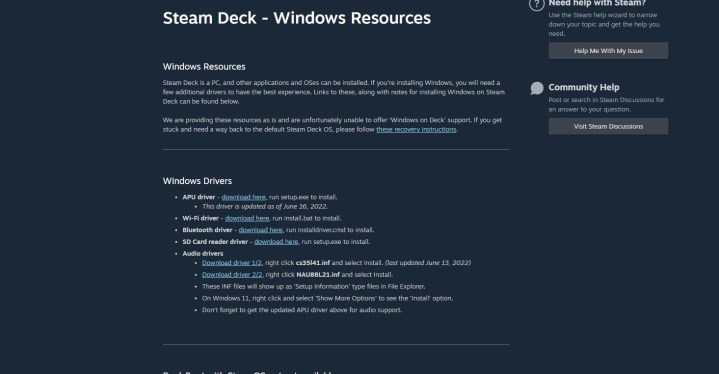
Image used with permission by copyright holder
How to recover SteamOS on the Steam Deck
If you installed Windows on the Steam Deck’s SSD and you want to go back, you can. Valve offers a Steam Deck recovery image that will get SteamOS back in working order — provided you’re OK with factory resetting your Steam Deck once again.
Step 1: To start, download the SteamOS recovery image from Valve.
Step 2: Download Rufus on a separate Windows PC and insert a USB drive. Write the SteamOS recovery image to the USB drive and eject it from your PC.
Step 3: Power down the Steam Deck completely and connect the USB drive using a USB-C hub. Hold the Volume down button while powering on the Steam Deck to enter the boot manager. Select your USB drive from there (it should be «EFI USB Device»).
Step 4: After some time, you will boot into the recovery environment. There are a few options here that will attempt to preserve your data, but I recommend using the Re-image Steam Deck option.
If you’re coming from Windows, you’ll need to factory reset the Steam Deck to get it working. Attempting the other options won’t keep your games if you’ve already installed Windows, and they could lead to some nasty file system conflicts.
Troubleshooting Windows on Steam Deck
-
If you are installing internally, make sure that the partition you choose is formatted as NTFS. Otherwise, it may not be compatible with Windows.
-
Some games will just run better in Steam OS than they will in Windows, especially with workaround methods. If you are running into performance issues with your game, it could be Windows: You may want to use our steps to revert to SteamOS.
-
Your games may need to be booted through Steam on Windows to use the Steam Deck control pad. There is also the SWICD workaround for games that aren’t on Steam, but that’s an extra step and customization process you’ll have to make time for.
-
Compatibility with audio drivers may be limited. Using Windows 11 and its latest updates is the best way to ensure you don’t run into audio issues.
-
For frequent Windows use on the Steam Deck, we highly recommend switching to a portable SSD instead of a microSD card
The Asus ROG Ally is a viable contender to the Steam Deck’s portable PC throne. Not convinced? Check out our head to head of these two system to see how the ROG Ally versus Steam Deck goes down.
Editors’ Recommendations
-
I can’t get excited about AMD’s next version of FSR anymore
-
Intel may have accidentally leaked the release date for Windows 12
-
Windows 11 adoption is slowing, and we finally know why
-
If you have an AMD GPU, stay away from the latest Windows Update
-
This HP gaming PC just had its price slashed from $830 to only $530
While SDHQ is nowhere near the first to cover this, I recently wanted to play the new Call of Duty: Modern Warfare II campaign on my Steam Deck. Its RICOCHET anti-cheat engine isn’t compatible with Proton, so my only choice was to install Windows. Windows is useful for other unsupported games as well, such as Fortnite and Destiny 2, which even bans players for attempting to play on their Steam Deck (c’mon Bungie!).
Before we begin, there are a few different ways to boot Windows on the Steam Deck:
- Alternative OS (Operating System) — This method involves using a separate device, like external SSD or Mircro SD card to boot Windows, keeping SteamOS dedicated to one device, and Windows dedicated to another.
- Dual Boot — Builds on the concept of an Alternative OS, but uses disk partitioning to share one section of a device with the other operating system. This method is especially useful if you have a large external drive or Micro SD card and want to use part of it for Windows, and the other part for extra game storage in SteamOS. Dual booting is not currently supported on the internal Steam Deck SSD.
In order to install windows on the Steam Deck, you’ll need a few things:
- A Windows PC. While there are Mac compatible methods available, the tools we will be using make the process simpler and are only available for Windows. Did you know you can install Windows on your Mac alongside MacOS? Check out Parallels (Paid) or Boot Camp (Free).
- A Windows 10 ISO or Windows 11 ISO. For Windows 10, follow the instructions to «Create installation media for another PC» and for Windows 11, download the ISO directly from the page.
- A disk image writing utility. A free tool, such as RUFUS is recommended.
- An external SSD or Micro SD card with at least 64gb capacity (256gb+ is recommended for gaming)
- The Steam Deck Windows drivers
- A USB adapter for your external SSD (optional)
Download the Windows ISO
From the Microsoft web pages linked above, download the ISO image of the operating system you wish to install. Note: You will need a valid Windows product key to remove the «Activate Windows» watermark, but you can install and use most of Windows’ features without activating. For this tutorial, we’ll be using Windows 10.
Creating your Windows Boot Drive
Plug your external SSD or Micro SD card into your computer. Open up RUFUS (no installation necessary) and select «yes» if prompted to allow RUFUS to make changes to your system. In the RUFUS UI, select your removable drive and the Windows ISO you downloaded earlier.

Under «Image Option» select «Windows to Go» and click Start
Note: Everything on this drive will be erased once you click Start, so make a backup if you are repurposing a drive.

Let RUFUS run its course writing the image. This can take anywhere from 5-25 minutes depending on the speed of your device.
Booting Windows and Installing Drivers
If this drive will be dedicated to Windows and no portion will be shared with SteamOS, then you’re almost done! Eject the drive, connect it to your Steam Deck, and access the bootloader by holding the Volume down button while powering on the Steam Deck. You’ll see a few options and will want to select «EFI — SD/USB» to access Windows. Windows will finalize the setup process and present you with the desktop.
At this point, you’ll want to install the Steam Deck drivers linked above. Simply run each setup.exe file and allow the installation to complete. For .inf drivers, right-click each one and click install. You’ll receive a confirmation message after each driver installs successfully. Windows will want you to restart the Steam Deck, so go ahead and do so using the Windows menu, and holding the volume down button to access the bootloader once the system starts powering on. Access the EFI SD/USB again, and you’ll be logged into a fully functioning Windows OS on the Steam Deck!
If you intend to split the drive’s capacity between Windows and SteamOS, power down your Steam Deck, insert your Windows SSD or Micro SD card into your PC, and follow the steps below. Otherwise, happy gaming!
Section 2: For Dual Boot ONLY
The sections below only apply if you’ll be sharing the drive capacity between Windows and SteamOS.
Let’s say you have a 1-2TB external SSD or Micro SD card you’re installing Windows on, and want a portion of that to be available to store games in SteamOS. There are a few extra steps required to partition and format the drive in a way where the space can be shared.
Note: Games installed via SteamOS will not be accessible in Windows. Even though both operating systems have access to the same physical storage device, Windows cannot read the Linux-based ext4 filesystem and each OS requires different user permissions to access the storage. You MUST install Windows first, as the process for creating a Windows to Go drive erases the entire disk. Therefore you cannot install to a partition on a drive currently used in SteamOS without erasing it. I tried a variety of tools to install and restore from an existing system image to no avail. Learn from my pain, install Windows first!
Partitioning
By this point in the guide, you have Windows installed on an external SSD or Micro SD card. Connect the drive to a PC and open Disk Management in Windows. You can find it by searching «partition» in Windows search. You’ll be presented with a list of disk drives connected to your computer. In the screenshot below, Disk 4 is my Windows to Go Micro SD card.

Right-click on the Windows partition and select Shrink Volume
Choose the amount of space to shrink your partition by. The space next to «Enter the amount of space to shrink in MB» will be the amount of storage available in SteamOS.

Once the operation completes, you’ll see a block of Unallocated Space on your disk. You’re all set on your computer and can eject your device.

Steam Game Library
Connect your SSD to your Steam Deck or insert the Micro SD card, and boot into Windows by holding Volume down during boot, and selecting «EFI SD/USB» from the bootloader menu. Once you’ve successfully booted into Windows, reboot your Steam Deck into SteamOS desktop mode. The next steps involve formatting the unallocated space with the ext4 filesystem, changing the partition permissions, adding the newly formatted space as a Steam game library, and if you’re using an external SSD connected via USB, editing the fstab to auto-mount the drive. Luckily, SDHQ already has a guide covering these steps.
If you’re using a Micro SD card, you can skip the steps about modifying fstab after adding the game library folder to Steam, since the Steam Deck automatically mounts the Micro SD card when powered on.
If you’ve gotten this far, you have a bootable Windows partition and SteamOS partition for use as a Steam games library folder! Happy gaming!

Короче я решил установить винду на мой стим дек после стольких заявлений о том, что на винде есть все что есть на стимОС но больше.
Действительно есть плюс от винды, например, ты можешь запустить exe файл без добавления в стим. Плюсы кончились.
Что касается минусов…их дохера. Начиная от инструкции, которую, я добывал потом и кровью так заканчивая тем, что мне пришлось делать после установки самой винды. Я обычный человек который никогда не ставил себе винду и вообще с установкой драйверов не шибко шарю. Поэтому то, что дальше будет написано это будет высказывание обычного чела, который просто хотел винду на стим дек, делающий все по инструкции.
Короче с установкой винды проблем не было, инструкция помогла. После этого начался какой-то попадос. Надо было скачать приложение которая все тебе закачит и тд. Добавил он мне типа Steam tool controller, который свистнут из стимОС и типа должен облегчить управление на винде. Сначала пришлось активировать винду 11 pro. Я в душе не шарил где искать ключ и тд. Доверился челу который типа нашел код который дает активацию винды. Все сделал как на видео и реально винда активировалась. Дальше я скачал оперу и стим. Опера работала хорошо но стим через жопу. Во первых этот стим не любит контроллер свистнутый из стим ос и поэтому он тупо соединил два контроллера в один, то есть нажимал один раз нажималось два раза. Короче чтобы этот бред пофиксить либо надо отключить до запуска винды контроллер либо перезапустить винду. Еще минус в том что это сука винда и на винде батарея жрется на угарелая, то есть ос стима даже со своими приколами можно 100% гарантией настроить так чтобы он работал так как ты ему сказал. У винды другой случай. Ты можешь ему поставить так же как на стимос но не факт что он сделает так как ты ему сказал. Игры из стима нельзя использовать с контроллером из ос стима не знаю почему это вообще бред я считаю. Не знаю как с другими играми, но тот же геншин тупо не хотел видеть этот санный контроллер, а он был в том приложении которая подразумевалась что ты все скачаешь для хорошего времяпрепровождения на винде. Валорант, например тоже не хотел запускаться и не просто не запускался ОН БЛЯ блокировал настройку вентиляторов. Тупо не давала доступ к вентилям и все время шумели. А говорили что все антивирусы нормально реагируют на винде
Короче я вообще не увидел плюсов от винды, только минусы. На стим ос есть все приложения и лаунчеры которые нужны для нормального запуска игр из других лаунчеров. Не совету. для новичков. Больше будите плакать чем радоваться.
2.4K
показов
1.7K
открытий
If you’re interested in trying Windows on Steam Deck baldsealion put together an amazing written guide detailing all the information and answers necessary to install it on the Steam Deck. Joey’s Retro Handhelds put together a video version, you can watch that above.
The Ultimate Windows On Steam Deck Guide
The guide goes over things such as the recommended OS Windows 11 or Windows 10, which external storage drive you should install Windows on, recommended drivers to install, how to increase the UMA buffer size, Windows OS tweaks to increase performance, installing Steam Deck tools which brings Steam OS features and more to Windows and more quality of life improvements.
You can check out the full written guide here.
SteamDeckAutomatedInstall Script
Someone also created an installation script that automatically installs most of the stuff mentioned in the guide above. You can checkout out that script here.
How To Dualboot SteamOS & Windows on the internal hard drive
How To Install Windows On An External SSD
To boot into your Windows drive, With the Steam Deck shut down, Hold “volume +” and press the power button. Go to Boot Manager and select the Windows OS hard drive.