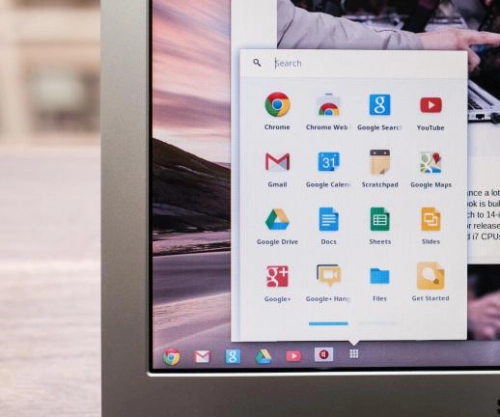
Between web apps and Android apps in Chrome OS, there’s a lot you can get done on Chromebooks. However, for those who have always used Windows-based products, it may not be a smooth transition. You may miss some of the Windows features. Or, maybe you’re just missing the familiarity of Windows.
Contents
- A warning
- Before you begin
- How to install Windows 10 on a Chromebook
- Alternative 1: Use Microsoft’s free apps
- Alternative 2: Use Chrome Remote Desktop
- Alternative 3: Use CrossOver
- Alternative 4: Use Google’s Project Campfire
You might not have thought it was possible, but you have a few different options for bringing some of that Windows goodness to your Chrome OS machine. There are many ways to make this work — and we can show you where to go. Here’s how to install Windows on a Chromebook.
Further reading
- How to rest a Chromebook
- How to take a screenshot on a Chromebook
- How to install Android apps on a Chromebook
A warning
Installing Windows 10 on a Chromebook is difficult, and the end result may not be great. For starters, manufacturers select specific components that complement Google’s lightweight, web-centric OS. Most mainstream models have less than 64GB of space, around 4GB of memory, and no dedicated graphics chips.
Additionally, both Google and Microsoft do not support Windows 10 running on Chromebook-focused hardware. That means you may not find Microsoft-certified drivers and must fall back on possible third-party solutions.
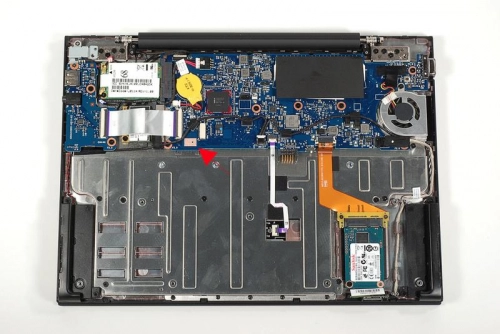
The biggest issue regarding Windows 10 on Chromebooks, however, is the process of installing Microsoft’s platform. Most Chromebooks include a write-protect screw on the motherboard that prevents you from installing any operating system. To get Windows 10 on the machine, you’ll need to remove the bottom shell, remove the screw from the motherboard, and then flash new firmware.
Finally, your Chromebook may not even have the hardware to support Windows 10. To determine if your Chromebook is compatible, check out CoolStar’s list.
With all that in mind, it is always worth considering our list of alternatives further down this article if you don’t want to completely hack your Chromebook.
If you still want to learn how to install Windows on a Chromebook, though, read on.
Before you begin
Before setting off on this grand hacking adventure of setting up Windows on your Chromebook, you should back up any important data you have on the system. Messing with your operating system, firmware, and BIOS can have serious effects on your system, and you could lose anything that isn’t otherwise protected.
If something does happen and you find yourself unable to use your Chromebook, you can create a USB drive from another computer to try and recover the system. This will erase all of your data, though, so backups are a must. Use Google Drive if you don’t have an external drive handy.
How to install Windows 10 on a Chromebook
It’s time to get to work. Here’s a step-by-step guide to installing Windows 10 on a Chromebook.
Step 1: First, gather the necessary tools listed above.
Step 2: Next, search online to find the write-protect screw’s exact location in your specific Chromebook model.
Step 3: Hold down the Power button until the Chromebook turns off.
Step 4: Flip the Chromebook over and remove the bottom shell.
Step 5: Locate and remove the write-protect screw.
Step 6: Put the bottom shell back on the Chromebook and plug in the power adapter.
Step 7: Press the Esc + Refresh + Power buttons to turn the Chromebook on in Recovery Mode.
Step 8: When the screen says Chrome OS is missing or damaged, press the Ctrl + D keys.
Step 9: Press the Enter key to turn OS verification off.
Step 10: The Chromebook should reboot into Developer Mode. When the screen states OS verification is OFF, press the Ctrl + D keys to boot into Chrome OS.
Step 11: After booting into Chrome OS, press the Ctrl + Alt + T keys simultaneously. This opens the Terminal.
Step 12: Type shell and press the Enter key.
Step 13: Type the following command and press the Enter key to download and run a script file with root privileges:
cd; curl -LO https://mrchromebox.tech/firmware-util.sh && sudo bash firmware-util.sh
Step 14: Type 3 and press the Enter key. This selects the Install/Update Full ROM Firmware option.
Step 15: Type Y to continue.
Step 16: Type U to install the UEFI firmware.
Step 17: Insert a USB drive to create a backup of the Chromebook’s current firmware.
Step 18: Turn off the Chromebook after the new Windows-friendly firmware installs.
Step 19: Go to your second PC and follow the instruction in our separate article, How to download a Windows 10 ISO file legally and install Windows 10 . You essentially use another USB stick to create a bootable drive that will install Windows 10 on the Chromebook.
Step 20: On your second PC, go to CoolStar’s website to see what Windows-based drivers you’ll need to install on the Chromebook. Find them and download them to the USB drive you previously used to back up the Chromebook’s original firmware.
Step 21: Connect a mouse and keyboard to your Chromebook and then install Windows 10 from the bootable USB drive.
Step 22: Once Windows 10 is installed, remove the installer USB drive and insert the USB with the downloaded drivers and update accordingly.
Image used with permission by copyright holder
Alternative 1: Use Microsoft’s free apps
Over the next few sections, we’ll cover methods to get the Windows-like hack-free experience without opening the Chromebook and installing new firmware.
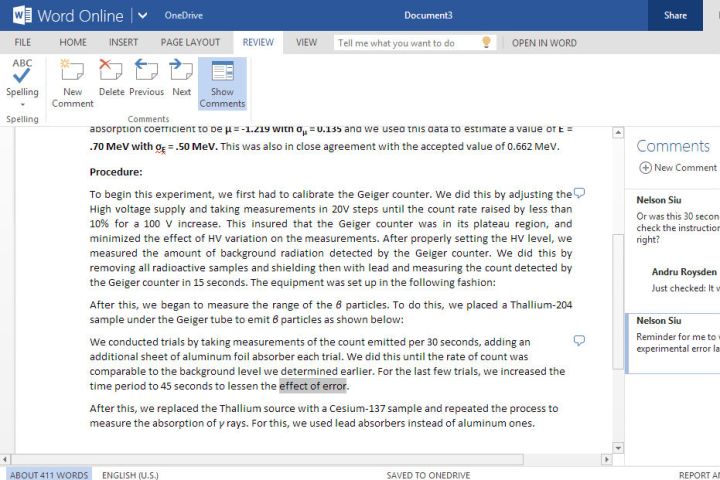
If you are primarily interested in accessing Microsoft’s office apps and don’t really care about any of the other Windows 10 apps, this is by far the easiest option.
Step 1: Launch the Chrome browser and navigate to the Office website.
Step 2: Log in to your Microsoft Account. You must have an account to use these free web-based apps.
Step 3: Select the web app listed on the left. It opens in the same tab — no downloads necessary.
Image used with permission by copyright holder
Alternative 2: Use Chrome Remote Desktop
Chrome Remote Desktop is software that simply allows you to access another desktop while using your Chromebook. In this case, it streams a Windows 10 PC to your Chromebook while enabling remote interaction via a mouse/trackpad and a keyboard.
The key to this method — and the caveat — is that you need that second Windows 10 machine connected to the internet. That’s the only way this works.
Step 1: With Chrome open on the Windows 10 PC, type the following in the address bar: remotedesktop.google.com/access.
Step 2: Click Download listed under Set Up Remote Access. This downloads and installs the host software.
Step 3: Choose a PIN with six or more digits and then click the blue Start button.
Step 4: Wait for the Windows 10 PC to read “online.”
Step 5: On the Chromebook, make sure it’s logged in to the same account, and type the following address in Chrome: remotedesktop.google.com/access.
Step 6: Click on the shared Windows 10 PC displayed under Remote Access.
Step 7: Enter the PIN you created on the Windows 10 machine and press the Enter key.
Step 8: Given screen sharing isn’t ideal in the Chrome browser, click the square icon with the angled up arrow in the address bar to move the screen to the Chrome Remote Desktop app.
Step 9: Click the blue and white button tucked away on the app’s right (or left) edge.
Step 10: Make the necessary changes, like selecting Full Screen, enabling clipboard optimization, and more.
You should now have remote access to the Windows 10 PC. You can move the cursor with the Chromebook’s trackpad, and type on the keyboard as usual. On the Windows 10 PC, you’ll see a small pop-up with a Stop Sharing button.
Note: This is a very good remote desktop app, but remote desktop solutions still have their pitfalls. They are highly dependent on internet connections and can experience delays at times. This works best if you have a high-speed internet connection between both computers.
Image used with permission by copyright holder
Alternative 3: Use CrossOver
CrossOver, by CodeWeavers, is a software solution that allows you to run specific OS apps on other operating systems. That includes running Windows software on your Chromebook.
Due to the software requirements involved, CrossOver isn’t available for everyone. Specifically, you can only run it on Intel-based Chromebooks. If you want to involve any Android devices or apps, they need to be compatible with Android 5.x or later. Also, certain functions like mouse locking (used often in FPS games) won’t function.
Next, CrossOver isn’t free. The current full version costs $40, whereas you can get the full version with 12 months of updates for $60. If you have money to blow, you can spend $500 to get the software with lifetime updates. At that price, however, you might as well buy a Windows 10 PC.
Here’s what you need to do:
Step 1: Enable Linux by opening the Chromebook settings and selecting Linux (beta). Follow the on-screen instructions.
Step 2: Visit the CodeWeavers website and enter your name and email address to access the free trial.
Step 3: Click the red Download Trial Now button. Chrome will retrieve a DEB file from the website and save it to your default download location.
Step 4: Locate and double-click on the download and click the blue Install button.
Step 5: Click the blue OK button to confirm. The app installs via Linux.
Step 6: Open the Launcher followed by the CrossOver app. You’ll likely find it within the Linux apps folder.
Step 7: Click the Install Windows Software button.
Step 8: A pop-up window appears. Click the Browse Available Applications link at the bottom to see what you can install. Alternatively, if you already have an installer, click the Select Installer tab instead.
Step 9: In many cases, you can confirm the software you want, and CrossOver will begin the installation process with no trouble. In some cases, you may have to choose the right installation file from a list, so pay close attention to file names and make sure you are choosing the one that you want. You may also have to consent to License Agreements and similar contracts at this time.
Step 10: After the installation is complete, you should have the ability to launch it directly. Remember that large programs will take up significant space, which not all Chromebooks have. Luckily, there are alternate ways to use Android apps on Chromebooks and save space.
Dan Baker/Digital Trends
Alternative 4: Use Google’s Project Campfire
We’ve got the impression that Google was quick to take up the idea of Windows-compatible Chromebooks several years ago. That connection would give users the chance to load and run Windows 10 through a dual-boot setup. Chromebook users with an eye for code may have caught sneaky references to “Alt-OS” within Google Chrome’s OS code. “Project Campfire” promised to blend the two operating systems together on a single device.
Google supposedly halted this project in 2019. We believe that Google may have switched their efforts to perfecting Android and Linux in Chrome OS. However, recent reporting suggests that the project may not be dead after all. Chrome in the Chromium Gerrit repository gives some indicators to Campfire running on Eve— that’s Google’s nickname for the Pixelbook. That specific code actually refers to an “Alternate OS mode,” similar to what we’ve seen before, and “HID for Eve sensors Alt-OS.”
One of the most notable features of Chrome OS is its excellent source of scarce system resources. Unfortunately, though, Windows 10 demands a lot more horsepower to fire up and run than any Chrome OS. So it’s likely that only higher-end Chromebooks, like Pixelbook, could have the capabilities to hold up to that OS requirement.
Editors’ Recommendations
-
The best 2-in-1 laptops in 2023
-
How to use Passkeys in Windows 11
-
Best Chromebook deals: Cheap laptops starting at $42
-
Chromebook vs laptop: Which is better and what is the difference?
-
9 best desktop computers of 2023: tested and reviewed
Хромбуки – специфические устройства, не предназначенные для работы с другими ОС. Но путем хитростей на них можно установить Windows.
Зачем?
Можно ли?
Как?
Хромбуки – самодостаточный нишевый продукт, ориентированный на выполнение специфических задач и предназначенный для поклонников серисов Google. Однако несмотря на четкое предназначение этих устройств, многие пользователи задаются вопросом: как установить на хромбук Windows?
Зачем?
На подобную операцию владельцев подвигают различные мотивы, один из наиболее частых – непонимание ситуации. Приобретая хромбук, потребитель удивляется, что на нем не работают привычные программы, нет кнопки «Пуск» или вообще рассматривает Chrome OS точно так же, как любую другую свободно распространяемую (читай: бесплатную) программу. Что греха таить, ведь покупая портативный компьютер, нередко отдают предпочтение моделям без ОС (или с какой-то из версий DOS/Linux) в расчете на то, что при первом же удобном случае сменят ее на нелицензионную версию Windows, самостоятельно или при помощи продвинутых знакомых.
Другими движет сугубо спортивный интерес: как сделать то, что производитель считает невозможным? Просто купить для работы с Windows обычный ноутбук или ультрабук им не подходит: слишком доступно. Куда заманчивее совмещать несовместимое!
И наконец, третья категория желает получить универсальное устройство типа «два–в-одном», сохранив Chrome OS для сетевой работы и дополнив ее Windows для полноценного использования привычных приложений, при запуске выбирая нужную систему.
Можно ли?
Теоретически параметры любого хромбука допускают замену операционной системы, ведь конфигурация начинки в большинстве ситуаций не слишком отличается от подобных устройств с Windows: процессор чаще всего из семейств Intel Atom или Celeron, 2 Гбайт ОЗУ и прочее вполне достаточно для нормальной работы ОС (исключение составляют модели со специфическими ARM-платформами, не поддерживаемыми продуктами Microsoft).
Единственное видимое ограничение – объем накопителя: 16 Гбайт, конечно, хватит для установки дистрибутива, но для работы и прикладного ПО оставшихся 2 Гбайт уже недостаточно. Проблему можно решить подключением внешнего накопителя или заменой встроенного SSD более емким (если возможно), хоть это и не самый лучший вариант.
Как?
Для перехода на Windows потребуется проделать ряд операций, поскольку изменения следует вносить не только в программную часть, но и в аппаратную. Как пример возьмем хромбук Google CR-48: процедура начинается с полной разборки устройства для того, чтобы отключить блокировку (защиту) внутреннего BIOS от перепрошивки. Подробная инструкция есть в Интернете, но если вкратце: нужно заклеить изолентой окно на специальном чипе.
Затем после сборки девайса необходимо перепрограммировать BIOS, заменив штатную прошивку альтернативной – она максимально близка к той, которая используется на обычных нетбуках. Операция сложная, для нее необходимо знание командной строки Linux, да и попасть в этот режим не очень-то легко. Кроме того, рецепты для моделей разных вендоров могут кардинально отличаться, наподобие процедуры рутинга смартфонов и планшетов. Если перезапись микропрограммы прошла успешно, дальнейшие действия не представляют особых затруднений: на стороннем компьютере создается загрузочная флеш-карта с образом Windows, в свежепрошитом BIOS
выполняются определенные настройки дисковой подсистемы и дальше производится инсталляция Windows в штатном режиме. В ходе установки вся информация на встроенном SSD будет уничтожена, так что рекомендуется сделать бэкап, если вы захотите впоследствии восстановить оригинальную конфигурацию (успех чего, кстати, не гарантируется).
После инсталляции и успешного запуска Windows придется найти и установить необходимые драйверы, без которых не будут действовать компоненты компьютера (тачпад, Bluetooth, звуковая и графическая подсистемы). Далеко не факт, что все из них удастся найти, к тому же не все устройства могут функционировать корректно – это неизбежная расплата за работу хромбука в нештатном режиме.
Выводы
Переделка хромбука в PC носит сугубо экспериментальный (и экстремальный!) характер: очевидно, что процедура представляет интерес лишь для энтузиастов. Объем усилий в сочетании с сомнительным качеством полученного результата заставляют сделать только один разумный вывод: для каждой задачи надо выбирать свой инструмент. Поэтому настоятельно рекомендую четко сформулировать собственные требования к портативному компьютеру и приобрести то, что нужно, чтобы потом не пытаться совмещать несовместимое.
Перейти к контенту

Chromebook – это небольшой ноутбук, на котором стоит операционная система Chrome. Но не всем пользователям импонирует эта оперативка. Что можно сделать в браузере? Только работать с браузером и сайтами. Конечно, можно установить Андроид-приложения, которые могут работать на Chrome OS. Офисом можно и от Гугла пользоваться, создавать презентацию, но многие привычные программы работать на Chromebook не будут. Поэтому большинство пользователей интересуется тем, как установить привычную Windows.
Внимание! Сразу следует предупредить, что Chromebook это не ноутбук от Google, это железо любого производителя, который решил установить на свой продукт Chrome OS. Поэтому перед установкой Windows, необходимо удостовериться в том, что в интернете можно найти все драйвера на устройство. Только после этого приступать к переустановке ОС.
- Необходимо сделать полную копию системы Chrome. Для этого следует перейти на chrome://imageburner, вставить в разъем USB внешний накопитель и нажать на кнопку на странице сайта «ОК». Все, пошла запись. Пользователю остается дождаться окончания процесса.
- Далее необходимо перейти в режим администратора. Это можно сделать, если одновременно прожать кнопки Ctrl + Esc + Referesh + Power. Через небольшой промежуток времени еще раз прожать комбинацию Ctrl + D. После выполнения данной операции все настройки, выполненные пользователем, исчезнут. Также каждый раз при включении система будет требовать прохождение верификации.
- Всплывающее окно можно убрать сочетанием Ctrl + D.
- После перезапуска системы необходимо нажать одновременно Alt + Ctrl + ->.
- В диалоговой строке вносим логин «Chronos».
- Далее необходимо написать команду, которая разрешает ноутбуку выбрать любой носитель для загрузки операционки – «sudo crossystem dev_boot_legacy=1».
- Перед установкой Windows необходимо позаботиться о дистрибутиве ОС.
- После ввода команды необходимо вставить носитель с инсталлятором Windows.
- Для запуска установки следует нажать на Ctrl + L.
- Далее начнется обычная установка Windows. Следует выполнять рекомендации, которые будут появляться на экране, вносить актуальные данные.
При каждом включении нужно будет нажимать на Ctrl + L (издержки неродной системы на железе). Однако в итоге получиться хорошая рабочая машина. Но не рекомендуется устанавливать Windows на Chromebook накопитель меньше 128 Гб.
Консультант сайта appleiwatch.name, соавтор статей. Работает с продукцией Apple более 10 лет.
We recently wrote two in-depth guides on how to install Chrome OS on PC and how to dual-boot Chrome OS and Windows 10 on a single machine. This was an effort to bring Chrome OS to users who have been using Windows for years. While people love the lightweight OS and snappy performance, it doesn’t take much time for users to realize the lack of Windows apps that they dearly loved.
Besides that, there are Chromebook users who want to install Windows 10 for native app support. So if you want to install Windows 10 on a Chromebook then you have come to the right place. In this article, we show you how to run Windows 10 on a Chromebook using a virtual machine. So without any delay, let’s get started.
Here, we have mentioned quick links so that you can navigate to various sections easily. I would strongly recommend you to go through all the points so that you can understand how we are going to run Windows 10 on a Chromebook.
Yes, the steps are lengthy but believe me, it’s the safest and probably the easiest way to run Windows 10 on a Chromebook. As we are going to use a virtual machine, there is no need to fiddle with system partition or anything.
Requirements
1. A powerful Chromebook featuring at least an Intel i3, i5, or i7 processor. If you have 4GB RAM (8GB would be nice) and 64GB storage then you are good to go. More the merrier.
2. A Windows 10 or Windows 7 ISO image. You can download a fresh copy of Windows 10 for free from here.
3. Linux support on your Chromebook. School Chromebooks tend to not have Linux support, but recently Google brought support for Linux containers on a few Chromebooks. So go ahead and check if you have Linux support. (Settings -> Linux (Beta) on the left menu -> Turn on).
Should You Install Windows 10 or Windows 7 on a Chromebook?
Before moving to the steps, you must know which Windows version would be a better pick for your Chromebook. To smoothly run Windows on a Chromebook, your Chromebook should have KVM support (Kernel-based Virtual Machine).
It allows your Chromebook to take full advantage of hardware acceleration using the built-in virtualization technology. I have mentioned the steps in the next section to find KVM support on Chromebooks.
If you don’t have KVM support then there is nothing to worry about. You can, of course, run Windows but the performance won’t be that good. In that case, I would recommend you to use Windows 7 as it’s bloat-free and much faster than Windows 10.
https://twitter.com/MaceMoneta/status/1289370308084813826
According to Chrome Unboxed, newly-launched Chromebooks (based on Hatch baseboard) are coming with built-in KVM support. The following are some of the Hatch-based Chromebooks available in the market. If you own any of these Chromebooks then the Windows performance will be much better and you can go ahead and install Windows 10 on your Chromebook.
- IdeaPad Flex 5i
- HP Chromebook x360 14c
- HP Pro c640 Chromebook
- ASUS Chromebook Flip C436FA
- HP Elite c1030 Chromebook
- Acer Chromebook 712 [C871]
- Acer Chromebook Spin 713 (CP713-2W)
- Samsung Galaxy Chromebook
So the bottom line is that if you have KVM support, go with Windows 10 and if your Chromebook does not support KVM then pick Windows 7. It’s not that non-KVM Chromebooks can’t run Windows 10, but it won’t be usable for even day to day task. And the installation process will take a much longer time.
Install Windows 10 on a Chromebook
Before we move forward, I want to clarify my specs so that you get a good idea about running a Windows 10 virtual machine on a Chromebook. I am using HP Chromebook x360 Core i5 8th Gen. It comes with 8 GB of RAM and 64 GB of storage. I have allotted 30GB to Linux disk space and my Chromebook does not support KVM. On the OS side, I am running Chrome OS Beta (86.0.4240.49). I am pretty sure this will work even on the Stable channel.
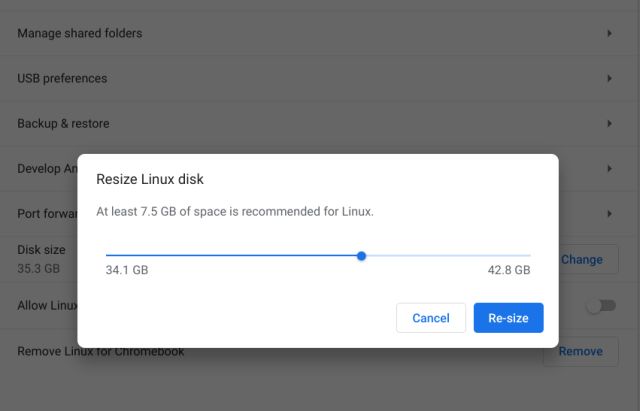
1. First of all, set up Linux on your Chromebook. Make sure to provide at least 25-35GB storage to Linux. If you have already set up Linux then you can increase the Linux disk size from Settings -> Linux (Beta) on the left menu -> Linux -> Disk Size. Here, increase the size to at least 25GB. If you are installing Windows 10 then increase the disk space to at least 35GB.
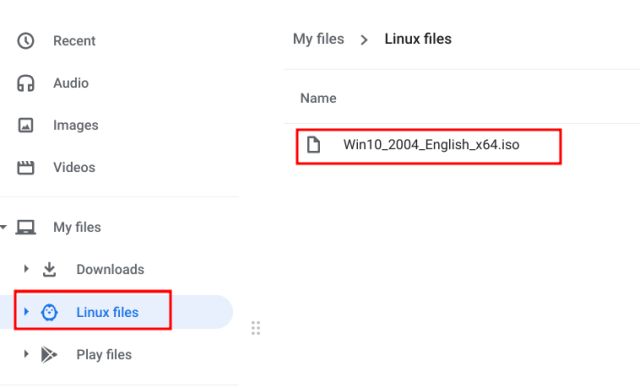
2. Next, move the ISO image of Windows 10 or Windows 7 in the Linux section of the Files app.
3. Now, open the Linux Terminal and run the below commands one by one to keep your Linux up to date. If you are doing this for the first time then it will take some time.
sudo apt-get update && sudo apt-get upgrade -y
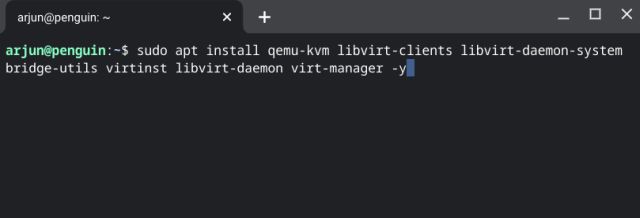
4. Having done that, run the below command to install Virtual Machine Manager on your Chromebook. For ease, just copy and paste the command in the Terminal and hit enter.
sudo apt install qemu-kvm libvirt-clients libvirt-daemon-system bridge-utils virtinst libvirt-daemon virt-manager -y
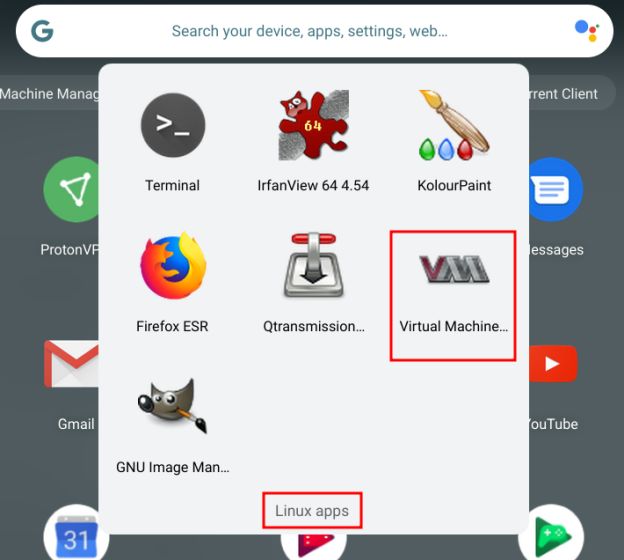
5. After the installation, open the App Drawer and move to the Linux apps folder. Here, open “Virtual Machine Manager”.
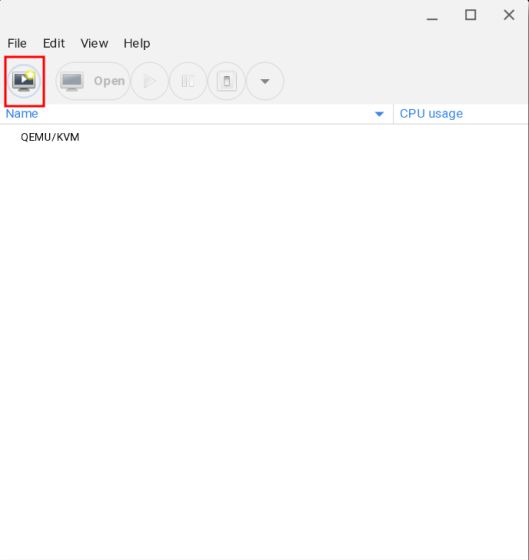
6. Once it’s opened, click on the “Create New Virtual Machine” button.
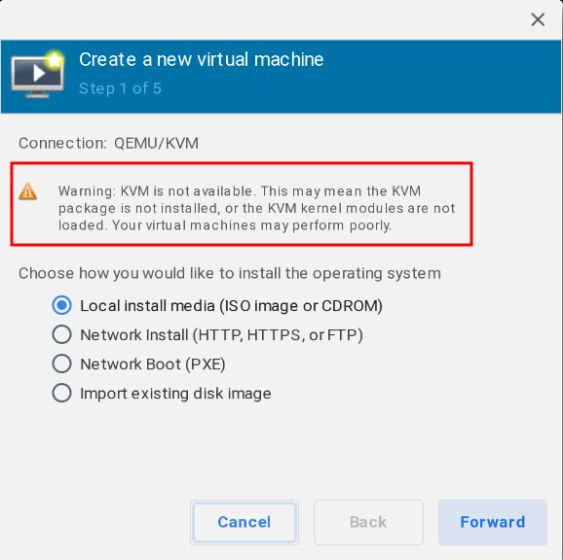
7. Here, you will find out if your Chromebook has support for KVM or not. For instance, my Chromebook does not support KVM so I should pick Windows 7. However, for this guide, I will be showing you how to install Windows 10 on a non-KVM Chromebook. The steps are almost similar for both operating systems.
Set Up Windows 10 Virtual Machine on a Chromebook
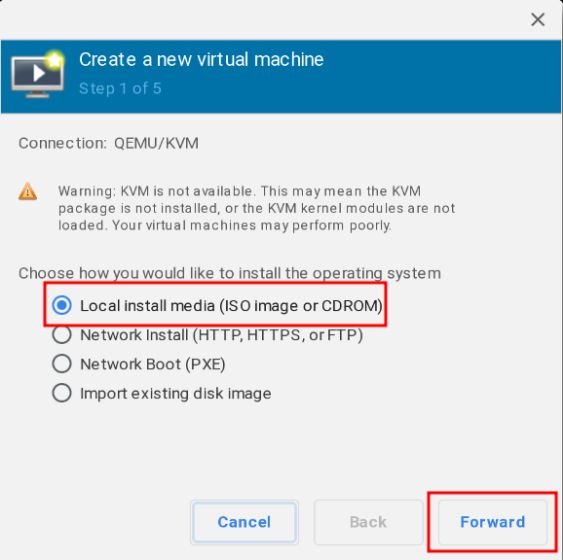
1. Choose “Local install media” and click on “Forward”.
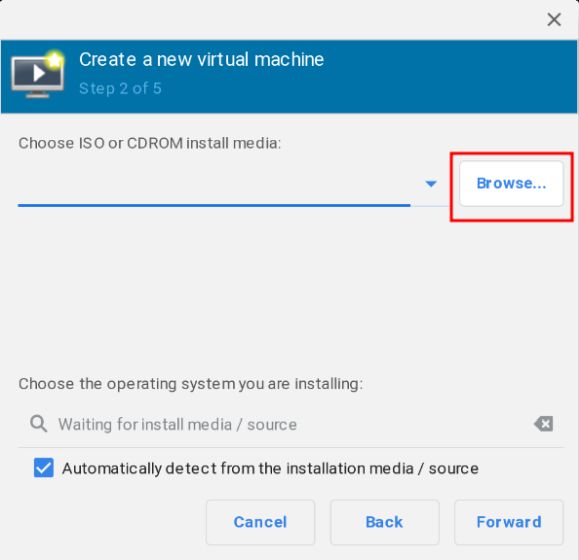
2. Here, click on “Browse“.
3. On the next screen, click on “Browse Local“.
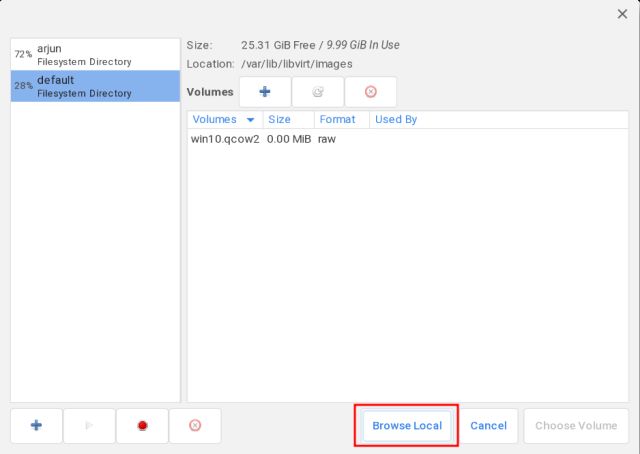
4. Select the Windows 10/7 ISO image that you moved to the Linux files section.

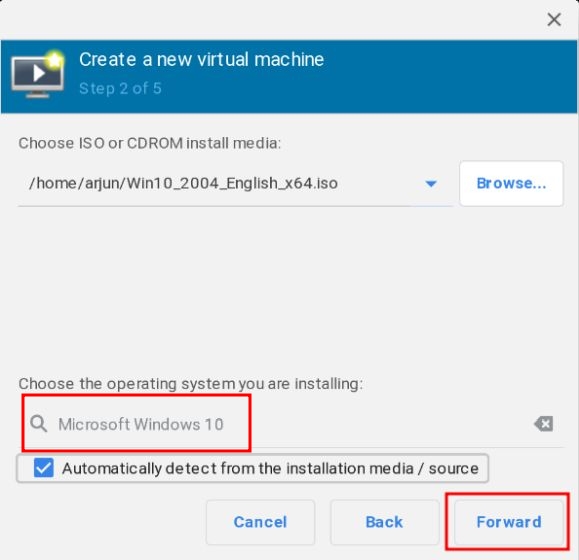
5. Once the selection is done, it will automatically detect the Windows version. For example, here it shows Windows 10. Now, click on “Forward”.
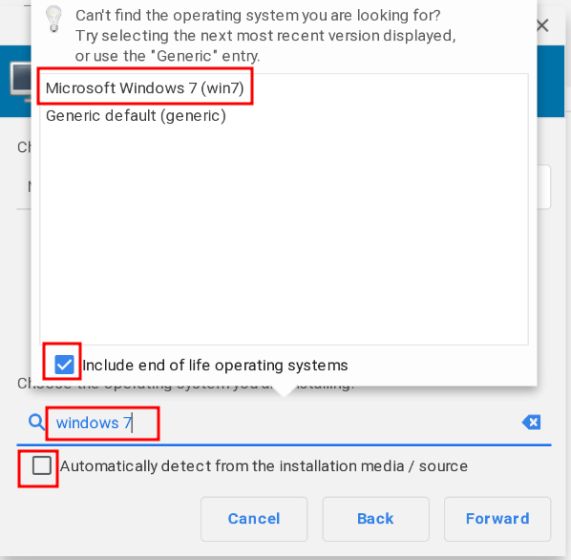
6. If you are installing Windows 7 then it won’t detect the OS automatically. In that case, you will have to first uncheck the Automatic checkbox and type “windows 7” manually. After that, enable the checkbox next to “Include end of life operating systems”. Windows 7 will now show up on the list. Now, just click on “Microsoft Windows 7” and click on the “Forward” button.
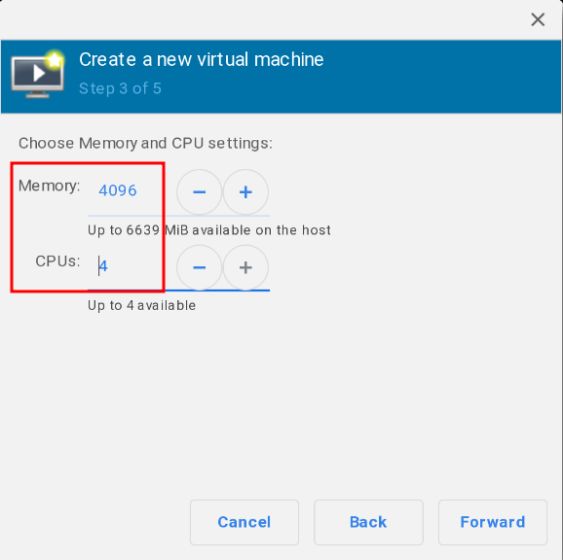
7. Here, enter how much memory and CPU cores you want to allot to the Windows virtual machine. I would recommend at least 4GB RAM and 4 cores if you are installing Windows 10. For Windows 7, 2GB RAM and 2 cores would do the job. But again, more the merrier.
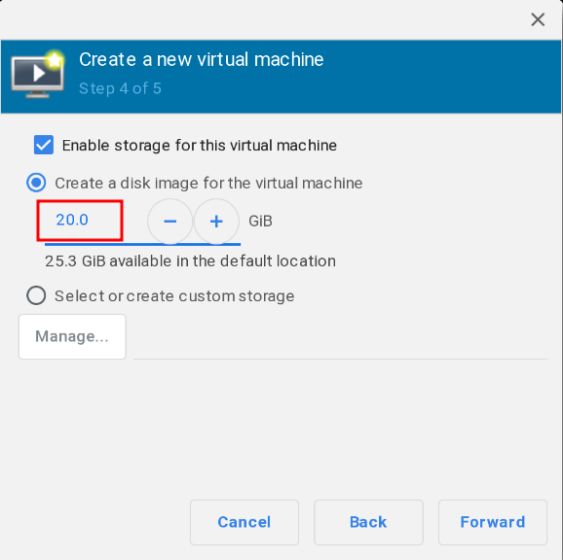
8. On the next screen, I have provided 20GB of storage for Windows 10. For Windows 7, you should at least provide 15GB of space. Click on “Forward”.
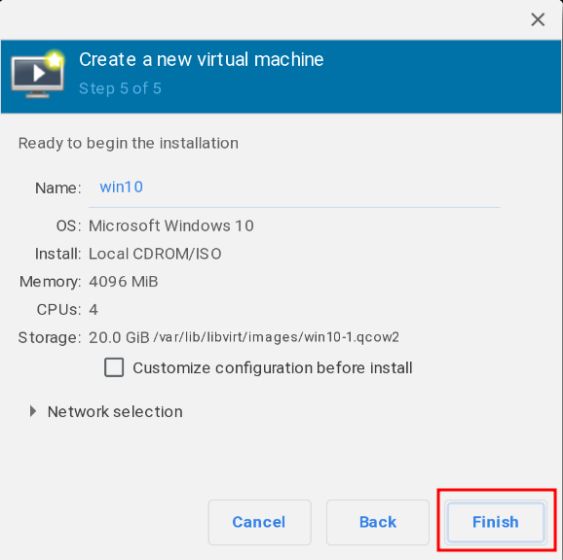
9. Finally, click on “Finish“.
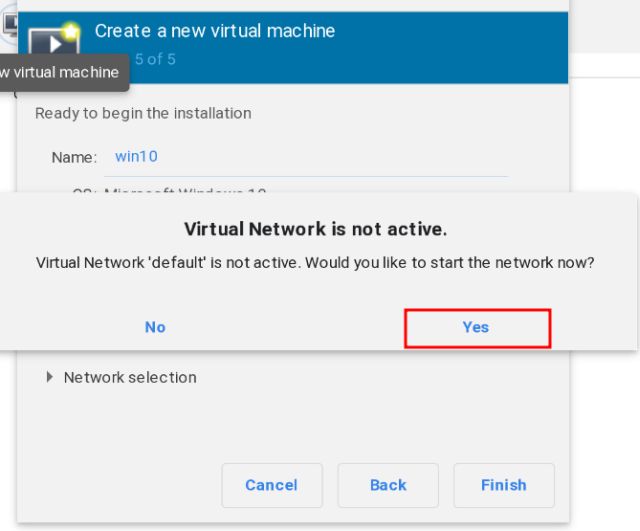
10. Once you do that, you will be asked to activate the Virtual Network. Click on “Yes“.
Run Windows 10 on a Chromebook
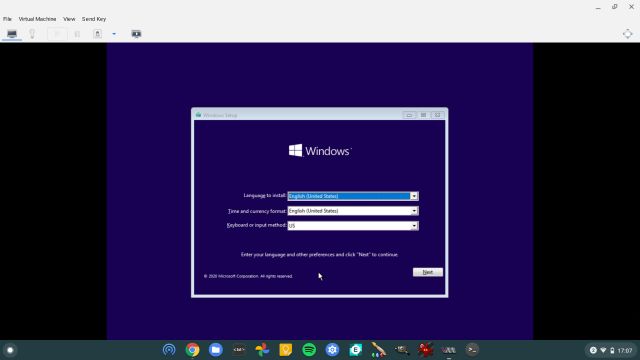
1. Within a few seconds, Windows 10 will boot inside the Virtual Machine (VM). Now, proceed with the installation just like you do on Windows. The best part is that the Windows VM has internet connectivity and sound functionality too.
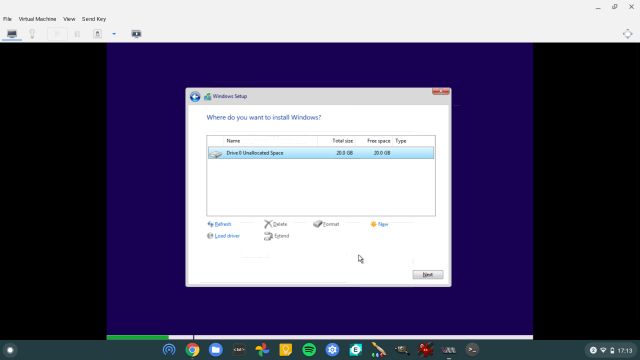
2. No need to fiddle with anything. Click on “Install Now” and then select the “Custom” option. After that, select the 20GB partition that you allotted and click on “Next”. That’s it.
3. Once you successfully boot into Windows 10, you can change the resolution to match your Chromebook’s resolution. For a full-screen operation, click on the “full-screen” button located at the top-right corner.

4. If you want to shut down the Windows VM, click on the “Shut Down” button. If it does not respond then click on File -> Quit. You can also force close the VM through Virtual Machine Manager. Right-click on the VM and click on Shut Down -> Force Off.
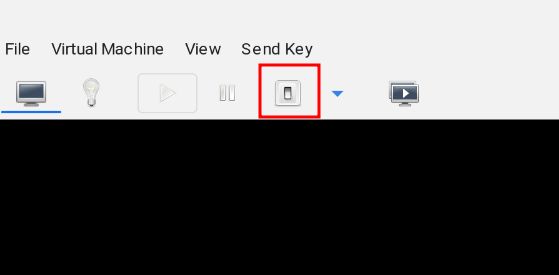
5. Now onwards, if you want to start Windows 10 on your Chromebook then you don’t have to go through all the steps. Just open Virtual Machine Manager and click on the “Open” button. After that, click on Virtual Machine -> Run from the top menu. You will directly boot into Windows will all your programs and files intact. No installation needed.

6. And if you want to completely delete Windows from Chromebook and free up space then first shut down the VM and then open Virtual Machine Manager. Now, right-click on it and select “Delete”. Do not worry, this won’t delete anything on your Chromebook as the VM is insulated from the rest of the system.
7. On the next page, make sure the “sda” target is checked, and then click on “Delete”. Within a few seconds, the Windows VM will be deleted and your storage will free up.

Use Windows 10 and Chrome OS Side by Side
So that is how you can install Windows 10 on a Chromebook. As I have mentioned above, the steps do look lengthy and complex but believe me, it’s quite easy and you can pull this off if you have a decent understanding of Linux.
Anyway, if you want to use Microsoft Office on a Chromebook without installing Windows 10 then go through our linked guide. Also, you can run any Windows app on Chromebook through Wine. You can even play popular games like Among Us on Chromebook. That is all from our side. If you are facing any issues then do comment down below and let us know. We will surely try to help you out.
Что вам нужно знать об этом процессе
Мы повторим еще раз: официально это не поддерживается. Для этого вам нужно будет установить замену BIOS для вашего Chromebook (технически это прошивка UEFI, которая является современной заменой традиционному BIOS). Это позволит вам загружать и устанавливать Windows. Запасной BIOS можно устанавливать только на моделях Chromebook, которые он поддерживает, поэтому вы не можете делать это на каждой модели Chromebook.
Вам также понадобится дополнительное оборудование. Для установки Windows вам понадобится USB-клавиатура и мышь, потому что встроенная клавиатура и мышь Chromebook не будут работать в установщике. И вам понадобится компьютер под управлением Windows для создания установочного носителя USB для вашего Chromebook.
Даже после установки Windows вы не выйдете из леса. Windows не поставляется с аппаратными драйверами для различных аппаратных средств, таких как сенсорные панели, встроенные во многие устройства Chromebook (что имеет смысл, поскольку производители Chromebook никогда не беспокоились о создании драйверов Windows для этих компонентов). Если вам повезет, вы найдете сторонние драйверы, которые были взломаны вместе, чтобы предоставить поддержку Windows для этих компонентов.
Это также, очевидно, уничтожит ваш Chromebook, поэтому убедитесь, что на нем нет ничего важного. (Вы не должны, поскольку Chrome OS обычно синхронизирует ваши данные с Google.)
Если ваш Chromebook когда-либо замерзнет или застрянет во время этого процесса, имейте в виду, что вы можете заставить Chromebook завершить работу, нажав кнопку питания и удерживая ее нажатой в течение десяти секунд или около того.
Будет ли это работать с вашим Chromebook?
Вы должны только попробовать установить Windows на Chromebook, если знаете, что ваша модель поддерживается. Вы также должны следовать инструкциям для своей конкретной модели Chromebook, поскольку шаги для разных моделей будут немного разными.
Вот некоторые полезные ресурсы:
- Windows на странице поддержки аппаратных средств Chromebook: на этом веб-сайте перечислены модели Chromebook, на которые вы можете установить Windows, с информацией о том, какие встроенные аппаратные компоненты будут работать и не будут работать после этого.
- Windows для Chromebook Installation Helper: этот веб-сайт позволяет вам выбрать вашу модель Chromebook и получить инструкции по установке для Windows, в комплекте со ссылками на драйверы, которые позволят использовать оборудование на вашей конкретной модели Chromebook.
- Chrultrabook Subreddit: сообщество, посвященное установке Windows на устройствах Chromebook. Если вы хотите найти дополнительную информацию о том, может ли Chromebook или конкретный аппаратный компонент поддерживать Windows, это хорошее место для поиска.
Если ваш Chromebook можно сделать для поддержки Windows, поздравляем. Мы рекомендуем следовать руководству по установке, аналогичному тому, которое содержится на сайте Coolstar Installation Helper, чтобы убедиться, что вы правильно настраиваете свою конкретную модель оборудования. Однако инструкции этого веб-сайта могут быть более подробными, поэтому вы, вероятно, найдете некоторую информацию в этом руководстве, которой нет в другом месте.
Мы предоставим вам помощь, пройдя вас через процесс установки Windows на Chromebook Acer C910 под кодовым именем YUNA. Процесс будет похож на другие модели Chromebook, но некоторые вещи, такие как расположение винта защиты от записи на материнской плате, будут разными.
Шаг первый: удалите винт защиты от записи
У Chromebook есть специальная аппаратная функция, которая не позволяет вам изменять BIOS. Чтобы отключить функцию защиты от записи, чтобы вы могли заменить BIOS на большинстве Chromebook, вам нужно открыть Chromebook, найти винт защиты от записи на материнской плате и удалить его. На некоторых устройствах Chromebook вместо этого вы можете найти переключатель защиты от записи.
Во-первых, выключите Chromebook. Не просто спать — выполните полное завершение работы. Переверните Chromebook и отвинтите дно, чтобы получить доступ к материнской плате. На нашем Chromebook это потребовало отвинчивания 18 винтов, прежде чем мы смогли снять пластиковую панель. Не забудьте потерять их! (Магнитный лоток для деталей — замечательная вещь.)
Шаг второй: включить режим разработчика
Теперь вам нужно включить режим разработчика, чтобы вы могли изменить программное обеспечение Chromebook. Чтобы сделать это на современных устройствах Chromebook, нажмите Esc + Refresh + Power, когда Chromebook выключен. (Кнопка «Обновить» находится там, где клавиша «F3» будет на обычной клавиатуре.)
Ваш Chromebook загрузится и отобразит сообщение о том, что «Chrome OS отсутствует или поврежден».
Ваш Chromebook уничтожит все ваши файлы личных данных, после того как вы сделаете это, сбросьте настройки по умолчанию. Вам нужно будет снова войти в свою учетную запись Google. Однако все ваши важные данные должны синхронизироваться с онлайн-сервисами, а не храниться на самом Chromebook.
Шаг третий: Вспышка новой BIOS
Из ChromeOS теперь вы можете запустить новый BIOS Chromebook. Нажмите Ctrl + Alt + T, чтобы открыть окно терминала.
Введите «shell» в терминал и нажмите «Enter», чтобы получить доступ к более мощной среде оболочки Linux.
cd ~; curl -L -O https://mrchromebox.tech/firmware-util.sh; sudo bash firmware-util.sh
Эта команда изменяется в ваш домашний каталог, загружает файл сценария https://mrchromebox.tech/firmware-util.sh и запускает его с правами root.
Обратитесь к веб-сайту разработчика, если вы хотите получить более подробную документацию о том, как работает этот скрипт.
Вам не нужно оставлять резервную копию BIOS на USB-накопителе. Вы получите файл.rom, который вы можете скопировать с USB-накопителя и сохранить в безопасном месте после завершения процесса.
Шаг четвертый: создайте установочный диск Windows
Теперь вы можете установить Windows на свой Chromebook, но сначала вам нужно установить установочный носитель Windows. Вы не можете, однако, сделать это с использованием официального метода Microsoft, вместо этого вам нужно будет загрузить ISO и записать его на USB-накопитель с помощью инструмента Rufus. Вам нужно будет выполнить эту часть процесса на ПК с ОС Windows.
Загрузите Windows 10 ISO от Microsoft. Нажмите «Загрузить инструмент сейчас», выберите «Создать установочный носитель для другого ПК» и скажите ему загрузить файл ISO для вас. Windows 8.1 и 7 могут работать или не работать с вашим Chromebook и его драйверами.
Подключите USB-накопитель к ПК. Вы будете использовать этот USB-накопитель для установщика Windows, и все файлы на нем будут удалены. (Поэтому убедитесь, что вы копируете что-нибудь важное, прежде чем продолжить!)
Запустите Rufus, выберите свой USB-накопитель и выберите «Схема разделов GPT для UEFI» и «NTFS». Нажмите кнопку справа от «Создание загрузочного диска с помощью» и выберите загруженный образ Windows 10 ISO.
Дважды проверьте, что Rufus фактически говорит «Схема разделения GPT для UEFI», прежде чем продолжить. При выборе файла ISO он может автоматически измениться на значение по умолчанию. После того, как вы дважды проверили все настройки, нажмите кнопку «Пуск», чтобы создать USB-диск установщика Windows.
Шаг пятый: установите Windows
Теперь вы готовы установить Windows на Chromebook. Подключите USB-накопитель к Chromebook и включите устройство Chromebook. Он должен автоматически загружаться с USB-накопителя, показывая вам установщик Windows. Если он не загружается автоматически с USB-накопителя, нажмите любую клавишу, когда на экране появится «Выбрать параметр загрузки». Затем вы можете выбрать «Менеджер загрузки» и выбрать свои USB-устройства.
С помощью USB-клавиатуры вы можете использовать клавиши Tab, стрелка и Enter для навигации по интерфейсу. С помощью мыши вы можете вытащить экранную клавиатуру и использовать ее для ввода.
Имейте в виду, что вам не нужен ключ продукта для установки и использования Windows 10. Вы всегда можете добавить ключ продукта или приобрести ключ продукта от Microsoft с Windows 10 позже.
Не беспокойтесь о Chrome OS, если вы хотите заменить Windows на Chrome OS, вы можете легко создать диск восстановления Chrome OS на любом компьютере под управлением Chrome и использовать его для восстановления исходной операционной системы Chrome OS.
Шаг шестой: установите сторонние драйверы для вашего оборудования
Теперь вы должны установить Windows, и Chromebook должен загрузиться в Windows при включении. Вы почти закончили! Вам просто нужно установить сторонние драйверы, чтобы как можно больше работать на вашем оборудовании. Для этого вам понадобится ваша USB-клавиатура и мышь.
Для этого откройте командную строку как администратор — щелкните правой кнопкой мыши кнопку «Пуск» или нажмите «Windows + X» и выберите «Командная строка (администратор)». Выполните следующую команду:
bcdedit -set testsigning on
Перезагрузите Chromebook.
Windows будет показывать предупреждение о безопасности при установке драйверов. Это потому, что это неофициальные драйверы сторонних производителей, которые не были созданы производителем и не подписаны Microsoft. Согласитесь, чтобы установить драйверы в любом случае. Если вы хотите использовать только драйверы, поставляемые производителем, вы не будете делать это в первую очередь!
Впоследствии все, казалось, правильно работало на этой модели Chromebook. Мы смогли отключить USB-клавиатуру и мышь и обычно использовать Chromebook. Кнопка «Поиск» на клавиатуре Chromebook даже становится ключом Windows.
