Skip to content

How-to Guide: Installing Oracle Virtualbox & Extension Pack on a Windows Server Machine

Table of Contents
- Introduction
- What is Oracle Virtualbox?
- Supporting Operating Systems as Guest OS
- What is the Oracle Virtualbox Extension pack?
- Steps for installing Oracle VirtualBox
- Installing Extension pack on Oracle VM Virtualbox Manager
- Conclusion
Introduction
What is Oracle Virtualbox?
Oracle VM Virtualbox is a free open source hypervisor to run on X86 server / desktop machines to host more guest operating systems on it independently and simultaneously. All the guest operating systems hardware is emulated by the host hypervisor.
Oracle VM Virtualbox software can be installed on various operating systems including Microsoft windows server & desktop OS versions, Linux, Mac OS, and Solaris hosts.
Supporting Operating Systems as Guest OS
Windows: Windows 2000, Windows XP, Windows Server 2003, Windows Vista, Windows Server 2008, Windows 7, Windows Server 2008 R2, Windows 8, Windows Server 2012, Windows 8.1, Windows Server 2012 R2, Windows 10, Windows Server 2016, Windows Server 2019

Linux: Linux 2.6 Kernel OS, Linux 3.X and later Kernel OS versions.
Other OS: Oracle Solaris 10 and 11 versions, FreeBSD and OpenBSD with limited support. And support for Mac OSX with restrictions and known limitations.
What is the Oracle Virtualbox Extension pack?
VirtualBox Extension Pack is an executable binary package intended to extend the functionality of VirtualBox. The Extension pack adds the following functionality:
- Oracle Cloud Infrastructure integration
- Support for USB 2.0 and USB 3.0 devices
- Intel PXE Boot ROM
- VirtualBox Remote Desktop Protocol (VRDP)
- Host webcam pass-through
- Disk image encryption with the AES algorithm
- NVMe – non-volatile memory express
Prerequisites :
- A server machine with enough storage space and RAM
- Basic knowledge of hypervisor technology & Networking
- Minimum one or two NIC
- Latest Oracle Virtualbox application downloaded from virtualbox.org
- Guest OS ISOs
Steps for installing Oracle VirtualBox
In this How-to guide, we are providing step by step instructions with screenshots to explain the process of installing Oracle Virtualbox 6.1.6 on a Windows 2019 server & Oracle Virtualbox Extension pack 6.1.6 over it.
Note: Before beginning the installation, make sure the host is connected to the Internet.
Step 1:
To begin, execute the installer “VirtualBox-6.1.6-137129-Win” with administrator privileges to install the Oracle VM Virtualbox 6.1.6 & Extension pack 6.1.6.

Step 2:
On the next screen, make sure all the features are selected – Virtualbox USB Support, Virtualbox Networking – Bridged Networking and Host-only Networking.
Note: Enabling bridged Networking will enable Guest OS’es to communicate with the host machine NIC adapter, and hence all Guests OS’es can communicate with each other and to the external world.
The total installation takes approximately 220 Mb of disk space, and later Guest OS’es occupy space depending on the disk storage used while creating individual VMs.
By default, the application will be installed on C:\Program Files\Oracle\Virtualbox directory, you can also change the installation directory in this step, after checking the Disk usage option.

Step 3:
On the next screen, The options are enabled automatically, click Next.

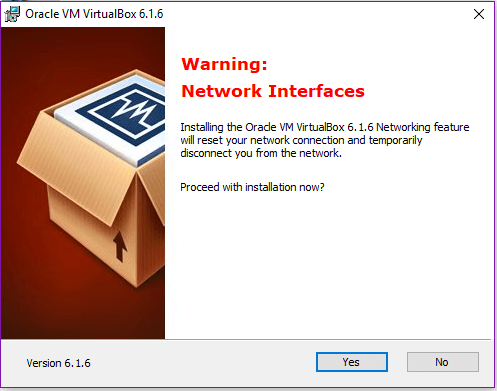
Step 4:
Before installation begins, you will get a warning message that Installing the Oracle VM Virtualbox Networking feature will reset your network connection and temporarily disconnect you from the network. Click Yes to proceed with the installation.
Step 5:
You will prompt to begin the installation. Click install.

Step 6:
Once after selecting Install, the Setup Wizard installs Oracle VM VirtualBox files, and it takes 10 to 15 minutes to copy all the relevant files into the selected installation directory.

Note: During installation, you will be asked to install USB device driver software and accept Install

Step 7:
Then, Installation continues and changes the running OS system registry values.

Step 8:
Once all installation files copied, and written system registry values, your installation will be finished. You can select the option “ Start Oracle VM Virtualbox after installation”. So you can straightway use the application

Step 9:
Once completed, Oracle VM Virtual Manager opens, this has two main tabs File & Machine

Under the File section, you can see various tools listed. Same are described below
Import Appliance – If you use another virtualization platform and have an export of an existing virtual machine in Open Virtualization Format (OVF or OVA), you can import the virtual machine into VirtualBox and use this to prepare the desktop template for further usage.
Export Appliance – Similarly you can export the existing virtual machine on Oracle VM Virtualbox into an OVF or OVA format, and can use it under another virtualization platform.
New Cloud VM – You can use this feature in Oracle VM VirtualBox to create new instances from a custom image on your cloud service.
Virtual Media Manager – Oracle VM VirtualBox keeps track of all the hard disk, CD/DVD-ROM, and floppy disk images that are in use by virtual machines. These are often referred to as known media and the same can be viewed and changed using the Virtual Media Manager.
Host Network Manager – Allows adding/removing host network adapters. By default, NIC will be added. If your host has more than one adapter, you can add another network adapter and can be leveraged for guest OSes.
Cloud profile Manager – The Cloud Profile Manager is a component of Oracle VM VirtualBox that enables you to create, edit, and manage cloud profiles for your cloud service accounts.
Both New Cloud VM and Cloud profile Manager are components that tightly work with the public Oracle cloud infrastructure.
On “Machine” Tab – You can add or create new virtual machines
Installing Extension pack on Oracle VM Virtualbox Manager
Here, we are going to install Oracle VirtualBox Extension pack ( same version ) on Oracle VM VirtualBox Manager.
Step 1:
Click Preferences → Extensions and Click Add + Symbol as shown below

Step 2:
Select downloaded path of the Oracle_VM_VirtualBox_Extension_Pack-6.1.6.vbox-extpack file
Step 3:
Click “Install” confirmation, and this will add Oracle VM VirtualBox Extension Pack successfully.

Conclusion:
In a few steps, a normal user can install Oracle VM VirtualBox and the same version of the Extension pack easily. This will be useful for basic learners who want to understand hypervisor technology, and how guest OSes are managed by hypervisors independently and simultaneously. Users are advised to install guest OS’es and configure networks independently to get more knowledge on hypervisor networking concepts.
Related Posts
Client Hyper-V vs VirtualBox
How-to Guide: Importing Oracle Virtualbox VM to Oracle Cloud Infrastructure
How-to Guide: Integrating Oracle VM Virtualbox to Oracle Cloud Infrastructure (OCI)
Follow our Twitter and Facebook feeds for new releases, updates, insightful posts and more.

On Windows Server (including version 2022, 2019, and older versions), you can install VirtualBox to create and run virtual machines, and in this guide, you will learn how.
Although the server version of Windows comes with the Microsoft Hyper-V feature, it’s also possible to use alternative virtualization solutions, such as Oracle’s VirtualBox, since it’s free and includes support for a variety of operating systems, including Windows 11, 10, Windows Server 2022, 2019, Linux, Solaris and OpenSolaris, and OS/2.
If you’re familiar with the installation of the virtualization application on the desktop version of Windows, the setup process for the server version is virtually the same.
This guide will teach you the steps to install VirtualBox on the latest version of Windows Server.
- Install VirtualBox on Windows Server
- Install extension pack for VirtualBox
To install VirtualBox on Windows Server, use these steps:
-
Open Oracle download website.
-
Under the “VirtualBox binaries” section, click the “Windows hosts” option and save the installers on the computer.

-
Double-click the VirtualBox-x.x.x-x-Win.exe file to launch the installer.
-
Click the Next button.
-
Click the Next button one more time.

-
(Optional) Clear the options you want to skip.
-
Click the Next button to begin the VirtualBox install process.
-
Click the Yes button to confirm the virtual network adapter install warning.
-
Click the Yes button to install missing dependencies (as necessary).
-
Click the Install button.
-
Click the Finish button.


Once you complete the steps, the VirtualBox setup will complete the installation on Windows Server 2022, 2019, or any other version you may have running on the server.
If you’re having issues installing the software, it’s likely because virtualization isn’t turned on in the motherboard’s Basic Input Output System (BIOS) or Unified Extensible Firmware Interface (UEFI). If this is the case, check your server documentation for more specific details on how to enable the feature.
Install extension pack for VirtualBox
To install the VirtualBox extension pack for Windows Server, use these steps:
-
Open Oracle download website.
-
Under the “VirtualBox Extension Pack” section, click the “All supported platforms” link to download the latest pack.

-
Open VirtualBox.
-
Click the File menu, select the Tools submenu, and choose the “Extension Pack Manager” option.

-
Click the Install button.
-
Select the “.vbox-extpack” file.
-
Click the Open button.
-
Click the Install button.
-
Click the “I Agree” button.
-
Click the OK button.
-
Click the OK button again.


After you complete the steps, the extension pack will be added to the setup of VirtualBox, enabling support for USB 2.0 and 3.0 devices, VirtualBox RDP, drive encryption, NVMe, and PXE boot for Intel Cards.
We may earn commission for purchases using our links to help keep offering the free content. Privacy policy info.
All content on this site is provided with no warranties, express or implied. Use any information at your own risk. Always backup of your device and files before making any changes. Privacy policy info.
You wanted to test something in the windows server operating system; maybe you want to create a domain controller, a DHCP server, or even a DNS server.
The best way to test the windows server configuration is to perform them on a LAB environment. And Some of you may not have lab access, so your available option would be to virtualize the windows server on a hypervisor.
That way, whatever you do on the machine will stay in a virtualized environment. There are multiple hypervisors you can use to spin up the Windows server. And in my last article, we had covered how you can install the windows server on a KVM host. And In this blog, we are going to install the windows server on a VirtualBox.
Can you run Windows Server in VirtualBox?
You can run most operating systems with VirtualBox, provided it should be bootable or a virtual hard disk. Most of the users out there will have Windows server ISO file, and it works perfectly fine. However, you have a choice from Microsoft to download the virtual hard disk in VHD format. You can use that as well to install the windows server on the VirtualBox. And the windows server works great with the VirtualBox.
To get better performance after the installation of the windows, you will also have to install the VirtualBox guest additions. We will cover that as well in this article.
How do I download windows server images for VirtualBox?
You can go to Microsoft windows server evaluation center and download the Version of your choice. When you choose the Version, you will have multiple options; you can either select ISO or VHD. After choosing the Version, you will have to submit the form and post which you will get a link to download the software.
When it comes to the installation, compared to the ISO installation, the VHD file is the easiest way; however, the VHD file size is about 8GB, so you need to be mindful of that.
We will see how we can install the windows server 2019 with both the ISO file and the Virtual hard disk file.
Though we are installing the windows server 2019 in a VirtualBox, the steps mentioned here are identical for other Version of windows as well, such as windows server 2016,2012 and so on.
Prerequisite.
- Download and install the VirtualBox.
- Download the windows server image (Either ISO or VHD)
- Installation using the ISO file.
- How to install windows server using virtual hard disk (VHD) in VirtualBox?
Installation using the ISO file.
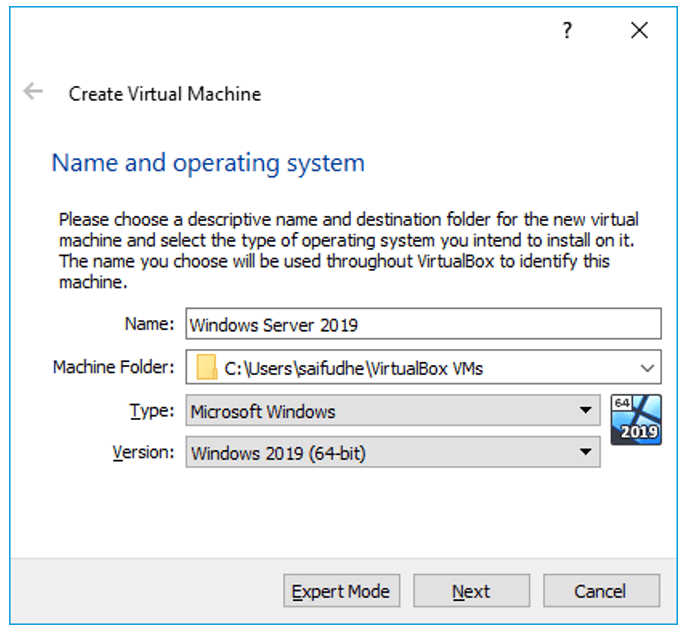
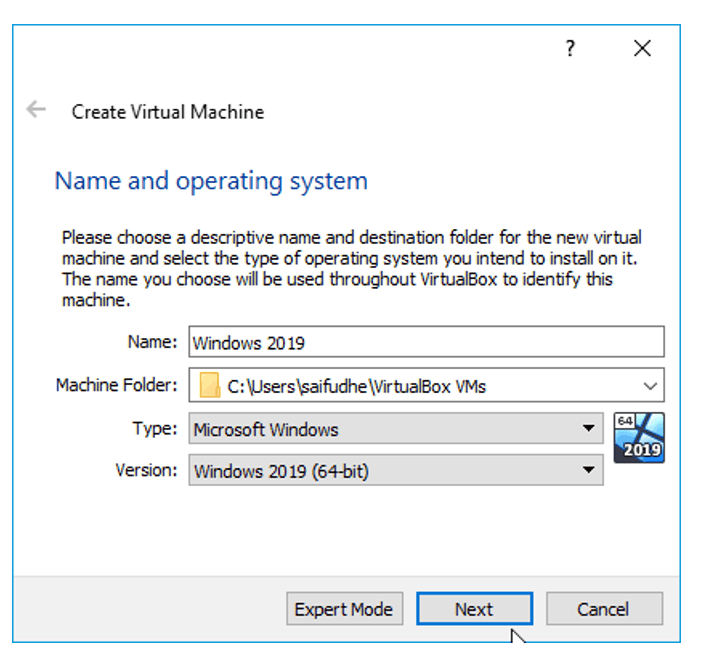
1. Creation of Windows server VM in VirtualBox.
Open VirtualBox and click on New or CTRL+N to start the windows server VM installation.
A new Create Virtual machine window will pop up; you can choose either Guided Mode or Expert Mode. We are using the Guided Mode for our lab.
- Enter the name of the VM.
- Select the folder where you want to keep the VM Hard disk files, I left as a default folder.
- Choose the Type as Microsoft Windows.
- Version as Windows 2019 (64bit), for other Version of windows server you may choose them here. For Example, Windows 2016 (64bit)
After specifying the above, you may Click on Next.
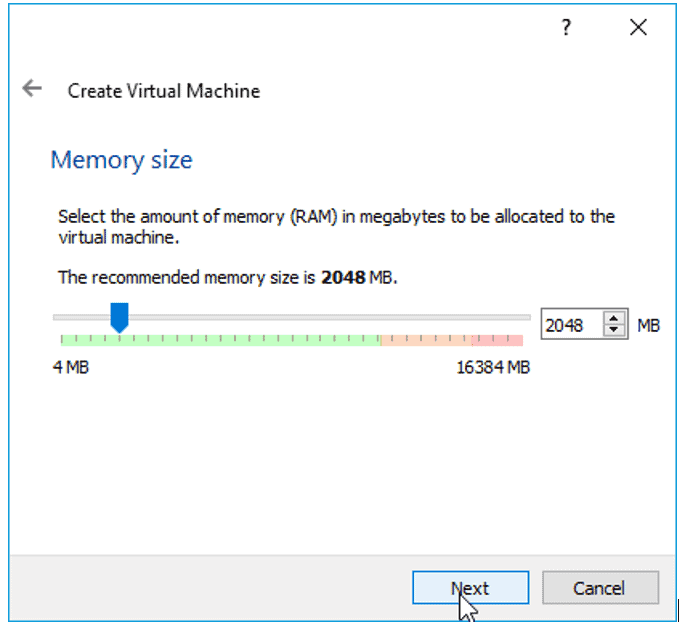
2. Specify the Memory.
You now have to define the Memory for the VM; since I most likely use it for a small Lab, I am fine with 2gigs of RAM. However, if you plan to do more stuff with it, you may need to increase the RAM accordingly.
3. Create virtual Hard disk.
We will create a virtual hard disk for our VM; in the hard disk wizard. Select the option à Create a virtual hard disk now and Click on create.
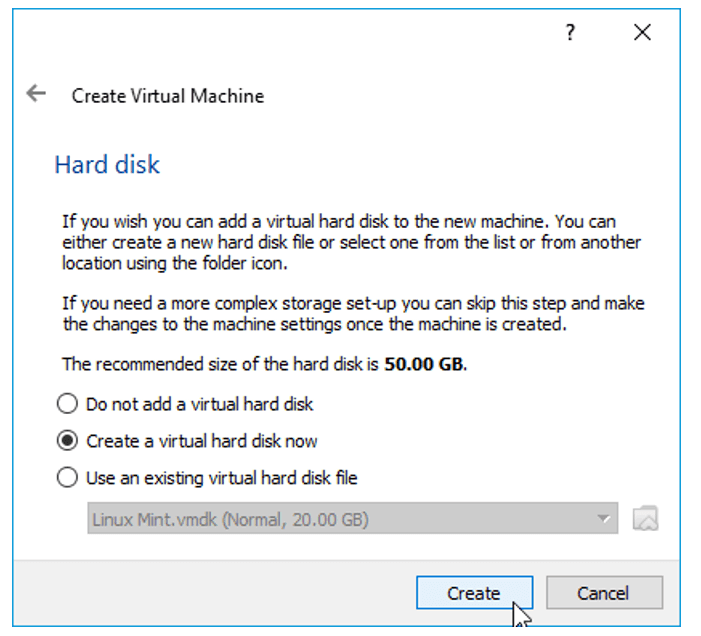
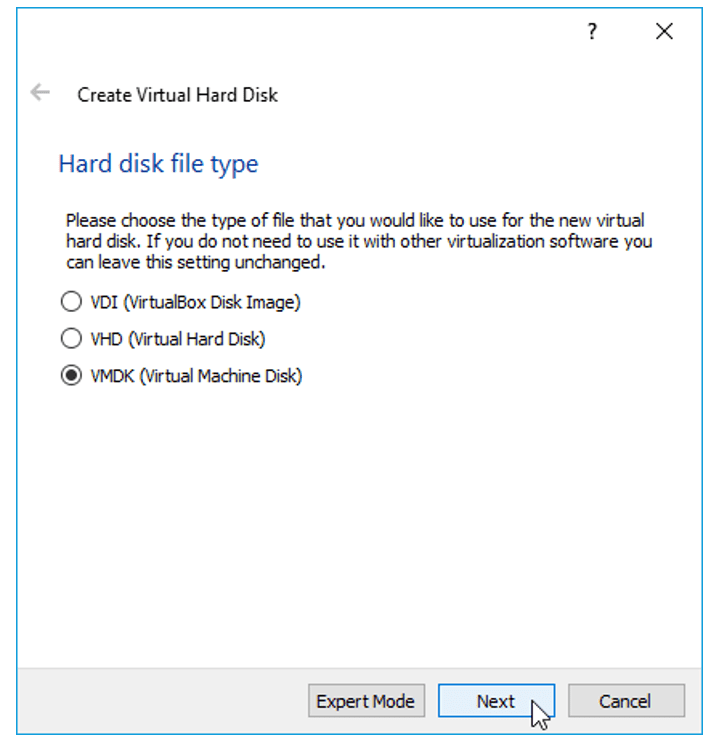
By default, the hard disk type would be VDI, and you may choose the default Value itself if you are planning to use the VirtualBox as your permanent hypervisor.
But I would recommend choosing VMDK so that you have an option to move from the VirtualBox to other hypervisors of your choice. Now Select VMDK and Click on the option Next.
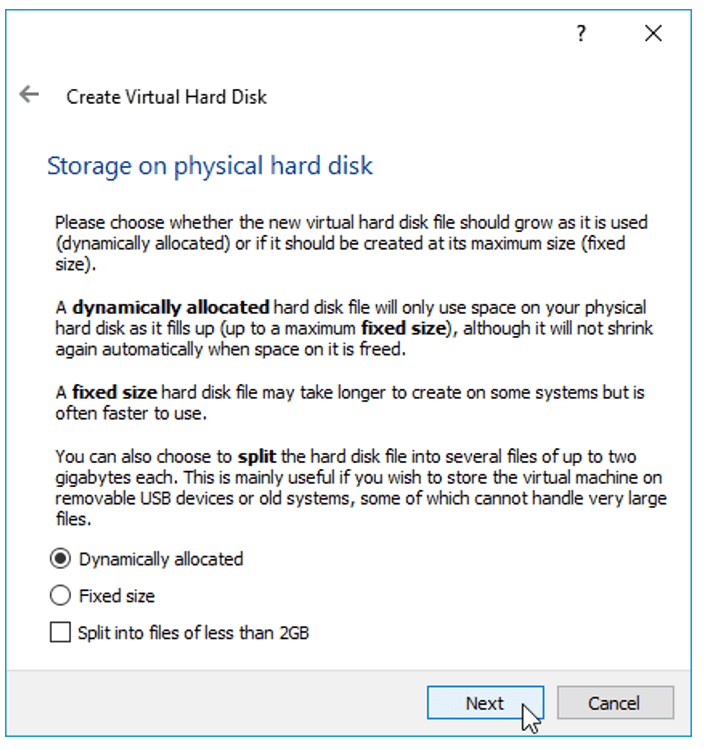
On Storage on Physical hard disk, Choose the default value Dynamically allocated and Click on Next.
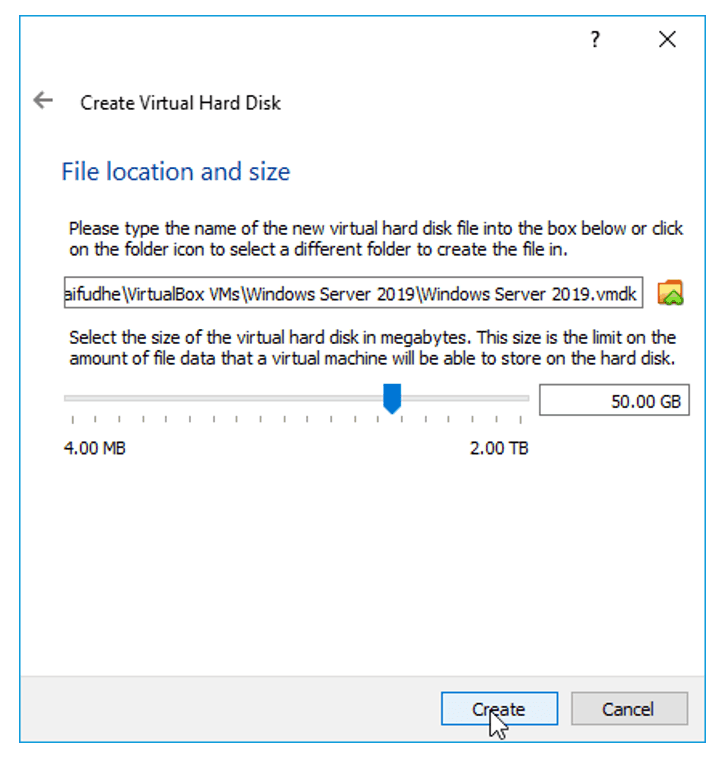
We will now define how much storage you want to provision for the windows server; I choose 50GB which is more than enough for me.
If you feel that you might need some extra space, you choose more based on your requirements and Click on Create.
You will be able to see the windows server VM instance is created.
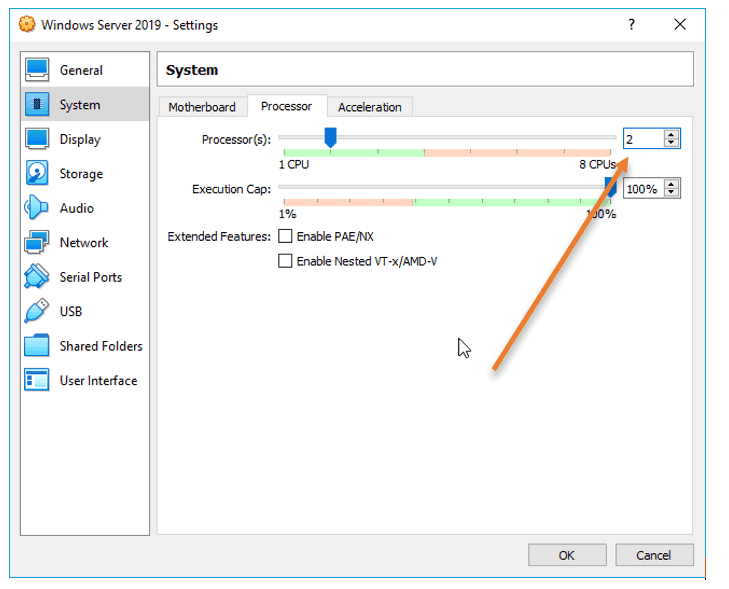
4. Increase the CPU.
By default, the VirtualBox would assign only one processor to the VM, and I need to add one more processor. That way, then the performance would be good. If you do not need more CPU, you may skip this step.
Right-Click on the VM and Click on settings.
Click on System and choose the Processor tab, and in the processor count, increase it to two.
5. Attach the windows server image to the virtualbox.
On the same VirtualBox settings, Click on storage.
Under storage devices, Choose the Empty Disk.
In the attributes, Click on the Disk icon to choose a disk file.
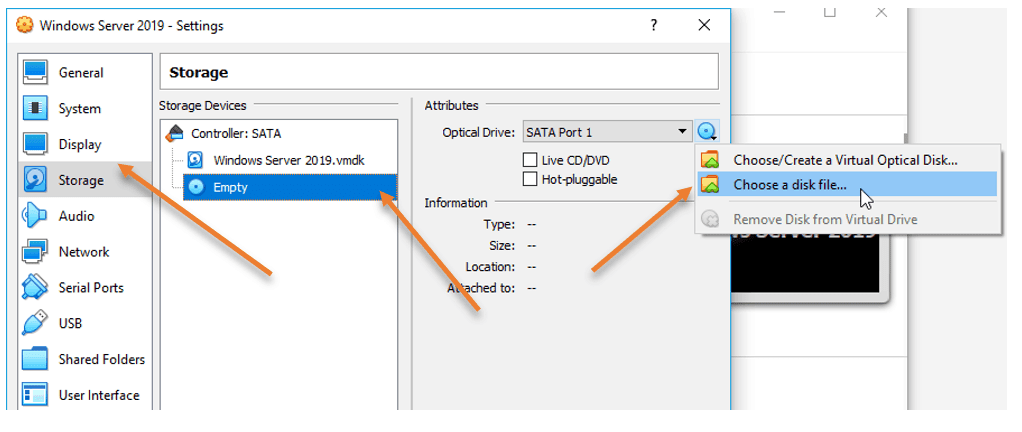
And attach the ISO that we have downloaded earlier and Click on Ok.
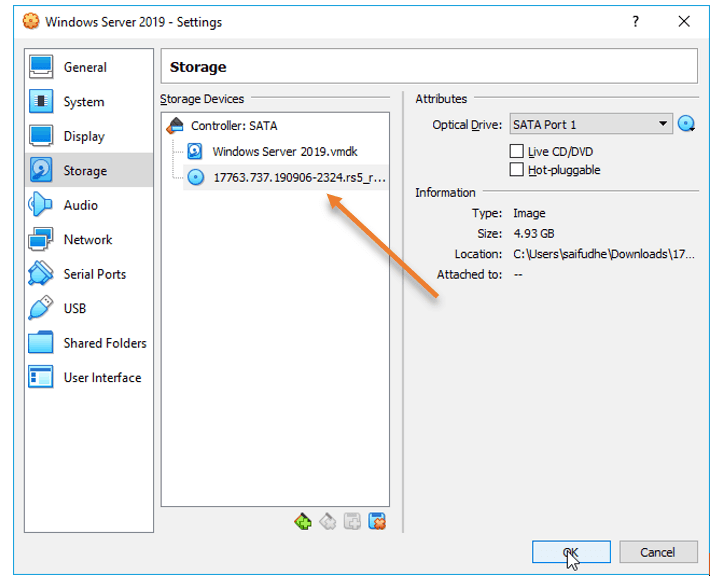
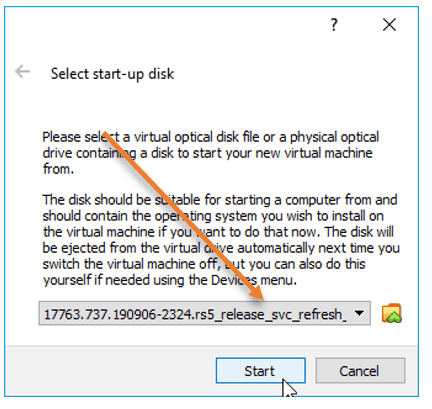
Right-Click on the VM and Click on start.
From the start-up disk, choose the ISO image that we have attached and click on start. The VirtualBox instance will boot the windows server image.
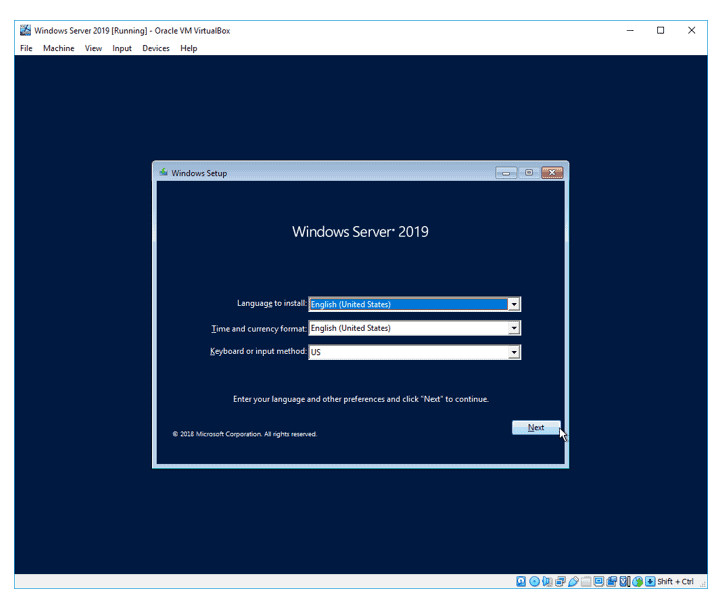
6. Begin the windows installation.
After a few seconds, you should see the windows installation screen, Choose the language, and Click on Next.
You can click on Install now.
7. Choose the Version – GUI or CLI.
You will be presented with the different Versions of windows server 2019 on the screen. You must be a little careful here.
If you want to install the windows server with GUI, you may choose Desktop experience, or if you are ok with CLI, you may select the other options.
I need GUI access; hence I selected Windows server 2019 Datacenter evaluation (Desktop Experience)
After you decided on the versions, you may Click on Next.

Accept the license agreement and Click on Next.
Choose the installation as Custom.
Choose hard disk that we have defined earlier, Click on Next.
The windows server installation will now begin; this will take some time to finish.
8. Setup the admin password.
After the installation, you will be prompted to enter the Administrator password. Set the administrator password and Click on Finish.
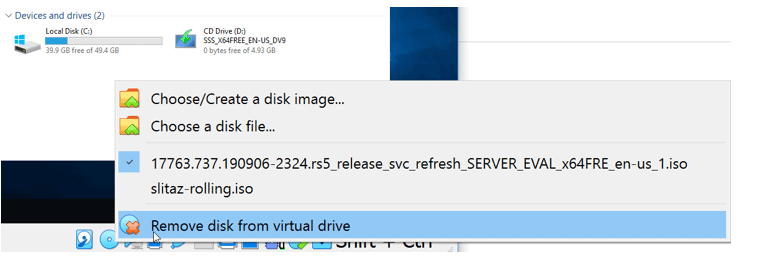
9. Remove the ISO file.
Installation of Windows server 2019 in Oracle VirtualBox is completed; you may now log in to the windows server.
Let’s remove the windows server ISO file that we had attached during the installation.
On the bottom corner of the VirtualBox window, right-click and click on the disk icon and click on Remove disk from virtual drive.
10. Installation of VirtualBox Guest additions.
Finally, we will have to install the VirtualBox guest addition, which will improve the performance of the windows server VM.
To install the VirtualBox guest additions, you may log in to the windows host.
Click on Input–> Keyboard–> Insert Ctrl+Alt+Del
You will be prompted to enter the admin password that we had set up earlier.
After logging in, Click on Devices > Insert Guest Additions CD image…
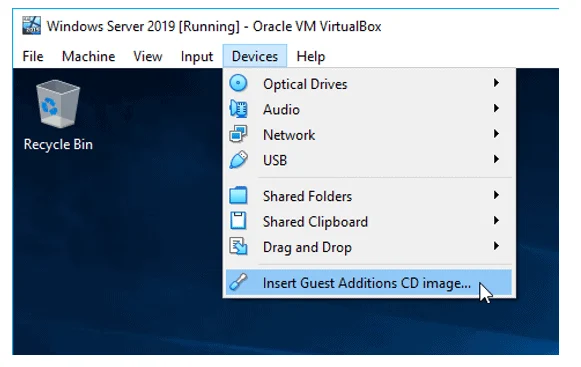
It will attach the Guest addition installation disk to the Windows server VM.
Open This PC, and you should see the VirtualBox Guest additions CD drive and double click on it.
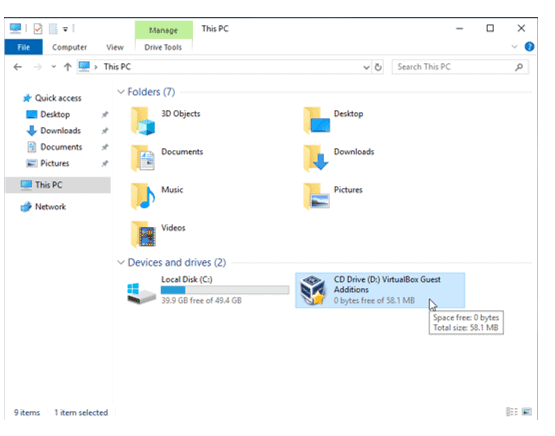
Double click on the Virtualbox Guest addition installation setup file to install the VirtualBox guest additions on your windows server machine.
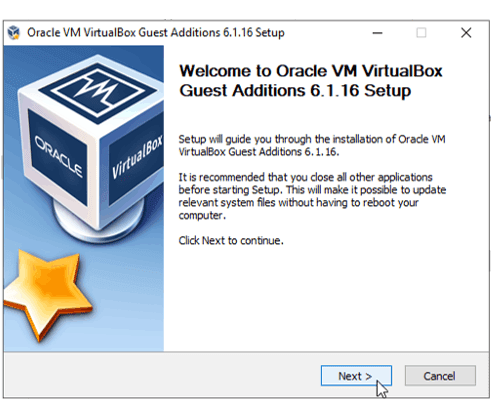
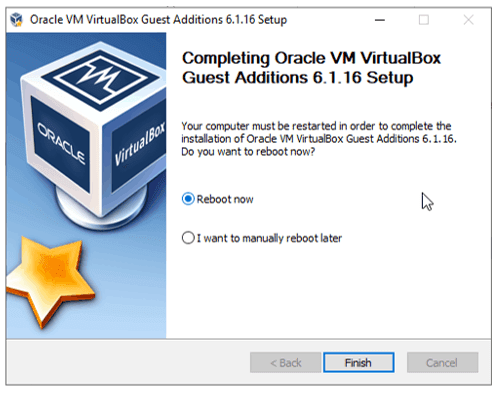
It is a typical software installation and nothing too complex here; you may click on next on all the drive installation prompt that you get.
After the installation, you may now go ahead and reboot the VM, and you should be good to go.
How to install Windows Server using Virtual Hard Disk (VHD) in VirtualBox?
We have successfully installed the windows server 2019 on the VirtualBox hypervisor using ISO image. We now will go ahead and install the virtual machine using the virtual hard disk. We already have a VHD file downloaded from the Microsoft site.
1. Creation of the VM.
On the VirtualBox, Click on New.
- Name the VM and the location where you want to save the virtual machine.
- Type as Windows.
- Version: Windows 2019 (64bit)
2. Define the memory size.
We can provide a Memory of 2GB or more, and I am choosing 2GB for now.
3. Attach the Virtual Hard disk.
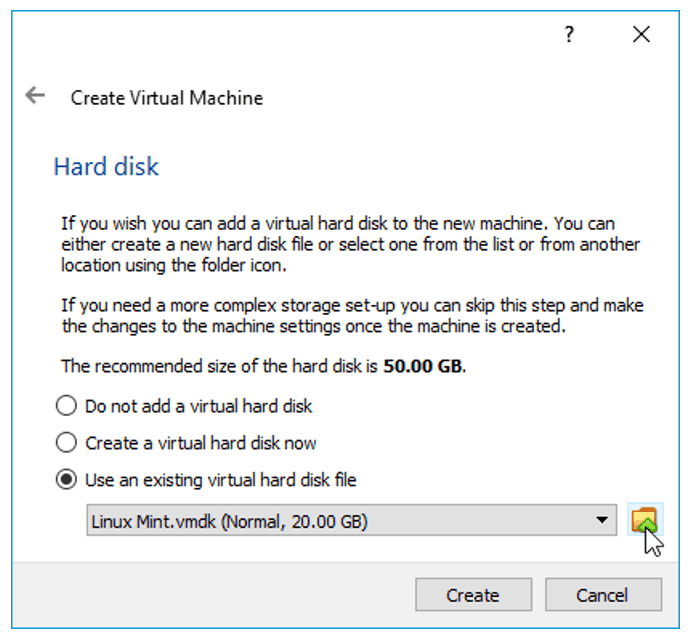
When we chose the ISO method of installation, we created a new hard disk in the VirtualBox.
But right now, we already have the virtual hard disk file, We need to attach that here.
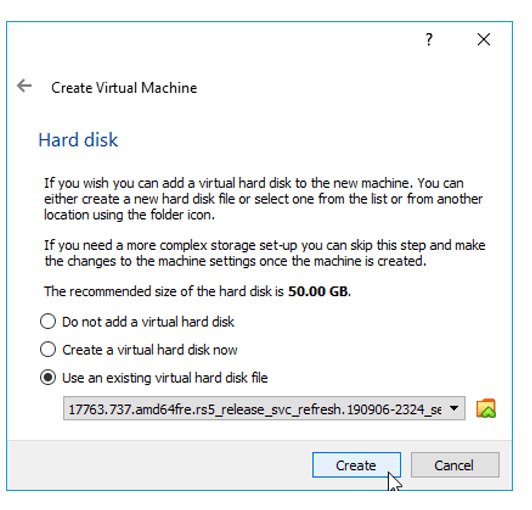
Select use existing virtual hard disk file and click on the browse button next to the drop-down.
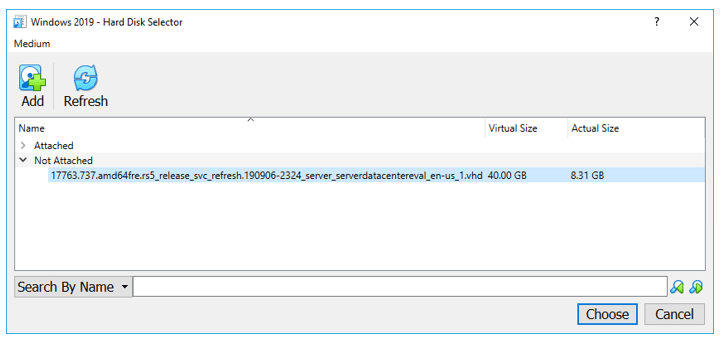
You will not see the virtual hard disk in the new pop up; Click on Add.
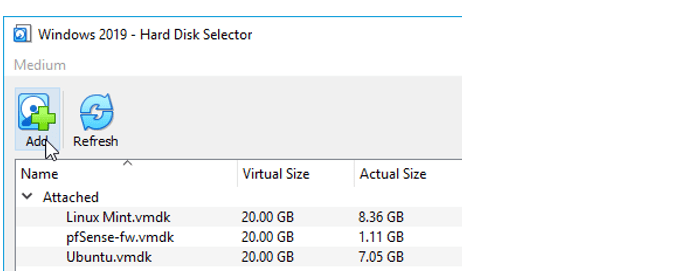
And Select the VHD file which we downloaded from Microsoft.
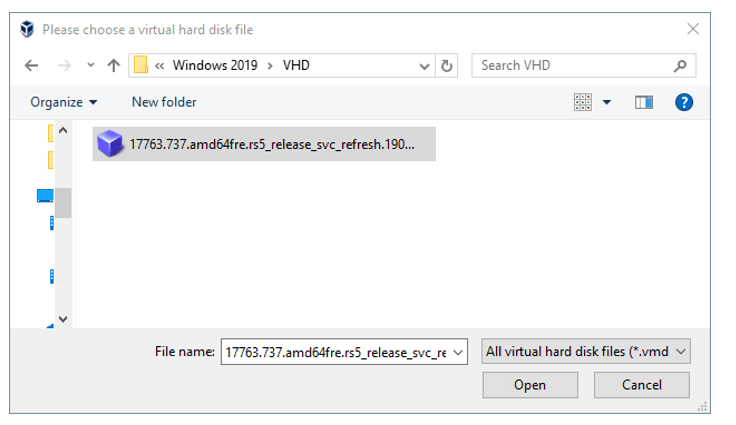
The new image is added under the not attached section.
Select the image and Click on Choose.
You need to make sure the new virtual hard disk is selected under ‘use existing hard disk file’
Click on Create.
4. Choose the region and Accept the license.
Once you power on the machine, you will get an option to Choose the region, Language, Layout and Click on Next.
You have to accept the license before you continue.
Follow the Step 8 above to set the admin password. Enter the password and Click on Finish.
Your VirtualBox is ready to use, and you still need to install the VirtualBox guest additions following Step 10 above which is important.
In a previous post I’ve covered the process of setting up a Windows Server 2019 VM in VirtualBox. So I’ve figured that I should add one to cover Windows Server 2022 as well.
Prerequisites
- Oracle VirtualBox – I’m currently using version 6.1.40
- Windows Server 2022 evaluation ISO
- Sufficient drive space – In my example I’ll be creating two dynamically allocated virtual disks (C drive – 50GB, D drive – 40GB)
The host, aka my PC, is running Windows 11 build 22621.963, but the process is the same on Windows 10.
Creating the VM
This time, I’ll cover both the GUI way of creating the VM as well as the PowerShell steps in a single post.
If you want to go straight to the PowerShell steps click here.
Via the GUI
I create a new, blank VM.

Once the “Create Virtual Machine” window opens, I switch to “Expert Mode” so that I can configure the RAM and system drive in one go.

Afterwards, I specify the name of the VM, the directory in which its base folder should reside, the OS type and version. Since VirtualBox 6.1.40 doesn’t have “Windows Server 2022” as a version, I’ll pick “Windows Server 2019” instead.
I’ll also set the machine’s RAM to 8GB and opt to create a virtual hard disk now, and press “Create”.

In the “Create Virtual Hard Disk” window I just go with the defaults:
- File size – 50GB
- Hard disk file type – VDI
- Storage on physical disk – Dynamically allocated
And I click on “Create”.

At this point the VM is created, but there are a few more things I like to set up before I start installing the OS.
So right click on the VM and go to “Settings”

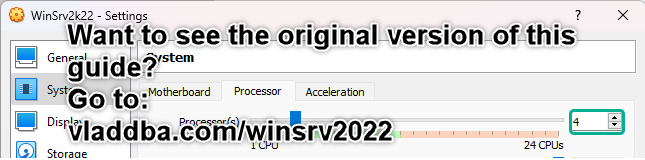
In the “Processor” tab of the “System” section, I set the number of CPUs to 4.
Now to add a second virtual disk drive – this will be the 40GB D drive.
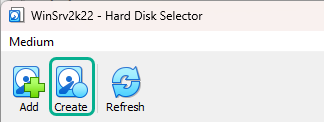
I go into the “Storage” section, increase the SATA controller’s port count from 2 to 3 (as per VirtualBox recommendations) and press the “add hard disk” button.

In the “Hard Disk Creator” window I press the “Create” button.

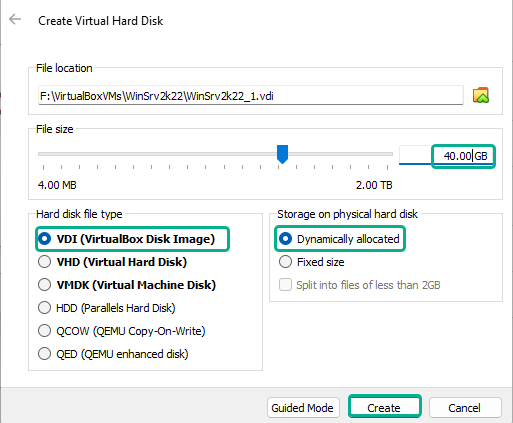
Once the windows switches to expert mode, I set the size to 40GB, validate the file location matches with the VM’s base directory and leave the defaults selected for hard disk file type and storage on physical hard disk, and then click on “Create”.
Now, in the “Hard Disk Selector” window I select the newly created virtual hard disk and then click on “Choose”.

While I’m in the “Storage” section, I’ll also attach the Windows Server 2022 Evaluation ISO by selecting the optical drive, expanding the disk drop-down menu and clicking on “Choose a disk file…”.
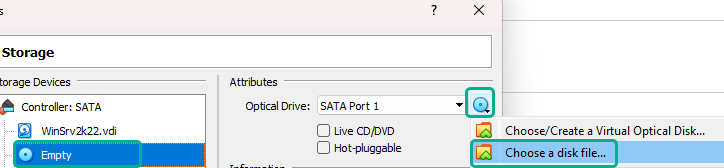
This opens up a file explorer window in which I navigate to where the “Windows_SERVER_2022_EVAL_x64FRE_en-us.iso” file resides so that I can attach it to the VM’s optical drive.

Afterwards, I navigate to the Network section set the network as bridged so the VM is accessible from the rest of the LAN.

At this point I can click “Ok” in the settings window so that the changes are saved.
I then start the VM.

And proceed with the OS installation process.
Via PowerShell
I open PowerShell and, to make things easier, append VirtualBox’s installation directory to the PATH environment variable.
|
$Env:Path += «;C:\Program Files\Oracle\VirtualBox\» |
Since VirtualBox 6.1.40 doesn’t have “Windows Server 2022” as a version, I’ll search for the OS ID for Windows Server 2019 instead.
|
VBoxManage list ostypes | Select-String -Pattern «Windows» | Select-String -Pattern «2019» -Raw |

I then use that OS ID to create and register an empty VM.
|
VBoxManage createvm —name WinSrv2k22 —ostype Windows2019_64 —register |
Take note of the location of the VM’s settings file location since that directory will also be the VM’s base directory.

Afterwards add CPU cores, RAM, and VRAM. Set the graphics controller, and set the network type as bridged as well as specifying the name of the host’s NIC that will be used.
|
VBoxManage modifyvm WinSrv2k22 —cpus 4 —memory 8192 —vram 128 ` —graphicscontroller vboxsvga —nic1 bridged ` —bridgeadapter1 «Intel(R) Ethernet Controller I225-V» |
Add a SATA storage controller, specify the controller’s chipset, port count, and set it as boot-able.
|
VBoxManage storagectl WinSrv2k22 —name «SATA» —add sata ` —controller IntelAHCI —portcount 3 —bootable on |
Create the virtual disk file that will eventually become the C drive.
|
VBoxManage createhd —filename F:\VirtualBoxVMs\WinSrv2k22\WinSrv2k22.vdi ` —size 51200 —variant Standard |
Add a second virtual disk file (optional).
|
VBoxManage createhd —filename F:\VirtualBoxVMs\WinSrv2k22\WinSrv2k22_1.vdi ` —size 40960 —variant Standard |
Attach the two disks to the storage controller.
|
VBoxManage storageattach WinSrv2k22 —storagectl «SATA» —port 0 ` —device 0 —type hdd —medium F:\VirtualBoxVMs\WinSrv2k22\WinSrv2k22.vdi |
|
VBoxManage storageattach WinSrv2k22 —storagectl «SATA» —port 1 ` —device 0 —type hdd —medium F:\VirtualBoxVMs\WinSrv2k22\WinSrv2k22_1.vdi |
Now, I can attache the Windows Server 2019 Evaluation ISO.
|
VBoxManage storageattach WinSrv2k22 —storagectl «SATA» —port 2 —device 0 ` —type dvddrive ` —medium C:\Users\Vlad\Downloads\Windows_SERVER_2022_EVAL_x64FRE_en-us.iso |
And start the VM in order to proceed with the OS install process.
|
VBoxManage startvm WinSrv2k22 |
Installing Windows Server 2022
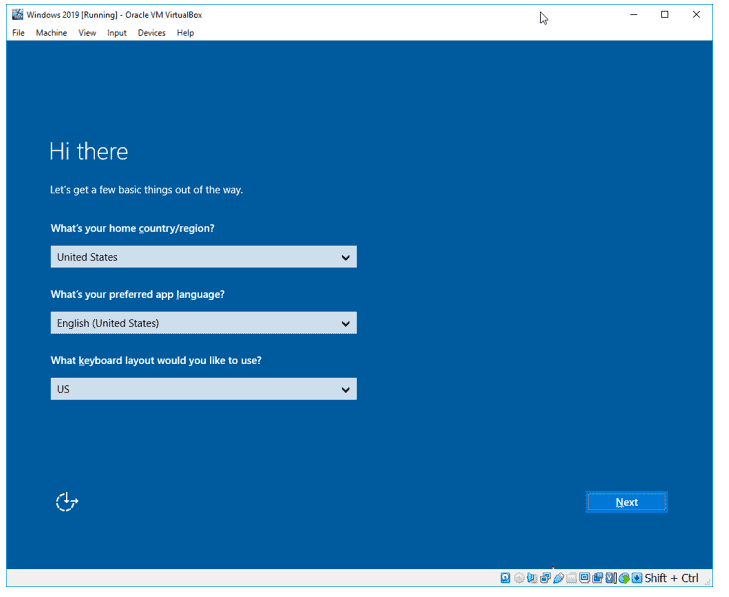
Once the VM boots, I can select the language and regional settings and click on “Next”

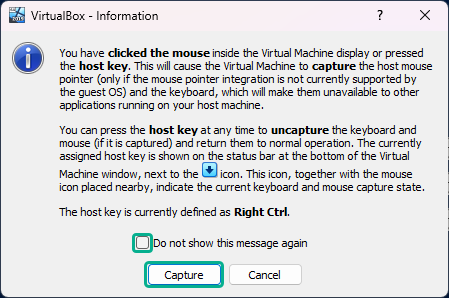
If this pops up, just check the “do not show this message again” box and click on “Capture”. Just remember to press right Ctrl whenever you want to move the mouse outside the VM window.
In the next prompt click “Install Now”

For this VM, I opt to install the Windows Server 2022 Standard Evaluation (Desktop Experience) version.

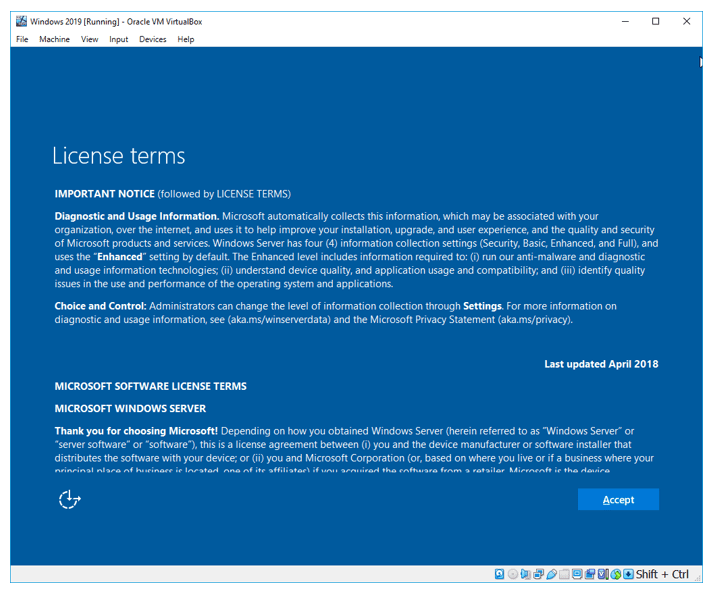
In the next window I read and accept the software license terms, and proceed with the installation process.
For installation type I click on “Custom”, because there’s really no previous version of the OS to upgrade from.

I then proceed with the partition configuration part.
First, I select the drive (Drive 0) that’s going to end up being the system drive, click on “New” and then “Apply” in order to create a new partition.

Click “Ok” on the prompt informing me about the creation of additional system partitions.
I then repeat the same steps for the second drive (Drive 1).
And now I select the partition (Drive 0 Partition 2) on which the OS should be installed and click on “Next” to begin the installation.

After the install process finishes, the VM reboots and a prompt to “press any key to boot from CD/DVD” appears, I just wait for the prompt to time-out since I want to boot directly in Windows.
Once the OS boots up, it asks to set up a password for the Administrator account.

I type a password, confirm it and press “Finish”.
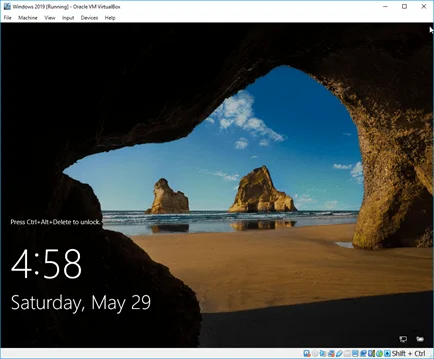
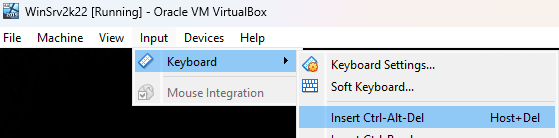
At the logon screen I send the Ctrl+Alt+Del input to the VM. This can also be done with the right Ctrl+Del keys.
And log into Windows with the previously configured password.
At this point I can eject the installation media and mount the VBoxGuestAdditions disk. If it doesn’t show up in the drop down list, it is located in “C:\Program Files\Oracle\VirtualBox\”.

Once the disk is mounted, I navigate to it in File Explorer and proceed with the installation of the guest additions. Right click on “VBoxWindowsAdditions.exe” and run as admin, then just proceed through the install without making any changes. I reboot the VM when the install process prompts me.
After the VM reboots I enable the shared bidirectional clipboard.

One last and optional part – I run the following commands in admin PowerShell to rename the VM, but also make sure that the current network profile is set to private so that the firewall won’t block me if I try to connect to SQL Server or anything else that I might install later.
|
Rename-Computer WinSrv2k22 get-netconnectionprofile | Select -ExpandProperty name | %{ set-netconnectionprofile -name $_ -networkcategory «private» } |

Oracle VM VirtualBox is a free and open-source hosted hypervisor for x86 virtualization, developed by Oracle Corporation. You may want to run multiple VMs on your operating system, with the type 2 virtualization type, this is possible. To achieve this, the following steps below need to be performed. To proceed, ensure you have VirtualBox installed on your device. On how to perform Post OS Installation configuration of Windows Server 2019 Properties, how to install Windows Server 2016 Operating System. Also, you may be interested in my YouTube video on how to setup Windows Server 2019 on a VMware Workstation. On how to install and configure Ubuntu Linux, see the visit link.
Part A: Prepare the Virtualbox environment to hold the windows folders for the new VM. Click on “New” from the Oracle VM VirtualBox Manager. See this guide for how to install Windows Server 2022 on VMware Workstation.

Enter the name, version, desired path to host the VMs and click on continue

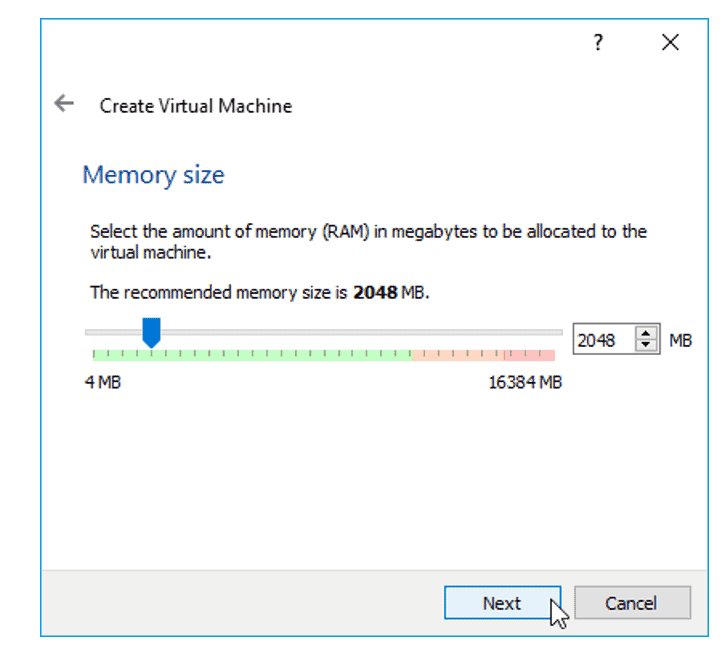
Select the memory size as shown below. You can type in the memory size or use the bar to increase it as well.

Click on “create a virtual hard disk now”

This will open the hard disk type window as shown below.
– I will select VDI (Virtual Disk image)

Choose if you wish the hard disk to dynamically increase or use a fixed hard disk file size. I will be using a fixed size which will be entered in the next page

Enter the Hard Disk size of your choice as shown below
– You can also change the file location if you wish from here.

Next, this will create the VM as shown below

Now the VM creation process is complate and VM successfull created.
Part B: To access and attached the Windows Server 2019 ISO file, the following steps should be followed.
Click on the Server and Click or settings or
– Right click on the server and select settings

Click on storage
– Click on Empty under the control IDE
– Select the Disk icon and choose the Operating system you wish to install as shown below

As you can see below, the ISO image has been selected. We can now proceed with our installation.

– Click on “ok”. Next, select the VM and click on start to continue the installation of Windows Server 2019.

This will load windows and prompt for the steps in Part C below.
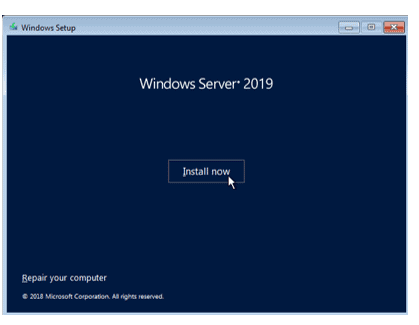
Part C: This step is similar to installing Windows 10, Windows Server 2008, 2012, 2016 on Virtualbox. On the Windows Setup page,
– Select the language to install
– Time and currency format
– Keyboard or input method

Click on Next and Click on “Install now“

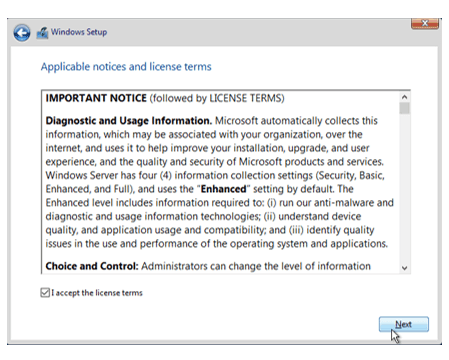
Note: Here you could click on repair your computer if this is the approach you need to take or use “Reset this PC”. See how to repair Windows 10 locally for similar steps. Select the operating system you wish to install and click on Next.

Accept the license agreement as shown below and click on next

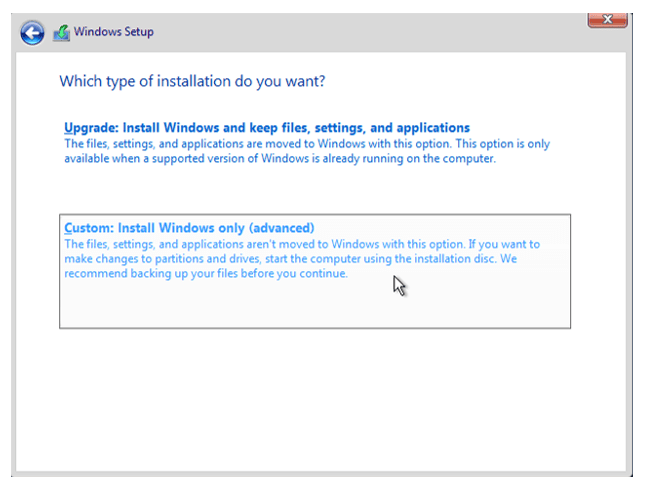
Select custom install as shown below to install Windows
– Pick Custom: Install Windows only (advanced)

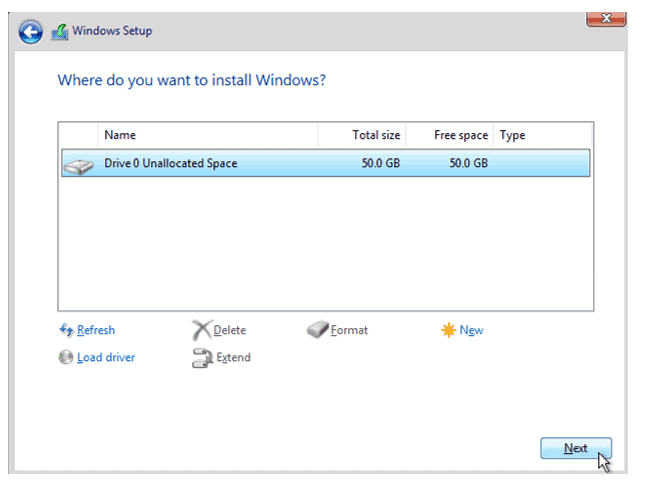
Select the Drive to install Windows and click on Next
Note: You can create an additional drive and install Windows on it. You can also format, delete and extend drives in this window.

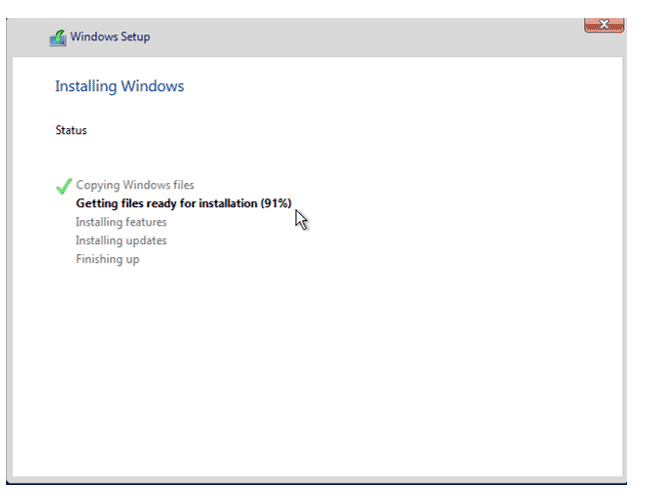
After this step, Windows will be installed unto the system.

When this step complete, the the device will reboot after few seconds
– Note: You can restart immediately

This will prepare and get windows ready as shown below

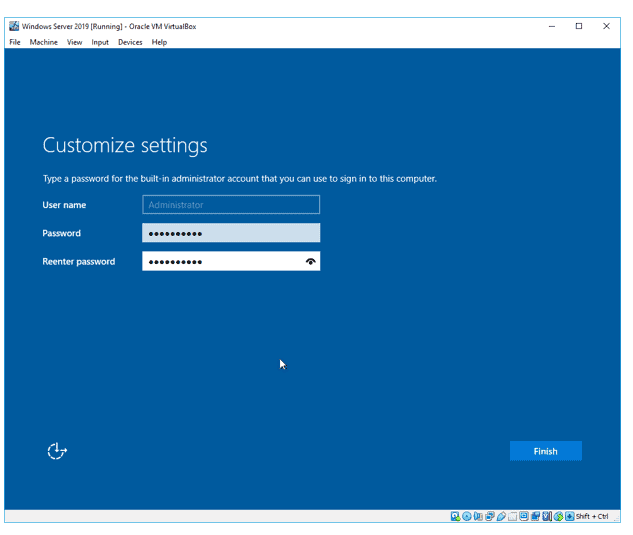
the customise settings window will be displayed. Enter the Password and click on finish to complete Windows Server 2019 Installation.

The Windows Server 2019 setup is now complete as shown below.

To access the login windows, use the Contl+Alt+Del and enter your password to access Windows. Refer to this guide for the Post OS Installation and configuration of Windows Server 2019 Properties (Configure TCP/IP Parameters).

I hope you found this blog post helpful. If you have any questions, please let me know in the comment session.