The installer has been renewed to provide a better user experience and show the unique Tizen philosophy. Using the new installer, you can now install the basic platform and the useful tools with a few clicks.
You can use either the GUI or the CLI version of the installer.
Using the GUI Installer
To install Tizen Studio:
- Launch the Tizen Studio installer.
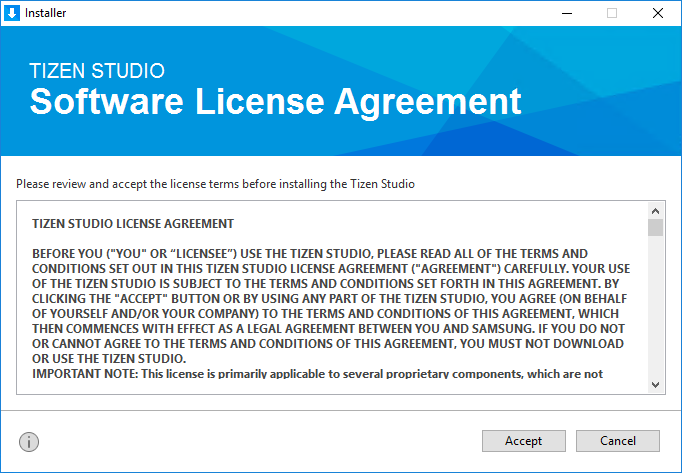
- Accept the software license.
The license contains important legal notices for using Tizen Studio. Read it fully, and click Accept only if you agree with the license statement:

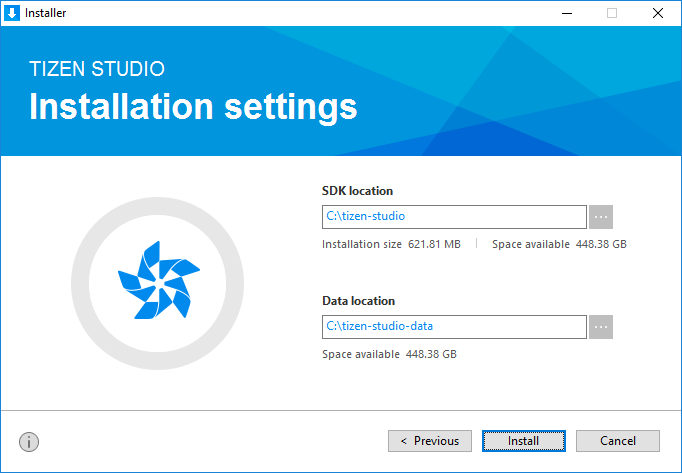
- Click the … button and specify a new directory to set the SDK and data location. If the new directory is valid and shows no errors, click Install:
- Click Install to install the required packages and tools in the specified directory.
You can monitor the installation process or cancel the installation. The installation process is completed in a few minutes, unless you cancel it.
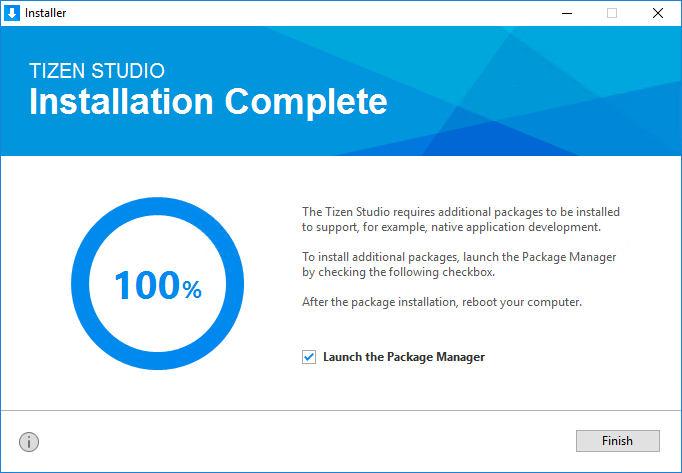
- Click Finish and close the installer:
If you want to install additional platforms and tools, launch the Package Manager by checking the Launch the Package Manager check box and click Finish.
Using the Tizen Studio Package Manager, you can install and update additional tools. For more information on the Package Manager, see Updating Tizen Studio.

Note If you install Tizen Studio in a directory that requires administrator privileges for access, such as C:\Program Files, administrator privileges are required to run the Tizen SDK tools.
Using the CLI Installer
The CLI (command line interface) provides functional tools for running the CLI installer without the GUI environment.
To install Tizen Studio using the CLI installer:
- Download the appropriate CLI installer for your platform.
- Run the CLI installer:
- On Microsoft Windows®, the command prompt opens and the installer is automatically executed.
- On Ubuntu and macOS, open the terminal, go to the directory where the installer is downloaded, and enter the
chmod +xcommand to apply the execute permission to the installer file. Then, execute the installer by entering the command with the following syntax:web-cli_Tizen_Studio_<version> [options] [<directory path>]
Table: Install options
Option Description --show-licenseDisplays the Tizen Studio software license agreement. You must use this option alone. Do not use with other options.
--accept-licenseAccepts the license terms. --no-java-checkSkips the Java version check. Table: Install command parameters
Parameter Description directory pathSpecifies the installation directory path. If you do not enter the path, Tizen Studio is installed in the default directory (
/home/{user}/tizen-studio).
- If you agree to the software license and the license terms, enter Y(yes) for the conditions.
- Enter the Tizen Studio installation location.
The CLI installer begins to install the Web App Development platform and tools on your computer.
Note
If you want to develop a native application on the CLI, you must install the Native App Development platform and tools using the CLI Package Manager.
Installing Additional Packages with CLI
Run the CLI Package Manager with the install command using the following syntax:
package-manager-cli install [--accept-license] [--no-java-check] [--proxy <value>] [-f <file path>] [-p <password>] <package name>[,...]
Table: Install command parameters
| Parameter | Description |
|---|---|
--accept-license |
Accepts the license terms. |
--no-java-check |
Skips the Java version check. |
--proxy <value> |
Proxy configuration value. Use one of the following values: direct, auto, or ip:port. |
-f, --file <file path> |
If you want to install packages from a local SDK image, specify the full path of the SDK image file. |
-p, --password <password> |
Administrator (sudo) password for authentication. Ubuntu only. |
<package name>[,...] |
Name of the package you want to install. You can enter multiple package names (such as NativeIDE and Emulator).
To retrieve the names of installable packages, use the following command: package-manager-cli show-pkgs |
Установка виджетов и приложений Smart TV Samsung значительно расширяет функциональные возможности телевизора, позволяя пользователю, руководствуясь своими интересами, настроить девайс под собственные нужды. Существует также возможность создания программ при помощи специальных инструментов, что делает работу с девайсом максимально комфортной. Платформа Tizen, построенная на Linux и отличающаяся гибкостью, позволяет создавать многочисленные приложения для любых устройств, совместимых с единой архитектурой Tizen.

Так, для сборки и отладки можно использовать Tizen Studio – софт имеет широкий набор инструментов для этих целей и сегодня является главной средой разработки. Инсталляция и настройка ПО происходит в несколько этапов.
Установка Tizen Studio
Для работы потребуется скачать дистрибутив и поставить необходимый софт на ПК. Установка пакетов Tizen Studio и программного комплекса Java на Windows 7/10 выполняется с учётом разрядности ОС (32 bit – X86/64 bit – X64). Узнать количество битов Виндовс, установленной на вашем устройстве, можно, например, если нажать на «Мой (Этот) компьютер» ПКМ – Свойства.

Чтобы установить Тайзен Студио, поочерёдно выполняем следующие действия:
- Устанавливаем актуальную версию программной среды Java.
- Качаем Tizen Studio, инсталлируем, приняв условия лицензионного соглашения и, если требуется, изменив путь установки.
- После успешной инсталляции ПО откроется Package Manager (если инструмент не запустился, идём в каталог с установленным софтом tizen-studio\package-manager и открываем его вручную с экзешника);
- В Менеджере пакетов Тизен Студио на вкладке «Main SDK» также устанавливаем модуль «Tizen SDK tools» путём нажатия «Install» напротив названия, после чего идём на вкладку «Extension SDK» и инсталлируем Extras. Подтверждаем инсталляцию.
Регистрация аккаунта Samsung и определение IP-адреса компьютера

Следующий этап предполагает регистрацию учётной записи Самсунг. Если ранее аккаунт был создан, пропускаем этот шаг. Для регистрации необходимо перейти на сайт Samsung и, согласившись с условиями использования сервиса, заполнить стандартную регистрационную форму с указанием адреса электронной почты и данных авторизации.
После этого нам понадобится выяснить IP-адрес сетевой карты ПК. Чтобы это осуществить, следует перейти из трея, поисковой строки или Панели управления в «Центр управления сетями и общим доступом», где нужно выбрать «Подключение по локальной сети» (или Wi-fi) и «Сведения», где в строчке IPv4 и будет указан IP.
Альтернативный вариант – использование Командной строки Windows и команды ipconfig, для чего вызываем службу из меню «Пуск», поиска или с помощью консоли «Выполнить» (Win+R) и команды cmd. В терминале набираем ipconfig, жмём клавишу ввода и смотрим в строчке IPv4-адрес присвоенный IP. Он понадобится для дальнейшей настройки.
Установка и запуск на телевизоре
Далее настройка Tizen Studio выполняется путём организации связи с телеприёмником.
ВАЖНО. Девайсам следует обеспечить бесперебойный доступ к интернету, при этом они должны находиться в одной сети. Это главное условие успешного взаимодействия.
Чтобы настроить телеприёмник для работы с Tizen Studio, выполняем следующее:
- Подключаем телеприёмник к той же сети, что и комп.
- На телевизоре идём в меню Smart Hub, раздел приложений.
- На пульте по очереди жмём кнопки 1, 2, 3, 4, 5.
- В результате активируется режим разработчика и появится соответствующее окно, где нужно выставить тумблер в положение ON и внести IP-адрес ПК в соответствующее поле, после чего нажать кнопку «Ок».
- Перезагружаем устройство путём выключения с кнопки Power и отключения от электросети.
- Включив телеприёмник, идём в раздел «Приложения». Если всё было сделано правильно, здесь в верхней области экрана появится сообщение «Developer Mode».
- Далее следует авторизоваться в учётной записи Самсунг. Жмём на «+» и вносим нужные данные.
- Выясняем IP-адрес телевизора в сети, для чего идём в раздел «Сеть» – «Состояние сети», жмём «Настройки IP».
- На компе открываем Tizen Studio с экзешника, находящегося в каталоге, куда ставили софт (tizen-studio/ide/).
- В программе в правой области интерфейса находим кнопку и открываем Remote Device Manager для подключения ТВ, жмём «+», чтобы добавить девайс, в открывшемся окошке прописываем имя, IP-адрес телевизора и жмём «Add» (данные в поле порт оставляем неизменными). После этого жмём «Connect» и переключаем тумблер в положение «On».
На этом настройка Tizen Studio для установки виджетов на Samsung Smart TV Q, R, N, M, K и J серий завершена, но, чтобы обеспечить совместимость приложения пользователя с телевизором, нужно правильно создать и установить сертификаты.
Создание авторского и дистрибьюторского сертификатов

Выполняем следующие действия:
- В верхнем меню Tizen Studio жмём «Tools» и выбираем «Certificate Manager» (или используем горячие клавиши Alt+Shift+C).
- Жмём значок плюса, чтобы создать новый сертификат профиля.
- Выбираем тип сертификата – «Tizen» (второй способ предполагает выбор варианта «Samsung», затем нужно отметить пункт «TV»).
- Задаём имя сертификату.
- Отмечаем пункт «Create a new author certificate», жмём «Next».
- Вносим в форму имя и пароль (сохраняем где-либо эти данные, они могут пригодиться в будущем), жмём «Next» (если выбран второй способ, за этим последует авторизация в аккаунте Самсунг).
- Отмечаем «Use the default Tizen distributor certificate», чтобы использовать дистрибьюторский сертификат по умолчанию, (во втором случае нужно отметить «Create a new distributor certificate», нажать кнопку «Next» и ввести пароль, можно применить ранее созданный).
- Жмём кнопки «Finish»и «Ок».
ВАЖНО. В обязательном порядке сохраняем сертификаты, поскольку есть вероятность, что получить их на телевизор можно единожды.
Создание проекта и установка приложений
Для создания проекта и установки виджетов выполняем следующее:
- в Тайзен Студио жмём кнопку на верхней панели инструментов (или переходим по меню «File» – «New» – «Tizen Project»), выбираем тип проекта «Template», жмём «Next»;
- выбираем профиль TV, жмём «Next»;
- на следующей странице отмечаем тип Web Application (CSS + HTML + JS);
- далее выбираем шаблон Basic Project;
- пишем название проекта и жмём «Finish»;
- теперь нужно скачать и распаковать требуемый софт для Tizen TV, после чего перетаскиваем элементы из архива софта в проект, подтвердив действие;
- жмём ПМК по имени проекта, из контекстного меню выбираем Run As – 1 Tizen Web Application.
Если все шаги проделаны правильно, софт будет доступен на ТВ.
Удаление ПО
Для удаления отдельных пакетов можно использовать Package Manager, на вкладках «Main SDK» и «Extension SDK» можно инсталлировать и удалять модули и инструменты нажатием соответствующей кнопки напротив их названий. Если пакет уже добавлен, будет доступна кнопка «Delete».
Чтобы полностью удалить Tizen Studio, можно использовать GUI Uninstaller:
- Запускаем программу удаления Тайзен Студио.
- Выбираем компоненты, которые следует удалять (если SDK data или KeyStore не будут выбраны, файлы в их папках сохранятся и могут быть использованы в дальнейшем). Каталог SDK data содержит созданные пользователем данные, KeyStore – это хранилище ключей, в котором содержатся файлы сертификатов автора и дистрибьютора. Если планируется переустановка Tizen Studio, нужно создать копии сертификатов или снять флажки в пунктах перед стартом процесса деинсталляции.
- Для удаления всех модулей и инструментов, а также пользовательских файлов, жмём кнопку «Uninstall». Если были отмечены SDK data и компоненты KeyStore, удалятся и они.
ВАЖНО. Запущенный процесс деинсталляции не может быть отменён, а удалённые элементы восстановлены, поэтому рекомендуется скопировать данные, которые нужно сохранить.
4 mins read
Install Tizen Studio on Windows
This page explains the process to download and install Tizen Studio on your development hardware.
To have optimal installation experience, follow these steps chronologically:
- System prerequisites
- Hardware requirements
- Software requirements
- Setup OpenJDK in Windows
- Launch installer
- Verify installation
System Prerequisites
Ensure that the following system prerequisites are met:
Hardware Requirements
| CPU | Dual Core, 2Ghz or faster |
| Architecture | x32 or x64 |
| Memory | 3GB or more |
| Disk space | 6 GB or more |
Software Requirements
<th colspan=»2″ align=left>Windows</th>
| Version | 7/8/10 |
| Bit | 32 or 64 bit |
| Software | Download Link |
|---|---|
| Open JDK | Click to Download |
| OpenJavaFX | Click to Download |
| Tizen Studio setup file | Click to Download |
Note:
- Download the relevant version based on the target device operating system, for example, openjdk-10_windows-x64_bin.tar.gz and openjfx-11.0.2_windows-x64_bin-sdk.zip
- Ensure that you download the JavaFX SDK product only, for example: JavaFX Windows SDK.
Disclaimer: The third party download links are subjected to change. Search and download the appropriate software.
Set Up Open JDK
To set up the Open JDK, follow these steps:
- Extract the downloaded openjdk-10_windows-x64_bin.tar.gz, and openjfx-11.0.2_windows-x64_bin-sdk.zip files at your preferred location.
Note
The openjdk-10_windows-x64_bin > jdk-10, openjfx-11.0.2_windows-x64_bin-sdk directories are created as a result of extraction.
- Locate the jdk-10 and the javafx-sdk-11.0.2 directories after extraction.
Note
- The jdk-10 is the sub directory under the openjdk-10_windows-x64_bin directory.
- The javafx-sdk-11.0.2 is the sub directory under the openjfx-11.0.2_windows-x64_bin-sdk directory.
- Double click to open the javafx-sdk-11.0.2 directory.
- Copy all the files except the src.zip from the lib sub directory located in the javafx-sdk-11.0.2 directory.
- Paste all the copied files in the lib sub directory of the jdk-10 directory.
- Copy all the files from the bin sub directory in the javafx-sdk-11.0.2.
-
Paste all the copied files in the bin sub directory of the jdk-10 directory.
Note
- In this installation guide, setting up OpenJDK is covered. However, Oracle JDK versions until version 10 are also supported.
- For Oracle JDK 10 installation steps, see the Oracle Documentation.
- If you have installed Oracle JDK 10 or below already, you can skip setting up OpenJDK.
Set Up Open JDK Path
To set up the JDK path, follow these steps:
- On the Windows desktop, click Start > Control Panel > System and security > System > Advanced system settings, the System Properties window appears.
- In the Startup and Recovery section, click Environment Variables the Environment Variables window appears.
- Click New under User variables for {user} section, also in case the JAVA_HOME variable is already in the list, select it and click Edit, enter the following details:
- Variable name: JAVA_HOME
- Variable value: C:\Path\to\your\openJDKtype, i.e. browse for the JDK directory path (for example, C:\Users\user\Desktop\jdk-10.0.2)
- Click OK, the Environment Variable list is updated with the JAVA_HOME variable.
- Click New under the System variables section also in case, if the Path variable already exists, select it and click Edit, and enter the following details:
- Variable name: Path
- Variable value: C:\Path \to\ openJDK\bin directory; i.e. browse for the bin subdirectory path in the JDK directory (for example, C:\Users\user\Desktop\jdk-10.0.2\bin )
- Click OK, the System Variable list is updated with the Path variable.
- Save and close the Environment Variables window.
- Open Command Prompt and type the
java –versioncommand to verify whether the OpenJDK version 10 is installed or not. Entering the command must give the following output:
windows console

   C:\Users\exampleconsole>java -version

   openjdk version "10" 2018-03-20

   OpenJDK Runtime Environment 18.3 (build 10+46)

   OpenJDK 64-Bit Server VM 18.3 (build 10+46, mixed mode)
Launch Installer
To launch the installer, follow these steps:
- Double click web-ide_Tizen_Studio_x.x_windows-64.exe file.
Note:
x.x represents the latest version of Tizen Studio, for example:web-ide_Tizen_Studio_3.3_windows-64.exe.
-
Accept the software license.
Note:
The license contains important legal notices for using Tizen Studio. Read it fully, and click Accept only if you agree with the license statement.

-
Click Browse and specify a new directory to set the SDK data location.
Note:
If the new directory is valid, it shows no errors.
- Click Install.
-
Click Finish to close the installer.
Note:
- If you install the Tizen Studio in a directory that requires administrator privileges for access, such as
C:\Program Files, then administrator privileges are required to run the Tizen SDK tools. - If you want to install additional platforms and tools, launch Package Manager by selecting the Launch the Package Manager check box and click Finish.
- Use Tizen Package Manager, to install and update additional tools.
- For more information on the Package Manager, see Updating Tizen Studio.
- If you install the Tizen Studio in a directory that requires administrator privileges for access, such as


Verify Installation
To verify whether the installation is successful or not, click Tizen Studio icon. The Tizen Studio startup window must appear.
This guide explains how to set up a Tizen .NET development environment on Windows.
Developing a Tizen .NET application requires three software tools.
- Visual Studio IDE
- Visual Studio Tools For Tizen
- Tizen SDK
The rest of the page briefly explains each of them and guides you how to install them on Windows.
Installing Visual Studio IDE
Visual Studio is a popular Integrated Development Environment(IDE) developed by Microsoft. Having many tools that work very well for C#, Visual Studio is considered the standard IDE.
Follow the steps below to install Visual Studio IDE:
-
Download Visual Studio 2022 installer. Choose any variation among Community, Professional, or Enterprise.
-
Either install Visual Studio, or modify your existing installation, and install .NET Multi-platform App UI development, .NET desktop development, and Desktop development with C++ workloads.
Figure 1. .NET Multi-platform App UI development workload

Visual Studio Tools for Tizen is a Visual Studio extension that helps the development of Tizen applications by linking the Visual Studio IDE with the Tizen SDK.
Take the following steps to install Visual Studio Tools For Tizen:
-
In the Visual Studio menu, select Extensions > Manage Extensions.
Figure 2. Extension > Manage Extensions
-
Click Online on the left menu and search «Tizen» in the search bar on the top-right corner.
-
Download Visual Studio Tools for Tizen.
Figure 3. Manage Extensions window
-
Close Visual Studio, the installation will start automatically.
Figure 4. Manage Extensions window
-
When the VSIX installer window appears, click Modify. The install may take several minutes. When finished, Close the window.
Figure 5. VSIX Installer


Installing Tizen SDK
Tizen SDK is a collection of essential software tools for Tizen application development. It includes:
- Package Manager
- Emulator Manager
- Certificate Manager
- Device Manager
- …
The following steps show how to install Tizen SDK through Visual Studio:
-
Start Visual Studio. On the Visual Studio menu bar, select Tools > Tizen > Tizen Package Manager. Tizen SDK installer window will pop up shortly.
Figure 6. Tools > Tizen >Tizen package manager
-
Click Install new Tizen SDK, and click I Agree if you accept the license agreement.
Figure 7. Tizen SDK Installer
-
Set an empty folder path for Tizen SDK. Then, click Next to start the installation of Tizen SDK. It will take a few minutes.
Warning: An unexpected error may occur if there is an empty space within the installation path of the SDK. Make sure there is no space in the path.
Figure 8. Tizen SDK Installer
-
If you can run the Tizen SDK tools on the Visual Studio menu bar Tools > Tizen, the installation is complete.
Figure 9. Tizen Package Manager


Installing TV emulator is provided under the Extension SDK tab.

You have now completed setting up the development environment. From here, you can learn how to build a simple app by following a series of tutorials in Get Started.
Tizen Studio — это комплексный набор инструментов для разработки приложений для ОС Tizen. Он состоит с IDE, эмулятора, набора инструментов, примера кода и документации.
Программисты могут использовать данную утилиту для создания приложений для различных устройств, включая умные часы, умные телевизоры, холодильники серии Family Hub и прочие устройства. Также программа Tizen Studio используется для самостоятельной установки виджетов для телевизоров Samsung.
Установка Tizen Studio
Важно! Перед установкой программы выберите версию, которая соответствует вашей системе Windows: 32/64 bit.
- Запустите установщик Tizen Studio.
- Примите лицензию на программное обеспечение. Лицензия содержит важные юридические уведомления для использования Tizen Studio. Прочитайте его полностью, после чего нажмите «Accept».
- При необходимости измените путь установки в отведенном поле и нажмите «Install».
- Установивите флажок Launch the Package Manager (используя Tizen Studio Package Manager, вы можете установить дополнительные платформы и инструменты).
- После завершения установки нажмите «Finish». Запустится Package Manager.
- Затем нажмите «Install» напротив Tizen SDK tools.
- После чего на вкладке Extension SDK нажмите «Install» напротив Extras.
- Закройте установщик.
- В открывшемся окошке поставьте галочку напротив Launch the Tizen Studio и нажмите «ОК».
- После чего еще раз нажмите кнопку «Launch» и дождитесь конца загрузки.
Изменения в последней версии
- Добавлена поддержка .NET Hot Reload для проектов Tizen dotnet, с помощью которой изменения кода могут быть применены к работающему приложению без перезапуска приложения и без потери состояния приложения.
- Добавлена поддержка шаблона NUIGadget, созданного как проект dotnet и упакованного в виде RPK.
- Обновлен путь Visual Studio в интерфейсе командной строки для использования Visual Studio 2022 для проектов dotnet.
- Исправлена ошибка, из-за которой эмулятор/оболочка устройства не открывалась из диспетчера устройств.
| Разработчик: | |
| Официальный сайт: | developer.tizen.org |
| Обновлено: | |
| Версия Windows: | 10 |
| Язык интерфейса: | English |
Скачать Tizen Studio для Windows