Python is a popular programming language known for its simplicity and versatility. When we install Python in our systems we always install the latest version of it but there may be situations where we need to install an older version of Python due to compatibility reasons or to work on legacy projects so that we can use old features of Python that are eliminated in latest versions. In this article, we will learn how to download and install an old version of Python.
Check Current Python Versions Installed on the System
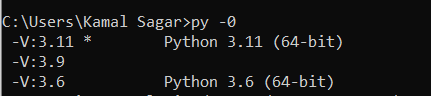
To check current versions of Python installed in Windows we have to run the below command in the command prompt:
py -0
Below is the output of the above command which shows currently Python 3.11 and Python 3.9 is installed on the system.

Steps to Download and Install Python Old Version
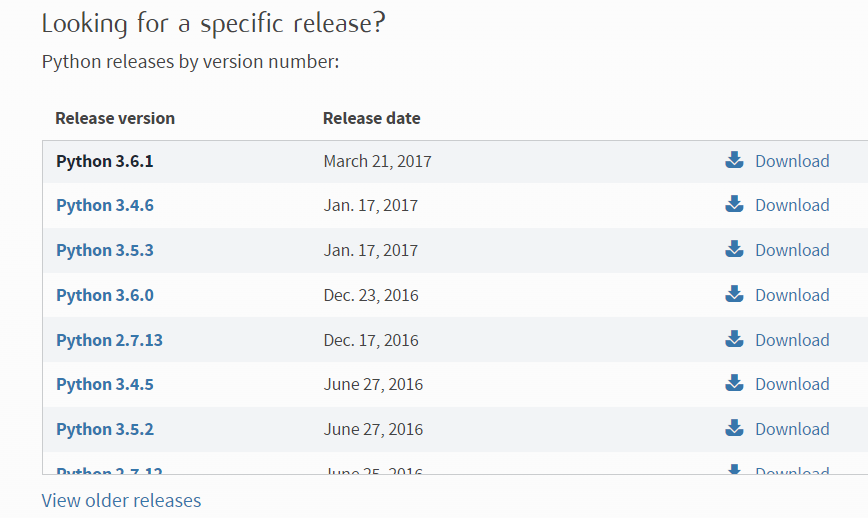
Step 1: First, we have to go to the official website of Python “https://www.python.org/downloads/” and when we scroll down the page we get the old release version of Python as seen in the screenshot below. We can select any specific version of Python that we want to install. Click on “Download” to download any specific version of Python.
Step 2: After clicking on download, the download page will open and again we have to scroll down the page and we find the installer files as seen in the below screenshots. Click on the installer that is compatible with your Windows or macOS (64-bit or 32-bit). The installer will be downloaded which is used to install Python.

Step 3: Double-click on the installer downloaded on your system. A window will be opened as given below screenshot. Select the checkbox “Add Python 3.6 to path” to automatically set the path and then click on “Install Now” to install the Python 3.6.1.

Step 4: To check all versions of Python installed on the system execute the command “py -0” on the command prompt. We will get the output as given below in which we can see that Python 3.6 is successfully installed on the system.
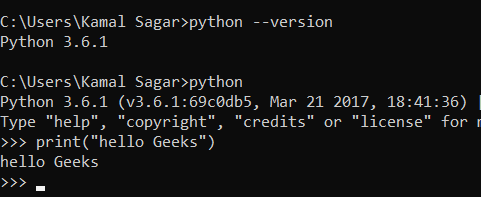
Step 5: Execute the commands on the command prompt as seen in the below screenshot. The first command will show the current version of Python and after executing the Second command we can run the Python program as given below.
Note: To Know more information about installing Python refer to this article “Download and Install Python“.
Last Updated :
31 Jul, 2023
Like Article
Save Article
- Downgrade Python 3.9 to 3.8 With the
virtualenvModule - Downgrade Python 3.9 to 3.8 With Anaconda
- Downgrade Python 3.9 to 3.8 With the Control Panel

You can use three effective methods to downgrade the version of Python installed on your device: the virtualenv method, the Control Panel method, and the Anaconda method. Here in our tutorial, we’ll provide you with the details and sample codes you need to downgrade your Python version.
Downgrade Python 3.9 to 3.8 With the virtualenv Module
The virtualenv method is used to create and manage different virtual environments for Python on a device; this helps resolve dependency issues, version issues, and permission issues among various projects.
Suppose we are dealing with a project that requires a different version of Python to run. In that case, we can use the virtualenv module to create a new virtual environment for that specific project and install the required version of Python inside that virtual environment. To create a virtual environment, we first have to install the vritualenv module. Here’s the command to install this module:
Now, we can create our virtual environment using the virtualenv module. The command to create a new virtual environment is given below.
virtualenv \path\to\env -p \path\to\python_install.exe
Here, \path\to\env is the path of the virtual environment, and \path\to\python_install.exe is the path where the required version of Python is already installed. For this command to work, we have to install the required version of Python on our device first.
Upon installation, you just have to activate our virtual environment. You can do so by executing the command below:
\path\to\env\Scripts\activate.bat
Here, \path\to\env is the path of the virtual environment.
Downgrade Python 3.9 to 3.8 With Anaconda
We can also use Anaconda, just like virtualenv, to downgrade a Python version. First, you need to install Anaconda on your device. After the installation, we can create a new virtual environment for our project using the conda package manager. The command to create a virtual environment with conda is given below:
conda create -n downgrade python=3.8 anaconda
This command creates a new virtual environment called downgrade for our project with Python 3.8. The next step is activating our virtual environment. The command to start a virtual environment using conda is given below.
The command above activates the downgrade virtual environment. Now, we can install all the packages required for our special project.
This approach is very similar to the virtualenv method. However, the conda method is simpler and easier to use than the previous approach. We don’t even need to install another Python version manually; the conda package manager automatically installs it for us.
Downgrade Python 3.9 to 3.8 With the Control Panel
This method only works for devices running the Windows Operating System. This approach involves manually uninstalling the previously existing Python version and then reinstalling the required version.
We can uninstall Python by doing these steps: Go to Control Panel -> Uninstall a program -> Search for Python -> Right Click on the Result -> Select Uninstall.
Now that the previous version of Python is uninstalled from your device, you can install your desired software version by going to the official Python download page.
This approach is the least preferred one among the ones discussed in this tutorial. It’s because this approach only works for Windows and should only be used when we don’t need the previous version of Python anymore.
The best approach for downgrading Python or using a different Python version, aside from the one already installed on your device, is using Anaconda. The commands for using Anaconda are very simple, and it automates most of the processes for us.
In this tutorial, you will learn how to downgrade Python from your current version to the lower version.
You can easily downgrade your Python version if you are using a visual editor such as Anaconda or Visual Studio.
You will need to make sure that you have PIP installed on your computer and also have virtualevn installed on your computer as well.
virtualevn Allows you to have multiple versions of the Python installed on your system. To downgrade Python or install multiple Python follow the below-mentioned steps.

On Windows:
- Open a command prompt (“cmd”) and type
pip install virtualenvinto the command window. - Install the Python version you want from here; remember not to include it in your PATH environment variable.
- Enter
virtualenv path\to\env -p \path\to\python_install.exeinto the command prompt, where \path\to\env will be the path where your virtual environment will be located and path\to\python_install.exe will be the path where your newly (presumably) installed Python version will be located. 4. - A virtual environment has now been created for you. After that, to activate the virtual environment, run the activate.bat batch file, which can be found in the path to the virtual environment’s scripts folder. This website or an official Python guide.
Alternate Option
Alternatively, you may choose to uninstall the version of the software that you are currently using from the installed program’s options. Then, from the official Python website, download the version of Python that you want to use and install it on your computer.
Ensure that you have set all of the environment Path variables for the newly installed Python version so that you can access the Python from anywhere in your program’s source code.
Uninstalling Python can be accomplished by going to Control Panel -> “Uninstall a program,” searching for “Python,” right-clicking the Python name, and selecting “Uninstall.” Keep in mind that Python typically has a PATH variable stored, so you should also remove it from the environment.
For HomeBrew Users:
Homebrew is a software package management system that can be used to downgrade the Python version on your Linux operating system. Follow the below code to install the required Python Version. In the below example I have installed version 3.9.0 by uninstalling Python version 3.10.2.
$ brew unlink python
$ brew install --ignore-dependencies https://raw.githubusercontent.com/Homebrew/homebrew-core/e128fa1bce3377de32cbf11bd8e46f7334dfd7a6/Formula/python.rb
$ brew switch python 3.9.0
For Linux Users:
To downgrade the Python version on the Linux operating system you may need to follow the below steps:
- To begin, download the desired Python version from the official Python website and install it as if it were a normal package on your computer.
- Then execute the following code: cd /Library/Frameworks/Python.framework/Version
- Now, To see a list of all the Python versions that are currently installed, run the command ls.
- Then run
sudo rm -rf 3.8(Note here you can enter the version you want to remove instead of 3.8) to remove the Python version from your System. - After you’ve done all of that, run python3 -v. It will display the version of the software you selected to install.
For Mac Users:
You can use the Homebrew option on your macOS operating system. To install Homebrew follow the below steps and then further to uninstall unwanted and install the required version of Python from your macOS operating system.
Installing pyenv With HomeBrew:
brew update
brew install pyenv
Clone the GitHub repository to get latest pyenv version:\
git clone https://github.com/pyenv/pyenv.git ~/.pyenvSet Environment Variables
echo 'export PYENV_ROOT="$HOME/.pyenv"' >> ~/.bash_profile
echo 'export PATH="$PYENV_ROOT/bin:$PATH"' >> ~/.bash_profile
Restart Shell Terminal
exec "$SHELL"Check Required Python Version
pyenv install --listInstalling Required Python Version
pyenv install 3.7Set Global Environment Variable
Changing it on a global scale (you can also go ahead and only use it in a certain environment)
pyenv global 3.7Check the Python version that is currently being used by the system – your desired/downgraded version should appear here.
python3 --versionFor Anaconda Users:
If you are using the Anaconda software to run a Python program and you want to set the Python version to a lower version than the one that is currently in use, then enter the code below in the Anaconda Terminal and hit enter.
conda install python=3.10.2
# or maybe
conda install python=3.7.0
# or whatever you want....
Wrap Up
On any of the environments listed above, I hope you were successful in downgrading Python to the required version that you desired.
If you are still unable to downgrade Python on your system, please let me know in the comments section and I will be happy to assist you as soon as possible.
If you liked the above tutorial then please follow us on Facebook and Twitter. Let us know the questions and answer you want to cover in this blog.
Further Read:
- Convert String To A List In Python
- Python User Input from Keyboard – input() function
- Fix: Python Is Not Set From Command Line Or npm Configuration
- How To Take Integer Input In Python 3
Python releases new updates regularly to address the limitations of previous versions. However, you may need to downgrade your Python version to be compatible with specific libraries, or the latest Python version has difficult syntax to learn. In this post, we’ll show you how to downgrade Python version from 3.10 to 3.9, so you can continue to use all the great features of Python 3.9.
Why might you need to downgrade the Python version?
Incompatibility with libraries
Compatibility with modules and libraries is one of the main reasons you should downgrade your Python version. For example, NumPy version 1.19.0 only supports Python versions 3.6 – 3.8; if you try to use NumPy 1.19.0 with Python 3.9 or higher, you will get an error. In this case, you would need to downgrade your Python version to use NumPy.
Consistency between your project and your computer
If your project is using Python 3.9 and your computer is using Python 3.10, you need to downgrade the Python version on your computer to work with your project without unexpected errors.
On Windows
Downgrading the Python version is a process of uninstalling the higher version and then installing the lower version again. If you want to downgrade Python from 3.10 to 3.9, you must first uninstall the higher version of Python, which is 3.10. Go to Control Panel->Uninstall a Program->Python 3.10 and click the Uninstall button. As shown in the image below.

After uninstalling Python 3.10, go to this page to download and install Python 3.9. Download the installation as shown below if you are using Windows 64-bit.

On Linux
First, we’ll remove Python 3.10 with the following command:
sudo apt-get remove python3.10Then we’ll run the following command to install Python 3.9:
sudo apt-get install python3.9That’s it. Python 3.9 is now available on your Linux.
On macOS
The pyenv tool is the best way to downgrade the Python version on macOS. With pyenv, you can easily switch between different versions of Python.
Before you start, make sure you have Homebrew installed first.
Use the following command to install pyenv:
brew install pyenvAfter successfully installing the pyenv tool, run the following command to install Python 3.9:
pyenv install 3.9Then set Python 3.9 as your global version:
pyenv global 3.9And that’s it for macOS. Python 3.10 has been completely replaced by Python 3.9 on your MacBook.
How to test your new version?
Check the version in a script
To check the Python version in a script, add the following line to the top of your script:
import sys
print(sys.version)
Output:
3.9.11Check the version in the Terminal
To check if Python has been successfully downgraded in your Terminal, run the following:
python --versionOn Linux or macOS:
python3 --versionIf the return is:
Python 3.9.11That means you have successfully downgraded.
Summary
It is possible to downgrade Python version from 3.10 to 3.9, but you should only do so if necessary. Downgrading can cause compatibility issues and may break certain packages or features that are only available in the newer version. So, think carefully before downgrading.
Thank you for reading!
Maybe you are interested:
- Check package versions in python
- Online Python Compiler: Write And Run Code In Your Browser
- The Zen of Python And What You Can Learn From It

Hi, I’m Cora Lopez. I have a passion for teaching programming languages such as Python, Java, Php, Javascript … I’m creating the free python course online. I hope this helps you in your learning journey.
Name of the university: HCMUE
Major: IT
Programming Languages: HTML/CSS/Javascript, PHP/sql/laravel, Python, Java
Python – это один из самых популярных языков программирования в мире. Он зарекомендовал себя как удобный и мощный инструмент для разработки различных типов приложений и скриптов. Однако, иногда возникает необходимость установить старую версию Python, например, для поддержки старого кода или совместимости с определенными библиотеками.
В этой статье мы рассмотрим подробную инструкцию по установке старой версии Python на различных операционных системах. Мы подробно рассмотрим каждый шаг и предоставим полезные советы, чтобы у вас не возникло проблем в процессе.
Важно отметить, что установка старой версии Python может иметь ряд ограничений и последствий для вашей системы. Поэтому перед началом необходимо тщательно взвесить все «за» и «против».
Содержание
- Шаг 1: Подготовка к установке
- Шаг 2: Выбор нужной версии Python
- Шаг 3: Скачивание выбранной версии Python
- Шаг 4: Установка старой версии Python
- Шаг 5: Проверка установки
- Вопрос-ответ
- Как установить старую версию Python?
- Какой версии Python мне нужно установить?
- Где скачать старую версию Python?
- Можно ли установить несколько версий Python на одном компьютере?
Шаг 1: Подготовка к установке
Перед тем как установить старую версию Python, необходимо выполнить несколько подготовительных шагов:
- Определите необходимую версию Python — перед установкой старой версии Python, важно определить, какую конкретную версию вы хотите установить. Убедитесь, что эта версия совместима с вашими задачами и проектами.
- Скачайте установочный файл — после определения нужной версии Python, перейдите на официальный сайт Python и скачайте установочный файл соответствующей версии. Обратите внимание на архитектуру своей операционной системы (32-битная или 64-битная) и выберите соответствующий вариант установки.
- Запишите текущие настройки Python — при установке старой версии Python может потребоваться удалить или изменить текущую версию. Поэтому перед установкой рекомендуется сохранить настройки, а также заметить, какая версия Python у вас сейчас установлена.
- Создайте резервную копию проектов — если у вас есть активные проекты, которые зависят от текущей версии Python, рекомендуется создать резервные копии этих проектов. Это поможет избежать потенциальных проблем, связанных с несовместимостью между версиями Python.
Подготовка к установке старой версии Python позволит вам избежать нежелательных ситуаций и снизить риски для ваших проектов. После выполнения этих шагов вы будете готовы перейти к установке и использованию старой версии Python.
Шаг 2: Выбор нужной версии Python
Перед тем, как установить старую версию Python, вам необходимо определить, какую именно версию вы хотите установить. Существует несколько способов выбрать нужную версию:
- Официальный сайт Python: Посетите официальный сайт Python и просмотрите список доступных для загрузки версий. Обратите внимание на статус каждой версии (к примеру, «бета», «стабильная» или «устаревшая»). Выберите версию в соответствии с вашими потребностями и требованиями.
- Сообщество Python: Консультироваться с сообществом Python может быть полезным для выбора правильной версии. На форумах и в группах обсуждений вы можете получить рекомендации от опытных разработчиков и узнать их мнение о различных версиях Python.
- Требования проекта: Если вы разрабатываете программу или веб-приложение, вам может потребоваться конкретная версия Python. Проверьте требования вашего проекта и выберите соответствующую версию.
После того, как вы определитесь с требуемой версией Python, вы готовы приступить к ее установке. В следующем шаге мы рассмотрим, как скачать установочный файл для выбранной версии Python.
Шаг 3: Скачивание выбранной версии Python
После того, как вы определились с версией Python, которую хотите установить, необходимо скачать установочный файл данной версии.
Для начала вам необходимо перейти на официальный сайт Python по адресу https://www.python.org/downloads/.
На странице загрузок вы увидите список доступных версий Python. Чтобы найти старую версию, которую вы хотите скачать, вам может понадобиться пролистать страницу вниз или воспользоваться функцией поиска на странице.
Когда вы найдете нужную версию, щелкните по ссылке «Download» напротив нее.
Выберите операционную систему, на которую вы хотите установить Python. Для Windows будет предоставлен один установочный файл с расширением .exe, который вы должны скачать.
После того, как файл загружен, вам нужно будет запустить его и следовать инструкциям на экране для установки Python выбранной версии.
Поздравляю, вы успешно скачали выбранную версию Python и готовы переходить к следующему шагу установки.
Шаг 4: Установка старой версии Python
После того как вы скачали нужную вам версию Python, можно приступать к ее установке.
Это самый простой шаг – нужно просто запустить установочный файл, согласиться с лицензионным соглашением и следовать инструкциям установщика. Ниже приведен общий план действий:
- Запустите установочный файл Python, который вы только что скачали.
- Появится окно приветствия. Нажмите кнопку «Next» (Далее).
- Выберите путь для установки Python. По умолчанию, Python устанавливается в папку C:\PythonXX, где XX – версия Python (например, 27 для Python 2.7 или 36 для Python 3.6).
- Если вы хотите изменить путь установки, нажмите кнопку «Browse» (Обзор) и выберите нужную директорию. Затем нажмите кнопку «Next» (Далее).
- На следующем экране выберите компоненты, которые вы хотите установить. Обычно нет необходимости изменять эти параметры, поэтому просто нажмите кнопку «Next» (Далее).
- Затем вы увидите экран, предлагающий настройку дополнительных параметров. По умолчанию все чекбоксы отмечены, и это хороший вариант для большинства пользователей. Нажмите кнопку «Next» (Далее).
- Выберите путь для установки Python в системном меню. По умолчанию, Python будет доступен только для текущего пользователя. Если вы хотите, чтобы Python был доступен для всех пользователей на компьютере, установите галочку «Add Python to environment variables» (Добавить Python в переменные среды). Затем нажмите кнопку «Install» (Установить).
- Установка Python начнется. В процессе установки вы увидите прогресс-бар. Подождите, пока установка не будет завершена.
- По завершении установки появится окно с сообщением «Setup was successful» (Установка успешно завершена). Просто нажмите кнопку «Close» (Закрыть).
Теперь вы установили старую версию Python на свой компьютер. Вы можете проверить установку, запустив командную строку и введя команду «python» или «python —version». В результате вы должны увидеть версию Python, которую вы только что установили.
Шаг 5: Проверка установки
После завершения установки старой версии Python вам необходимо проверить, что установка прошла успешно. Для этого выполните следующие действия:
- Откройте командную строку или терминал на вашем компьютере.
- Введите команду
python --versionи нажмите клавишу Enter.
Если вы видите версию Python, которую вы установили, то это означает, что установка прошла успешно. Например, вы можете увидеть:
Python 2.7.15
Если вы видите сообщение об ошибке или не видите вывода версии Python, то возможно установка была выполнена неправильно. В этом случае рекомендуется повторить установку, проверив все шаги инструкции.
Вопрос-ответ
Как установить старую версию Python?
Чтобы установить старую версию Python, вам понадобится скачать соответствующий установочный файл с официального сайта Python. Затем запустите этот файл и следуйте инструкциям установщика. После завершения установки у вас будет установлена старая версия Python.
Какой версии Python мне нужно установить?
Выбор версии Python зависит от ваших потребностей и требований вашего проекта. Если ваш проект требует определенной версии Python, то установите именно эту версию. Иначе, рекомендуется установить последнюю стабильную версию Python.
Где скачать старую версию Python?
Старые версии Python можно скачать с официального сайта Python. На сайте есть архив всех старых версий Python, начиная от первой версии. Вам нужно выбрать нужную вам версию и скачать ее установочный файл.
Можно ли установить несколько версий Python на одном компьютере?
Да, вы можете установить несколько версий Python на одном компьютере. В этом случае вам понадобится указывать путь к конкретной версии Python при запуске скриптов или использовать специальные инструменты для управления версиями Python, такие как virtualenv или pyenv.